CM241 - Unit 9: Easy Guide to Building a Solar Panel at Home

Verified

Added on  2023/06/03

|13
|1184
|271
Homework Assignment
AI Summary
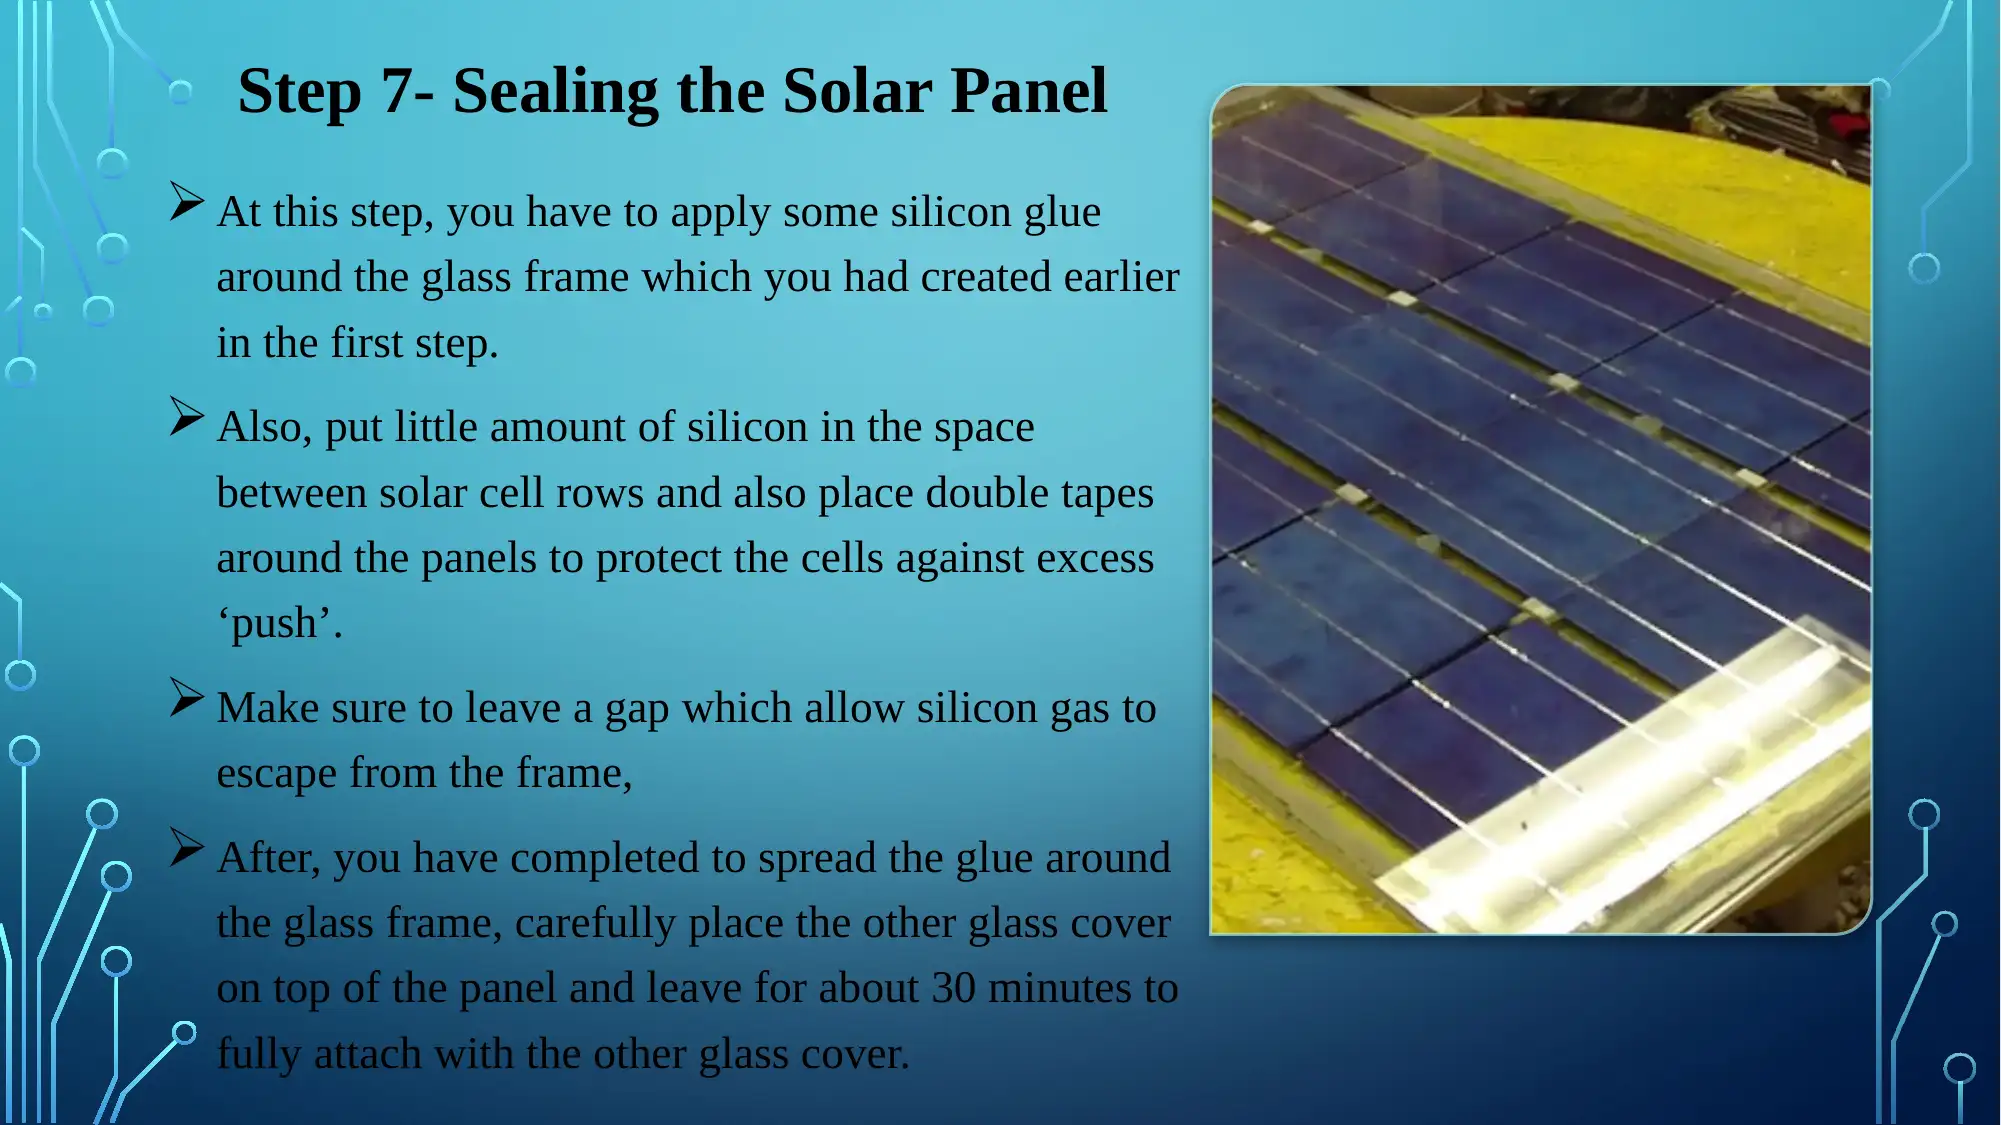
This assignment is a detailed tutorial explaining how to build a solar panel at home using readily available tools and materials. The tutorial is broken down into eight easy-to-follow steps, beginning with acquiring the necessary components like solar cells, glass, and soldering equipment. The instructions cover assembling the solar cells, measuring connections, connecting terminals, and sealing the panel. The tutorial also emphasizes the importance of safety, handling the solar cells carefully, and connecting the terminals to an external power storage unit. Finally, the tutorial concludes by highlighting the benefits of building a solar panel, such as reducing energy costs and promoting energy independence, even for those without technical expertise. The tutorial provides factors to consider during the process and benefits of the tutorial.
Document Page
How To Easily Build a Solar Panel At
Home
Presented By:
tabler-icon-diamond-filled.svg

Paraphrase This Document

Need a fresh take? Get an instant paraphrase of this document with our AI Paraphraser
Document Page
Introduction
On this tutorial am going to explain how to
make solar panel at home.
To perform this task, there is no any
technical experienced required expect just
some necessary simple tools.
The idea of sharing this tutorial was the
rise of the need of coming up with
sustainable energy system in homes and
with low cost by following eight simple
steps which I have prepared in this tutorial.
Document Page
Required Tools for the Project
In order to have a complete and easily executed plan you will need the following;
An open working space
Solar cells.
Two pieces of glass that are large enough to cover the number of solar cells
targeted to be used.
Soldering iron and Solder (use any type that is effective for electrical use)
Glass frame
Tape and scissor for cutting the tape
Voltmeter
Terminal Wire
Side cutters for cutting Terminal wires.
Document Page
Step 1- Find the Glass Fittings
Dealing with panels can a very delicate matter and for this case I would
highly recommend you find very clean glasses thus to avoid causing any
inefficacy in the solar cells.
The size of the glasses being used should be measured in terms of the
number of cells you are considering to use to create the panel.
The glasses should be enough to cover both sides of the panel. Avoid also
using broken or cracked glasses especially in the front cover of the panel.
tabler-icon-diamond-filled.svg

Paraphrase This Document

Need a fresh take? Get an instant paraphrase of this document with our AI Paraphraser
Document Page
Step 2 – Assembling the Solar Cells
At this step you have to very careful since we’ll be
connecting the solar cells together thus to form a
complete electrical loop for the entire panel.
First, we’ll start by identifying the positive and the
negative sides of the solar cells. The positive
terminals are one which protrude in back side while
the negative are terminals coming out from the front
side of the solar cells.
If you bring together the parts facing backwards, both
negative and positive terminals will be able to
interlink.
With the proper position, solder the connection points
of the entire number of solar cells you will be using.
Document Page
Step 3- Measure the Connection Continuity
After the completion of the soldering
process, you should the measure the
connection process just to make sure
everything was right.
If everything is ‘right’, place a tape on
the back of the solar cells to hold them
firmly.
Although, it may seem as an easy
procedure, make sure place the tape
carefully placed as it can easily ruin the
solar cells if handled without care.
Document Page
Step 4- Make Sure all the Terminals are
Protruded
Normally, most of the solar cells terminals
are very short.
Make sure the terminals stick out where
you will have to cut a small piece of
terminal wire and join the connection using
the soldering iron as we did earlier when
we were connecting together the solar cell
pieces. This step is significantly important
for the next stage.
tabler-icon-diamond-filled.svg

Paraphrase This Document

Need a fresh take? Get an instant paraphrase of this document with our AI Paraphraser
Document Page
Step 5- Connect the Solar Cells Rows to Form a
Complete Panel Circuit
To connect the solar cell rows, we will use bus
bars as our connector.
For clarification, we are going to connect the solar
cell rows in a series connection.
Like the in the image, the connection will be as
follows where we will be connecting from the
negative terminals to positive terminals of different
rows.
This part might be a challenge to many thus one
should be extra careful but on the hand its also very
simple since you just have understand the circuit
current flow of your solar cells.
Document Page
Step 6- Connect the Two (Positive and Negative)
Terminal Points of the Solar Panel
If you have managed to connect the rows
in series successfully this will therefore be
an easy task for you.
First, cut about 10-15 cm of terminal wire
and solder them at both the end of positive
and negative terminal.
At this point I believe most of hard work
is done and to make sure our solar panel is
well connected, we can measure continuity
of the panel using a voltmeter via the two
connected terminals.
Document Page
Step 7- Sealing the Solar Panel
At this step, you have to apply some silicon glue
around the glass frame which you had created earlier
in the first step.
Also, put little amount of silicon in the space
between solar cell rows and also place double tapes
around the panels to protect the cells against excess
‘push’.
Make sure to leave a gap which allow silicon gas to
escape from the frame,
After, you have completed to spread the glue around
the glass frame, carefully place the other glass cover
on top of the panel and leave for about 30 minutes to
fully attach with the other glass cover.
tabler-icon-diamond-filled.svg

Paraphrase This Document

Need a fresh take? Get an instant paraphrase of this document with our AI Paraphraser
Document Page
Step 8- Terminal Interlink and Set-Up of the Panel
At this part you need to find a pieces of wires which you will need to
connect both the terminals with the outer power storage unit i.e. battery or a
converter in order to attain the desired current.
Make sure to cover the other open space of the terminal with a tape thus to
avoid any short circuit in the terminal.
After carrying out this major eight steps successfully, you can be able to start
enjoying your hard work by using own power which comes with no monthly
charges or cost of running.
Document Page
Factors to critically Considered
Handling the solar cells can be very critical cause if one solar cell is damaged,
the entire circuit loop will not work.
The alignment of the positive and negative parts of the solar cells terminals is
also very important part to be considered.
The solar cells should be of right quality thus when purchasing it’s important to
consult an expert for the right material.
Make sure to consider to use right quality materials such as cables which work
properly and also material which cannot react with the solar cells if by mistake
they come into contact.
chevron_up_icon
1 out of 13
circle_padding
hide_on_mobile
zoom_out_icon
[object Object]