Business Certificate II: LEMAX (Come & Go) Travel Software User Manual
VerifiedAdded on 2022/10/04
|24
|3790
|20
AI Summary
This document is a user manual for LEMAX (Come & Go Travel) software, designed to help users navigate and utilize its features effectively. It covers essential aspects such as logging in, viewing the homepage, modifying traveler profiles (including contact information, preferences, and credit card details), making reservations for air travel, car rentals, and hotels, and changing passwords. The manual also provides instructions on installing a printer and discusses accommodation capacities, categories, and trip information. The goal is to enhance the user's ability to manage travel arrangements efficiently and leverage the software's capabilities for business purposes. Desklib provides this and other solved assignments to assist students.
Running head: CERTIFICATE 2 IN BUSINESS
User Manual
CERTIFICATE 2 IN BUSINESS
User Manual
CERTIFICATE 2 IN BUSINESS
Paraphrase This Document
Need a fresh take? Get an instant paraphrase of this document with our AI Paraphraser
1CERTIFICATE 2 IN BUSINESS
Table of Contents:
List of figures:............................................................................................................................2
LEMAX User Manual................................................................................................................4
1. Requirements Gathering and Analysis:...........................................................................6
Brainstorming:.............................................................................................................6
Interface Analysis:.......................................................................................................6
Analysis of Documents:..............................................................................................6
Focus Group:...............................................................................................................6
Interviewing the stakeholders:.....................................................................................6
Observations................................................................................................................6
2. Portal Handling:..............................................................................................................7
a) Instructions for Login:.............................................................................................7
b) Viewing the Homepage:..........................................................................................8
3. Features of the User manual:...........................................................................................8
4. Modifying the Traveler Profile:......................................................................................9
a) Modifying the Traveler profile:.............................................................................10
b) Modifying the phone number and address:............................................................10
c) Modifying Preferences of the Traveler:.................................................................11
d) Modifying/Adding Credit Card Information:........................................................12
e) Saving the profile:..................................................................................................13
5. Reservations:....................................................................................................................13
a) Air Reservations:...................................................................................................14
b) Car reservations:....................................................................................................15
c) Hotel Reservations:................................................................................................16
d) Airline Seat Map:...................................................................................................17
6. Feedback:.........................................................................................................................17
7. To Change the Password:.................................................................................................19
8. Facilities for the User:......................................................................................................20
a) Installing a network, wireless/ Bluetooth printer:..................................................20
9. Accommodation capacities and Availability:..................................................................21
10. Categories:.....................................................................................................................22
2CERTIFICATE 2 IN BUSINESS
11. Trip Information:...........................................................................................................23
Conclusion:..............................................................................................................................24
List of figures:
Figure: Login for existing users.
Figure: Login for new user.
Figure: A display of the homepage.
Figure: A display of my profile page.
Figure: The system structure.
Figure: To modify the address and phone number.
Figure: Information credentials fill-up according to the preference of the traveler.
Figure: Modifying travel programs.
Figure: Travel authorization and reservation process.
Figure: Modifying and adding credit card details.
Figure: Information credentials authorizations.
Figure: Saving the Profile
Figure: To make an air reservation the above process in the figure.
Figure: To book car reservation the above process.
Figure: To book on hotels the above steps.
Figure: The figure depicts the airline seat map.
⊘ This is a preview!⊘
Do you want full access?
Subscribe today to unlock all pages.
Trusted by 1+ million students worldwide

3CERTIFICATE 2 IN BUSINESS
LEMAX User Manual
The main purpose of creating this user guide is to make complete use of travel trade
opportunities and increase the functionality of LEMAX (Come & Go travel) website by
collating all the required resources from one location like a PC folder or a USB flash drive.
The user guide will help the users to get all the required information regarding the subject the
user is looking for. With the help of this user guide, the user can keep their information and
personal data available on the road. The user guide provides operators to get new approvals
for the recognition of their travel trade business online. The user guide is an organised
document, is set out in structured fashion, and is easy to understand.
A user can get the step-to-step-detailed understanding from the user guide. The goal
of making this user guide is to bring out the idea to encourage quality, standard and service in
the categories of Tour and travels. Every potential user like Travel Agents, Inbound Tour
Operators, Tourist Transport Operators, Adventure Tour Operators and Domestic Tour
Operators can get all travel details. In today’s digital and automatic time, numerous
organisations are yet to update their frameworks into the cloud (not internet storing, generally
manual) and in the process of keeping track of everything manually decreases the work
process and time is wasted. If these things are deployed in an online user guide like Lemax,
the user will have a portable database wherever they go, and this also decreases the load of
manually keeping track of everything and efficient time management. Lemax also is known
as Come & Go travel is a travelling program that is online and computerises the business, and
displays provide tasks and funds. The Lemax has become a solution for problems like
organization’s executive goals, Visit for inbound administrators, Organizing travel and OTA,
MICE and corporate travel and visit for outbound administrators.
Paraphrase This Document
Need a fresh take? Get an instant paraphrase of this document with our AI Paraphraser

4CERTIFICATE 2 IN BUSINESS
Interface: Description:
Web-Based Software: LEMAX (Come &
Go Travel)
Modeled upon the most successful travel
businesses worldwide.
Complete Sales Automation: Improves efficiency and reduce costs with a
completely automated sales flow.
Invoice and Quick quote: Quick responses and beautiful itineraries
that provide powerful engine enable instant
quoting and the invoice of customers.
Maximisation of Revenues: Automated follow-up emails and other sales
and marketing tools to increase revenue win
rates by 30%.
Selling Channels Expansion: Easy to add sales channels and boost sales.
Automate upselling and reselling: Increasing sales by generating automated
emails and offer customers additional
options for travel products.
Operations Automation: An automatic inquiry confirmation process
that reduces the costs and can handle up to
10x reservations.
Intelligent Business: Smart planning decisions to improve
productivity and make the right decisions.
5CERTIFICATE 2 IN BUSINESS
1. Requirements Gathering and Analysis:
Requirements gathering and analysis can describe different tasks performed in different
circumstances. Task may have one or more related tasks, and certain techniques relate to one
task at least. The following are the techniques that are used for this purpose while creating the
user guide required.
Brainstorming: This process allows the ideas to accumulate from a group of
individuals. This is done to identify solutions to potential risks and clarify the details
of the opportunities.
Interface Analysis: A useable interface is created by user-centric designing
approaches, which is an efficient way. The integration of the device and the external
systems is just another interface. Interface analysis is also done so that requirements
aren’t overlooked that are not immediately visible to users.
Analysis of Documents: The gap analysis of existing system and reviewing the
documentation and creating scope and project migration will help. Validating the
completeness of requirements means that reviewing the requirements that drove the
creation of the user guide for LEMAX.
Focus Group: Gathering a group of people to get feedback son the
opportunities/problems and needs to create a user guide that is feasible to the potential
set of audiences.
Interviewing the stakeholders: Interviewing the stakeholders for the understanding
of their goals and the product. To properly weigh and recognize the perspective of
each stakeholder or a customer interviewing them is a must to do.
Observations: An analyst is able to identify certain process flows if they observe the
user. This creates a path for opportunities for improvements.
⊘ This is a preview!⊘
Do you want full access?
Subscribe today to unlock all pages.
Trusted by 1+ million students worldwide
6CERTIFICATE 2 IN BUSINESS
2. Portal Handling:
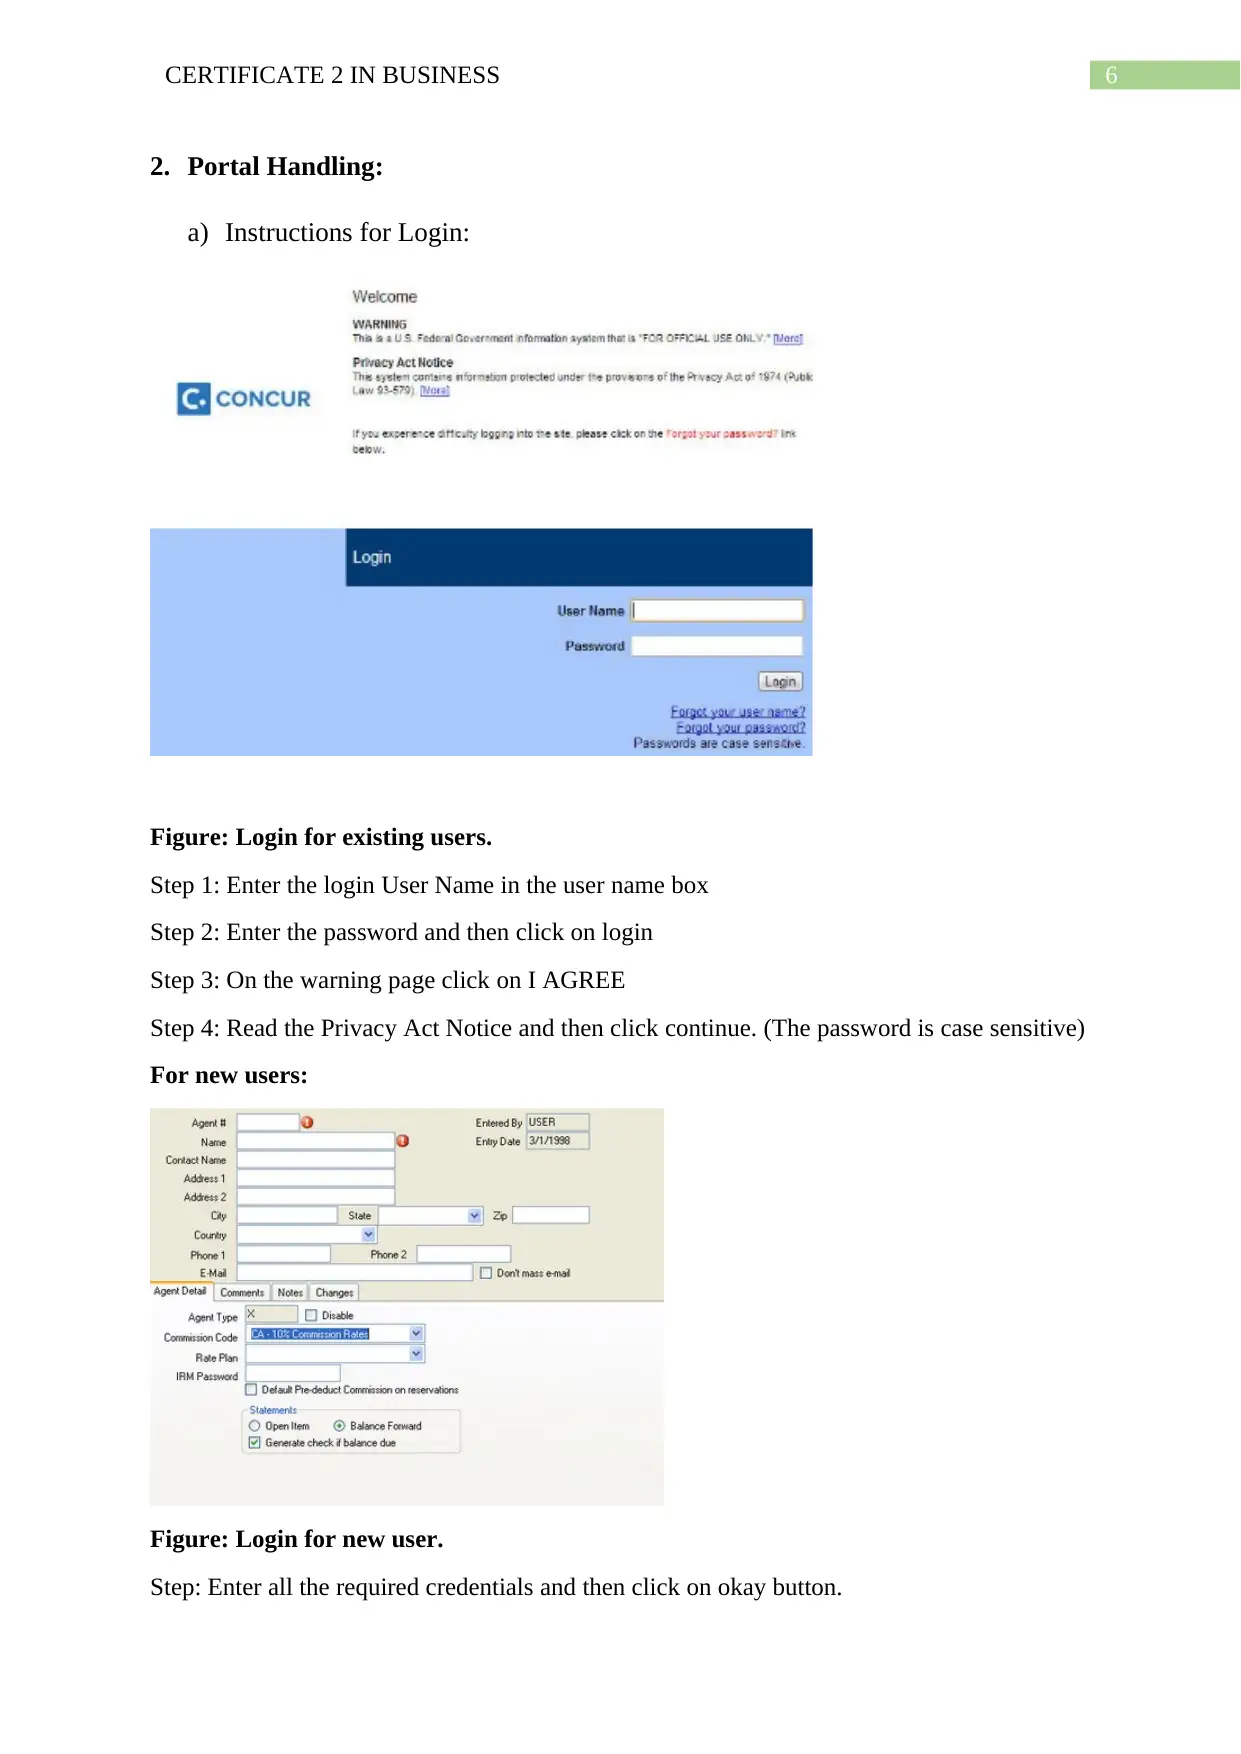
a) Instructions for Login:
Figure: Login for existing users.
Step 1: Enter the login User Name in the user name box
Step 2: Enter the password and then click on login
Step 3: On the warning page click on I AGREE
Step 4: Read the Privacy Act Notice and then click continue. (The password is case sensitive)
For new users:
Figure: Login for new user.
Step: Enter all the required credentials and then click on okay button.
2. Portal Handling:
a) Instructions for Login:
Figure: Login for existing users.
Step 1: Enter the login User Name in the user name box
Step 2: Enter the password and then click on login
Step 3: On the warning page click on I AGREE
Step 4: Read the Privacy Act Notice and then click continue. (The password is case sensitive)
For new users:
Figure: Login for new user.
Step: Enter all the required credentials and then click on okay button.
Paraphrase This Document
Need a fresh take? Get an instant paraphrase of this document with our AI Paraphraser
7CERTIFICATE 2 IN BUSINESS
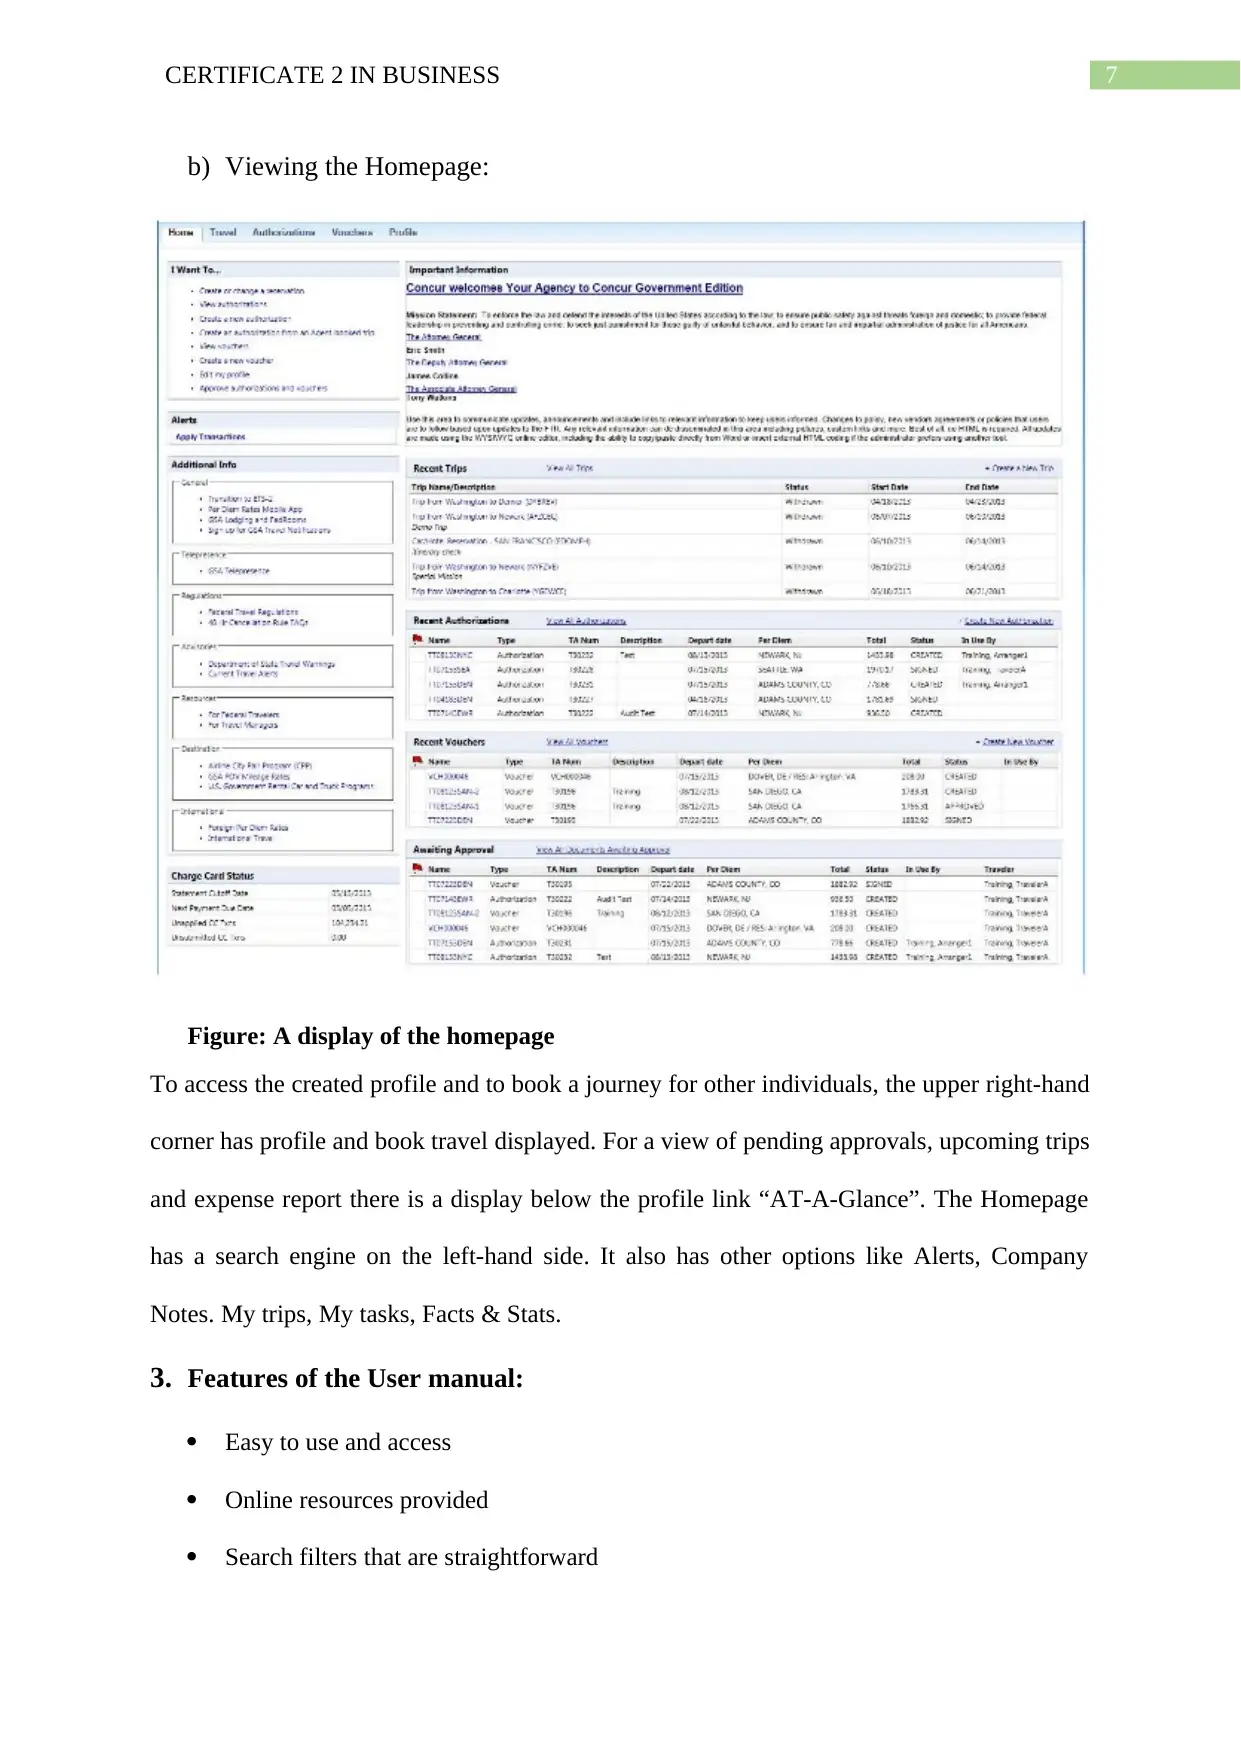
b) Viewing the Homepage:
Figure: A display of the homepage
To access the created profile and to book a journey for other individuals, the upper right-hand
corner has profile and book travel displayed. For a view of pending approvals, upcoming trips
and expense report there is a display below the profile link “AT-A-Glance”. The Homepage
has a search engine on the left-hand side. It also has other options like Alerts, Company
Notes. My trips, My tasks, Facts & Stats.
3. Features of the User manual:
Easy to use and access
Online resources provided
Search filters that are straightforward
8CERTIFICATE 2 IN BUSINESS
Point-and-click interactions provided
Reviews of customers based on their experiences
Transparent way of doing business, no hidden fees and clear pricing and
Simple checkout
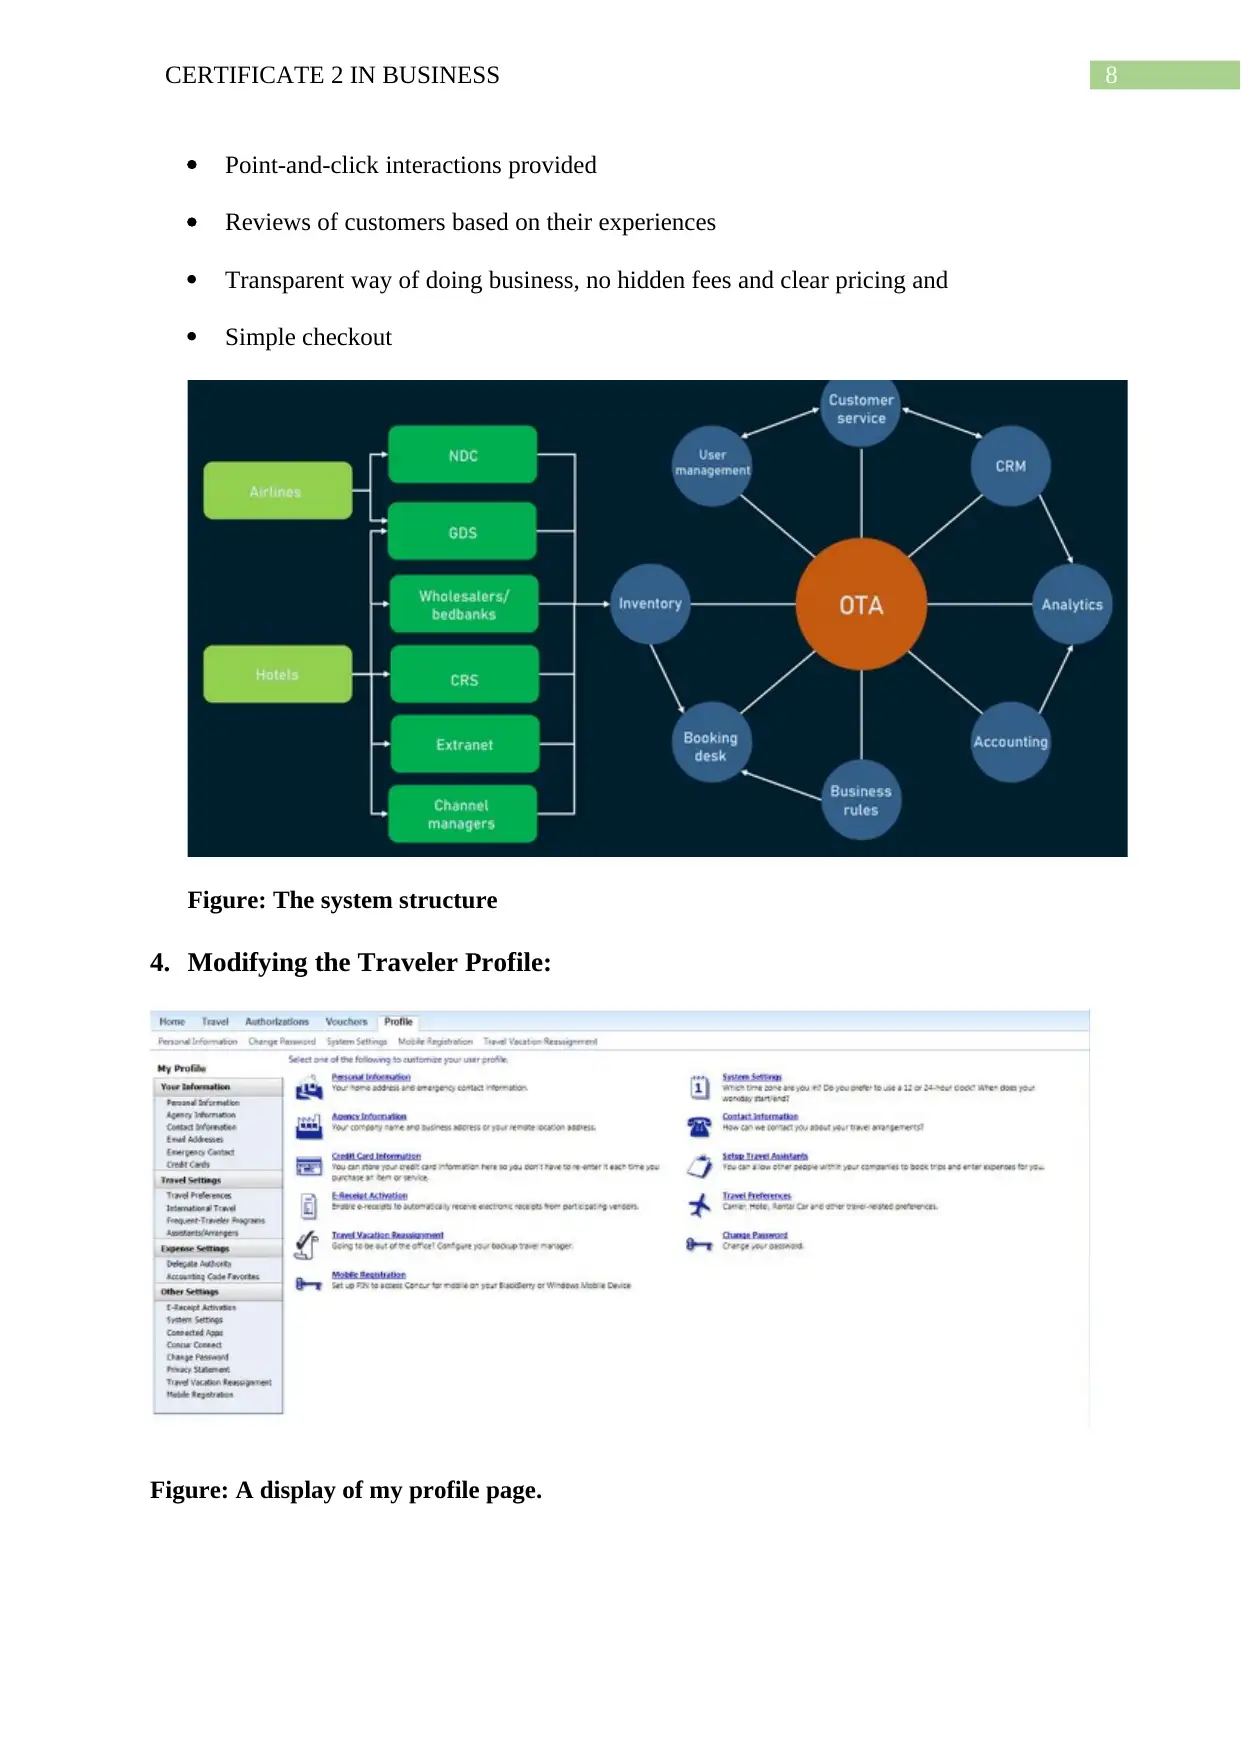
Figure: The system structure
4. Modifying the Traveler Profile:
Figure: A display of my profile page.
Point-and-click interactions provided
Reviews of customers based on their experiences
Transparent way of doing business, no hidden fees and clear pricing and
Simple checkout
Figure: The system structure
4. Modifying the Traveler Profile:
Figure: A display of my profile page.
⊘ This is a preview!⊘
Do you want full access?
Subscribe today to unlock all pages.
Trusted by 1+ million students worldwide
9CERTIFICATE 2 IN BUSINESS
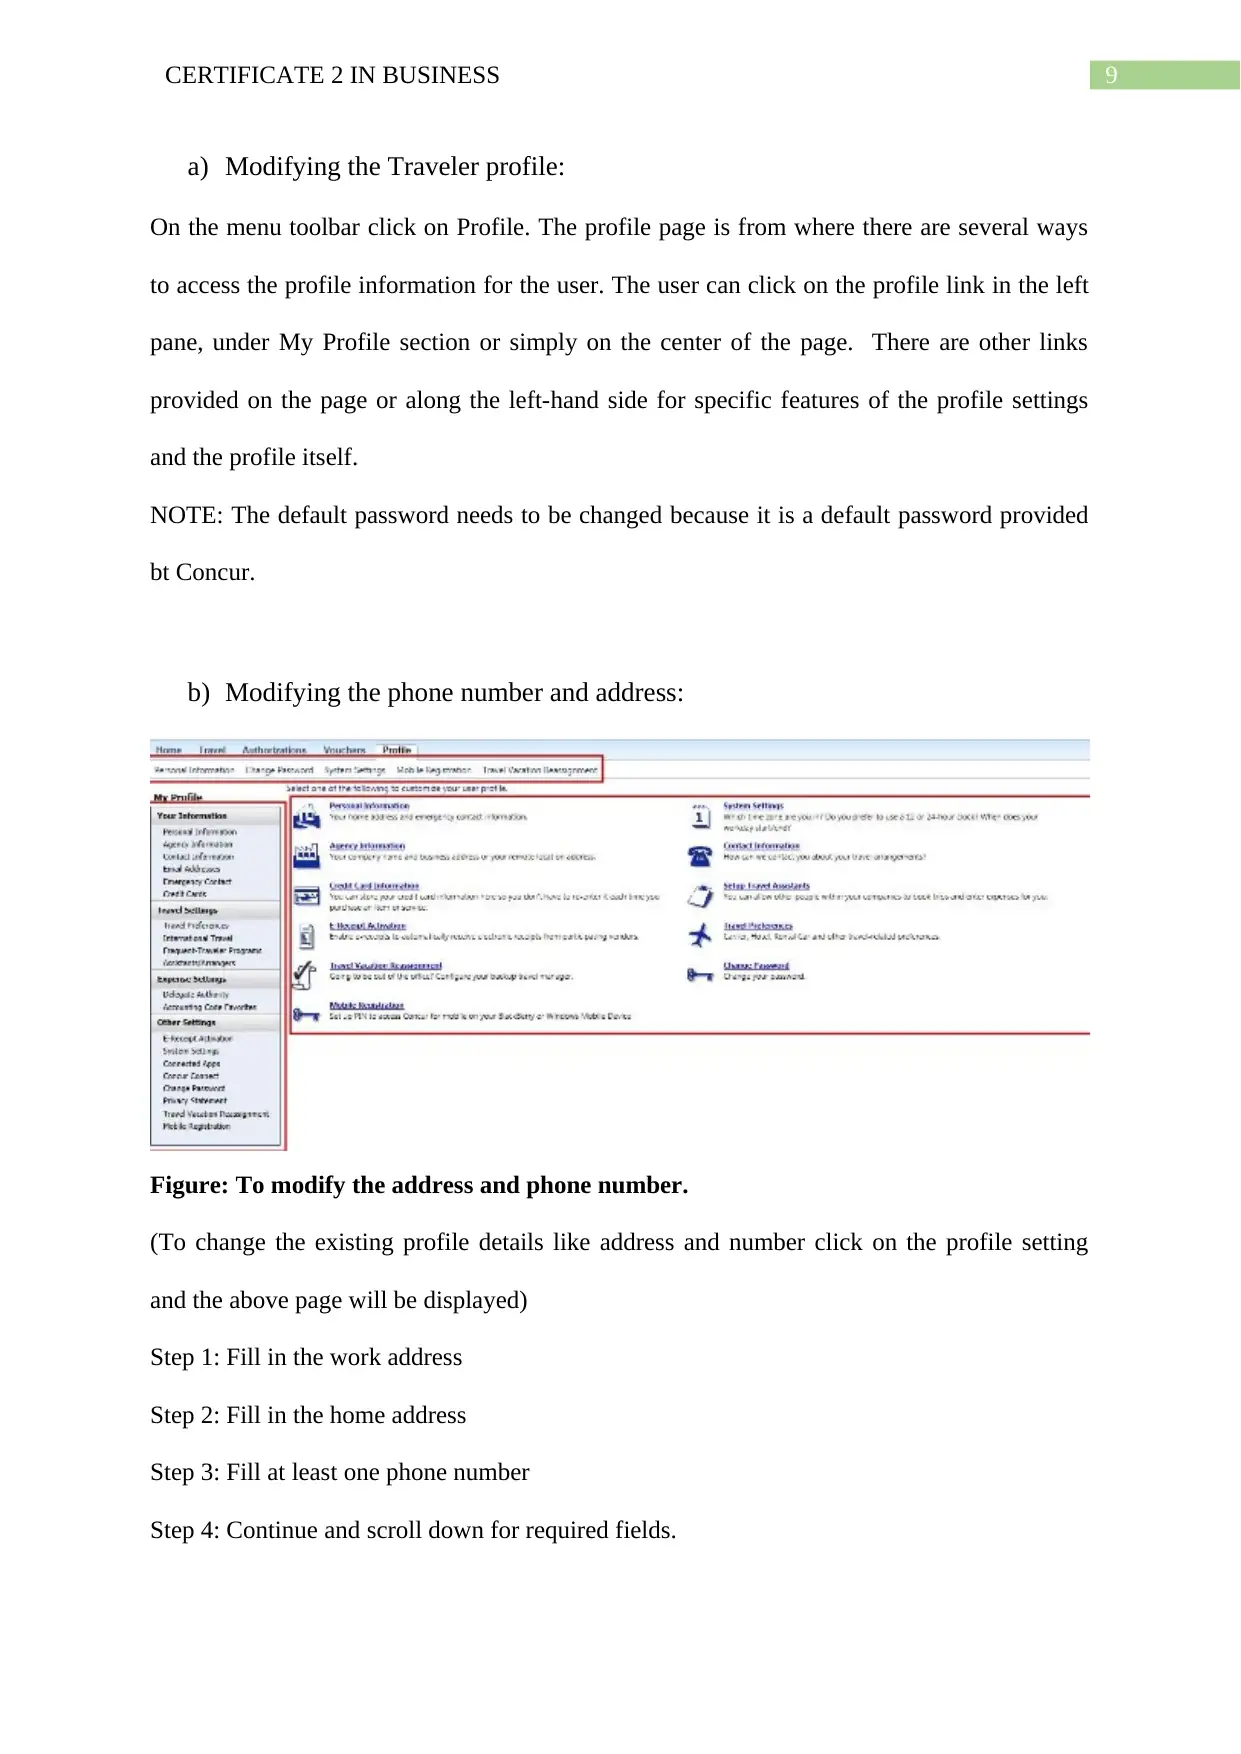
a) Modifying the Traveler profile:
On the menu toolbar click on Profile. The profile page is from where there are several ways
to access the profile information for the user. The user can click on the profile link in the left
pane, under My Profile section or simply on the center of the page. There are other links
provided on the page or along the left-hand side for specific features of the profile settings
and the profile itself.
NOTE: The default password needs to be changed because it is a default password provided
bt Concur.
b) Modifying the phone number and address:
Figure: To modify the address and phone number.
(To change the existing profile details like address and number click on the profile setting
and the above page will be displayed)
Step 1: Fill in the work address
Step 2: Fill in the home address
Step 3: Fill at least one phone number
Step 4: Continue and scroll down for required fields.
Paraphrase This Document
Need a fresh take? Get an instant paraphrase of this document with our AI Paraphraser
10CERTIFICATE 2 IN BUSINESS
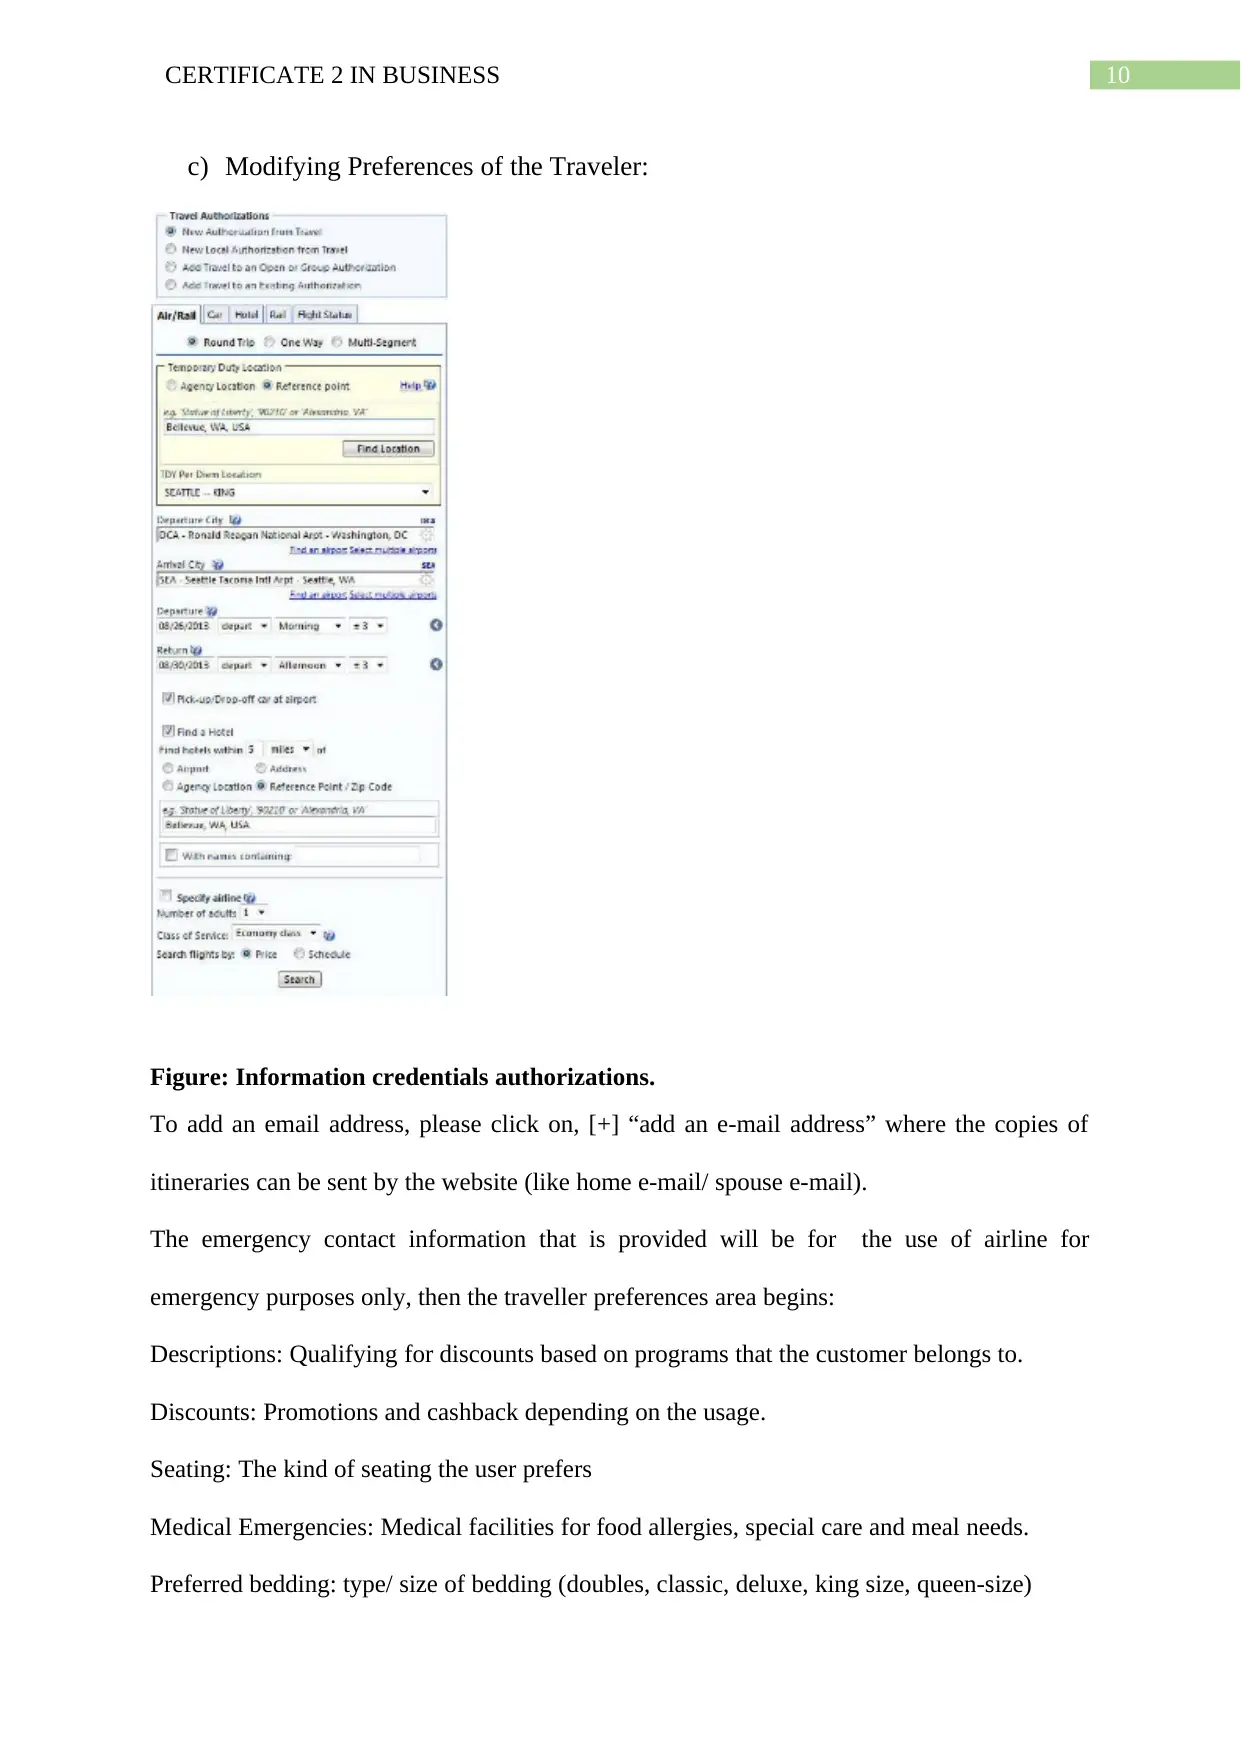
c) Modifying Preferences of the Traveler:
Figure: Information credentials authorizations.
To add an email address, please click on, [+] “add an e-mail address” where the copies of
itineraries can be sent by the website (like home e-mail/ spouse e-mail).
The emergency contact information that is provided will be for the use of airline for
emergency purposes only, then the traveller preferences area begins:
Descriptions: Qualifying for discounts based on programs that the customer belongs to.
Discounts: Promotions and cashback depending on the usage.
Seating: The kind of seating the user prefers
Medical Emergencies: Medical facilities for food allergies, special care and meal needs.
Preferred bedding: type/ size of bedding (doubles, classic, deluxe, king size, queen-size)
11CERTIFICATE 2 IN BUSINESS
Other preferences for the room.
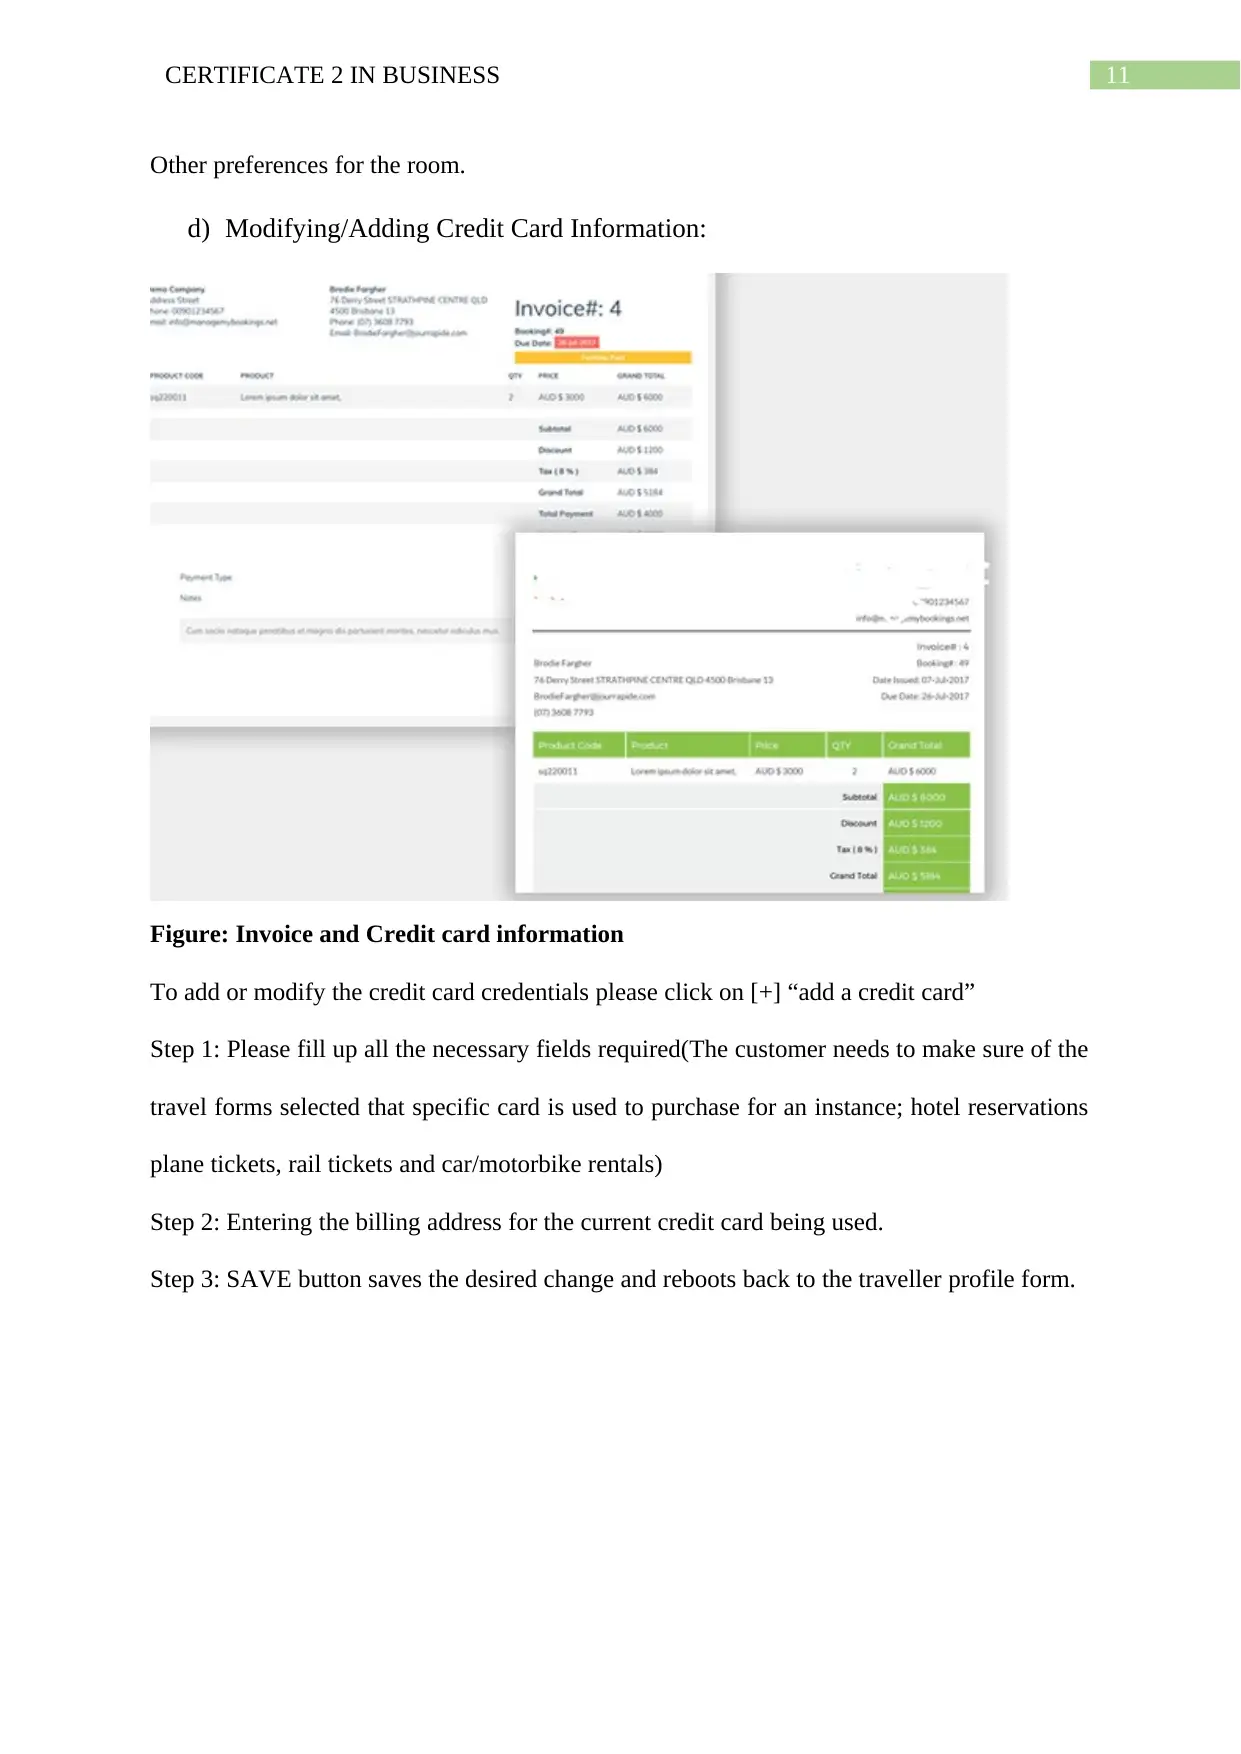
d) Modifying/Adding Credit Card Information:
Figure: Invoice and Credit card information
To add or modify the credit card credentials please click on [+] “add a credit card”
Step 1: Please fill up all the necessary fields required(The customer needs to make sure of the
travel forms selected that specific card is used to purchase for an instance; hotel reservations
plane tickets, rail tickets and car/motorbike rentals)
Step 2: Entering the billing address for the current credit card being used.
Step 3: SAVE button saves the desired change and reboots back to the traveller profile form.
Other preferences for the room.
d) Modifying/Adding Credit Card Information:
Figure: Invoice and Credit card information
To add or modify the credit card credentials please click on [+] “add a credit card”
Step 1: Please fill up all the necessary fields required(The customer needs to make sure of the
travel forms selected that specific card is used to purchase for an instance; hotel reservations
plane tickets, rail tickets and car/motorbike rentals)
Step 2: Entering the billing address for the current credit card being used.
Step 3: SAVE button saves the desired change and reboots back to the traveller profile form.
⊘ This is a preview!⊘
Do you want full access?
Subscribe today to unlock all pages.
Trusted by 1+ million students worldwide
1 out of 24

Your All-in-One AI-Powered Toolkit for Academic Success.
+13062052269
info@desklib.com
Available 24*7 on WhatsApp / Email
![[object Object]](/_next/static/media/star-bottom.7253800d.svg)
Unlock your academic potential
Copyright © 2020–2025 A2Z Services. All Rights Reserved. Developed and managed by ZUCOL.