Client-Side JavaScript User Information Tracking
VerifiedAdded on 2019/09/16
|5
|2266
|500
Report
AI Summary
The provided JavaScript code is used to manage user login and logout functionality in a photo album application. It declares two global variables, `user` and `role`, initially set to `
Contribute Materials
Your contribution can guide someone’s learning journey. Share your
documents today.
Digital Business Application – Lab Exercises
JavaScript and Ajax
EXERCISE 5: PHOTO ALBUM CLIENT-RENDERED VERSION E
Photo Album Client-Rendered Version E
The next version of the photoalbum restores the use of authentication to the site (corresponding to
the PHP version e) .
There are three stages we will do for this:
1. We will protect the server side code that deletes photographs and accepts uploaded
photographs from running unless you are logged in.
2. We will add code to the server and to the client page to allow you to log in.
3. We will hide the add images and delete links from non-logged in users.
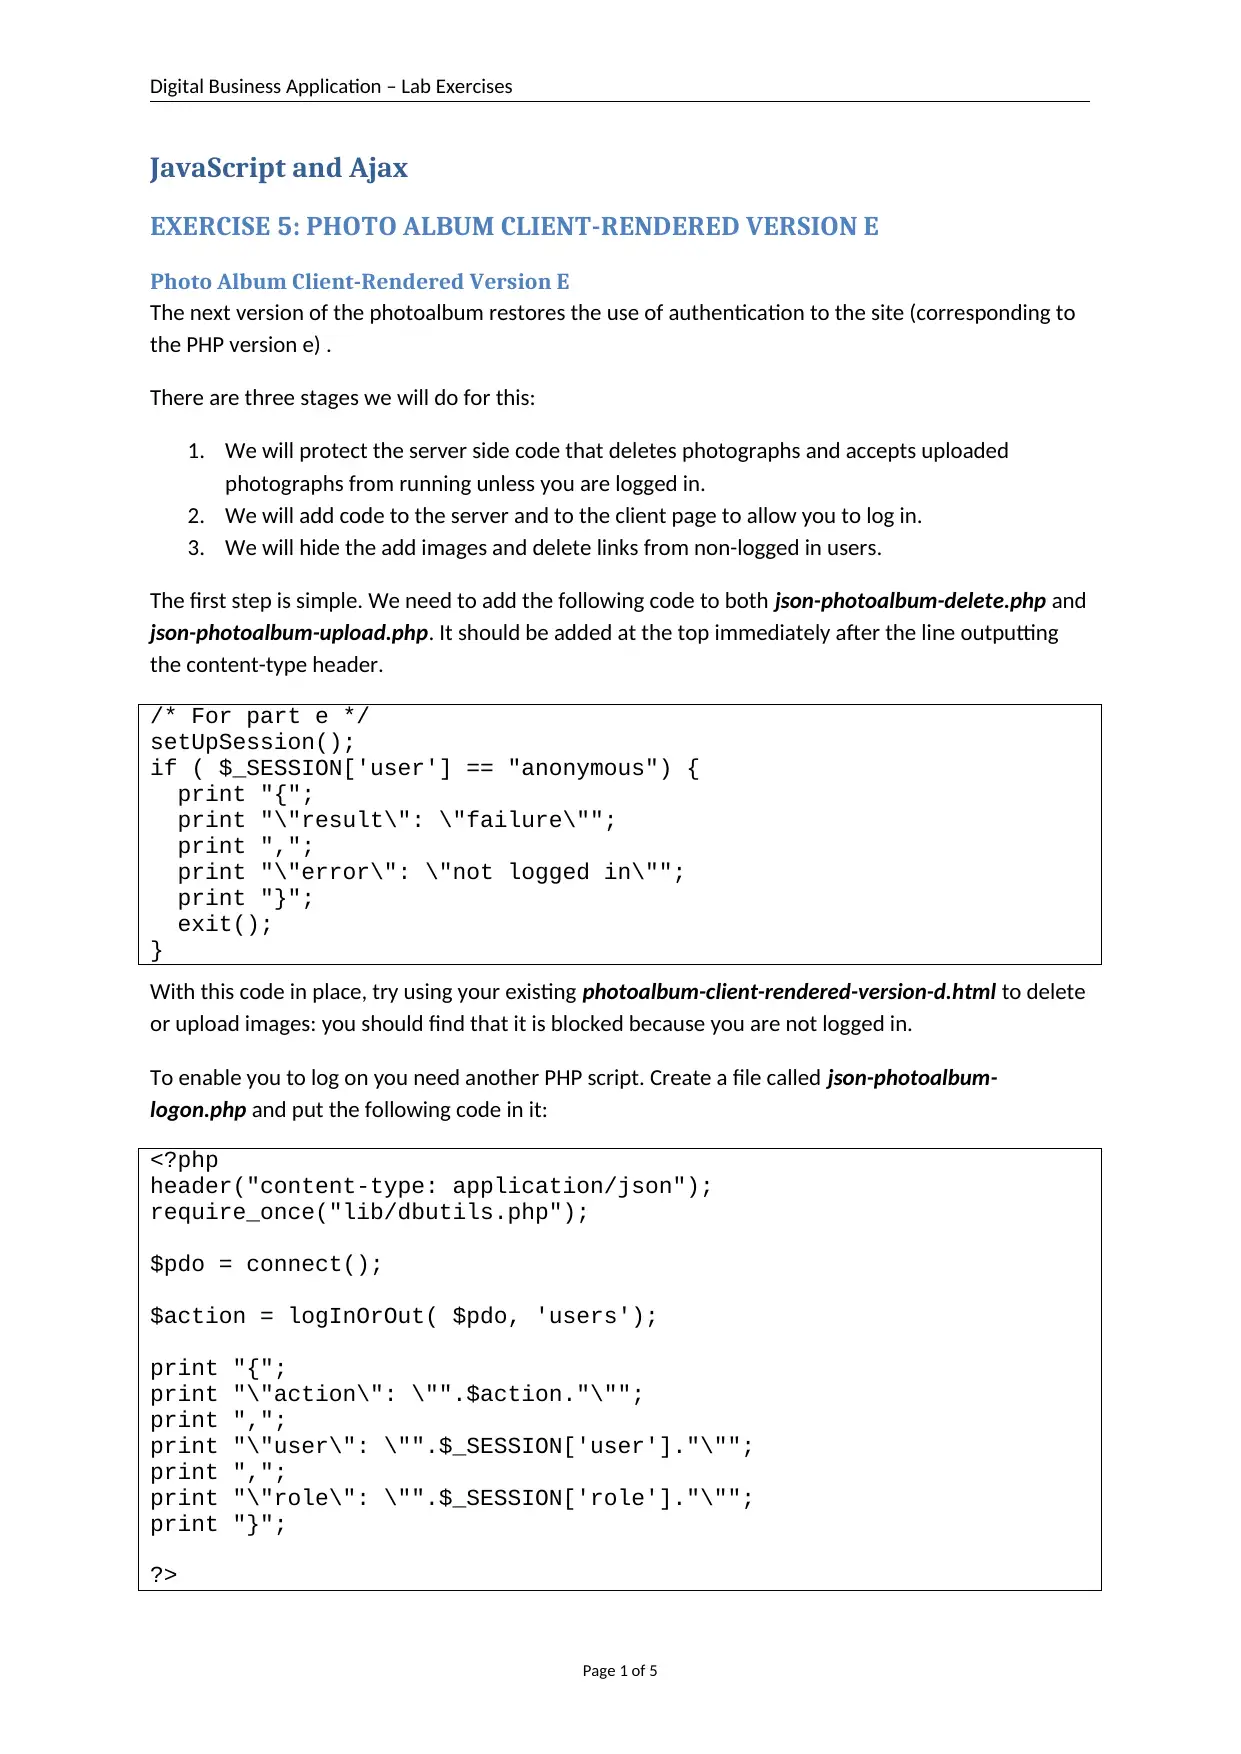
The first step is simple. We need to add the following code to both json-photoalbum-delete.php and
json-photoalbum-upload.php. It should be added at the top immediately after the line outputting
the content-type header.
/* For part e */
setUpSession();
if ( $_SESSION['user'] == "anonymous") {
print "{";
print "\"result\": \"failure\"";
print ",";
print "\"error\": \"not logged in\"";
print "}";
exit();
}
With this code in place, try using your existing photoalbum-client-rendered-version-d.html to delete
or upload images: you should find that it is blocked because you are not logged in.
To enable you to log on you need another PHP script. Create a file called json-photoalbum-
logon.php and put the following code in it:
<?php
header("content-type: application/json");
require_once("lib/dbutils.php");
$pdo = connect();
$action = logInOrOut( $pdo, 'users');
print "{";
print "\"action\": \"".$action."\"";
print ",";
print "\"user\": \"".$_SESSION['user']."\"";
print ",";
print "\"role\": \"".$_SESSION['role']."\"";
print "}";
?>
Page 1 of 5
JavaScript and Ajax
EXERCISE 5: PHOTO ALBUM CLIENT-RENDERED VERSION E
Photo Album Client-Rendered Version E
The next version of the photoalbum restores the use of authentication to the site (corresponding to
the PHP version e) .
There are three stages we will do for this:
1. We will protect the server side code that deletes photographs and accepts uploaded
photographs from running unless you are logged in.
2. We will add code to the server and to the client page to allow you to log in.
3. We will hide the add images and delete links from non-logged in users.
The first step is simple. We need to add the following code to both json-photoalbum-delete.php and
json-photoalbum-upload.php. It should be added at the top immediately after the line outputting
the content-type header.
/* For part e */
setUpSession();
if ( $_SESSION['user'] == "anonymous") {
print "{";
print "\"result\": \"failure\"";
print ",";
print "\"error\": \"not logged in\"";
print "}";
exit();
}
With this code in place, try using your existing photoalbum-client-rendered-version-d.html to delete
or upload images: you should find that it is blocked because you are not logged in.
To enable you to log on you need another PHP script. Create a file called json-photoalbum-
logon.php and put the following code in it:
<?php
header("content-type: application/json");
require_once("lib/dbutils.php");
$pdo = connect();
$action = logInOrOut( $pdo, 'users');
print "{";
print "\"action\": \"".$action."\"";
print ",";
print "\"user\": \"".$_SESSION['user']."\"";
print ",";
print "\"role\": \"".$_SESSION['role']."\"";
print "}";
?>
Page 1 of 5
Secure Best Marks with AI Grader
Need help grading? Try our AI Grader for instant feedback on your assignments.
Digital Business Application – Lab Exercises
This script uses the existing logInOrOut function in dbutils.php to start a session if the supplied
username and password are correct. Then it prints out a JSON object containing the username and
role that has been assigned.
Try visiting this script directly by typing its URL into the browser address bar to see this JSON object.
We need to add javascript to our client page to allow it to send an AJAX request for logging in and
out. The first thing this requires is that we add the log in form to our page.
Make a copy of photoalbum-client-rendered-version-d.html and call it photoalbum-client-rendered-
version-e.html.
Add the HTML for the log in form that is given in PHP and MySQL Exercise 6 to the new version of
the page. This form is initially hidden, so we need a link to make it appear. However, we also want to
display a different link dependent on whether the user is logged in or not – that is, we want a link
that says “log in” first, and then a link that says “log out”.
In the server version we achieved this by printing out a different link as we served up the whole page
again, but in this client version, the page is never reloaded. It is the same page in the window at all
times, it changes itself using JavaScript running in it. Therefore, we need some javascript to display
the appropriate links.
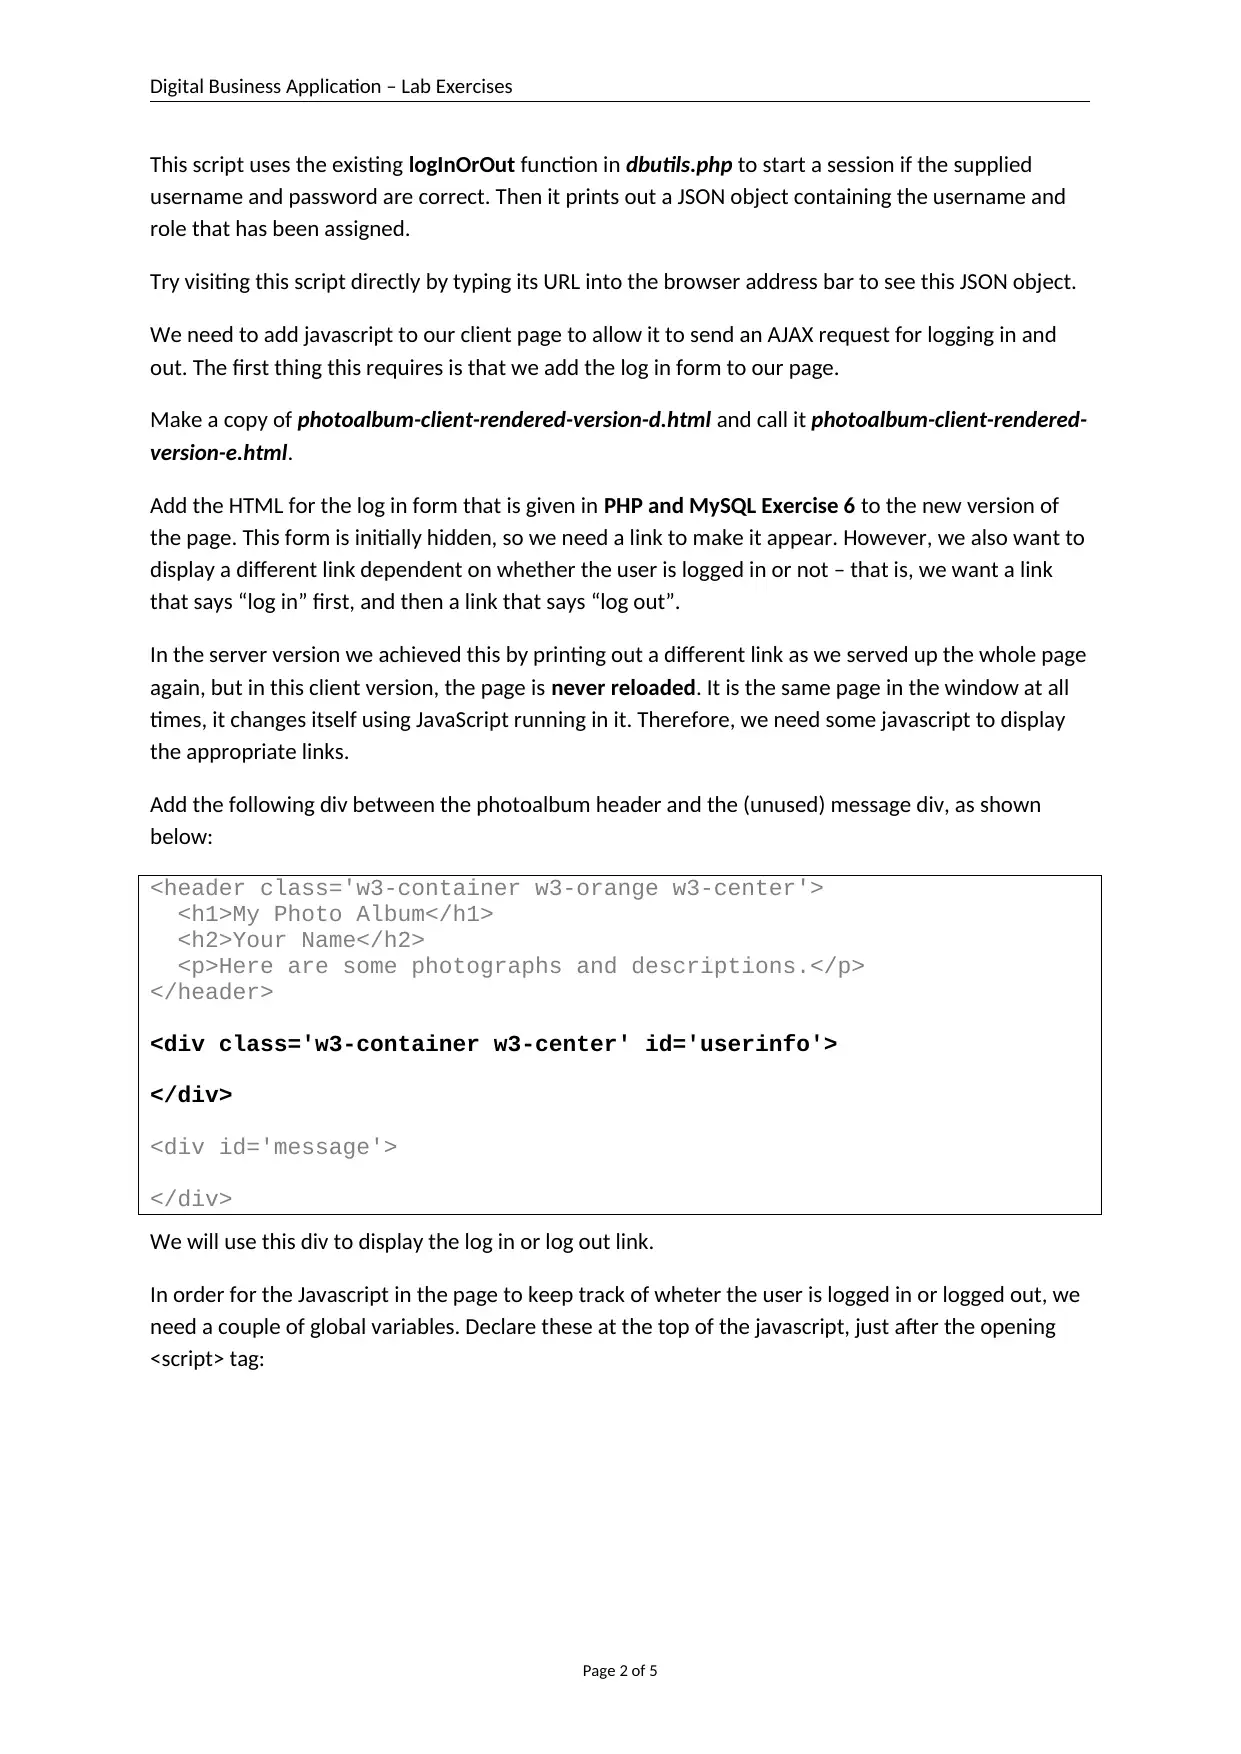
Add the following div between the photoalbum header and the (unused) message div, as shown
below:
<header class='w3-container w3-orange w3-center'>
<h1>My Photo Album</h1>
<h2>Your Name</h2>
<p>Here are some photographs and descriptions.</p>
</header>
<div class='w3-container w3-center' id='userinfo'>
</div>
<div id='message'>
</div>
We will use this div to display the log in or log out link.
In order for the Javascript in the page to keep track of wheter the user is logged in or logged out, we
need a couple of global variables. Declare these at the top of the javascript, just after the opening
<script> tag:
Page 2 of 5
This script uses the existing logInOrOut function in dbutils.php to start a session if the supplied
username and password are correct. Then it prints out a JSON object containing the username and
role that has been assigned.
Try visiting this script directly by typing its URL into the browser address bar to see this JSON object.
We need to add javascript to our client page to allow it to send an AJAX request for logging in and
out. The first thing this requires is that we add the log in form to our page.
Make a copy of photoalbum-client-rendered-version-d.html and call it photoalbum-client-rendered-
version-e.html.
Add the HTML for the log in form that is given in PHP and MySQL Exercise 6 to the new version of
the page. This form is initially hidden, so we need a link to make it appear. However, we also want to
display a different link dependent on whether the user is logged in or not – that is, we want a link
that says “log in” first, and then a link that says “log out”.
In the server version we achieved this by printing out a different link as we served up the whole page
again, but in this client version, the page is never reloaded. It is the same page in the window at all
times, it changes itself using JavaScript running in it. Therefore, we need some javascript to display
the appropriate links.
Add the following div between the photoalbum header and the (unused) message div, as shown
below:
<header class='w3-container w3-orange w3-center'>
<h1>My Photo Album</h1>
<h2>Your Name</h2>
<p>Here are some photographs and descriptions.</p>
</header>
<div class='w3-container w3-center' id='userinfo'>
</div>
<div id='message'>
</div>
We will use this div to display the log in or log out link.
In order for the Javascript in the page to keep track of wheter the user is logged in or logged out, we
need a couple of global variables. Declare these at the top of the javascript, just after the opening
<script> tag:
Page 2 of 5
Digital Business Application – Lab Exercises
Now add the following Javascript, just after the opening <script> tag.
var user = "anonymous";
var role = "anonymous";
function renderUserInformation() {
$('#userinfo').empty();
if ( user == "anonymous") {
$('#userinfo').append( "<a href='#id02' class='link'>Log in</a>");
$('#addlink').hide();
} else {
$('#userinfo').append( "User: " + user + " Role: " + role + " <a href='#'
class='link' onclick='logout()'>Log out</a>");
$('#addlink').show();
}
}
function login() {
$.post( "json-photoalbum-logon.php",
$('#loginform').serialize(),
function( data) {
user = data.user;
role = data.role;
renderUserInformation();
loadPhotos();
$('#loginform').get(0).reset();
location.href='#';
alert( data.action + " " + data.user + " " + data.role);
}
);
}
function logout() {
$.getJSON( "json-photoalbum-logon.php?logout=true",
function( data) {
user = data.user;
role = data.role;
renderUserInformation();
loadPhotos();
location.href='#';
//alert( data.action + " " + data.user + " " + data.role);
}
);
}
This code starts by declaring two global variables, user and role, and setting them both to
“anonymous”. Once logged in, these values will be replaced by the username and a role provided by
the server.
The function renderUserInformation() fills in the div we added a moment ago. When run it does the
following: First it discards any content of the div with id #userinfo. Then if the value of the global
variable user is “anonymous”, it adds a link to that div with the text “Log in” and then hides the link
with the id #addlink, which it the “Add images” link. Thus if no one is logged in, it displays a log in
link and hides the add images link. The “Log in” link uses the w3css classes to show the log in form
when it is clicked. If the value of user is not anonymous, it means someone is logged in. In that case
Page 3 of 5
Digital Business Application – Lab Exercises
the function adds a display of the username and role, and a link with the text “Log out”. It also shows
the add image link. The log out link has an onclick() handler pointing to the logout() function.
The logout() function constructs an AJAX request using getJSON and sends it to json-photoalbum-
logon.php with the appended value logout=true. This will cause it to end the session on the server
and return a JSON object with user and role fields set to “anonymous”. These are copied into the
global variables in the javascript. It then does the following:
1. Calls renderUserInformation() to replace the log out link with a log in link
2. Calls loadPhotos() – this is to allow the delete links beside the images to be removed, but
the code to do that has not yet been added.
3. Sets location.href to ‘#’ to clear any target thus hiding the log on form, although this is
unnecessary since it isn’t showing (I copied it from when I wrote the login() function where it
is necessary!)
To log in the user must click the log in link. This simply causes the log in form to be displayed. When
the log in form is submitted it needs to call the login() function. (It doesn’t yet do this.)
The login() function is very similar to the logout() function, but this time is creates a POST request
using $.post(), using the JQuery serialize function to read all the fields from the form and add it to
the request. The request is again sent to json-photoalbum-logon.php and a JSON object is received
which contains the username and role. If the log on was successful these will bereal values, if the log
on details were not recognised, they will be anonymous. The function then updates the log in link to
be a log out link, reloads the photos (to add delete links beside each image), clears the log in form
and then hides it. Finally it displays an alert either confirming log in or notifying of failure
(experiment with invalid credentials to see this).
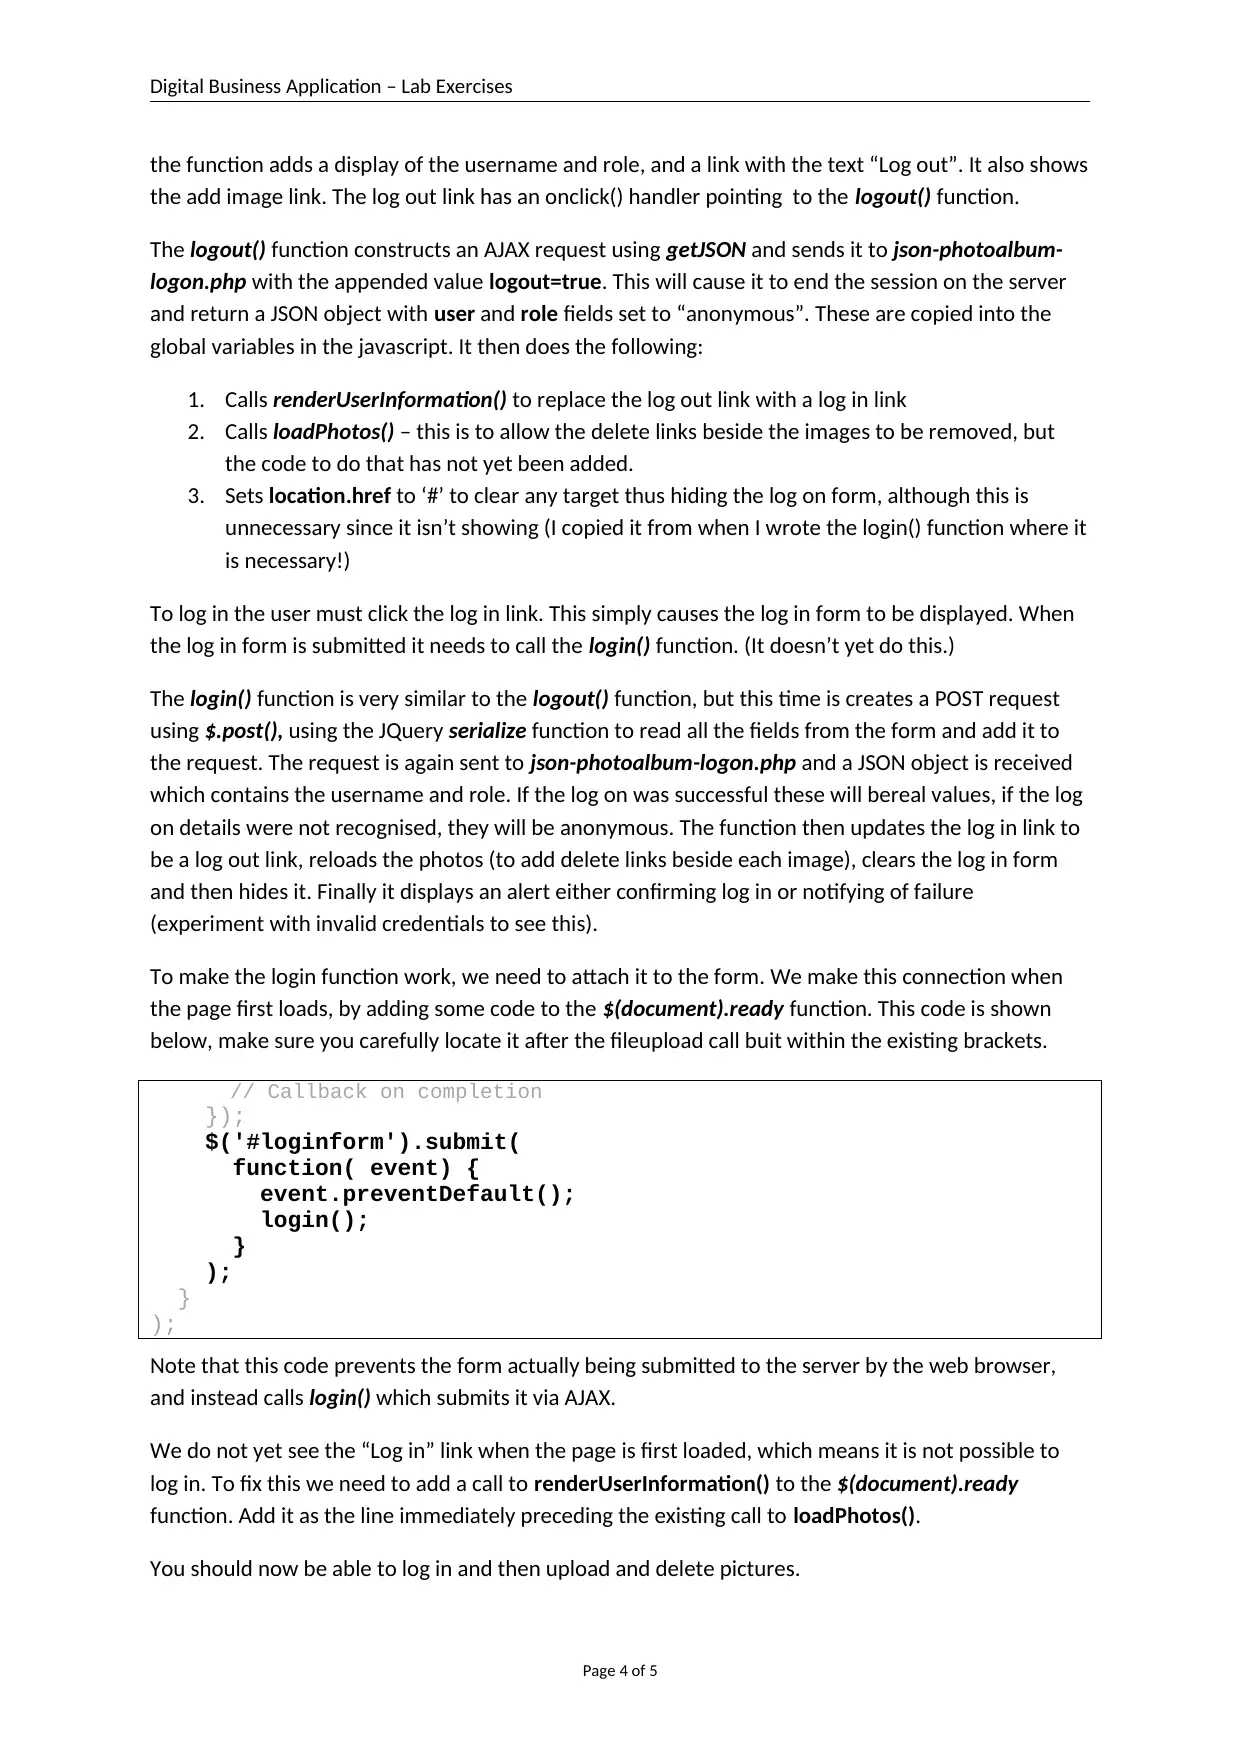
To make the login function work, we need to attach it to the form. We make this connection when
the page first loads, by adding some code to the $(document).ready function. This code is shown
below, make sure you carefully locate it after the fileupload call buit within the existing brackets.
// Callback on completion
});
$('#loginform').submit(
function( event) {
event.preventDefault();
login();
}
);
}
);
Note that this code prevents the form actually being submitted to the server by the web browser,
and instead calls login() which submits it via AJAX.
We do not yet see the “Log in” link when the page is first loaded, which means it is not possible to
log in. To fix this we need to add a call to renderUserInformation() to the $(document).ready
function. Add it as the line immediately preceding the existing call to loadPhotos().
You should now be able to log in and then upload and delete pictures.
Page 4 of 5
the function adds a display of the username and role, and a link with the text “Log out”. It also shows
the add image link. The log out link has an onclick() handler pointing to the logout() function.
The logout() function constructs an AJAX request using getJSON and sends it to json-photoalbum-
logon.php with the appended value logout=true. This will cause it to end the session on the server
and return a JSON object with user and role fields set to “anonymous”. These are copied into the
global variables in the javascript. It then does the following:
1. Calls renderUserInformation() to replace the log out link with a log in link
2. Calls loadPhotos() – this is to allow the delete links beside the images to be removed, but
the code to do that has not yet been added.
3. Sets location.href to ‘#’ to clear any target thus hiding the log on form, although this is
unnecessary since it isn’t showing (I copied it from when I wrote the login() function where it
is necessary!)
To log in the user must click the log in link. This simply causes the log in form to be displayed. When
the log in form is submitted it needs to call the login() function. (It doesn’t yet do this.)
The login() function is very similar to the logout() function, but this time is creates a POST request
using $.post(), using the JQuery serialize function to read all the fields from the form and add it to
the request. The request is again sent to json-photoalbum-logon.php and a JSON object is received
which contains the username and role. If the log on was successful these will bereal values, if the log
on details were not recognised, they will be anonymous. The function then updates the log in link to
be a log out link, reloads the photos (to add delete links beside each image), clears the log in form
and then hides it. Finally it displays an alert either confirming log in or notifying of failure
(experiment with invalid credentials to see this).
To make the login function work, we need to attach it to the form. We make this connection when
the page first loads, by adding some code to the $(document).ready function. This code is shown
below, make sure you carefully locate it after the fileupload call buit within the existing brackets.
// Callback on completion
});
$('#loginform').submit(
function( event) {
event.preventDefault();
login();
}
);
}
);
Note that this code prevents the form actually being submitted to the server by the web browser,
and instead calls login() which submits it via AJAX.
We do not yet see the “Log in” link when the page is first loaded, which means it is not possible to
log in. To fix this we need to add a call to renderUserInformation() to the $(document).ready
function. Add it as the line immediately preceding the existing call to loadPhotos().
You should now be able to log in and then upload and delete pictures.
Page 4 of 5
Secure Best Marks with AI Grader
Need help grading? Try our AI Grader for instant feedback on your assignments.

Digital Business Application – Lab Exercises
One detail remains, and that is that the delete links are still showing to non-logged in users, even
though they won’t work for them. To hide these links we need to change the code output by
createPhotoHTML.
Because createPhotoHTML constructs and returns a string all in one statement, the best thing to do
is to use the ternary operator to replace part of the string conditionally. The ternary operator looks
like this:
condition ? value-if-true : value-if -false
For example,
Status = (age >= 18) ? “adult” : “child”;
Where status would be assigned either adult of child depending on the value of age. See
https://en.wikipedia.org/wiki/%3F: for more details.
At the moment, one fragment of the string assembled by createPhotoHTML looks like this:
" <span class='link deletelink' id='" + photoInfo.photoid +
"'>(Delete)</span>" +
This prints out the delete link uncontionally. We want that printed out ONLY when user is not
anonymous. To achieve this, replace that line with the following version:
(( user != "anonymous") ? "<span class='link deletelink' id='" +
photoInfo.photoid + "'>(Delete)</span>" : "") +
Note that the green section here is the same as was there before, it’s the delete link. The blue bit is
the condition. If the condition is not met the value is the red bit – an empty string, so we print
nothing.
Once this change is made the page is complete.
EXERCISE 5: PHOTO ALBUM CLIENT-RENDERED VERSION E
Required in your report (basic exercise).
A clickable link to photoalbum-client-rendered-e.html.
Reflection on the tasks and all activities involved.
Extended Tasks
No extended tasks are defined for this exercise.
Original additional work:
Investigate and experiment with any related subject matter that interests you.
Page 5 of 5
1 out of 5
Related Documents


Your All-in-One AI-Powered Toolkit for Academic Success.
+13062052269
info@desklib.com
Available 24*7 on WhatsApp / Email
![[object Object]](/_next/static/media/star-bottom.7253800d.svg)
Unlock your academic potential
© 2024 | Zucol Services PVT LTD | All rights reserved.