Additive Manufacturing: FDM Process, Simulation & 3D Printing

Verified

Added on  2023/05/28

|6
|1292
|56
Report
AI Summary
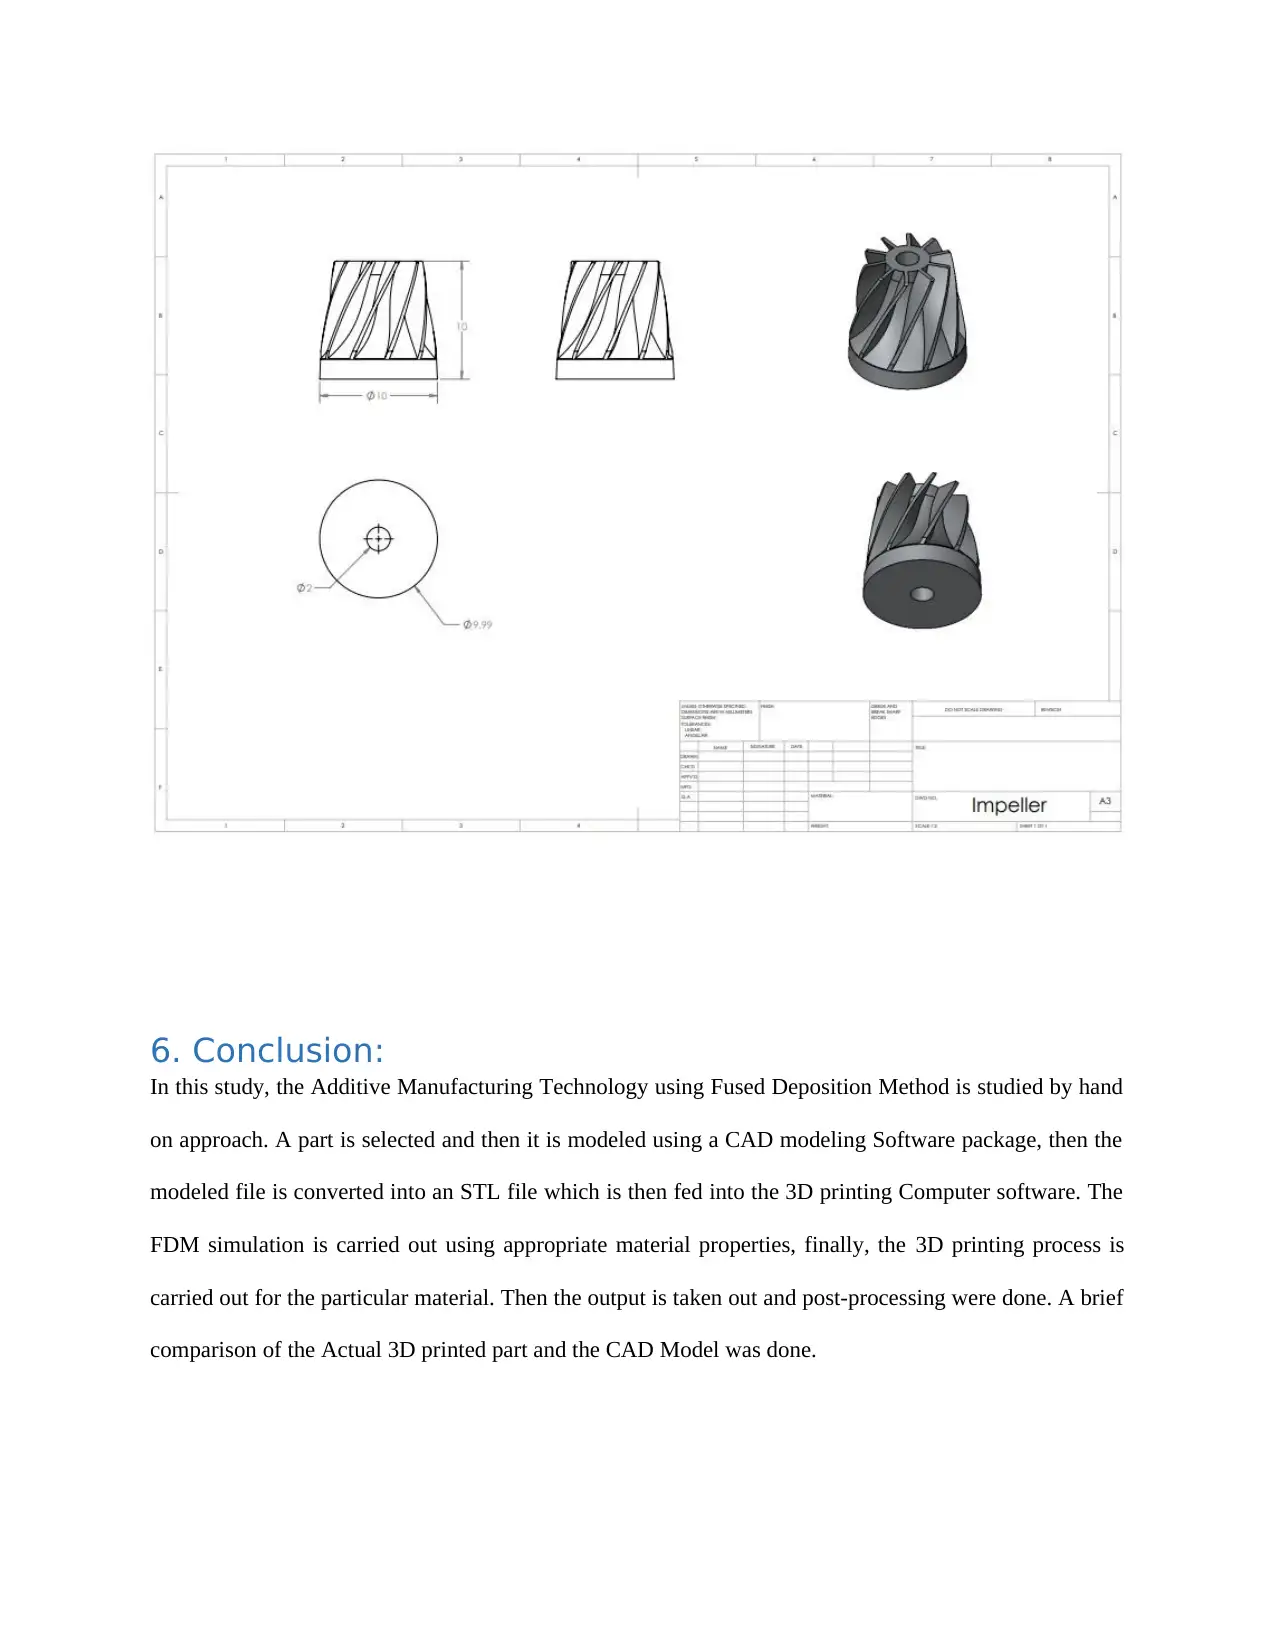
This report comprehensively details the Fused Deposition Modeling (FDM) additive manufacturing process, beginning with the selection of a centrifugal air compressor impeller as the part for study. The report outlines the steps involved in model processing, starting with 3D CAD modeling using SolidWorks and conversion to STL format, followed by transferring the file to the printing computer and setting up the 3D printing device. It elaborates on the prototype creation, removal of the finished part, and post-processing techniques. Furthermore, the report discusses the steps involved in FDM simulation, including discretizing the part, defining printing parameters, calibrating material properties, running the simulation, and analyzing the output results. A comparison is made between the 3D printed part and the original CAD model, focusing on physical appearance, surface quality, and dimensional accuracy, ultimately leading to a conclusion about the effectiveness and challenges of the FDM process.
Document Page
Report 2
Contents
1. Executive summary:.................................................................................................................................1
2. Steps in Model Processing:......................................................................................................................2
3D CAD modelling:...................................................................................................................................2
Transforming the CAD model into STL format:........................................................................................3
Moving the file to Printing computer:.....................................................................................................3
Setting up the device:..............................................................................................................................3
Creation of prototype:.............................................................................................................................3
Removal of the finished part:..................................................................................................................3
Post-processing.......................................................................................................................................4
3. Steps involved in FDM Simulation:..........................................................................................................4
Discretizing..............................................................................................................................................4
Printing parameters:................................................................................................................................4
Calibration of properties:........................................................................................................................4
Run simulation:........................................................................................................................................4
Output and results:..................................................................................................................................5
4. 3D printed part:.......................................................................................................................................5
5. Key dimensions:.......................................................................................................................................5
6. Conclusion:..............................................................................................................................................6
tabler-icon-diamond-filled.svg

Paraphrase This Document

Need a fresh take? Get an instant paraphrase of this document with our AI Paraphraser
Document Page
1. Executive summary:
In the previous report, we have selected an appropriate part which suits for the study of Fused Deposition
Method Additive manufacturing technique. The selected part was Impeller of a Centrifugal air
compressor. The impeller is responsible for the compressing acting of a compressor. A 3D part model of
the impeller was also developed using SolidWorks CAD modeling Package. In this report, we will further
continue the study from the part where we have stopped at report 1. In this report, we will study the
model processing techniques that are handled by the 3D printing machine to print the modeled 3D part
using the Fused Deposition Method technique. The 3D printing process will be simulated using the FDM
simulation software. The various steps involved in the process of converting the CAD model into a
product with the help of additive manufacturing will be explained in this report. Finally, the similarities
between the actual 3D printed part and the designed CAD model are compared. Variables such as
Physical appearance, surface quality, etc. Will be compared. A conclusion will be drawn at last.
2. Steps in Model Processing:
There are eight general steps that are to be following in order to 3D print a part. The process begins with
the CAD and ends with completed real product.
The eight steps are given as:
1. 3D CAD modeling
2. Transforming the CAD model into STL format
3. Moving the file to Printing computer
4. Setting up the device
5. Creation of prototype
6. Removal of the finished part
7. Post processing
8. Final usage.
Document Page
3D CAD modeling:
The first step in any 3D printing process is the creation of a CAD model of the part that is required to be
3D printed. The CAD model is generated using the SolidWorks CAD modeling software. The selected
part was briefly explained in the Report 1 and also the basis on which and why the particular part is
selected was also discussed in the report 1. The 3D model is saved in a separate file.
Transforming the CAD model into STL format:
The second step in the 3D printing process is the conversion of the CAD file into STL format. STL stands
for Standard Tessellation Language. The STL file ends with an extension .STL this type of file system
was originally developed at 1987 for 3 D systems to be utilized in a Stereolithography apparatus. In
general Stereolithography technique based printers requires the input file in the STL format.
Moving the file to Printing computer:
In most of the cases, the printing computer is not the same as that of the computer which is used for the
CAD modeling purpose. The computer which is connected with the 3D printer is the printing computer
the file needed to be transferred from the CAD computer to the printing computer. In this process, the size
and the printing orientation are selected.
Setting up the device:
The 3D printing device needed to be set up or calibrated before beginning the process. In this process, the
user checks if all the parts are in working conditions and if the polymers are filled properly or not. All the
necessary things required to successfully complete the process are present or not. After checking all the
systems are calibrated to give its best performance.
Creation of prototype:
In this step, all the properties are given to the system and the 3D printing process starts up. The Machine
prints the 3D parts in a layer by layer manner. The 3D printing process takes up some time.
Document Page
Removal of the finished part:
After completion of the 3D printing process, the printed part should be removed carefully with exercising
proper precautions. There are many dangers related to it as the part may be very hot, it may have not been
cured properly, etc.
Post processing
The post-processing process includes cleaning up the removed part, cleaning the edges, surfaces etc.
3. Steps involved in FDM Simulation:
The 3D printing simulation can be done using software packages such as ANSYS, Autodesk NETFABB,
Simufact, Ex Digimat-AM, etc. one of this software is utilized in order to simulate the 3D printing
process
The main steps involved in 3D printing Simulation process are:
1. Discretizing
2. Printing parameters
3. Calibration of properties
4. Run Simulation
5. Output and results.
Discretizing
The first step in the simulation process is the discretization of the parts. The 3D volume is discretized into
separate cubes. The more precise and smaller the cubes make the best result.
Printing parameters:
The print parameters include a selection of the proper material properties that are required in the final
printed part. The accuracy of this data is very much important a wrong data will surely result in a wrong
result.
tabler-icon-diamond-filled.svg

Paraphrase This Document

Need a fresh take? Get an instant paraphrase of this document with our AI Paraphraser
Document Page
Calibration of properties:
The selected properties are calibrated for better results based on previously printed material properties
and the quality of the print.
Run simulation:
Finally, the simulation is ran
Output and results:
The output and results are obtained in form of Temperature distribution and the deformation.
4. 3D printed part:
The printed 3D printed part is finally removed and taken out. The part is measured with a vernier and it is
found that the Dimensional properties match with the input 3D Cad model. Even though There was some
need for slight removal of built-up material. The Surface finish of the material was not as good as the 3D
CAD model. The surfaces had built up edges and some roughness. The physical appearance was as good
as that of the input 3D CAD model.
5. Key dimensions:
The Dimension is provided in the Drawing sheet generated from the 3D model. The critical dimension is
shown as:
Document Page
6. Conclusion:
In this study, the Additive Manufacturing Technology using Fused Deposition Method is studied by hand
on approach. A part is selected and then it is modeled using a CAD modeling Software package, then the
modeled file is converted into an STL file which is then fed into the 3D printing Computer software. The
FDM simulation is carried out using appropriate material properties, finally, the 3D printing process is
carried out for the particular material. Then the output is taken out and post-processing were done. A brief
comparison of the Actual 3D printed part and the CAD Model was done.
chevron_up_icon
1 out of 6
circle_padding
hide_on_mobile
zoom_out_icon
[object Object]