A Detailed Report on Instrument Sterilization and Reprocessing Methods
VerifiedAdded on 2023/06/09
|15
|5191
|412
Report
AI Summary
This report provides a detailed overview of instrument reprocessing in healthcare, emphasizing the importance of following established protocols to minimize patient infection risks. It outlines the six recommended steps: cleaning, inspection, packaging, sterilization, sterile storage, and quality assurance. The cleaning process, involving manual, ultrasonic, and automated methods, is highlighted as crucial for removing soil that shields bacteria from sterilizing agents. The report also covers the inspection process to ensure instruments meet required standards, proper packaging using FDA-cleared materials like pouches and wraps to maintain sterility, and different sterilization methods. It stresses the importance of quality assurance through chemical indicators and adherence to CDC guidelines. Post-sterilization measures, including storage and handling, are essential to maintain instrument sterility until use.

Sterilization 1
Name:
Course:
Tutor:
Date:
Name:
Course:
Tutor:
Date:
Paraphrase This Document
Need a fresh take? Get an instant paraphrase of this document with our AI Paraphraser
Sterilization 2
INTRODUCTION
Following established protocols, i.e., best practices for instrument reprocessing is an important
aspect of modern health care as it helps to minimize the patient’s risk of infection. This article is
intended to provide an overview of the six (6) recommended steps for instrument reprocessing;
cleaning, inspection, packaging, sterilization, sterile storage, and quality assurance. The cleaning
and sterilizing process is key process for different sections. Any equipment requires proper
procedure of cleaning and sterilization in order to meet the required standards of health and
hygiene. Different codes and ethics are able to focus on a defined procedure which will ensure
that the sterilization and cleaning able to meet the required standards. The protocol for the
procedure during the cleaning and sterilization is essential to ensure that the effectiveness of the
processes is achieved. Lastly, post cleaning and sterilization measures need to be enhanced to
ensure that the instruments are able to maintain the required standards until the time they are
used. These include the specified measures of pre and post packaging measures.
STEP 1: CLEANING
The first and most important step in instrument reprocessing is cleaning, as studies [Alfa, 1998]
have shown that a dirty instrument cannot be effectively sterilized. This is because the soil
shields bacteria and viruses from the sterilizing agent. As a result, bacteria and viruses may very
well survive the sterilization process and can cross infect the next patient. The cleaning process
is able to remove the dirt which is present on the instrument surfaces. Dirt is able to form a key
layer which shields the sterilizing agents from action on instrument surfaces. Cleaning can be
done in different forms which include the manual ultrasonic and automated cleaning processes
(British Columbia., & Ontario, 2007). Some enzymes with some key levels of pH levels are
required to enhance the effectiveness of the cleaning process. In addition, temperature regulation
is another parameter which is controlled during the cleaning process.
The most common method of cleaning instruments is manual cleaning (cleaning by hand).
Manual cleaning has the advantage of flexibility, in that any type of instrument can be cleaned
manually. Drawbacks to manual cleaning are that the cleanliness of the instruments can vary
between workers as well as that employees are at risk of being exposed to possible cross
Sterilization 3
infection as they are in contact with contaminated instruments. For these reasons, it is important
that health care facilities establish protocols for instrument cleaning and require staff to wear
proper personal protection equipment (PPE) when working with contaminated instruments.
Personal health needs protection and this prompts for the use of the proper PPE. Gloves are
highly recommended during the manual cleaning of the equipment to ensures that germs
protection is enhanced (Resuggan, 1957). In addition, germs are sticky and this requires an
important procedure to soften and detach them from the surface. Soaking is one of the important
procedures practices during the cleaning process.
In addition, use of warm water of about 60oC is another important factor which is encouraged
during the cleaning process. Warm water is able to break the bonds of the dirt and therefore
enhance the cleaning process. Warm water, mild pH enzymatic detergent, and soft brush are
usually combined to enhance the removal of dirt from the instrument.
Recommended procedures for manual cleaning are to first soak the instrument in a tepid or
lukewarm water or detergent bath for at least 10 minutes. This step softens and loosens much of
the soil that may have dried on the instrument between the time it was used and the time cleaning
has started. The duration of the soak depends upon how much soil is on the instruments and how
long the soil has been allowed to dry. Note: The use of enzyme detergents is preferred as they
help to break up organic soil more readily and rapidly than do conventional detergents. The next
step is to completely brush the instrument with a medium-soft bristle brush while it is in the soak
bath. In the case of tubed devices like dental handpieces, the insides (lumens, channels, etc.)
should be brushed out as well. Care should be taken to use brushes recommended by the
manufacturer to avoid damaging the instrument. Note: Brushing should be done under the
surface of the water to minimize aerosols and with brush strokes away from the body to avoid
exposure to spray from the brush. The instrument should then be rinsed with clean water and, if
difficult-to-remove soil remains, another enzyme soak followed by brushing and rinsing should
be done.
Ultrasonic Cleaning
For health care facilities that have them, ultrasonic cleaning is a great follow-up to manual
cleaning. Although manual cleaning removes most or all of the visible soil from instruments, it
may not remove small or microscopic particles that are protected by the texture of a surface or
design features like hinges. Ultrasonic cleaners create microscopic bubbles in the solution that
collapse when they contact the instrument releasing energy. This energy “kicks” any soil that is
⊘ This is a preview!⊘
Do you want full access?
Subscribe today to unlock all pages.
Trusted by 1+ million students worldwide
Sterilization 4
in the area off the instrument. This process is called cavitation. The detergent in the ultrasonic
bath suspends the soil particles and keeps them from attaching back to the instruments.
Ultrasonic cleaning should be done for a duration specified by the instrument, detergent, or
ultrasonic bath manufacturer, whichever is longer. Following ultrasonic cleaning, the instruments
are rinsed with clean water and dried. Distilled water is preferred to ensure removal of as much
detergent as possible but is only essential if the tap water has a high mineral content that could
cause spotting. After drying, the instruments may be packaged for sterilization.
Automatic Washers
Practices that need to clean a large quantity of instruments and/or cassettes should consider
purchasing automatic cleaning machines. These machines may resemble home dishwashers or be
specialized for the specific needs of cleaning complex instruments, e.g., endoscopic instruments.
Validated to meet the special needs of cleaning instruments, automatic washers offer a wide
range of temperature settings that allow the instruments to be processed at the maximum safe
temperature for their use. Higher temperatures speed cleaning and provide some disinfection.
Regardless of the automatic washer type used, instruments must be prepared for processing
before being placed into a washer, with the extent of preparation depending upon the capabilities
of the washer. The actual preparation must be done in accordance with the washer
manufacturer’s instructions. For the simplest washers, manual presoaking and sonication remain
as necessary reprocessing steps. More sophisticated washers include a presoaking step in the
automated process.
STEP 2: INSPECTION
Each and every instrument should be inspected for function and cleanliness after cleaning. Any
damaged instrument should be replaced and any instrument with visible soil or residual debris
should be returned for further cleaning. Never clean a dirty instrument in a clean area unless you
have proper PPE. The cleaning action can cross contaminate other instruments and work
surfaces. Special Note: Instruments with stiff joints may be a sign of inadequate cleaning. The
inspection procedures are meant to ensure that the instruments are able to meet the required
standards before being packaged. Most importantly, the different instruments are required to
meet the required standards of sterilization and this requires the implementation of the inspection
Paraphrase This Document
Need a fresh take? Get an instant paraphrase of this document with our AI Paraphraser
Sterilization 5
process (Haider, & Asif, 2010). Additionally, inspection process is combined with maintenance
and functional testing of the instruments. This ensures that the instruments are able to meet the
required standards of cleanings and sterilization. Visual inspection for damage and cleanness
status is required at different points. The inspection process is able to ensure detection of soils
and other germs are identified. Removal of the same is done during this process (Centers for
Disease Control and Prevention, 2003). In addition, the inspection process is meant to ensure that
the instruments are able to meet the required standards of operation and sterilization.
STEP 3: PACKAGING
After cleaning and sterilization, it is important to ensure that the equipment keeps their condition
until they are utilized. Proper sterilizing packaging is required to ensure that the status of the
equipment is kept. Sterile packaging, i.e., pouches, wrap, or rigid containers serve to maintain
the sterility of processed instruments and allow for aseptic opening at point of use. Packaging
should be done in a clean area using FDA-cleared materials such as pouches, wrap, or rigid
containers. Most importantly, the sterilizing packaging materials are used for different purposes
and for different instruments.
Pouches
Sterilization pouches are commonly used for small, lightweight instruments and should be placed
on edge facing the same direction in the sterilizer. This best practice loading technique assists
sterilant penetration and facilitates drying. Prior to sealing a sterilization pouch, it is important to
include a “multiparameter” chemical indicator and remove excess air. With self-sealing pouches,
be sure to fold the adhesive flap on the perforation line and make contact with both the paper and
plastic film (ideally 50% each). Some sterilization pouches come printed with both external and
internal chemical indicators. This complies with CDC guidelines, providing the supplier has
validated the internal indicator as a multiparameter indicator.
In addition, quality assurance is important to ensure that the different standards are met and
maintained. Inclusion of the chemical indicators which are used in the pouches is important to
ensure that the instruments are able to maintain their sterilized status (Ontario, 2006). The CDC
guidelines states that the sterilizing parameters both inside and outside the pouches are met.
Sterilization 6
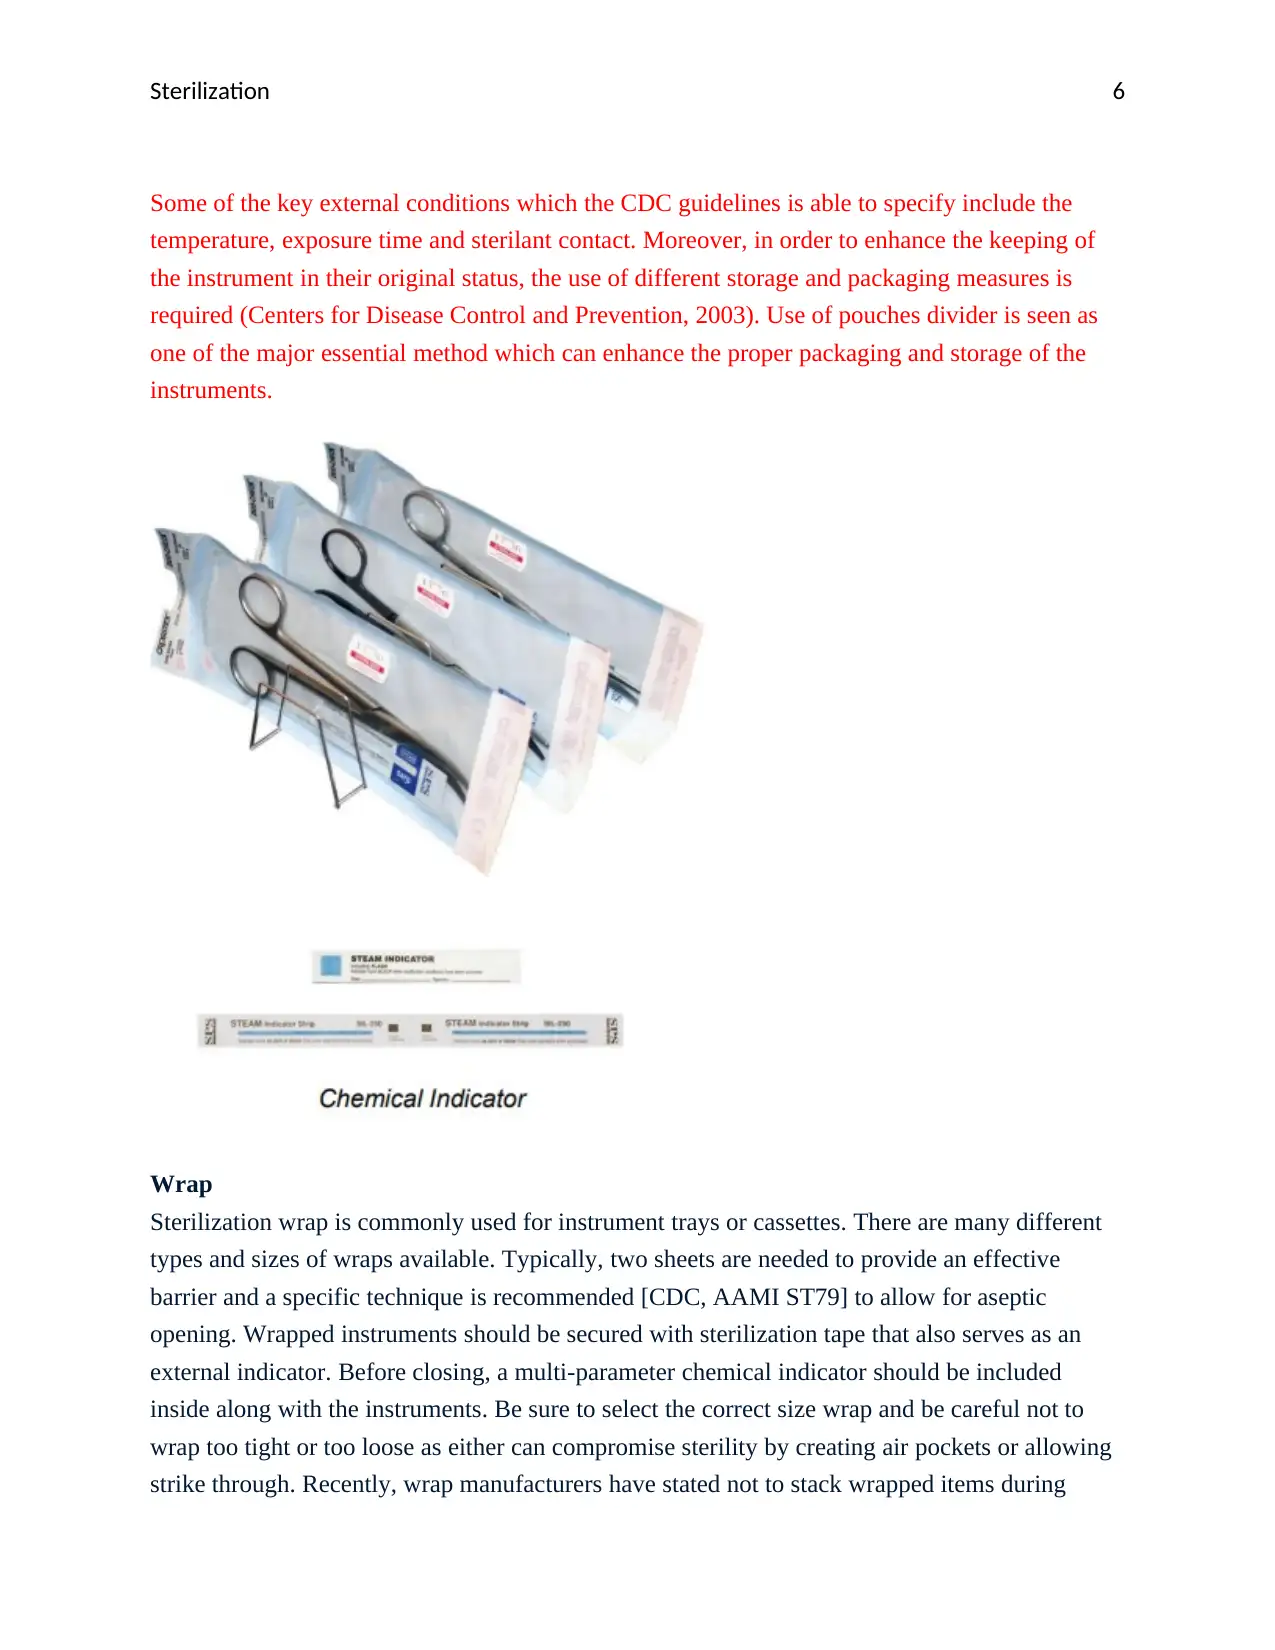
Some of the key external conditions which the CDC guidelines is able to specify include the
temperature, exposure time and sterilant contact. Moreover, in order to enhance the keeping of
the instrument in their original status, the use of different storage and packaging measures is
required (Centers for Disease Control and Prevention, 2003). Use of pouches divider is seen as
one of the major essential method which can enhance the proper packaging and storage of the
instruments.
Wrap
Sterilization wrap is commonly used for instrument trays or cassettes. There are many different
types and sizes of wraps available. Typically, two sheets are needed to provide an effective
barrier and a specific technique is recommended [CDC, AAMI ST79] to allow for aseptic
opening. Wrapped instruments should be secured with sterilization tape that also serves as an
external indicator. Before closing, a multi-parameter chemical indicator should be included
inside along with the instruments. Be sure to select the correct size wrap and be careful not to
wrap too tight or too loose as either can compromise sterility by creating air pockets or allowing
strike through. Recently, wrap manufacturers have stated not to stack wrapped items during
⊘ This is a preview!⊘
Do you want full access?
Subscribe today to unlock all pages.
Trusted by 1+ million students worldwide
Sterilization 7
storage as this can compromise sterility. Moreover, the wraps are required to meet different
guidelines from MFR’s FDA. Their clearance is able to ensure that the packaging wraps are able
to meet the required standards (Brunkow, & Parenteral Drug Association, 1996). Securing the
wraps with sterile indicator tapes is a key measure which is used to enhance the securing of the
instruments.
Rigid Containers
Sterilization containers are commonly used for heavy, mostly layered instrument trays, i.e.,
orthopedic sets. A maximum weight of 25 pounds has been established [AAMI ST79, AORN]
regardless of the instrument trays being wrapped or placed in rigid containers. There are many
different types and sizes of rigid containers, all of which provide excellent protection during
storage and can be stacked during storage without compromising sterility. For quality assurance,
a multiparameter chemical indicator should be included on each layer of multilayered sets and in
opposite corners of rigid containers.
STEP 4: STERILIZATION
Sterilizers are able to enhance the cleaning of the equipment. The use of sterilizers requires the
clearances from FDA. This ensures that the equipment and their packages are able to meet the
required level of cleanness and hygiene (Voss, 2017). The sterilizers are able to come in different
sizes and different processes are also used for sterilization. Some of the key sterilizing processes
include steam, chemical vapor, and dry heat or rapid heat transfer. The saturated stream, which is
imposed under pressure is one of the old key sterilization process which has been used for long
(Queen Victoria Hospital, 1985). The CDC is able to encourage the use of this method for
sterilization of some of key equipment used in medical sector. It is identified as one of the key
efficient, fast and most inexpensive method.
Steam sterilization is the most commonly used process for sterilizing instruments, trays, and
cassettes. According to the CDC, steam under pressure is the process of choice whenever
possible as it is considered safe, fast, and the most cost-effective for health care facilities. Steam
sterilizers come in many different sizes and sterilizer cycles can vary among manufacturers. The
cycle a sterilizer runs can typically be found in the sterilizer manual. The following are examples
Paraphrase This Document
Need a fresh take? Get an instant paraphrase of this document with our AI Paraphraser
Sterilization 8
of standard cycle parameters (AAMI ST79, AORN) for packaged instruments.
Gravity – 121°C/250°F for 30 minutes exposure and 15–30 minutes drying time
Gravity – 132°C/270°F for 15 minutes exposure and 15–30 minutes drying time
Gravity – 135°C/275°F for 10 minutes exposure and 30 minutes drying time
Dynamic Air Removal – 132°C/270°F for 4 minutes exposure and 20–30 minutes drying
time
Dynamic Air Removal – 135°C/275°F for 3 minutes exposure and 16 minutes drying
time
Other commercially available sterilization processes include: chemical vapor, dry heat, ethylene
oxide, vaporized hydrogen peroxide, and ozone. Although each of these processes offer
advantages and disadvantages, the decision about which sterilization process the health care
facility should choose lies with the instrument manufacturer as to what was validated in their
instructions for use (IFU). For patient safety, the process must be compatible as to not cause
damage and must be efficacious to ensure sterility.
Steam sterilization is another key sterilizing method which is used to clean the equipment. Three
key types of steam sterilizers include;
1. Gravity Displacement
2. Prevacuum
3. Steam Flush Pressure Pulse (SFPP)
All the above procedures are able to employ the use of air in sterilizing equipment (Lewis, &
Heppell, 2000).
STEP 5: STERILE STORAGE
Sterilization 9
Keeping the equipment in their initial condition is important after sterilizing and cleaning
processes. The storage devices as well require the sterilizing process to ensure that the equipment
are not contaminated. In addition, the sterilizing process and packaging sterilizing process is
needed to ensure that the shelve life of the equipment is maintained (Burke, 1997). Sterilized
packages should be stored in a manner that reduces the potential for contamination, i.e., clean,
dry, and temperature- and traffic-controlled areas. Sterility is event related and sterile items are
considered sterile unless damaged or open. Therefore, it is important for sterilized packages to be
handled with care: avoid dragging, crushing, bending, compressing, or puncturing. During
transport, they should be protected from environmental contaminants. Prior to use, each
sterilized package should be inspected for integrity. If a package is suspect, it should not be used
and the item should be reprocessed. Sterile packages should not be opened until point of use.
Moreover, inspection of the sterile storage is required to ensure that placed for the entry of germs
is not attained. The inspection of the storage devices ensures that the equipment is able to meet
the required quality and standard. Before packaging and distribution, the sterilization process for
the storage packages must be carried out (Robert & Brady Company, 1977). This ensures that
distribution of germs is not enhanced. The storage packages may be a key source of germs which
may lead to contamination of the already sterilized equipment.
STEP 6: QUALITY ASSURANCE
Sterility assurance of processed instruments should be routinely verified using three (3) types of
indicators; physical, chemical, and biological. The sterile storage always require inspection so
that it can meet the key specified quality assurance measures. Sterility assurance is usually
carried out in three different stages which include the physical verification, chemical verification
and the biological verification. The key physical indicators which are checked include time,
temperature and pressures gauges for the sterilized equipment and storages (Aorn, 2013). The
chemical and biological verification indicators is able to include both the internal and external
indicators. The CDC guidelines is able to specify the different indicators which need to be placed
for each equipment according to the required standards.
Physical Indicators
Physical indicators consist of the time, temperature, and pressure gauges built into sterilizers. For
⊘ This is a preview!⊘
Do you want full access?
Subscribe today to unlock all pages.
Trusted by 1+ million students worldwide
Sterilization 10
each sterilization cycle, these readings should be observed and verified prior to unloading the
sterilizer. Large freestanding sterilizers, which are often found in surgery centers and hospitals,
are required to have a chart or printout that is initialed after each cycle. This physical indicator is
then maintained as part of their overall infection-control records. Many tabletop sterilizers do not
provide physical indicator printouts.
Chemical Indicators
Chemical indicators (CIs) change color or show movement during the sterilizer cycle to verify
that some or all sterilization parameters were met. As stated earlier, CIs should be used on the
outside and inside of all sterilized packages. CIs range in performance characteristics and health
care facilities should select the CI that best fits their monitoring needs. Indicator tape is an
example of an external CI and it simply indicates that a package was run in the sterilizer. Internal
CIs are used to ensure the sterilant penetrated the packaging system and a Class 5 integrating
indicator demonstrates that ALL of the parameters necessary for sterilization were met for that
specific cycle.
If using a dynamic air removal (pre-vacuum) sterilizer, an air removal test should be run daily.
This is called a Bowie-Dick type test and passes when the chemical indicator sheet inside a
process challenge device (PCD) changes to a uniform color after processing at 134°C/274°F for
3.5- or 4-minute exposure time. This test should be ran in an empty sterilizer and drying time is
optional as this daily air removal test is performed without a load.
Biological Indicators
Biological Indicator (BI) monitoring is the gold standard for sterility assurance [CDC, 2003,
2008] as BI’s contain bacterial spores that test the lethality of sterilizers. The science behind this
is, if your sterilizer can effectively kill the highly resistant spores in the BI, then we can be
confident it is capable of killing the less resistant organisms found on our instruments. Biological
Indicators are available in both mail-in and in-office systems. BIs should be run at least weekly,
per CDC guidelines [CDC, 2003, 2008]. Weekly BI monitoring is completed by running a BI in
the sterilizer with a load. In-office BI testing requires test vials, a preset incubator, and a record
notebook. After processing, the BI is incubated at a preset. Moreover, the biological sterilization
is required on weekly basis. This ensures that any moving germs are well controlled from
spreading (Sandle, 2012). BI test pack is usually a key important sterilizer which need to be used
to control biological germs.
Paraphrase This Document
Need a fresh take? Get an instant paraphrase of this document with our AI Paraphraser
Sterilization 11
Proper surface cleaning and disinfection is one of the most important ways to prevent health
care-associated infections (HAIs). The transmission of infection occurs when the gloved or
ungloved hands of a health care worker comes in contact with a contaminated surface and/or
there is patient contact with contaminated surfaces or equipment. Studies have shown that
contamination of the environment has likely contributed to the spread of resistant pathogens such
as Methicillin-Resistant Staphylococcus Aereus (MRSA).
Source: Centers for Disease Control and Prevention (CDC)
Sterilization Methods
Sterilization is carried out in different methods. The method adopted is able to depend on
the sterilization level required as well as the kind of equipment being sterilized. The use of
the equipment is able to determine the level of sterilization and therefore defining the
method which will be adopted for sterilization (McDonnell, 2017). Some of the key
sterilization method used include;
Heat sterilization- Used in the autoclave to kill the microorganisms.
o Autoclaving/steam under pressure
o Unsaturated chemical vapors
o Dry heat
Heat-Based Sterilization
There are three types of heat sterilization methods commonly used in dentistry.
Sterilization 12
1. Steam under pressure (autoclaving). There are two types of tabletop steam autoclaves:
o In most commonly used gravity displacement sterilizers, steam enters the chamber and
unsaturated air is forced out of the chamber through a vent in the chamber wall. o In
contrast, pre-vacuum sterilizers are fitted with a vacuum pump to create a vacuum in the
chamber and ensure air removal from the sterilizing chamber and load before the
chamber is pressurized with steam. This method improves the speed and efficiency of the
sterilization process.
2. Dry heat sterilizers are either static air (convection or FDA-approved oven type) or
forced air (rapid heat-transfer).
3. Unsaturated chemical vapor sterilizers use a proprietary formula of
alcohol/formaldehyde.
With all of these methods, always use FDA-approved devices and closely follow the
manufacturer's instructions for proper use.
Liquid Chemical Sterilant/Disinfectant
Heat-sensitive instruments can be sterilized or high-level disinfected by soaking them in a liquid
chemical germicide cleared by the FDA. However, exposure to these powerful and toxic
chemicals can be harmful to DHCP and patients if the manufacturer's instructions for use and
safety precautions are not followed precisely. For these reasons, CDC encourages the use of
heat-tolerant or disposable alternatives.
Reference:
https://www.accesscontinuingeducation.com/ACE6002LP-13/c5/index.htm
Monitoring Sterilization
The monitoring of the sterilization process is important to ensure that each step is able to
meet the required levels of hygiene and cleanness. The monitoring methods can be carried
through the following methods.
Mechanical
⊘ This is a preview!⊘
Do you want full access?
Subscribe today to unlock all pages.
Trusted by 1+ million students worldwide
1 out of 15
Related Documents


Your All-in-One AI-Powered Toolkit for Academic Success.
+13062052269
info@desklib.com
Available 24*7 on WhatsApp / Email
![[object Object]](/_next/static/media/star-bottom.7253800d.svg)
Unlock your academic potential
Copyright © 2020–2025 A2Z Services. All Rights Reserved. Developed and managed by ZUCOL.