HND Networking Infrastructure Assignment Report - Solution
VerifiedAdded on 2023/01/09
|17
|5270
|1
Report
AI Summary
This report presents a comprehensive solution for a Network Infrastructure assignment, tailored for an HND level course. It begins with an introduction to network infrastructure, emphasizing its role in facilitating communication and operations. The solution then delves into the design and implementation of automatic IP addressing mechanisms using DHCP, including detailed steps for installation, scope creation, and DHCP relay agent configuration. Furthermore, it explores domain naming strategies and DNS service installation, covering forward and reverse lookup zones. The report also addresses troubleshooting, fault tolerance, and backup strategies, along with network monitoring tools and connectivity solutions, including file server integration and VPN configuration. Security threats and counteractive approaches are outlined, and the execution of certificate services and the implementation of IPSec for data encryption are justified. The report is structured to provide practical guidance on implementing and managing network infrastructure for Creative Ltd. and similar organizations.

Network
Infrastructures
Infrastructures
Paraphrase This Document
Need a fresh take? Get an instant paraphrase of this document with our AI Paraphraser

Table of Contents
Introduction......................................................................................................................................1
Deliverable 1....................................................................................................................................1
a. Design and implement automatic IP addressing mechanism..................................................1
b. Design & implement domain naming strategy along with NetBIOS strategy........................5
Deliverable 2....................................................................................................................................8
a. Design strategies for troubleshoot, fault tolerance and backup...............................................8
b. Analyse network monitoring tools for smooth execution of operations.................................9
c. Designing and implementation to render connectivity solutions by incorporating file server
as well as windows client..........................................................................................................10
Deliverable 3..................................................................................................................................10
a. Design a network and implement report for connecting and provide access by making use
of VPN......................................................................................................................................10
b. Outline security threats to modern networking solutions as well as justify counteractive
approaches for protecting network............................................................................................12
c. Outline execution of certificate services for addressing requirements. Justify the
requirement for implementation of IPSec for encrypting data..................................................13
Conclusion...................................................................................................................................14
References......................................................................................................................................15
Introduction
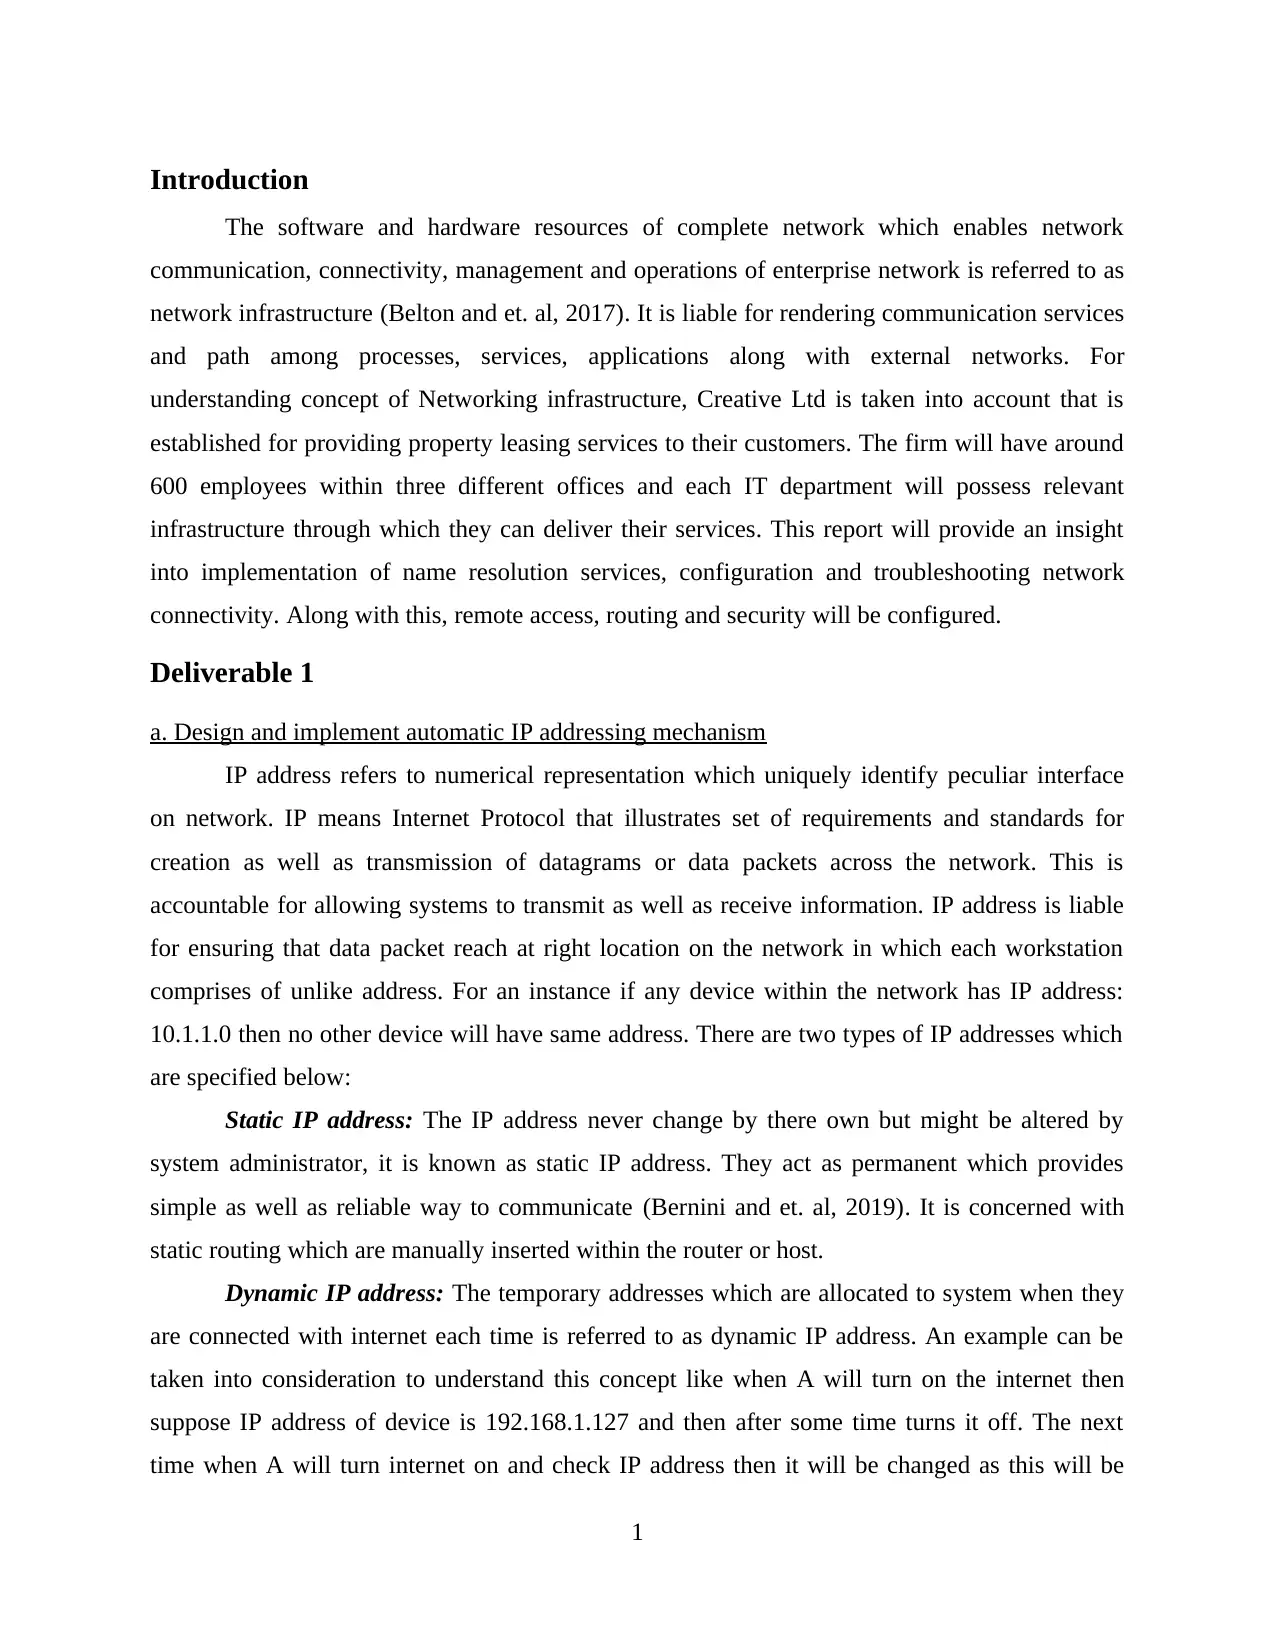
The software and hardware resources of complete network which enables network
communication, connectivity, management and operations of enterprise network is referred to as
network infrastructure (Belton and et. al, 2017). It is liable for rendering communication services
and path among processes, services, applications along with external networks. For
understanding concept of Networking infrastructure, Creative Ltd is taken into account that is
established for providing property leasing services to their customers. The firm will have around
600 employees within three different offices and each IT department will possess relevant
infrastructure through which they can deliver their services. This report will provide an insight
into implementation of name resolution services, configuration and troubleshooting network
connectivity. Along with this, remote access, routing and security will be configured.
Deliverable 1
a. Design and implement automatic IP addressing mechanism
IP address refers to numerical representation which uniquely identify peculiar interface
on network. IP means Internet Protocol that illustrates set of requirements and standards for
creation as well as transmission of datagrams or data packets across the network. This is
accountable for allowing systems to transmit as well as receive information. IP address is liable
for ensuring that data packet reach at right location on the network in which each workstation
comprises of unlike address. For an instance if any device within the network has IP address:
10.1.1.0 then no other device will have same address. There are two types of IP addresses which
are specified below:
Static IP address: The IP address never change by there own but might be altered by
system administrator, it is known as static IP address. They act as permanent which provides
simple as well as reliable way to communicate (Bernini and et. al, 2019). It is concerned with
static routing which are manually inserted within the router or host.
Dynamic IP address: The temporary addresses which are allocated to system when they
are connected with internet each time is referred to as dynamic IP address. An example can be
taken into consideration to understand this concept like when A will turn on the internet then
suppose IP address of device is 192.168.1.127 and then after some time turns it off. The next
time when A will turn internet on and check IP address then it will be changed as this will be
1
⊘ This is a preview!⊘
Do you want full access?
Subscribe today to unlock all pages.

Trusted by 1+ million students worldwide
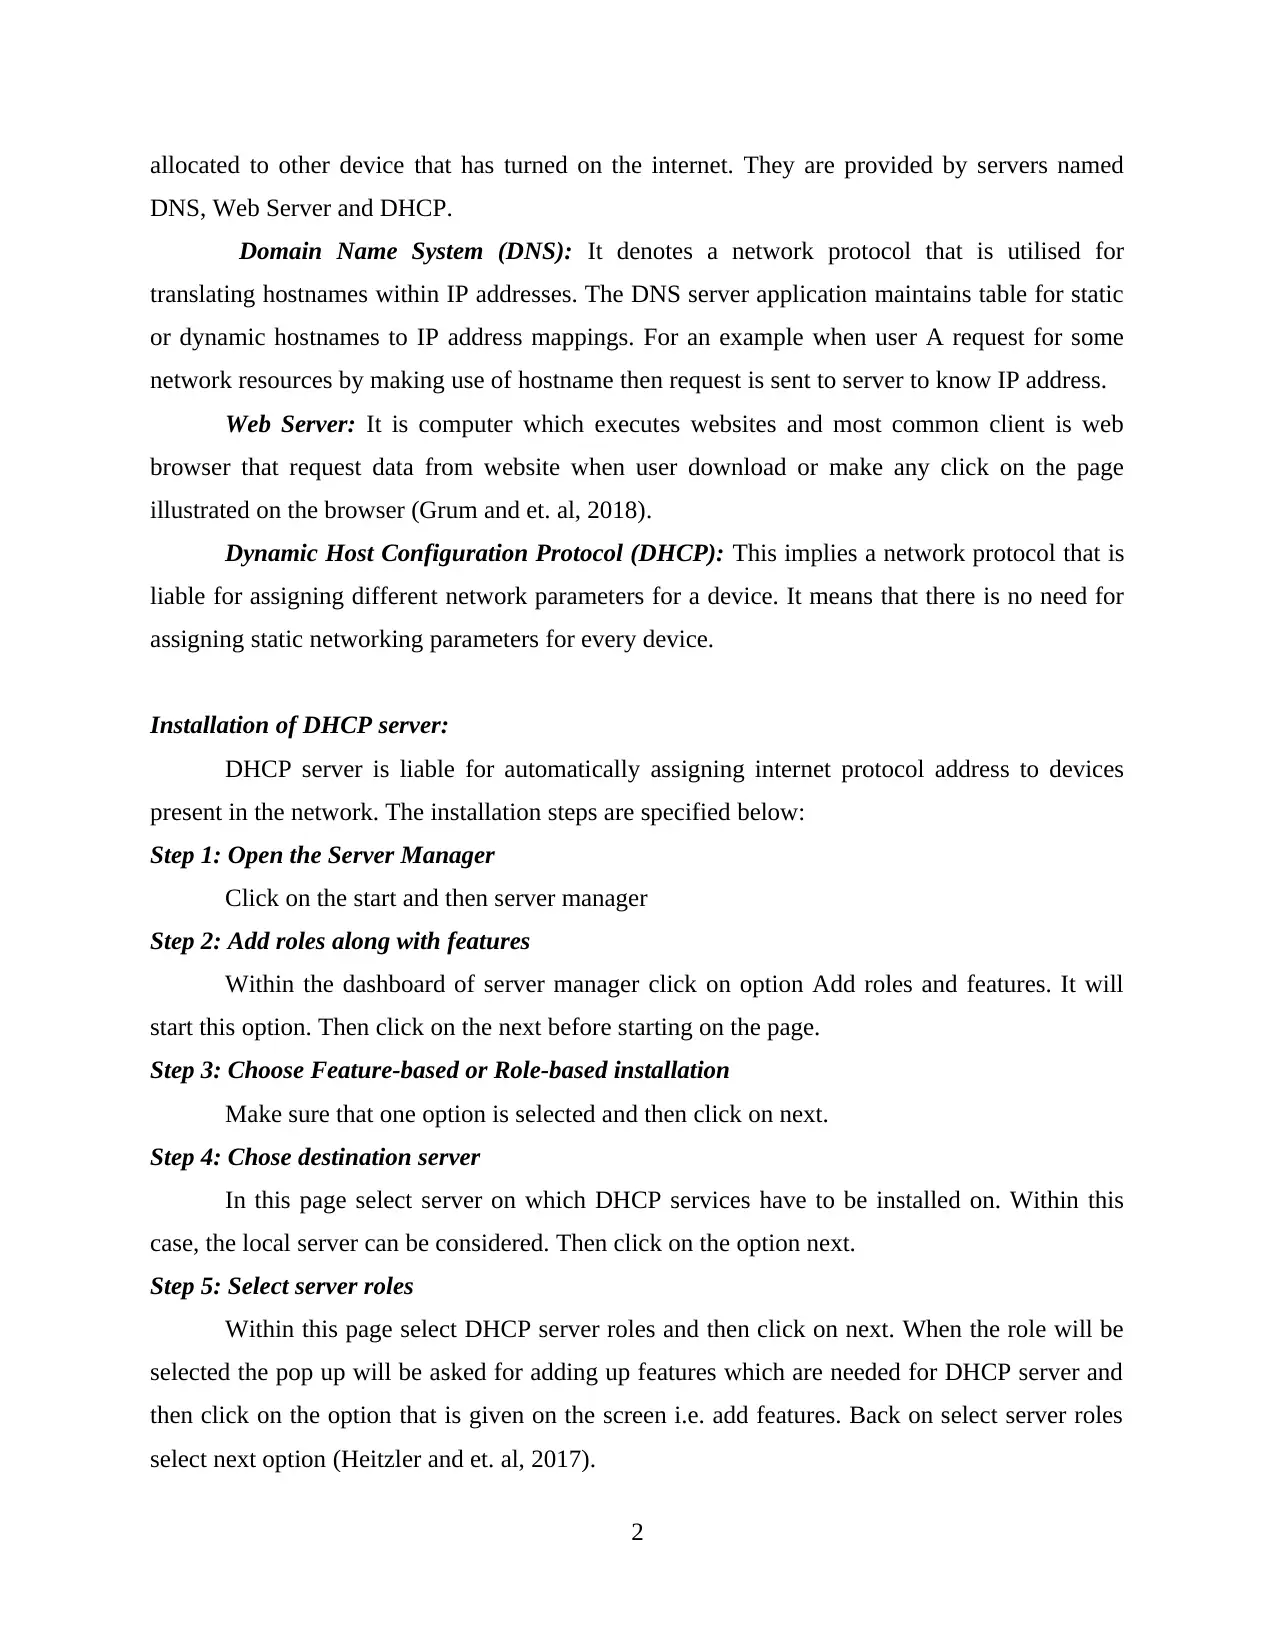
allocated to other device that has turned on the internet. They are provided by servers named
DNS, Web Server and DHCP.
Domain Name System (DNS): It denotes a network protocol that is utilised for
translating hostnames within IP addresses. The DNS server application maintains table for static
or dynamic hostnames to IP address mappings. For an example when user A request for some
network resources by making use of hostname then request is sent to server to know IP address.
Web Server: It is computer which executes websites and most common client is web
browser that request data from website when user download or make any click on the page
illustrated on the browser (Grum and et. al, 2018).
Dynamic Host Configuration Protocol (DHCP): This implies a network protocol that is
liable for assigning different network parameters for a device. It means that there is no need for
assigning static networking parameters for every device.
Installation of DHCP server:
DHCP server is liable for automatically assigning internet protocol address to devices
present in the network. The installation steps are specified below:
Step 1: Open the Server Manager
Click on the start and then server manager
Step 2: Add roles along with features
Within the dashboard of server manager click on option Add roles and features. It will
start this option. Then click on the next before starting on the page.
Step 3: Choose Feature-based or Role-based installation
Make sure that one option is selected and then click on next.
Step 4: Chose destination server
In this page select server on which DHCP services have to be installed on. Within this
case, the local server can be considered. Then click on the option next.
Step 5: Select server roles
Within this page select DHCP server roles and then click on next. When the role will be
selected the pop up will be asked for adding up features which are needed for DHCP server and
then click on the option that is given on the screen i.e. add features. Back on select server roles
select next option (Heitzler and et. al, 2017).
2
Paraphrase This Document
Need a fresh take? Get an instant paraphrase of this document with our AI Paraphraser

Step 6: Feature, DHCP Server
On features screen select next and on DHCP server press next.
Step 7: Select static IP address
Choose IP address that Creative Ltd want to use for DHCP server and then click next
Step 8: Enter domain name & DNS Servers
For entering within domain name system server type there address within IP address text
box and then press Add. Then press next the options for WINS configuration information will be
shown (Künneke, 2018). This is optional but in case if system administrator of Creative Ltd
wants it then they can enable it by entering into WINS server configuration and press next.
Step 9: Create a scope
For creation of this press on the add scope button. The wizard will ask for name as well
as descriptions related with new scope.
Scope Name: It can be anything like Creative unless two or more scopes are created.
Then, name must depict function for each scope.
Scope Starting IP Address: This is the lowest initial IP address that will be given to
scope.
Scope Ending IP Address: It denotes highest IP address means last that is issued for a
scope.
Subnet Mask: This implies subnet mask for peculiar IP address within the scope.
Default Gateway: It is default gateway address which will be utilised for a scope .
Generally, it is address of router.
Subnet type: Depending upon requirements Creative Ltd can opt for wired or wireless.
The difference is for how long IP address is valid. In case of wired networks, address is
valid for around six days and for wireless network, this will expire within eight hours.
Step 10: Select activate scope check box and press OK.
By doing so scope will be created.
Step 11: Create additional scope
As per the requirements Creative Ltd can create many scopes for DHCP server. When
creation of scopes is done then press next. Here, wizard will ask whether stateless mode has to be
enabled (used for Ipv6 addresses). This mode can be disabled as Creative Ltd will be making use
3
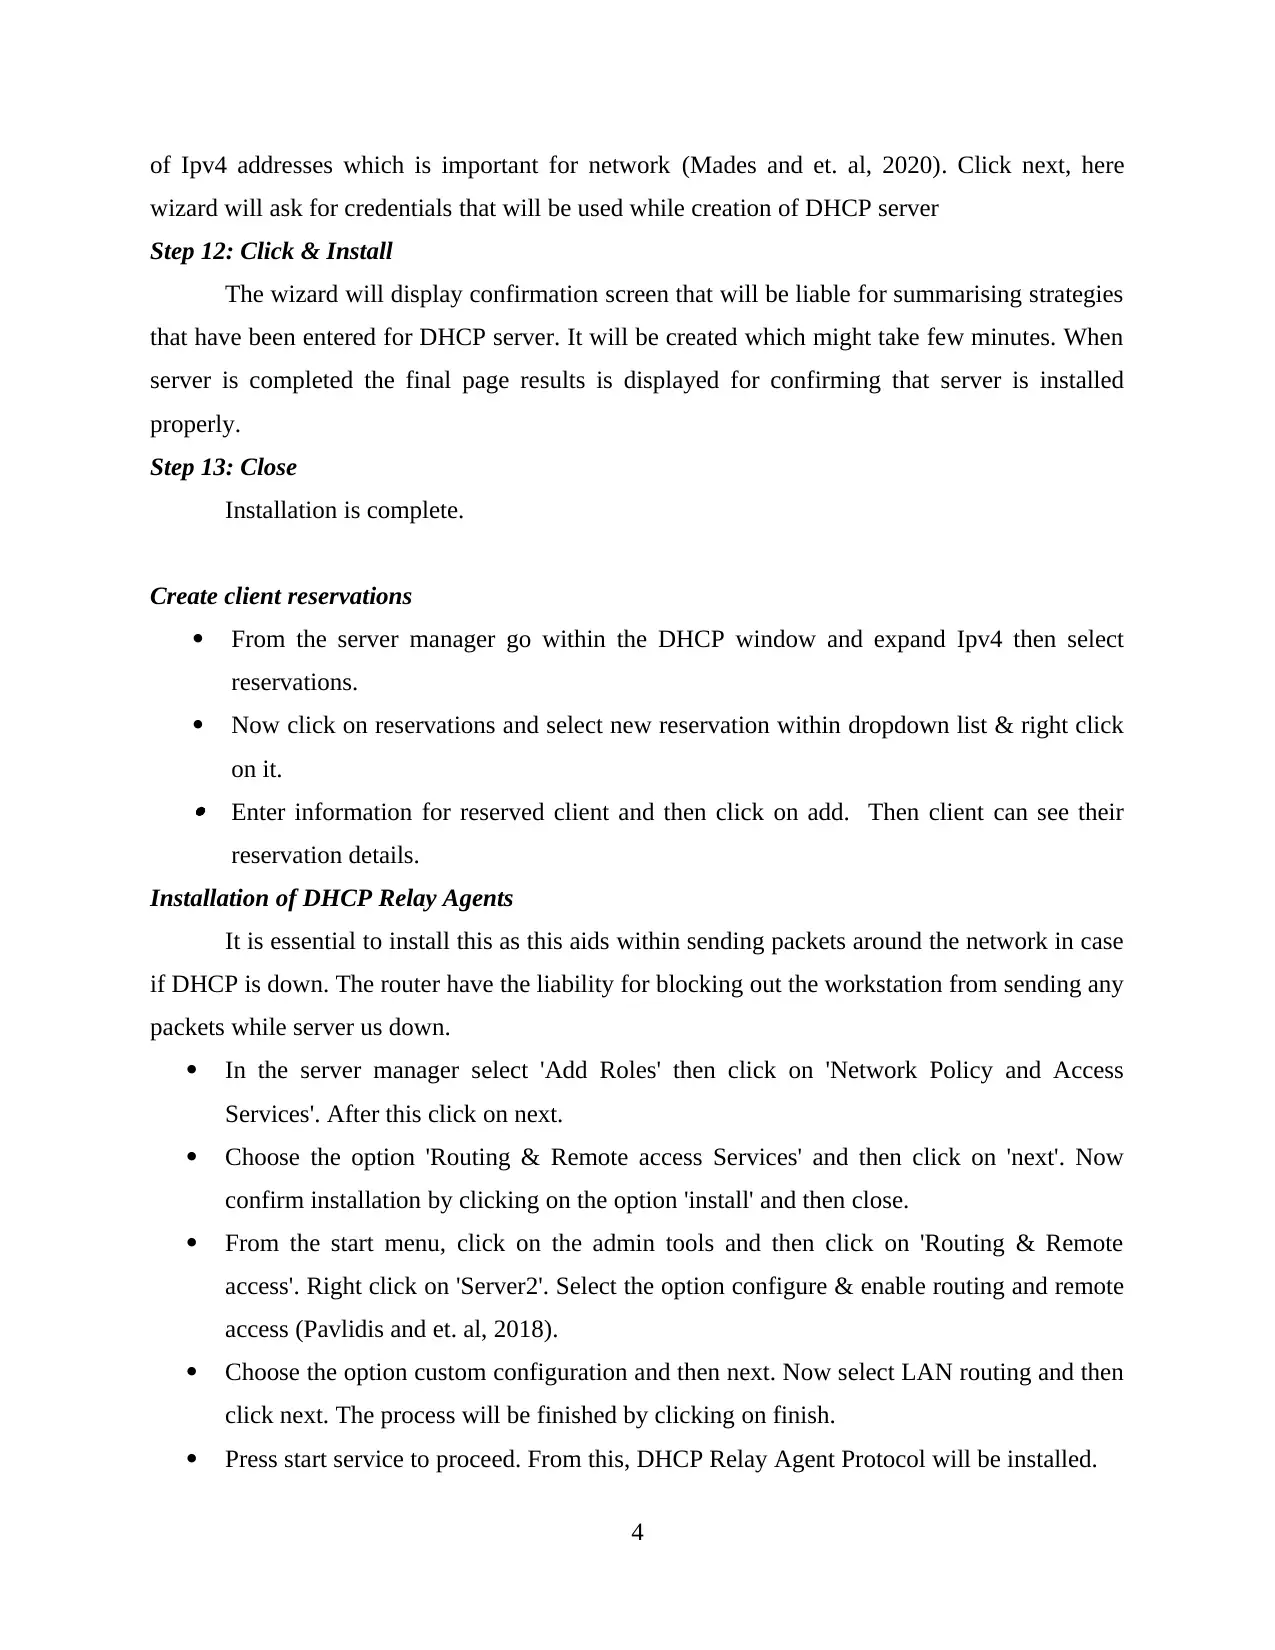
of Ipv4 addresses which is important for network (Mades and et. al, 2020). Click next, here
wizard will ask for credentials that will be used while creation of DHCP server
Step 12: Click & Install
The wizard will display confirmation screen that will be liable for summarising strategies
that have been entered for DHCP server. It will be created which might take few minutes. When
server is completed the final page results is displayed for confirming that server is installed
properly.
Step 13: Close
Installation is complete.
Create client reservations
From the server manager go within the DHCP window and expand Ipv4 then select
reservations.
Now click on reservations and select new reservation within dropdown list & right click
on it. Enter information for reserved client and then click on add. Then client can see their
reservation details.
Installation of DHCP Relay Agents
It is essential to install this as this aids within sending packets around the network in case
if DHCP is down. The router have the liability for blocking out the workstation from sending any
packets while server us down.
In the server manager select 'Add Roles' then click on 'Network Policy and Access
Services'. After this click on next.
Choose the option 'Routing & Remote access Services' and then click on 'next'. Now
confirm installation by clicking on the option 'install' and then close.
From the start menu, click on the admin tools and then click on 'Routing & Remote
access'. Right click on 'Server2'. Select the option configure & enable routing and remote
access (Pavlidis and et. al, 2018).
Choose the option custom configuration and then next. Now select LAN routing and then
click next. The process will be finished by clicking on finish.
Press start service to proceed. From this, DHCP Relay Agent Protocol will be installed.
4
⊘ This is a preview!⊘
Do you want full access?
Subscribe today to unlock all pages.

Trusted by 1+ million students worldwide

Now enter within start menu then admin tools and choose routing & remote access. Now
click on Server2.
Enhance IPv4 and then right click on general and choose new routing protocol. Select the
option DHCP relay agent and then press OK. Furthermore, right click on DHCP relay
agent and choose new interface.
The screen will be opened and internal option has to be selected in which relay agent
protocol will be executed. Press OK.
Now select relay DHCP packets for specifying need for relay packets and also mention
number of relay agents that will go on the computer and press OK. Enter the IP address
of destination and click OK.
Right click on the option relay agent the choose properties, specify their destination IP
address and then OK.
https://activedirectorypro.com/configure-dhcp-server/
https://www.dummies.com/programming/networking/network-administration-installing-and-
configuring-a-dhcp-server/
b. Design & implement domain naming strategy along with NetBIOS strategy
Domain names are critical part for firm's online go-to-market as well as brand protection
strategy. The rationale behind this proactive protection of brand online through minimisation of
chances for using brand name of peculiar firm like Creative Ltd within their online activities,
generally within their website URLs. There is structure which is involved within designing as
well as implementation of domain name (Serra Parajes, Crespo Márquez and Sola Rosique,
2018). It comprises of header which have relevant information like geographical location. The
forward slash is utilised for separating header from variable. For an instance
www.creative.com/about.
Installation of DNS service
Domain name system is liable for connecting URLs with IP addresses. When user search
for peculiar domain name within the browser then query is sent over internet for matching
domain with correspondent IP. When this is located then IP is utilised for retrieving content of
5
Paraphrase This Document
Need a fresh take? Get an instant paraphrase of this document with our AI Paraphraser
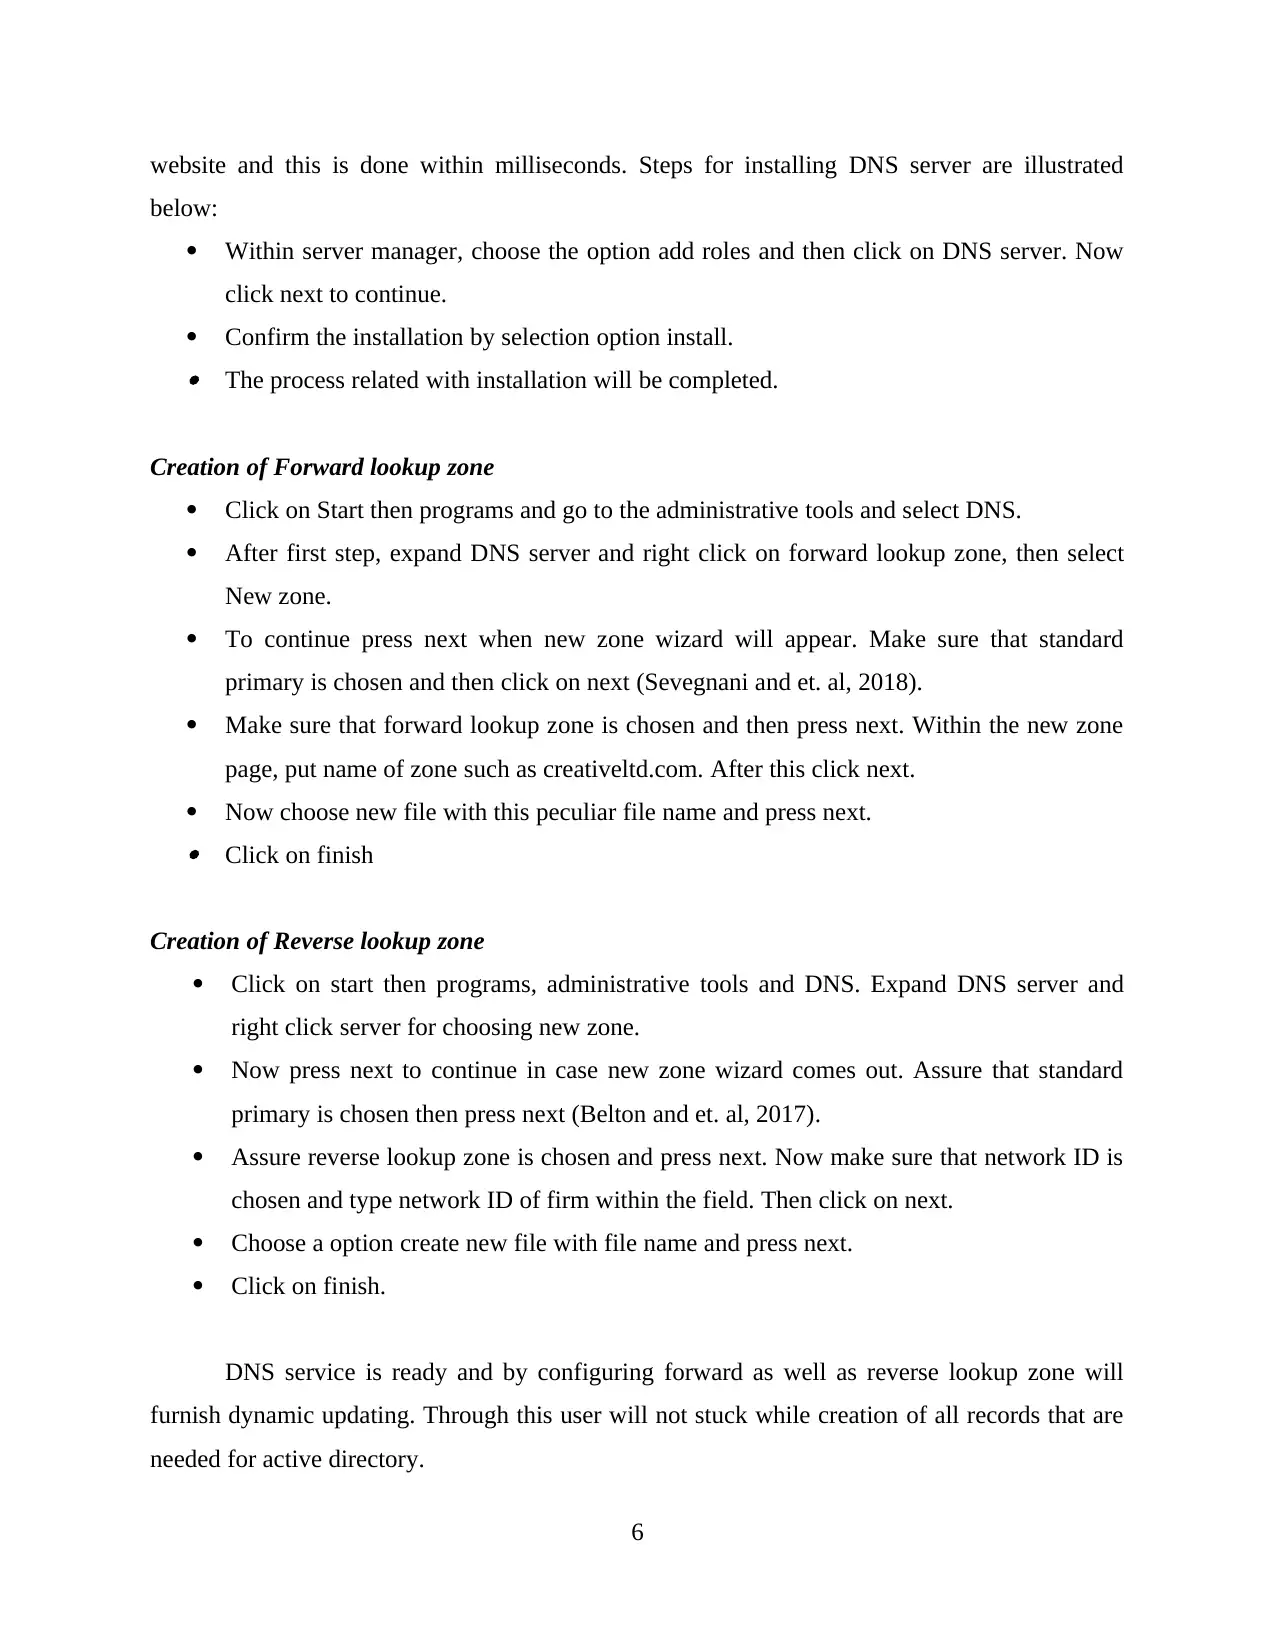
website and this is done within milliseconds. Steps for installing DNS server are illustrated
below:
Within server manager, choose the option add roles and then click on DNS server. Now
click next to continue.
Confirm the installation by selection option install. The process related with installation will be completed.
Creation of Forward lookup zone
Click on Start then programs and go to the administrative tools and select DNS.
After first step, expand DNS server and right click on forward lookup zone, then select
New zone.
To continue press next when new zone wizard will appear. Make sure that standard
primary is chosen and then click on next (Sevegnani and et. al, 2018).
Make sure that forward lookup zone is chosen and then press next. Within the new zone
page, put name of zone such as creativeltd.com. After this click next.
Now choose new file with this peculiar file name and press next. Click on finish
Creation of Reverse lookup zone
Click on start then programs, administrative tools and DNS. Expand DNS server and
right click server for choosing new zone.
Now press next to continue in case new zone wizard comes out. Assure that standard
primary is chosen then press next (Belton and et. al, 2017).
Assure reverse lookup zone is chosen and press next. Now make sure that network ID is
chosen and type network ID of firm within the field. Then click on next.
Choose a option create new file with file name and press next.
Click on finish.
DNS service is ready and by configuring forward as well as reverse lookup zone will
furnish dynamic updating. Through this user will not stuck while creation of all records that are
needed for active directory.
6
Adding appropriate record
For doing so, go in the DNS manager and expand forward lookup zones. Then right click
on domain name that is created (Sfyrakis and Gross, 2020).
Now add the new host name along with its IP address and then click on add host. This
will will lead to creation of new host.
NetBIOS (Network basic input/output system) Name resolution
The process through which NetBIOS name of system is resolved by their IP address. This
enables the hosts for communicating with one other through usage of TCP/IP. It is utilised for
naming resolution system on Ethernet networks and token rings (Bernini and et. al, 2019).
WINS (Windows Internet Name Service) implies legacy computer name resolution and
registration service that is liable for mapping computer NetBIOS names with IP address.
Installation of WINS
Launch server manager and choose dashboard section then click on add roles & feature
links.
Press next and leave default selection feature-based or role-based installation then click
next.
Choose server from server pool for adding DNS role and then click on next.
Now select the option WINS Server feature check box, click on add feature button then
next.
The installation is done, click on close option.
Adding static WINS for non-WINS clients
For doing so go to start menu and then click on the admin tools. Further click on WINS
option and expand server2
Make a right click on active registration. This will prompt a static mapping window, here
enter computer name and type IP address then press OK (Shah and et. al, 2016).
Configuration of push and pull replication partners
With respect to this, go to start menu, then admin tools and choose option WINS. Now
right click on SERVER2 and then choose pull or push replication.
7
⊘ This is a preview!⊘
Do you want full access?
Subscribe today to unlock all pages.

Trusted by 1+ million students worldwide
Now in this window add or name IP address related with WINS server and press OK.
Choose the replication method and select option 'start for partner only'. Now click the
option OK.
Alternative strategy for automatic IP addressing
The alternative ways related with assigning automatic IP addresses are specified below: Dynamic allocation: DHCP server is liable for assigning reusable IP address from the IP
Pool of addresses to their clients for maximised frame of time which is referred to as
lease. It is method that is used for address allocation when customer have restricted IP
addresses (Travanca and et. al, 2019). They can be allocated to clients who require
temporary access to network. Static allocation: Manual IP address will be allocated to peculiar system like DNS
server, print server or DHCP server. Alternative configuration: With distinct method user can manually configure IP address
for system they are using. This is apt when system is used in distinct environments.
Alternative strategy for name resolution Recursive resolution: In this case, client needs local server for giving either error
message or requested mapping. If server find the response then request will be sent and in
case server is not able to find answer then it will become client itself. Iterative resolution: Here, each server that do not know the response sends query to other
servers so that client can have match or referral answer for their query.
Deliverable 2
a. Design strategies for troubleshoot, fault tolerance and backup.
With respect to troubleshooting, there are three aspects that have to be addressed they
are: symptoms, causes and identification of problems. Different commands are used for
diagnosing the issues and they can be entered within the command prompt. They are specified
beneath:
8
Paraphrase This Document
Need a fresh take? Get an instant paraphrase of this document with our AI Paraphraser
Ping: This enables user to deal with connectivity issues with servers or computers. Like
ping 10.1.1.126. Loopback: This is utilised to test IP configuration and test packets that are sent to the
destination network.
IP addressing issues
Some users utilise cable internet where IP addresses are allocated on restricted basis from
ISP where they run out from permitted Internet protocol addresses. This can be resolved
by connecting with local router that operates with DHCP and NAT for security purpose
as well as preventing IP address exhaustion (Tzanakaki, Anastasopoulos and Simeonidou,
2019).
Errors like IP address or Network Path not found are common. For resolving them
networking devices and workstations can be configured for using DNS server.
Backing up strategies
DHCP server: Window automatically back up DHCP configuration but in case if server
crash then access to file system will be lost. A simple command can be used for doing so i.e.
Backup-DhcpServer -path c: \DHCPBackup.
DNS server: The DNS restoration can be carried out by making use of two ways, they
are: creation of primary zone with usage of created backup file and conversion of this zone into
AD Integrated zone.
b. Analyse network monitoring tools for smooth execution of operations
The hardware or software that continuously observes network as well as data that is
flowing through it is referred to as network monitoring tool. It is liable for identification of issues
that are present within the network. There are different networking tools that can be utilised by
Creative Ltd for doing so.
Logic Monitor: It implies automated SaaS IT performance monitoring tool that will
enable firm to have complete visibility related with health and performance of network. They
monitor IT infrastructure devices proactively. This aids within identification of incoming issues
by rendering trend analysis. This will provide Creative Ltd with alert routing, unlimited emails
and SMS alerts along with automated recovery and data backup.
9
c. Designing and implementation to render connectivity solutions by incorporating file server as
well as windows client.
It is difficult for managing distinct OS within the identical network compliance that
possess abilities for setting up automated management routines. Some problems are: large
networks comprises of distinct systems that are utilised for unlike reasons, complexity increases
when new technologies & operating systems are introduced. Compatibility issues are major as
different devices cannot communicate with each other within same network. To deal with this,
there are different solutions, like different services can be installed within the server so that
devices can communicate via server. Other option is to make use of redirectors that will aid
clients for communicating with networking components that have different specifications. Multi-
vendor networking technology can be utilised for data sharing and having effectual domain
communication.
Deliverable 3
a. Design a network and implement report for connecting and provide access by making use of
VPN.
Virtual private network denotes encrypted connection that is present on internet from
device to network. Encrypted connection will aid within making sure that sensitive or private
information is transmitted safely and unauthorised access is prevented.
Configuring VPN
Within the server manager choose Add roles and then select the option network policy &
access services.
Click on the next option. Role services which have to be installed must be selected and
then press next.
Now click on install for confirming installation and then press close. After this, go to start
menu then admin tools and select routing & remote access.
On the SERVER2 option make a right click and then select configure & enable routing &
remote access. Press next.
Now choose the custom configuration and press next. Choose VPN access then next. Choose finish for completion of process and start services.
Configuration of outbound & inbound connections
10
⊘ This is a preview!⊘
Do you want full access?
Subscribe today to unlock all pages.

Trusted by 1+ million students worldwide
1 out of 17
Related Documents
Your All-in-One AI-Powered Toolkit for Academic Success.
+13062052269
info@desklib.com
Available 24*7 on WhatsApp / Email
![[object Object]](/_next/static/media/star-bottom.7253800d.svg)
Unlock your academic potential
Copyright © 2020–2025 A2Z Services. All Rights Reserved. Developed and managed by ZUCOL.


