DreamSpark Premium Software Download
VerifiedAdded on 2019/10/18
|98
|10941
|360
Report
AI Summary
The DreamSpark Premium program provides software and product keys for ITT Technical Institute students. To access the DreamSpark Web Store, users must maintain an email account ending with itt-tech.edu and log in using their provided credentials. Up to two downloads are allowed per person, and each product requires a unique activation key. The end user is responsible for ensuring software is used exclusively for curriculum purposes. Downloading software prior to the course/ lab session is crucial, as downloading large files can disrupt campus network functionality. Detailed procedures for downloading software are provided in the assignment content.
Contribute Materials
Your contribution can guide someone’s learning journey. Share your
documents today.
SD1420 Introduction to Java Programming
Study Guide
Study Guide
Secure Best Marks with AI Grader
Need help grading? Try our AI Grader for instant feedback on your assignments.
SD1420 Introduction to Java Programming Study Guide
DISCUSSION 1.1 (2.0 HOURS)
Title: Software Naming Conventions
Using the ITT Tech Virtual Library, research the topic “software naming convention.”
Answer the following questions:
1. Name at least two software-naming conventions.
2. Why do we and our companies want us to use software-naming conventions?
3. Which software-naming convention would you want to use and why?
Support all your answers with appropriate examples.
Participation Requirements:
Respond to at least two of your classmates. When responding:
Provide complete, well-thought-out responses.
Ask questions, share experiences, challenge ideas, and help your peers expand their responses.
Note: One-sentence answers will not be sufficient. If your answer is "I agree" or "I disagree," explain
why you agree or disagree. Remember that a discussion is an opportunity to interact with your
classmates. Observe discussion etiquette: Be respectful, kind, and nonjudgmental of your classmates.
Evaluation Criteria:
The Discussion rubric will be used to evaluate this assessment.
© ITT Educational Services, Inc.
All Rights Reserved. [2] 6/15/15
SD1420 Introduction to Java Programming Study Guide
LAB 1.1 (2.0 HOURS)
Assessment Preparation Checklist:
To prepare for this assessment:
Read Chapters 1 and 2 from your textbook, Introduction to Java Programming. These chapters
provide an introduction to Java programming.
Go through the lesson for Module 1 that discusses the basics of elementary programming and
Java.
Title: Command Line Tasks
In this lab, you will use the command line interface to write your first Java programs. The command line
interface is limited in its visual capabilities but can still be very powerful.
Required Setup and Resources:
A virtual machine with Eclipse installed
Microsoft Word
Recommended Procedures:
Read the “SD1420_Lab_1.1_LabProcedure” handout and follow the guidance to complete the lab.
Submission Requirements:
Compress your Java project folder and responses in a Microsoft Word document into one zipped
folder and submit it to the instructor.
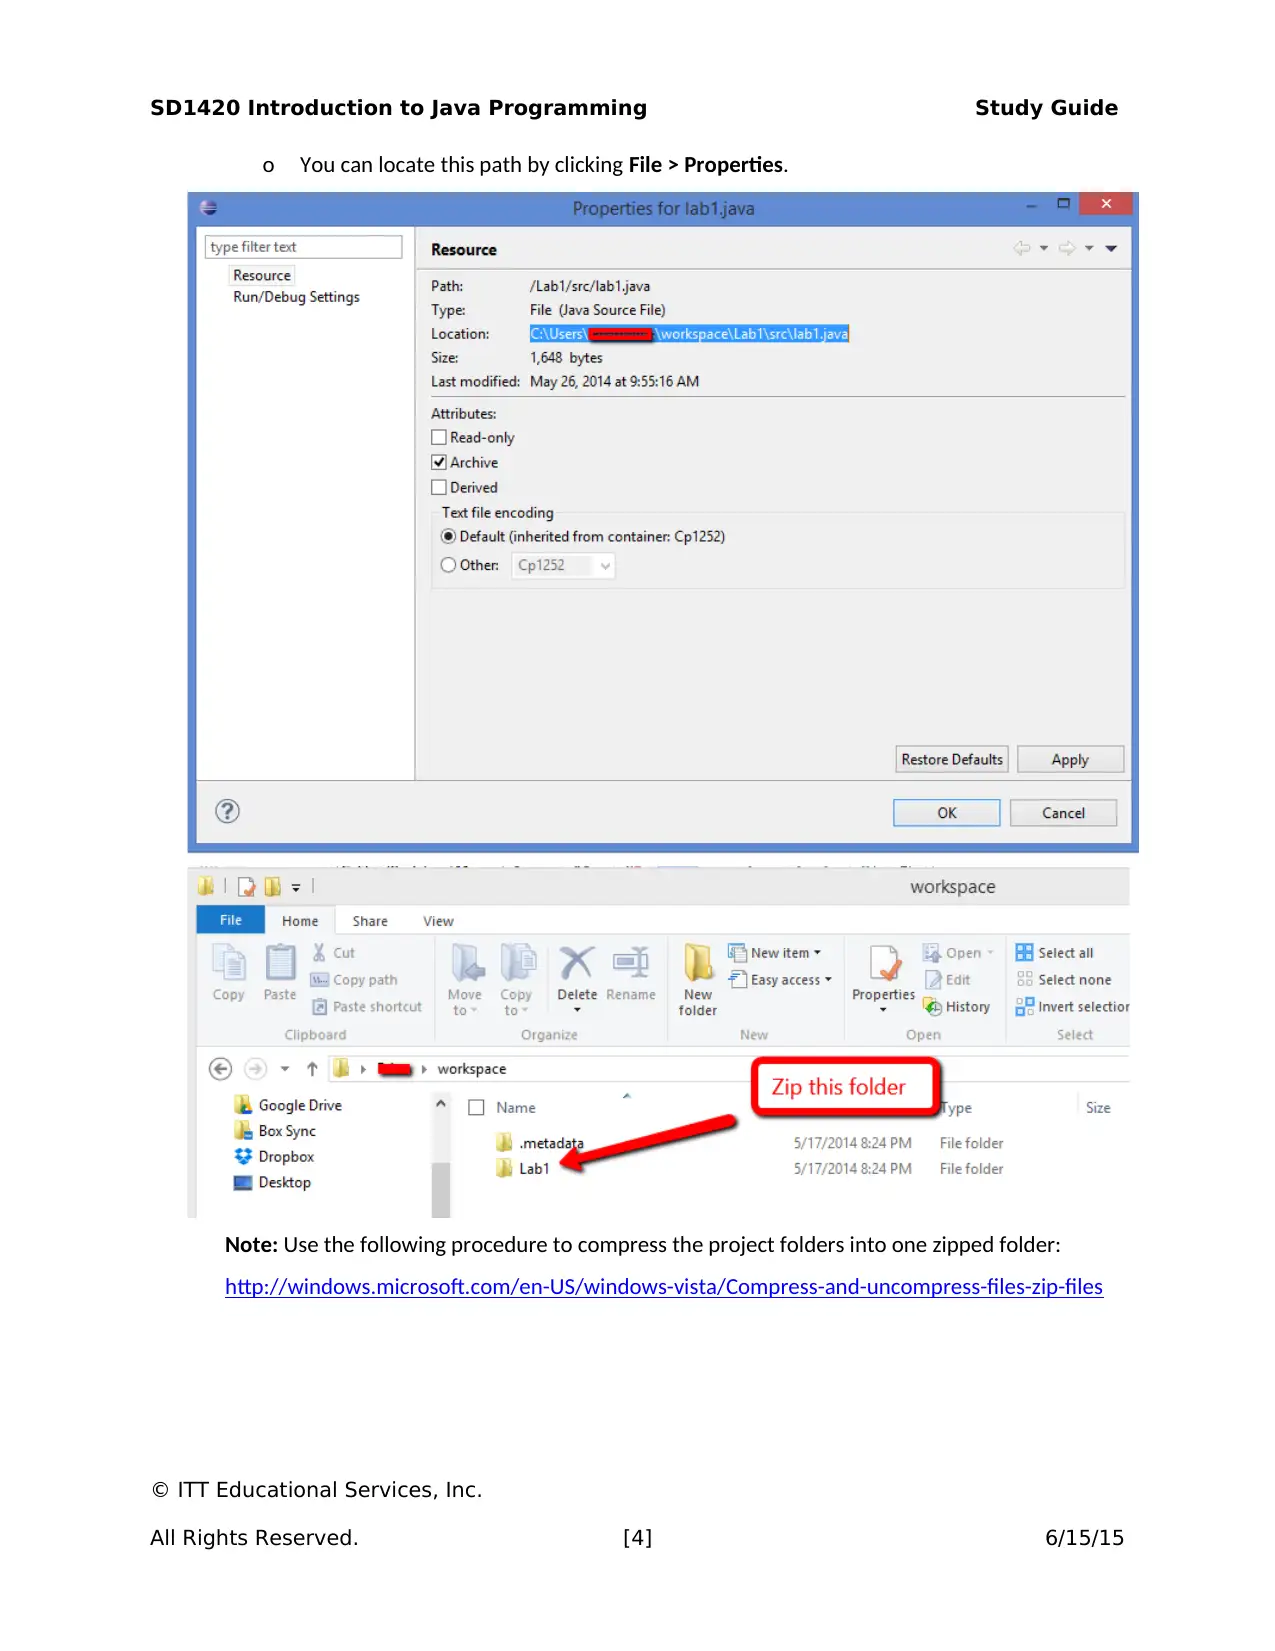
o Your Java project folder is found by default here: C:\Users\{your computer user name]\
workspace\Lab1\src\lab1.java
© ITT Educational Services, Inc.
All Rights Reserved. [3] 6/15/15
SD1420 Introduction to Java Programming Study Guide
o You can locate this path by clicking File > Properties.
Note: Use the following procedure to compress the project folders into one zipped folder:
http://windows.microsoft.com/en-US/windows-vista/Compress-and-uncompress-files-zip-files
© ITT Educational Services, Inc.
All Rights Reserved. [4] 6/15/15
Secure Best Marks with AI Grader
Need help grading? Try our AI Grader for instant feedback on your assignments.
SD1420 Introduction to Java Programming Study Guide
Evaluation Criteria:
The Lab rubric will be used to evaluate this assessment. Your submission will be evaluated against the
following criteria using the grading rubric:
Does the code meet all functional requirements?
Did you provide all requested screenshots in the worksheet?
Did you answer all questions?
Is the code is readable and documented?
© ITT Educational Services, Inc.
All Rights Reserved. [5] 6/15/15
SD1420 Introduction to Java Programming Study Guide
LAB 2.1 (2.0 HOURS)
Assessment Preparation Checklist:
To prepare for this assessment:
Read Chapters 3–5 and 20 from your textbook, Introduction to Java Programming. These
chapters focus on selections, loops, and methods.
Go through the lesson for Module 2, which will guide you through how to use conditional and
control statements.
Title: Control Structures
In this lab, you will write a program using IF, If/Else, If/ElseIf/Else, and switch control structures. Working
through this lab will provide you with a strong foundation of programming methods.
Required Setup and Resources:
A virtual machine with Eclipse installed
Microsoft Word
Recommended Procedures:
Task 1: Create an Eclipse project.
1. Launch your ITT-Lab virtual machine.
2. In ITT-Lab, launch Eclipse.
3. Click File > New > Java Project.
© ITT Educational Services, Inc.
All Rights Reserved. [6] 6/15/15
SD1420 Introduction to Java Programming Study Guide
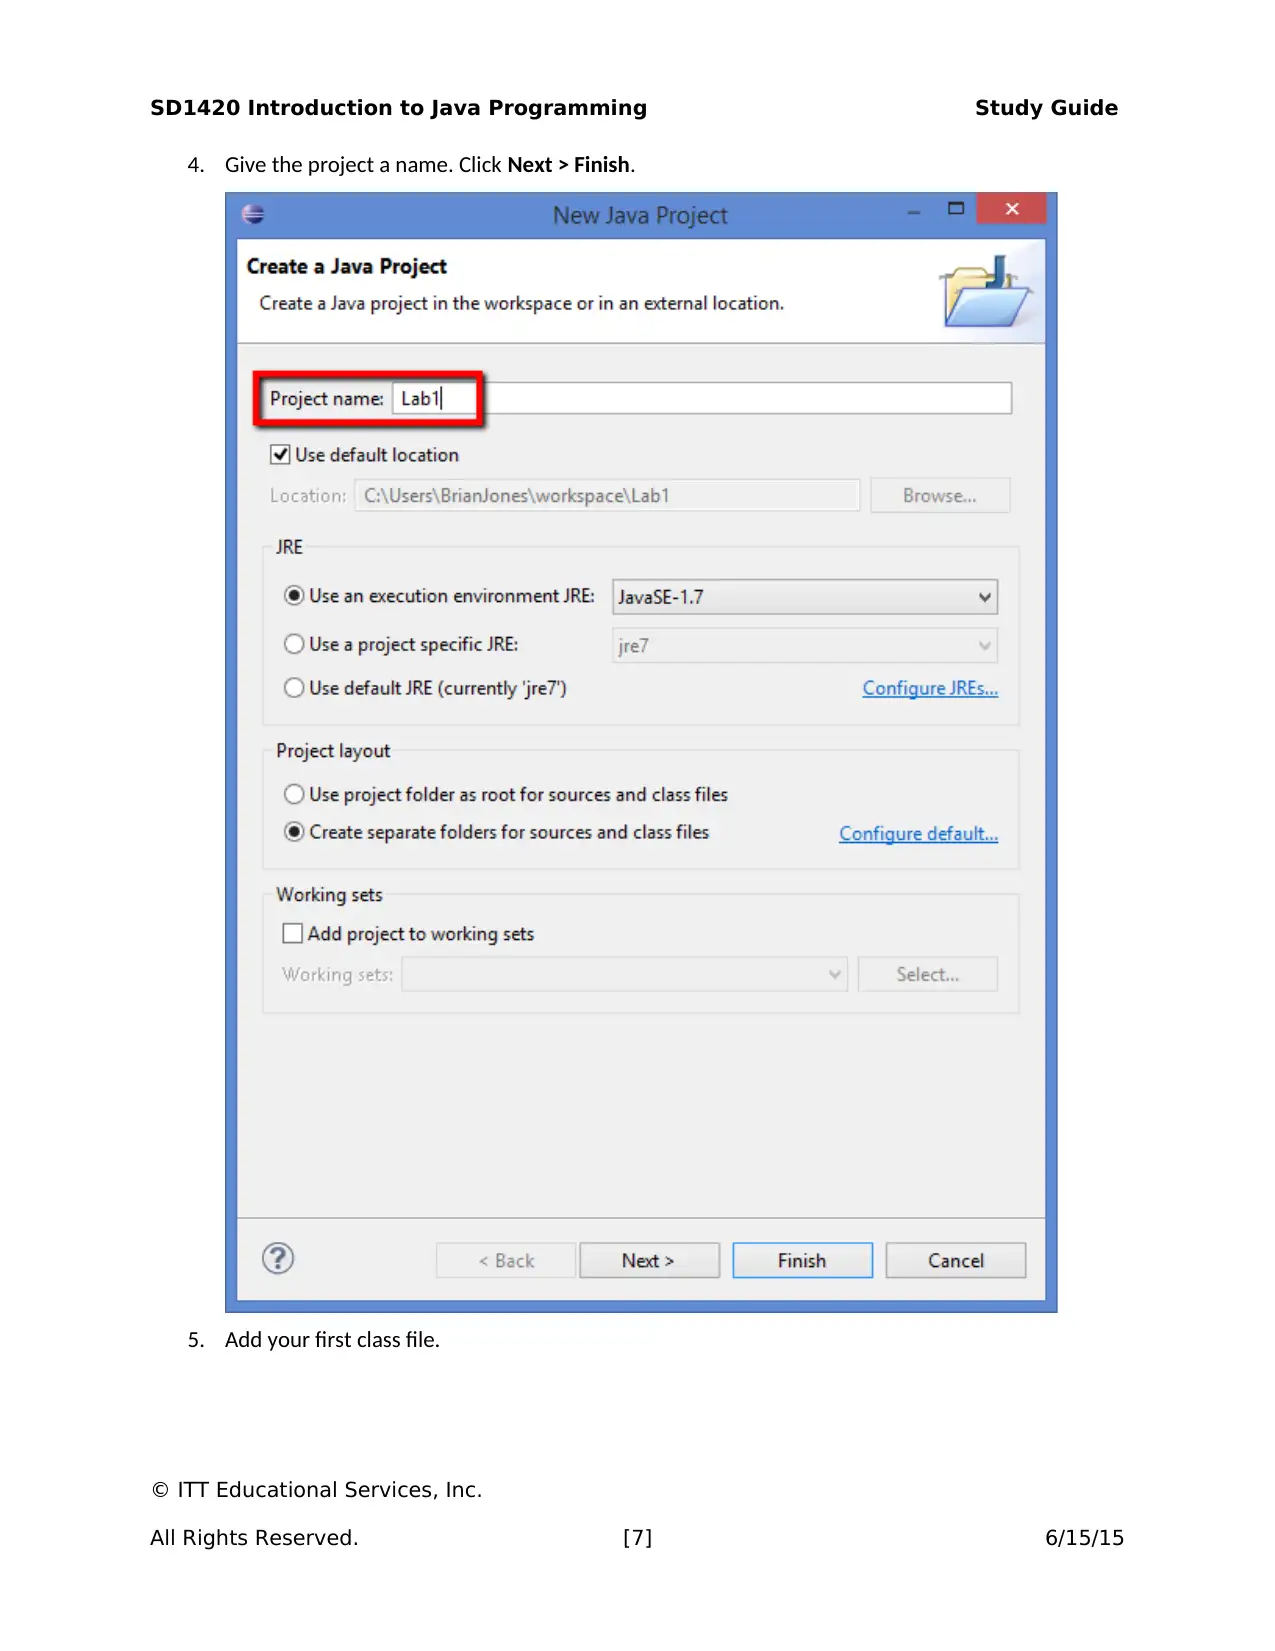
4. Give the project a name. Click Next > Finish.
5. Add your first class file.
© ITT Educational Services, Inc.
All Rights Reserved. [7] 6/15/15
4. Give the project a name. Click Next > Finish.
5. Add your first class file.
© ITT Educational Services, Inc.
All Rights Reserved. [7] 6/15/15
Paraphrase This Document
Need a fresh take? Get an instant paraphrase of this document with our AI Paraphraser
SD1420 Introduction to Java Programming Study Guide
6. Click Package Explorer.
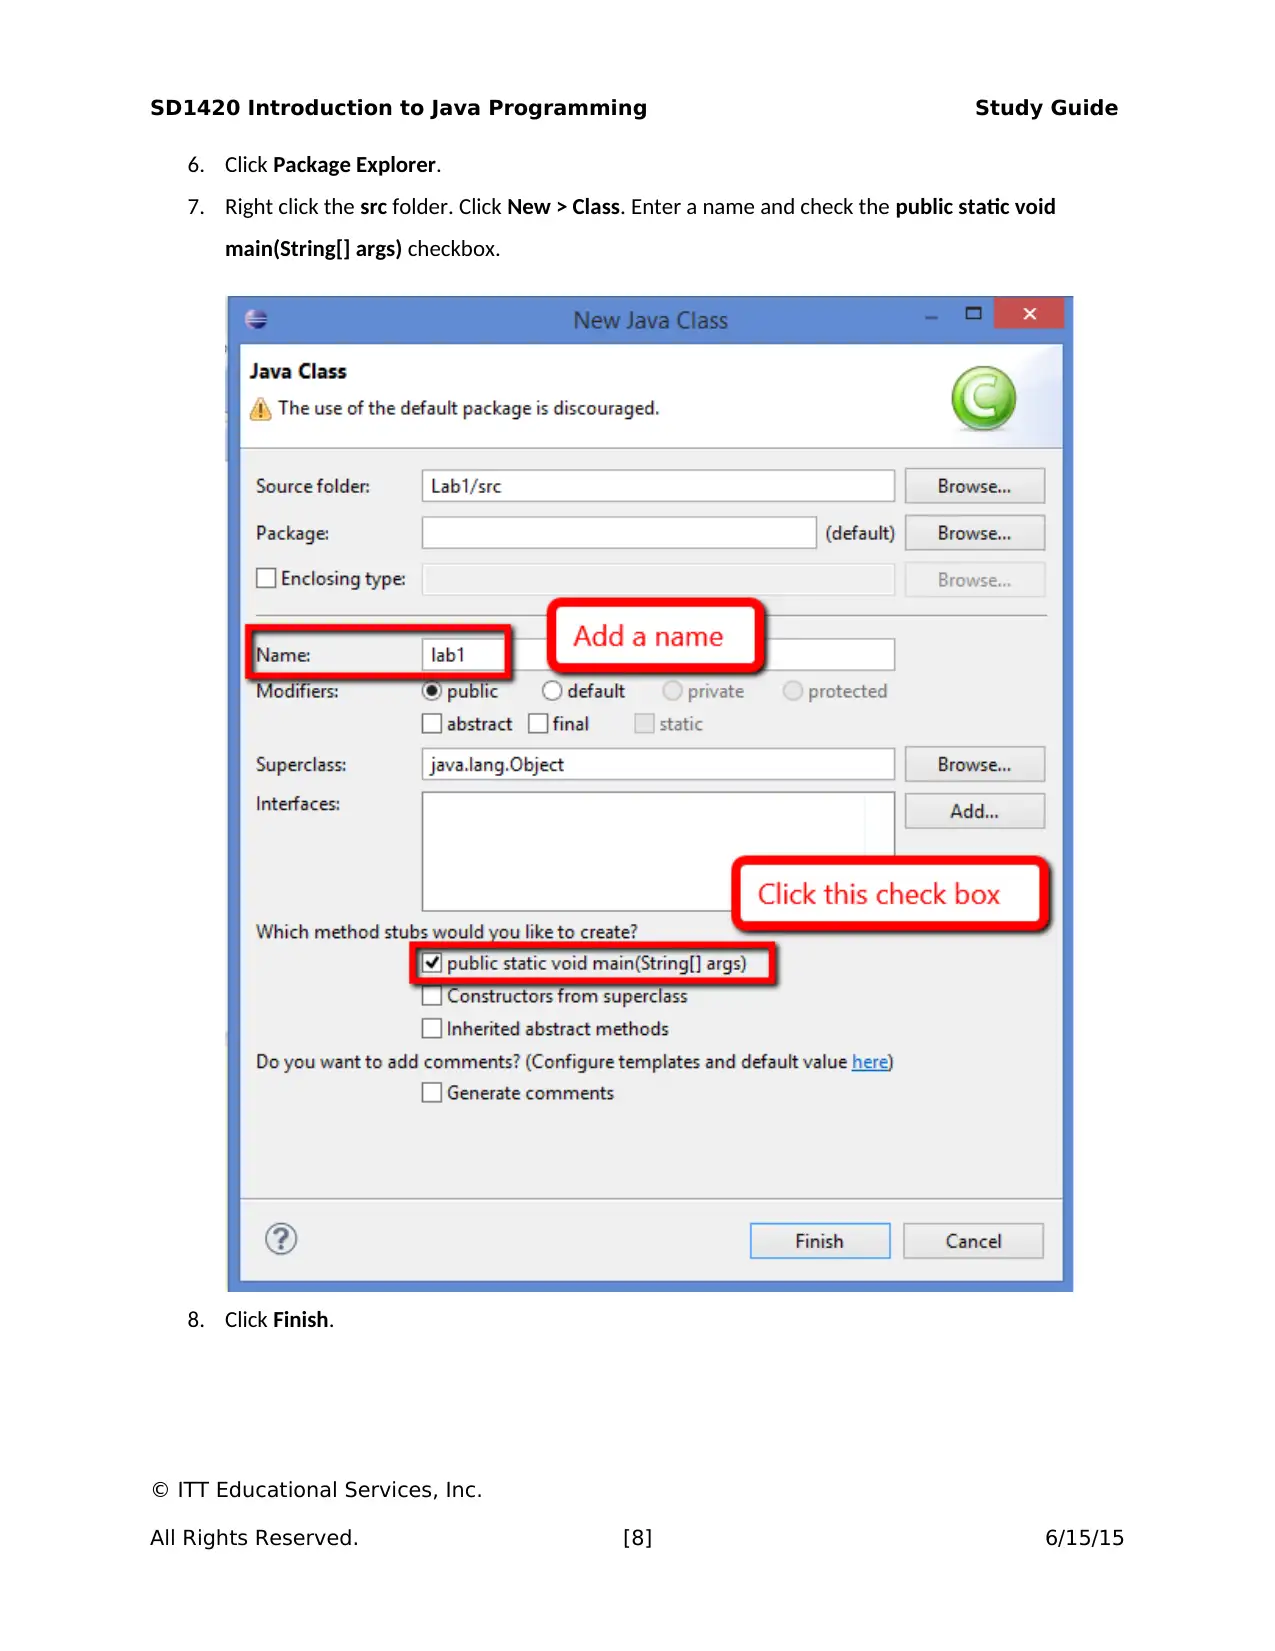
7. Right click the src folder. Click New > Class. Enter a name and check the public static void
main(String[] args) checkbox.
8. Click Finish.
© ITT Educational Services, Inc.
All Rights Reserved. [8] 6/15/15
6. Click Package Explorer.
7. Right click the src folder. Click New > Class. Enter a name and check the public static void
main(String[] args) checkbox.
8. Click Finish.
© ITT Educational Services, Inc.
All Rights Reserved. [8] 6/15/15
SD1420 Introduction to Java Programming Study Guide
Task 2: Create a Menu.
1. Locate the main method and create a new scanner for getting user input.
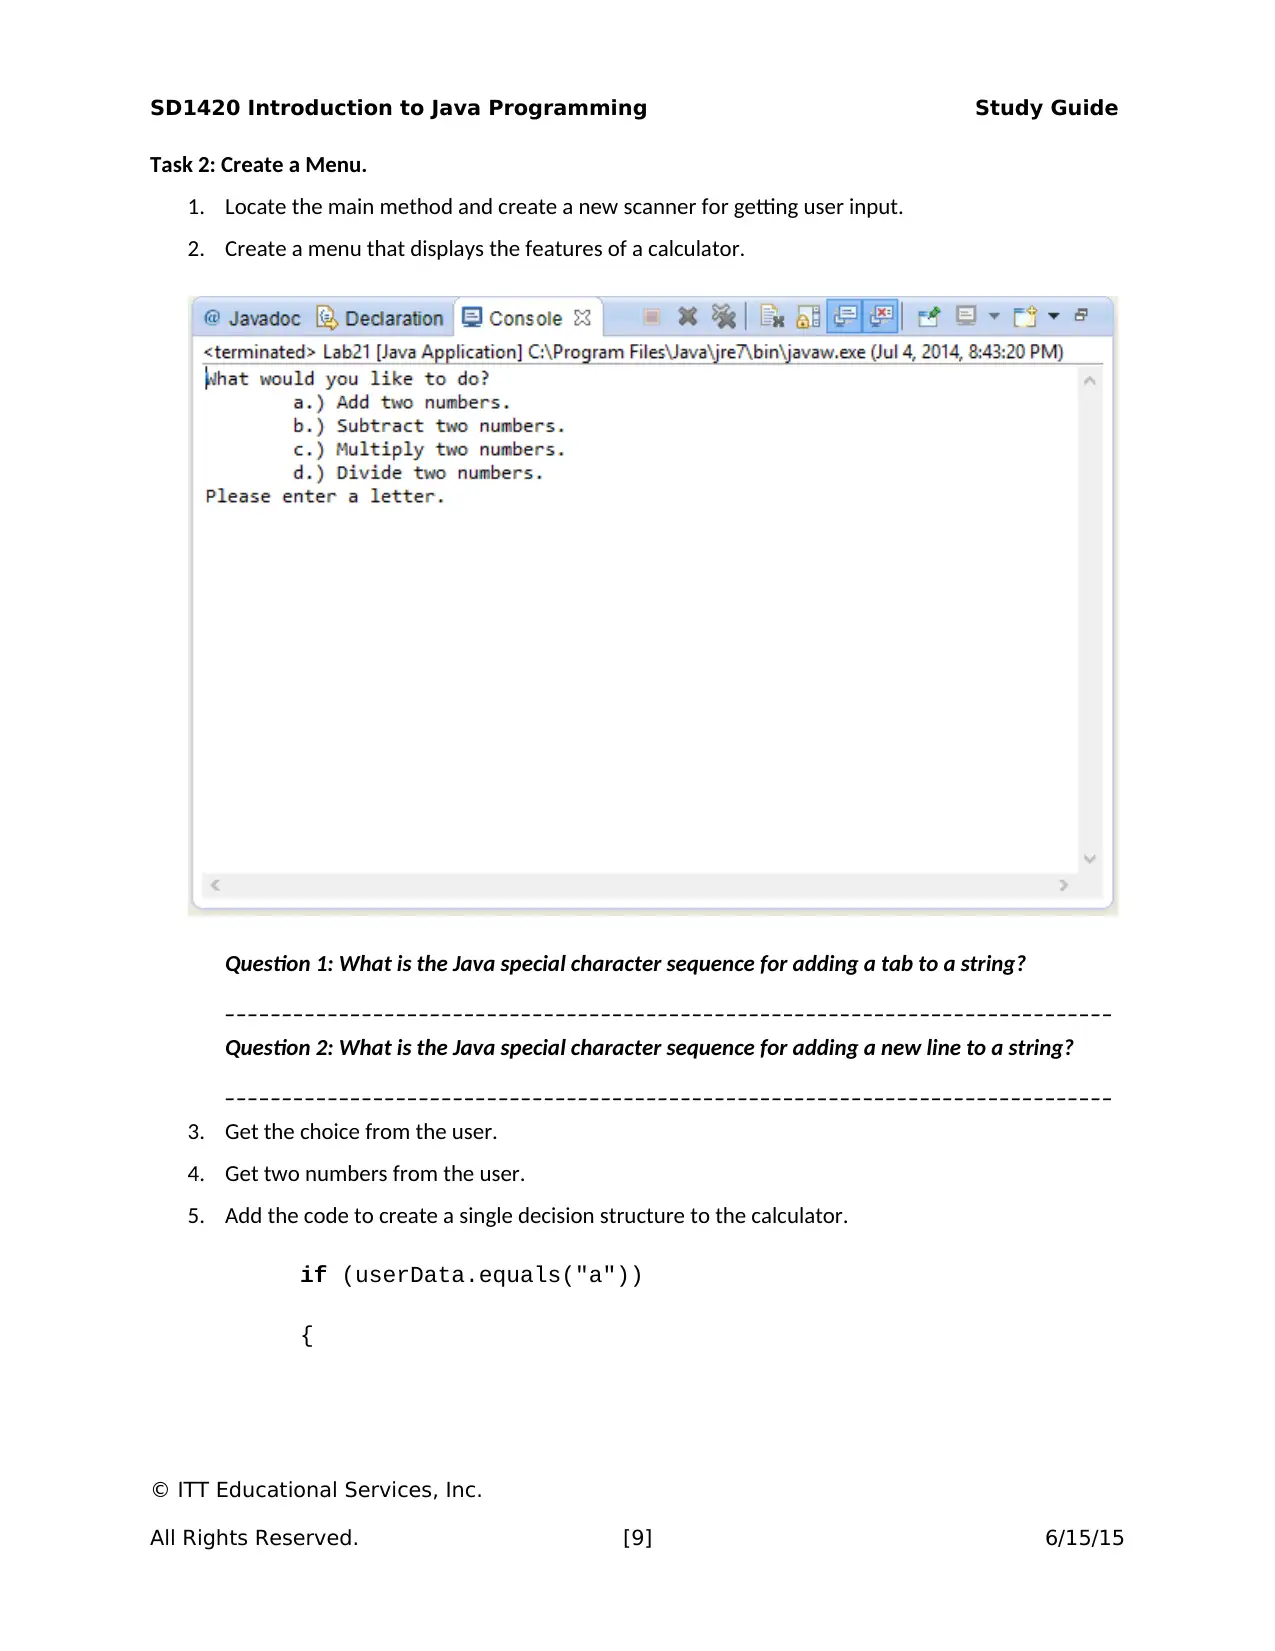
2. Create a menu that displays the features of a calculator.
Question 1: What is the Java special character sequence for adding a tab to a string?
______________________________________________________________________________
Question 2: What is the Java special character sequence for adding a new line to a string?
______________________________________________________________________________
3. Get the choice from the user.
4. Get two numbers from the user.
5. Add the code to create a single decision structure to the calculator.
if (userData.equals("a"))
{
© ITT Educational Services, Inc.
All Rights Reserved. [9] 6/15/15
SD1420 Introduction to Java Programming Study Guide
}
a. Note the { and the } every line of code between them is going to run when the user
types a.
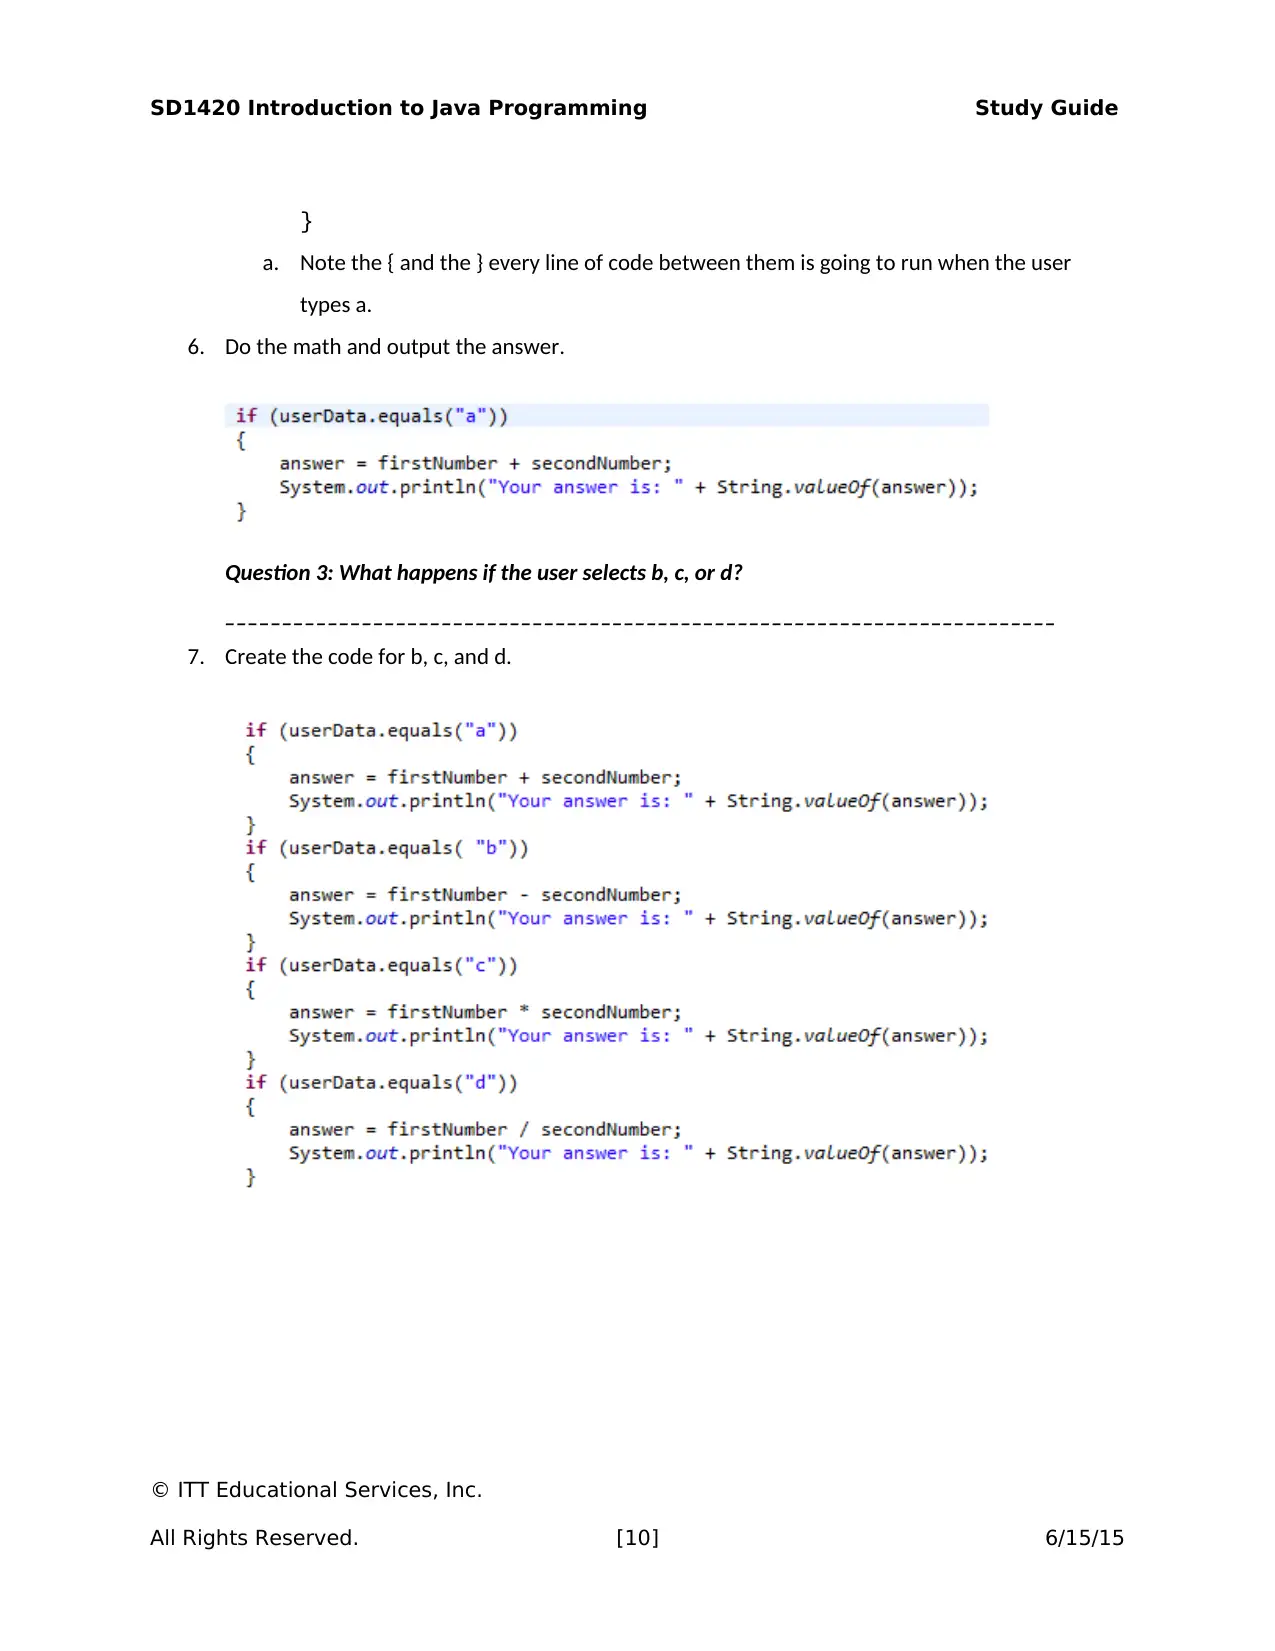
6. Do the math and output the answer.
Question 3: What happens if the user selects b, c, or d?
_________________________________________________________________________
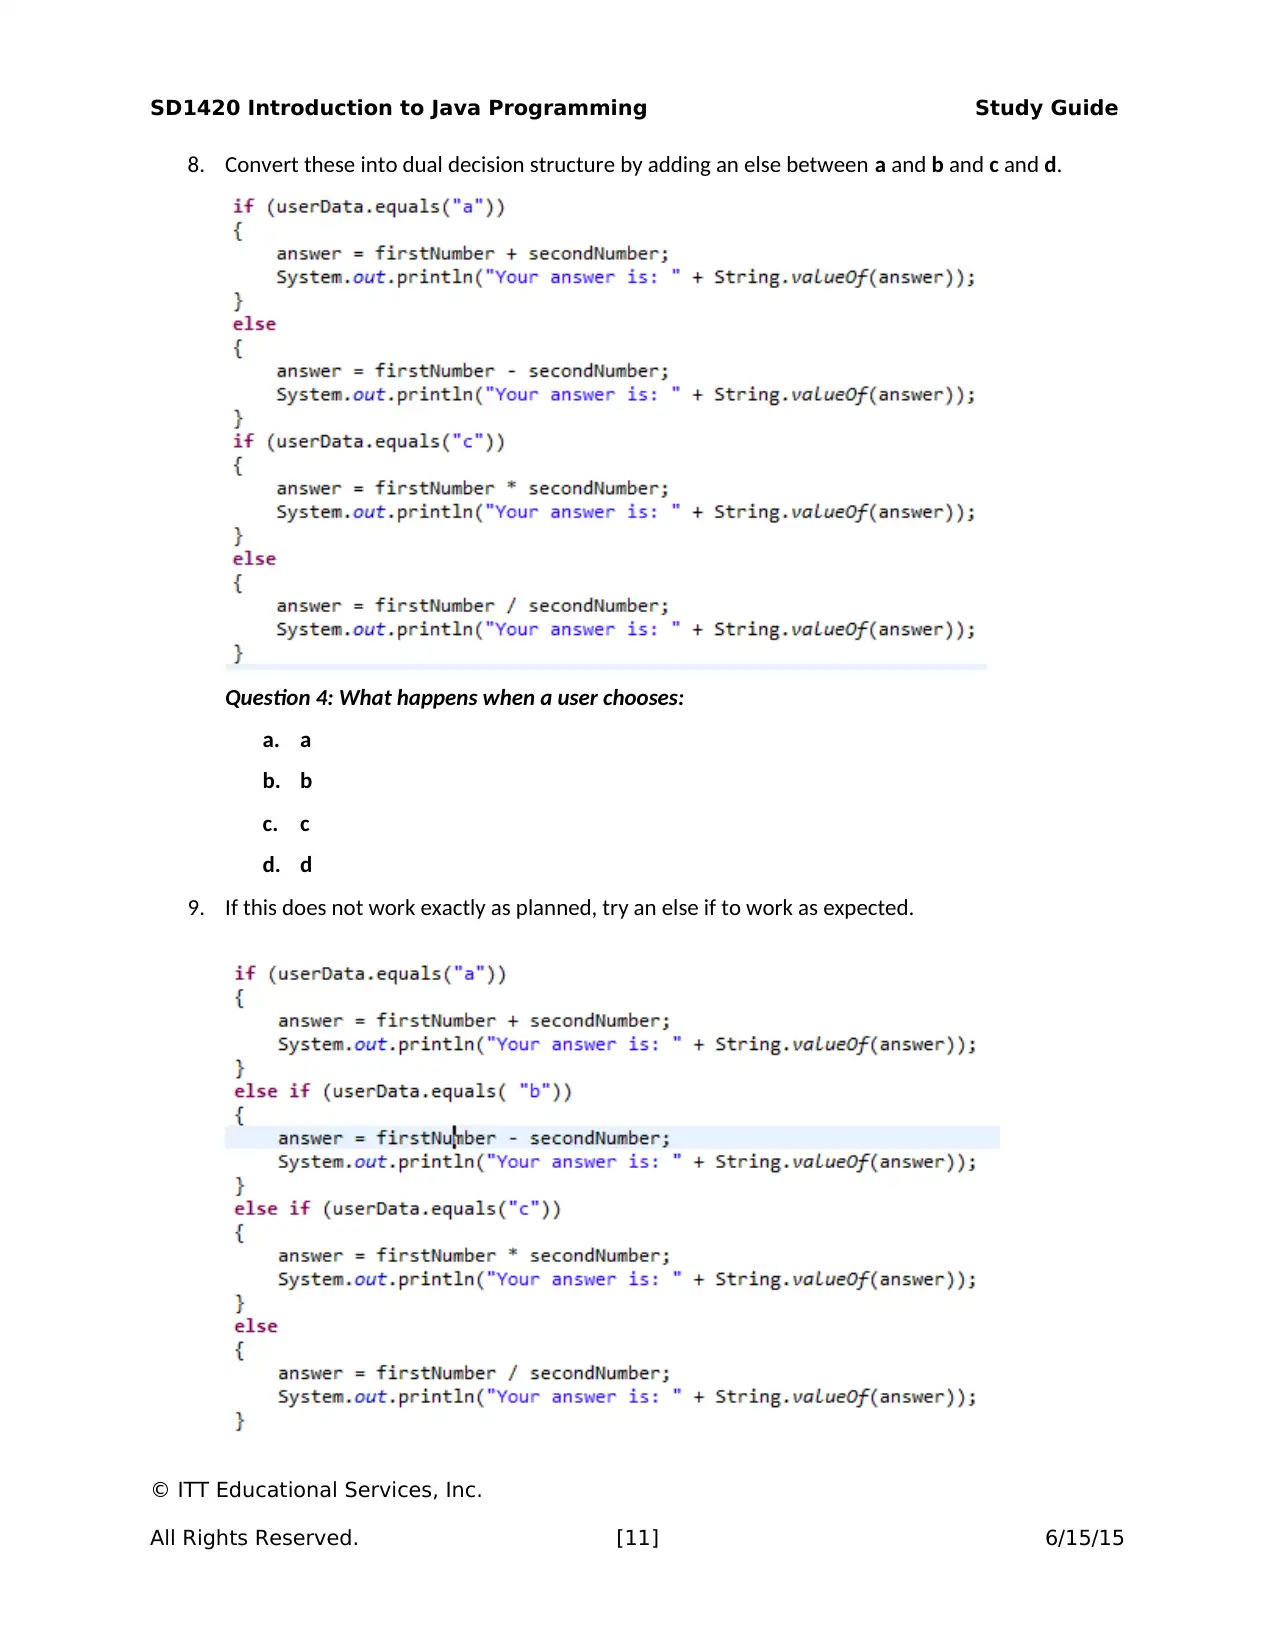
7. Create the code for b, c, and d.
© ITT Educational Services, Inc.
All Rights Reserved. [10] 6/15/15
Secure Best Marks with AI Grader
Need help grading? Try our AI Grader for instant feedback on your assignments.
SD1420 Introduction to Java Programming Study Guide
8. Convert these into dual decision structure by adding an else between a and b and c and d.
Question 4: What happens when a user chooses:
a. a
b. b
c. c
d. d
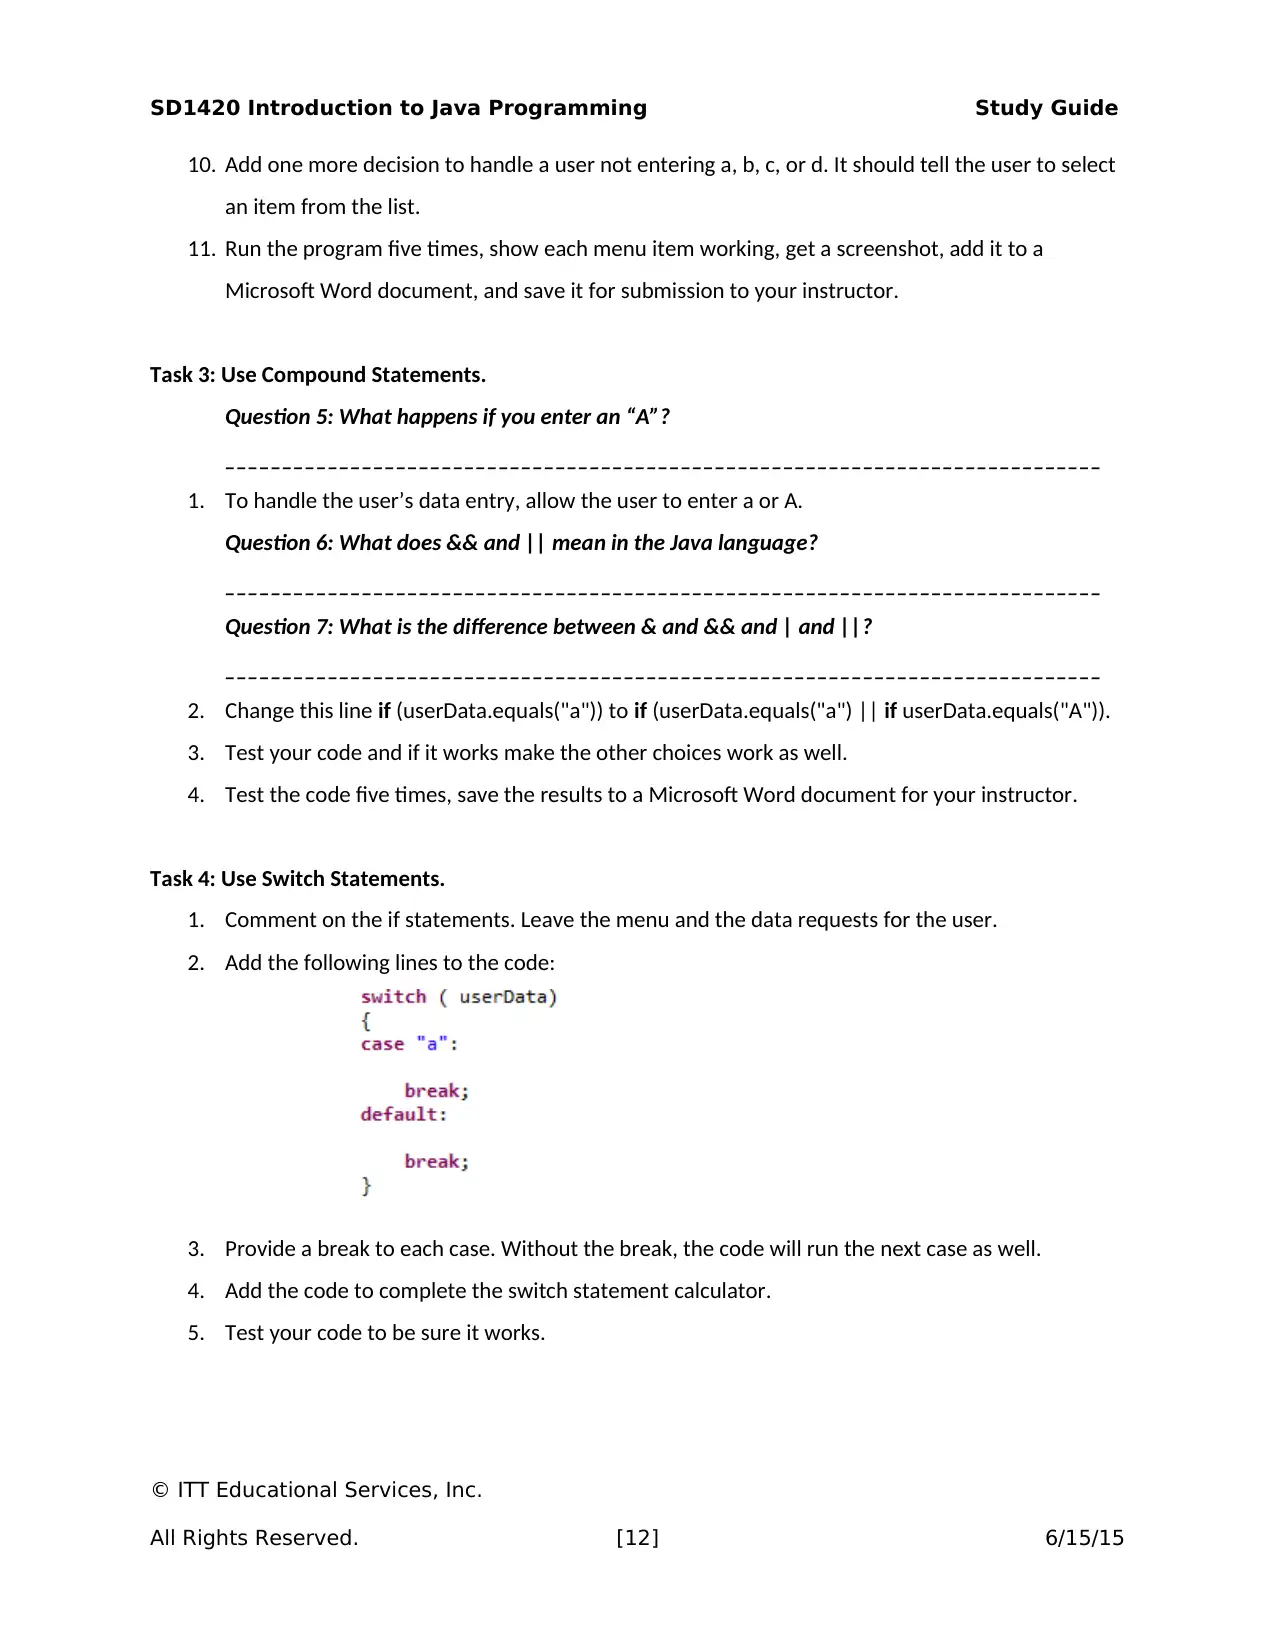
9. If this does not work exactly as planned, try an else if to work as expected.
© ITT Educational Services, Inc.
All Rights Reserved. [11] 6/15/15
SD1420 Introduction to Java Programming Study Guide
10. Add one more decision to handle a user not entering a, b, c, or d. It should tell the user to select
an item from the list.
11. Run the program five times, show each menu item working, get a screenshot, add it to a
Microsoft Word document, and save it for submission to your instructor.
Task 3: Use Compound Statements.
Question 5: What happens if you enter an “A”?
_____________________________________________________________________________
1. To handle the user’s data entry, allow the user to enter a or A.
Question 6: What does && and || mean in the Java language?
_____________________________________________________________________________
Question 7: What is the difference between & and && and | and ||?
_____________________________________________________________________________
2. Change this line if (userData.equals("a")) to if (userData.equals("a") || if userData.equals("A")).
3. Test your code and if it works make the other choices work as well.
4. Test the code five times, save the results to a Microsoft Word document for your instructor.
Task 4: Use Switch Statements.
1. Comment on the if statements. Leave the menu and the data requests for the user.
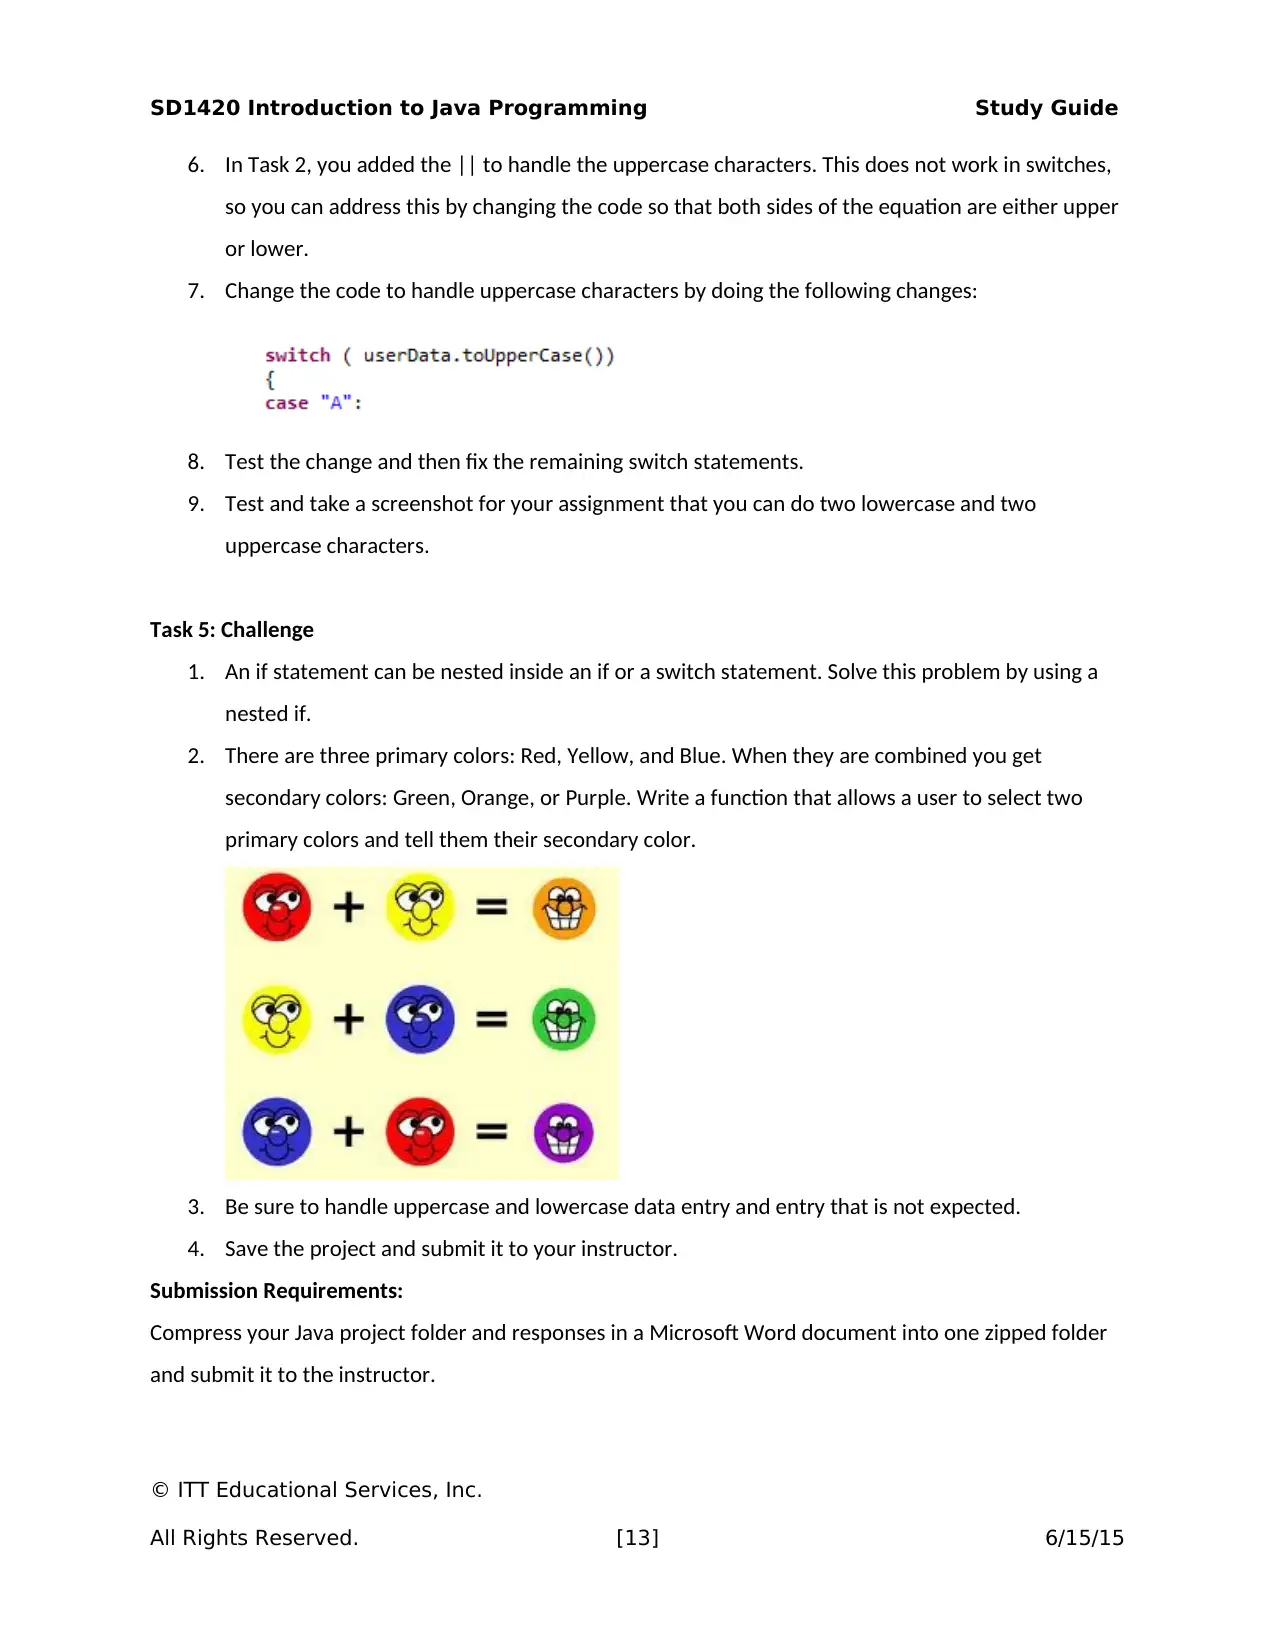
2. Add the following lines to the code:
3. Provide a break to each case. Without the break, the code will run the next case as well.
4. Add the code to complete the switch statement calculator.
5. Test your code to be sure it works.
© ITT Educational Services, Inc.
All Rights Reserved. [12] 6/15/15
SD1420 Introduction to Java Programming Study Guide
6. In Task 2, you added the || to handle the uppercase characters. This does not work in switches,
so you can address this by changing the code so that both sides of the equation are either upper
or lower.
7. Change the code to handle uppercase characters by doing the following changes:
8. Test the change and then fix the remaining switch statements.
9. Test and take a screenshot for your assignment that you can do two lowercase and two
uppercase characters.
Task 5: Challenge
1. An if statement can be nested inside an if or a switch statement. Solve this problem by using a
nested if.
2. There are three primary colors: Red, Yellow, and Blue. When they are combined you get
secondary colors: Green, Orange, or Purple. Write a function that allows a user to select two
primary colors and tell them their secondary color.
3. Be sure to handle uppercase and lowercase data entry and entry that is not expected.
4. Save the project and submit it to your instructor.
Submission Requirements:
Compress your Java project folder and responses in a Microsoft Word document into one zipped folder
and submit it to the instructor.
© ITT Educational Services, Inc.
All Rights Reserved. [13] 6/15/15
Paraphrase This Document
Need a fresh take? Get an instant paraphrase of this document with our AI Paraphraser
SD1420 Introduction to Java Programming Study Guide
Note: Use the following procedure to compress the project folders into one zipped folder:
http://windows.microsoft.com/en-US/windows-vista/Compress-and-uncompress-files-zip-files
Evaluation Criteria:
The Lab rubric will be used to evaluate this assessment. Your submission will be evaluated against the
following criteria using the grading rubric:
Does the code meet all functional requirements?
Did you provide all requested screenshots in the worksheet?
Did you answer all questions?
Is the code readable and documented?
© ITT Educational Services, Inc.
All Rights Reserved. [14] 6/15/15
SD1420 Introduction to Java Programming Study Guide
LAB 2.2 (2.0 HOURS)
Assessment Preparation Checklist:
To prepare for this assessment:
Read Chapters 3–5 and 20 from your textbook, Introduction to Java Programming. These
chapters focus on selections, loops, and methods.
Go through the lesson for Module 2, which will guide you through how to use conditional and
control statements.
Title: Loops
This lab will walk you through the creation of a program that uses loops, pre-check, post-check, count
controlled, and sentinel loops. These loops are required in many programs to work through lists and
allow users to do a repeatable task.
Required Setup and Resources:
A virtual machine with Eclipse installed
Microsoft Word
Recommended Procedures:
Task 1: Create an Eclipse project.
1. Launch your ITT-Lab virtual machine.
2. In ITT-Lab, launch Eclipse.
3. Click File > New > Java Project.
© ITT Educational Services, Inc.
All Rights Reserved. [15] 6/15/15
SD1420 Introduction to Java Programming Study Guide
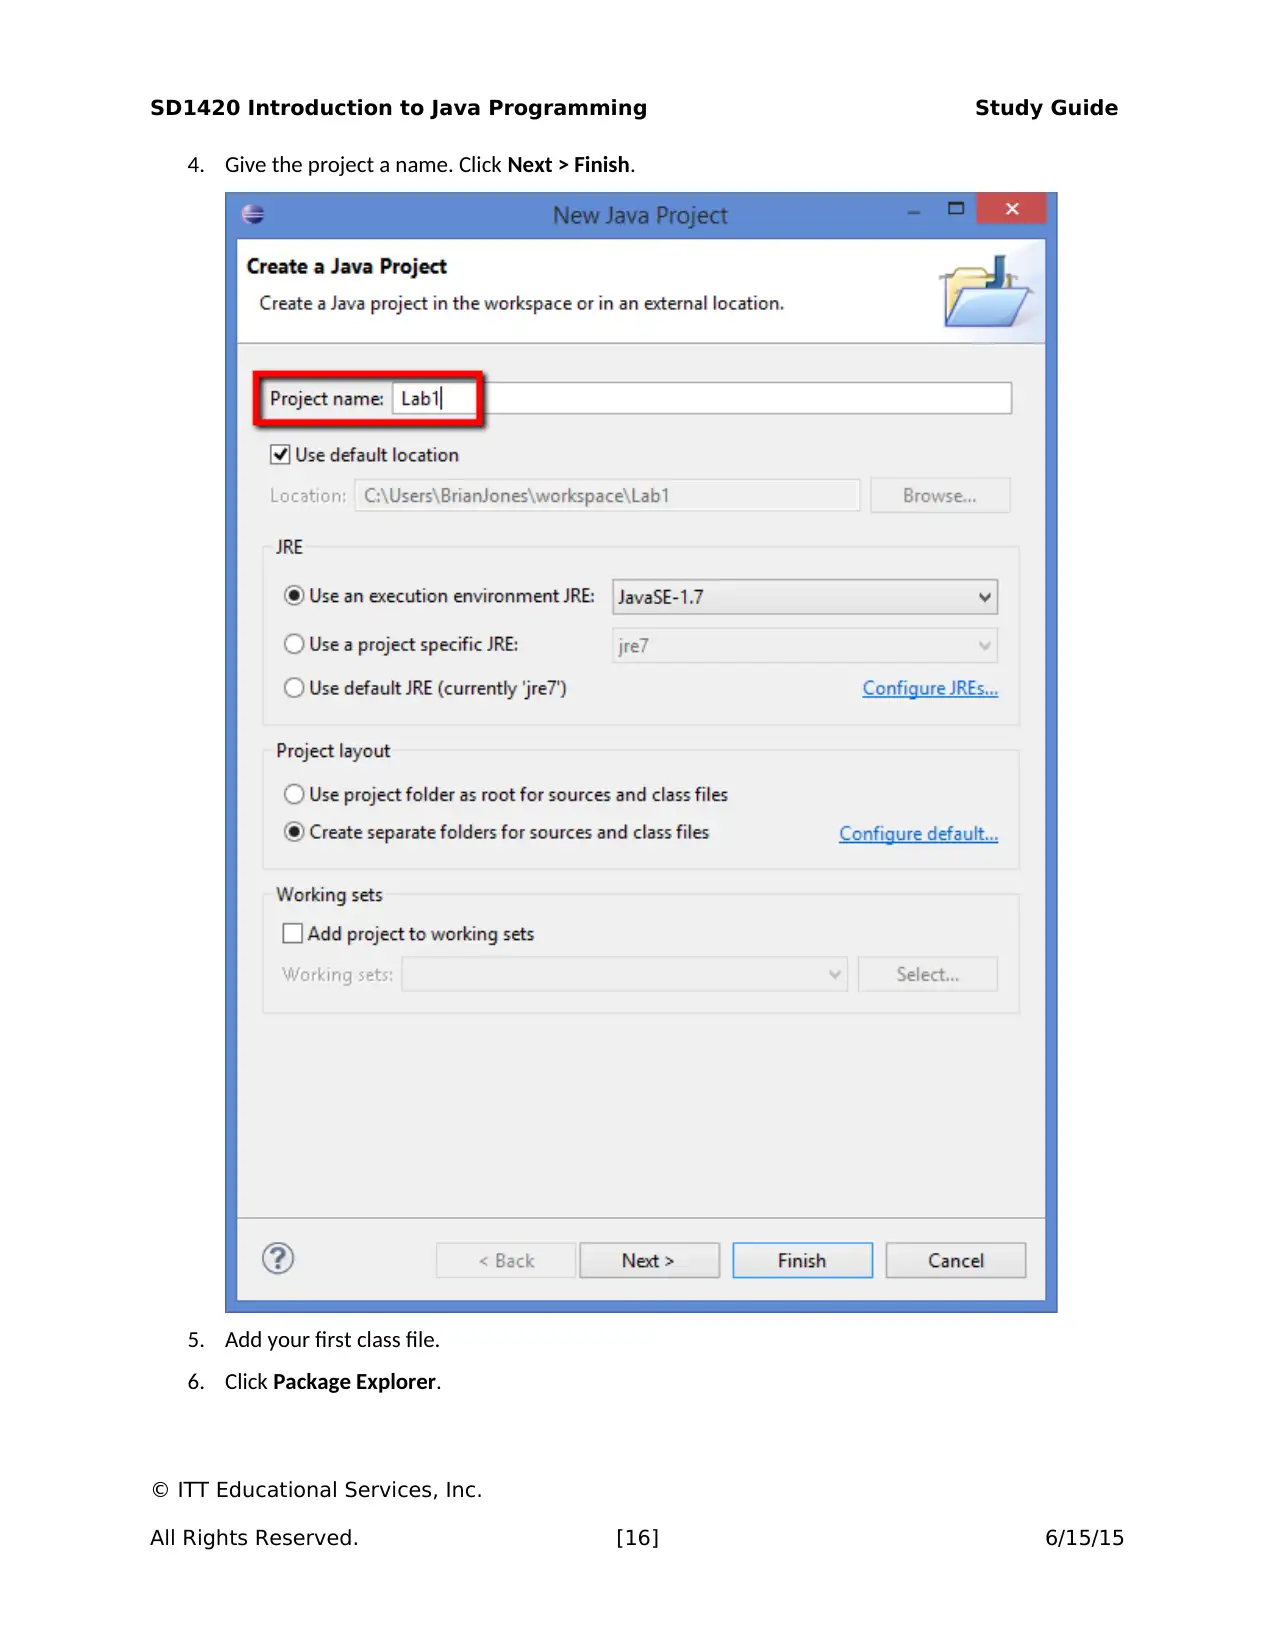
4. Give the project a name. Click Next > Finish.
5. Add your first class file.
6. Click Package Explorer.
© ITT Educational Services, Inc.
All Rights Reserved. [16] 6/15/15
4. Give the project a name. Click Next > Finish.
5. Add your first class file.
6. Click Package Explorer.
© ITT Educational Services, Inc.
All Rights Reserved. [16] 6/15/15
Secure Best Marks with AI Grader
Need help grading? Try our AI Grader for instant feedback on your assignments.
SD1420 Introduction to Java Programming Study Guide
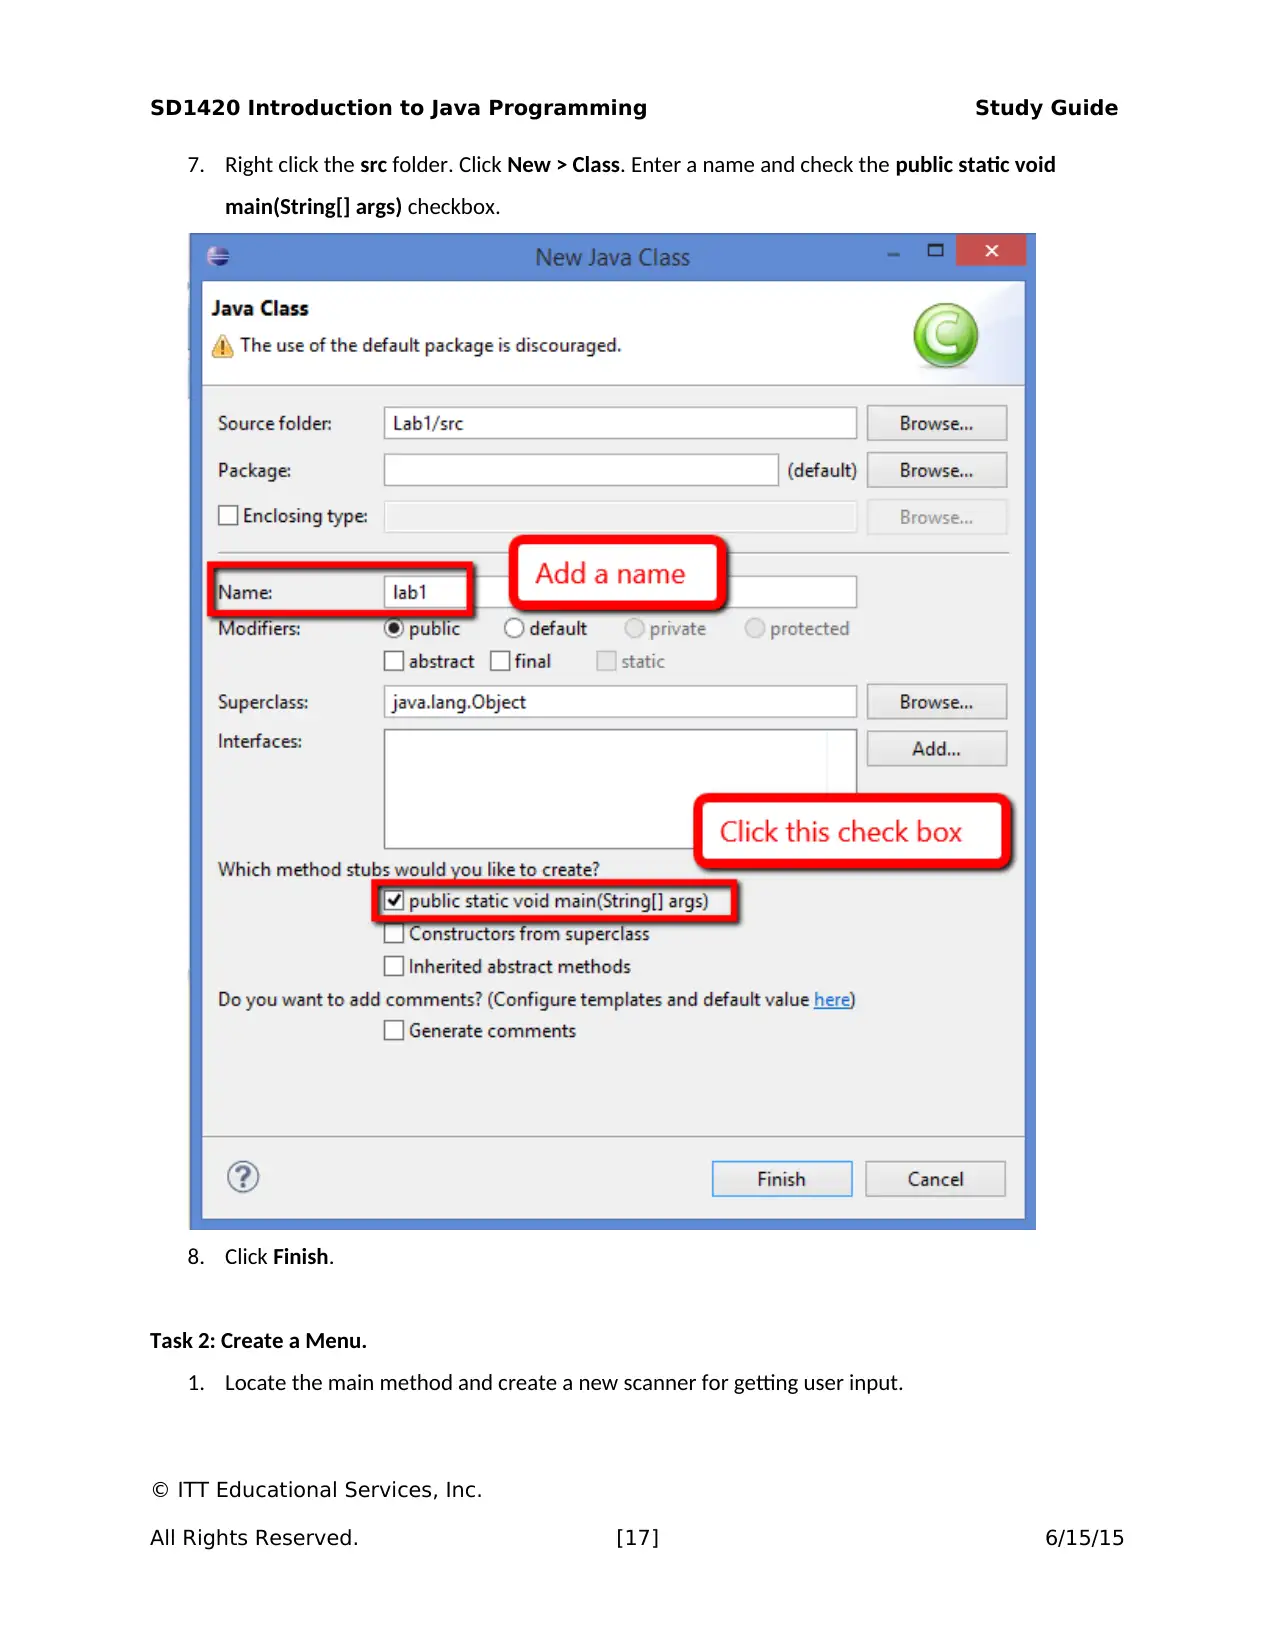
7. Right click the src folder. Click New > Class. Enter a name and check the public static void
main(String[] args) checkbox.
8. Click Finish.
Task 2: Create a Menu.
1. Locate the main method and create a new scanner for getting user input.
© ITT Educational Services, Inc.
All Rights Reserved. [17] 6/15/15
SD1420 Introduction to Java Programming Study Guide
Task 3: Use While Loop (Pre-check loop).
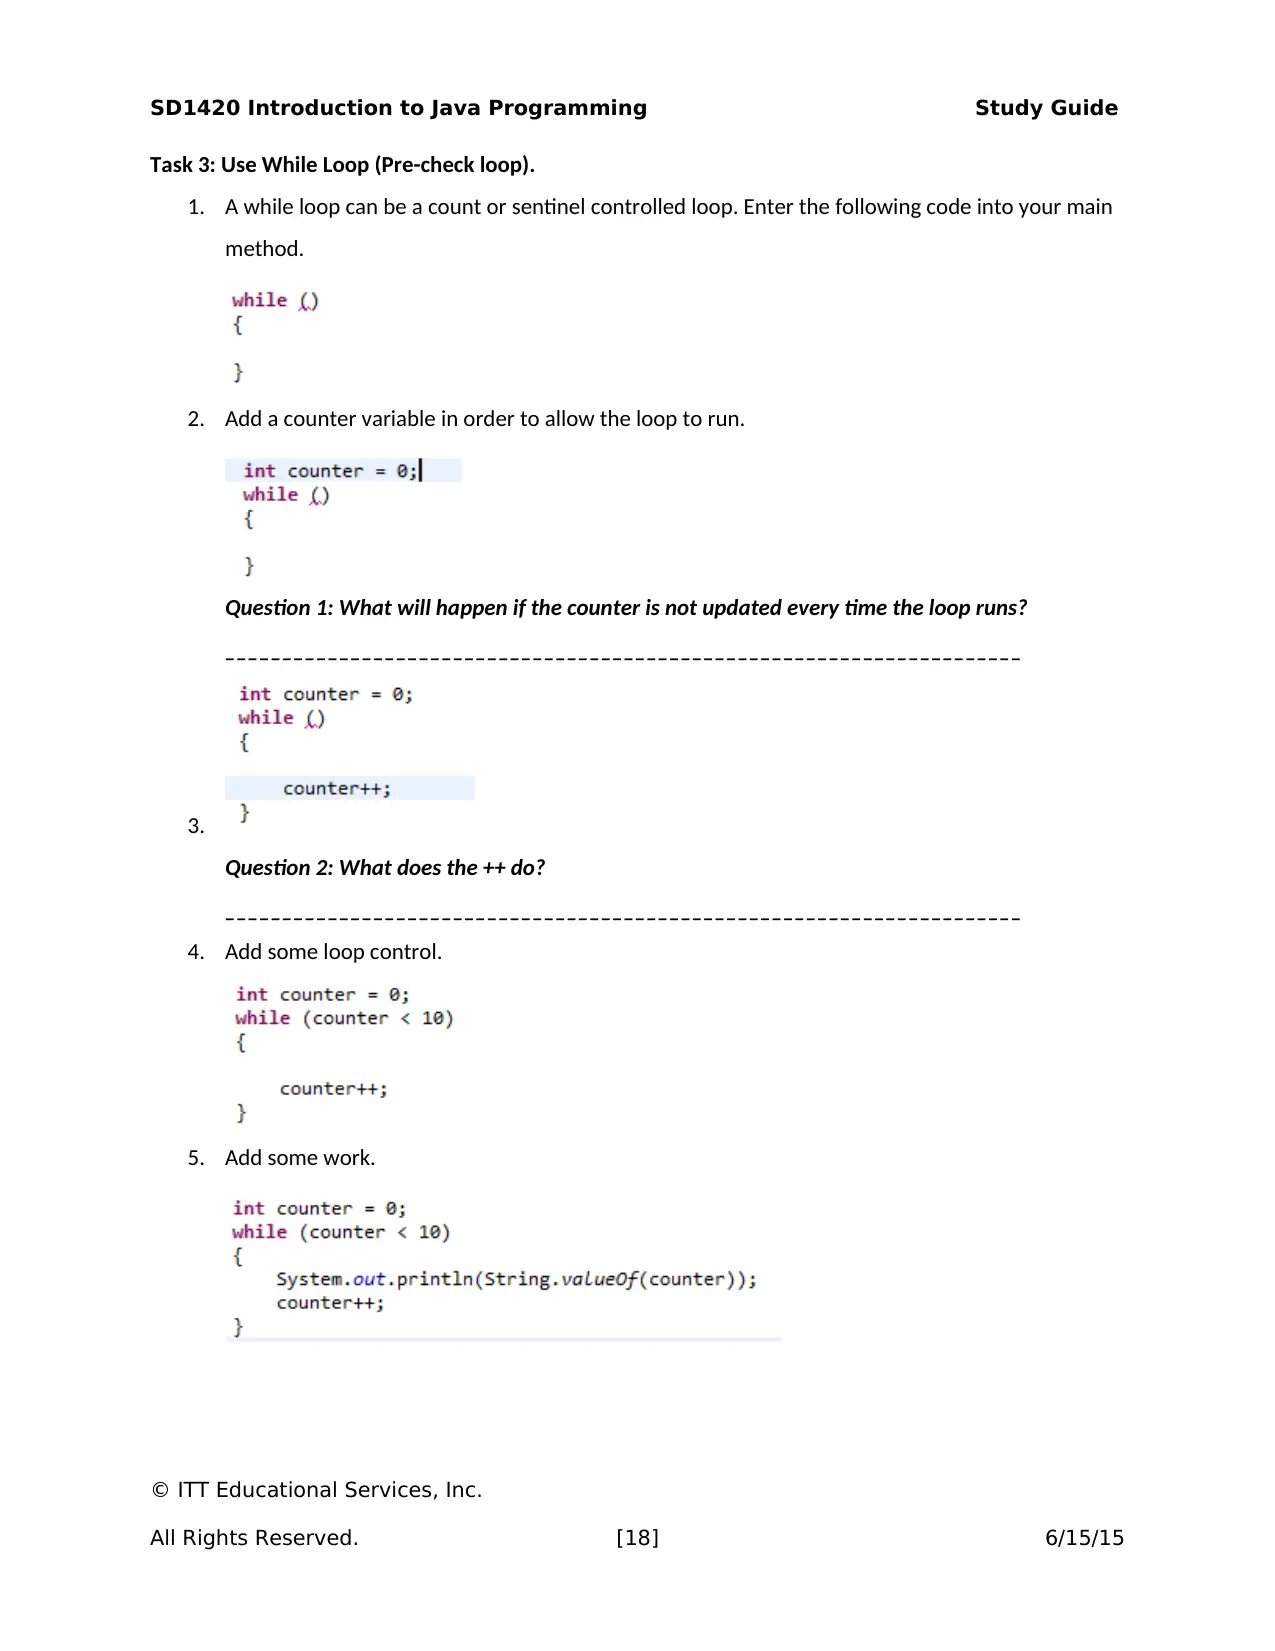
1. A while loop can be a count or sentinel controlled loop. Enter the following code into your main
method.
2. Add a counter variable in order to allow the loop to run.
Question 1: What will happen if the counter is not updated every time the loop runs?
______________________________________________________________________
3.
Question 2: What does the ++ do?
______________________________________________________________________
4. Add some loop control.
5. Add some work.
© ITT Educational Services, Inc.
All Rights Reserved. [18] 6/15/15
SD1420 Introduction to Java Programming Study Guide
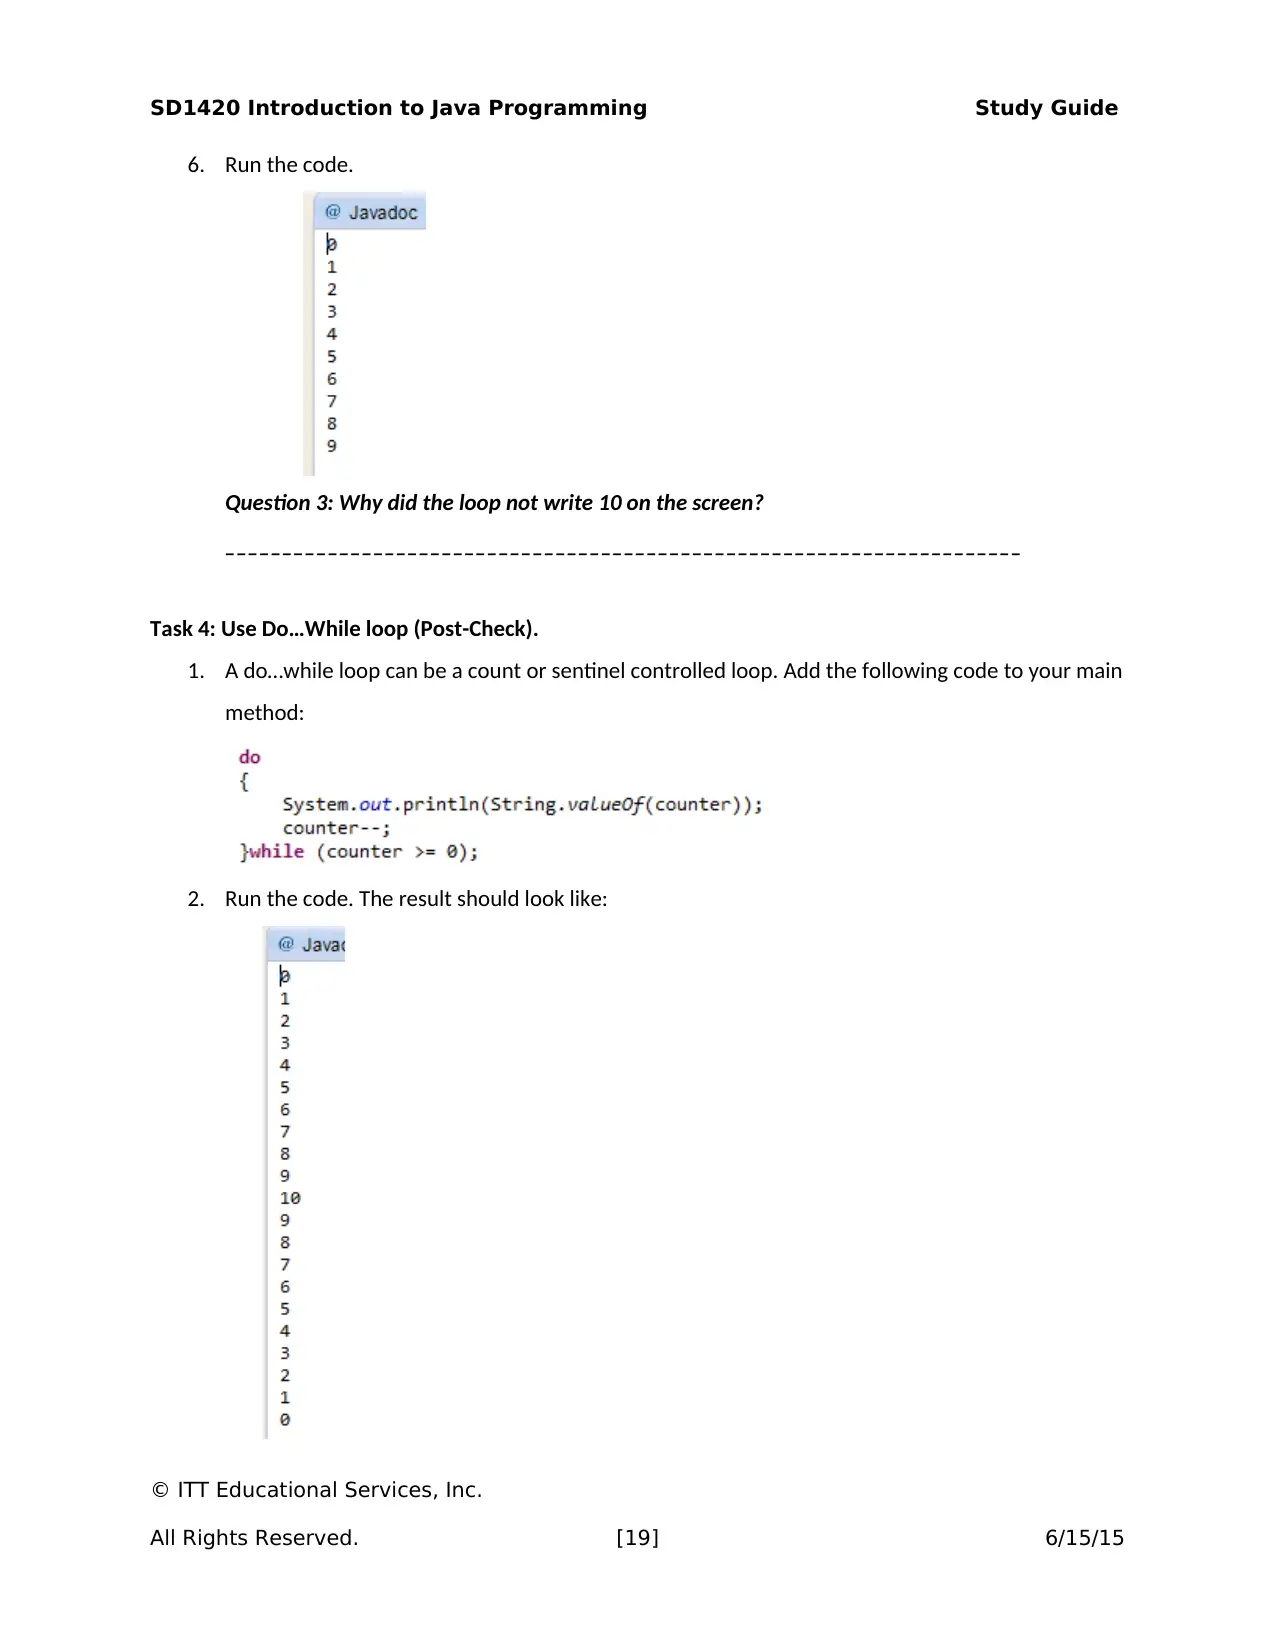
6. Run the code.
Question 3: Why did the loop not write 10 on the screen?
______________________________________________________________________
Task 4: Use Do…While loop (Post-Check).
1. A do…while loop can be a count or sentinel controlled loop. Add the following code to your main
method:
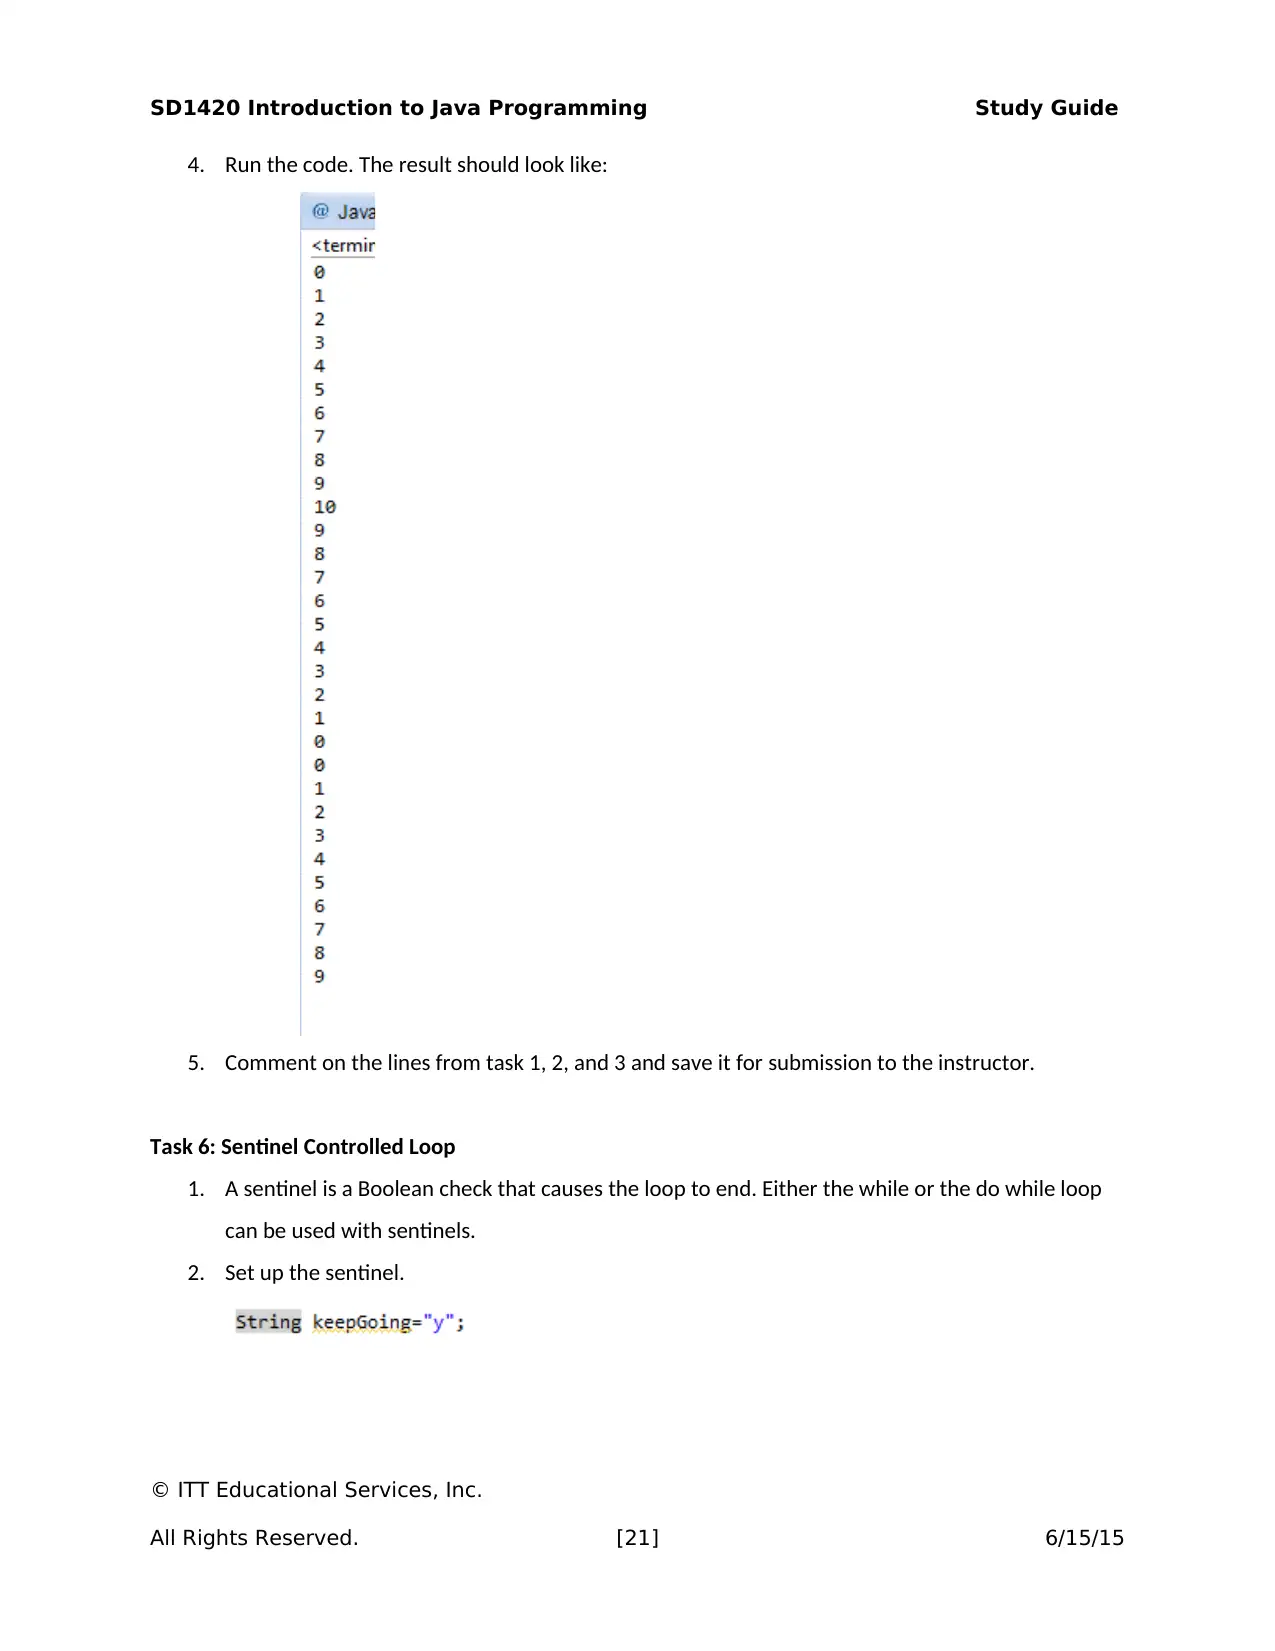
2. Run the code. The result should look like:
© ITT Educational Services, Inc.
All Rights Reserved. [19] 6/15/15
Paraphrase This Document
Need a fresh take? Get an instant paraphrase of this document with our AI Paraphraser
SD1420 Introduction to Java Programming Study Guide
Question 4: What is the difference between a pre-check loop and a post-check loop?
______________________________________________________________________
Task 5: Use For Loop.
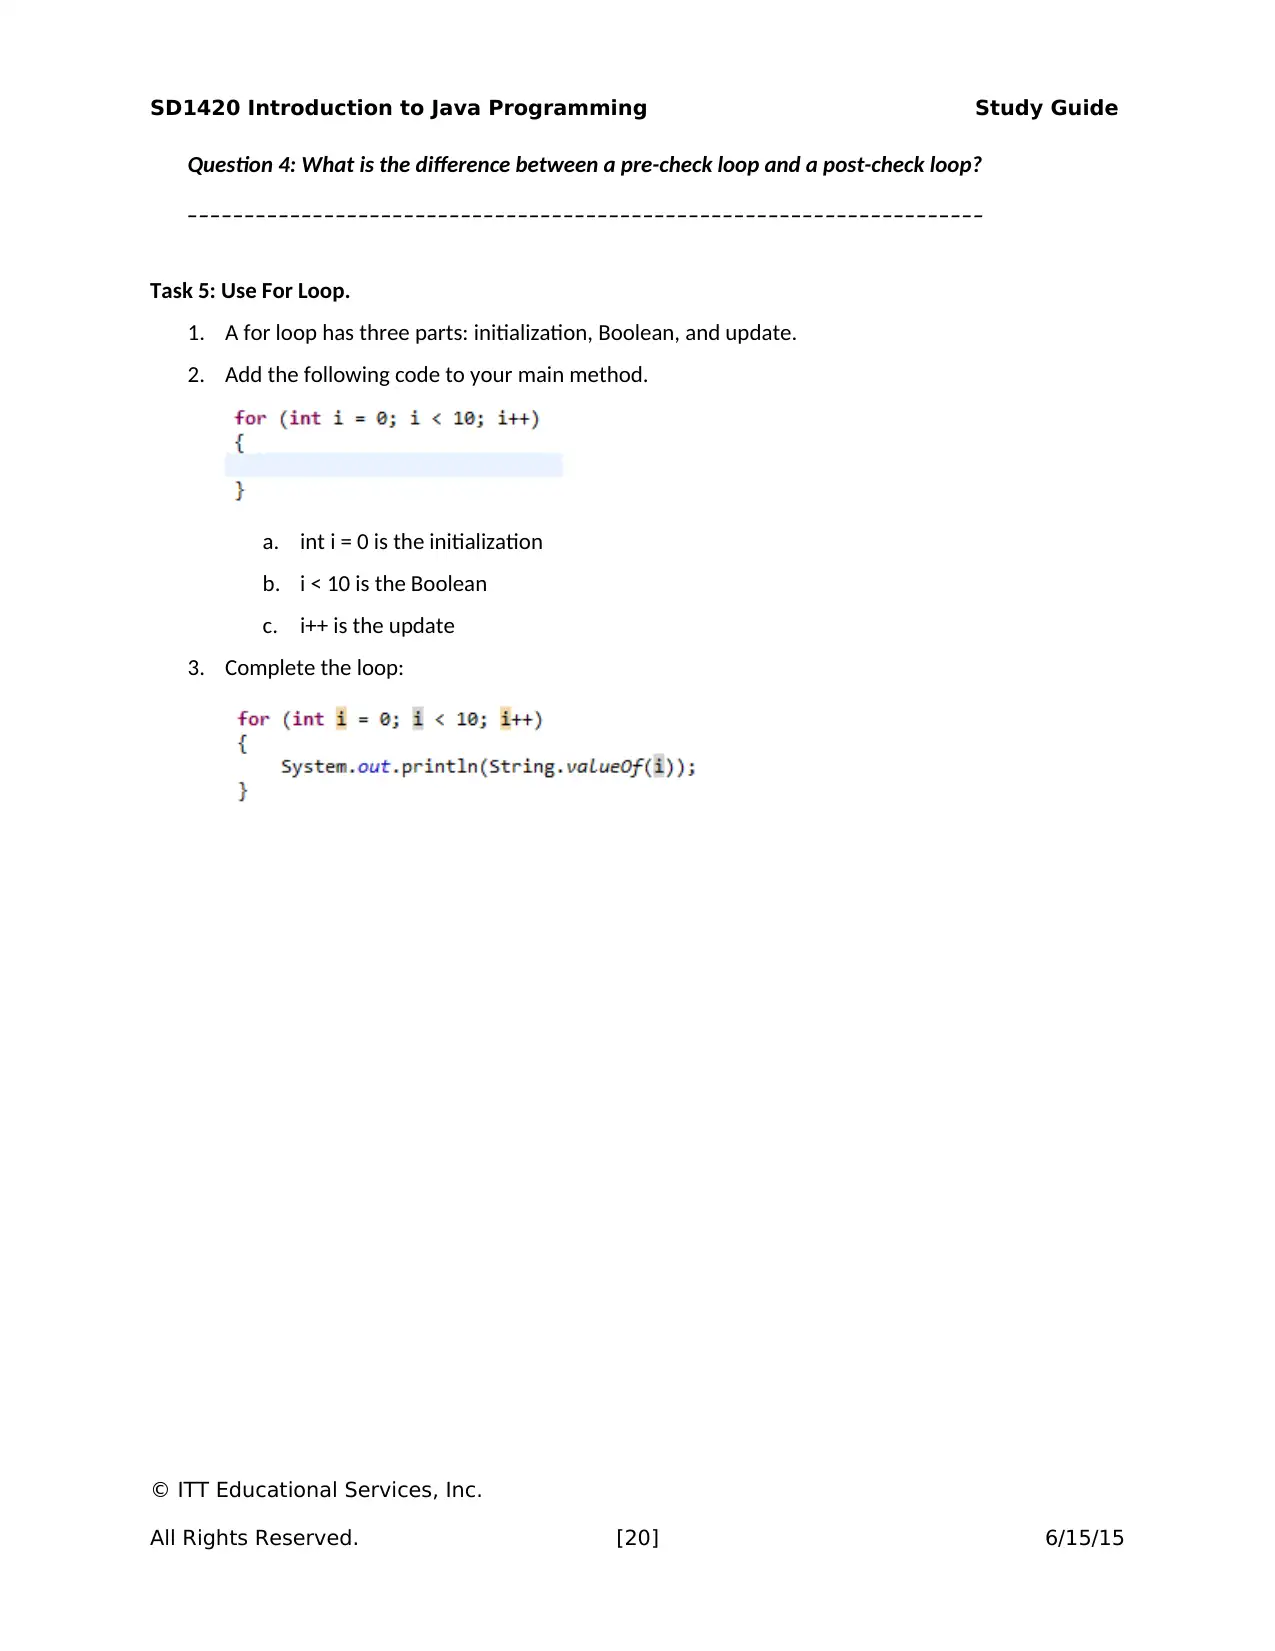
1. A for loop has three parts: initialization, Boolean, and update.
2. Add the following code to your main method.
a. int i = 0 is the initialization
b. i < 10 is the Boolean
c. i++ is the update
3. Complete the loop:
© ITT Educational Services, Inc.
All Rights Reserved. [20] 6/15/15
SD1420 Introduction to Java Programming Study Guide
4. Run the code. The result should look like:
5. Comment on the lines from task 1, 2, and 3 and save it for submission to the instructor.
Task 6: Sentinel Controlled Loop
1. A sentinel is a Boolean check that causes the loop to end. Either the while or the do while loop
can be used with sentinels.
2. Set up the sentinel.
© ITT Educational Services, Inc.
All Rights Reserved. [21] 6/15/15
SD1420 Introduction to Java Programming Study Guide
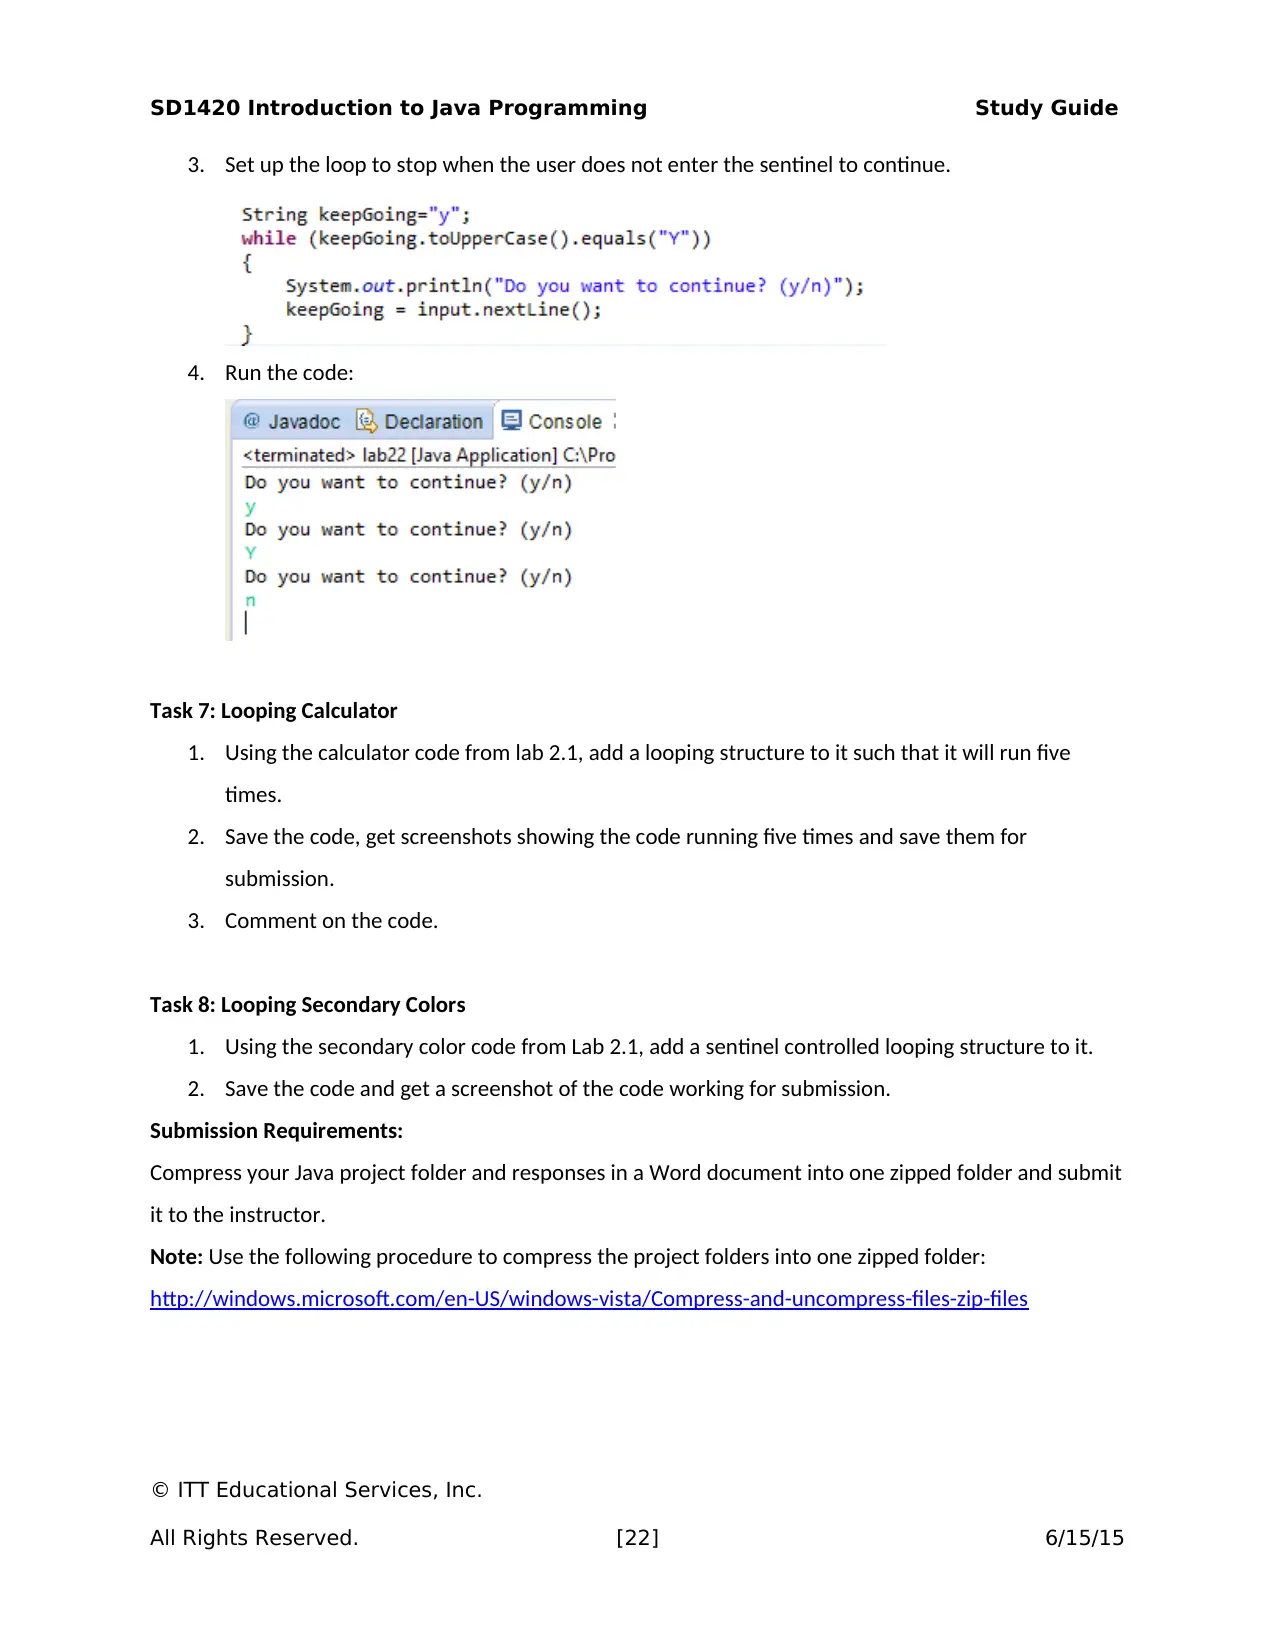
3. Set up the loop to stop when the user does not enter the sentinel to continue.
4. Run the code:
Task 7: Looping Calculator
1. Using the calculator code from lab 2.1, add a looping structure to it such that it will run five
times.
2. Save the code, get screenshots showing the code running five times and save them for
submission.
3. Comment on the code.
Task 8: Looping Secondary Colors
1. Using the secondary color code from Lab 2.1, add a sentinel controlled looping structure to it.
2. Save the code and get a screenshot of the code working for submission.
Submission Requirements:
Compress your Java project folder and responses in a Word document into one zipped folder and submit
it to the instructor.
Note: Use the following procedure to compress the project folders into one zipped folder:
http://windows.microsoft.com/en-US/windows-vista/Compress-and-uncompress-files-zip-files
© ITT Educational Services, Inc.
All Rights Reserved. [22] 6/15/15
Secure Best Marks with AI Grader
Need help grading? Try our AI Grader for instant feedback on your assignments.
SD1420 Introduction to Java Programming Study Guide
Evaluation Criteria:
The Lab rubric will be used to evaluate this assessment. Your submission will be evaluated against the
following criteria using the grading rubric:
Does the code meet all functional requirements?
Did you provide all requested screenshots in the worksheet?
Did you answer all questions?
Is the code is readable and documented?
© ITT Educational Services, Inc.
All Rights Reserved. [23] 6/15/15
SD1420 Introduction to Java Programming Study Guide
EXERCISE 2.1 (4.0 HOURS)
Assessment Preparation Checklist:
To prepare for this assessment:
Read Chapters 3–5 and 20 from your textbook, Introduction to Java Programming. These
chapters focus on selections, loops, and methods.
Go through the lesson for Module 2, which will introduce you to the common syntax and logical
errors made while programming and to ways to identify these errors.
Title: Debugging Programs with Loops and Switches
1. The following code has syntax errors in it. Fix the code by inserting the proper characters in a
red font. Assume the code that is not seen is OK and work only with what you see.
if (keepGoing.equals(“y”)
{
System.out.println(“Please enter a number”);
userInput = input.nextInt()
else
{
System.out.println(“Thanks for playing our game”);
}
2. There is a logic error in the code below. The user enters the date they are graduating on and the
code calculates how many days there are until graduation. If the student is within 60 days of
graduation the program will announce “almost done.” GetDays is a function that returns the
number of day in a date. Describe the logic error(s) in the given code and explain how to fix
them.
daysDifference = todaysDate – graduationDate;
daysToGraduate = GetDays(daysDifference);
if (daysToGraduate < 60)
{
System.out.printLn(“You are almost done”);
© ITT Educational Services, Inc.
All Rights Reserved. [24] 6/15/15
SD1420 Introduction to Java Programming Study Guide
}
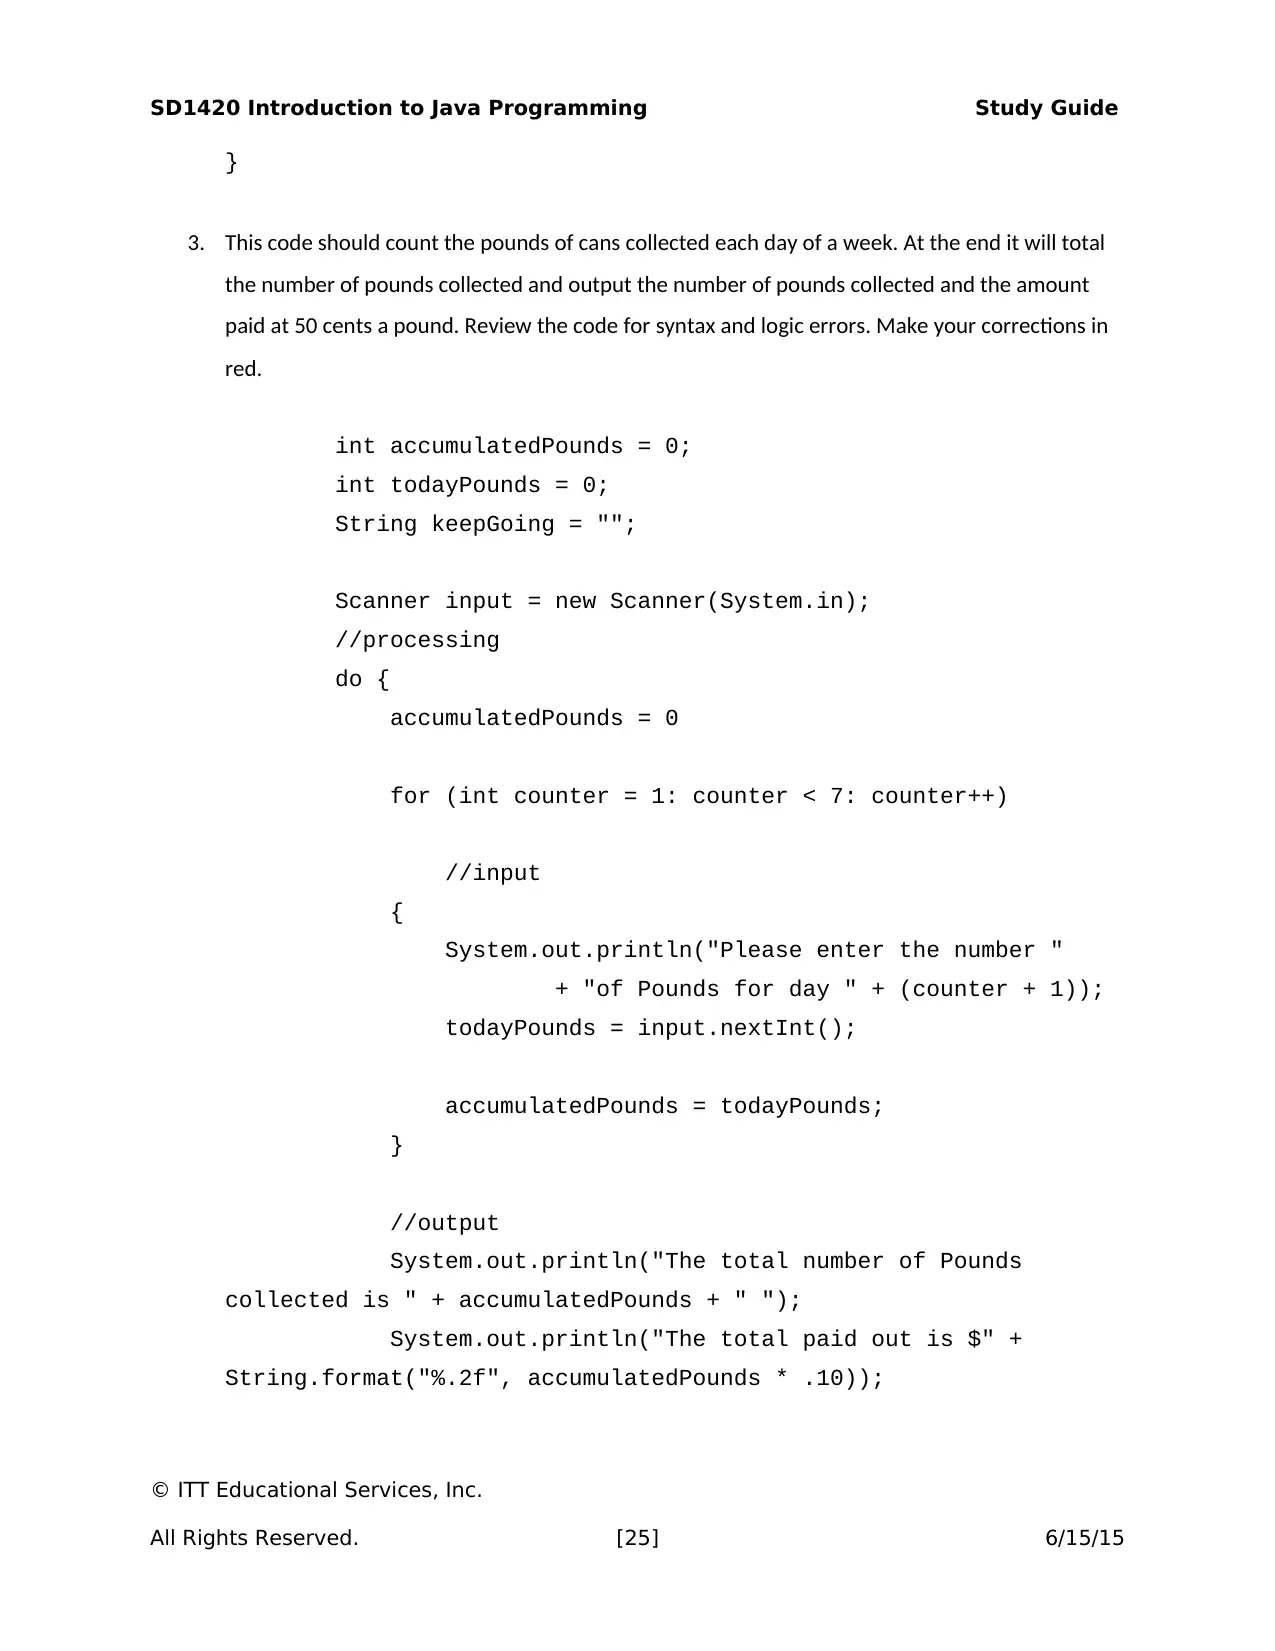
3. This code should count the pounds of cans collected each day of a week. At the end it will total
the number of pounds collected and output the number of pounds collected and the amount
paid at 50 cents a pound. Review the code for syntax and logic errors. Make your corrections in
red.
int accumulatedPounds = 0;
int todayPounds = 0;
String keepGoing = "";
Scanner input = new Scanner(System.in);
//processing
do {
accumulatedPounds = 0
for (int counter = 1: counter < 7: counter++)
//input
{
System.out.println("Please enter the number "
+ "of Pounds for day " + (counter + 1));
todayPounds = input.nextInt();
accumulatedPounds = todayPounds;
}
//output
System.out.println("The total number of Pounds
collected is " + accumulatedPounds + " ");
System.out.println("The total paid out is $" +
String.format("%.2f", accumulatedPounds * .10));
© ITT Educational Services, Inc.
All Rights Reserved. [25] 6/15/15
}
3. This code should count the pounds of cans collected each day of a week. At the end it will total
the number of pounds collected and output the number of pounds collected and the amount
paid at 50 cents a pound. Review the code for syntax and logic errors. Make your corrections in
red.
int accumulatedPounds = 0;
int todayPounds = 0;
String keepGoing = "";
Scanner input = new Scanner(System.in);
//processing
do {
accumulatedPounds = 0
for (int counter = 1: counter < 7: counter++)
//input
{
System.out.println("Please enter the number "
+ "of Pounds for day " + (counter + 1));
todayPounds = input.nextInt();
accumulatedPounds = todayPounds;
}
//output
System.out.println("The total number of Pounds
collected is " + accumulatedPounds + " ");
System.out.println("The total paid out is $" +
String.format("%.2f", accumulatedPounds * .10));
© ITT Educational Services, Inc.
All Rights Reserved. [25] 6/15/15
Paraphrase This Document
Need a fresh take? Get an instant paraphrase of this document with our AI Paraphraser
SD1420 Introduction to Java Programming Study Guide
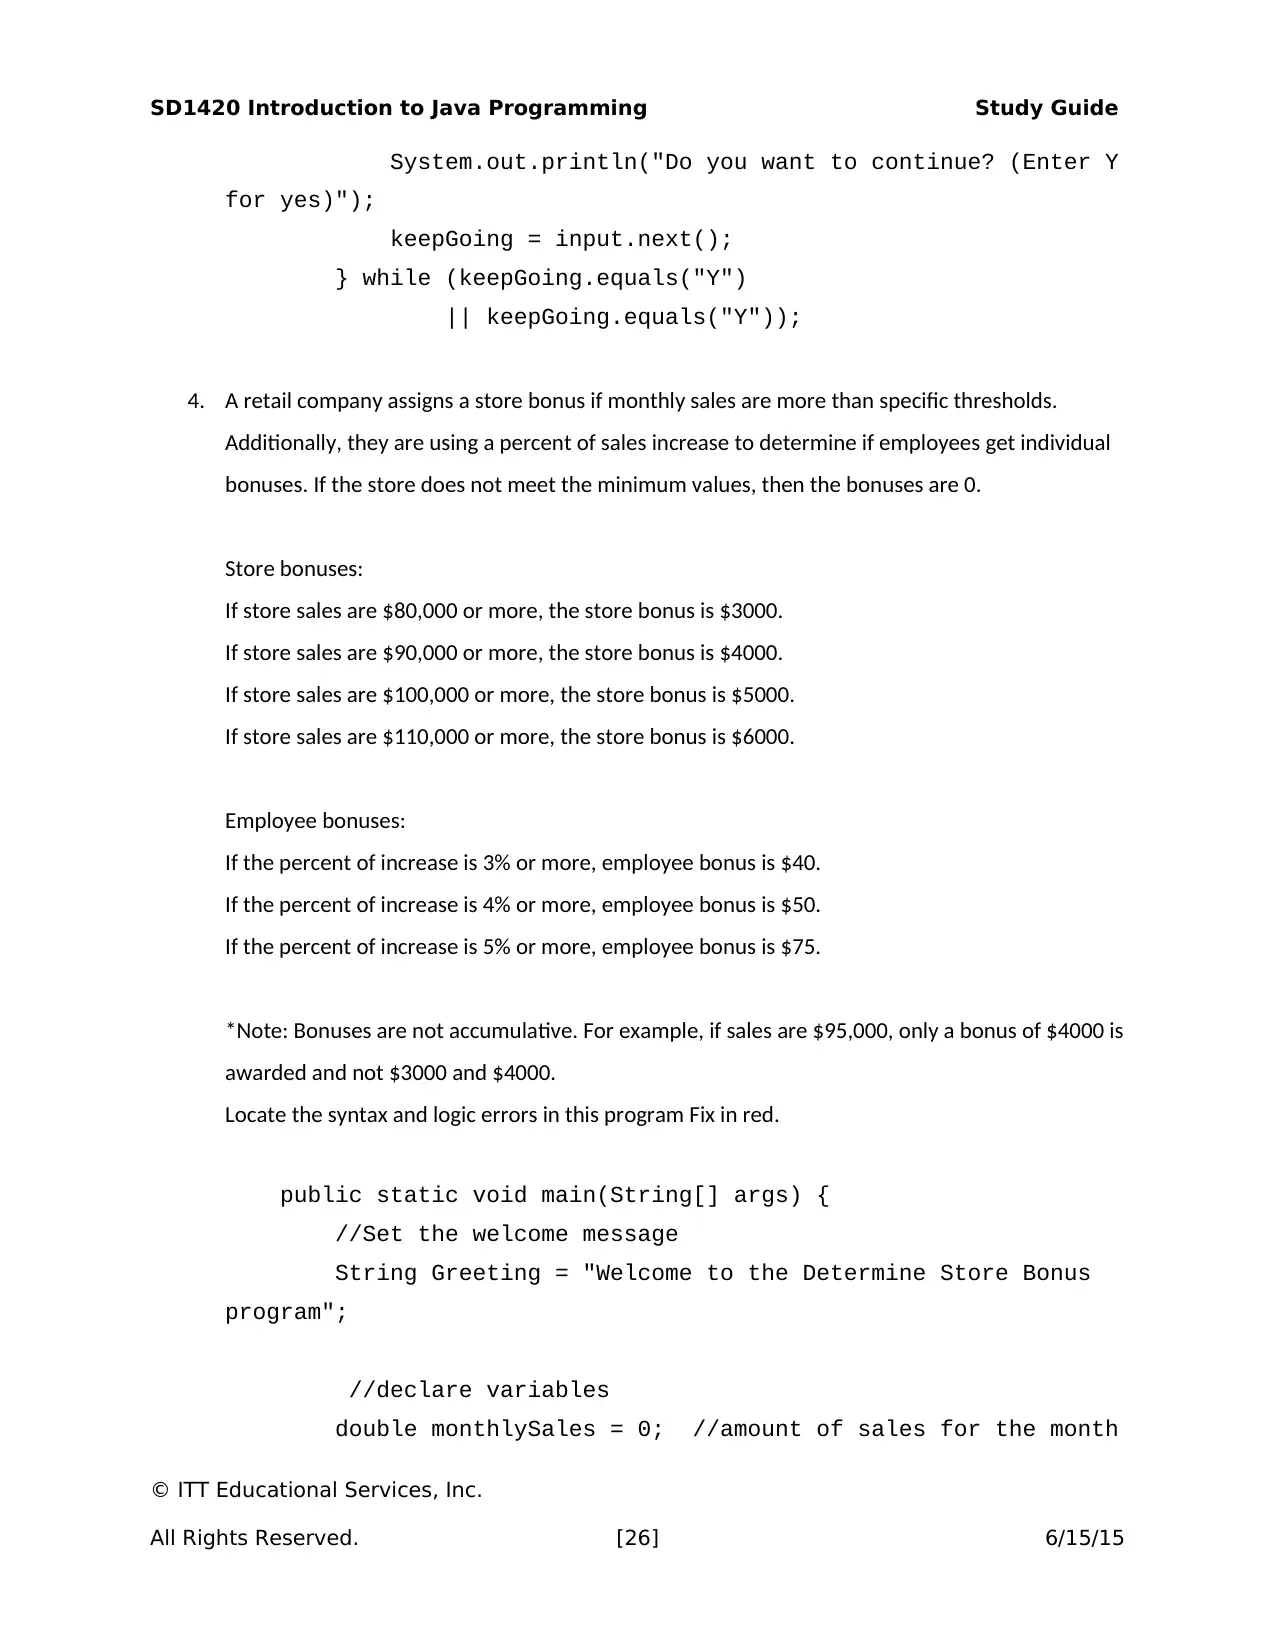
System.out.println("Do you want to continue? (Enter Y
for yes)");
keepGoing = input.next();
} while (keepGoing.equals("Y")
|| keepGoing.equals("Y"));
4. A retail company assigns a store bonus if monthly sales are more than specific thresholds.
Additionally, they are using a percent of sales increase to determine if employees get individual
bonuses. If the store does not meet the minimum values, then the bonuses are 0.
Store bonuses:
If store sales are $80,000 or more, the store bonus is $3000.
If store sales are $90,000 or more, the store bonus is $4000.
If store sales are $100,000 or more, the store bonus is $5000.
If store sales are $110,000 or more, the store bonus is $6000.
Employee bonuses:
If the percent of increase is 3% or more, employee bonus is $40.
If the percent of increase is 4% or more, employee bonus is $50.
If the percent of increase is 5% or more, employee bonus is $75.
*Note: Bonuses are not accumulative. For example, if sales are $95,000, only a bonus of $4000 is
awarded and not $3000 and $4000.
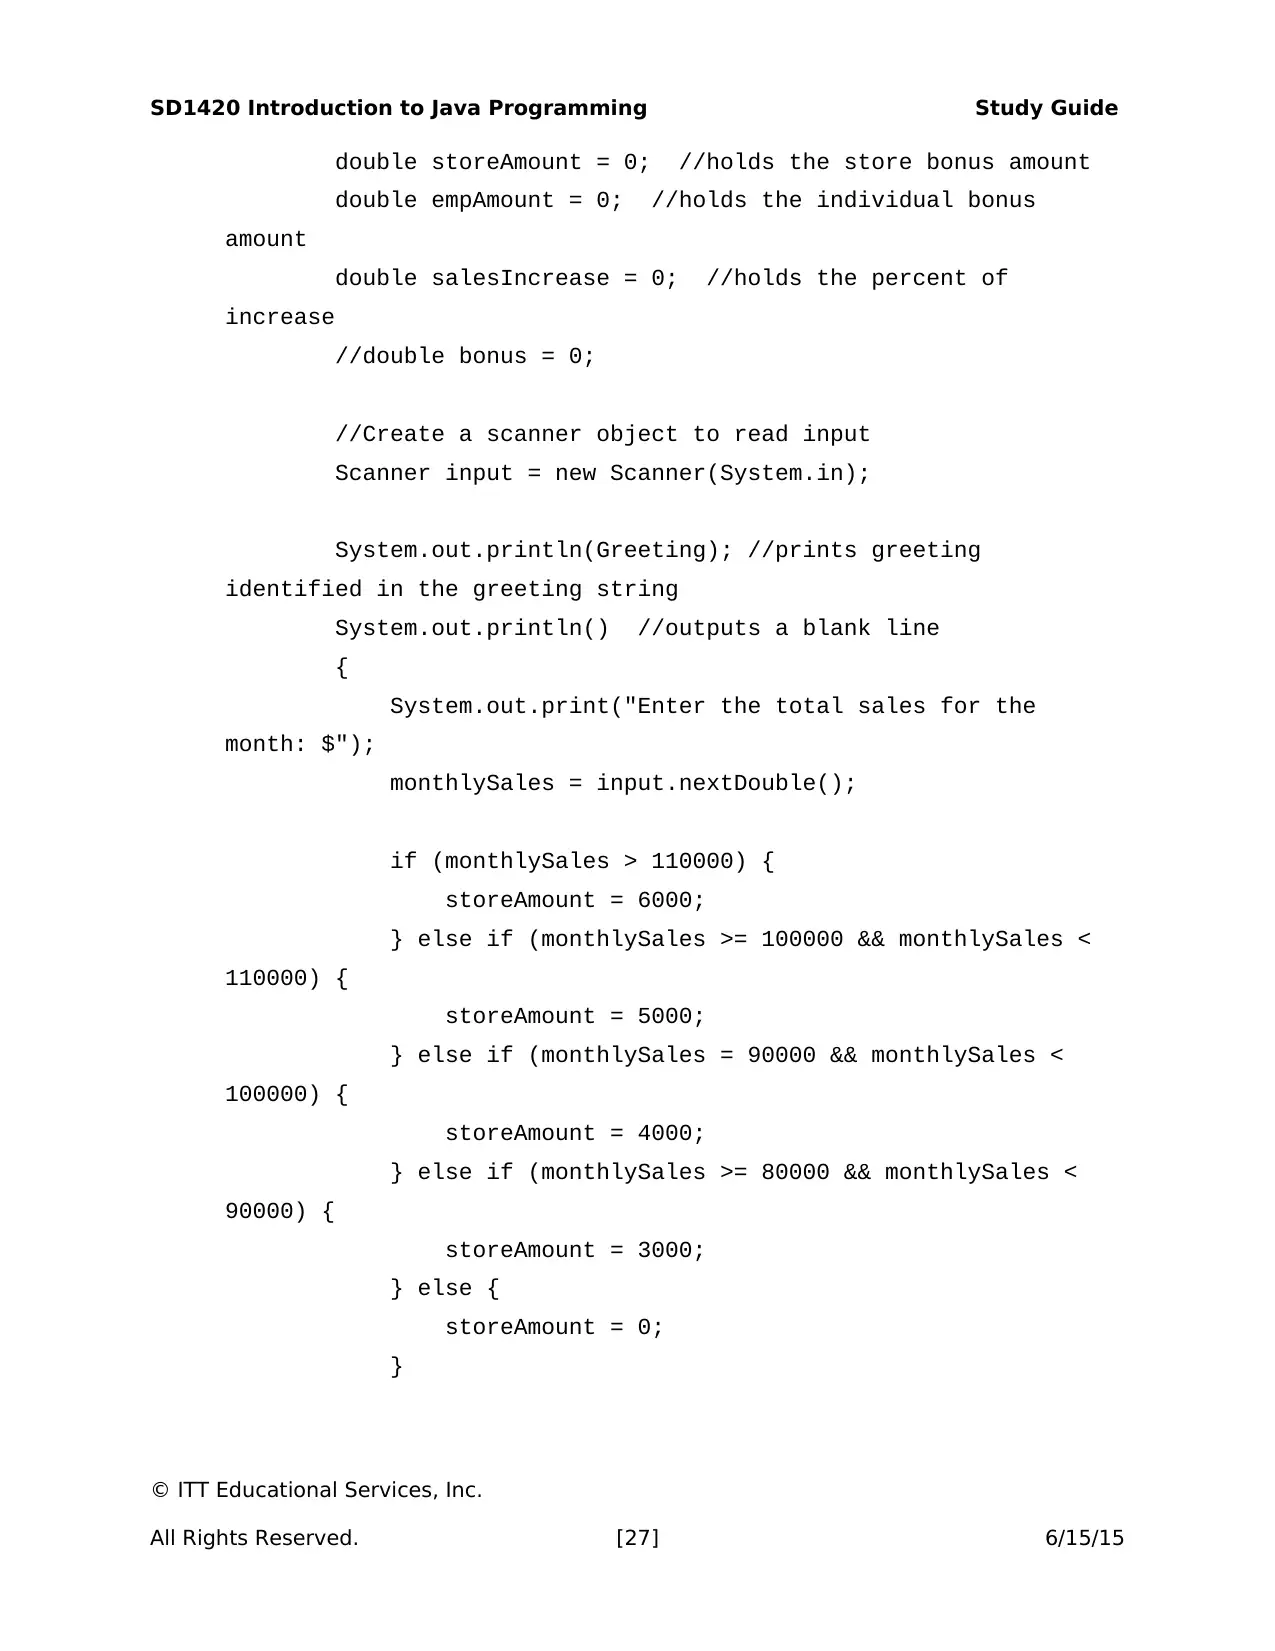
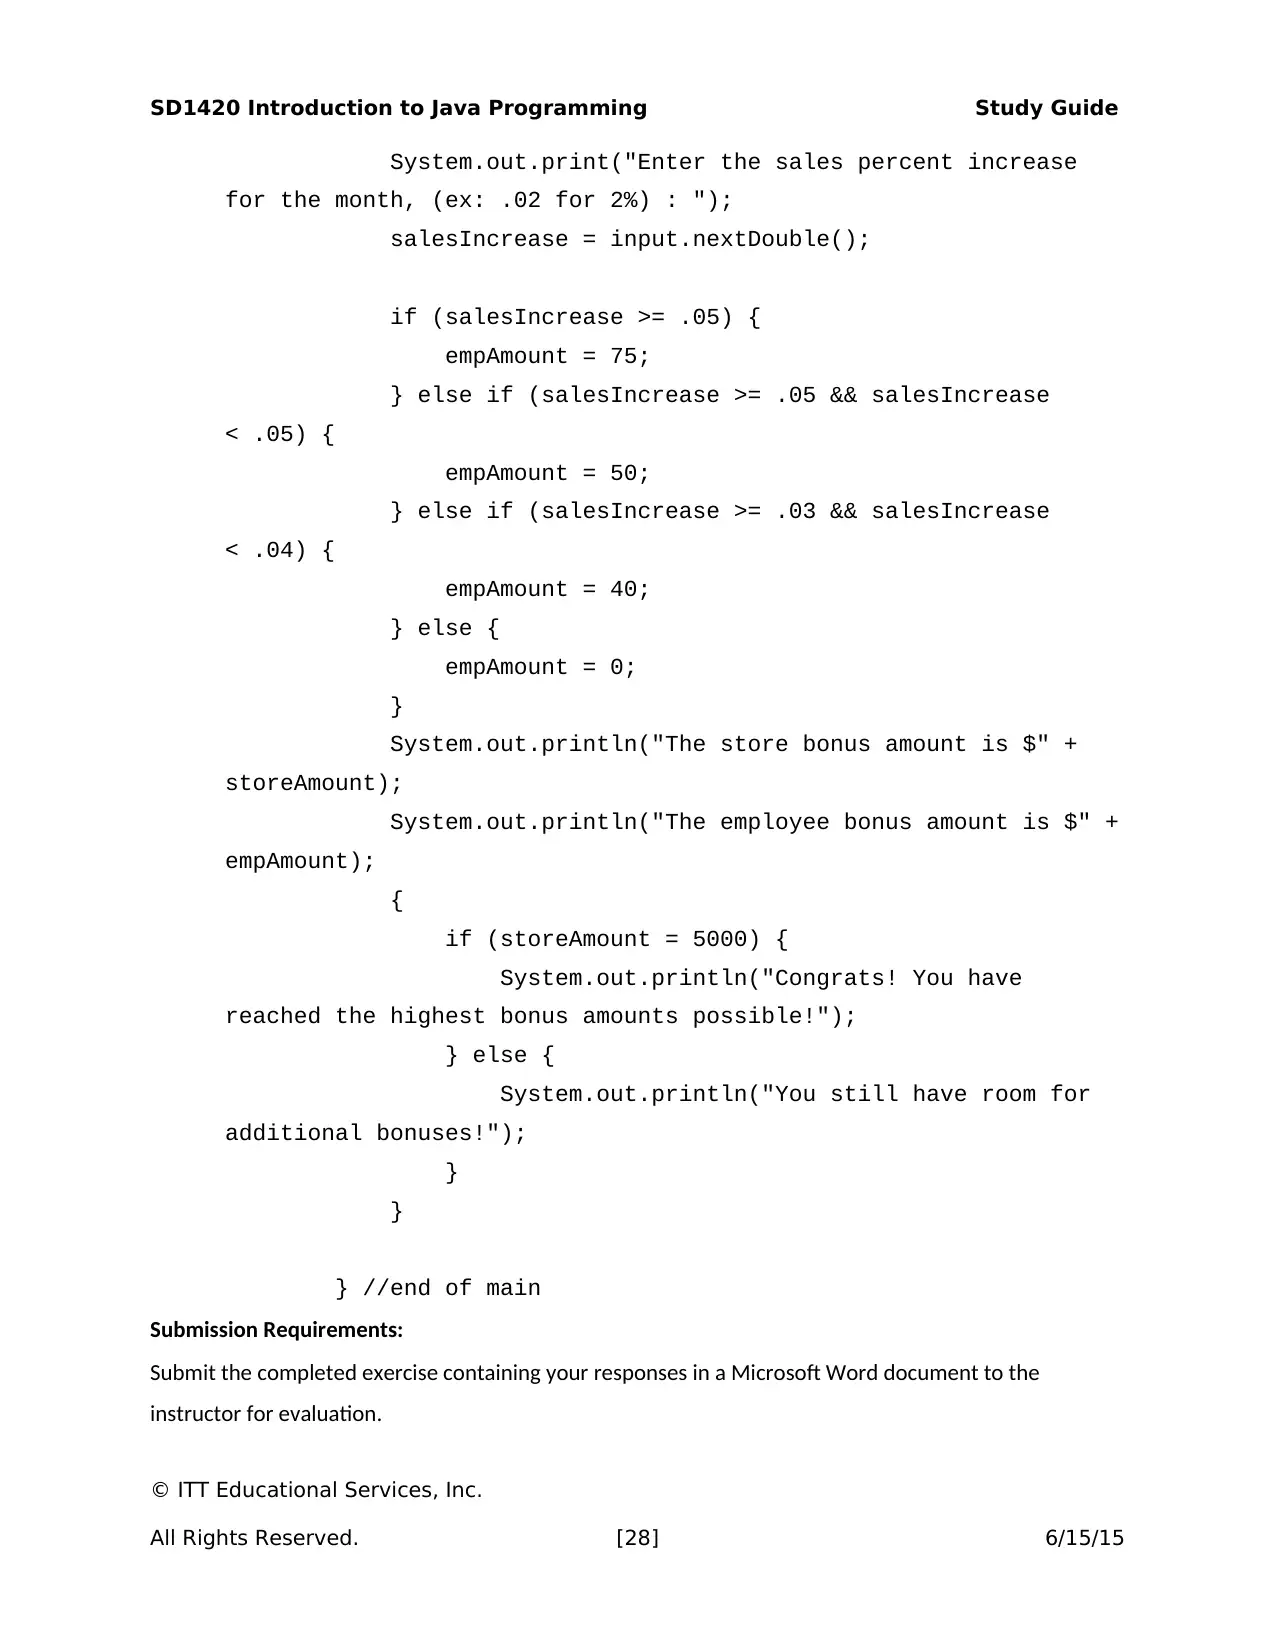
Locate the syntax and logic errors in this program Fix in red.
public static void main(String[] args) {
//Set the welcome message
String Greeting = "Welcome to the Determine Store Bonus
program";
//declare variables
double monthlySales = 0; //amount of sales for the month
© ITT Educational Services, Inc.
All Rights Reserved. [26] 6/15/15
SD1420 Introduction to Java Programming Study Guide
double storeAmount = 0; //holds the store bonus amount
double empAmount = 0; //holds the individual bonus
amount
double salesIncrease = 0; //holds the percent of
increase
//double bonus = 0;
//Create a scanner object to read input
Scanner input = new Scanner(System.in);
System.out.println(Greeting); //prints greeting
identified in the greeting string
System.out.println() //outputs a blank line
{
System.out.print("Enter the total sales for the
month: $");
monthlySales = input.nextDouble();
if (monthlySales > 110000) {
storeAmount = 6000;
} else if (monthlySales >= 100000 && monthlySales <
110000) {
storeAmount = 5000;
} else if (monthlySales = 90000 && monthlySales <
100000) {
storeAmount = 4000;
} else if (monthlySales >= 80000 && monthlySales <
90000) {
storeAmount = 3000;
} else {
storeAmount = 0;
}
© ITT Educational Services, Inc.
All Rights Reserved. [27] 6/15/15
SD1420 Introduction to Java Programming Study Guide
System.out.print("Enter the sales percent increase
for the month, (ex: .02 for 2%) : ");
salesIncrease = input.nextDouble();
if (salesIncrease >= .05) {
empAmount = 75;
} else if (salesIncrease >= .05 && salesIncrease
< .05) {
empAmount = 50;
} else if (salesIncrease >= .03 && salesIncrease
< .04) {
empAmount = 40;
} else {
empAmount = 0;
}
System.out.println("The store bonus amount is $" +
storeAmount);
System.out.println("The employee bonus amount is $" +
empAmount);
{
if (storeAmount = 5000) {
System.out.println("Congrats! You have
reached the highest bonus amounts possible!");
} else {
System.out.println("You still have room for
additional bonuses!");
}
}
} //end of main
Submission Requirements:
Submit the completed exercise containing your responses in a Microsoft Word document to the
instructor for evaluation.
© ITT Educational Services, Inc.
All Rights Reserved. [28] 6/15/15
Secure Best Marks with AI Grader
Need help grading? Try our AI Grader for instant feedback on your assignments.

SD1420 Introduction to Java Programming Study Guide
Evaluation Criteria:
Your submission will be evaluated against the following criteria:
Did you answer all the questions correctly?
Did you support your answers with relevant coding wherever required?
© ITT Educational Services, Inc.
All Rights Reserved. [29] 6/15/15
Evaluation Criteria:
Your submission will be evaluated against the following criteria:
Did you answer all the questions correctly?
Did you support your answers with relevant coding wherever required?
© ITT Educational Services, Inc.
All Rights Reserved. [29] 6/15/15
SD1420 Introduction to Java Programming Study Guide
QUIZ 1 (1.0 HOUR)
Assessment Preparation Checklist:
To prepare for this assessment:
Read Chapters 1 and 2 from the textbook Introduction to Java Programming.
Go through the lesson for Module 1, which discusses the basics of elementary programming and
Java.
Title: Quiz 1
Take the quiz based on the concepts covered in Module 1.
© ITT Educational Services, Inc.
All Rights Reserved. [30] 6/15/15
SD1420 Introduction to Java Programming Study Guide
DISCUSSION 3.1 (2.0 HOURS)
Title: Arrays, Objects, and Classes
Think of an example in your daily life where you have a list of items that derive from a blueprint and you
instantiate.
Define item and list. Define the base class attributes and some extra attributes for each class and the
instantiation of the items. Share them with your classmates and be sure to be unique.
Participation Requirements:
Respond to at least two of your classmates. When responding:
Provide complete, well-thought-out responses.
Ask questions, share experiences, challenge ideas, and help your peers expand their responses.
Note: One-sentence answers will not be sufficient. If your answer is "I agree" or "I disagree," explain
why you agree or disagree. Remember that a discussion is an opportunity to interact with your
classmates. Observe discussion etiquette: Be respectful, kind, and nonjudgmental of your classmates.
Evaluation Criteria:
The Discussion rubric will be used to evaluate this assessment.
© ITT Educational Services, Inc.
All Rights Reserved. [31] 6/15/15
Paraphrase This Document
Need a fresh take? Get an instant paraphrase of this document with our AI Paraphraser
SD1420 Introduction to Java Programming Study Guide
LAB 3.1 (2.0 HOURS)
Assessment Preparation Checklist:
To prepare for this assessment:
Read Chapters 6 and 7 from your textbook, Introduction to Java Programming. These chapters
focus on single and multidimensional arrays.
Go through the lesson for Module 3, which explains how to use arrays in programming.
Title: Working with Arrays
In this lab, you will use arrays in your Java program.
Required Setup and Resources:
A virtual machine with Eclipse installed
Microsoft Word
Recommended Procedures:
Task 1: Create an Eclipse Project.
1. Create a new project.
2. In ITT-Lab, launch Eclipse.
3. Click File > New > Java Project.
© ITT Educational Services, Inc.
All Rights Reserved. [32] 6/15/15
SD1420 Introduction to Java Programming Study Guide
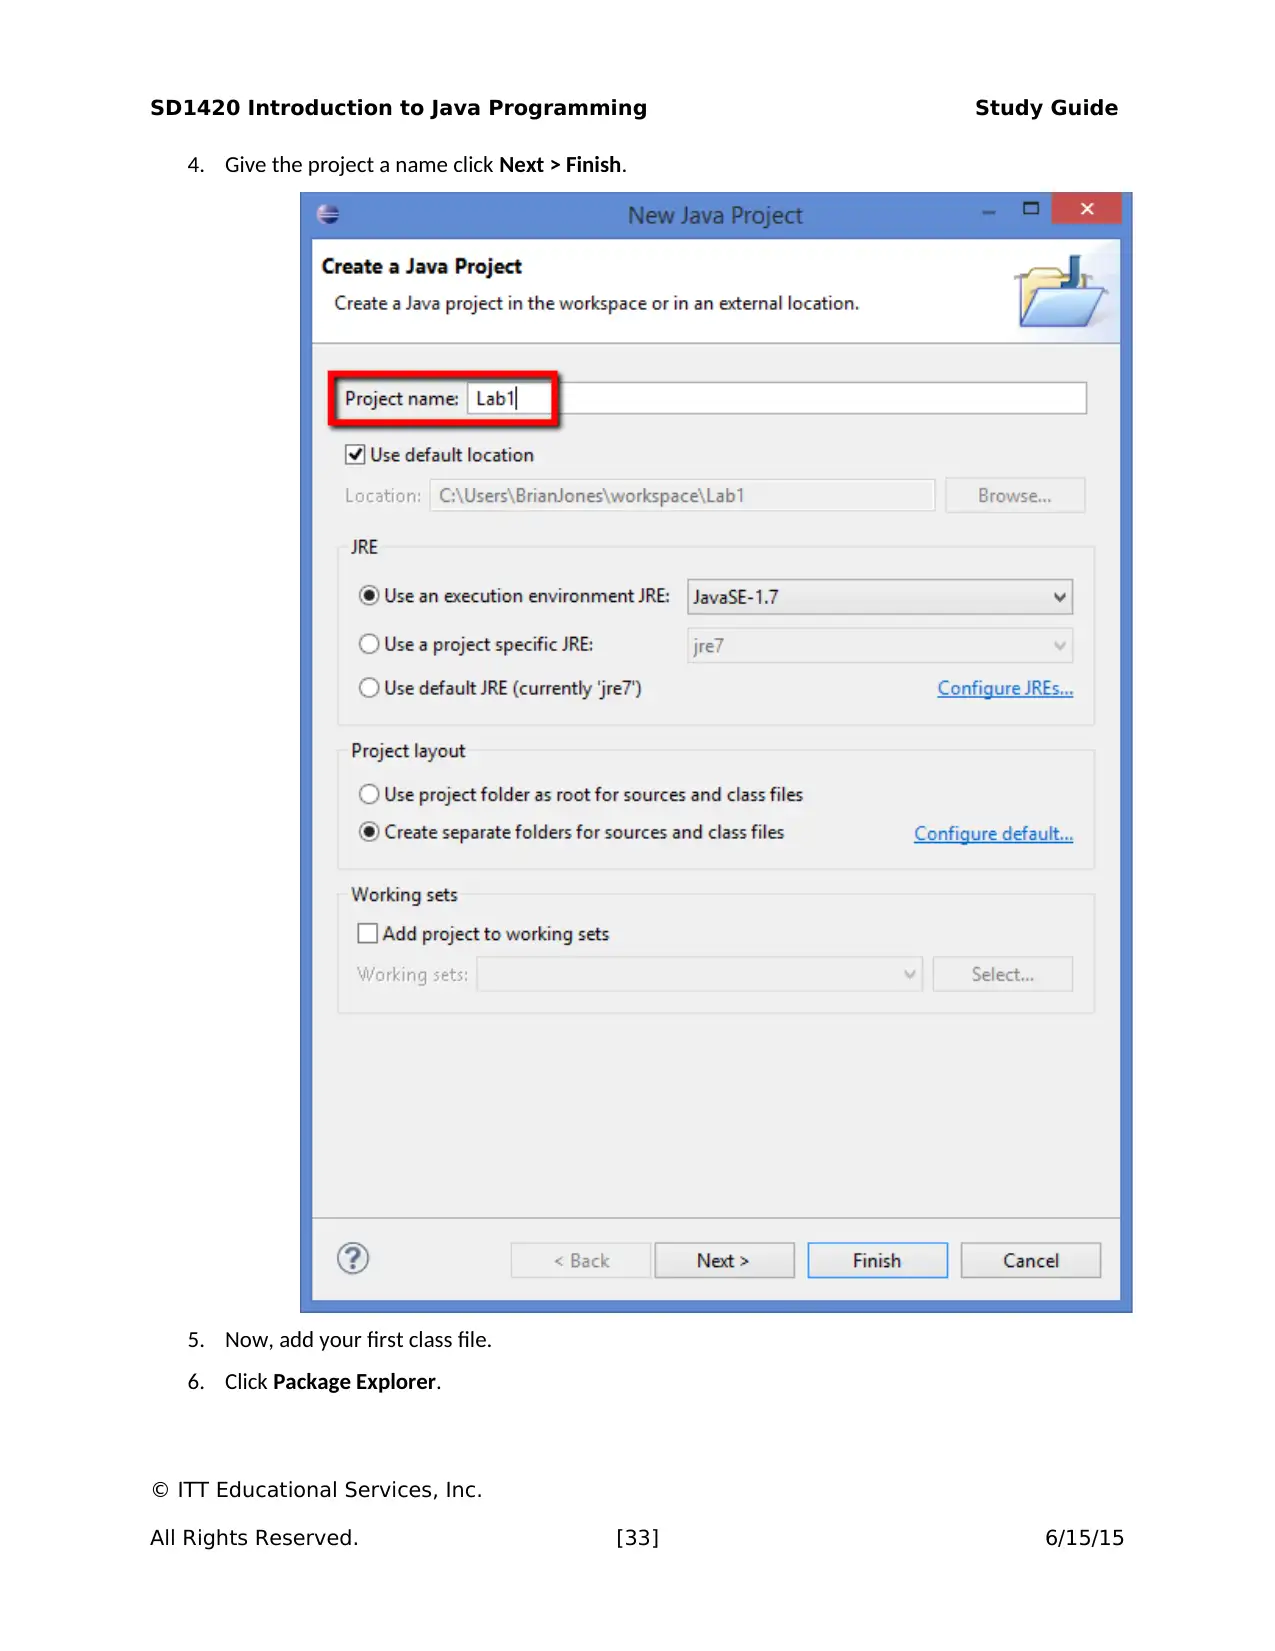
4. Give the project a name click Next > Finish.
5. Now, add your first class file.
6. Click Package Explorer.
© ITT Educational Services, Inc.
All Rights Reserved. [33] 6/15/15
4. Give the project a name click Next > Finish.
5. Now, add your first class file.
6. Click Package Explorer.
© ITT Educational Services, Inc.
All Rights Reserved. [33] 6/15/15
SD1420 Introduction to Java Programming Study Guide
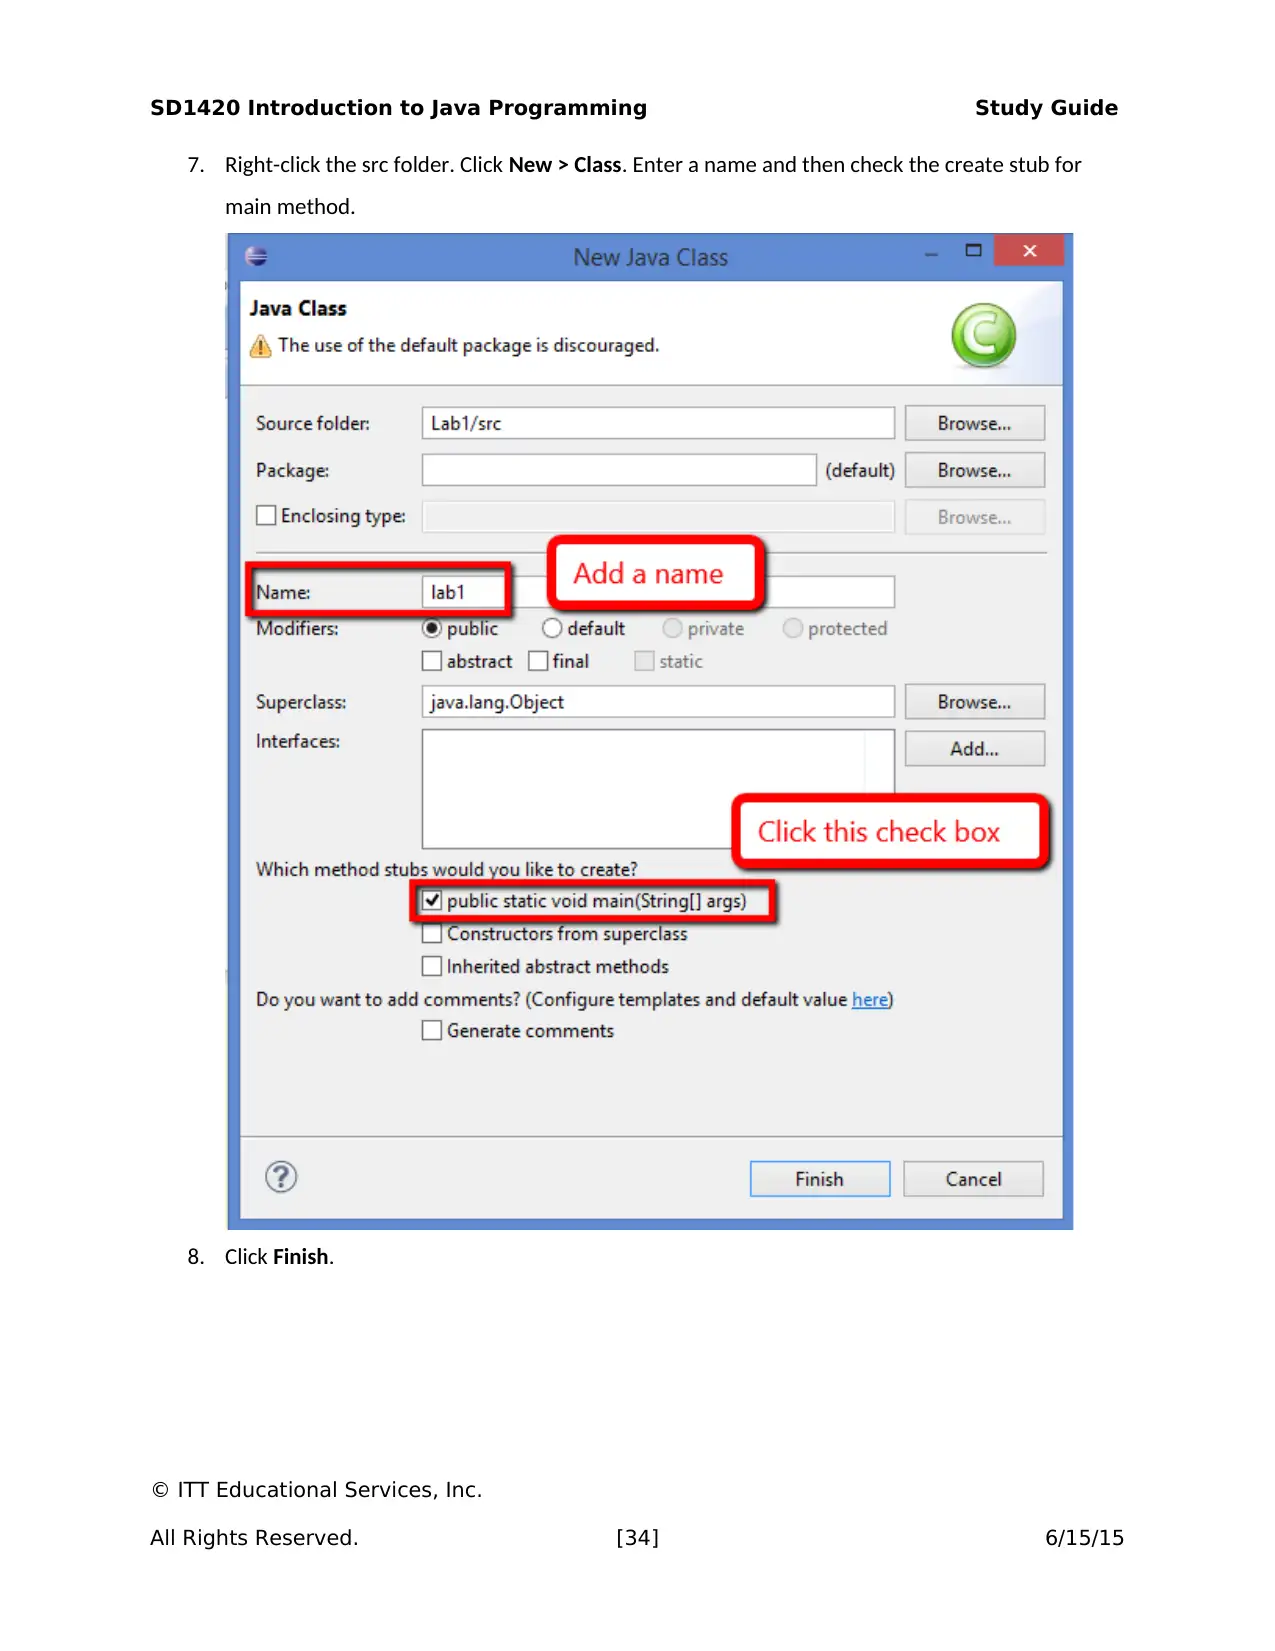
7. Right-click the src folder. Click New > Class. Enter a name and then check the create stub for
main method.
8. Click Finish.
© ITT Educational Services, Inc.
All Rights Reserved. [34] 6/15/15
7. Right-click the src folder. Click New > Class. Enter a name and then check the create stub for
main method.
8. Click Finish.
© ITT Educational Services, Inc.
All Rights Reserved. [34] 6/15/15
Secure Best Marks with AI Grader
Need help grading? Try our AI Grader for instant feedback on your assignments.
SD1420 Introduction to Java Programming Study Guide
Task 2: Create a Menu.
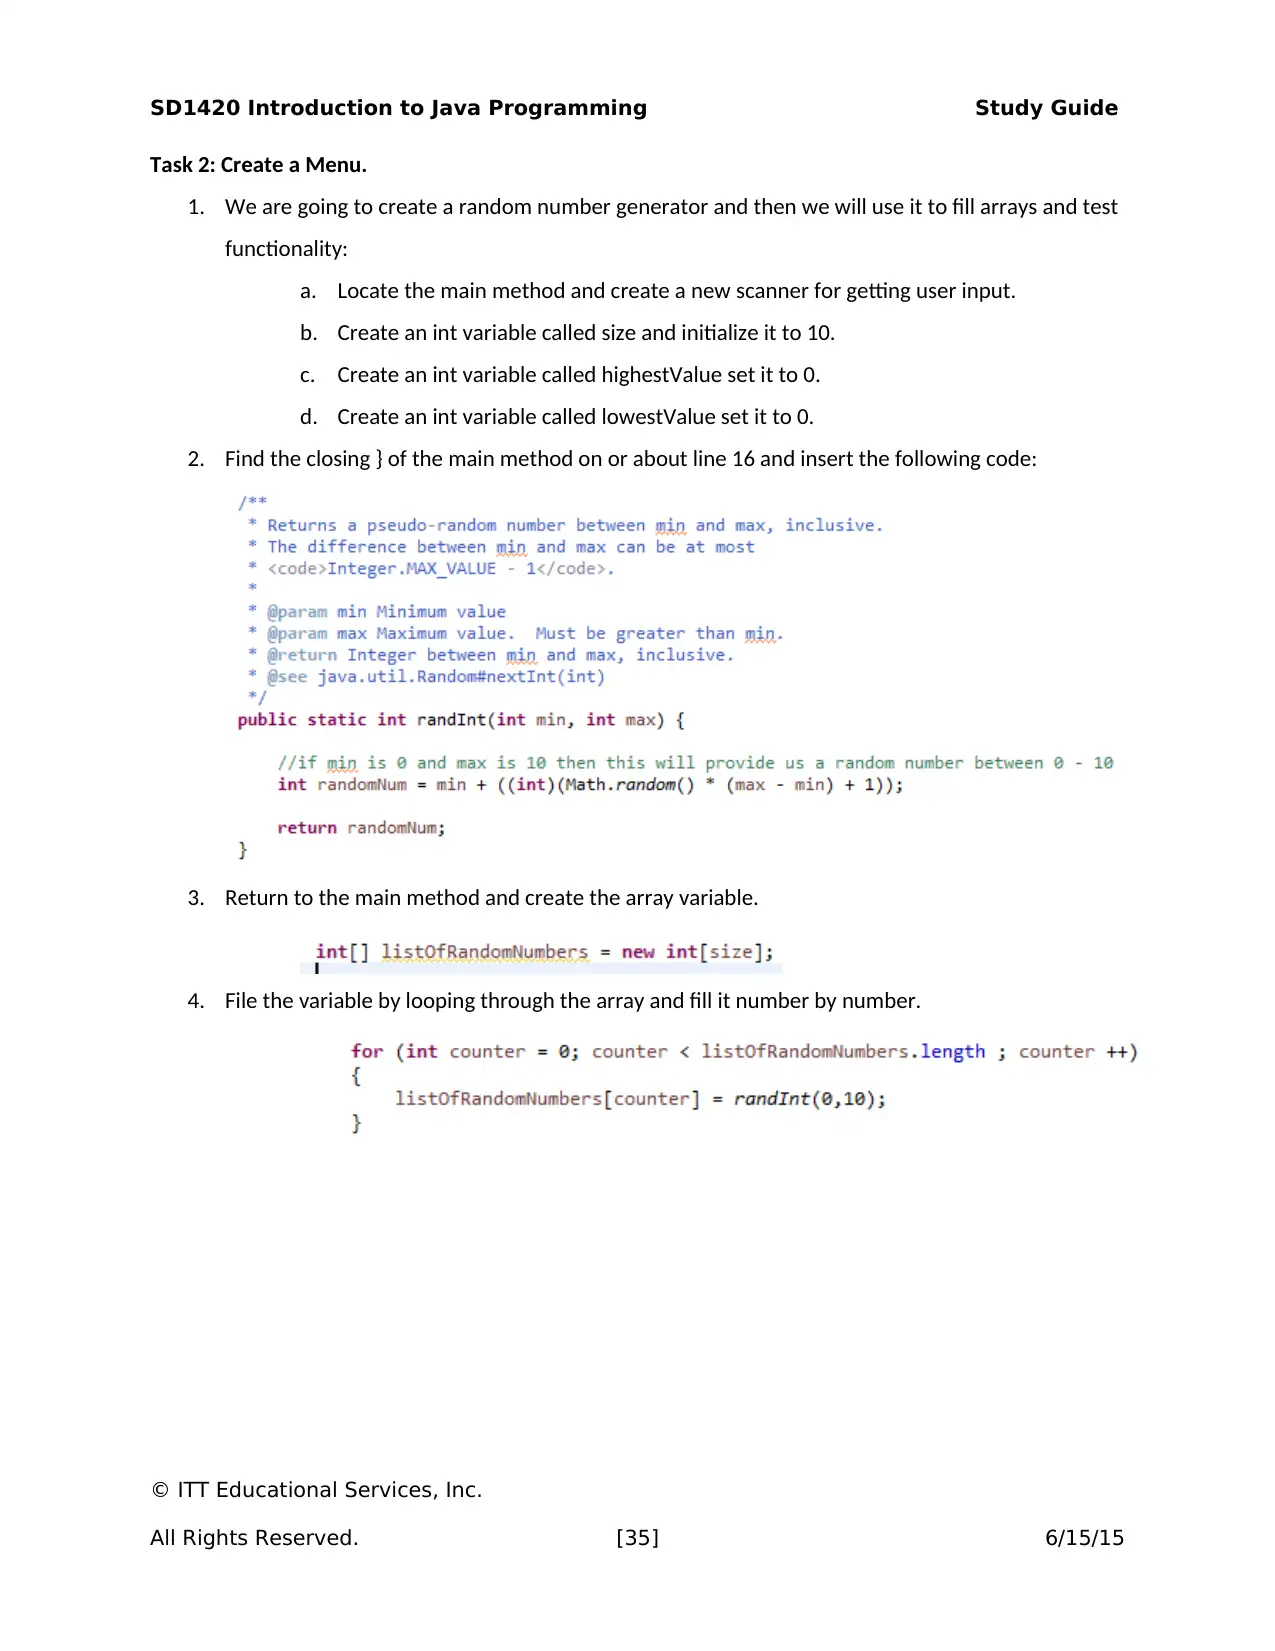
1. We are going to create a random number generator and then we will use it to fill arrays and test
functionality:
a. Locate the main method and create a new scanner for getting user input.
b. Create an int variable called size and initialize it to 10.
c. Create an int variable called highestValue set it to 0.
d. Create an int variable called lowestValue set it to 0.
2. Find the closing } of the main method on or about line 16 and insert the following code:
3. Return to the main method and create the array variable.
4. File the variable by looping through the array and fill it number by number.
© ITT Educational Services, Inc.
All Rights Reserved. [35] 6/15/15
SD1420 Introduction to Java Programming Study Guide
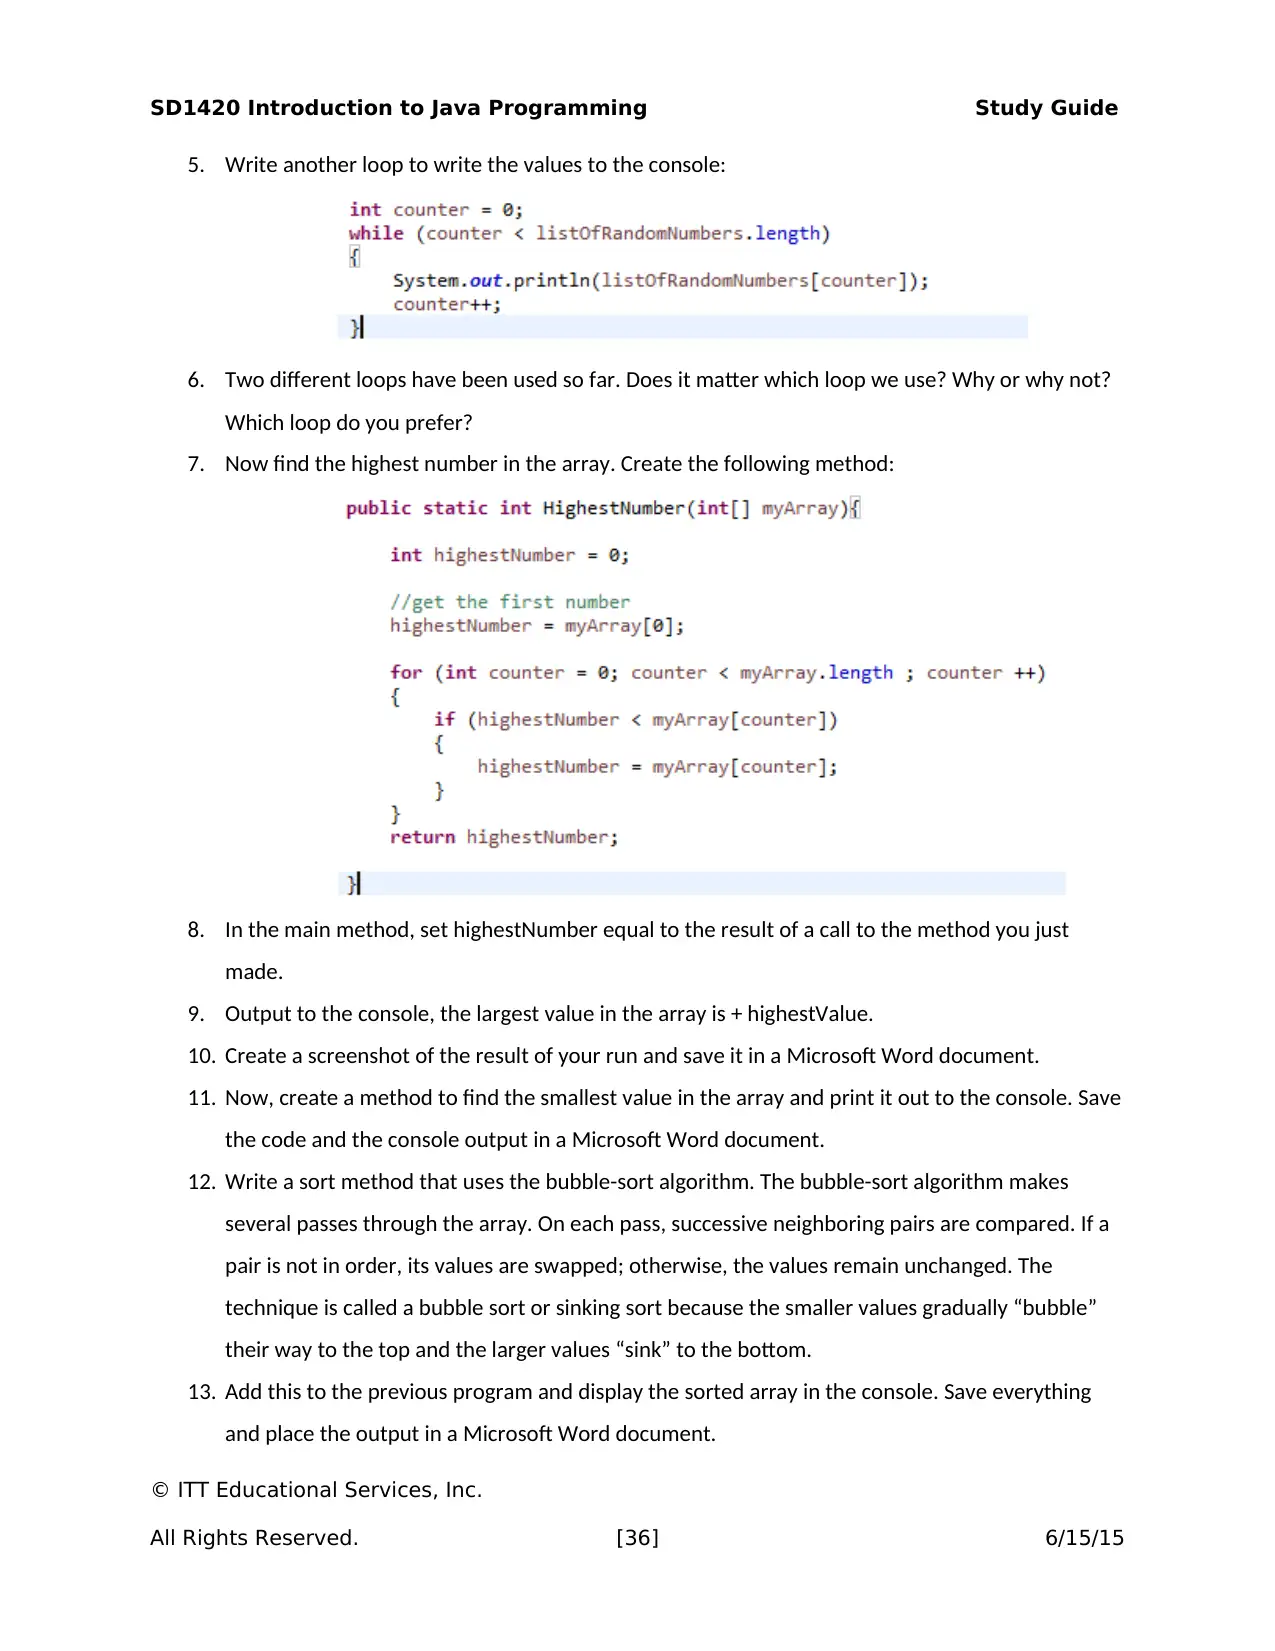
5. Write another loop to write the values to the console:
6. Two different loops have been used so far. Does it matter which loop we use? Why or why not?
Which loop do you prefer?
7. Now find the highest number in the array. Create the following method:
8. In the main method, set highestNumber equal to the result of a call to the method you just
made.
9. Output to the console, the largest value in the array is + highestValue.
10. Create a screenshot of the result of your run and save it in a Microsoft Word document.
11. Now, create a method to find the smallest value in the array and print it out to the console. Save
the code and the console output in a Microsoft Word document.
12. Write a sort method that uses the bubble-sort algorithm. The bubble-sort algorithm makes
several passes through the array. On each pass, successive neighboring pairs are compared. If a
pair is not in order, its values are swapped; otherwise, the values remain unchanged. The
technique is called a bubble sort or sinking sort because the smaller values gradually “bubble”
their way to the top and the larger values “sink” to the bottom.
13. Add this to the previous program and display the sorted array in the console. Save everything
and place the output in a Microsoft Word document.
© ITT Educational Services, Inc.
All Rights Reserved. [36] 6/15/15
SD1420 Introduction to Java Programming Study Guide
Submission Requirements:
Compress your Java project folder and responses in a Word document into one zipped folder and submit
it to the instructor.
Note: Use the following procedure to compress the project folders into one zipped folder:
http://windows.microsoft.com/en-US/windows-vista/Compress-and-uncompress-files-zip-files
Evaluation Criteria:
The Lab rubric will be used to evaluate this assessment. Your submission will be evaluated against the
following criteria using the grading rubric:
Does the code meet all functional requirements?
Did you provide all requested screenshots in the worksheet?
Did you answer all questions?
Is the code is readable and documented?
© ITT Educational Services, Inc.
All Rights Reserved. [37] 6/15/15
Paraphrase This Document
Need a fresh take? Get an instant paraphrase of this document with our AI Paraphraser
SD1420 Introduction to Java Programming Study Guide
LAB 3.2 (2.0 HOURS)
Assessment Preparation Checklist:
To prepare for this assessment:
Read Chapter 8 from your textbook, Introduction to Java Programming. This chapter focuses on
objects and classes in programming.
Go through the lesson for Module 3, which covers the basics of using use objects and classes in
programming.
Title: Working with Objects and Classes
In this lab, you will use objects and classes in your Java programs.
Required Setup and Resources:
A virtual machine with Eclipse installed
Microsoft Word
Recommended Procedures:
Task 1: Create an Eclipse Project.
1. First step will be to create a new project.
2. In ITT-Lab, launch Eclipse.
3. Click File > New > Java Project.
© ITT Educational Services, Inc.
All Rights Reserved. [38] 6/15/15
SD1420 Introduction to Java Programming Study Guide
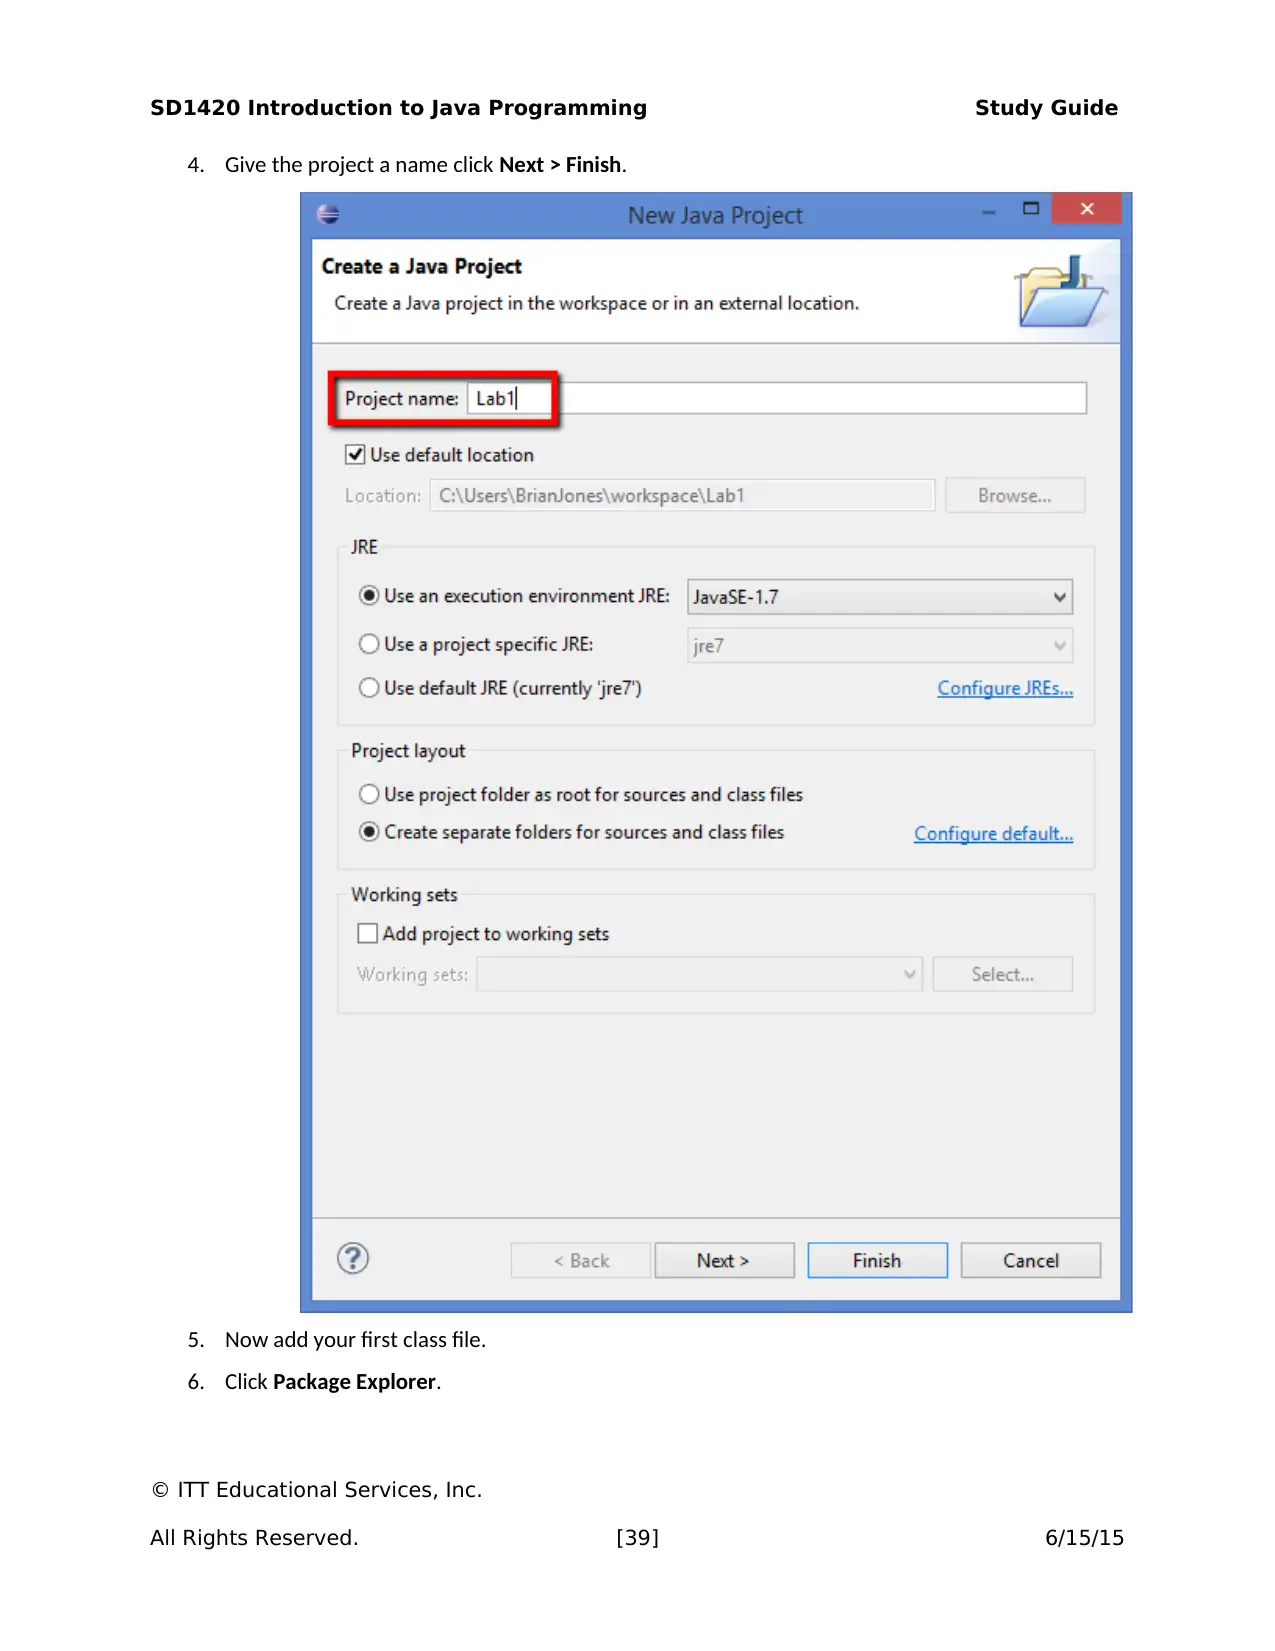
4. Give the project a name click Next > Finish.
5. Now add your first class file.
6. Click Package Explorer.
© ITT Educational Services, Inc.
All Rights Reserved. [39] 6/15/15
4. Give the project a name click Next > Finish.
5. Now add your first class file.
6. Click Package Explorer.
© ITT Educational Services, Inc.
All Rights Reserved. [39] 6/15/15
SD1420 Introduction to Java Programming Study Guide
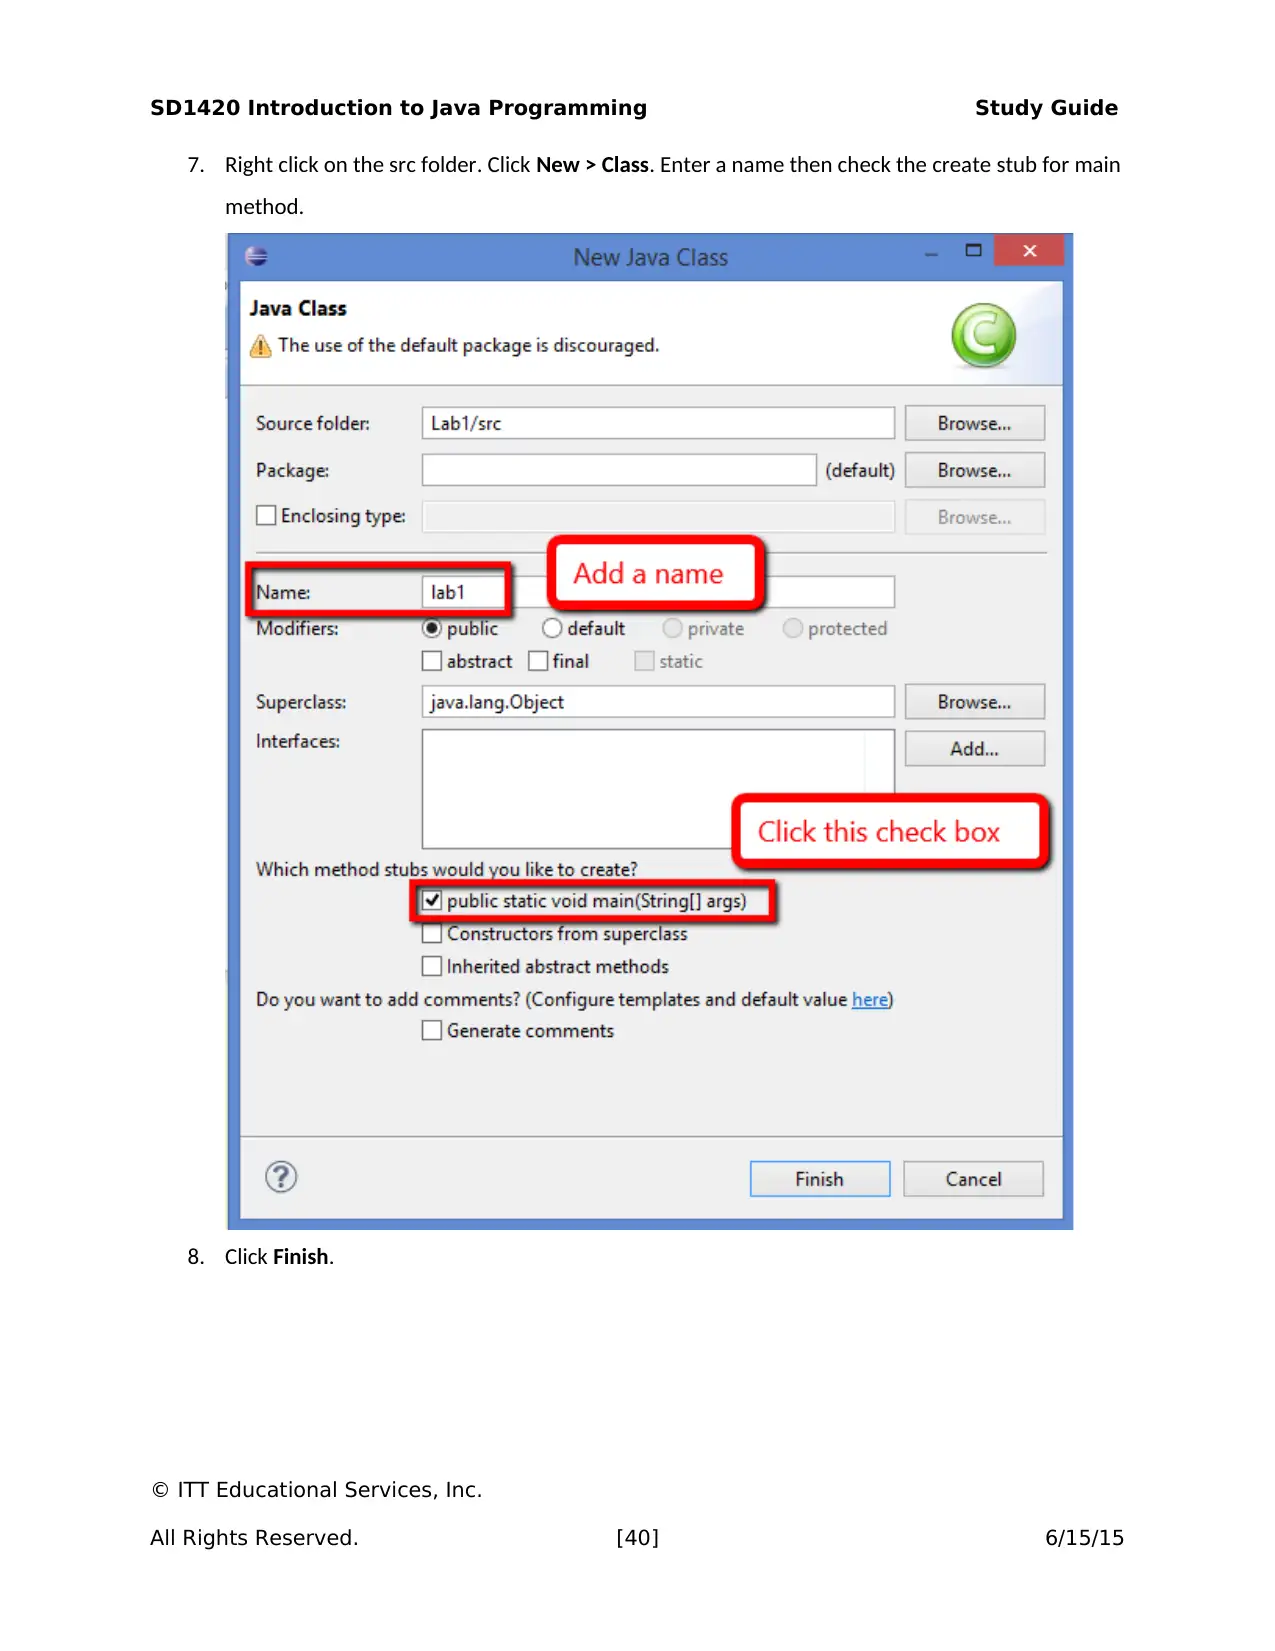
7. Right click on the src folder. Click New > Class. Enter a name then check the create stub for main
method.
8. Click Finish.
© ITT Educational Services, Inc.
All Rights Reserved. [40] 6/15/15
7. Right click on the src folder. Click New > Class. Enter a name then check the create stub for main
method.
8. Click Finish.
© ITT Educational Services, Inc.
All Rights Reserved. [40] 6/15/15
Secure Best Marks with AI Grader
Need help grading? Try our AI Grader for instant feedback on your assignments.
SD1420 Introduction to Java Programming Study Guide
Task 2: Create a Class.
1. The system we are going to build is an address book. We start with a class that stores
information about your contacts and then we work on a program to read your contacts.
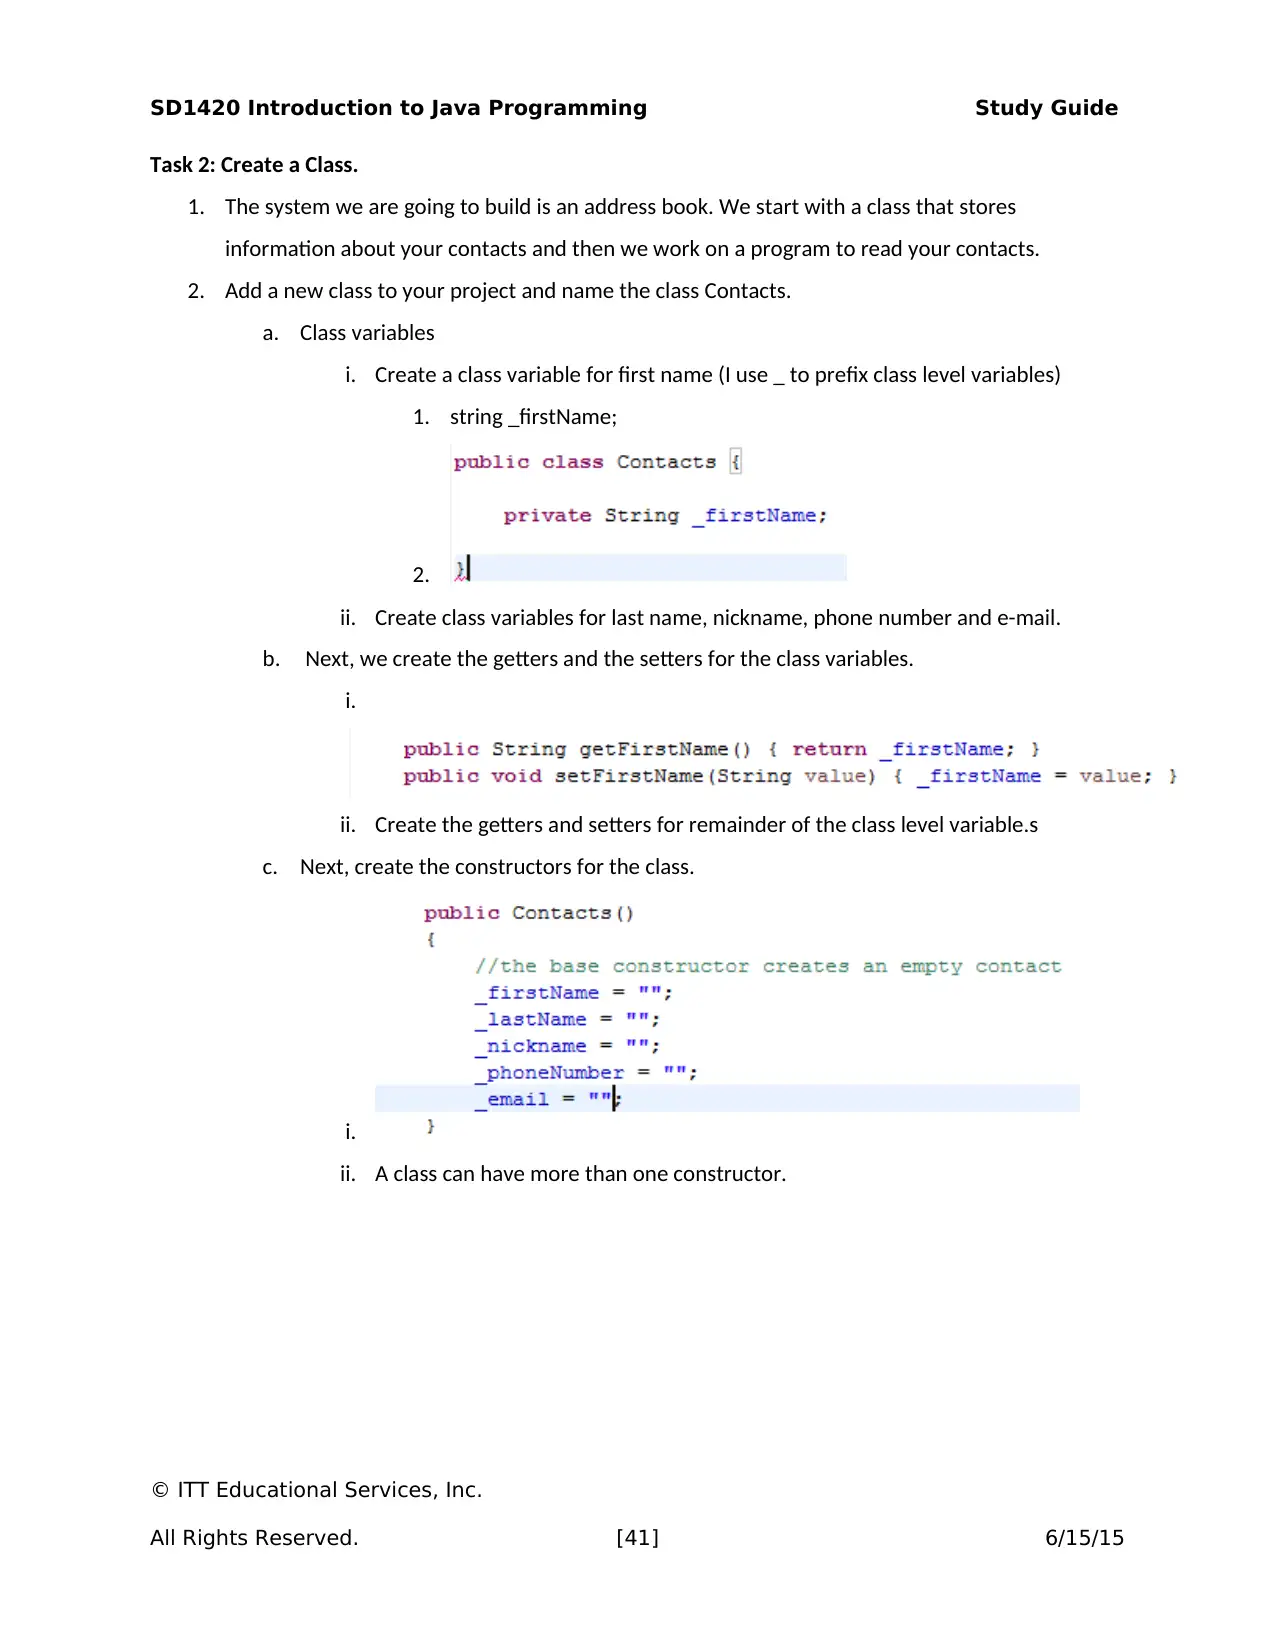
2. Add a new class to your project and name the class Contacts.
a. Class variables
i. Create a class variable for first name (I use _ to prefix class level variables)
1. string _firstName;
2.
ii. Create class variables for last name, nickname, phone number and e-mail.
b. Next, we create the getters and the setters for the class variables.
i.
ii. Create the getters and setters for remainder of the class level variable.s
c. Next, create the constructors for the class.
i.
ii. A class can have more than one constructor.
© ITT Educational Services, Inc.
All Rights Reserved. [41] 6/15/15
SD1420 Introduction to Java Programming Study Guide
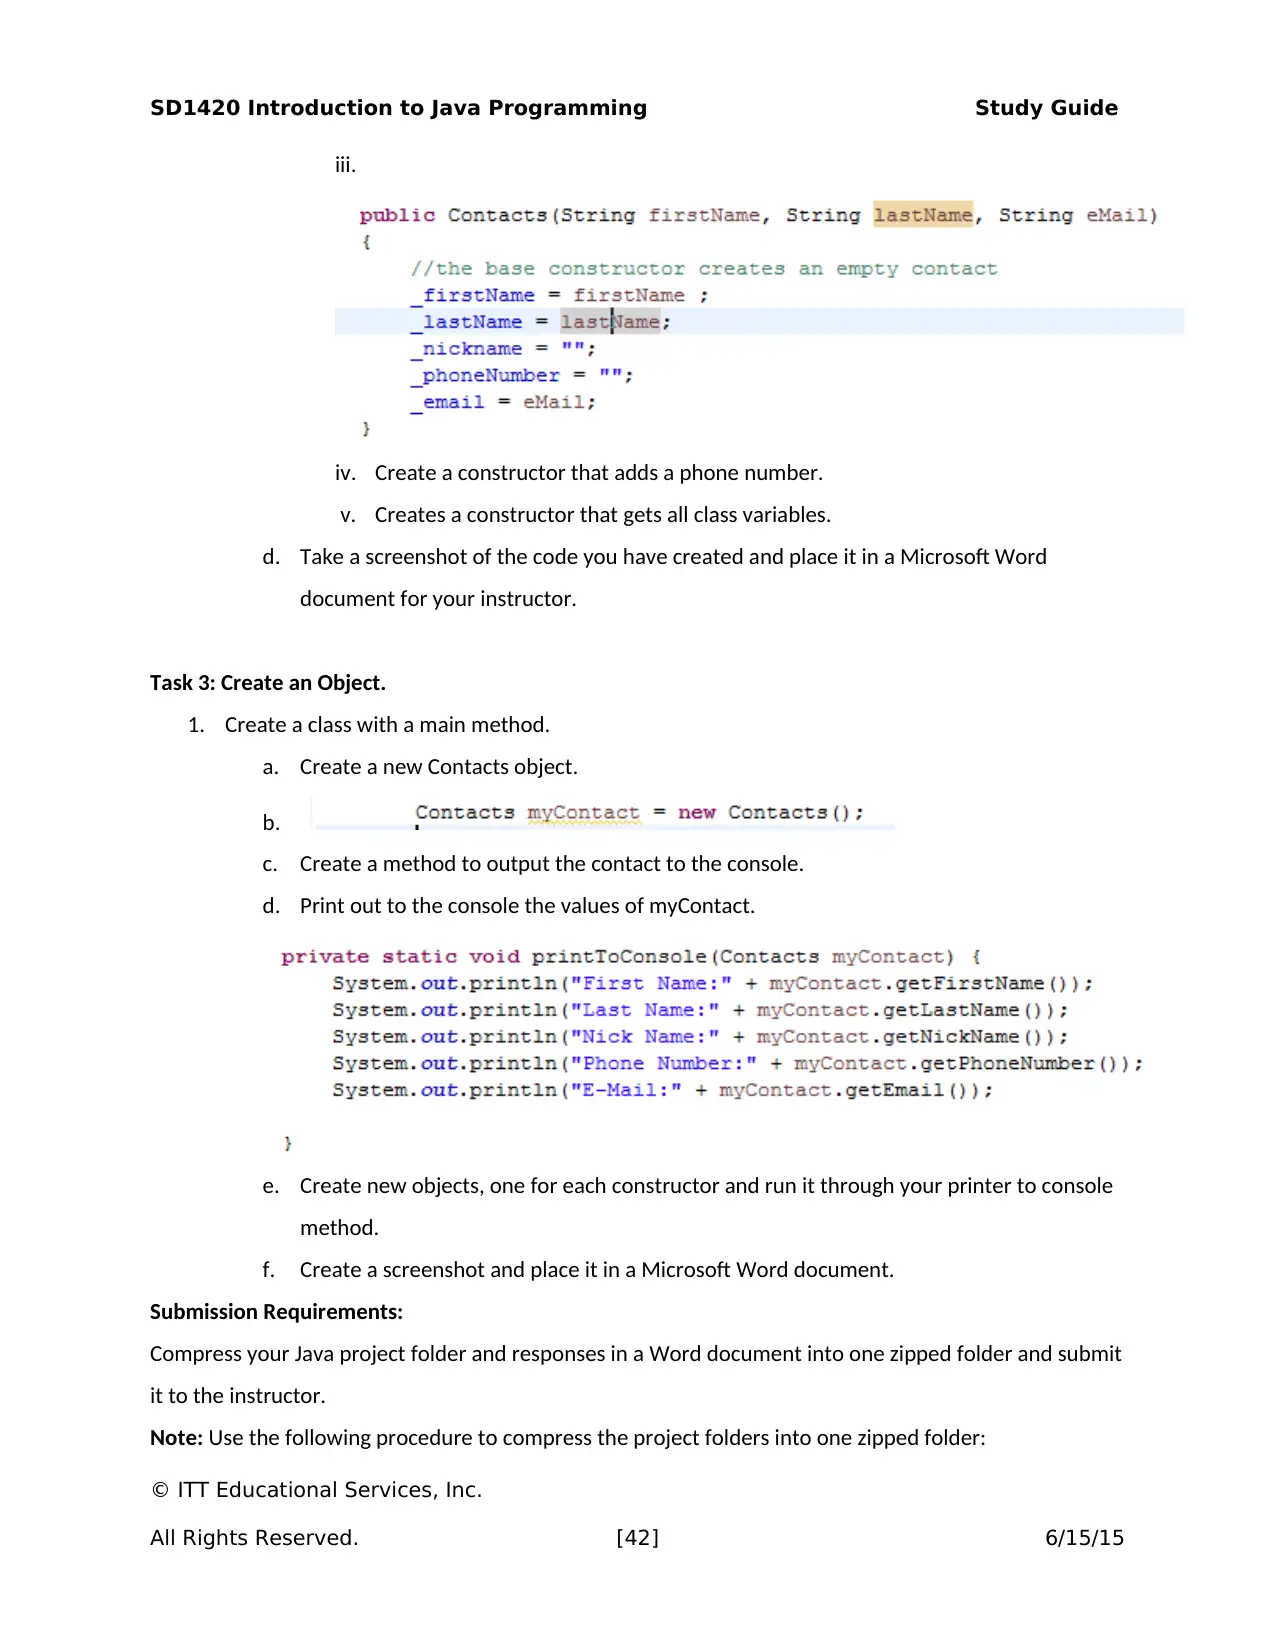
iii.
iv. Create a constructor that adds a phone number.
v. Creates a constructor that gets all class variables.
d. Take a screenshot of the code you have created and place it in a Microsoft Word
document for your instructor.
Task 3: Create an Object.
1. Create a class with a main method.
a. Create a new Contacts object.
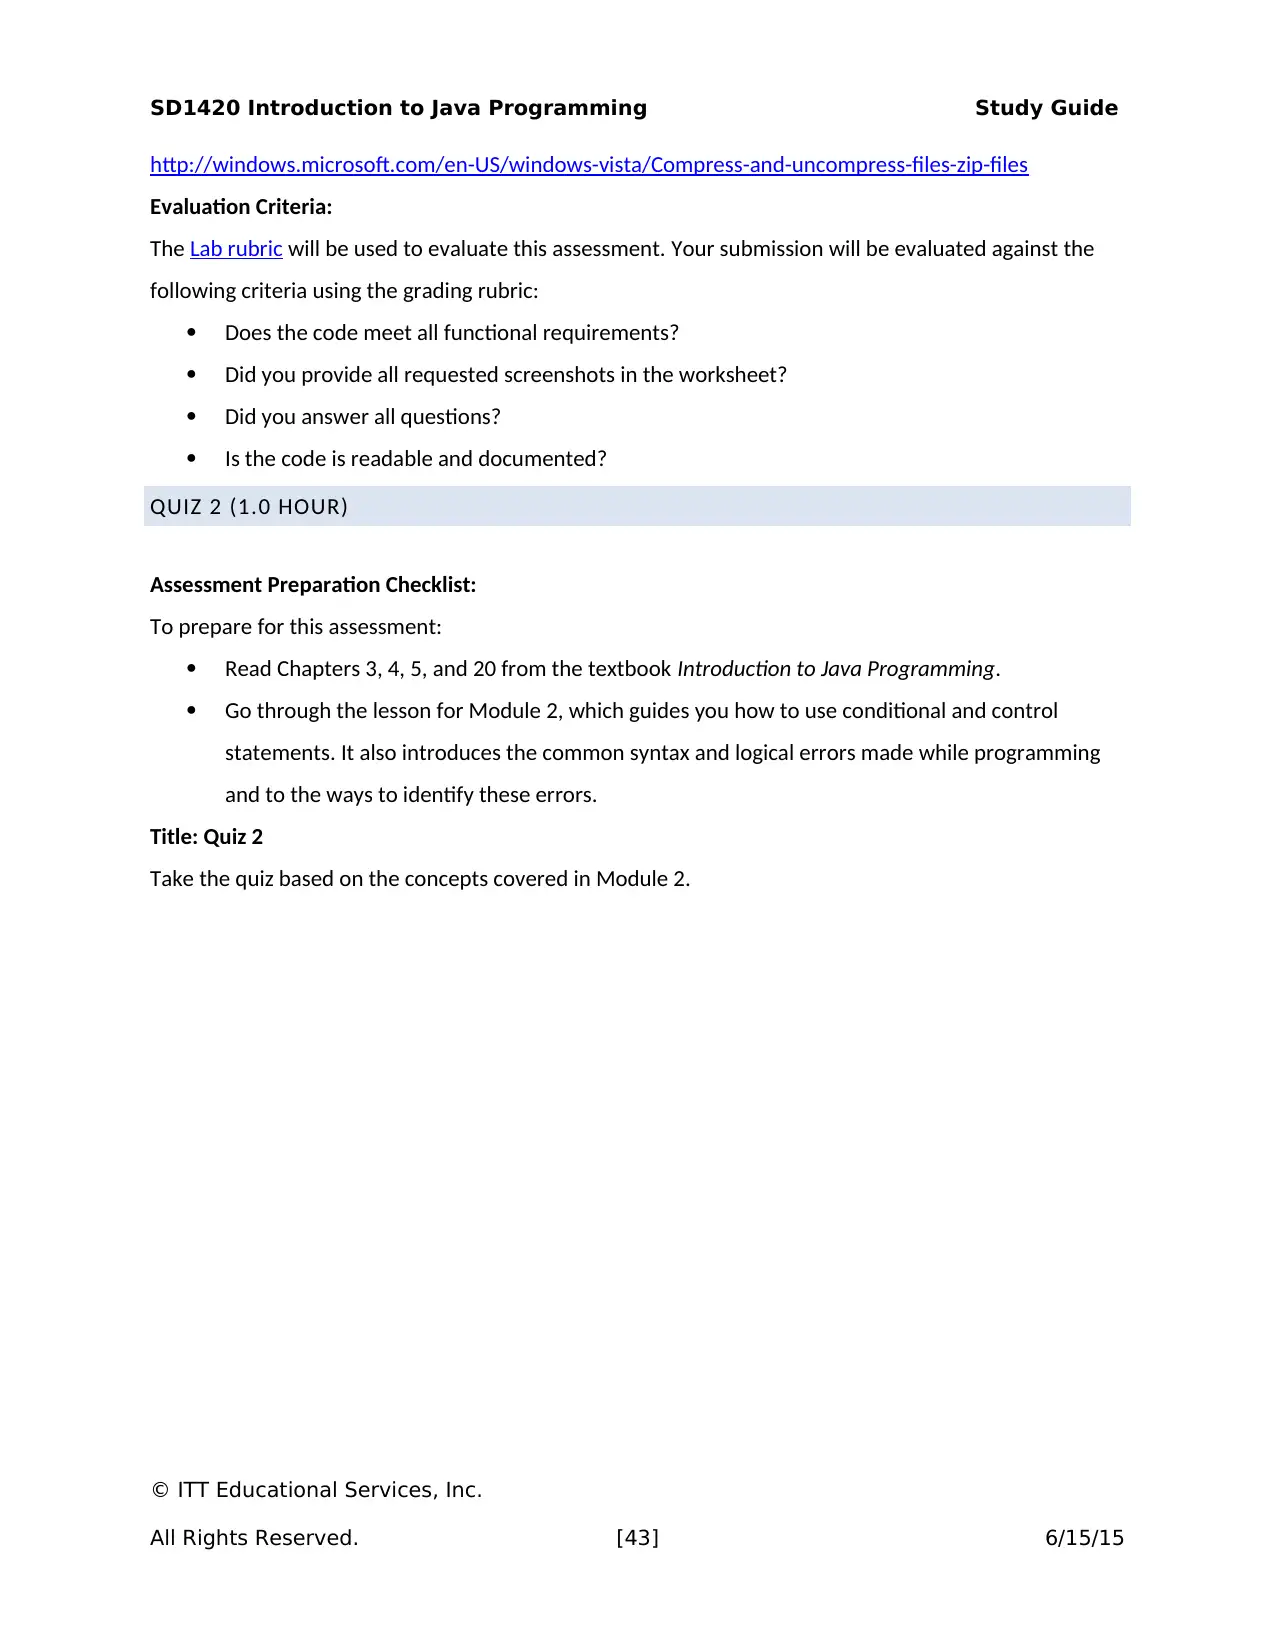
b.
c. Create a method to output the contact to the console.
d. Print out to the console the values of myContact.
e. Create new objects, one for each constructor and run it through your printer to console
method.
f. Create a screenshot and place it in a Microsoft Word document.
Submission Requirements:
Compress your Java project folder and responses in a Word document into one zipped folder and submit
it to the instructor.
Note: Use the following procedure to compress the project folders into one zipped folder:
© ITT Educational Services, Inc.
All Rights Reserved. [42] 6/15/15
SD1420 Introduction to Java Programming Study Guide
http://windows.microsoft.com/en-US/windows-vista/Compress-and-uncompress-files-zip-files
Evaluation Criteria:
The Lab rubric will be used to evaluate this assessment. Your submission will be evaluated against the
following criteria using the grading rubric:
Does the code meet all functional requirements?
Did you provide all requested screenshots in the worksheet?
Did you answer all questions?
Is the code is readable and documented?
QUIZ 2 (1.0 HOUR)
Assessment Preparation Checklist:
To prepare for this assessment:
Read Chapters 3, 4, 5, and 20 from the textbook Introduction to Java Programming.
Go through the lesson for Module 2, which guides you how to use conditional and control
statements. It also introduces the common syntax and logical errors made while programming
and to the ways to identify these errors.
Title: Quiz 2
Take the quiz based on the concepts covered in Module 2.
© ITT Educational Services, Inc.
All Rights Reserved. [43] 6/15/15
Paraphrase This Document
Need a fresh take? Get an instant paraphrase of this document with our AI Paraphraser
SD1420 Introduction to Java Programming Study Guide
DISCUSSION 4.1 (1.0 HOUR)
Title: Designing Class
There are a lot of things to consider when designing a class for your project. Briefly define getters\
setters, constructors, inheritance, overloading\overriding and polymorphism. Choose three of the above
items that you feel are the most important and discuss why you feel that way.
Participation Requirements:
Respond to at least two of your classmates. When responding:
Provide complete, well-thought-out responses.
Ask questions, share experiences, challenge ideas, and help your peers expand their responses.
Note: One-sentence answers will not be sufficient. If your answer is "I agree" or "I disagree," explain
why you agree or disagree. Remember that a discussion is an opportunity to interact with your
classmates. Observe discussion etiquette: Be respectful, kind, and nonjudgmental of your classmates.
Evaluation Criteria:
The Discussion rubric will be used to evaluate this assessment.
© ITT Educational Services, Inc.
All Rights Reserved. [44] 6/15/15
SD1420 Introduction to Java Programming Study Guide
LAB 4.1 (2.0 HOURS)
Assessment Preparation Checklist:
To prepare for this assessment:
Read Chapter 11 from your textbook, Introduction to Java Programming. This chapter discusses
inheritance and polymorphism in Java programming.
Go through the lesson for Module 4, which will introduce you superclass and subclass in Java
programming.
Title: Superclass and Subclass
In this lab, you will use superclass and subclass in your Java programs.
Required Setup and Resources:
A virtual machine with Eclipse installed
Microsoft Word
Recommended Procedures:
Task 1: Create an Eclipse Project.
1. First step will be to create a new project.
2. In ITT-Lab, launch Eclipse.
3. Click File > New > Java Project.
© ITT Educational Services, Inc.
All Rights Reserved. [45] 6/15/15
SD1420 Introduction to Java Programming Study Guide
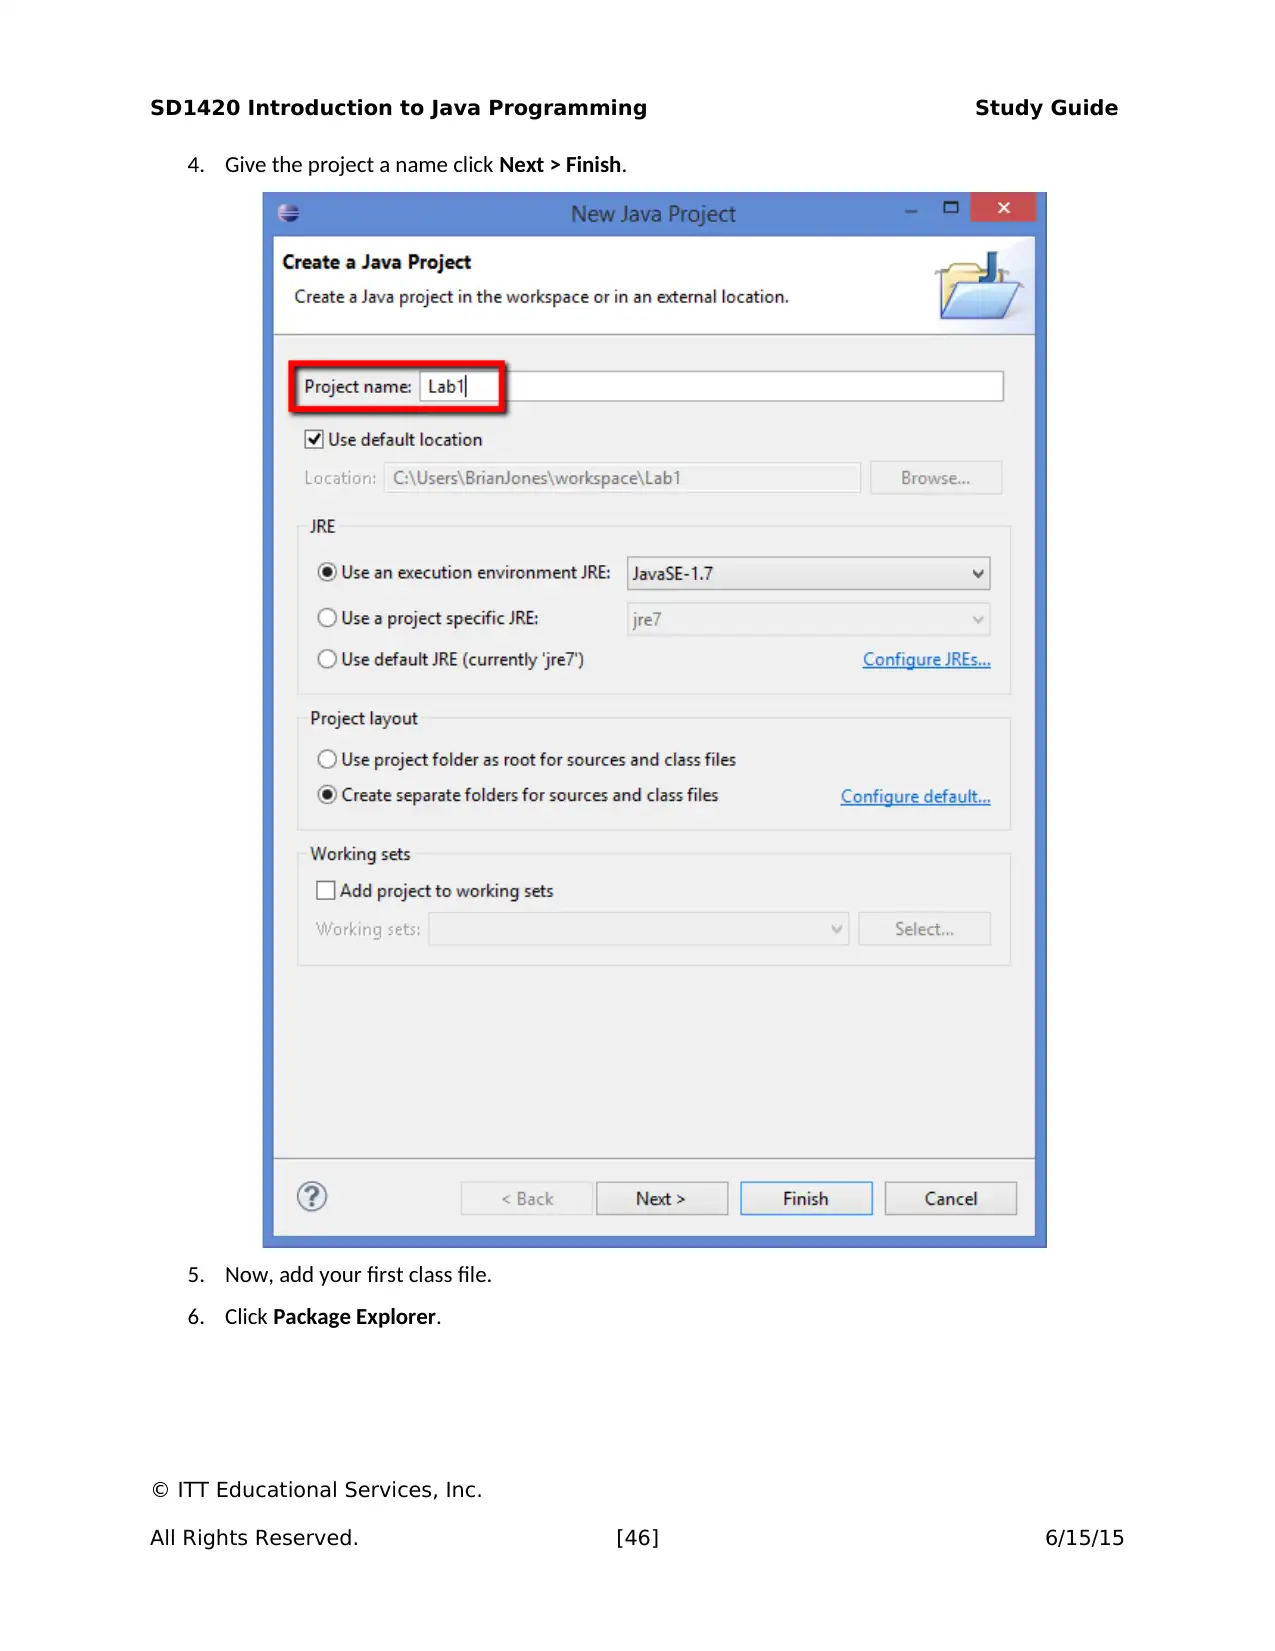
4. Give the project a name click Next > Finish.
5. Now, add your first class file.
6. Click Package Explorer.
© ITT Educational Services, Inc.
All Rights Reserved. [46] 6/15/15
4. Give the project a name click Next > Finish.
5. Now, add your first class file.
6. Click Package Explorer.
© ITT Educational Services, Inc.
All Rights Reserved. [46] 6/15/15
Secure Best Marks with AI Grader
Need help grading? Try our AI Grader for instant feedback on your assignments.
SD1420 Introduction to Java Programming Study Guide
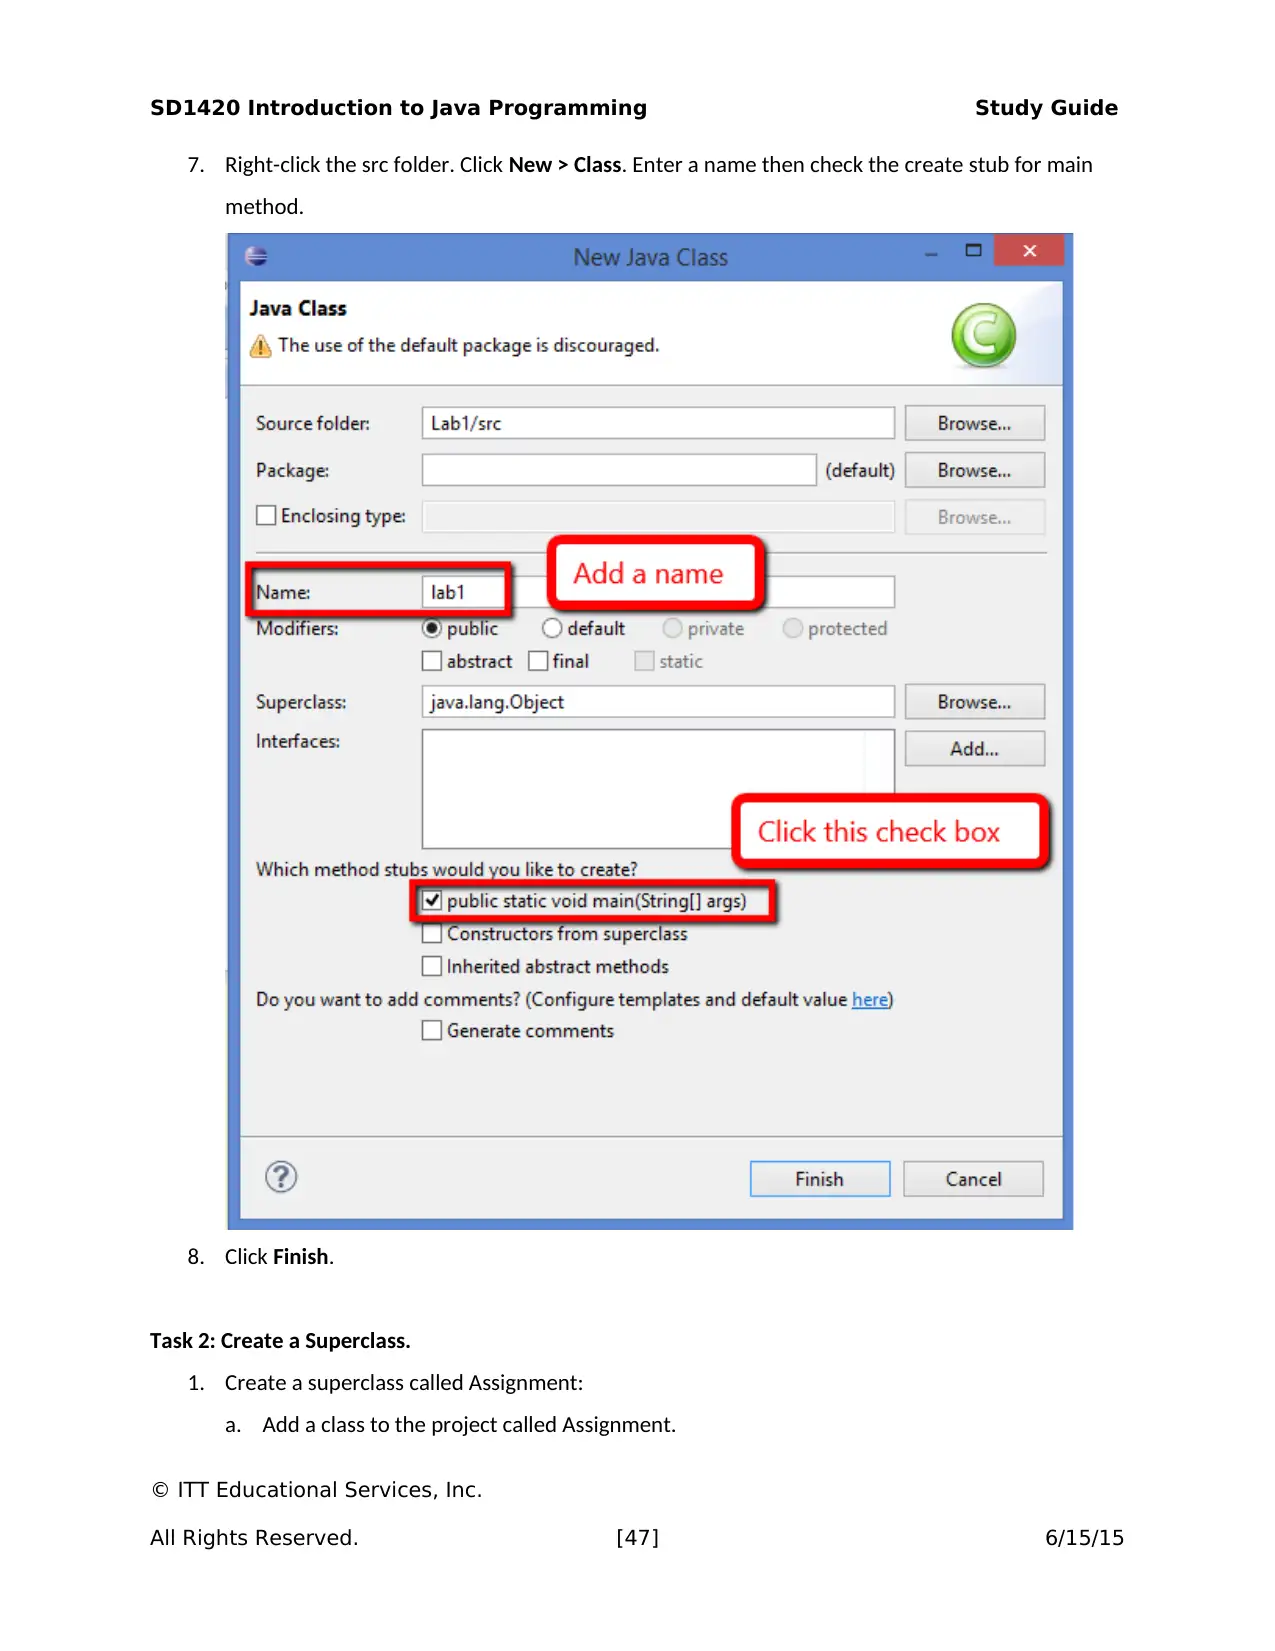
7. Right-click the src folder. Click New > Class. Enter a name then check the create stub for main
method.
8. Click Finish.
Task 2: Create a Superclass.
1. Create a superclass called Assignment:
a. Add a class to the project called Assignment.
© ITT Educational Services, Inc.
All Rights Reserved. [47] 6/15/15
SD1420 Introduction to Java Programming Study Guide
b. Create a private variable score. It must be a type that handles decimals.
c. Create a getter and setter for private variable score.
d. Create a method that returns a letter grade that fulfills the following conditions:
i. Scores greater than 90 is an A.
ii. Scores greater than or equal to 80; less than 90 is a B.
iii. Scores greater than or equal to 70; but less than 80 is a C.
iv. Scores greater than or equal to 60; less than 70 is a D.
v. Scores less than 60 is a F.
2. Submit a copy of this code to your instructor.
Task 3: Create a Main Class and Method.
1. Create the main class and method.
a. Add a class to the project and create the main method to that class.
b. Create a variable that stores decimals test score.
c. Create a variable to hold the Assignment object.
d. Instantiate that variable object.
e. Ask the user for the score.
f. Add the score to the Assignment object.
g. Display the letter grade back to the user.
2. Submit a copy of this code to your instructor.
Task 4: Create a Subclass.
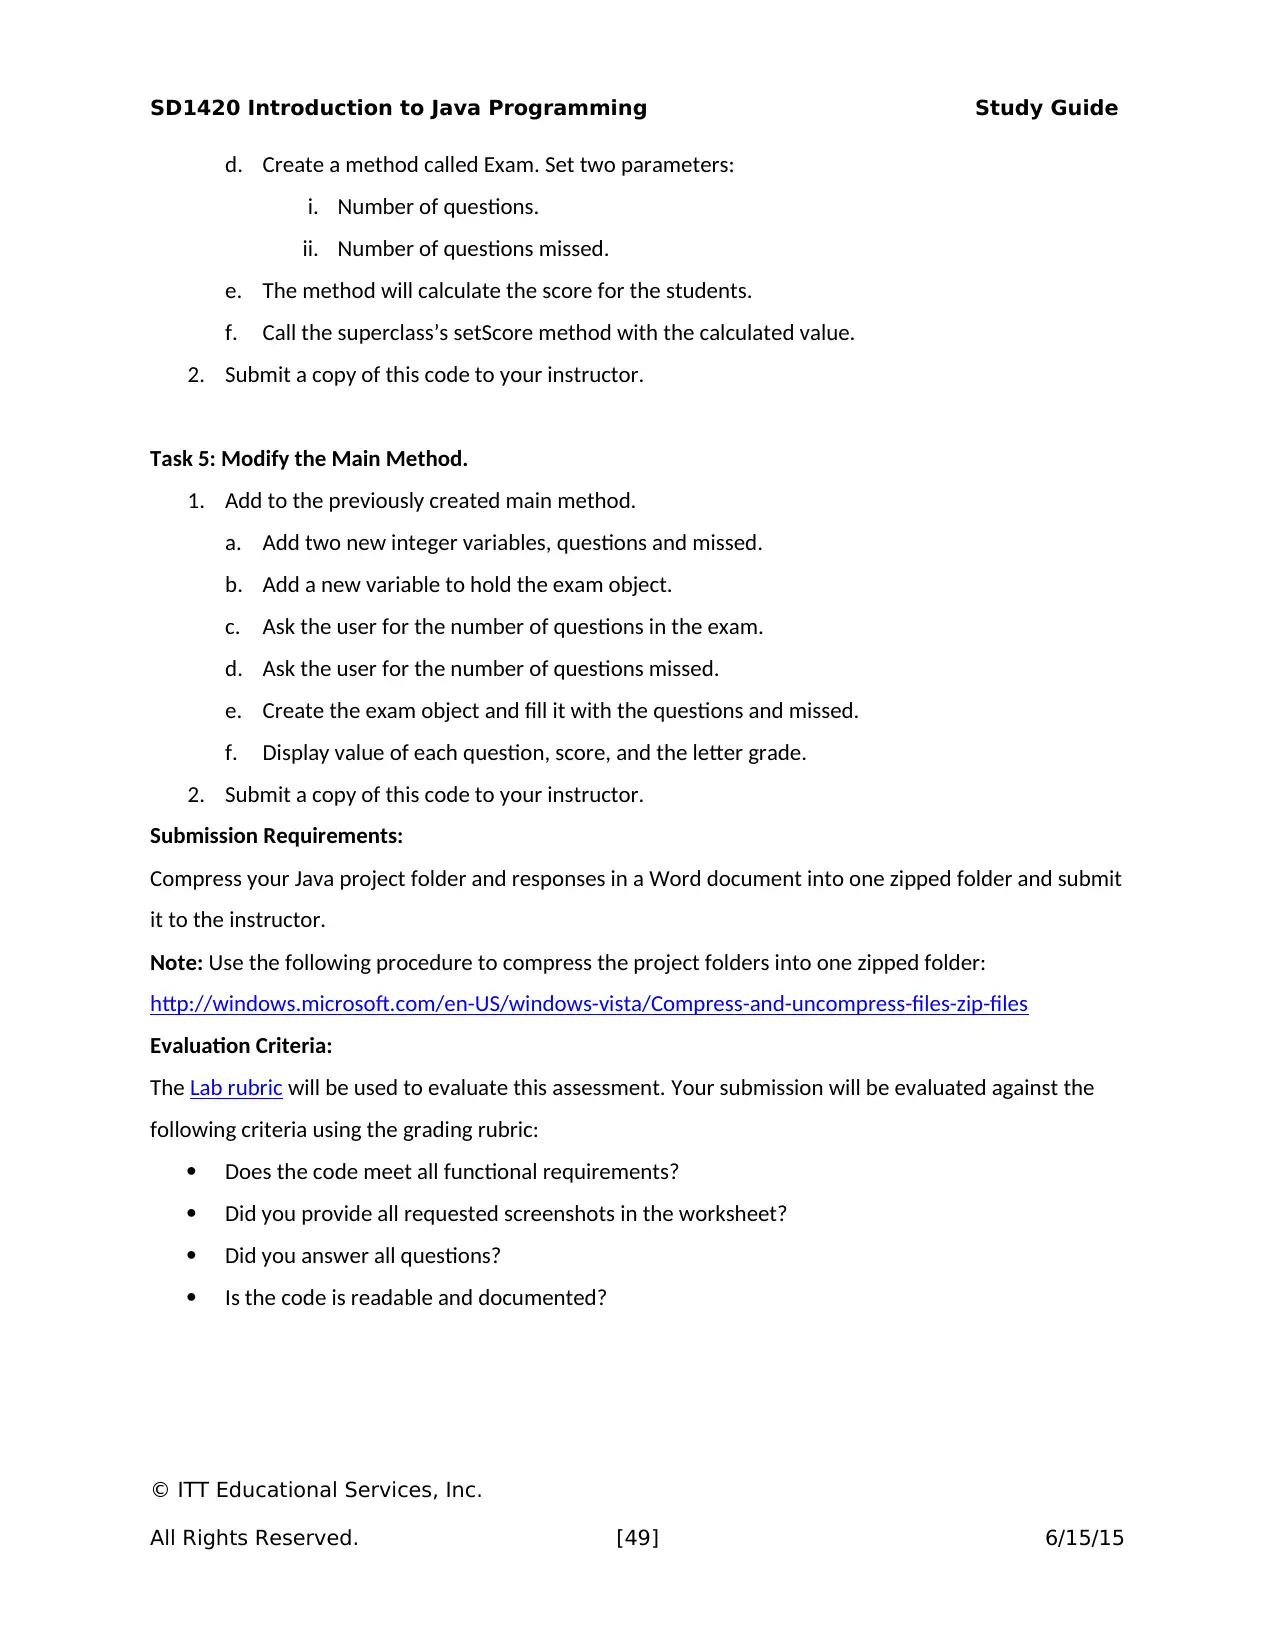
1. Create a superclass called Exam:
a. Add three variables:
i. Integer to store the number of questions.
ii. Float to store the number of points each question is worth.
iii. Integer to store the number of missed questions.
b. Create a getter for points each question is worth.
c. Create a getter for the number of questions missed.
© ITT Educational Services, Inc.
All Rights Reserved. [48] 6/15/15
SD1420 Introduction to Java Programming Study Guide
d. Create a method called Exam. Set two parameters:
i. Number of questions.
ii. Number of questions missed.
e. The method will calculate the score for the students.
f. Call the superclass’s setScore method with the calculated value.
2. Submit a copy of this code to your instructor.
Task 5: Modify the Main Method.
1. Add to the previously created main method.
a. Add two new integer variables, questions and missed.
b. Add a new variable to hold the exam object.
c. Ask the user for the number of questions in the exam.
d. Ask the user for the number of questions missed.
e. Create the exam object and fill it with the questions and missed.
f. Display value of each question, score, and the letter grade.
2. Submit a copy of this code to your instructor.
Submission Requirements:
Compress your Java project folder and responses in a Word document into one zipped folder and submit
it to the instructor.
Note: Use the following procedure to compress the project folders into one zipped folder:
http://windows.microsoft.com/en-US/windows-vista/Compress-and-uncompress-files-zip-files
Evaluation Criteria:
The Lab rubric will be used to evaluate this assessment. Your submission will be evaluated against the
following criteria using the grading rubric:
Does the code meet all functional requirements?
Did you provide all requested screenshots in the worksheet?
Did you answer all questions?
Is the code is readable and documented?
© ITT Educational Services, Inc.
All Rights Reserved. [49] 6/15/15
Paraphrase This Document
Need a fresh take? Get an instant paraphrase of this document with our AI Paraphraser
SD1420 Introduction to Java Programming Study Guide
LAB 4.2 (2.0 HOURS)
Assessment Preparation Checklist:
To prepare for this assessment:
Read Chapter 12 from your textbook, Introduction to Java Programming. This chapter discusses
the basics of GUI programing.
Go through the lesson for Module 4, which focuses on simple GUI components and the basics of
creating user interfaces using frames and panels.
Title: Creating a UI
In this lab, you will create a UI for your application.
Required Setup and Resources:
A virtual machine with Eclipse installed
Microsoft Word
Recommended Procedures:
Task 1: Create an Eclipse Project.
1. First step will be to create a new project.
2. In ITT-Lab, launch Eclipse.
3. Click File > New > Java Project.
© ITT Educational Services, Inc.
All Rights Reserved. [50] 6/15/15
SD1420 Introduction to Java Programming Study Guide
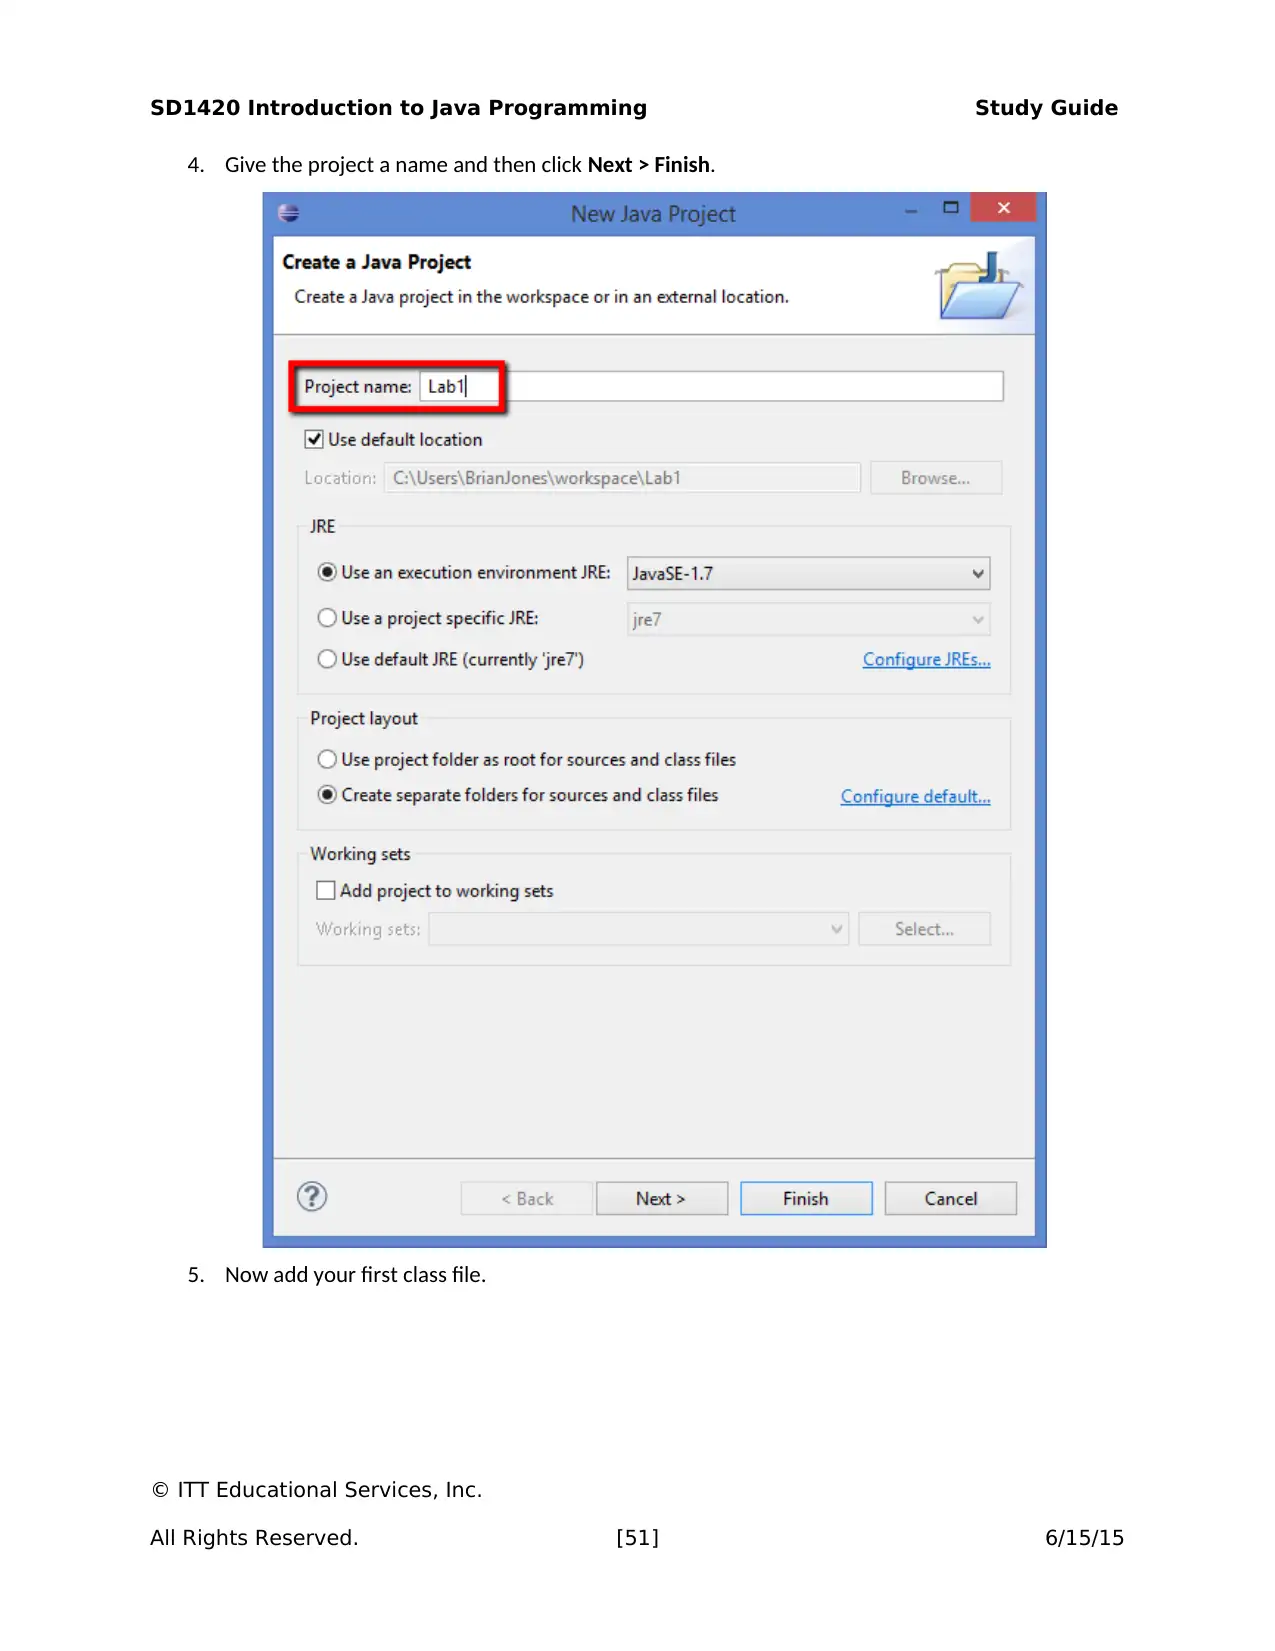
4. Give the project a name and then click Next > Finish.
5. Now add your first class file.
© ITT Educational Services, Inc.
All Rights Reserved. [51] 6/15/15
4. Give the project a name and then click Next > Finish.
5. Now add your first class file.
© ITT Educational Services, Inc.
All Rights Reserved. [51] 6/15/15
SD1420 Introduction to Java Programming Study Guide
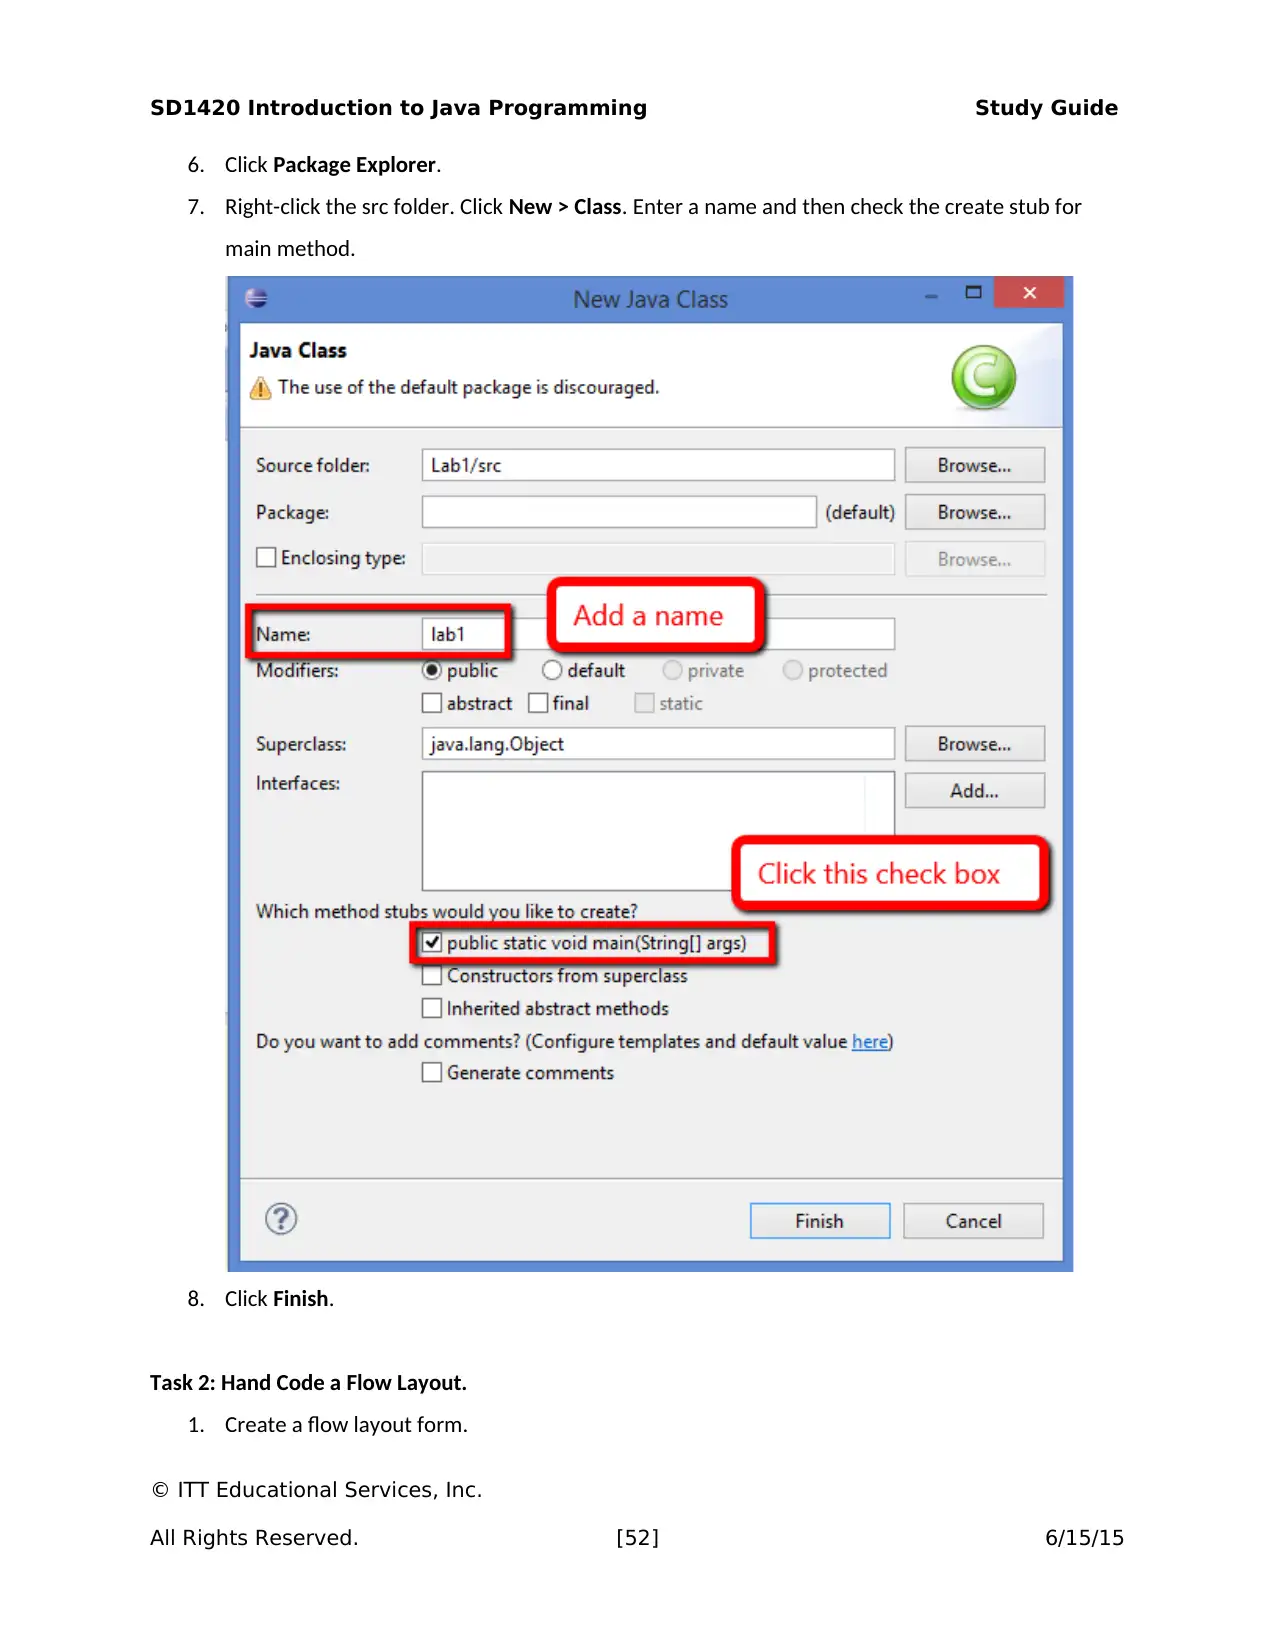
6. Click Package Explorer.
7. Right-click the src folder. Click New > Class. Enter a name and then check the create stub for
main method.
8. Click Finish.
Task 2: Hand Code a Flow Layout.
1. Create a flow layout form.
© ITT Educational Services, Inc.
All Rights Reserved. [52] 6/15/15
6. Click Package Explorer.
7. Right-click the src folder. Click New > Class. Enter a name and then check the create stub for
main method.
8. Click Finish.
Task 2: Hand Code a Flow Layout.
1. Create a flow layout form.
© ITT Educational Services, Inc.
All Rights Reserved. [52] 6/15/15
Secure Best Marks with AI Grader
Need help grading? Try our AI Grader for instant feedback on your assignments.
SD1420 Introduction to Java Programming Study Guide
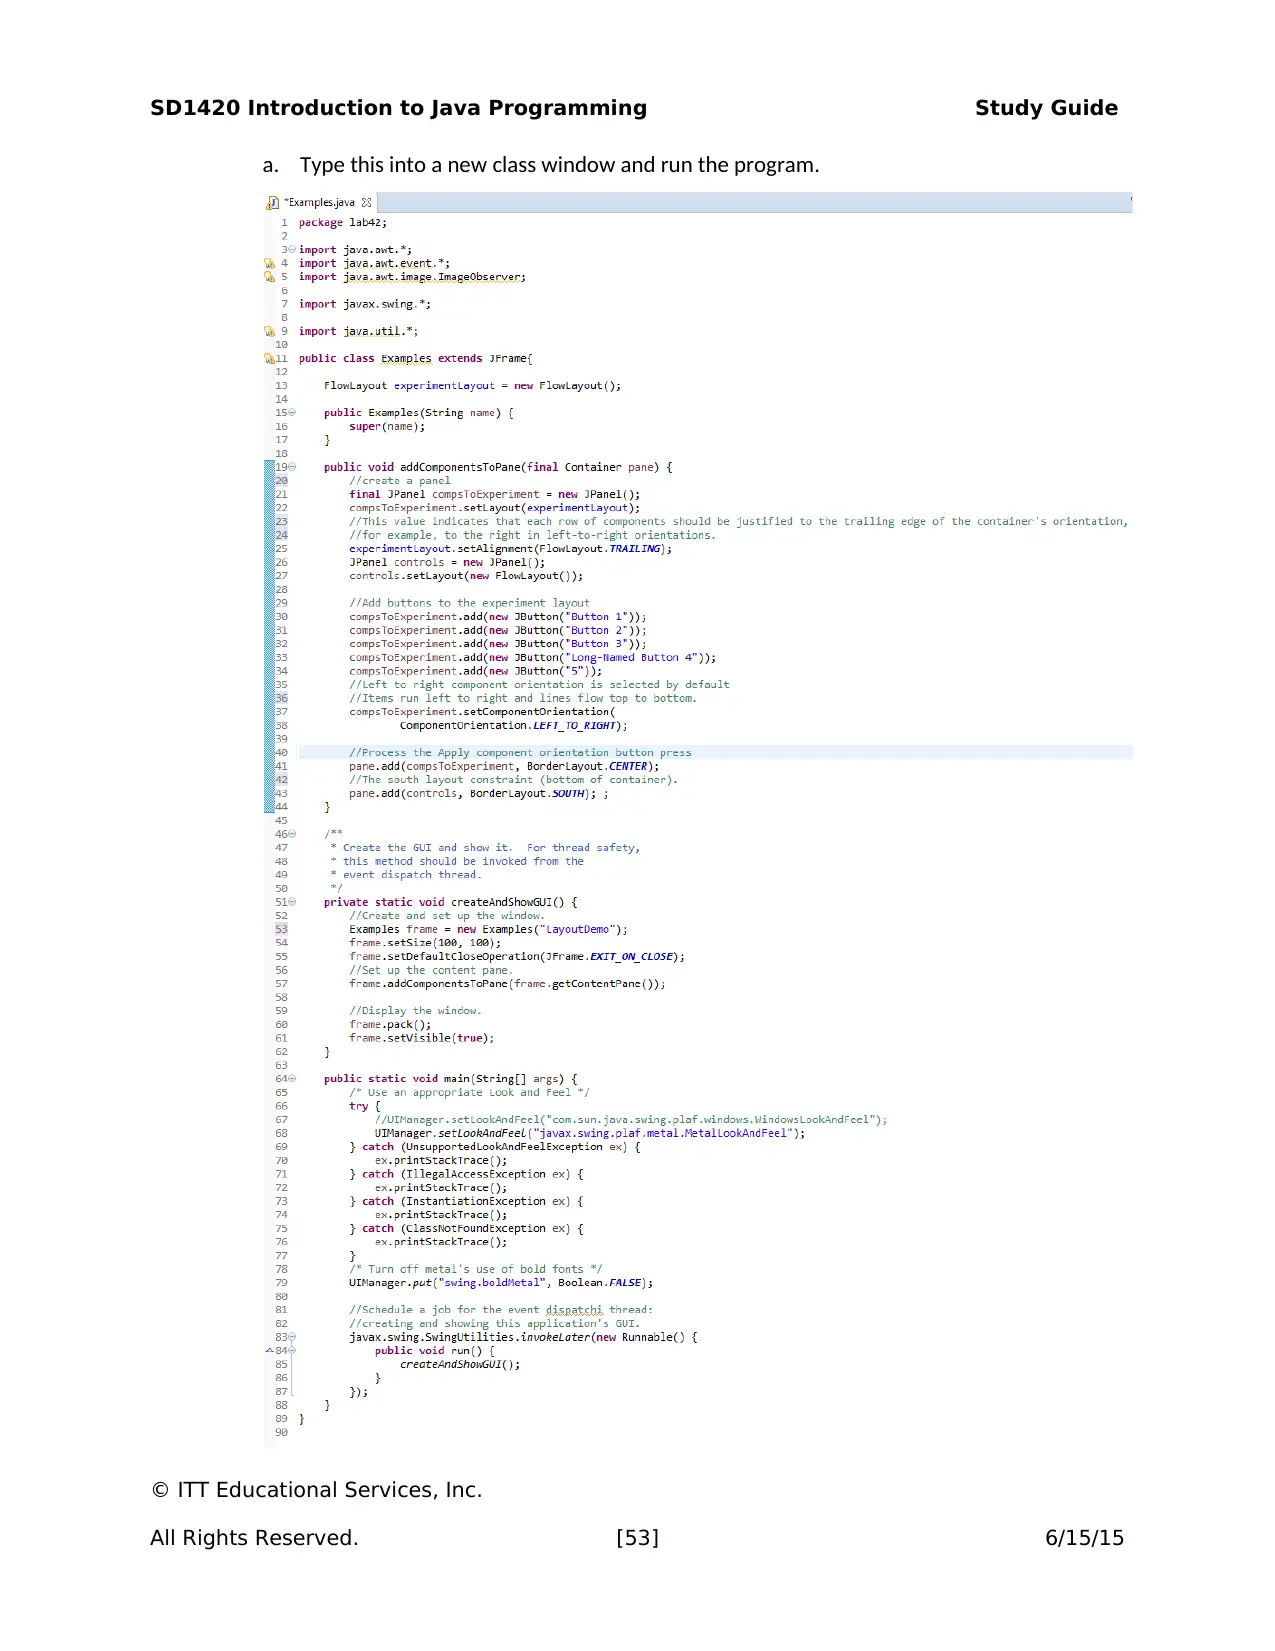
a. Type this into a new class window and run the program.
© ITT Educational Services, Inc.
All Rights Reserved. [53] 6/15/15
a. Type this into a new class window and run the program.
© ITT Educational Services, Inc.
All Rights Reserved. [53] 6/15/15
SD1420 Introduction to Java Programming Study Guide
b. What happens when you resize the form?
c. Change line 25 to FlowLayout.Center. What happens now when you resize the form?
Task 3: Add Color to Form.
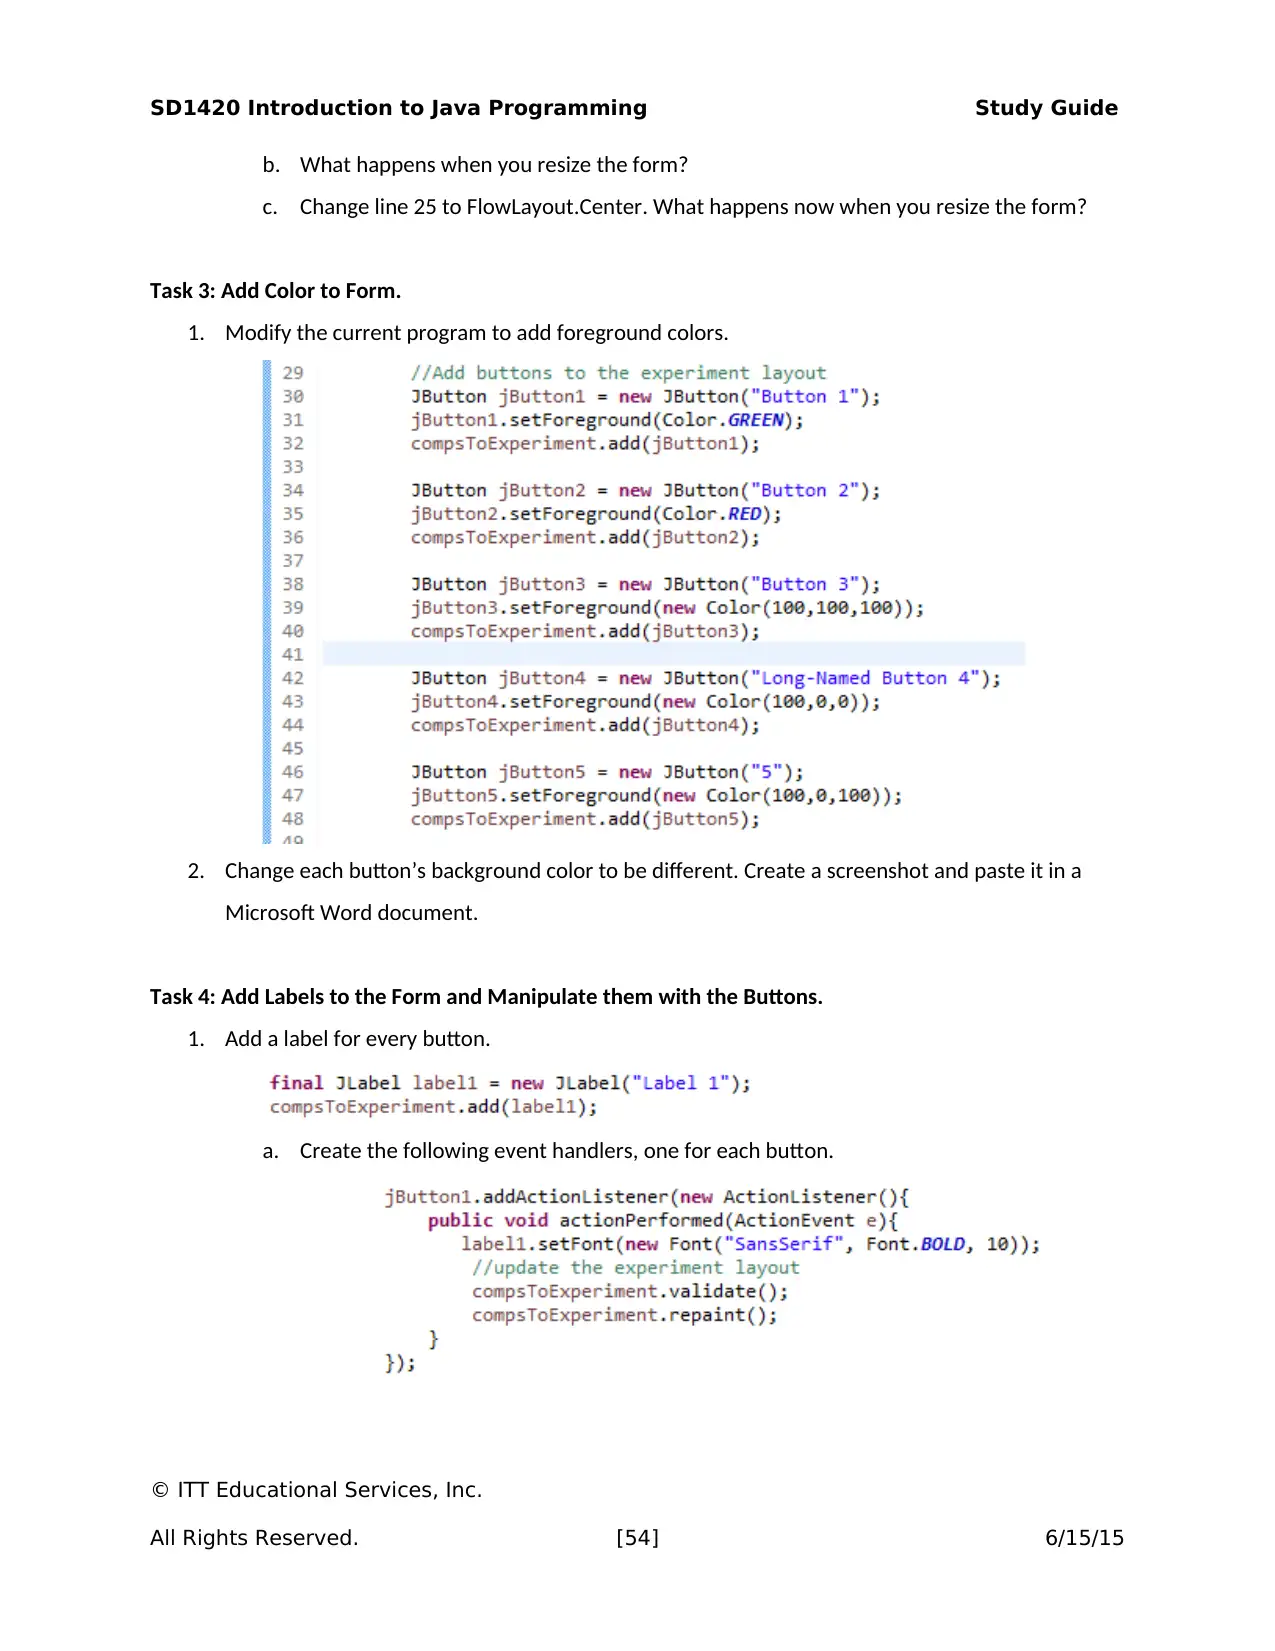
1. Modify the current program to add foreground colors.
2. Change each button’s background color to be different. Create a screenshot and paste it in a
Microsoft Word document.
Task 4: Add Labels to the Form and Manipulate them with the Buttons.
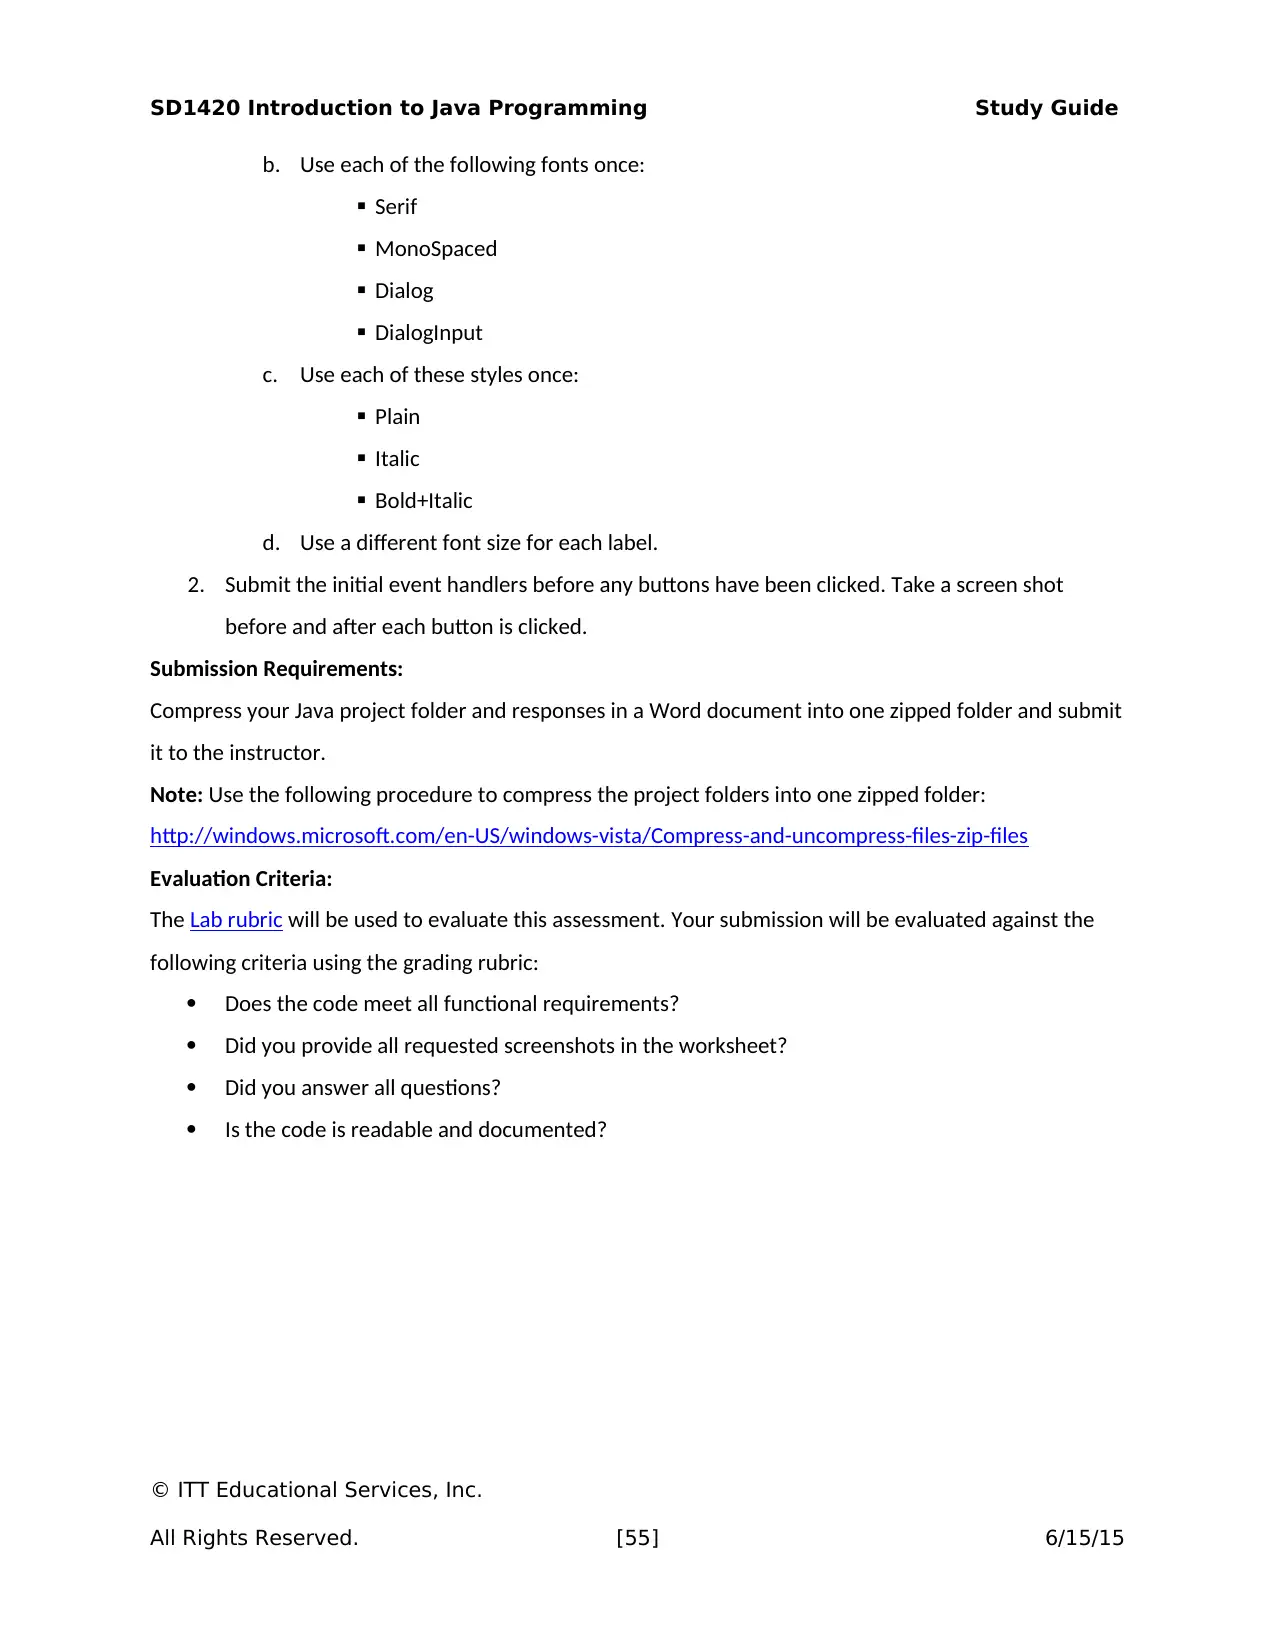
1. Add a label for every button.
a. Create the following event handlers, one for each button.
© ITT Educational Services, Inc.
All Rights Reserved. [54] 6/15/15
SD1420 Introduction to Java Programming Study Guide
b. Use each of the following fonts once:
Serif
MonoSpaced
Dialog
DialogInput
c. Use each of these styles once:
Plain
Italic
Bold+Italic
d. Use a different font size for each label.
2. Submit the initial event handlers before any buttons have been clicked. Take a screen shot
before and after each button is clicked.
Submission Requirements:
Compress your Java project folder and responses in a Word document into one zipped folder and submit
it to the instructor.
Note: Use the following procedure to compress the project folders into one zipped folder:
http://windows.microsoft.com/en-US/windows-vista/Compress-and-uncompress-files-zip-files
Evaluation Criteria:
The Lab rubric will be used to evaluate this assessment. Your submission will be evaluated against the
following criteria using the grading rubric:
Does the code meet all functional requirements?
Did you provide all requested screenshots in the worksheet?
Did you answer all questions?
Is the code is readable and documented?
© ITT Educational Services, Inc.
All Rights Reserved. [55] 6/15/15
Paraphrase This Document
Need a fresh take? Get an instant paraphrase of this document with our AI Paraphraser
SD1420 Introduction to Java Programming Study Guide
QUIZ 3 (1.0 HOUR)
Assessment Preparation Checklist:
To prepare for this assessment:
Read Chapters 6–9 from your textbook, Introduction to Java Programming. These chapters focus
on single and multidimensional arrays, objects and classes, and strings.
Go through the lesson for Module 3, which covers the basics of array, objects and classes, and
strings.
Title: Quiz 3
Take the quiz based on the concepts covered in Module 3.
© ITT Educational Services, Inc.
All Rights Reserved. [56] 6/15/15
SD1420 Introduction to Java Programming Study Guide
LAB 5.1 (2.0 HOURS)
Assessment Preparation Checklist:
To prepare for this assessment:
Read Chapters 14–16 from your textbook, Introduction to Java Programming. These chapters
focus on exception handling and event-driven programming.
Go through the lesson for Module 5, which focuses on exception handling and event-driven
programming.
Title: Exception Handlers
In this lab, you will use abstract classes, and interfaces to set up the exception handling.
Required Setup and Resources:
A virtual machine with Eclipse installed
Microsoft Word
Recommended Procedures:
Task 1: Create an Eclipse project.
1. The first step will be to create a new project.
2. In ITT-Lab, launch Eclipse.
3. Click File > New > Java Project.
© ITT Educational Services, Inc.
All Rights Reserved. [57] 6/15/15
SD1420 Introduction to Java Programming Study Guide
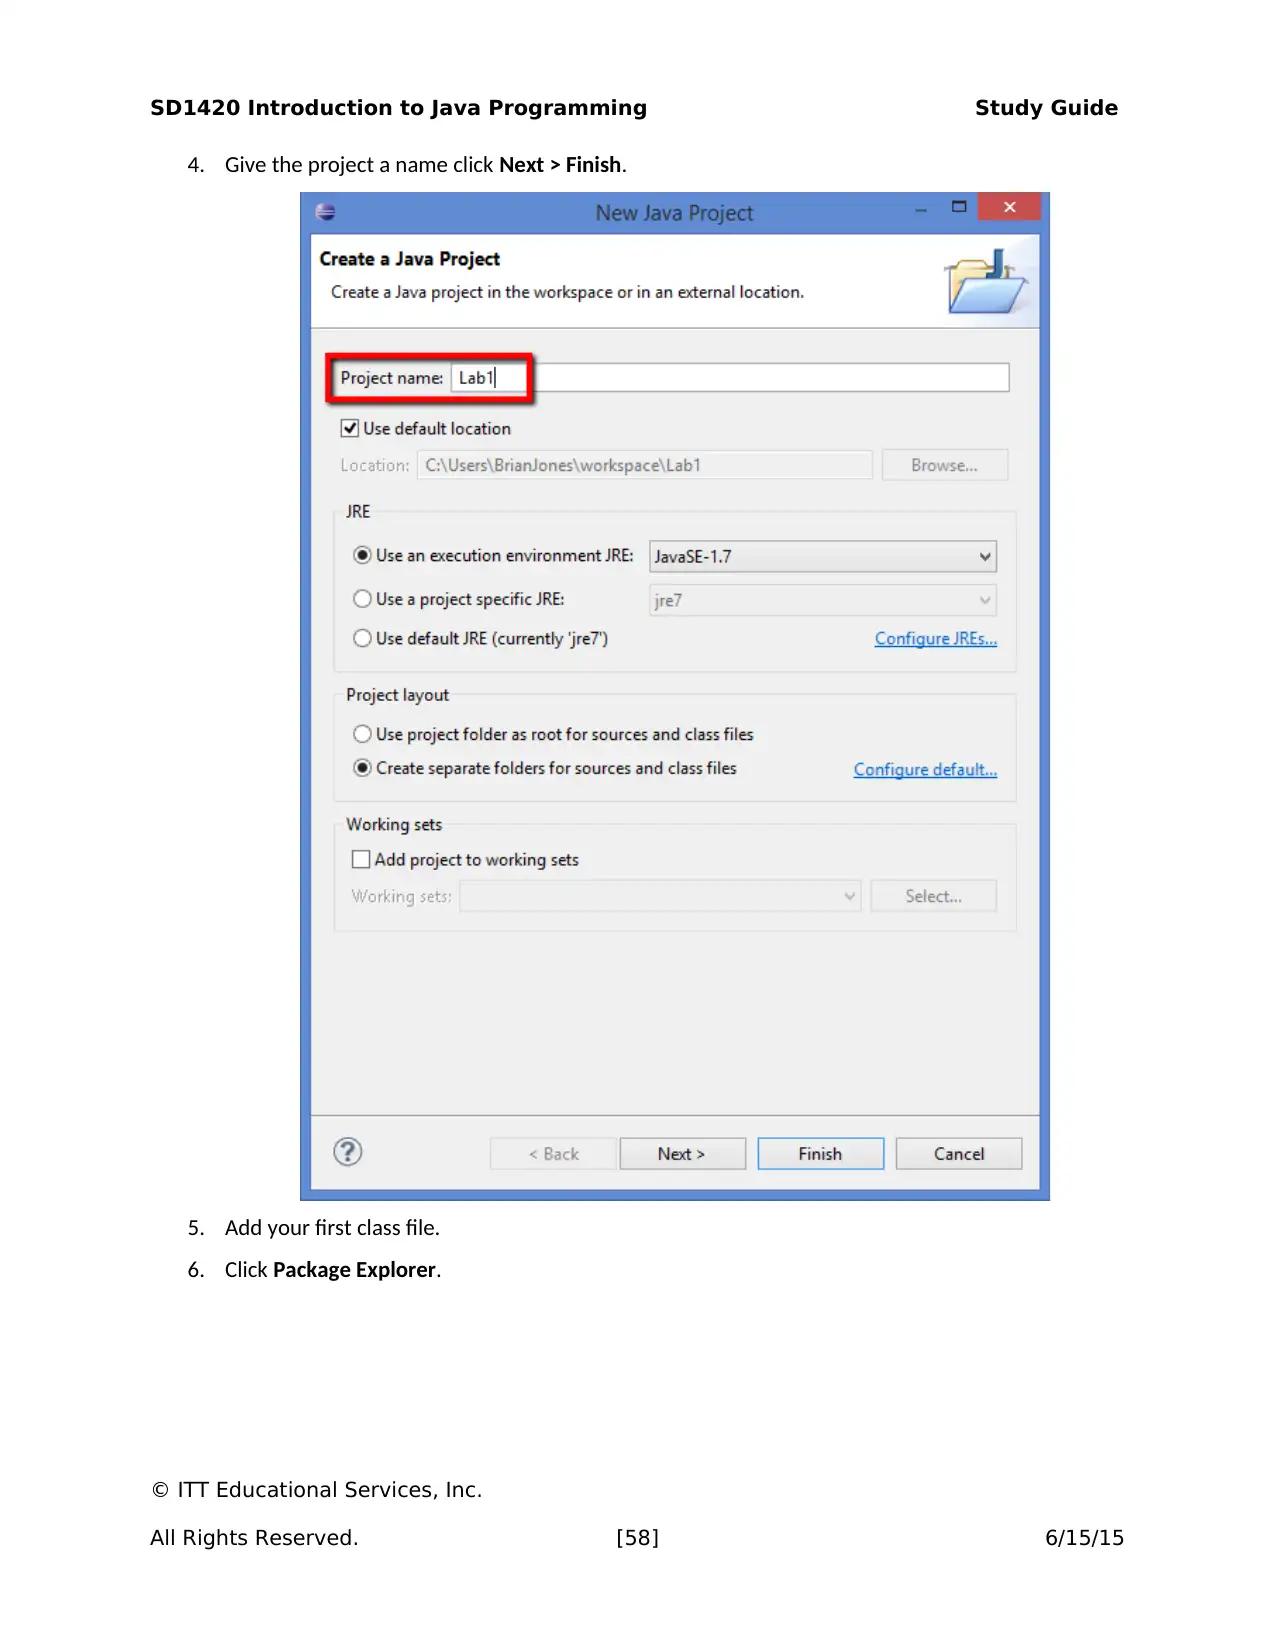
4. Give the project a name click Next > Finish.
5. Add your first class file.
6. Click Package Explorer.
© ITT Educational Services, Inc.
All Rights Reserved. [58] 6/15/15
4. Give the project a name click Next > Finish.
5. Add your first class file.
6. Click Package Explorer.
© ITT Educational Services, Inc.
All Rights Reserved. [58] 6/15/15
Secure Best Marks with AI Grader
Need help grading? Try our AI Grader for instant feedback on your assignments.
SD1420 Introduction to Java Programming Study Guide
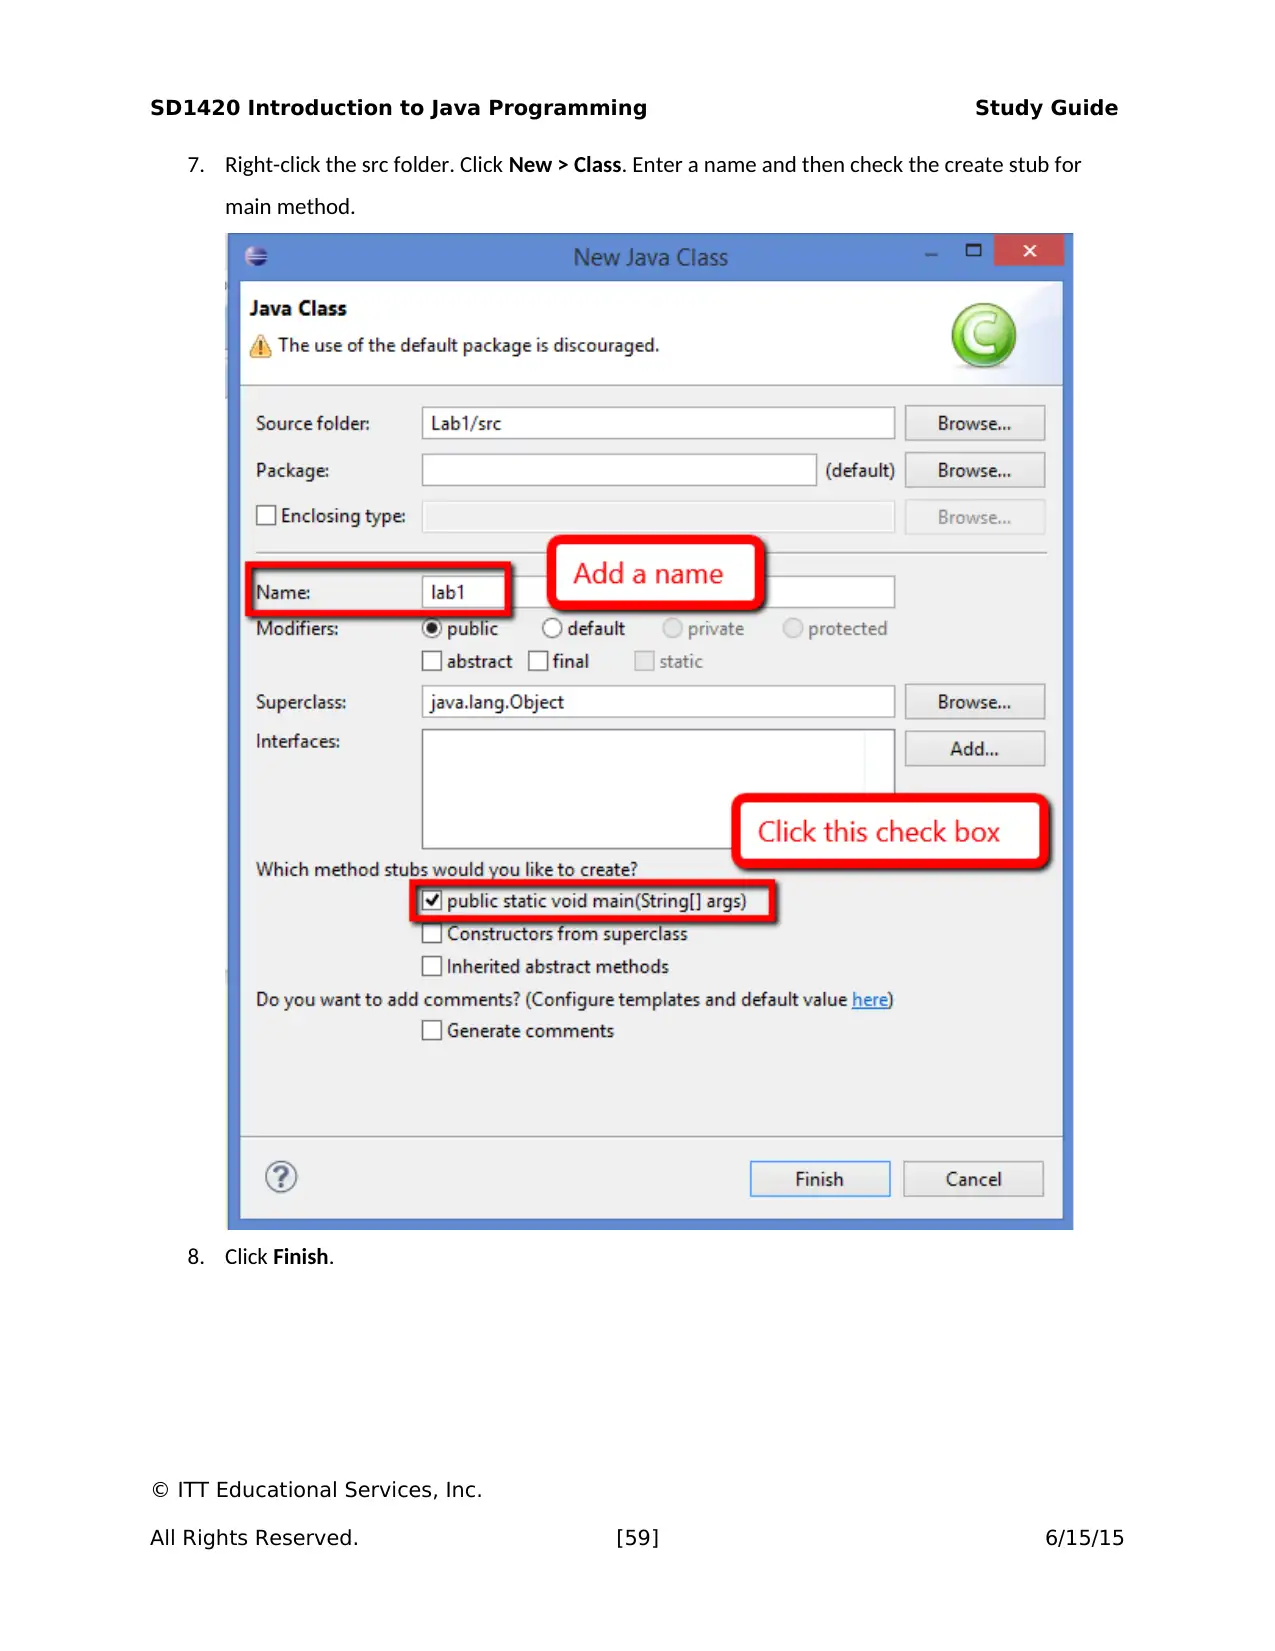
7. Right-click the src folder. Click New > Class. Enter a name and then check the create stub for
main method.
8. Click Finish.
© ITT Educational Services, Inc.
All Rights Reserved. [59] 6/15/15
7. Right-click the src folder. Click New > Class. Enter a name and then check the create stub for
main method.
8. Click Finish.
© ITT Educational Services, Inc.
All Rights Reserved. [59] 6/15/15
SD1420 Introduction to Java Programming Study Guide
Task 2: Work with Exceptions—Part 1.
1. Now, you will work with exceptions on user input.
a. Create a calculator menu that includes add, subtract, multiply, and divide.
b. Create a method for each of the menu items.
c. Ask the user for a menu choice.
d. Ask the user for two numbers.
e. Call the user’s menu choice method.
f. Display the answer on the screen.
2. What happens if the user enters a letter and not a number?
3. Submit a copy of this code to your instructor.
Task 3: Work with Exceptions—Part 2.
1. Handle the exception. In order to handle this exception, you need to put the data collection
process into a sentinel controlled loop.
a. Create a sentinel variable and give it a default value.
b. Place the menu and the user-input code into a loop that runs as long as the sentinel
is valid.
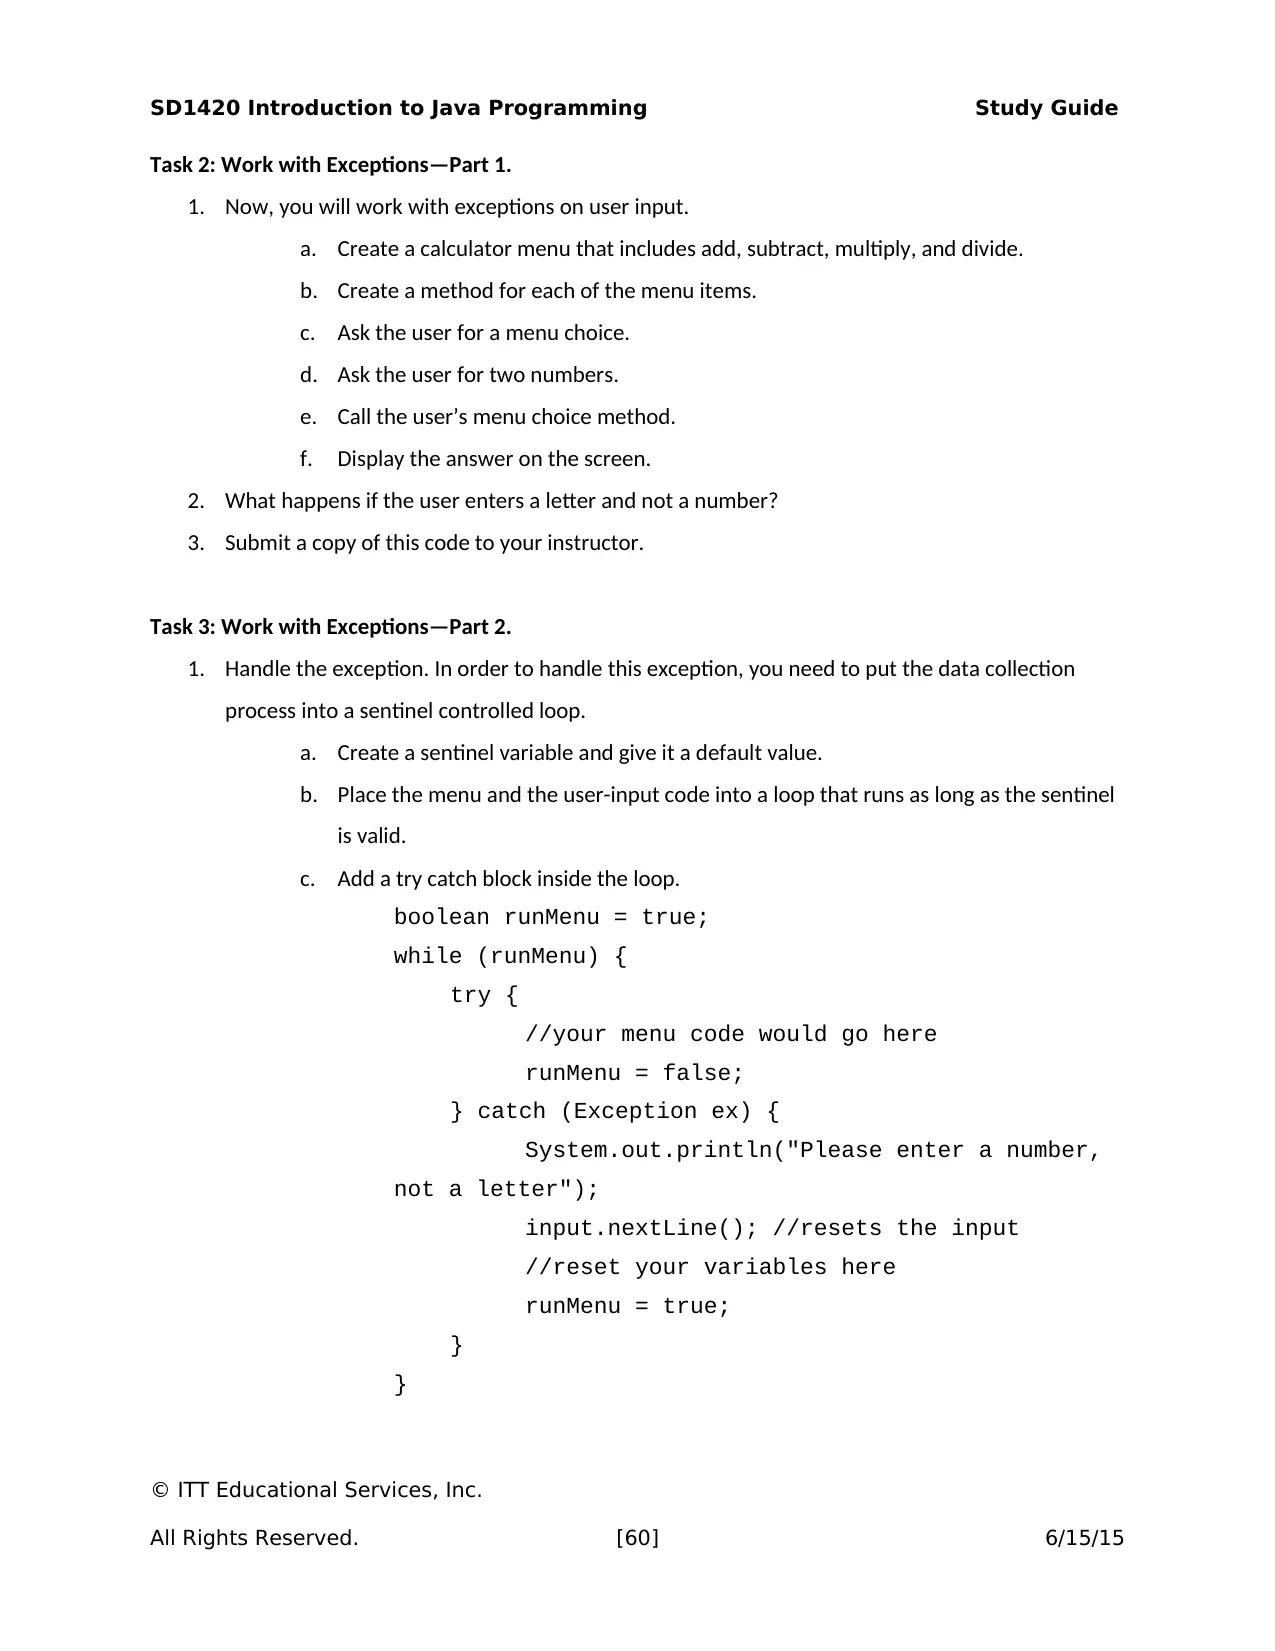
c. Add a try catch block inside the loop.
boolean runMenu = true;
while (runMenu) {
try {
//your menu code would go here
runMenu = false;
} catch (Exception ex) {
System.out.println("Please enter a number,
not a letter");
input.nextLine(); //resets the input
//reset your variables here
runMenu = true;
}
}
© ITT Educational Services, Inc.
All Rights Reserved. [60] 6/15/15
SD1420 Introduction to Java Programming Study Guide
2. What happens if the user does not enter a number?
3. Submit a copy of this code to your instructor.
Task 4: Work with Exceptions—Part 3.
1. Create our own exception to handle an invalid menu choice.
2. What is the name of the exception you receive?
3. Handle the divide by zero exception.
a. Add a try catch loop around the entire code.
b. Catch the specific exception found in item 2 above.
try {
//Your code from previous sections
}
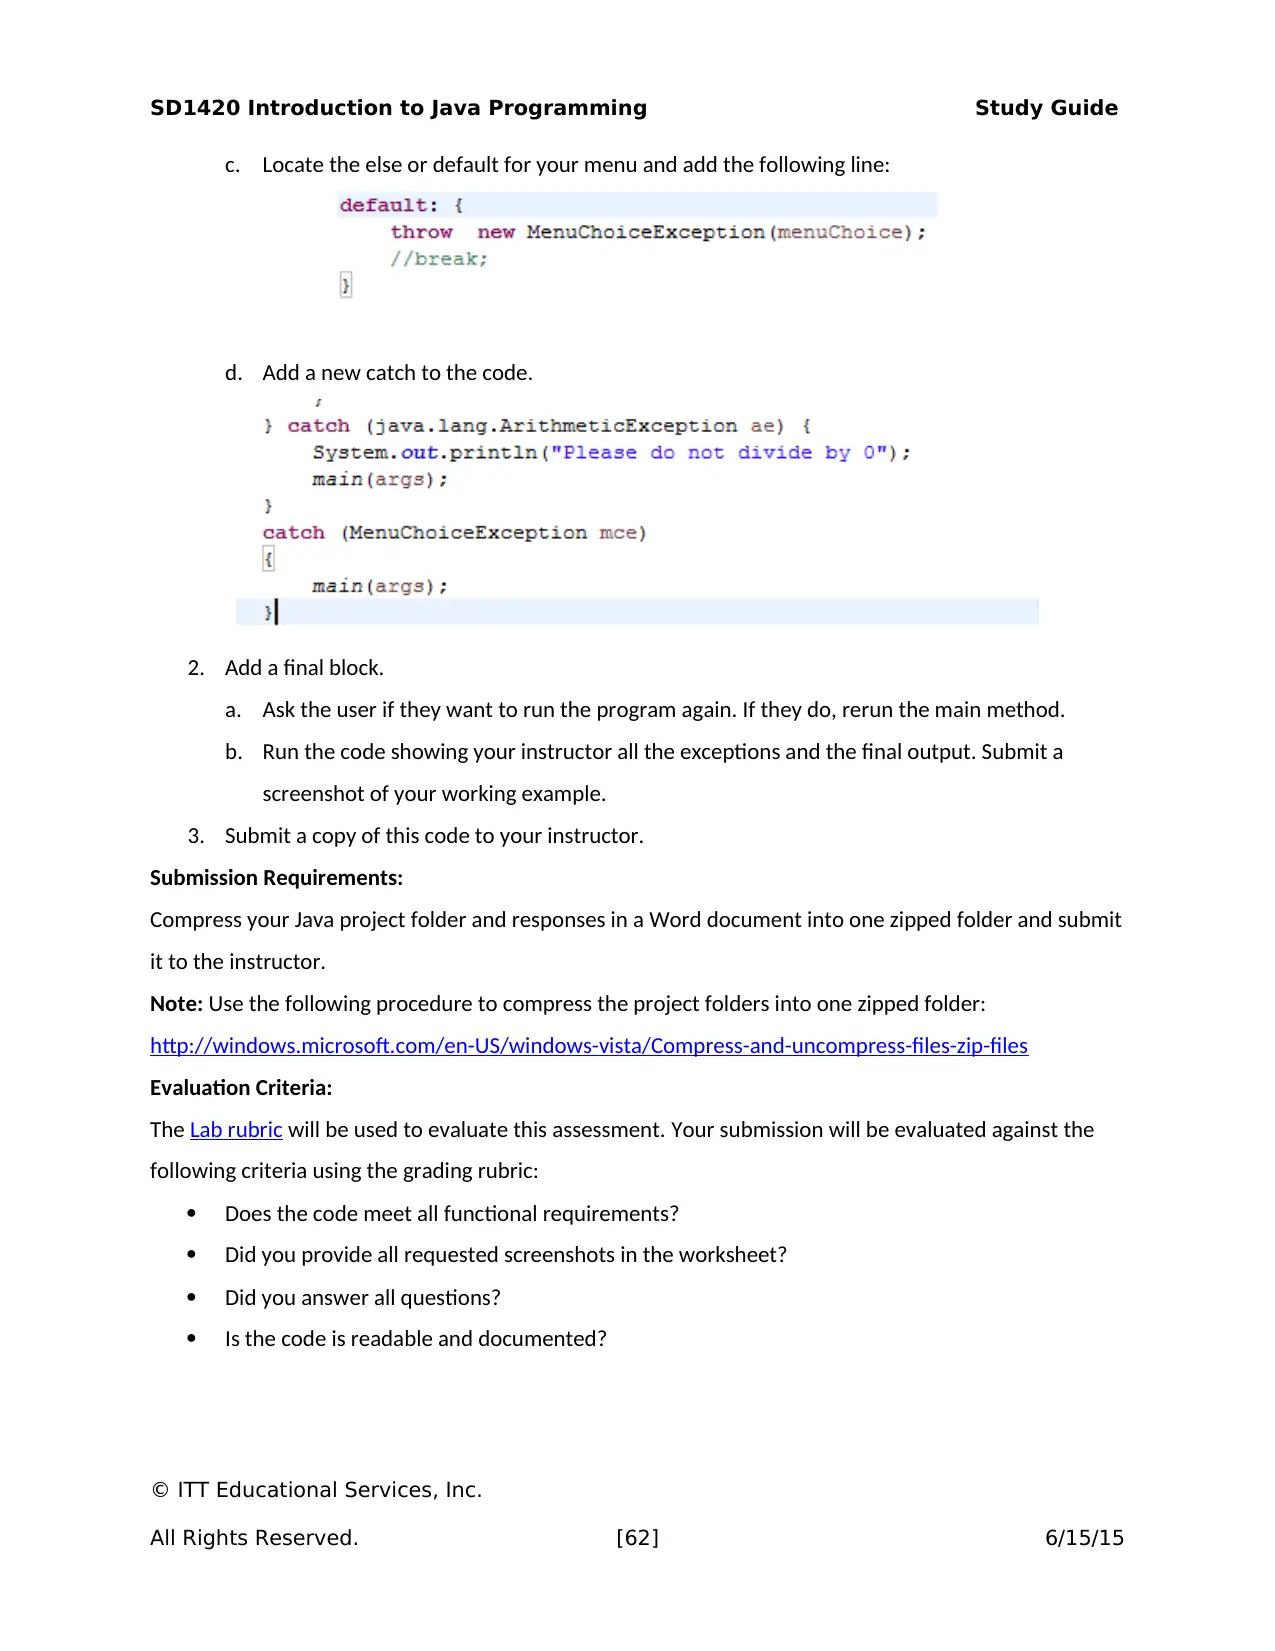
} catch (java.lang.ArithmeticException ae) {
System.out.println("Please do not divide by 0");
main(args);
}
4. Submit a copy of this code to your instructor.
Task 5: Work with Exceptions—Part 4.
1. Create our own exception for a bad menu choice.
a. If you do not have an else or a default that handles the user entering a menu choice not
defined, add one.
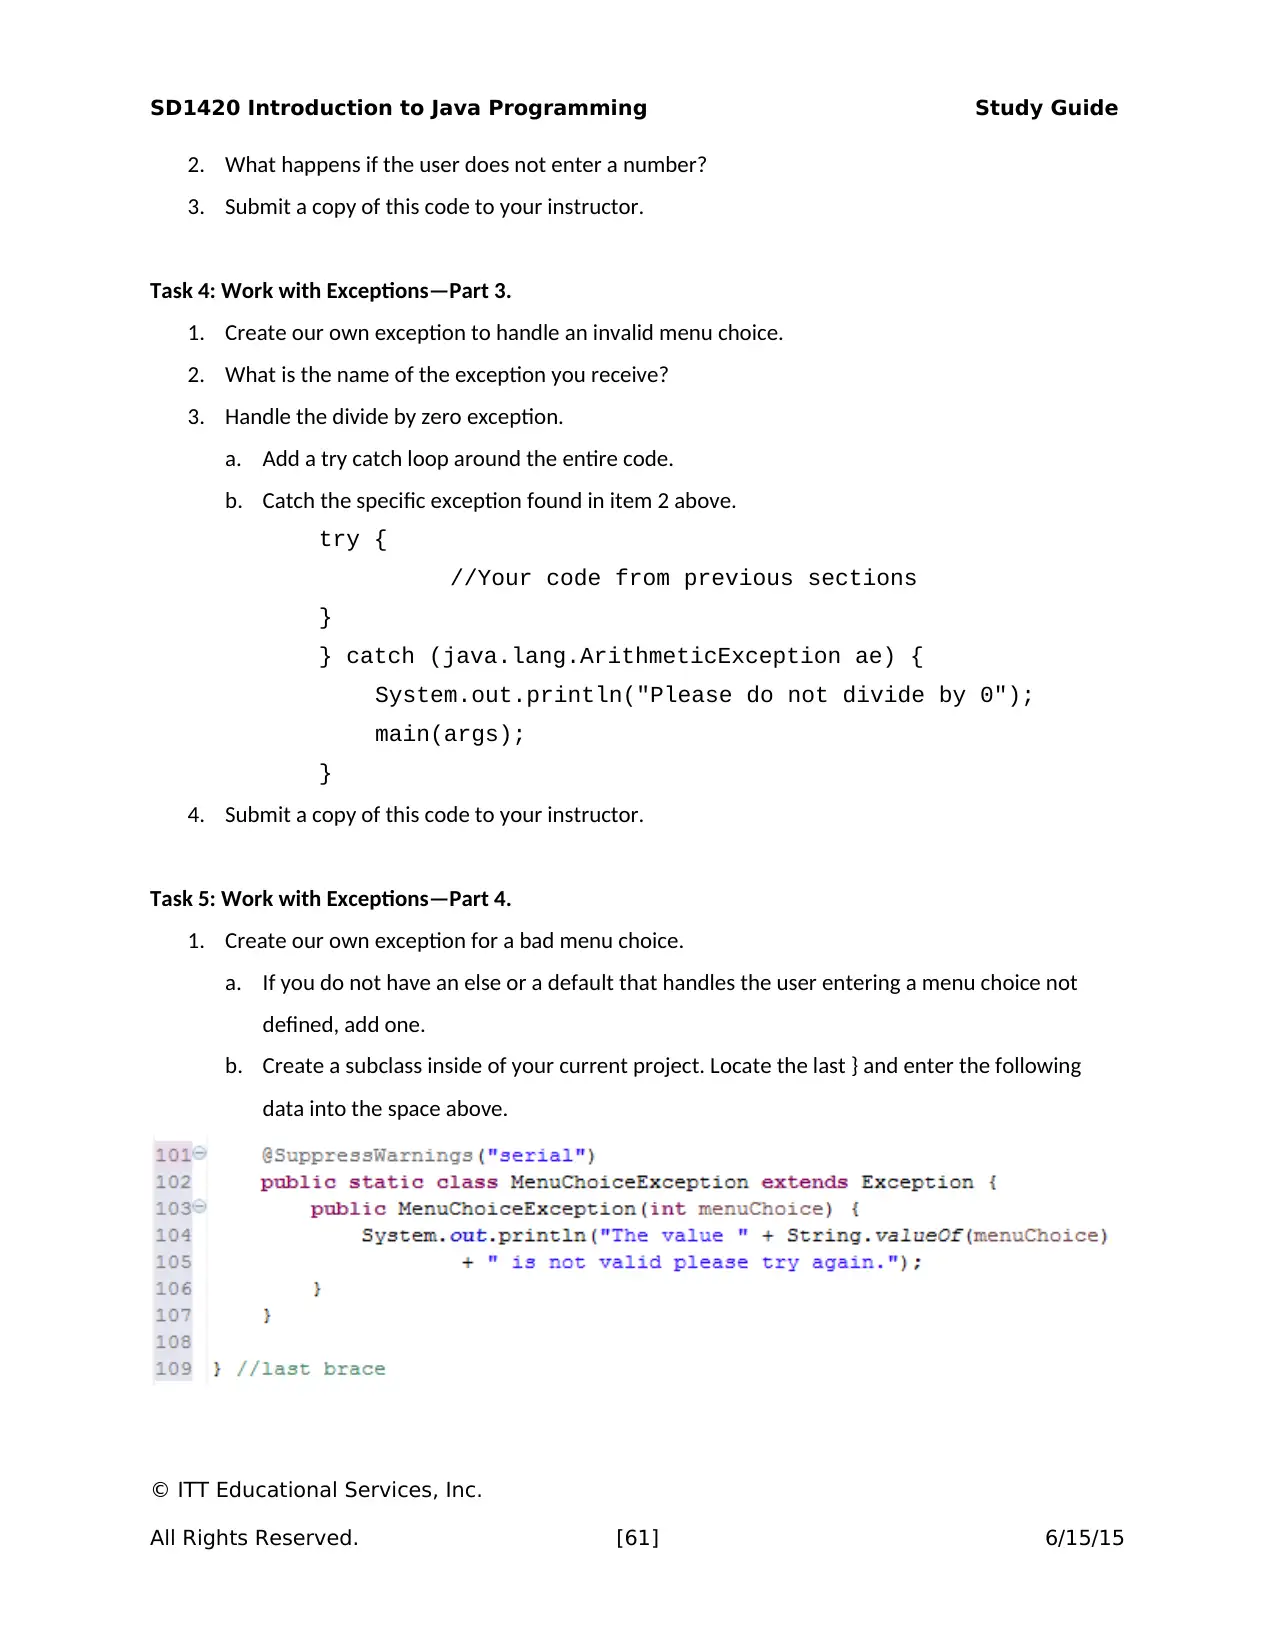
b. Create a subclass inside of your current project. Locate the last } and enter the following
data into the space above.
© ITT Educational Services, Inc.
All Rights Reserved. [61] 6/15/15
Paraphrase This Document
Need a fresh take? Get an instant paraphrase of this document with our AI Paraphraser
SD1420 Introduction to Java Programming Study Guide
c. Locate the else or default for your menu and add the following line:
d. Add a new catch to the code.
2. Add a final block.
a. Ask the user if they want to run the program again. If they do, rerun the main method.
b. Run the code showing your instructor all the exceptions and the final output. Submit a
screenshot of your working example.
3. Submit a copy of this code to your instructor.
Submission Requirements:
Compress your Java project folder and responses in a Word document into one zipped folder and submit
it to the instructor.
Note: Use the following procedure to compress the project folders into one zipped folder:
http://windows.microsoft.com/en-US/windows-vista/Compress-and-uncompress-files-zip-files
Evaluation Criteria:
The Lab rubric will be used to evaluate this assessment. Your submission will be evaluated against the
following criteria using the grading rubric:
Does the code meet all functional requirements?
Did you provide all requested screenshots in the worksheet?
Did you answer all questions?
Is the code is readable and documented?
© ITT Educational Services, Inc.
All Rights Reserved. [62] 6/15/15
SD1420 Introduction to Java Programming Study Guide
LAB 5.2 (2.0 HOURS)
Assessment Preparation Checklist:
To prepare for this assessment:
Read Chapters 14–16 from your textbook, Introduction to Java Programming. These chapters
focus on exception handling and event-driven programming.
Go through the lesson for Module 5, which focuses on exception handling and event-driven
programming.
Title: Abstract Classes and Event-Driven Programming
In this lab, you will work on event-driven programming.
Required Setup and Resources:
A virtual machine with Eclipse installed
Microsoft Word
Recommended Procedures:
Task 1: Create an Eclipse Project.
1. The first step will be to create a new project.
2. In ITT-Lab, launch Eclipse.
3. Click File > New > Java Project.
© ITT Educational Services, Inc.
All Rights Reserved. [63] 6/15/15
SD1420 Introduction to Java Programming Study Guide
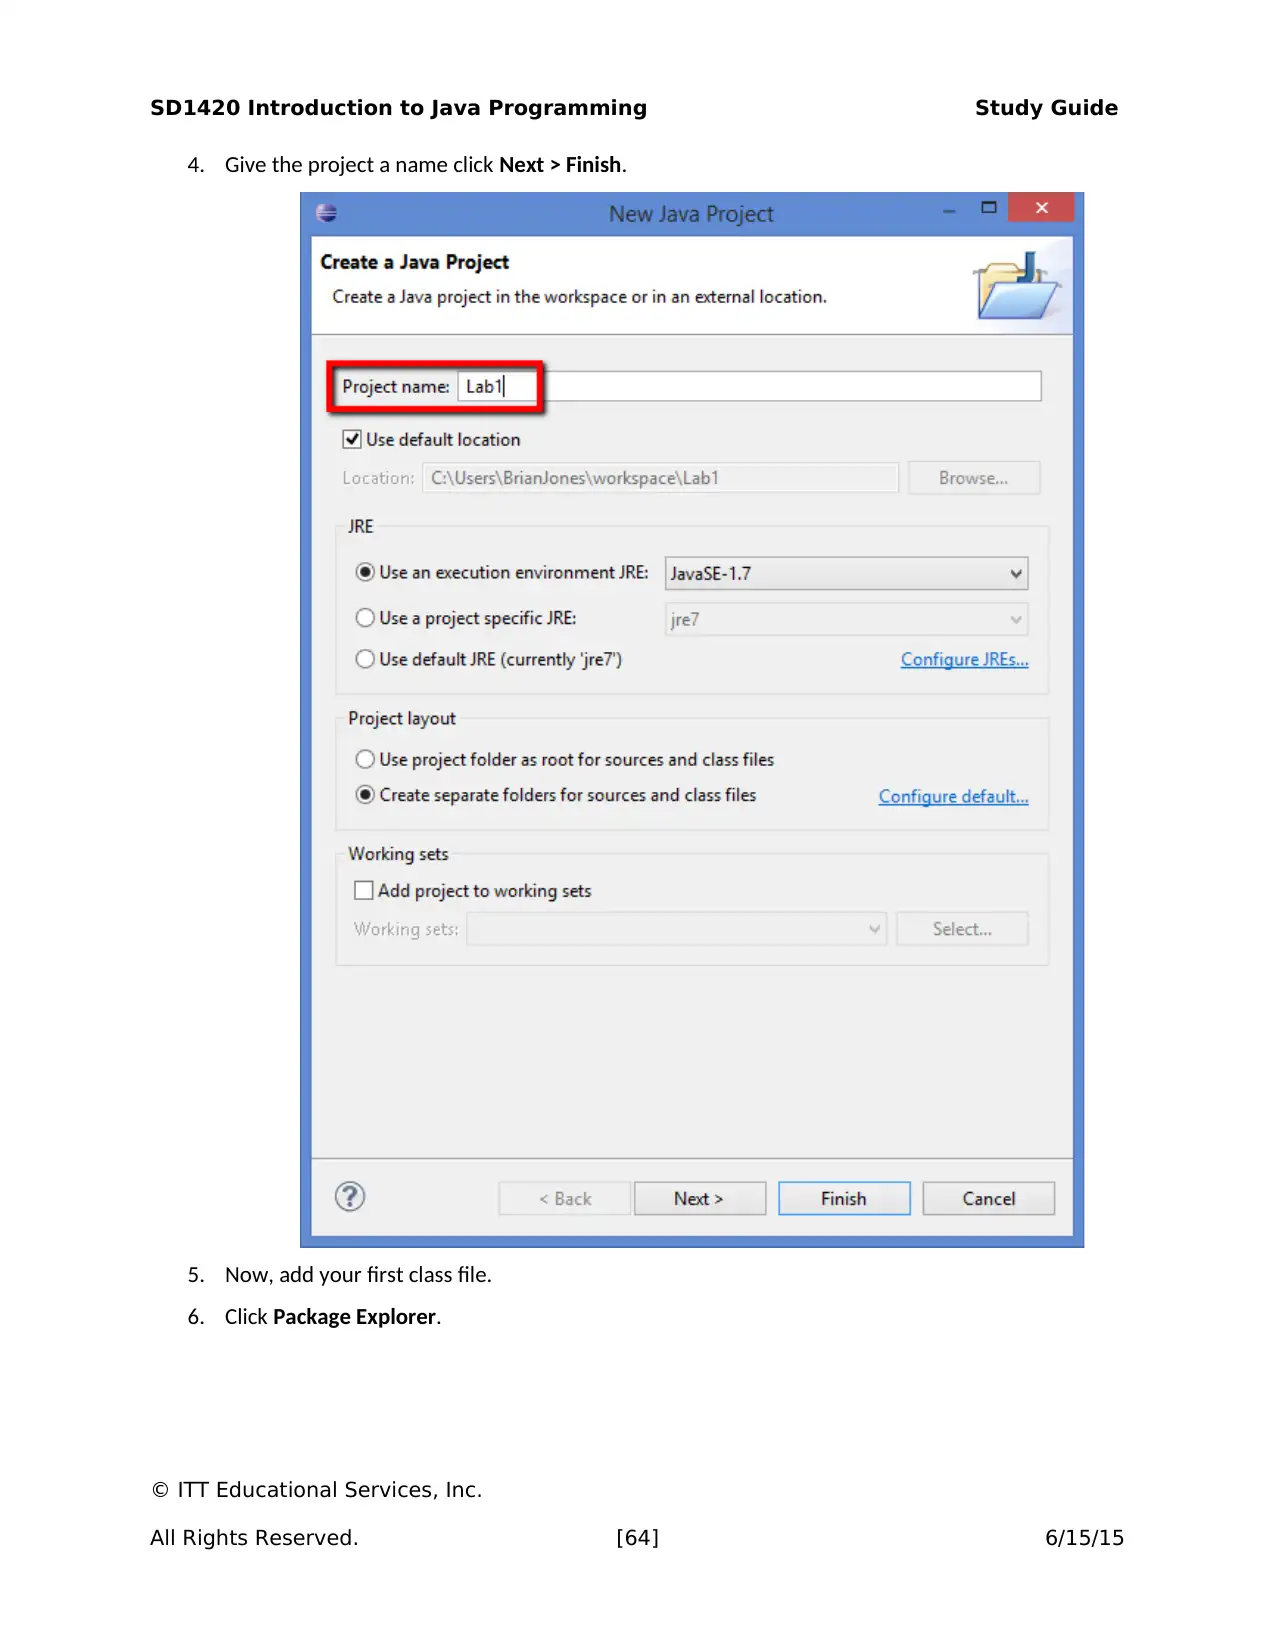
4. Give the project a name click Next > Finish.
5. Now, add your first class file.
6. Click Package Explorer.
© ITT Educational Services, Inc.
All Rights Reserved. [64] 6/15/15
4. Give the project a name click Next > Finish.
5. Now, add your first class file.
6. Click Package Explorer.
© ITT Educational Services, Inc.
All Rights Reserved. [64] 6/15/15
Secure Best Marks with AI Grader
Need help grading? Try our AI Grader for instant feedback on your assignments.
SD1420 Introduction to Java Programming Study Guide
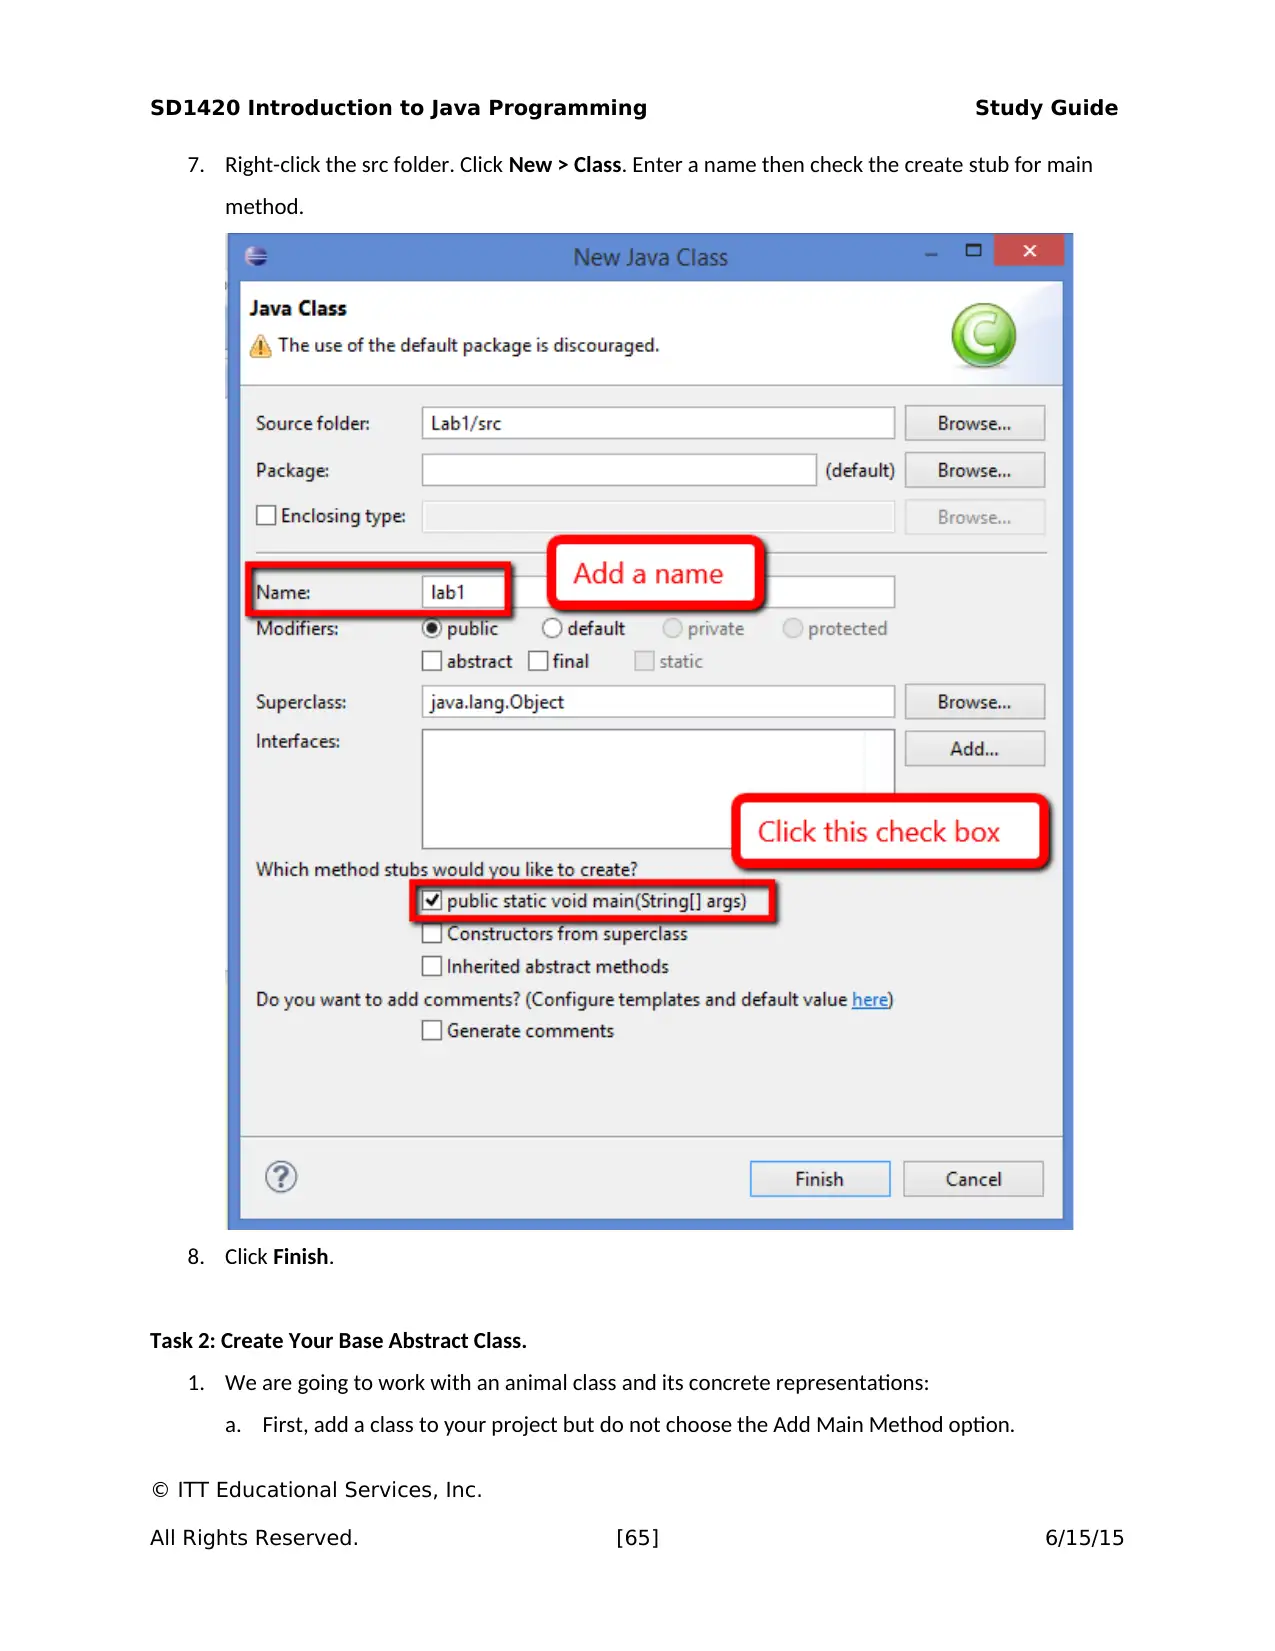
7. Right-click the src folder. Click New > Class. Enter a name then check the create stub for main
method.
8. Click Finish.
Task 2: Create Your Base Abstract Class.
1. We are going to work with an animal class and its concrete representations:
a. First, add a class to your project but do not choose the Add Main Method option.
© ITT Educational Services, Inc.
All Rights Reserved. [65] 6/15/15
SD1420 Introduction to Java Programming Study Guide
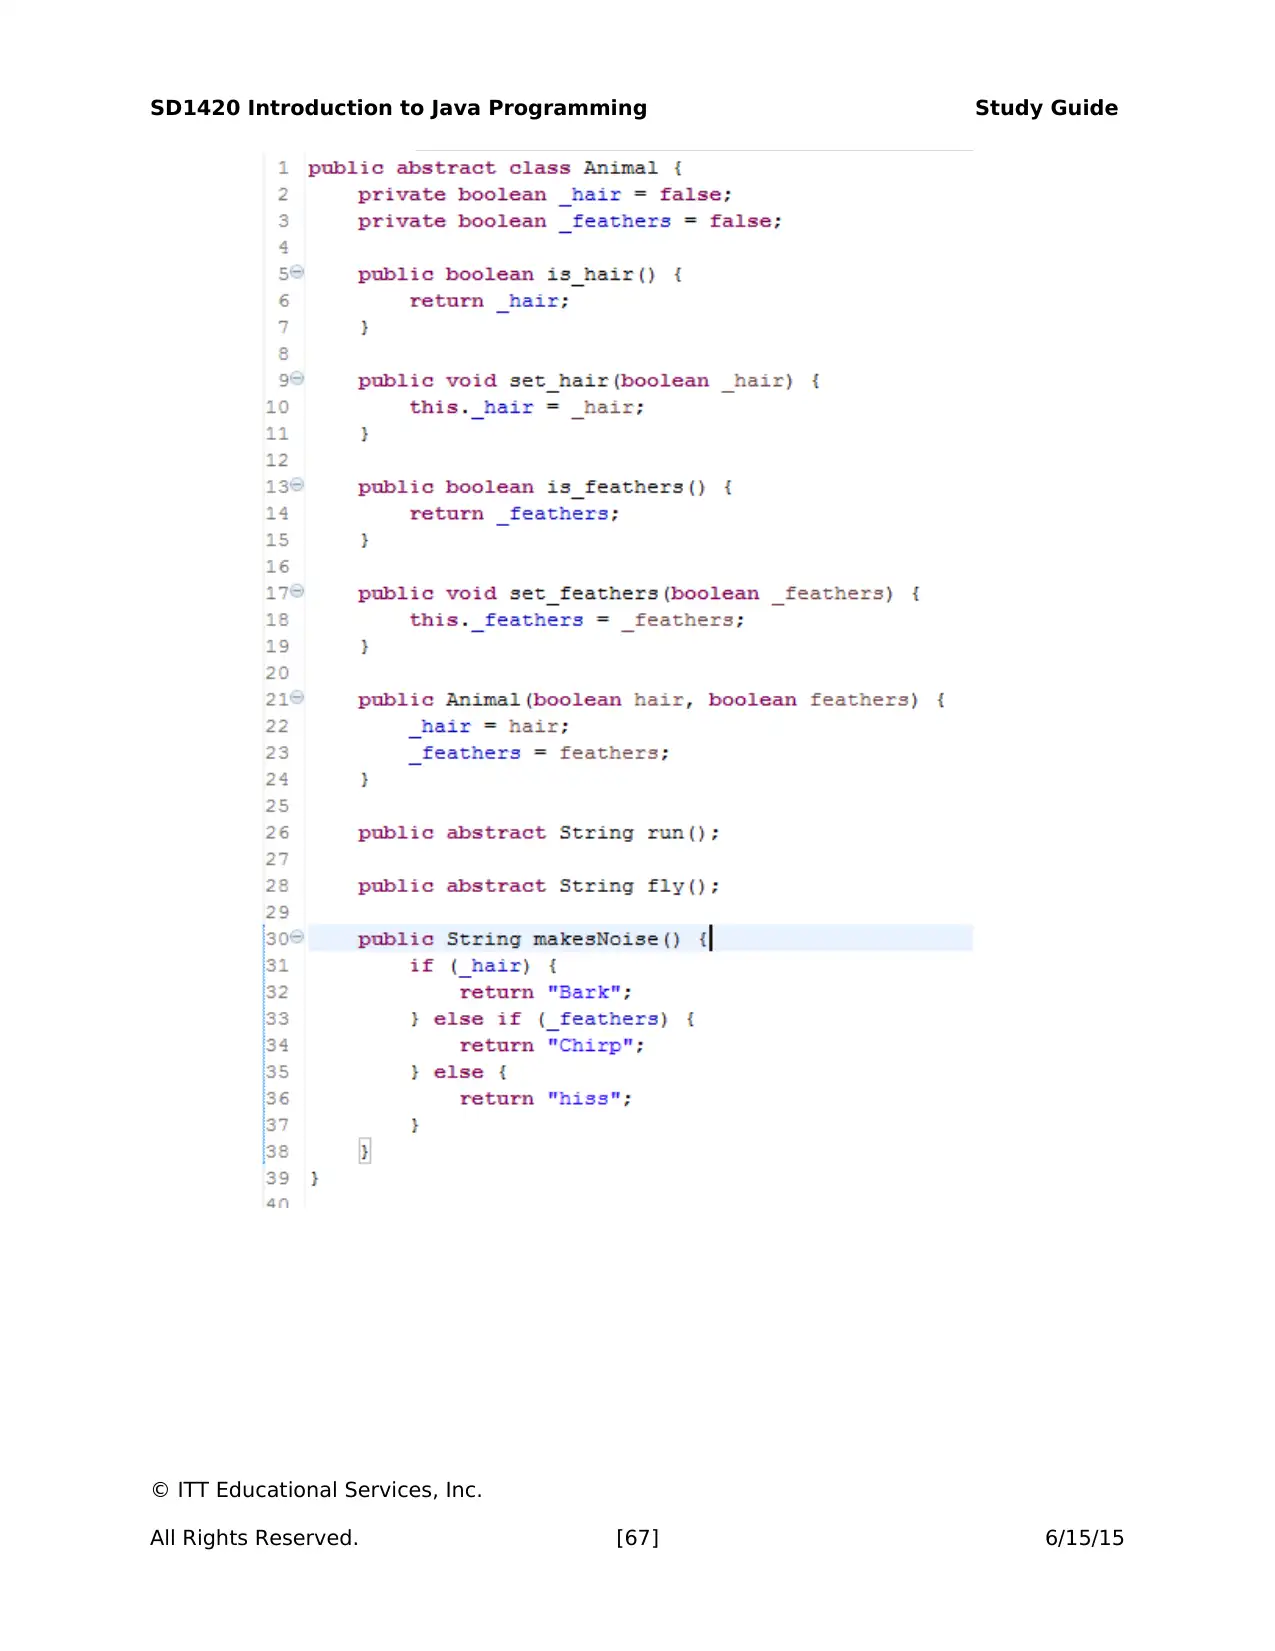
b. The class name is Animal and it has an added keyword of abstract.
c. Create two private Boolean attributes, hair and feathers, and their getters and setters.
i. On the menu, choose source.
ii. Then, generate Getters and Setters.
iii. Choose the variable you are interested in.
iv. Finish the process.
d. Create two abstract String methods run() and fly().
e. Create a non-abstract String method makesNoise and it needs to return a default noise
based on hair or feathers.
2. Save this code and move to Task 3.
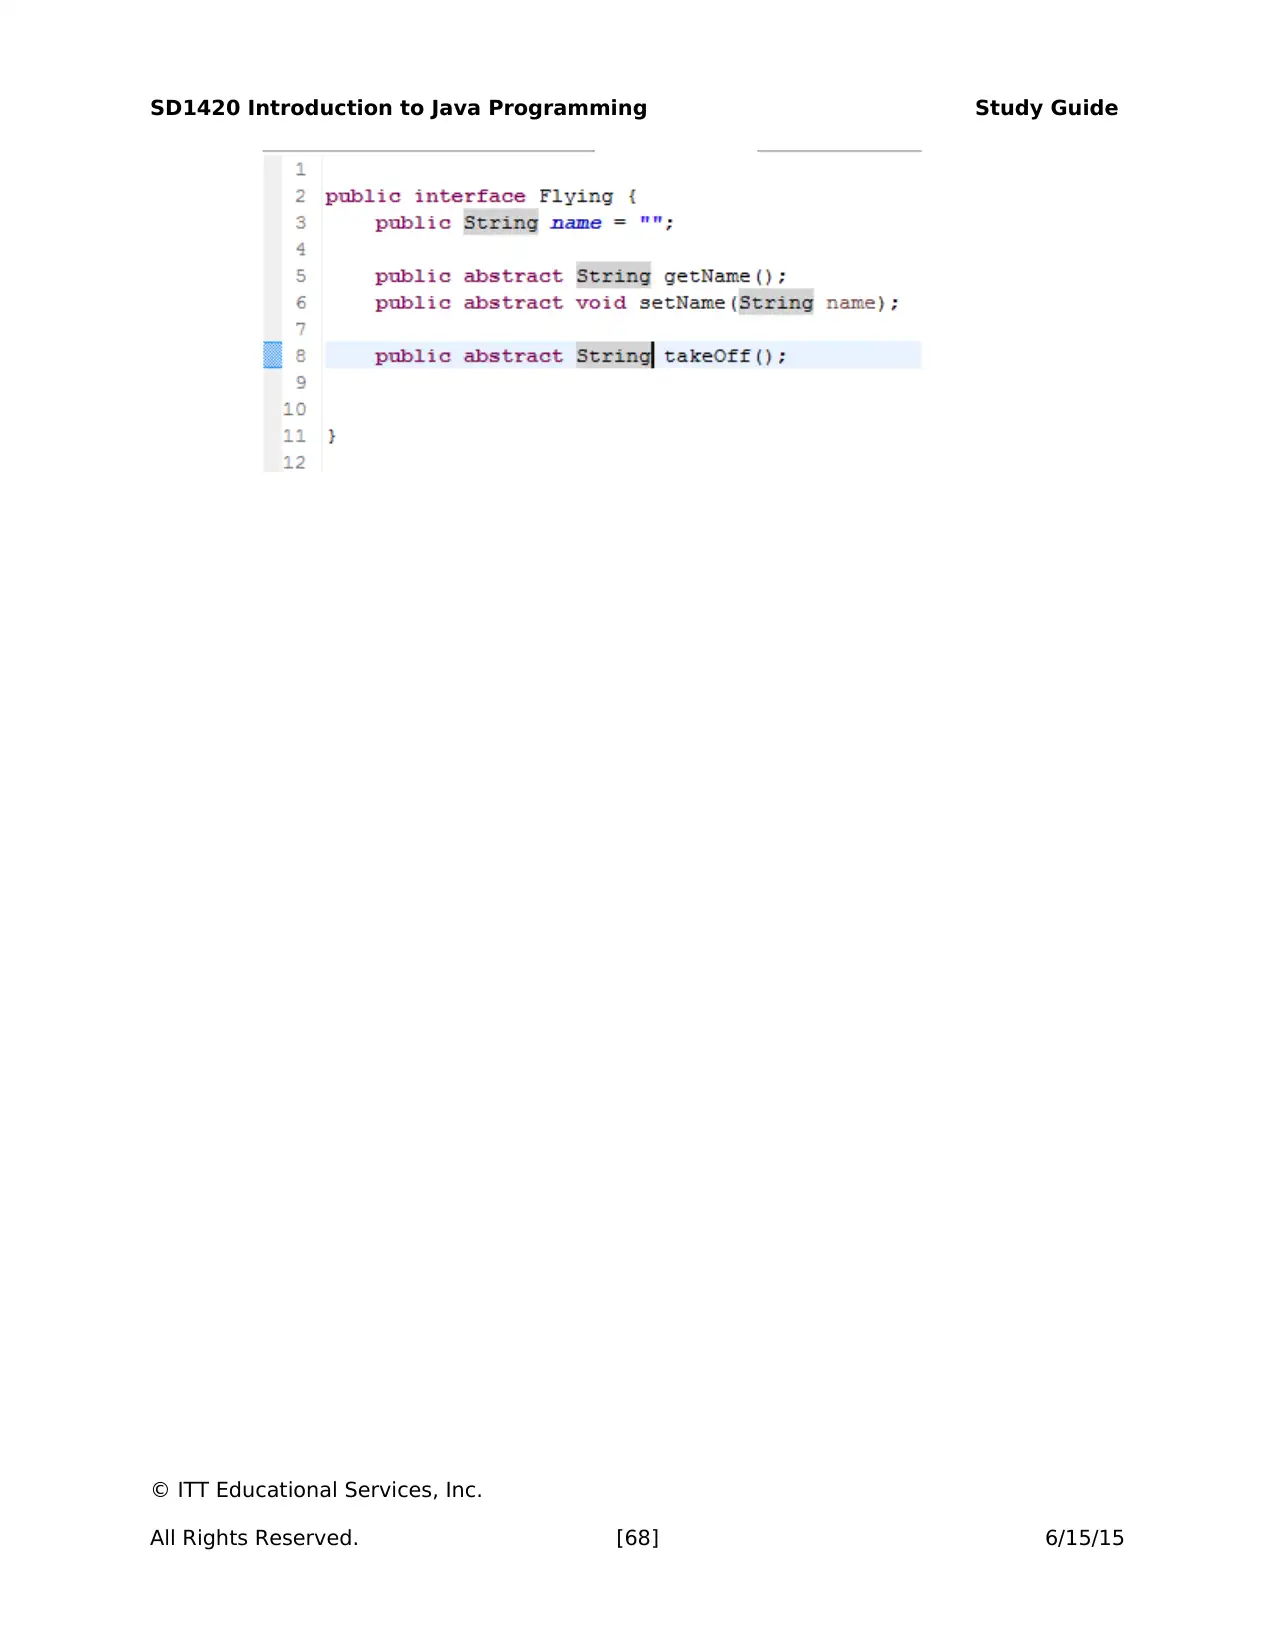
Task 3: Create the Interfaces.
1. Add a new interface to the project.
a. Name it NonFlying.
b. Add the following abstract methods:
i. String getName()
ii. void setName(String name)
iii. String takeoff()
2. Add a new interface to the project.
a. Name it Flying
b. Add the following abstract methods:
i. String getName()
ii. void setName(String name)
iii. String movement()
3. Save this code and move to Task 3.
Task 4: Create Specific Animals.
1. Create 2 flying (Raven, Bat) and 2 non-flying animals (Dog, Frog).
2. All classes extend Animal and implement either Flying or Non-Flying.
3. Develop different behaviors as required, hair/feathers and movement.
4. Examples of the classes used to create Raven.
© ITT Educational Services, Inc.
All Rights Reserved. [66] 6/15/15
SD1420 Introduction to Java Programming Study Guide
© ITT Educational Services, Inc.
All Rights Reserved. [67] 6/15/15
© ITT Educational Services, Inc.
All Rights Reserved. [67] 6/15/15
Paraphrase This Document
Need a fresh take? Get an instant paraphrase of this document with our AI Paraphraser
SD1420 Introduction to Java Programming Study Guide
© ITT Educational Services, Inc.
All Rights Reserved. [68] 6/15/15
© ITT Educational Services, Inc.
All Rights Reserved. [68] 6/15/15
SD1420 Introduction to Java Programming Study Guide
Task 5: Create a Test Class and Use Event Handlers.
1. Right-click on your package.
a. Choose New.
i. Select Other.
ii. Select WindowBuilder.
iii. Select Swing designer.
iv. Select JFrame.
v. Name it AnimalTest.
vi. At the bottom of the screen is a design tab.
Click Design and wait for the process to complete.
2. Click Absolute layout item.
3. Add the following controls to the jFrame:
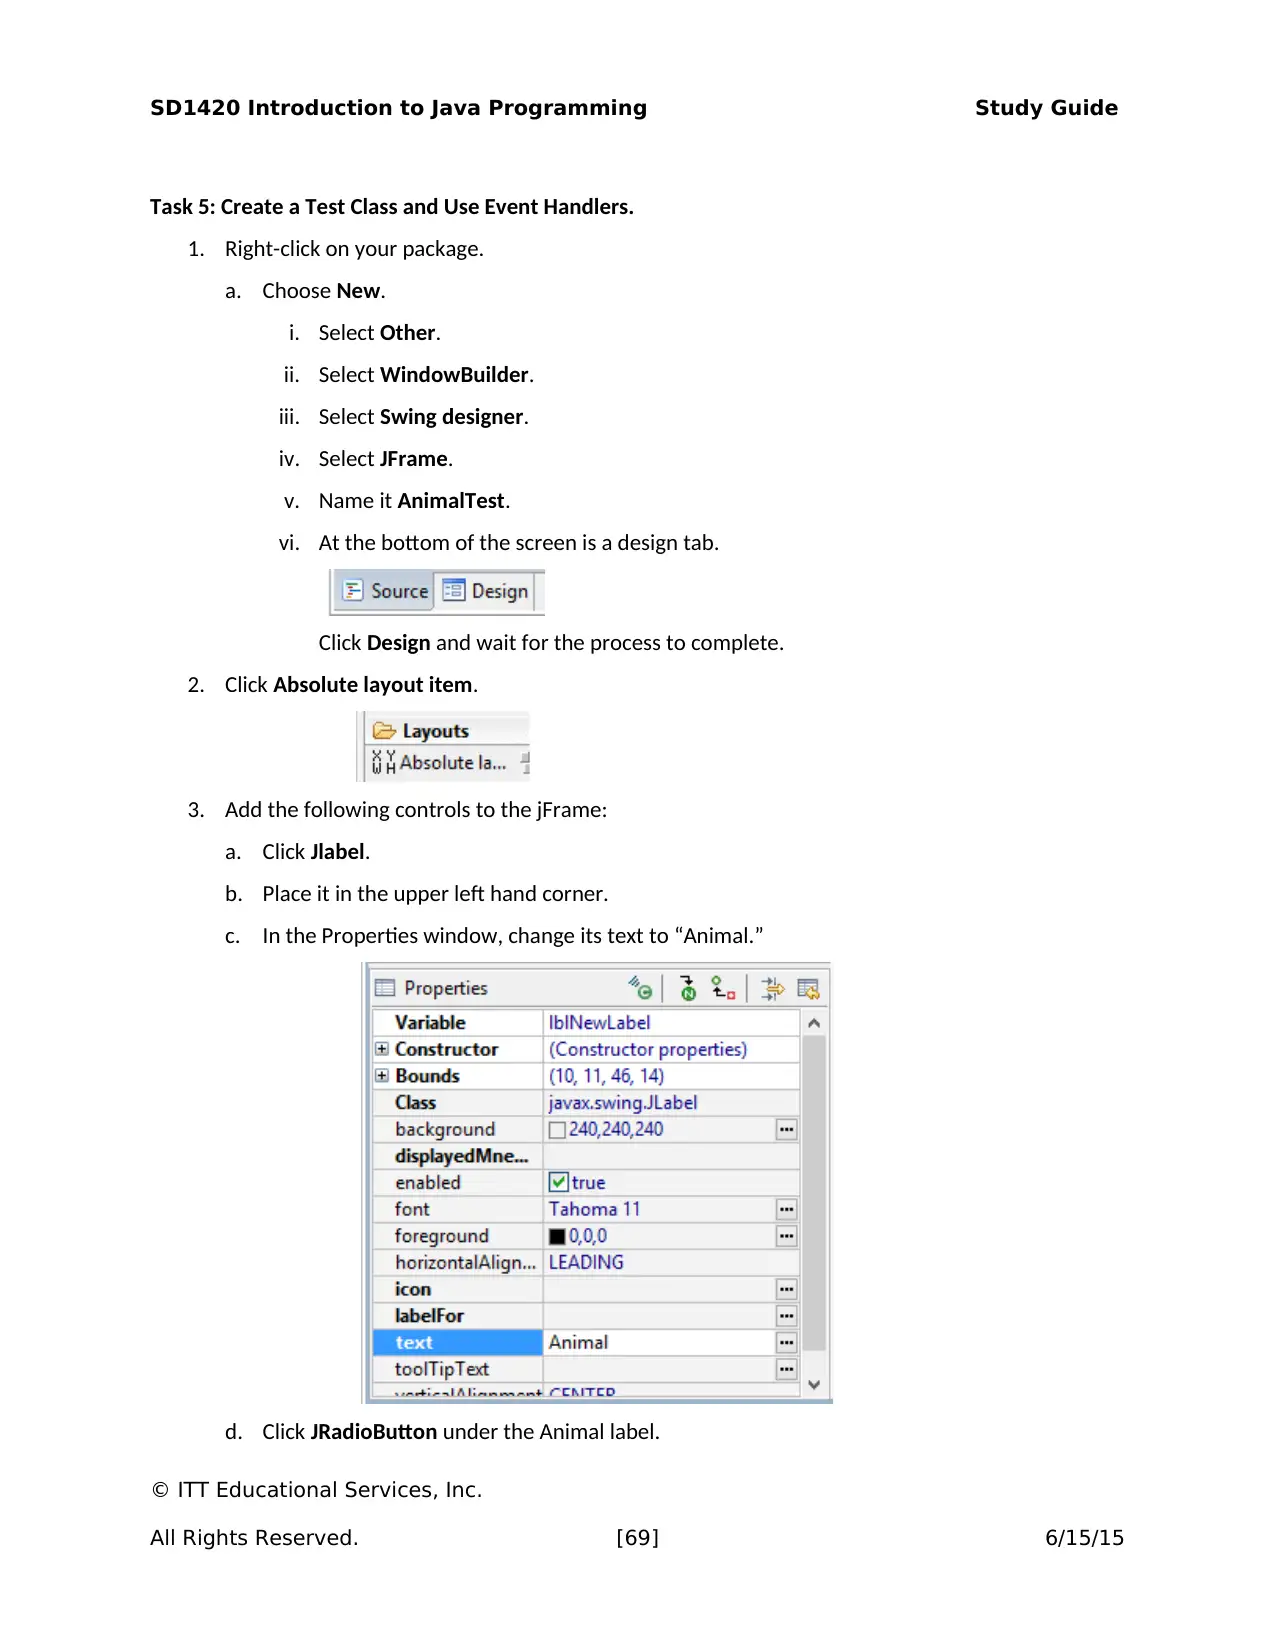
a. Click Jlabel.
b. Place it in the upper left hand corner.
c. In the Properties window, change its text to “Animal.”
d. Click JRadioButton under the Animal label.
© ITT Educational Services, Inc.
All Rights Reserved. [69] 6/15/15

SD1420 Introduction to Java Programming Study Guide
© ITT Educational Services, Inc.
All Rights Reserved. [70] 6/15/15
© ITT Educational Services, Inc.
All Rights Reserved. [70] 6/15/15
Secure Best Marks with AI Grader
Need help grading? Try our AI Grader for instant feedback on your assignments.
SD1420 Introduction to Java Programming Study Guide
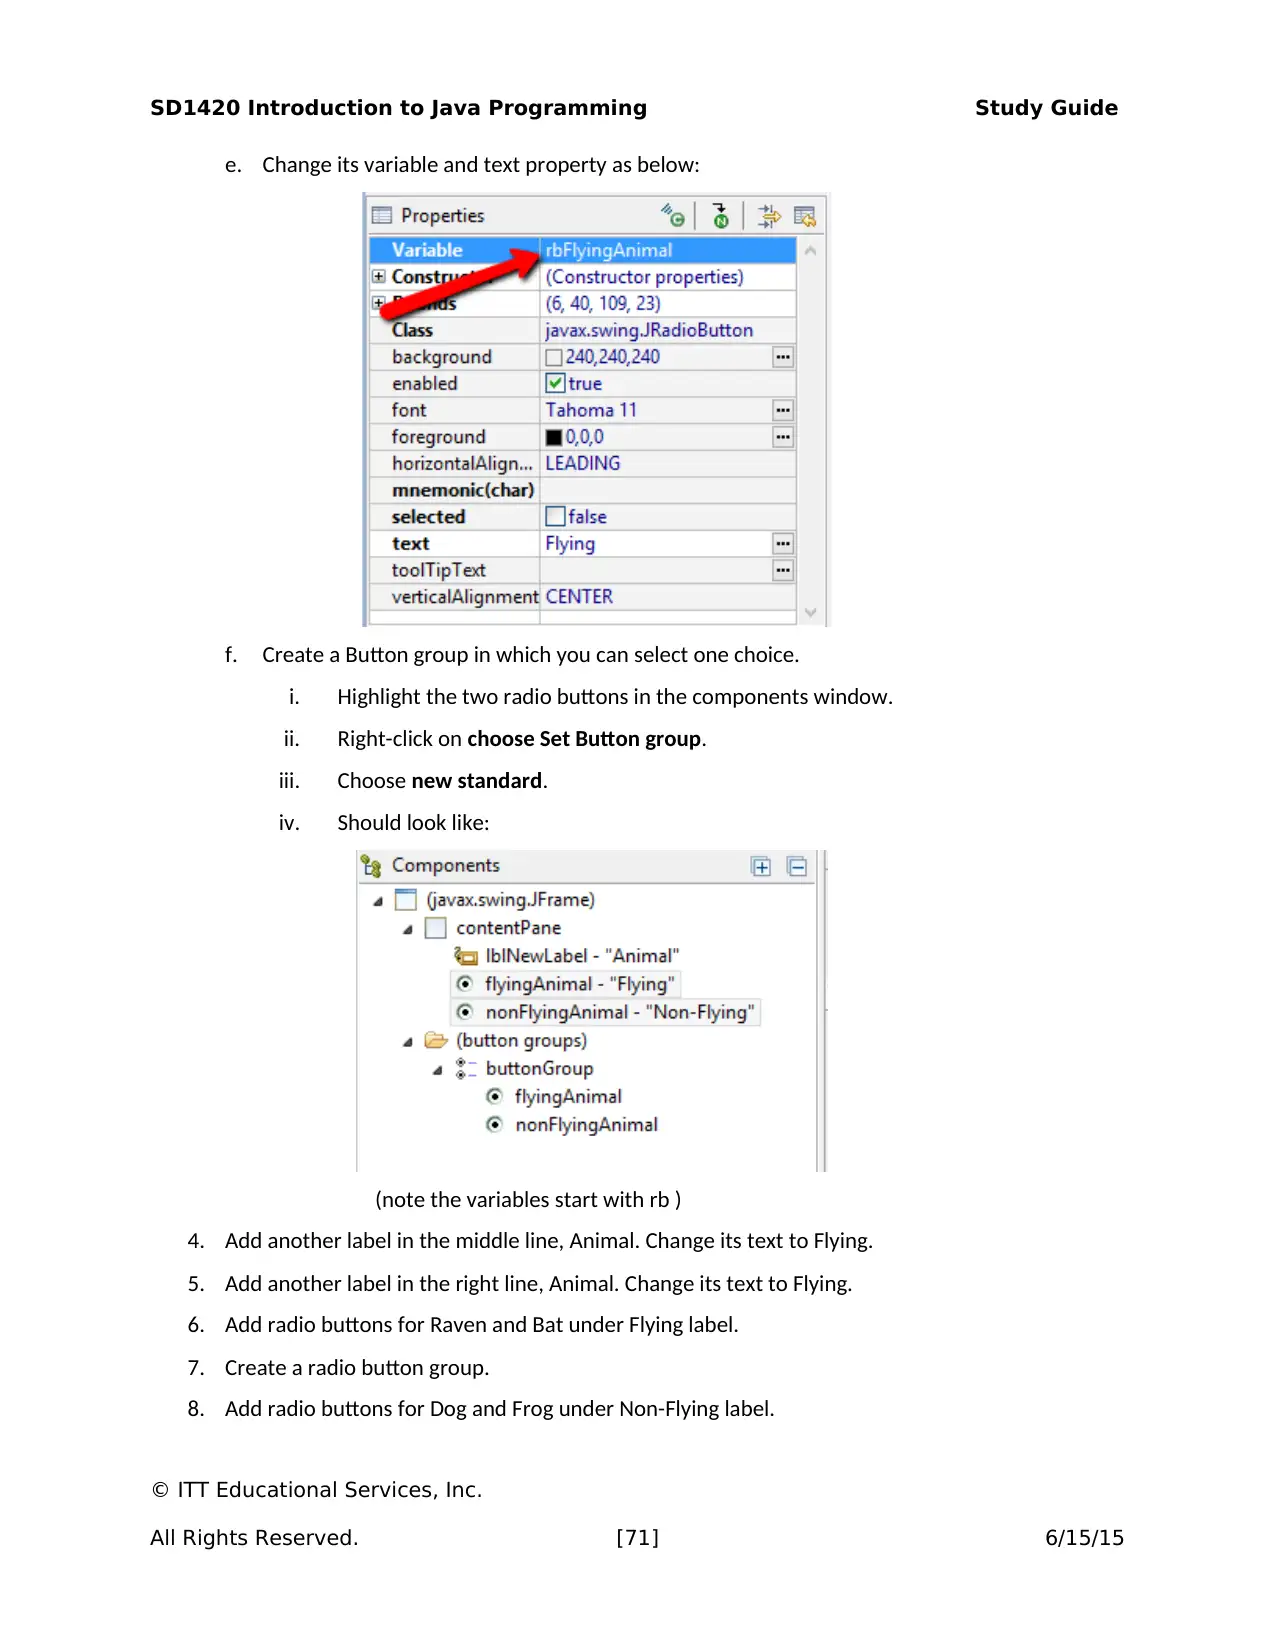
e. Change its variable and text property as below:
f. Create a Button group in which you can select one choice.
i. Highlight the two radio buttons in the components window.
ii. Right-click on choose Set Button group.
iii. Choose new standard.
iv. Should look like:
(note the variables start with rb )
4. Add another label in the middle line, Animal. Change its text to Flying.
5. Add another label in the right line, Animal. Change its text to Flying.
6. Add radio buttons for Raven and Bat under Flying label.
7. Create a radio button group.
8. Add radio buttons for Dog and Frog under Non-Flying label.
© ITT Educational Services, Inc.
All Rights Reserved. [71] 6/15/15
SD1420 Introduction to Java Programming Study Guide
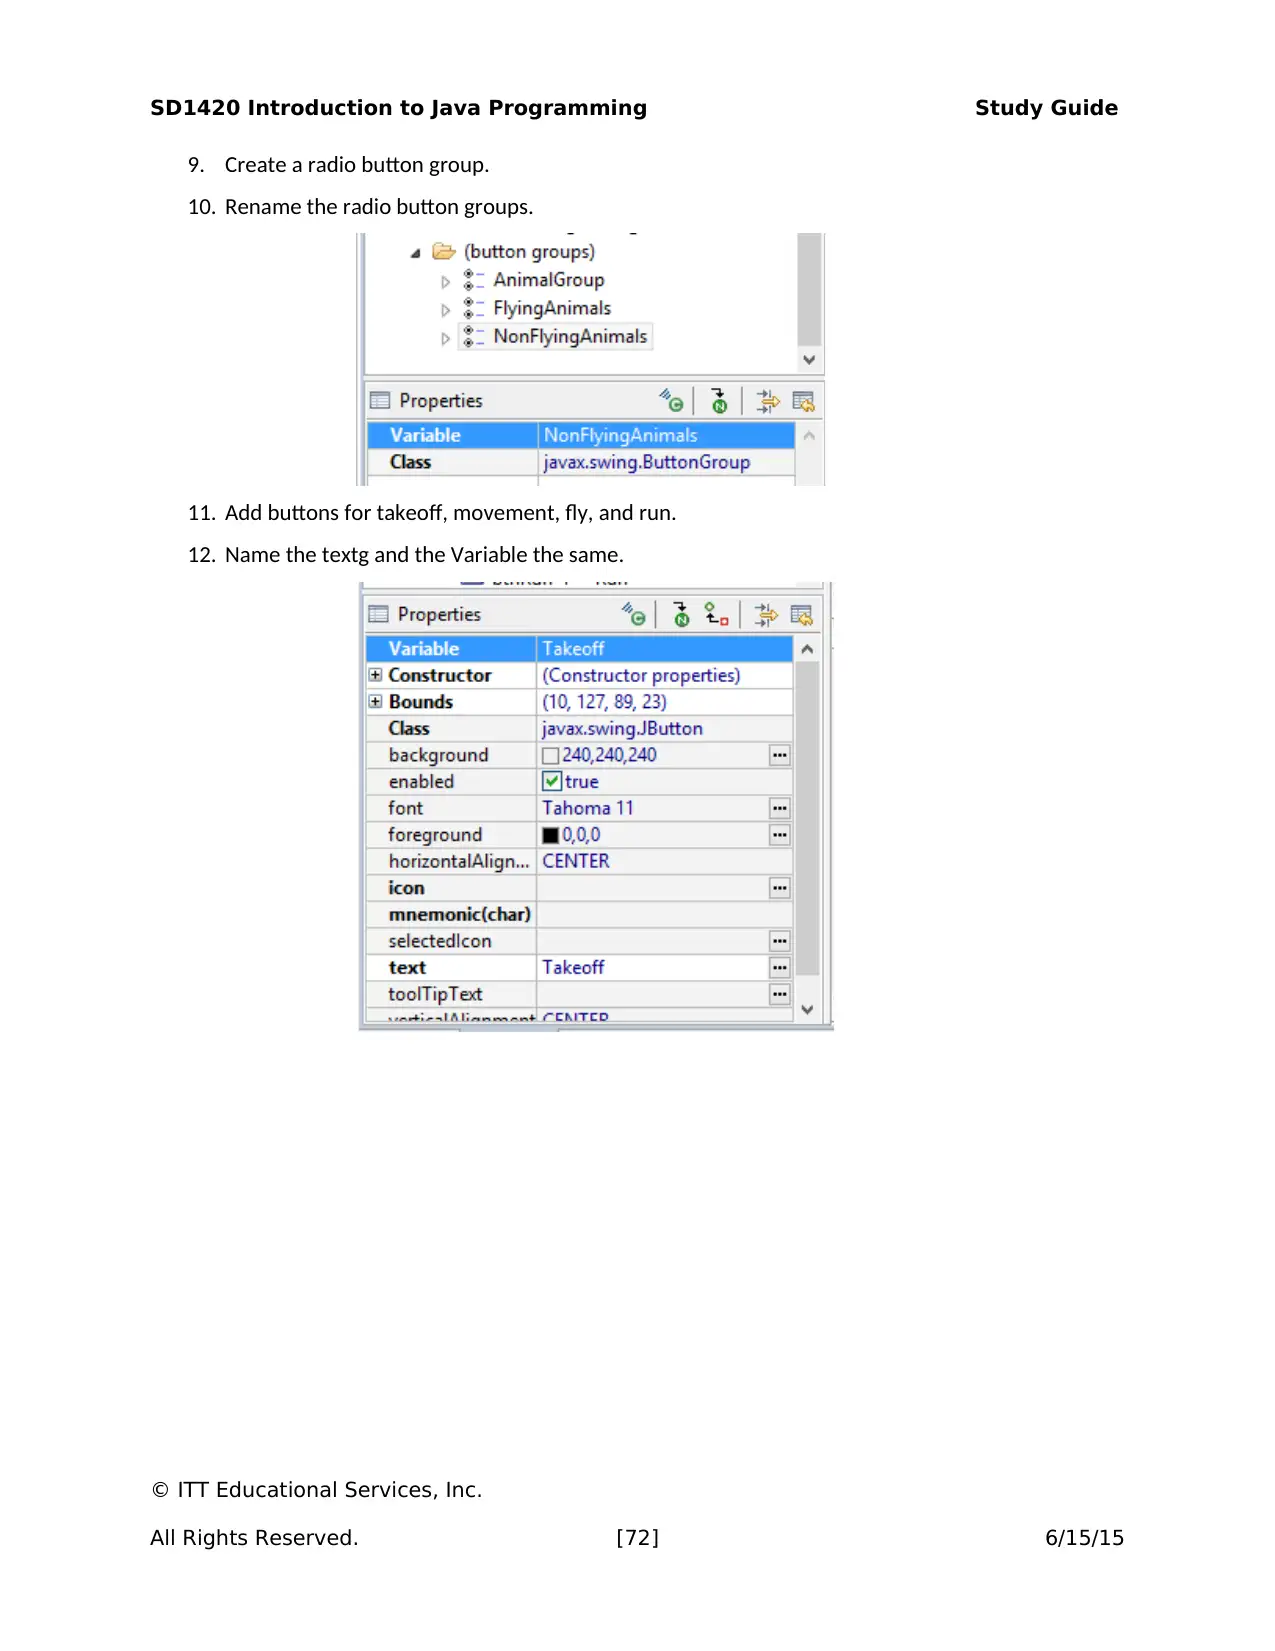
9. Create a radio button group.
10. Rename the radio button groups.
11. Add buttons for takeoff, movement, fly, and run.
12. Name the textg and the Variable the same.
© ITT Educational Services, Inc.
All Rights Reserved. [72] 6/15/15
9. Create a radio button group.
10. Rename the radio button groups.
11. Add buttons for takeoff, movement, fly, and run.
12. Name the textg and the Variable the same.
© ITT Educational Services, Inc.
All Rights Reserved. [72] 6/15/15
SD1420 Introduction to Java Programming Study Guide
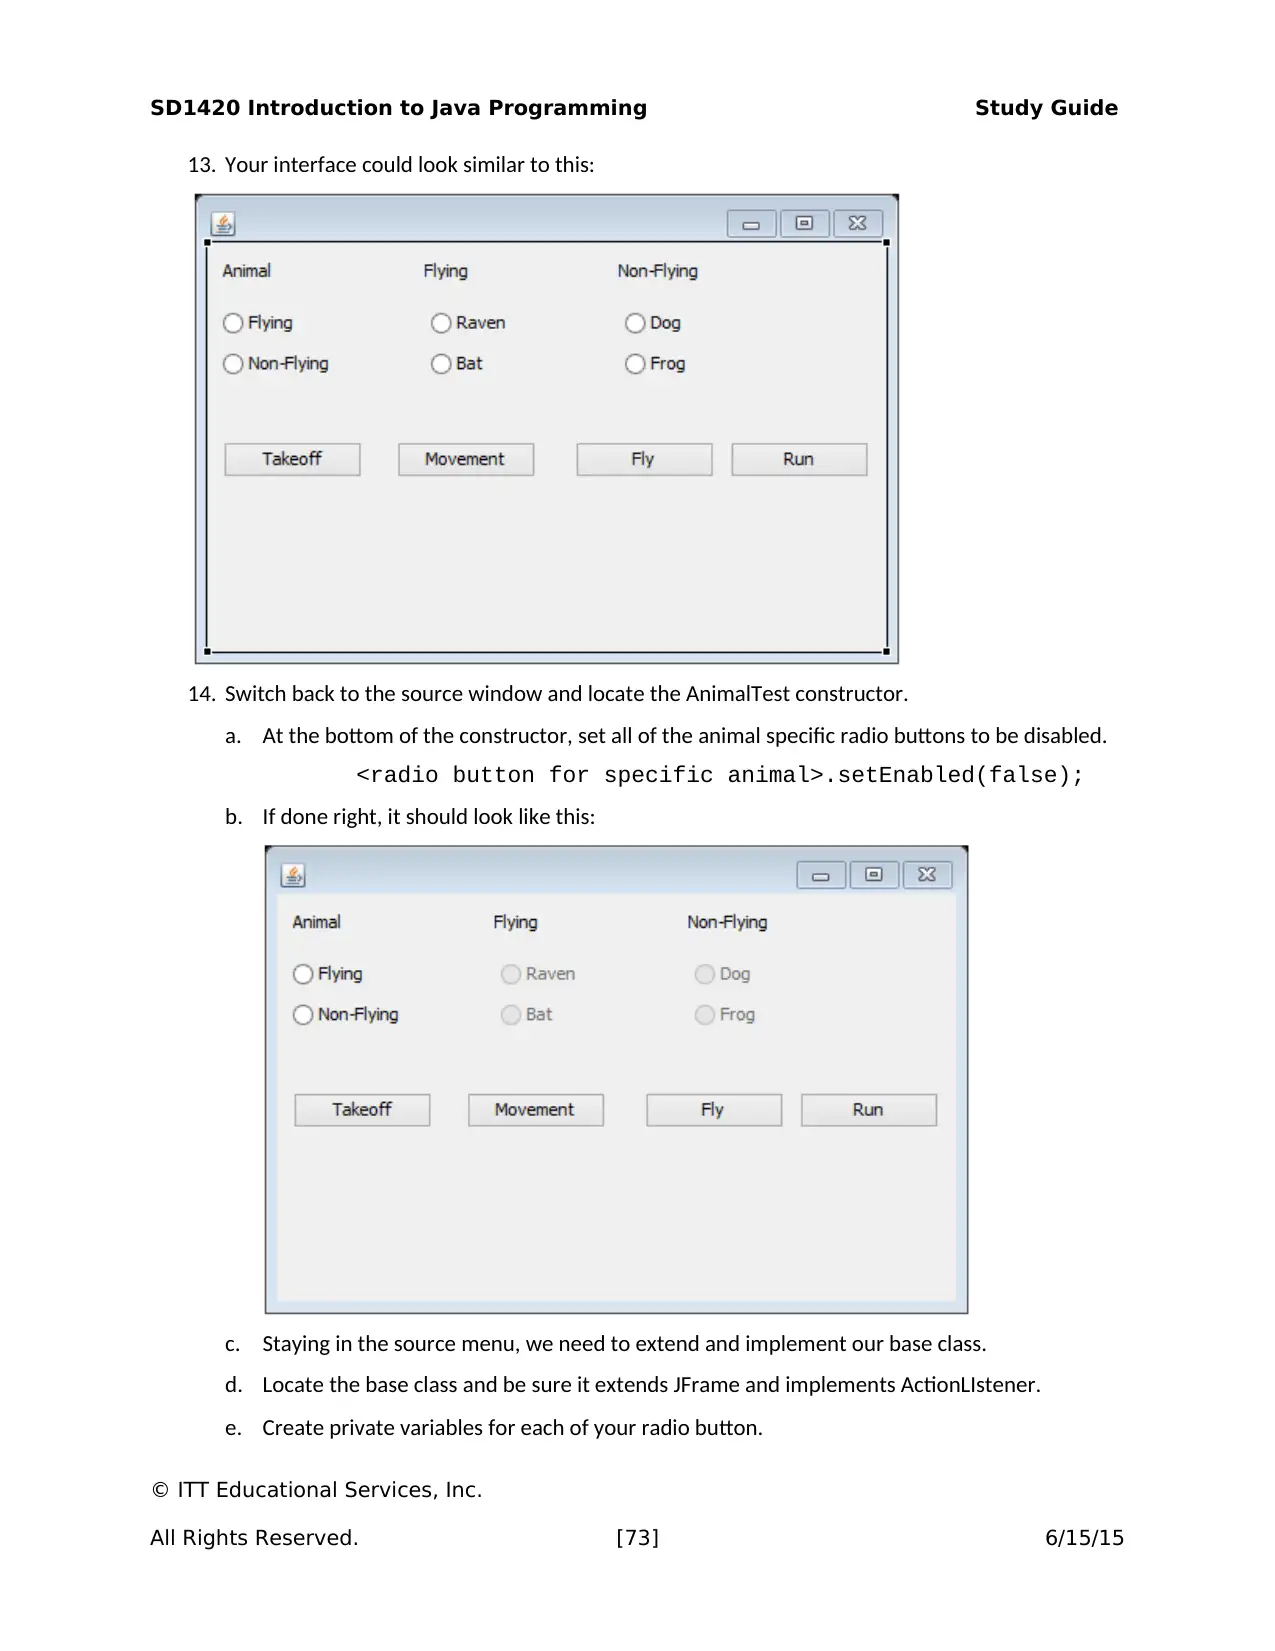
13. Your interface could look similar to this:
14. Switch back to the source window and locate the AnimalTest constructor.
a. At the bottom of the constructor, set all of the animal specific radio buttons to be disabled.
<radio button for specific animal>.setEnabled(false);
b. If done right, it should look like this:
c. Staying in the source menu, we need to extend and implement our base class.
d. Locate the base class and be sure it extends JFrame and implements ActionLIstener.
e. Create private variables for each of your radio button.
© ITT Educational Services, Inc.
All Rights Reserved. [73] 6/15/15
Paraphrase This Document
Need a fresh take? Get an instant paraphrase of this document with our AI Paraphraser
SD1420 Introduction to Java Programming Study Guide
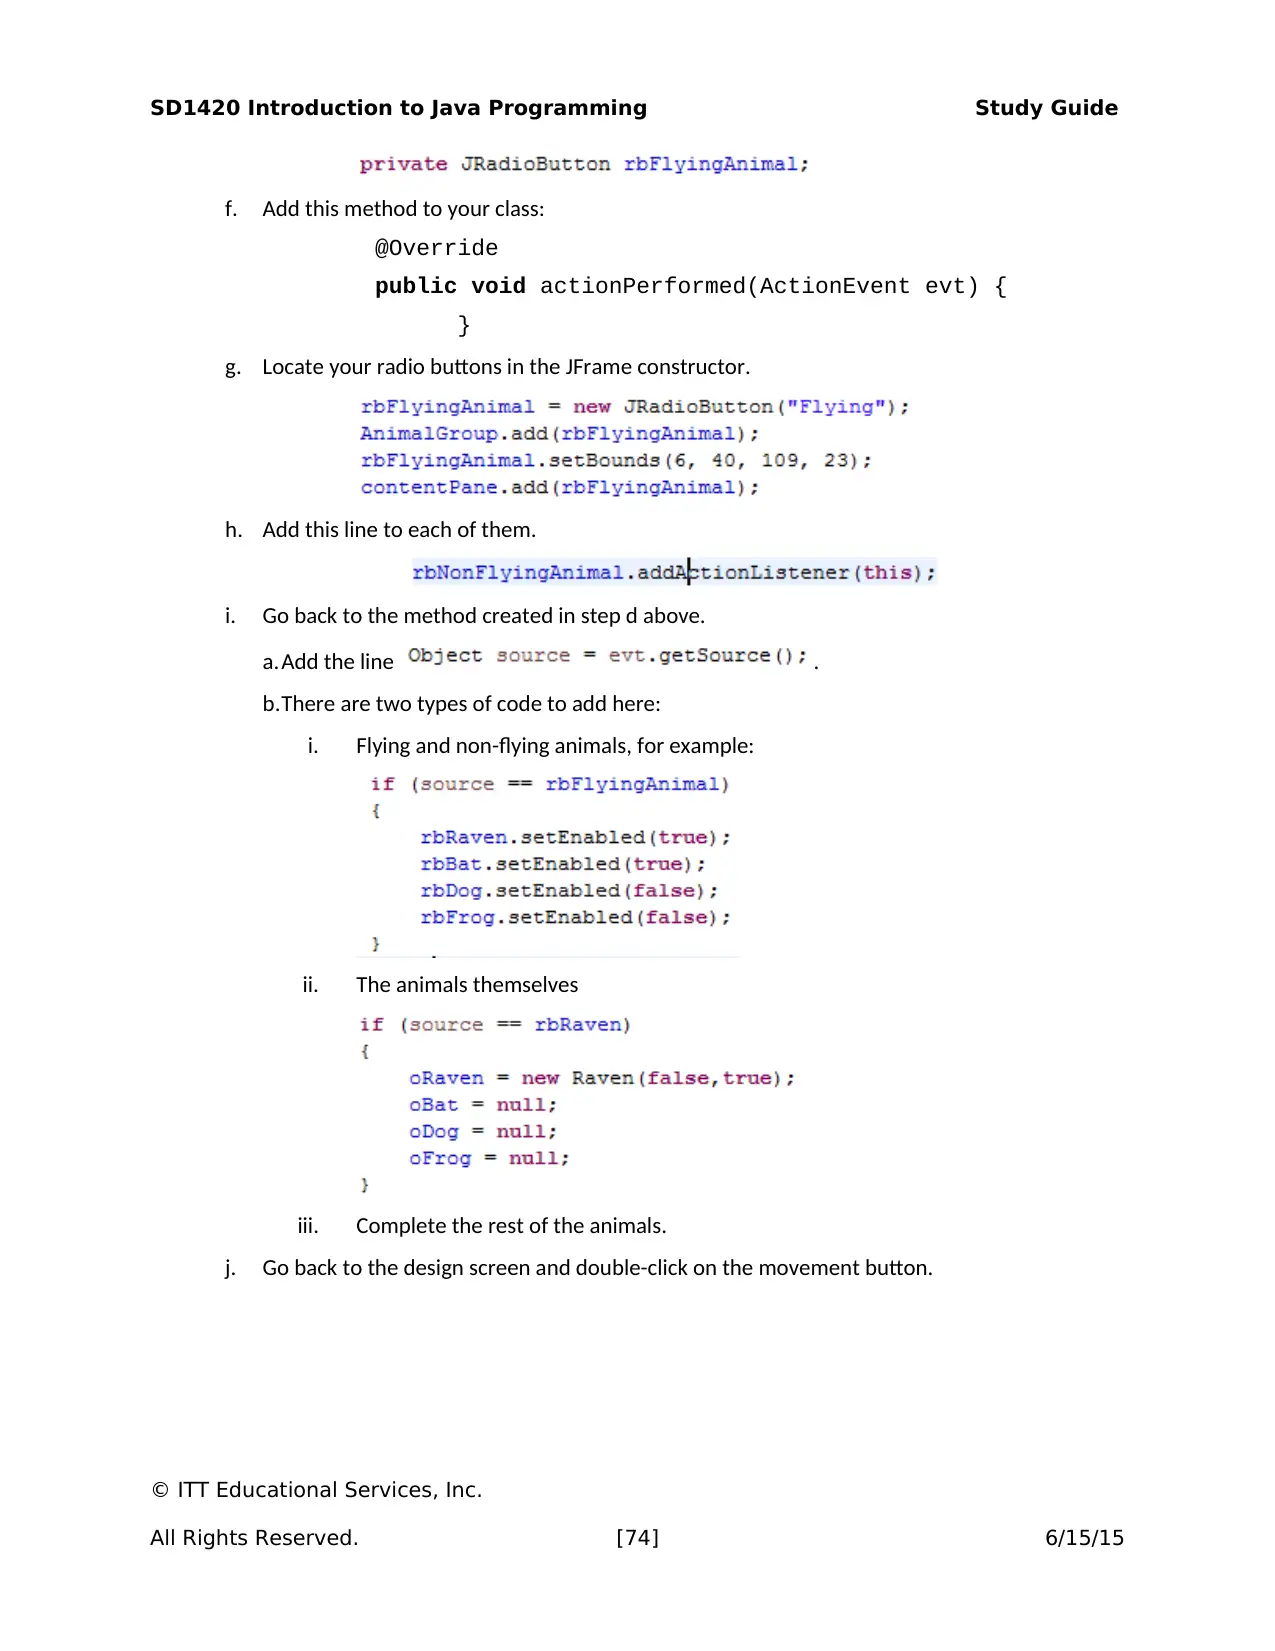
f. Add this method to your class:
@Override
public void actionPerformed(ActionEvent evt) {
}
g. Locate your radio buttons in the JFrame constructor.
h. Add this line to each of them.
i. Go back to the method created in step d above.
a.Add the line .
b.There are two types of code to add here:
i. Flying and non-flying animals, for example:
ii. The animals themselves
iii. Complete the rest of the animals.
j. Go back to the design screen and double-click on the movement button.
© ITT Educational Services, Inc.
All Rights Reserved. [74] 6/15/15
SD1420 Introduction to Java Programming Study Guide
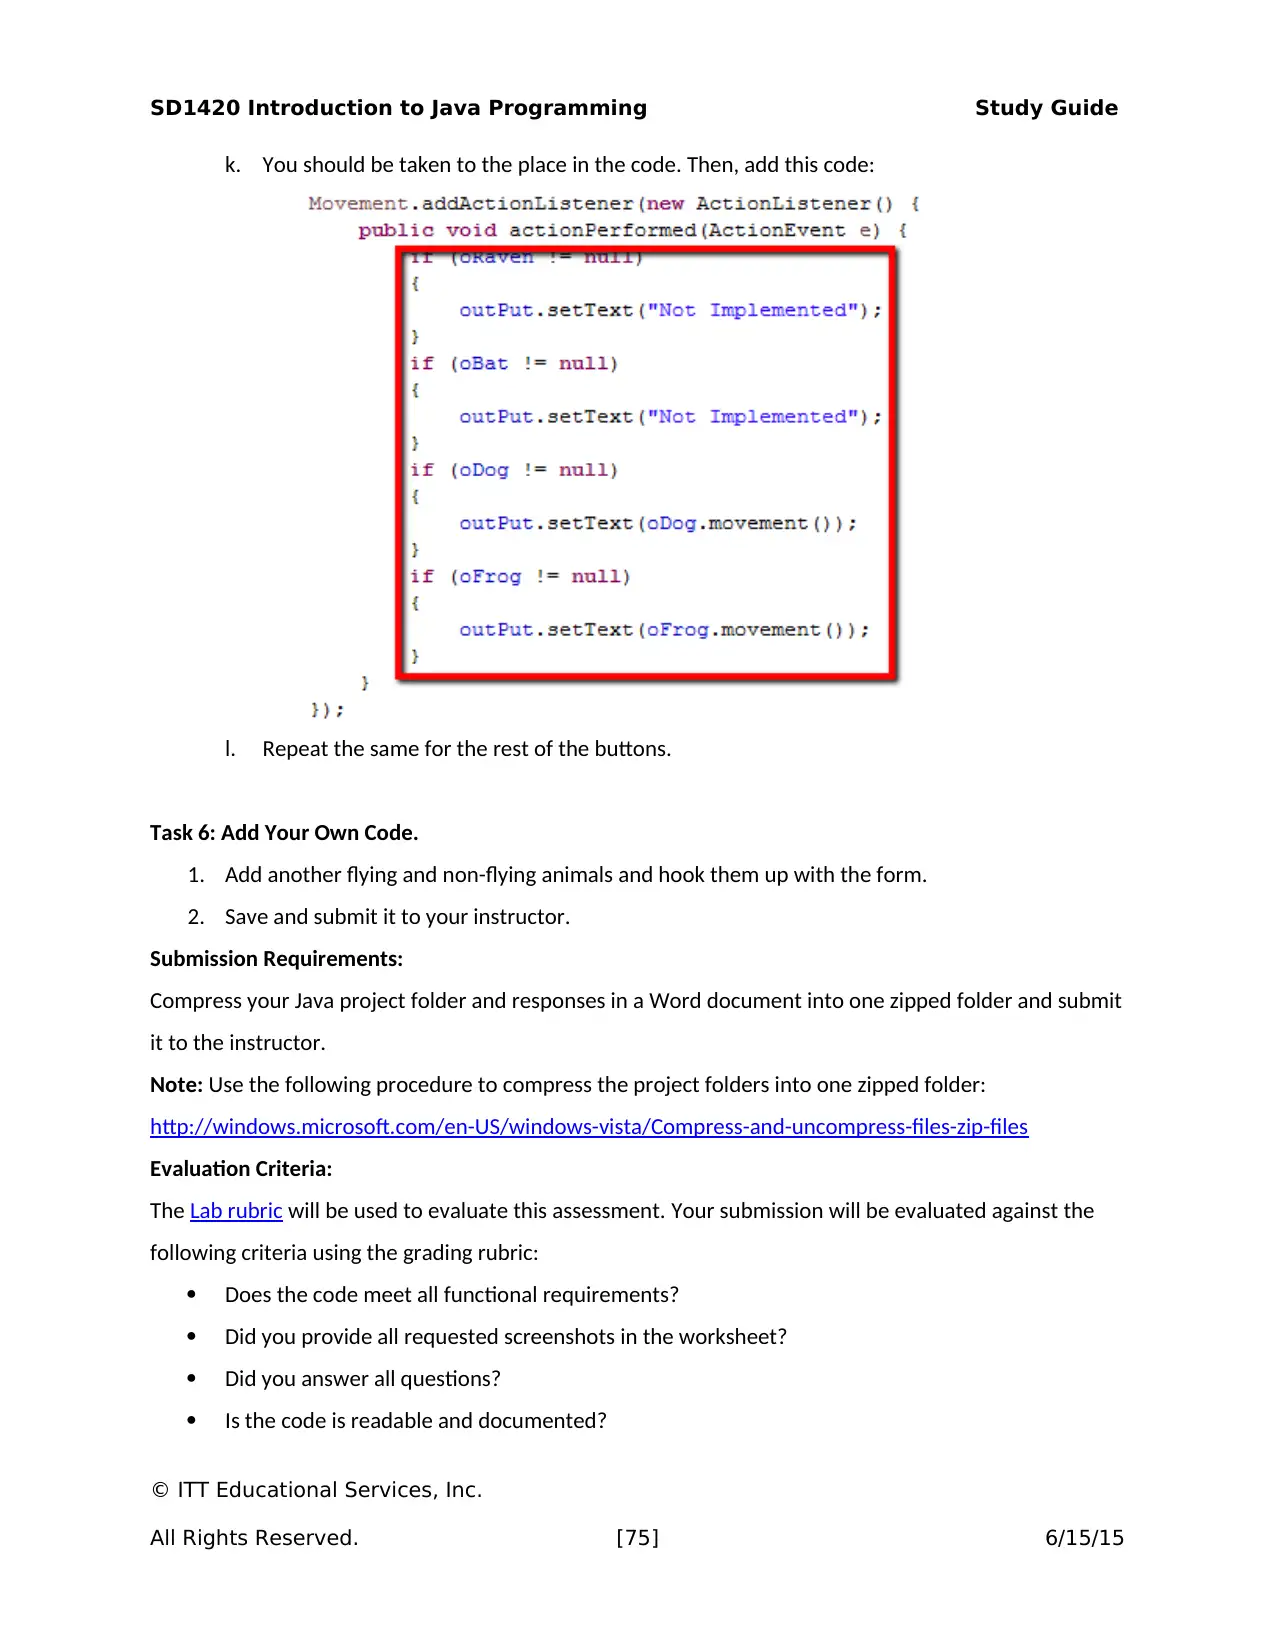
k. You should be taken to the place in the code. Then, add this code:
l. Repeat the same for the rest of the buttons.
Task 6: Add Your Own Code.
1. Add another flying and non-flying animals and hook them up with the form.
2. Save and submit it to your instructor.
Submission Requirements:
Compress your Java project folder and responses in a Word document into one zipped folder and submit
it to the instructor.
Note: Use the following procedure to compress the project folders into one zipped folder:
http://windows.microsoft.com/en-US/windows-vista/Compress-and-uncompress-files-zip-files
Evaluation Criteria:
The Lab rubric will be used to evaluate this assessment. Your submission will be evaluated against the
following criteria using the grading rubric:
Does the code meet all functional requirements?
Did you provide all requested screenshots in the worksheet?
Did you answer all questions?
Is the code is readable and documented?
© ITT Educational Services, Inc.
All Rights Reserved. [75] 6/15/15
SD1420 Introduction to Java Programming Study Guide
EXERCISE 5.1 (2.0 HOURS)
Assessment Preparation Checklist:
To prepare for this assessment:
Read Chapters 14–16 from your textbook, Introduction to Java Programming. These chapters
focus on exception handling and event-driven programming.
Go through the lesson for Module 5, which will help you identify the common programming
mistakes and methods of avoiding these mistakes.
Title: Error Handling
Review the following code and answer the questions. You may refer to the Java Platform API
specification available at http://docs.oracle.com/javase/8/docs/api/overview-summary.html for more
information.
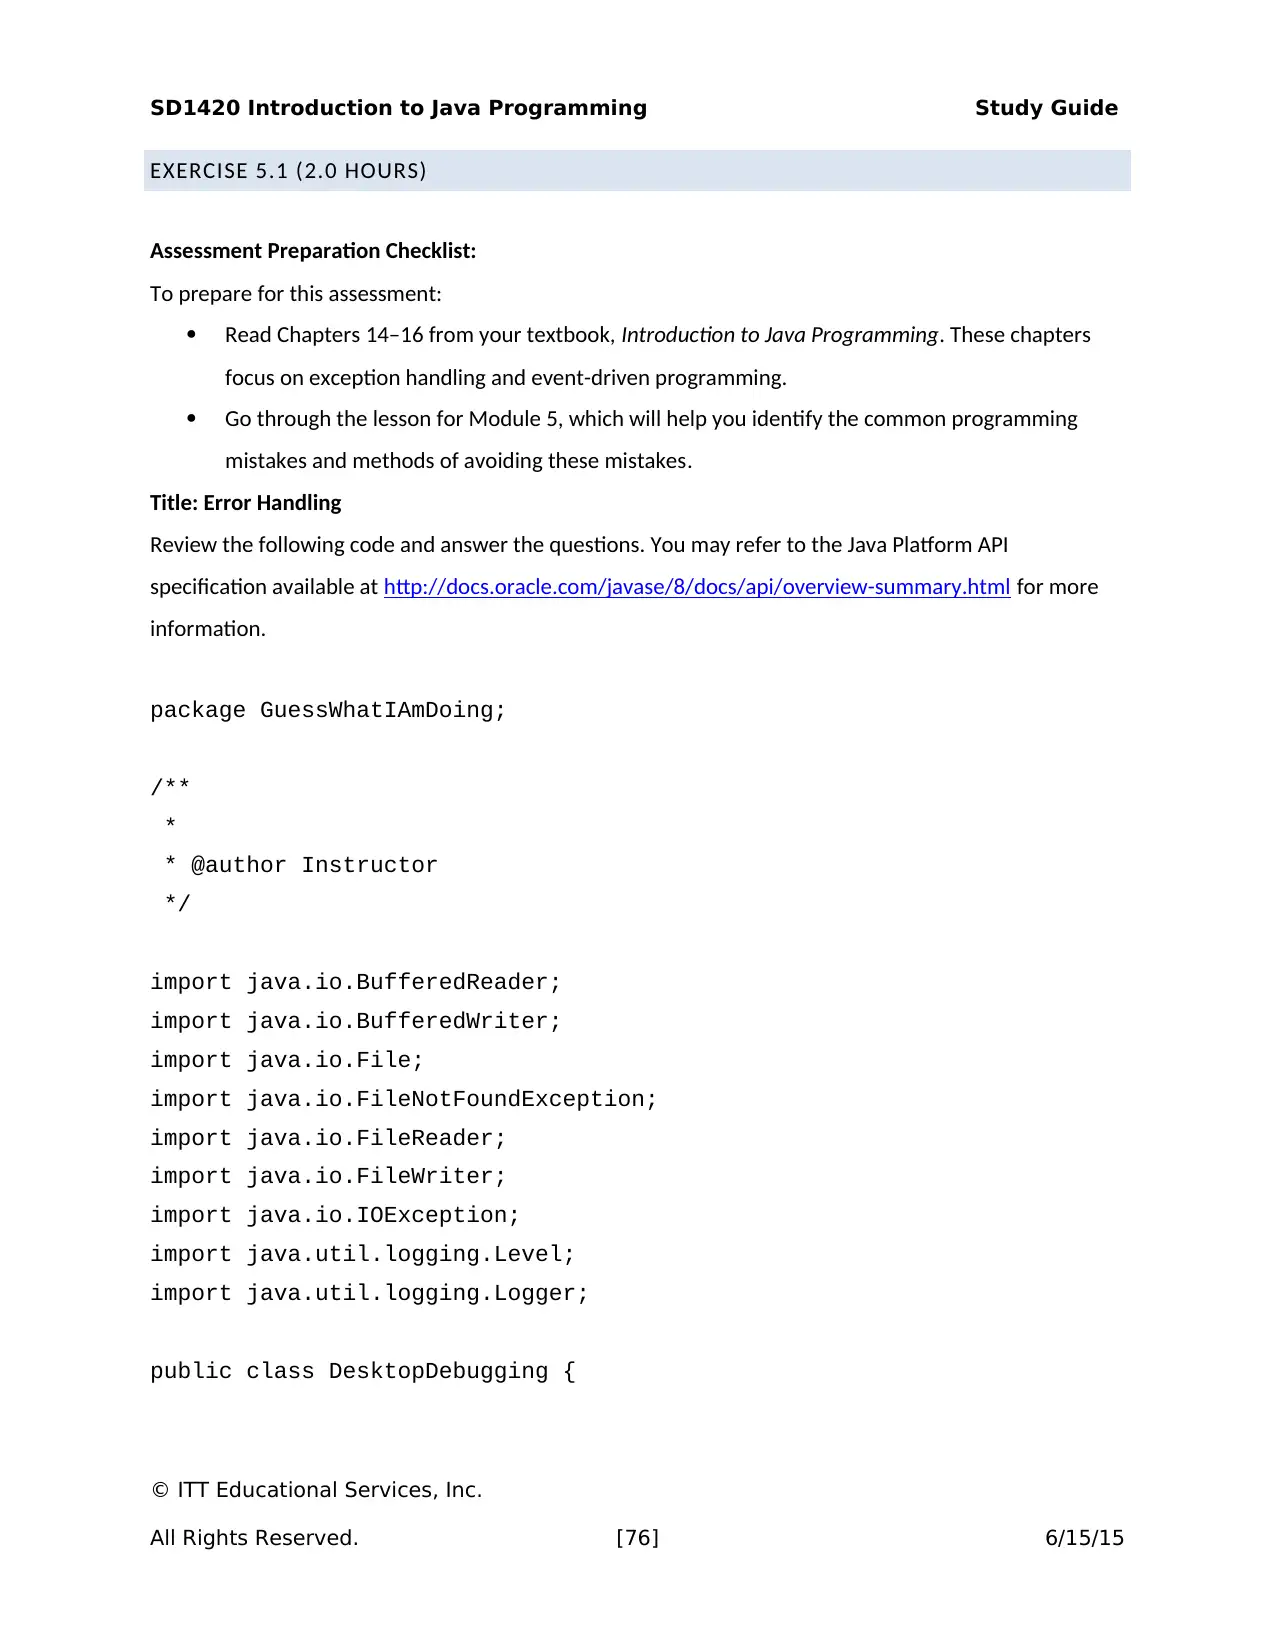
package GuessWhatIAmDoing;
/**
*
* @author Instructor
*/
import java.io.BufferedReader;
import java.io.BufferedWriter;
import java.io.File;
import java.io.FileNotFoundException;
import java.io.FileReader;
import java.io.FileWriter;
import java.io.IOException;
import java.util.logging.Level;
import java.util.logging.Logger;
public class DesktopDebugging {
© ITT Educational Services, Inc.
All Rights Reserved. [76] 6/15/15
Secure Best Marks with AI Grader
Need help grading? Try our AI Grader for instant feedback on your assignments.
SD1420 Introduction to Java Programming Study Guide
public static void main(String[] args)
{
File myFile = new File("C:\\SD1420\\MyTextDocument.txt");
System.out.println(myFile.exists());
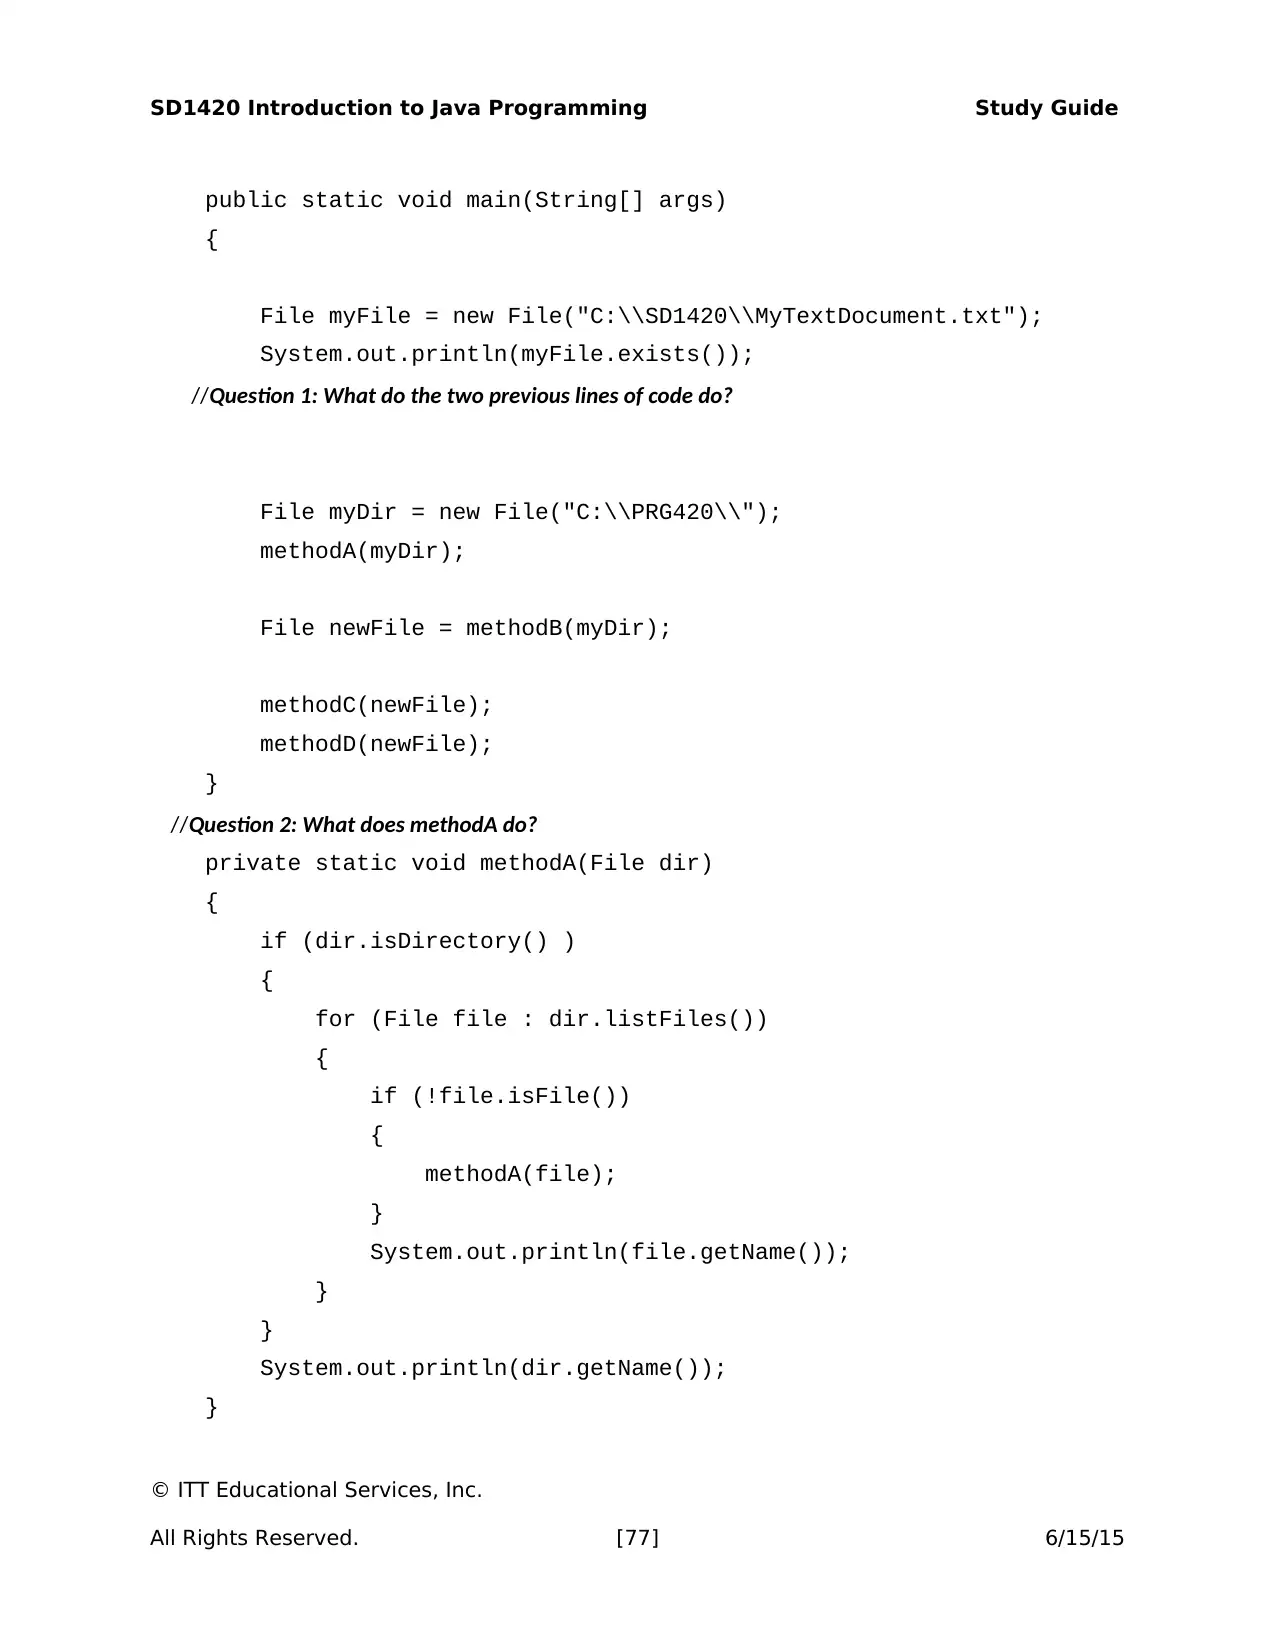
//Question 1: What do the two previous lines of code do?
File myDir = new File("C:\\PRG420\\");
methodA(myDir);
File newFile = methodB(myDir);
methodC(newFile);
methodD(newFile);
}
//Question 2: What does methodA do?
private static void methodA(File dir)
{
if (dir.isDirectory() )
{
for (File file : dir.listFiles())
{
if (!file.isFile())
{
methodA(file);
}
System.out.println(file.getName());
}
}
System.out.println(dir.getName());
}
© ITT Educational Services, Inc.
All Rights Reserved. [77] 6/15/15
SD1420 Introduction to Java Programming Study Guide
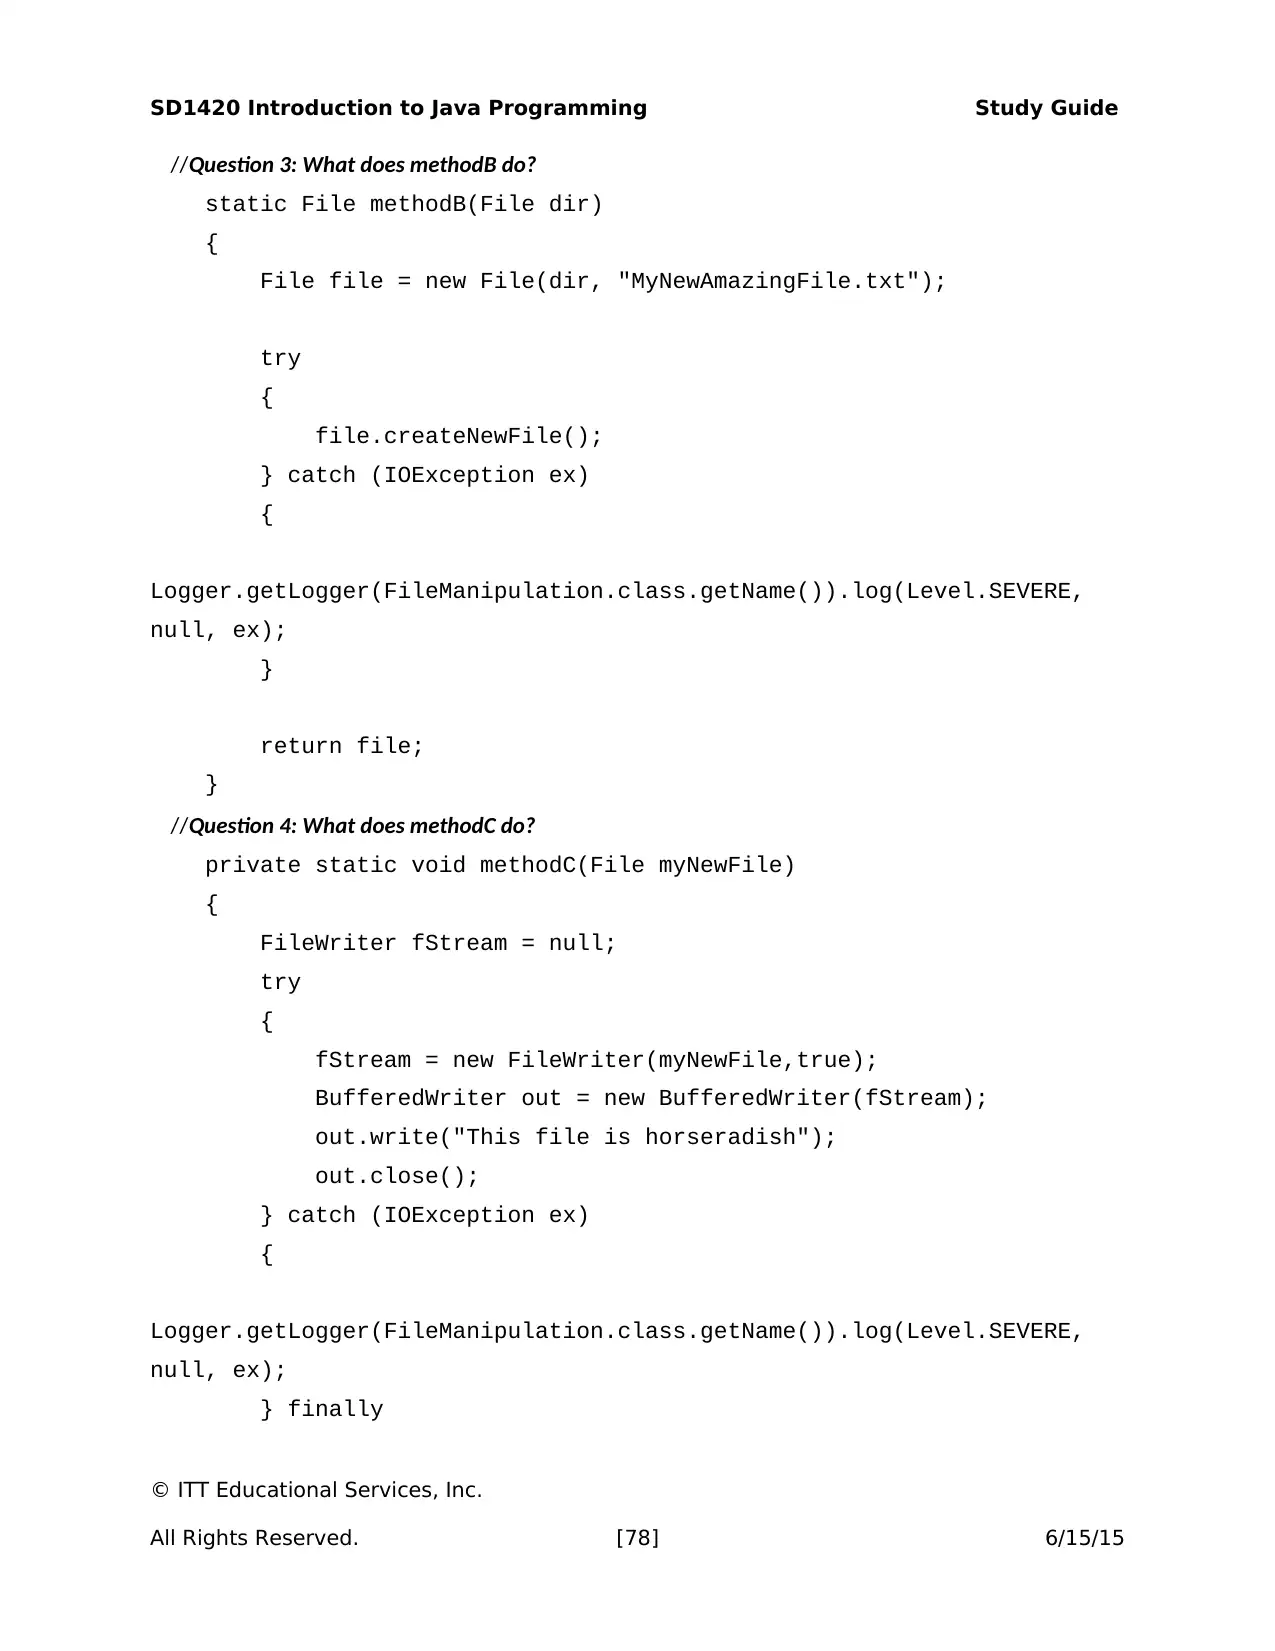
//Question 3: What does methodB do?
static File methodB(File dir)
{
File file = new File(dir, "MyNewAmazingFile.txt");
try
{
file.createNewFile();
} catch (IOException ex)
{
Logger.getLogger(FileManipulation.class.getName()).log(Level.SEVERE,
null, ex);
}
return file;
}
//Question 4: What does methodC do?
private static void methodC(File myNewFile)
{
FileWriter fStream = null;
try
{
fStream = new FileWriter(myNewFile,true);
BufferedWriter out = new BufferedWriter(fStream);
out.write("This file is horseradish");
out.close();
} catch (IOException ex)
{
Logger.getLogger(FileManipulation.class.getName()).log(Level.SEVERE,
null, ex);
} finally
© ITT Educational Services, Inc.
All Rights Reserved. [78] 6/15/15
SD1420 Introduction to Java Programming Study Guide
{
try
{
fStream.close();
} catch (IOException ex)
{
Logger.getLogger(FileManipulation.class.getName()).log(Level.SEVERE,
null, ex);
}
}
}
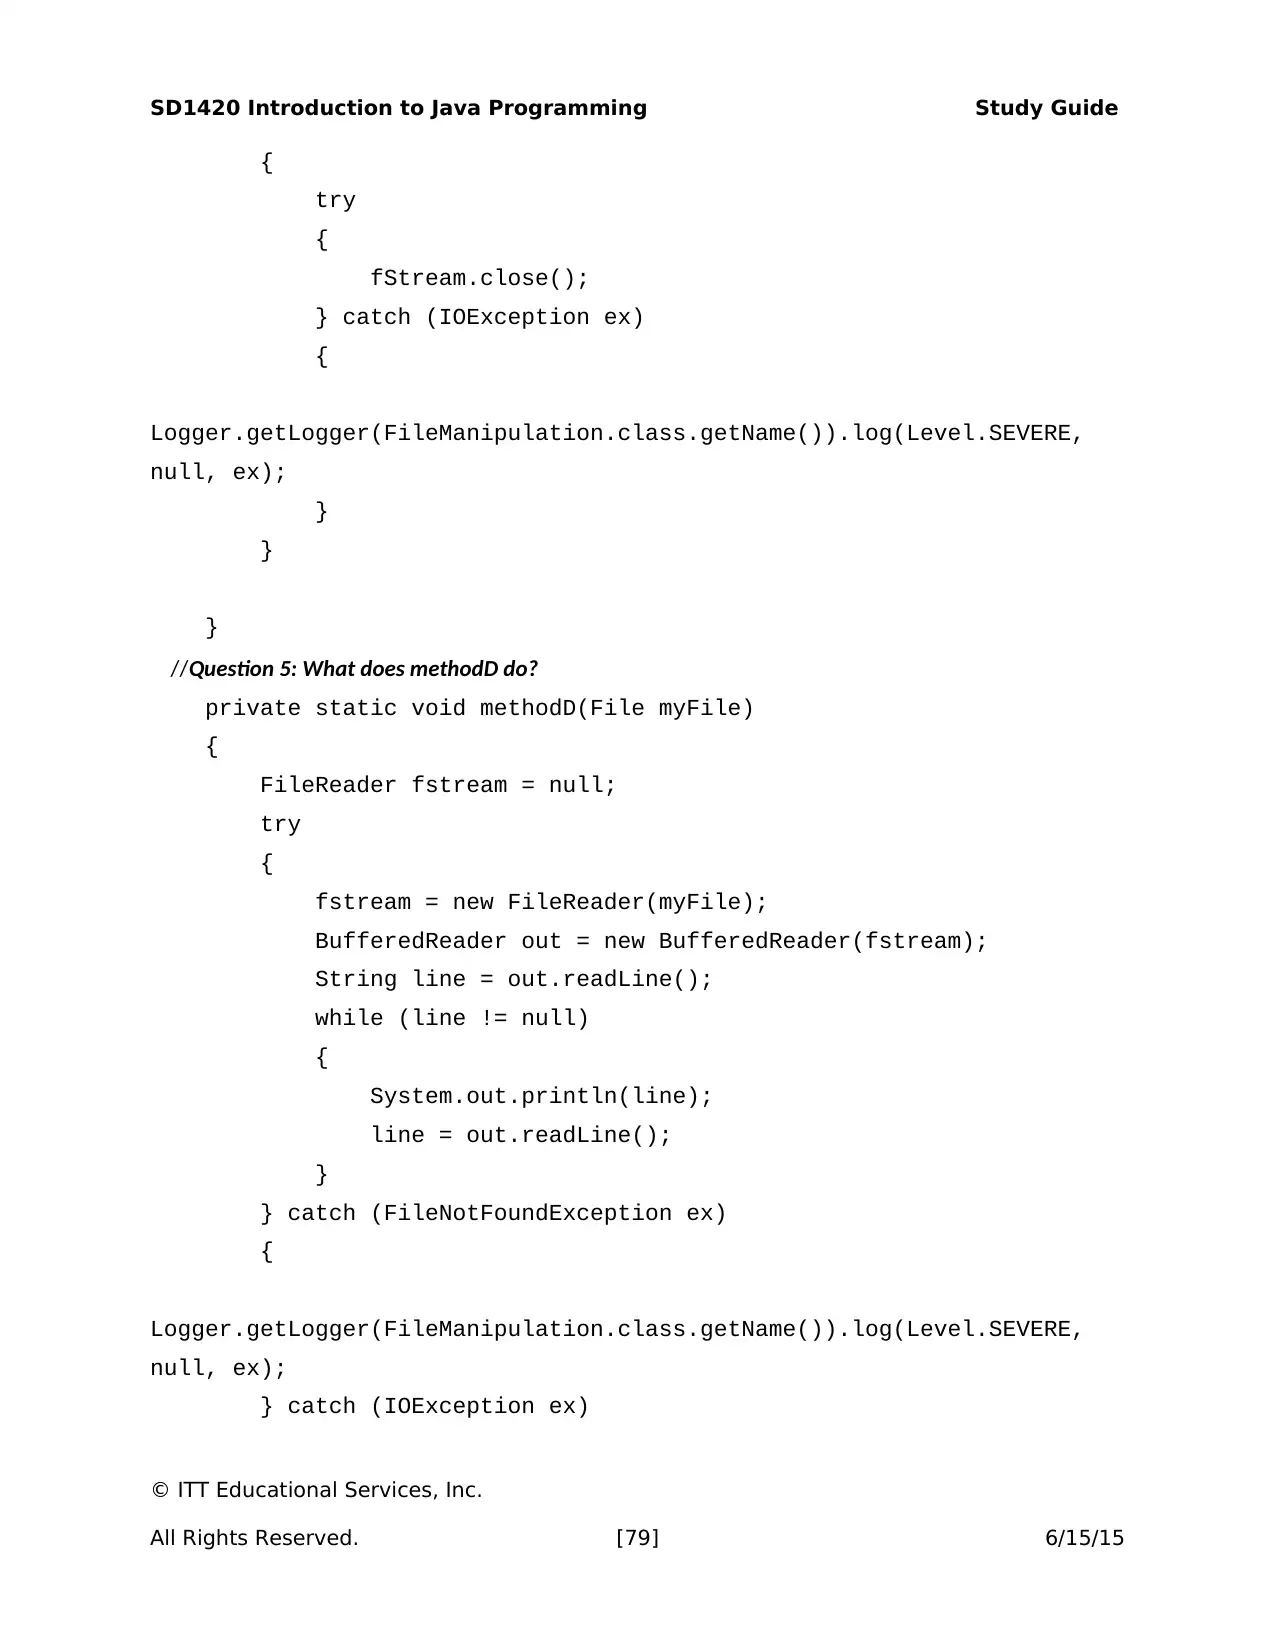
//Question 5: What does methodD do?
private static void methodD(File myFile)
{
FileReader fstream = null;
try
{
fstream = new FileReader(myFile);
BufferedReader out = new BufferedReader(fstream);
String line = out.readLine();
while (line != null)
{
System.out.println(line);
line = out.readLine();
}
} catch (FileNotFoundException ex)
{
Logger.getLogger(FileManipulation.class.getName()).log(Level.SEVERE,
null, ex);
} catch (IOException ex)
© ITT Educational Services, Inc.
All Rights Reserved. [79] 6/15/15
{
try
{
fStream.close();
} catch (IOException ex)
{
Logger.getLogger(FileManipulation.class.getName()).log(Level.SEVERE,
null, ex);
}
}
}
//Question 5: What does methodD do?
private static void methodD(File myFile)
{
FileReader fstream = null;
try
{
fstream = new FileReader(myFile);
BufferedReader out = new BufferedReader(fstream);
String line = out.readLine();
while (line != null)
{
System.out.println(line);
line = out.readLine();
}
} catch (FileNotFoundException ex)
{
Logger.getLogger(FileManipulation.class.getName()).log(Level.SEVERE,
null, ex);
} catch (IOException ex)
© ITT Educational Services, Inc.
All Rights Reserved. [79] 6/15/15
Paraphrase This Document
Need a fresh take? Get an instant paraphrase of this document with our AI Paraphraser
SD1420 Introduction to Java Programming Study Guide
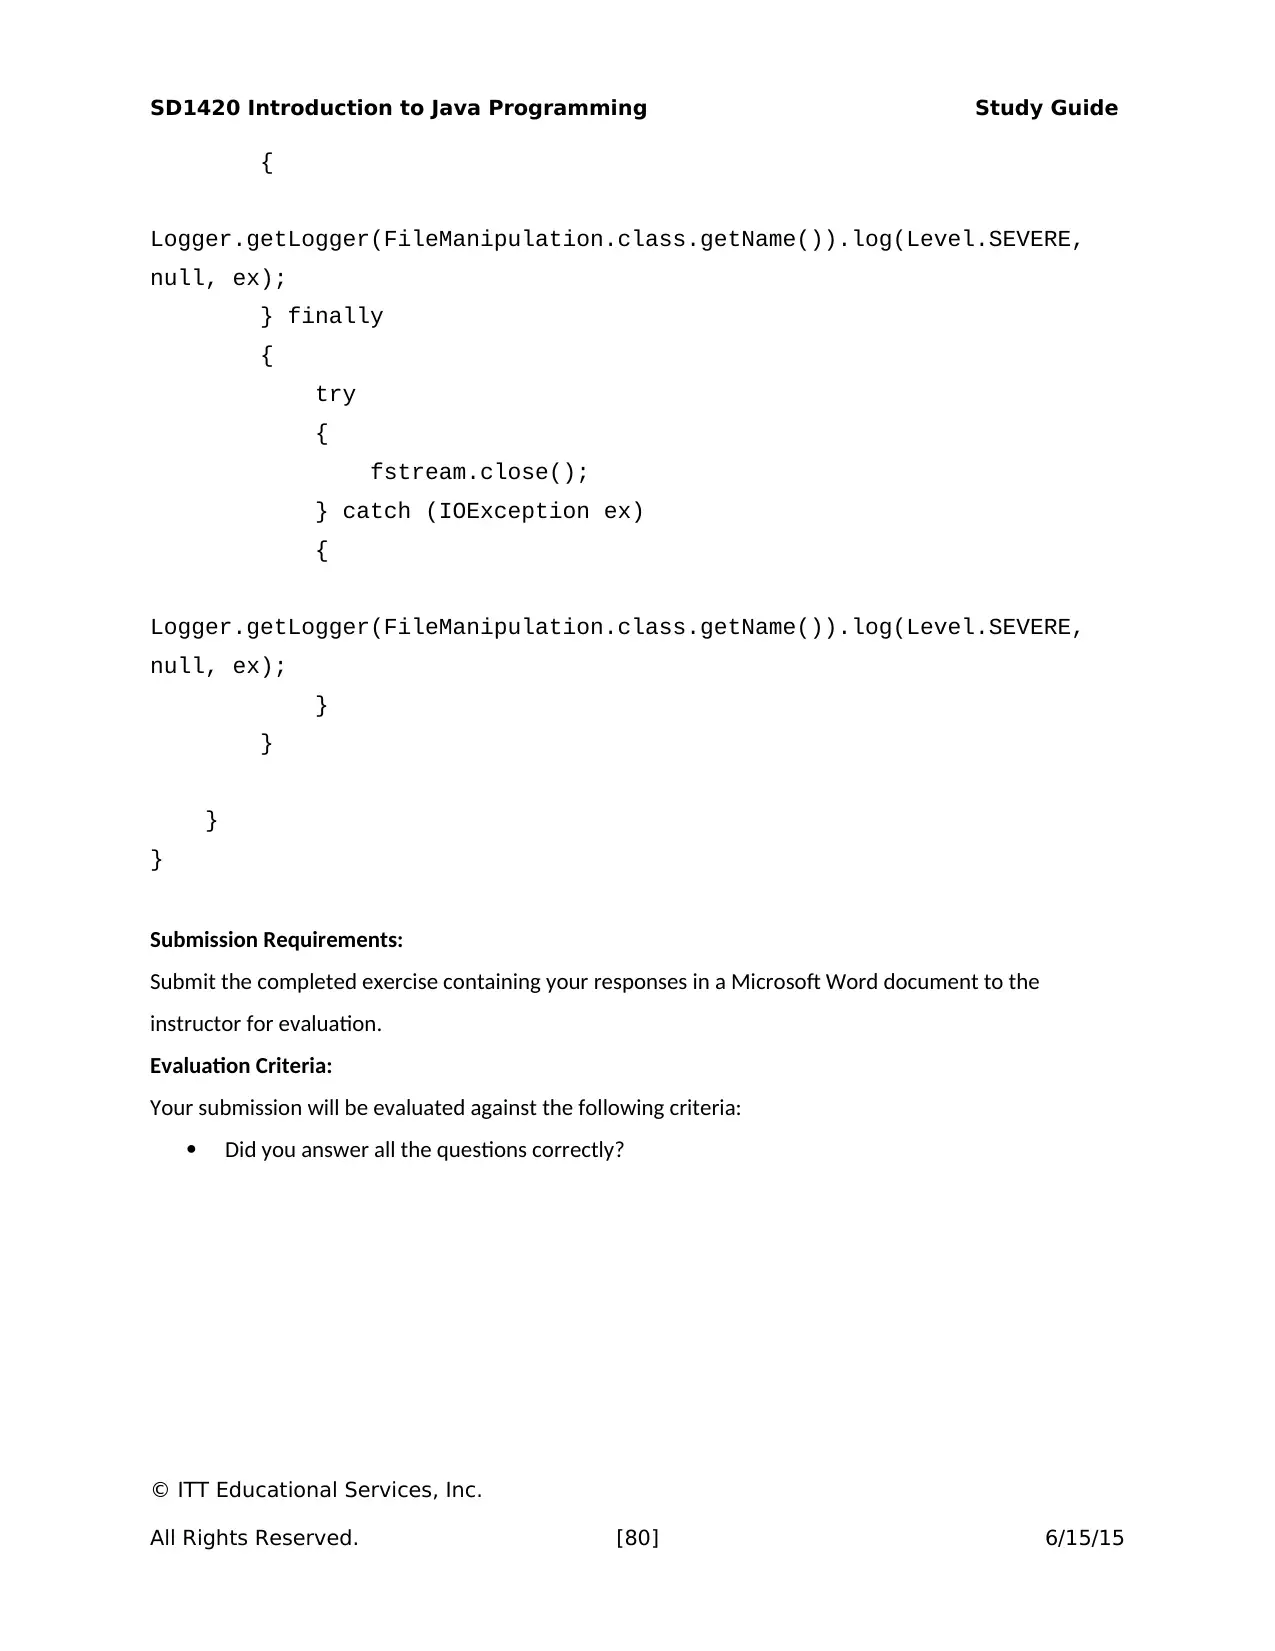
{
Logger.getLogger(FileManipulation.class.getName()).log(Level.SEVERE,
null, ex);
} finally
{
try
{
fstream.close();
} catch (IOException ex)
{
Logger.getLogger(FileManipulation.class.getName()).log(Level.SEVERE,
null, ex);
}
}
}
}
Submission Requirements:
Submit the completed exercise containing your responses in a Microsoft Word document to the
instructor for evaluation.
Evaluation Criteria:
Your submission will be evaluated against the following criteria:
Did you answer all the questions correctly?
© ITT Educational Services, Inc.
All Rights Reserved. [80] 6/15/15
{
Logger.getLogger(FileManipulation.class.getName()).log(Level.SEVERE,
null, ex);
} finally
{
try
{
fstream.close();
} catch (IOException ex)
{
Logger.getLogger(FileManipulation.class.getName()).log(Level.SEVERE,
null, ex);
}
}
}
}
Submission Requirements:
Submit the completed exercise containing your responses in a Microsoft Word document to the
instructor for evaluation.
Evaluation Criteria:
Your submission will be evaluated against the following criteria:
Did you answer all the questions correctly?
© ITT Educational Services, Inc.
All Rights Reserved. [80] 6/15/15
SD1420 Introduction to Java Programming Study Guide
QUIZ 4 (1.0 HOUR)
Assessment Preparation Checklist:
To prepare for this assessment:
Read Chapters 10–12 from your textbook, Introduction to Java Programming. These chapters
discuss inheritance and polymorphism in Java programming.
Go through the lesson for Module 4, which will introduce you superclass and subclass in Java
programming.
Title: Quiz 4
Take the quiz based on the concepts covered in Module 4.
© ITT Educational Services, Inc.
All Rights Reserved. [81] 6/15/15
SD1420 Introduction to Java Programming Study Guide
LAB 6.1 (2.0 HOURS)
Assessment Preparation Checklist:
To prepare for this assessment:
Read Chapters 17 and 19 from your textbook, Introduction to Java Programming. These
chapters focus on the methods of developing a comprehensive user interface and reading and
writing text data in Java.
Go through the lesson for Module 6, which will introduce you to the methods of programming
for text-based I/O.
Title: Programming for Text-Based I/O
In this lab, you will create a GUI and read and write data to and from a file.
Required Setup and Resources:
A virtual machine with Eclipse installed
Microsoft Word
Recommended Procedures:
Task 1: Create an Eclipse project.
1. Launch your ITT-Lab virtual machine.
2. In ITT-Lab, launch Eclipse.
3. Click File > New > Java Project.
© ITT Educational Services, Inc.
All Rights Reserved. [82] 6/15/15
Secure Best Marks with AI Grader
Need help grading? Try our AI Grader for instant feedback on your assignments.
SD1420 Introduction to Java Programming Study Guide
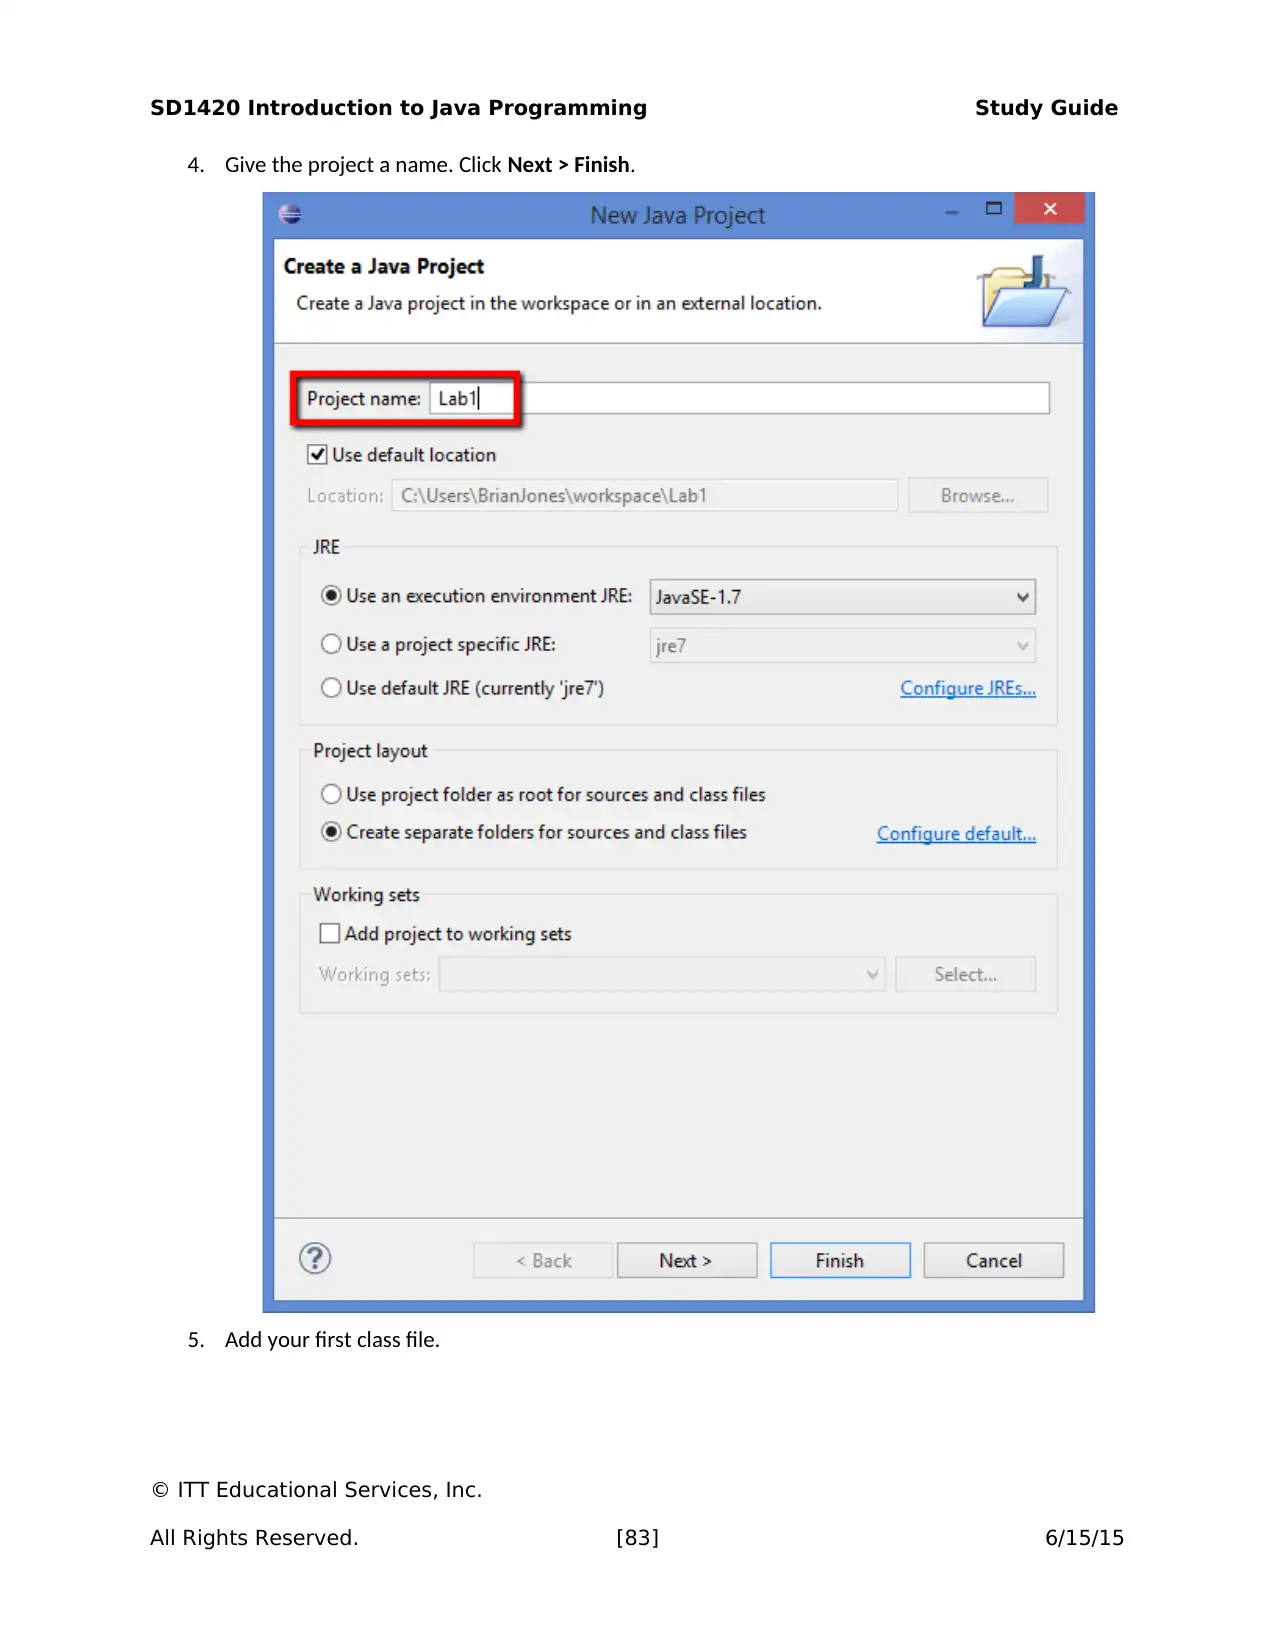
4. Give the project a name. Click Next > Finish.
5. Add your first class file.
© ITT Educational Services, Inc.
All Rights Reserved. [83] 6/15/15
4. Give the project a name. Click Next > Finish.
5. Add your first class file.
© ITT Educational Services, Inc.
All Rights Reserved. [83] 6/15/15
SD1420 Introduction to Java Programming Study Guide
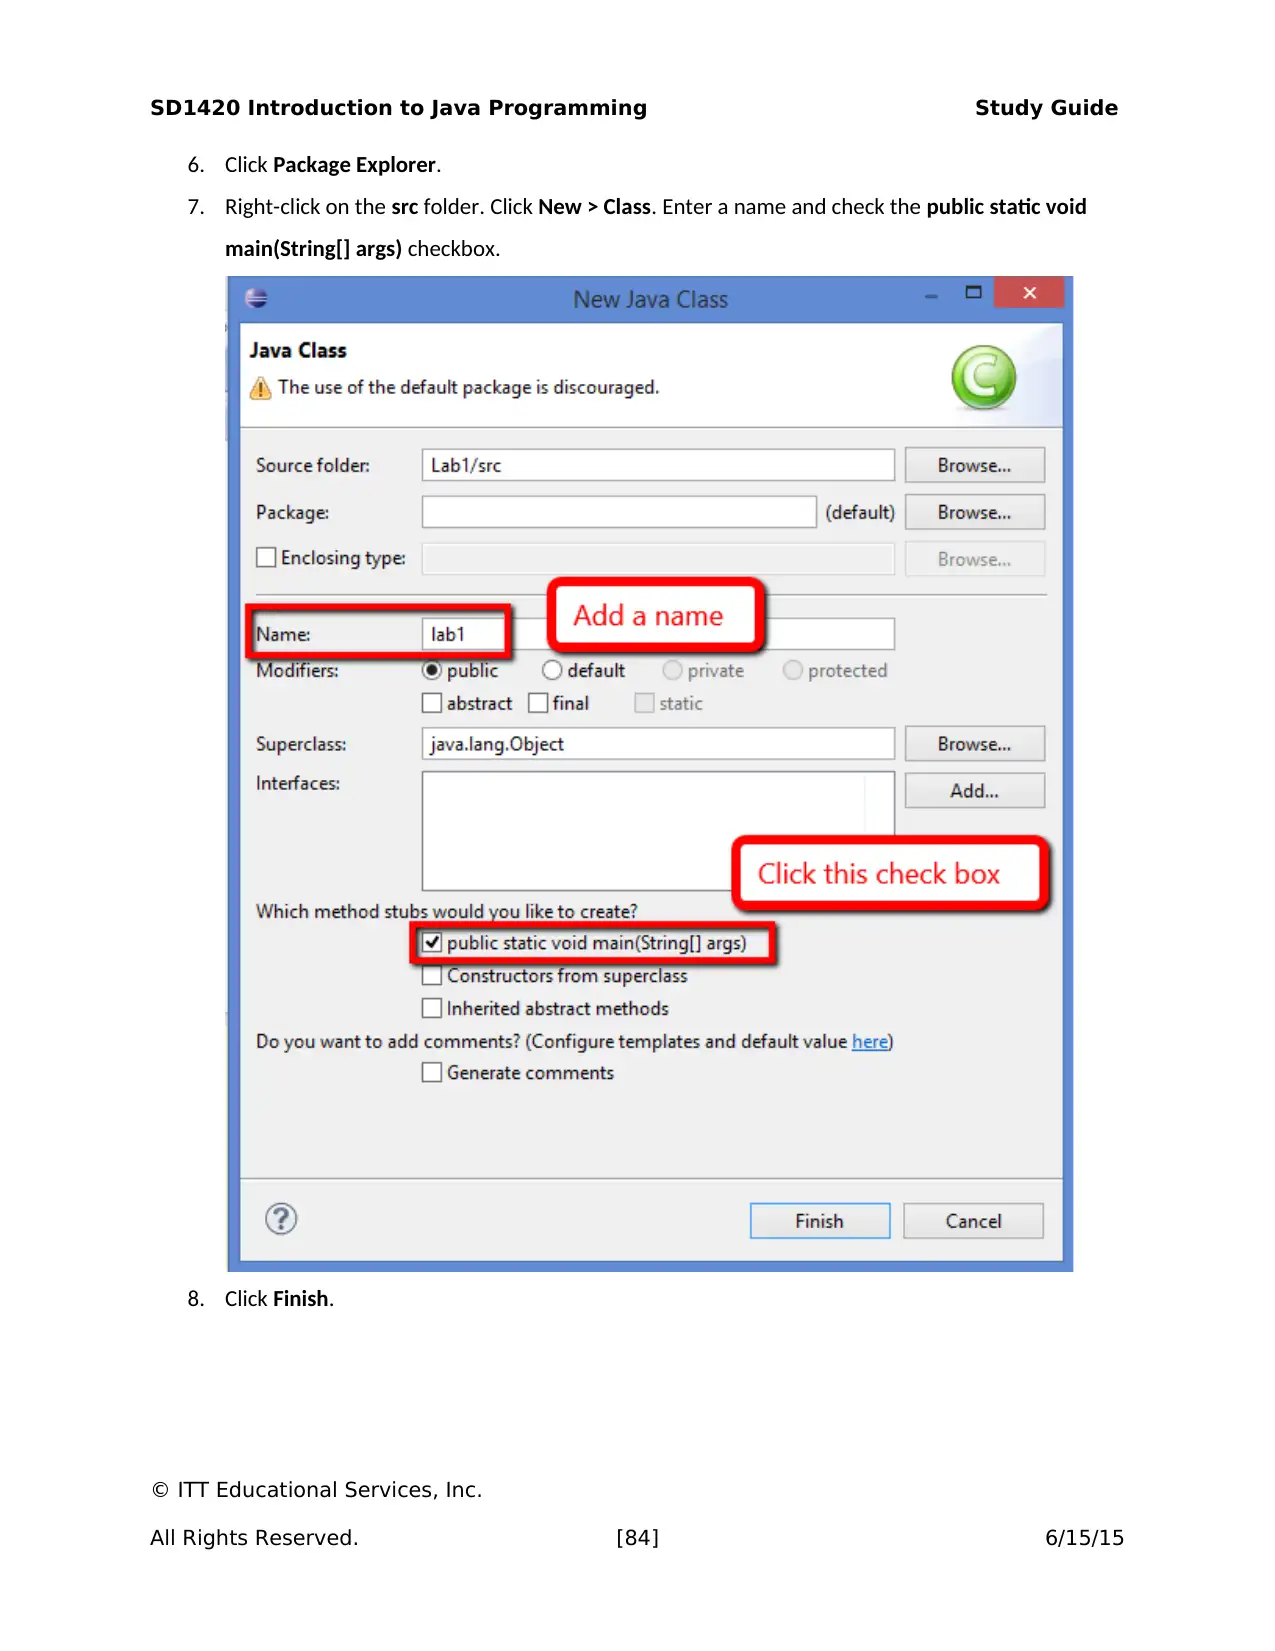
6. Click Package Explorer.
7. Right-click on the src folder. Click New > Class. Enter a name and check the public static void
main(String[] args) checkbox.
8. Click Finish.
© ITT Educational Services, Inc.
All Rights Reserved. [84] 6/15/15
6. Click Package Explorer.
7. Right-click on the src folder. Click New > Class. Enter a name and check the public static void
main(String[] args) checkbox.
8. Click Finish.
© ITT Educational Services, Inc.
All Rights Reserved. [84] 6/15/15
SD1420 Introduction to Java Programming Study Guide
Task 2: Create a Base GUI.
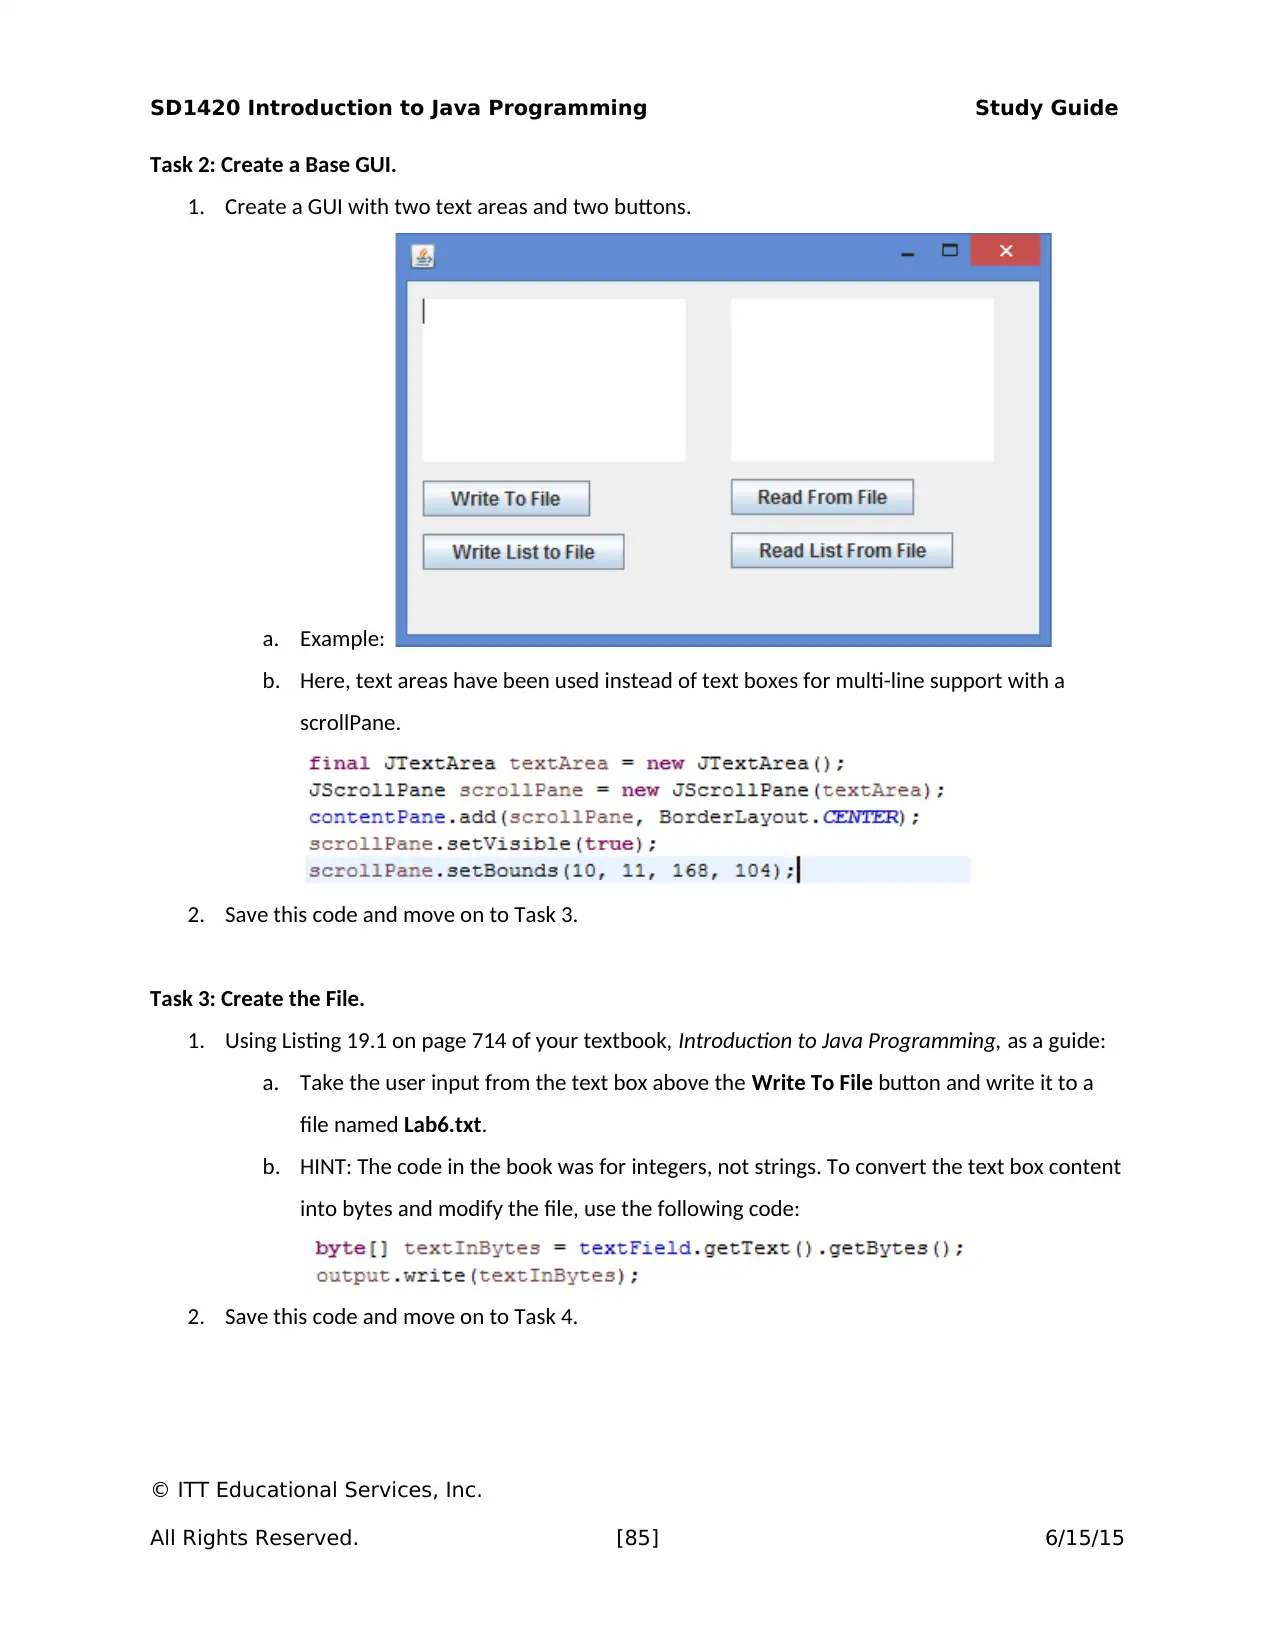
1. Create a GUI with two text areas and two buttons.
a. Example:
b. Here, text areas have been used instead of text boxes for multi-line support with a
scrollPane.
2. Save this code and move on to Task 3.
Task 3: Create the File.
1. Using Listing 19.1 on page 714 of your textbook, Introduction to Java Programming, as a guide:
a. Take the user input from the text box above the Write To File button and write it to a
file named Lab6.txt.
b. HINT: The code in the book was for integers, not strings. To convert the text box content
into bytes and modify the file, use the following code:
2. Save this code and move on to Task 4.
© ITT Educational Services, Inc.
All Rights Reserved. [85] 6/15/15
Paraphrase This Document
Need a fresh take? Get an instant paraphrase of this document with our AI Paraphraser
SD1420 Introduction to Java Programming Study Guide
Task 4: Read from the File.
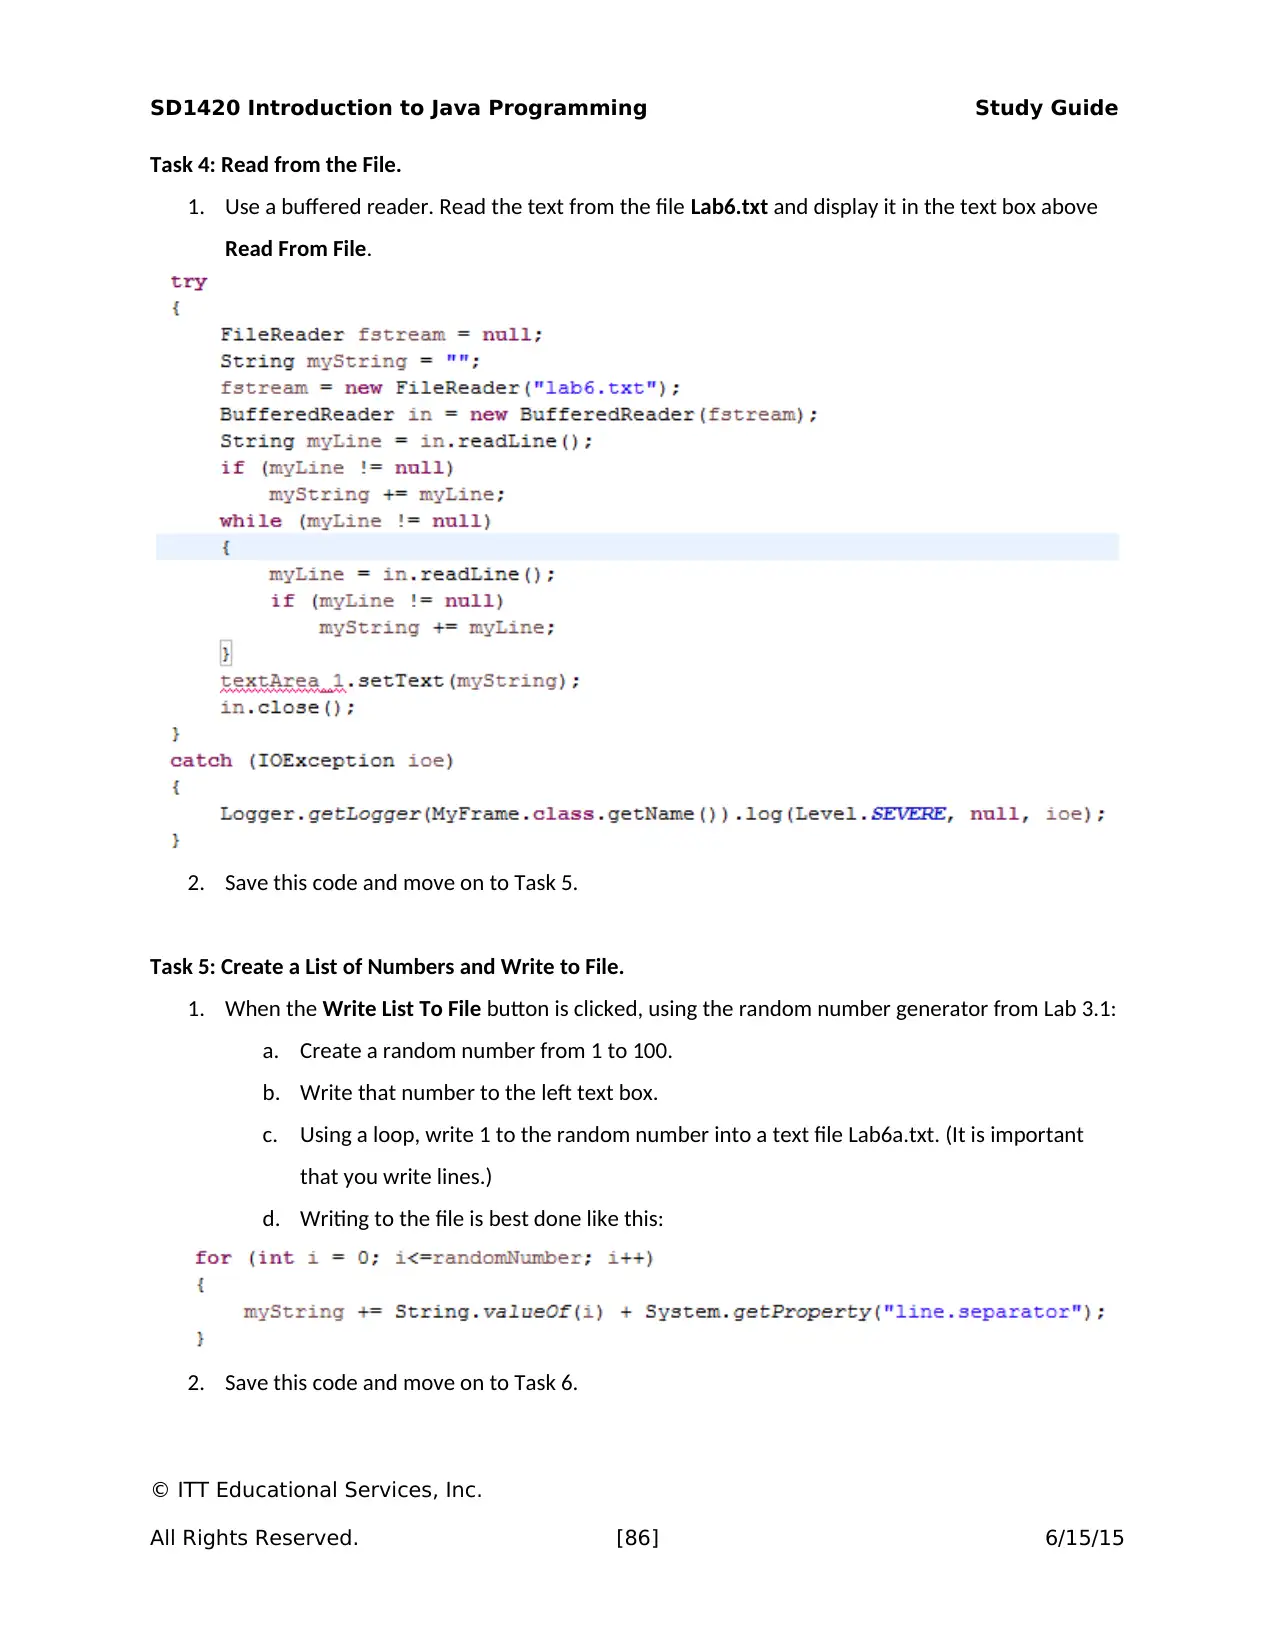
1. Use a buffered reader. Read the text from the file Lab6.txt and display it in the text box above
Read From File.
2. Save this code and move on to Task 5.
Task 5: Create a List of Numbers and Write to File.
1. When the Write List To File button is clicked, using the random number generator from Lab 3.1:
a. Create a random number from 1 to 100.
b. Write that number to the left text box.
c. Using a loop, write 1 to the random number into a text file Lab6a.txt. (It is important
that you write lines.)
d. Writing to the file is best done like this:
2. Save this code and move on to Task 6.
© ITT Educational Services, Inc.
All Rights Reserved. [86] 6/15/15
SD1420 Introduction to Java Programming Study Guide
Task 6: Read to End of File.
1. Use Listing 19.3 on p. 719 of your textbook, Introduction to Java Programming, as a guide:
a. Read contents of the file from Lab6a.txt.
b. Output the code to the right-hand text box.
2. Save this code and zip it up and submit it to your instructor for grading.
Submission Requirements:
Compress your Java project folder and responses in a Word document into one zipped folder and submit
it to the instructor.
Note: Use the following procedure to compress the project folders into one zipped folder:
http://windows.microsoft.com/en-US/windows-vista/Compress-and-uncompress-files-zip-files
Evaluation Criteria:
The Lab rubric will be used to evaluate this assessment. Your submission will be evaluated against the
following criteria using the grading rubric:
Does the code meet all functional requirements?
Did you provide all requested screenshots in the worksheet?
Did you answer all questions?
Is the code is readable and documented?
© ITT Educational Services, Inc.
All Rights Reserved. [87] 6/15/15
SD1420 Introduction to Java Programming Study Guide
FINAL EXAM (2.0 HOURS)
Assessment Preparation Checklist:
To prepare for this assessment:
Revisit the assigned readings for the previous modules.
Go through the lessons for Modules 1–6.
Title: Final Exam
Take the final exam based on the concepts covered in Modules 1–6.
(End of Study Guide)
© ITT Educational Services, Inc.
All Rights Reserved. [88] 6/15/15
Secure Best Marks with AI Grader
Need help grading? Try our AI Grader for instant feedback on your assignments.
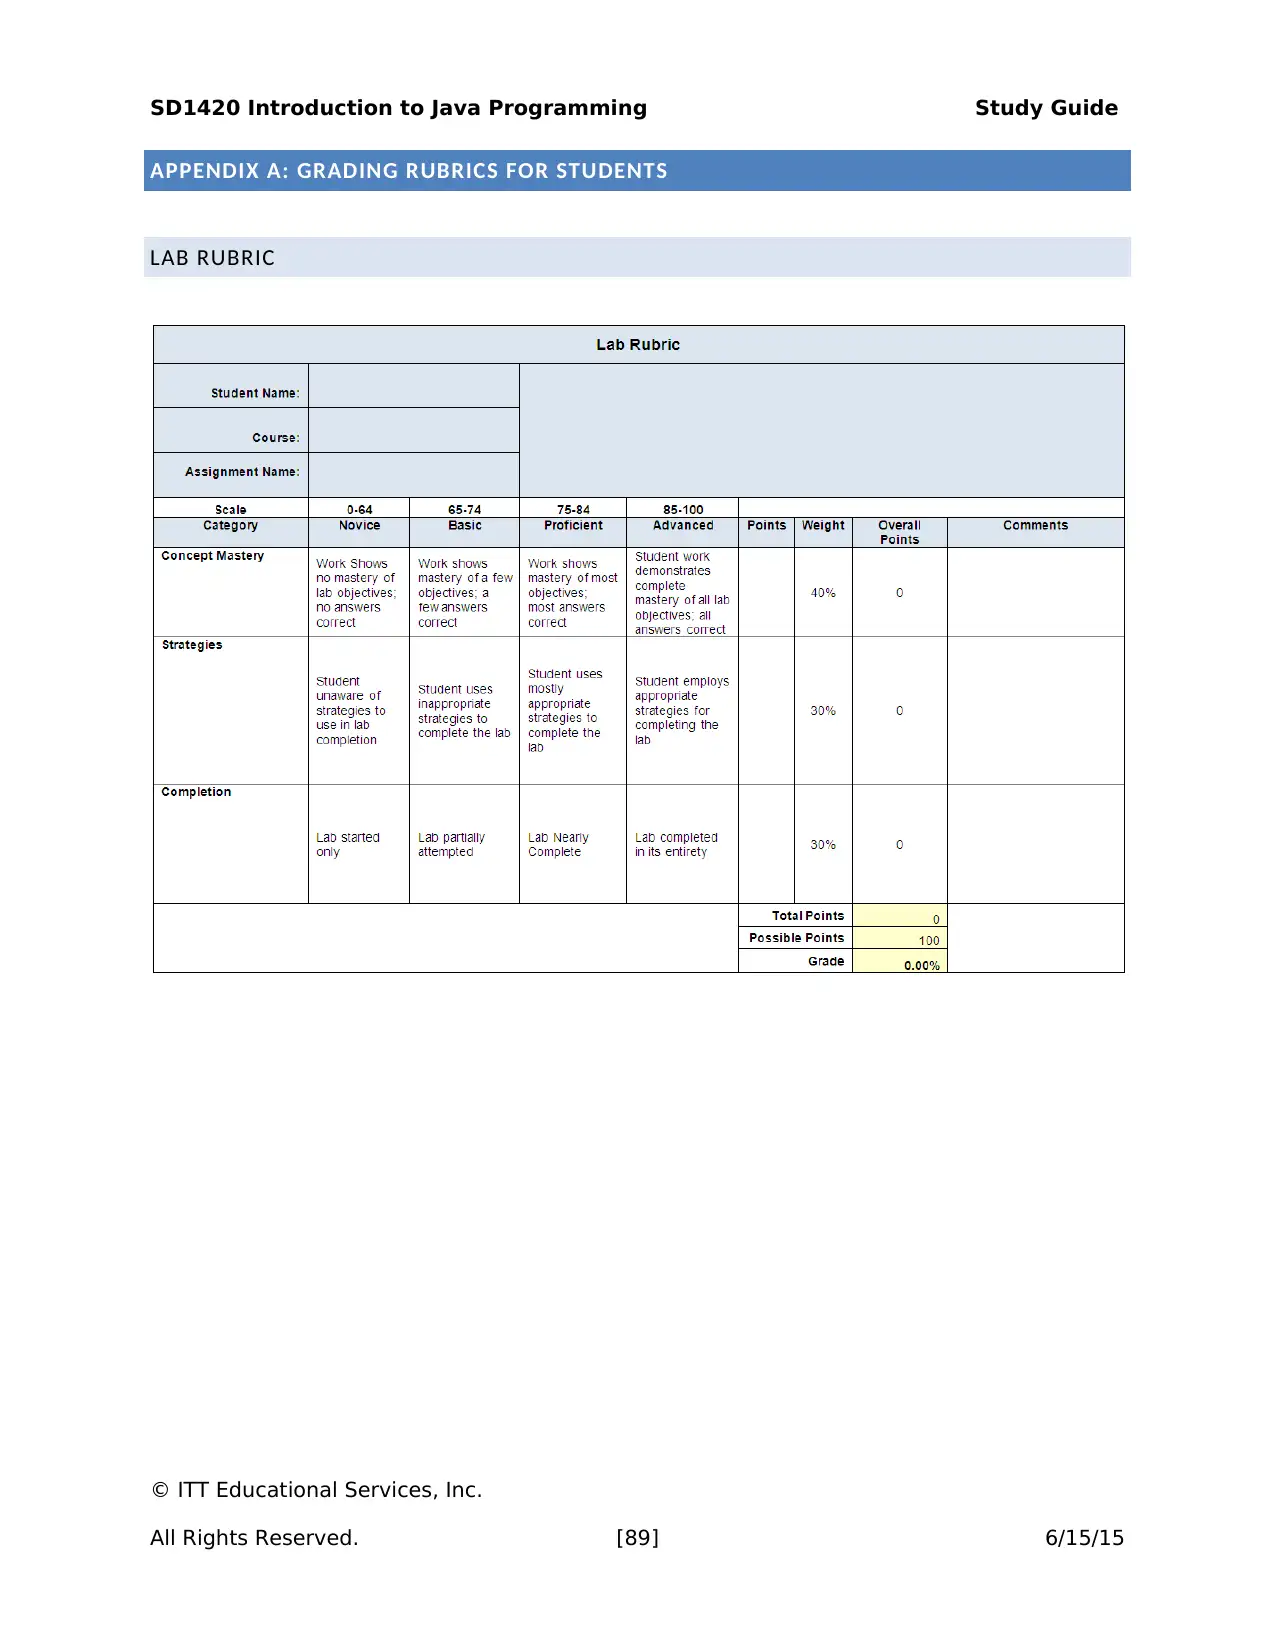
SD1420 Introduction to Java Programming Study Guide
APPENDIX A: GRADING RUBRICS FOR STUDENTS
LAB RUBRIC
© ITT Educational Services, Inc.
All Rights Reserved. [89] 6/15/15
APPENDIX A: GRADING RUBRICS FOR STUDENTS
LAB RUBRIC
© ITT Educational Services, Inc.
All Rights Reserved. [89] 6/15/15
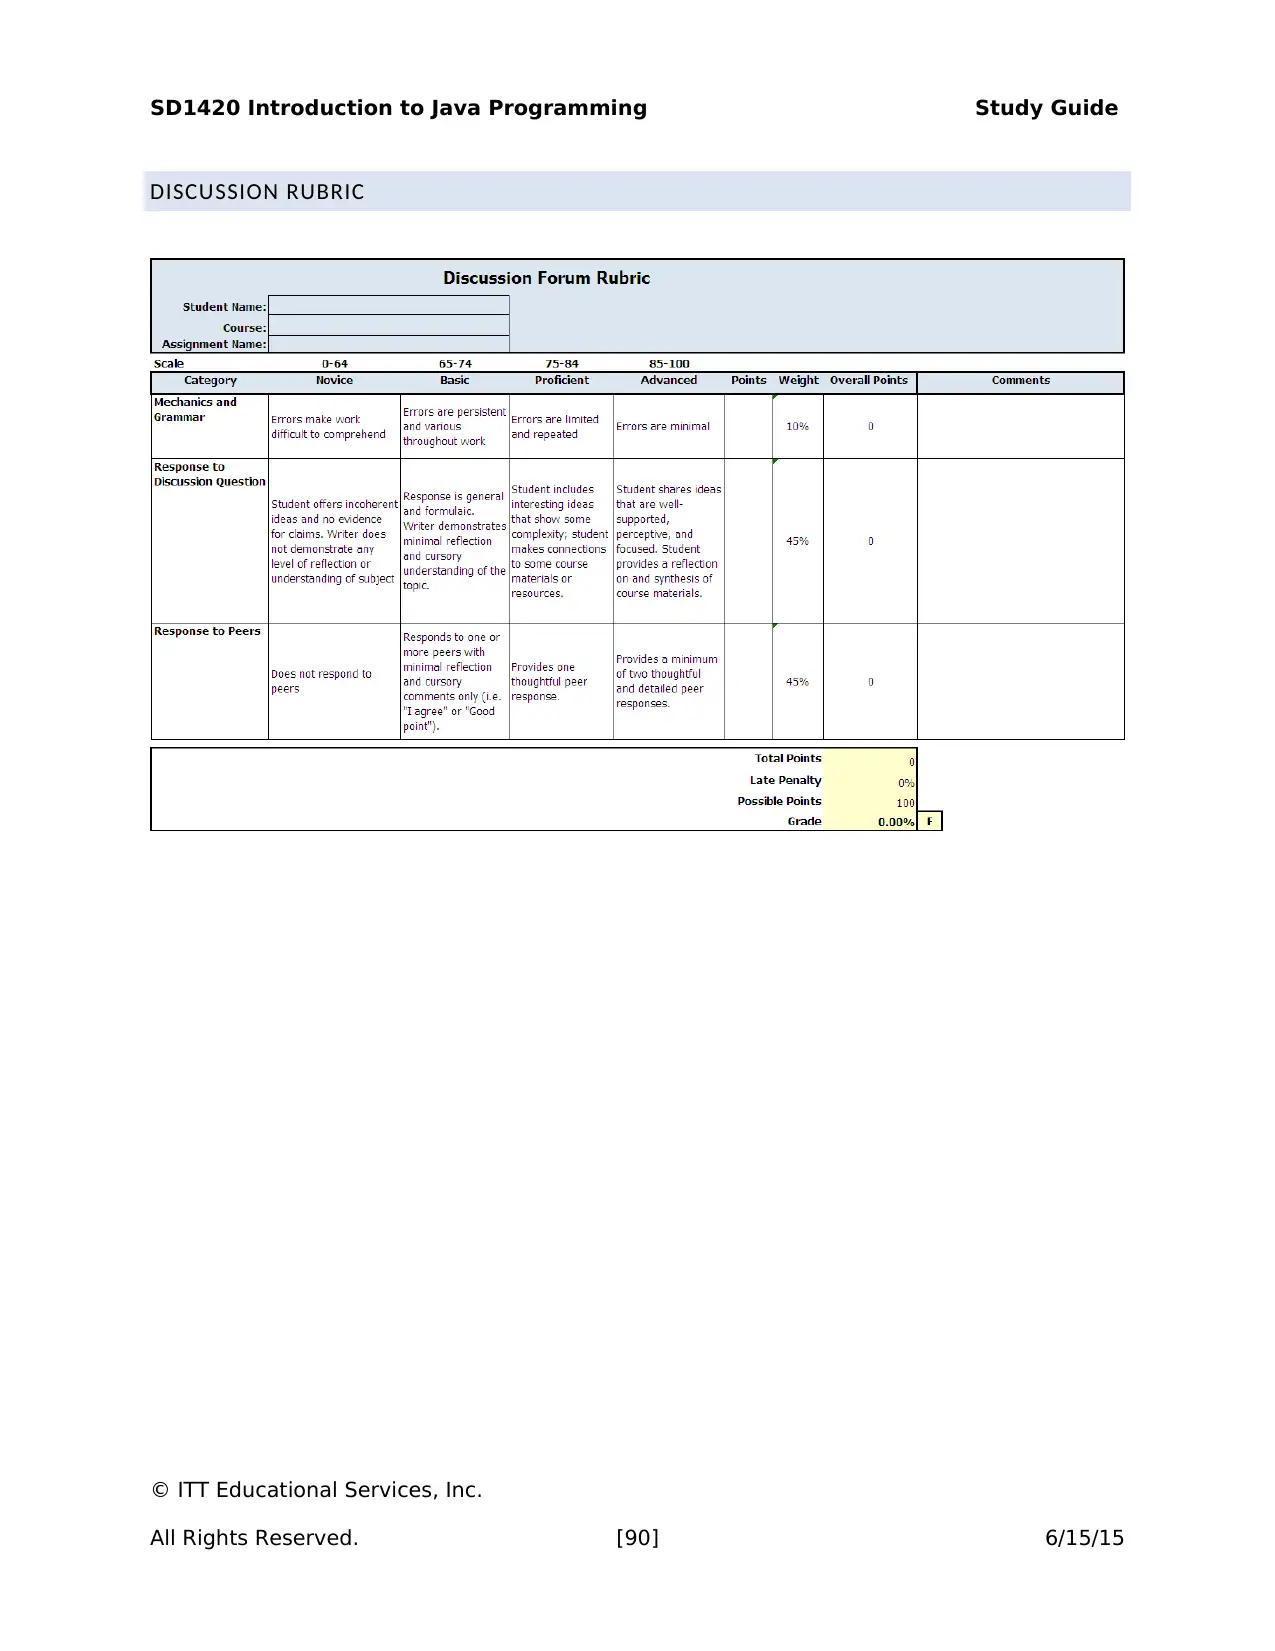
SD1420 Introduction to Java Programming Study Guide
DISCUSSION RUBRIC
© ITT Educational Services, Inc.
All Rights Reserved. [90] 6/15/15
DISCUSSION RUBRIC
© ITT Educational Services, Inc.
All Rights Reserved. [90] 6/15/15
SD1420 Introduction to Java Programming Study Guide
APPENDIX B: HANDOUTS AND WORKSHEETS
MICROSOFT DREAMSPARK PREMIUM PROGRAM IMPLEMENTATION GUIDE
SECTION I: GENERAL
1. The DreamSpark Premium Program is the official provider of Microsoft software previously
distributed through the MSDNAA (Microsoft Developers Network for Academic Alliance)
Program. The DreamSpark Premium program logo now replaces the MSDNAA program logo on
the Web store while retaining the same functions of the former MSDNAA Program.
2. ITT Technical Institute is an official subscriber to the DreamSpark Premium Program and is the
authorized institutional provider for the software from this program to support the delivery of
the curricula offered at ITT Technical Institute that require the use of such software.
3. The use of the software supplied through the DreamSpark Premium program is subject to the
user license agreement and specific procedures set forth by Microsoft and by ITT Technical
Institute.
4. The user of this program agrees to fully comply with the End User License Agreement (EULA) that
governs the use of the software obtained through the DreamSpark Premium program. A copy of
the EULA is located at the DreamSpark Web Store once you select the software and click the
Check Out button, where you will be required to read the policy and select either Accept or
Decline in order to proceed with the download. If you select Decline, your transaction will be
terminated.
5. The software from the DreamSpark Premium program is available for download by the end user
at ITT Technical Institute. The term end user refers to all active students and faculty whose
curricula specify the use of the software supplied through the DreamSpark Premium program.
6. Online download from DreamSpark’s Web store is the ONLY institutional distribution mechanism
for software and associated product keys supplied through the DreamSpark Premium program.
The ITT Technical Institute Headquarters does not ship any DreamSpark Premium software
media and the corresponding license keys to the field.
7. In order to obtain the login credentials for accessing the DreamSpark Web Store, each qualified
© ITT Educational Services, Inc.
All Rights Reserved. [91] 6/15/15
Paraphrase This Document
Need a fresh take? Get an instant paraphrase of this document with our AI Paraphraser
SD1420 Introduction to Java Programming Study Guide
individual end user must actively maintain his/her email account ending with itt-tech.edu.
Credentials for accessing DreamSpark Premium program will ONLY be sent to the email account
ending with itt-tech.edu.
8. Up to two downloads are granted for the selected software per person. Only one
license/activation key will be provided for the downloaded product that requires such a key.
Depending on the nature of the product, some would allow activation on more than one
computer. Some can be activated on only one computer. In most cases, Operating System
software, such as Windows 7 and Server 2008, will allow to be installed on one computer,
whereas typical application software, such as Visual Studio, could be allowed on more than one
computer.
9. For products that require activation on one device, the activated instance must be retained
exclusively for curriculum use. Noncompliance with this may cause the software to become
unavailable for curriculum use. The end user is solely responsible for ensuring the software is to
be dedicated to the curriculum use. Microsoft and ITT Technical Institute will NOT be
responsible if the end user fails to comply with the End User Agreement.
10. Please refer to the curriculum for required software, and follow instructions provided in the
curriculum for the use of the software.
11. IMPORTANT—In order to ensure the required software is available for use by the course, it is
imperative that the required software is downloaded prior to the course/lab session that
requires the use of the software. In no circumstance is the download allowed as a class activity,
as the downloading action is likely to take up the valuable lab time, and downloading a large file
as a class could disturb the normal functionality of the campus network.
12. Please refer to the next section (Download Instructions) for detailed procedures on how to
download the software.
© ITT Educational Services, Inc.
All Rights Reserved. [92] 6/15/15
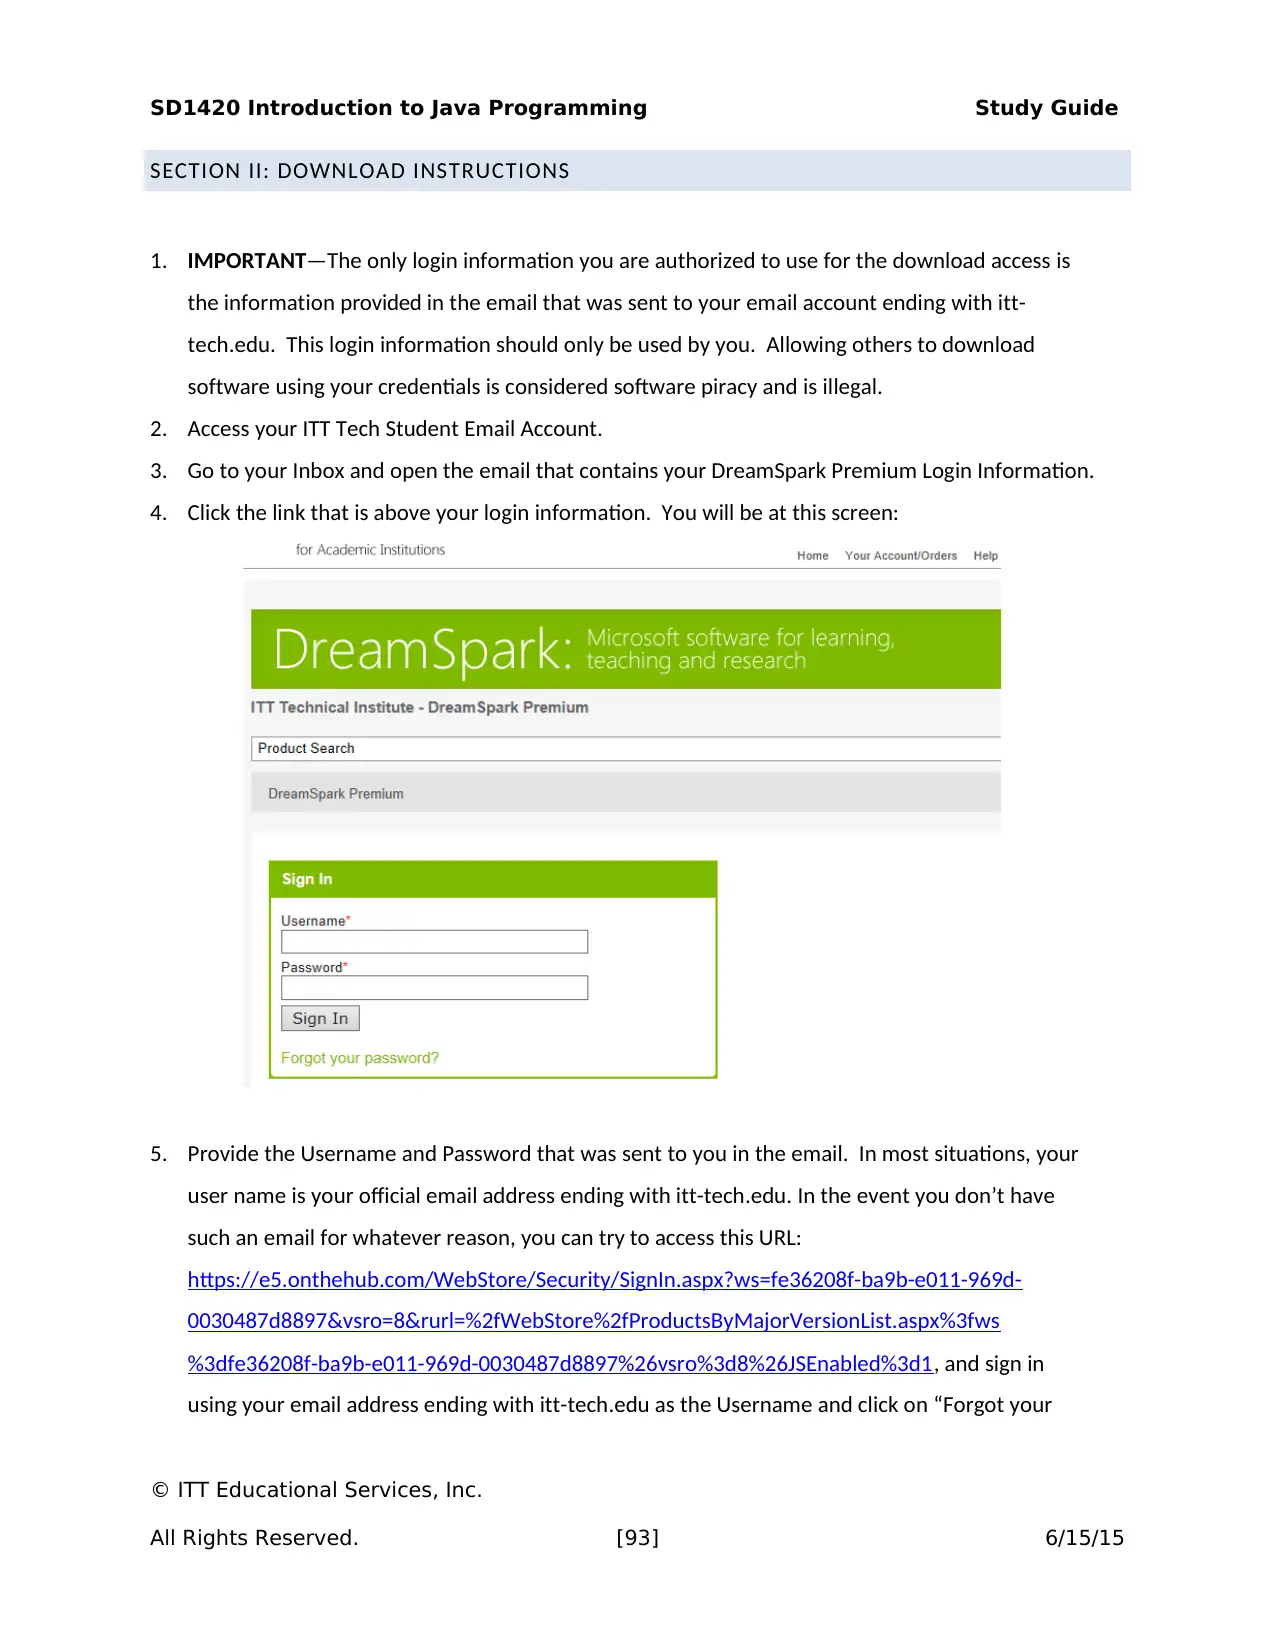
SD1420 Introduction to Java Programming Study Guide
SECTION II: DOWNLOAD INSTRUCTIONS
1. IMPORTANT—The only login information you are authorized to use for the download access is
the information provided in the email that was sent to your email account ending with itt-
tech.edu. This login information should only be used by you. Allowing others to download
software using your credentials is considered software piracy and is illegal.
2. Access your ITT Tech Student Email Account.
3. Go to your Inbox and open the email that contains your DreamSpark Premium Login Information.
4. Click the link that is above your login information. You will be at this screen:
5. Provide the Username and Password that was sent to you in the email. In most situations, your
user name is your official email address ending with itt-tech.edu. In the event you don’t have
such an email for whatever reason, you can try to access this URL:
https://e5.onthehub.com/WebStore/Security/SignIn.aspx?ws=fe36208f-ba9b-e011-969d-
0030487d8897&vsro=8&rurl=%2fWebStore%2fProductsByMajorVersionList.aspx%3fws
%3dfe36208f-ba9b-e011-969d-0030487d8897%26vsro%3d8%26JSEnabled%3d1, and sign in
using your email address ending with itt-tech.edu as the Username and click on “Forgot your
© ITT Educational Services, Inc.
All Rights Reserved. [93] 6/15/15
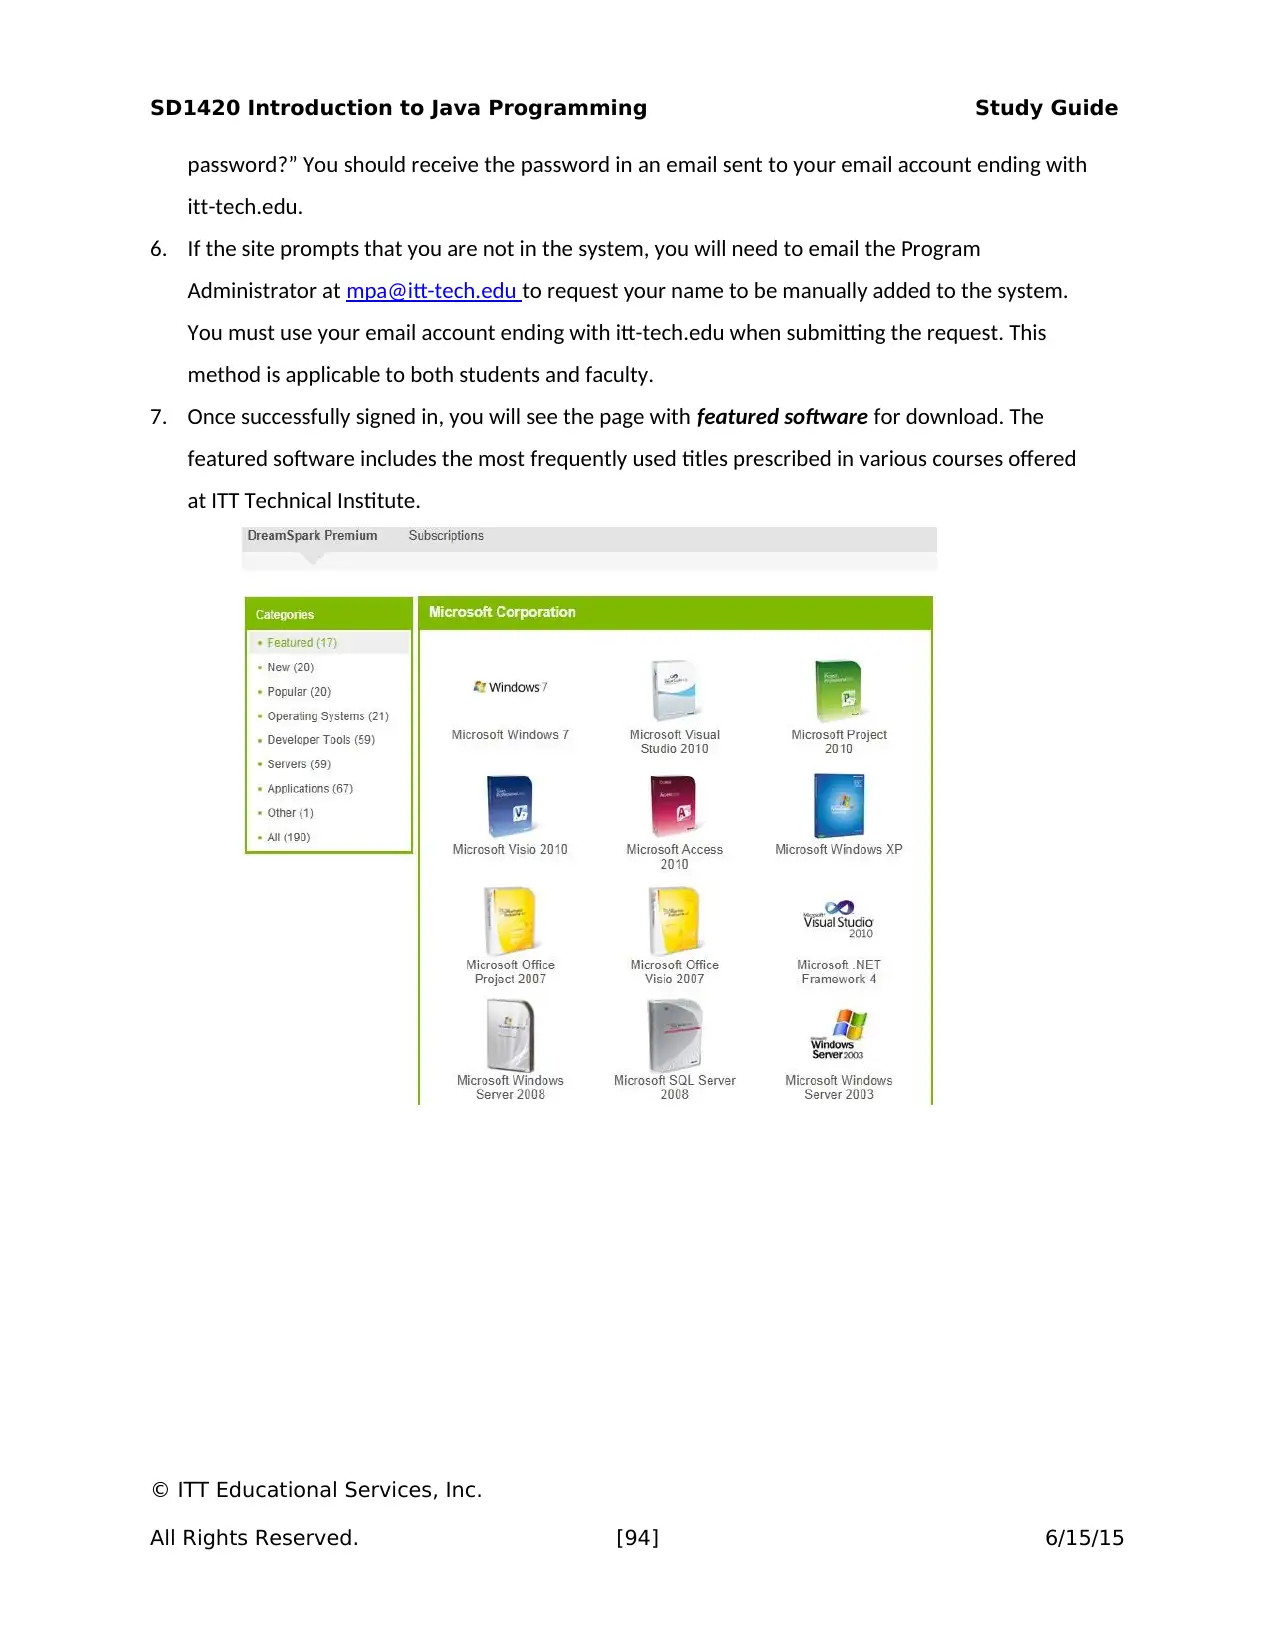
SD1420 Introduction to Java Programming Study Guide
password?” You should receive the password in an email sent to your email account ending with
itt-tech.edu.
6. If the site prompts that you are not in the system, you will need to email the Program
Administrator at mpa@itt-tech.edu to request your name to be manually added to the system.
You must use your email account ending with itt-tech.edu when submitting the request. This
method is applicable to both students and faculty.
7. Once successfully signed in, you will see the page with featured software for download. The
featured software includes the most frequently used titles prescribed in various courses offered
at ITT Technical Institute.
© ITT Educational Services, Inc.
All Rights Reserved. [94] 6/15/15
Secure Best Marks with AI Grader
Need help grading? Try our AI Grader for instant feedback on your assignments.
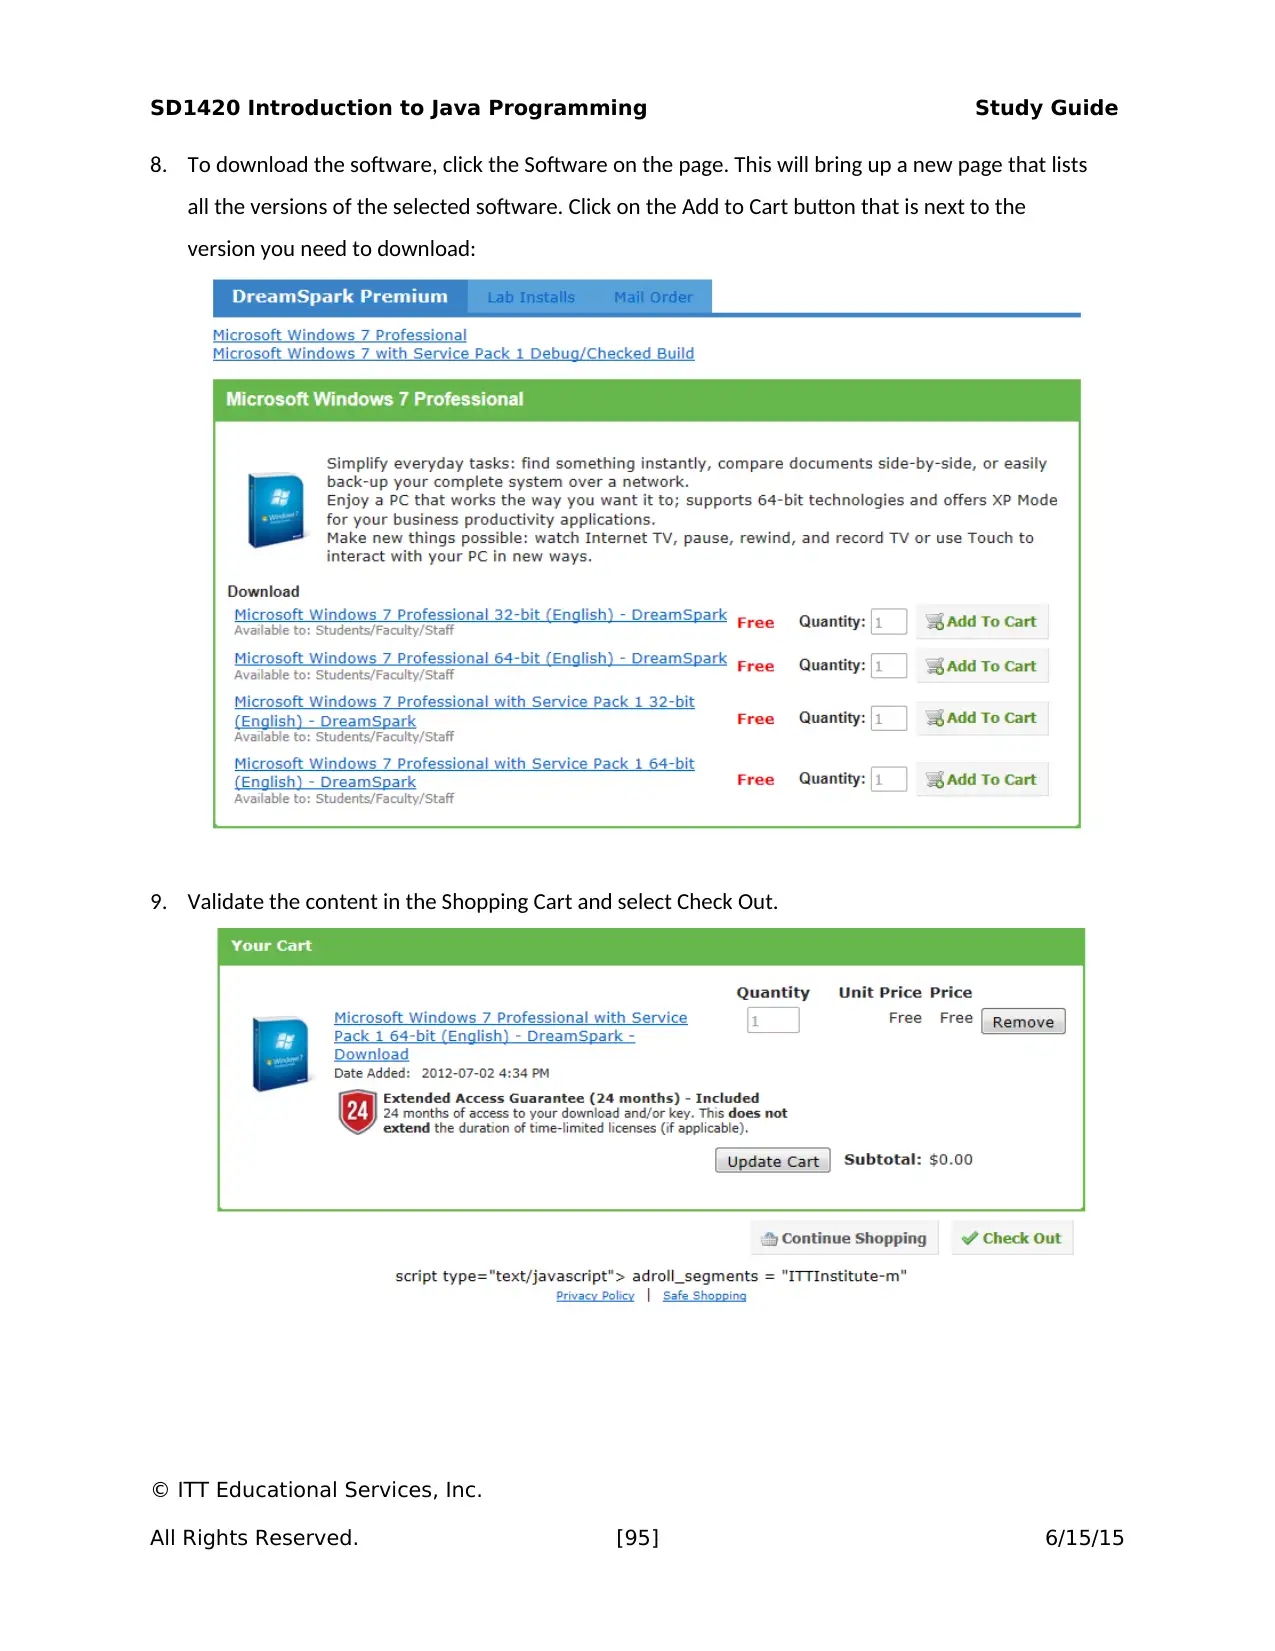
SD1420 Introduction to Java Programming Study Guide
8. To download the software, click the Software on the page. This will bring up a new page that lists
all the versions of the selected software. Click on the Add to Cart button that is next to the
version you need to download:
9. Validate the content in the Shopping Cart and select Check Out.
© ITT Educational Services, Inc.
All Rights Reserved. [95] 6/15/15
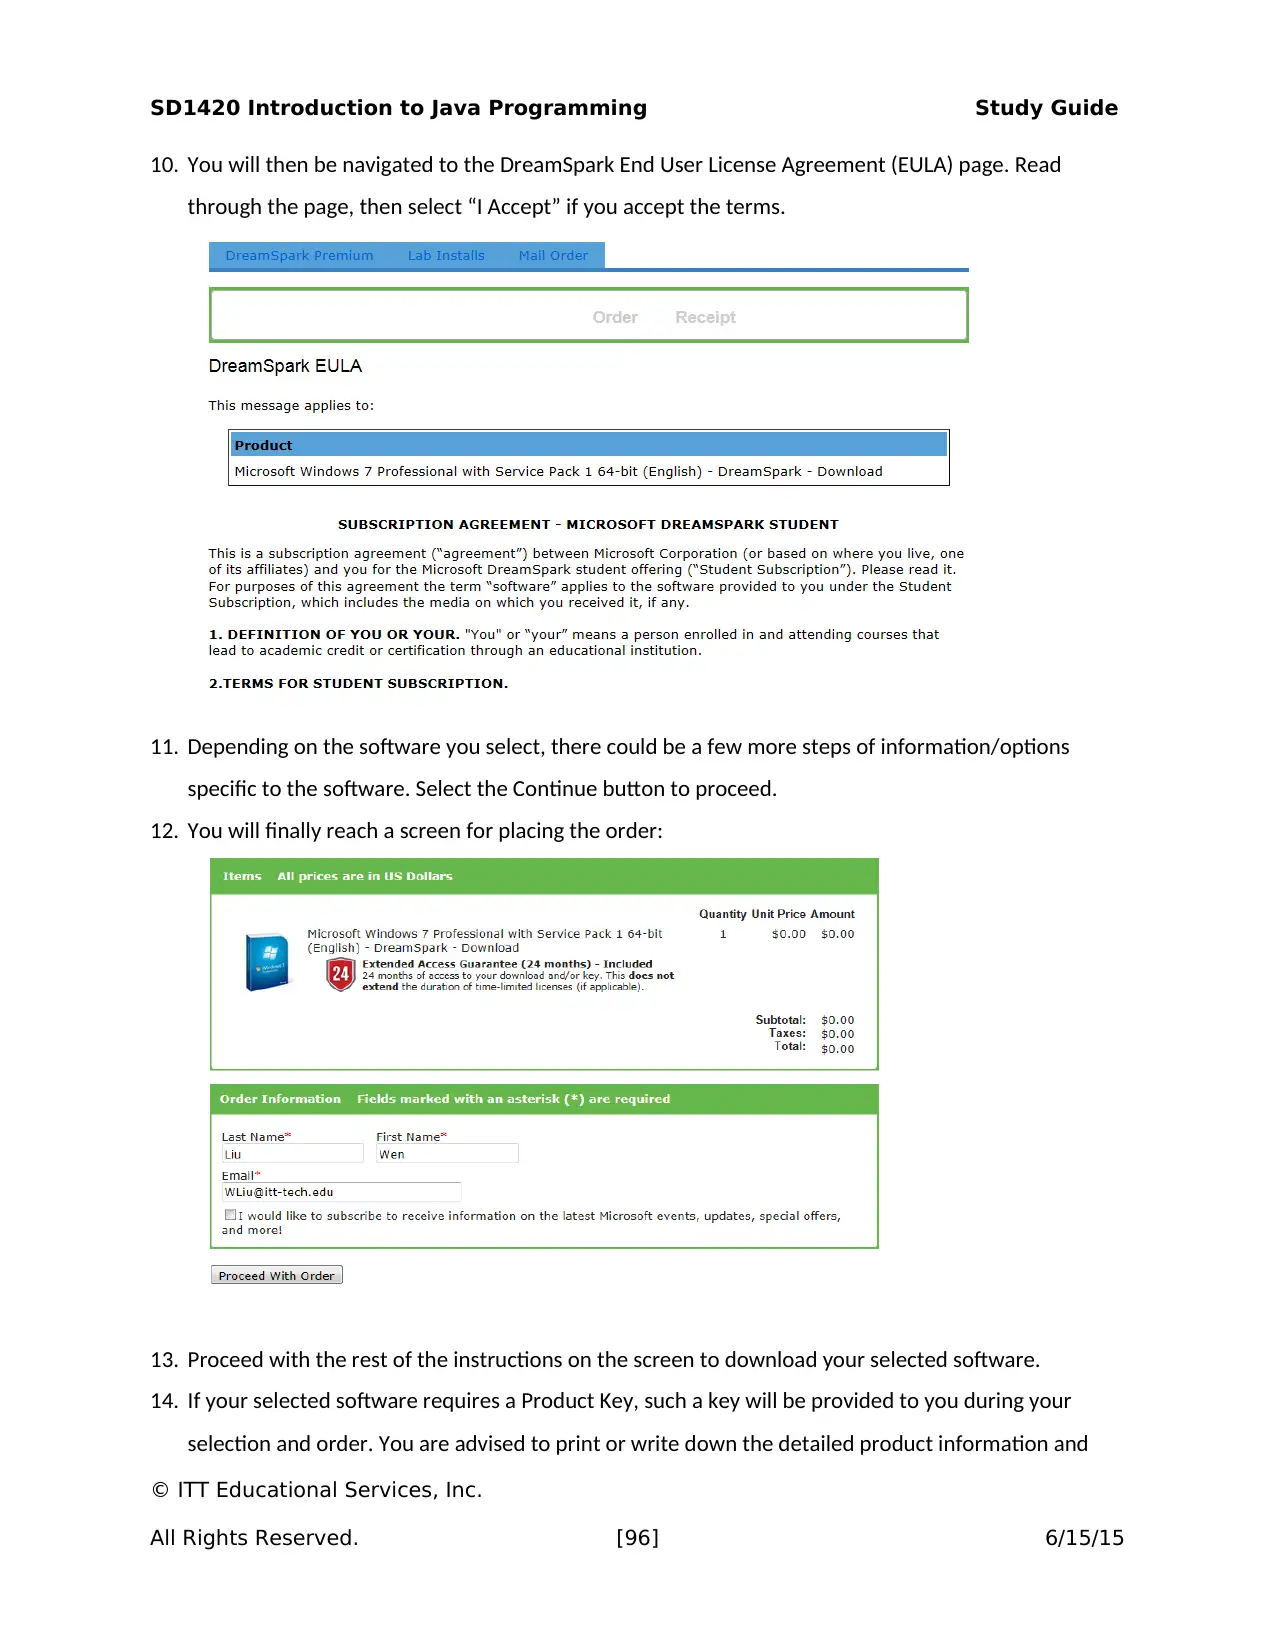
SD1420 Introduction to Java Programming Study Guide
10. You will then be navigated to the DreamSpark End User License Agreement (EULA) page. Read
through the page, then select “I Accept” if you accept the terms.
11. Depending on the software you select, there could be a few more steps of information/options
specific to the software. Select the Continue button to proceed.
12. You will finally reach a screen for placing the order:
13. Proceed with the rest of the instructions on the screen to download your selected software.
14. If your selected software requires a Product Key, such a key will be provided to you during your
selection and order. You are advised to print or write down the detailed product information and
© ITT Educational Services, Inc.
All Rights Reserved. [96] 6/15/15

SD1420 Introduction to Java Programming Study Guide
keep it in your file for future reference.
15. Any retail key you obtain with the software from the DreamSpark program is yours to use
permanently under the EULA terms.
© ITT Educational Services, Inc.
All Rights Reserved. [97] 6/15/15
keep it in your file for future reference.
15. Any retail key you obtain with the software from the DreamSpark program is yours to use
permanently under the EULA terms.
© ITT Educational Services, Inc.
All Rights Reserved. [97] 6/15/15
Paraphrase This Document
Need a fresh take? Get an instant paraphrase of this document with our AI Paraphraser
SD1420 Introduction to Java Programming Study Guide
SECTION III: SOFTWARE ELIGIBILITY FOR CURRICULA
1. In principle, the authorized end user is eligible for any software provided through the DreamSpark
program as long as the software is for use by the curriculum as defined by the DreamSpark program
and EULA.
2. Microsoft Office (specifically Microsoft Word, Excel, and PowerPoint) is not part of the DreamSpark
program. Other than the Microsoft Office Suite, the DreamSpark program is the source for all
Microsoft software that is required in the curricula offered at ITT Technical Institute.
3. Please refer to specific courses to identify the software needed, and search on the DreamSpark Web
Store to download the software accordingly.
Due to specific licensing provisions, certain software (such as Windows 7) requires activation after
installation. The curriculum has specific instructions regarding how to handle this requirement for the
virtual machine implementation of the labs in our specific lab environment. It is important such
instructions be followed strictly. Failure to do so will negatively affect the end user’s ability to achieve
the outcomes prescribed by the curriculum.
© ITT Educational Services, Inc.
All Rights Reserved. [98] 6/15/15
1 out of 98
Your All-in-One AI-Powered Toolkit for Academic Success.
+13062052269
info@desklib.com
Available 24*7 on WhatsApp / Email
![[object Object]](/_next/static/media/star-bottom.7253800d.svg)
Unlock your academic potential
© 2024 | Zucol Services PVT LTD | All rights reserved.