Database Recovery and Backup

Verified

Added on  2019/09/25

|11
|2811
|269
Report
AI Summary
The assignment involves creating and populating a table called LA7_PATIENT in an Oracle database, using SQL commands. The table has four columns: LA7_PATIENT_NO, LA7_PATIENT_NAME, WARD_NO, and PHY_ID. The table is then backed up using the RMAN tool, and its contents are displayed. Next, the table is dropped to simulate its loss, after which it is restored using the RESTORE TABLE command. Finally, the assignment asks several questions about various Oracle features, including flashback databases, backup and recovery, and database architecture.

Contribute Materials

Your contribution can guide someone’s learning journey. Share your documents today.
Document Page
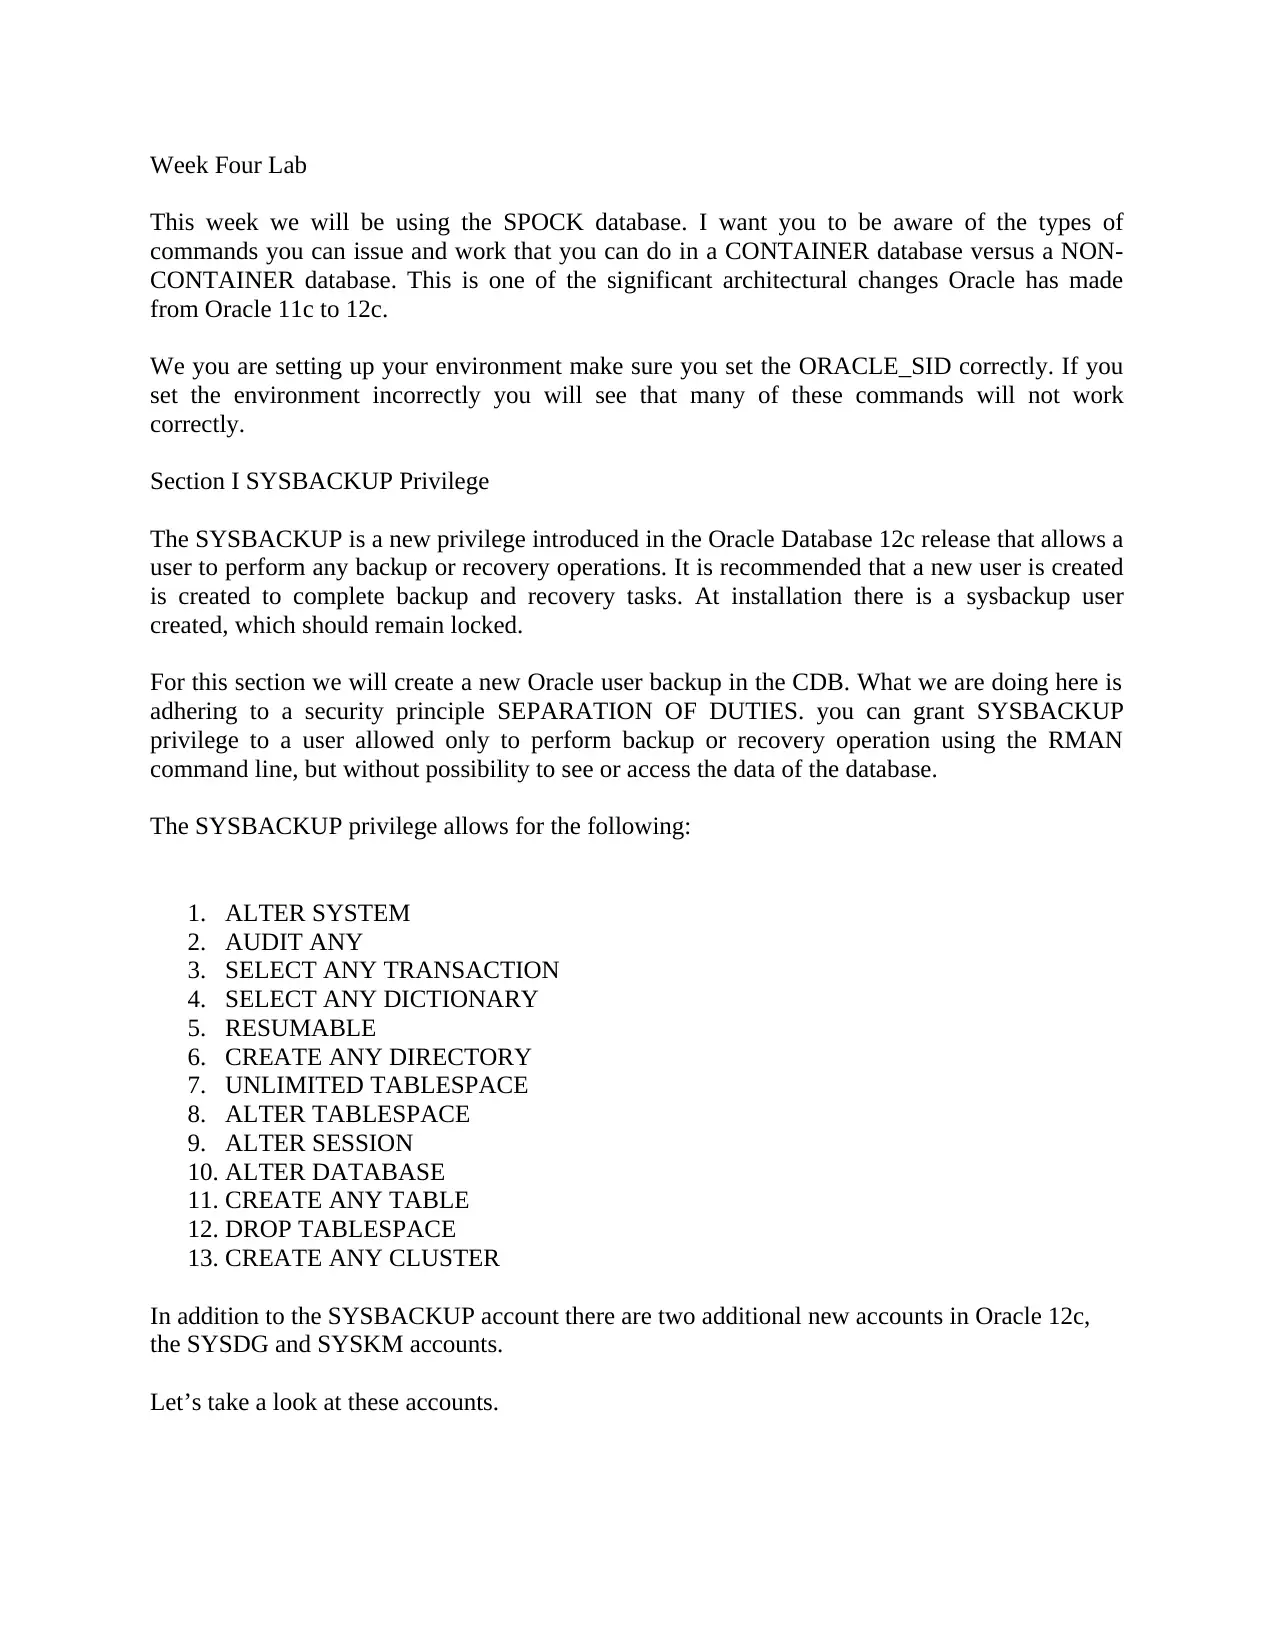
Week Four Lab
This week we will be using the SPOCK database. I want you to be aware of the types of
commands you can issue and work that you can do in a CONTAINER database versus a NON-
CONTAINER database. This is one of the significant architectural changes Oracle has made
from Oracle 11c to 12c.
We you are setting up your environment make sure you set the ORACLE_SID correctly. If you
set the environment incorrectly you will see that many of these commands will not work
correctly.
Section I SYSBACKUP Privilege
The SYSBACKUP is a new privilege introduced in the Oracle Database 12c release that allows a
user to perform any backup or recovery operations. It is recommended that a new user is created
is created to complete backup and recovery tasks. At installation there is a sysbackup user
created, which should remain locked.
For this section we will create a new Oracle user backup in the CDB. What we are doing here is
adhering to a security principle SEPARATION OF DUTIES. you can grant SYSBACKUP
privilege to a user allowed only to perform backup or recovery operation using the RMAN
command line, but without possibility to see or access the data of the database.
The SYSBACKUP privilege allows for the following:
1. ALTER SYSTEM
2. AUDIT ANY
3. SELECT ANY TRANSACTION
4. SELECT ANY DICTIONARY
5. RESUMABLE
6. CREATE ANY DIRECTORY
7. UNLIMITED TABLESPACE
8. ALTER TABLESPACE
9. ALTER SESSION
10. ALTER DATABASE
11. CREATE ANY TABLE
12. DROP TABLESPACE
13. CREATE ANY CLUSTER
In addition to the SYSBACKUP account there are two additional new accounts in Oracle 12c,
the SYSDG and SYSKM accounts.
Let’s take a look at these accounts.

Secure Best Marks with AI Grader

Need help grading? Try our AI Grader for instant feedback on your assignments.
Document Page
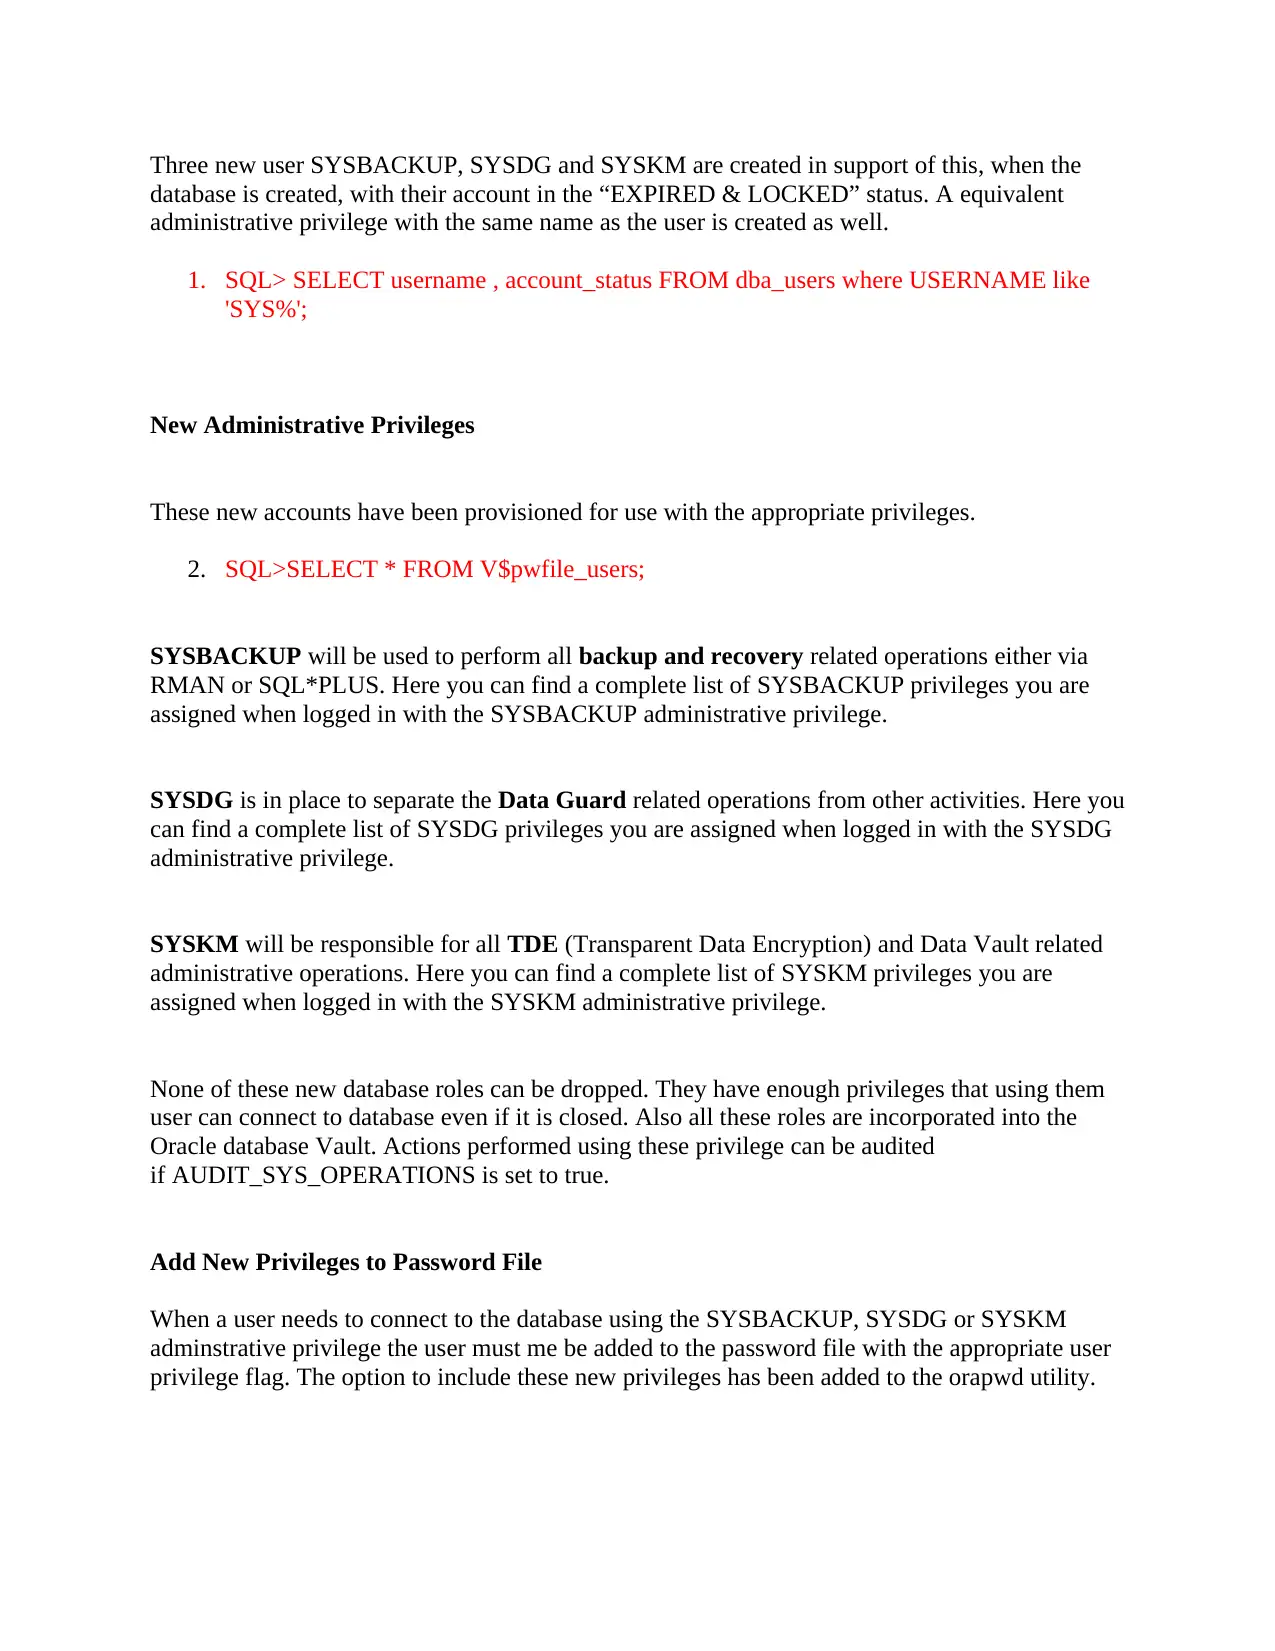
Three new user SYSBACKUP, SYSDG and SYSKM are created in support of this, when the
database is created, with their account in the “EXPIRED & LOCKED” status. A equivalent
administrative privilege with the same name as the user is created as well.
1. SQL> SELECT username , account_status FROM dba_users where USERNAME like
'SYS%';
New Administrative Privileges
These new accounts have been provisioned for use with the appropriate privileges.
2. SQL>SELECT * FROM V$pwfile_users;
SYSBACKUP will be used to perform all backup and recovery related operations either via
RMAN or SQL*PLUS. Here you can find a complete list of SYSBACKUP privileges you are
assigned when logged in with the SYSBACKUP administrative privilege.
SYSDG is in place to separate the Data Guard related operations from other activities. Here you
can find a complete list of SYSDG privileges you are assigned when logged in with the SYSDG
administrative privilege.
SYSKM will be responsible for all TDE (Transparent Data Encryption) and Data Vault related
administrative operations. Here you can find a complete list of SYSKM privileges you are
assigned when logged in with the SYSKM administrative privilege.
None of these new database roles can be dropped. They have enough privileges that using them
user can connect to database even if it is closed. Also all these roles are incorporated into the
Oracle database Vault. Actions performed using these privilege can be audited
if AUDIT_SYS_OPERATIONS is set to true.
Add New Privileges to Password File
When a user needs to connect to the database using the SYSBACKUP, SYSDG or SYSKM
adminstrative privilege the user must me be added to the password file with the appropriate user
privilege flag. The option to include these new privileges has been added to the orapwd utility.
Document Page
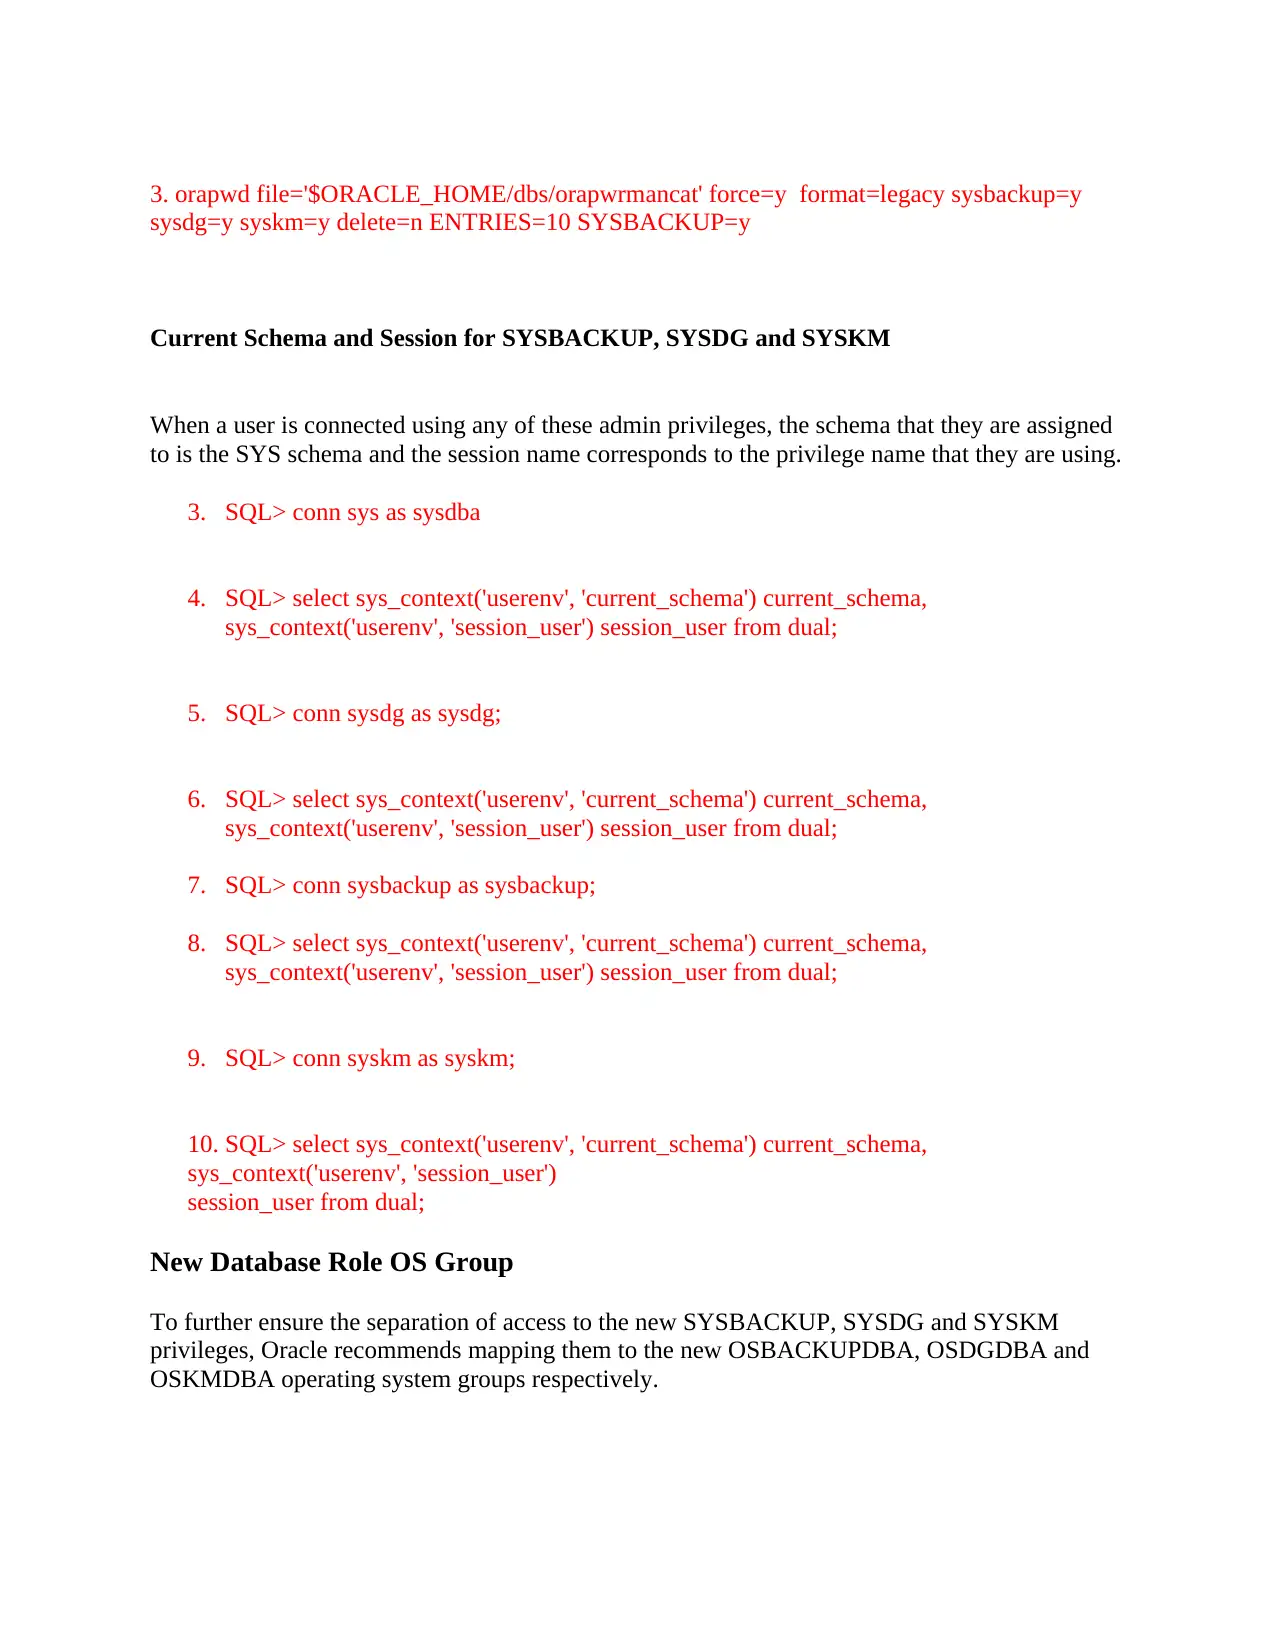
3. orapwd file='$ORACLE_HOME/dbs/orapwrmancat' force=y format=legacy sysbackup=y
sysdg=y syskm=y delete=n ENTRIES=10 SYSBACKUP=y
Current Schema and Session for SYSBACKUP, SYSDG and SYSKM
When a user is connected using any of these admin privileges, the schema that they are assigned
to is the SYS schema and the session name corresponds to the privilege name that they are using.
3. SQL> conn sys as sysdba
4. SQL> select sys_context('userenv', 'current_schema') current_schema,
sys_context('userenv', 'session_user') session_user from dual;
5. SQL> conn sysdg as sysdg;
6. SQL> select sys_context('userenv', 'current_schema') current_schema,
sys_context('userenv', 'session_user') session_user from dual;
7. SQL> conn sysbackup as sysbackup;
8. SQL> select sys_context('userenv', 'current_schema') current_schema,
sys_context('userenv', 'session_user') session_user from dual;
9. SQL> conn syskm as syskm;
10. SQL> select sys_context('userenv', 'current_schema') current_schema,
sys_context('userenv', 'session_user')
session_user from dual;
New Database Role OS Group
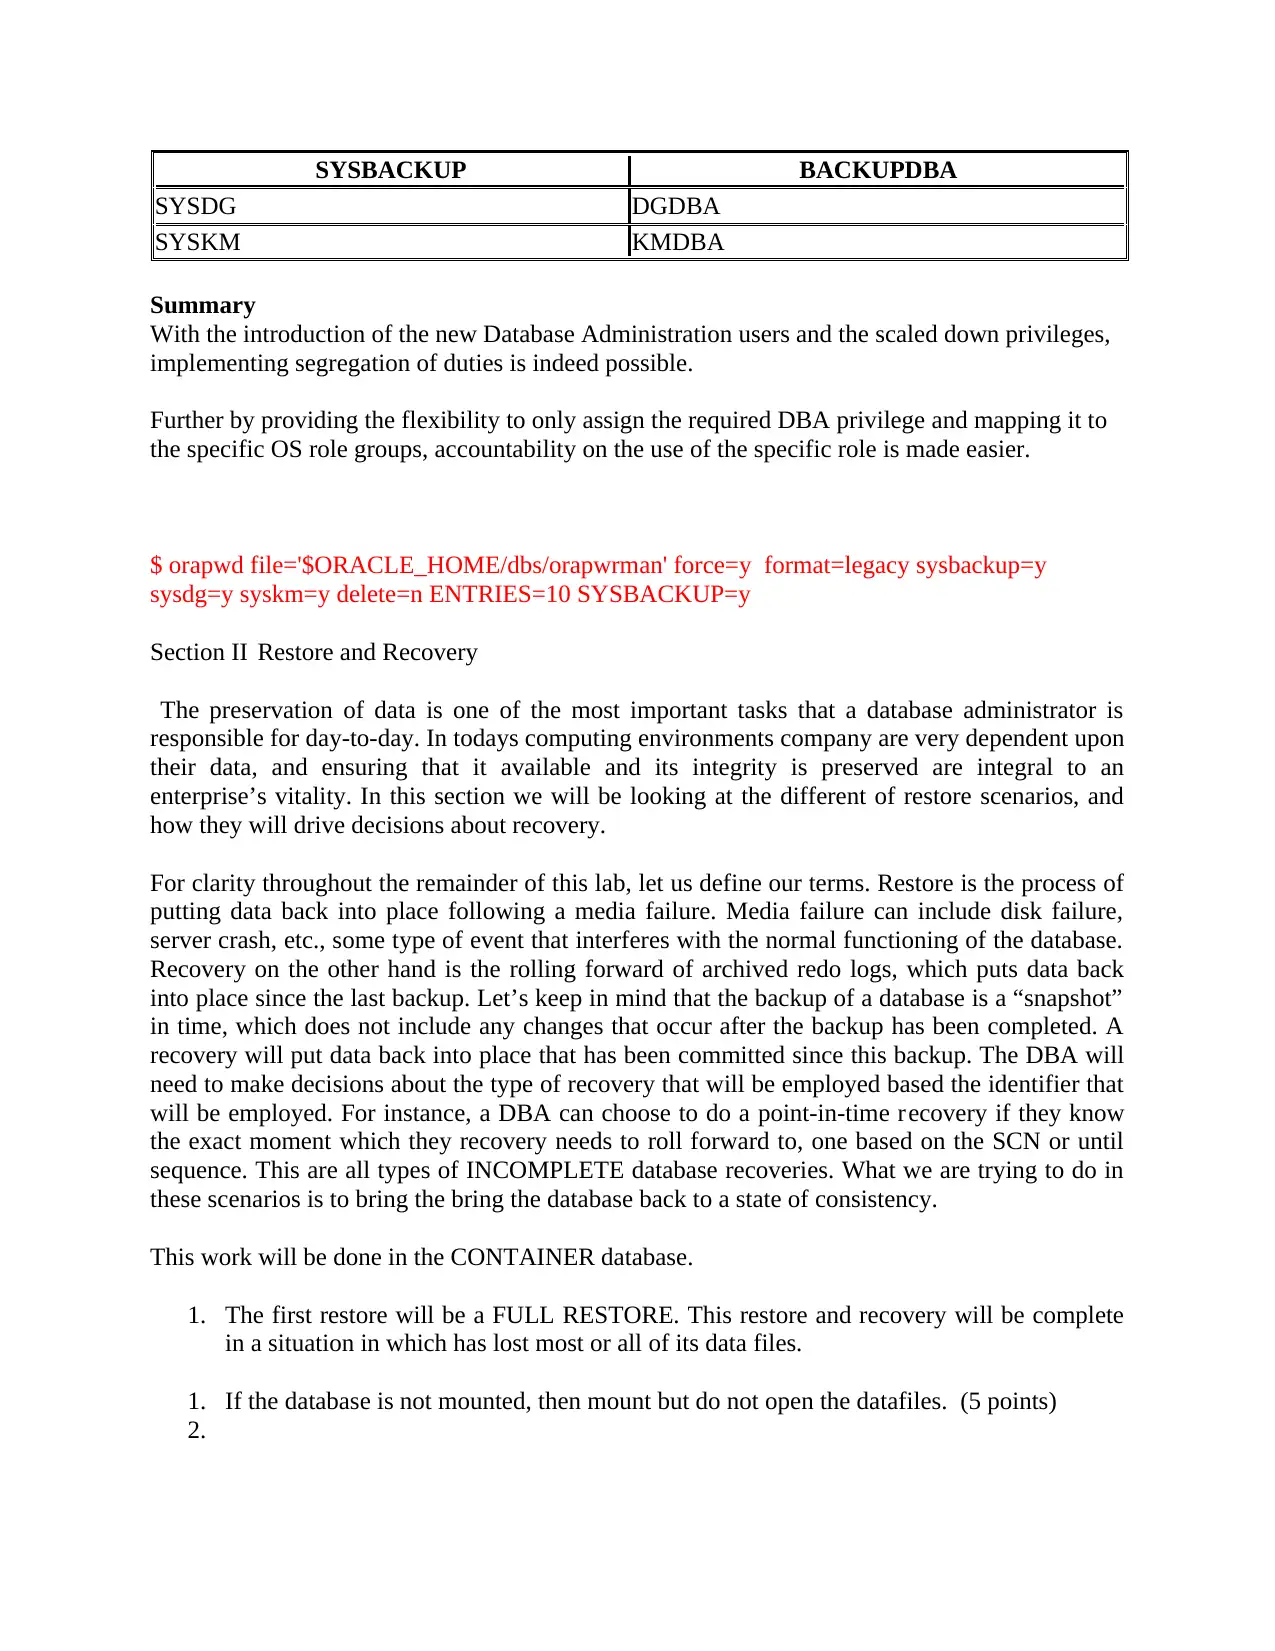
To further ensure the separation of access to the new SYSBACKUP, SYSDG and SYSKM
privileges, Oracle recommends mapping them to the new OSBACKUPDBA, OSDGDBA and
OSKMDBA operating system groups respectively.
Document Page
SYSBACKUP BACKUPDBA
SYSDG DGDBA
SYSKM KMDBA
Summary
With the introduction of the new Database Administration users and the scaled down privileges,
implementing segregation of duties is indeed possible.
Further by providing the flexibility to only assign the required DBA privilege and mapping it to
the specific OS role groups, accountability on the use of the specific role is made easier.
$ orapwd file='$ORACLE_HOME/dbs/orapwrman' force=y format=legacy sysbackup=y
sysdg=y syskm=y delete=n ENTRIES=10 SYSBACKUP=y
Section II Restore and Recovery
The preservation of data is one of the most important tasks that a database administrator is
responsible for day-to-day. In todays computing environments company are very dependent upon
their data, and ensuring that it available and its integrity is preserved are integral to an
enterprise’s vitality. In this section we will be looking at the different of restore scenarios, and
how they will drive decisions about recovery.
For clarity throughout the remainder of this lab, let us define our terms. Restore is the process of
putting data back into place following a media failure. Media failure can include disk failure,
server crash, etc., some type of event that interferes with the normal functioning of the database.
Recovery on the other hand is the rolling forward of archived redo logs, which puts data back
into place since the last backup. Let’s keep in mind that the backup of a database is a “snapshot”
in time, which does not include any changes that occur after the backup has been completed. A
recovery will put data back into place that has been committed since this backup. The DBA will
need to make decisions about the type of recovery that will be employed based the identifier that
will be employed. For instance, a DBA can choose to do a point-in-time recovery if they know
the exact moment which they recovery needs to roll forward to, one based on the SCN or until
sequence. This are all types of INCOMPLETE database recoveries. What we are trying to do in
these scenarios is to bring the bring the database back to a state of consistency.
This work will be done in the CONTAINER database.
1. The first restore will be a FULL RESTORE. This restore and recovery will be complete
in a situation in which has lost most or all of its data files.
1. If the database is not mounted, then mount but do not open the datafiles. (5 points)
2.

Secure Best Marks with AI Grader

Need help grading? Try our AI Grader for instant feedback on your assignments.
Document Page
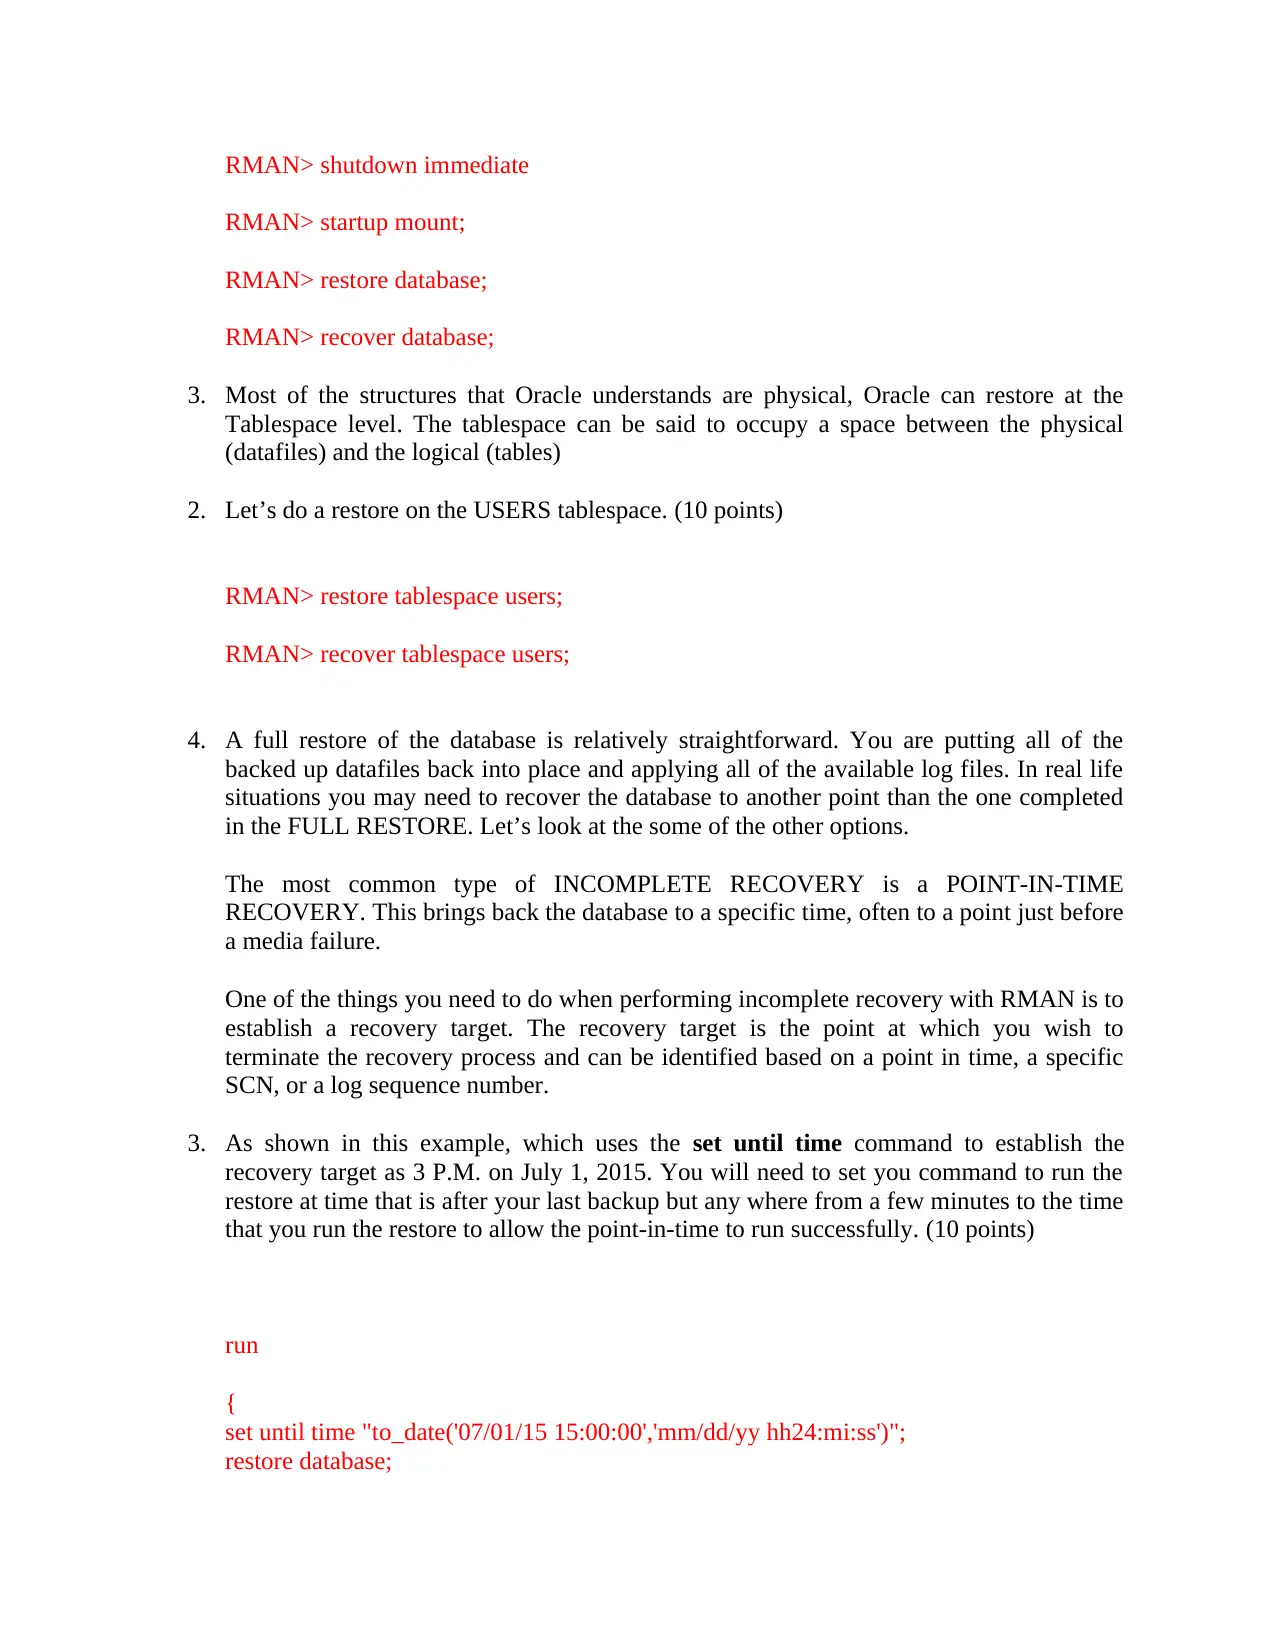
RMAN> shutdown immediate
RMAN> startup mount;
RMAN> restore database;
RMAN> recover database;
3. Most of the structures that Oracle understands are physical, Oracle can restore at the
Tablespace level. The tablespace can be said to occupy a space between the physical
(datafiles) and the logical (tables)
2. Let’s do a restore on the USERS tablespace. (10 points)
RMAN> restore tablespace users;
RMAN> recover tablespace users;
4. A full restore of the database is relatively straightforward. You are putting all of the
backed up datafiles back into place and applying all of the available log files. In real life
situations you may need to recover the database to another point than the one completed
in the FULL RESTORE. Let’s look at the some of the other options.
The most common type of INCOMPLETE RECOVERY is a POINT-IN-TIME
RECOVERY. This brings back the database to a specific time, often to a point just before
a media failure.
One of the things you need to do when performing incomplete recovery with RMAN is to
establish a recovery target. The recovery target is the point at which you wish to
terminate the recovery process and can be identified based on a point in time, a specific
SCN, or a log sequence number.
3. As shown in this example, which uses the set until time command to establish the
recovery target as 3 P.M. on July 1, 2015. You will need to set you command to run the
restore at time that is after your last backup but any where from a few minutes to the time
that you run the restore to allow the point-in-time to run successfully. (10 points)
run
{
set until time "to_date('07/01/15 15:00:00','mm/dd/yy hh24:mi:ss')";
restore database;
Document Page
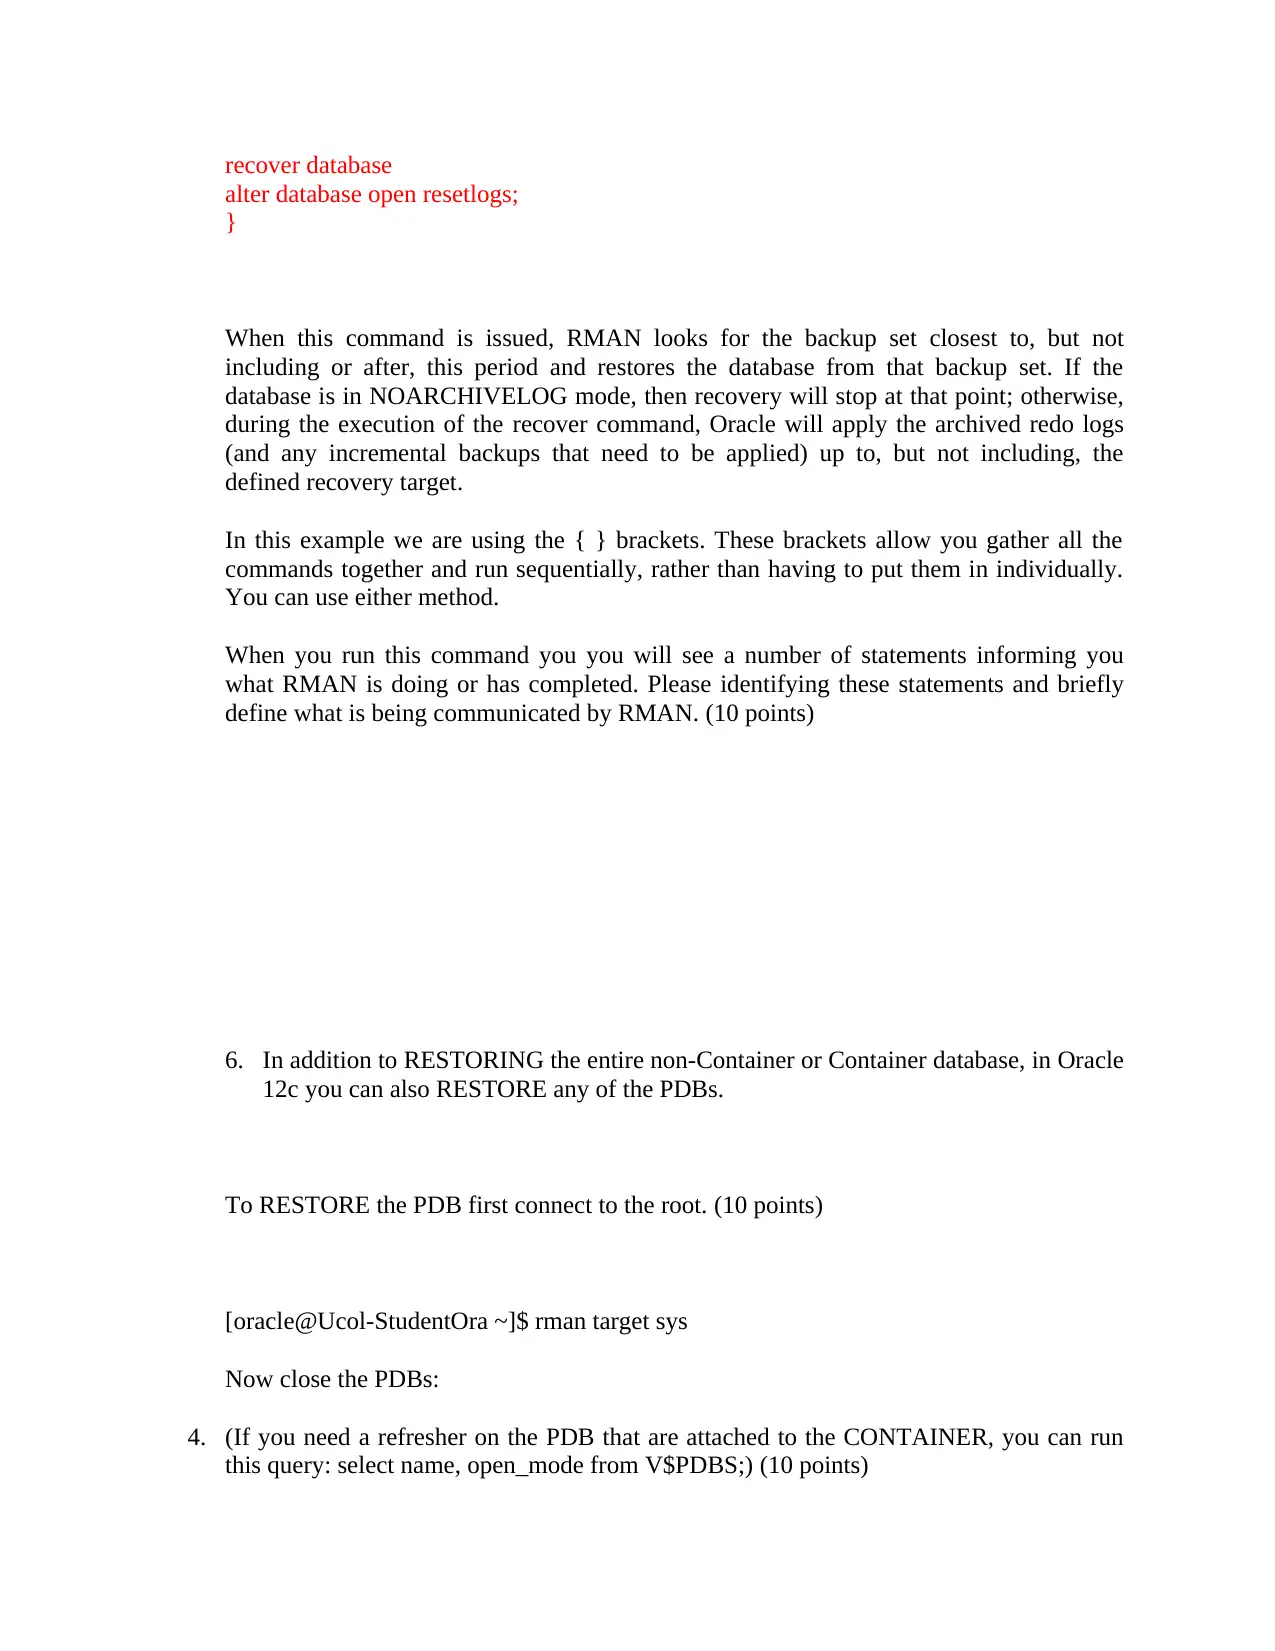
recover database
alter database open resetlogs;
}
When this command is issued, RMAN looks for the backup set closest to, but not
including or after, this period and restores the database from that backup set. If the
database is in NOARCHIVELOG mode, then recovery will stop at that point; otherwise,
during the execution of the recover command, Oracle will apply the archived redo logs
(and any incremental backups that need to be applied) up to, but not including, the
defined recovery target.
In this example we are using the { } brackets. These brackets allow you gather all the
commands together and run sequentially, rather than having to put them in individually.
You can use either method.
When you run this command you you will see a number of statements informing you
what RMAN is doing or has completed. Please identifying these statements and briefly
define what is being communicated by RMAN. (10 points)
6. In addition to RESTORING the entire non-Container or Container database, in Oracle
12c you can also RESTORE any of the PDBs.
To RESTORE the PDB first connect to the root. (10 points)
[oracle@Ucol-StudentOra ~]$ rman target sys
Now close the PDBs:
4. (If you need a refresher on the PDB that are attached to the CONTAINER, you can run
this query: select name, open_mode from V$PDBS;) (10 points)
Document Page
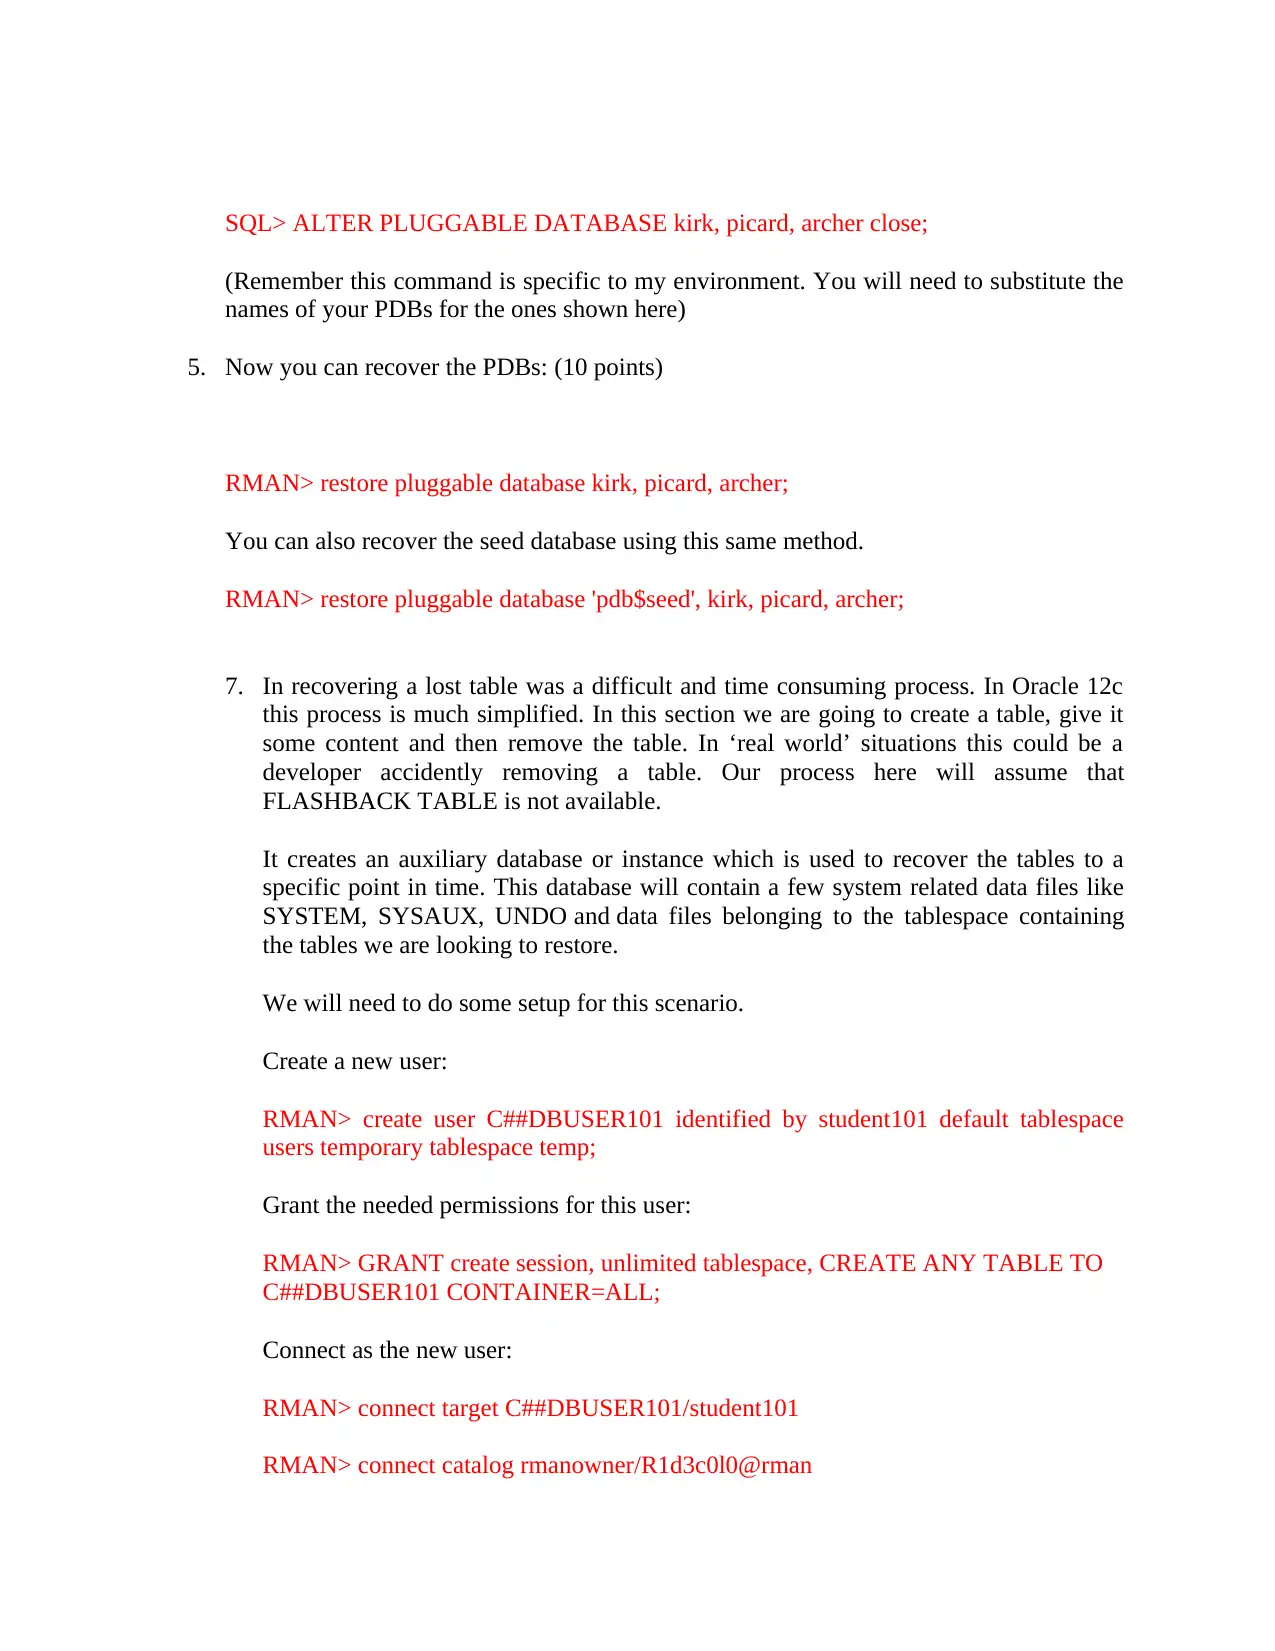
SQL> ALTER PLUGGABLE DATABASE kirk, picard, archer close;
(Remember this command is specific to my environment. You will need to substitute the
names of your PDBs for the ones shown here)
5. Now you can recover the PDBs: (10 points)
RMAN> restore pluggable database kirk, picard, archer;
You can also recover the seed database using this same method.
RMAN> restore pluggable database 'pdb$seed', kirk, picard, archer;
7. In recovering a lost table was a difficult and time consuming process. In Oracle 12c
this process is much simplified. In this section we are going to create a table, give it
some content and then remove the table. In ‘real world’ situations this could be a
developer accidently removing a table. Our process here will assume that
FLASHBACK TABLE is not available.
It creates an auxiliary database or instance which is used to recover the tables to a
specific point in time. This database will contain a few system related data files like
SYSTEM, SYSAUX, UNDO and data files belonging to the tablespace containing
the tables we are looking to restore.
We will need to do some setup for this scenario.
Create a new user:
RMAN> create user C##DBUSER101 identified by student101 default tablespace
users temporary tablespace temp;
Grant the needed permissions for this user:
RMAN> GRANT create session, unlimited tablespace, CREATE ANY TABLE TO
C##DBUSER101 CONTAINER=ALL;
Connect as the new user:
RMAN> connect target C##DBUSER101/student101
RMAN> connect catalog rmanowner/R1d3c0l0@rman

Paraphrase This Document

Need a fresh take? Get an instant paraphrase of this document with our AI Paraphraser
Document Page
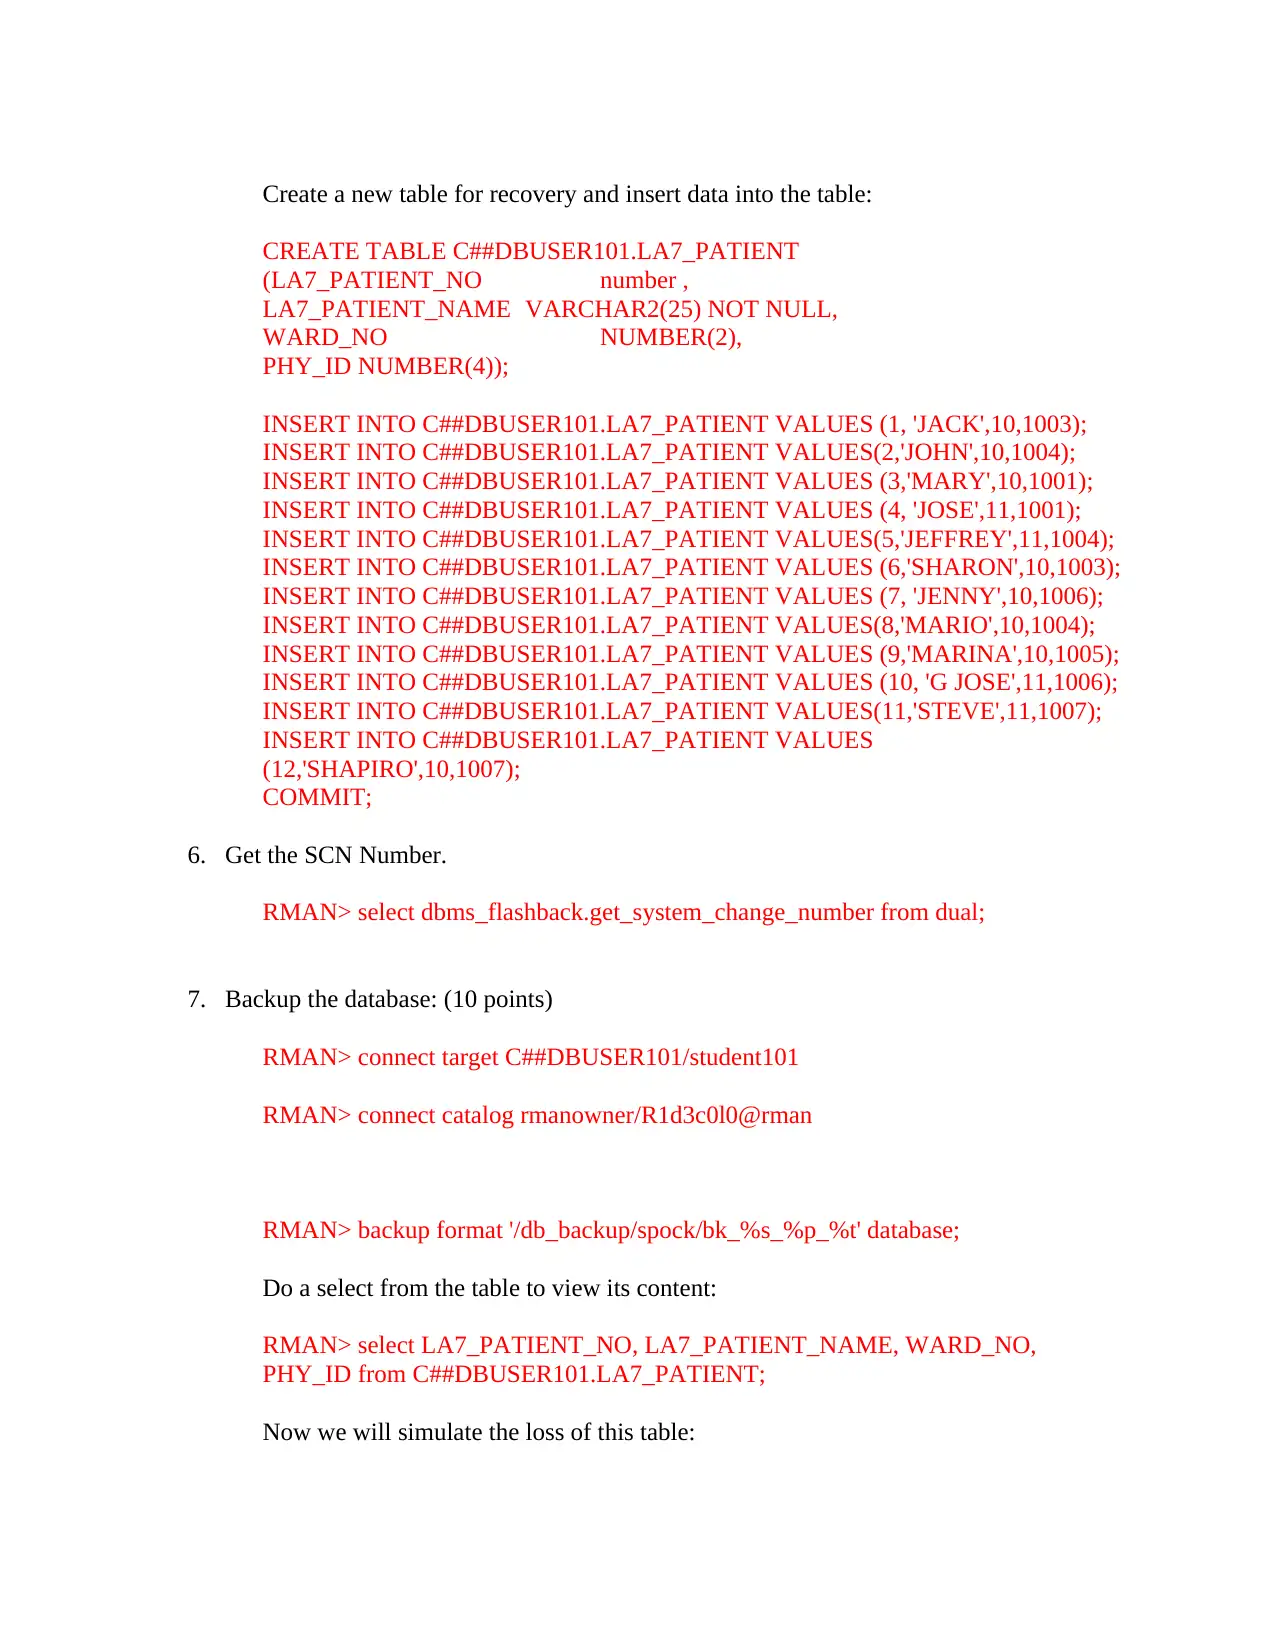
Create a new table for recovery and insert data into the table:
CREATE TABLE C##DBUSER101.LA7_PATIENT
(LA7_PATIENT_NO number ,
LA7_PATIENT_NAME VARCHAR2(25) NOT NULL,
WARD_NO NUMBER(2),
PHY_ID NUMBER(4));
INSERT INTO C##DBUSER101.LA7_PATIENT VALUES (1, 'JACK',10,1003);
INSERT INTO C##DBUSER101.LA7_PATIENT VALUES(2,'JOHN',10,1004);
INSERT INTO C##DBUSER101.LA7_PATIENT VALUES (3,'MARY',10,1001);
INSERT INTO C##DBUSER101.LA7_PATIENT VALUES (4, 'JOSE',11,1001);
INSERT INTO C##DBUSER101.LA7_PATIENT VALUES(5,'JEFFREY',11,1004);
INSERT INTO C##DBUSER101.LA7_PATIENT VALUES (6,'SHARON',10,1003);
INSERT INTO C##DBUSER101.LA7_PATIENT VALUES (7, 'JENNY',10,1006);
INSERT INTO C##DBUSER101.LA7_PATIENT VALUES(8,'MARIO',10,1004);
INSERT INTO C##DBUSER101.LA7_PATIENT VALUES (9,'MARINA',10,1005);
INSERT INTO C##DBUSER101.LA7_PATIENT VALUES (10, 'G JOSE',11,1006);
INSERT INTO C##DBUSER101.LA7_PATIENT VALUES(11,'STEVE',11,1007);
INSERT INTO C##DBUSER101.LA7_PATIENT VALUES
(12,'SHAPIRO',10,1007);
COMMIT;
6. Get the SCN Number.
RMAN> select dbms_flashback.get_system_change_number from dual;
7. Backup the database: (10 points)
RMAN> connect target C##DBUSER101/student101
RMAN> connect catalog rmanowner/R1d3c0l0@rman
RMAN> backup format '/db_backup/spock/bk_%s_%p_%t' database;
Do a select from the table to view its content:
RMAN> select LA7_PATIENT_NO, LA7_PATIENT_NAME, WARD_NO,
PHY_ID from C##DBUSER101.LA7_PATIENT;
Now we will simulate the loss of this table:
Document Page
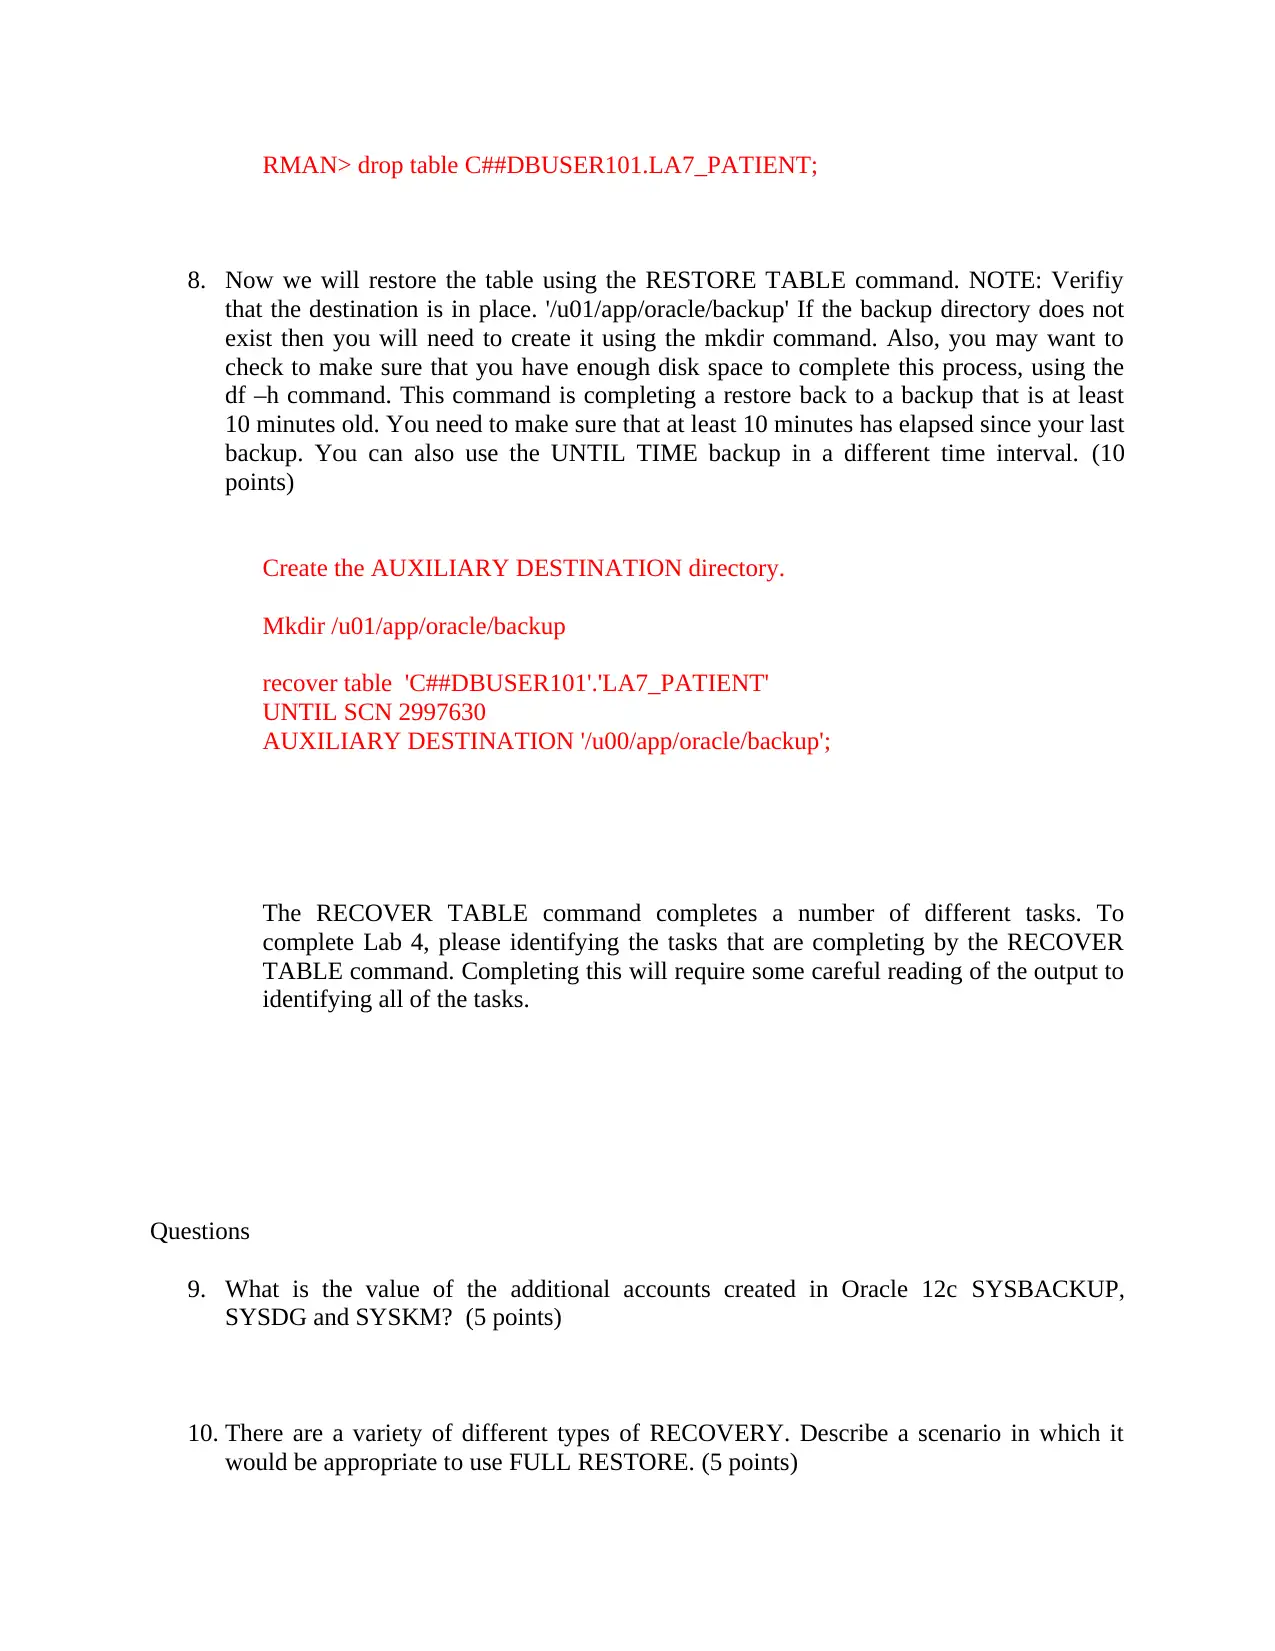
RMAN> drop table C##DBUSER101.LA7_PATIENT;
8. Now we will restore the table using the RESTORE TABLE command. NOTE: Verifiy
that the destination is in place. '/u01/app/oracle/backup' If the backup directory does not
exist then you will need to create it using the mkdir command. Also, you may want to
check to make sure that you have enough disk space to complete this process, using the
df –h command. This command is completing a restore back to a backup that is at least
10 minutes old. You need to make sure that at least 10 minutes has elapsed since your last
backup. You can also use the UNTIL TIME backup in a different time interval. (10
points)
Create the AUXILIARY DESTINATION directory.
Mkdir /u01/app/oracle/backup
recover table 'C##DBUSER101'.'LA7_PATIENT'
UNTIL SCN 2997630
AUXILIARY DESTINATION '/u00/app/oracle/backup';
The RECOVER TABLE command completes a number of different tasks. To
complete Lab 4, please identifying the tasks that are completing by the RECOVER
TABLE command. Completing this will require some careful reading of the output to
identifying all of the tasks.
Questions
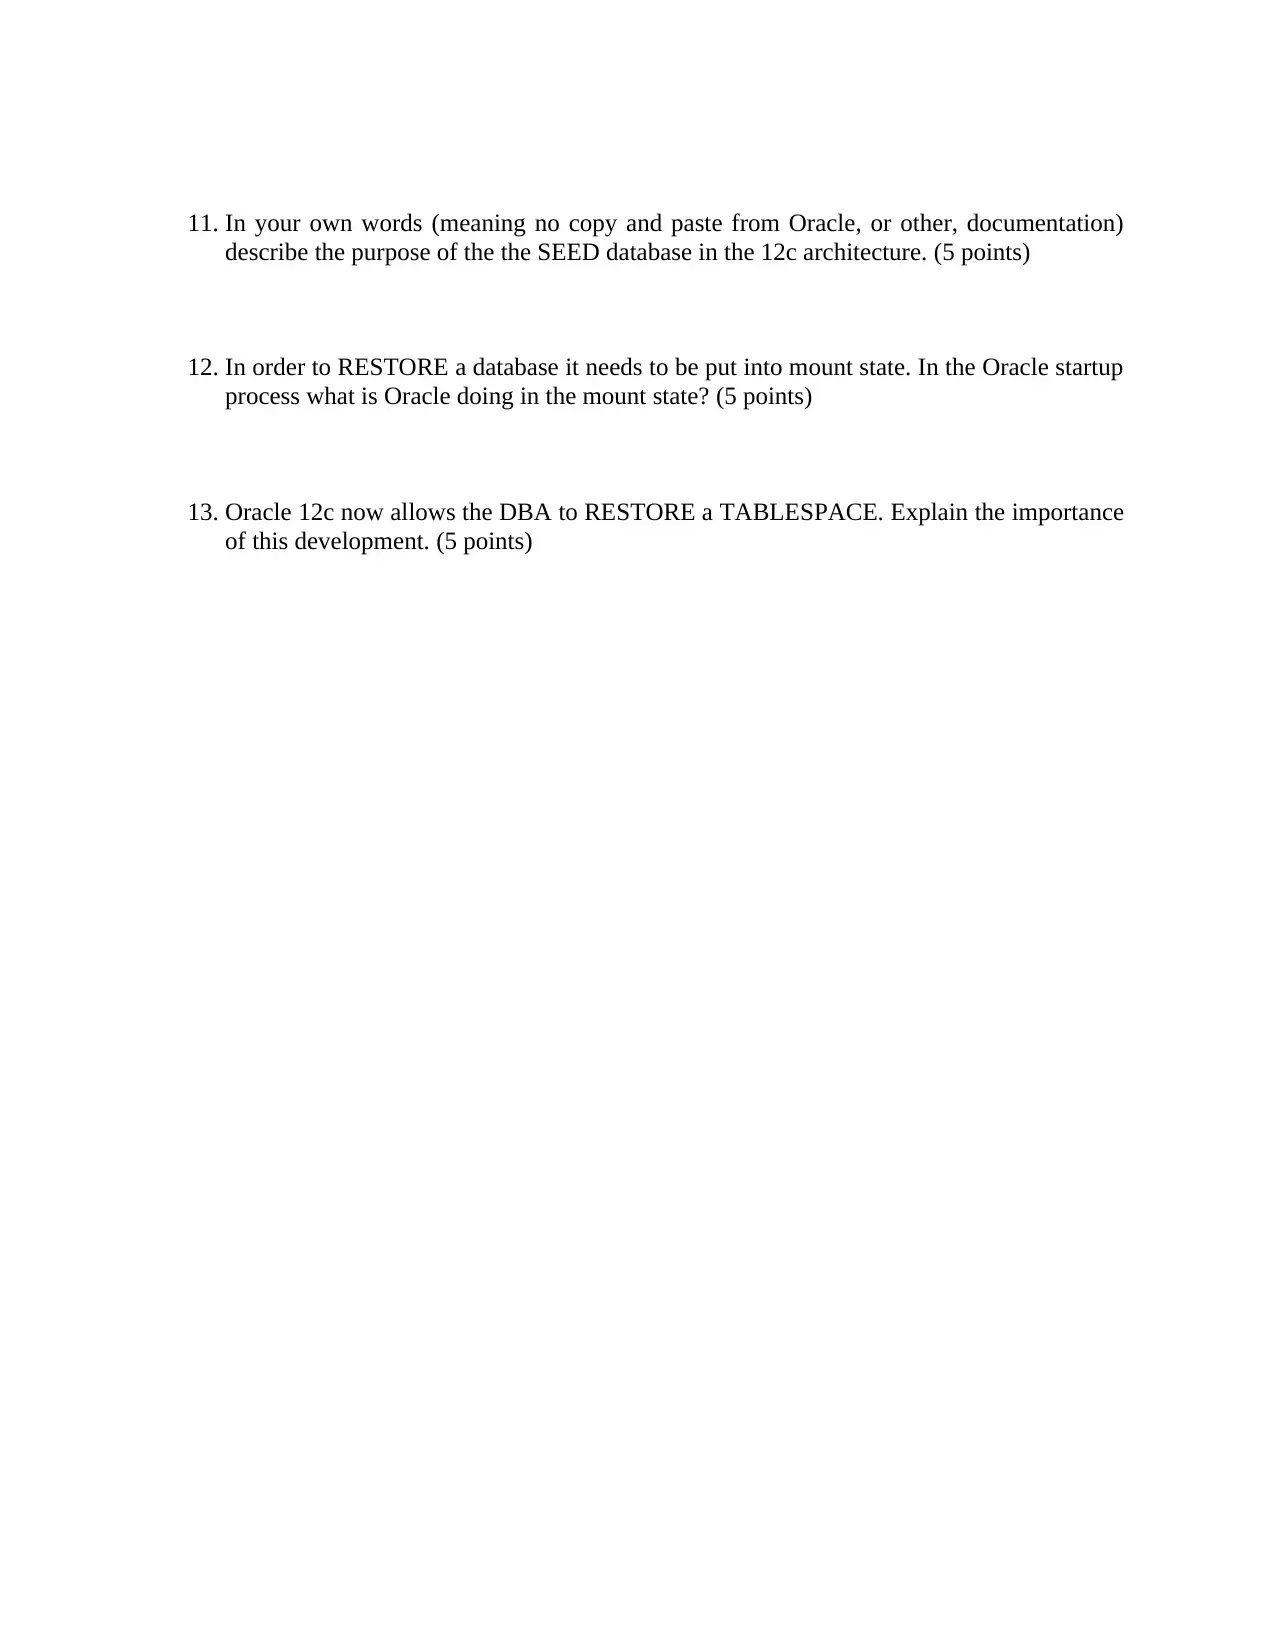
9. What is the value of the additional accounts created in Oracle 12c SYSBACKUP,
SYSDG and SYSKM? (5 points)
10. There are a variety of different types of RECOVERY. Describe a scenario in which it
would be appropriate to use FULL RESTORE. (5 points)
Document Page
11. In your own words (meaning no copy and paste from Oracle, or other, documentation)
describe the purpose of the the SEED database in the 12c architecture. (5 points)
12. In order to RESTORE a database it needs to be put into mount state. In the Oracle startup
process what is Oracle doing in the mount state? (5 points)
13. Oracle 12c now allows the DBA to RESTORE a TABLESPACE. Explain the importance
of this development. (5 points)

Secure Best Marks with AI Grader

Need help grading? Try our AI Grader for instant feedback on your assignments.
Document Page
1 out of 11
circle_padding
hide_on_mobile
zoom_out_icon
[object Object]

Your All-in-One AI-Powered Toolkit for Academic Success.

Available 24*7 on WhatsApp / Email

[object Object]