CSE3BDC Assignment: Cloudera, Hive, Impala, and Data Processing

Verified

Added on  2022/11/13

|25
|2909
|245
Practical Assignment
AI Summary
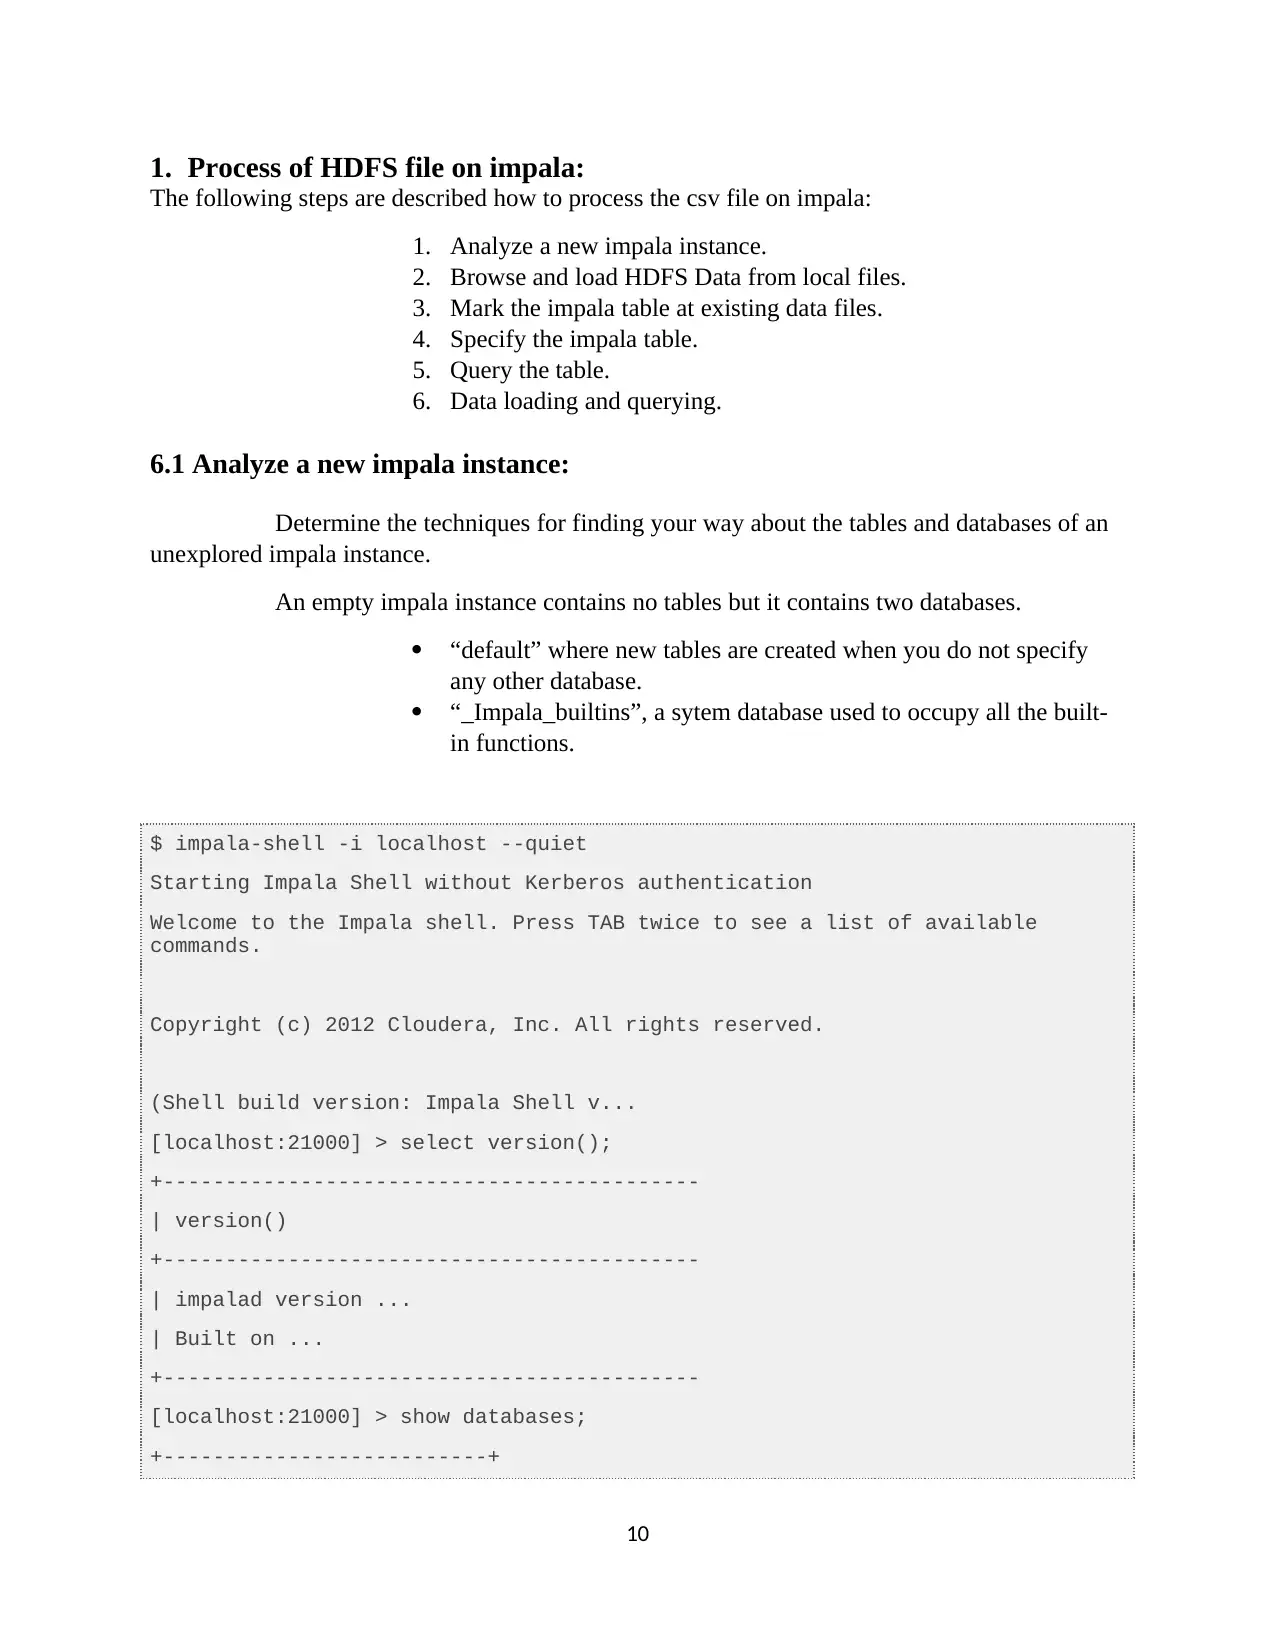
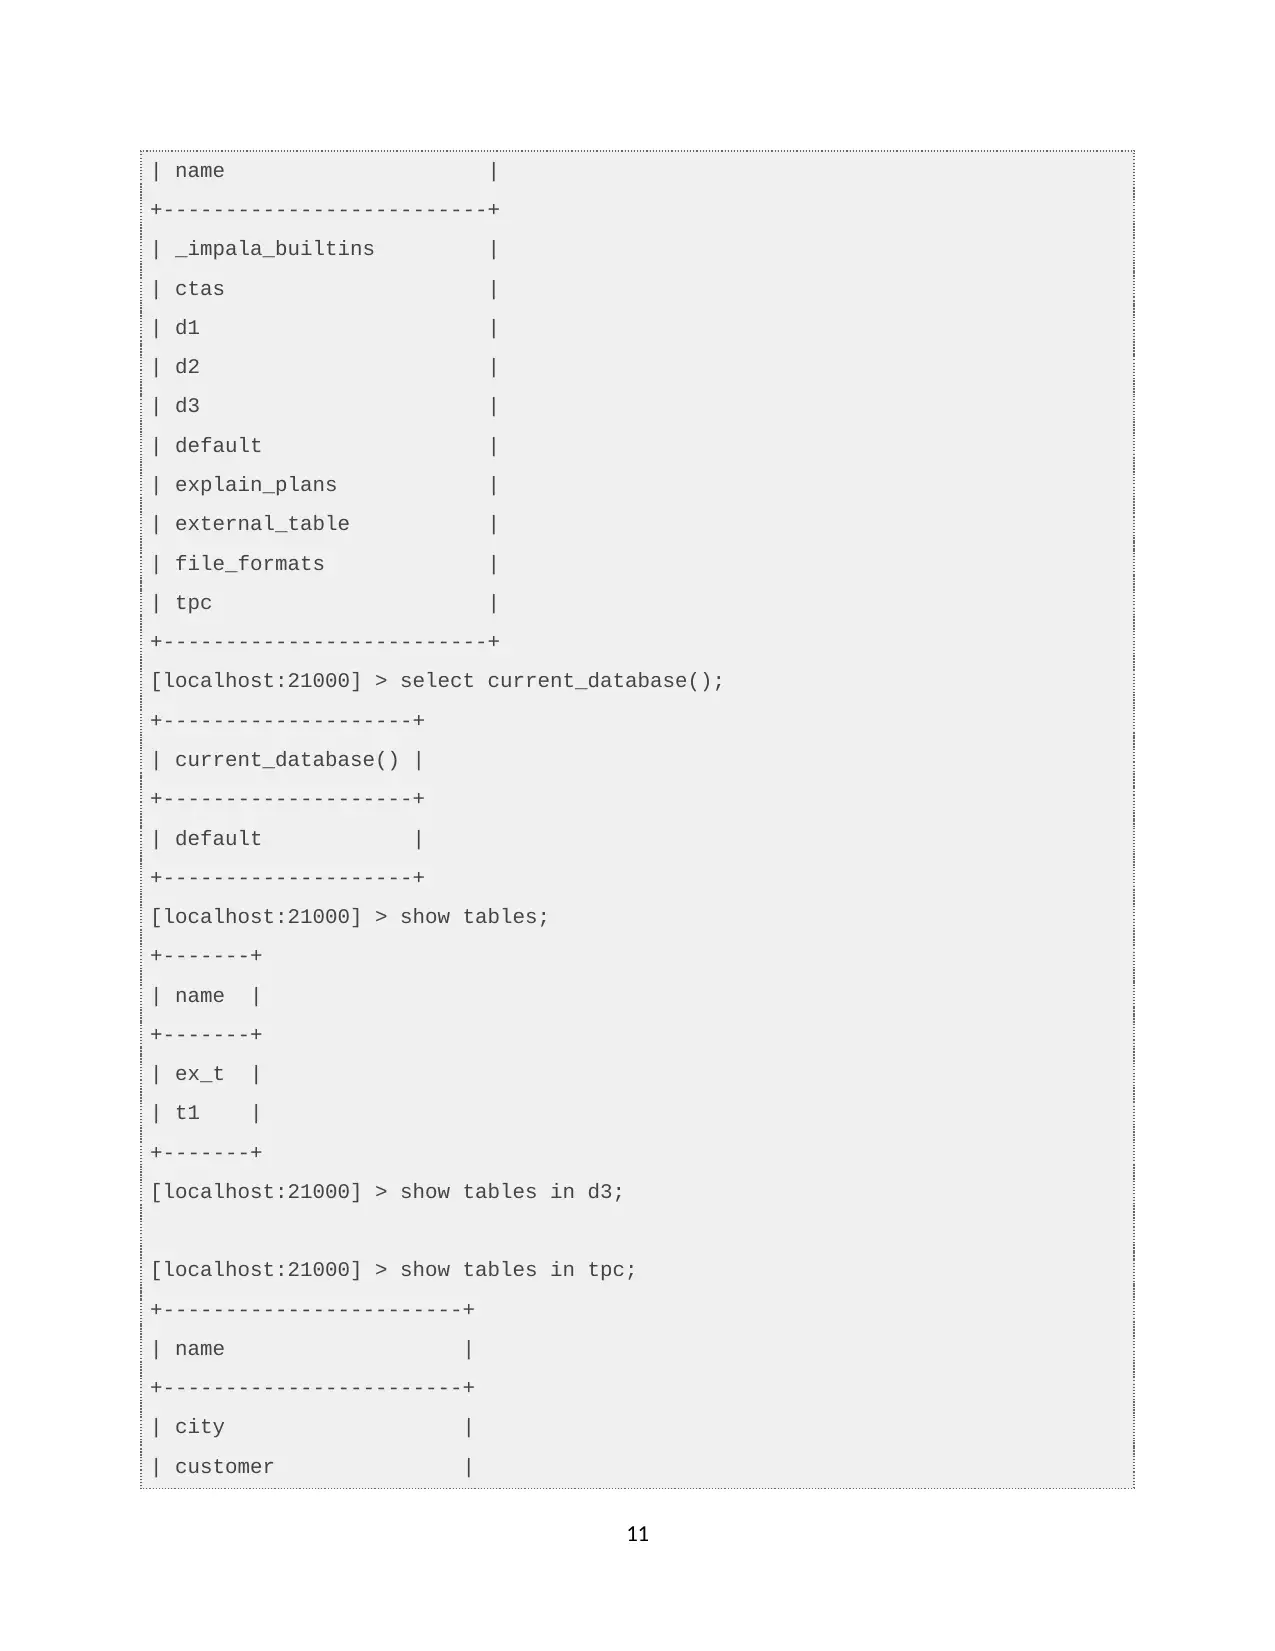
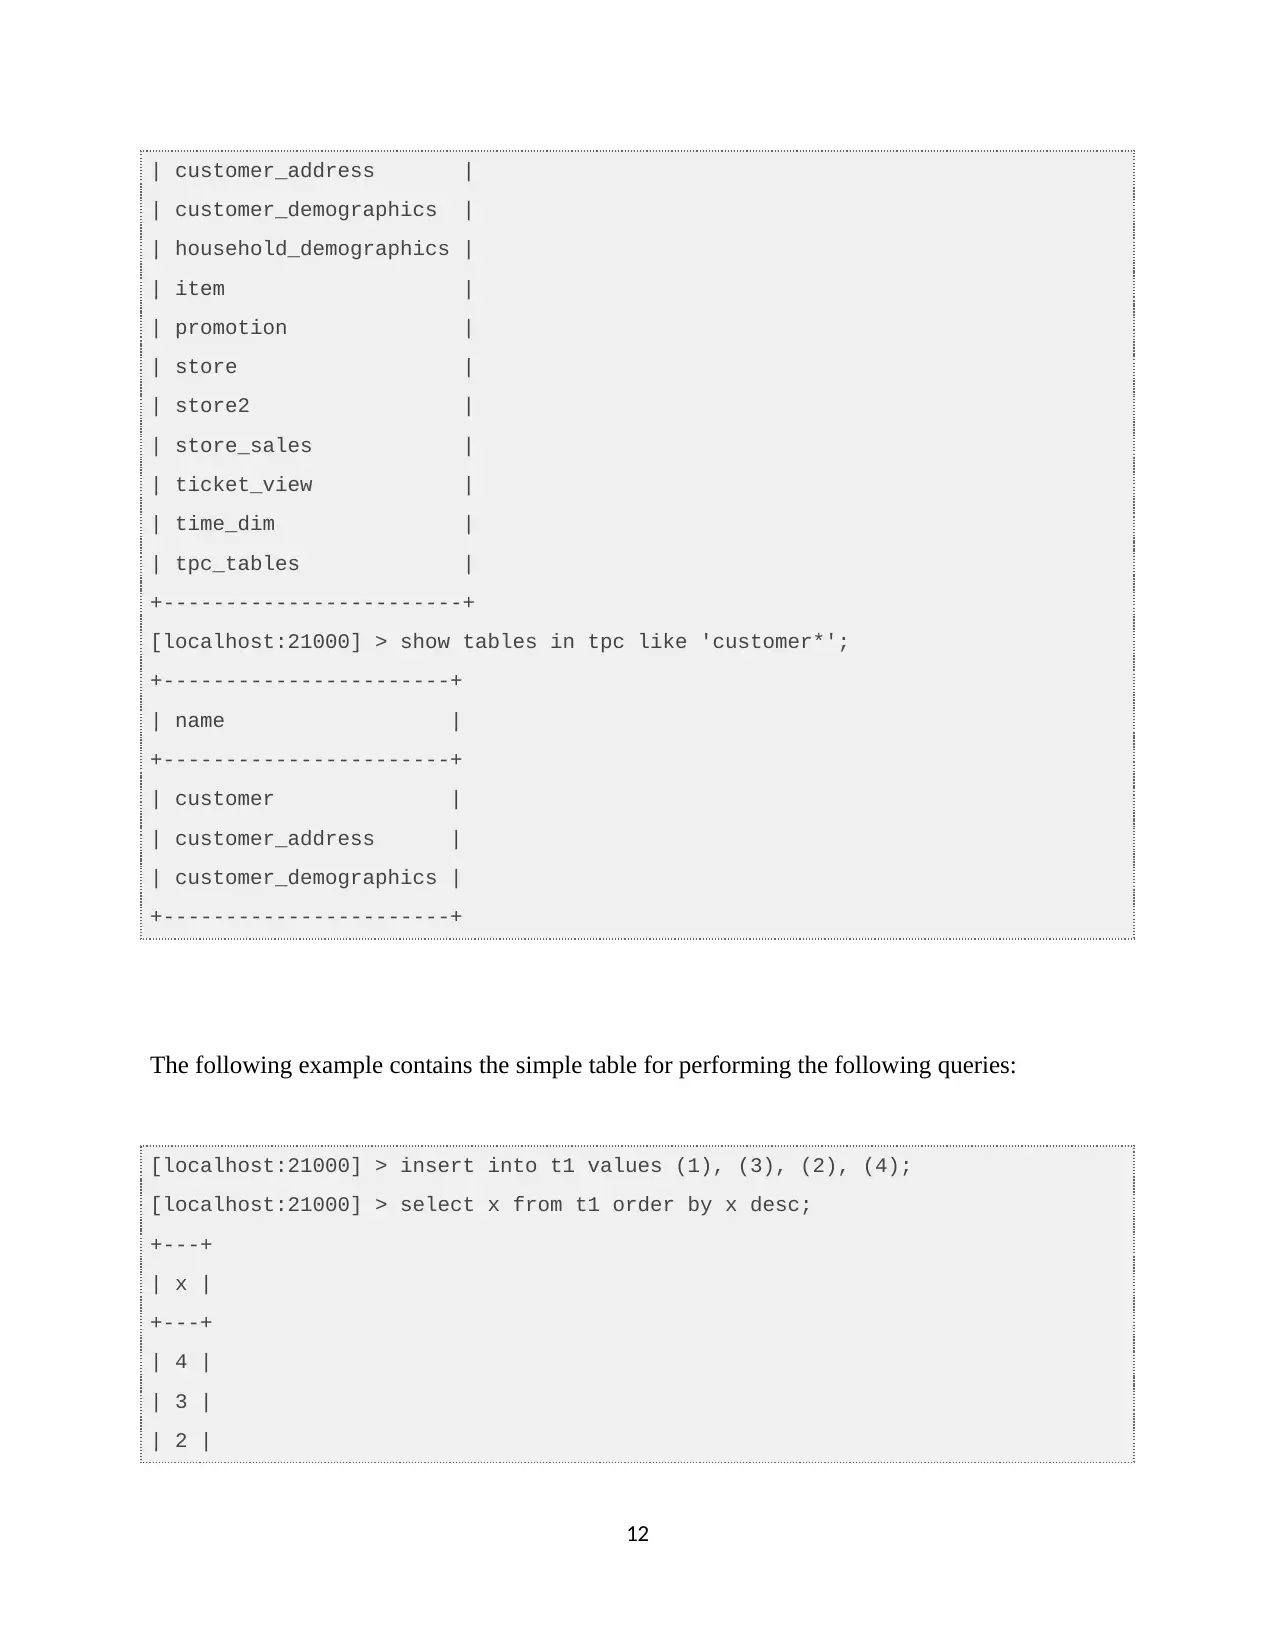
This assignment provides a comprehensive guide to installing and utilizing Cloudera QuickStart on VMware, followed by detailed instructions on processing data using Impala and Hive. The process includes downloading and setting up Cloudera, configuring VMware, and launching the Cloudera Manager. The assignment then dives into Impala, demonstrating how to analyze an instance, browse and load HDFS data, mark Impala tables, specify tables, and execute queries. The document provides code snippets for common Impala operations, including inserting, selecting, and aggregating data. Furthermore, it covers the creation of databases and tables in Hive, along with the loading of CSV data and querying using HiveQL. The document also includes a section on data loading and querying, including examples of inserting data, examining table contents, and performing aggregate and join operations. Finally, the assignment concludes with references to relevant research papers and resources for further study.
Document Page
1. Installing & getting started with Cloudera QuickStart on VMWare
Install VMware for windows
1. Using the https://my.vmware.com/web/vmware/free link for download the VMware. And
we select the VMware Workstation player.
2. Downloaded VMware is installed by double clicking on the downloaded ".exe" file.
System automatically restarts when we install the VMware.
Install Cloudera for VMWare
1. Download the Cloudera quick start from the
"https://www.cloudera.com/downloads/quickstart_vms/5-12.html".
1
tabler-icon-diamond-filled.svg

Paraphrase This Document

Need a fresh take? Get an instant paraphrase of this document with our AI Paraphraser
Document Page
2. Fill the form and download the "zip" file.
3. Extract the zip file.
2
Document Page
4. Open the installed VMware Workstation Plyer. And Select “cloudera-quickstart-vm-
5.12.0-0-vmware.vmx” to open a virtual machine.
5. Click the edit settings and allocate RAM size as "8GB" and "2 CPU cores".Go to
start-->run and type “msinfo32.exe” to find the information of our window systems.
3
Document Page
6. Click play.
4
tabler-icon-diamond-filled.svg

Paraphrase This Document

Need a fresh take? Get an instant paraphrase of this document with our AI Paraphraser
Document Page
7. we will see the below screen,If it has started.
5
Document Page
8. Click Launch Cloudera Express.
6
Document Page
9. Login to the Cloudera manager by username and password and start all the services.
10. Click on Hue.
7
tabler-icon-diamond-filled.svg

Paraphrase This Document

Need a fresh take? Get an instant paraphrase of this document with our AI Paraphraser
Document Page
11. By using username and password we login to the hue.The impala is shown below.
8
Document Page
12. If we done the process on Impala,then logout the Hue and Cloudera manager.
9
Document Page
1. Process of HDFS file on impala:
The following steps are described how to process the csv file on impala:
1. Analyze a new impala instance.
2. Browse and load HDFS Data from local files.
3. Mark the impala table at existing data files.
4. Specify the impala table.
5. Query the table.
6. Data loading and querying.
6.1 Analyze a new impala instance:
Determine the techniques for finding your way about the tables and databases of an
unexplored impala instance.
An empty impala instance contains no tables but it contains two databases.
“default” where new tables are created when you do not specify
any other database.
“_Impala_builtins”, a sytem database used to occupy all the built-
in functions.
$ impala-shell -i localhost --quiet
Starting Impala Shell without Kerberos authentication
Welcome to the Impala shell. Press TAB twice to see a list of available
commands.
Copyright (c) 2012 Cloudera, Inc. All rights reserved.
(Shell build version: Impala Shell v...
[localhost:21000] > select version();
+-------------------------------------------
| version()
+-------------------------------------------
| impalad version ...
| Built on ...
+-------------------------------------------
[localhost:21000] > show databases;
+--------------------------+
10
tabler-icon-diamond-filled.svg

Paraphrase This Document

Need a fresh take? Get an instant paraphrase of this document with our AI Paraphraser
Document Page
| name |
+--------------------------+
| _impala_builtins |
| ctas |
| d1 |
| d2 |
| d3 |
| default |
| explain_plans |
| external_table |
| file_formats |
| tpc |
+--------------------------+
[localhost:21000] > select current_database();
+--------------------+
| current_database() |
+--------------------+
| default |
+--------------------+
[localhost:21000] > show tables;
+-------+
| name |
+-------+
| ex_t |
| t1 |
+-------+
[localhost:21000] > show tables in d3;
[localhost:21000] > show tables in tpc;
+------------------------+
| name |
+------------------------+
| city |
| customer |
11
Document Page
| customer_address |
| customer_demographics |
| household_demographics |
| item |
| promotion |
| store |
| store2 |
| store_sales |
| ticket_view |
| time_dim |
| tpc_tables |
+------------------------+
[localhost:21000] > show tables in tpc like 'customer*';
+-----------------------+
| name |
+-----------------------+
| customer |
| customer_address |
| customer_demographics |
+-----------------------+
The following example contains the simple table for performing the following queries:
[localhost:21000] > insert into t1 values (1), (3), (2), (4);
[localhost:21000] > select x from t1 order by x desc;
+---+
| x |
+---+
| 4 |
| 3 |
| 2 |
12
chevron_up_icon
1 out of 25
circle_padding
hide_on_mobile
zoom_out_icon
[object Object]