Setting up CentOS 7 Server with DNS, DHCP, Postfix, IMAP, and OSSSEC
VerifiedAdded on 2021/06/16
|15
|1663
|146
Practical Assignment
AI Summary
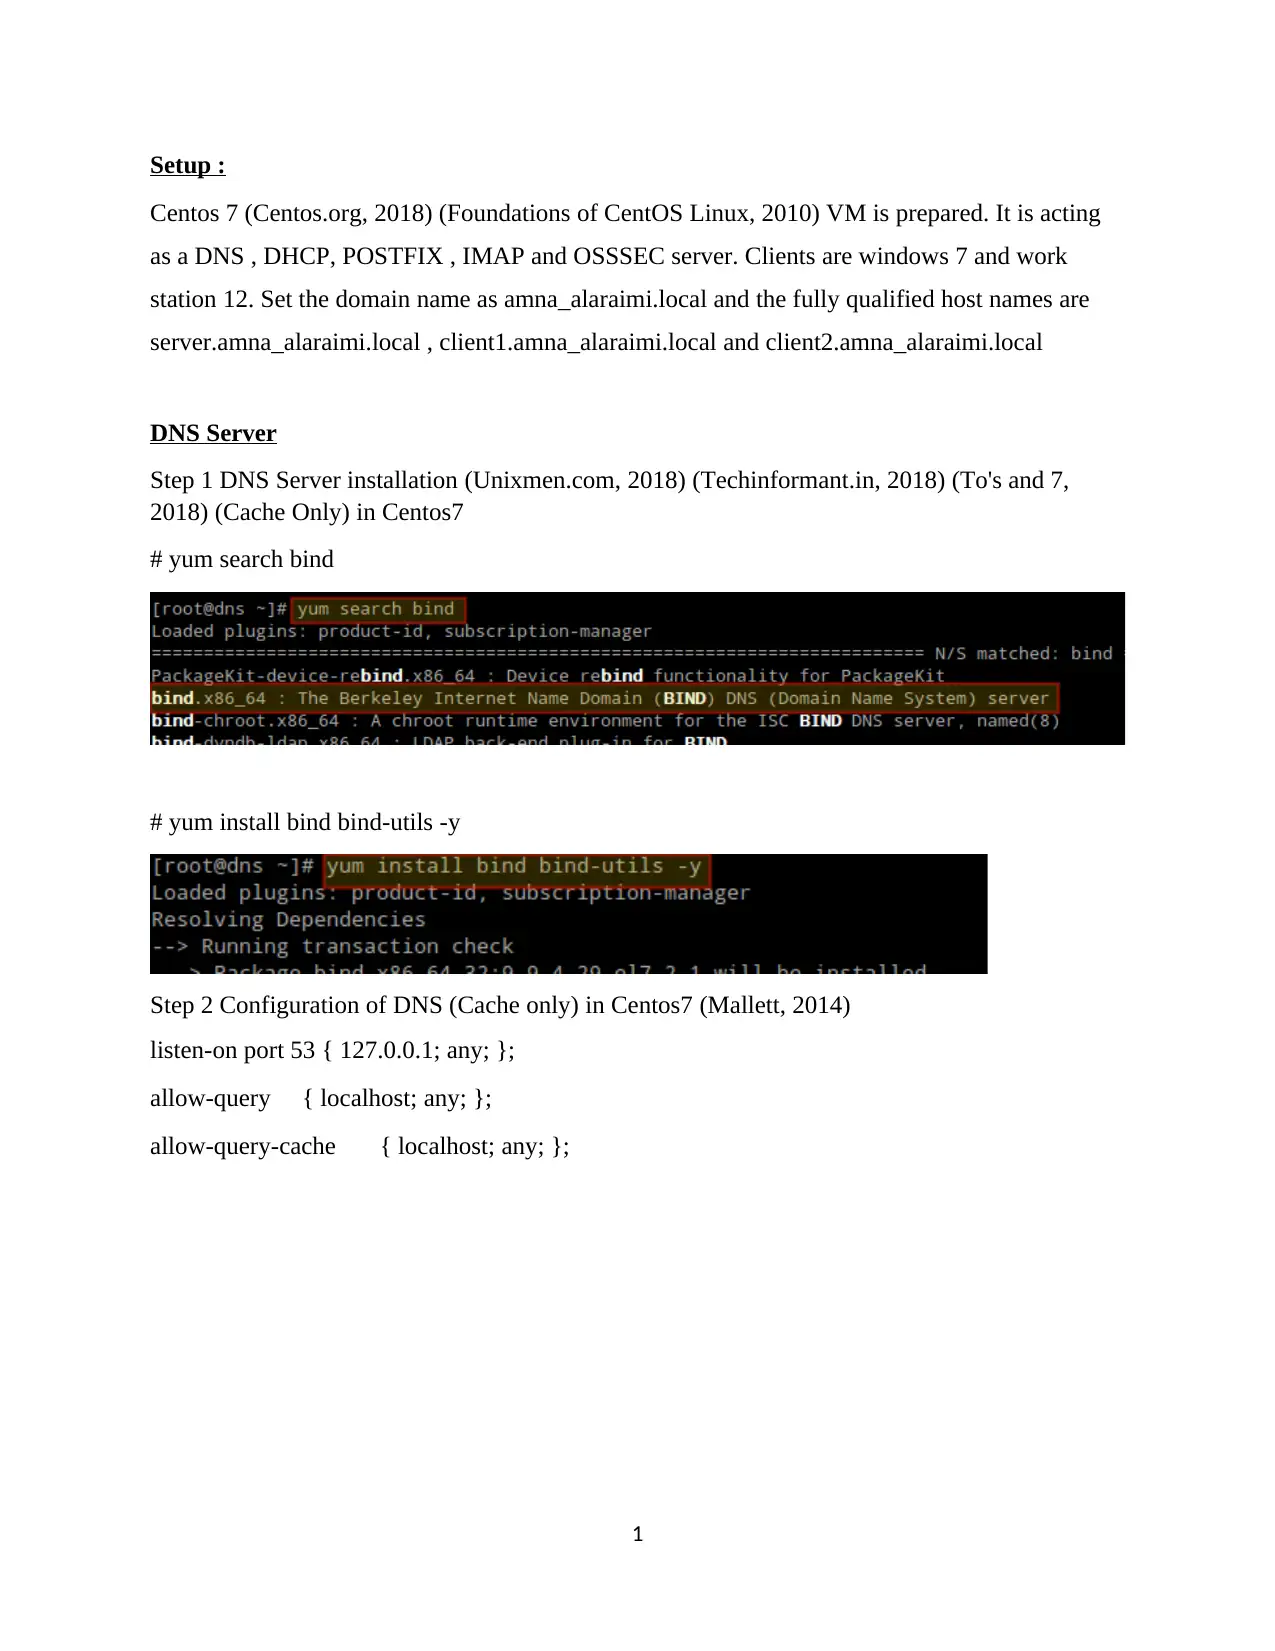
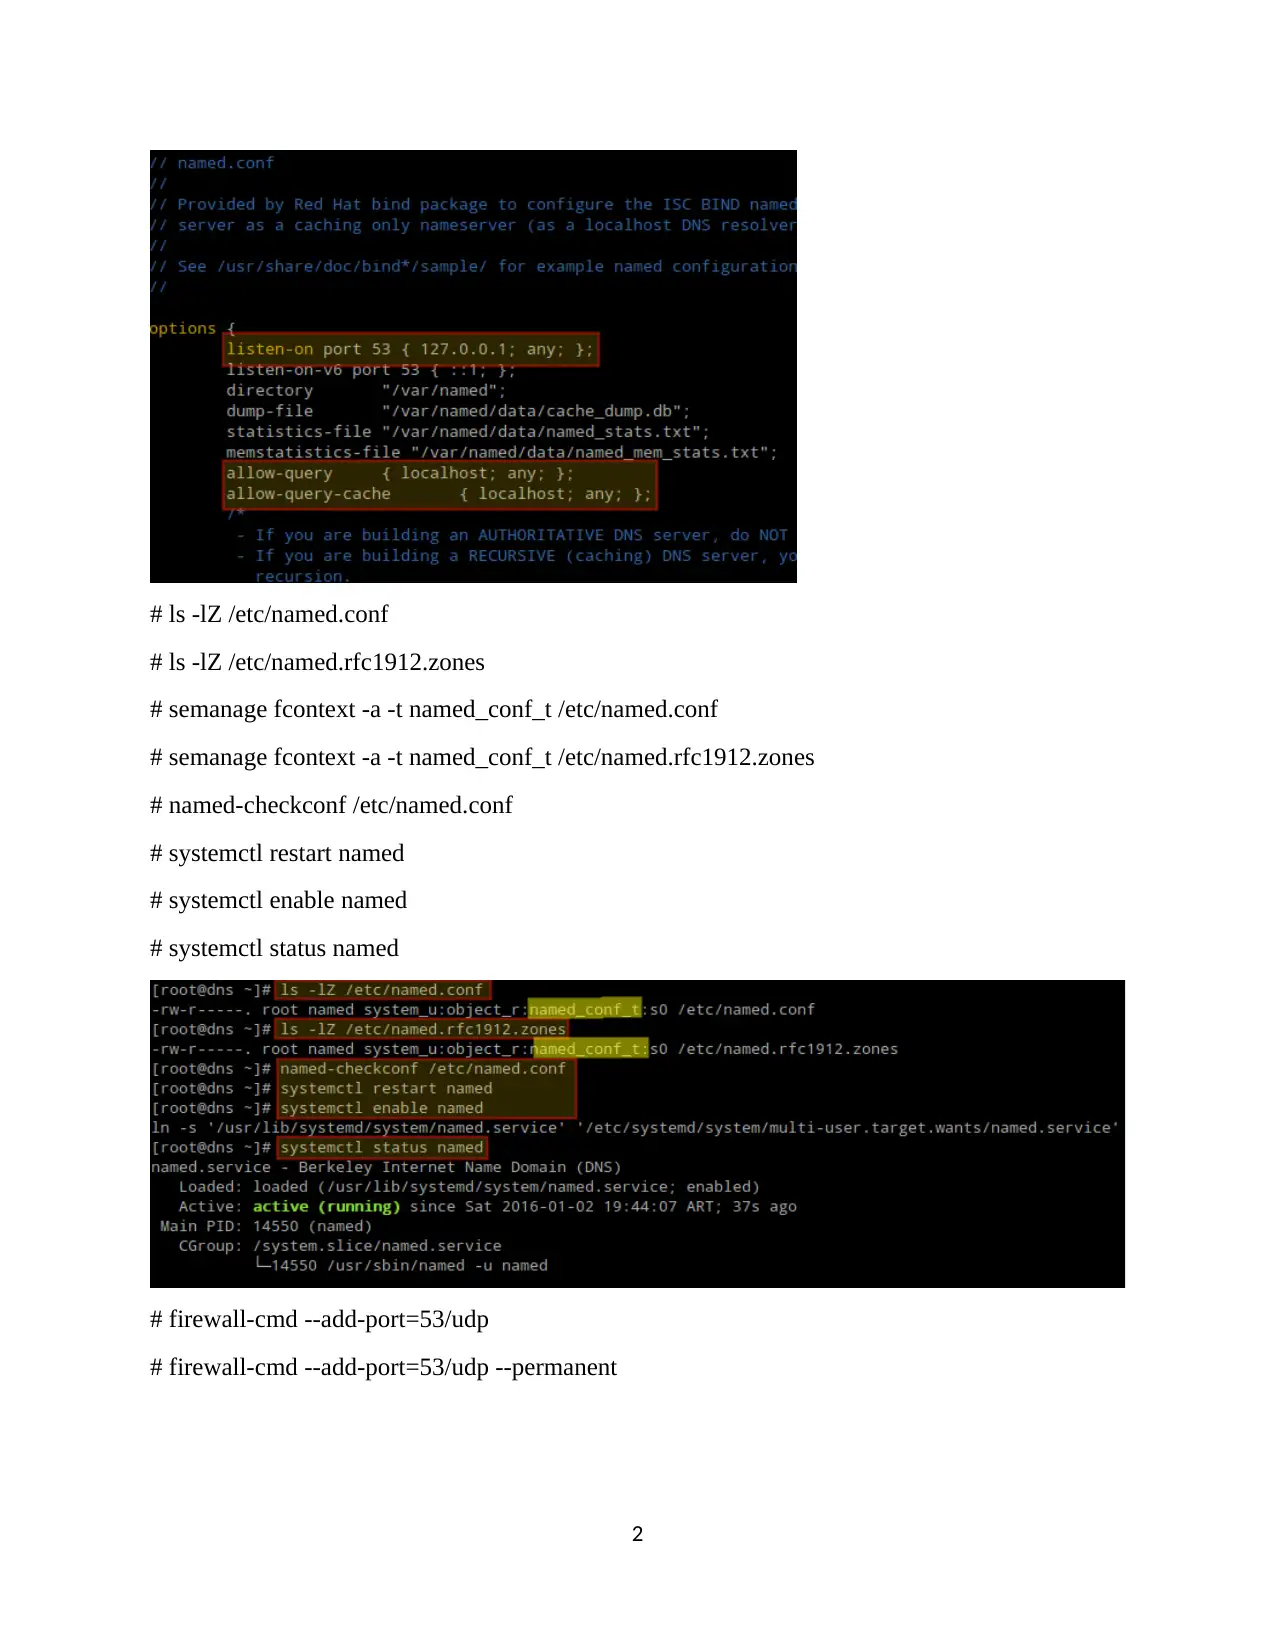
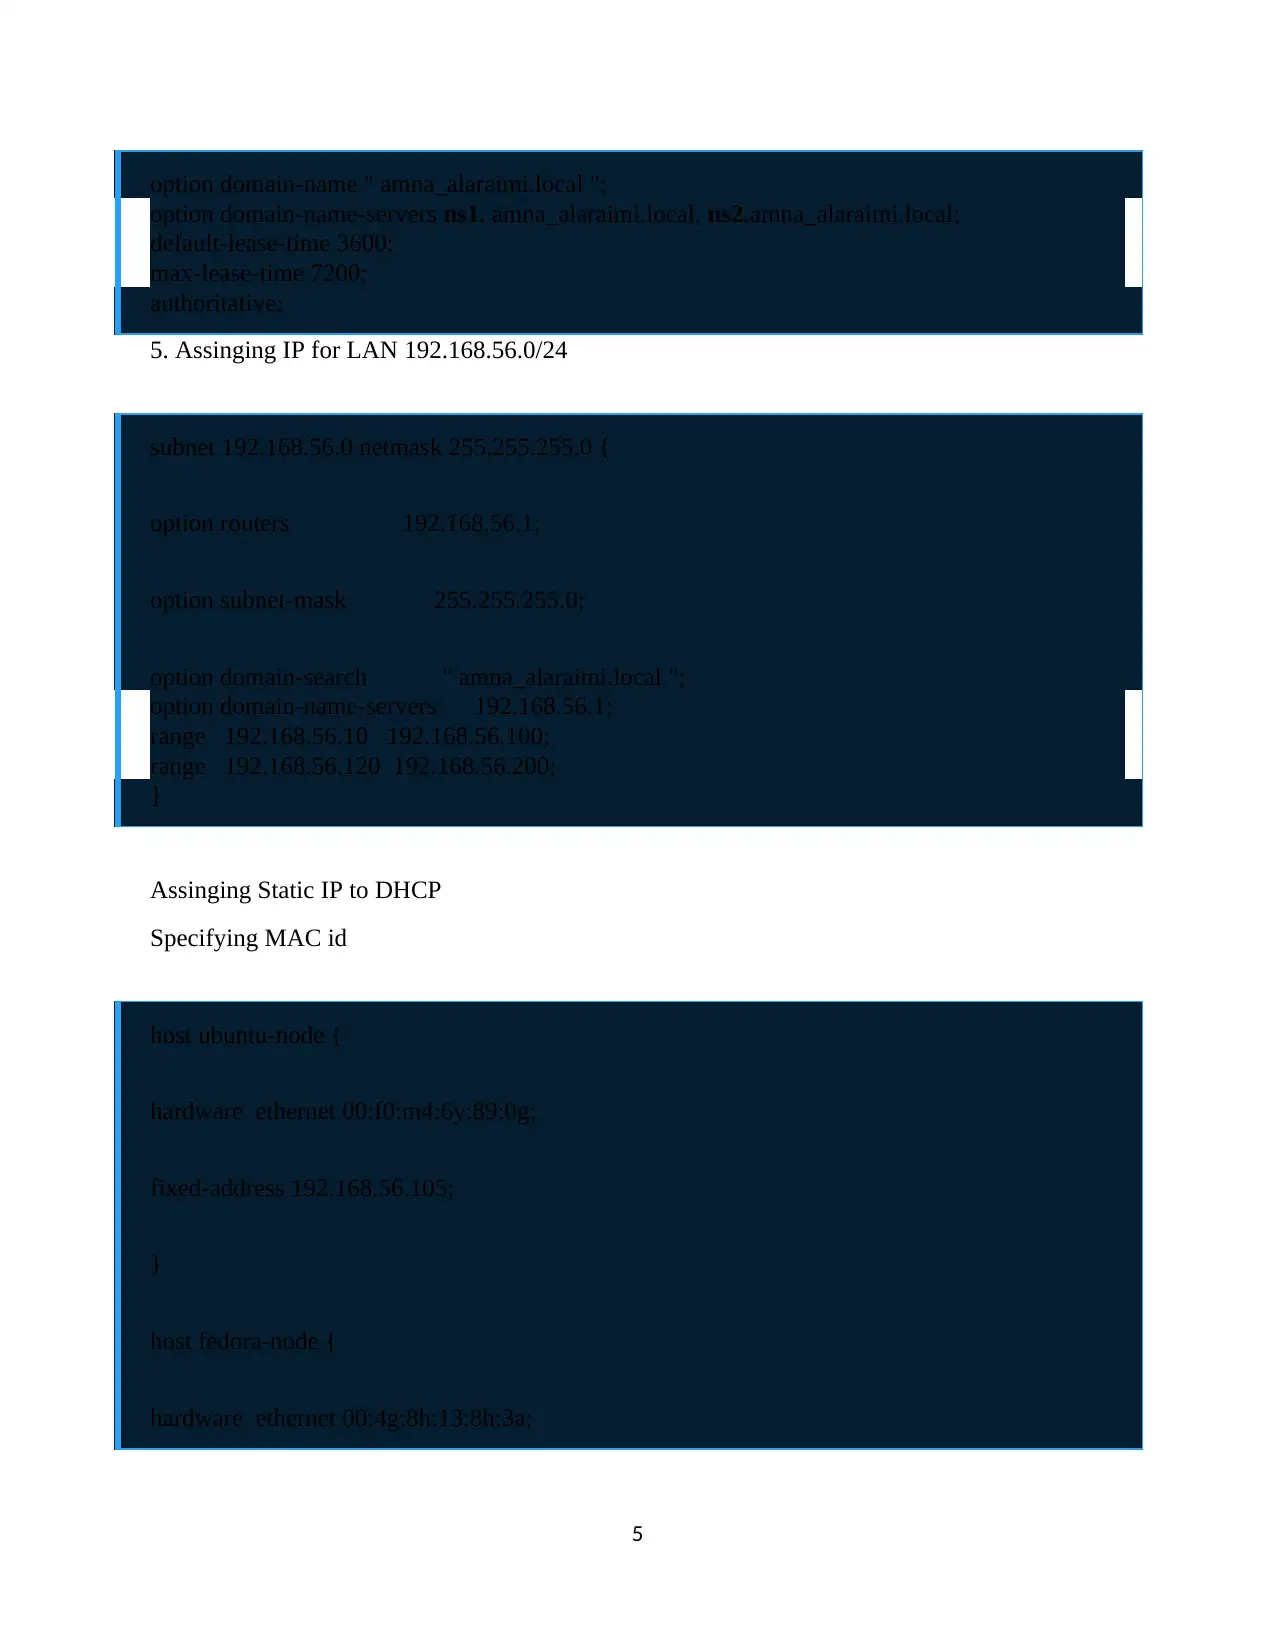
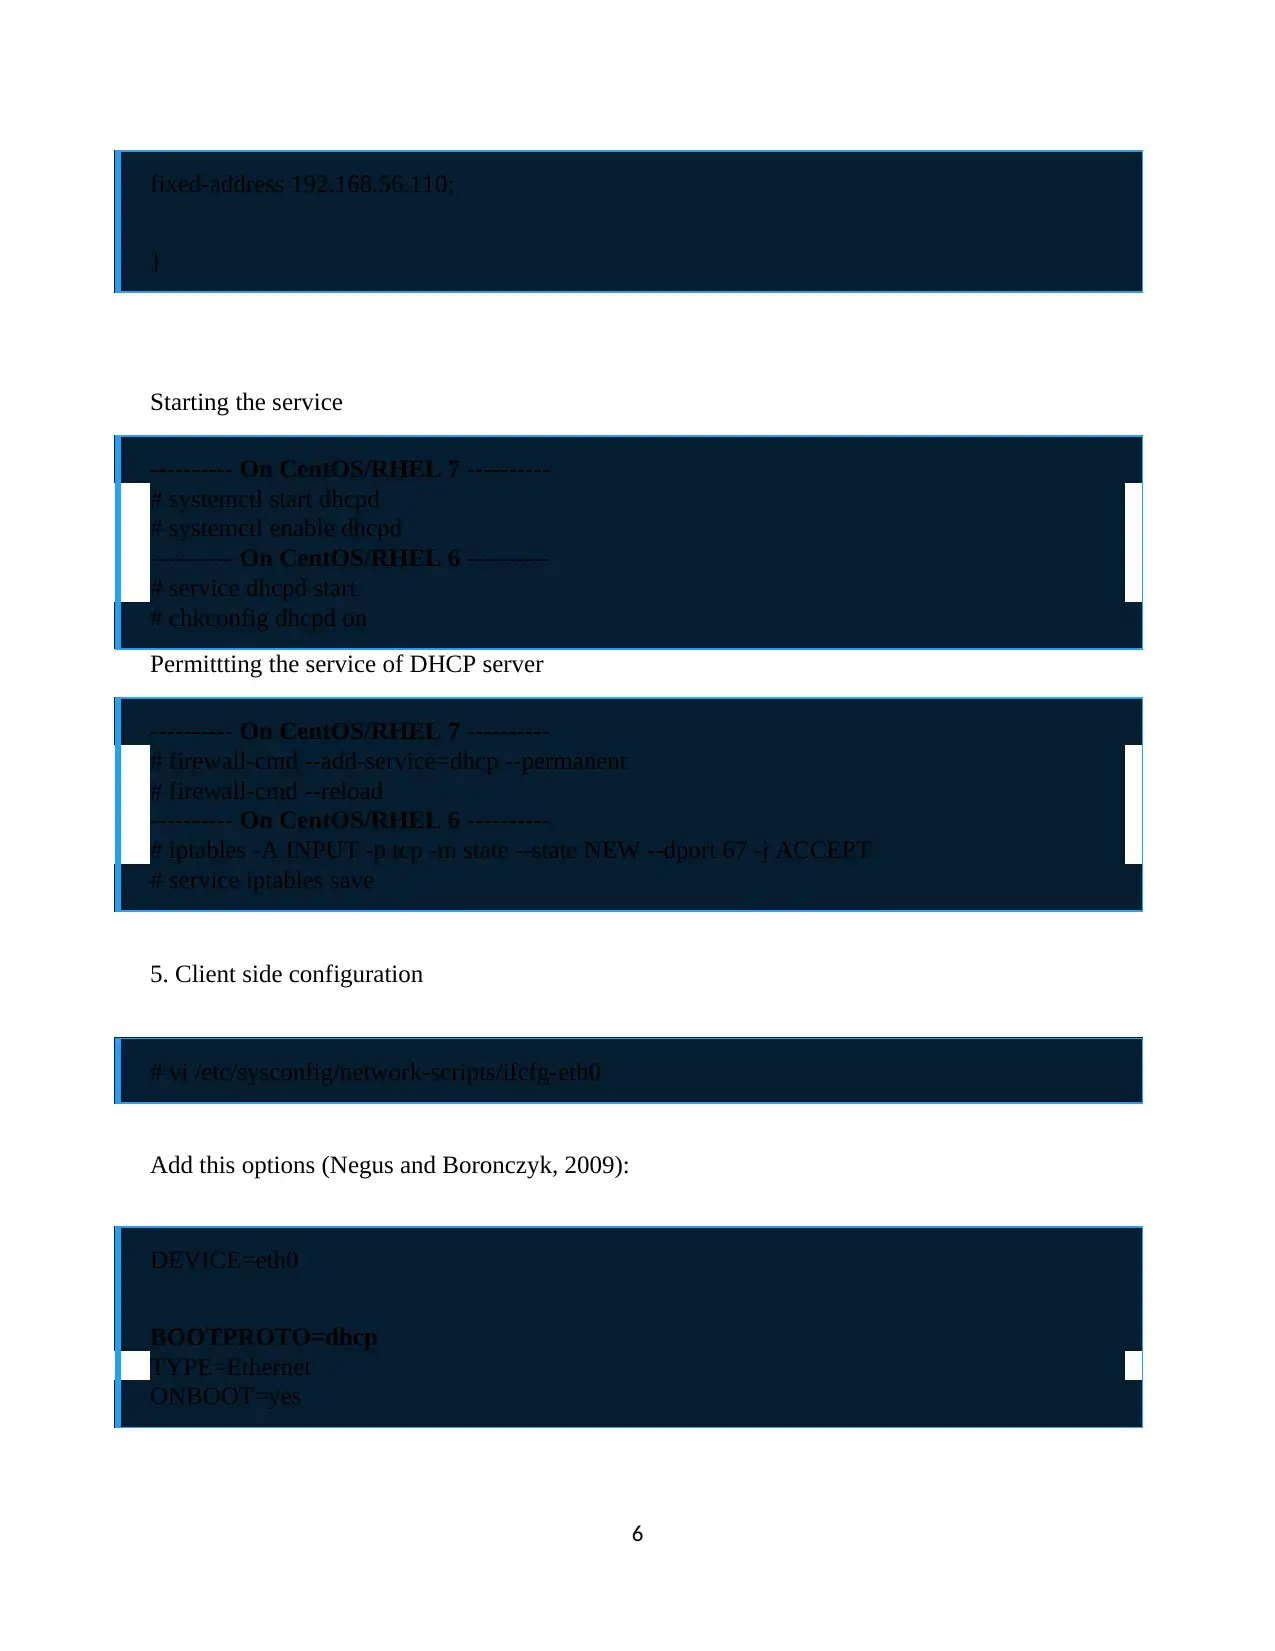
This assignment details the comprehensive setup of a CentOS 7 virtual machine, configured to function as a DNS, DHCP, Postfix, IMAP, and OSSSEC server. The document outlines the installation and configuration steps for each service, including the setup of a cache-only DNS server, a DHCP server for IP address assignment, a Postfix mail server, IMAP installation, and the implementation of OSSSEC for host-based intrusion detection. The assignment covers the configuration of domain names, hostnames, firewall rules, and client-side settings to ensure proper network and service functionality. References to relevant online resources and publications are included to support the setup process. The goal is to create a fully functional server environment with essential network and security services.
Contribute Materials
Your contribution can guide someone’s learning journey. Share your
documents today.

Setup :
Centos 7 (Centos.org, 2018) (Foundations of CentOS Linux, 2010) VM is prepared. It is acting
as a DNS , DHCP, POSTFIX , IMAP and OSSSEC server. Clients are windows 7 and work
station 12. Set the domain name as amna_alaraimi.local and the fully qualified host names are
server.amna_alaraimi.local , client1.amna_alaraimi.local and client2.amna_alaraimi.local
DNS Server
Step 1 DNS Server installation (Unixmen.com, 2018) (Techinformant.in, 2018) (To's and 7,
2018) (Cache Only) in Centos7
# yum search bind
# yum install bind bind-utils -y
Step 2 Configuration of DNS (Cache only) in Centos7 (Mallett, 2014)
listen-on port 53 { 127.0.0.1; any; };
allow-query { localhost; any; };
allow-query-cache { localhost; any; };
1
Secure Best Marks with AI Grader
Need help grading? Try our AI Grader for instant feedback on your assignments.

# ls -lZ /etc/named.conf
# ls -lZ /etc/named.rfc1912.zones
# semanage fcontext -a -t named_conf_t /etc/named.conf
# semanage fcontext -a -t named_conf_t /etc/named.rfc1912.zones
# named-checkconf /etc/named.conf
# systemctl restart named
# systemctl enable named
# systemctl status named
# firewall-cmd --add-port=53/udp
# firewall-cmd --add-port=53/udp --permanent
2

Step 3 ChRoot of DNS (Cache only) Server in centos 7
# yum install bind-chroot -y
# systemctl restart named
# ln -s /etc/named.conf /var/named/chroot/etc/named.conf
Step 4 Configuration of DNS (Cache only) in Client machine is done
# dig facebook.com
# nslookup facebook.com
3
# yum install bind-chroot -y
# systemctl restart named
# ln -s /etc/named.conf /var/named/chroot/etc/named.conf
Step 4 Configuration of DNS (Cache only) in Client machine is done
# dig facebook.com
# nslookup facebook.com
3

DHCP Server
Installing DHCP server in centOS 7 (Centos.org, 2018)
1.Executing the command
# yum -y install dhcp
And Trace the file location /etc/sysconfig/dhcpd for DHCPDARGS
DHCPDARGS=eth0
2.Configuring DHCP server
Setting path
/usr/share/doc/dhcp*/dhcpd.conf.sample
Two states defined
Parameters
Declarations
Configuration:
# cp /usr/share/doc/dhcp-4.2.5/dhcpd.conf.example /etc/dhcp/dhcpd.conf
4.verify our DHCP server
# vi /etc/dhcp/dhcpd.conf
Checking parameters
4
Secure Best Marks with AI Grader
Need help grading? Try our AI Grader for instant feedback on your assignments.

option domain-name " amna_alaraimi.local ";
option domain-name-servers ns1. amna_alaraimi.local, ns2.amna_alaraimi.local;
default-lease-time 3600;
max-lease-time 7200;
authoritative;
5. Assinging IP for LAN 192.168.56.0/24
subnet 192.168.56.0 netmask 255.255.255.0 {
option routers 192.168.56.1;
option subnet-mask 255.255.255.0;
option domain-search " amna_alaraimi.local ";
option domain-name-servers 192.168.56.1;
range 192.168.56.10 192.168.56.100;
range 192.168.56.120 192.168.56.200;
}
Assinging Static IP to DHCP
Specifying MAC id
host ubuntu-node {
hardware ethernet 00:f0:m4:6y:89:0g;
fixed-address 192.168.56.105;
}
host fedora-node {
hardware ethernet 00:4g:8h:13:8h:3a;
5

fixed-address 192.168.56.110;
}
Starting the service
---------- On CentOS/RHEL 7 ----------
# systemctl start dhcpd
# systemctl enable dhcpd
---------- On CentOS/RHEL 6 ----------
# service dhcpd start
# chkconfig dhcpd on
Permittting the service of DHCP server
---------- On CentOS/RHEL 7 ----------
# firewall-cmd --add-service=dhcp --permanent
# firewall-cmd --reload
---------- On CentOS/RHEL 6 ----------
# iptables -A INPUT -p tcp -m state --state NEW --dport 67 -j ACCEPT
# service iptables save
5. Client side configuration
# vi /etc/sysconfig/network-scripts/ifcfg-eth0
Add this options (Negus and Boronczyk, 2009):
DEVICE=eth0
BOOTPROTO=dhcp
TYPE=Ethernet
ONBOOT=yes
6

Client side changing the desktop setting of GUI (Hobson, n.d.)
7
7
Paraphrase This Document
Need a fresh take? Get an instant paraphrase of this document with our AI Paraphraser

POSTFIX Installation
Step 1 – Install Postfix
Command for Install Postfix (Biswas and Biswas, 2018)
# yum remove sendmail
# yum install postfix
The following command used to make postfix as a default MTA
# alternatives --set mta /usr/sbin/postfix
Use the following command unless the above commant not work properly
# alternatives --set mta /usr/sbin/sendmail.postfix
Step 2 – Configure Postfix
If you want to edit Postfix configuration file use /etc/postfix/main.cf
myhostname = mail.tecadmin.net
mydomain = tecadmin.net
myorigin = $mydomain
inet_interfaces = all
8

mydestination = $myhostname, localhost, $mydomain
mynetworks = 127.0.0.0/8, /32
relay_domains = $mydestination
home_mailbox = Maildir/
Step 3 – Restart Postfix Service
After completing basic Postfix configuration, we have to restart Postfix service to read changes
of configuration. Finally configure to autostart on system boot.
# service postfix restart
# chkconfig postfix on
Step 4 – Open Firewall Port
The following command used to add firewall rules to make postfix accessible from outside.
# iptables -A INPUT -m state --state NEW -m tcp -p tcp --dport 25 -j ACCEPT
# iptables -A INPUT -m state --state NEW -m udp -p udp --dport 25 -j ACCEPT
9

IMAP installation
Enter the following command to install IMAP in centos 7 in command line (Electric Toolbox,
2018)
sudo yum install php-imap
After that you got a output as shown below
Then you need to enter “y” for proceed the further installation process
After that you can access functions of IMAP through the command line, if you need to access the
web based functions there is a need of restarting Apache
10
Secure Best Marks with AI Grader
Need help grading? Try our AI Grader for instant feedback on your assignments.

Installing OSSSEC HIDS
Setting up the for initial setup (Vultr, 2018)
ssh -l joe server-ip-address
Defining packages
sudo yum install -y gcc inotify-tools
Checking OSSSEC
Downloading tarball:
wget -U ossec http://www.ossec.net/files/ossec-hids-2.8.2.tar.gz
For checksum:
wget -U ossec http://www.ossec.net/files/ossec-hids-2.8.2-checksum.txt
This step is to verify the MD5 and SHA1 checksums of the tarball:
md5sum -c ossec-hids-2.8.2-checksum.txt
Expected output is:
ossec-hids-2.8.2.tar.gz: OK
md5sum: WARNING: 1 line is improperly formatted
To verify the SHA1 hash:
sha1sum -c ossec-hids-2.8.2-checksum.txt
And its expected output is:
ossec-hids-2.8.2.tar.gz: OK
11

sha1sum: WARNING: 1 line is improperly formatted
Install OSSSEC
Unpack tarball
tar xf ossec-hids-2.8.2.tar.gz
unpack directory
nano active-response/hosts-deny.sh
EndofFile
# Deleting from hosts.deny
elif [ "x$" = "xdelete" ]; then
lock;
TMP_FILE = `mktemp /var/ossec/ossec-hosts.XXXXXXXXXX`
if [ "X$" = "X" ]; then
# Cheap fake tmpfile, but should be harder then no random data
TMP_FILE = "/var/ossec/ossec-hosts.`cat /dev/urandom | tr -dc 'a-zA-Z0-9' | fold -w 32 |
head -1 `"
fi
TMP_FILE
elif [ "x$" = "xdelete" ]; then
lock;
12

TMP_FILE=`mktemp /var/ossec/ossec-hosts.XXXXXXXXXX`
if [ "X$" = "X" ]; then
# Cheap fake tmpfile, but should be harder then no random data
TMP_FILE="/var/ossec/ossec-hosts.`cat /dev/urandom | tr -dc 'a-zA-Z0-9' | fold -w 32 | head
-1 `"
fi
Install state
sudo ./install.sh
Question and Answers doing installation:
1- What kind of installation do you want (server, agent, local, hybrid or help)? local
3- Configuring the OSSEC HIDS.
3.1- Do you want e-mail notification? (y/n) [y]:
- What's your e-mail address? you@ amna_alaraimi.local
- What's your SMTP server ip/host?
- Configuration finished properly.
More information can be found at http://www.ossec.net
--- Press ENTER to finish (maybe more information below). ---
Start Execution of OSSSEC
nano /var/ossec/etc/ossec.conf
<global>
13
Paraphrase This Document
Need a fresh take? Get an instant paraphrase of this document with our AI Paraphraser

<email_notification>yes</email_notification>
<email_to>finid@vivaldi.net</email_to>
<smtp_server>mail.vivaldi.net.</smtp_server>
<email_from>ossecm@vultr.guest</email_from>
</global>
Email form validation
<syscheck>
<!-- Frequency that syscheck is executed - default to every 22 hours -->
<frequency>79200</frequency>
<syscheck>
<!-- Frequency that syscheck is executed - default to every 22 hours -->
<frequency>79200</frequency>
<alert_new_files>yes</alert_new_files>
Modify
<directories report_changes="yes" realtime="yes"
check_all="yes">/etc,/usr/bin,/usr/sbin</directories>
<directories report_changes="yes" realtime="yes" check_all="yes">/bin,/sbin</directories>
14

References
Alibi, M. and Roy, B. (2016). Mastering CentOS 7 Linux Server. Birmingham: Packt Publishing,
Limited.
Biswas, L. and Biswas, L. (2018). How to Setup an Email Server on CentOS 7. [online]
Hostpresto.com. Available at: https://hostpresto.com/community/tutorials/how-to-setup-an-
email-server-on-centos7/ [Accessed 4 May 2018].
Centos.org. (2018). Download CentOS. [online] Available at: https://www.centos.org/download/
[Accessed 4 May 2018].
Centos.org. (2018). 20.3. Configuring a DHCP Client. [online] Available at:
https://www.centos.org/docs/5/html/Deployment_Guide-en-US/s1-dhcp-configuring-
client.html [Accessed 4 May 2018].
Electric Toolbox. (2018). Install PHP IMAP on CentOS. [online] Available at:
https://www.electrictoolbox.com/install-php-imap-centos/ [Accessed 4 May 2018].
Foundations of CentOS Linux. (2010). Apress.
Hobson, J. (n.d.). Troubleshooting CentOS.
Mallett, A. (2014). CentOS System Administration Essentials. Birmingham: Packt Publishing.
Negus, C. and Boronczyk, T. (2009). CentOS. Hoboken: Wiley [Imprint].
Techinformant.in. (2018). [online] Available at: https://www.techinformant.in/dns-server-
configuration-on-rhelcentos-7/ [Accessed 4 May 2018].
To's, H. and 7, C. (2018). Configure DNS (BIND) Server on CentOS 7 / RHEL 7. [online]
ITzGeek -. Available at: https://www.itzgeek.com/how-tos/linux/centos-how-tos/configure-
dns-bind-server-on-centos-7-rhel-7.html [Accessed 4 May 2018].
Unixmen.com. (2018). Setting Up DNS Server On CentOS 7 | Unixmen. [online] Available at:
https://www.unixmen.com/setting-dns-server-centos-7/ [Accessed 4 May 2018].
Vultr. (2018). Vultr: High Performance SSD Cloud.. [online] Available at:
https://www.vultr.com/docs/how-to-install-ossec-hids-on-a-centos-7-server [Accessed 4
May 2018].
15
1 out of 15

Your All-in-One AI-Powered Toolkit for Academic Success.
+13062052269
info@desklib.com
Available 24*7 on WhatsApp / Email
Unlock your academic potential
© 2024 | Zucol Services PVT LTD | All rights reserved.