ABC IT Company: Centralized User Authentication and Server Project

Verified

Added on  2020/04/01

|17
|2371
|296
Project
AI Summary
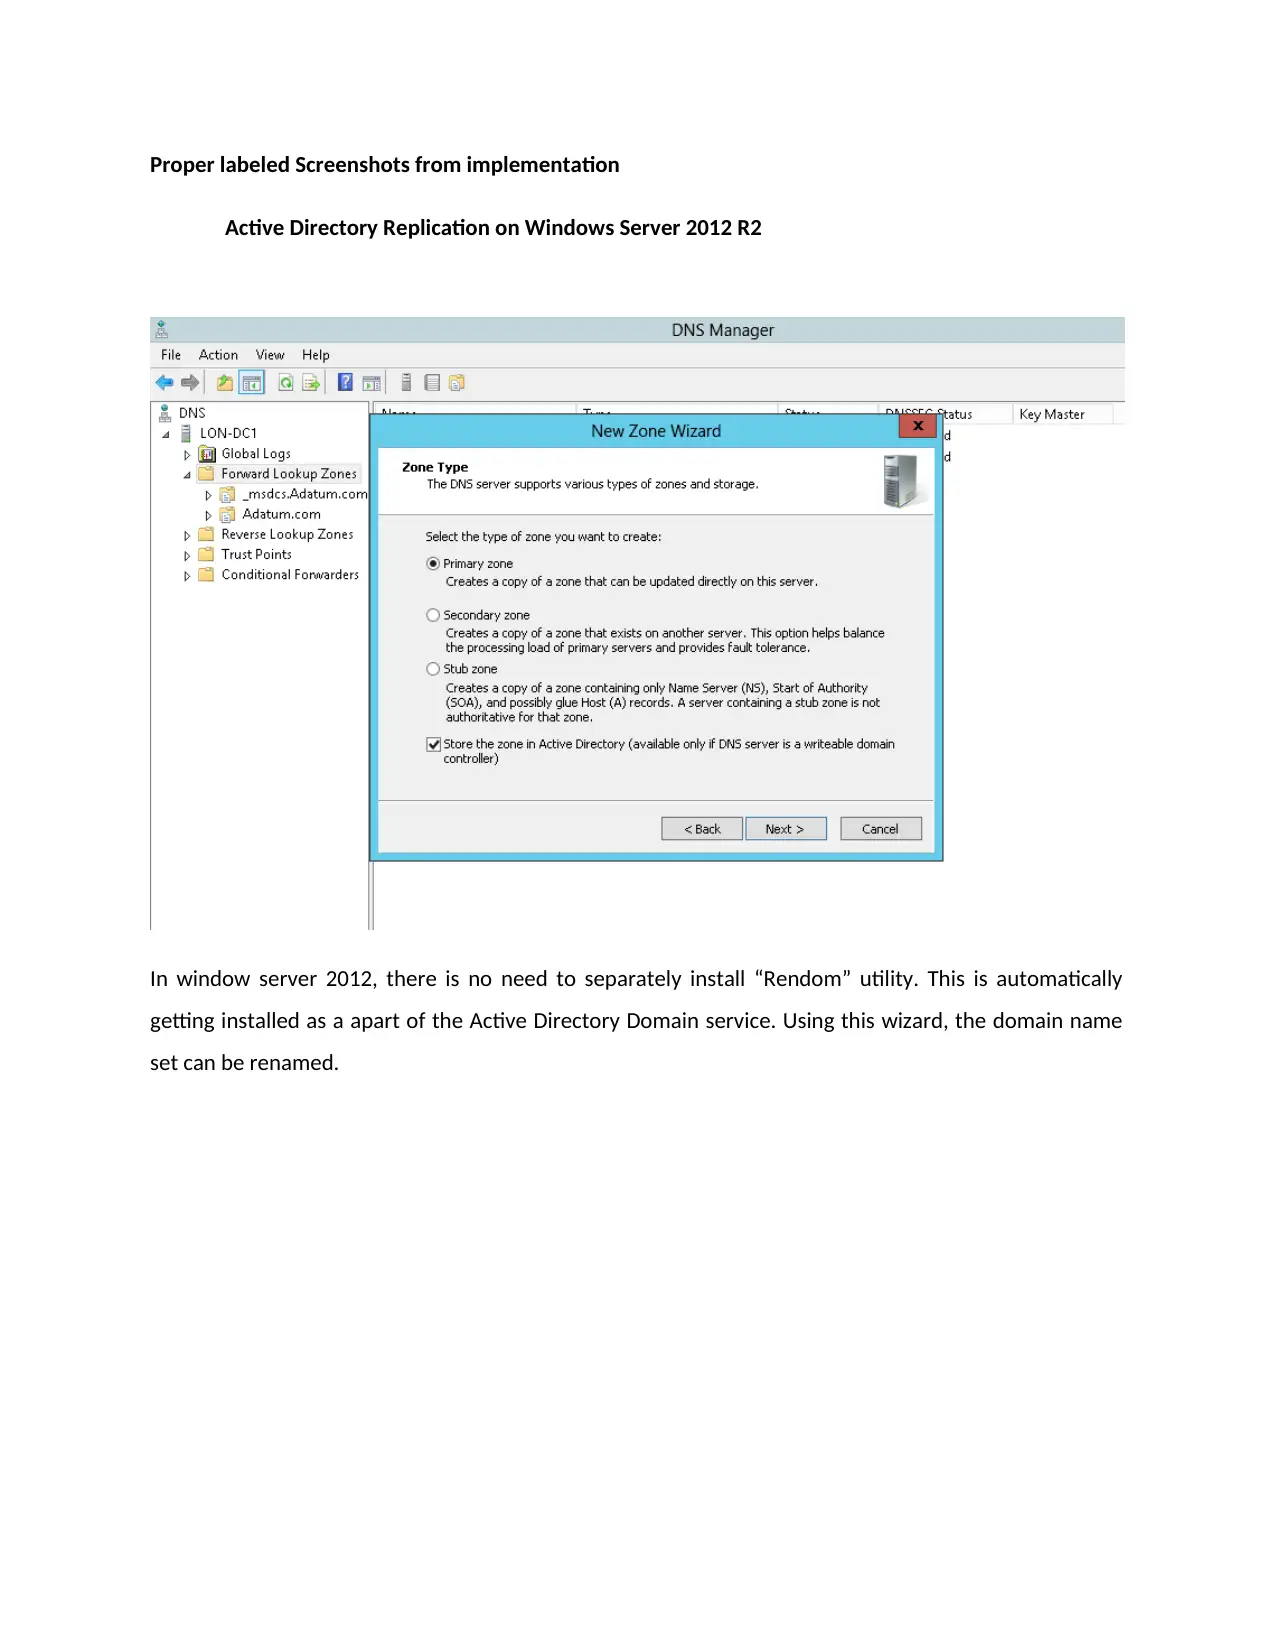
This project report details the network design and implementation for ABC IT Company, focusing on centralized user authentication. The project covers various aspects, including network requirements, design using Netsim, DNS and DHCP server configuration, and the creation of a mirror server for backup purposes. The report includes detailed steps for setting up a DNS server, DHCP server, and creating a mirror server to ensure data safety. It also discusses Active Directory replication on Windows Server 2012 R2 and network performance testing. The project aims to improve the functionality of the network server by implementing robust authentication and backup solutions. The report provides an overview of the company's IT infrastructure, including sales, finance, and HR departments, and the importance of data backup. The project also addresses network protocols, client access, and data security considerations.
Document Page
NABIN PANTHA MIT173044
DILAN PERERA
tabler-icon-diamond-filled.svg

Paraphrase This Document

Need a fresh take? Get an instant paraphrase of this document with our AI Paraphraser
Document Page
Executive summary
ABC is an IT company, located in Melbourne. They are involved in giving it support and services to their
clients. They are into server connection, server set up, website development, website designing,
software development, mobile application development, graphics designing and content writing. They
are into winning the trust of our customers since inception. They are going to set up a centralized user
authentication for server.
Document Page
Contents
Introduction.................................................................................................................................................4
Network requirements and design model...................................................................................................4
Design of Network diagram using Netsim...................................................................................................5
Network Diagram....................................................................................................................................5
Demonstration............................................................................................................................................8
Configuration of the whole project set up a DNS (domain name server)................................................8
Step 1: Centralized user authentication..............................................................................................9
Step 2: Set up a DNS (Domain name server)........................................................................................9
Step 3: Set up a DHCP server to acquire IP address...........................................................................10
Step 4: Create a mirror server for the backup purpose in case of failure..........................................11
Proper labeled Screenshots from implementation....................................................................................13
Active Directory Replication on Windows Server 2012 R2....................................................................13
Installing a window server 2012 by opening the Active directory administration.....................................15
Network performance Result................................................................................................................16
Step 5: Network Implementation and Network testing.....................................................................16
Conclusion.................................................................................................................................................17
Reference..................................................................................................................................................19
Document Page
Introduction
ABC is an IT company which is based on Melbourne. The company has three departments in the field of
Sales, Finance and HR. In each of these departments there are 15 people working. Back up of important
resources in the form of data is the main concern for the company. Now the company has a system
administrator to look after the data recovery in case of any system failure. It is the responsibility of the
system administrator to replicate the active directory of the company and move the database from one
site to another for future. A copy of the master domain controller i.e. DC1 is created to make sure for
future availability.
Network requirements and design model
Figure: Outline of the network diagram
tabler-icon-diamond-filled.svg

Paraphrase This Document

Need a fresh take? Get an instant paraphrase of this document with our AI Paraphraser
Document Page
Design of Network diagram using Netsim
Network Diagram
Network diagram is shown including server, router, switches and PCs on Netsim. There are many
updates that have been seen in the Netsim 9 parent application. There has been multiple monitor that
can be used simultaneously.
The network set up is done by the following setting wizard. It is done by the installation of the window
server.
Document Page
Document Page
Netsim or graphical network simulator (GNS3) are designed to run the complex network configuration
structure with different functional requirements are performed using the computing power of the
system. Depending upon the different demands according to the network requirement and the amount
of the elemental network within the topology, the simulation process is carried out.
Demonstration
Configuration of the whole project set up a DNS (domain name server)
tabler-icon-diamond-filled.svg

Paraphrase This Document

Need a fresh take? Get an instant paraphrase of this document with our AI Paraphraser
Document Page
Step 1: Centralized user authentication
The network servers are centralized computer system within an office, lab or an institute. In the network
servers the programs, data, algorithms and many data files are stored. These files are accessed by the all
computers in the place which are under the main server. The users in the network will share all kinds of
data from the server. The security of the servers is so high that they are protected from all kinds of
threats and faults. The network servers need the hard drives of vey high capacity in the order of 100 GB
and above. As the data shared by the users, this storage capacity of the server must be very high. This
drive size must be too high for the video storage. In the server model one must always prefer the wired
connection of the computer rather than the wireless as the data rates of the wired connections are far
ahead then the wireless connection [1].
Step 2: Set up a DNS (Domain name server)
DNS is abbreviated as the domain name server. This is very similar to the phone call or the truck call. The
internet access has a special type of data establishment. In this the source person will request for the
data access or the data connection establishment. In which the destination must accept or respond. or
else the data may not be obtained or accessed completed. One must know the connection
Document Page
establishment between the systems. Here in the network server management we must connect the
servers [5]. First there must be request from the home server to the destination, and then the
destination must accept the request. Then only the next process is started. Then the destination must
send you the acknowledgement. After receiving the acknowledgement the source will now ask the data
whatever they need. Then the source request for data access will be accepted by the destination server
for the data. After reading the data request from the source the destination will ready the data for the
source. After receiving the request the source will accept the data from the destination. Once the data is
transferred continuously from the destination then at one point they will end the data transfer. In this
time source will send a stop request for the server. Hence the data transfer will be stopped. This process
will take place with the help of DNS servers with the requests through the network servers [6]. The DNS
servers will communicate with the other DNS servers and the client pc also. In some environment the
DNS servers will not communicate with the clients but only communicate with the DNS servers only. The
IP address is always necessary for the communication of the data in any DNS server based
communication.
Step 3: Set up a DHCP server to acquire IP address
DHCP is abbreviated as dynamic host configuration protocol. TheDHCP is a type of network protocol
which will allows the servers to automatically assign the IP of the clients, source, destination or any IP
address which is required for some work action. TheIP address will be in the form of number and will
have to follow some rules for the establishment of connection. These IP address will vary from time to
time and from the system to system, network to network. Hence the obtaining of the IP address
automatically is very crucial. The manual process of obtaining such IP address is not possible in all cases.
It will be tedious process.
Document Page
The DHCP client will initial ask for the IP lease request for the DHCP servers. Then the DHCP servers must
offer the lease. If they are not offering the lease it is not possible for the data to establish. Then after the
IP lease offer the next process is associated with the IP lease selection. The IP lease selection will be
initiated with the DHCP client. Then after DHCP client request the DHCP server must receive the IP lease
selection request. Once the DHCP server got the request from the DHCP client it will give the IP lease
acknowledgement to the DHCP client. The DHCP client will receive the IP lease acknowledgement. The IP
process must be very quick and automatic or else the data will flow very slowly. There are three types of
allocation. The first one is the dynamic allocation, the second one is the automatic allocation and the
third and final one is the manual allocation. The dynamic allocation of IP address is varied according to
the situation. In this it may done automatically or by manually. In the automatic process the IP address is
allocated automatically [4]. The least preferred is manual process of establishing the IP address. These
are the important IP allocations in the DHCP.
Step 4: Create a mirror server for the backup purpose in case of failure.
The mirror servers are one of the backup kinds of servers always necessary for the data storage. The
accessing data from the servers have to be back up or stored for various uses like reference or proof. If
the server suddenly fails to work or crash the data then entire process will be affected. The data must be
stored in the alternate servers for the safety. The alternate servers are known as the mirror servers, the
mirror servers are very essential in the data safety. The data in the main server and the mirror servers
are stored simultaneously. There should not be much time delay in the storage. The mirror server must
have the same configuration of the main server as the data is replicated. Mirror server is also known as
slave servers. There are some types of mirror server software which will tell the identical nature of the
master server and the mirror servers.
tabler-icon-diamond-filled.svg

Paraphrase This Document

Need a fresh take? Get an instant paraphrase of this document with our AI Paraphraser
Document Page
Running Performance test on the server
Document Page
Proper labeled Screenshots from implementation
Active Directory Replication on Windows Server 2012 R2
In window server 2012, there is no need to separately install “Rendom” utility. This is automatically
getting installed as a apart of the Active Directory Domain service. Using this wizard, the domain name
set can be renamed.
chevron_up_icon
1 out of 17
circle_padding
hide_on_mobile
zoom_out_icon
[object Object]