Configuration of OSPF, DHCP, and VLANs in Data and Computer Networking

Verified

Added on  2023/06/11

|22
|1045
|337
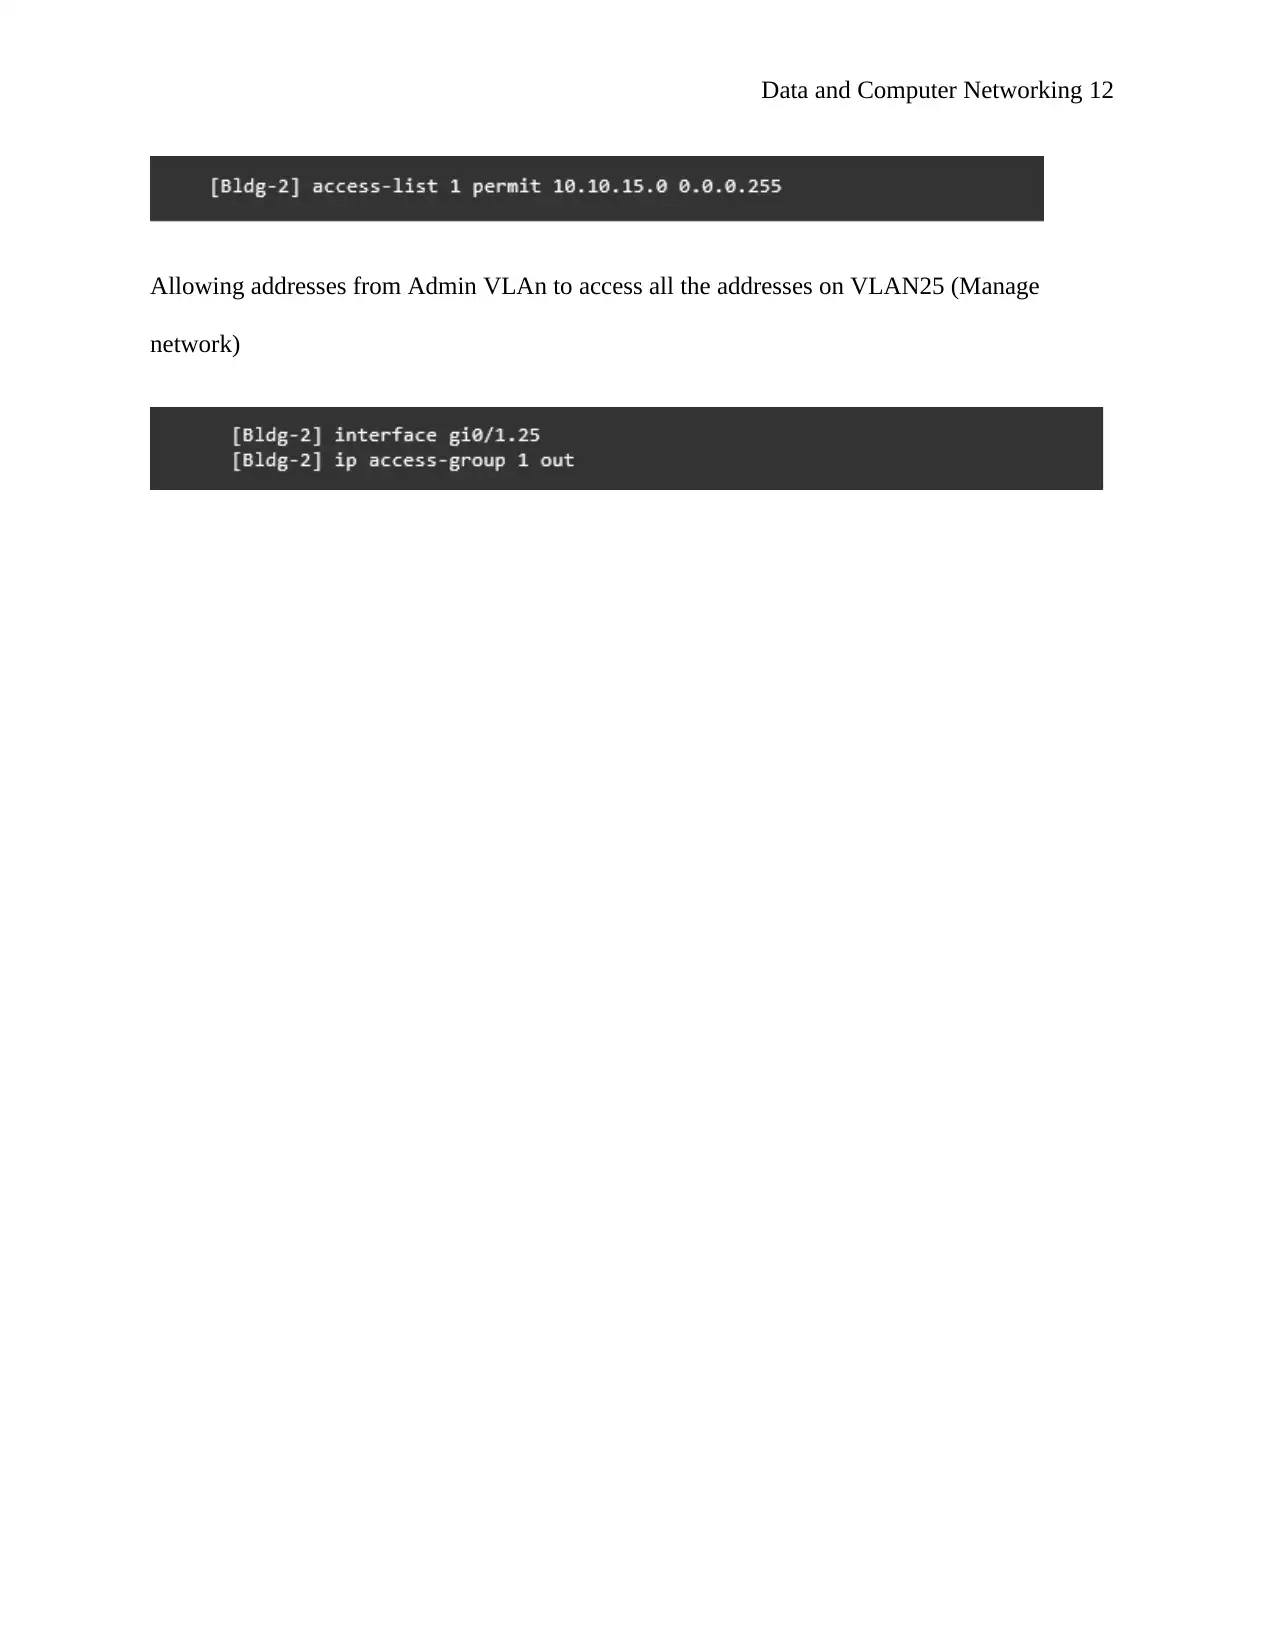
Practical Assignment
AI Summary
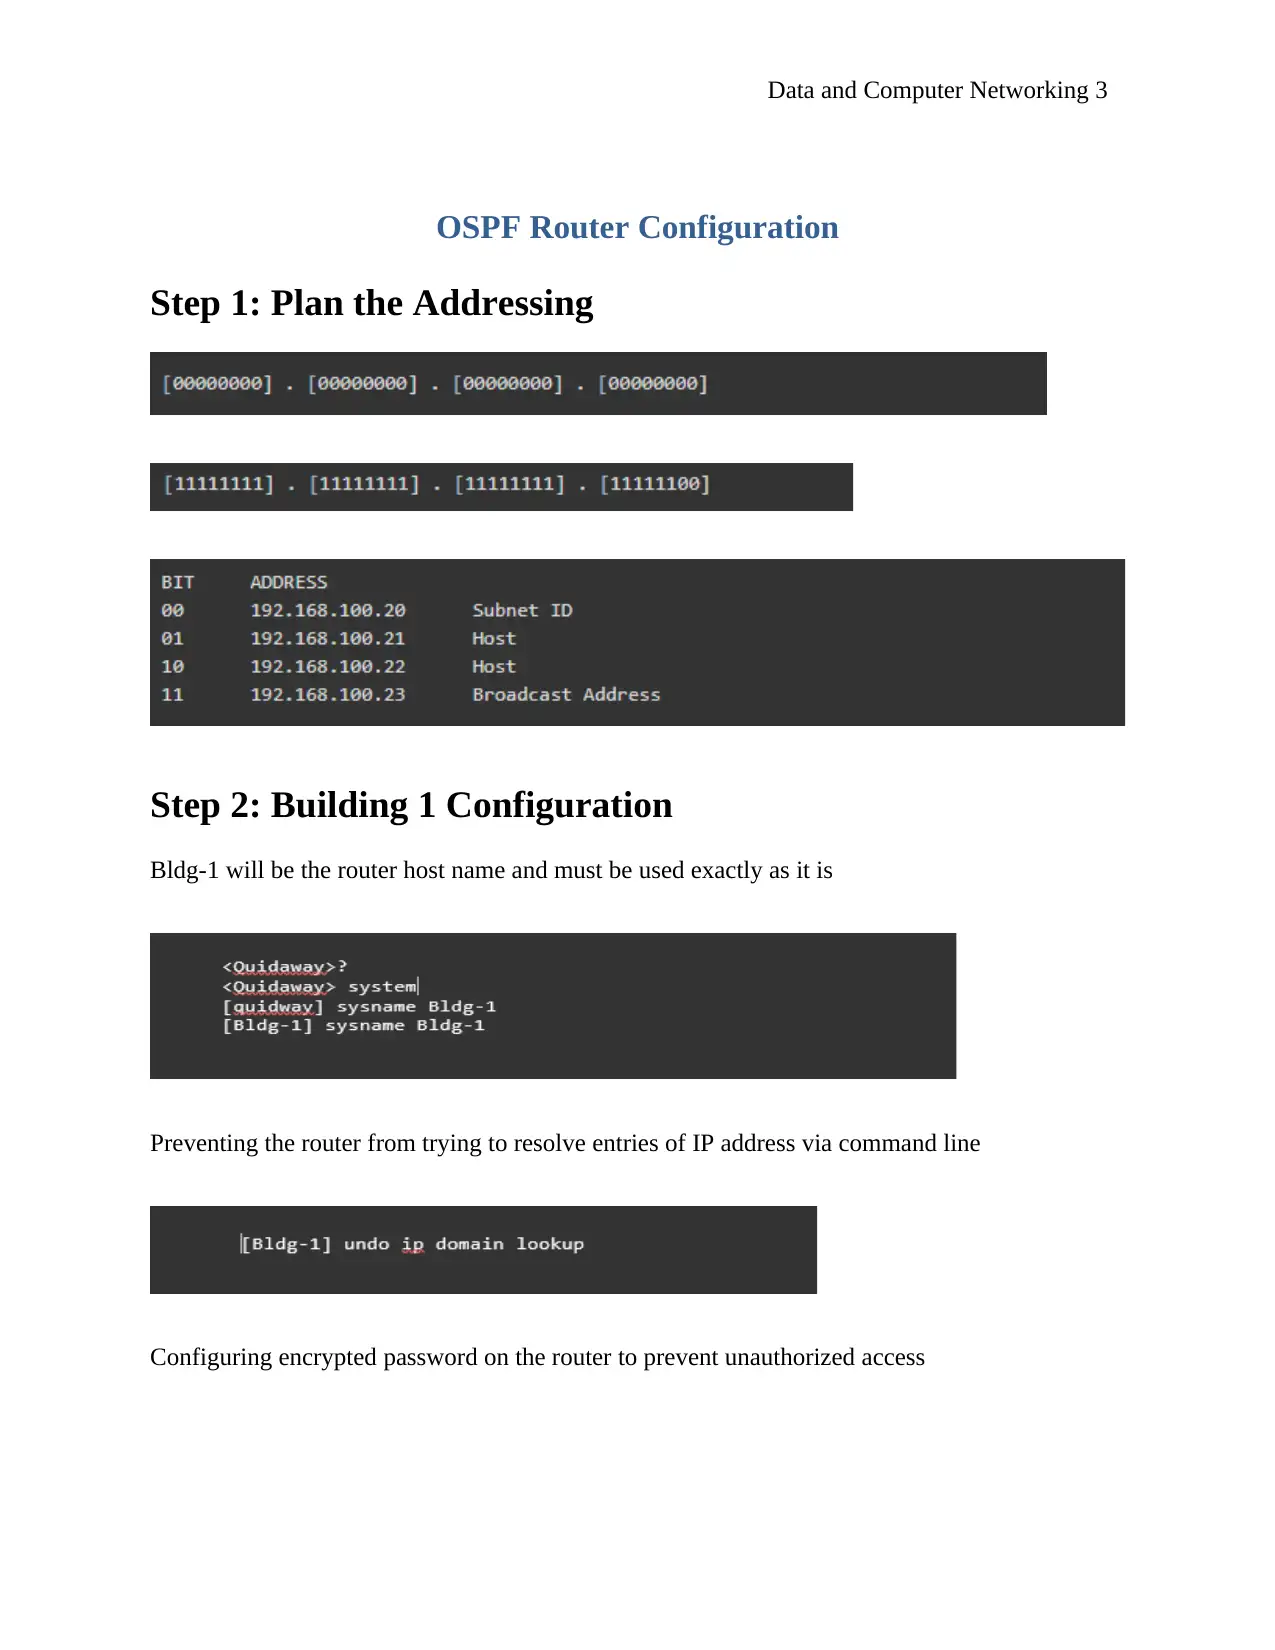
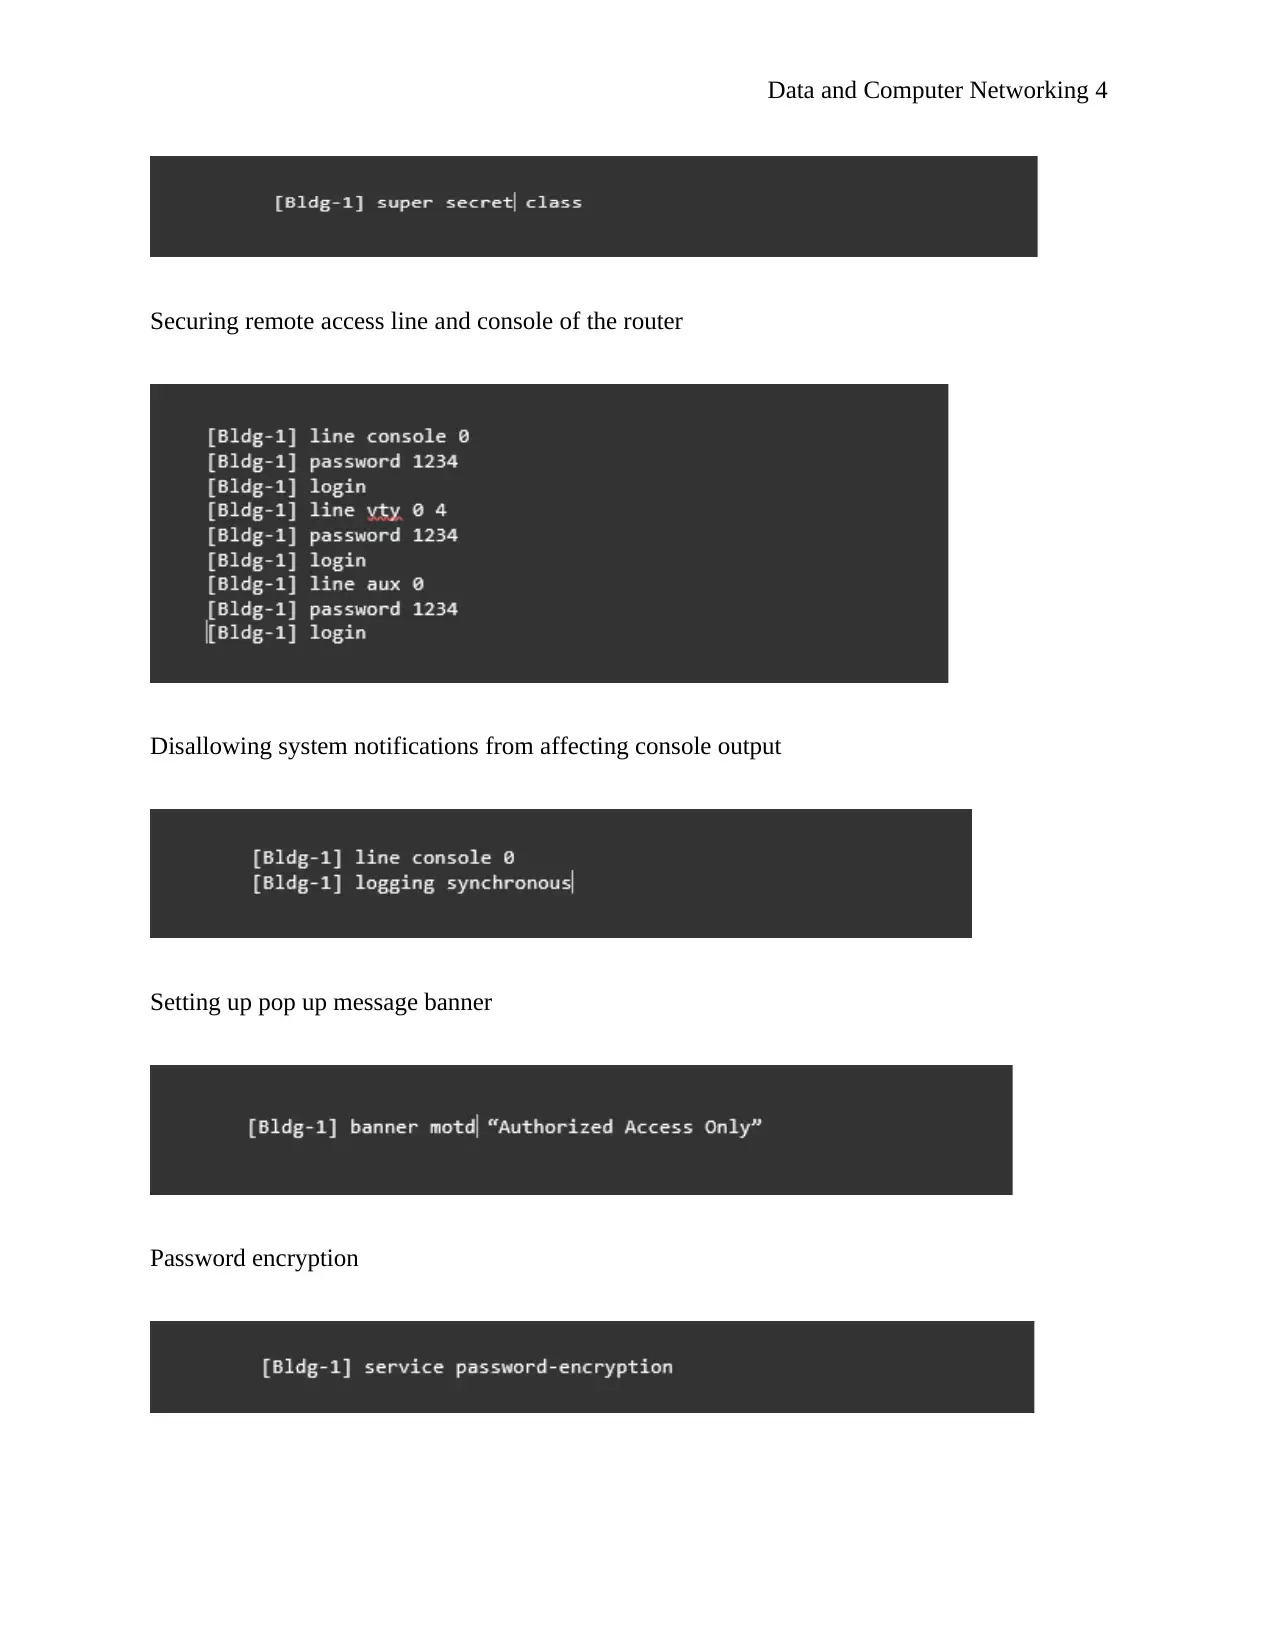
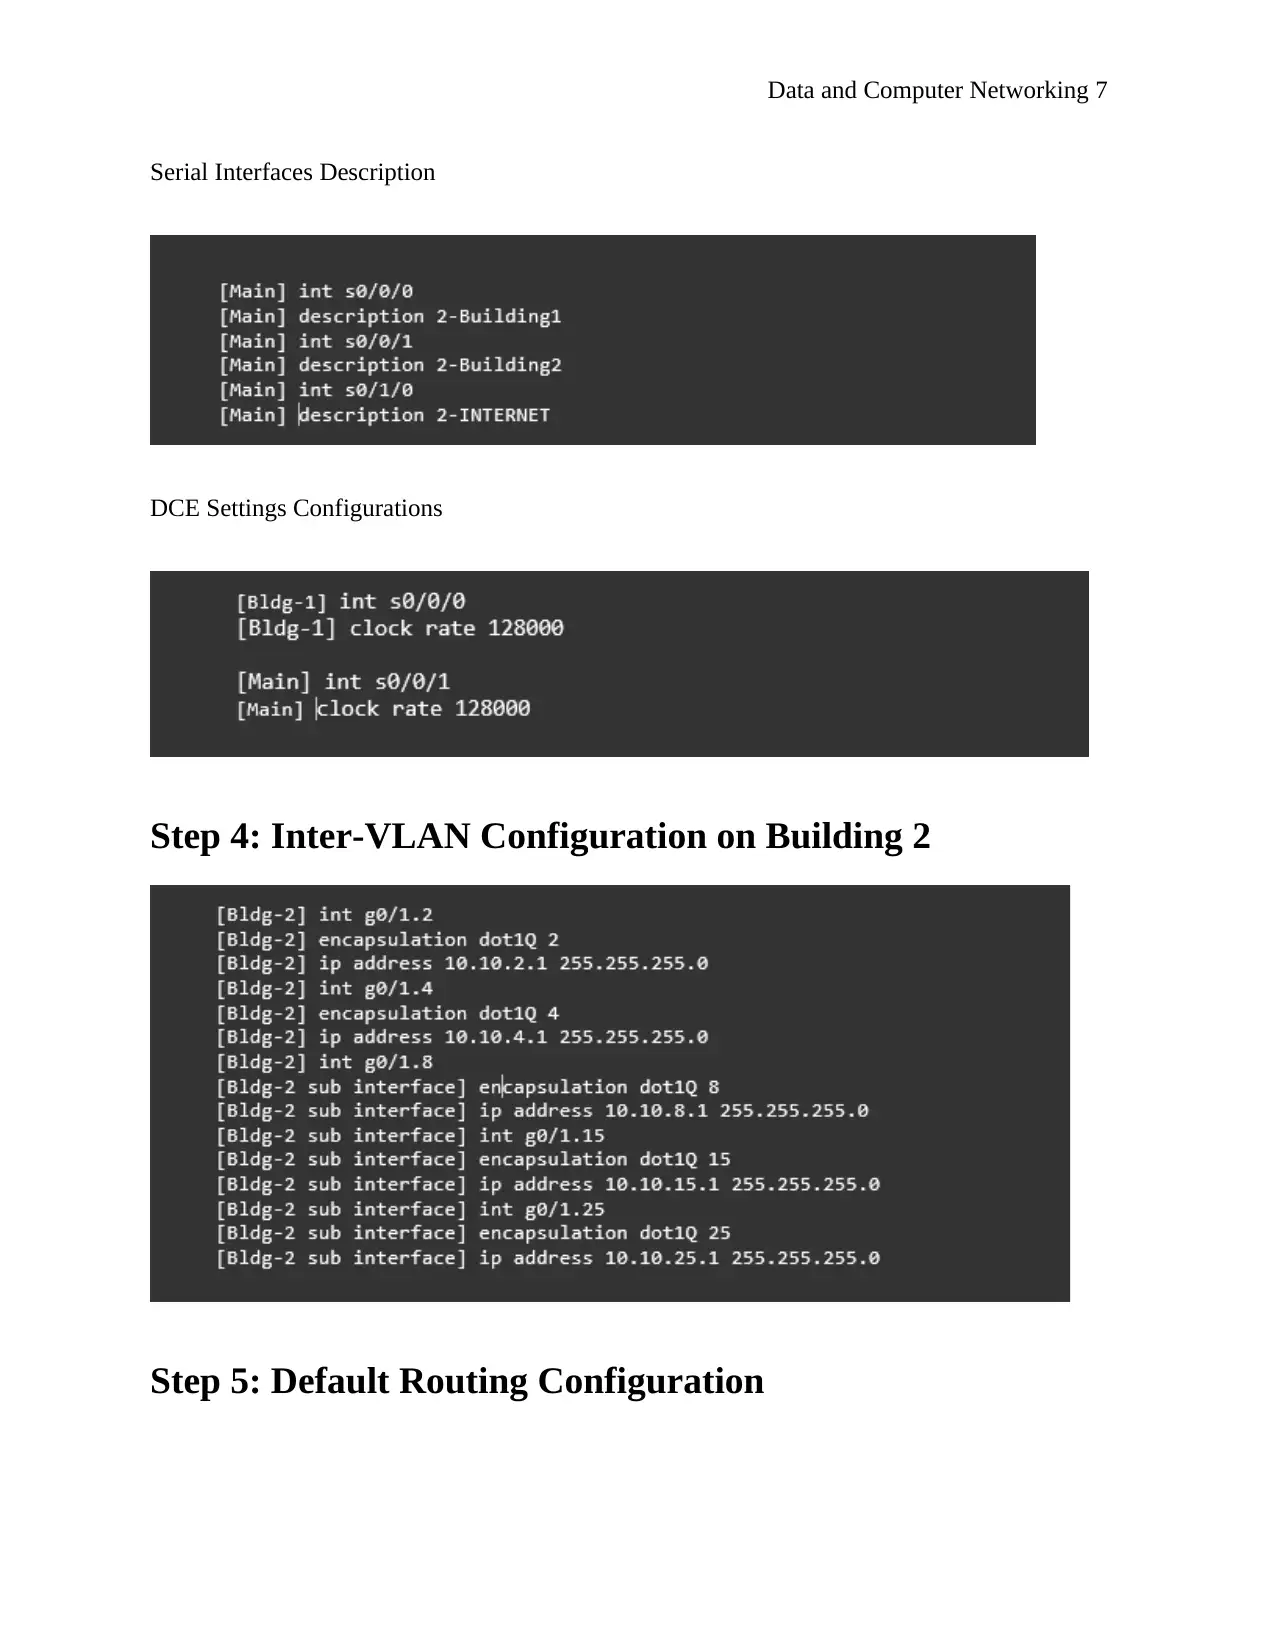
This document presents a solution to a practical assignment focused on data and computer networking. The project involves configuring a network using OSPF for dynamic routing and distributing a default route. It also covers configuring RSTP, port security, EtherChannel, DHCP, VLANs, and trunking, as well as routing between VLANs. The solution includes initial switch configuration, securing switch ports, and creating SVIs. Specific steps detail the planning and implementation of OSPF router configuration, including addressing, interface configuration, inter-VLAN setup, default routing, and OSPFv2 multiarea customization. Furthermore, it addresses switching and DHCP configuration, covering VLAN creation, port assignment, SVIs configuration, EtherChannel and trunking, Rapid PVST+, switch security, and DHCP server setup for hosts. The configuration is completed by manually setting up addressing on each workstation, ensuring full network communication. Desklib offers many resources for students looking for solved assignments and past papers.
Document Page
Data and Computer Networking 1
Data and Computer Networking
Student Name
Student ID
Course
Date
tabler-icon-diamond-filled.svg

Secure Best Marks with AI Grader

Need help grading? Try our AI Grader for instant feedback on your assignments.
Document Page
Data and Computer Networking 2
Table of Contents
OSPF Router Configuration............................................................................................................3
Step 1: Plan the Addressing.........................................................................................................3
Step 2: Building 1 Configuration.................................................................................................3
Step 3: Router Interface Configuration........................................................................................5
Step 4: Inter-VLAN Configuration on Building 2.......................................................................6
Step 5: Default Routing Configuration........................................................................................6
Step 6: OSPF Routing Configuration...........................................................................................7
Step 7: OSPFv2 Multiarea Customization...................................................................................9
Switching and DHCP Configuration.............................................................................................12
Step 1: Creating and Naming VLANs.......................................................................................12
Step 2: Assigning VLANs Switch Ports....................................................................................13
Step 3: SVIs Configuration........................................................................................................14
Step 4: EtherChannel and Trunking Configuration...................................................................15
Step 5: Rapid PVST+ Configuration.........................................................................................16
Step 6: Switch Security Configuration.......................................................................................18
Step 7: DHCP Server Configuration on Building 2 for hosts attached to FL-C and FL-A
switches......................................................................................................................................19
Step 8: Configure host addressing.............................................................................................20
Reference List................................................................................................................................21
Document Page
Data and Computer Networking 3
OSPF Router Configuration
Step 1: Plan the Addressing
Step 2: Building 1 Configuration
Bldg-1 will be the router host name and must be used exactly as it is
Preventing the router from trying to resolve entries of IP address via command line
Configuring encrypted password on the router to prevent unauthorized access
Document Page
Data and Computer Networking 4
Securing remote access line and console of the router
Disallowing system notifications from affecting console output
Setting up pop up message banner
Password encryption
tabler-icon-diamond-filled.svg

Secure Best Marks with AI Grader

Need help grading? Try our AI Grader for instant feedback on your assignments.
Document Page
Data and Computer Networking 5
Document Page
Data and Computer Networking 6
Step 3: Router Interface Configuration
IP Addressing
Document Page
Data and Computer Networking 7
Serial Interfaces Description
DCE Settings Configurations
Step 4: Inter-VLAN Configuration on Building 2
Step 5: Default Routing Configuration
tabler-icon-diamond-filled.svg

Paraphrase This Document

Need a fresh take? Get an instant paraphrase of this document with our AI Paraphraser
Document Page
Data and Computer Networking 8
Step 6: OSPF Routing Configuration
1.1.1.0 or/32 Wild Card Mask Calculation
Since we have 30 bits, only 2 will remain
0.0.0.3 will now be our wild card from above calculations
For a /24 network bit pattern will look like the screenshot below
Document Page
Data and Computer Networking 9
Thus, 0.0.0.255 will be /24 wildcard
The information above will now be used to set up several networks on every router
Disallowing LANs from receiving routing updates
OSPFv2 (Main) multiarea configuration for default route distribution to other routers
Document Page
Data and Computer Networking 10
Step 7: OSPFv2 Multiarea Customization
Setting the bandwidth of all serial interfaces to 128kb/s
OSPF Router IDs Configuration
Building 1: 1.1.1.1
Main: 2.2.2.2
Building 2: 3.3.3.3
tabler-icon-diamond-filled.svg

Secure Best Marks with AI Grader

Need help grading? Try our AI Grader for instant feedback on your assignments.
Document Page
Data and Computer Networking 11
OSPF MD5 Authentication Configuration
Access Control Lists configuration
TELNET-BLOCK is used to create standard ACL name
To allows administrators only to access the vty line of the main, the following commands are
issued
Preventing ping commands from the internet
Management interfaces (SVI) access control of building 2 switches
Document Page
Data and Computer Networking 12
Allowing addresses from Admin VLAn to access all the addresses on VLAN25 (Manage
network)
Document Page
Data and Computer Networking 13
Switching and DHCP Configuration
Step 1: Creating and Naming VLANs
tabler-icon-diamond-filled.svg

Paraphrase This Document

Need a fresh take? Get an instant paraphrase of this document with our AI Paraphraser
Document Page
Data and Computer Networking 14
Step 2: Assigning VLANs Switch Ports
Document Page
Data and Computer Networking 15
Unused switch ports on FL-A should be shutdown to secure them
Step 3: SVIs Configuration
Document Page
Data and Computer Networking 16
Step 4: EtherChannel and Trunking Configuration
It is necessary for switch ports on FL-C to initiate negotiations with switch ports of FL-B of
Channel 3
tabler-icon-diamond-filled.svg

Secure Best Marks with AI Grader

Need help grading? Try our AI Grader for instant feedback on your assignments.
Document Page
Data and Computer Networking 17
Allowing Channels to forward data
Configuring every port channel interface to act as trunk
FL-B switch port static trunking configuration
Step 5: Rapid PVST+ Configuration
Setting root priorities and Rapid PVST+ activation
Configuring FL-A as VLAN 2 and VLAN 4 root primary using default primary priority
Configuring FL-A as VLAN 8 and VLAN 15 root secondary using default secondary priority
Configuring FL-C as VLAN 8 and VLAN 15 root primary using default primary priority
Document Page
Data and Computer Networking 18
Configuring FL-C as VLAN 2 and VLAN 4 root secondary using default secondary priority
BPDU Guard and PortFast Activation on FL-C switch access port which is active
BPDU Guard
PortFast
Document Page
Data and Computer Networking 19
Step 6: Switch Security Configuration
Configure port security on all active access ports that have hosts connected on FL-A
Each active access port should accept only two MAC addresses before a security action occurs.
The learned MAC addresses should be recorded in the running configuration
If a security violation occurs, the switch ports should provide notification that a violation has
occurred but not place the interface in an err-disabled state.
tabler-icon-diamond-filled.svg

Paraphrase This Document

Need a fresh take? Get an instant paraphrase of this document with our AI Paraphraser
Document Page
Data and Computer Networking 20
Securing unused Switch ports on FL-A
Step 7: DHCP Server Configuration on Building 2 for hosts
attached to FL-C and FL-A switches
Create a DHCP pool for hosts on VLAN 2 using the pool name vlan2pool
Document Page
Data and Computer Networking 21
Create a DHCP pool for hosts on VLAN 4 using the pool name vlan4pool.
Create a DHCP pool for hosts on VLAN 8 using the pool name vlan8pool
Exclude the first five addresses from each pool
Configure a DNS server address of 192.168.200.225
All hosts should be able to communication with hosts on other networks
Step 8: Configure host addressing.
This is done by manually setting up all the addressing on every workstation GUI from the IP
addressing table
Document Page
Data and Computer Networking 22
Reference List
Benjamin, H. (2018). Configuring OSPF in a Single Area > CCNP Routing Studies: Basic Open
Shortest Path First. [online] Ciscopress.com. Available at:
http://www.ciscopress.com/articles/article.asp?p=26919&seqNum=3 [Accessed 13 Jun. 2018].
Study-ccna.com. (2018). OSPF configuration. [online] Available at: http://study-ccna.com/ospf-
configuration/ [Accessed 13 Jun. 2018].
Support, P., Series, C. and Guides, C. (2018). IP Routing: OSPF Configuration Guide -
Configuring OSPF [Cisco Cloud Services Router 1000V Series]. [online] Cisco. Available at:
https://www.cisco.com/c/en/us/td/docs/ios-xml/ios/iproute_ospf/configuration/xe-16/iro-xe-16-
book/iro-cfg.html [Accessed 13 Jun. 2018].
chevron_up_icon
1 out of 22
circle_padding
hide_on_mobile
zoom_out_icon
[object Object]