Mail Merge Tutorial: Creating Mail Merges with Excel and Word

Verified

Added on  2023/03/29

|14
|462
|494
Homework Assignment
AI Summary
This assignment provides a comprehensive, step-by-step tutorial on creating mail merges using Microsoft Excel and Word. The tutorial begins by explaining how to prepare data in Excel, emphasizing the importance of correctly formatted data and field names. It then guides the user through the process of starting a mail merge in Word, selecting recipients, and connecting the data source. The assignment details how to insert merge fields, specifically addressing the insertion of address blocks and greeting lines. The tutorial also covers how to preview the merged documents, navigate through the records, and finalize the mail merge by either printing the documents or sending them via email. Finally, it provides instructions on how to save the mail merge document. The document includes a reference to an online article from Microsoft Support, providing additional context and support for the concepts discussed. This assignment is designed to help individuals learn and apply mail merge techniques, essential for professional communication and data management.
Document Page
HOW I CREATED
A MAIL MERGE
tabler-icon-diamond-filled.svg

Paraphrase This Document

Need a fresh take? Get an instant paraphrase of this document with our AI Paraphraser
Document Page
Covered content
Introduction
Step 1: Prepare data in Excel for mail merge
Step 2: Start mail merge
Step 3: Insert a merge field
Step 4: Preview and finish mail merge
Step 5: Save mail merge
References
Document Page
Introduction
Mail merge is utilized so that at a time many documents can
be create. It may consists text, identical layouts, graphics and
so on. Some of particular parts of every papers can be
different as well as individualized.
Document Page
Step 1: Prepare data in Excel for mail merge
Name of each column must be same as field names which
an individual wants to insert in mail merge.
Data which people are going to mixed must be show in
first sheet.
Entries of data should be adequate.
Spreadsheet which is using by an individual must be
available in their local system.
Alterations must be made before connecting to mail mix.
tabler-icon-diamond-filled.svg

Paraphrase This Document

Need a fresh take? Get an instant paraphrase of this document with our AI Paraphraser
Document Page
Step 2: Start mail merge
Primarily, select file, then go to new and choose blank
page.
On mail tab, go to start mail merge and select start
mail merge. Then select an option as per choice.
Document Page
Continued...
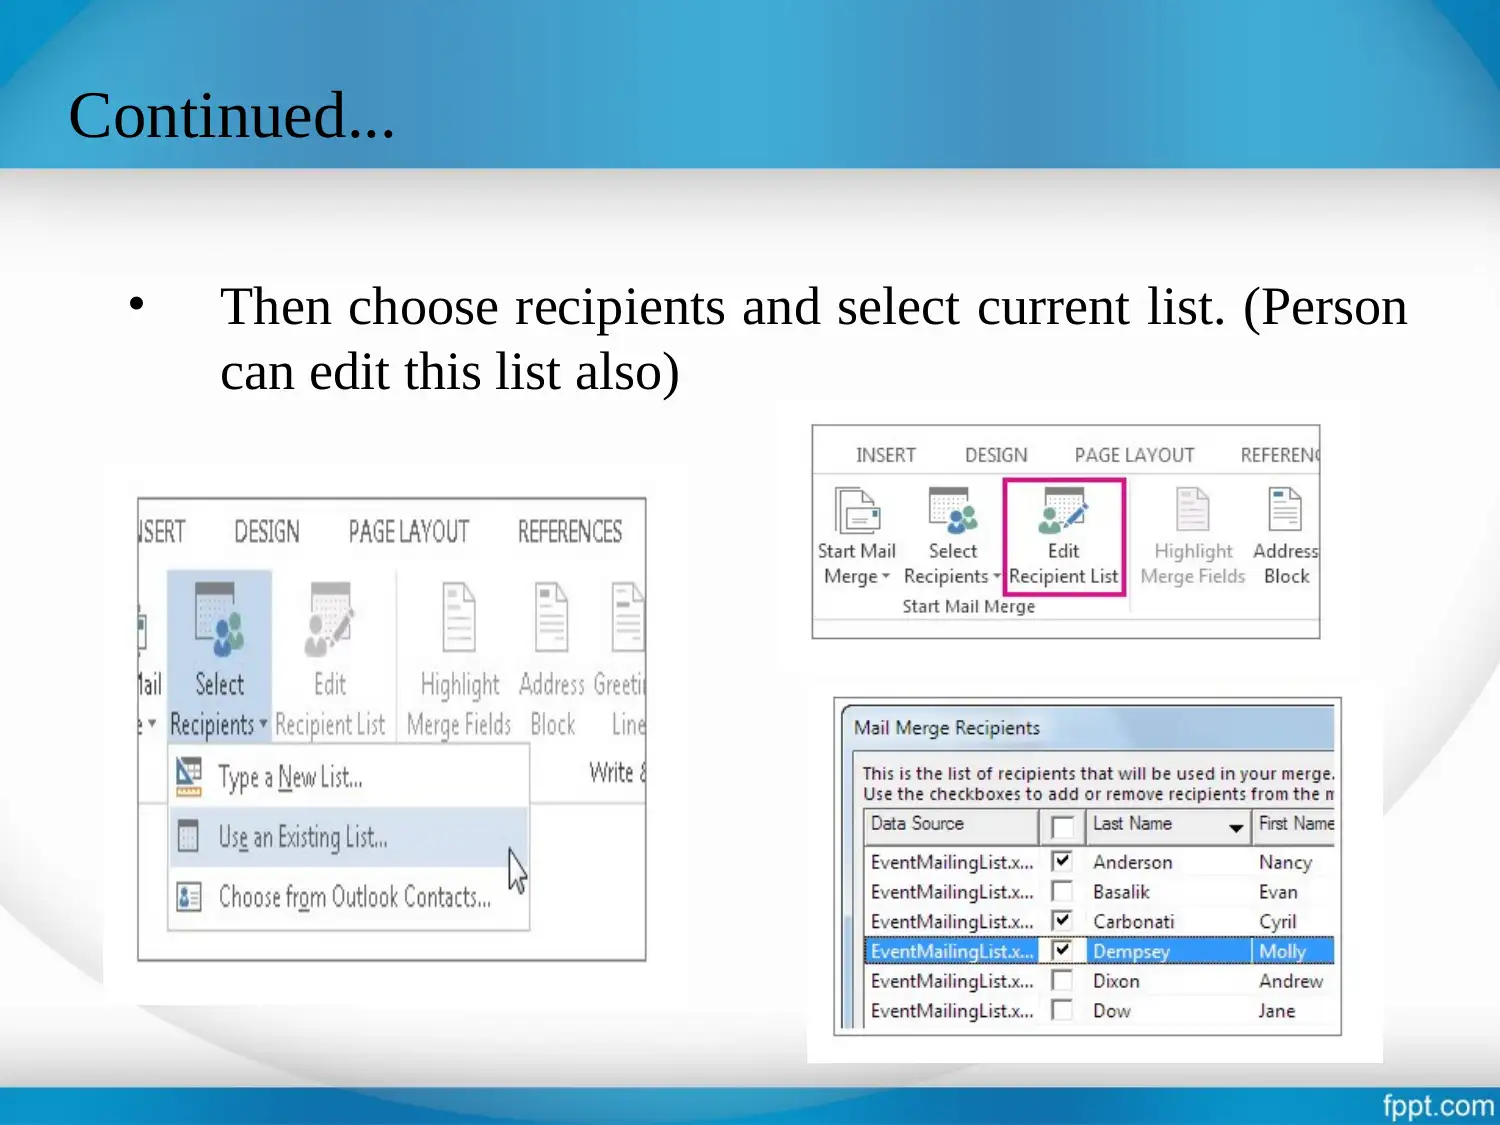
Then choose recipients and select current list. (Person
can edit this list also)
Document Page
Continued...
Search excel spreadsheet, then select open.
Select Sheet1$ and then click on OK.
tabler-icon-diamond-filled.svg

Paraphrase This Document

Need a fresh take? Get an instant paraphrase of this document with our AI Paraphraser
Document Page
Step 3: Insert a merge field
At mailing tab, in group which is related to write and
insert field, select address book. People can also insert
greeting line which is come into group of write and
insert fields and to insert data, person has to select
insert merge field.
Document Page
Continued...
Then in dialog box of insert address block select the
receiver's name format as it looks at envelop.
Select OK.
Select file and then save.
Document Page
Step 4: Preview and finish mail merge
At the tab of mailing, select preview.
If person wants to move through records then they can
select next or previous button.
tabler-icon-diamond-filled.svg

Paraphrase This Document

Need a fresh take? Get an instant paraphrase of this document with our AI Paraphraser
Document Page
Continued...
At finish group, select finish and merge, then choose
an appropriate option either print document or send e-
mail.
Document Page
Step 5: Save mail merge
Open document of mail merge and select yes.
chevron_up_icon
1 out of 14
circle_padding
hide_on_mobile
zoom_out_icon
[object Object]