Implementing C# Code for Gamers Application - Dashboard & Company

Verified

Added on  2022/12/12

|11
|1346
|97
Practical Assignment
AI Summary
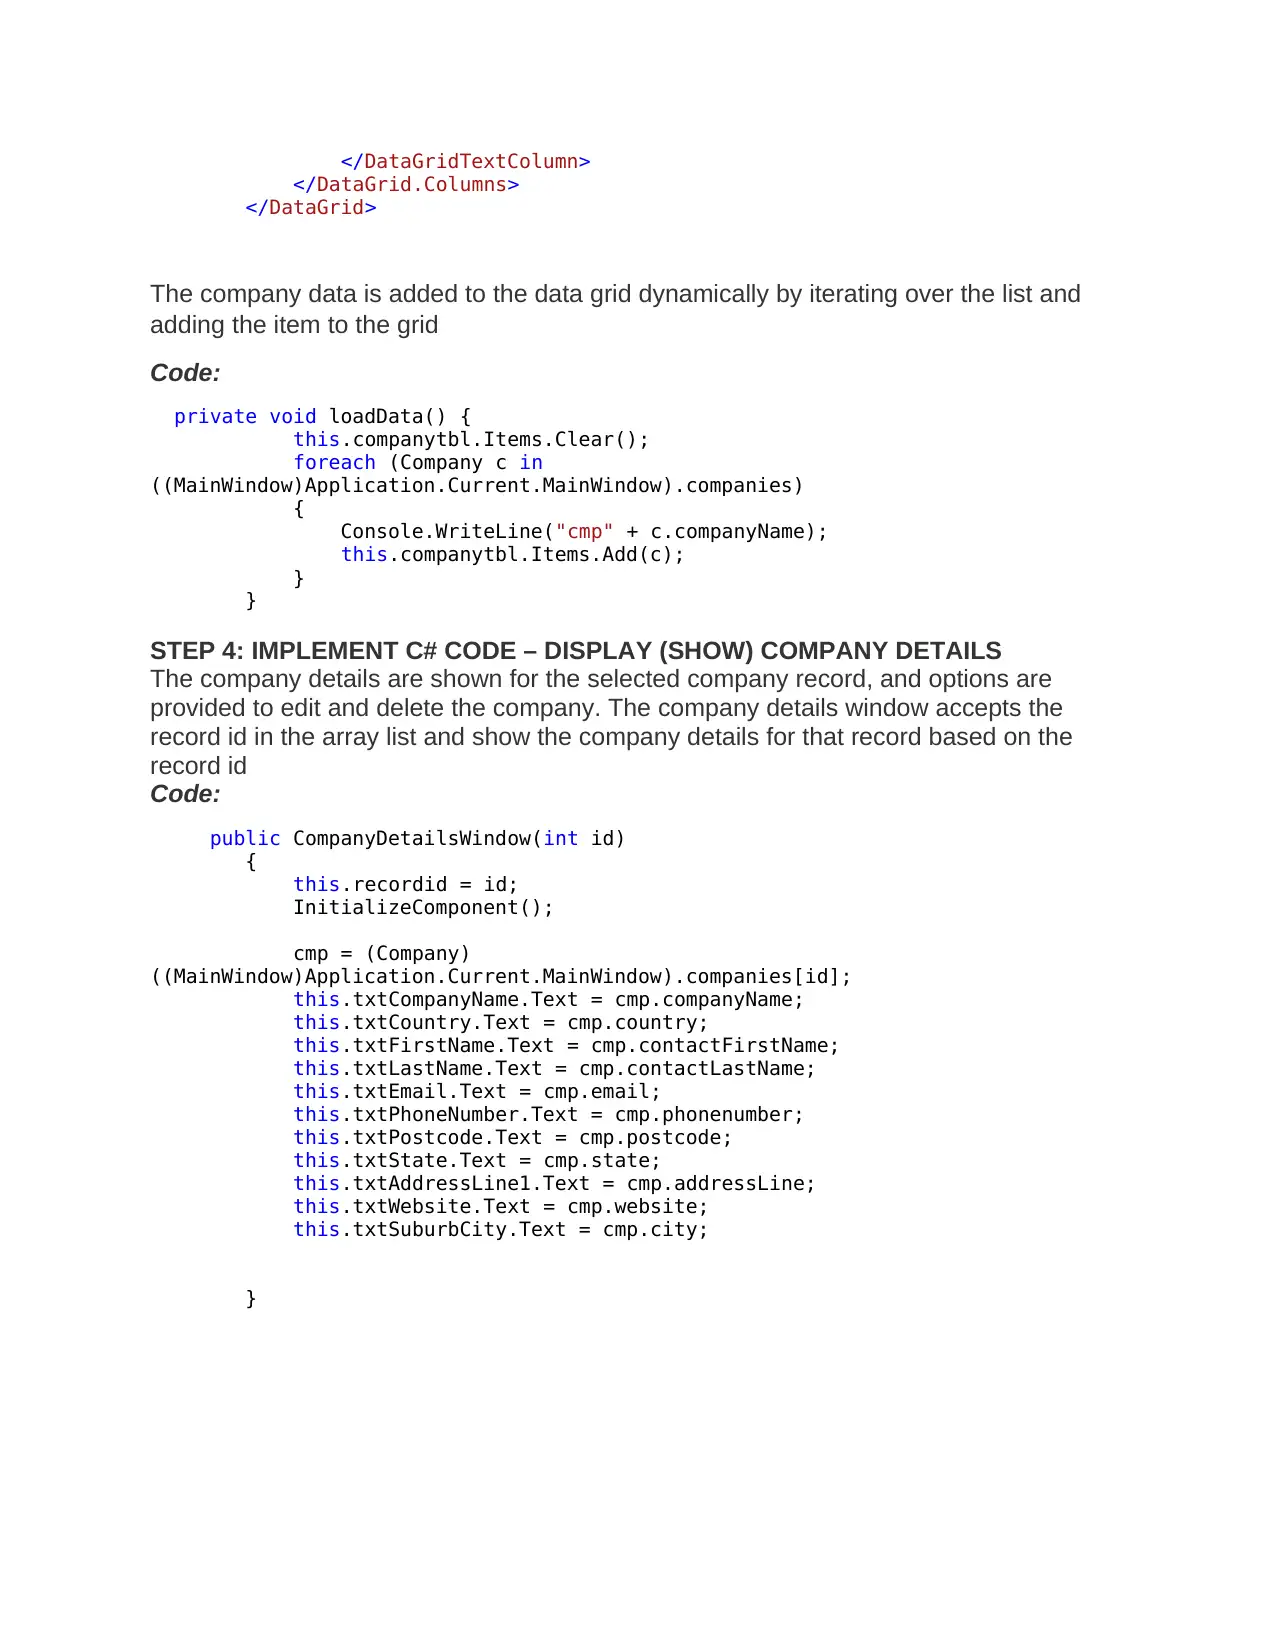
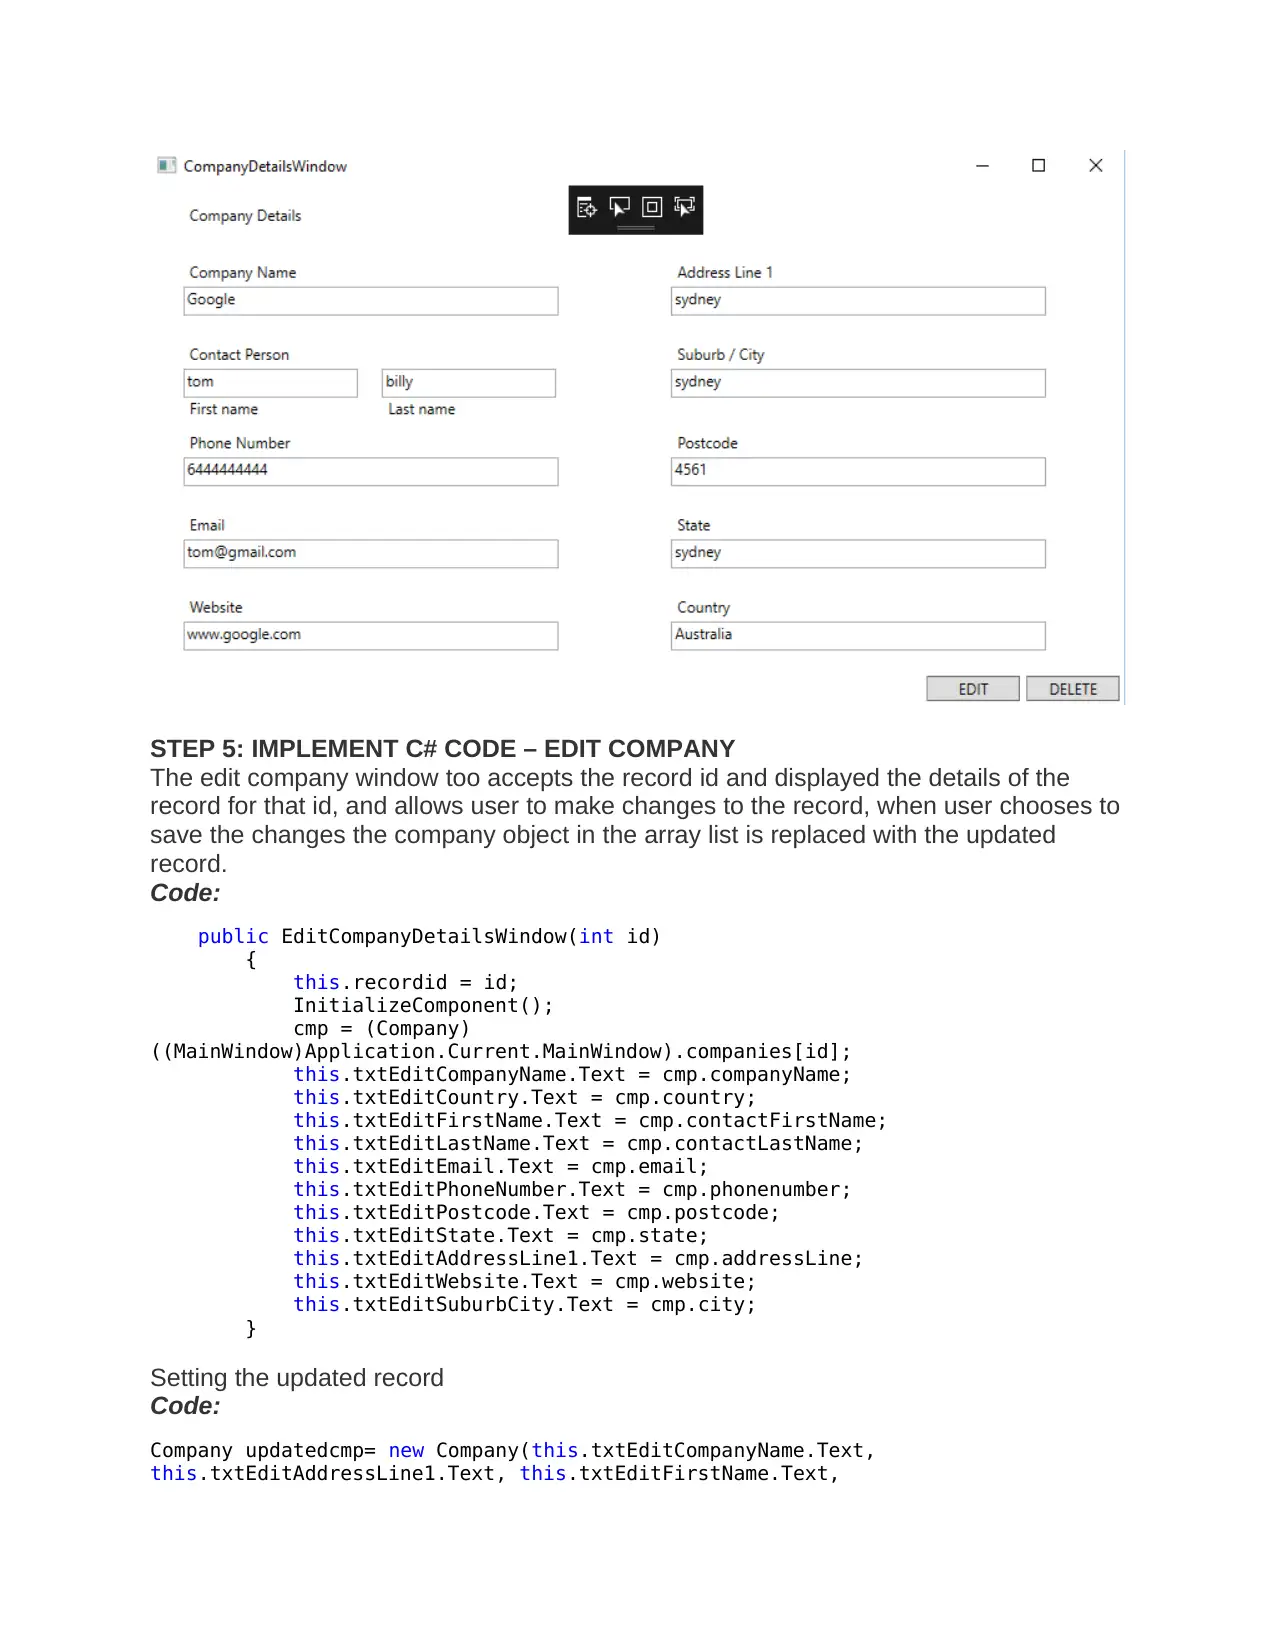
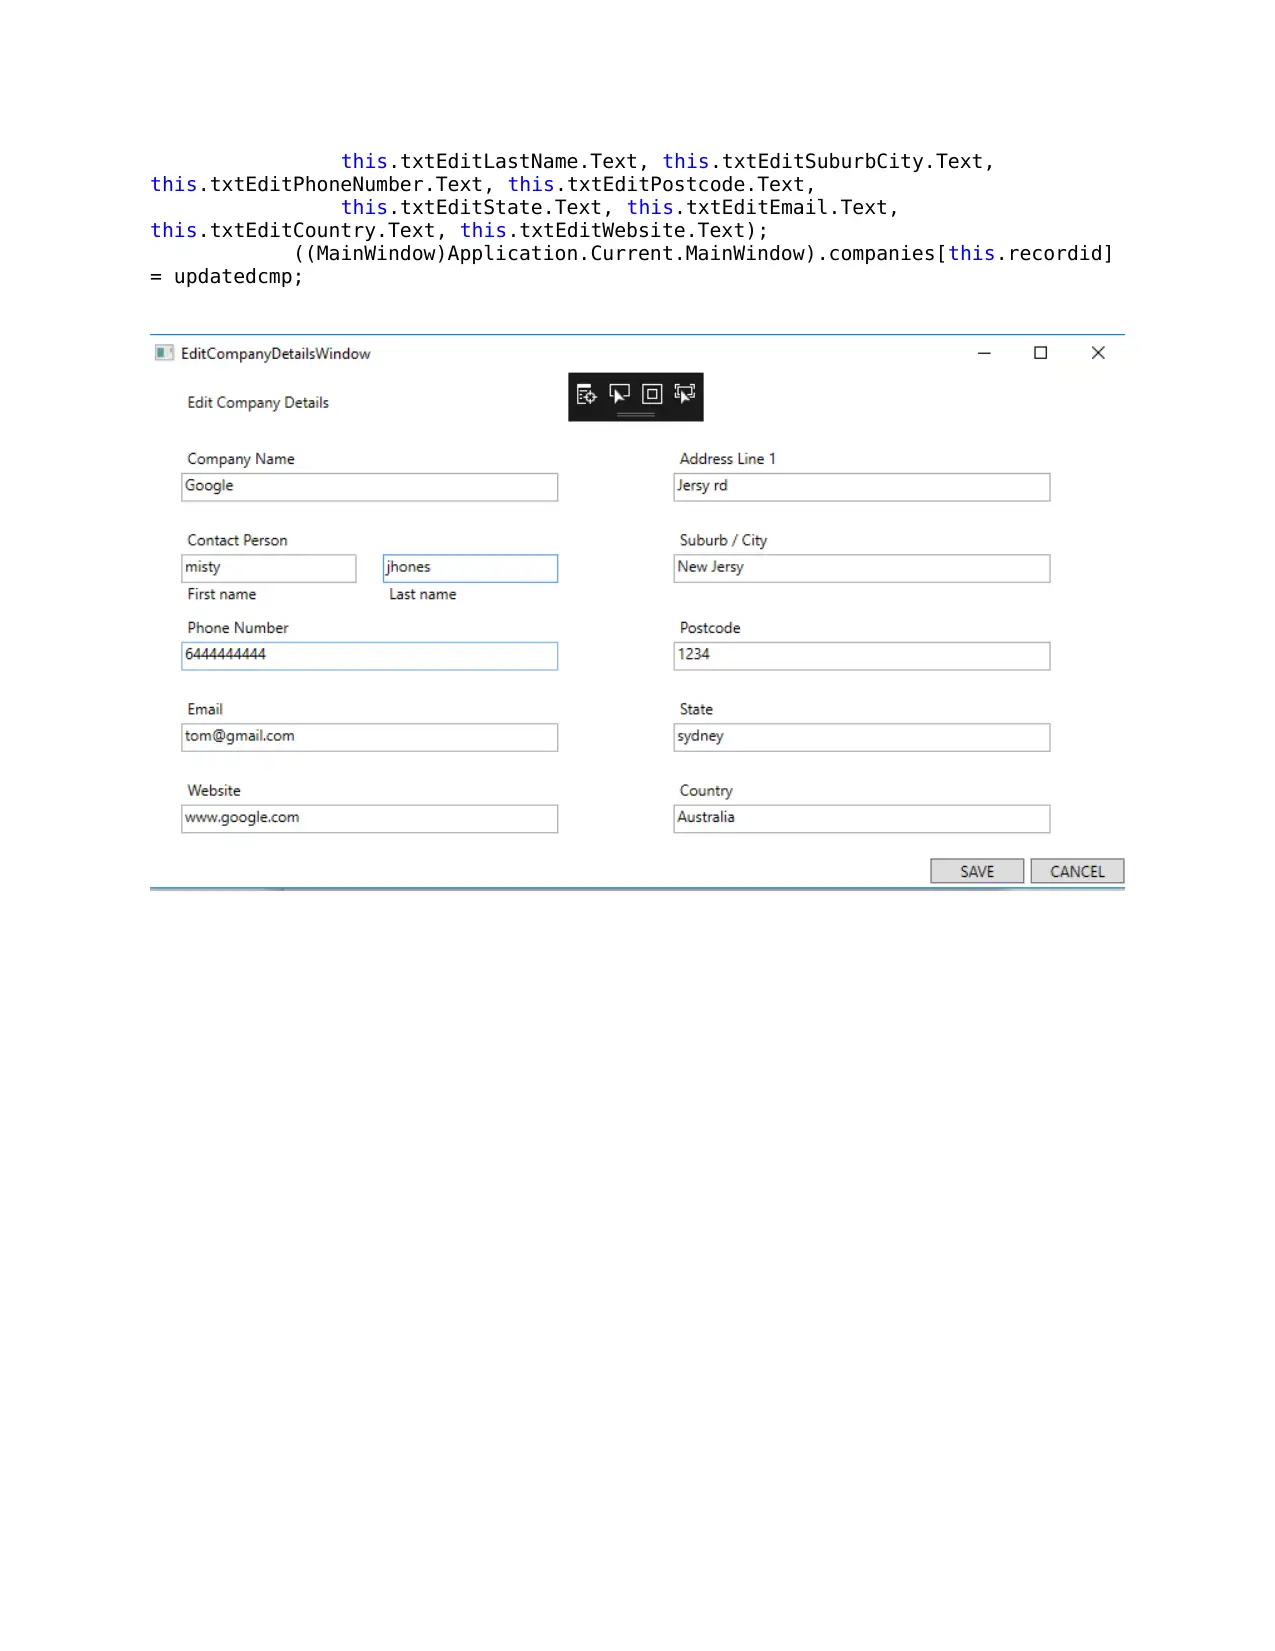
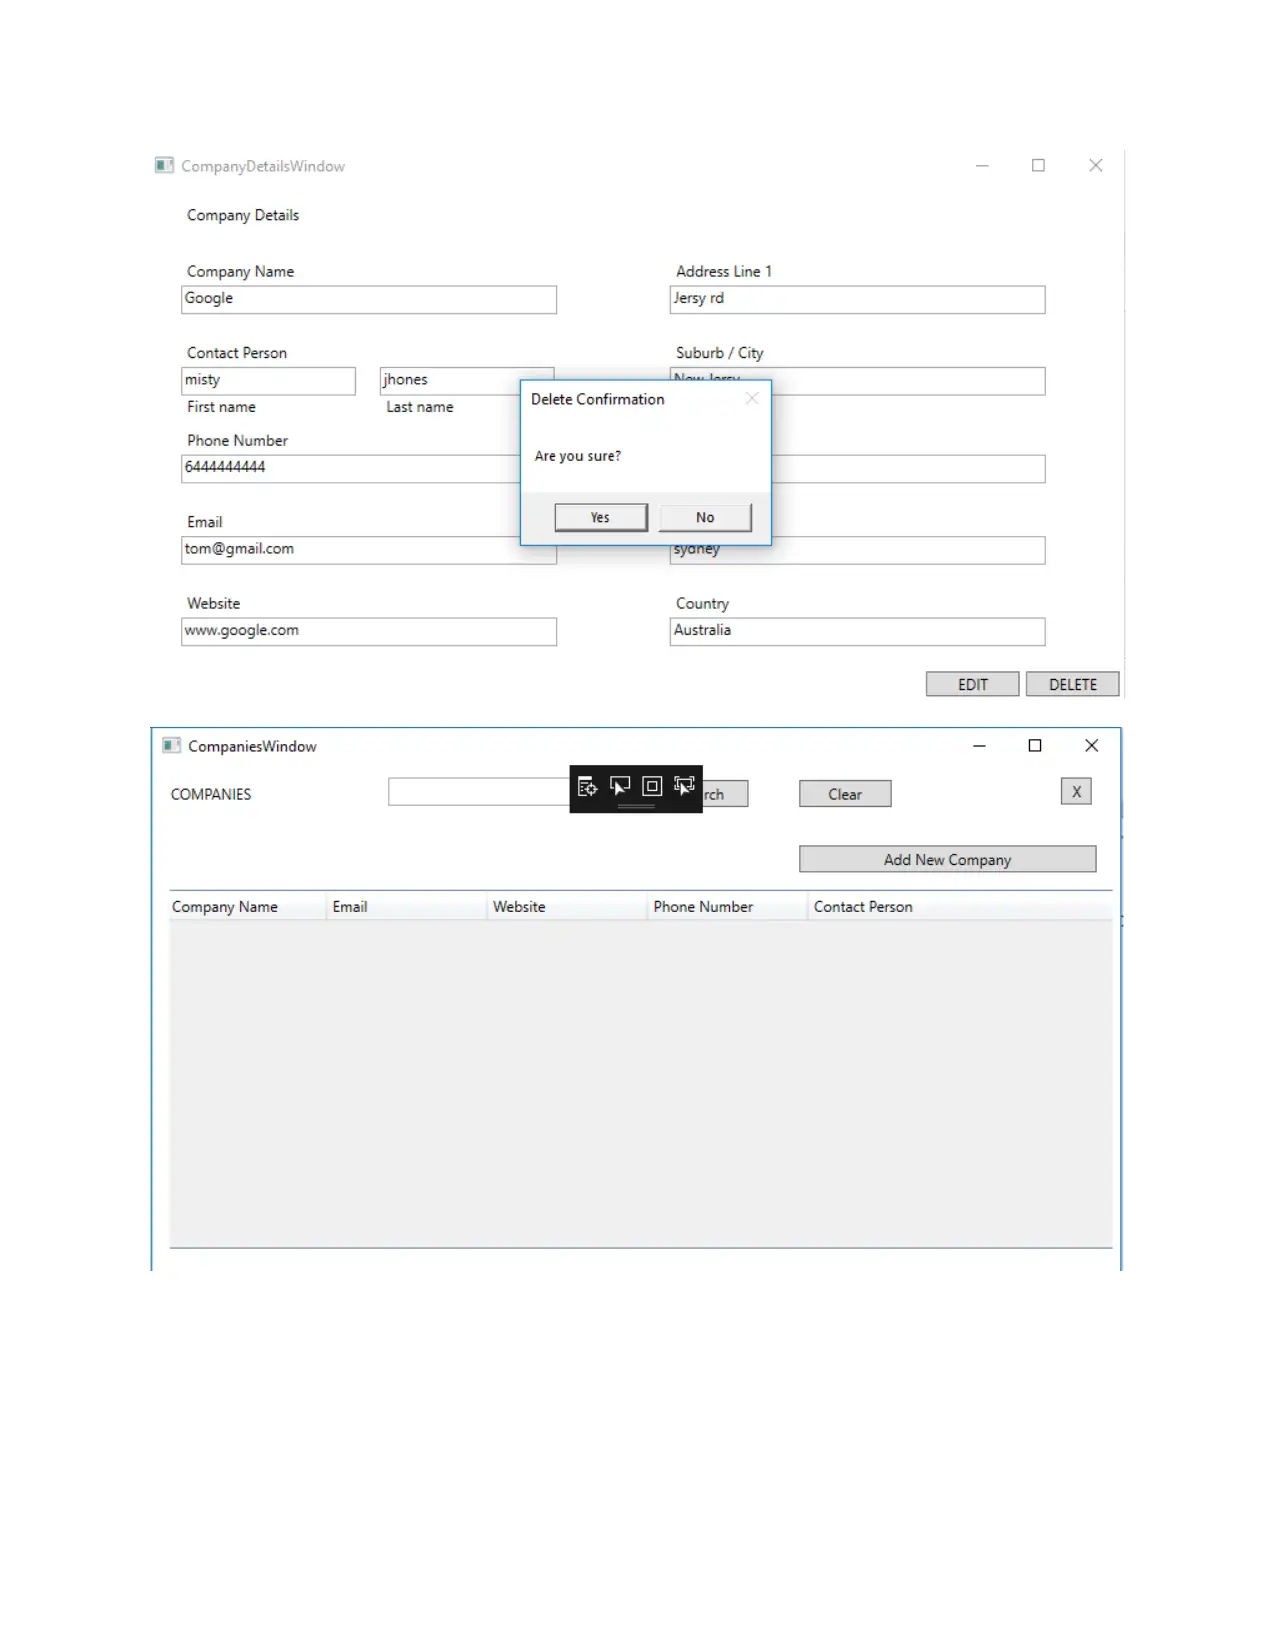
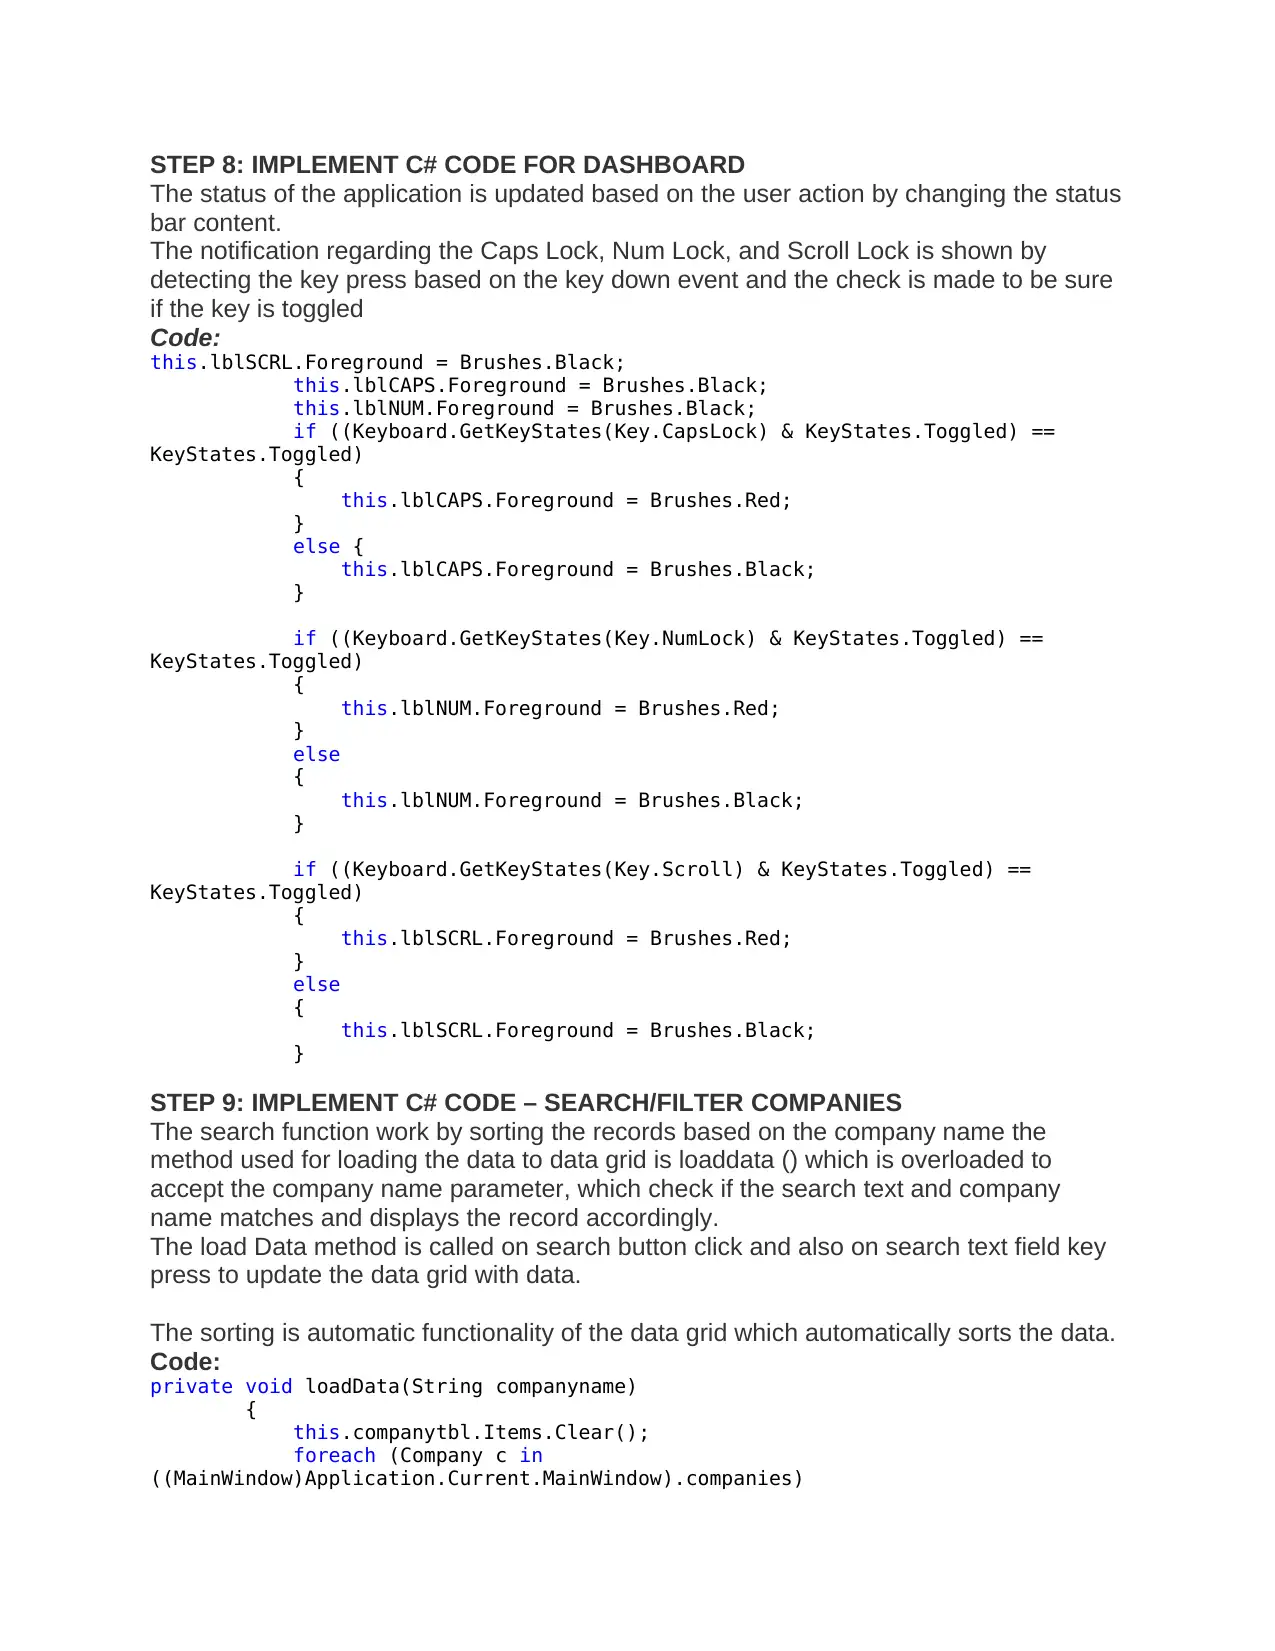
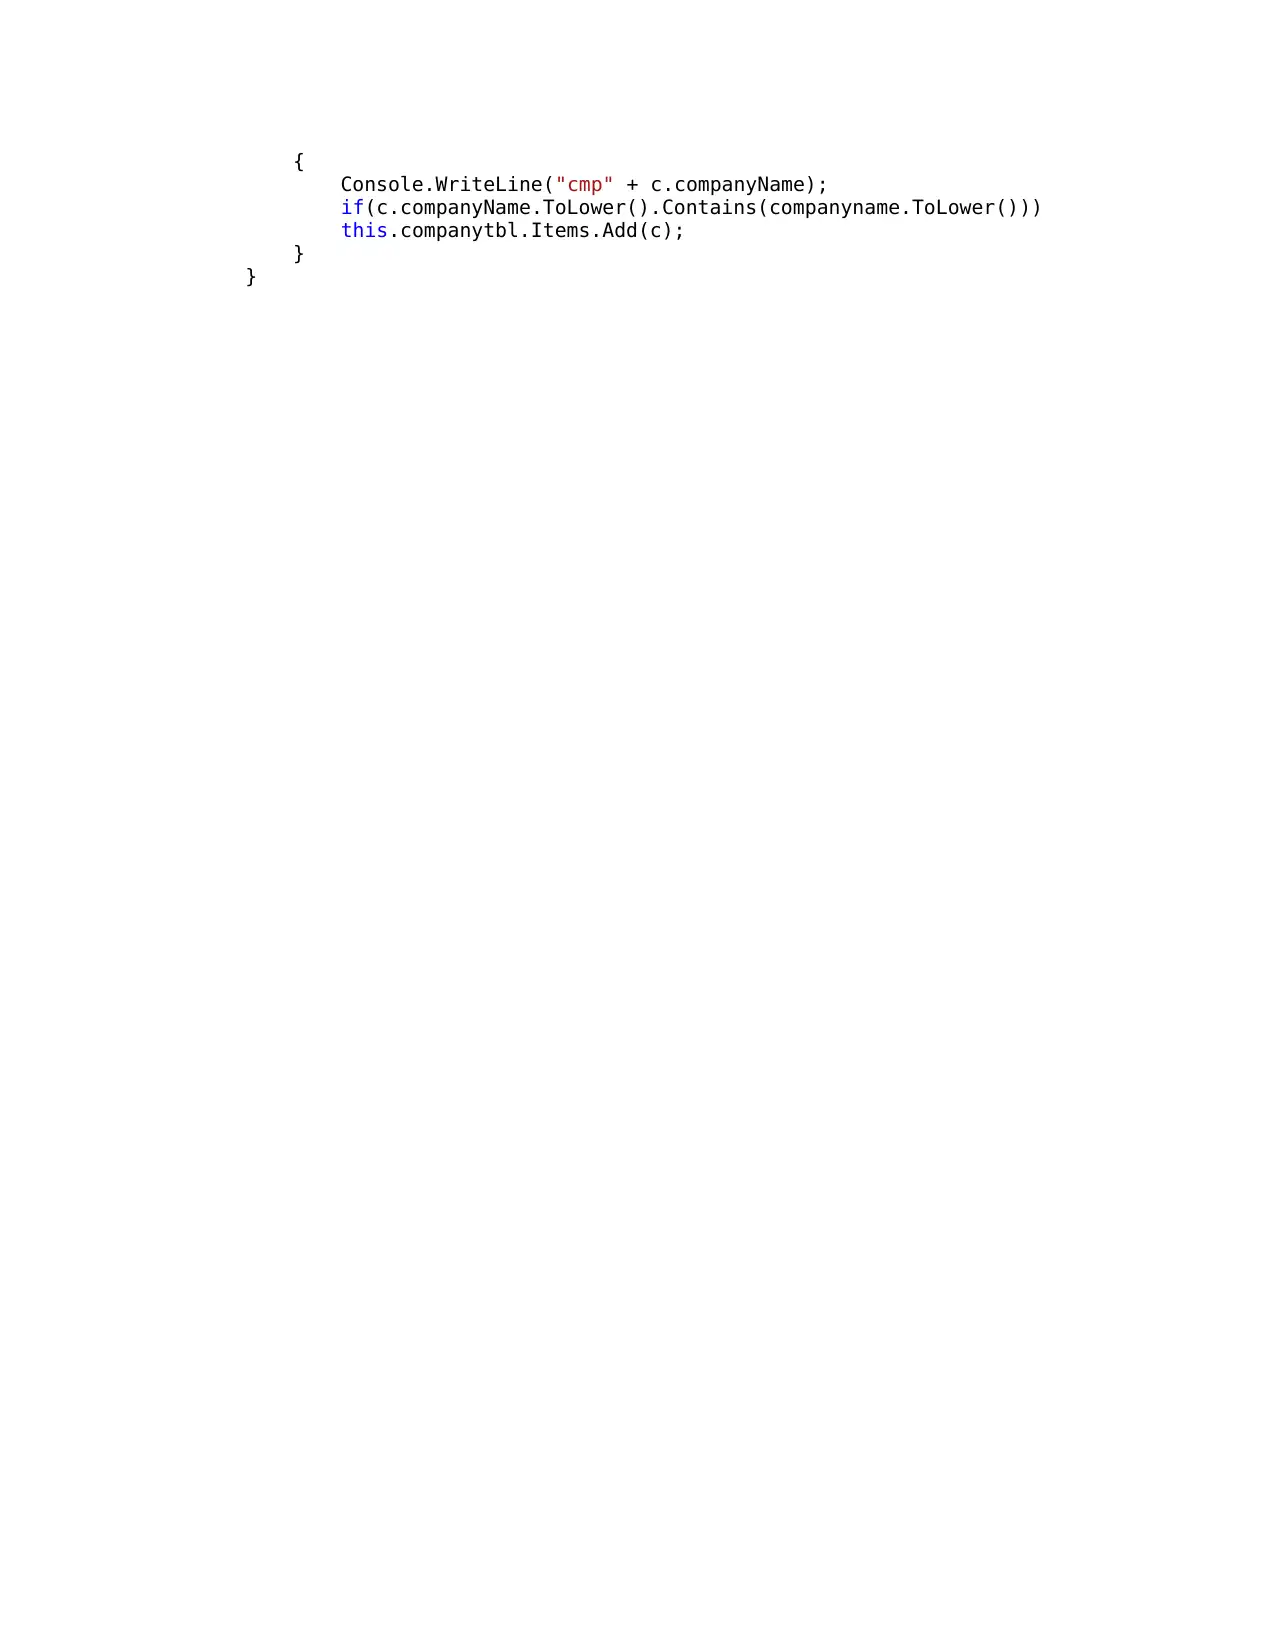
This document details the implementation of C# code for a Gamers Application, focusing primarily on the dashboard and company management features. It outlines the steps involved in connecting different screens, adding new companies with field validation, displaying a list of companies using a data grid, showing company details, and implementing edit and delete functionalities. Additionally, it covers the implementation of the dashboard, including updating the status bar and displaying notifications for Caps Lock, Num Lock, and Scroll Lock keys. The document also explains the search and filter functionalities for companies, using overloaded methods to update the data grid based on user input. The solution uses ArrayList to store company data and provides code snippets for each step, illustrating how to create, read, update, and delete company records within the application.
tabler-icon-diamond-filled.svg

Contribute Materials

Your contribution can guide someone’s learning journey. Share your documents today.
Document Page
STEP 1: IMPLEMENT WINDOW CONNECTIONS
The connection to other screen are made by creating the object of that screen (Window)
and using the ShowDialog method
The following code opens the CompaniesWindow when user selects company from the
navigation
Code:
private void mnuList_Click(object sender, RoutedEventArgs e)
{
CompaniesWindow cw = new CompaniesWindow();
cw.ShowDialog();
}
In the same fashion other windows are also connected based on the user action such
as click of a button the Object for that window is create and that window is set to be
display.
When user click on Companies the new CompaniesWIndow Object is create and
displayed
tabler-icon-diamond-filled.svg

Secure Best Marks with AI Grader

Need help grading? Try our AI Grader for instant feedback on your assignments.
Document Page
STEP 2: IMPLEMENT C# CODE – ADD COMPANY
An Array list of companies objects is used to store the companies’ data. To make it
accessible throughout the application the Array List is defined in the Main Window of the
application.
Code:
public ArrayList companies = new ArrayList();
The field validation is done to check for empty values in required fields and appropriate
error messages are shown
Code:
if (this.txtlblNewCompanyName.Text.Trim().Equals(""))
{
MessageBox.Show("Enter company name", "Error");
return;
}
After the field validation object of the Companies class is created based on the input
values in the textboxes and added to the Array list.
Company cmp = new Company(this.txtlblNewCompanyName.Text,
this.txtNewAddressLine1.Text, this.txtNewFirstName.Text,
this.txtNewLastName.Text, this.txtNewSuburbCity.Text,
Document Page
this.txtNewPhoneNumber.Text, this.txtNewPostcode.Text, this.txtNewState.Text,
this.txtNewEmail.Text, this.txtNewCountry.Text, this.txtNewWebsite.Text);
((MainWindow)Application.Current.MainWindow).companies.Add(cmp);
The Status bar on the main window is also updated with added status
Code:
((MainWindow)Application.Current.MainWindow).lblStatudBar.Content = "Company
Added";
Window that accepts company details
Document Page
Company gets added and shown in the list
STEP 3: IMPLEMENT C# CODE – LIST/BROWSE ALL COMPANIES
The data grid is used to display the list of companies the binding is done in the XAML
Code:
<DataGrid x:Name="companytbl" Grid.ColumnSpan="6" HorizontalAlignment="Center"
CanUserAddRows="True" Height="291" Margin="14,101,6,0" VerticalAlignment="Top"
Width="772" SelectionChanged="companytbl_SelectionChanged">
<DataGrid.Columns>
<DataGridTextColumn Header="Company Name" IsReadOnly="True"
Binding="{Binding Path=companyName}"
Width="130">
</DataGridTextColumn>
<DataGridTextColumn Header="Email" IsReadOnly="True"
Binding="{Binding Path=email}" Width="130">
</DataGridTextColumn>
<DataGridTextColumn Header="Website" IsReadOnly="True"
Binding="{Binding Path=website}" Width="130">
</DataGridTextColumn>
<DataGridTextColumn Header="Phone Number" IsReadOnly="True"
Binding="{Binding Path=phonenumber}" Width="130">
</DataGridTextColumn>
<DataGridTextColumn Header="Contact Person" IsReadOnly="True"
Binding="{Binding Path=contactName}" Width="250">
tabler-icon-diamond-filled.svg

Secure Best Marks with AI Grader

Need help grading? Try our AI Grader for instant feedback on your assignments.
Document Page
</DataGridTextColumn>
</DataGrid.Columns>
</DataGrid>
The company data is added to the data grid dynamically by iterating over the list and
adding the item to the grid
Code:
private void loadData() {
this.companytbl.Items.Clear();
foreach (Company c in
((MainWindow)Application.Current.MainWindow).companies)
{
Console.WriteLine("cmp" + c.companyName);
this.companytbl.Items.Add(c);
}
}
STEP 4: IMPLEMENT C# CODE – DISPLAY (SHOW) COMPANY DETAILS
The company details are shown for the selected company record, and options are
provided to edit and delete the company. The company details window accepts the
record id in the array list and show the company details for that record based on the
record id
Code:
public CompanyDetailsWindow(int id)
{
this.recordid = id;
InitializeComponent();
cmp = (Company)
((MainWindow)Application.Current.MainWindow).companies[id];
this.txtCompanyName.Text = cmp.companyName;
this.txtCountry.Text = cmp.country;
this.txtFirstName.Text = cmp.contactFirstName;
this.txtLastName.Text = cmp.contactLastName;
this.txtEmail.Text = cmp.email;
this.txtPhoneNumber.Text = cmp.phonenumber;
this.txtPostcode.Text = cmp.postcode;
this.txtState.Text = cmp.state;
this.txtAddressLine1.Text = cmp.addressLine;
this.txtWebsite.Text = cmp.website;
this.txtSuburbCity.Text = cmp.city;
}
Document Page
STEP 5: IMPLEMENT C# CODE – EDIT COMPANY
The edit company window too accepts the record id and displayed the details of the
record for that id, and allows user to make changes to the record, when user chooses to
save the changes the company object in the array list is replaced with the updated
record.
Code:
public EditCompanyDetailsWindow(int id)
{
this.recordid = id;
InitializeComponent();
cmp = (Company)
((MainWindow)Application.Current.MainWindow).companies[id];
this.txtEditCompanyName.Text = cmp.companyName;
this.txtEditCountry.Text = cmp.country;
this.txtEditFirstName.Text = cmp.contactFirstName;
this.txtEditLastName.Text = cmp.contactLastName;
this.txtEditEmail.Text = cmp.email;
this.txtEditPhoneNumber.Text = cmp.phonenumber;
this.txtEditPostcode.Text = cmp.postcode;
this.txtEditState.Text = cmp.state;
this.txtEditAddressLine1.Text = cmp.addressLine;
this.txtEditWebsite.Text = cmp.website;
this.txtEditSuburbCity.Text = cmp.city;
}
Setting the updated record
Code:
Company updatedcmp= new Company(this.txtEditCompanyName.Text,
this.txtEditAddressLine1.Text, this.txtEditFirstName.Text,
Document Page
this.txtEditLastName.Text, this.txtEditSuburbCity.Text,
this.txtEditPhoneNumber.Text, this.txtEditPostcode.Text,
this.txtEditState.Text, this.txtEditEmail.Text,
this.txtEditCountry.Text, this.txtEditWebsite.Text);
((MainWindow)Application.Current.MainWindow).companies[this.recordid]
= updatedcmp;
tabler-icon-diamond-filled.svg

Paraphrase This Document

Need a fresh take? Get an instant paraphrase of this document with our AI Paraphraser
Document Page
Record Updated
STEP 6: IMPLEMENT C# CODE – DELETE COMPANY
First the confirmation is asked to the client before deleting the record, if client chooses
to the delete the record then the selected record is removed from the array list
Code:
MessageBoxResult messageBoxResult = System.Windows.MessageBox.Show("Are you
sure?", "Delete Confirmation", System.Windows.MessageBoxButton.YesNo);
if (messageBoxResult == MessageBoxResult.Yes)
{
((MainWindow)Application.Current.MainWindow).companies.RemoveAt(this.recordid);
((MainWindow)Application.Current.MainWindow).lblStatudBar.Content
= "Company Deleted";
this.Close();
}
Document Page
Document Page
STEP 8: IMPLEMENT C# CODE FOR DASHBOARD
The status of the application is updated based on the user action by changing the status
bar content.
The notification regarding the Caps Lock, Num Lock, and Scroll Lock is shown by
detecting the key press based on the key down event and the check is made to be sure
if the key is toggled
Code:
this.lblSCRL.Foreground = Brushes.Black;
this.lblCAPS.Foreground = Brushes.Black;
this.lblNUM.Foreground = Brushes.Black;
if ((Keyboard.GetKeyStates(Key.CapsLock) & KeyStates.Toggled) ==
KeyStates.Toggled)
{
this.lblCAPS.Foreground = Brushes.Red;
}
else {
this.lblCAPS.Foreground = Brushes.Black;
}
if ((Keyboard.GetKeyStates(Key.NumLock) & KeyStates.Toggled) ==
KeyStates.Toggled)
{
this.lblNUM.Foreground = Brushes.Red;
}
else
{
this.lblNUM.Foreground = Brushes.Black;
}
if ((Keyboard.GetKeyStates(Key.Scroll) & KeyStates.Toggled) ==
KeyStates.Toggled)
{
this.lblSCRL.Foreground = Brushes.Red;
}
else
{
this.lblSCRL.Foreground = Brushes.Black;
}
STEP 9: IMPLEMENT C# CODE – SEARCH/FILTER COMPANIES
The search function work by sorting the records based on the company name the
method used for loading the data to data grid is loaddata () which is overloaded to
accept the company name parameter, which check if the search text and company
name matches and displays the record accordingly.
The load Data method is called on search button click and also on search text field key
press to update the data grid with data.
The sorting is automatic functionality of the data grid which automatically sorts the data.
Code:
private void loadData(String companyname)
{
this.companytbl.Items.Clear();
foreach (Company c in
((MainWindow)Application.Current.MainWindow).companies)
tabler-icon-diamond-filled.svg

Secure Best Marks with AI Grader

Need help grading? Try our AI Grader for instant feedback on your assignments.
Document Page
{
Console.WriteLine("cmp" + c.companyName);
if(c.companyName.ToLower().Contains(companyname.ToLower()))
this.companytbl.Items.Add(c);
}
}
chevron_up_icon
1 out of 11
circle_padding
hide_on_mobile
zoom_out_icon
logo.png

Your All-in-One AI-Powered Toolkit for Academic Success.

Available 24*7 on WhatsApp / Email

[object Object]