DTGOV Web Server Migration to AWS Cloud Computing & WordPress Instance
VerifiedAdded on 2023/06/07
|14
|1348
|51
Report
AI Summary
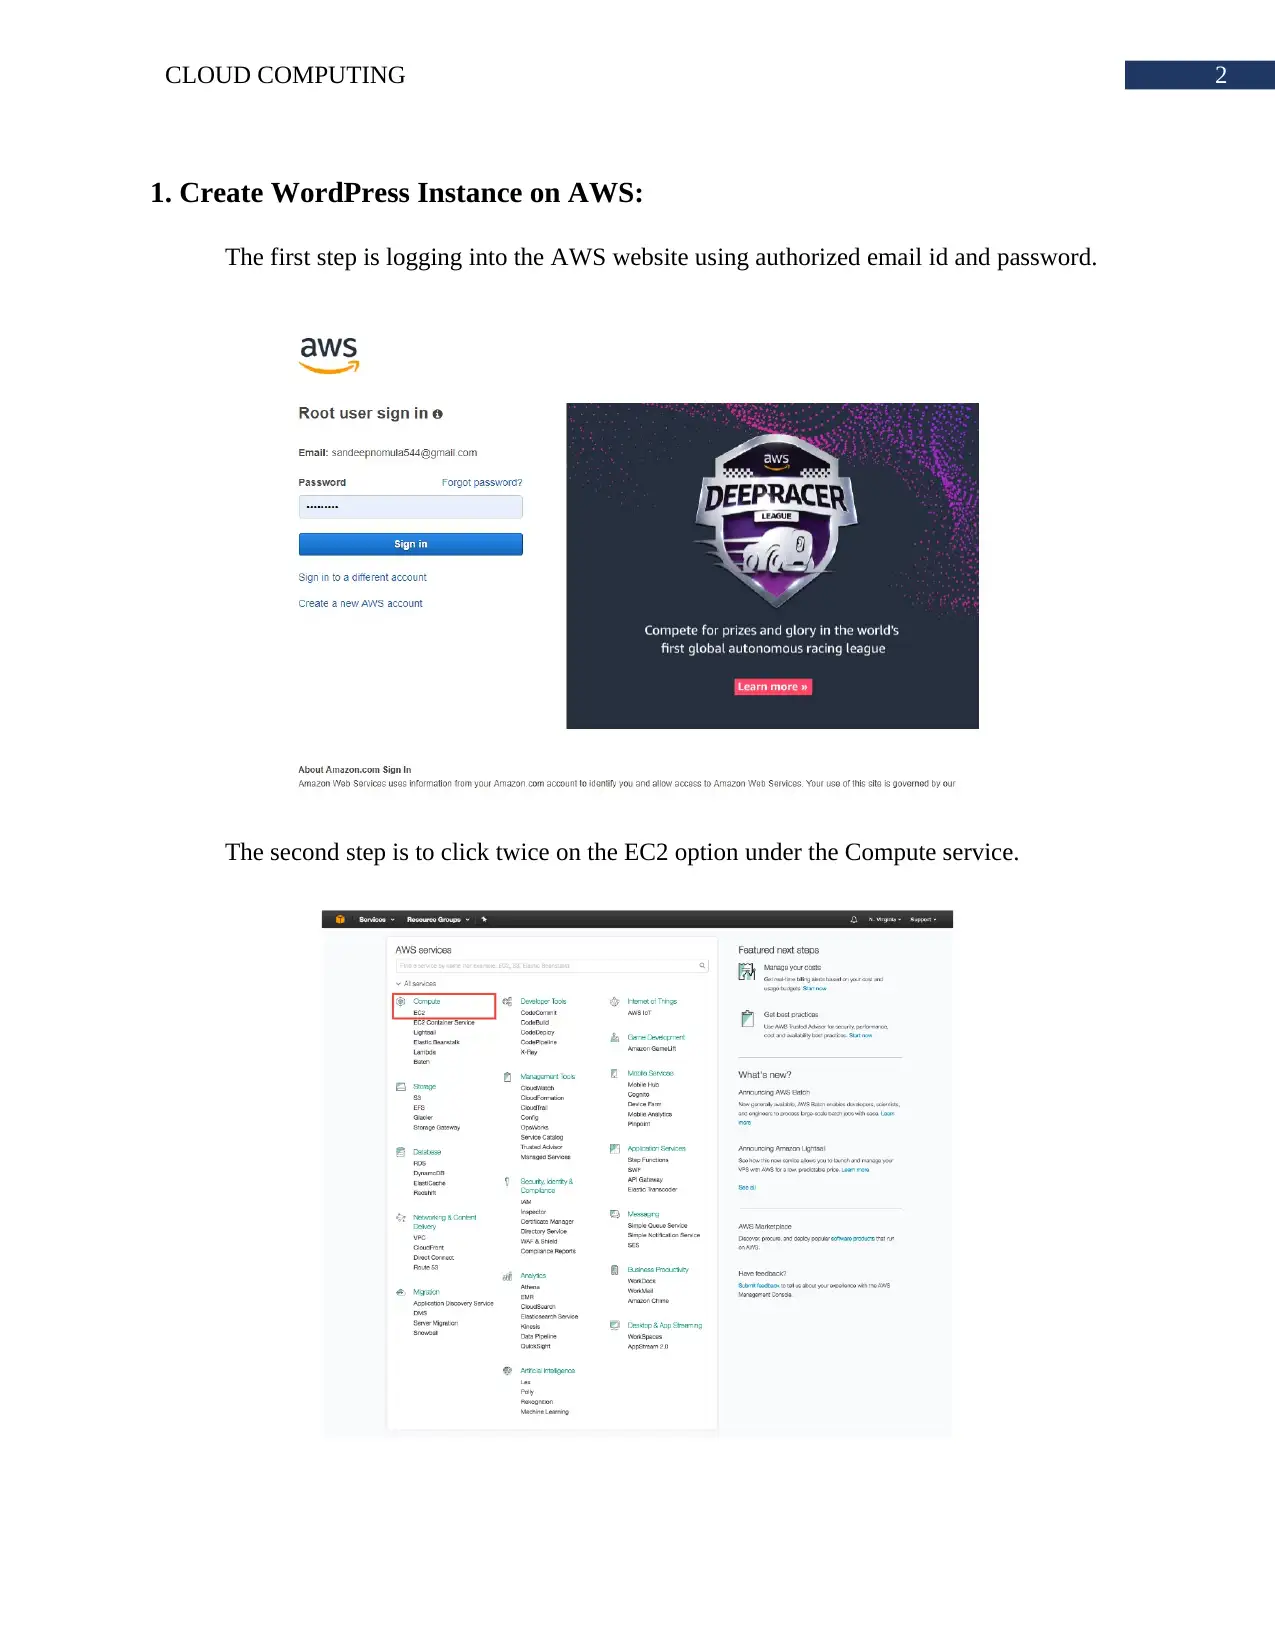
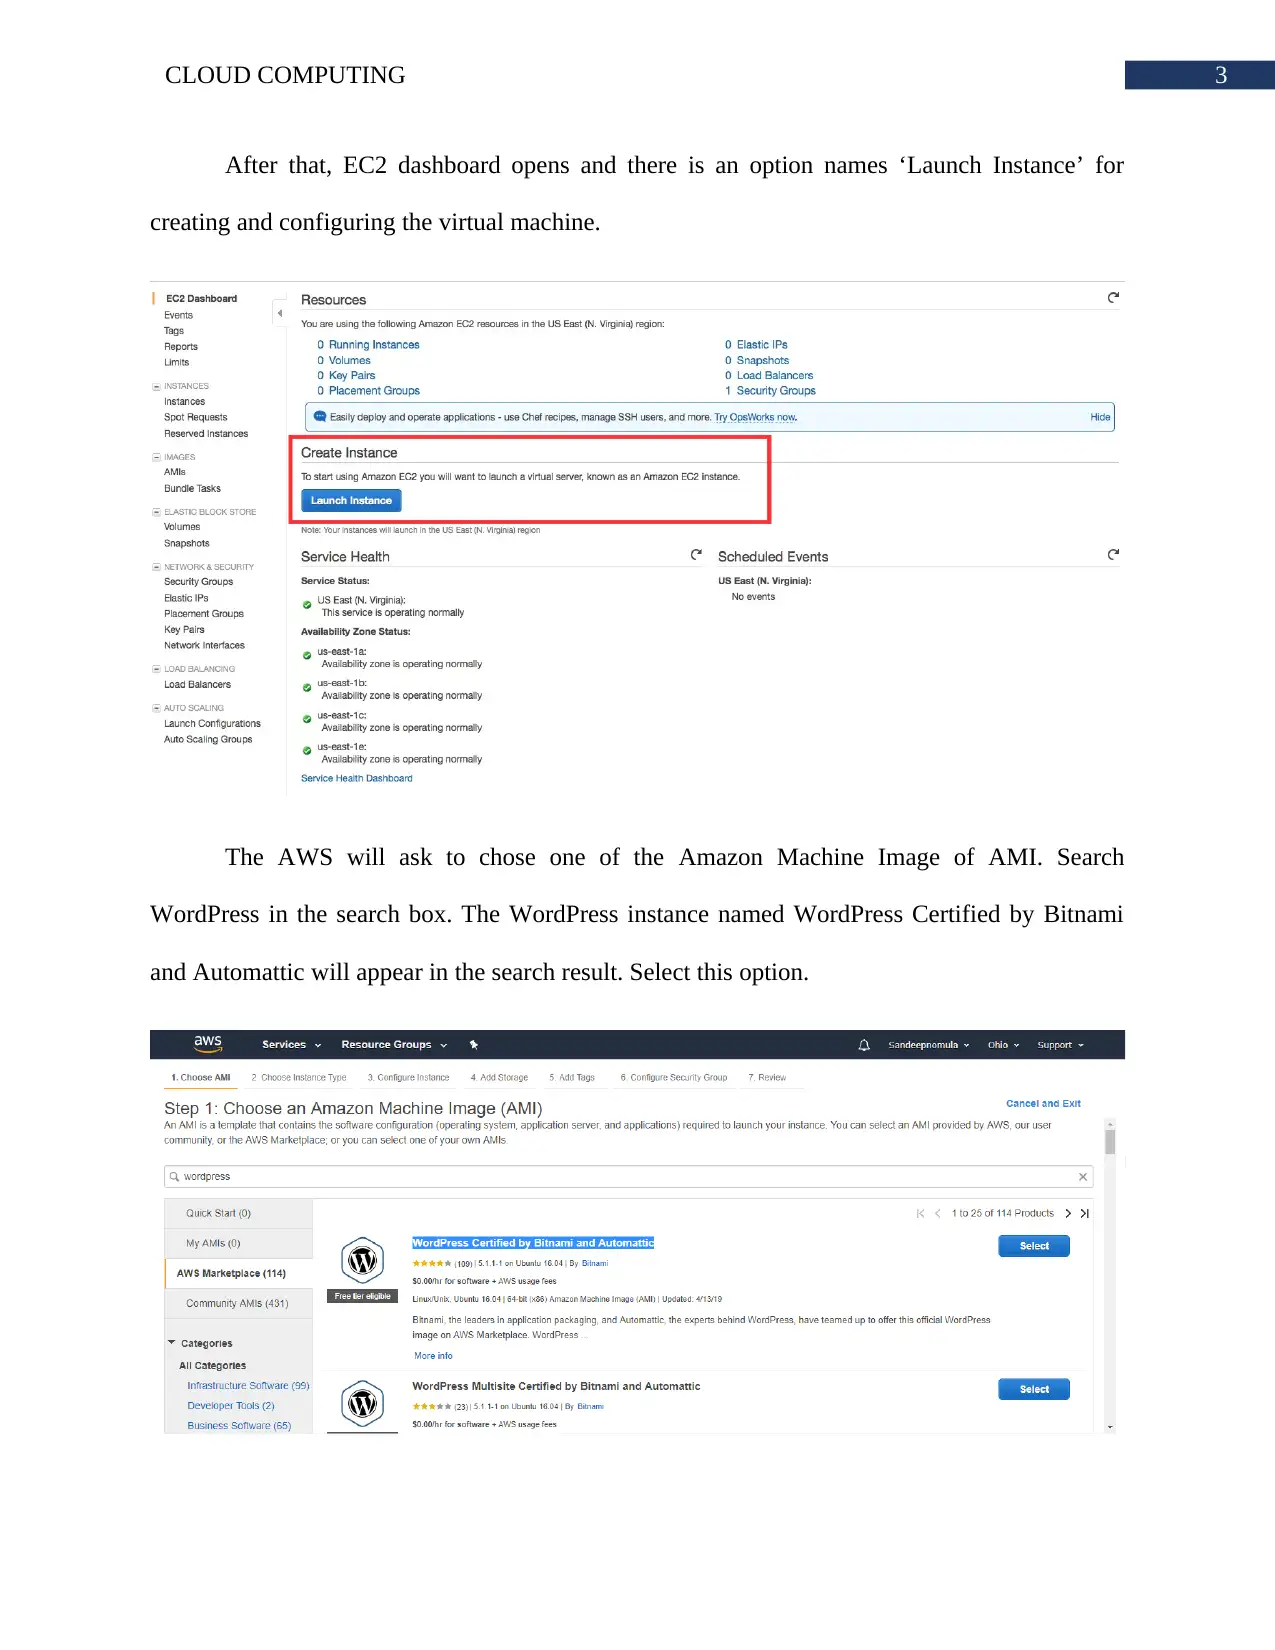
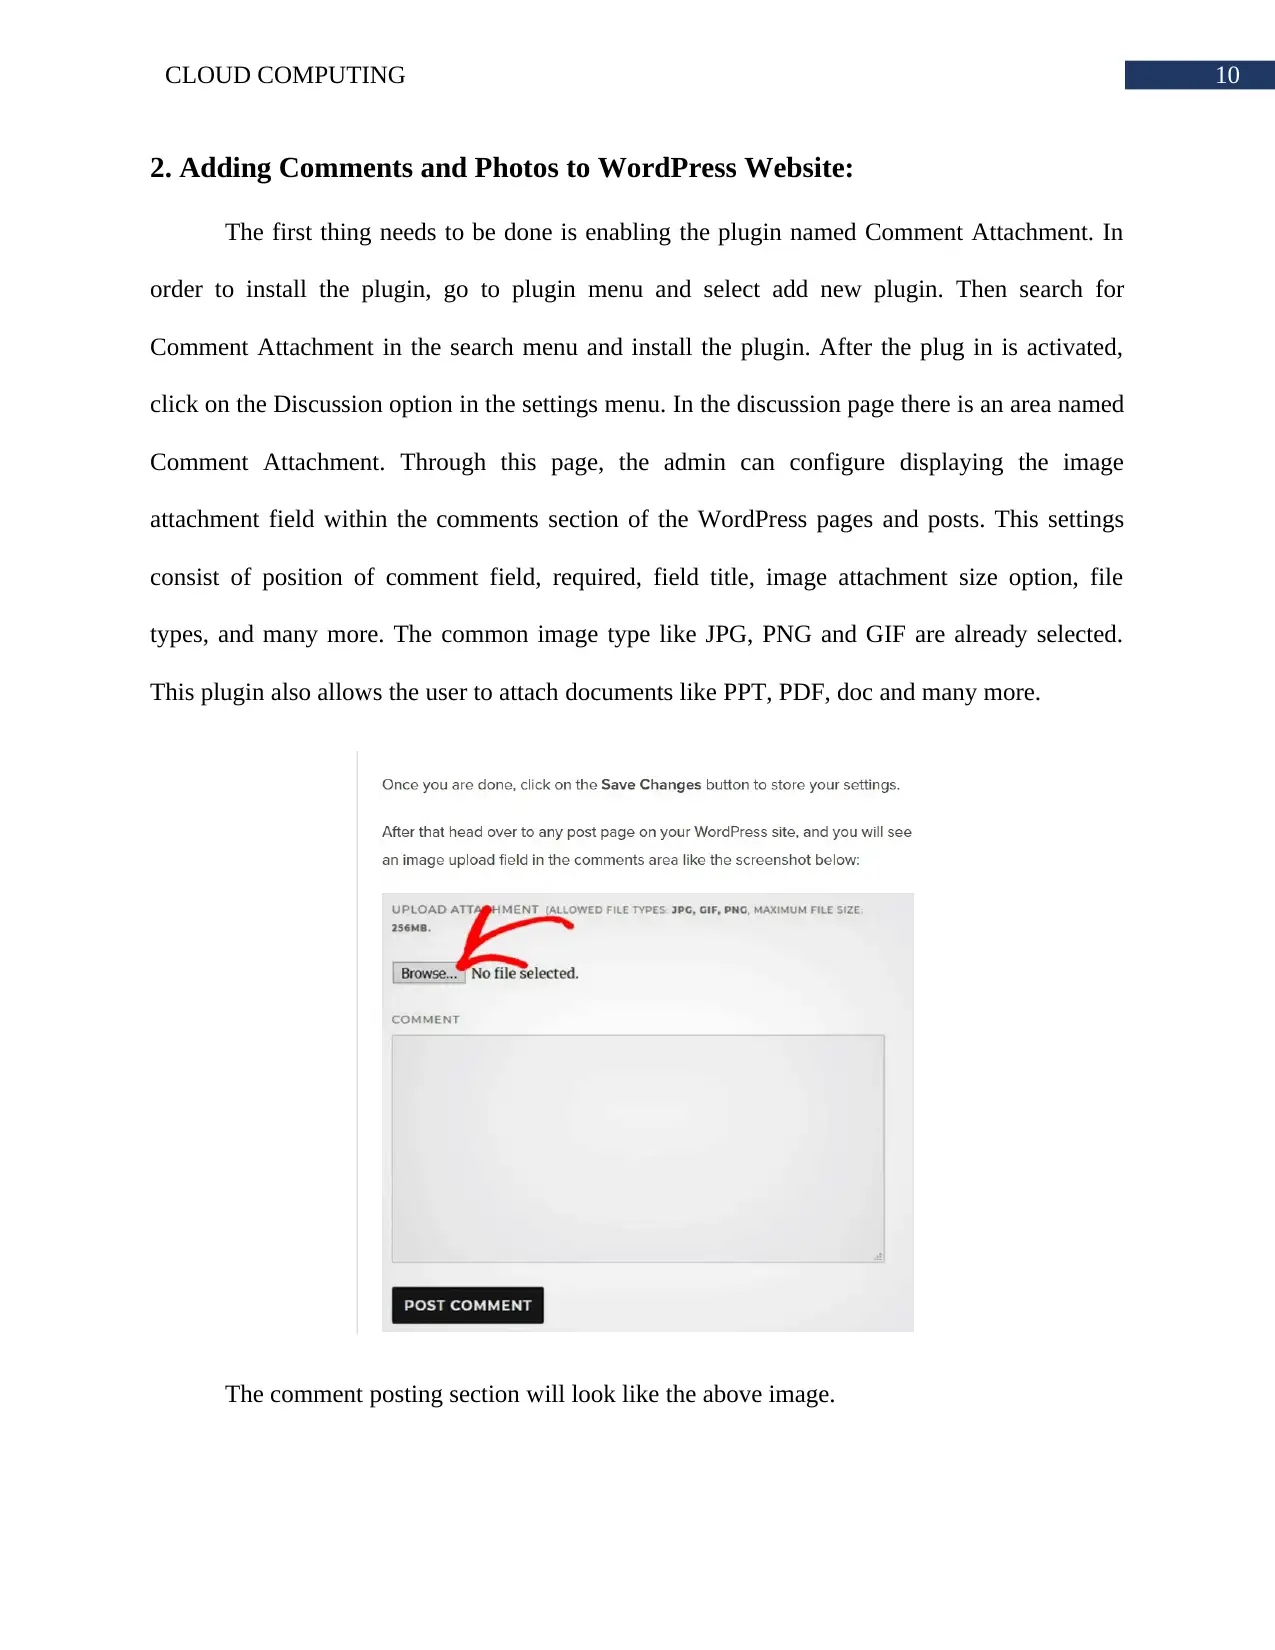
This report details the process of creating a WordPress instance on Amazon Web Services (AWS), including configuring the instance, adding comments and photos, and implementing security measures. It covers logging into AWS, launching an EC2 instance, selecting a WordPress AMI, configuring instance details, adding storage and tags, and retrieving the system log password. The report also discusses enabling the Comment Attachment plugin and configuring its settings to allow image and document attachments in comments. Furthermore, it addresses general and access security measures for WordPress websites, such as choosing a reputable hosting organization, using premium themes, installing security plugins, disabling file editing, installing SSL, using strong passwords, and limiting login attempts. The report references various sources to support its recommendations for securing WordPress websites. Finally, it explores migrating DTGOV web servers to an IaaS instance in AWS, considering the impact on users and the benefits of the move.

Running head: CLOUD COMPUTING
Cloud Computing: Amazon Web Services
Name of the Student
Name of the University
Author’s note:
Cloud Computing: Amazon Web Services
Name of the Student
Name of the University
Author’s note:
Paraphrase This Document
Need a fresh take? Get an instant paraphrase of this document with our AI Paraphraser

1CLOUD COMPUTING
Table of Contents
1. Create WordPress Instance on AWS:..........................................................................................2
2. Adding Comments and Photos to WordPress Website:............................................................10
3. Securing WordPress Website:...................................................................................................11
3.1 General Security:.................................................................................................................11
3.2 Access Security:...................................................................................................................11
Bibliography:.................................................................................................................................13

2CLOUD COMPUTING
1. Create WordPress Instance on AWS:
The first step is logging into the AWS website using authorized email id and password.
The second step is to click twice on the EC2 option under the Compute service.
1. Create WordPress Instance on AWS:
The first step is logging into the AWS website using authorized email id and password.
The second step is to click twice on the EC2 option under the Compute service.
⊘ This is a preview!⊘
Do you want full access?
Subscribe today to unlock all pages.

Trusted by 1+ million students worldwide

3CLOUD COMPUTING
After that, EC2 dashboard opens and there is an option names ‘Launch Instance’ for
creating and configuring the virtual machine.
The AWS will ask to chose one of the Amazon Machine Image of AMI. Search
WordPress in the search box. The WordPress instance named WordPress Certified by Bitnami
and Automattic will appear in the search result. Select this option.
Paraphrase This Document
Need a fresh take? Get an instant paraphrase of this document with our AI Paraphraser

4CLOUD COMPUTING
A detailed pricing page appears on the screen. Nothing more to be done in this page, so
just click on continue.
In the next page t2.micro will be available as the only free option. Chose t2.micro and
click on Next: Configure Instance Details
A detailed pricing page appears on the screen. Nothing more to be done in this page, so
just click on continue.
In the next page t2.micro will be available as the only free option. Chose t2.micro and
click on Next: Configure Instance Details

5CLOUD COMPUTING
Configure Instance Details page opens in this step. Nothing to be changed here.
Therefore, click on the ‘Add Storag’ option.
The add storage is also needs to be default. Click on ‘Add Tags’
Configure Instance Details page opens in this step. Nothing to be changed here.
Therefore, click on the ‘Add Storag’ option.
The add storage is also needs to be default. Click on ‘Add Tags’
⊘ This is a preview!⊘
Do you want full access?
Subscribe today to unlock all pages.

Trusted by 1+ million students worldwide

6CLOUD COMPUTING
The next step is providing a name to the WordPress site. Enter Name in the Key column
and WordPress in the value column. But first click on the Add Tag option to enable the fields.
Click review and launch after entering the information.
A review page will appear in the next page. Here all the selected options can be seen.
Click on the Launch button to run the instance.
AWS will ask to choose a pair key before launching the instance. Select Proceed with a
Key Pair and Launch Instance.
Paraphrase This Document
Need a fresh take? Get an instant paraphrase of this document with our AI Paraphraser

7CLOUD COMPUTING
Wait until the status checks looks like the previous image.
Select the instance and click on actions. There is an option named Get System Log in the
instance settings. In the system log, the password can be found.
Wait until the status checks looks like the previous image.
Select the instance and click on actions. There is an option named Get System Log in the
instance settings. In the system log, the password can be found.

8CLOUD COMPUTING
The password is available in the system log.
Copy the IPv4 Public IP and paste it into the Web Browser. Then put ‘/admin’ after the ip
address and press enter to get to the login page.
The password is available in the system log.
Copy the IPv4 Public IP and paste it into the Web Browser. Then put ‘/admin’ after the ip
address and press enter to get to the login page.
⊘ This is a preview!⊘
Do you want full access?
Subscribe today to unlock all pages.

Trusted by 1+ million students worldwide

9CLOUD COMPUTING
Enter user in the username or password field and password got from the system log in the
word press login page.
From the dashboard of the home page, the WordPress website can be customized.
Enter user in the username or password field and password got from the system log in the
word press login page.
From the dashboard of the home page, the WordPress website can be customized.
Paraphrase This Document
Need a fresh take? Get an instant paraphrase of this document with our AI Paraphraser

10CLOUD COMPUTING
2. Adding Comments and Photos to WordPress Website:
The first thing needs to be done is enabling the plugin named Comment Attachment. In
order to install the plugin, go to plugin menu and select add new plugin. Then search for
Comment Attachment in the search menu and install the plugin. After the plug in is activated,
click on the Discussion option in the settings menu. In the discussion page there is an area named
Comment Attachment. Through this page, the admin can configure displaying the image
attachment field within the comments section of the WordPress pages and posts. This settings
consist of position of comment field, required, field title, image attachment size option, file
types, and many more. The common image type like JPG, PNG and GIF are already selected.
This plugin also allows the user to attach documents like PPT, PDF, doc and many more.
The comment posting section will look like the above image.

11CLOUD COMPUTING
3. Securing WordPress Website:
3.1 General Security:
The first step toward securing the WordPress website is selecting a hosting organization
that has good reputation. AWS is one of the best options for hosting a WordPress website
(Amazon, 2015). However, HostGator and Cloudaccess.net are also good choices.
The second suggestion is not to use any nulled theme within the website. Always
premium themes must be considered over the free themes (Rautanen, 2015). Because, the
premium themes are codes by best professionals and implement multiple check right approaches.
The support is also far better than free themes.
Installing WordPress Security Plugin. The owner or administrator must check for
malware. One ways is to regularly knowing more about the current threats and check the codes
manually (Jerkovic & Sinkovic, 2017). Other option is installing security plug in and allow the
plug in to do the work instead.
Disabling file editing option is one of the recommended settings for WordPress. The
theme editor option is available under the Appearance menu (Kalin, 2013). The plug editor is
available under the plugins option.
3.2 Access Security:
Installing the Single Sockets Layer is also a crucial step toward increasing the security of
the website. In order to process payments, the Single Sockets Layer is essential to install
(Tajalizadehkhoob, Van Goethem, Korczyński, Noroozian, Böhme, Moore & van Eeten, 2017).
This piece of technology is a must for the websites that handle sensitive data.
⊘ This is a preview!⊘
Do you want full access?
Subscribe today to unlock all pages.

Trusted by 1+ million students worldwide
1 out of 14
Related Documents

Your All-in-One AI-Powered Toolkit for Academic Success.
+13062052269
info@desklib.com
Available 24*7 on WhatsApp / Email
Unlock your academic potential
Copyright © 2020–2025 A2Z Services. All Rights Reserved. Developed and managed by ZUCOL.