Enterprise Communications Practical: Diploma of IT, Semester 2, 2019

Verified

Added on  2022/10/06

|24
|3036
|19
Practical Assignment
AI Summary
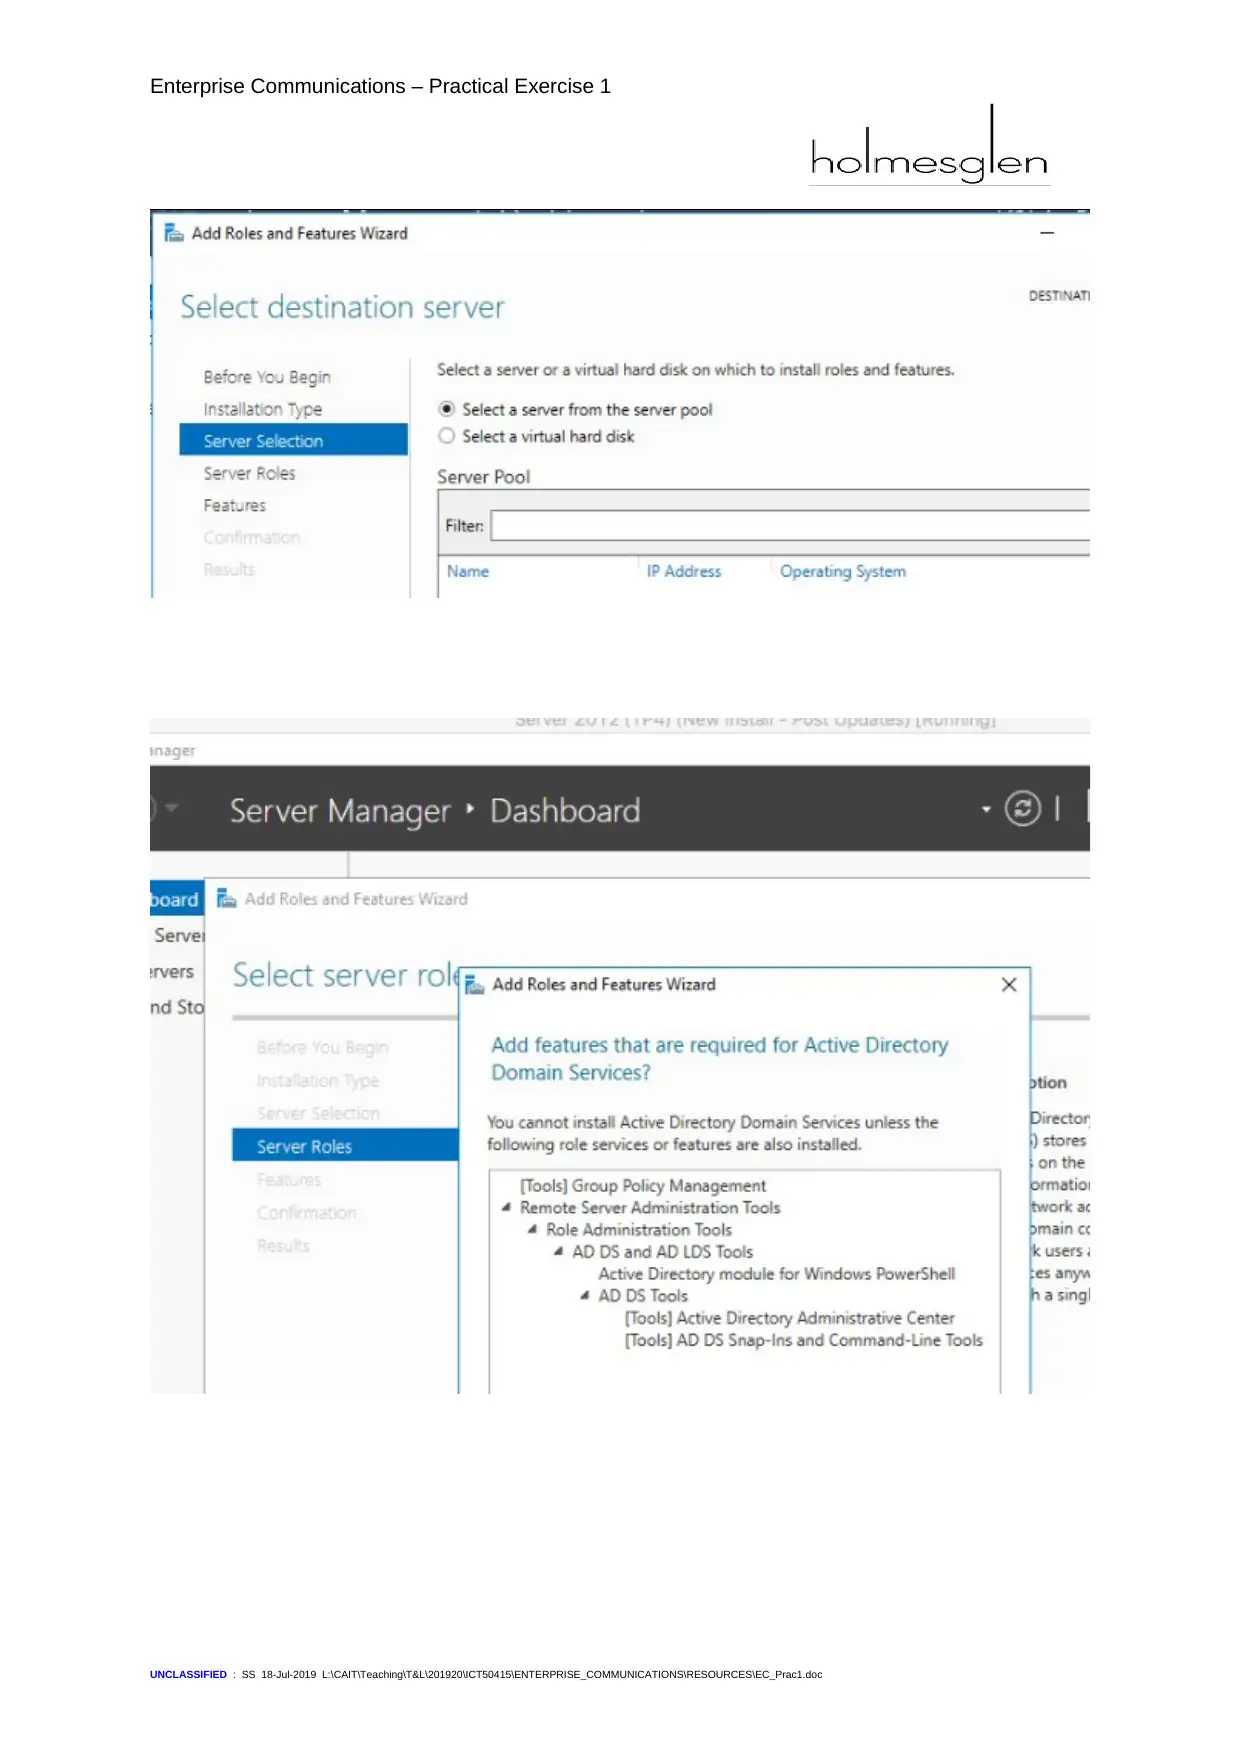
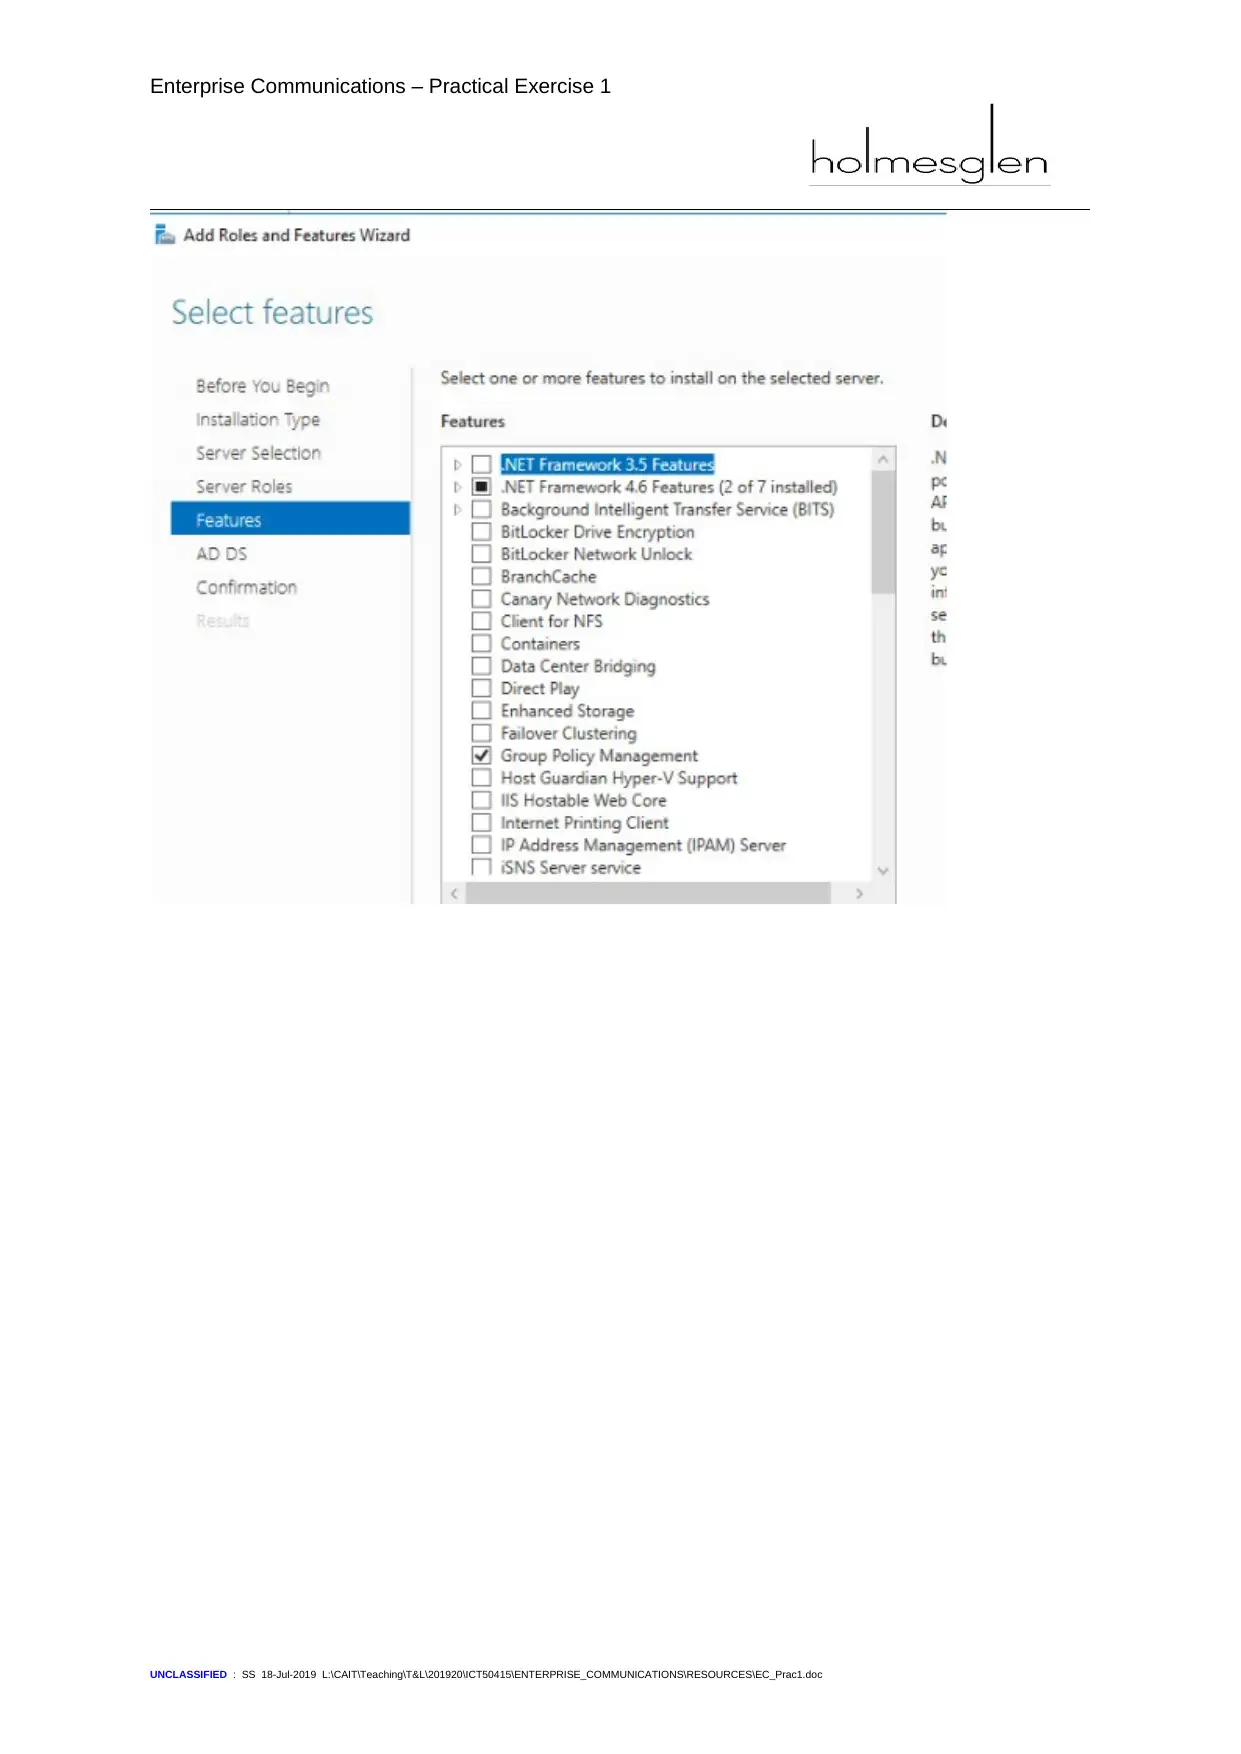
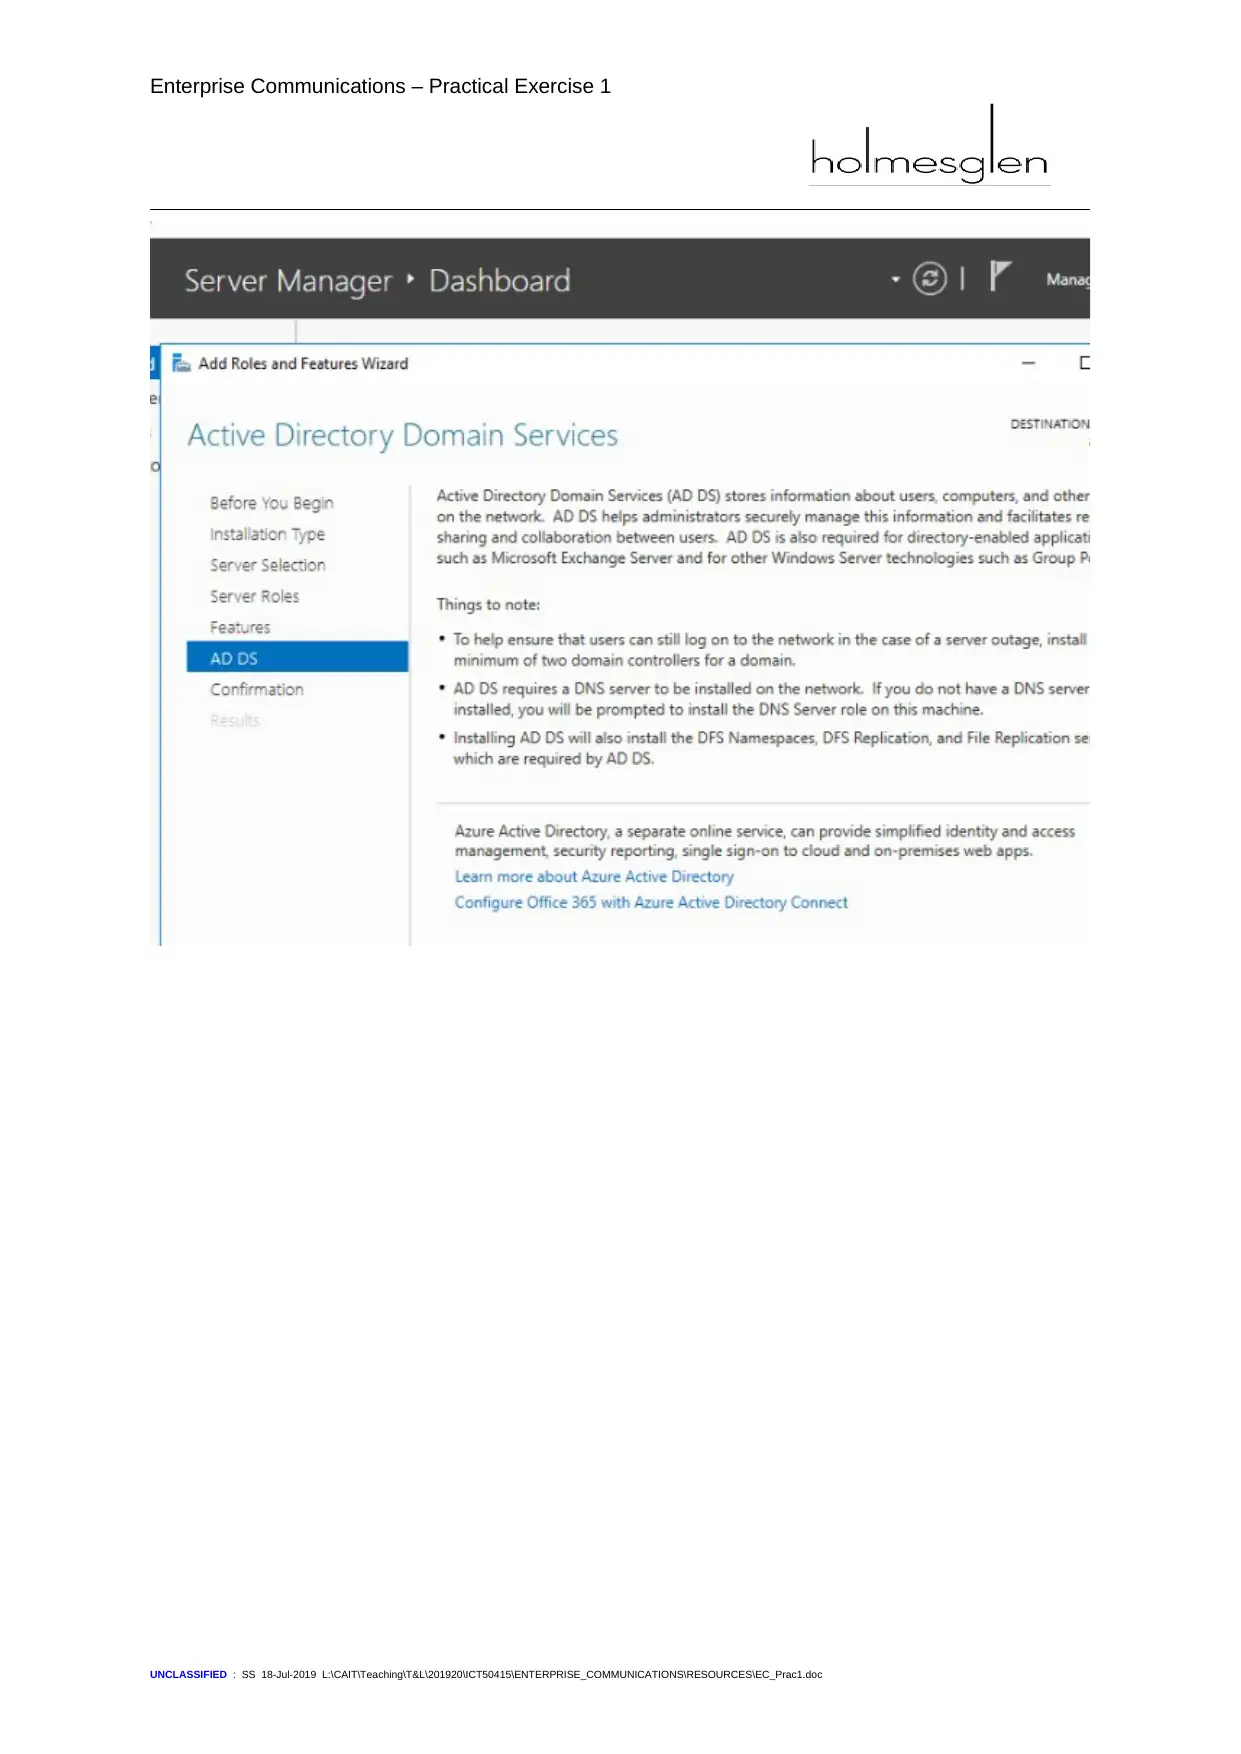
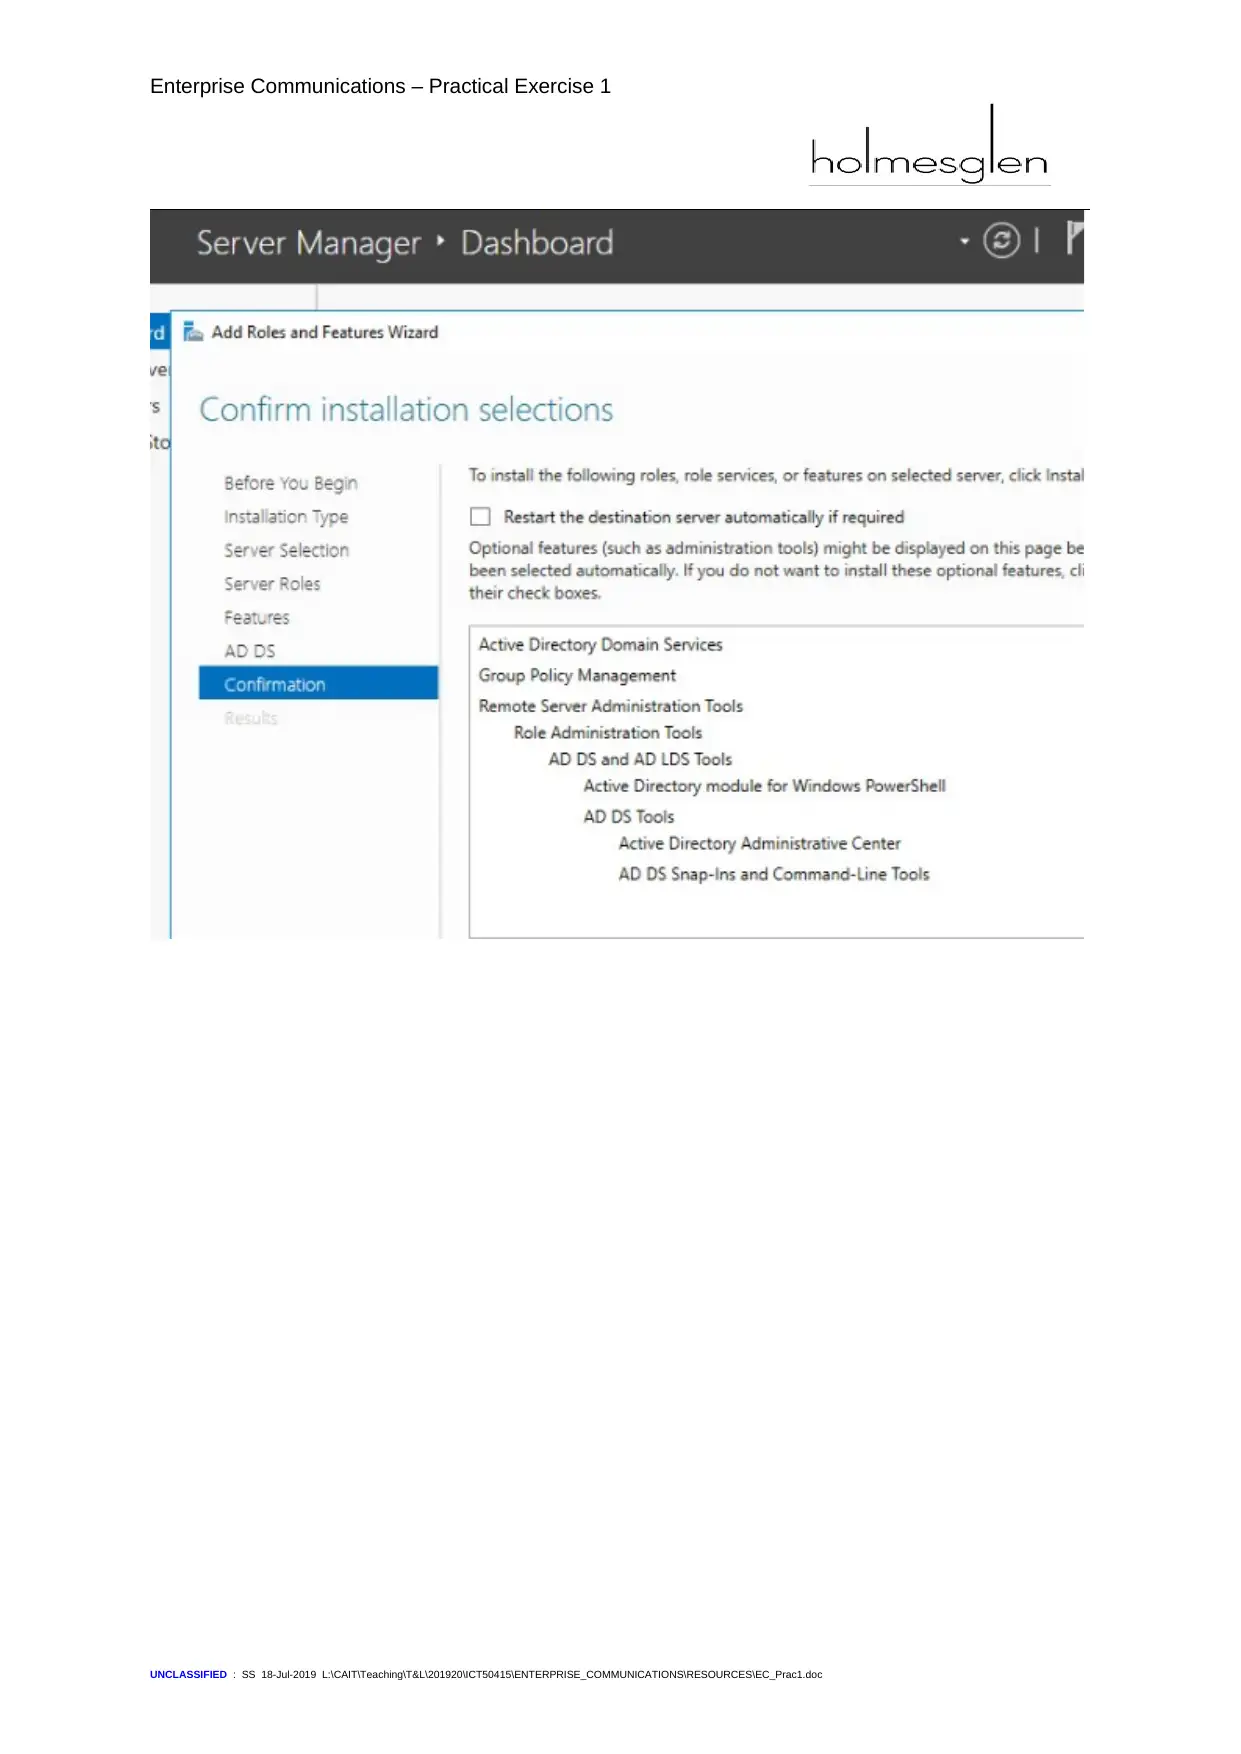
This practical assignment for the Enterprise Communications module (ICT50415 Diploma of Information Technology Networking) involves a series of hands-on exercises designed to explore and implement various aspects of enterprise communication systems. The assignment begins with planning and configuring a basic mail system using hMailServer and Thunderbird within a VMware Workstation environment, including setting up DNS servers and routers. Students are tasked with implementing a Windows 2016 server and a Windows 10 workstation, configuring network settings, and establishing domain connectivity. Subsequent activities involve installing Active Directory, configuring MX records, creating user accounts, and testing mail client functionality. The assignment then progresses to exploring VoIP systems using OfficeSIP and Skype for Business, and concludes with the configuration of a PBX system. Students are expected to document their steps, troubleshoot issues, and demonstrate an understanding of the underlying protocols and technologies involved in enterprise communications.
tabler-icon-diamond-filled.svg

Contribute Materials

Your contribution can guide someone’s learning journey. Share your documents today.
Document Page
Enterprise Communications – Practical Exercise 1
Department of
Computing and Information Technology
EnterpriseWeb Authoring
Semester 2, 2019
Version 1.0: 31/08/2024
ICT50415 Diploma of Information Technology Networking
Competencies
ICANWK501: Plan, implement and test enterprise communication solutions
ICTTEN512: Design and implement an enterprise voice over internet protocol and a unified
communications network
ICTNWK505: Design, build and test a network server
Instructions
To Students
Submit your assessment items by the specified dates
Present material according to IT Dept. standards
specified.
Practical activities are to be noted down in the student
journals specifically for this subject. Result will be
allotted according to the practical and the write up.
Method Introductory Activity – Assessed as a Prac in-class activity
Due Date
As completed. Refer to subject outline.
Tools &
Equipment
Windows Based Computer(s) with Virtualisation Environment
Grade A satisfactory assessment.
UNCLASSIFIED : SS 18-Jul-2019 L:\CAIT\Teaching\T&L\201920\ICT50415\ENTERPRISE_COMMUNICATIONS\RESOURCES\EC_Prac1.doc
tabler-icon-diamond-filled.svg

Secure Best Marks with AI Grader

Need help grading? Try our AI Grader for instant feedback on your assignments.
Document Page
Enterprise Communications – Practical Exercise 1
Practical 1
Aim
The aims of this exercise are to investigate some of the resourcing requirements and basic
concepts around installing and configuring a simple mail system.
Firstly, we will configure the mail system to work locally. Then we will implement infrastructure,
such as DNS Servers and Routers, to permit mail transports across different notional sites.
We will investigate this using simple software – hMail and Thunderbird. Utilising these tools, we
will be able to discover some of the basic issues and configuration specifics that we will need when
implementing more comprehensive systems.
Activities 1 – 6 should be completed individually. Activity 7 & 8 should be completed with another
student.
Note that this is a Diploma subject and that steps for pracs will now be less prescriptive. You may
need to research how to complete tasks yourself by using The Internet or documentation available
for your products.
This exercise will be completed within a VMware Workstation Environment.
You must maintain an error log sheet and mention how you troubleshot the issues.
Read the entire activity before starting!!!
Document the steps that you followed in your Journal. Journal must have full screen
and clear screenshots.
Activity 1 (Implementation Planning)
In this activity we will prepare the basic server OS, workstation OS and their networking environs.
The server environ will be implemented within a Windows 2016 Virtual Machine.
By default, the NAT environment is configured to use the 192.168.200.0/24 subnet.
Each student should also determine their internet domain name (i.e.xxxstudentid.edu.au) for their
environment, where xxx = the first three letters of their surname and studentid is their student
number.
i.e. Student “Saththiyan Satchi” with student number 12345678 has domain name
Sat12345678.edu.au” Domains without the students’ name will not be accepted.
Student name : Gurjashanjeet Singh
Student ID number : 100602009
SIN100602009.edu.au should be the correct domain name.
Server Specification:
UNCLASSIFIED : SS 18-Jul-2019 L:\CAIT\Teaching\T&L\201920\ICT50415\ENTERPRISE_COMMUNICATIONS\RESOURCES\EC_Prac1.doc
Document Page
Enterprise Communications – Practical Exercise 1
Deploy a Windows 2016 Server Virtual machine.
Allocate a 4GB of RAM and at least 60GB of Virtual HDD space to this VM.
Implement the VM within a NAT networking environ.
o Remember that the 192.168.x.2 address is the address of the NAT/Router
A Windows Server 2016 can be downloaded from or use the MSDNAA
o As we are working in VMware Player and need to do a fresh install download
the .iso version. Save a copy of this to your removable HDD.
Establish Internet connectivity with this VM
Activate this VM
Update this VM using the Windows Update facility.
Configure the Server Virtual Machine as follows:
Install the server with “Server with a GUI” option
Machine Name: win2k16dc
Change the “Primary DNS suffix of the computer” to that which you determined earlier:
o i.e. Sat12345678.edu.au
IP Address: 192/168.200.10/24.
Gateway: 192.168.200.1
o Note this will be the address of your Router NAT interface implemented in
VMware Player.
Used 192.168.200.1 in my VMware workstation Pro
DNS Server: 127.0.0.1
o Remember that the only time a DNS server address of 127.0.0.1 is set is when
the machine that you are on will be a DNS server itself.
UNCLASSIFIED : SS 18-Jul-2019 L:\CAIT\Teaching\T&L\201920\ICT50415\ENTERPRISE_COMMUNICATIONS\RESOURCES\EC_Prac1.doc
Document Page
Enterprise Communications – Practical Exercise 1
UNCLASSIFIED : SS 18-Jul-2019 L:\CAIT\Teaching\T&L\201920\ICT50415\ENTERPRISE_COMMUNICATIONS\RESOURCES\EC_Prac1.doc
tabler-icon-diamond-filled.svg

Secure Best Marks with AI Grader

Need help grading? Try our AI Grader for instant feedback on your assignments.
Document Page
Enterprise Communications – Practical Exercise 1
Workstation Specification:
You will deploy a Windows 10 Workstation within a VM to implement and simulate client
connectivity.
UNCLASSIFIED : SS 18-Jul-2019 L:\CAIT\Teaching\T&L\201920\ICT50415\ENTERPRISE_COMMUNICATIONS\RESOURCES\EC_Prac1.doc
Document Page
Enterprise Communications – Practical Exercise 1
Deploy a Windows 10 (64 bit) Virtual machine.
A Windows 10 can be downloaded from or use the MSDNAA
A trial version of Windows 10 (64 bit) that is active for 90 days can be downloaded from
http://www.microsoft.com/en-us/evalcenter/evaluate-windows-8-1-enterprise
o As we are working in VMware Player and need to do a fresh install download
the .iso version. Save a copy of this to your removable HDD.
Allocate a 2Gb of RAM and at least 25Gb of Virtual HDD space to this VM.
Implement the VM within a NAT networking environ.
o Name: win10ws
o IP Address: 192.168.200.100/24
o DNS: 192.168.200.10
o Gateway: 192.168.200.1
UNCLASSIFIED : SS 18-Jul-2019 L:\CAIT\Teaching\T&L\201920\ICT50415\ENTERPRISE_COMMUNICATIONS\RESOURCES\EC_Prac1.doc
Document Page
Enterprise Communications – Practical Exercise 1
Change the “Primary DNS suffix of the computer” to that which you determined earlier:
o i.e. Sat12345678.edu.au
Save settings and reboot the machine
Now you need to test connectivity between machines.
Open a command prompt window on both the server and Workstation
Ping each machine:
o ping 192.168.200.2 From every machine
o ping 192.168.200.10 From the workstation
o ping 192.168.200.100 From the server
UNCLASSIFIED : SS 18-Jul-2019 L:\CAIT\Teaching\T&L\201920\ICT50415\ENTERPRISE_COMMUNICATIONS\RESOURCES\EC_Prac1.doc
tabler-icon-diamond-filled.svg

Paraphrase This Document

Need a fresh take? Get an instant paraphrase of this document with our AI Paraphraser
Document Page
Enterprise Communications – Practical Exercise 1
Resolve any connectivity issues should they exist.
Test internet connectivity for each machine.
Both the Server and the client workstation(s) should now have IP settings set appropriately and
should be able to access the internet.
Activity 2 (Install and configure Domain and DNS )
At this point we are going to deploy Active Directory to the Windows 2016 server and join the
Windows 10 Workstation to this domain.
This is technically not required to complete this exercise.
Should you not be sure on how to do this please refer to this “Eli The Computer Guy” video at:
https://www.youtube.com/watch?v=ZRRmR_FmptI
https://www.youtube.com/watch?v=4lWtqOcufkQ
Perform the following activities:
Deploy Active Directory to your Windows 2016 Server
Each student should also determine their Active Directory domain name
(i.e.xxxstudentid.edu.au) for their environment, where xxx = the first three letters of their
surname and studentid is their student number.
o i.e. Student “Saththiyan Satchi” with student number 12345678 has domain
name “Sat12345678.edu.au”
Ensure that the DNS server is properly configured.
Note: There is no need to install a DHCP server at this time as VMware Player has a
built-in DHCP server although this may be desirable for future exercises. If you do install
the DHCP server within Windows 2016 disable the VMware Player DHCP Server from the
vmnetcfg” console that should be available on your desktop.
Join the Windows 10 workstation to your Active Directory domain.
Document the steps that you followed to obtain and install your tool in your Journal.
UNCLASSIFIED : SS 18-Jul-2019 L:\CAIT\Teaching\T&L\201920\ICT50415\ENTERPRISE_COMMUNICATIONS\RESOURCES\EC_Prac1.doc
Document Page
Enterprise Communications – Practical Exercise 1
UNCLASSIFIED : SS 18-Jul-2019 L:\CAIT\Teaching\T&L\201920\ICT50415\ENTERPRISE_COMMUNICATIONS\RESOURCES\EC_Prac1.doc
Document Page
Enterprise Communications – Practical Exercise 1
UNCLASSIFIED : SS 18-Jul-2019 L:\CAIT\Teaching\T&L\201920\ICT50415\ENTERPRISE_COMMUNICATIONS\RESOURCES\EC_Prac1.doc
tabler-icon-diamond-filled.svg

Secure Best Marks with AI Grader

Need help grading? Try our AI Grader for instant feedback on your assignments.
Document Page
Enterprise Communications – Practical Exercise 1
UNCLASSIFIED : SS 18-Jul-2019 L:\CAIT\Teaching\T&L\201920\ICT50415\ENTERPRISE_COMMUNICATIONS\RESOURCES\EC_Prac1.doc
Document Page
Enterprise Communications – Practical Exercise 1
UNCLASSIFIED : SS 18-Jul-2019 L:\CAIT\Teaching\T&L\201920\ICT50415\ENTERPRISE_COMMUNICATIONS\RESOURCES\EC_Prac1.doc
Document Page
Enterprise Communications – Practical Exercise 1
UNCLASSIFIED : SS 18-Jul-2019 L:\CAIT\Teaching\T&L\201920\ICT50415\ENTERPRISE_COMMUNICATIONS\RESOURCES\EC_Prac1.doc
tabler-icon-diamond-filled.svg

Paraphrase This Document

Need a fresh take? Get an instant paraphrase of this document with our AI Paraphraser
Document Page
Enterprise Communications – Practical Exercise 1
UNCLASSIFIED : SS 18-Jul-2019 L:\CAIT\Teaching\T&L\201920\ICT50415\ENTERPRISE_COMMUNICATIONS\RESOURCES\EC_Prac1.doc
Document Page
Enterprise Communications – Practical Exercise 1
Activity 3(install and configure hmail server)
In this activity we will acquire and deploy all the resources needed for the exercise.
Firstly, we need to deploy Thunderbird within the Windows 10 workstation.
Download and deploy Thunderbird from the following URL:
http://www.mozilla.org/en-US/thunderbird/
Skip any “Integration” or “Account Setup” at this stage.
The VMware Player Virtual environment shares an IP address with the host operating system. For
the NAT interface that we are using this IP address is 192.168.200.1
The Mozilla Thunderbird client should already be installed on the base OS of each machine.
If Thunderbird is installed it may need updating.
Select Help.
Thunderbird should auto-update.
The next state is to download hMail
Download the latest production release of hMail to this machine to the Windows 2016 server.
http://www.hmailserver.com/index.php?page=download
UNCLASSIFIED : SS 18-Jul-2019 L:\CAIT\Teaching\T&L\201920\ICT50415\ENTERPRISE_COMMUNICATIONS\RESOURCES\EC_Prac1.doc
Document Page
Enterprise Communications – Practical Exercise 1
Deploy the hMail Server
A simple tutorial is available at https://www.youtube.com/watch?v=AbYINKGo0Wc as a
guide.
Document the steps that you followed to obtain and install your tool in your Journal.
UNCLASSIFIED : SS 18-Jul-2019 L:\CAIT\Teaching\T&L\201920\ICT50415\ENTERPRISE_COMMUNICATIONS\RESOURCES\EC_Prac1.doc
tabler-icon-diamond-filled.svg

Secure Best Marks with AI Grader

Need help grading? Try our AI Grader for instant feedback on your assignments.
Document Page
Enterprise Communications – Practical Exercise 1
UNCLASSIFIED : SS 18-Jul-2019 L:\CAIT\Teaching\T&L\201920\ICT50415\ENTERPRISE_COMMUNICATIONS\RESOURCES\EC_Prac1.doc
Document Page
Enterprise Communications – Practical Exercise 1
UNCLASSIFIED : SS 18-Jul-2019 L:\CAIT\Teaching\T&L\201920\ICT50415\ENTERPRISE_COMMUNICATIONS\RESOURCES\EC_Prac1.doc
Document Page
Enterprise Communications – Practical Exercise 1
UNCLASSIFIED : SS 18-Jul-2019 L:\CAIT\Teaching\T&L\201920\ICT50415\ENTERPRISE_COMMUNICATIONS\RESOURCES\EC_Prac1.doc
tabler-icon-diamond-filled.svg

Paraphrase This Document

Need a fresh take? Get an instant paraphrase of this document with our AI Paraphraser
Document Page
Enterprise Communications – Practical Exercise 1
Mail boxes and mail clients are configured as asked in the remaining tasks.
Activity 4 (Create and configure MX records for mail server access)
In this Activity we will configure the DNS Server on our machine designated as the server that will
also hold the mail server itself.
Use the Server Manager of Windows Server 2016 to install the DNS Service if it has not
already been deployed.
Install a “Forward Lookup Zone” zone for the subnet that you have been allocated.
Make sure that there is an “A” record for each machine in your group.
Create a MX record for your “Host Domain” (i.e. home.org,au) and point it to the “A” record of
the machine that is to become your mail server.
Create an Alias record of “mail” to the “A” record of the machine that is to become your mail
server.
Note: leave the “Host or child domain:” box BLANK
The “Fully qualified domain name (FQDN) of mail server:” box should point to the fully
qualified domain name of your server.
Fully test domain name resolution with the “ping” and “nslookup” commands at both IP
address and host/domain name levels
nslookup -type:MX sat12345678.org.au where sat12345678.org.au is
replaced with your domain name, may assist
UNCLASSIFIED : SS 18-Jul-2019 L:\CAIT\Teaching\T&L\201920\ICT50415\ENTERPRISE_COMMUNICATIONS\RESOURCES\EC_Prac1.doc
Document Page
Enterprise Communications – Practical Exercise 1
Only continue when all name resolution issues are resolved.
Activity 5 (Configure users, mailboxes, address lists, distribution lists and user
constraints)
In this Activity we will install hMail server and create accounts.
Firstly, review the following tutorials for installing and deploying hMail:
https://www.hmailserver.com/documentation/latest/?page=howto_install
https://www.hmailserver.com/documentation/latest/?page=basic_configuration
https://www.youtube.com/watch?v=7SZcogPRXNk
https://www.youtube.com/watch?v=gmR5UIo-0bo
If hMail is not already installed on your server install hMail now
Create a domain for your allocated internet domain (i.e. sat12345678.edu.au)
Create accounts for the following users:
User A: Account Sathi@your-domain.edu.au Password Tafe123!
User B: Account Fred@your-domain.edu.au Password Tafe123!
User C: Account Sara@your-domain.edu.au Password Tafe123!
Document the steps that you followed in your Journal.
Activity 6 (Configure mail client)
In this Activity we will configure Thunderbird on each machine to retrieve and send mail for each
account (i.e. one account per PC)
Configure Thunderbird for User A within the Windows 10 OS installed within a VM. Diagnose
any connection issues.
Likewise configure Thunderbird for User B and User C on the host OS.
Test that you can send email between each user.
Document the steps that you followed in your Journal.
UNCLASSIFIED : SS 18-Jul-2019 L:\CAIT\Teaching\T&L\201920\ICT50415\ENTERPRISE_COMMUNICATIONS\RESOURCES\EC_Prac1.doc
Document Page
Enterprise Communications – Practical Exercise 1
Activity 7(Prepare Remote mail access)
In this activity we will use simple routing techniques to exchange mail across different domains
and resources.
Document your planning how you could create this in the virtual environment.
Prepare a detailed network diagram and mention IP address and other information.
Migrate the VM network settings to “bridged” VM Networking
You will need to collaborate with a second student at this point who has completed up to this
stage.
Reconfigure an adjacent student’s system to operate on Network 192.168.220.0/24
o Adjust all IP addresses accordingly
Adjust your base machine IP address to
o IP: 192.168.200.200/24
o Gateway: 192.168.200.2
o DNS 192.168.200.10
Adjust an adjacent student machine’s IP address to
o IP: 192.168.220.200/24
o Gateway: 192.168.220.2
o DNS 192.168.220.10
Set up “DNS Forwarder” group.
o Forward DNS Lookups to 192.168.220.10 on your DNS Server
o Forward DNS Lookups to 192.168.200.10 on the adjacent student’s DNS Server
Using a crossover cable patch each group’s networks together using a router.
o Configure the IP address of the port that YOUR PC connects to as
192.168.200.2/24.
o Configure the IP address of the port that THE ADJACENT STUDENT’S PC
connects to as 192.168.220.2/24.
Ping test via IP to ensure that all PCs can see each other.
Ping test via machine DNS names to ensure that all PCs can see each other.
Attempt to send mail to users not on your network but created on the other group’s network.
Change the specification (RAM, CPU) should you required changes to increase the
performance. Get the screenshot of your changes
Document the steps that you followed in your Journal.
Clean up and restore workstation after backup the virtual machines
UNCLASSIFIED : SS 18-Jul-2019 L:\CAIT\Teaching\T&L\201920\ICT50415\ENTERPRISE_COMMUNICATIONS\RESOURCES\EC_Prac1.doc
Activity 8 (Remote mail access)
tabler-icon-diamond-filled.svg

Secure Best Marks with AI Grader

Need help grading? Try our AI Grader for instant feedback on your assignments.
Document Page
Enterprise Communications – Practical Exercise 1
Tasks Done
The fundamental steps of setting up an hMailServer setup are simple enough for a
layman to execute. From the Start menu, hMailServer Administrator-Connect window
enables you to link to various facilities offered by hMailServer. To link to the
hMailServer version working on localhost, double-click "localhost." Enter the password
and start hMailServer Administrator. Each domain of hMailServer must be linked to a
domain of the Internet. Begin hMailAdmin, add a domain, enter a website as domain
name and save it. The next move is to connect your server's accounts. To add addresses:
Begin hMailAdmin, extend the domains module, click on domain, click on Add account,
enter account address, set up a password and save it. An email server needs to know its
public name on the Internet to function intelligently. Begin hMailAdmin, go over to
Settings > Protocols > SMTP, select the option Delivery of e-mail tab, enter the public
hostname of the computer and update the changes. If you calibrate the mail server of
your ISP as SMTP relayer, hMailServer will supply all departing mails to the mail
server of your ISP, which will supply them to the right location. Begin hMailAdmin, go
over to Settings > Protocols > SMTP, select the option Delivery of e-mail tab, enter your
ISP’s email server’s host name and update the changes. It would result in an infinite
loop if you ever mention localhost, 127.0.0.1. In hMailServer, IP ranges are used to
indicate who is permitted to deliver mail via your server. There are 2 different ranges
for hMailServer which are set by default and should be adequate. It is common for
users to report some issues which actually have very little to do with hMailServer itself,
rather are cause by some other mistakes. So hMailServer has proven to be quite simple
and easy to use without causing too much difficulty.
Explain and demonstrate a fully functioning mail environ to your teacher
Upload your Journal Notes to BrightSpace for assessment.
----------------------------------------------------------------------------------------------------------------------------
UNCLASSIFIED : SS 18-Jul-2019 L:\CAIT\Teaching\T&L\201920\ICT50415\ENTERPRISE_COMMUNICATIONS\RESOURCES\EC_Prac1.doc
Document Page
Enterprise Communications – Practical Exercise 1
If there are no further tasks given by the Teacher at this point, then shut down your virtual
operating systems. Remember to shut down the client workstation first and then the server
operating system
*********************************************************************************************************
At the end of the practical session, please ensure that you have saved the folders of the
virtual operating systems on to your USB hard disk. Before leaving the lab room return each
machine to a better state than you found it I, removing all software that you have installed.
UNCLASSIFIED : SS 18-Jul-2019 L:\CAIT\Teaching\T&L\201920\ICT50415\ENTERPRISE_COMMUNICATIONS\RESOURCES\EC_Prac1.doc
chevron_up_icon
1 out of 24
circle_padding
hide_on_mobile
zoom_out_icon
logo.png

Your All-in-One AI-Powered Toolkit for Academic Success.

Available 24*7 on WhatsApp / Email

[object Object]