IoT Network Setup in Packet Tracer: Hoarders Smart Offices
VerifiedAdded on 2022/09/16
|21
|2194
|26
Case Study
AI Summary
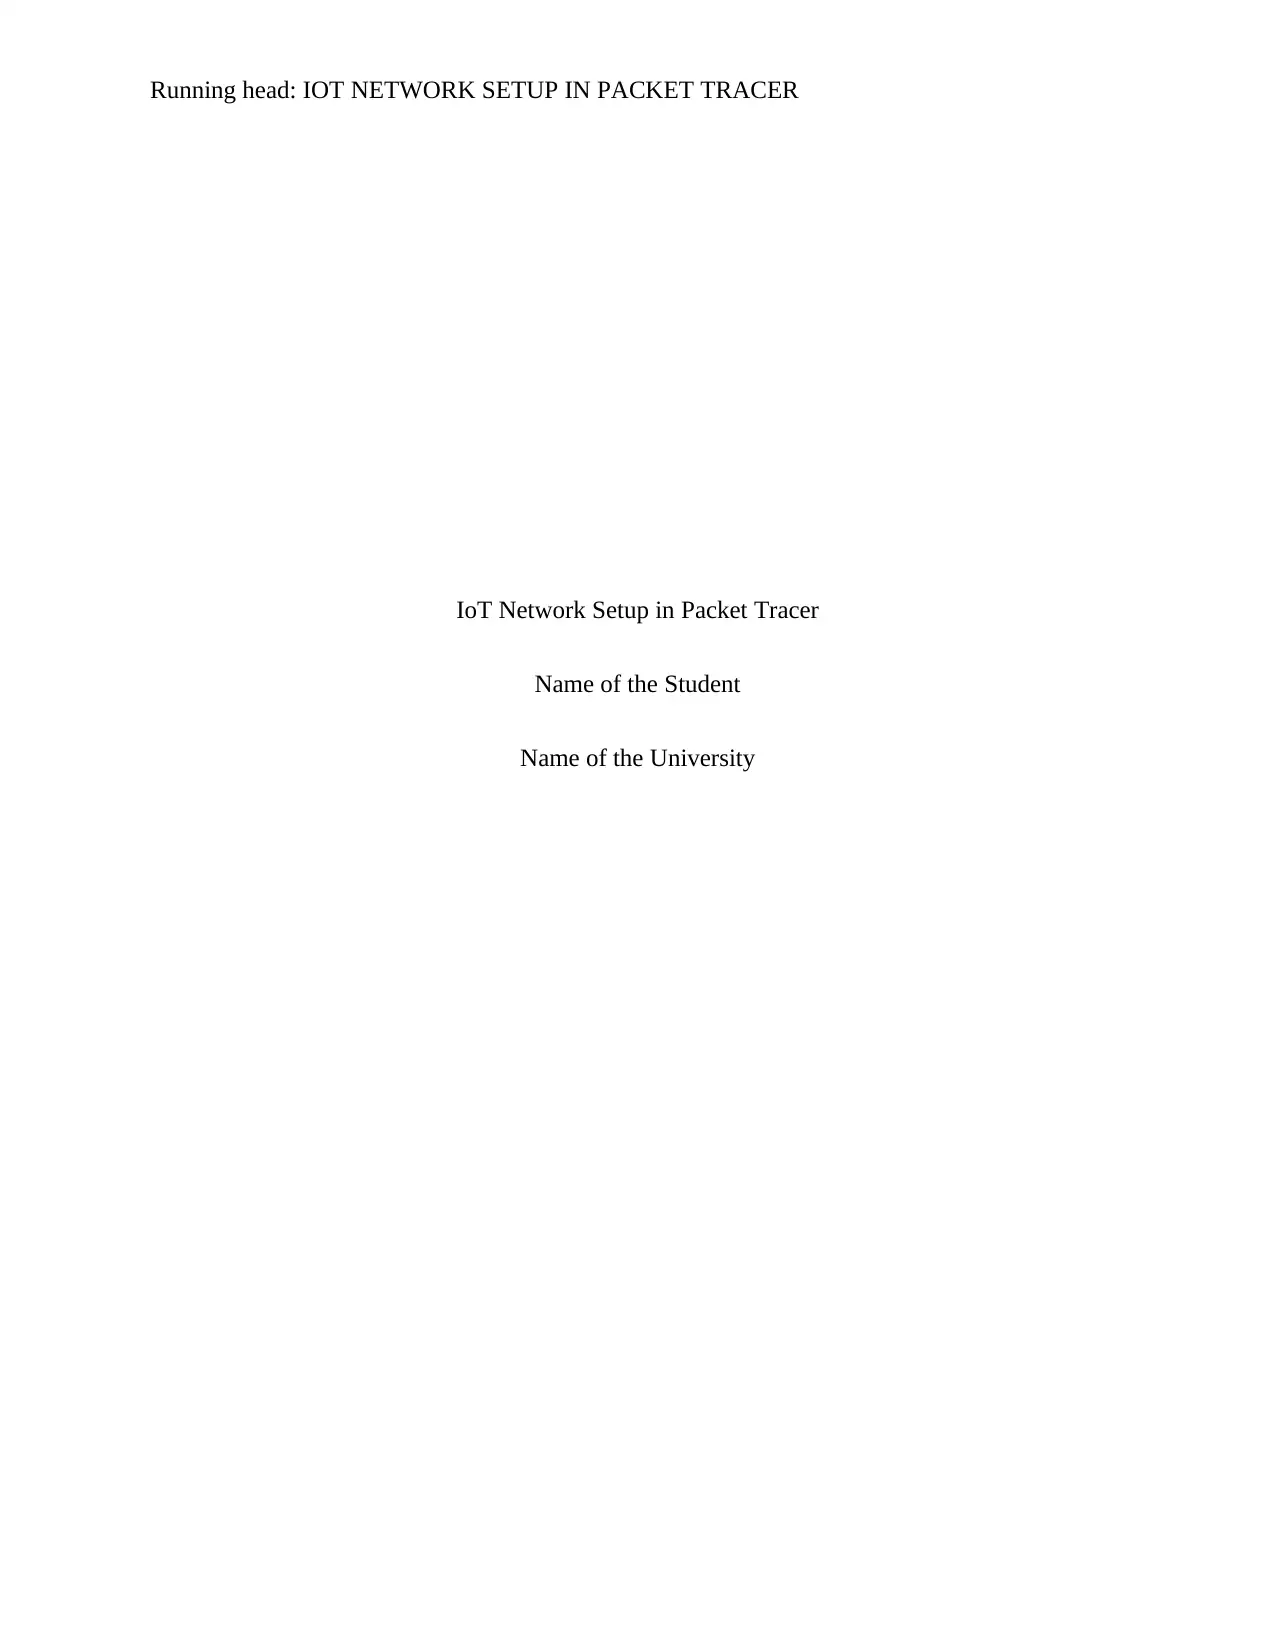
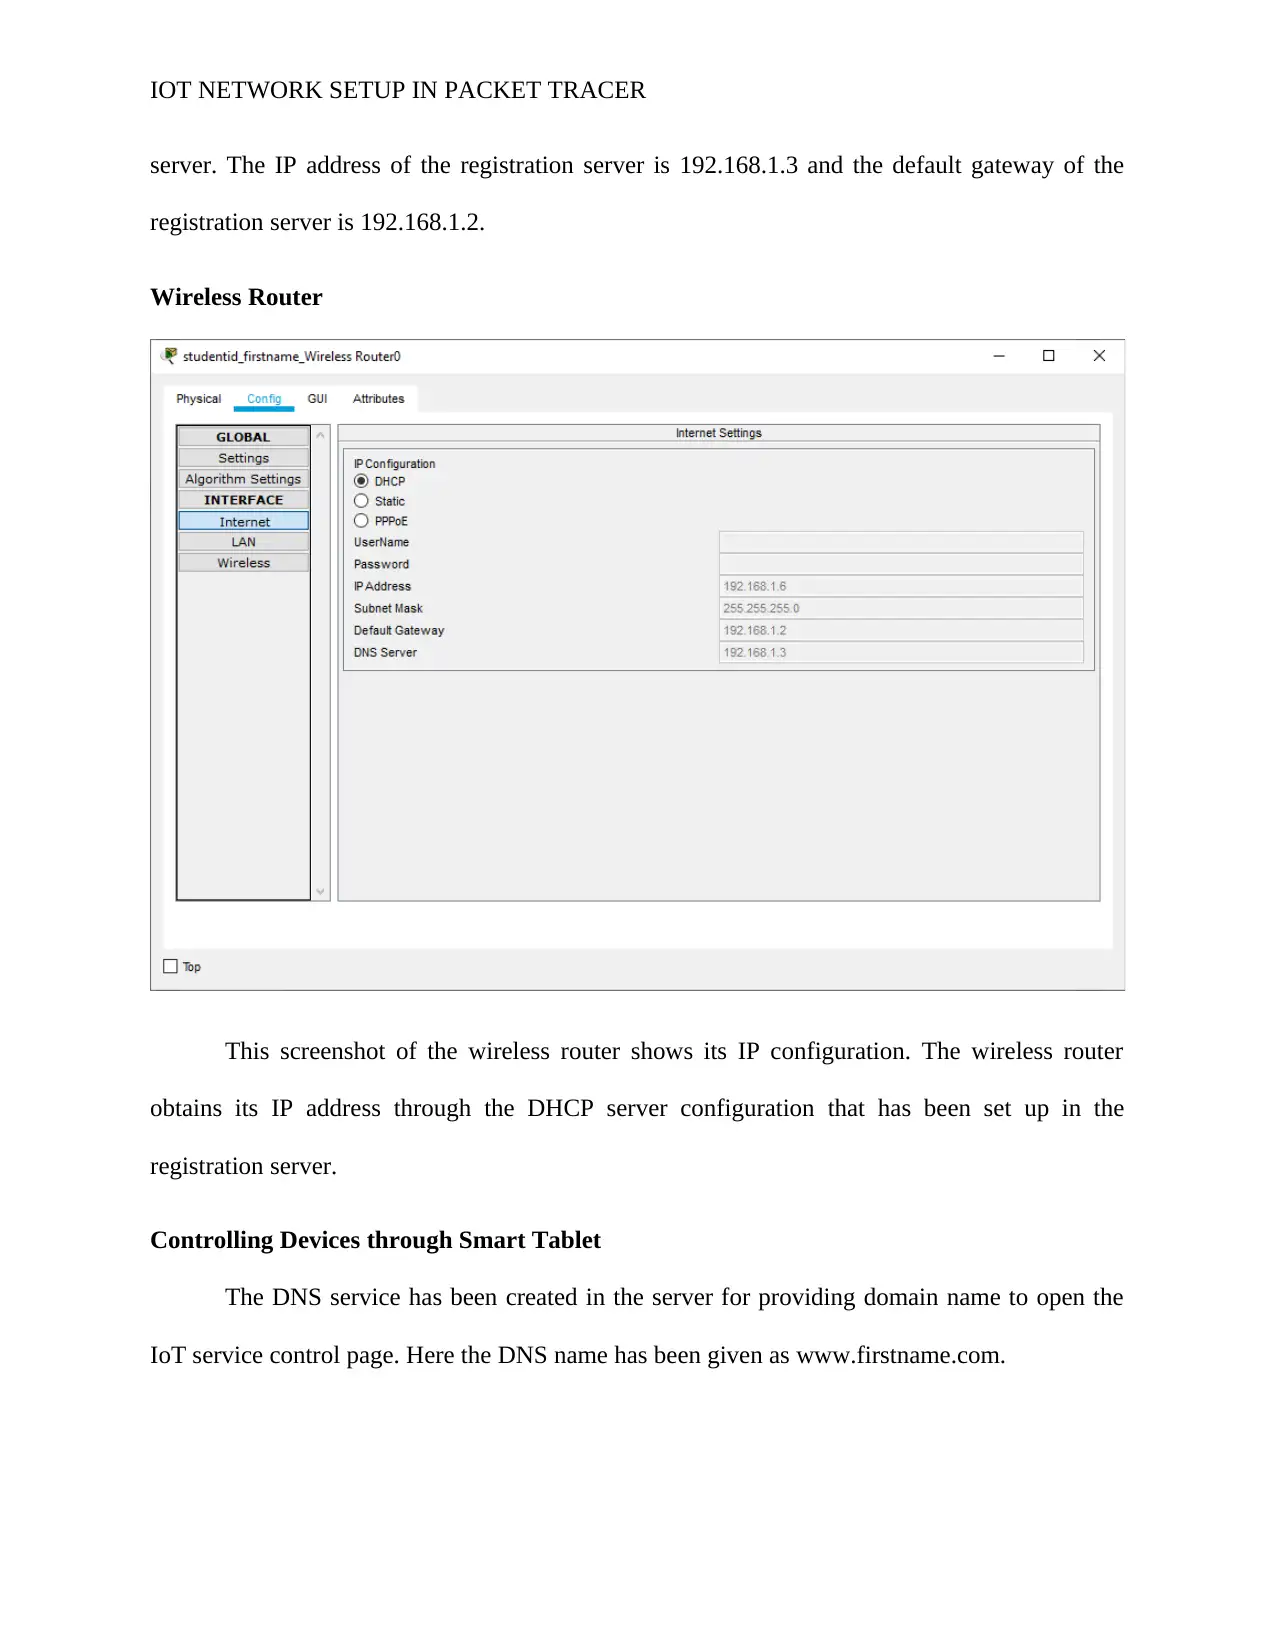
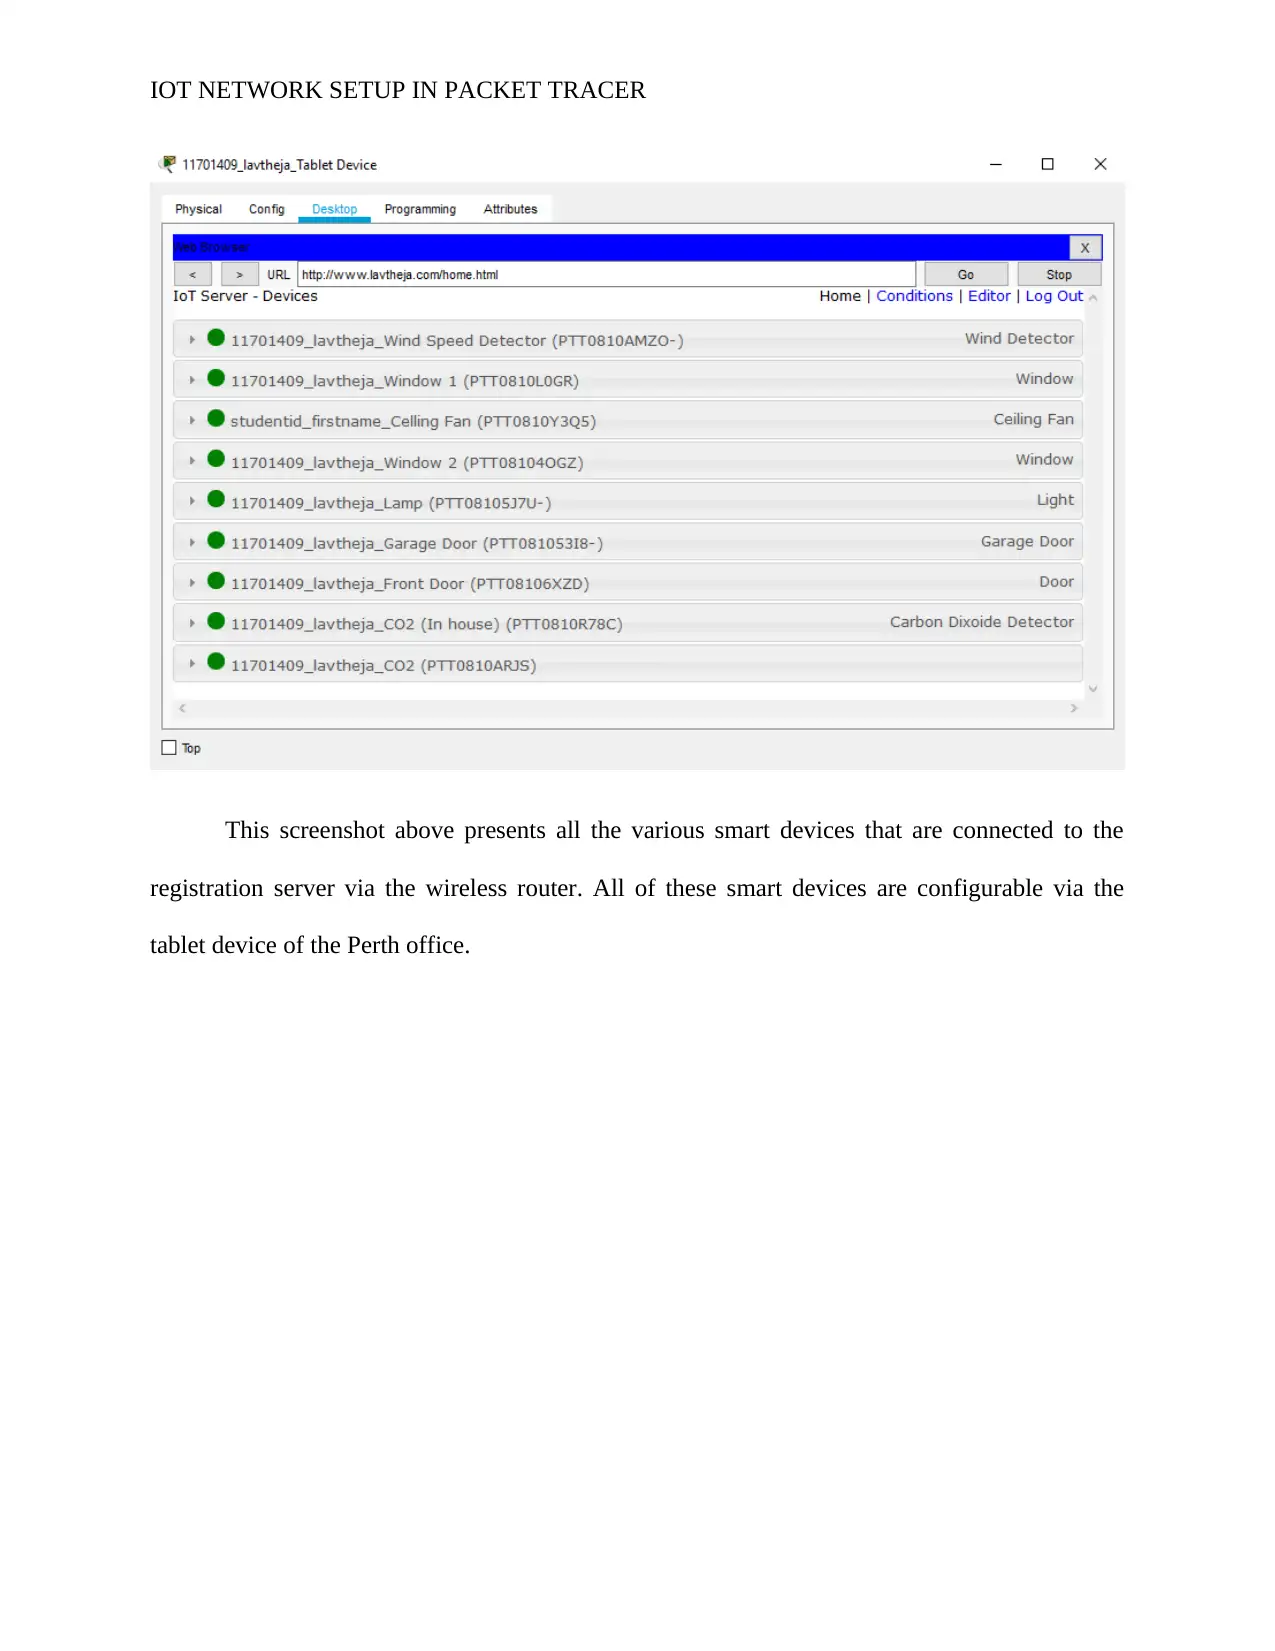
This assignment details the design and implementation of an IoT network for the company "Hoarders", with offices in Perth and Kalgoorlie, using Cisco Packet Tracer. The solution involves setting up a smart office in Perth, including configuring a registration server, wireless router, and various smart devices like LED lamps, ceiling fans, and door locks, all controlled via a tablet. The network utilizes DHCP and DNS services for IP address assignment and domain name resolution. The assignment further extends to connecting the Perth and Kalgoorlie offices via a WAN, enabling remote control of the Perth office's smart devices from Kalgoorlie. The solution also includes setting up conditional triggers based on environmental factors such as CO2 levels and wind speed to automate device actions. Finally, the assignment provides a list of required hardware components with associated costs and a bibliography of relevant research papers.

Running head: IOT NETWORK SETUP IN PACKET TRACER
IoT Network Setup in Packet Tracer
Name of the Student
Name of the University
IoT Network Setup in Packet Tracer
Name of the Student
Name of the University
Paraphrase This Document
Need a fresh take? Get an instant paraphrase of this document with our AI Paraphraser

IOT NETWORK SETUP IN PACKET TRACER
Part 1
Add, connect, enable and configure the registration server, tablet and wireless
router
Smart Office Setup of Perth Branch
Registration Server
The Registration server whose configuration is shown in this screenshot is used for
providing IoT based services. All of the IoT based devices get connected to this registration

IOT NETWORK SETUP IN PACKET TRACER
server. The IP address of the registration server is 192.168.1.3 and the default gateway of the
registration server is 192.168.1.2.
Wireless Router
This screenshot of the wireless router shows its IP configuration. The wireless router
obtains its IP address through the DHCP server configuration that has been set up in the
registration server.
Controlling Devices through Smart Tablet
The DNS service has been created in the server for providing domain name to open the
IoT service control page. Here the DNS name has been given as www.firstname.com.
⊘ This is a preview!⊘
Do you want full access?
Subscribe today to unlock all pages.

Trusted by 1+ million students worldwide

IOT NETWORK SETUP IN PACKET TRACER
This screenshot above presents all the various smart devices that are connected to the
registration server via the wireless router. All of these smart devices are configurable via the
tablet device of the Perth office.
This screenshot above presents all the various smart devices that are connected to the
registration server via the wireless router. All of these smart devices are configurable via the
tablet device of the Perth office.
Paraphrase This Document
Need a fresh take? Get an instant paraphrase of this document with our AI Paraphraser

IOT NETWORK SETUP IN PACKET TRACER
Add, configure the smart devices and name these as given in Figure 1 below.
Note that these devices should be wirelessly connected to a wireless router,
they should be encrypted using AES with WPA-PSK and the pass phrase
MUST be your student ID. Connect and activate the devices with username
and password (use your Student ID for both). This is to ensure a unique login
to the smart network
This screenshot presents the configuration of the wireless router. The SSID and WPA2-
PSK key used is ‘studentid’. Here WAP2-PSK is the authentication technique and the type of
encryption being used is AES.

IOT NETWORK SETUP IN PACKET TRACER
Device Configuration
This screenshot above shows how the smart devices like LED lamp are configured to
connect to the registration server over the wireless network implemented by the wireless router.
All of these smart devices get configured using the same wireless router SSID and authentication
technique. On top of that, these devices obtain their IP addresses from this wireless router using
the DHCP service that has been configured on the registration server.
Therefore, for ensuring the wireless network connectivity all smart devices have been
assigned the registration server IP address as the gateway address.
Set up all the smart device attributes in the Perth Office through the tablet
web browser as shown in Figure 1 below (this is an incomplete diagram, also
⊘ This is a preview!⊘
Do you want full access?
Subscribe today to unlock all pages.

Trusted by 1+ million students worldwide

IOT NETWORK SETUP IN PACKET TRACER
make sure all labels match requirements). Use
DNS wwwFirstName.com (where FirstName is your own first name) to access
the connected devices
Figure 1: Network design of the Perth Office
(Source - Created by the Author)
The screenshot above shows the Perth office network design of the company Hoarders. This
design includes all smart devices that are being used by the branch through wireless network.
These smart devices include the wind speed detector, the garage door, the two windows, the
ceiling fan, the LED lamp, the carbon dioxide level detectors and the front door.
Paraphrase This Document
Need a fresh take? Get an instant paraphrase of this document with our AI Paraphraser

IOT NETWORK SETUP IN PACKET TRACER
DHCP Server
The DHCP server is primarily being used to assign IP addresses among all the various
smart devices that are connected to the network. Here this DHCP server configuration is
performed on the primary registration server in which the IP addresses begin with 192.168.0.4
since first three IPs are getting used by the key components of the network like the server and the
routers. Thus the DHCP server provides rest of the IPs to all the devices installed in the network.

IOT NETWORK SETUP IN PACKET TRACER
DNS Server
This above screenshot shows the creation of the DNS firstname.com with IP address
192.168.1.3. This enables the IoT network to be configurable from all servers and tablet devices
connected to the network using the web browser.
DNS Server
This above screenshot shows the creation of the DNS firstname.com with IP address
192.168.1.3. This enables the IoT network to be configurable from all servers and tablet devices
connected to the network using the web browser.
⊘ This is a preview!⊘
Do you want full access?
Subscribe today to unlock all pages.

Trusted by 1+ million students worldwide

IOT NETWORK SETUP IN PACKET TRACER
A registration server gets used for providing IoT services. This screenshot presents the control
page of the IoT network being opened through the web browser once the services are turned on.
The user first requires to sign up and create his account. Here the account of the student gets
created and the username and password are both the same which is ‘studentid’.
Paraphrase This Document
Need a fresh take? Get an instant paraphrase of this document with our AI Paraphraser

IOT NETWORK SETUP IN PACKET TRACER
Show the protocols that are used in transmitting a simple PDU from the tablet
to the remote server (by going to simulation mode) and record all the
protocols that are used for transmission of the simple PDU when the packet is
sent
PDU
The simulation presented by the above screenshot clearly describes how the ICMP protocol is
being used for packet transfers between the devices and the router and the protocol being used
for assigned their IP addresses is DHCP.

IOT NETWORK SETUP IN PACKET TRACER
Add a new branch office in Kalgoorlie. Connect these sites using appropriate
devices and configure accordingly (see Figure 2). Use a new Tablet device and
PC in the Kalgoorlie office to control smart devices at the Perth office. It
should be on a different network to the main office
Control Perth office Smart IoT Devices from Kalgoorlie Office
Network Design
Figure 2: Network design of Hoarders WAN network
(Source - Created by the Author)
This diagram above presents the overall WAN network of the organization Hoarders that
stretches from their smart office at Perth to another branch located at Kalgoorlie. This includes
the IoT network of the smart office at Perth along with the WAN setup. The network design
shows how the smart devices are controllable through the wireless network from distant branches
like Kalgoorlie.
⊘ This is a preview!⊘
Do you want full access?
Subscribe today to unlock all pages.

Trusted by 1+ million students worldwide
1 out of 21
Related Documents

Your All-in-One AI-Powered Toolkit for Academic Success.
+13062052269
info@desklib.com
Available 24*7 on WhatsApp / Email
Unlock your academic potential
Copyright © 2020–2025 A2Z Services. All Rights Reserved. Developed and managed by ZUCOL.