Configuring Linux Servers: DNS, SSH, LAMP Stack, FTP, and SSL
VerifiedAdded on 2022/10/01
|27
|1850
|17
Practical Assignment
AI Summary
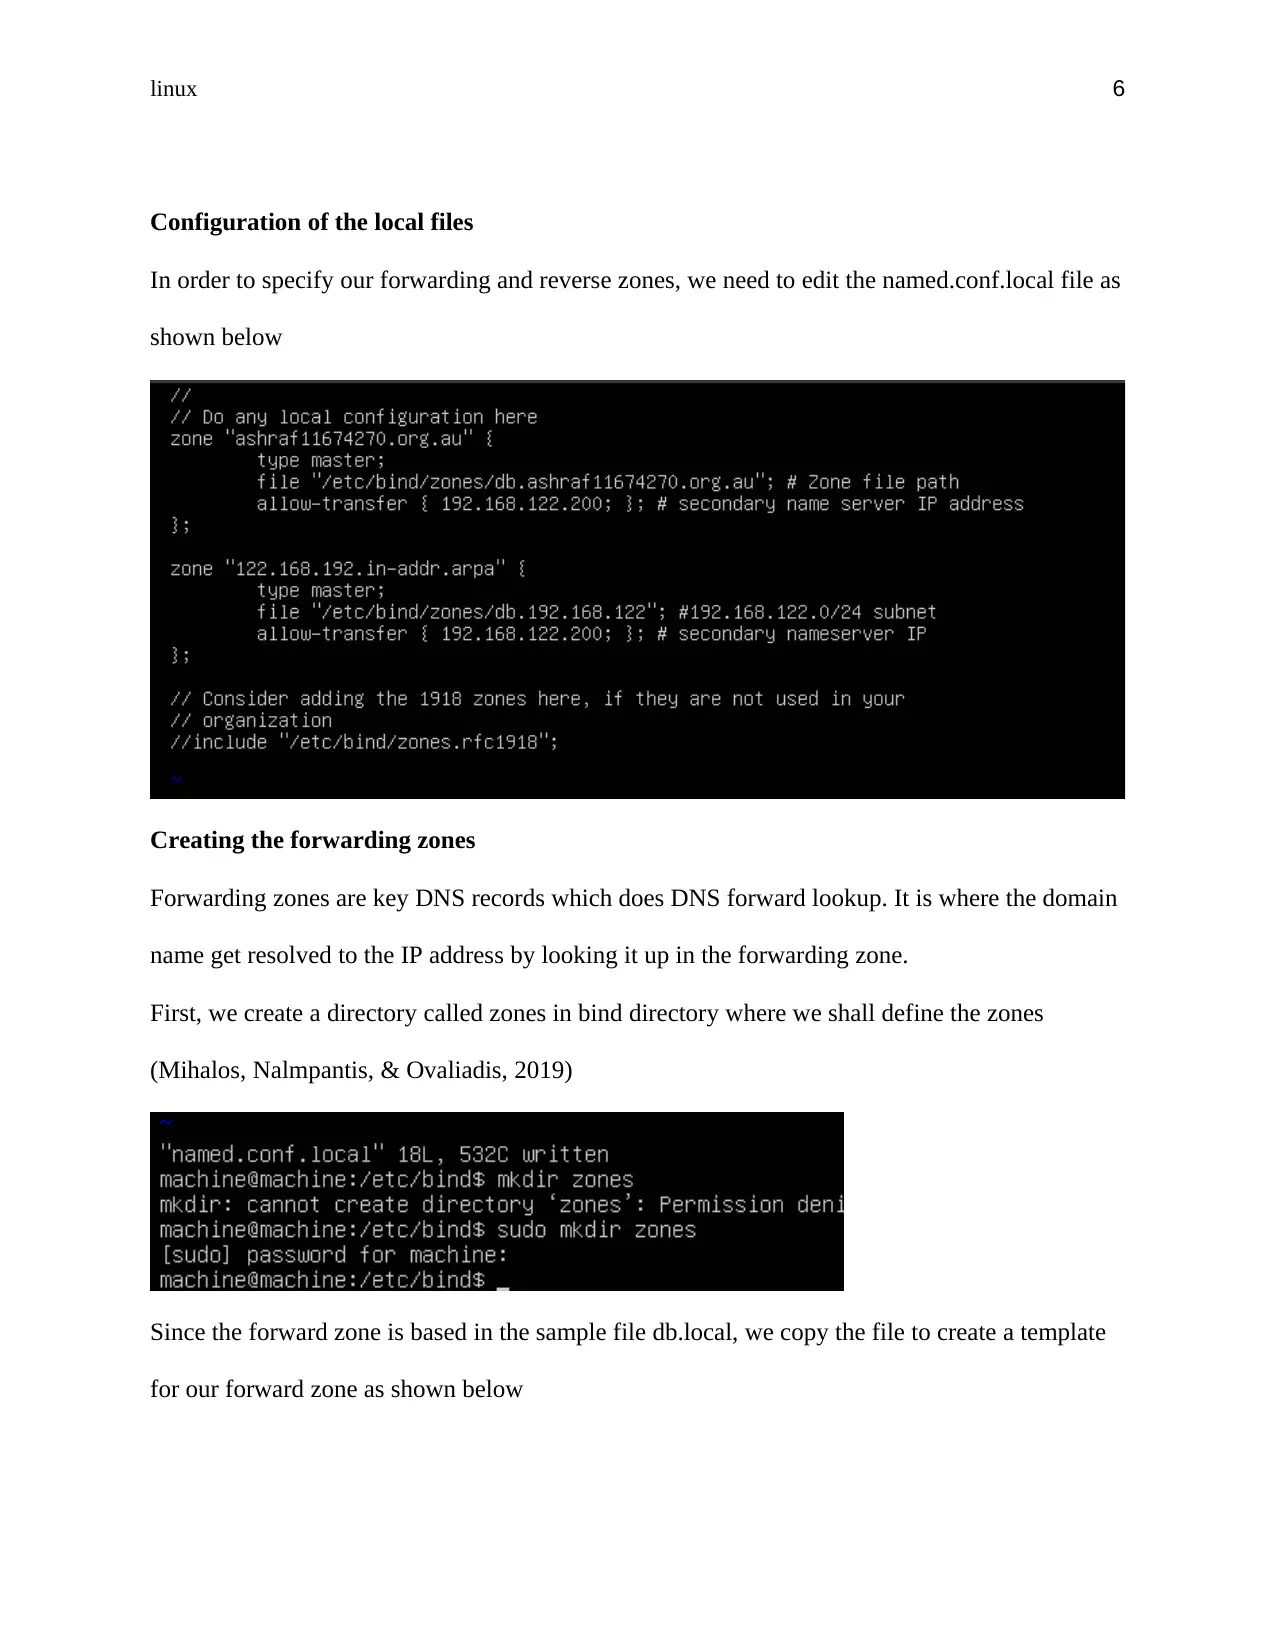
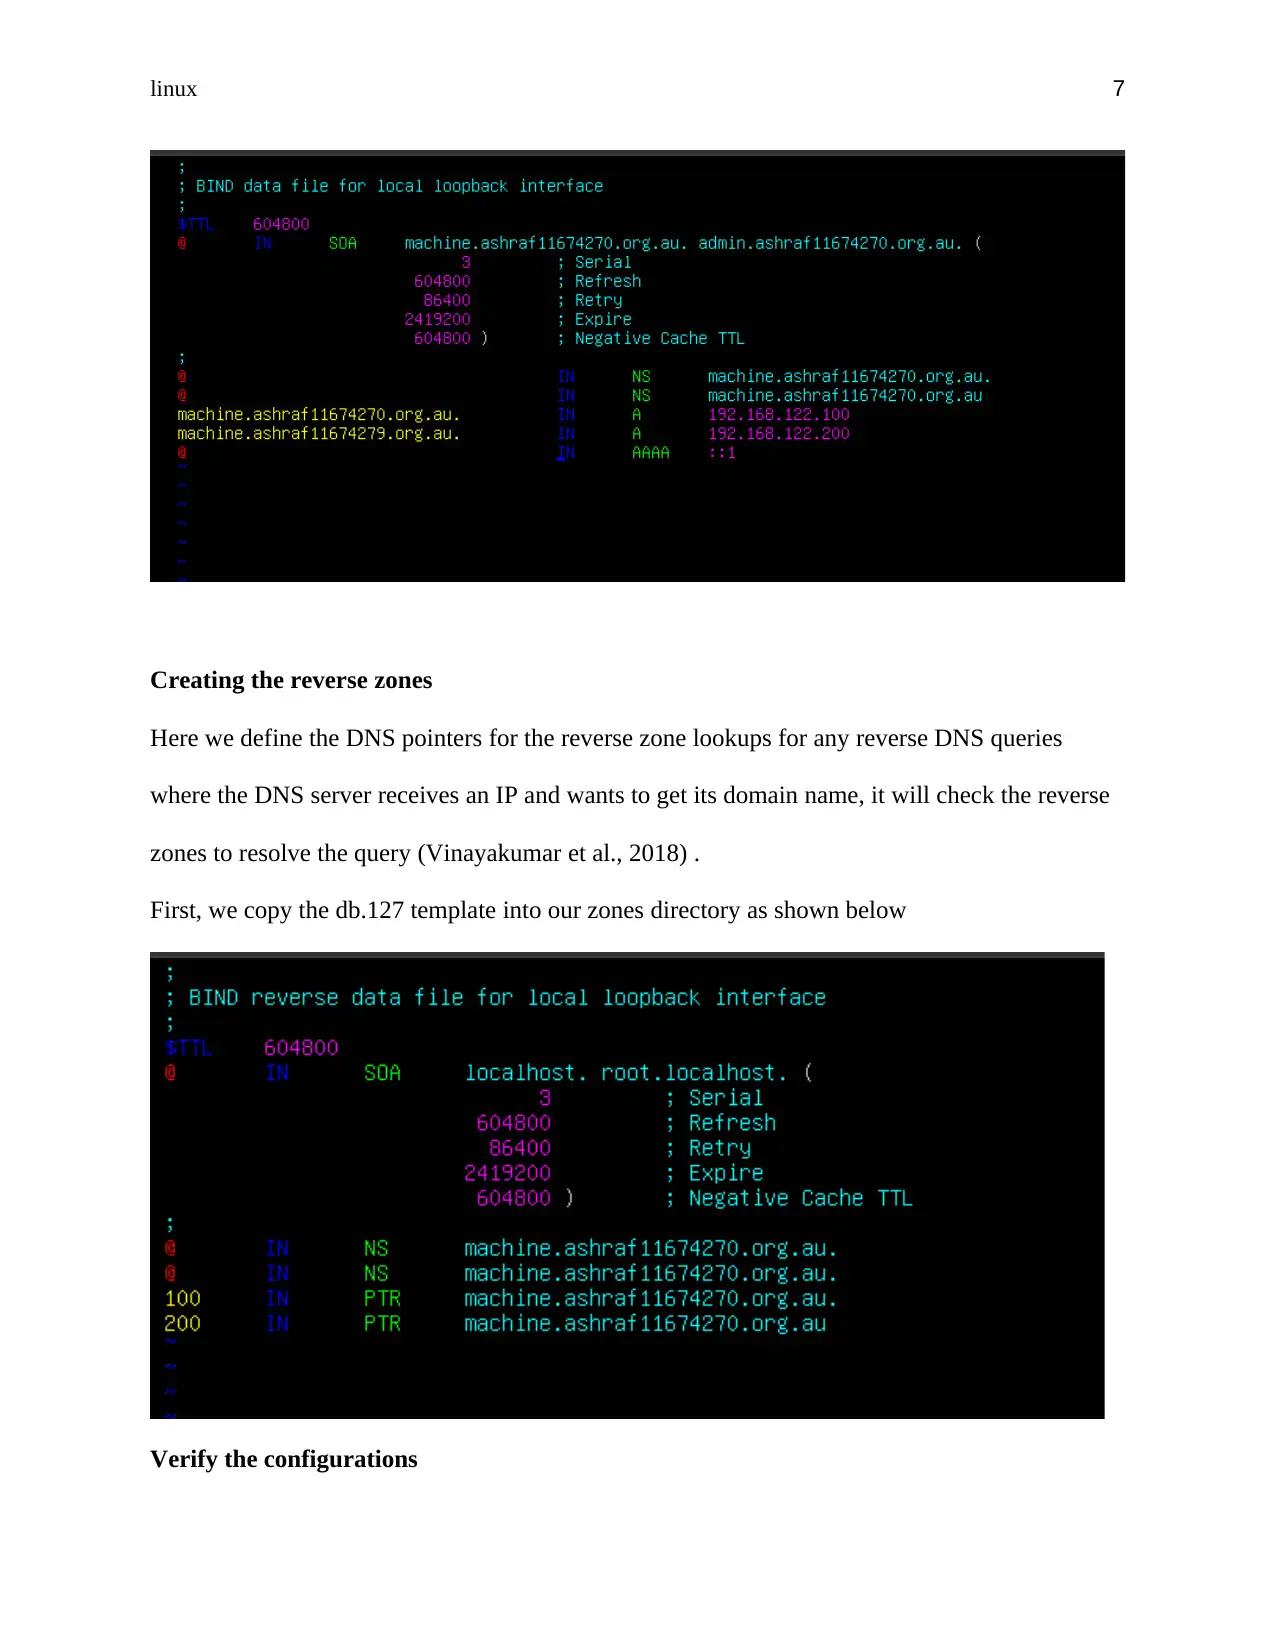
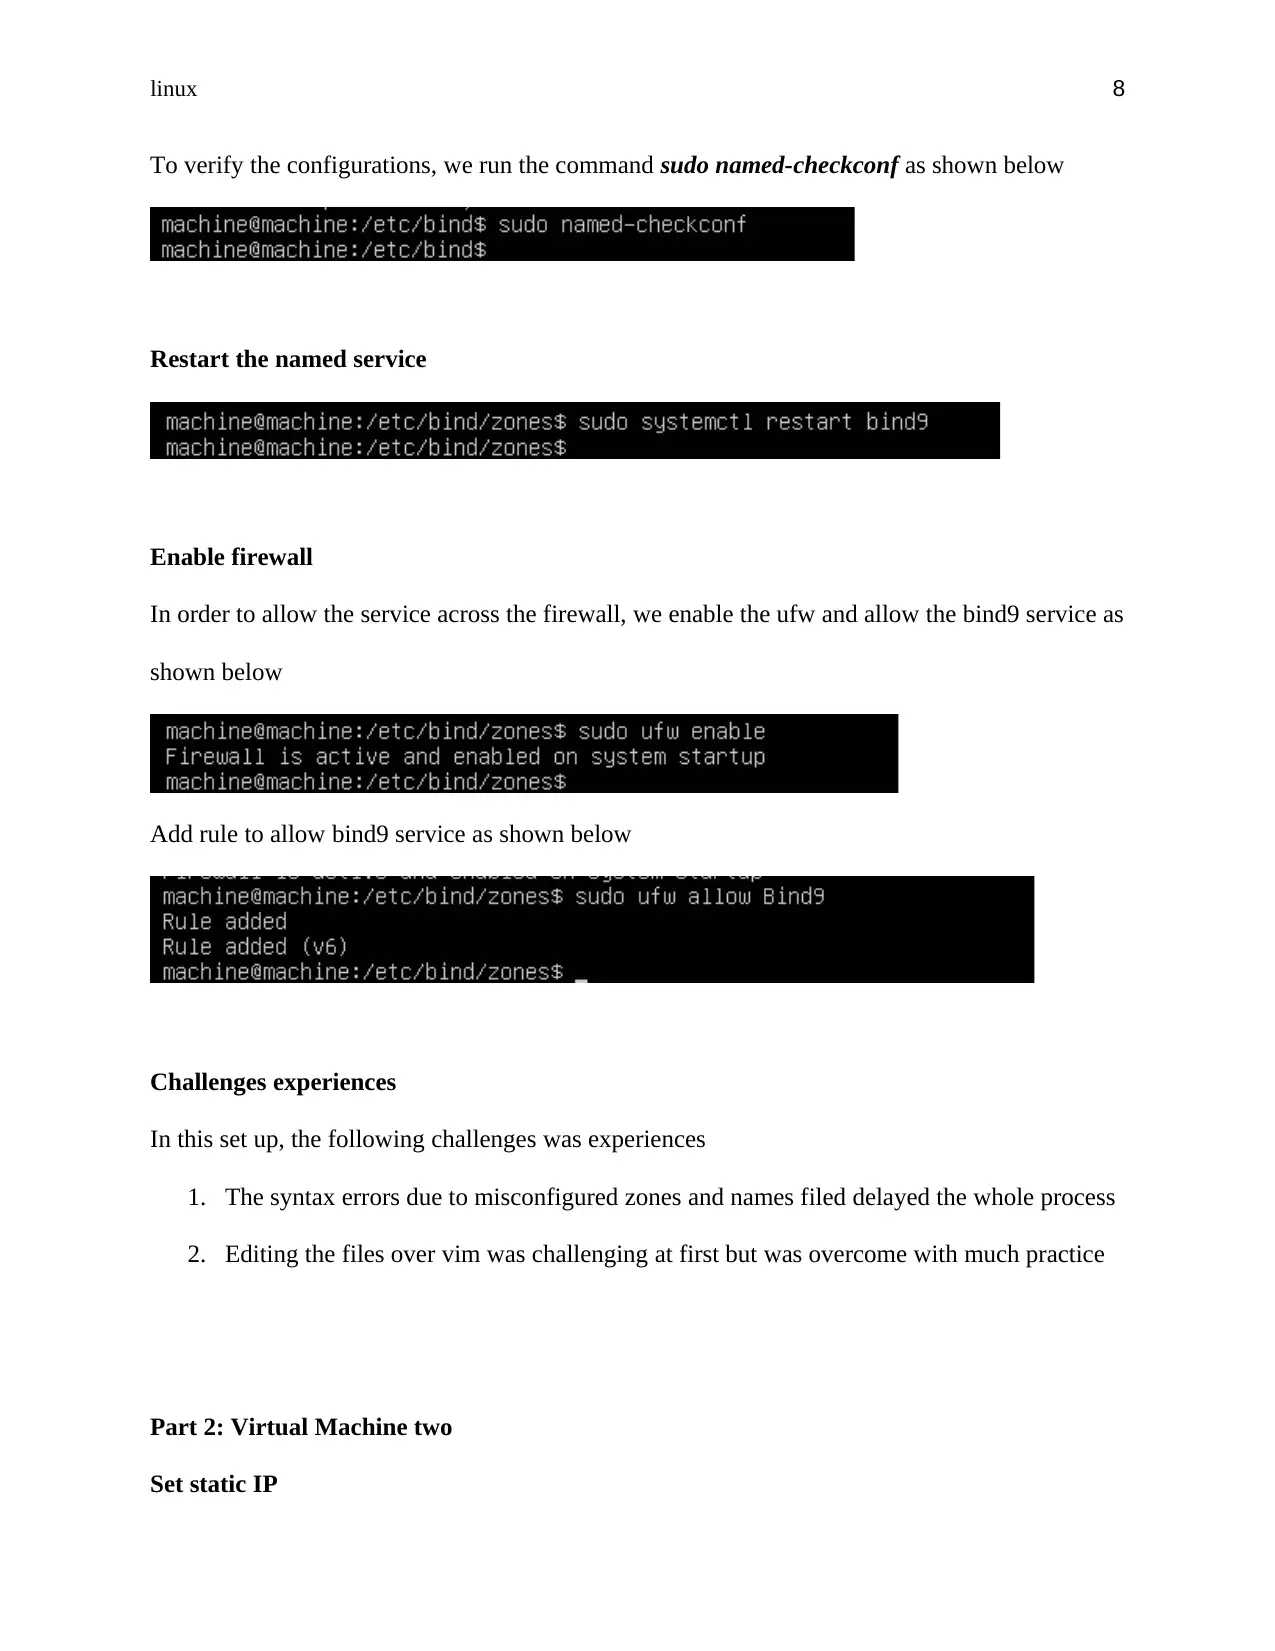
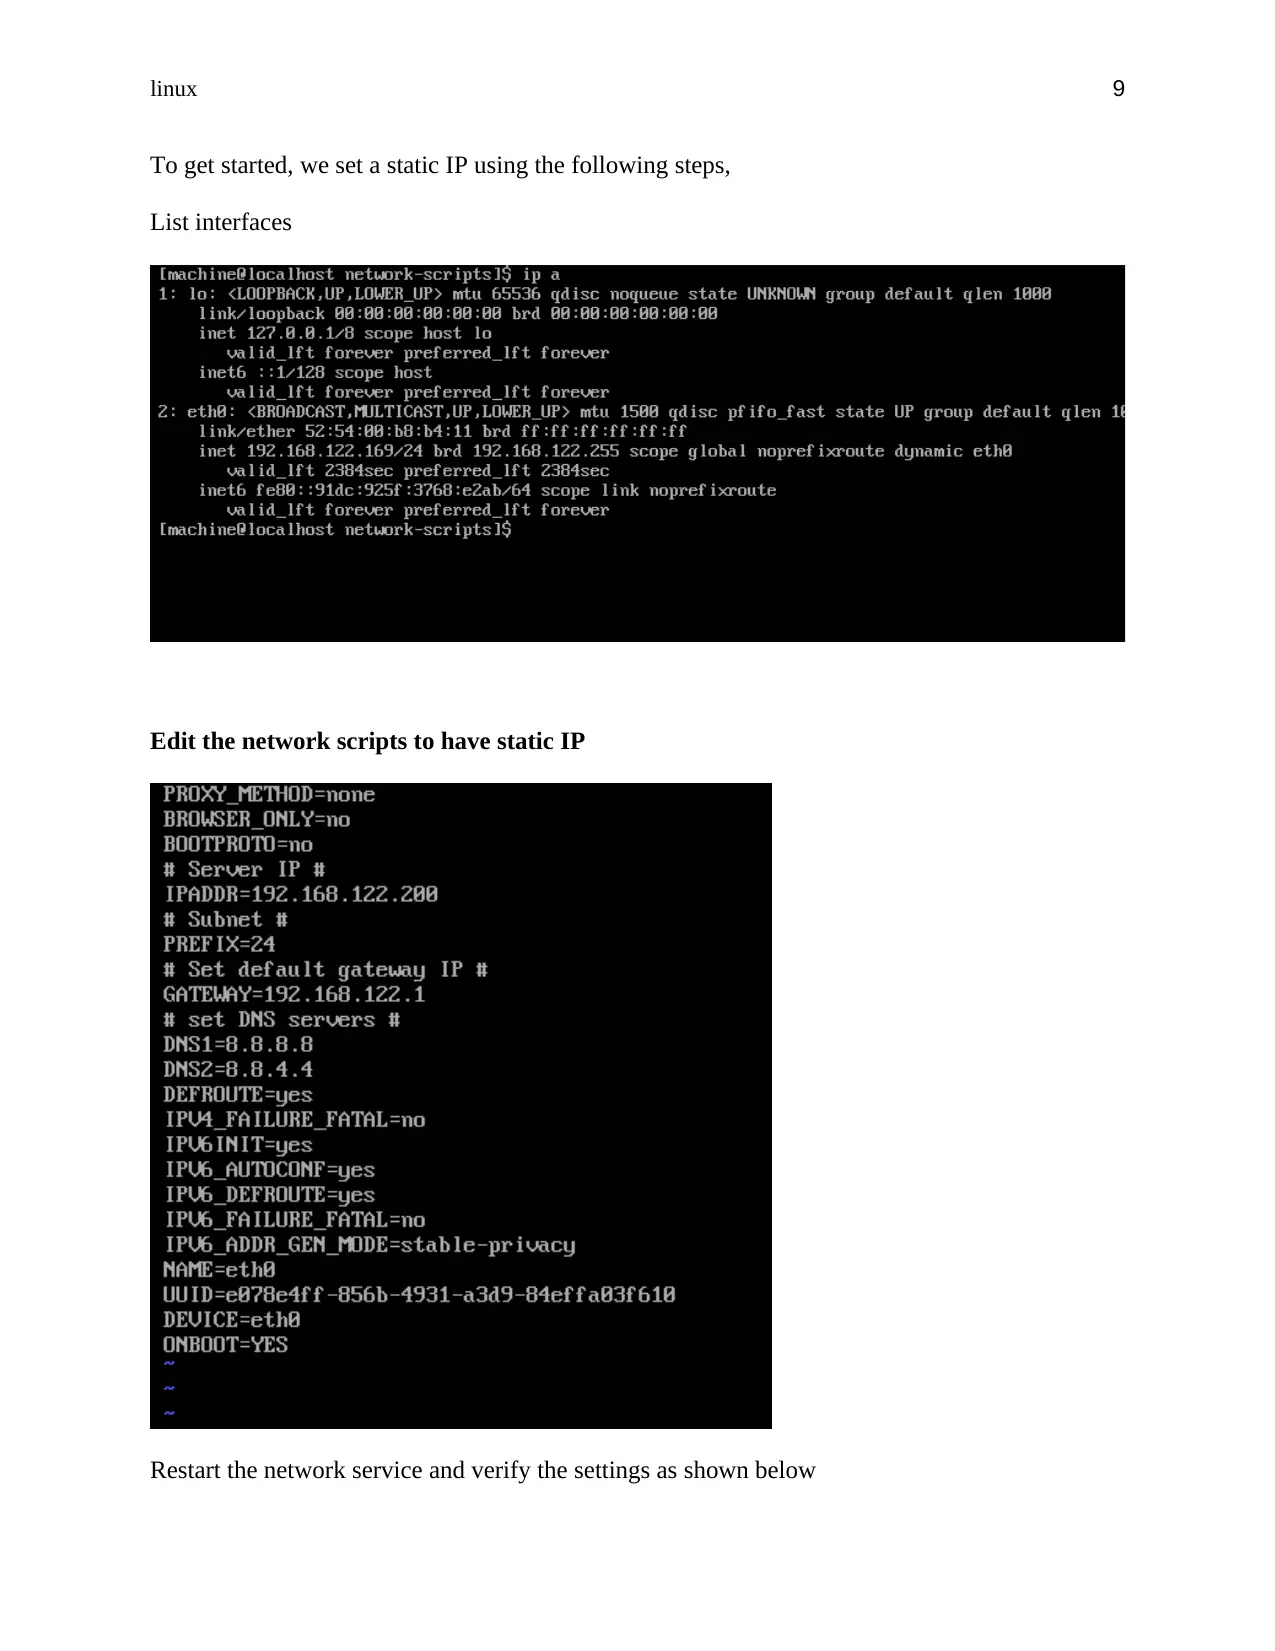
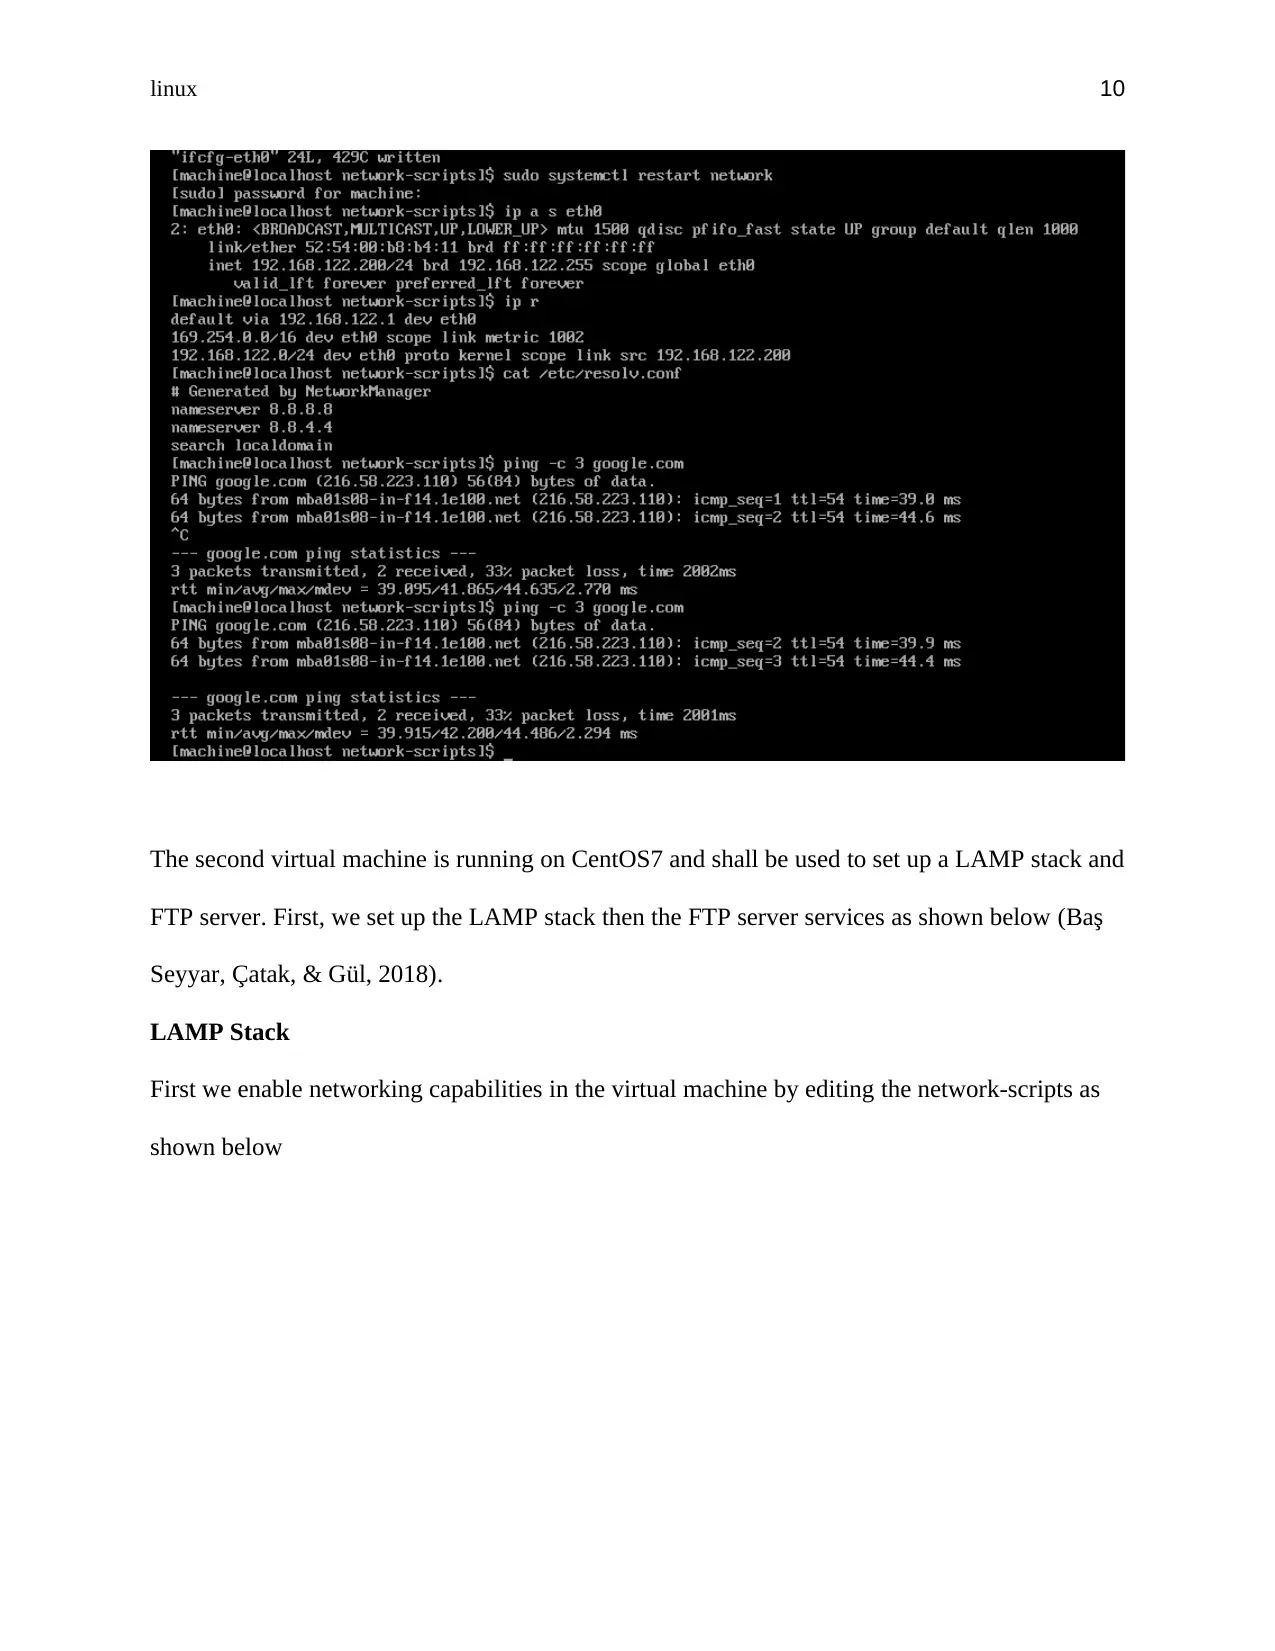
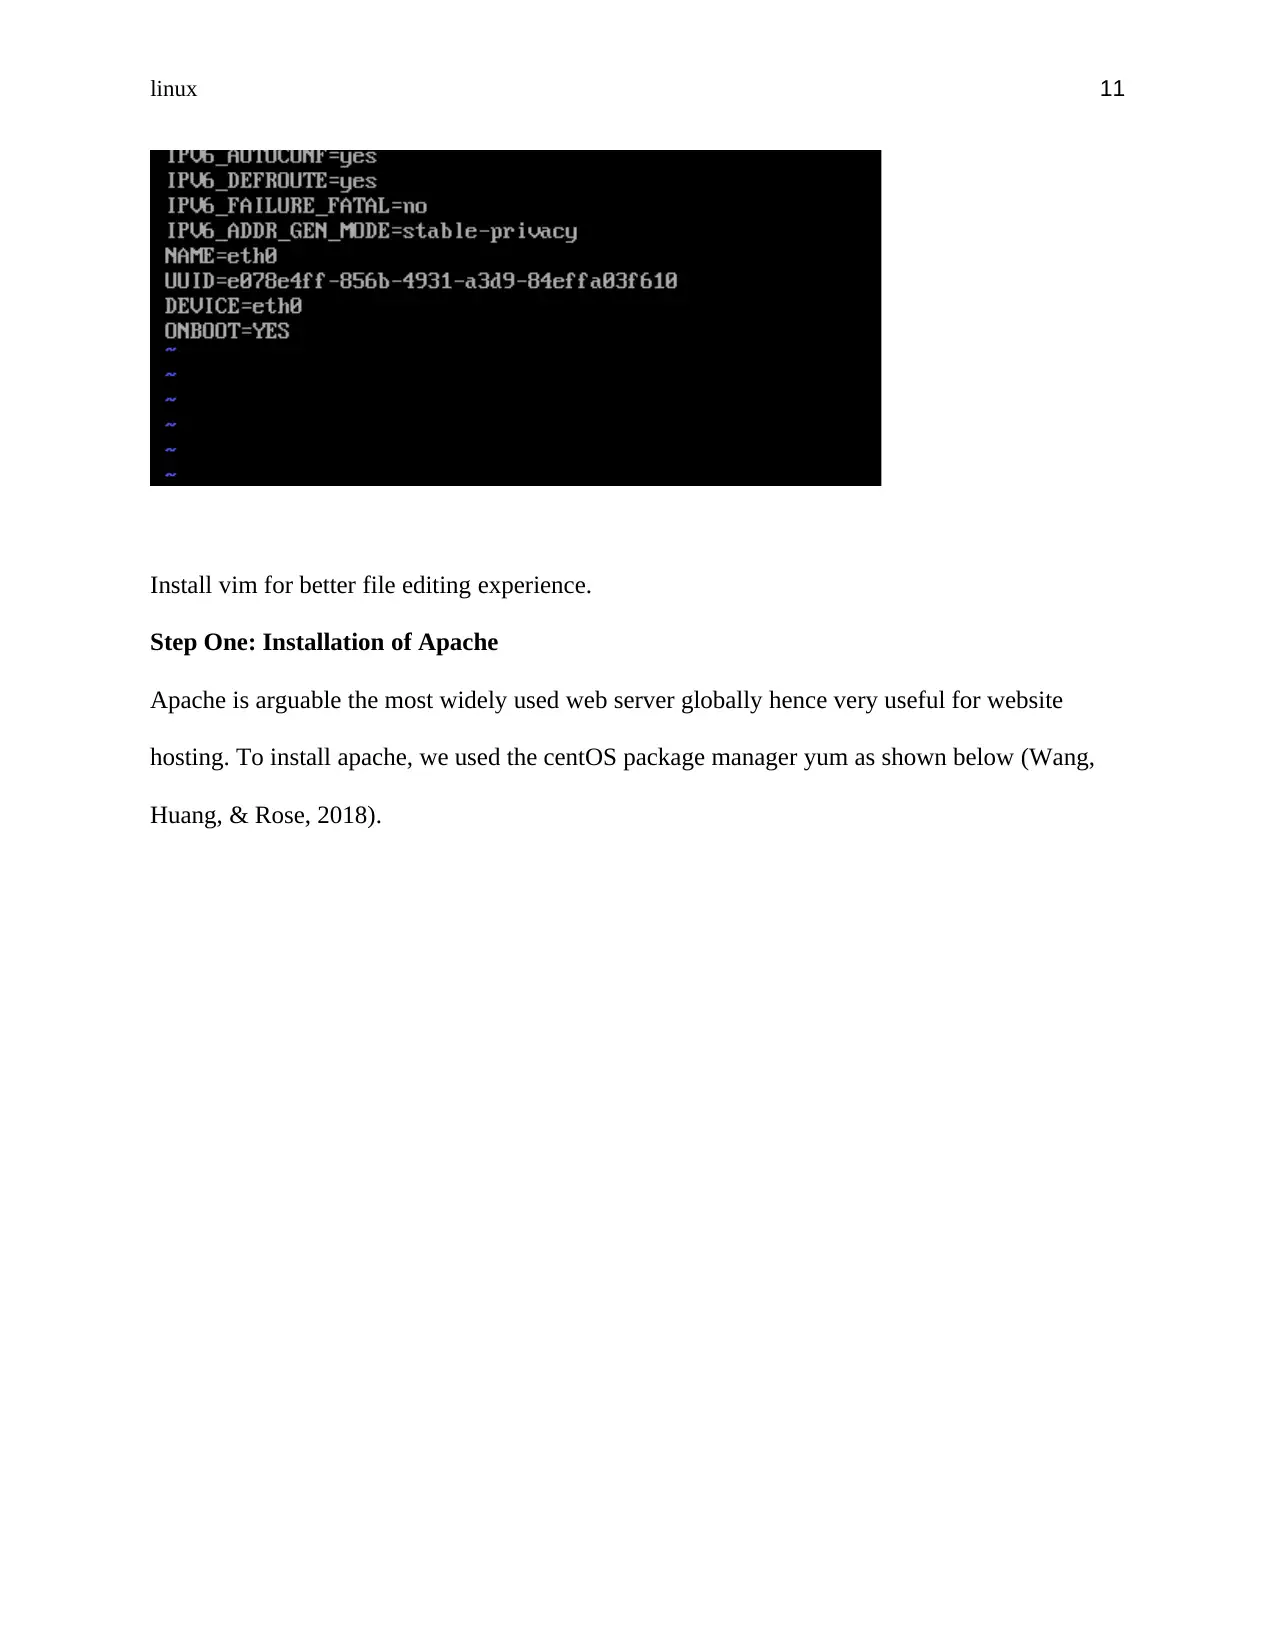
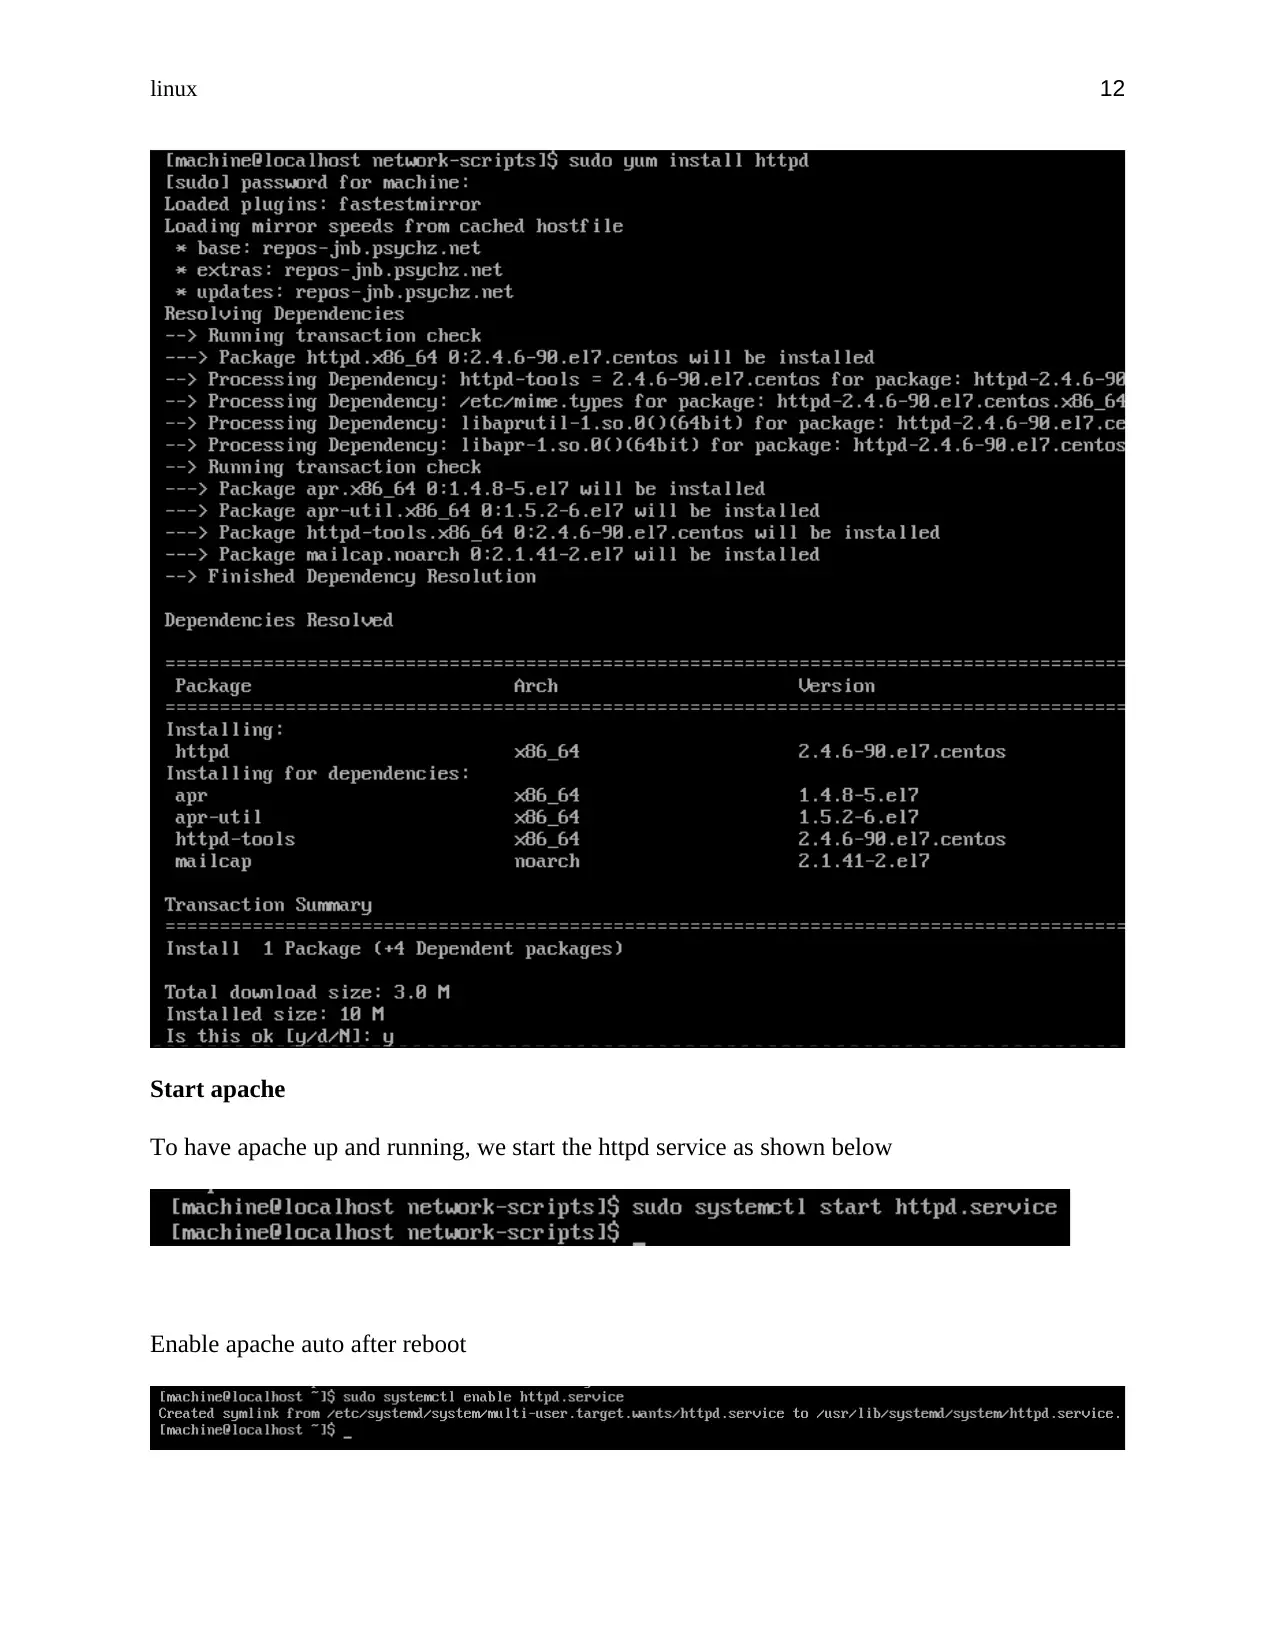
This assignment details the step-by-step process of configuring two virtual machines on Ubuntu Server 2018 and CentOS7 platforms to perform various server-related tasks. Part 1 focuses on setting up a fully functional DNS server on Ubuntu, including static IP configuration, Bind DNS server installation, DNS configuration, and firewall enablement. Part 2 involves setting up a LAMP stack and FTP server on CentOS7, covering the installation and configuration of Apache, MariaDB, PHP, and vsftpd. The setup also includes firewall configuration. Part 3 focuses on setting up an SSL server service on CentOS, including SSL certificate setup and Apache SSL file configuration. The assignment highlights challenges encountered during the process, such as syntax errors and difficulties in configuring iptables rules and PHP modules. References to related publications are provided.

linux 1
LINUX
My Name
Course Title
Professor name
Date
LINUX
My Name
Course Title
Professor name
Date
Paraphrase This Document
Need a fresh take? Get an instant paraphrase of this document with our AI Paraphraser

linux 2
Introduction
In this assignment, the two virtual machines used are from the ubuntu server 2018 and the
centOS7 platforms which were used to answer the different parts of the questions. The following
are the step by step procedures to finish different tasks;
Part 1: DNS and SSH server
To configure configure a fully functional DNS server in ubuntu, we used the bind module (PR
Newswire, 2014)
Steps 1: Configure static IP
The ubuntu server is configured with a static IP of 192.168.122.100 with the gateway being
192.168.122.1 this shall allow a more stable configurations since the IP won't change with time.
In ubuntu server 2018, the IP configuration is done under the /etc/netpan and configure the .yaml
file as shown below (Hintsch, Kramer, & Turowski, 2018)

linux 3
To apply the changes, we used the sudo netplan apply command to apply the changes.
To verify the changes have been made, we used the command ip address show dev ens3
(Hoffman, 2010)command
The output shows a well configured static IP with an IP address of 192.168.122.100/24
Step 2: Install Bind DNS server module
To get the bind services, we first run a package update and install the bind9 services and its
related libraries as shown below
Update packages
⊘ This is a preview!⊘
Do you want full access?
Subscribe today to unlock all pages.

Trusted by 1+ million students worldwide

linux 4
Install bind9
Setting bind to ipv4 mode
Since our server is set to use ipv4 statically, we need to configure the bind service to exclusively
use ipv4 mode (Kerner, 2019) . This is as shown below;
Install bind9
Setting bind to ipv4 mode
Since our server is set to use ipv4 statically, we need to configure the bind service to exclusively
use ipv4 mode (Kerner, 2019) . This is as shown below;
Paraphrase This Document
Need a fresh take? Get an instant paraphrase of this document with our AI Paraphraser

linux 5
Step 3: Configuration of primary Domain Name Server
Bind configuration are mainly kept in the domain name daemon file which shall be used mostly
to configure the domain name servers
Set the access control list
We edit the named.conf.options file and added the following trusted name servers and hosts.
This will be updated as more server and host get connected to the network (Khan & Khan, 2017).
Set the bind options
Now, lets configure the various bind options to allow the clients gets queries from the named
service.

linux 6
Configuration of the local files
In order to specify our forwarding and reverse zones, we need to edit the named.conf.local file as
shown below
Creating the forwarding zones
Forwarding zones are key DNS records which does DNS forward lookup. It is where the domain
name get resolved to the IP address by looking it up in the forwarding zone.
First, we create a directory called zones in bind directory where we shall define the zones
(Mihalos, Nalmpantis, & Ovaliadis, 2019)
Since the forward zone is based in the sample file db.local, we copy the file to create a template
for our forward zone as shown below
⊘ This is a preview!⊘
Do you want full access?
Subscribe today to unlock all pages.

Trusted by 1+ million students worldwide

linux 7
Creating the reverse zones
Here we define the DNS pointers for the reverse zone lookups for any reverse DNS queries
where the DNS server receives an IP and wants to get its domain name, it will check the reverse
zones to resolve the query (Vinayakumar et al., 2018) .
First, we copy the db.127 template into our zones directory as shown below
Verify the configurations
Paraphrase This Document
Need a fresh take? Get an instant paraphrase of this document with our AI Paraphraser

linux 8
To verify the configurations, we run the command sudo named-checkconf as shown below
Restart the named service
Enable firewall
In order to allow the service across the firewall, we enable the ufw and allow the bind9 service as
shown below
Add rule to allow bind9 service as shown below
Challenges experiences
In this set up, the following challenges was experiences
1. The syntax errors due to misconfigured zones and names filed delayed the whole process
2. Editing the files over vim was challenging at first but was overcome with much practice
Part 2: Virtual Machine two
Set static IP

linux 9
To get started, we set a static IP using the following steps,
List interfaces
Edit the network scripts to have static IP
Restart the network service and verify the settings as shown below
To get started, we set a static IP using the following steps,
List interfaces
Edit the network scripts to have static IP
Restart the network service and verify the settings as shown below
⊘ This is a preview!⊘
Do you want full access?
Subscribe today to unlock all pages.

Trusted by 1+ million students worldwide

linux 10
The second virtual machine is running on CentOS7 and shall be used to set up a LAMP stack and
FTP server. First, we set up the LAMP stack then the FTP server services as shown below (Baş
Seyyar, Çatak, & Gül, 2018).
LAMP Stack
First we enable networking capabilities in the virtual machine by editing the network-scripts as
shown below
Paraphrase This Document
Need a fresh take? Get an instant paraphrase of this document with our AI Paraphraser

linux 11
Install vim for better file editing experience.
Step One: Installation of Apache
Apache is arguable the most widely used web server globally hence very useful for website
hosting. To install apache, we used the centOS package manager yum as shown below (Wang,
Huang, & Rose, 2018).
Install vim for better file editing experience.
Step One: Installation of Apache
Apache is arguable the most widely used web server globally hence very useful for website
hosting. To install apache, we used the centOS package manager yum as shown below (Wang,
Huang, & Rose, 2018).

linux 12
Start apache
To have apache up and running, we start the httpd service as shown below
Enable apache auto after reboot
Start apache
To have apache up and running, we start the httpd service as shown below
Enable apache auto after reboot
⊘ This is a preview!⊘
Do you want full access?
Subscribe today to unlock all pages.

Trusted by 1+ million students worldwide
1 out of 27
Related Documents

Your All-in-One AI-Powered Toolkit for Academic Success.
+13062052269
info@desklib.com
Available 24*7 on WhatsApp / Email
Unlock your academic potential
Copyright © 2020–2025 A2Z Services. All Rights Reserved. Developed and managed by ZUCOL.