Linux Server Administration Assignment: Virtual Machine Configuration
VerifiedAdded on 2023/06/04
|27
|2455
|167
Practical Assignment
AI Summary
This assignment solution details the step-by-step process of setting up and configuring various server services on two virtual machines, one using CentOS and the other Ubuntu Server 16.04. The tasks include installing and configuring DNS, SSH, FTP, and SSL. Part 1 focuses on setting up a DNS and SSH server on CentOS, including installing BIND, configuring static IPs, setting up FQDNs, and configuring the named.conf and zones. Part 2 involves setting up a LAMP stack (Linux, Apache, MySQL, PHP) on Ubuntu, including installing Apache, MySQL, and PHP, and configuring IPTables for security. Part 3 covers the configuration of an FTP server using VSFTPD. Part 4 describes making the DNS robust by setting up a secondary DNS server. Part 5 covers setting up SSL for secure browsing. Each part documents the experiences and challenges encountered during the implementation. The solution provides detailed commands, configurations, and screenshots to illustrate the process.
Running head: LINUX SERVER ADMINISTRATION 1
Linux Server Administration
Name of Student
Institution Affiliation
Linux Server Administration
Name of Student
Institution Affiliation
Paraphrase This Document
Need a fresh take? Get an instant paraphrase of this document with our AI Paraphraser
Running head: LINUX SERVER ADMINISTRATION 2
The two virtual machines are created using the CentOS for machine one and Ubuntu
Server 16.04 for, machine two. The step by step installation and configuration of the various
server services such as the DNS, FTP, SSH, SSL. The experiences and challenges witnessed
shall be documented in each part. The hosting OS is the Ubuntu desktop 18.04 and the
hypervisor is the QEMU/KVM which works seamlessly with the Linux environment (Drako,
2013) .
Part 1: Virtual Machine One – DNS & SSH Server (3 marks)
This is a one-time task that that is going to installed and configured in the virtual machine
two with the CentOS. In this server, Bind is used to run the DNS service on server1. The steps
are outlined as follows
i. Installation of the DNS packages onto our virtual machine
ii. The configuration of static IP address onto the VM
iii. The configuration of a fully qualified domain name(FQDN) for the server
iv. Assignment of an IP address to the FQDNS in the host's file
v. The configuration of the resolv. conf
vi. Configure the named. conf file
vii. Define zones
viii. Configuration of zones
ix. Change group permission of the zone files
x. Restart DNS service
Hand On
Step 0: Installation of BIND
Running head: LINUX SERVER ADMINISTRATION 3
BIND is mostly used DNS service and shall be installed on the server1 using the
following command sudo yum install bind* This shall install the bind services and any other bind
utils
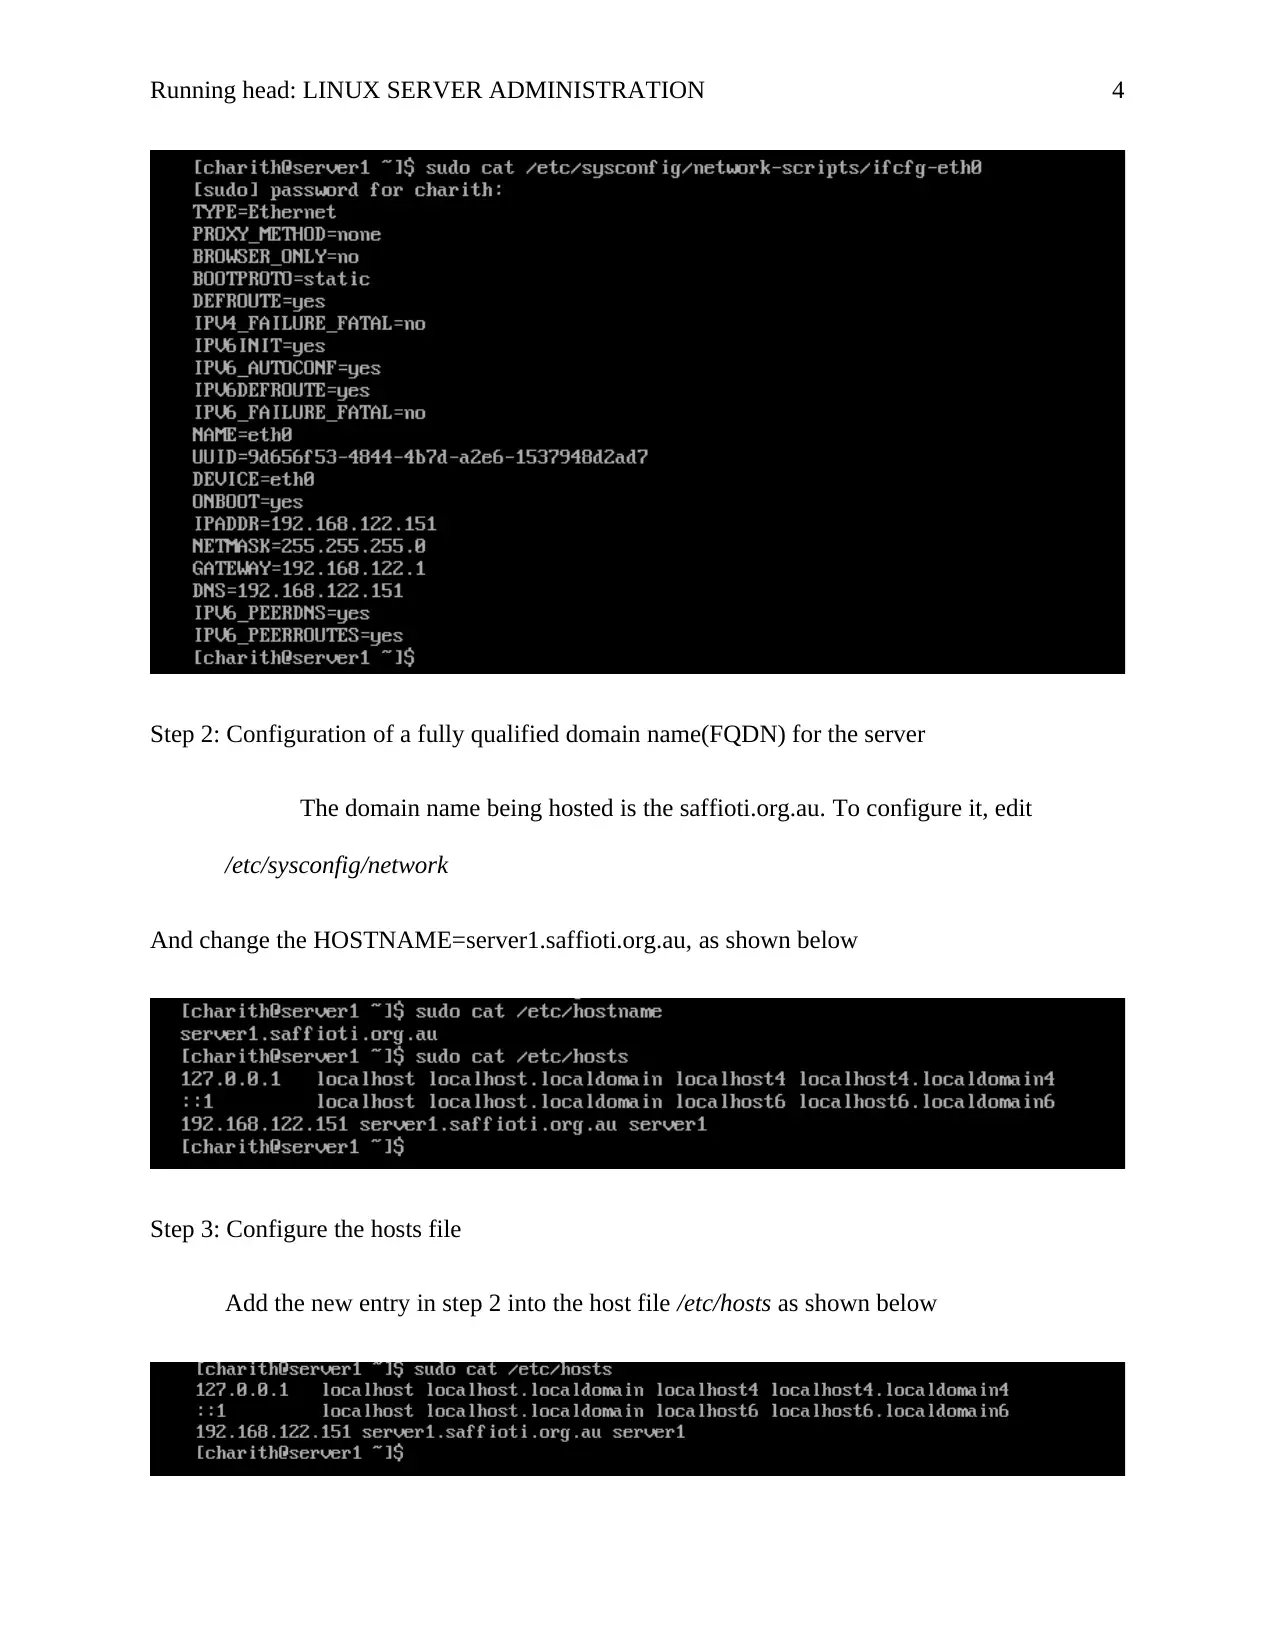
Step 1: Set Up Static IP
First, change the status of the eth0 interface to up using the following command
ifup eth0
Now assign a static IP to the interface by editing the following file,
/etc/sysconfig/network-scripts/ifcfg-eth0
The Boot proto=static
IPADDR=192.168.122.155
NETMASK=255.255.255.0
GATEWAY=192.168.122.1
ONBOOT=YES
This is as shown below
⊘ This is a preview!⊘
Do you want full access?
Subscribe today to unlock all pages.

Trusted by 1+ million students worldwide
Running head: LINUX SERVER ADMINISTRATION 4
Step 2: Configuration of a fully qualified domain name(FQDN) for the server
The domain name being hosted is the saffioti.org.au. To configure it, edit
/etc/sysconfig/network
And change the HOSTNAME=server1.saffioti.org.au, as shown below
Step 3: Configure the hosts file
Add the new entry in step 2 into the host file /etc/hosts as shown below
Paraphrase This Document
Need a fresh take? Get an instant paraphrase of this document with our AI Paraphraser
Running head: LINUX SERVER ADMINISTRATION 5
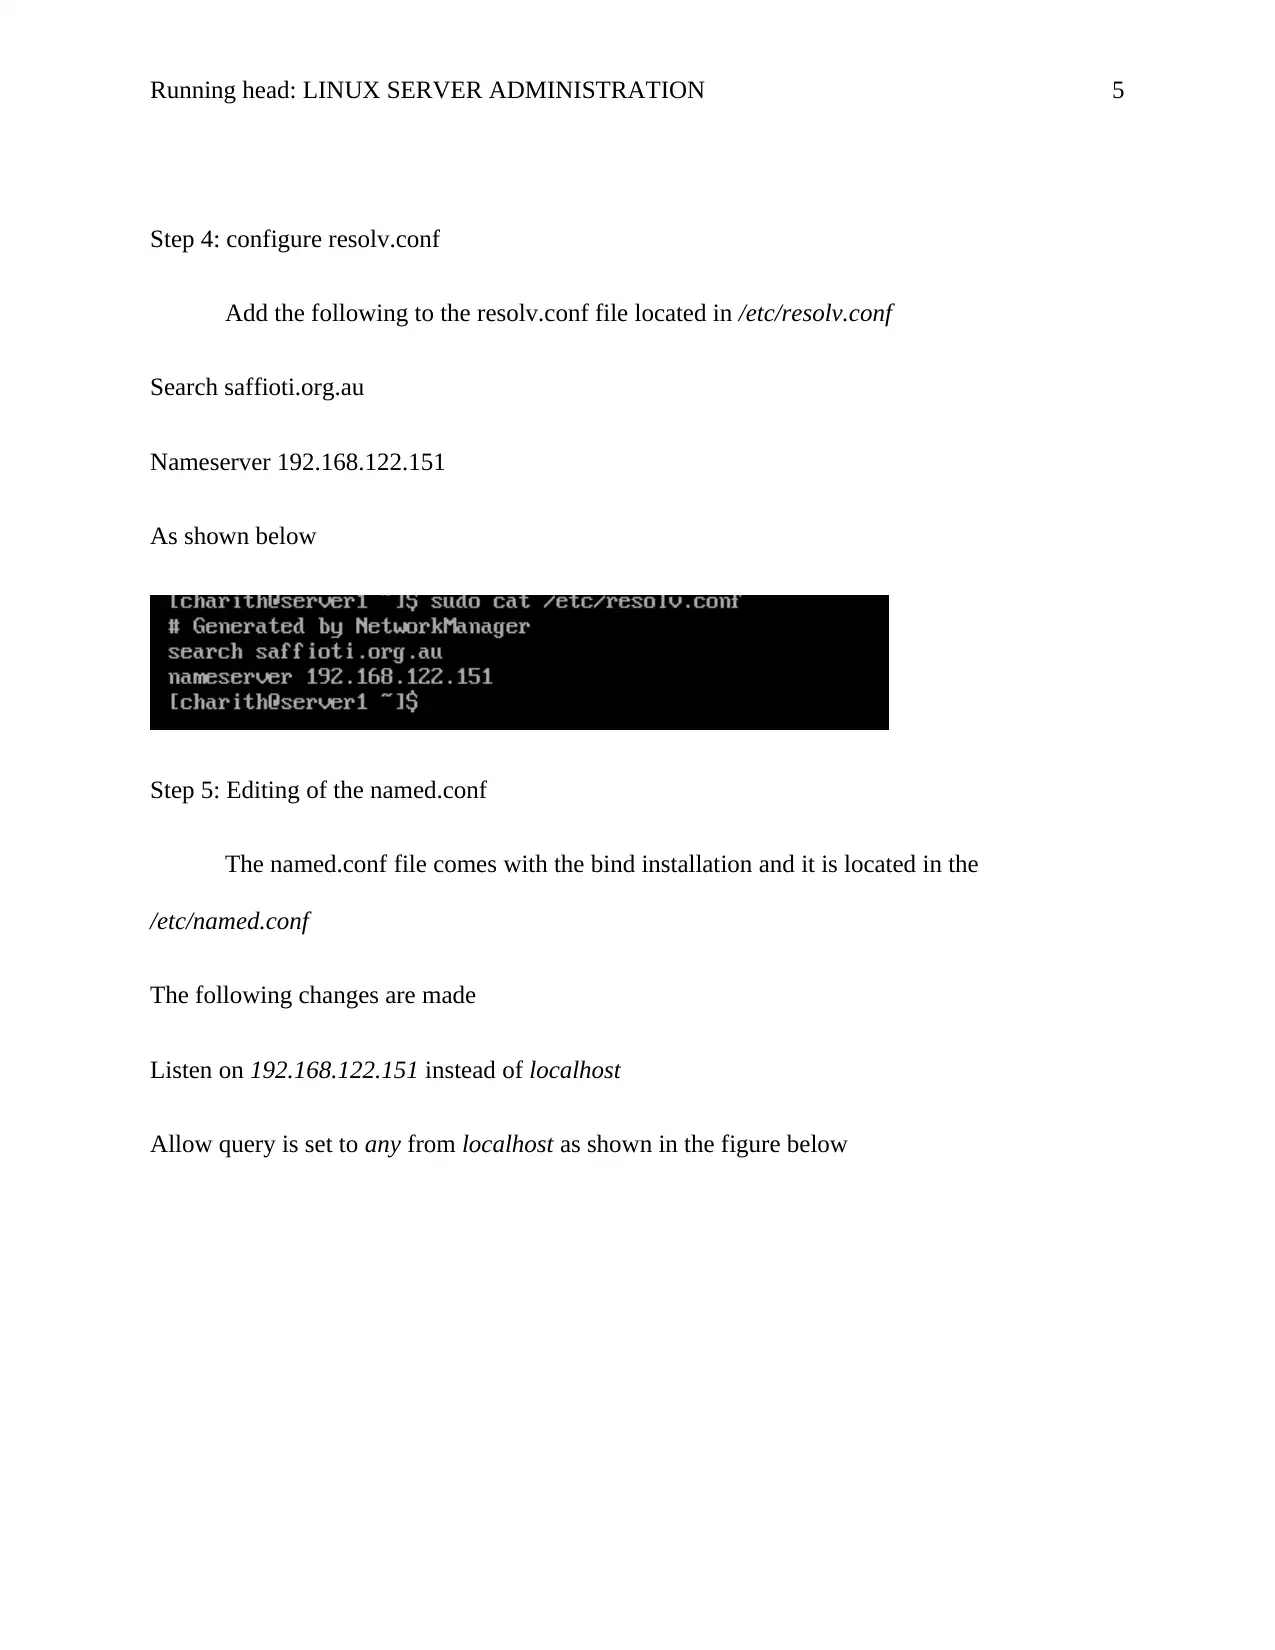
Step 4: configure resolv.conf
Add the following to the resolv.conf file located in /etc/resolv.conf
Search saffioti.org.au
Nameserver 192.168.122.151
As shown below
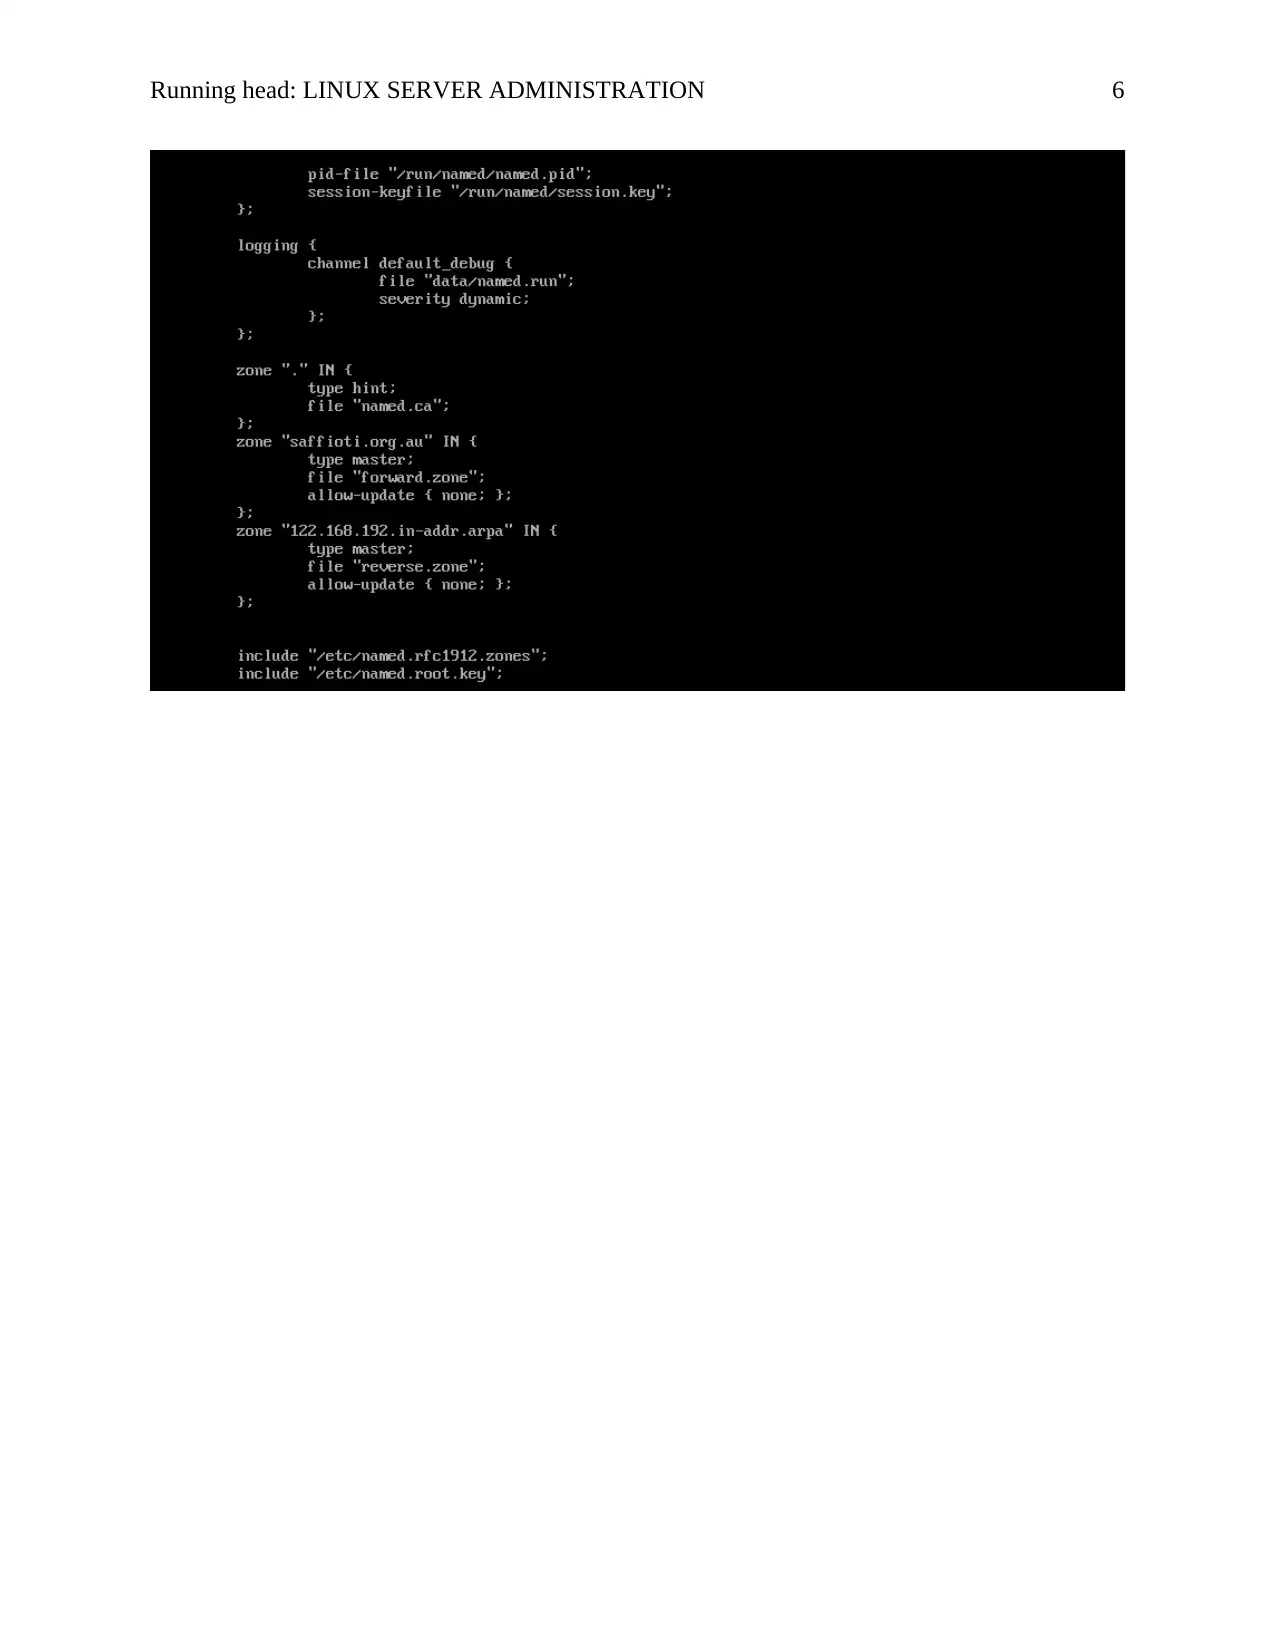
Step 5: Editing of the named.conf
The named.conf file comes with the bind installation and it is located in the
/etc/named.conf
The following changes are made
Listen on 192.168.122.151 instead of localhost
Allow query is set to any from localhost as shown in the figure below
Running head: LINUX SERVER ADMINISTRATION 6
⊘ This is a preview!⊘
Do you want full access?
Subscribe today to unlock all pages.

Trusted by 1+ million students worldwide
Running head: LINUX SERVER ADMINISTRATION 7
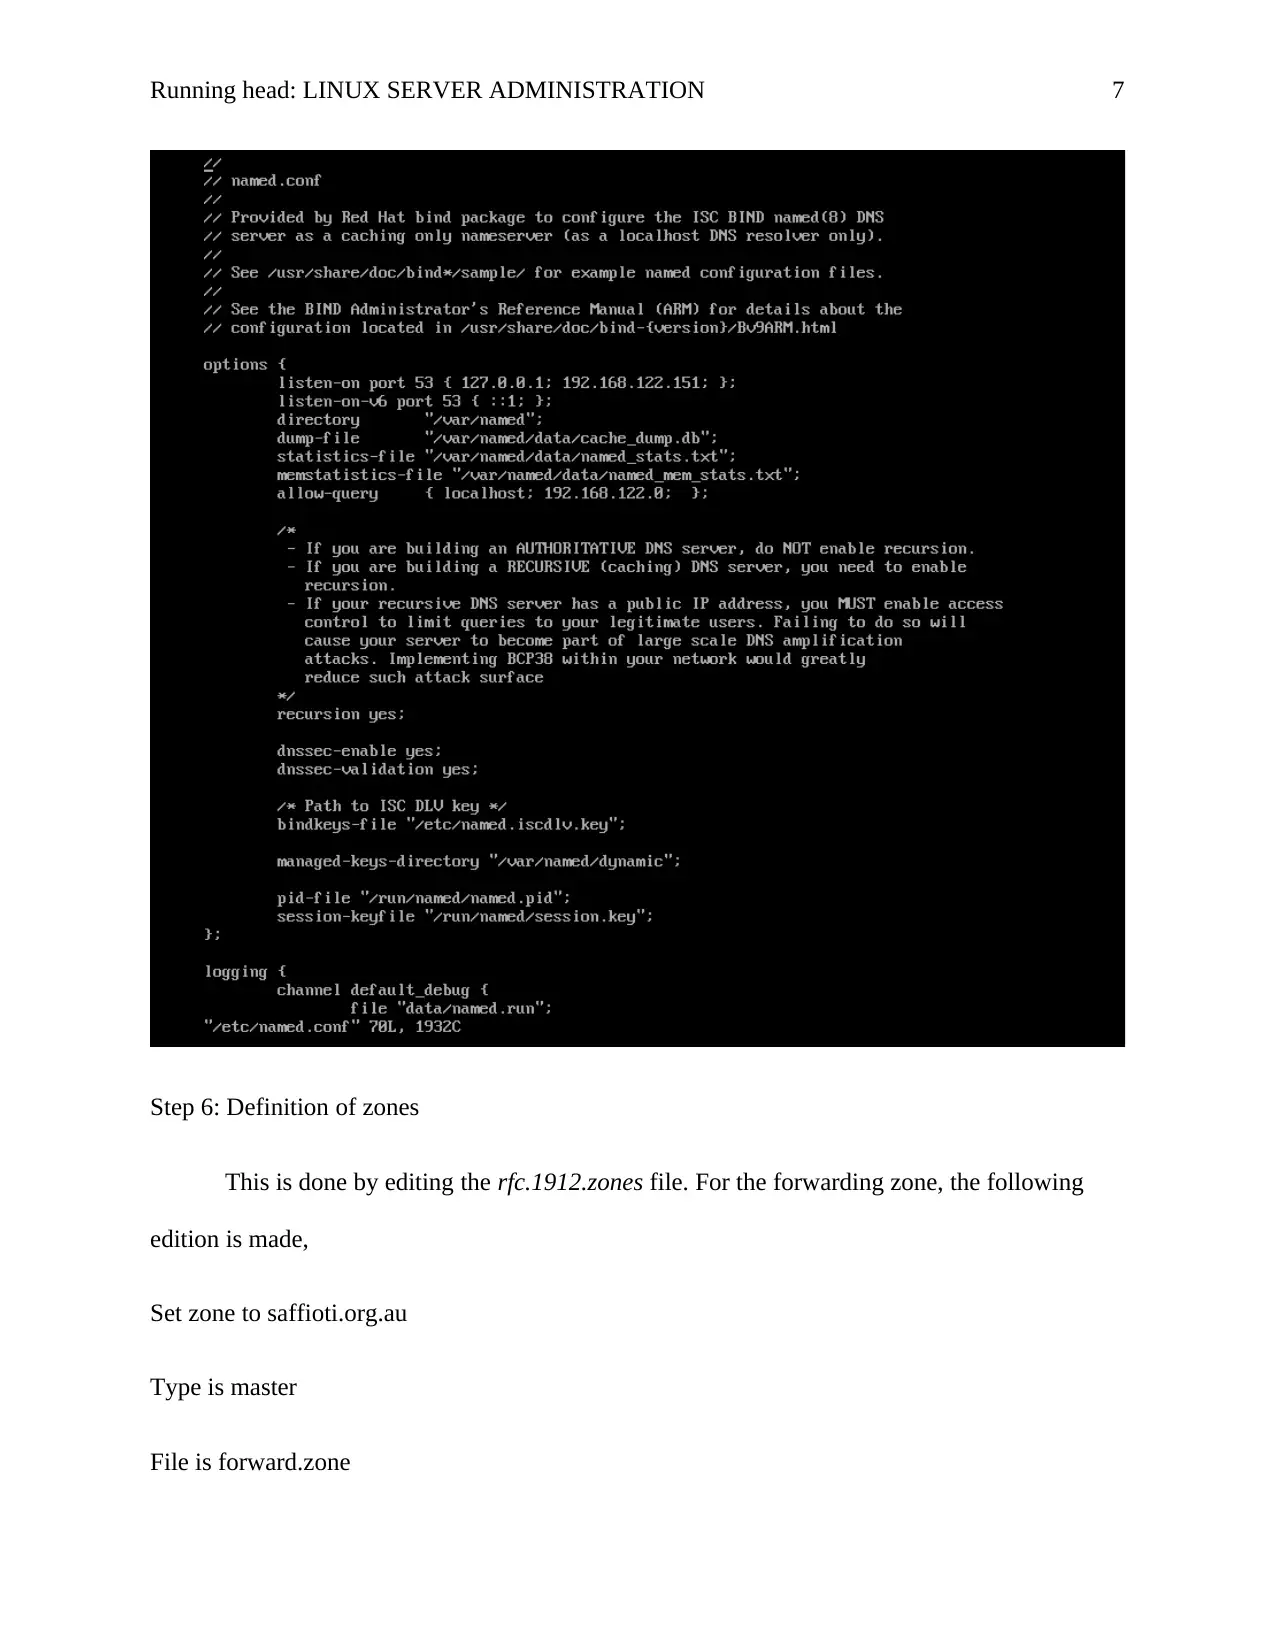
Step 6: Definition of zones
This is done by editing the rfc.1912.zones file. For the forwarding zone, the following
edition is made,
Set zone to saffioti.org.au
Type is master
File is forward.zone
Step 6: Definition of zones
This is done by editing the rfc.1912.zones file. For the forwarding zone, the following
edition is made,
Set zone to saffioti.org.au
Type is master
File is forward.zone
Paraphrase This Document
Need a fresh take? Get an instant paraphrase of this document with our AI Paraphraser
Running head: LINUX SERVER ADMINISTRATION 8
The reverse zone has the following edition
Zone is 122.168.192.in-addr.arpa //the subnet is in the reverse order
Type is master
The file is reverse.zone
The above configurations are shown below
Step 7: Configuration of the zones
The template for configuring the zones is located in the /var/named.localhost
Copy the contents of the named.localhost to both the forward. zone and reverse.zone
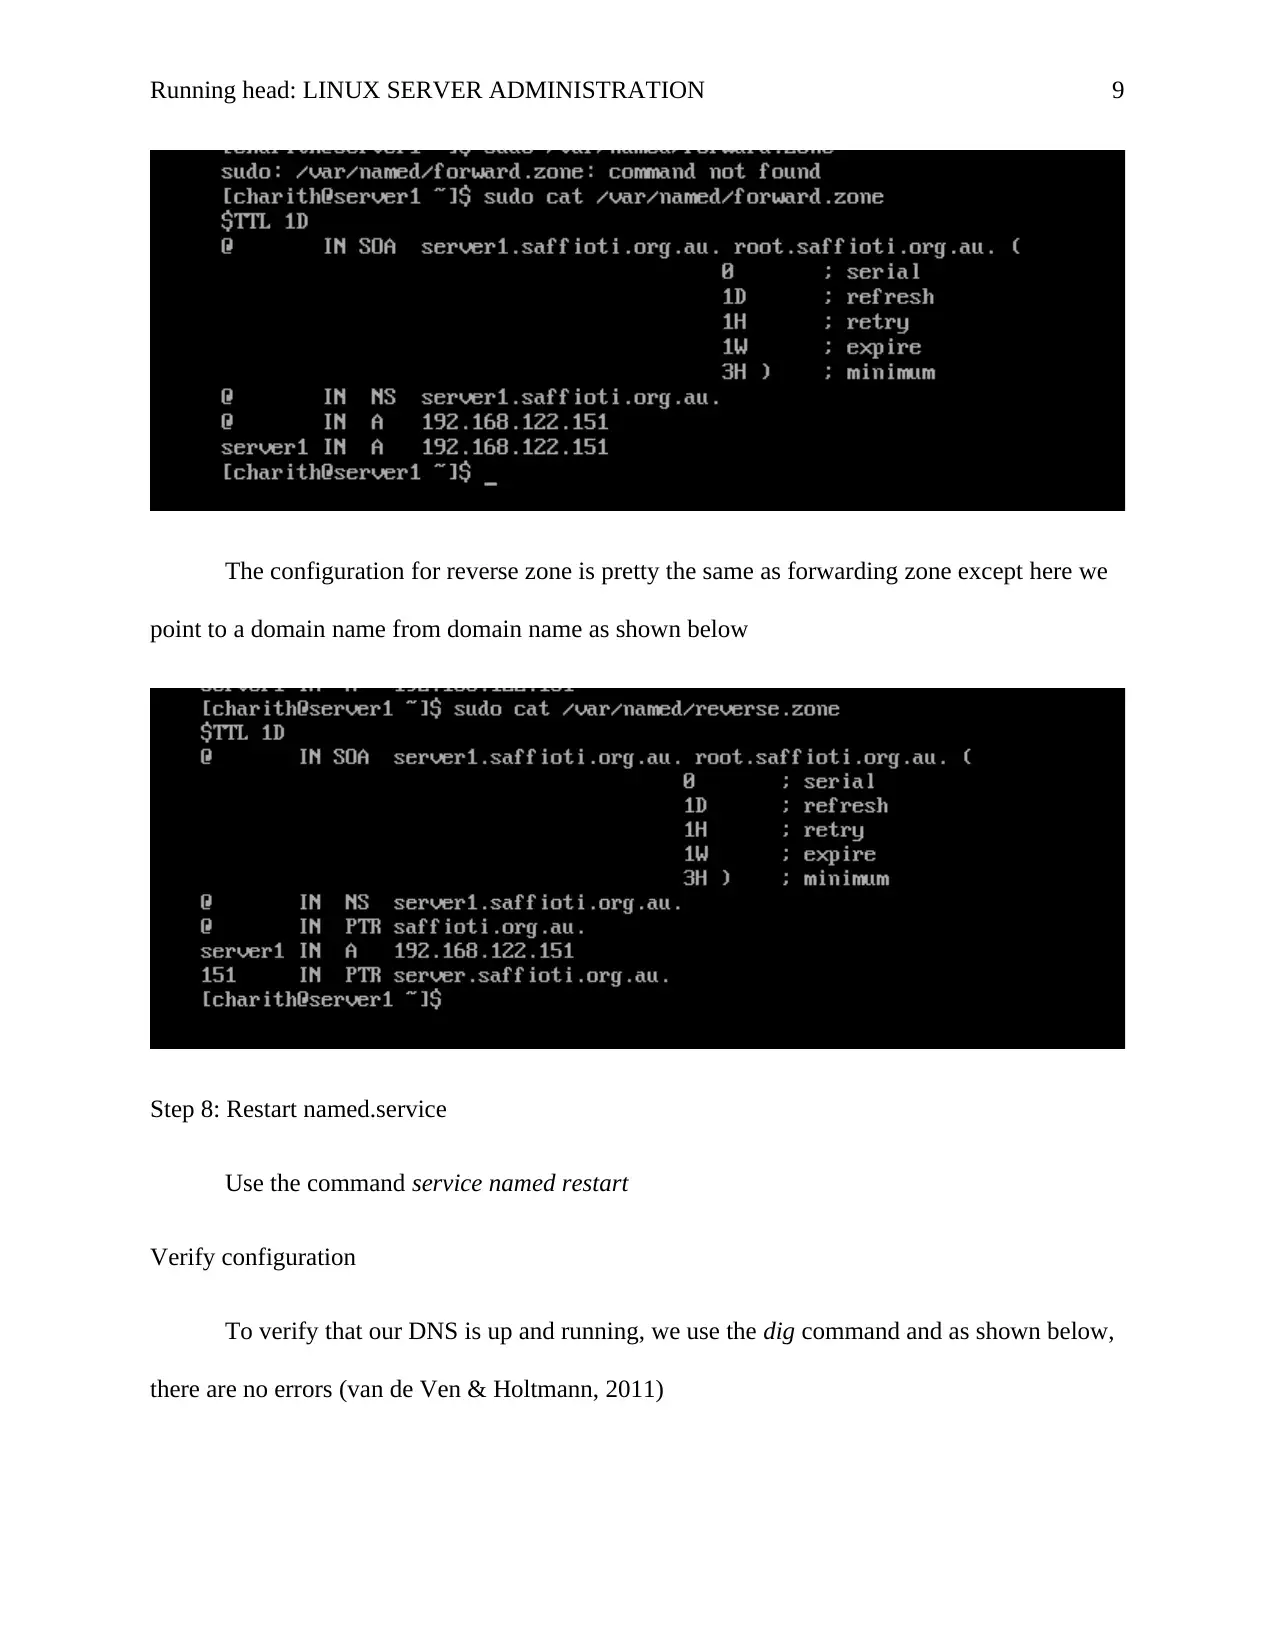
Then configure the forward. zone as follows
Set TTL=1 day
SOA =server1.saffioti.org.au
NS=server1.saffioti.org.au
A=192.168.122.151
This is as shown below
Running head: LINUX SERVER ADMINISTRATION 9
The configuration for reverse zone is pretty the same as forwarding zone except here we
point to a domain name from domain name as shown below
Step 8: Restart named.service
Use the command service named restart
Verify configuration
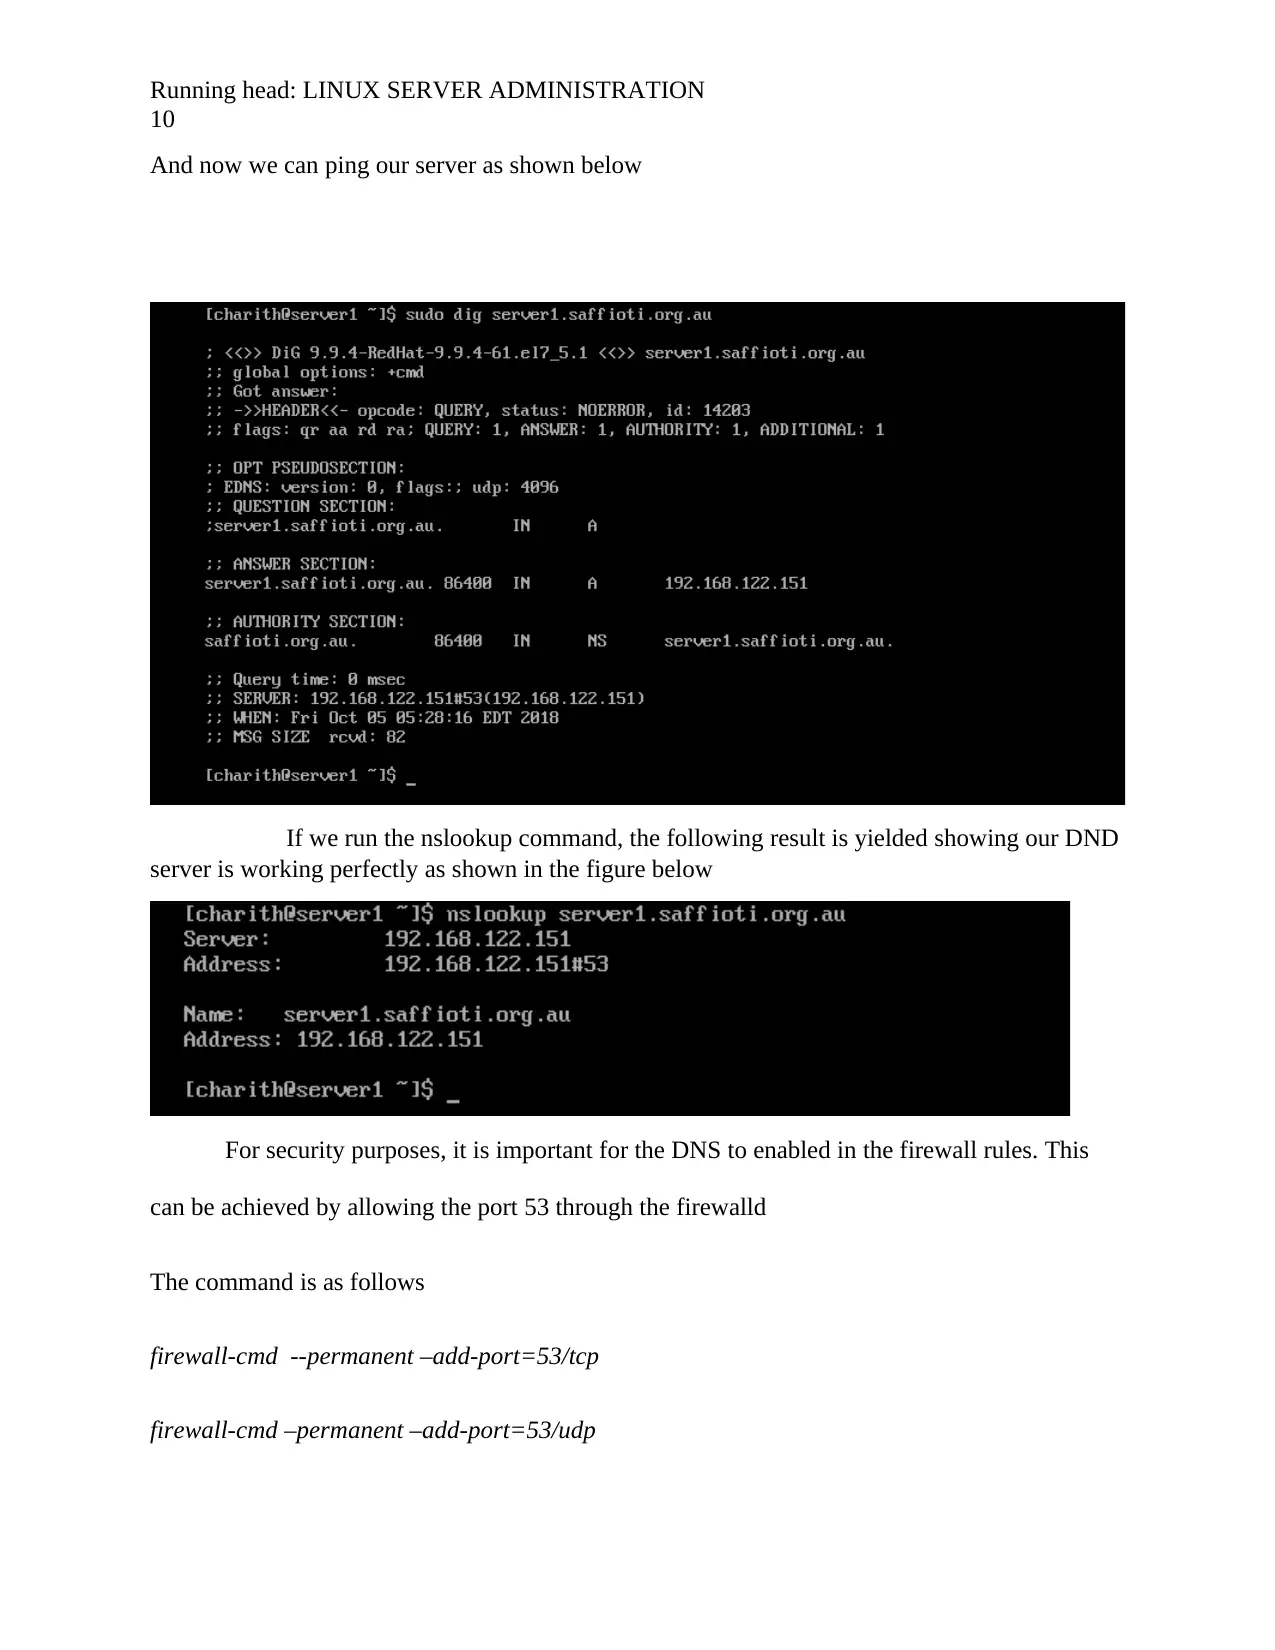
To verify that our DNS is up and running, we use the dig command and as shown below,
there are no errors (van de Ven & Holtmann, 2011)
⊘ This is a preview!⊘
Do you want full access?
Subscribe today to unlock all pages.

Trusted by 1+ million students worldwide
Running head: LINUX SERVER ADMINISTRATION
10
And now we can ping our server as shown below
If we run the nslookup command, the following result is yielded showing our DND
server is working perfectly as shown in the figure below
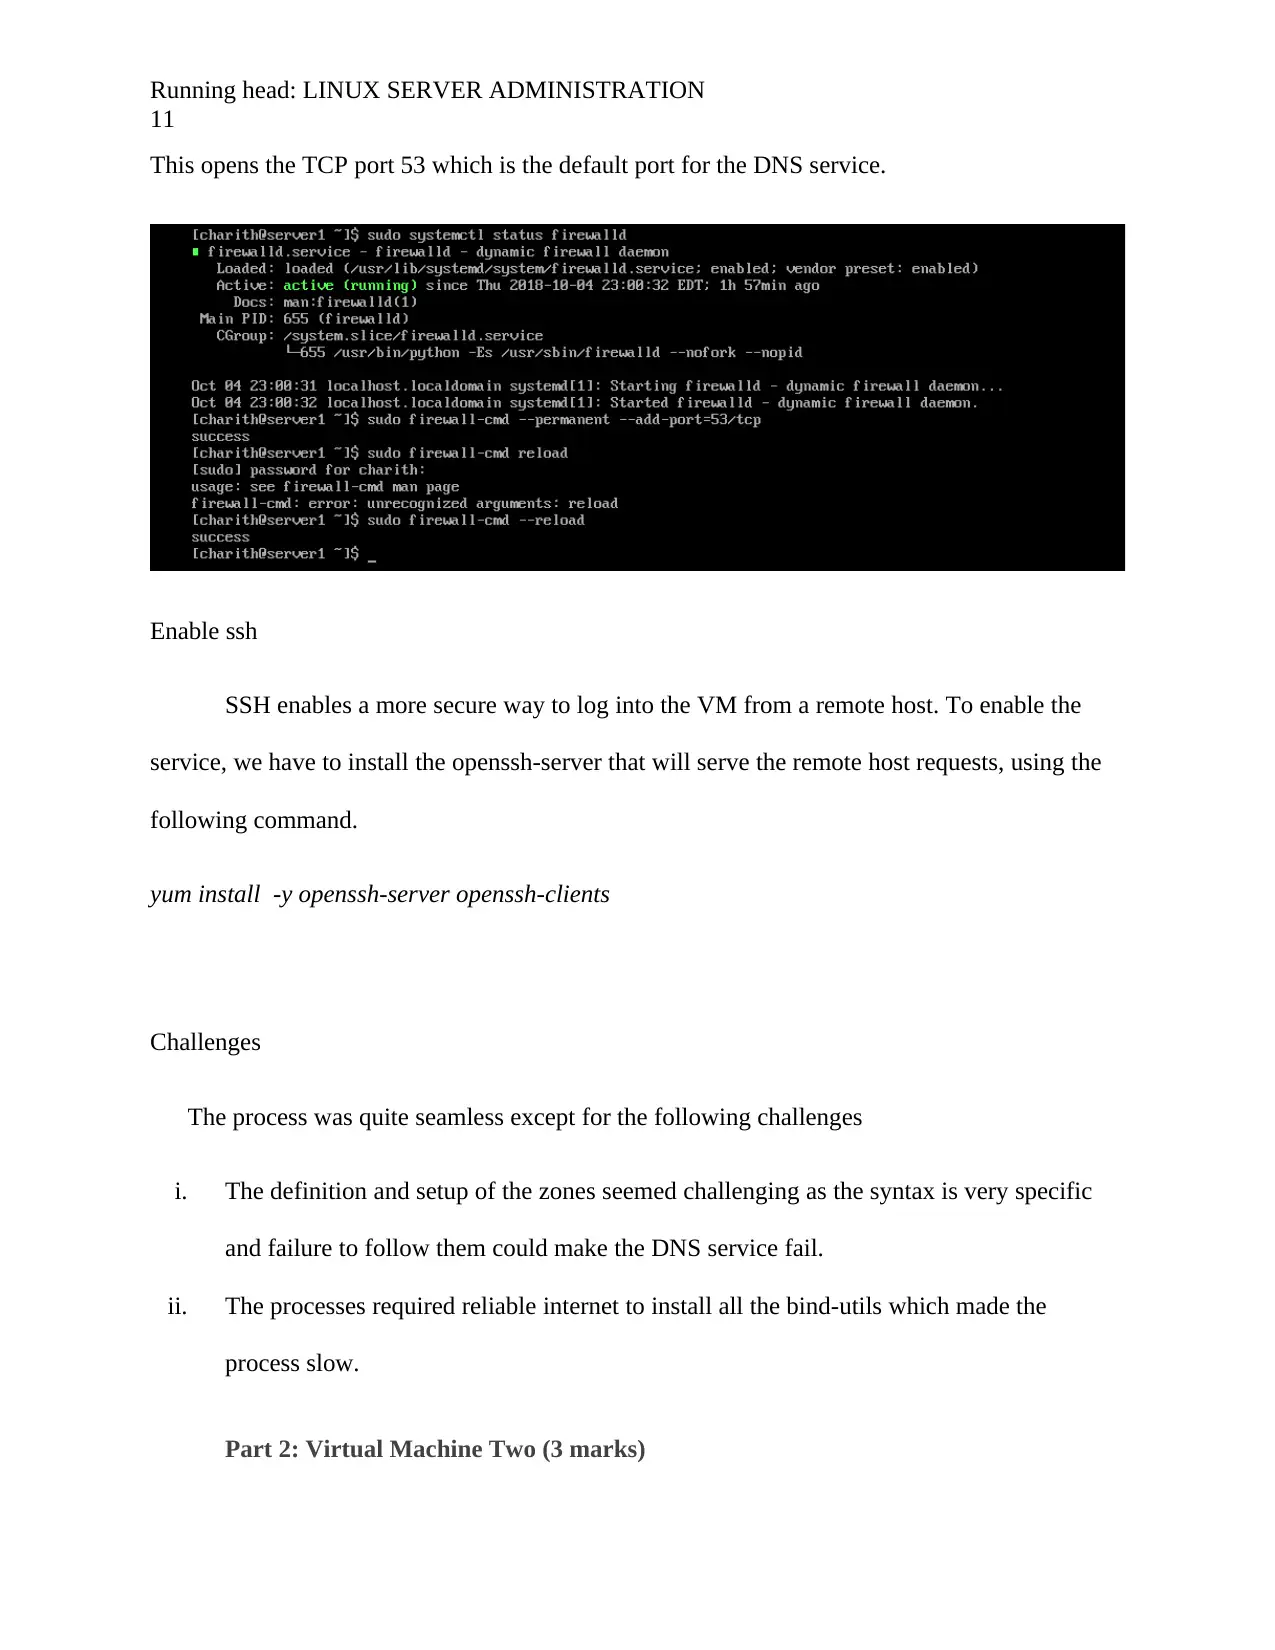
For security purposes, it is important for the DNS to enabled in the firewall rules. This
can be achieved by allowing the port 53 through the firewalld
The command is as follows
firewall-cmd --permanent –add-port=53/tcp
firewall-cmd –permanent –add-port=53/udp
Paraphrase This Document
Need a fresh take? Get an instant paraphrase of this document with our AI Paraphraser
Running head: LINUX SERVER ADMINISTRATION
11
This opens the TCP port 53 which is the default port for the DNS service.
Enable ssh
SSH enables a more secure way to log into the VM from a remote host. To enable the
service, we have to install the openssh-server that will serve the remote host requests, using the
following command.
yum install -y openssh-server openssh-clients
Challenges
The process was quite seamless except for the following challenges
i. The definition and setup of the zones seemed challenging as the syntax is very specific
and failure to follow them could make the DNS service fail.
ii. The processes required reliable internet to install all the bind-utils which made the
process slow.
Part 2: Virtual Machine Two (3 marks)
Running head: LINUX SERVER ADMINISTRATION
12
The second virtual machine runs the Ubuntu server 16.04 and in it, the web server shall
be installed to serve HTTP requests. To do this, the LAMP (Linux Apache MySQL PHP)
modules must be installed, configured and enabled to provide a full stack apache web server. But
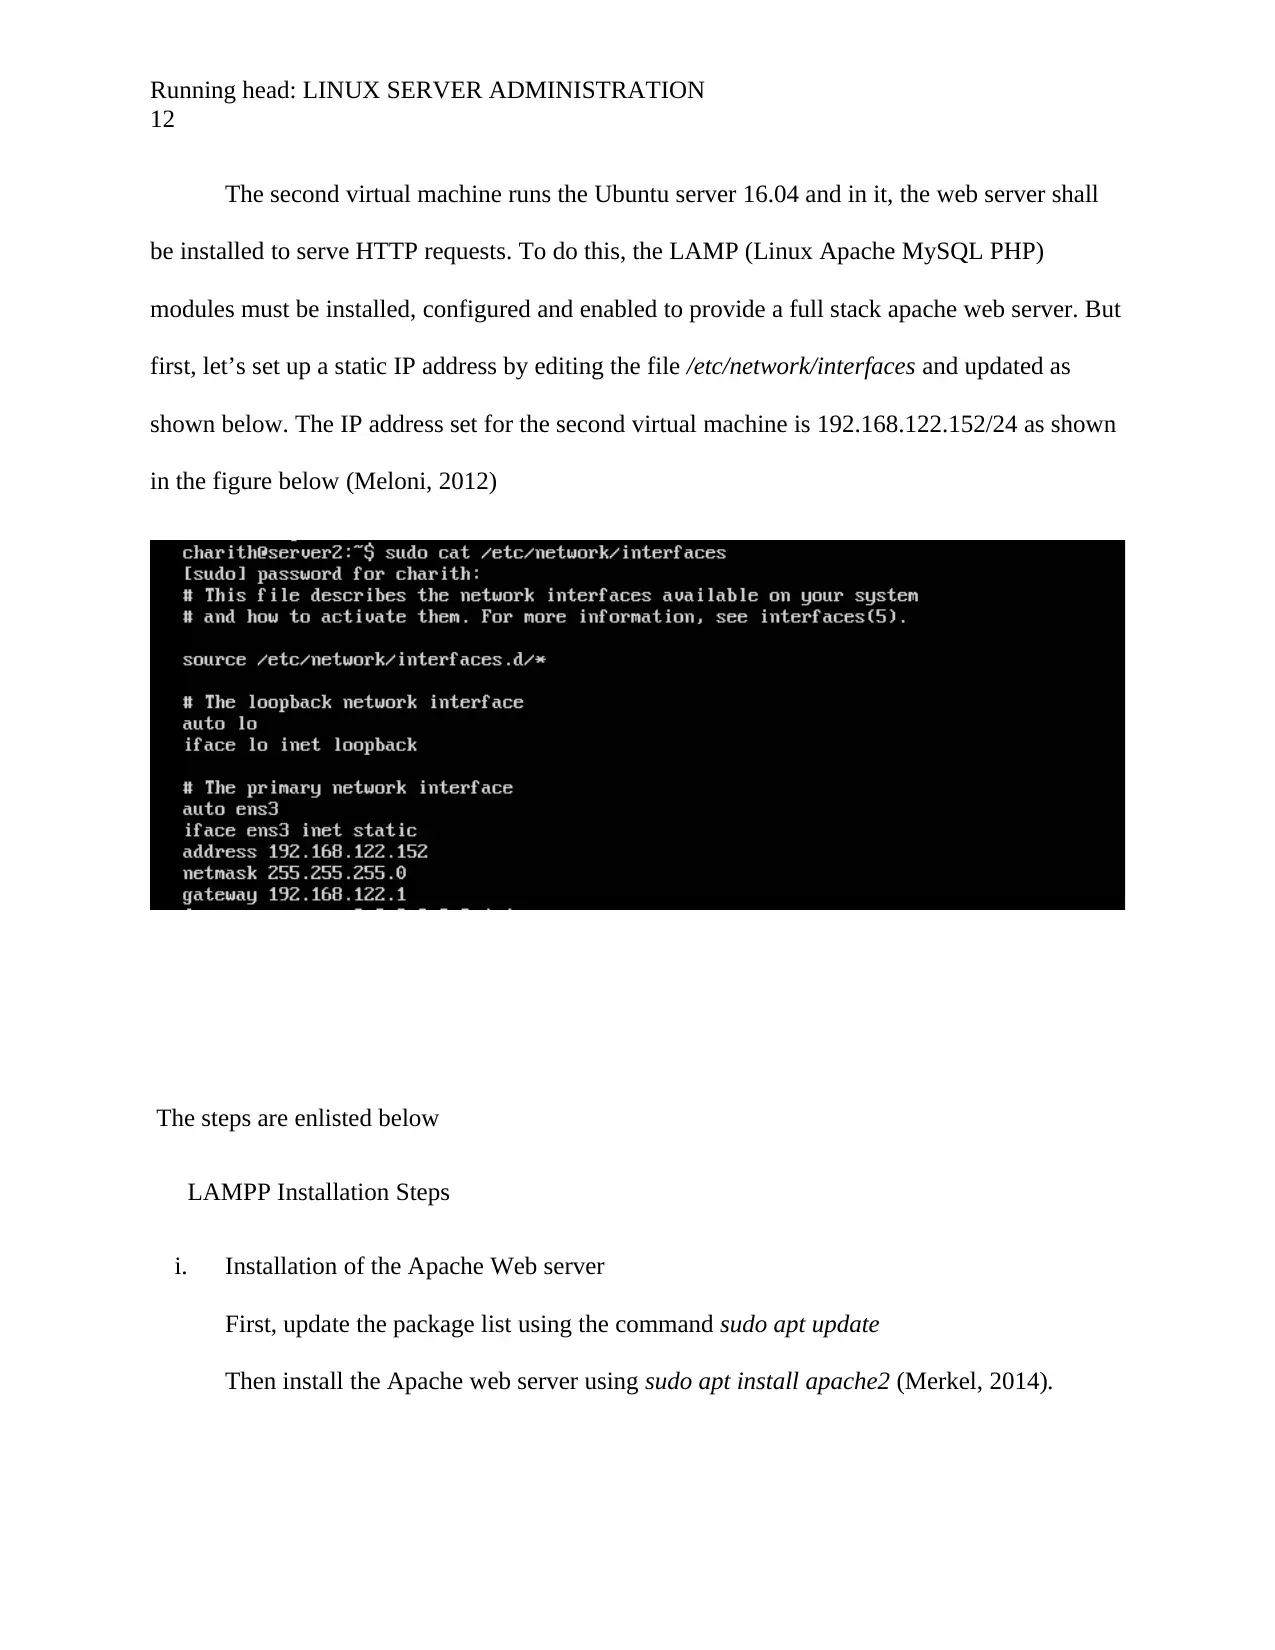
first, let’s set up a static IP address by editing the file /etc/network/interfaces and updated as
shown below. The IP address set for the second virtual machine is 192.168.122.152/24 as shown
in the figure below (Meloni, 2012)
The steps are enlisted below
LAMPP Installation Steps
i. Installation of the Apache Web server
First, update the package list using the command sudo apt update
Then install the Apache web server using sudo apt install apache2 (Merkel, 2014).
⊘ This is a preview!⊘
Do you want full access?
Subscribe today to unlock all pages.

Trusted by 1+ million students worldwide
1 out of 27
Related Documents
Your All-in-One AI-Powered Toolkit for Academic Success.
+13062052269
info@desklib.com
Available 24*7 on WhatsApp / Email
![[object Object]](/_next/static/media/star-bottom.7253800d.svg)
Unlock your academic potential
Copyright © 2020–2026 A2Z Services. All Rights Reserved. Developed and managed by ZUCOL.


