SYST28296 Tutorial 3: Kubuntu Linux User and Group Management
VerifiedAdded on 2022/10/09
|18
|4010
|24
Practical Assignment
AI Summary
This tutorial provides a comprehensive guide to managing user accounts and groups within a Kubuntu Linux virtual machine. It begins with an exploration of the /etc/passwd file and its significance. The tutorial then delves into the practical aspects of user account creation, modification, and deletion using command-line tools like `useradd`, `userdel`, `usermod`, and `passwd`. It covers creating home directories, setting passwords, and managing temporary user accounts with expiration dates. The tutorial also introduces shell scripting for automating the creation of multiple user accounts, including the use of graphical dialog boxes and database files. Furthermore, it explores group management using the /etc/group file, demonstrating how to add, remove, and append users to groups, and how to set file permissions using the `chmod` command. The tutorial emphasizes practical application and provides step-by-step instructions for each task, including how to create and manage temporary accounts, modify existing accounts and automate the creation of multiple user accounts. Finally, it concludes by outlining the required files for submission.
SYST28296 Tutorial 3
In this tutorial, you will learn how to manage user accounts and
groups for your Kubuntu Linux VM. First, you will learn about the
/etc/passwd file. Then you will learn how to efficiently create user
accounts and have files automatically created on the behalf of the
user upon user account creation.
You will also perform additional user account management such as
removing user accounts, modifying user accounts and resetting user account passwords.
You will also learn how to create and manage temporary user accounts that will be locked after
a predetermined set date. You will also use shell scripts that can be used to automate the
creation of multiple user accounts.
Finally, you will be learning how to manage groups contained in the /etc/group file in order to
allow users to share resources such as files and directories for collaborative development
projects in your Kubuntu Linux VM. You will learn how to add, remove and append user
accounts to an existing group. You will also set permissions using the chmod command.
You can refer to the SUBMITTING TUTORIAL 3 section at the end of this document for a
check-list of the required files to submit for marks.
PART 1: MANAGING USER ACCOUNTS
The /etc/passwd File
This is a database file that contains all usernames on your Linux system as well as other
important information related to each user account.
This file is accessed by root to verify and load user
account defaults when the user logs into their
computer system. The file separates user accounts
(system vs regular users) by account number.
Throughout this tutorial, you will be asked some
questions relating to this week’s notes. These
questions will appear as a green coloured box,
where you will be required to type the answer to the
questions within the area provided. You should save
your MS Word document frequently.
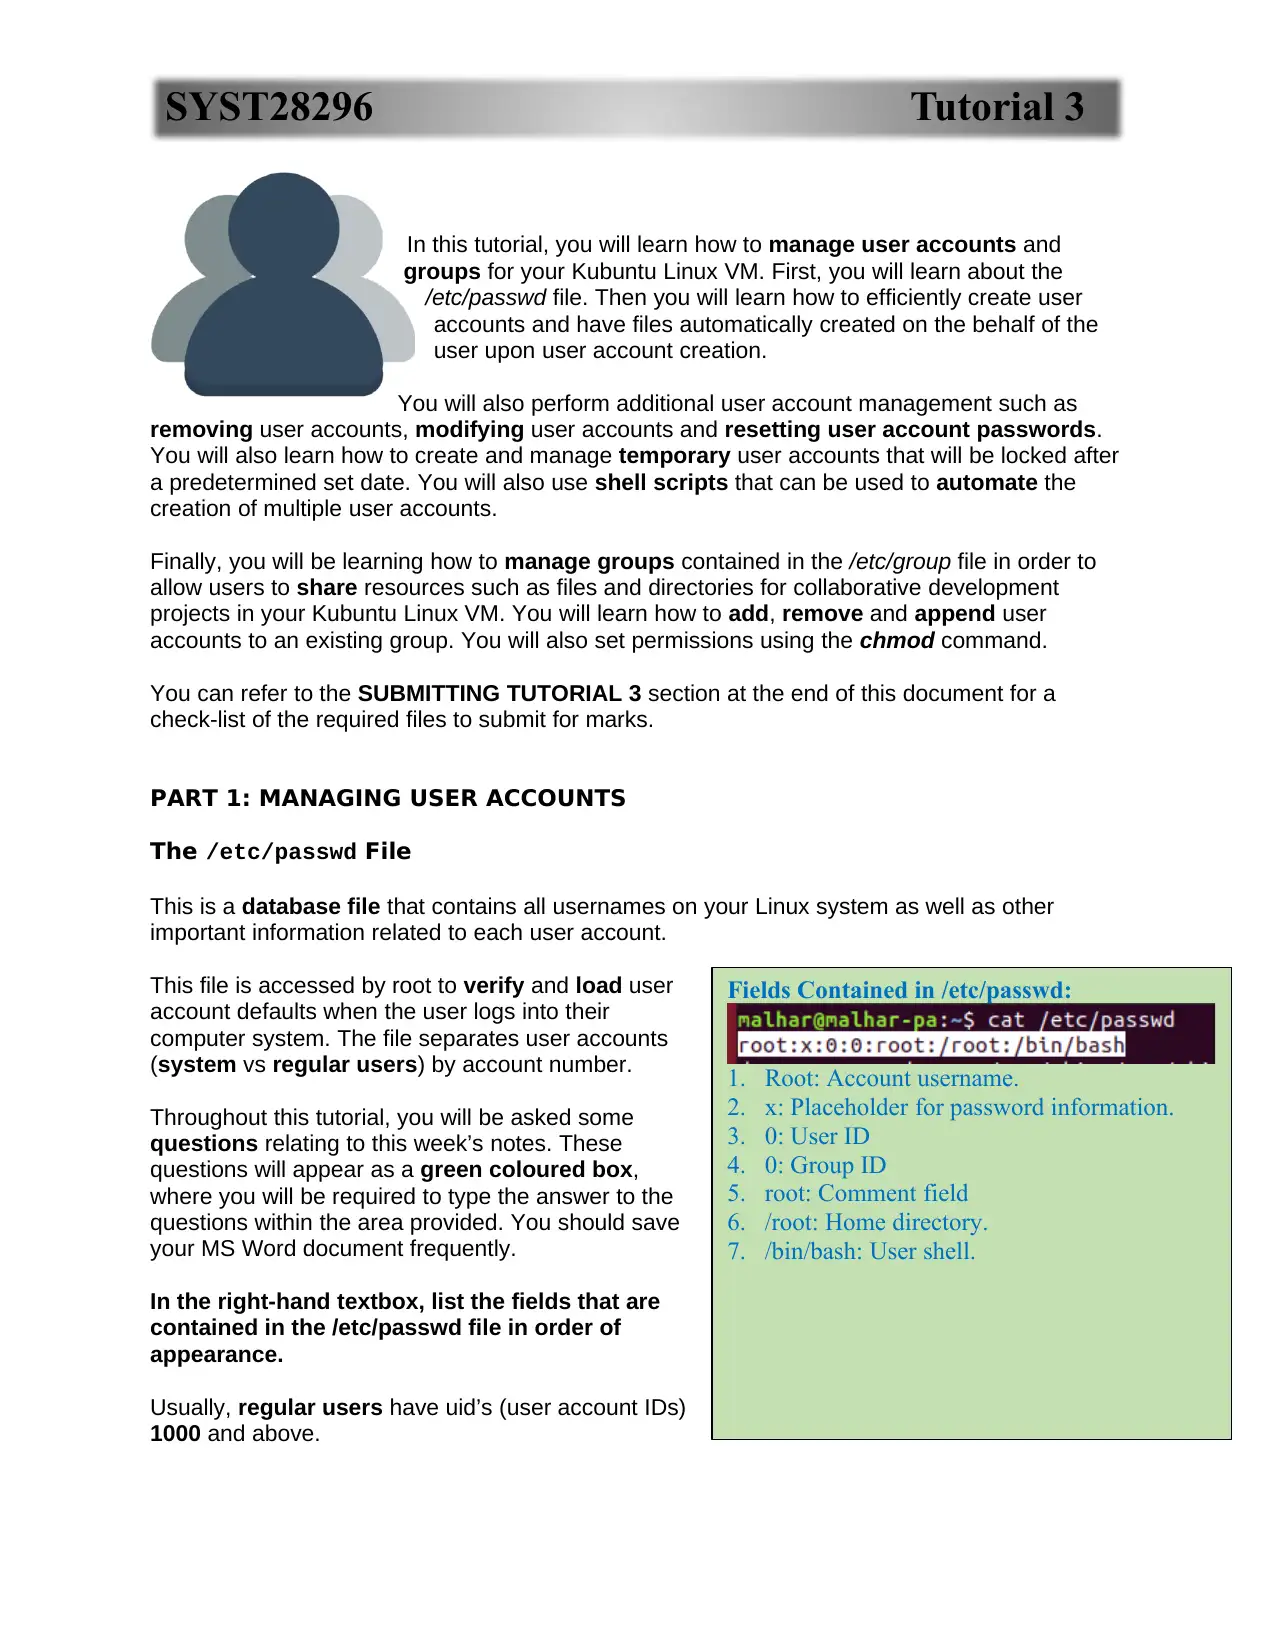
In the right-hand textbox, list the fields that are
contained in the /etc/passwd file in order of
appearance.
Usually, regular users have uid’s (user account IDs)
1000 and above.
Fields Contained in /etc/passwd:
1. Root: Account username.
2. x: Placeholder for password information.
3. 0: User ID
4. 0: Group ID
5. root: Comment field
6. /root: Home directory.
7. /bin/bash: User shell.
In this tutorial, you will learn how to manage user accounts and
groups for your Kubuntu Linux VM. First, you will learn about the
/etc/passwd file. Then you will learn how to efficiently create user
accounts and have files automatically created on the behalf of the
user upon user account creation.
You will also perform additional user account management such as
removing user accounts, modifying user accounts and resetting user account passwords.
You will also learn how to create and manage temporary user accounts that will be locked after
a predetermined set date. You will also use shell scripts that can be used to automate the
creation of multiple user accounts.
Finally, you will be learning how to manage groups contained in the /etc/group file in order to
allow users to share resources such as files and directories for collaborative development
projects in your Kubuntu Linux VM. You will learn how to add, remove and append user
accounts to an existing group. You will also set permissions using the chmod command.
You can refer to the SUBMITTING TUTORIAL 3 section at the end of this document for a
check-list of the required files to submit for marks.
PART 1: MANAGING USER ACCOUNTS
The /etc/passwd File
This is a database file that contains all usernames on your Linux system as well as other
important information related to each user account.
This file is accessed by root to verify and load user
account defaults when the user logs into their
computer system. The file separates user accounts
(system vs regular users) by account number.
Throughout this tutorial, you will be asked some
questions relating to this week’s notes. These
questions will appear as a green coloured box,
where you will be required to type the answer to the
questions within the area provided. You should save
your MS Word document frequently.
In the right-hand textbox, list the fields that are
contained in the /etc/passwd file in order of
appearance.
Usually, regular users have uid’s (user account IDs)
1000 and above.
Fields Contained in /etc/passwd:
1. Root: Account username.
2. x: Placeholder for password information.
3. 0: User ID
4. 0: Group ID
5. root: Comment field
6. /root: Home directory.
7. /bin/bash: User shell.
Paraphrase This Document
Need a fresh take? Get an instant paraphrase of this document with our AI Paraphraser
SYST28296 Tutorial 3
Perform the following Steps:
1. Start up your Kubuntu-VM1 virtual machine and log-in using your regular user and password.
2. Open your Bash Shell and switch to the root account.
Although the sysadmin (root) account can directly edit the /etc/passwd file, it is NOT recommended
that you edit that file since it could create errors and/or corrupt that important database file.
Instead, there are sysadmin commands that can be issued that will consistently and safely modify
the /etc/passwd file.
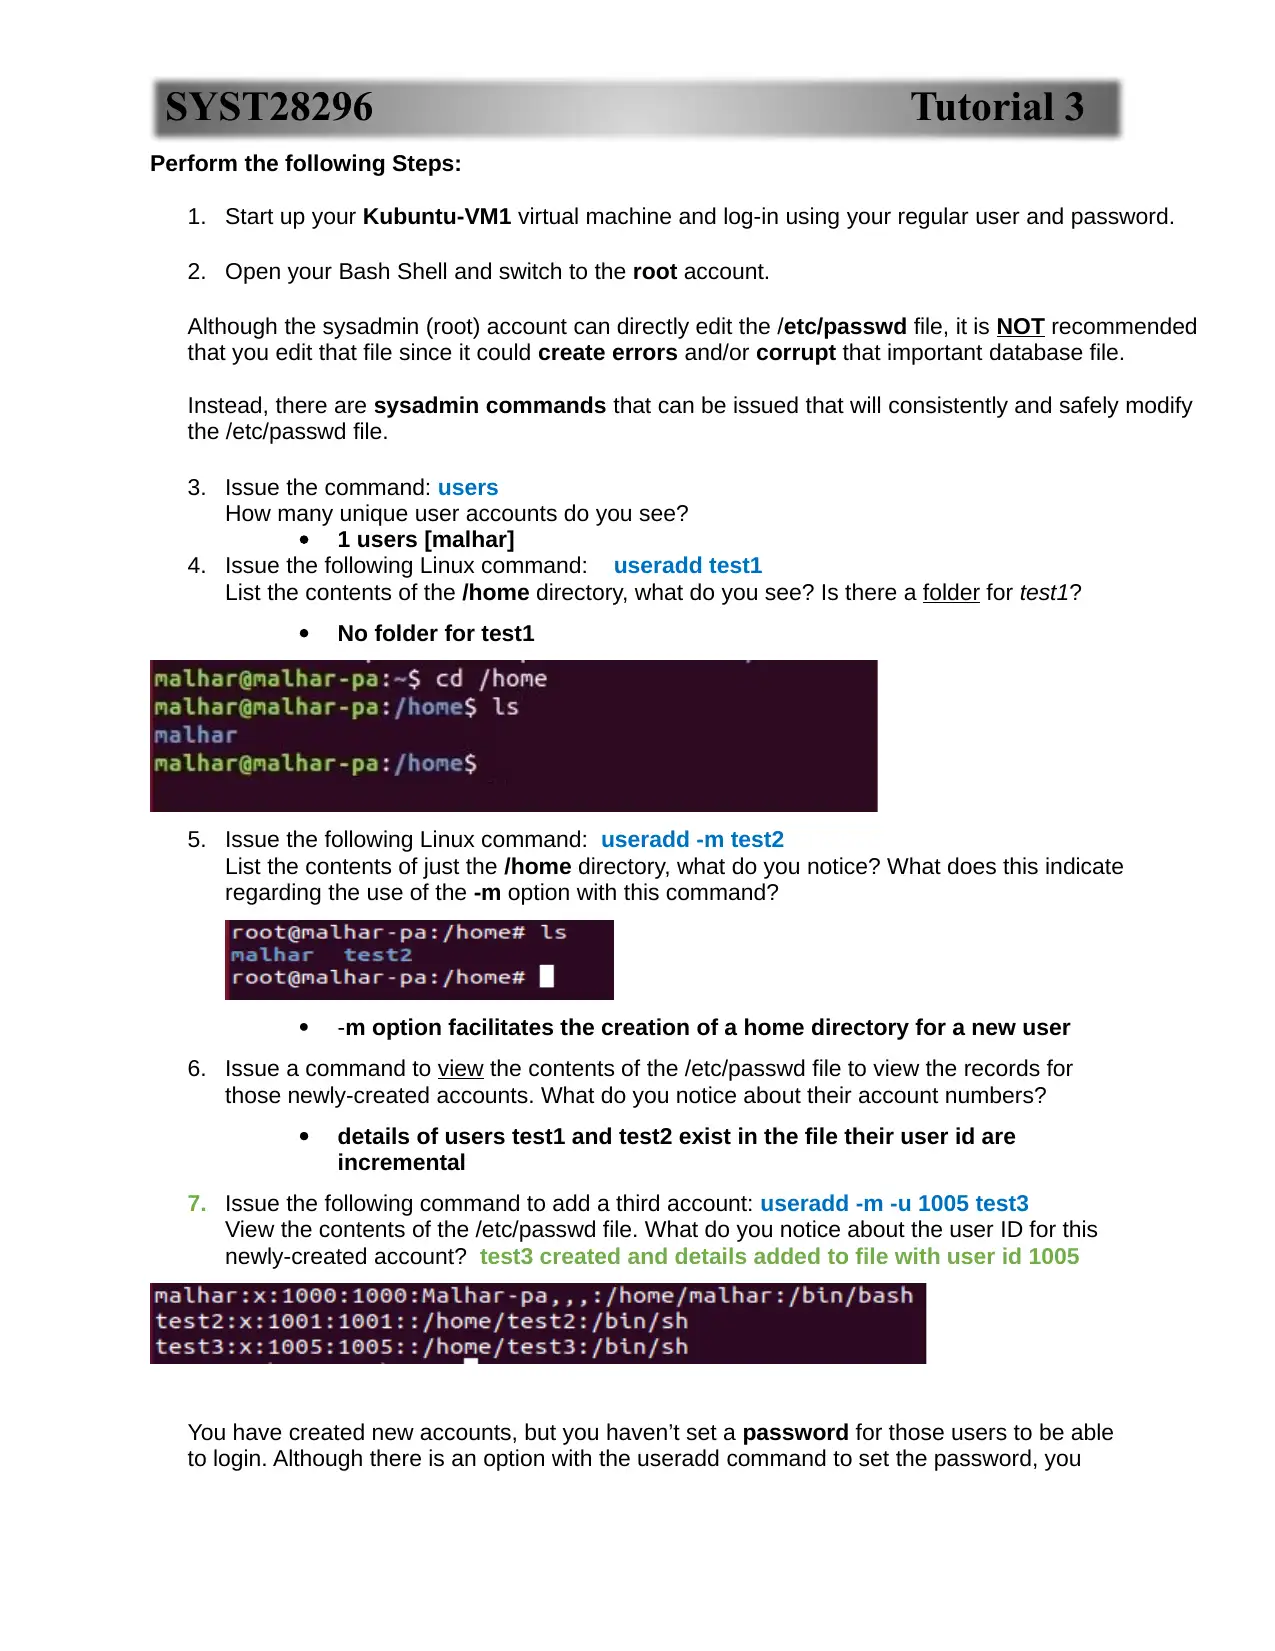
3. Issue the command: users
How many unique user accounts do you see?
1 users [malhar]
4. Issue the following Linux command: useradd test1
List the contents of the /home directory, what do you see? Is there a folder for test1?
No folder for test1
5. Issue the following Linux command: useradd -m test2
List the contents of just the /home directory, what do you notice? What does this indicate
regarding the use of the -m option with this command?
-m option facilitates the creation of a home directory for a new user
6. Issue a command to view the contents of the /etc/passwd file to view the records for
those newly-created accounts. What do you notice about their account numbers?
details of users test1 and test2 exist in the file their user id are
incremental
7. Issue the following command to add a third account: useradd -m -u 1005 test3
View the contents of the /etc/passwd file. What do you notice about the user ID for this
newly-created account? test3 created and details added to file with user id 1005
You have created new accounts, but you haven’t set a password for those users to be able
to login. Although there is an option with the useradd command to set the password, you
Perform the following Steps:
1. Start up your Kubuntu-VM1 virtual machine and log-in using your regular user and password.
2. Open your Bash Shell and switch to the root account.
Although the sysadmin (root) account can directly edit the /etc/passwd file, it is NOT recommended
that you edit that file since it could create errors and/or corrupt that important database file.
Instead, there are sysadmin commands that can be issued that will consistently and safely modify
the /etc/passwd file.
3. Issue the command: users
How many unique user accounts do you see?
1 users [malhar]
4. Issue the following Linux command: useradd test1
List the contents of the /home directory, what do you see? Is there a folder for test1?
No folder for test1
5. Issue the following Linux command: useradd -m test2
List the contents of just the /home directory, what do you notice? What does this indicate
regarding the use of the -m option with this command?
-m option facilitates the creation of a home directory for a new user
6. Issue a command to view the contents of the /etc/passwd file to view the records for
those newly-created accounts. What do you notice about their account numbers?
details of users test1 and test2 exist in the file their user id are
incremental
7. Issue the following command to add a third account: useradd -m -u 1005 test3
View the contents of the /etc/passwd file. What do you notice about the user ID for this
newly-created account? test3 created and details added to file with user id 1005
You have created new accounts, but you haven’t set a password for those users to be able
to login. Although there is an option with the useradd command to set the password, you
SYST28296 Tutorial 3
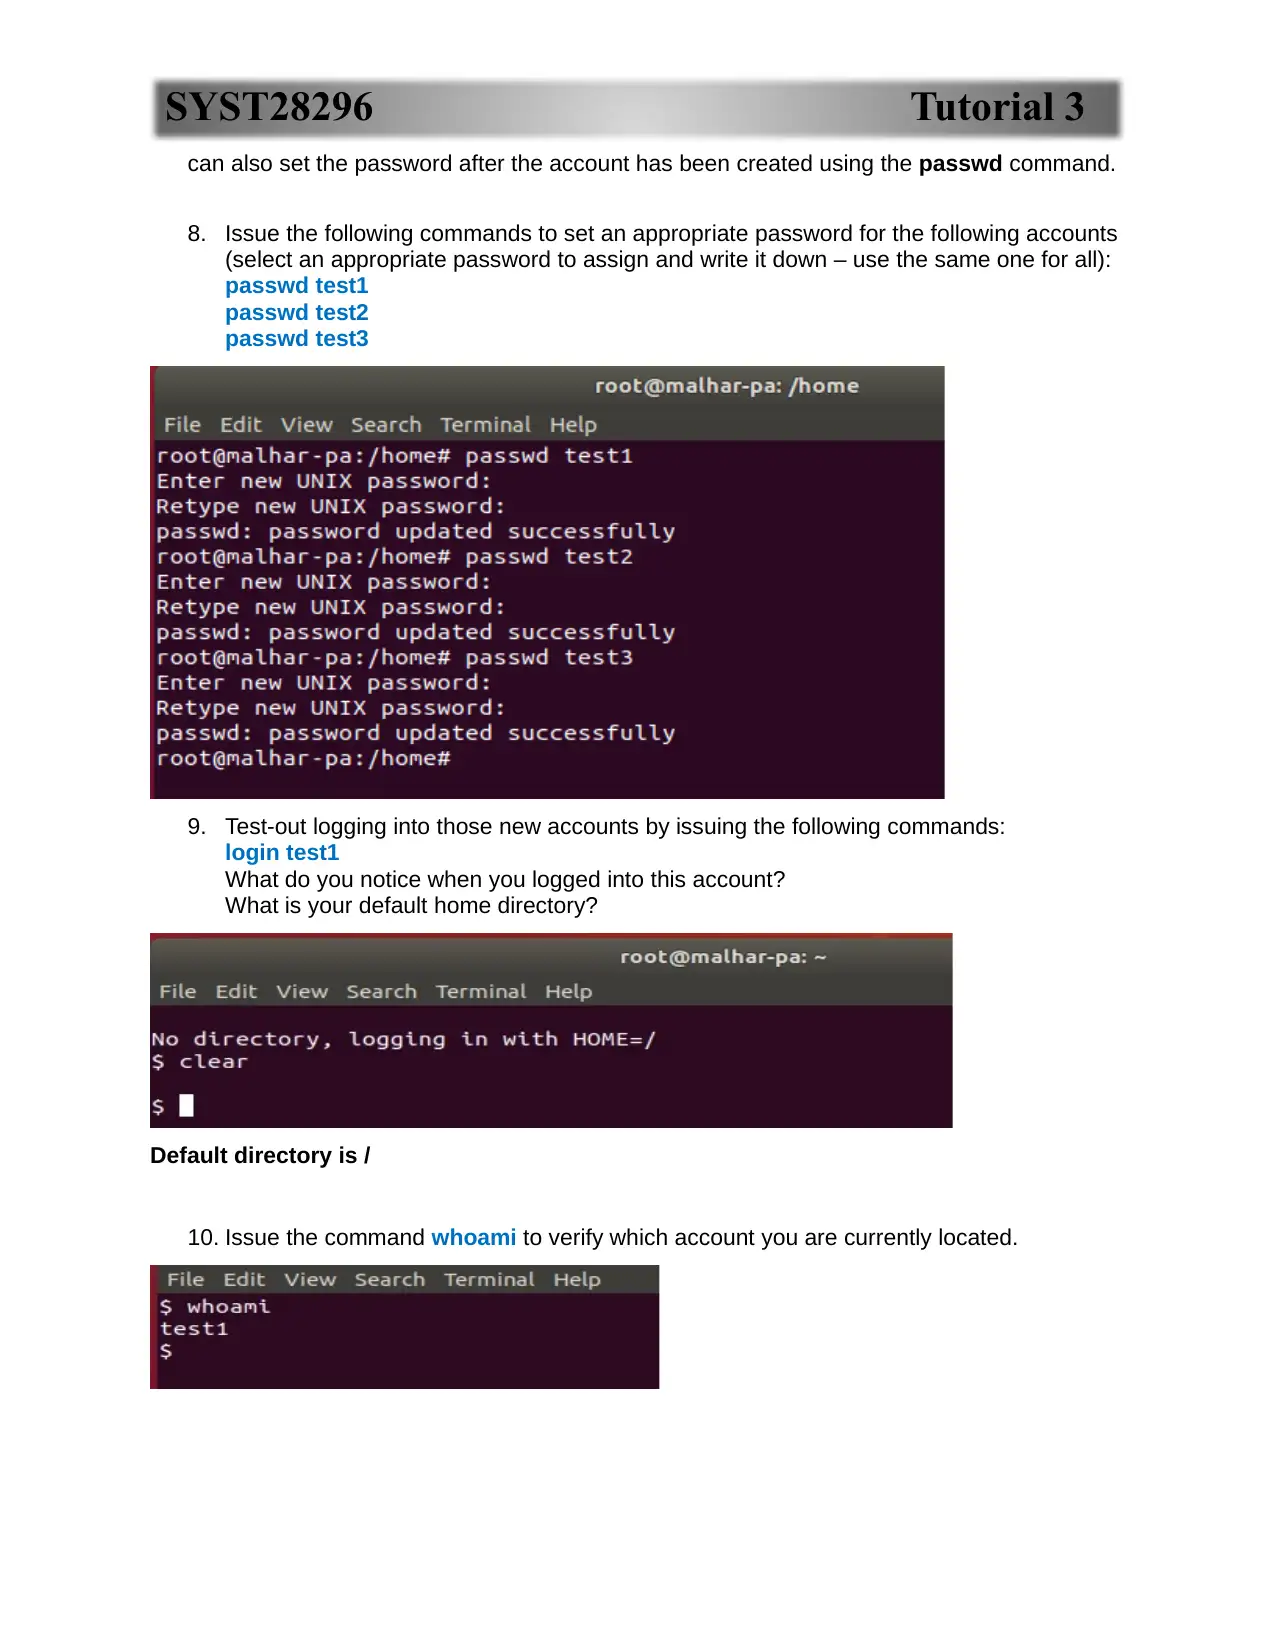
can also set the password after the account has been created using the passwd command.
8. Issue the following commands to set an appropriate password for the following accounts
(select an appropriate password to assign and write it down – use the same one for all):
passwd test1
passwd test2
passwd test3
9. Test-out logging into those new accounts by issuing the following commands:
login test1
What do you notice when you logged into this account?
What is your default home directory?
Default directory is /
10. Issue the command whoami to verify which account you are currently located.
⊘ This is a preview!⊘
Do you want full access?
Subscribe today to unlock all pages.
Trusted by 1+ million students worldwide
SYST28296 Tutorial 3
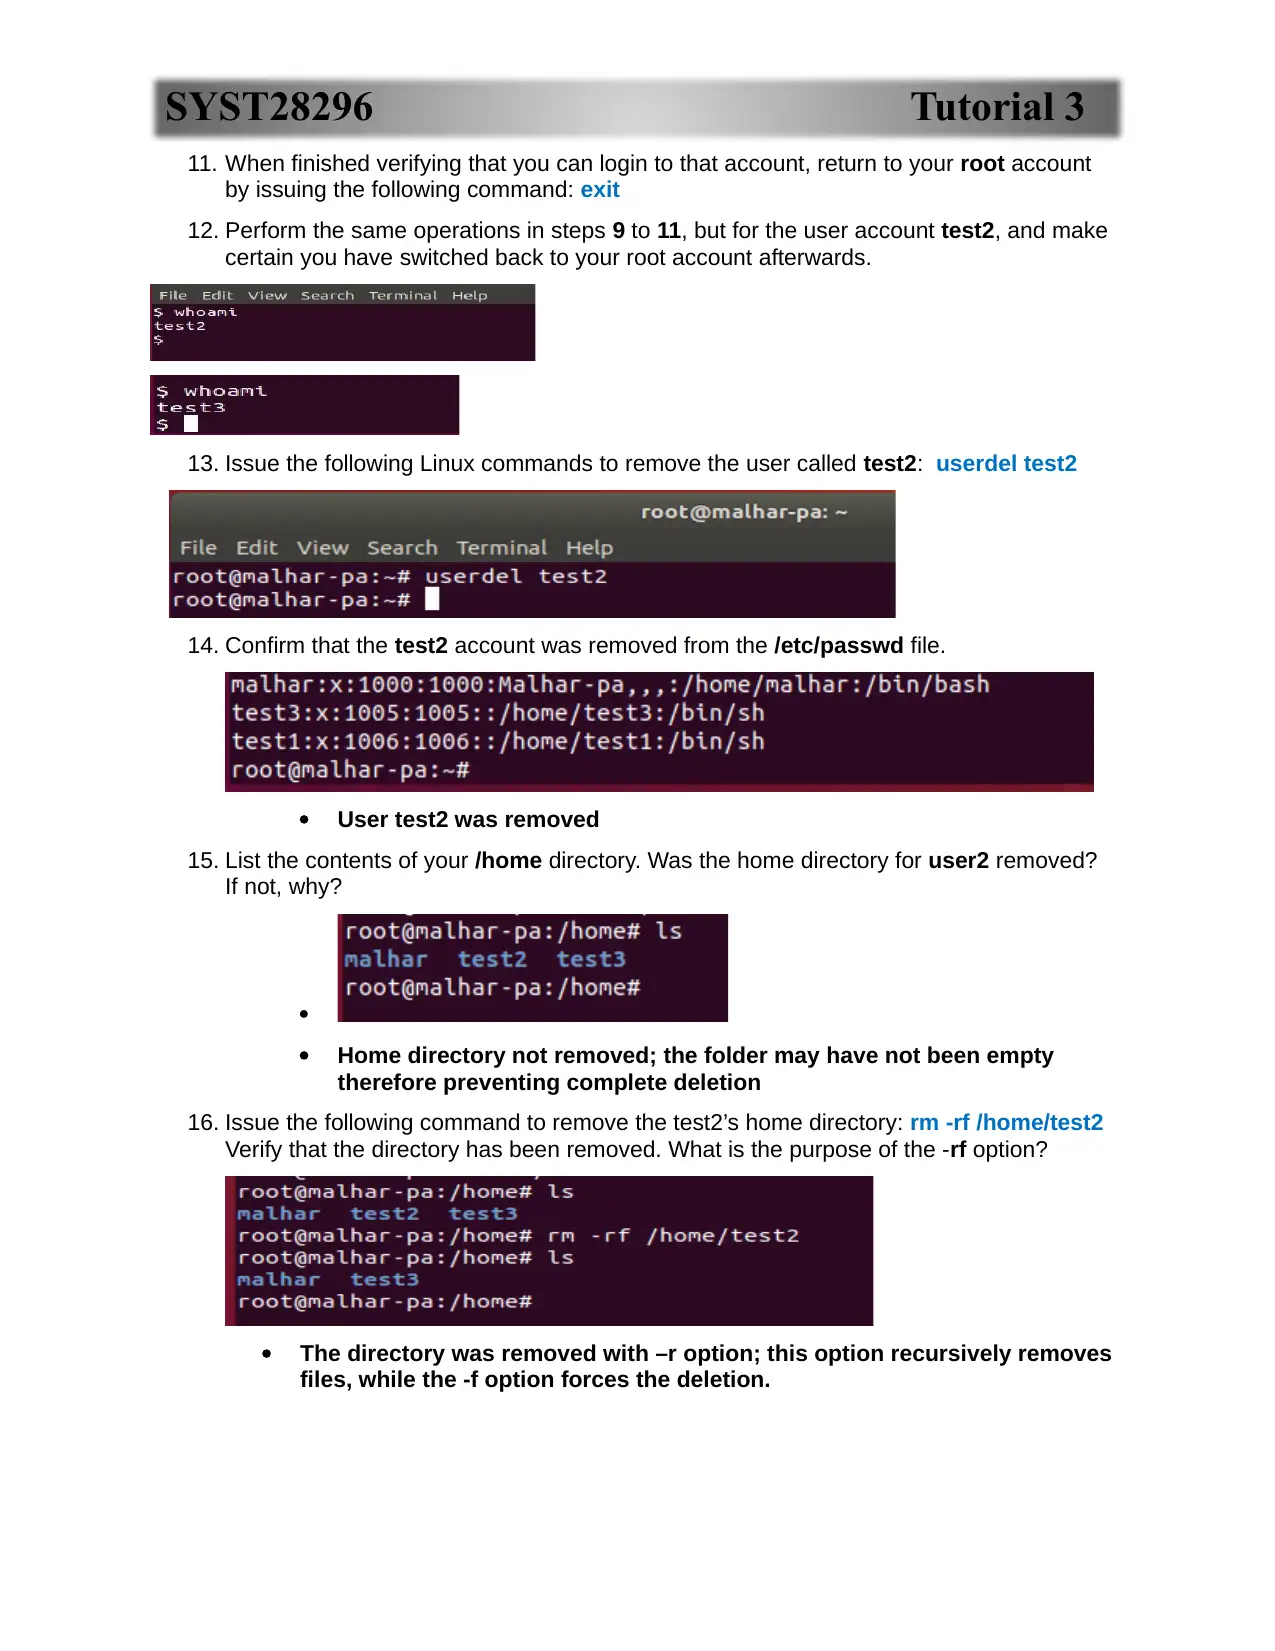
11. When finished verifying that you can login to that account, return to your root account
by issuing the following command: exit
12. Perform the same operations in steps 9 to 11, but for the user account test2, and make
certain you have switched back to your root account afterwards.
13. Issue the following Linux commands to remove the user called test2: userdel test2
14. Confirm that the test2 account was removed from the /etc/passwd file.
User test2 was removed
15. List the contents of your /home directory. Was the home directory for user2 removed?
If not, why?
Home directory not removed; the folder may have not been empty
therefore preventing complete deletion
16. Issue the following command to remove the test2’s home directory: rm -rf /home/test2
Verify that the directory has been removed. What is the purpose of the -rf option?
The directory was removed with –r option; this option recursively removes
files, while the -f option forces the deletion.
Paraphrase This Document
Need a fresh take? Get an instant paraphrase of this document with our AI Paraphraser
SYST28296 Tutorial 3
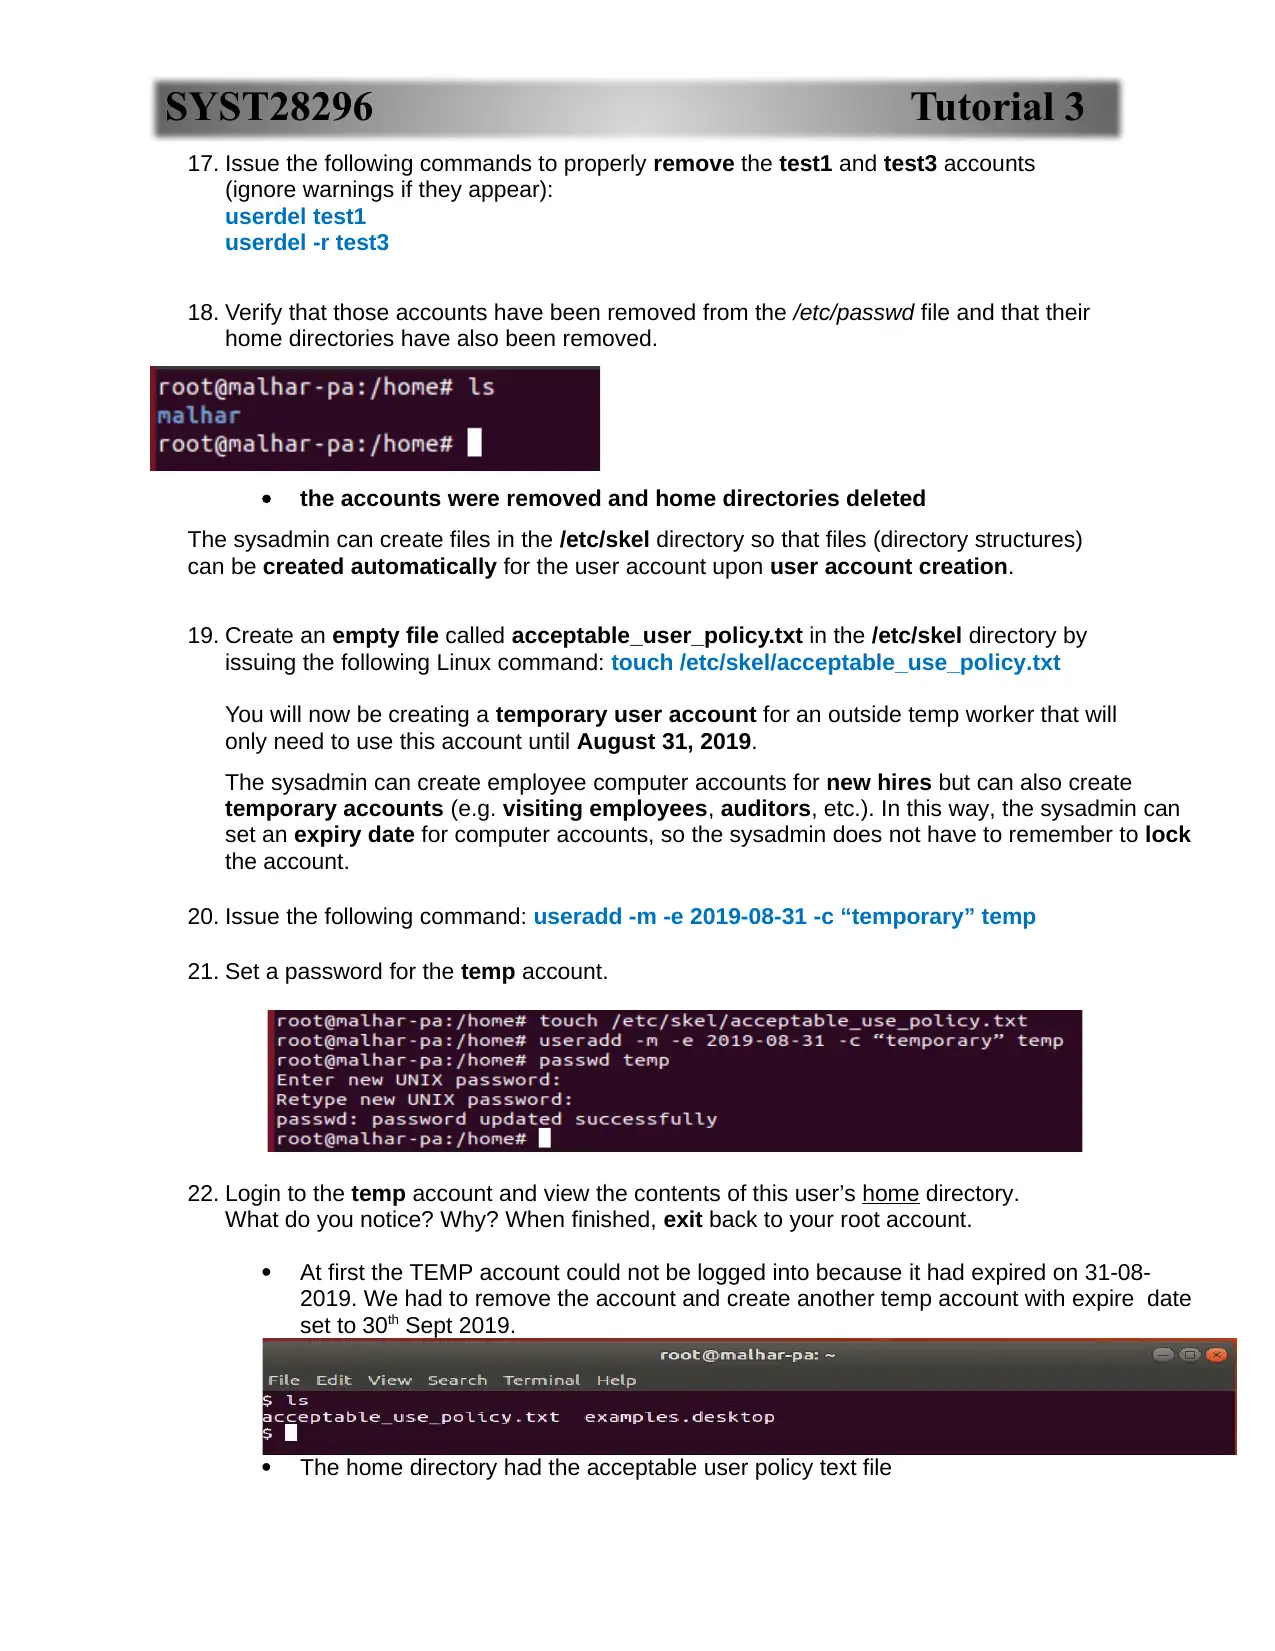
17. Issue the following commands to properly remove the test1 and test3 accounts
(ignore warnings if they appear):
userdel test1
userdel -r test3
18. Verify that those accounts have been removed from the /etc/passwd file and that their
home directories have also been removed.
the accounts were removed and home directories deleted
The sysadmin can create files in the /etc/skel directory so that files (directory structures)
can be created automatically for the user account upon user account creation.
19. Create an empty file called acceptable_user_policy.txt in the /etc/skel directory by
issuing the following Linux command: touch /etc/skel/acceptable_use_policy.txt
You will now be creating a temporary user account for an outside temp worker that will
only need to use this account until August 31, 2019.
The sysadmin can create employee computer accounts for new hires but can also create
temporary accounts (e.g. visiting employees, auditors, etc.). In this way, the sysadmin can
set an expiry date for computer accounts, so the sysadmin does not have to remember to lock
the account.
20. Issue the following command: useradd -m -e 2019-08-31 -c “temporary” temp
21. Set a password for the temp account.
22. Login to the temp account and view the contents of this user’s home directory.
What do you notice? Why? When finished, exit back to your root account.
At first the TEMP account could not be logged into because it had expired on 31-08-
2019. We had to remove the account and create another temp account with expire date
set to 30th Sept 2019.
The home directory had the acceptable user policy text file

SYST28296 Tutorial 3
23. Issue the following Linux commands to change the username from “temp” to “audit” and the
account name from “temporary” to “auditor”:
usermod -l “audit” temp
usermod -c “auditor” audit
24. View the /etc/passwd file to confirm that this information has been changed for that account.
The sysadmin can also lock-out existing accounts.
Examples would include employees that have been fired or are leaving the organization for
various reasons. History has proven that it is a BAD idea for an organization to allow former
employees to be able to access their computer account after physically leaving the organization.
25. Issue the following command to create user1:
useradd -m user1
26. Create a password for user1.
For some reason, the sysadmin suspects that the user account called “user1” has been
compromised by a hand you can to force user1 to reset their password upon their next login.
27. Issue the following Linux command: chage -d 0 user1
28. Issue the following command to confirm that new aging setting for that user: chage -l user1
⊘ This is a preview!⊘
Do you want full access?
Subscribe today to unlock all pages.
Trusted by 1+ million students worldwide

SYST28296 Tutorial 3
29. Login to user1. What happened?
forced to change the password
30. Try re-setting to the old password. What happens?
When finished entering a new password, exit back to your root account.
the old password is not accepted
31. Create a user account (with home directory) for username user2. Set a password for this
newly-created user account.
Let’s assume that the person with the computer account called user2 did something illegal
while working for this organization. You need to lock the user in order to prevent them from
accessing their account since they have been placed on leave pending a criminal investigation.
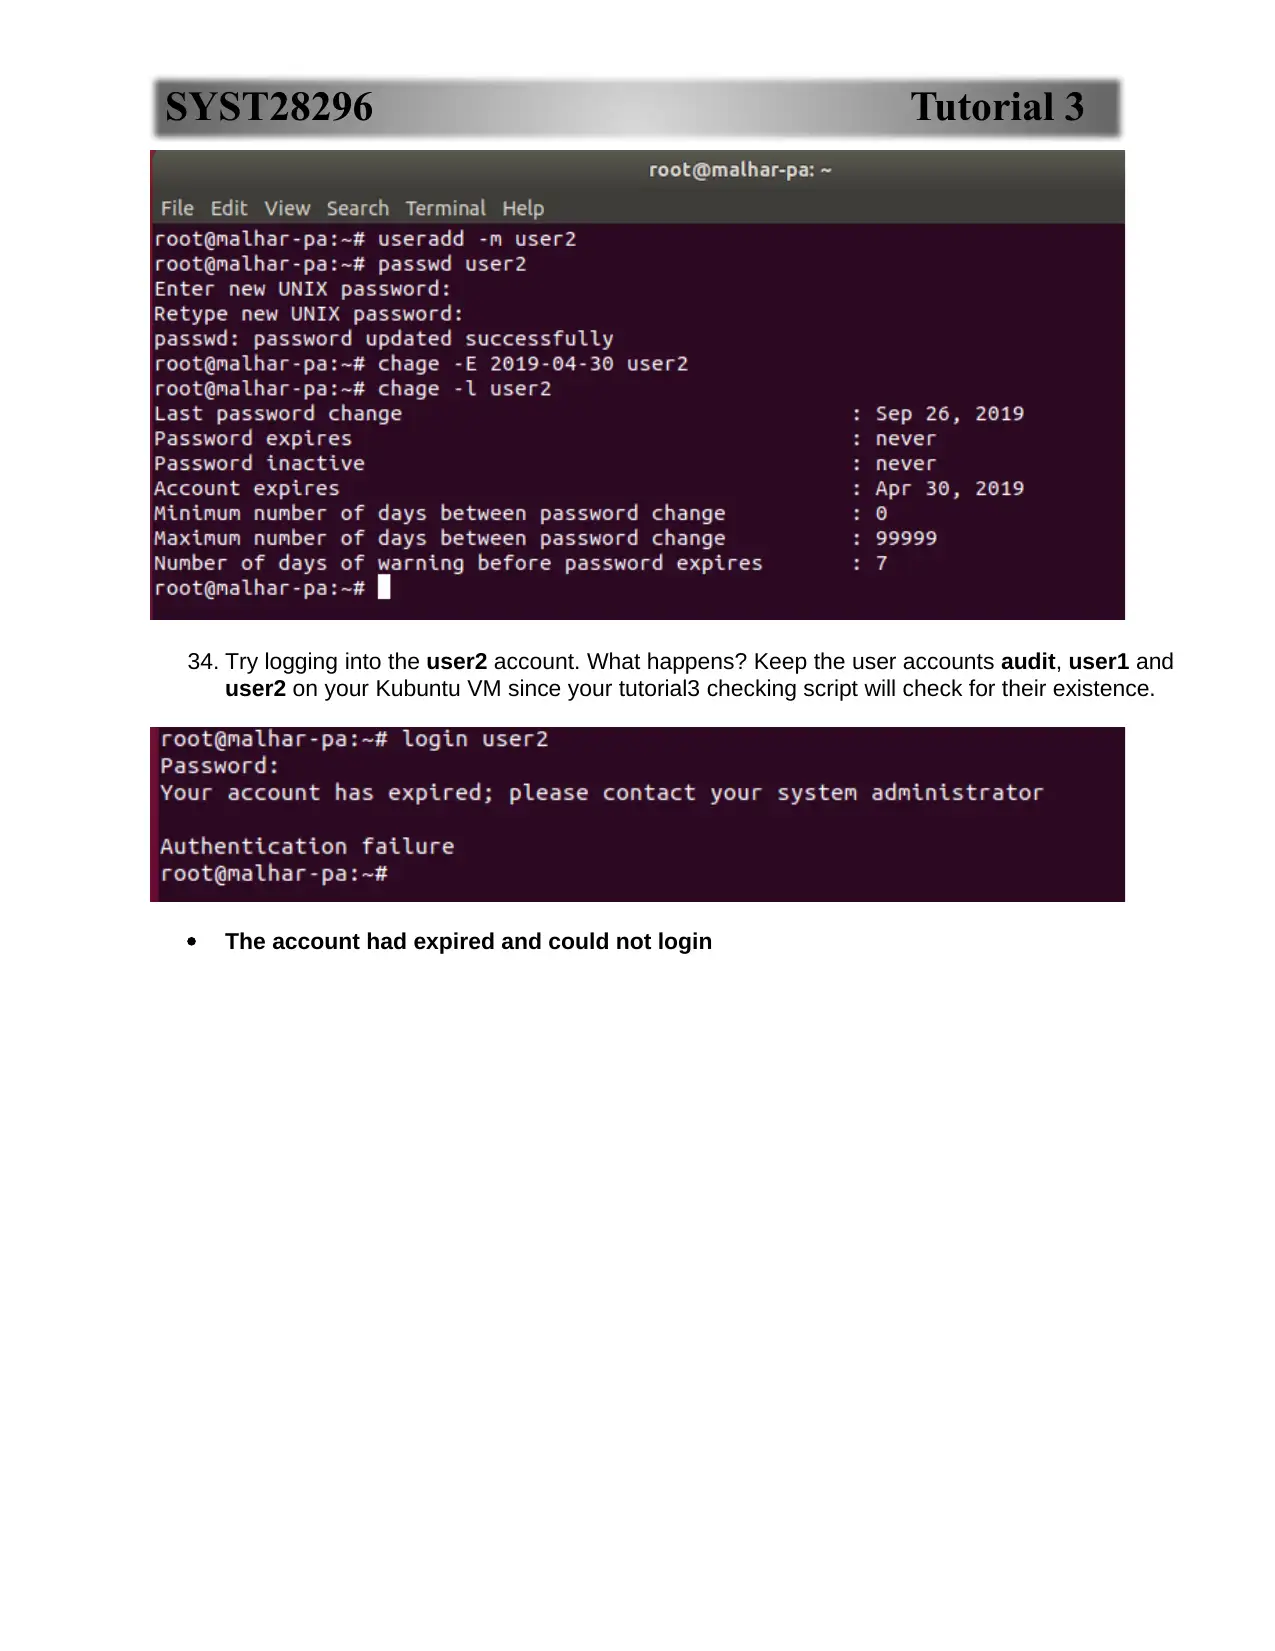
32. Issue the following Linux command: chage -E 2019-04-30 user2
33. Issue the following command to confirm those “aging” settings for that user:
chage -l user2
29. Login to user1. What happened?
forced to change the password
30. Try re-setting to the old password. What happens?
When finished entering a new password, exit back to your root account.
the old password is not accepted
31. Create a user account (with home directory) for username user2. Set a password for this
newly-created user account.
Let’s assume that the person with the computer account called user2 did something illegal
while working for this organization. You need to lock the user in order to prevent them from
accessing their account since they have been placed on leave pending a criminal investigation.
32. Issue the following Linux command: chage -E 2019-04-30 user2
33. Issue the following command to confirm those “aging” settings for that user:
chage -l user2
Paraphrase This Document
Need a fresh take? Get an instant paraphrase of this document with our AI Paraphraser
SYST28296 Tutorial 3
34. Try logging into the user2 account. What happens? Keep the user accounts audit, user1 and
user2 on your Kubuntu VM since your tutorial3 checking script will check for their existence.
The account had expired and could not login
34. Try logging into the user2 account. What happens? Keep the user accounts audit, user1 and
user2 on your Kubuntu VM since your tutorial3 checking script will check for their existence.
The account had expired and could not login
SYST28296 Tutorial 3
PART 2: AUTOMATING MULTIPLE USER ACCOUNT CREATION
Running shell-scripting-1 and shell-scripting-2 Tutorials
Before demonstrating how to automate the creation of multiple user accounts, it is a good idea
to run two online tutorials on how to create shell scripts. Those scripts should already have
been set-up on your Kubuntu VM.
You are required to complete these tutorials in order to submit this tutorial.
Perform the following Steps:
1. Open the Bash shell and make certain you are logged on as your original user account
you created in tutorial 1 (i.e. NOT your root account).
2. Issue the following commands
~/syst28296/tutorials/shell-scripting-1 and then
~/syst28296/tutorials/shell-scripting-2
3. Perform all the tutorial sections of this tutorial like you did for the linux-intro tutorial for
tutorial 1. A file called ~/shell-scripting-1.ans and ~/shell-scripting-2.ans
(i.e. in your regular user’s home directory) will be created for later submission.
4. Issue a Linux command to return to your home directory.
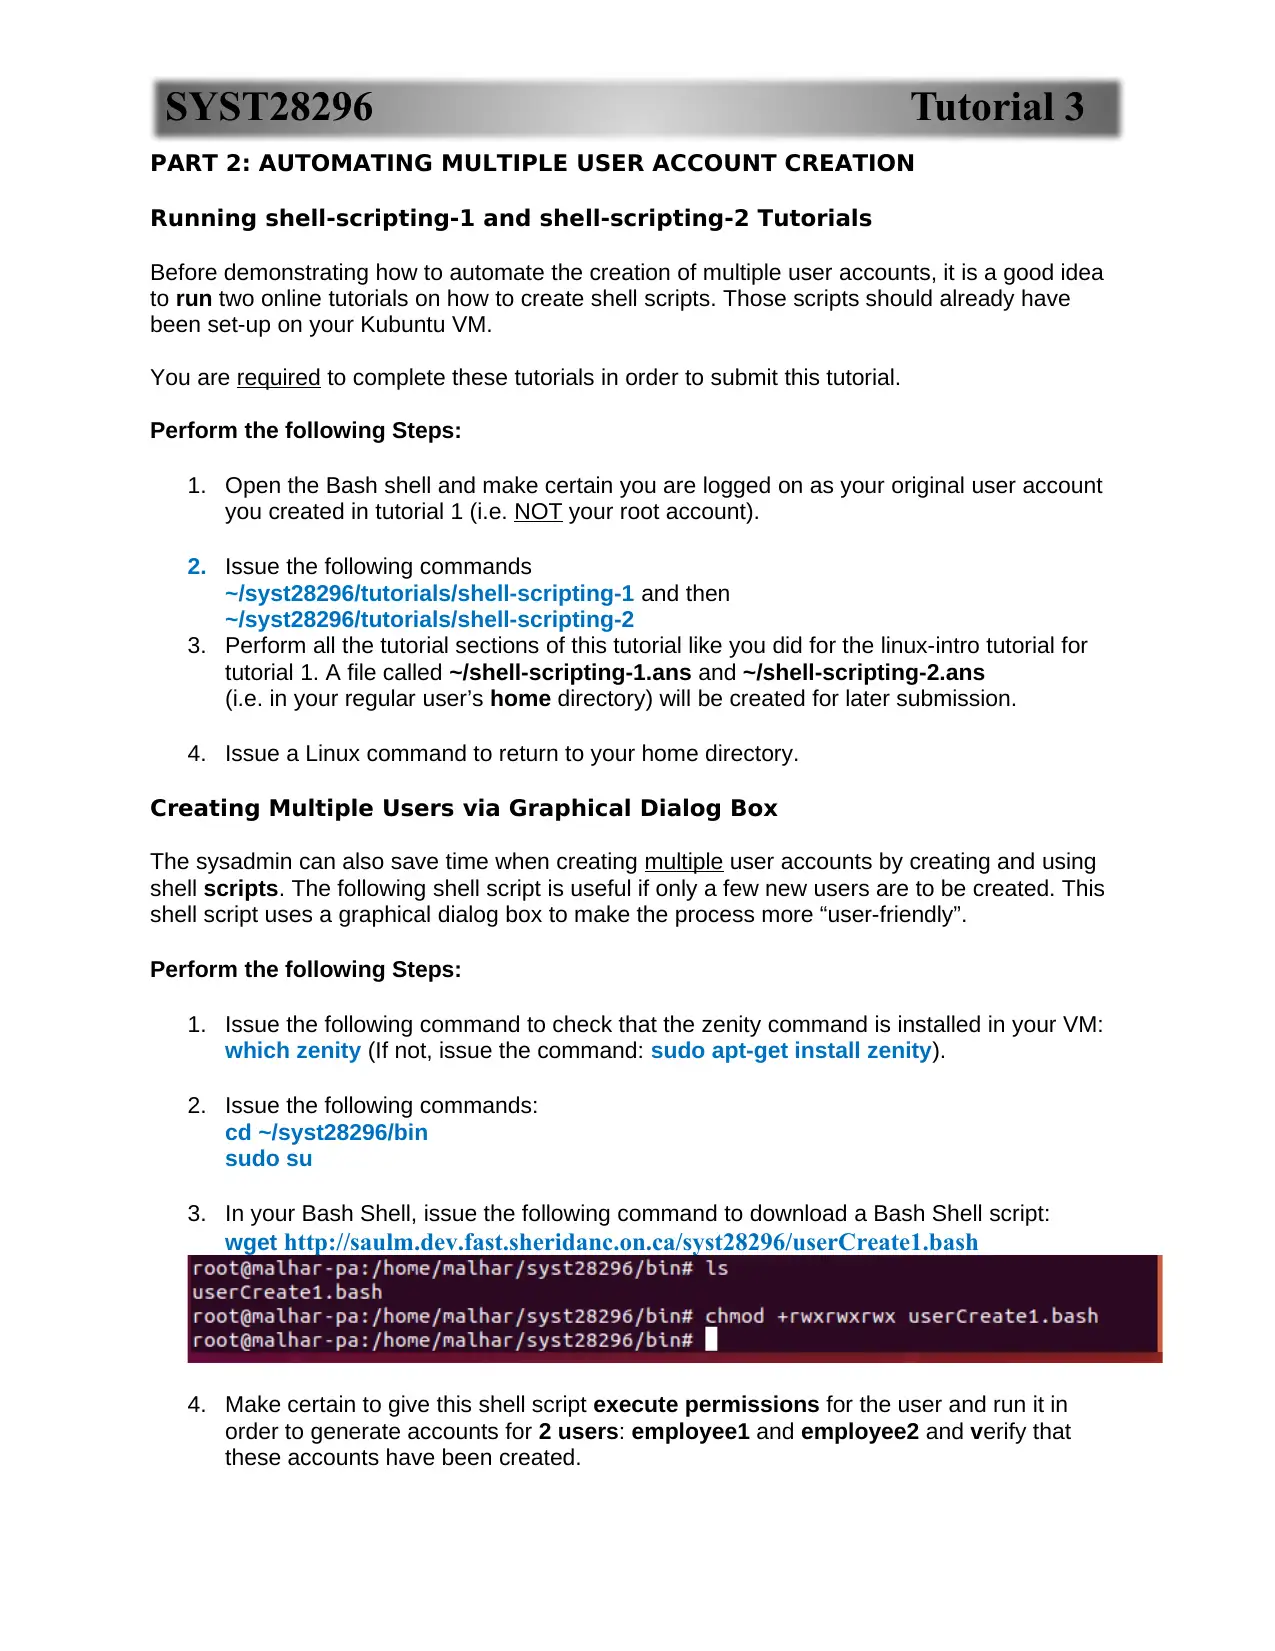
Creating Multiple Users via Graphical Dialog Box
The sysadmin can also save time when creating multiple user accounts by creating and using
shell scripts. The following shell script is useful if only a few new users are to be created. This
shell script uses a graphical dialog box to make the process more “user-friendly”.
Perform the following Steps:
1. Issue the following command to check that the zenity command is installed in your VM:
which zenity (If not, issue the command: sudo apt-get install zenity).
2. Issue the following commands:
cd ~/syst28296/bin
sudo su
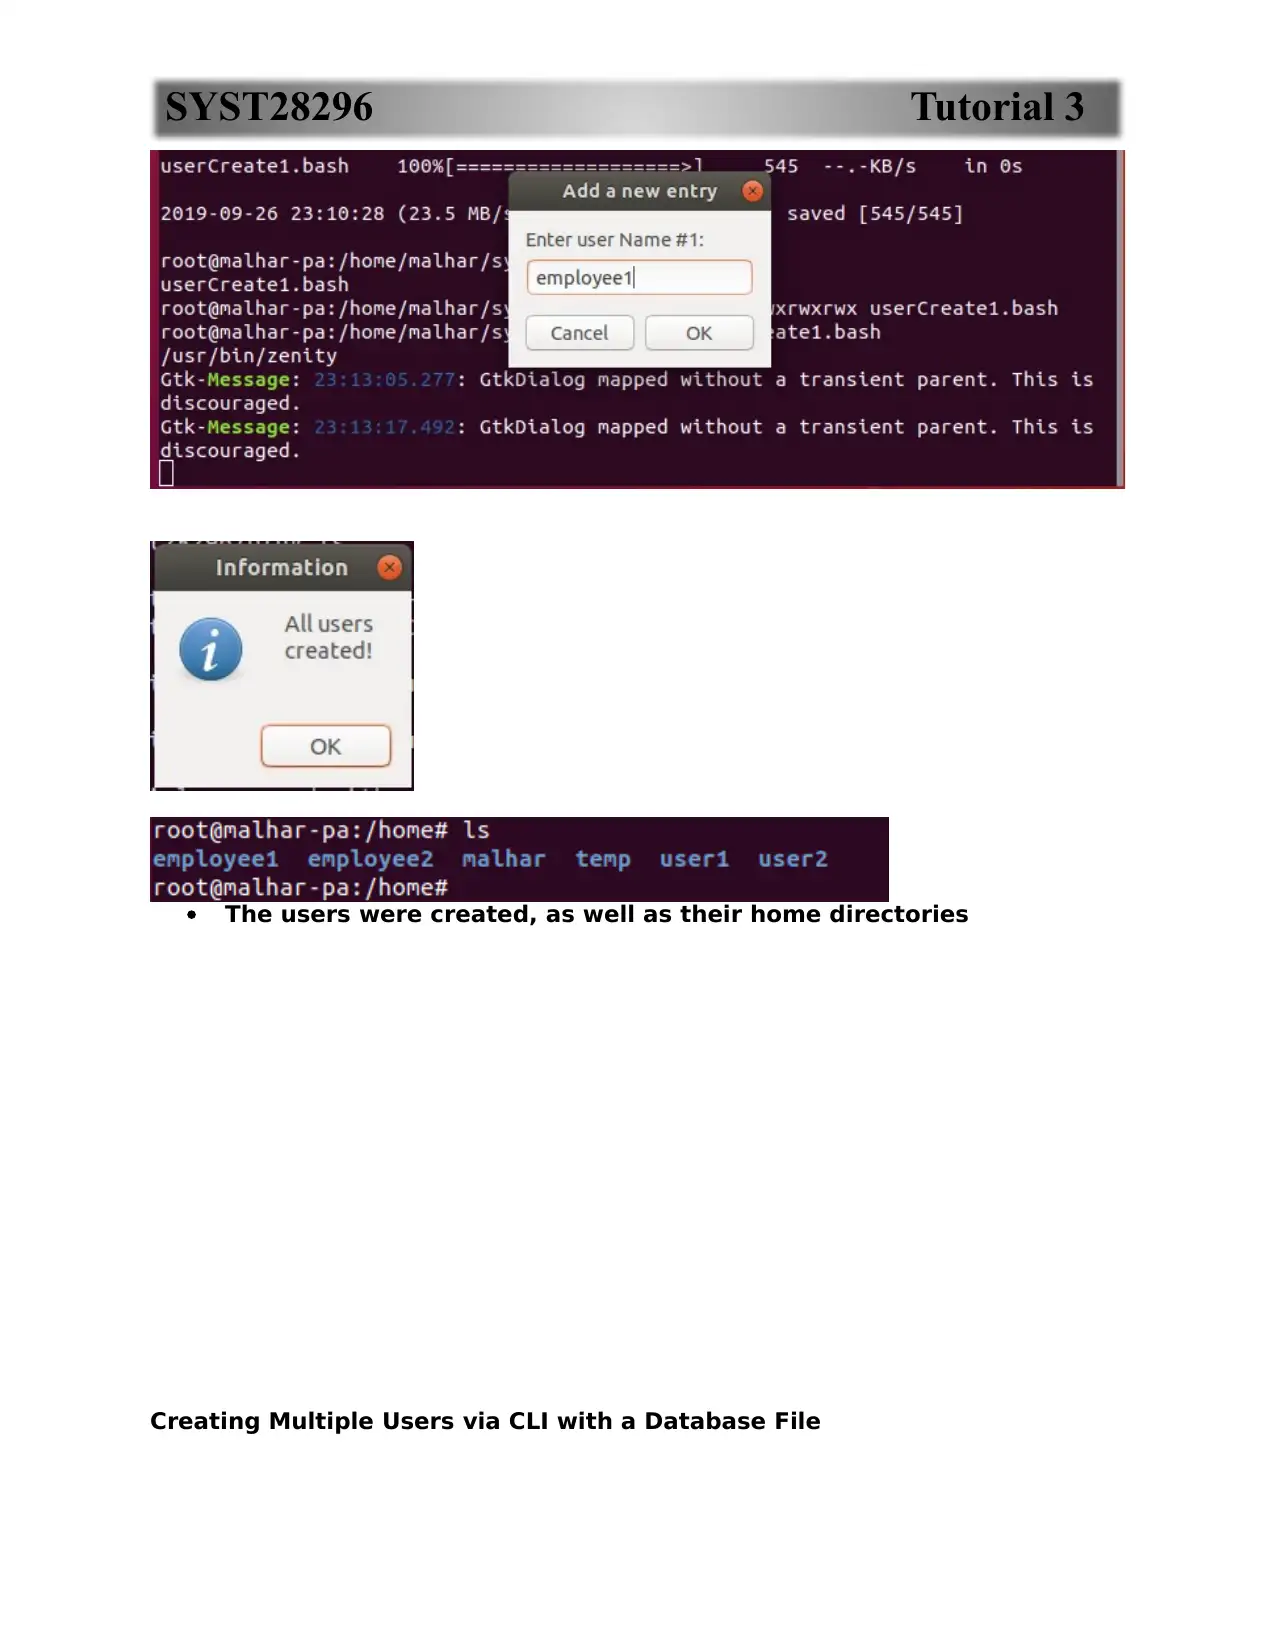
3. In your Bash Shell, issue the following command to download a Bash Shell script:
wget http://saulm.dev.fast.sheridanc.on.ca/syst28296/userCreate1.bash
4. Make certain to give this shell script execute permissions for the user and run it in
order to generate accounts for 2 users: employee1 and employee2 and verify that
these accounts have been created.
PART 2: AUTOMATING MULTIPLE USER ACCOUNT CREATION
Running shell-scripting-1 and shell-scripting-2 Tutorials
Before demonstrating how to automate the creation of multiple user accounts, it is a good idea
to run two online tutorials on how to create shell scripts. Those scripts should already have
been set-up on your Kubuntu VM.
You are required to complete these tutorials in order to submit this tutorial.
Perform the following Steps:
1. Open the Bash shell and make certain you are logged on as your original user account
you created in tutorial 1 (i.e. NOT your root account).
2. Issue the following commands
~/syst28296/tutorials/shell-scripting-1 and then
~/syst28296/tutorials/shell-scripting-2
3. Perform all the tutorial sections of this tutorial like you did for the linux-intro tutorial for
tutorial 1. A file called ~/shell-scripting-1.ans and ~/shell-scripting-2.ans
(i.e. in your regular user’s home directory) will be created for later submission.
4. Issue a Linux command to return to your home directory.
Creating Multiple Users via Graphical Dialog Box
The sysadmin can also save time when creating multiple user accounts by creating and using
shell scripts. The following shell script is useful if only a few new users are to be created. This
shell script uses a graphical dialog box to make the process more “user-friendly”.
Perform the following Steps:
1. Issue the following command to check that the zenity command is installed in your VM:
which zenity (If not, issue the command: sudo apt-get install zenity).
2. Issue the following commands:
cd ~/syst28296/bin
sudo su
3. In your Bash Shell, issue the following command to download a Bash Shell script:
wget http://saulm.dev.fast.sheridanc.on.ca/syst28296/userCreate1.bash
4. Make certain to give this shell script execute permissions for the user and run it in
order to generate accounts for 2 users: employee1 and employee2 and verify that
these accounts have been created.
⊘ This is a preview!⊘
Do you want full access?
Subscribe today to unlock all pages.
Trusted by 1+ million students worldwide
SYST28296 Tutorial 3
The users were created, as well as their home directories
Creating Multiple Users via CLI with a Database File
The users were created, as well as their home directories
Creating Multiple Users via CLI with a Database File
Paraphrase This Document
Need a fresh take? Get an instant paraphrase of this document with our AI Paraphraser
SYST28296 Tutorial 3
The sysadmin may have access to this database file which they can use and manipulate the
data to automate the creation of new user accounts.
Here are links to a more advanced shell script and a database file:
http://saulm.dev.fast.sheridanc.on.ca/syst28296/userCreate2.bash
http://saulm.dev.fast.sheridanc.on.ca/syst28296/user-data.txt
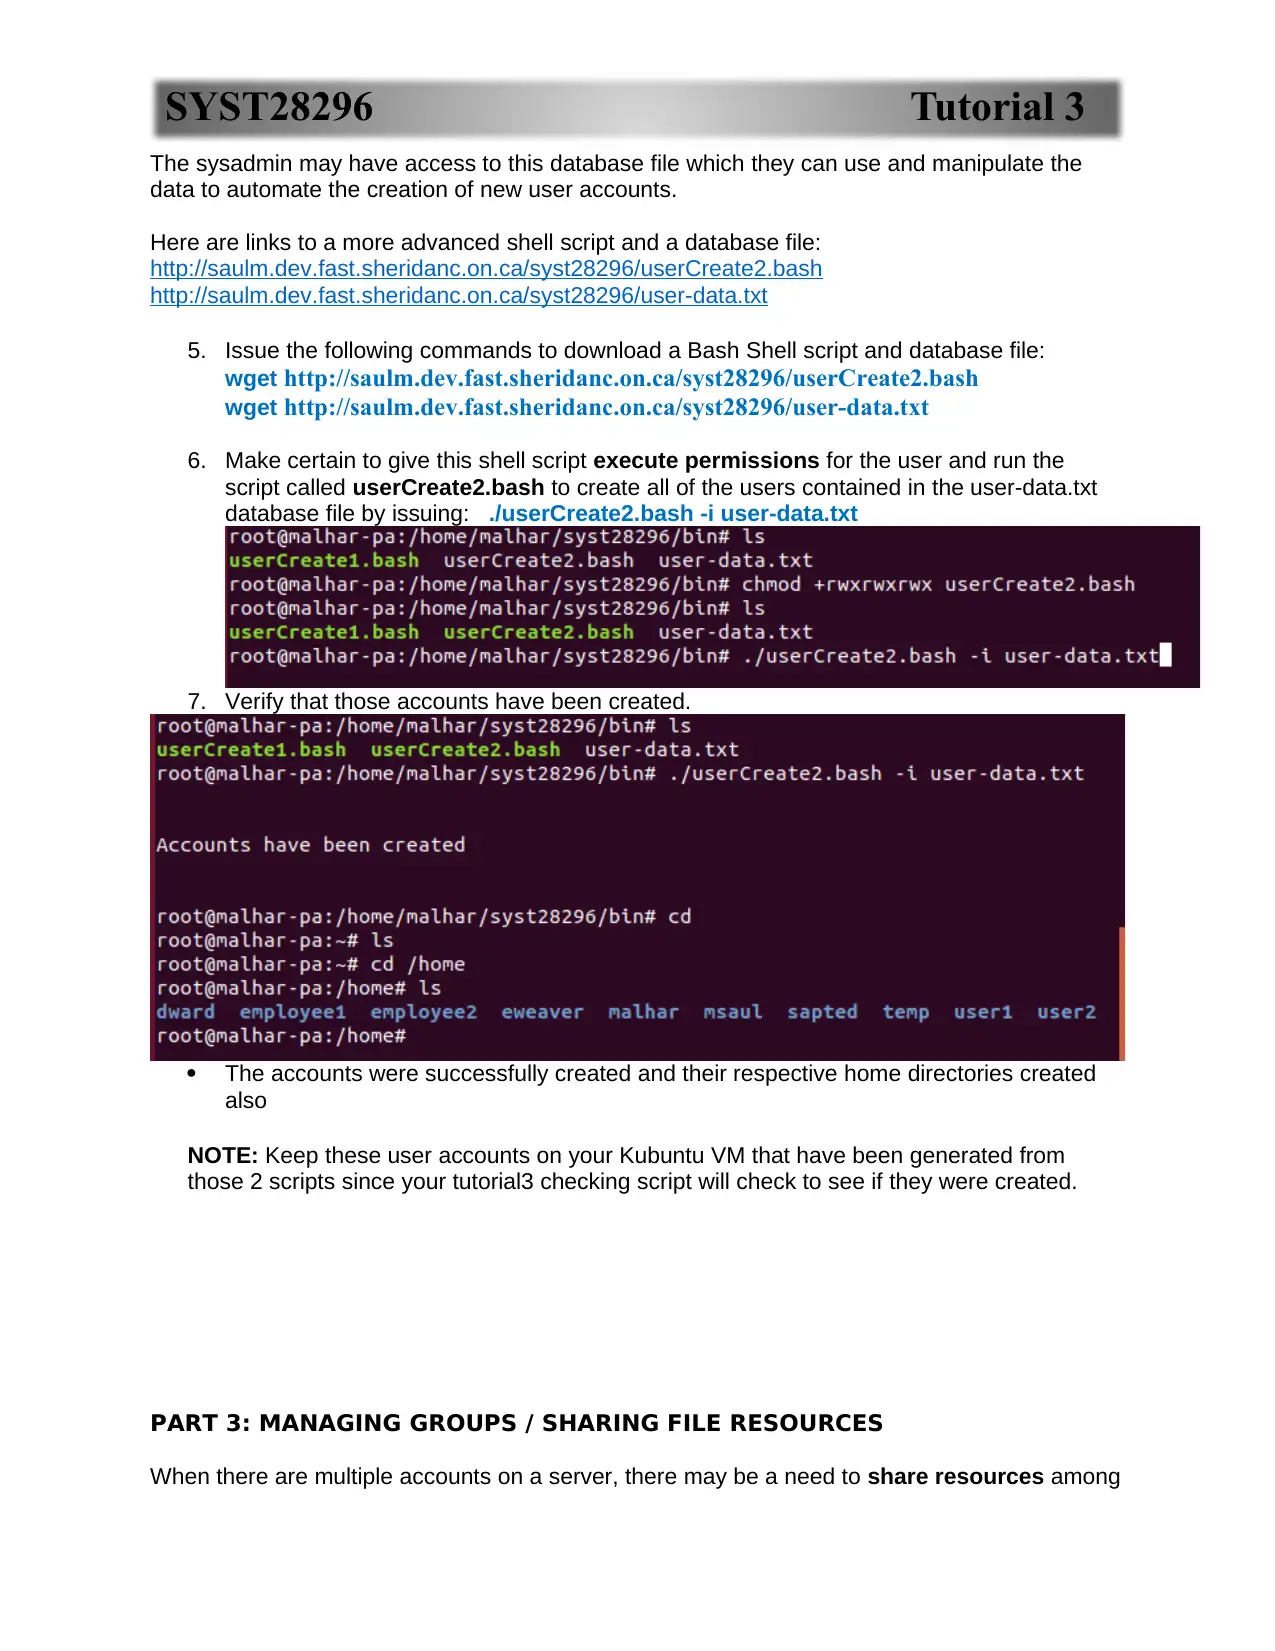
5. Issue the following commands to download a Bash Shell script and database file:
wget http://saulm.dev.fast.sheridanc.on.ca/syst28296/userCreate2.bash
wget http://saulm.dev.fast.sheridanc.on.ca/syst28296/user-data.txt
6. Make certain to give this shell script execute permissions for the user and run the
script called userCreate2.bash to create all of the users contained in the user-data.txt
database file by issuing: ./userCreate2.bash -i user-data.txt
7. Verify that those accounts have been created.
The accounts were successfully created and their respective home directories created
also
NOTE: Keep these user accounts on your Kubuntu VM that have been generated from
those 2 scripts since your tutorial3 checking script will check to see if they were created.
PART 3: MANAGING GROUPS / SHARING FILE RESOURCES
When there are multiple accounts on a server, there may be a need to share resources among
The sysadmin may have access to this database file which they can use and manipulate the
data to automate the creation of new user accounts.
Here are links to a more advanced shell script and a database file:
http://saulm.dev.fast.sheridanc.on.ca/syst28296/userCreate2.bash
http://saulm.dev.fast.sheridanc.on.ca/syst28296/user-data.txt
5. Issue the following commands to download a Bash Shell script and database file:
wget http://saulm.dev.fast.sheridanc.on.ca/syst28296/userCreate2.bash
wget http://saulm.dev.fast.sheridanc.on.ca/syst28296/user-data.txt
6. Make certain to give this shell script execute permissions for the user and run the
script called userCreate2.bash to create all of the users contained in the user-data.txt
database file by issuing: ./userCreate2.bash -i user-data.txt
7. Verify that those accounts have been created.
The accounts were successfully created and their respective home directories created
also
NOTE: Keep these user accounts on your Kubuntu VM that have been generated from
those 2 scripts since your tutorial3 checking script will check to see if they were created.
PART 3: MANAGING GROUPS / SHARING FILE RESOURCES
When there are multiple accounts on a server, there may be a need to share resources among
SYST28296 Tutorial 3
some of those users on a computer system. An example would be to allow users to collaborate
on a software development project (setting directory and file access permissions).
The /etc/group file is used to store user group information in a similar way that the /etc/passwd
file is used to store user information. This file is a database file that database file that contains
all groups on the Linux system to permit / deny user access.
Perform the following Steps:
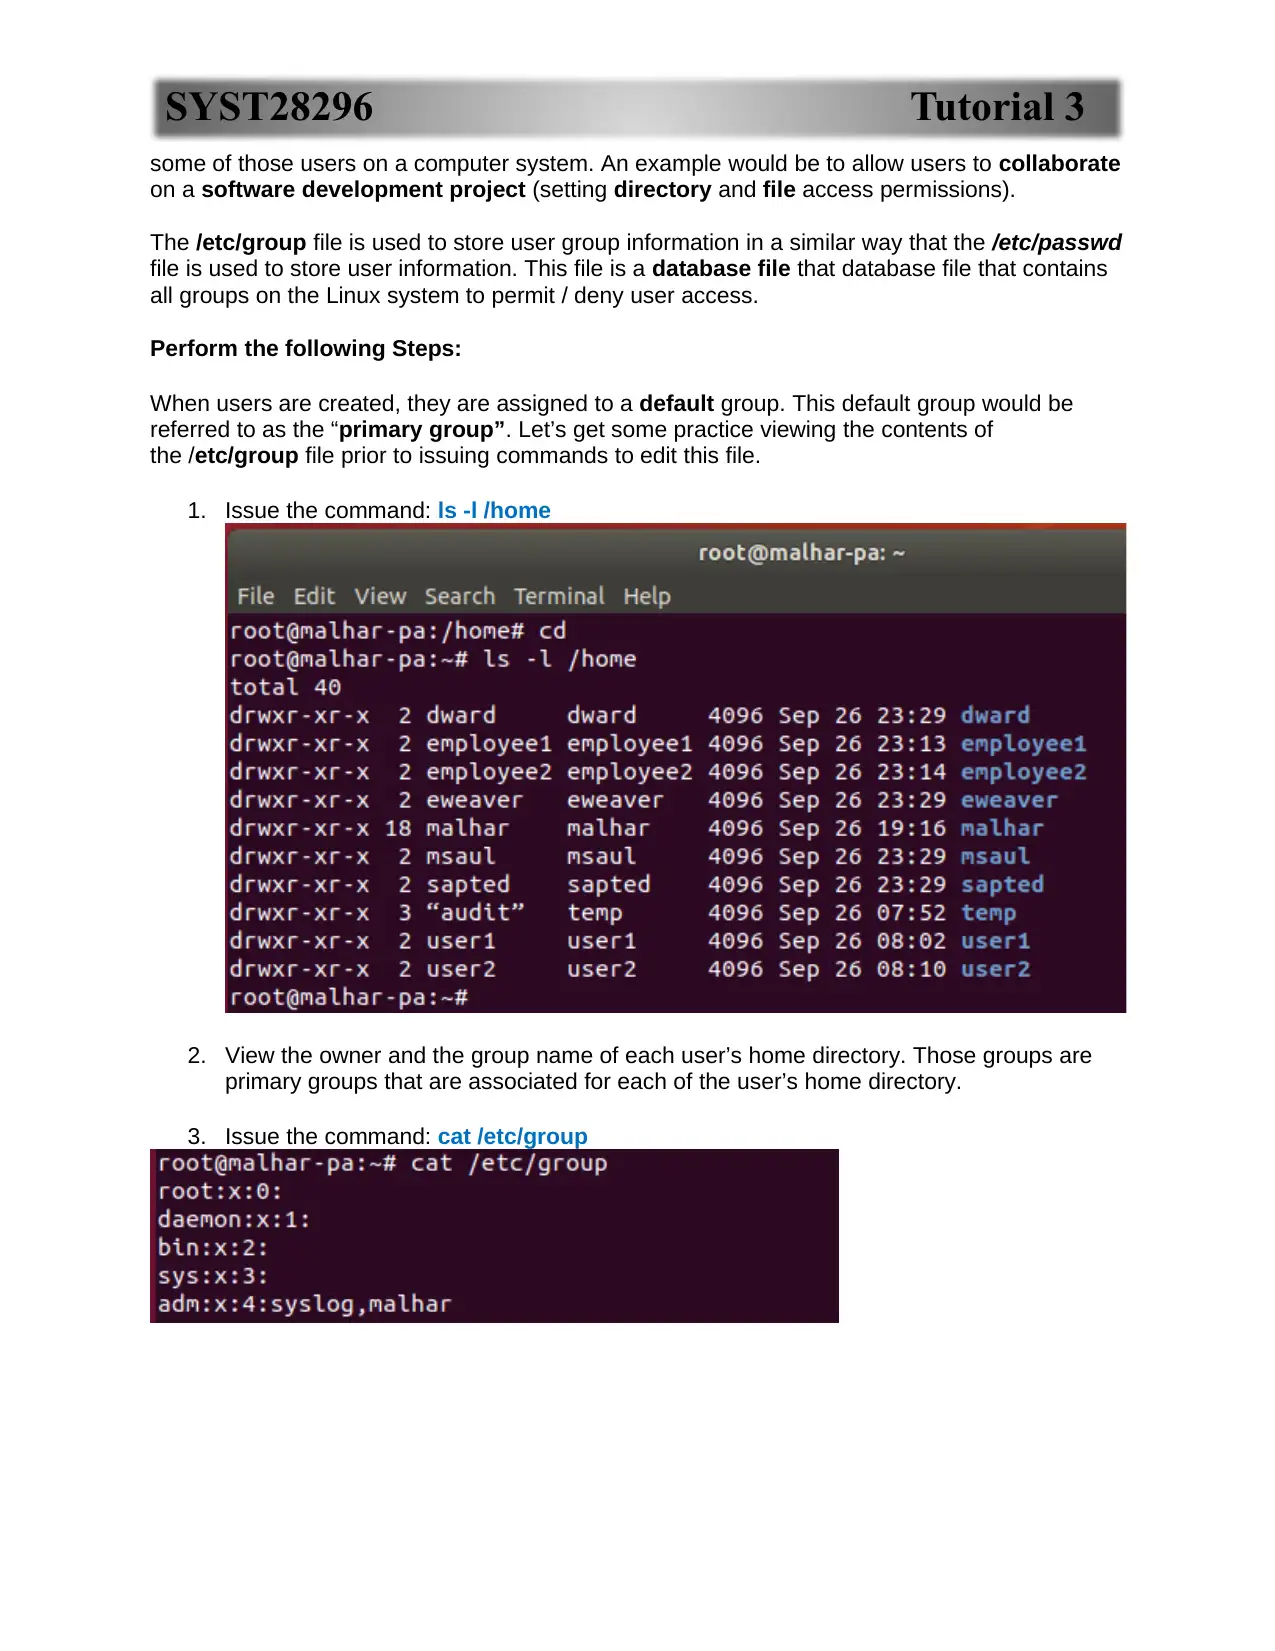
When users are created, they are assigned to a default group. This default group would be
referred to as the “primary group”. Let’s get some practice viewing the contents of
the /etc/group file prior to issuing commands to edit this file.
1. Issue the command: ls -l /home
2. View the owner and the group name of each user’s home directory. Those groups are
primary groups that are associated for each of the user’s home directory.
3. Issue the command: cat /etc/group
some of those users on a computer system. An example would be to allow users to collaborate
on a software development project (setting directory and file access permissions).
The /etc/group file is used to store user group information in a similar way that the /etc/passwd
file is used to store user information. This file is a database file that database file that contains
all groups on the Linux system to permit / deny user access.
Perform the following Steps:
When users are created, they are assigned to a default group. This default group would be
referred to as the “primary group”. Let’s get some practice viewing the contents of
the /etc/group file prior to issuing commands to edit this file.
1. Issue the command: ls -l /home
2. View the owner and the group name of each user’s home directory. Those groups are
primary groups that are associated for each of the user’s home directory.
3. Issue the command: cat /etc/group
⊘ This is a preview!⊘
Do you want full access?
Subscribe today to unlock all pages.
Trusted by 1+ million students worldwide
1 out of 18
Related Documents


Your All-in-One AI-Powered Toolkit for Academic Success.
+13062052269
info@desklib.com
Available 24*7 on WhatsApp / Email
![[object Object]](/_next/static/media/star-bottom.7253800d.svg)
Unlock your academic potential
Copyright © 2020–2026 A2Z Services. All Rights Reserved. Developed and managed by ZUCOL.