Detailed Report: Malware Analysis with SNORT Intrusion Detection
VerifiedAdded on 2023/04/22
|26
|2719
|142
Report
AI Summary
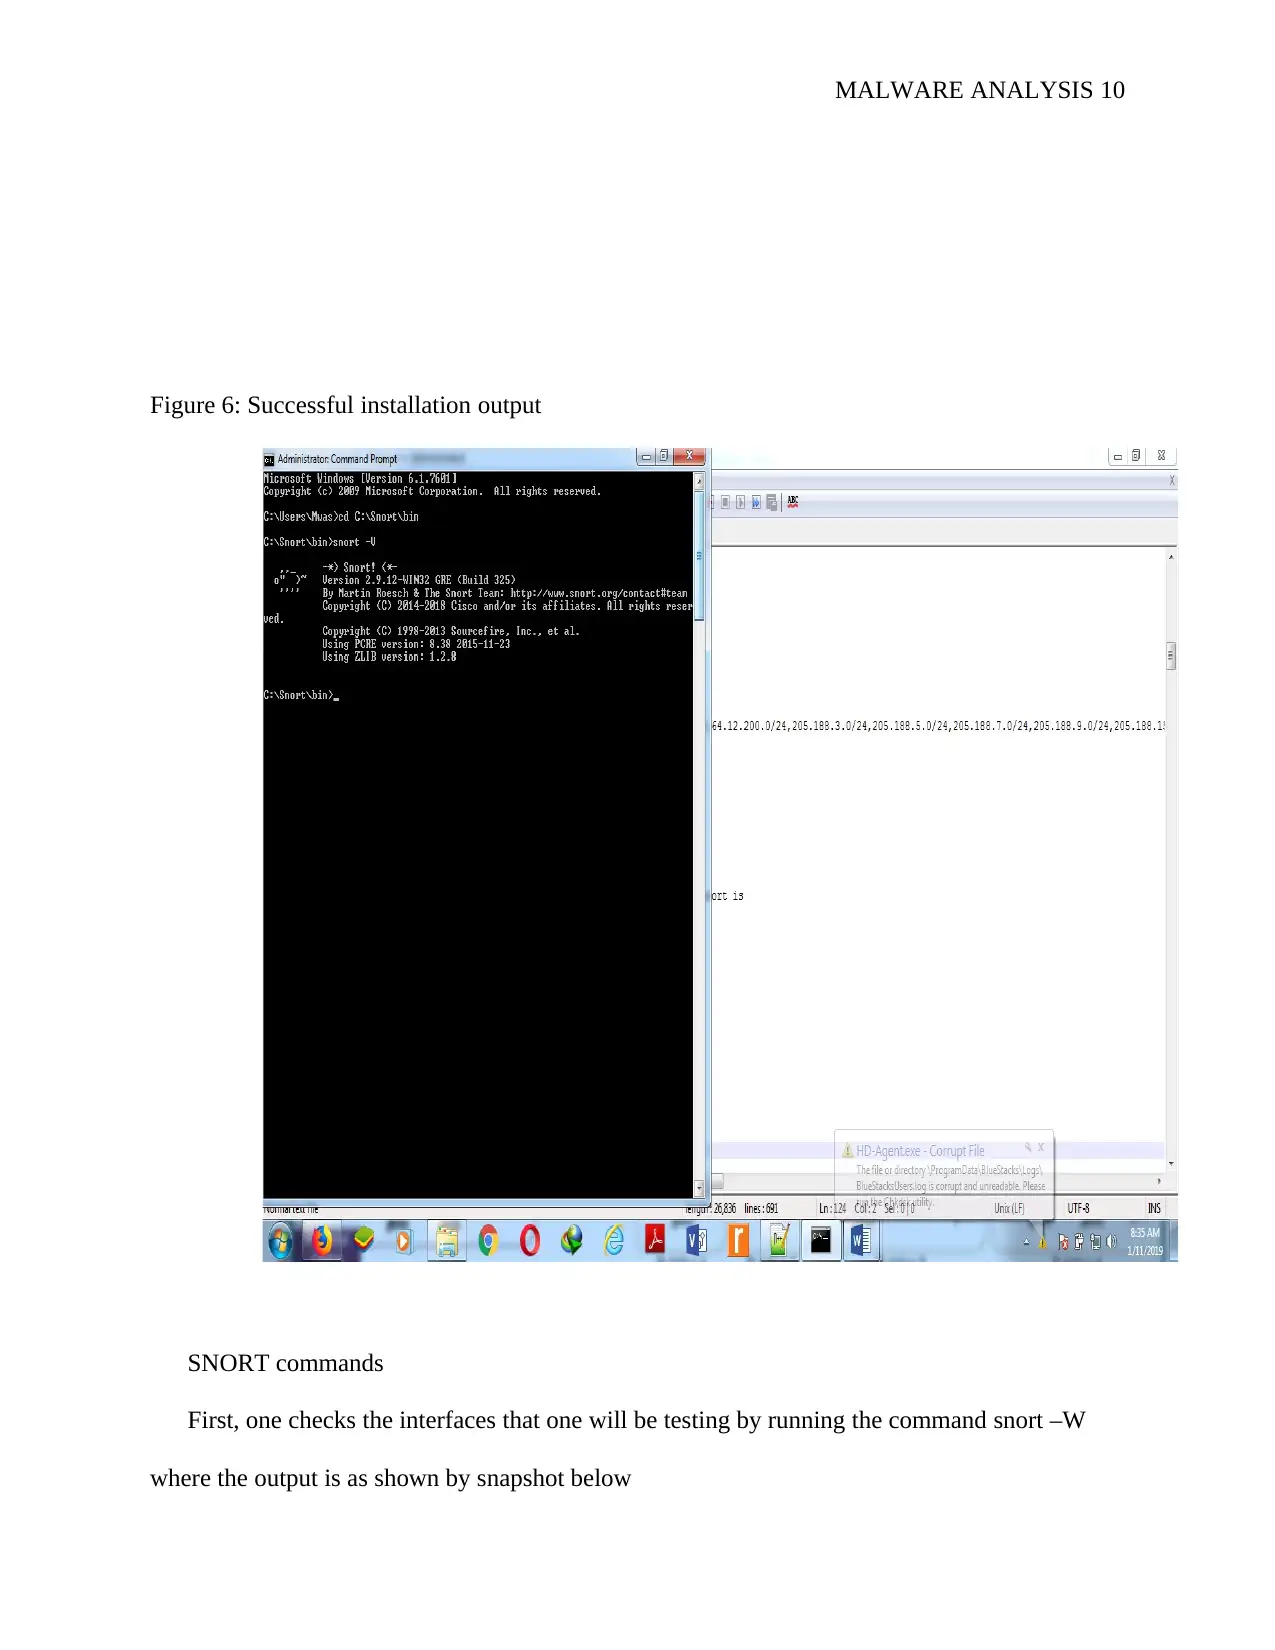
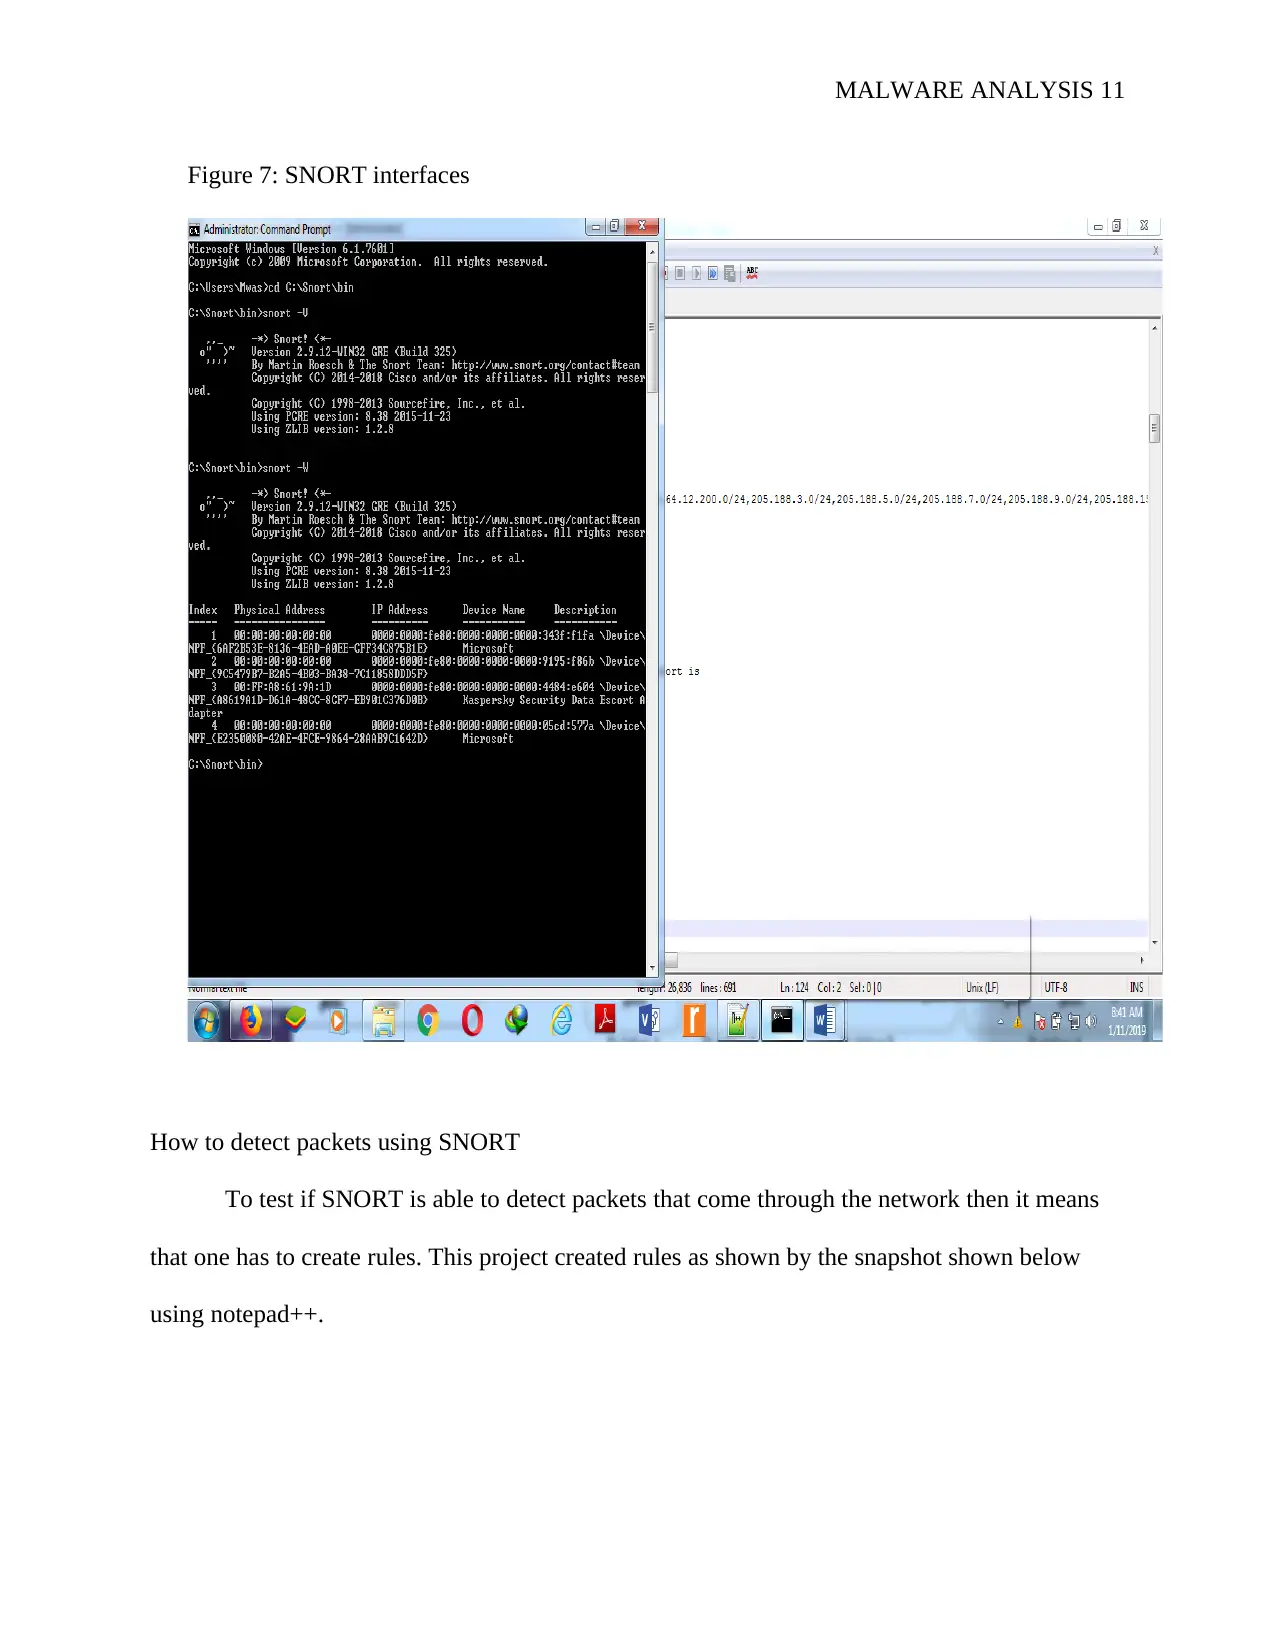
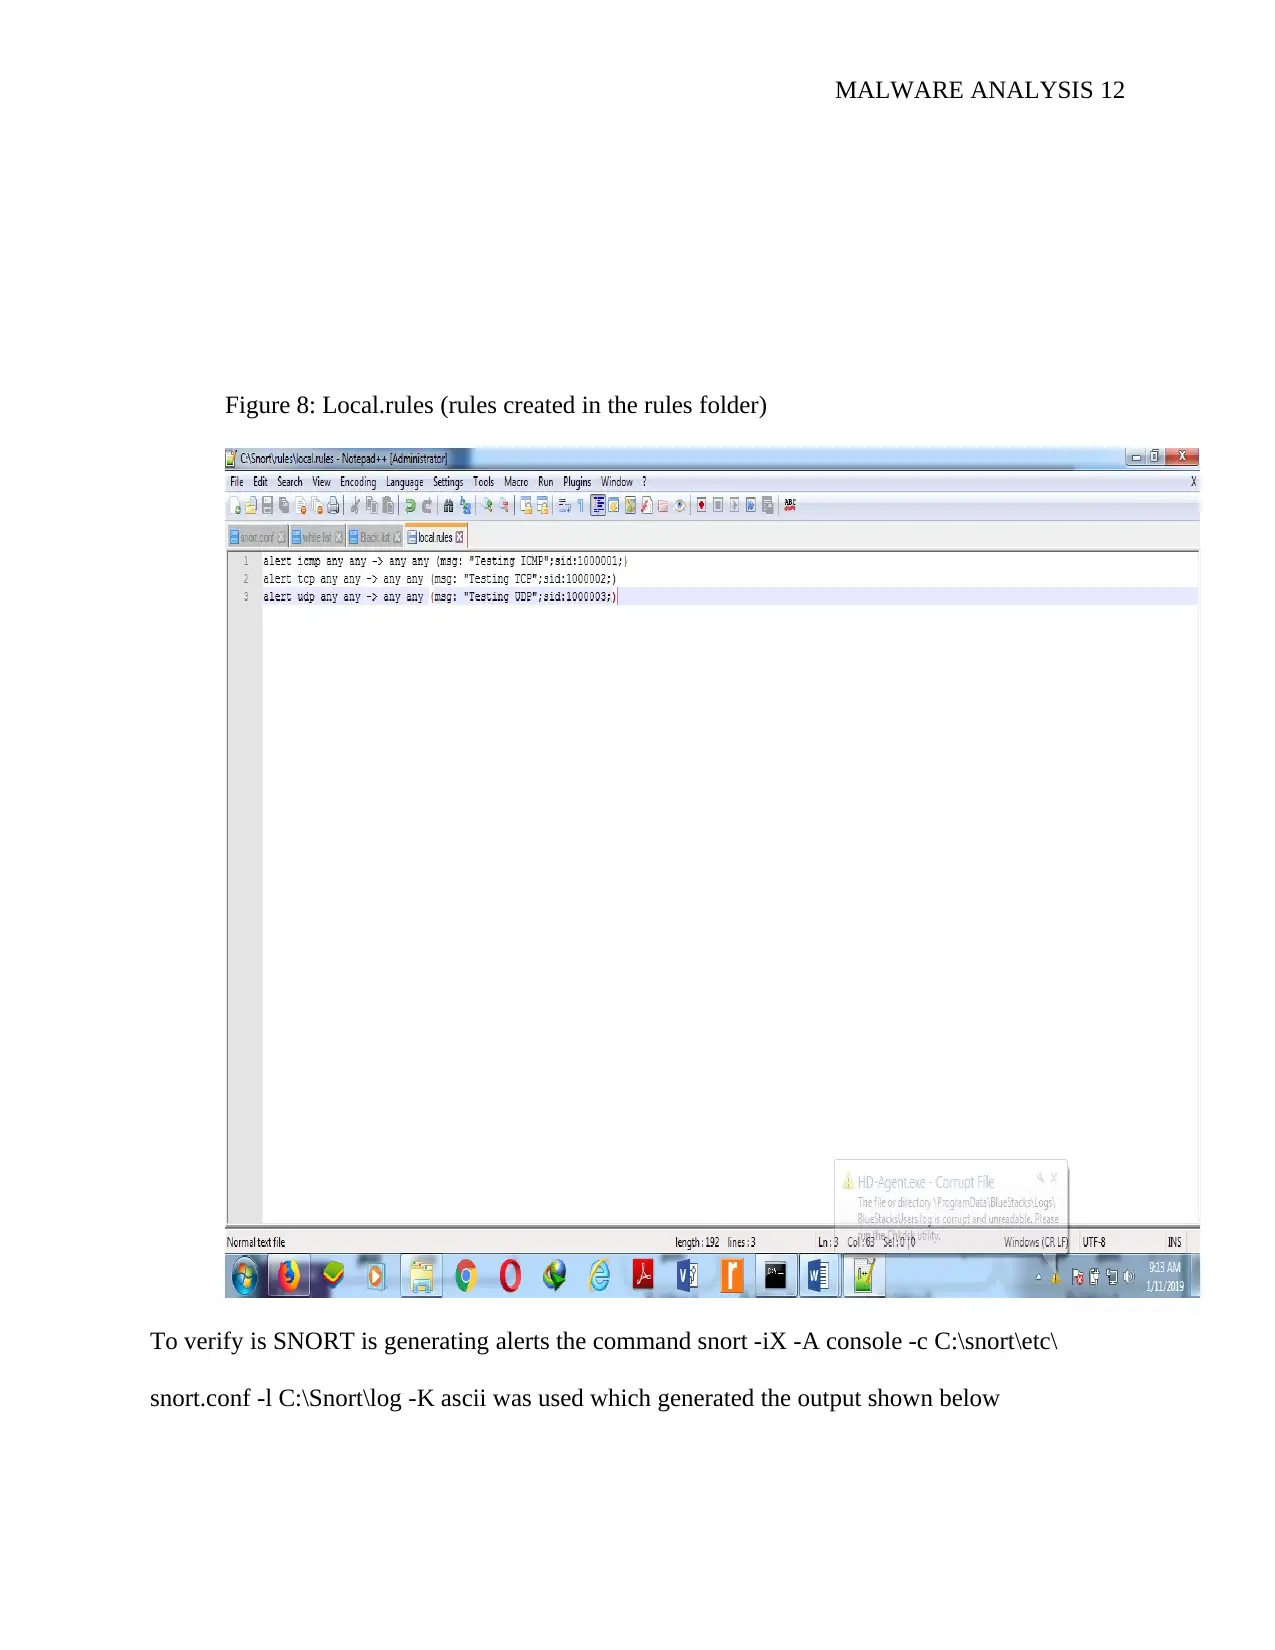
This report provides a detailed analysis of malware detection and network security using the SNORT intrusion detection system and Winpcap for packet capture. It includes the installation and configuration of SNORT, setting up rules for suspicious activities, launching simulated malicious attacks, and creating logbooks for detected threats. Screenshots are provided to illustrate each step, including packet analysis, port scanning, and malware detection. The report also covers the use of Winpcap for capturing network packets and explores different modes of SNORT operation, such as sniffer mode, packet logger, and intrusion detection mode. Furthermore, the document explains how to create custom rules in SNORT to detect specific types of malware and network anomalies. This student-contributed resource is available on Desklib, offering a valuable study aid for understanding network security and malware analysis techniques.

MALWARE ANALYSIS 1
MALWARE ANALYSIS
Name
Instructor
Institution
Course
City
Date
MALWARE ANALYSIS
Name
Instructor
Institution
Course
City
Date
Paraphrase This Document
Need a fresh take? Get an instant paraphrase of this document with our AI Paraphraser

MALWARE ANALYSIS 2
Introduction
Wincap is an open source software, the program is used for network analysis and packet
capture. Most of the networked applications in organizations access network via the widely used
OS like sockets. Wincap software has been used widely to capture and at the same time transmit
network packets. The software consists of a driver which extends the OS so as to provide low-
level network access. This paper will use Wincap to capture packets and provide screenshots on
the same. In addition, the paper will explain what is SNORT, how it works, and its disadvantages
and advantages. Also, the screenshot on SNORT network analyzer will be provided.
Wincap
On September 15th, 2018 Riverbed released a new version of Wincap i.e. version 4.1.3.
The software has not been upgraded for many years since the 1990s. The version has the ability
to sniff loopback packets using windows filtering platform. One of the major purposes of the
current version of Wincap is to provide facilities to capture raw packets, both the one exchanged
by other host and the one destined to the machine where it is running. Second, Wincap is used to
filter packets according to the user-specified rules before even dispatching them to the
application [1]. In addition, Wincap is used to gather statistical information on the organization
network and transmit raw packets to the organization network. Wincap application is used by
lots of network tools for monitoring, security, and troubleshooting. Some of the classical tools
which rely on Wincap are network monitors, network and protocols analyzers, security tools,
traffic monitors, network scanners, security tools, and traffic loggers. In addition, Wincap only
sends and receives packets independently from host protocol.
The current Wincap i.e. is able to send back loopback packets using Winsock Kernel
technique. The look of the of the version is as shown by figure one below

MALWARE ANALYSIS 3
Figure 1: Wincap interface
Some disadvantages of Wincap is that it cannot be used to prevent an incident by itself
i.e. it does not prevent or even block attacks. Also, wincap does help in resolving any malware
issue it only assists in identifying malware. Lastly, the tool does not process encrypted packets.
How to use Winmap
First, one need to examine the interface of the software. By opening the software there
several profiles which is as shown by the screenshot shown below
Figure 2: Winmap profile
⊘ This is a preview!⊘
Do you want full access?
Subscribe today to unlock all pages.

Trusted by 1+ million students worldwide

MALWARE ANALYSIS 4
From the interface, there are four menus which are; scan, tools, profile, and help.
The second step is to ping scan or ping sweep so as to discover all the hosts which can
respond to ICMP and ARP on a certain subnet example is nmap-Sp 192.168.1.1/24. By pinging
the nmap Sp 192.168.1.1/24 the output of the scan is shown by screen shot below (figure 3)
Figure 3: Winpcap 192.168.1.1/24 scan
Paraphrase This Document
Need a fresh take? Get an instant paraphrase of this document with our AI Paraphraser

MALWARE ANALYSIS 5
The third step is to ping sweep over port 80 so as to discover the hosts which are on the
network where the firewall is blocking the ICMP protocol packet but allowing the web traffic.
An example would be Winpcap-sP –PT80 192.168.1.0/24. The fourth step is port scan to
discover those ports which are open on hosts which will respond to multiple TCP protocols this
is done using the nmap Ss command. The fourth step is to port scan the entire organization
network. Other ways to port scan is to use the –sS option and then decoy it with the “-D” option
which means one need to spoof the said IP address.

MALWARE ANALYSIS 6
SNORT network analysis tool
Snort is said to be a multi-mode packet analysis tool which is used to sniffer and packet
logger. The tool is also used as a forensic data analysis tool and a network intrusion detection
system. The tool is portable i.e. can be installed in Linux, Solaris, HP-UX, Mac OS, and
Windows. One of the advantages of the tool is that it is fast and has a high probability of
detection for a given network so long as it is on 100 Mbps network. In addition, one can be able
to configure the tool. Third, the tool is an open source software meaning that it is free hence one
can easily download it from the internet with a small file of up to 800k. The fourth advantage is
that it is a packet sniffing lightweight network analysis tool with a rule-based detection engine.
Fifth, with a plug-in, the tool is flexible. Sixth the tool offers a wide range of detection
capabilities as compared to other tools such as OS fingerprinting, CGO exploits, backdoors,
stealth scans, and buffer overflows. Seventh, the creation of new rules is simple when using
SNORT. The tool, also reports results from other tools.
Snort tool has three modes i.e. sniffer mode, intrusion detection, and as a packet logger.
As a packet sniffer one can use the tool as sniffer without having to turn on the tools detection
capabilities. In here one gets a live readout of the network packets without having to pass along
the organization network. As an intrusion detection mode one can invoke the analysis mode
which applies to a set of traffic rules. As a snort mode, the tool is able to perform a deeper
analysis of the network data which is collected by Snort [2].
⊘ This is a preview!⊘
Do you want full access?
Subscribe today to unlock all pages.

Trusted by 1+ million students worldwide

MALWARE ANALYSIS 7
How SNORT tool works
To start with SNORT tool can be configured to perform deep packet inspection and
complex packet processing. After and installing Snort and running the help command the
interface looks like snapshot shown below. The SNORT tool used here is the latest version.
Few programs are needed if one wants to run SNORT tool. Some of the programs which
were used in this project are MYSQL-Server, PHP5-MySQL, and PHP Extension and
Application Repository (PEAR).
Before installation of SNORT it is important to note that the snort.conf file is the one
control SNORT watches. In addition, the file defends SNORT tool from attack and the rules
which it uses to find malicious traffic. In addition, the file watches for dangerous traffic which is
not defined by signature. It is also important to understand how to use SNORT tool using the
three modes. Using the Sniffer mode, the tool is able to print TCP/IP packet headers to the
screen. This done using the command snort –v. To display the packet data and their headers one
just need to run the Snort-vd commands. In addition, -e command is used as a descriptive
display. The second mode is the packet logger; in here the major idea is to record packets on the
disk. In here one usually specifies the logging directory using a very simple command –dev -1
./log.
For this project, SNORT.exe was downloaded from the snort website. Wincap was also
installed from riverbed modeler site. The following steps were carried out to install and to
configure the SNORT network analysis tool
1. Click on the SNORT installer .exe file
2. After installation a folder of Snort was created in C as shown by snapshot shown
below (The highlighted folder)
Paraphrase This Document
Need a fresh take? Get an instant paraphrase of this document with our AI Paraphraser

MALWARE ANALYSIS 8
Figure 4: Snort installation folder in C
3. One then continued to configure SNORT tool located on the etc folder. This done
using notepad++ where one is required to edit the IP address as shown by the figure
below (The highlighted one)
Figure 4: Snort installation folder in C
3. One then continued to configure SNORT tool located on the etc folder. This done
using notepad++ where one is required to edit the IP address as shown by the figure
below (The highlighted one)

MALWARE ANALYSIS 9
Figure 5: Configuring the snort.config file
4. Other files which are edited are inserting the path where the rules are located
5. After installation one can then continue to run the SNORT tool to do this one runs the
command prompt as a run administrator then runs the cd C:\Snort\bin command and
then the snort –V command. By running the commands the output is as shown by the
screenshot below which shows that this project is running version 2.9.12 of the Snort
tool
⊘ This is a preview!⊘
Do you want full access?
Subscribe today to unlock all pages.

Trusted by 1+ million students worldwide

MALWARE ANALYSIS 10
Figure 6: Successful installation output
SNORT commands
First, one checks the interfaces that one will be testing by running the command snort –W
where the output is as shown by snapshot below
Figure 6: Successful installation output
SNORT commands
First, one checks the interfaces that one will be testing by running the command snort –W
where the output is as shown by snapshot below
Paraphrase This Document
Need a fresh take? Get an instant paraphrase of this document with our AI Paraphraser

MALWARE ANALYSIS 11
Figure 7: SNORT interfaces
How to detect packets using SNORT
To test if SNORT is able to detect packets that come through the network then it means
that one has to create rules. This project created rules as shown by the snapshot shown below
using notepad++.
Figure 7: SNORT interfaces
How to detect packets using SNORT
To test if SNORT is able to detect packets that come through the network then it means
that one has to create rules. This project created rules as shown by the snapshot shown below
using notepad++.

MALWARE ANALYSIS 12
Figure 8: Local.rules (rules created in the rules folder)
To verify is SNORT is generating alerts the command snort -iX -A console -c C:\snort\etc\
snort.conf -l C:\Snort\log -K ascii was used which generated the output shown below
Figure 8: Local.rules (rules created in the rules folder)
To verify is SNORT is generating alerts the command snort -iX -A console -c C:\snort\etc\
snort.conf -l C:\Snort\log -K ascii was used which generated the output shown below
⊘ This is a preview!⊘
Do you want full access?
Subscribe today to unlock all pages.

Trusted by 1+ million students worldwide
1 out of 26
Related Documents
Your All-in-One AI-Powered Toolkit for Academic Success.
+13062052269
info@desklib.com
Available 24*7 on WhatsApp / Email
Unlock your academic potential
Copyright © 2020–2025 A2Z Services. All Rights Reserved. Developed and managed by ZUCOL.


