Comprehensive Guide to Microsoft Word: Features, Shortcuts, and Forms
VerifiedAdded on 2021/06/22
|31
|4097
|347
Homework Assignment
AI Summary
This document is a detailed guide to Microsoft Word, covering a wide range of features and functions. It begins with essential shortcuts for tasks like saving, page breaks, and formatting. It then explores creating shortcuts, using AutoCorrect, and creating new templates. The guide explains how to create forms with drop-down options and checkboxes, and how to protect them. It also covers linking objects from Excel, saving documents as webpages, compressing images, adding speaker notes, and hiding slides. The document provides step-by-step instructions and examples for each function, making it a useful resource for both beginners and intermediate users of Microsoft Word. This assignment is designed to help students understand and utilize various features of Microsoft Word effectively for their academic and professional work.
CTRL + S – Save the current document
CTRL + Enter = page break
CTRL + F4 – Close the current document
CTRL + A – Select everything in the current document
Alt + Spacebar – Open the main menu for the program you are using
CTRL + B – Apply bold formatting to the selected text
CTRL + I – Apply italic formatting to the selected text
CTRL + U – Underline the selected text
CTRL + K – Insert a hyperlink
CTRL + Z – Undo your last action
CTRL + Y – Redo your last action
CTRL + A = select the text in a page
Press enter twice = to start a new paragraph
Function keys
F1- to get help F7- choosing spellings from the tools menu
F2 -move text or graphics F8 – extend a Selection
F3 – insert an auto Text entry F9- update selected field.
F4- repeat the last action F10 – activate the menu bar
F5- select go from the edit menu F11-go to next field
Paraphrase This Document
Need a fresh take? Get an instant paraphrase of this document with our AI Paraphraser
F6 – go to next pane or next frame F12- save the work
Creating shortcuts
You can create a shortcut key for any command, font, style or commonly used symbol. To do this:
1. Click the File tab and then click on Options.
2. Click Customise Ribbon – the Word Options dialog box will
appear.
3. Near the bottom of the Word Options dialog box you will
see Keyboard Shortcuts, click on the Customise button next to
this.
4. Select a Category, and then select the item for which you want to
create the keyboard shortcut.
5. Use your keyboard to input the new shortcut in the Press New
Shortcut Key box. Microsoft Word will tell you whether the key is
already assigned to some other command.
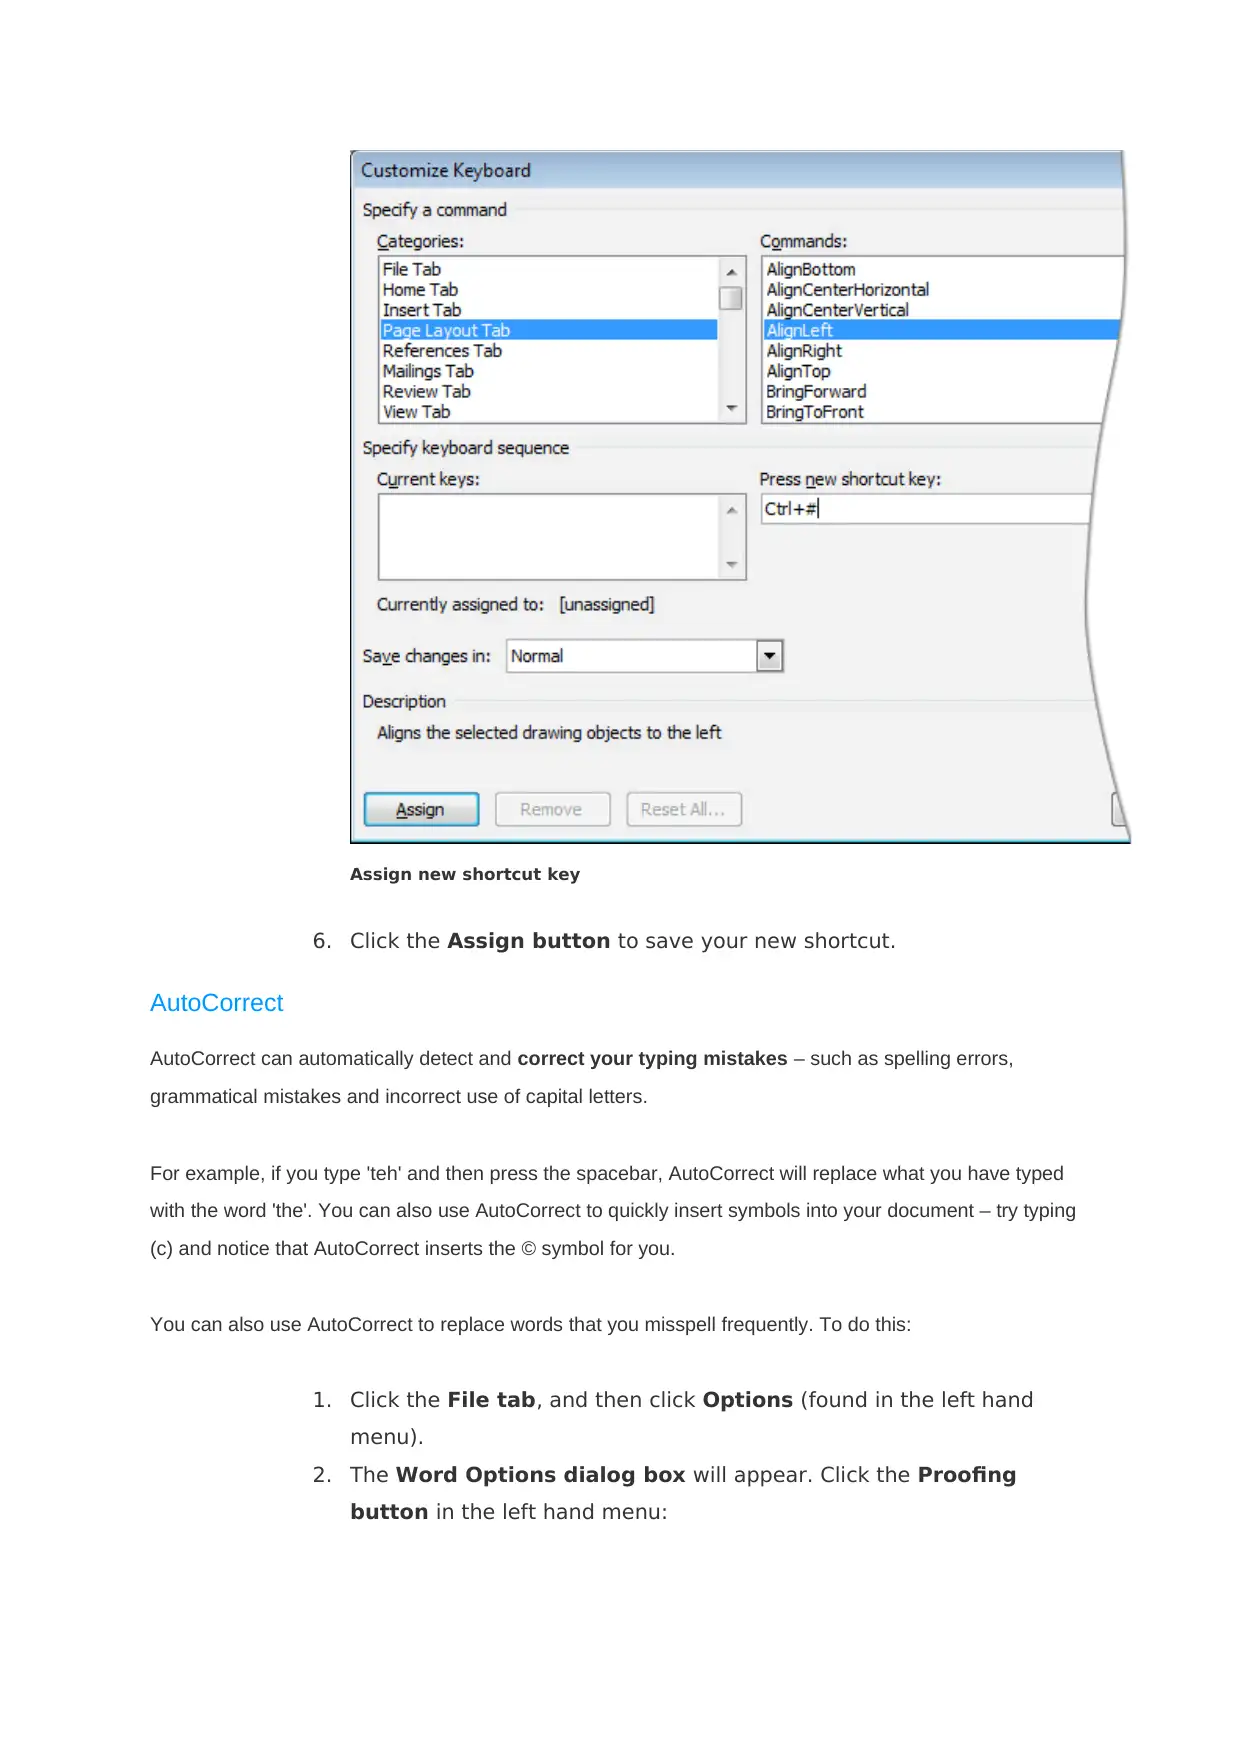
Assign new shortcut key
6. Click the Assign button to save your new shortcut.
AutoCorrect
AutoCorrect can automatically detect and correct your typing mistakes – such as spelling errors,
grammatical mistakes and incorrect use of capital letters.
For example, if you type 'teh' and then press the spacebar, AutoCorrect will replace what you have typed
with the word 'the'. You can also use AutoCorrect to quickly insert symbols into your document – try typing
(c) and notice that AutoCorrect inserts the © symbol for you.
You can also use AutoCorrect to replace words that you misspell frequently. To do this:
1. Click the File tab, and then click Options (found in the left hand
menu).
2. The Word Options dialog box will appear. Click the Proofing
button in the left hand menu:
⊘ This is a preview!⊘
Do you want full access?
Subscribe today to unlock all pages.

Trusted by 1+ million students worldwide
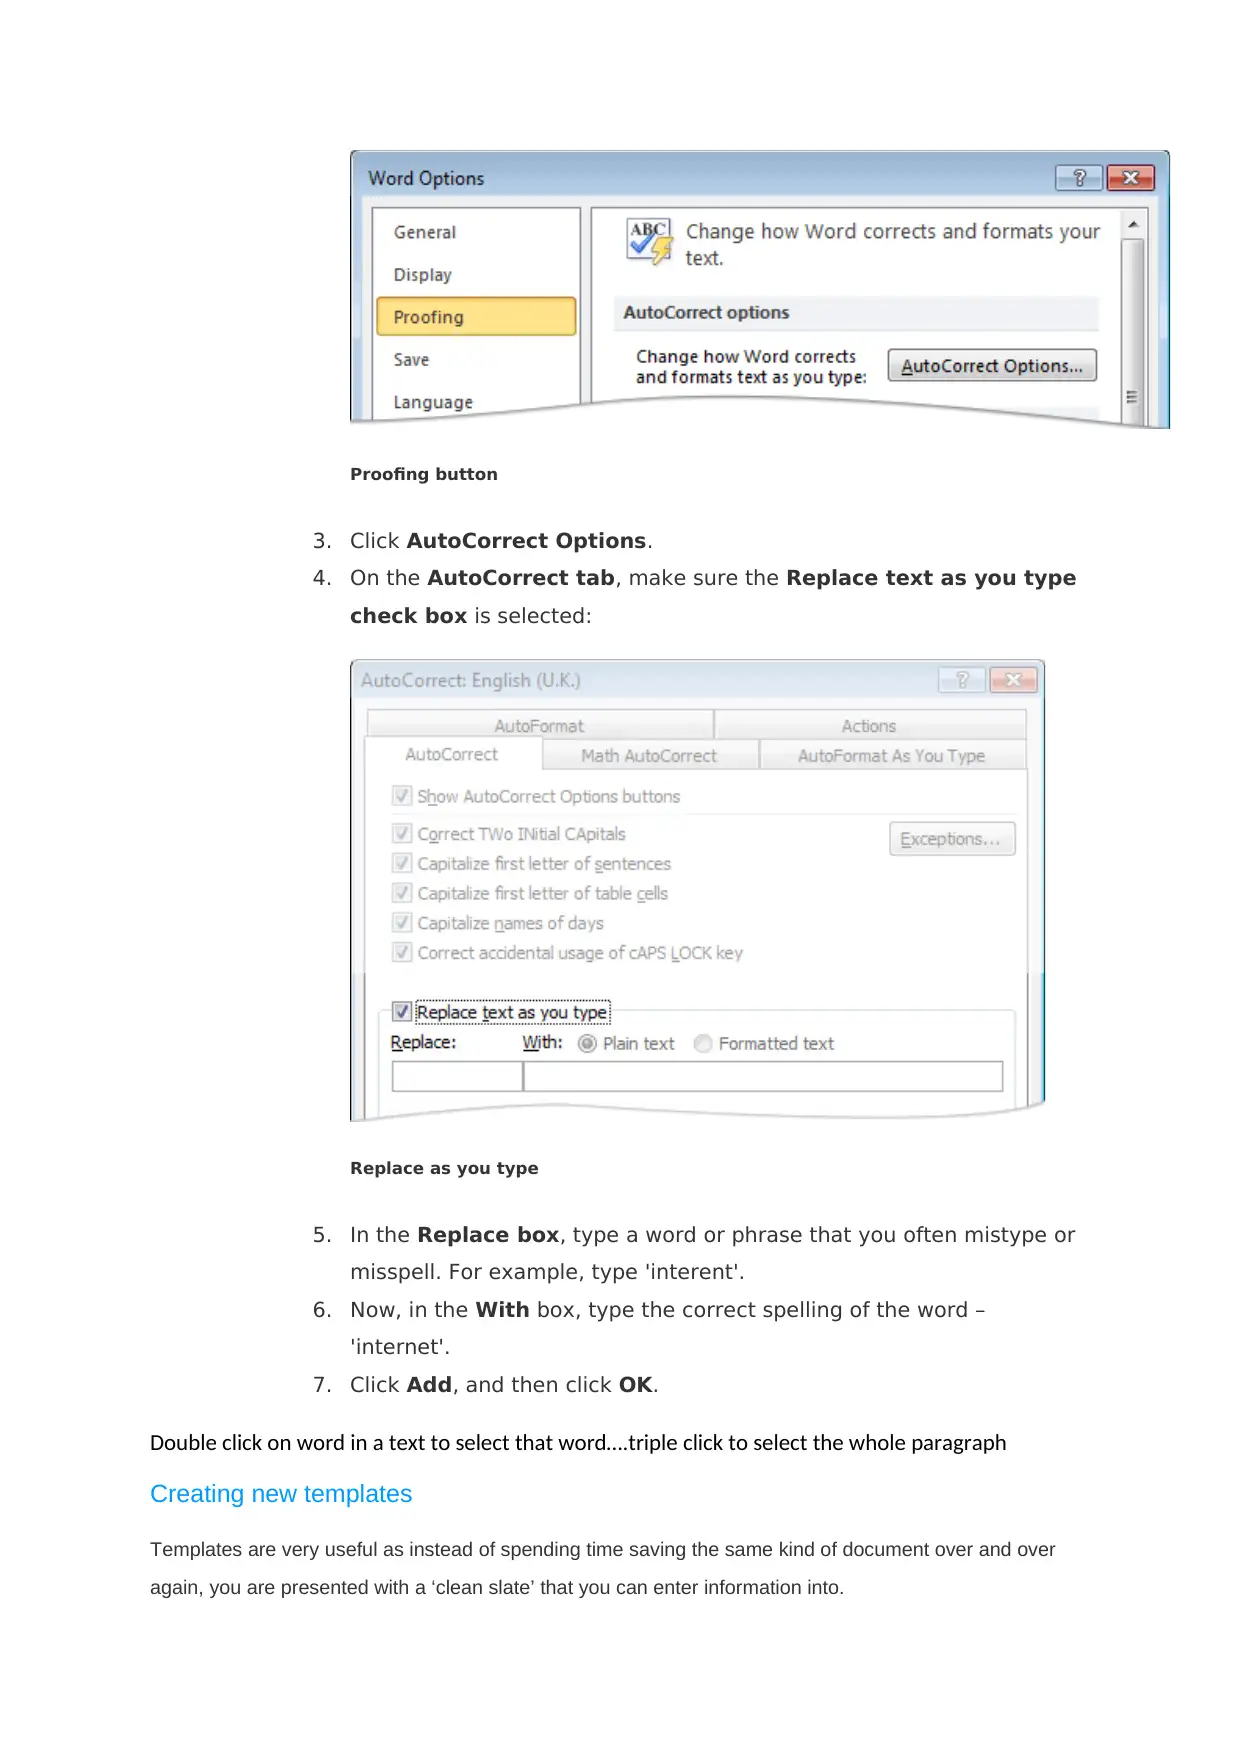
Proofing button
3. Click AutoCorrect Options.
4. On the AutoCorrect tab, make sure the Replace text as you type
check box is selected:
Replace as you type
5. In the Replace box, type a word or phrase that you often mistype or
misspell. For example, type 'interent'.
6. Now, in the With box, type the correct spelling of the word –
'internet'.
7. Click Add, and then click OK.
Double click on word in a text to select that word….triple click to select the whole paragraph
Creating new templates
Templates are very useful as instead of spending time saving the same kind of document over and over
again, you are presented with a ‘clean slate’ that you can enter information into.
Paraphrase This Document
Need a fresh take? Get an instant paraphrase of this document with our AI Paraphraser
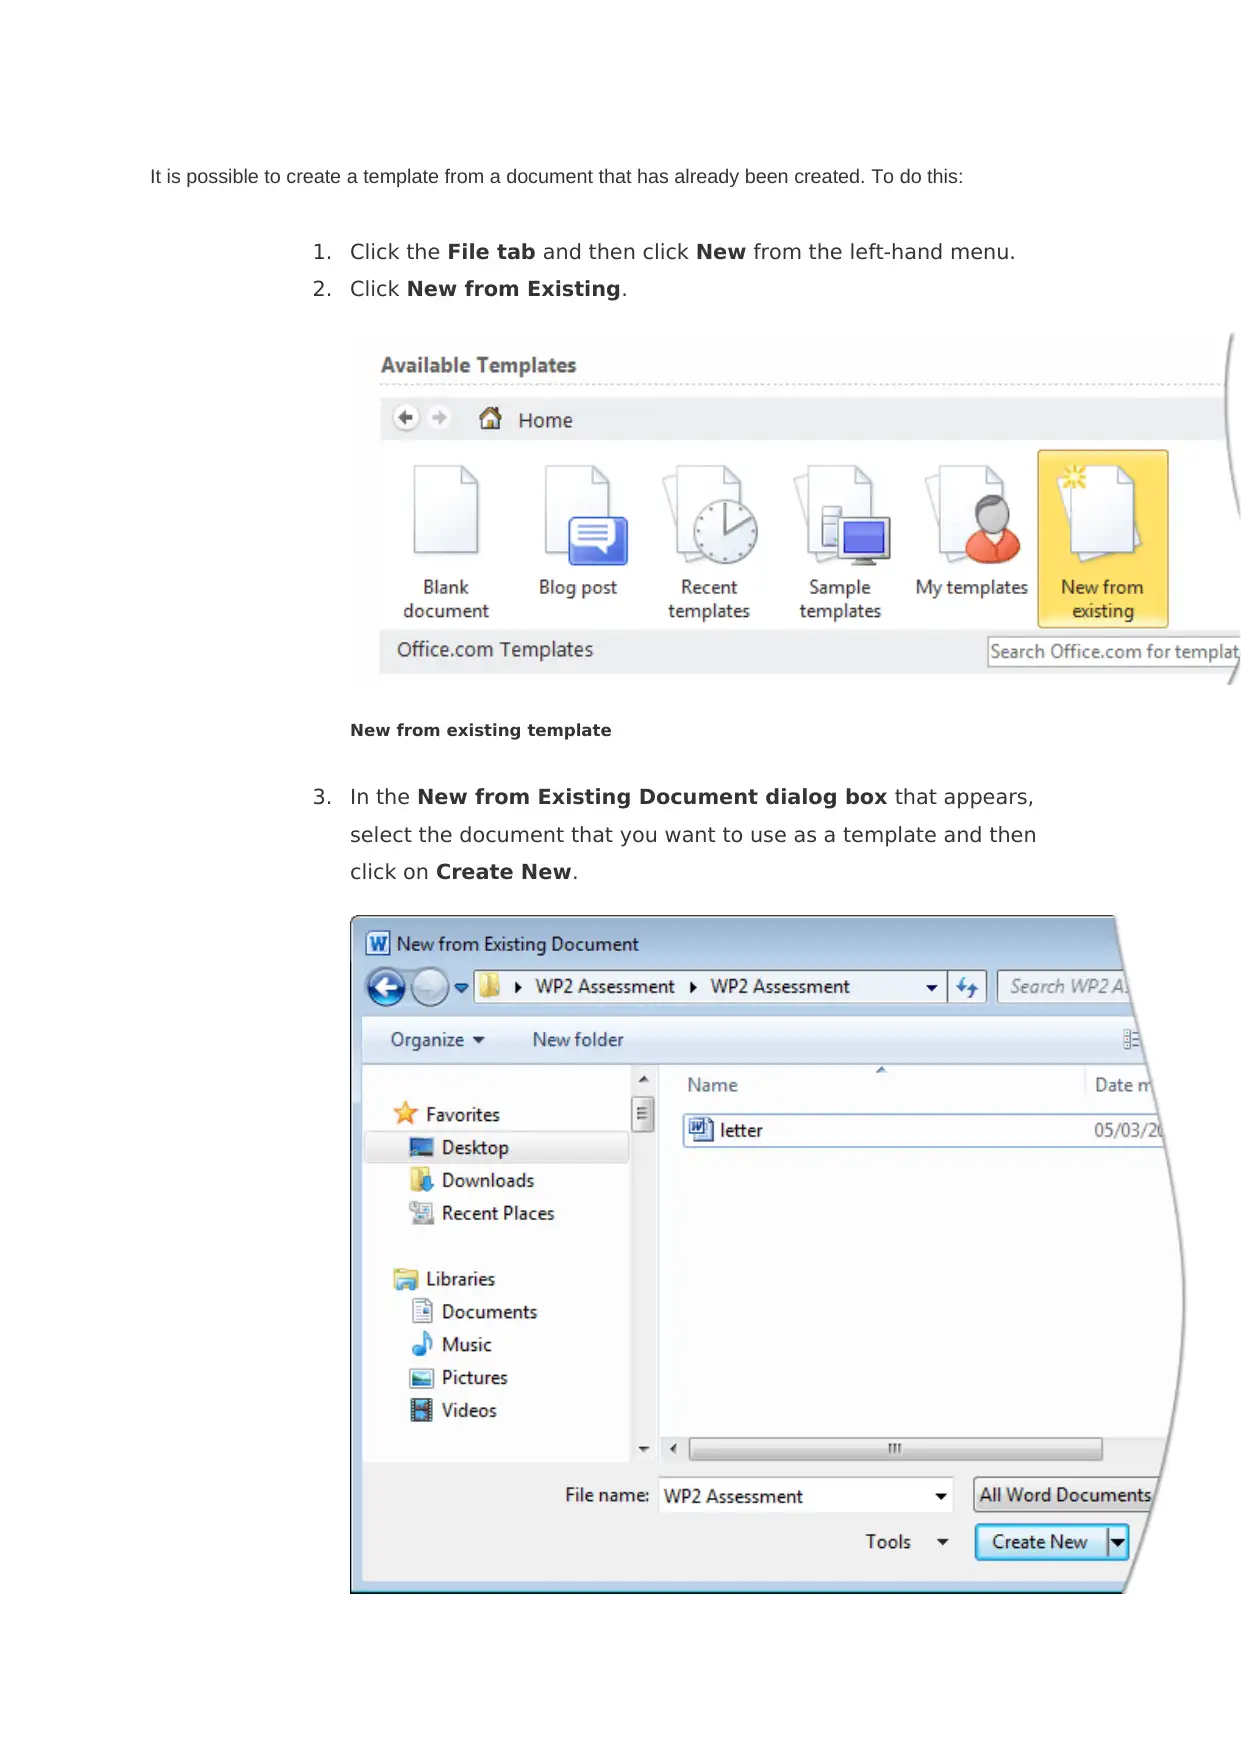
It is possible to create a template from a document that has already been created. To do this:
1. Click the File tab and then click New from the left-hand menu.
2. Click New from Existing.
New from existing template
3. In the New from Existing Document dialog box that appears,
select the document that you want to use as a template and then
click on Create New.
1. Click the File tab and then click New from the left-hand menu.
2. Click New from Existing.
New from existing template
3. In the New from Existing Document dialog box that appears,
select the document that you want to use as a template and then
click on Create New.
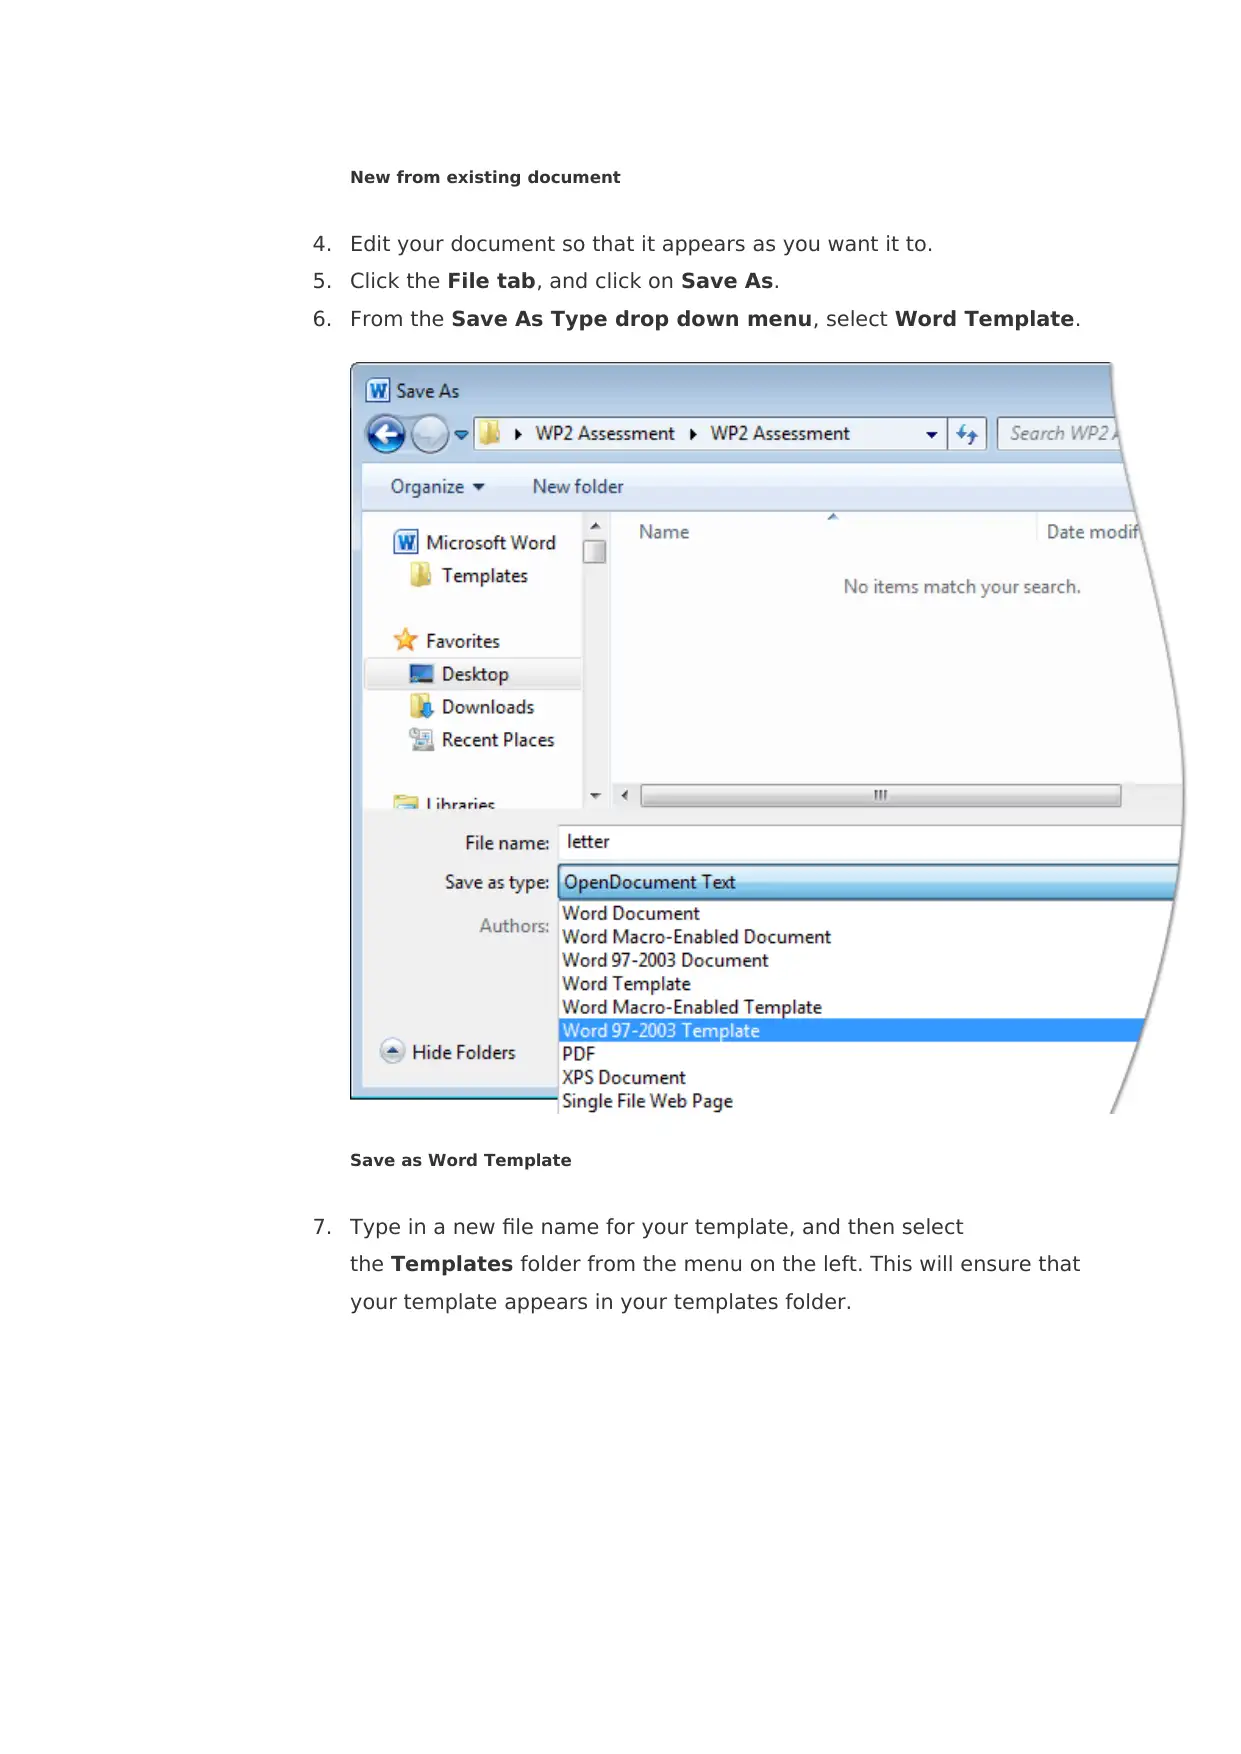
New from existing document
4. Edit your document so that it appears as you want it to.
5. Click the File tab, and click on Save As.
6. From the Save As Type drop down menu, select Word Template.
Save as Word Template
7. Type in a new file name for your template, and then select
the Templates folder from the menu on the left. This will ensure that
your template appears in your templates folder.
⊘ This is a preview!⊘
Do you want full access?
Subscribe today to unlock all pages.

Trusted by 1+ million students worldwide
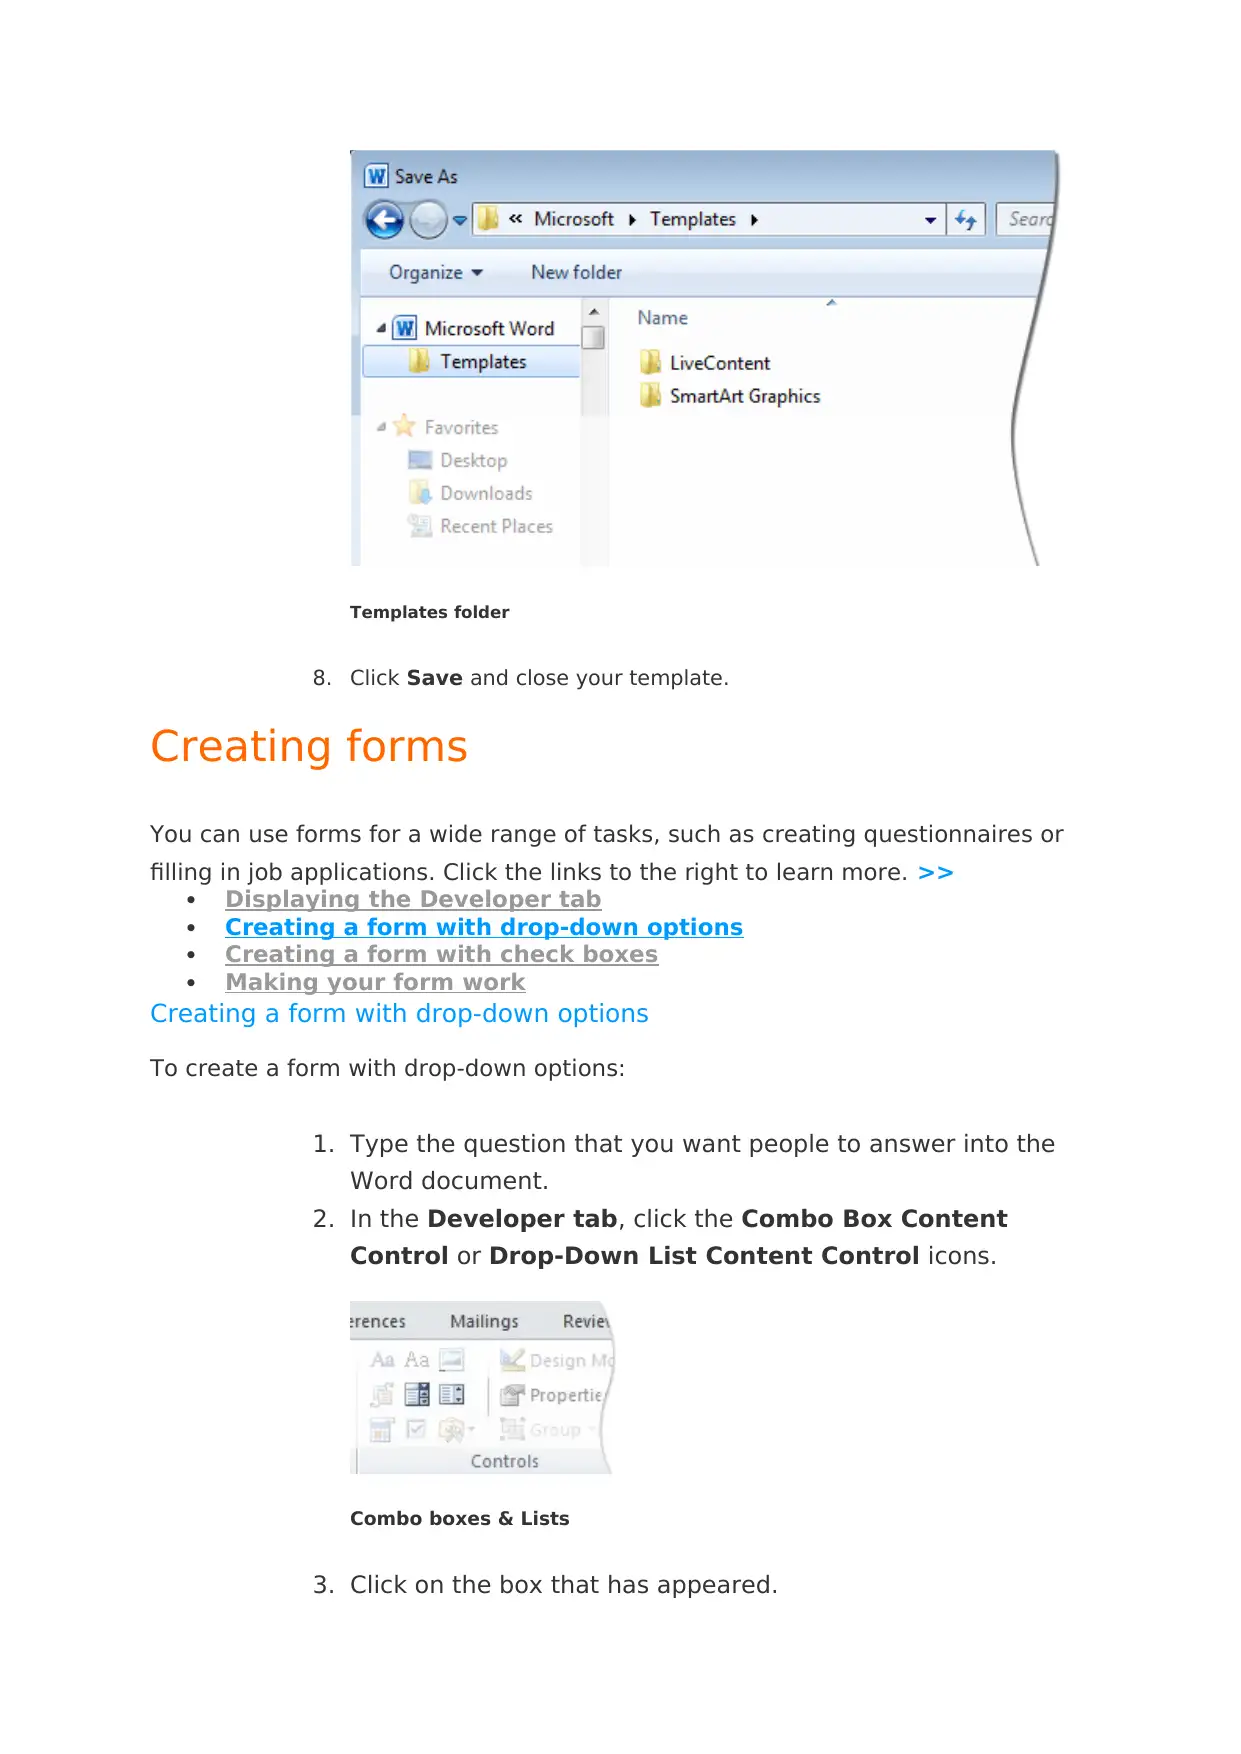
Templates folder
8. Click Save and close your template.
Creating forms
You can use forms for a wide range of tasks, such as creating questionnaires or
filling in job applications. Click the links to the right to learn more. >>
Displaying the Developer tab
Creating a form with drop-down options
Creating a form with check boxes
Making your form work
Creating a form with drop-down options
To create a form with drop-down options:
1. Type the question that you want people to answer into the
Word document.
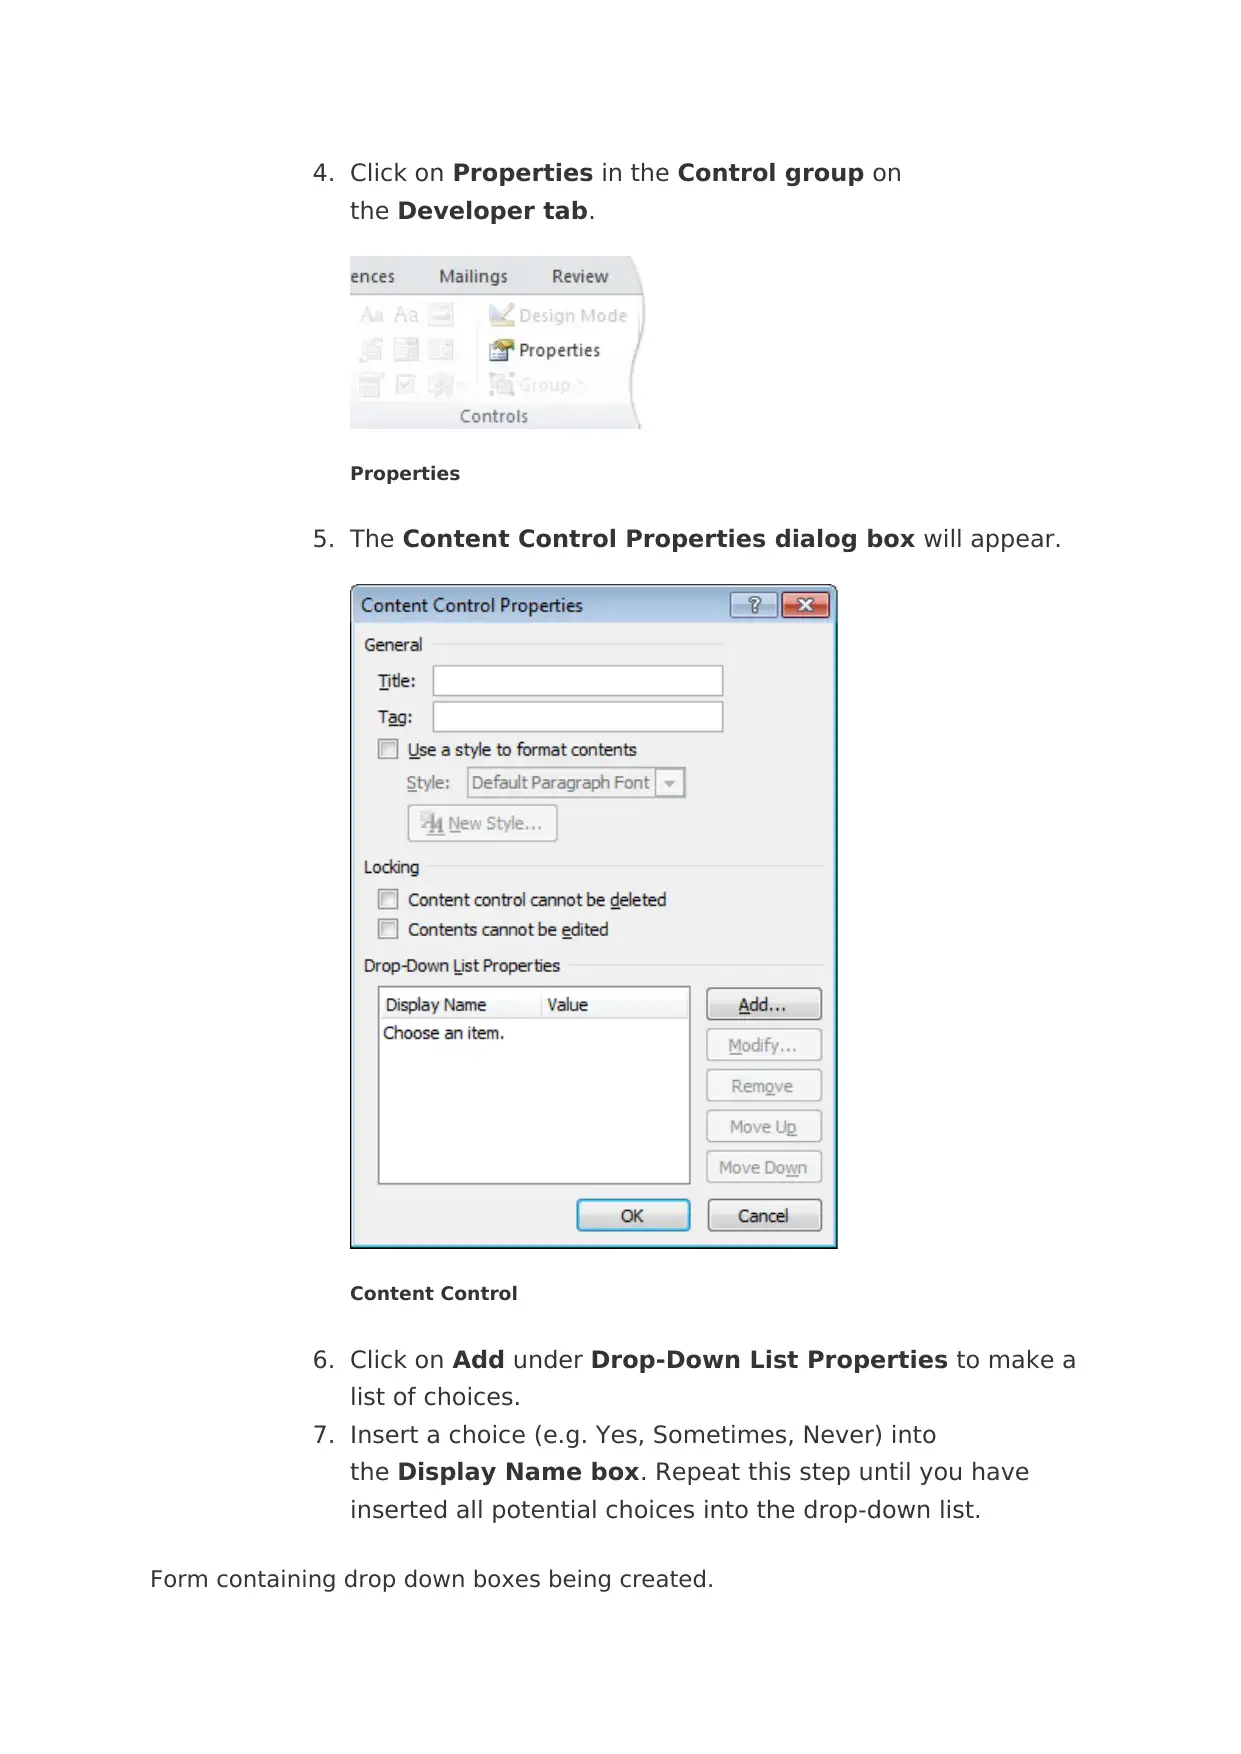
2. In the Developer tab, click the Combo Box Content
Control or Drop-Down List Content Control icons.
Combo boxes & Lists
3. Click on the box that has appeared.
Paraphrase This Document
Need a fresh take? Get an instant paraphrase of this document with our AI Paraphraser
4. Click on Properties in the Control group on
the Developer tab.
Properties
5. The Content Control Properties dialog box will appear.
Content Control
6. Click on Add under Drop-Down List Properties to make a
list of choices.
7. Insert a choice (e.g. Yes, Sometimes, Never) into
the Display Name box. Repeat this step until you have
inserted all potential choices into the drop-down list.
Form containing drop down boxes being created.
Creating forms
You can use forms for a wide range of tasks, such as creating questionnaires or filling in job applications.
Click the links to the right to learn more. >>
Displaying the Developer tab
Creating a form with drop-down options
Creating a form with check boxes
Making your form work
Making your form work
Before you send your form to people to be completed, you can protect your form
so that other people can only make changes to certain parts of it. This means
that no one can make changes to the questions in your form – they can just input
their answers! To do this:
1. Click on the Developer tab in the document containing your
form.
2. Click the Restrict Editing button in the Protect group.
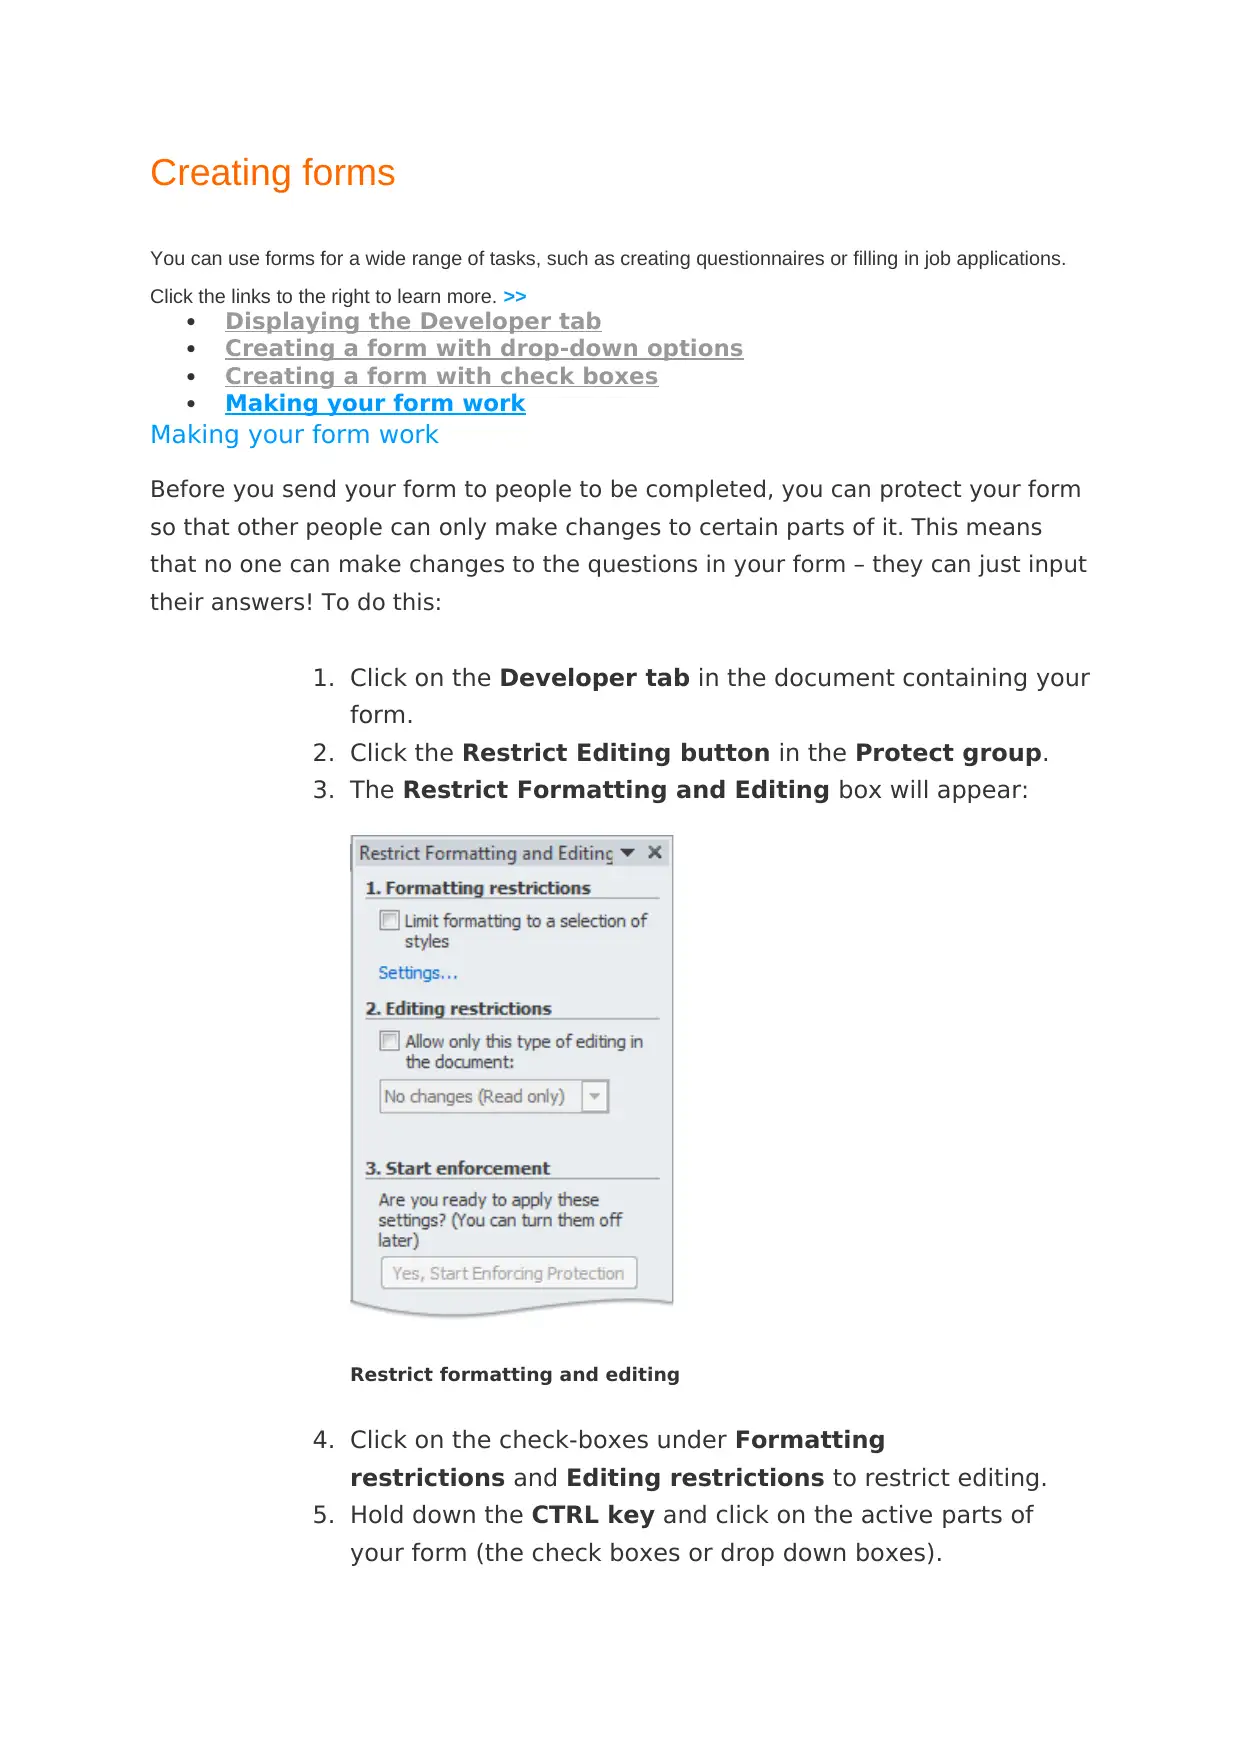
3. The Restrict Formatting and Editing box will appear:
Restrict formatting and editing
4. Click on the check-boxes under Formatting
restrictions and Editing restrictions to restrict editing.
5. Hold down the CTRL key and click on the active parts of
your form (the check boxes or drop down boxes).
⊘ This is a preview!⊘
Do you want full access?
Subscribe today to unlock all pages.

Trusted by 1+ million students worldwide
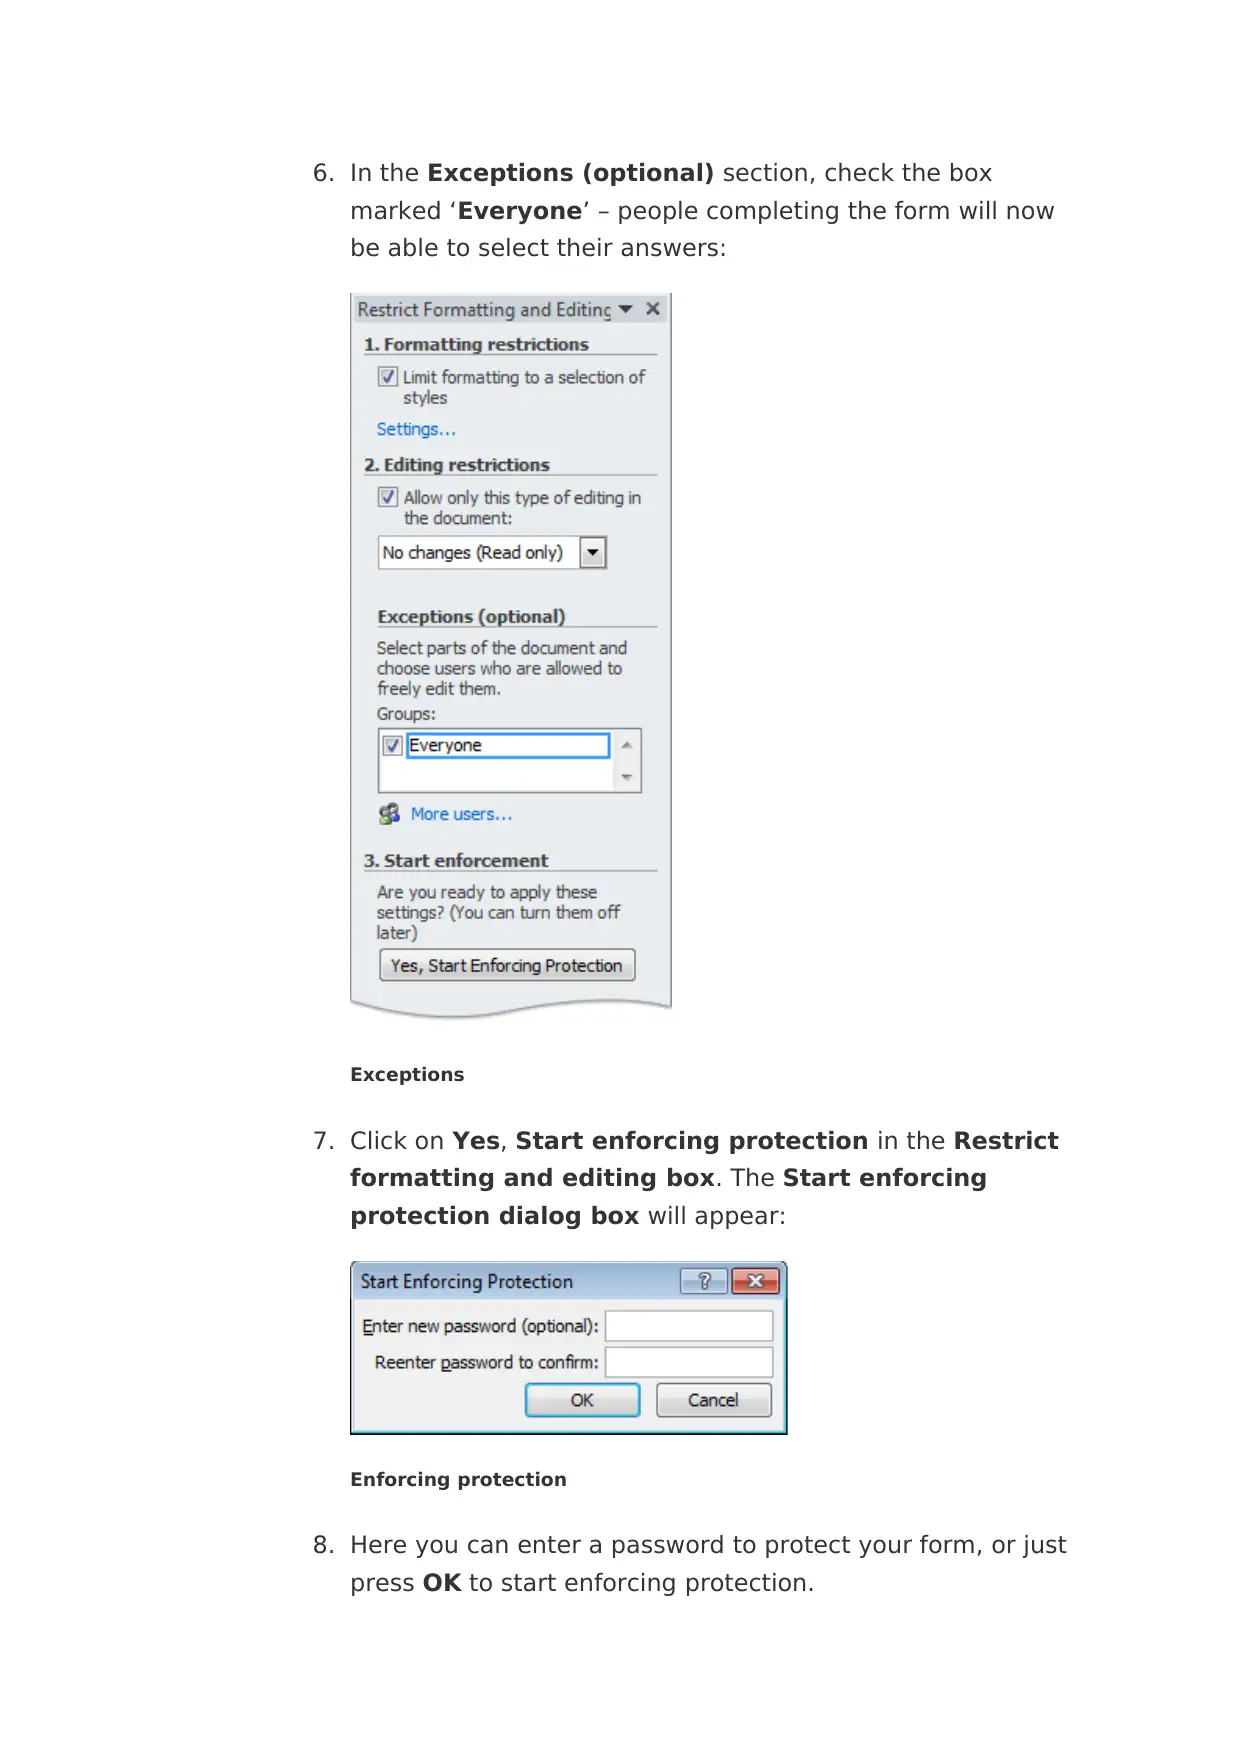
6. In the Exceptions (optional) section, check the box
marked ‘Everyone’ – people completing the form will now
be able to select their answers:
Exceptions
7. Click on Yes, Start enforcing protection in the Restrict
formatting and editing box. The Start enforcing
protection dialog box will appear:
Enforcing protection
8. Here you can enter a password to protect your form, or just
press OK to start enforcing protection.
Paraphrase This Document
Need a fresh take? Get an instant paraphrase of this document with our AI Paraphraser
Linking objects
As well as copying and pasting data, you can also import spreadsheet data as a
‘linked object’, which means that whenever information is updated in Excel, the
content in your Word document will also update automatically! To do this:
Open the Excel spreadsheet that you want to transfer data from and the
Word document that you want to transfer data to.
In Excel, select the data that you want to use – this could be a chart or a
graph. Press CTRL + C to copy this data.
Now go to the Word document and insert your cursor at the point where
you want the data to be pasted.
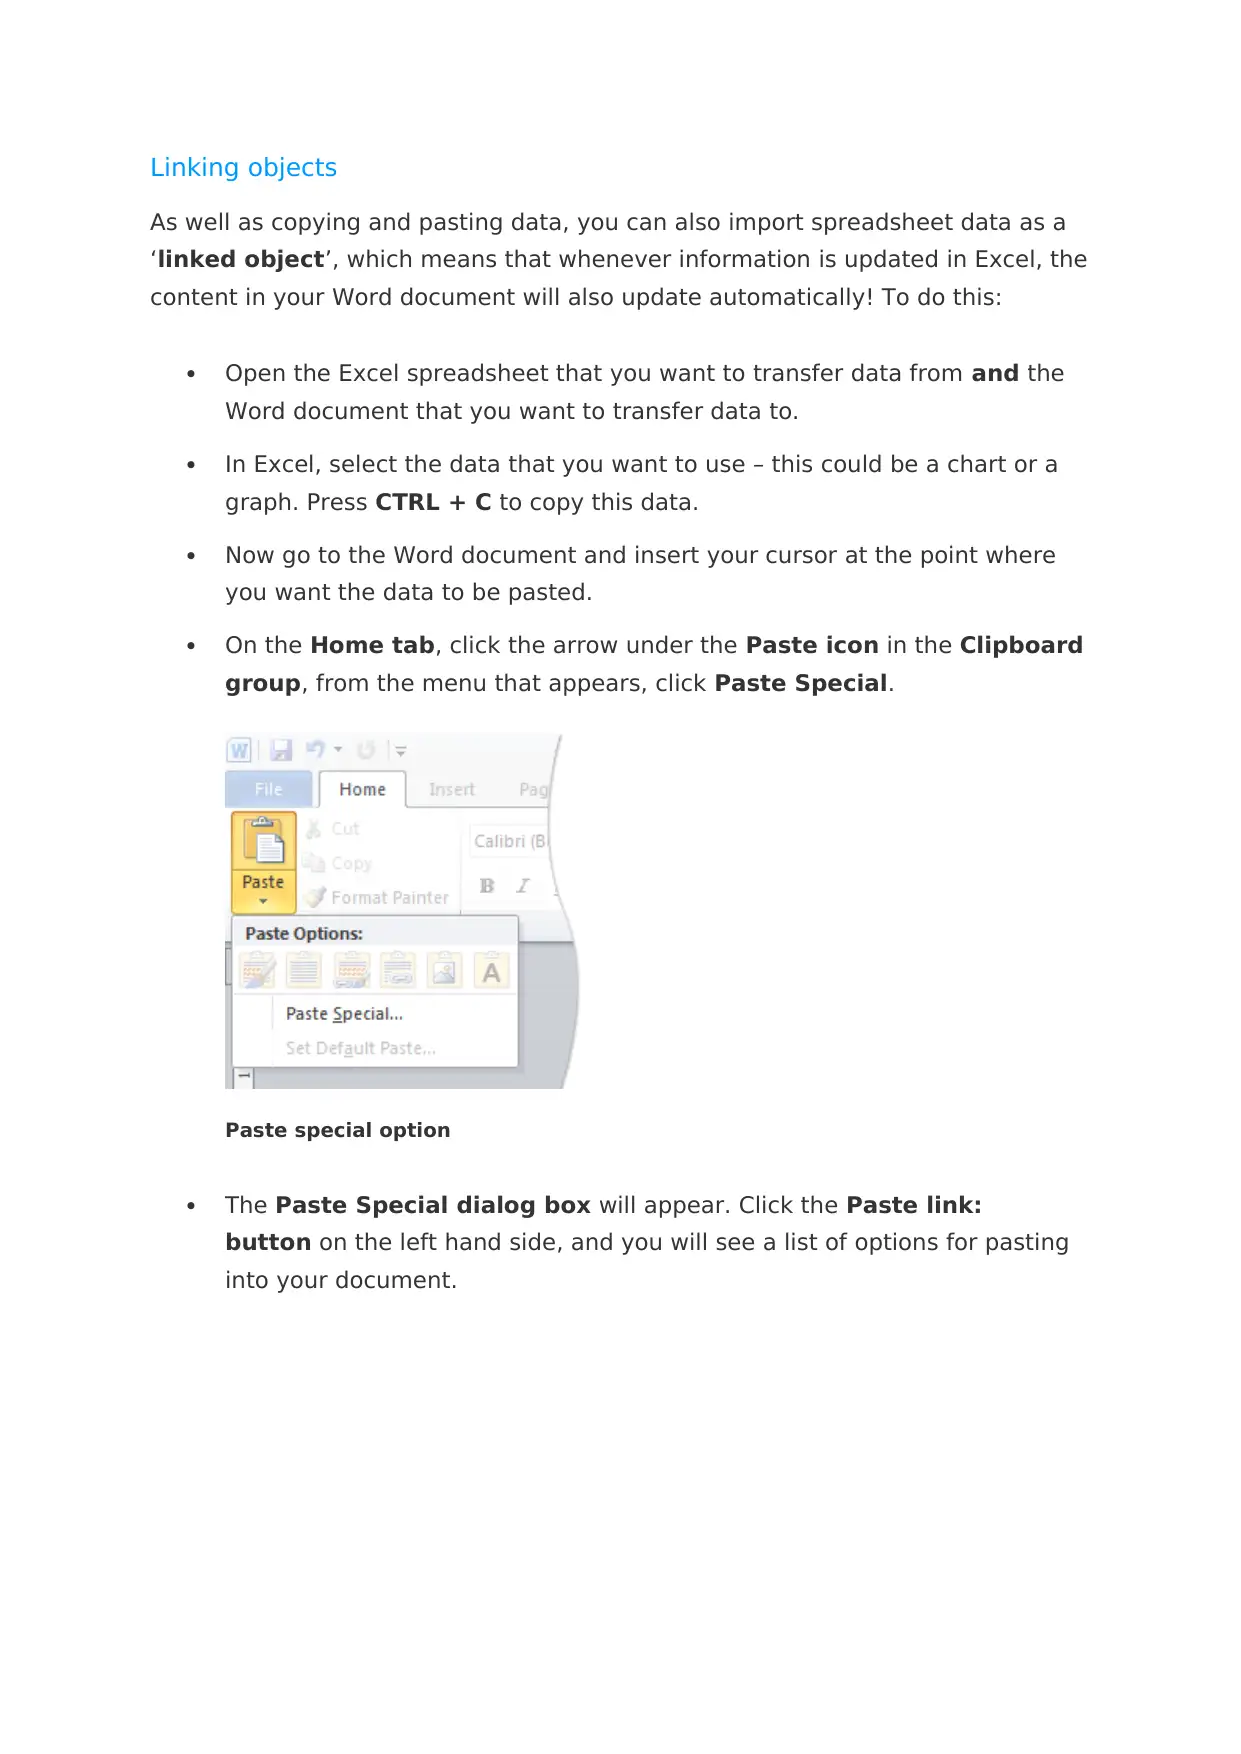
On the Home tab, click the arrow under the Paste icon in the Clipboard
group, from the menu that appears, click Paste Special.
Paste special option
The Paste Special dialog box will appear. Click the Paste link:
button on the left hand side, and you will see a list of options for pasting
into your document.
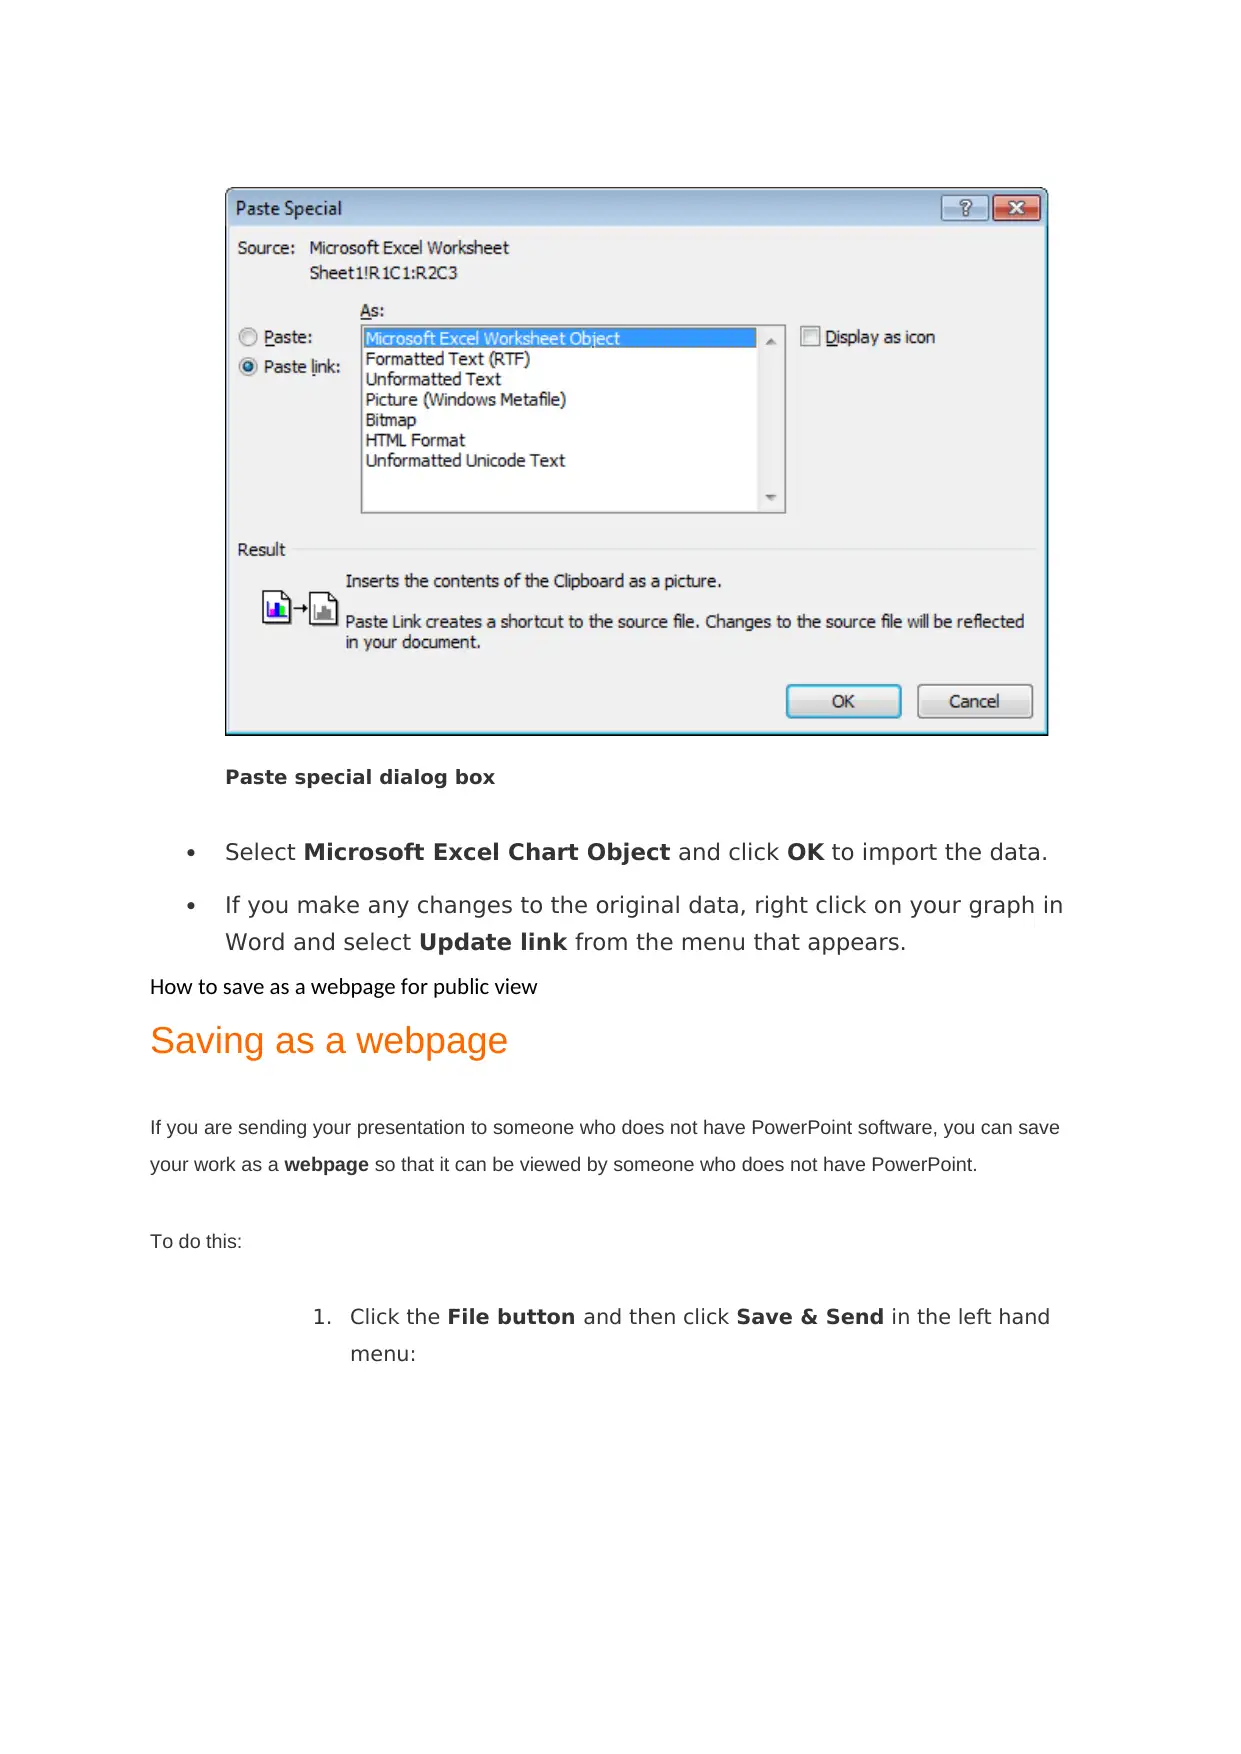
Paste special dialog box
Select Microsoft Excel Chart Object and click OK to import the data.
If you make any changes to the original data, right click on your graph in
Word and select Update link from the menu that appears.
How to save as a webpage for public view
Saving as a webpage
If you are sending your presentation to someone who does not have PowerPoint software, you can save
your work as a webpage so that it can be viewed by someone who does not have PowerPoint.
To do this:
1. Click the File button and then click Save & Send in the left hand
menu:
⊘ This is a preview!⊘
Do you want full access?
Subscribe today to unlock all pages.

Trusted by 1+ million students worldwide
1 out of 31
Related Documents
Your All-in-One AI-Powered Toolkit for Academic Success.
+13062052269
info@desklib.com
Available 24*7 on WhatsApp / Email
![[object Object]](/_next/static/media/star-bottom.7253800d.svg)
Unlock your academic potential
Copyright © 2020–2026 A2Z Services. All Rights Reserved. Developed and managed by ZUCOL.


