Kanti and Kunja International College: MS Office Report (BBA 1st Sem)
VerifiedAdded on 2021/11/23
|28
|5888
|416
Report
AI Summary
This lab report, submitted by Anisha Acharya from Kanti and Kunja International College, provides an overview of Microsoft Office applications, specifically MS Word, MS Excel, and PowerPoint. The report begins with an introduction to MS Word, detailing its layout, features like editing, enhancement, and formatting, and the mail merge function. It then moves on to PowerPoint, explaining the layout, features such as animation and transitions, and slide layouts. Finally, the report covers MS Excel, including its layout, record and calculation capabilities, and the use of charts. The report is designed to fulfill the requirements of a BBA first-semester degree and includes acknowledgements and a table of contents to guide the reader through the software applications.

KANTI AND KUNJA INTERNATIONAL
COLLEGE
(AFFILIATED TO TRIBHUVAN UNIVERSITY)
NEW BANESHWOR KATHMANDU
A lab report based on application software package
MS- WORD
MS-EXCEL
POWERPOINT
In the partial fulfillment of the requirement for the first
semester degree of bachelor in business administration
Submitted By: Submitted To:
Anisha Acharya Anil Lamichhane
Paraphrase This Document
Need a fresh take? Get an instant paraphrase of this document with our AI Paraphraser
ACKNOWLEDGEMENT
I gratefully acknowledge to almighty god for giving me wisdom, knowledge with
creativity for completing this report.
I would like to express my particular thanks of gratitude to my respected teacher sir
Anil Lamichhane who gave me the golden opportunity to do this wonderful report which
also help me in doing a lot of research and I came to know about so many new things I am
really thankful to them .
Secondly, A word of gratitude goes to my parents for giving me the best creativity and
suggestions and a note of thanks goes to my friends who helped me a lot in finalizing this
report within the limited time.

⊘ This is a preview!⊘
Do you want full access?
Subscribe today to unlock all pages.
Trusted by 1+ million students worldwide
Table of Contents
ACKNOWLEDGEMENT..................................................................................................................2
CHAPTER- 1: INTRODUCTION TO MS-WORD............................................................................1
1.1 LAYOUT OF MS-WORD.........................................................................................................1
1.2 FEATURES OF MS-WORD....................................................................................................2
1.3 MAIL MERGE..........................................................................................................................9
CHAPTER-2 INTRODUCTION TO POWERPOINT.....................................................................10
2.1 LAYOUT OF POWERPOINT...............................................................................................10
2.2 FEATURES OF POWERPOINT...........................................................................................11
2.3 DESCRIPTION OF ANIMATION, TRANSITION, SLIDE LAYOUT..............................16
CHAPTER 3 INTRODUCTION TO MS-EXCEL..............................................................................19
3.1 EXCEL LAYOUT...................................................................................................................19
3.2 RECORD AND CALCULATE...............................................................................................20
3.3. ANY 3 CHARTS.....................................................................................................................23
Paraphrase This Document
Need a fresh take? Get an instant paraphrase of this document with our AI Paraphraser
CHAPTER- 1: INTRODUCTION TO MS-WORD
A word processor is a software program capable of creating, storing, and printing
documents. Unlike the standard typewriter, users using word processors have the ability of creating
a document and making any changes anywhere in the document. This document can also be saved
for modification at a later time or to be opened on any other computer using the same word
processor. Today, the word processor is one of the most frequently used programs or online
services used on a computer today. Some examples of word processing programs include
Microsoft Word, WordPerfect (Windows only), AppleWorks (Mac only), and OpenOffice.org.
Microsoft Word is a widely used commercial word processor designed by Microsoft. Microsoft
Word is a component of the Microsoft Office suite of productivity software, but can also be
purchased as a stand-alone product.
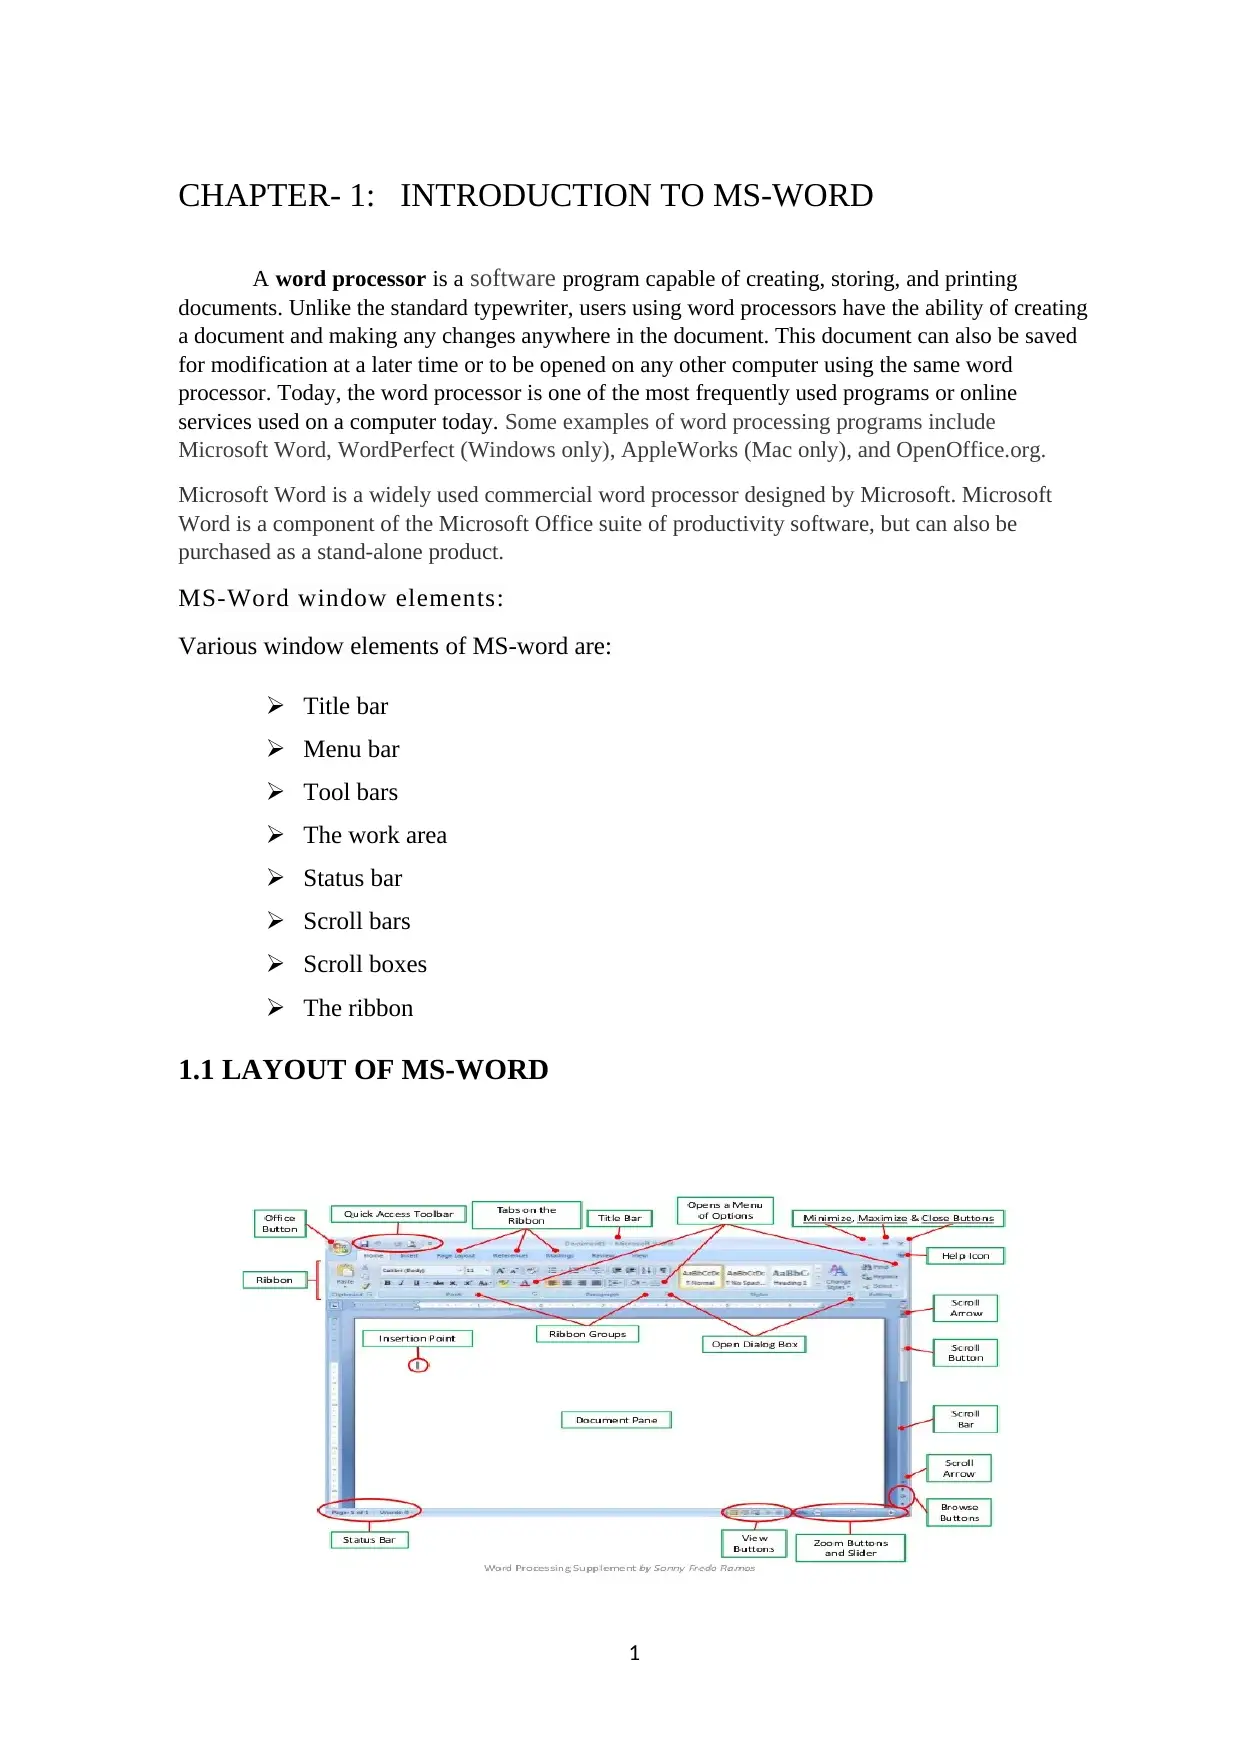
MS-Word window elements:
Various window elements of MS-word are:
Title bar
Menu bar
Tool bars
The work area
Status bar
Scroll bars
Scroll boxes
The ribbon
1.1 LAYOUT OF MS-WORD
1
A word processor is a software program capable of creating, storing, and printing
documents. Unlike the standard typewriter, users using word processors have the ability of creating
a document and making any changes anywhere in the document. This document can also be saved
for modification at a later time or to be opened on any other computer using the same word
processor. Today, the word processor is one of the most frequently used programs or online
services used on a computer today. Some examples of word processing programs include
Microsoft Word, WordPerfect (Windows only), AppleWorks (Mac only), and OpenOffice.org.
Microsoft Word is a widely used commercial word processor designed by Microsoft. Microsoft
Word is a component of the Microsoft Office suite of productivity software, but can also be
purchased as a stand-alone product.
MS-Word window elements:
Various window elements of MS-word are:
Title bar
Menu bar
Tool bars
The work area
Status bar
Scroll bars
Scroll boxes
The ribbon
1.1 LAYOUT OF MS-WORD
1
Quick Access Toolbar: The top element of the Ms-word 2013 is quick access toolbar.
The quick access toolbar provides you with access to command you frequently use. By
default, save,
1. Undo and Redo appear on the Quick Access Toolbar. You can use save to save
your file, undo to rollback an action you have taken and redo to reapply an action
you have rolled back.
2. The Title Bar: The title bar displays the title of the document on which you are
currently working. Word names the first new document you open Document1. As
you open additional new document Word names them sequentially. When you save
your document, you assign the document a new name.
3. The File Menu: This is the only menu in Ms-word 2013. Earlier in 2007 is was
named as office button.
4. The Ribbon: We use The Ribbon to issue commands. The Ribbon is located near
the top of the screen, below the Quick Access toolbar. There are several tabs at the
top of the Ribbon; clicking a tab displays several related commands groups within
each group there are related commands buttons.
5. The Ruler: The ruler is found below the ribbon. You can use the ruler to change
the format of your document quickly. If your ruler is not visible, follow these steps
to make it visible.
6. The Text Area: Just below the ruler is a large area called the text area. You type
your document in the text area. The blinking vertical line in the upper-left corner
of the text area is the cursor. It marks the insertion point.
7. The Vertical and Horizontal Scroll Bars: The vertical and horizontal scroll bars
enable you to move up, down and across your window simply by dragging the
icon located on the scroll bar. The vertical scroll bar is located along the right side
of the screen. The horizontal scroll bar is located just above the status bar.
8. The Status Bar: The status bar appears at the very bottom of your window and
provides such information as the current page and the number of words in your
document
1.2 FEATURES OF MS-WORD
1.2.1 EDITING FEATURES
2
⊘ This is a preview!⊘
Do you want full access?
Subscribe today to unlock all pages.
Trusted by 1+ million students worldwide
Editing features allow the user to locate, revise, correct, and rearrange text in a
document.
■ Copy: Copies selected text so it can be placed in another location, leaving the
original text unchanged.
■ Cut: Removes selected text from the current location.
■ Paste: Places selected text that has been copied or cut at another location.
■ Find: Locates a specified keystroke, word, or phrase in a document. Available Find
options include: – Find only occurrences that match the specified case. – Find only
whole words containing the specified text. – Find all forms of a specified word. – Find
specified text using the asterisk (*) and question mark (?) as wildcard (unspecified)
characters.
■ Replace: Finds a specified keystroke, word, or phrase, and then replaces it with
another keystroke, word, or phrase. All occurrences of the specified text can be
replaced at one time, or replacements can be made individually (selectively).
■ Select: Highlights text on which various operations may be performed. Use the
mouse and/or key combinations to select text. Once selected, the text can be bolded,
underlined, italicized, deleted, copied, moved, printed, saved, etc.
■ Spell-Check: Checks words, documents, or parts of documents for misspellings.
■ Undo: Reverses the last change made in the text. This feature restores moved text to
its original location.
■ Redo: Reverses the last Undo action.
■ Typeover. Replaces existing text with newly keyed text (also called Overstrike or
Overtype).
1.2.2 ENHANCEMENT FEATURES
Enhancement features improve the appearance of a document and/or emphasize
important words, phrases, or sentences.
■ Bold: Prints text darker than other copy as it is keyed. Bold may be added after text
has been keyed by first selecting the text.
■ Borders: Adds a border to any or all sides of a page, paragraph, or column, as well
as to a table or a cell within a table. Page border options may include small pictures.
3
Paraphrase This Document
Need a fresh take? Get an instant paraphrase of this document with our AI Paraphraser
Borders not only enhance appearance, but also make text easier to read by
emphasizing certain passages. Borders are most effective when used sparingly
■ Bullets: Highlights each item in a list with a heavy dot or other character, as
demonstrated in this list of features. Bullets add visual interest and emphasis.
■ Change Case: Changes capitalization. The lowercase option changes all selected
text to lowercase; the UPPERCASE option changes selected text to all capitals. The
Sentence case option capitalizes the first letter of the first word, and the Title Case
option capitalizes the first letter of each selected word.
■ Drop Cap: Formats paragraphs to begin with a large dropped capital letter. Drop
caps are objects (pictures) that can be formatted and sized.
■ Font: Consists of the typeface, style, size, and any effects used. Font features may
be changed before or after text is keyed. The number and size of fonts available
depends on the software and printer used.
– Typeface: Refers to the design of the characters. Examples include Times New
Roman, Courier New, and Arial
– Styles: Include bold and italic.
– Size: Measured in points such as 10 point or 12 point. One point is about 1⁄72 of
an inch.
– Effect: Added to give text a special look. Examples of effects are shadow, emboss,
and small caps. Effects should be used infrequently.
■ Italic: Prints letters that slope up toward the right. Italic may be added after text has
been keyed by first selecting the text.
■ Numbering: Shows the proper order of a series of steps or items. Use numbers
instead of bullets whenever the order of items is important.
■ Shading: Adds color or patterns to paragraphs or table cells to emphasize them and
focus the reader’s attention on the contents.
■ Superscript: Places text slightly higher than other text on a line. Superscript is
commonly used for footnotes and endnotes, and for mathematical formulas and
equations.
■ Underline: Underlines text as it is keyed. An underline may be added after text has
been keyed by first selecting the text.
4
■ Watermark: Prints any desired text or graphics behind the main text on document
pages.
1.2.3 FORMATTING FEATURES
Formatting features change the arrangement, or layout, of pages. These
features include aligning text vertically and horizontally, indenting and hyphenating
text, and changing margins and line spacing.
■ Alignment: Refers to the horizontal position of a line of text (also called
justification).
– Use left alignment to start text at the left margin (even left margin).
– Use right alignment to align text at the right margin (even right margin).
– Use center alignment to center text between the left and right margins.
– Use justify alignment for even left and right margins.
■ Center Page: Centers text between top and bottom margins of a page. This feature
leaves an equal (or nearly equal) amount of white space above and below text.
Inserting two hard returns below the last keyed line gives centered documents a better
appearance
■ Hyphenation: Automatically divides (hyphenates) words that would normally wrap
to the next line. When used with left-aligned text, hyphenation makes the right margin
less ragged, making text more attractive.
■ Indent: Moves text away from the left or right margin. – Left indent (paragraph
indent) moves the text one tab stop to the right (usually 0.5"), away from the left
margin. – Hanging indent moves all but the first line of a paragraph 0.5" (one tab stop)
to the right. Hanging indent is commonly used on bibliographies and reference pages.
■ Line Spacing: Changes the amount of blank space between lines of text.
■ Margins: Changes the amount of blank space at the top, bottom, right, and/or left
edges of a page. Default margin settings are not the same for all software.
■ Page Break: Inserts a soft page break automatically when the current page is full. A
hard page break can be inserted manually to start a new page before the current page is
full.
■ Tab: Aligns text according to the type of tab set. By default, most word processing
software programs have left tabs already set at half-inch (0.5") intervals from the left
margin. These preset tabs can be cleared and reset.
5
⊘ This is a preview!⊘
Do you want full access?
Subscribe today to unlock all pages.
Trusted by 1+ million students worldwide
– Left tabs, commonly used to align words, align text evenly at the left by placing the
keyed text to the right of the tab setting.
– Right tabs, commonly used to align whole numbers, align text evenly at the right by
placing the keyed text to the left of the tab setting.
– Decimal tabs align numbers at the decimal point, regardless of the number of places
before or after the decimal point.
– Dot Leader tabs automatically place dot leaders (. . . .) between columns of
designated text. The leaders lead the reader’s eyes from text in the left column to text
in the right column.
■ Text Wrapping: Positions text in relation to an inserted object (graphic). Text may
appear above and below, around, behind, or in front of an object.
■ Widow/Orphan: Ensures that the first line of a paragraph does not appear by itself
at the bottom of a page (orphan line) or that the last line of a paragraph does not
appear by itself at the top of a page (widow line).
1.2.4 INSERT FEATURES
Various commands on the Insert menu are used to add page numbers, dates,
headers, footers, and footnotes and to insert symbols, clip art, files, pictures, shapes,
text boxes, and word art.
■ Shapes: Adds a variety of shapes (rectangles, stars, banners, arrows, flow chart
symbols, etc.) to a document.
■ Clip Art: Drawings, pictures, sounds, and video clips can be inserted into documents.
Collection of clip art files is provided with word processing software; additional clip
art can be purchased or downloaded from the Internet
■ Date: Automatically inserts the date into a document. Some software contains an
Update option that automatically replaces the previous date with the current date each
time the document is opened or printed.
■ Footnote and Endnote: Identifies sources quoted or paraphrased in the text or gives
extra information about the main text. Word processing software automatically
positions and prints each footnote at the bottom of the same page as the reference to it.
It prints endnotes on a separate page at the end of a report. When footnotes or endnotes
6
Paraphrase This Document
Need a fresh take? Get an instant paraphrase of this document with our AI Paraphraser
are edited, added, or deleted, the software feature automatically makes the necessary
changes in numbering, formatting, and page breaks.
■ Header and Footer: Adds text (such as a chapter title, date, filename, or name of a
person or company) or graphic (a company logo, for example) in the top margin (header)
or bottom margin (footer) of a page. Headers or footers often include page numbers.
■ Page Numbers: Places page numbers in a specified location on printed pages.
– Most software contains a variety of numbering styles from which to choose: Arabic
numerals (1, 2, 3), lowercase Roman numerals (i, ii, iii), uppercase Roman numerals (I, II,
III), uppercase letters (A, B, C), and lowercase letters (a, b, c).
– Numbers can be placed at the top or bottom of the page, and aligned at the left margin,
center, or right margin.
– The Hide or Suppress option keeps the page number from appearing on a specified
page.
■ Text Boxes: Frequently used for labels or callouts in a document. Once a text box is
inserted in a document, it can be formatted, resized, and moved.
■ Word Art : Changes text into a graphic object. Most word processing software
programs have a word art gallery that contains predefined styles such as curved or
stretched text
1.2.5 MISCELLANEOUS FEATURES
This group contains features included in most word processing software that make the
keying task easier and more efficient.
■ AutoFormat: Automatically formats headings, bulleted and numbered lists, borders,
numbers, symbols, and so on as a document is keyed. Table AutoFormat applies borders,
shading, font effects, etc., to tables.
■ AutoCorrect: Automatically corrects many common keying, spelling, and grammatical
errors. It can also insert certain text, graphics, and symbols automatically.
■ AutoComplete: Inserts entire items such as dates and AutoText (stored phrases) when a
few identifying characters are keyed.
7
■ Macro: Allows the user to save (record) keystrokes and/or commands for retrieval
(playback) later. Macros save time by eliminating repetitive keying and formatting.
■ Show: Displays marks in text showing where tabs, spaces, and hard returns are inserted.
Being able to see these marks helps when editing a document or solving formatting
problems. The marks do not print.
■ Split Window: Displays a document in two panes, each with its own scroll bars. This
feature can be useful when copying text between parts of a long document, or when it is
necessary to see text not visible in the window where you are keying.
■ Zoom: Increases or decreases the size of text and amount of a page appearing on the
screen. Zoom out (a rate below 100%) to see more of a page and smaller text; zoom in (a
rate above 100%) to see less page area and larger text.
1.2.6 SPECIAL FEATURES
The word processing features listed below are used to create specific kinds of
documents.
■ Merge: Combines information from two files into one merged file. The feature is often
used to merge a form letter (main document) with a name and address file (data source) to
create a personalized letter (merged file) to each recipient in the data source file.
■ Newspaper-Style Columns: Divides a page into two or more side-by-side columns to
create pamphlets, leaflets, brochures, and newsletters. The columns may be equal or
unequal width. As the document is keyed, text fills a column before moving to the next
column. Often, newspaper-style columns need to be balanced (equal or nearly equal in
length). The desired balance can be achieved by inserting column breaks as needed.
■ Outline: Automatically labels each topic (paragraph) with a number or letter. The
alphanumeric outlining system uses Roman and Arabic numbers and capital and lowercase
letters. For example, Level 1 items might be labeled I, II, III, etc. Level 2 would be A, B,
C, etc., and Level 3 would be labeled 1, 2, 3, etc.
■ Styles: Applies a predefined set of formatting options to text to add consistency to a
document.
8
⊘ This is a preview!⊘
Do you want full access?
Subscribe today to unlock all pages.
Trusted by 1+ million students worldwide
1 out of 28
Your All-in-One AI-Powered Toolkit for Academic Success.
+13062052269
info@desklib.com
Available 24*7 on WhatsApp / Email
![[object Object]](/_next/static/media/star-bottom.7253800d.svg)
Unlock your academic potential
Copyright © 2020–2026 A2Z Services. All Rights Reserved. Developed and managed by ZUCOL.