Advanced Network Configuration Implementation Project - University

Verified

Added on  2020/03/23

|12
|1430
|201
Project
AI Summary
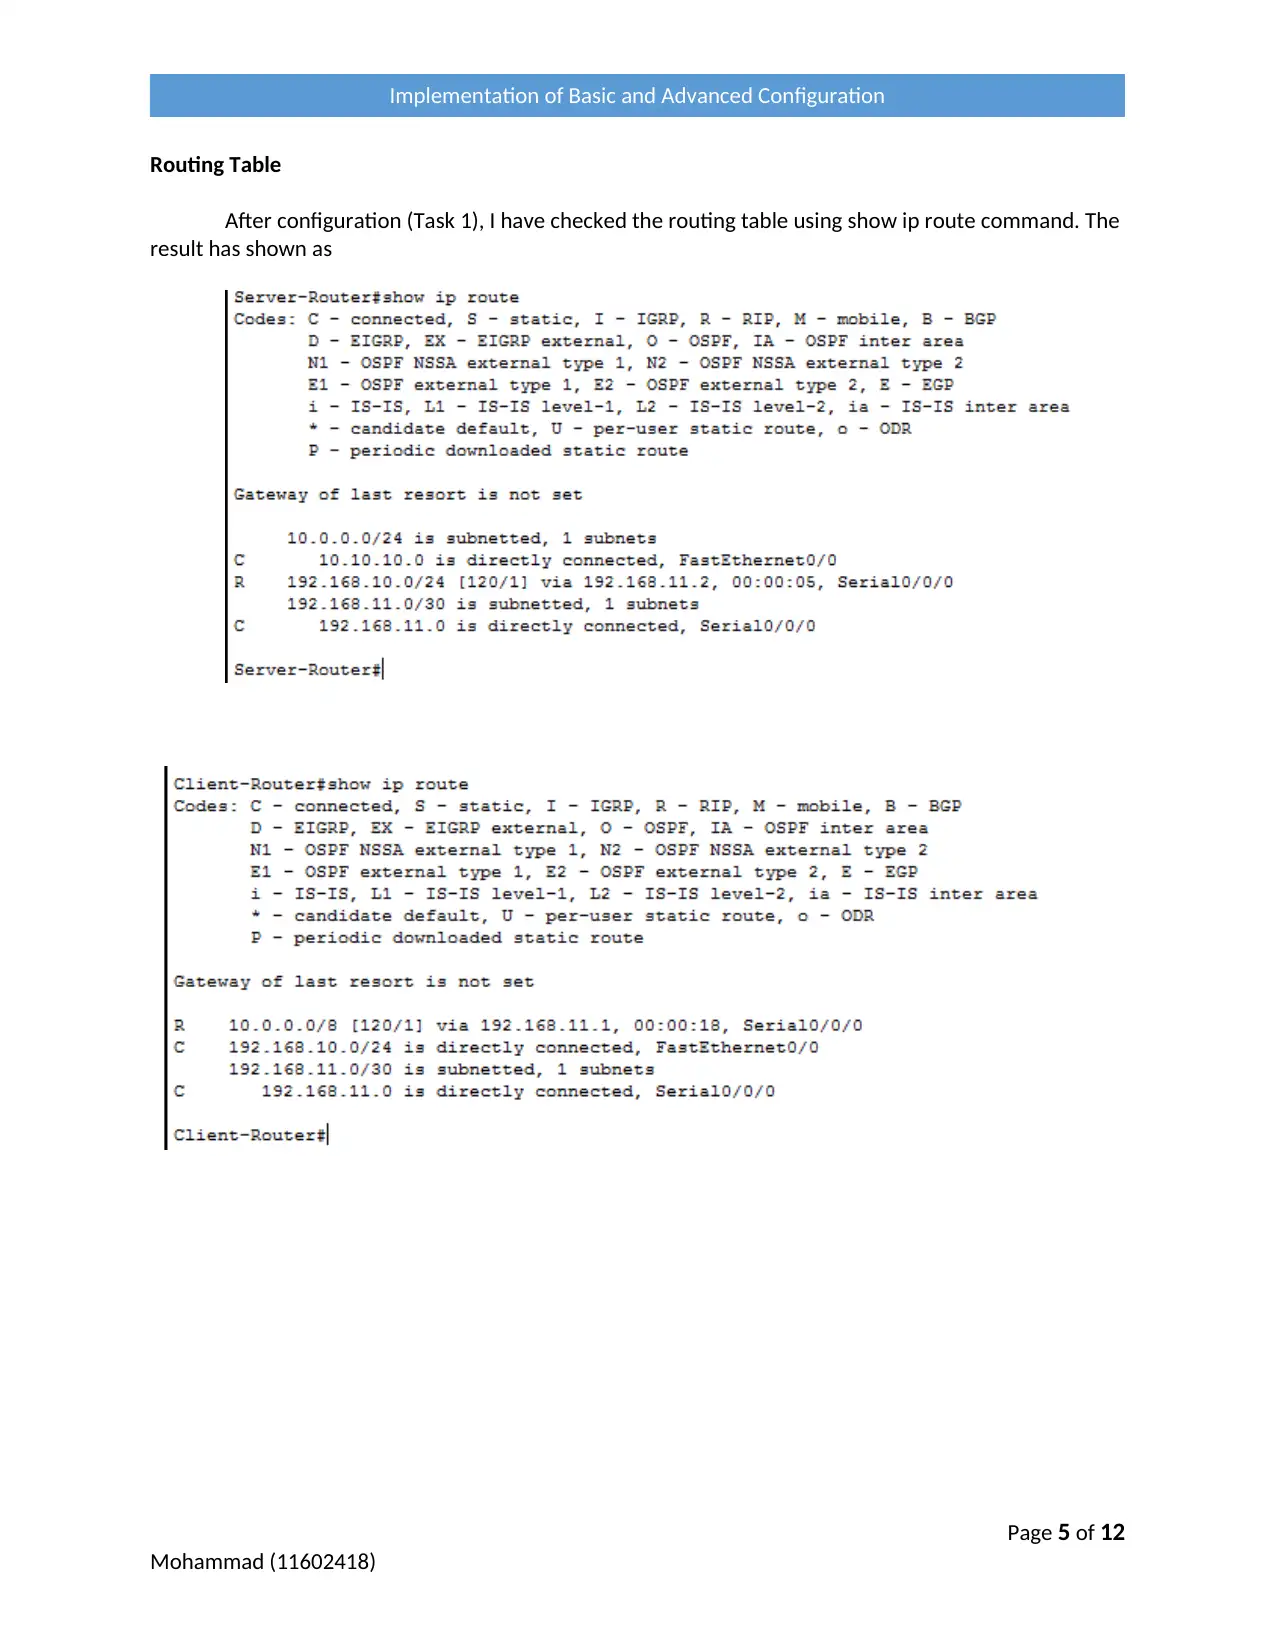
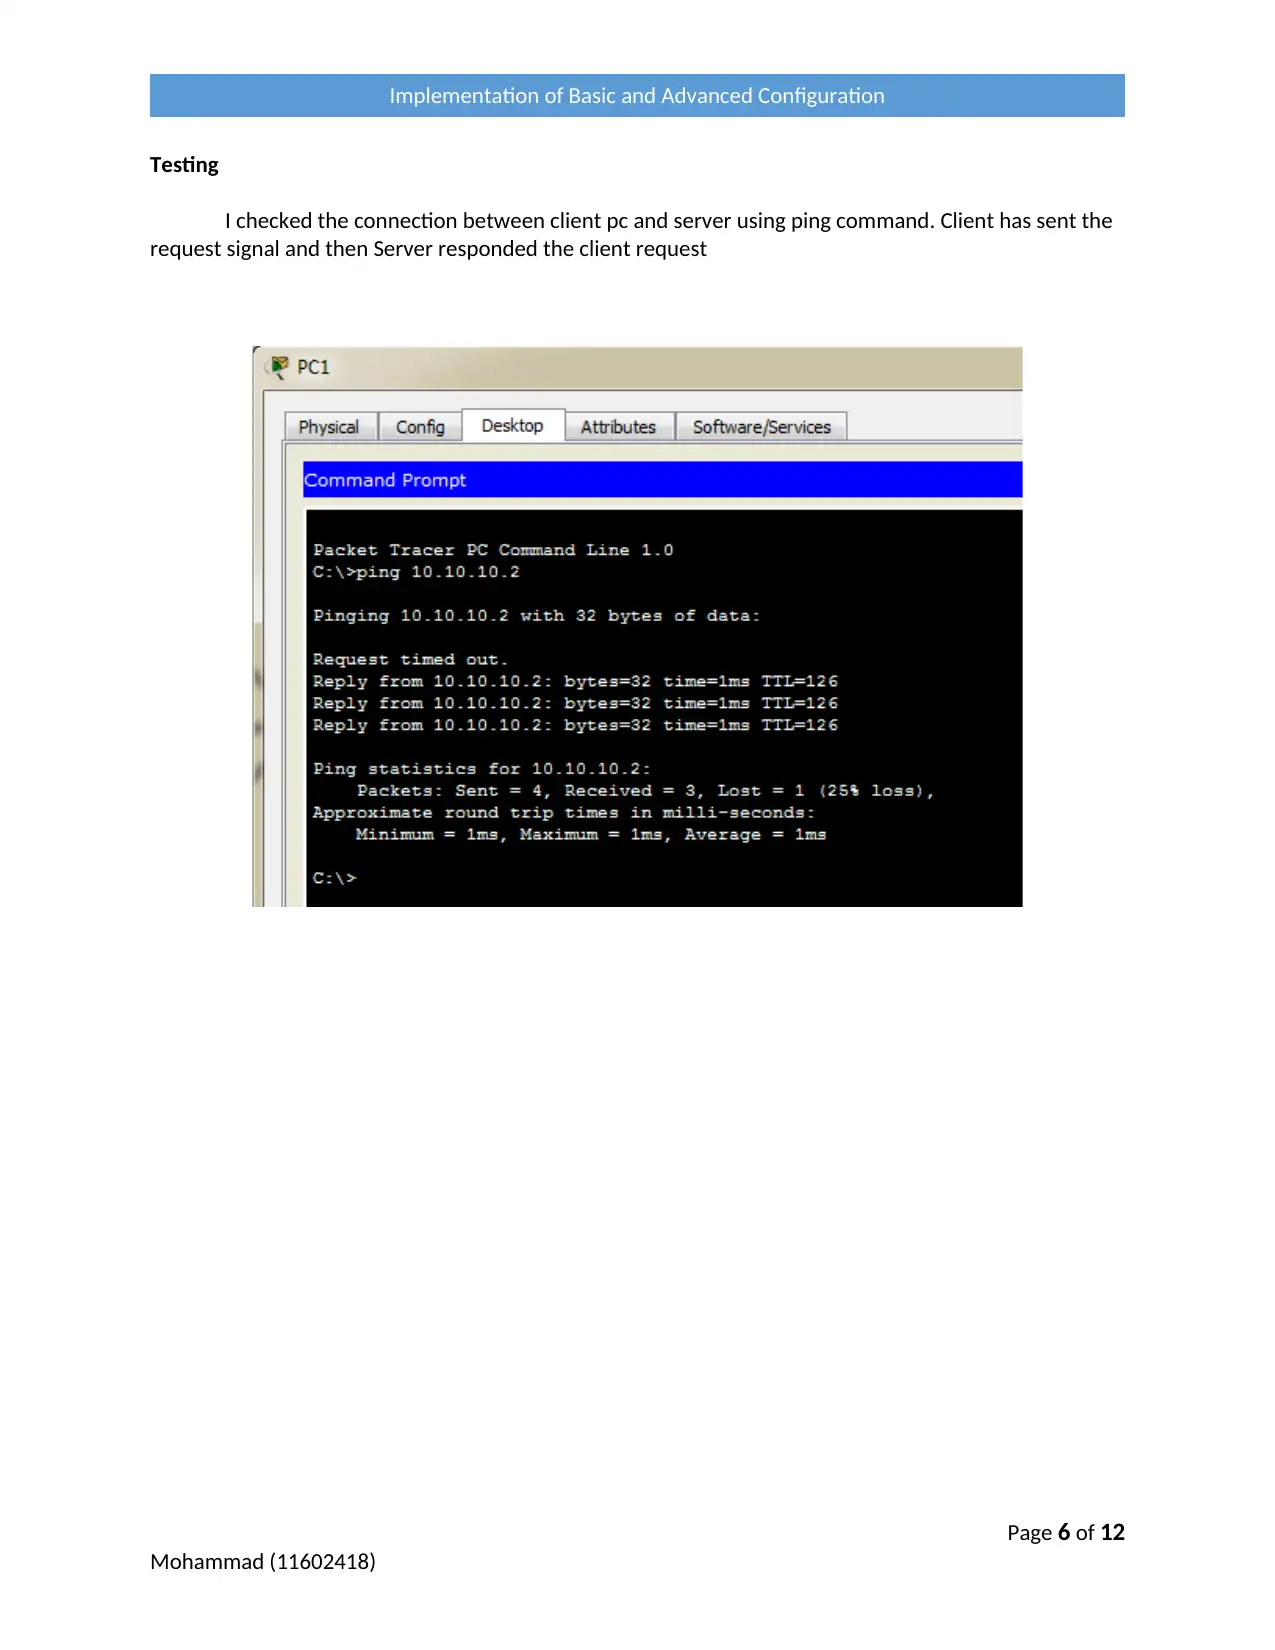
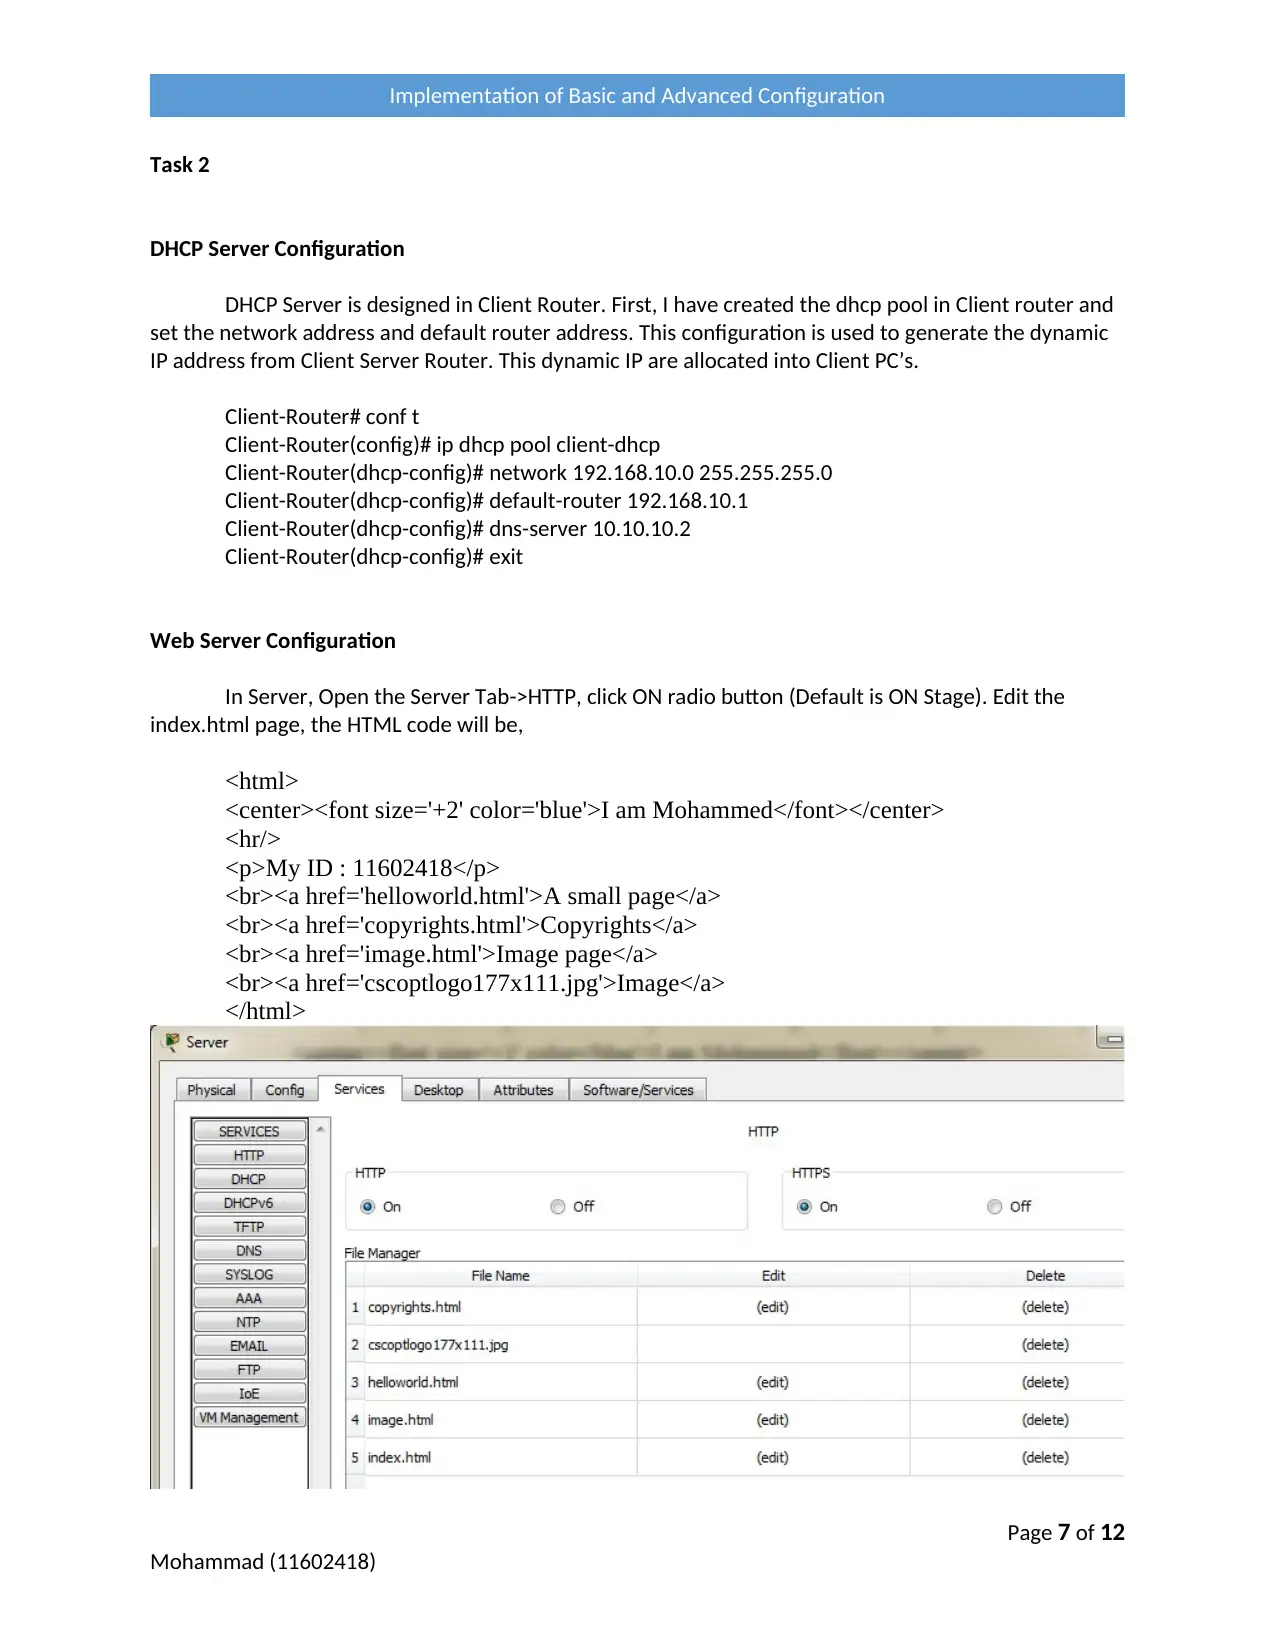
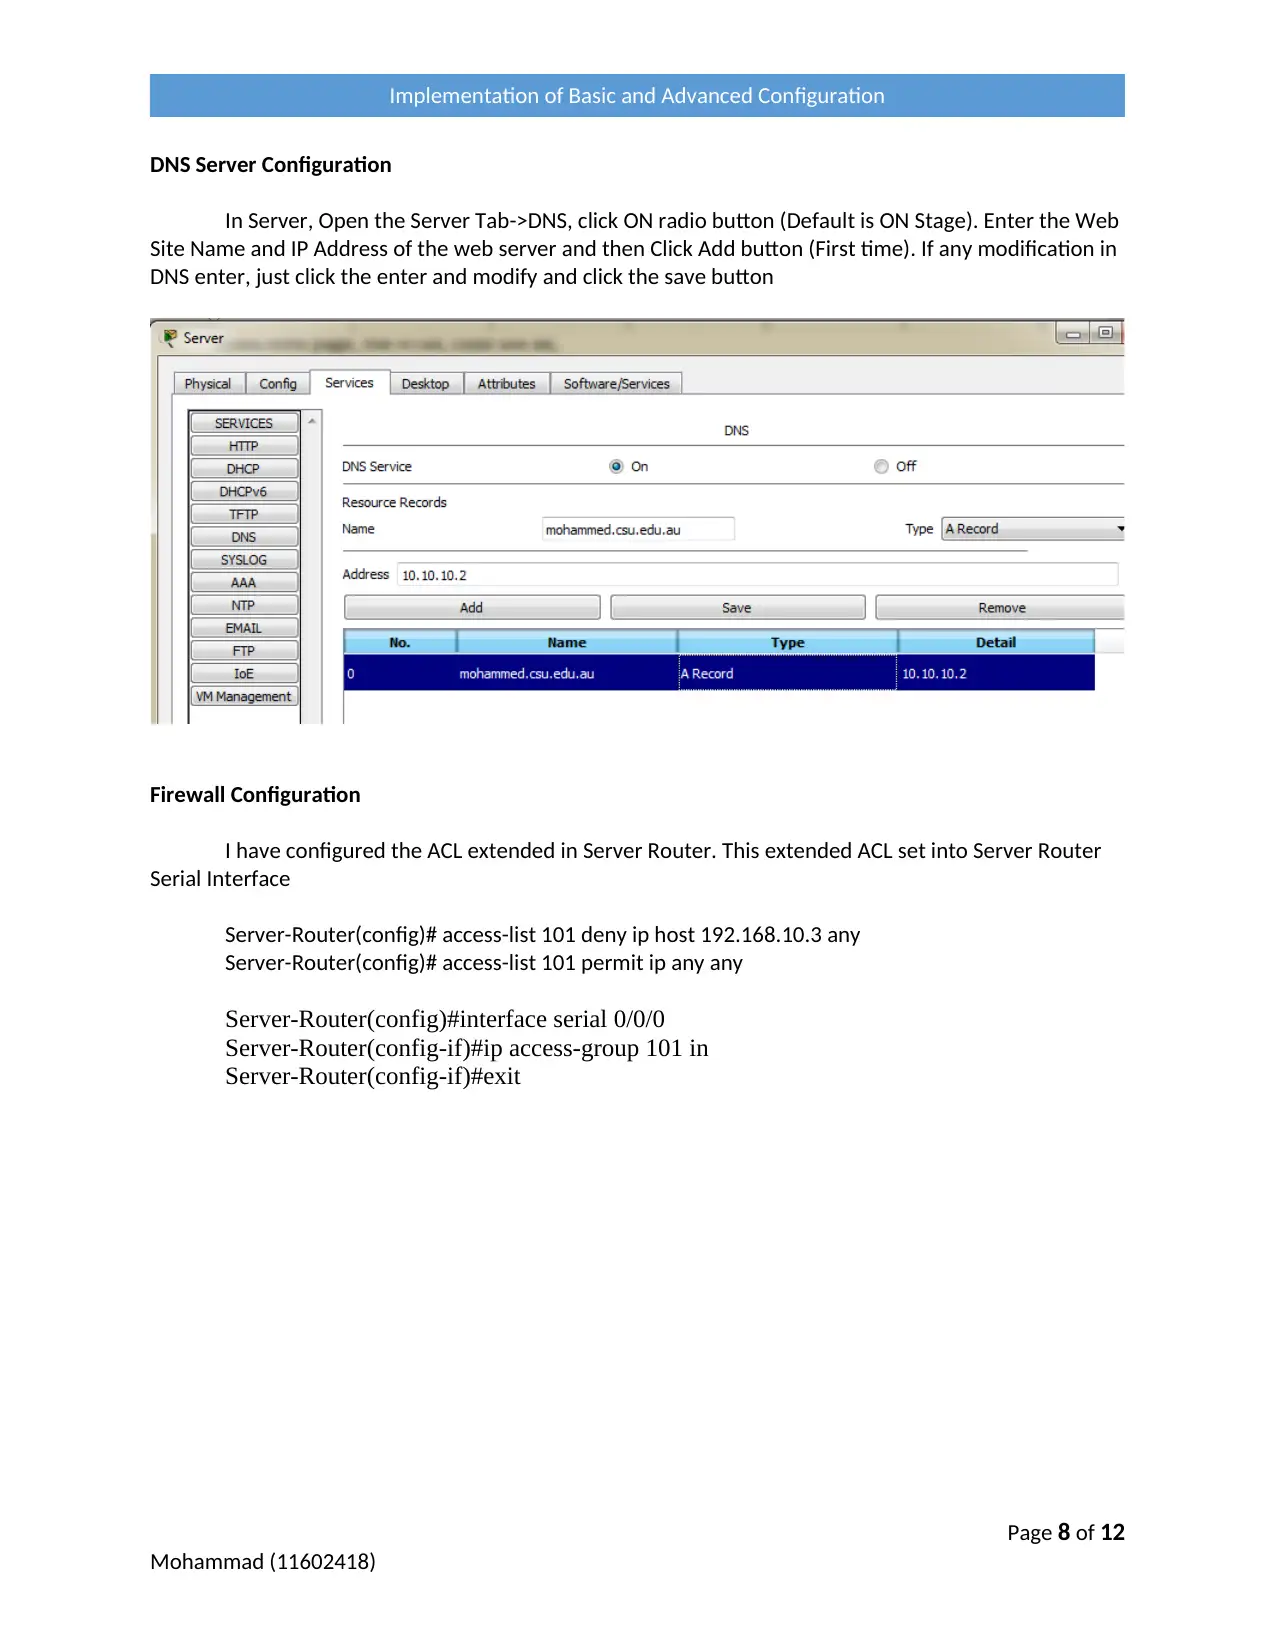
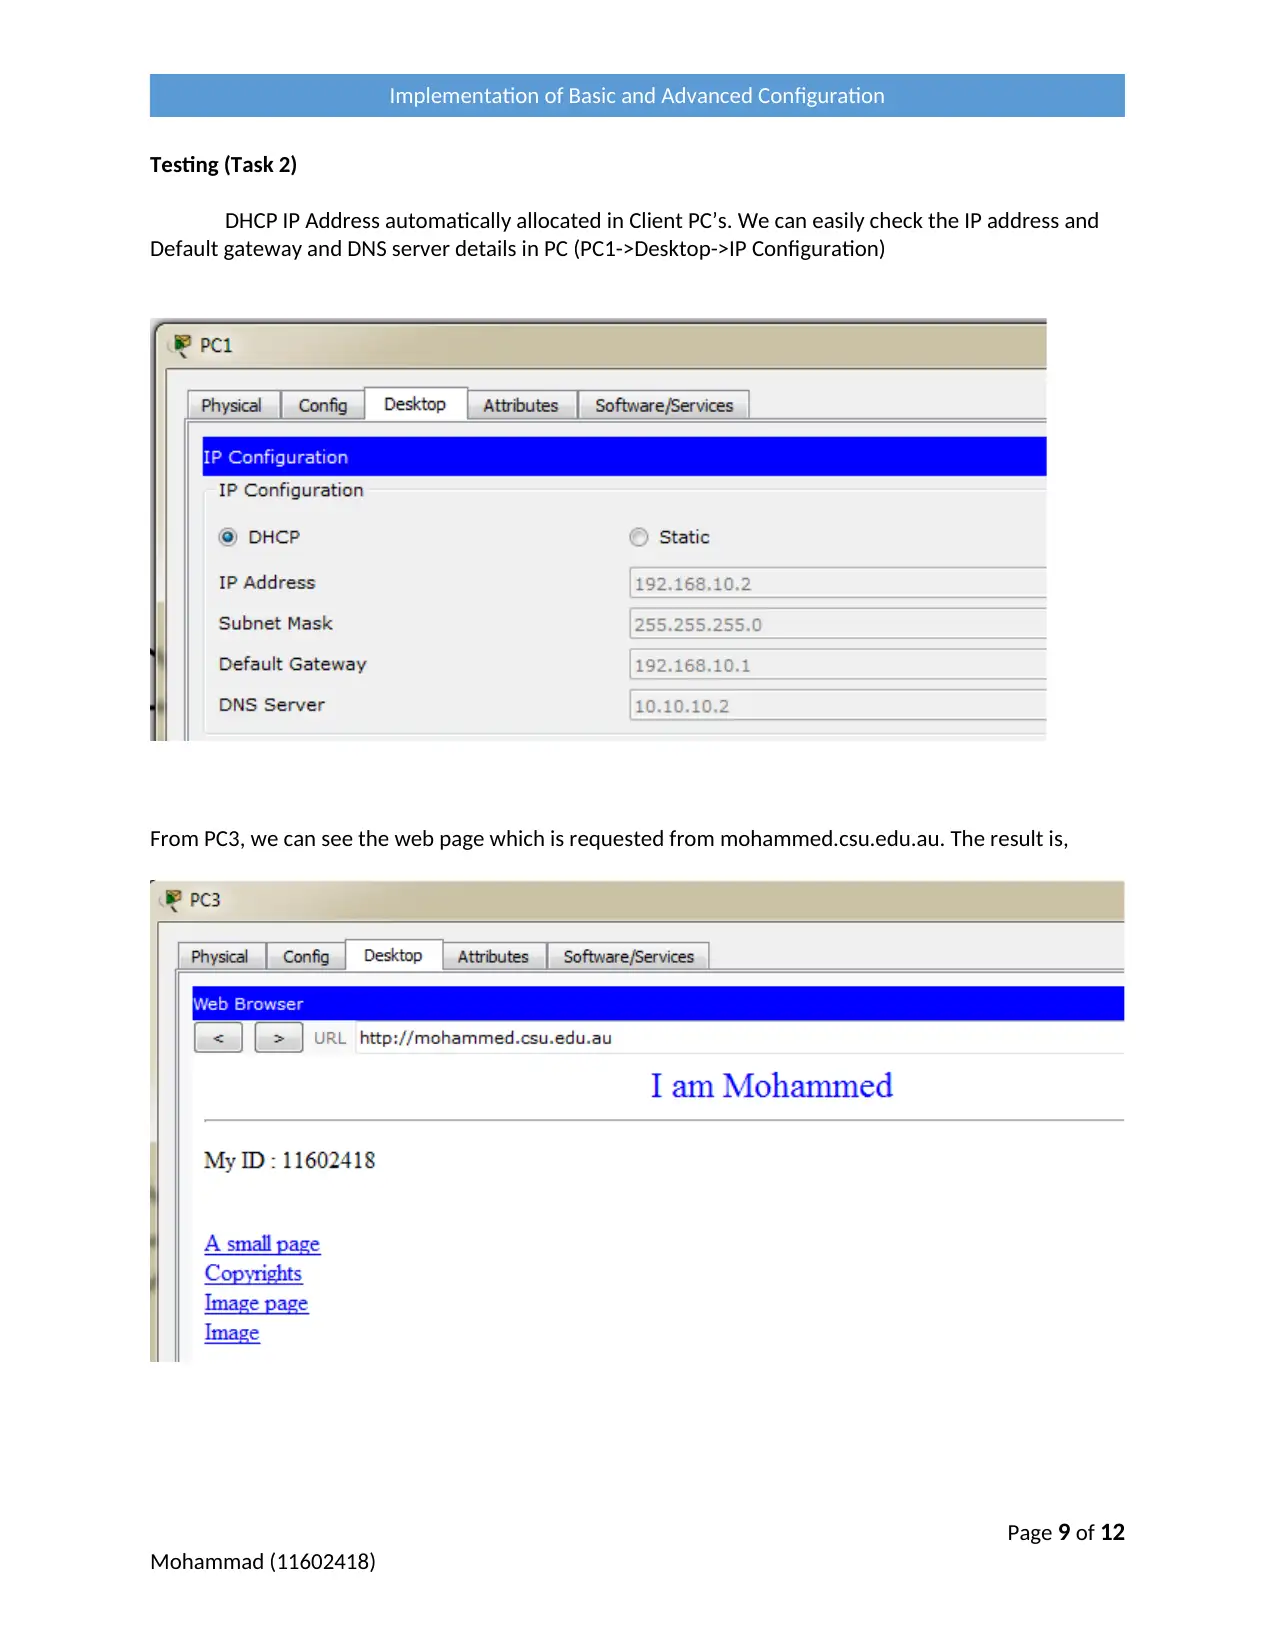
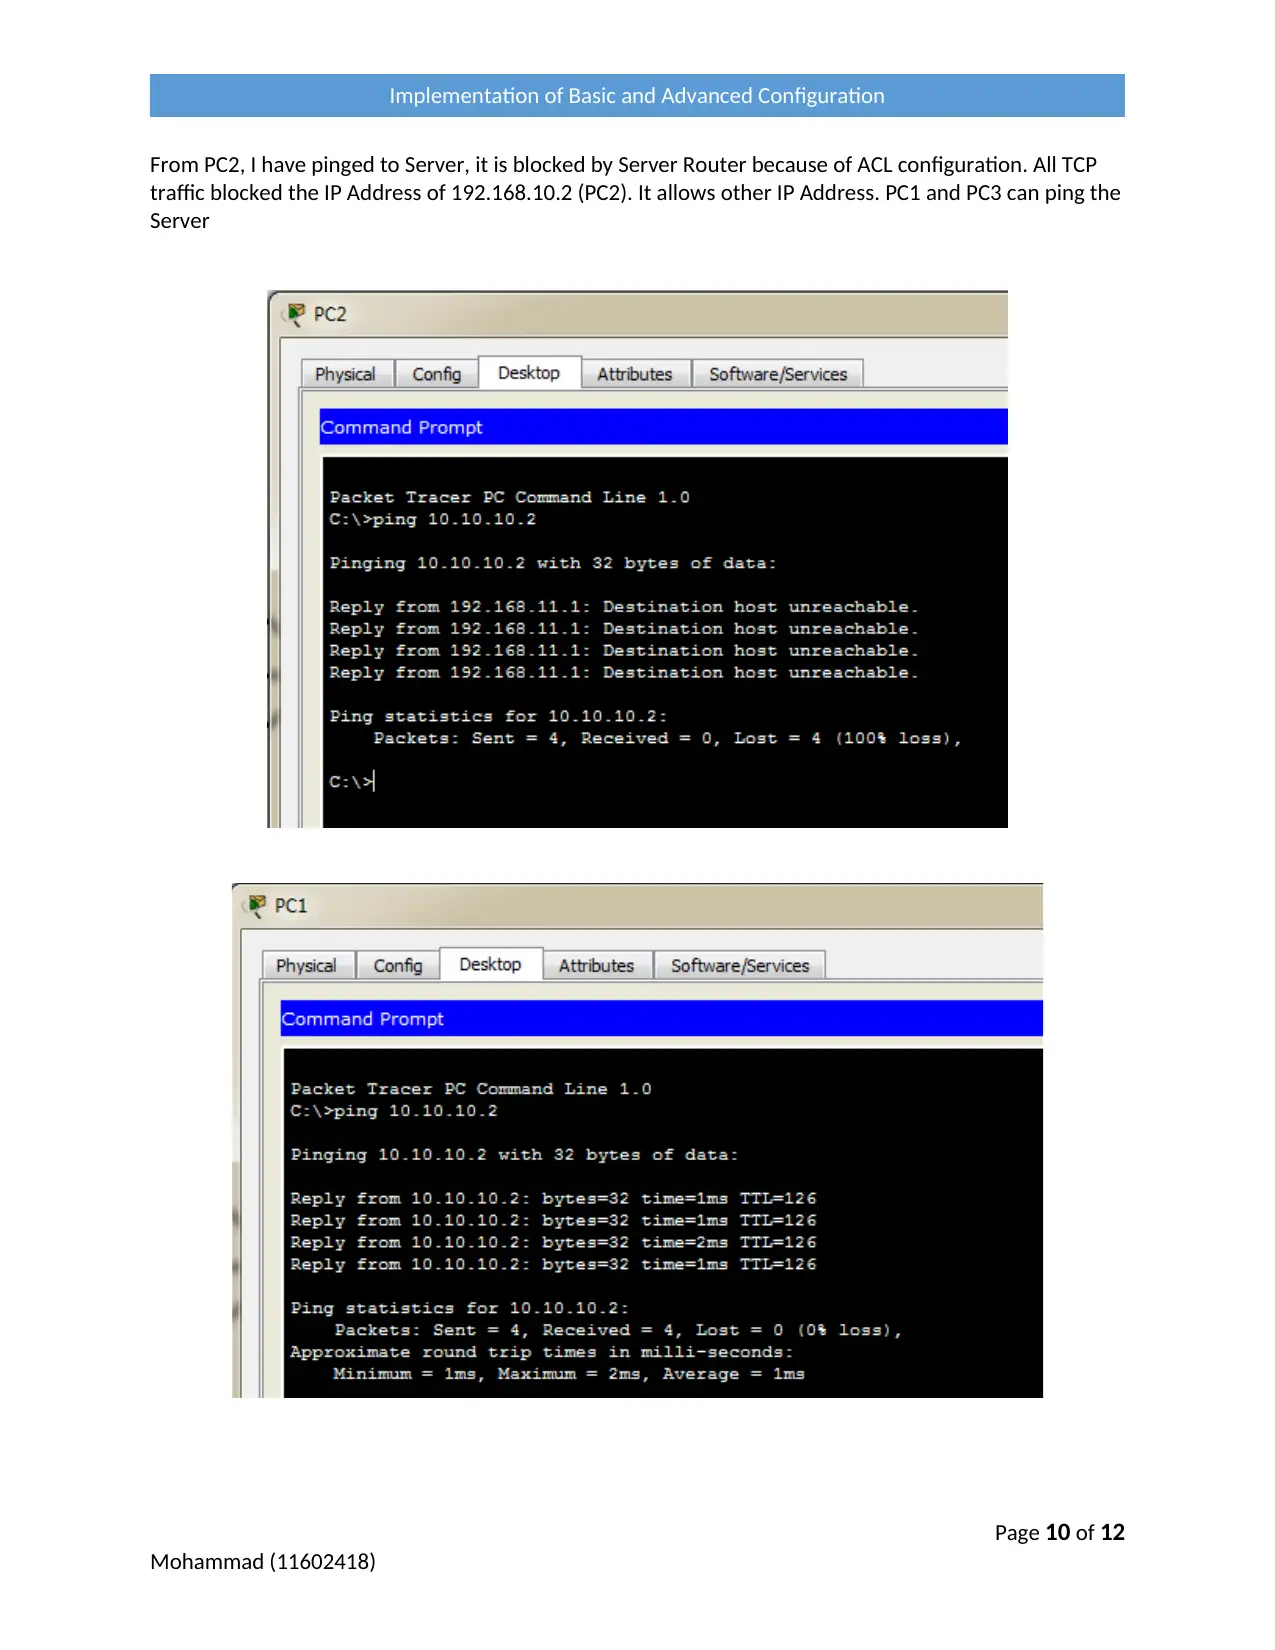
This project provides a detailed implementation of basic and advanced network configurations using Packet Tracer. The project is divided into two main tasks. The first task focuses on establishing a basic network design and implementing fundamental configurations, including hostname setup, console password settings, and RIP protocol implementation for remote network communication. The second task delves into advanced configurations, such as setting up a web server, modifying web page content, and configuring DHCP and DNS servers. Additionally, the project covers the implementation of firewall settings using ACL configurations to enhance network security by blocking unauthorized access. The project includes network design, device configurations, and testing to verify the functionality of the implemented features. The project demonstrates practical skills in network design, dynamic routing, DHCP and DNS server implementation, and advanced firewall configurations.
Document Page
9/17/2017
Implementation of Basic and Advanced Configuration
Using Packet Tracer
11602418
Mohammed
tabler-icon-diamond-filled.svg

Secure Best Marks with AI Grader

Need help grading? Try our AI Grader for instant feedback on your assignments.
Document Page
Executive Summary
This project has two tasks. First one is based on basic network design and configurations. Second
one is based on advanced configuration like DHCP, DNS, HTTP and ACL.
Generally, Client – Server model network organizes network traffic by a client application. Client
can communicate the server such as file transfer, email and web services. One server manages one or
more client systems. This type model can extend more server with more client. It forms a huge network
like Web. This type model network is used to share the hardware devices, applications and etc.
From the first part, I have implemented the basic configuration like hostname, console password
setting and etc. Another one, RIP protocol is implemented between client and server network. It is used
to communicate the remote network.
From the second part, we have implemented the Web Server in server. Server acts as web
server and dns server. I have modified the web page content in web server. If a client request the web
page from web server, web server replied the web content to the requested client. In Client network,
Client Router acts as DHCP server. If any one of the PC requested the IP address from server, Client
DHCP Server pooled the new IP to Client Machine. Lastly, I have implemented the Firewall setting in
Server Router. This is very important for security purpose. It is very helpful to avoid unauthorized access
from remote. I have blocked the communication between PC2 and Server using ACL configurations
From this project, I have learnt the basic configuration of router, Dynamic Routing protocol
implementation, DHCP and DNS Server implementation and advanced firewall configurations
Page 1 of 12
Mohammad (11602418)
Implementation of Basic and Advanced Configuration
Document Page
Task 1
Network Design
Network Network
Address Subnet Mask Start IP
Address Last IP Address Broadcast
Address
Server 10.10.10.0 255.255.255.0 10.10.10.1 10.10.10.254 10.10.10.255
Client 192.168.10.0 255.255.255.0 192.168.10.1 192.168.10.254 192.168.10.255
Server –
Client
192.168.11.0 255.255.255.252 192.168.11.1 192.168.11.2 192.168.11.3
Device Name Interface Name IP Address Subnet Mask Default Gateway
Server-Router Fast Ethernet 0/0 10.10.10.1 255.255.255.0 -
Server-Router Serial 0/0/0 192.168.11.1 255.255.255.252 -
Client-Router Fast Ethernet 0/0 192.168.10.1 255.255.255.0 -
Client-Router Serial 0/0/0 192.168.11.2 255.255.255.252 -
PC1 Ethernet 0 192.168.10.2 255.255.255.0 192.168.10.1
PC2 Ethernet 0 192.168.10.3 255.255.255.0 192.168.10.1
PC3 Ethernet 0 192.168.10.4 255.255.255.0 192.168.10.1
Server Ethernet 0 10.10.10.2 255.255.255.0 10.10.10.1
Page 2 of 12
Mohammad (11602418)
Implementation of Basic and Advanced Configuration
Document Page
Basic Configuration
To enable privileged mode, use enable command
Router > enable
Router #
To set the hostname, using the following commands
Router # conf t
Router (conf) # hostname Client-Router
To set the Privileged login password,
Client-Router>en
Client-Router#conf t
Client-Router(config)# line console 0
Client-Router(config-line)# password cisco
Client-Router(config-line)# login
Client-Router(config-line)# exit
Client-Router(config)#
To set the IP Address (Client Router)
Client-Router(config)# interface fastEthernet 0/0
Client-Router(config-if)# ip address 192.168.10.1 255.255.255.0
Client-Router(config-if)# no shut
Client-Router(config-if)# exit
Client-Router(config)# interface serial 0/0/0
Client-Router(config-if)# ip address 192.168.11.2 255.255.255.252
Client-Router(config-if)# clock rate 128000
Client-Router(config-if)# no shut
Client-Router(config-if)# exit
Client-Router(config)#
To set the IP Address (Server Router)
Router>en
Router#conf t
Router(config)# hostname Server-Router
Server-Router(config)# interface fastethernet 0/0
Server-Router(config-if)# ip address 10.10.10.1 255.255.255.0
Server-Router(config-if)# no shut
Server-Router(config-if)#exit
Server-Router(config)# interface serial 0/0/0
Server-Router(config-if)# ip address 192.168.11.1 255.255.255.252
Server-Router(config-if)# no shut
Server-Router(config-if)# exit
Server-Router#
Page 3 of 12
Mohammad (11602418)
Implementation of Basic and Advanced Configuration
tabler-icon-diamond-filled.svg

Secure Best Marks with AI Grader

Need help grading? Try our AI Grader for instant feedback on your assignments.
Document Page
Dynamic Routing Configuration
Client-Router#conf t
Enter configuration commands, one per line. End with CNTL/Z.
Client-Router(config)# router rip
Client-Router(config-router)# version 2
Client-Router(config-router)# network 192.168.10.0
Client-Router(config-router)# network 192.168.11.0
Client-Router(config-router)# exit
Client-Router(config)#
Client-Router#
Server-Router#conf t
Enter configuration commands, one per line. End with CNTL/Z.
Server-Router(config)#router rip
Server-Router(config-router)#version 2
Server-Router(config-router)#network 192.168.11.0
Server-Router(config-router)#network 10.10.10.0
Server-Router(config-router)#exit
Server-Router(config)#exit
Server-Router#
PC Static IP Address Allocation
In PC1, I have set the Static IP address, subnet mask and default gateway in Desktop Tab -> IP
Configuration.
Page 4 of 12
Mohammad (11602418)
Implementation of Basic and Advanced Configuration
Document Page
Routing Table
After configuration (Task 1), I have checked the routing table using show ip route command. The
result has shown as
Page 5 of 12
Mohammad (11602418)
Implementation of Basic and Advanced Configuration
Document Page
Testing
I checked the connection between client pc and server using ping command. Client has sent the
request signal and then Server responded the client request
Page 6 of 12
Mohammad (11602418)
Implementation of Basic and Advanced Configuration
tabler-icon-diamond-filled.svg

Paraphrase This Document

Need a fresh take? Get an instant paraphrase of this document with our AI Paraphraser
Document Page
Task 2
DHCP Server Configuration
DHCP Server is designed in Client Router. First, I have created the dhcp pool in Client router and
set the network address and default router address. This configuration is used to generate the dynamic
IP address from Client Server Router. This dynamic IP are allocated into Client PC’s.
Client-Router# conf t
Client-Router(config)# ip dhcp pool client-dhcp
Client-Router(dhcp-config)# network 192.168.10.0 255.255.255.0
Client-Router(dhcp-config)# default-router 192.168.10.1
Client-Router(dhcp-config)# dns-server 10.10.10.2
Client-Router(dhcp-config)# exit
Web Server Configuration
In Server, Open the Server Tab->HTTP, click ON radio button (Default is ON Stage). Edit the
index.html page, the HTML code will be,
<html>
<center><font size='+2' color='blue'>I am Mohammed</font></center>
<hr/>
<p>My ID : 11602418</p>
<br><a href='helloworld.html'>A small page</a>
<br><a href='copyrights.html'>Copyrights</a>
<br><a href='image.html'>Image page</a>
<br><a href='cscoptlogo177x111.jpg'>Image</a>
</html>
Page 7 of 12
Mohammad (11602418)
Implementation of Basic and Advanced Configuration
Document Page
DNS Server Configuration
In Server, Open the Server Tab->DNS, click ON radio button (Default is ON Stage). Enter the Web
Site Name and IP Address of the web server and then Click Add button (First time). If any modification in
DNS enter, just click the enter and modify and click the save button
Firewall Configuration
I have configured the ACL extended in Server Router. This extended ACL set into Server Router
Serial Interface
Server-Router(config)# access-list 101 deny ip host 192.168.10.3 any
Server-Router(config)# access-list 101 permit ip any any
Server-Router(config)#interface serial 0/0/0
Server-Router(config-if)#ip access-group 101 in
Server-Router(config-if)#exit
Page 8 of 12
Mohammad (11602418)
Implementation of Basic and Advanced Configuration
Document Page
Testing (Task 2)
DHCP IP Address automatically allocated in Client PC’s. We can easily check the IP address and
Default gateway and DNS server details in PC (PC1->Desktop->IP Configuration)
From PC3, we can see the web page which is requested from mohammed.csu.edu.au. The result is,
Page 9 of 12
Mohammad (11602418)
Implementation of Basic and Advanced Configuration
tabler-icon-diamond-filled.svg

Secure Best Marks with AI Grader

Need help grading? Try our AI Grader for instant feedback on your assignments.
Document Page
From PC2, I have pinged to Server, it is blocked by Server Router because of ACL configuration. All TCP
traffic blocked the IP Address of 192.168.10.2 (PC2). It allows other IP Address. PC1 and PC3 can ping the
Server
Page 10 of 12
Mohammad (11602418)
Implementation of Basic and Advanced Configuration
Document Page
References
Cisco 910 Industrial Router Software Configuration Guide, Release 1.0 - Configuring
DHCP Server [Cisco 900 Series Industrial Routers] - Cisco. (n.d.). Retrieved from
https://www.cisco.com/c/en/us/td/docs/routers/ir910/software/release/1_0/
configuration/guide/ir910scg/swdhcp.html
Client Server Network Technology Explained. (n.d.). Retrieved from
https://www.lifewire.com/introduction-to-client-server-networks-817420
How To Configure DNS Server On A Cisco Router. (n.d.). Retrieved from
http://www.firewall.cx/cisco-technical-knowledgebase/cisco-routers/257-cisco-router-
dns-server.html
Page 11 of 12
Mohammad (11602418)
Implementation of Basic and Advanced Configuration
chevron_up_icon
1 out of 12
circle_padding
hide_on_mobile
zoom_out_icon
logo.png

Your All-in-One AI-Powered Toolkit for Academic Success.

Available 24*7 on WhatsApp / Email

[object Object]