Advanced Network Design Report for Ecommerce Business Network
VerifiedAdded on 2020/05/28
|21
|3526
|196
Report
AI Summary
This report details the development of a local area network for an ecommerce business, including the configuration of hardware devices. It analyzes the organization's infrastructure to propose a new network solution and accommodate future growth, considering the floor plan and departmental data points. The report outlines hardware requirements, network diagrams, and justifications, with Cisco Packet Tracer used for network simulation and configuration. Key aspects include VLAN implementation to reduce network congestion, security measures like authorization and firewalls, and the use of various protocols such as DHCP, Frame Relay, TDM, and VoIP configurations. The network design supports VPN connections and redundant paths for increased fault tolerance. Configuration commands for routers and switches are provided, along with demonstrations of physical device communication and DHCP requests. The report concludes with an assessment of the network's structure, security, and scalability, aligning with the current and future needs of the ecommerce business.

Running head: ADVANCED NETWORK DESIGN
Advanced Network Design
Name of the Student
Name of the University
Author’s Note
Advanced Network Design
Name of the Student
Name of the University
Author’s Note
Paraphrase This Document
Need a fresh take? Get an instant paraphrase of this document with our AI Paraphraser
1
ADVANCED NETWORK DESIGN
Table of Contents
1. Introduction................................................................................................................................2
2. Project Scope..............................................................................................................................2
3. Project Hardware requirements.................................................................................................3
4. Network Diagram........................................................................................................................6
5. Network Design Justification......................................................................................................6
6. Configurations commands of the network devices.....................................................................7
7. Network Device Configurations................................................................................................17
7.1 Demonstration on physical device......................................................................................17
9. Conclusion................................................................................................................................18
10. Bibliography............................................................................................................................19
2
ADVANCED NETWORK DESIGN
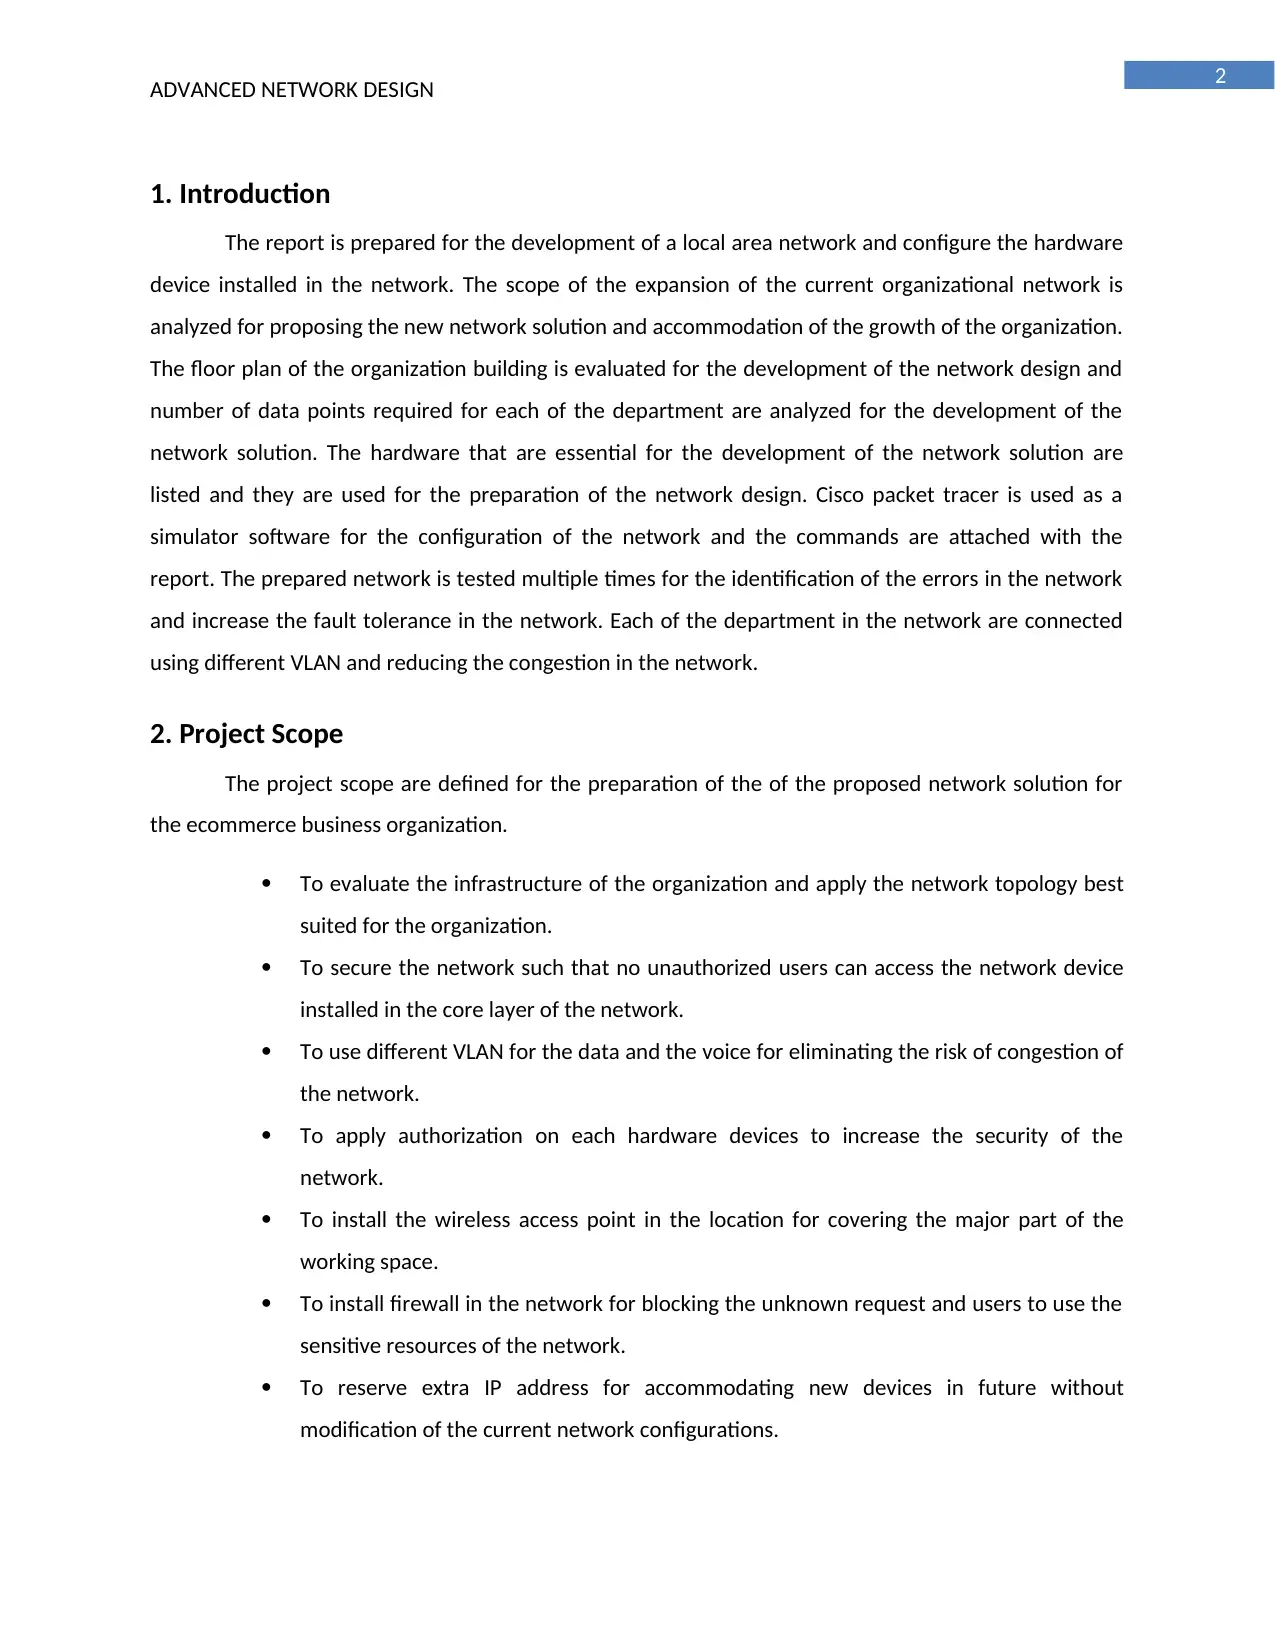
1. Introduction
The report is prepared for the development of a local area network and configure the hardware
device installed in the network. The scope of the expansion of the current organizational network is
analyzed for proposing the new network solution and accommodation of the growth of the organization.
The floor plan of the organization building is evaluated for the development of the network design and
number of data points required for each of the department are analyzed for the development of the
network solution. The hardware that are essential for the development of the network solution are
listed and they are used for the preparation of the network design. Cisco packet tracer is used as a
simulator software for the configuration of the network and the commands are attached with the
report. The prepared network is tested multiple times for the identification of the errors in the network
and increase the fault tolerance in the network. Each of the department in the network are connected
using different VLAN and reducing the congestion in the network.
2. Project Scope
The project scope are defined for the preparation of the of the proposed network solution for
the ecommerce business organization.
To evaluate the infrastructure of the organization and apply the network topology best
suited for the organization.
To secure the network such that no unauthorized users can access the network device
installed in the core layer of the network.
To use different VLAN for the data and the voice for eliminating the risk of congestion of
the network.
To apply authorization on each hardware devices to increase the security of the
network.
To install the wireless access point in the location for covering the major part of the
working space.
To install firewall in the network for blocking the unknown request and users to use the
sensitive resources of the network.
To reserve extra IP address for accommodating new devices in future without
modification of the current network configurations.
ADVANCED NETWORK DESIGN
1. Introduction
The report is prepared for the development of a local area network and configure the hardware
device installed in the network. The scope of the expansion of the current organizational network is
analyzed for proposing the new network solution and accommodation of the growth of the organization.
The floor plan of the organization building is evaluated for the development of the network design and
number of data points required for each of the department are analyzed for the development of the
network solution. The hardware that are essential for the development of the network solution are
listed and they are used for the preparation of the network design. Cisco packet tracer is used as a
simulator software for the configuration of the network and the commands are attached with the
report. The prepared network is tested multiple times for the identification of the errors in the network
and increase the fault tolerance in the network. Each of the department in the network are connected
using different VLAN and reducing the congestion in the network.
2. Project Scope
The project scope are defined for the preparation of the of the proposed network solution for
the ecommerce business organization.
To evaluate the infrastructure of the organization and apply the network topology best
suited for the organization.
To secure the network such that no unauthorized users can access the network device
installed in the core layer of the network.
To use different VLAN for the data and the voice for eliminating the risk of congestion of
the network.
To apply authorization on each hardware devices to increase the security of the
network.
To install the wireless access point in the location for covering the major part of the
working space.
To install firewall in the network for blocking the unknown request and users to use the
sensitive resources of the network.
To reserve extra IP address for accommodating new devices in future without
modification of the current network configurations.
⊘ This is a preview!⊘
Do you want full access?
Subscribe today to unlock all pages.
Trusted by 1+ million students worldwide
3
ADVANCED NETWORK DESIGN
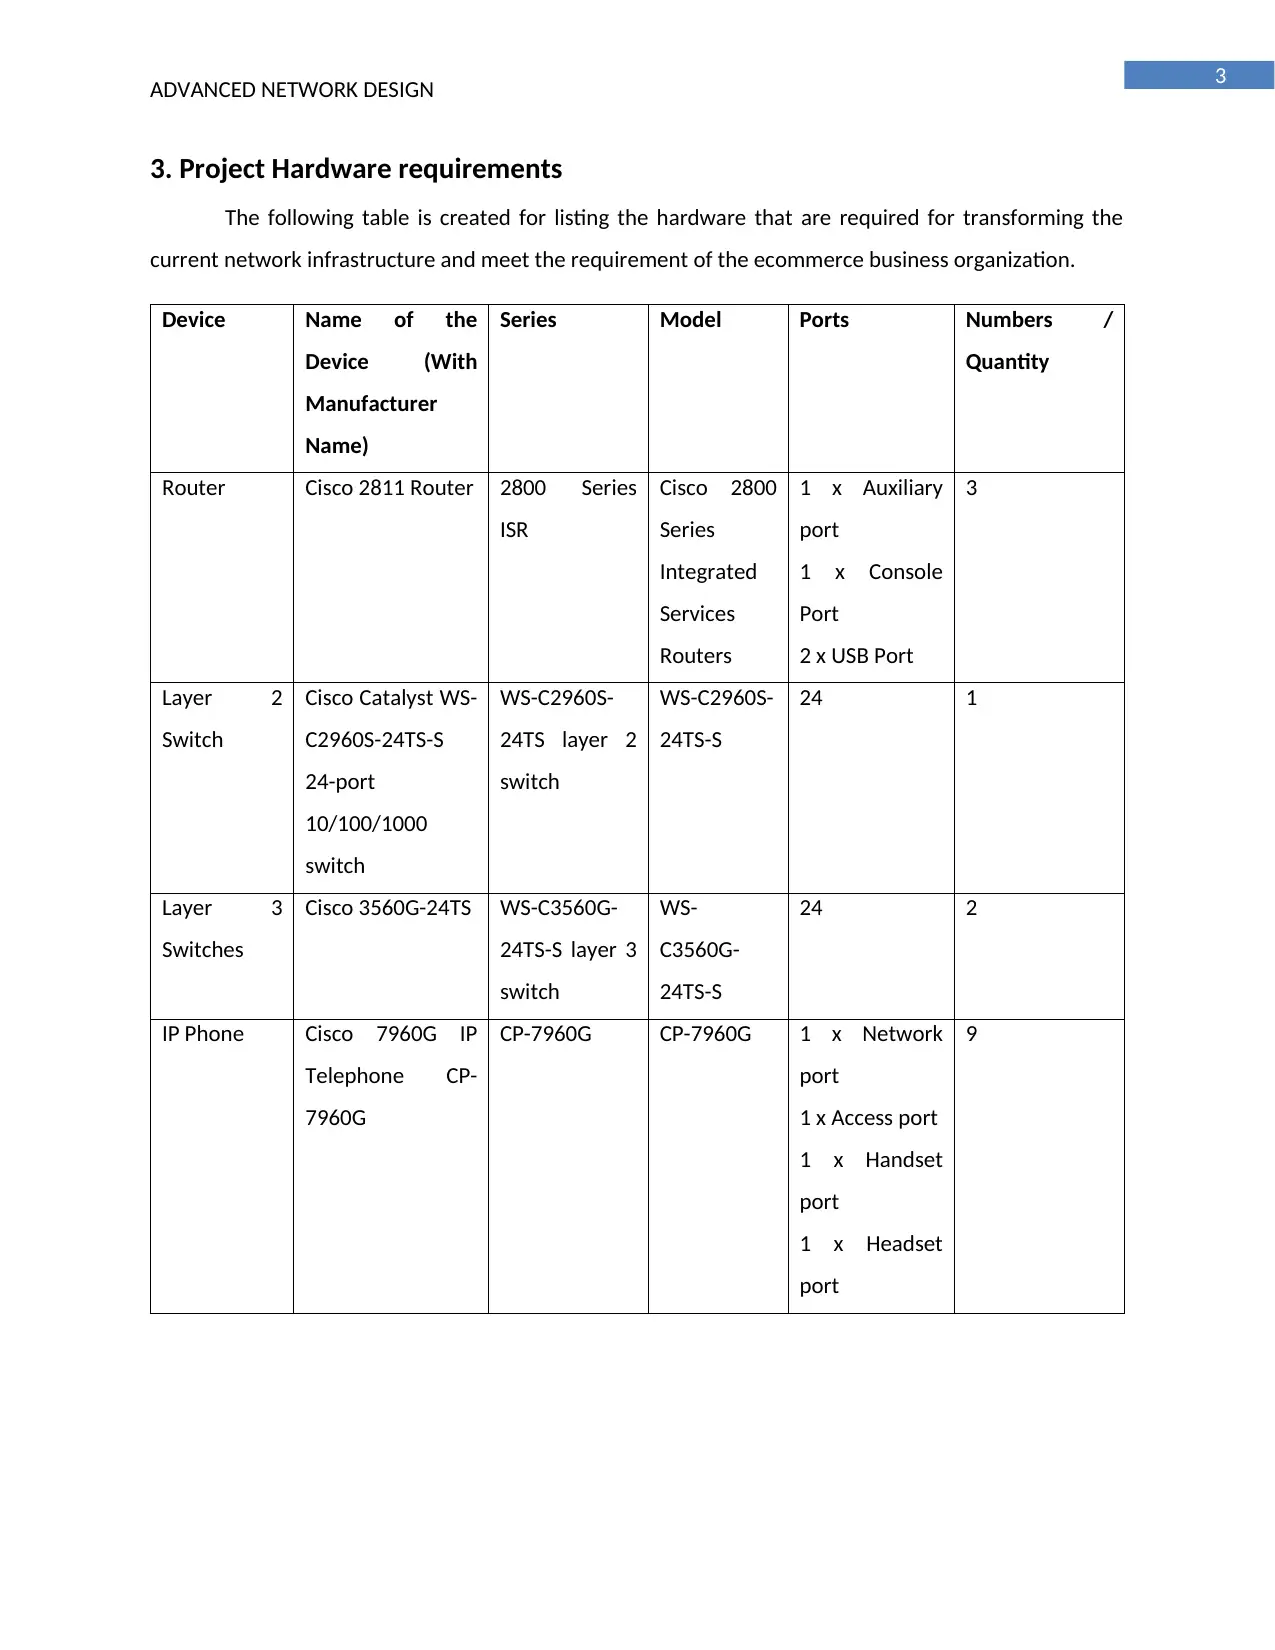
3. Project Hardware requirements
The following table is created for listing the hardware that are required for transforming the
current network infrastructure and meet the requirement of the ecommerce business organization.
Device Name of the
Device (With
Manufacturer
Name)
Series Model Ports Numbers /
Quantity
Router Cisco 2811 Router 2800 Series
ISR
Cisco 2800
Series
Integrated
Services
Routers
1 x Auxiliary
port
1 x Console
Port
2 x USB Port
3
Layer 2
Switch
Cisco Catalyst WS-
C2960S-24TS-S
24-port
10/100/1000
switch
WS-C2960S-
24TS layer 2
switch
WS-C2960S-
24TS-S
24 1
Layer 3
Switches
Cisco 3560G-24TS WS-C3560G-
24TS-S layer 3
switch
WS-
C3560G-
24TS-S
24 2
IP Phone Cisco 7960G IP
Telephone CP-
7960G
CP-7960G CP-7960G 1 x Network
port
1 x Access port
1 x Handset
port
1 x Headset
port
9
ADVANCED NETWORK DESIGN
3. Project Hardware requirements
The following table is created for listing the hardware that are required for transforming the
current network infrastructure and meet the requirement of the ecommerce business organization.
Device Name of the
Device (With
Manufacturer
Name)
Series Model Ports Numbers /
Quantity
Router Cisco 2811 Router 2800 Series
ISR
Cisco 2800
Series
Integrated
Services
Routers
1 x Auxiliary
port
1 x Console
Port
2 x USB Port
3
Layer 2
Switch
Cisco Catalyst WS-
C2960S-24TS-S
24-port
10/100/1000
switch
WS-C2960S-
24TS layer 2
switch
WS-C2960S-
24TS-S
24 1
Layer 3
Switches
Cisco 3560G-24TS WS-C3560G-
24TS-S layer 3
switch
WS-
C3560G-
24TS-S
24 2
IP Phone Cisco 7960G IP
Telephone CP-
7960G
CP-7960G CP-7960G 1 x Network
port
1 x Access port
1 x Handset
port
1 x Headset
port
9
Paraphrase This Document
Need a fresh take? Get an instant paraphrase of this document with our AI Paraphraser
4
ADVANCED NETWORK DESIGN
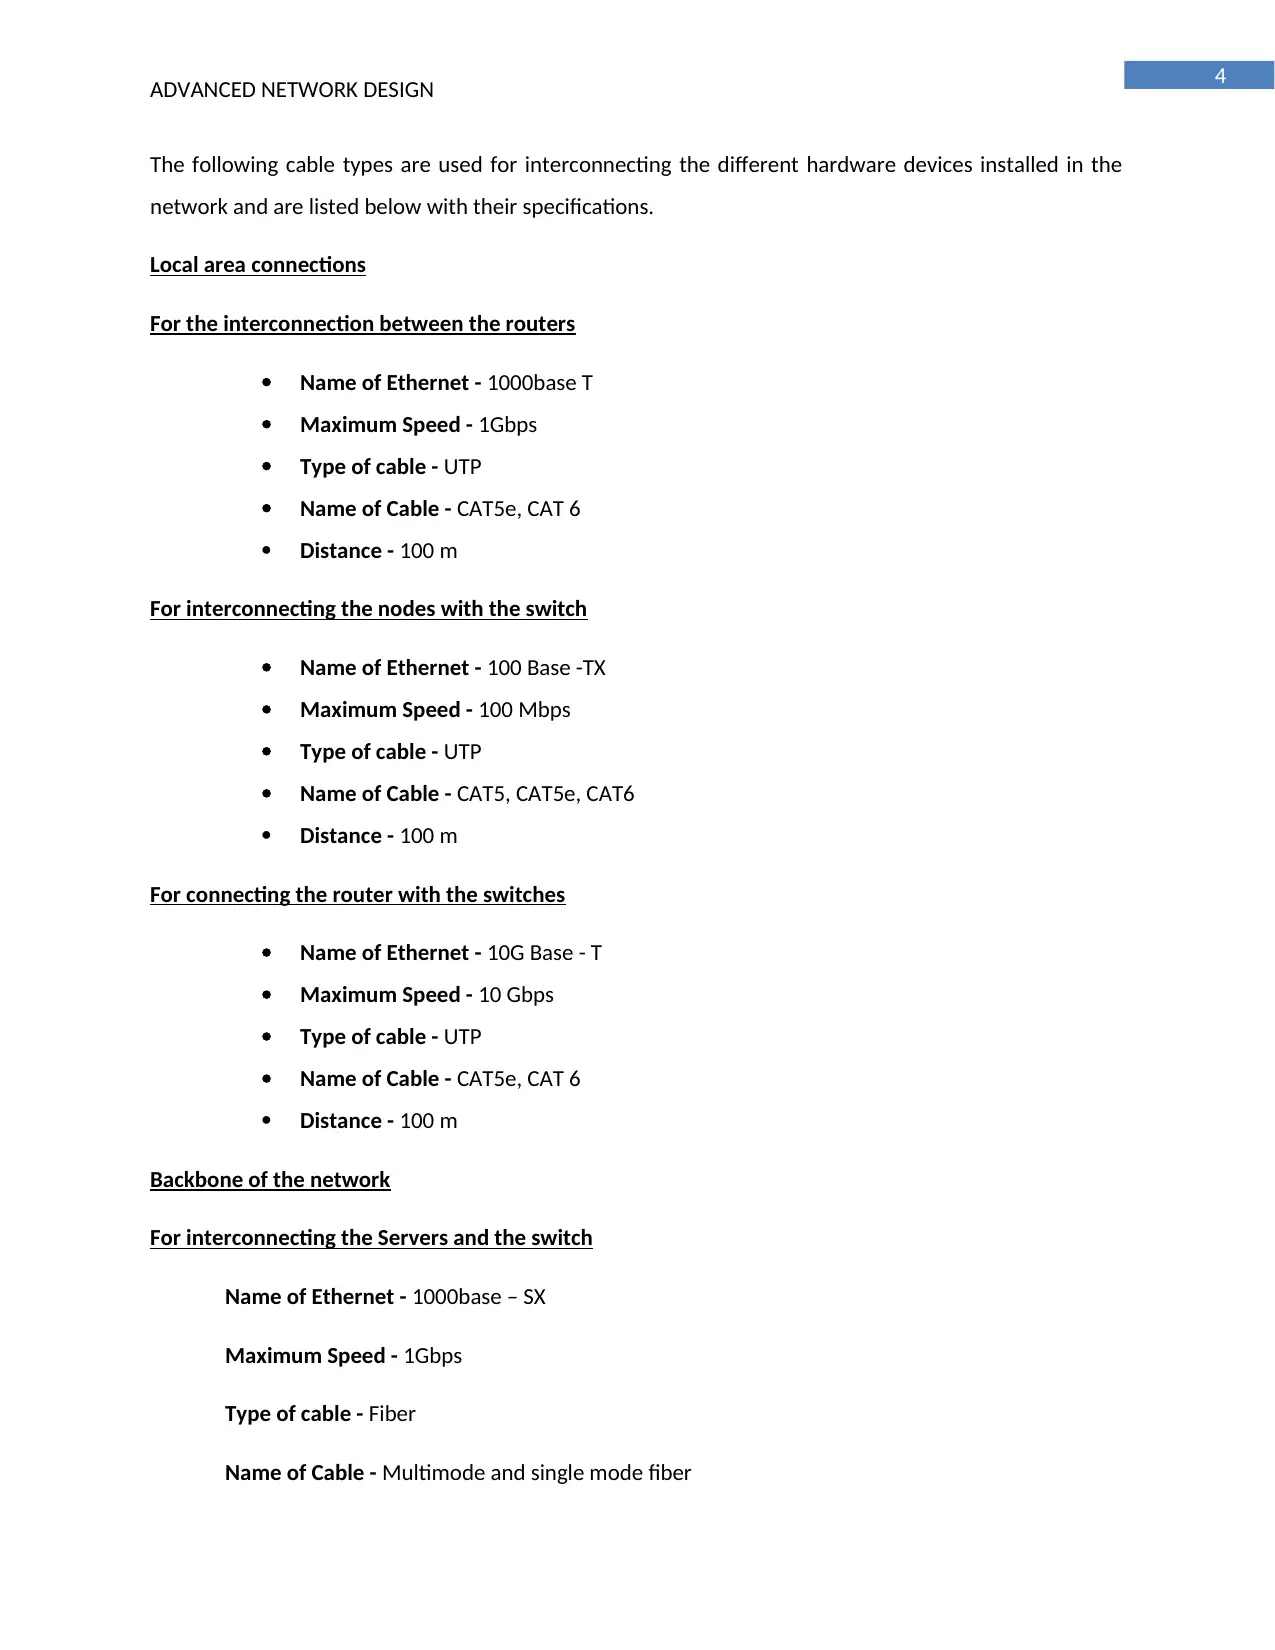
The following cable types are used for interconnecting the different hardware devices installed in the
network and are listed below with their specifications.
Local area connections
For the interconnection between the routers
Name of Ethernet - 1000base T
Maximum Speed - 1Gbps
Type of cable - UTP
Name of Cable - CAT5e, CAT 6
Distance - 100 m
For interconnecting the nodes with the switch
Name of Ethernet - 100 Base -TX
Maximum Speed - 100 Mbps
Type of cable - UTP
Name of Cable - CAT5, CAT5e, CAT6
Distance - 100 m
For connecting the router with the switches
Name of Ethernet - 10G Base - T
Maximum Speed - 10 Gbps
Type of cable - UTP
Name of Cable - CAT5e, CAT 6
Distance - 100 m
Backbone of the network
For interconnecting the Servers and the switch
Name of Ethernet - 1000base – SX
Maximum Speed - 1Gbps
Type of cable - Fiber
Name of Cable - Multimode and single mode fiber
ADVANCED NETWORK DESIGN
The following cable types are used for interconnecting the different hardware devices installed in the
network and are listed below with their specifications.
Local area connections
For the interconnection between the routers
Name of Ethernet - 1000base T
Maximum Speed - 1Gbps
Type of cable - UTP
Name of Cable - CAT5e, CAT 6
Distance - 100 m
For interconnecting the nodes with the switch
Name of Ethernet - 100 Base -TX
Maximum Speed - 100 Mbps
Type of cable - UTP
Name of Cable - CAT5, CAT5e, CAT6
Distance - 100 m
For connecting the router with the switches
Name of Ethernet - 10G Base - T
Maximum Speed - 10 Gbps
Type of cable - UTP
Name of Cable - CAT5e, CAT 6
Distance - 100 m
Backbone of the network
For interconnecting the Servers and the switch
Name of Ethernet - 1000base – SX
Maximum Speed - 1Gbps
Type of cable - Fiber
Name of Cable - Multimode and single mode fiber
5
ADVANCED NETWORK DESIGN
Distance - 550 m
For interconnecting the ISP and the router
Name of Ethernet - 1000 Base - LX
Maximum Speed - 1Gbps
Type of cable - Fiber
Name of Cable - Multimode and single mode fiber
Distance - 550 m for multimode fiber and 2000 m for single mode fiber
For interconnecting the different departments
Name of Ethernet - 1000 Base - ZX
Maximum Speed - 1Gbps
Type of cable - Fiber
Name of Cable - Multimode and single mode fiber
Distance - 70000 meter or 70 km
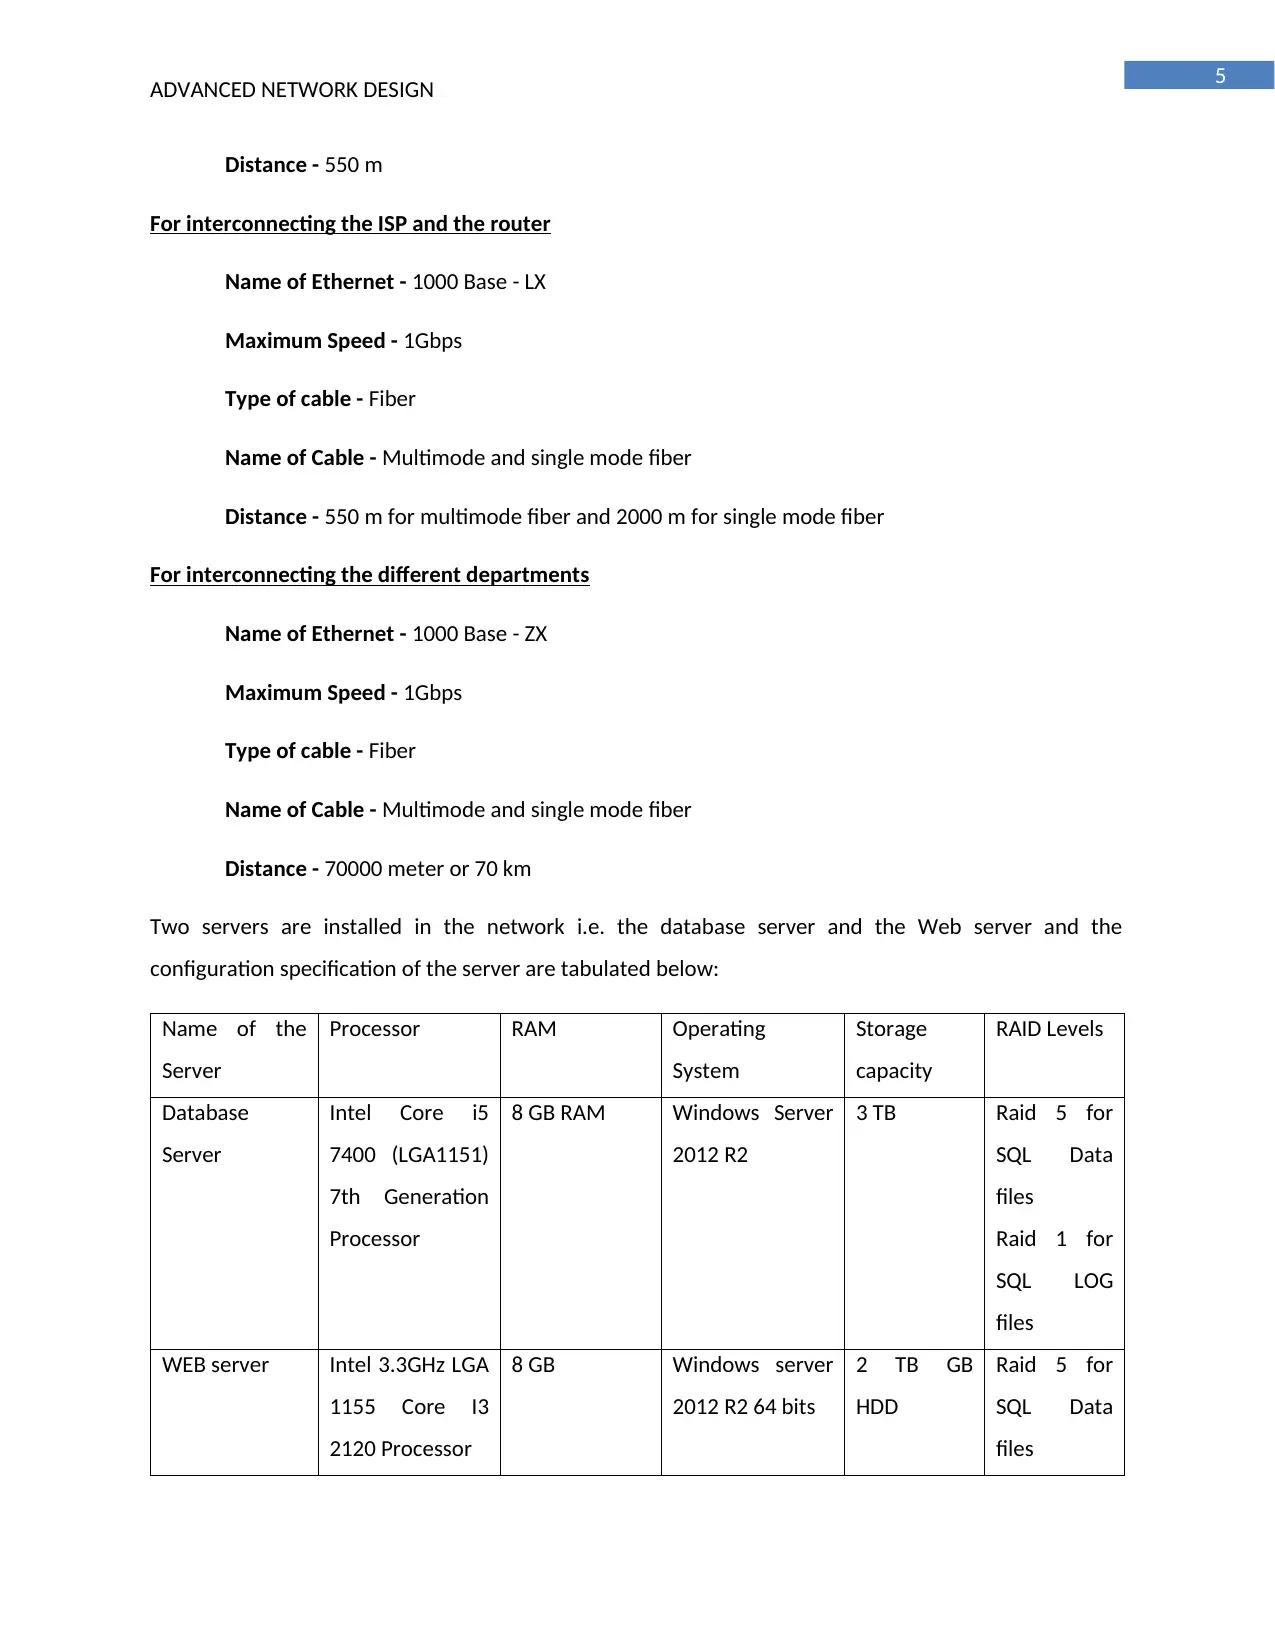
Two servers are installed in the network i.e. the database server and the Web server and the
configuration specification of the server are tabulated below:
Name of the
Server
Processor RAM Operating
System
Storage
capacity
RAID Levels
Database
Server
Intel Core i5
7400 (LGA1151)
7th Generation
Processor
8 GB RAM Windows Server
2012 R2
3 TB Raid 5 for
SQL Data
files
Raid 1 for
SQL LOG
files
WEB server Intel 3.3GHz LGA
1155 Core I3
2120 Processor
8 GB Windows server
2012 R2 64 bits
2 TB GB
HDD
Raid 5 for
SQL Data
files
ADVANCED NETWORK DESIGN
Distance - 550 m
For interconnecting the ISP and the router
Name of Ethernet - 1000 Base - LX
Maximum Speed - 1Gbps
Type of cable - Fiber
Name of Cable - Multimode and single mode fiber
Distance - 550 m for multimode fiber and 2000 m for single mode fiber
For interconnecting the different departments
Name of Ethernet - 1000 Base - ZX
Maximum Speed - 1Gbps
Type of cable - Fiber
Name of Cable - Multimode and single mode fiber
Distance - 70000 meter or 70 km
Two servers are installed in the network i.e. the database server and the Web server and the
configuration specification of the server are tabulated below:
Name of the
Server
Processor RAM Operating
System
Storage
capacity
RAID Levels
Database
Server
Intel Core i5
7400 (LGA1151)
7th Generation
Processor
8 GB RAM Windows Server
2012 R2
3 TB Raid 5 for
SQL Data
files
Raid 1 for
SQL LOG
files
WEB server Intel 3.3GHz LGA
1155 Core I3
2120 Processor
8 GB Windows server
2012 R2 64 bits
2 TB GB
HDD
Raid 5 for
SQL Data
files
⊘ This is a preview!⊘
Do you want full access?
Subscribe today to unlock all pages.
Trusted by 1+ million students worldwide
6
ADVANCED NETWORK DESIGN
Raid 1 for
SQL LOG
files
Local Nodes Intel Core i3-
7100H Processor
2 GB / 4 GB Windows 10
Enterprise /
Windows 7
professional
edition
500 GB /
1TB
NULL
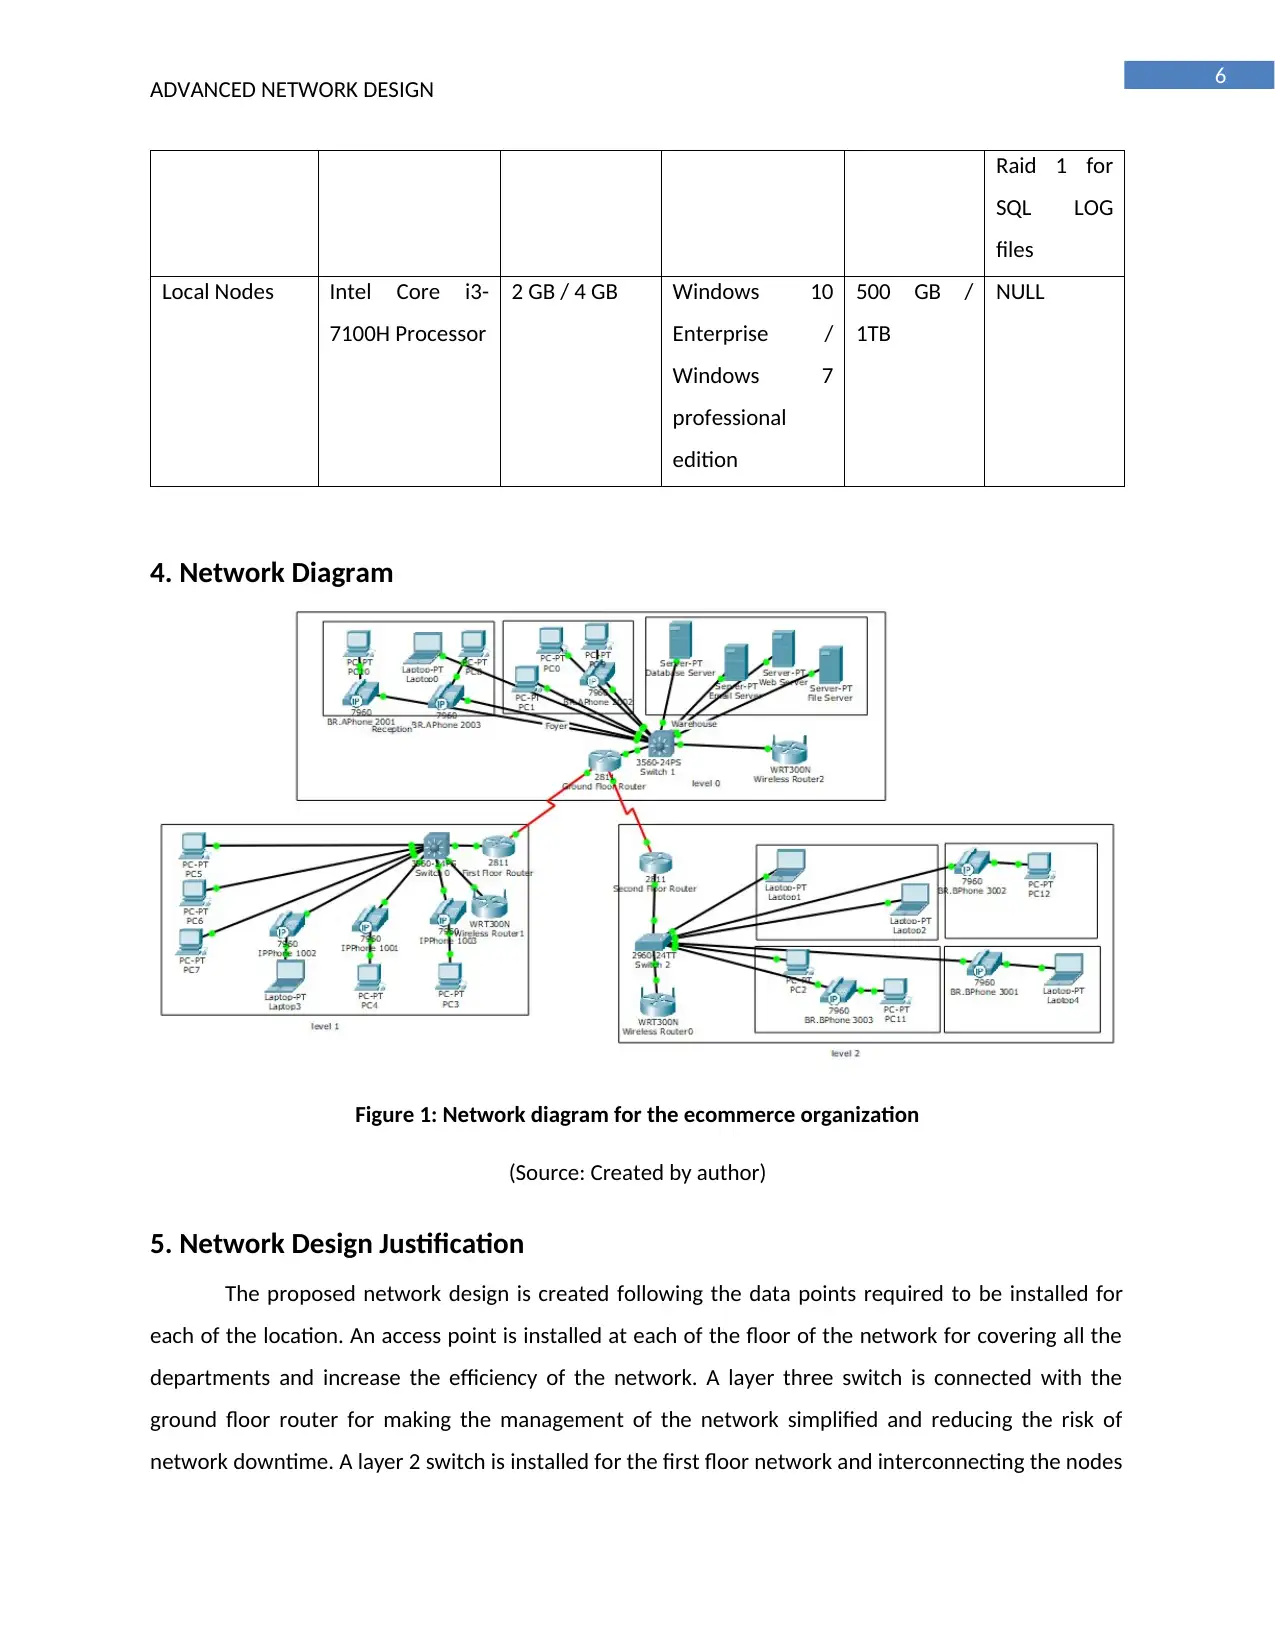
4. Network Diagram
Figure 1: Network diagram for the ecommerce organization
(Source: Created by author)
5. Network Design Justification
The proposed network design is created following the data points required to be installed for
each of the location. An access point is installed at each of the floor of the network for covering all the
departments and increase the efficiency of the network. A layer three switch is connected with the
ground floor router for making the management of the network simplified and reducing the risk of
network downtime. A layer 2 switch is installed for the first floor network and interconnecting the nodes
ADVANCED NETWORK DESIGN
Raid 1 for
SQL LOG
files
Local Nodes Intel Core i3-
7100H Processor
2 GB / 4 GB Windows 10
Enterprise /
Windows 7
professional
edition
500 GB /
1TB
NULL
4. Network Diagram
Figure 1: Network diagram for the ecommerce organization
(Source: Created by author)
5. Network Design Justification
The proposed network design is created following the data points required to be installed for
each of the location. An access point is installed at each of the floor of the network for covering all the
departments and increase the efficiency of the network. A layer three switch is connected with the
ground floor router for making the management of the network simplified and reducing the risk of
network downtime. A layer 2 switch is installed for the first floor network and interconnecting the nodes
Paraphrase This Document
Need a fresh take? Get an instant paraphrase of this document with our AI Paraphraser
7
ADVANCED NETWORK DESIGN
of the first floor. The second floor router is also connected with a layer three switch for easy
management of the network. The data packets and the voice packets are sent in the network using
different VLAN for reducing the risk of congestion and delay in communication. The routers installed in
the network are configured with DHCP protocol for allocation of the IP address to the nodes connected
in the network. Four server are installed in the network i.e. database server, file server, webserver and
email sever. For the server the windows server 2012 R2 is used and the active directory are configured
according to the business requirement if the organization. The access point installed in the network are
secured with WPA/ PSK 2 for securing the network from illegal access. The firewall installed in the
network are configured such that the normal users does not have access to the file and the database
server and the company information are kept secured.
Frame relay, TDM and HDLC protocol are used for the configuration of the network. The frame
relay uses the packet switching for the transmission of the data packets in the network and the high
level data link control is used for the establishment of point to multipoint connection between the
source and the destination nodes in the network. The time division multiplexing is used for the
avoidance of the deadlock situation in the network and increase its efficiency.
Asynchronous transfer mode and CSMA/CD is used as a LAN protocol for the development of
the network solution. The SDP and RTP (Session description and real time transfer protocol) is used for
the configuration of the VOIP devices in the network.
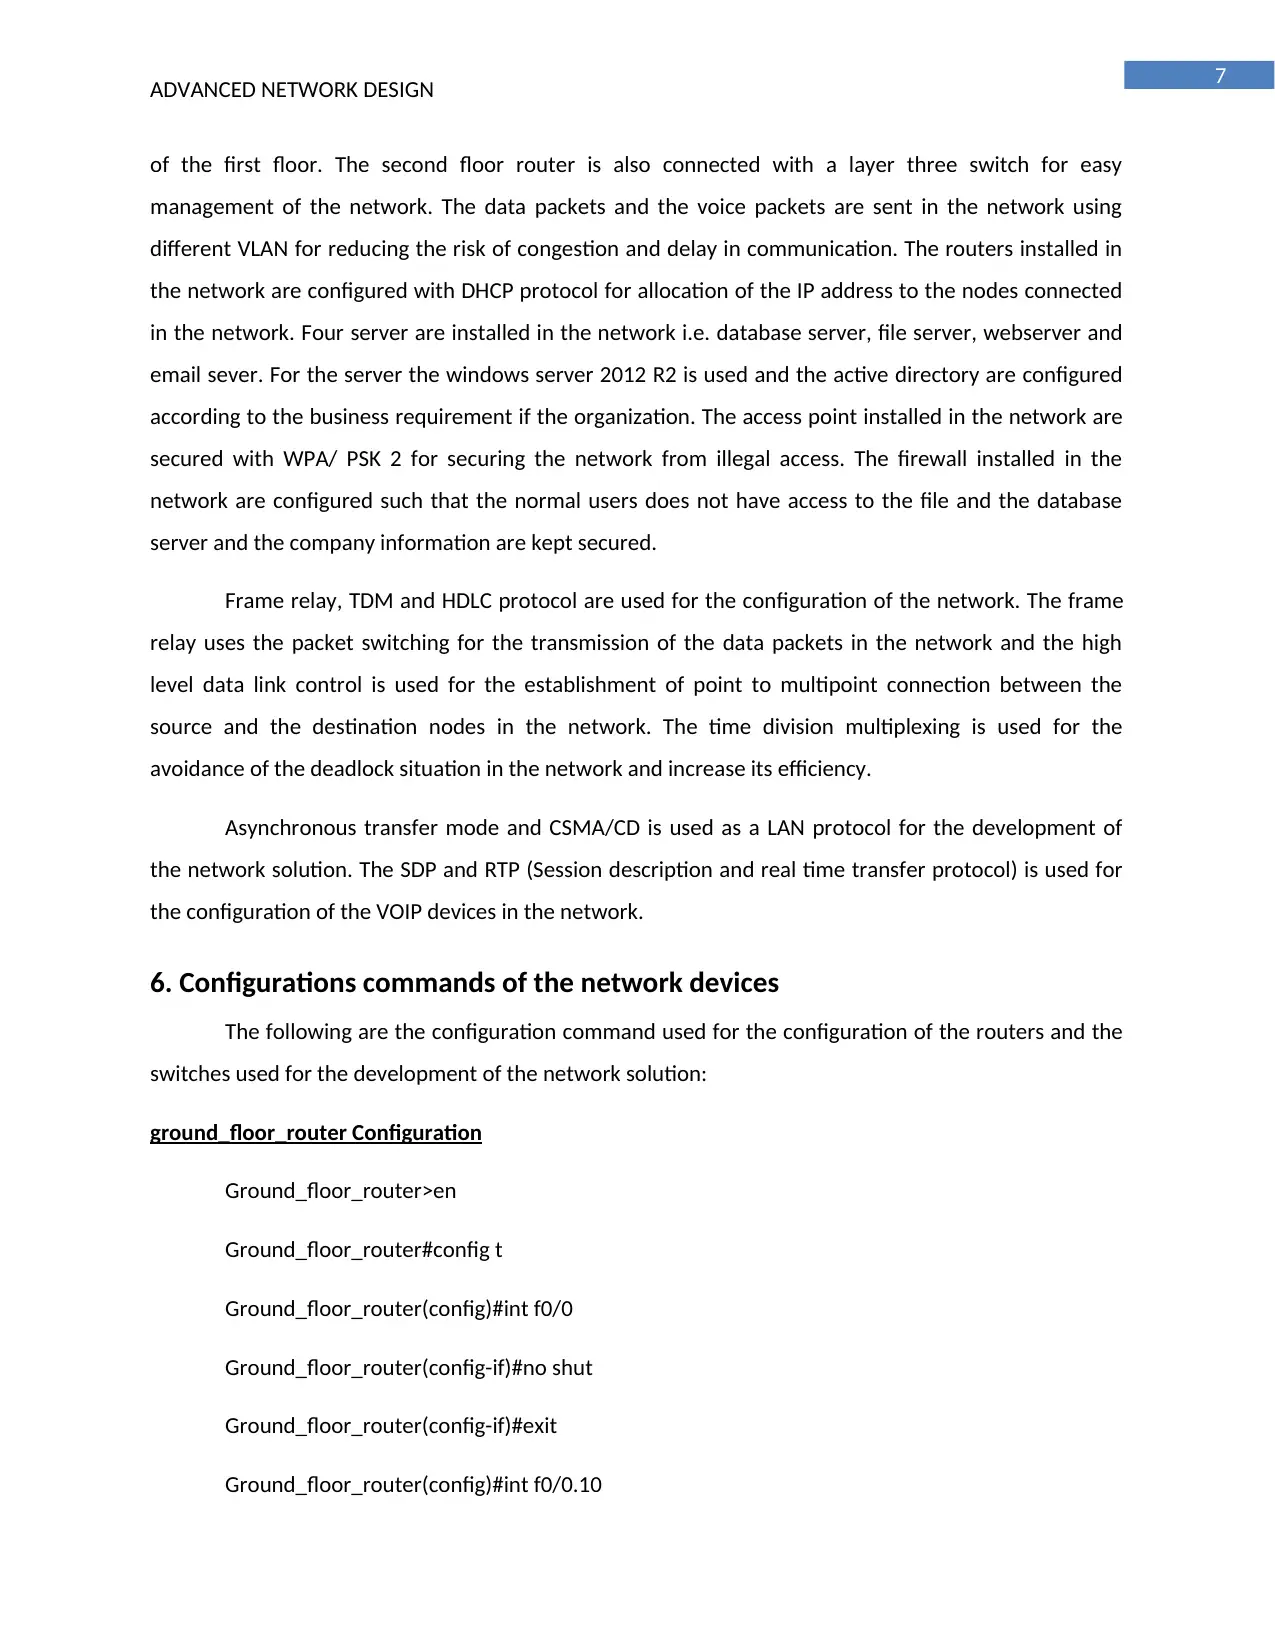
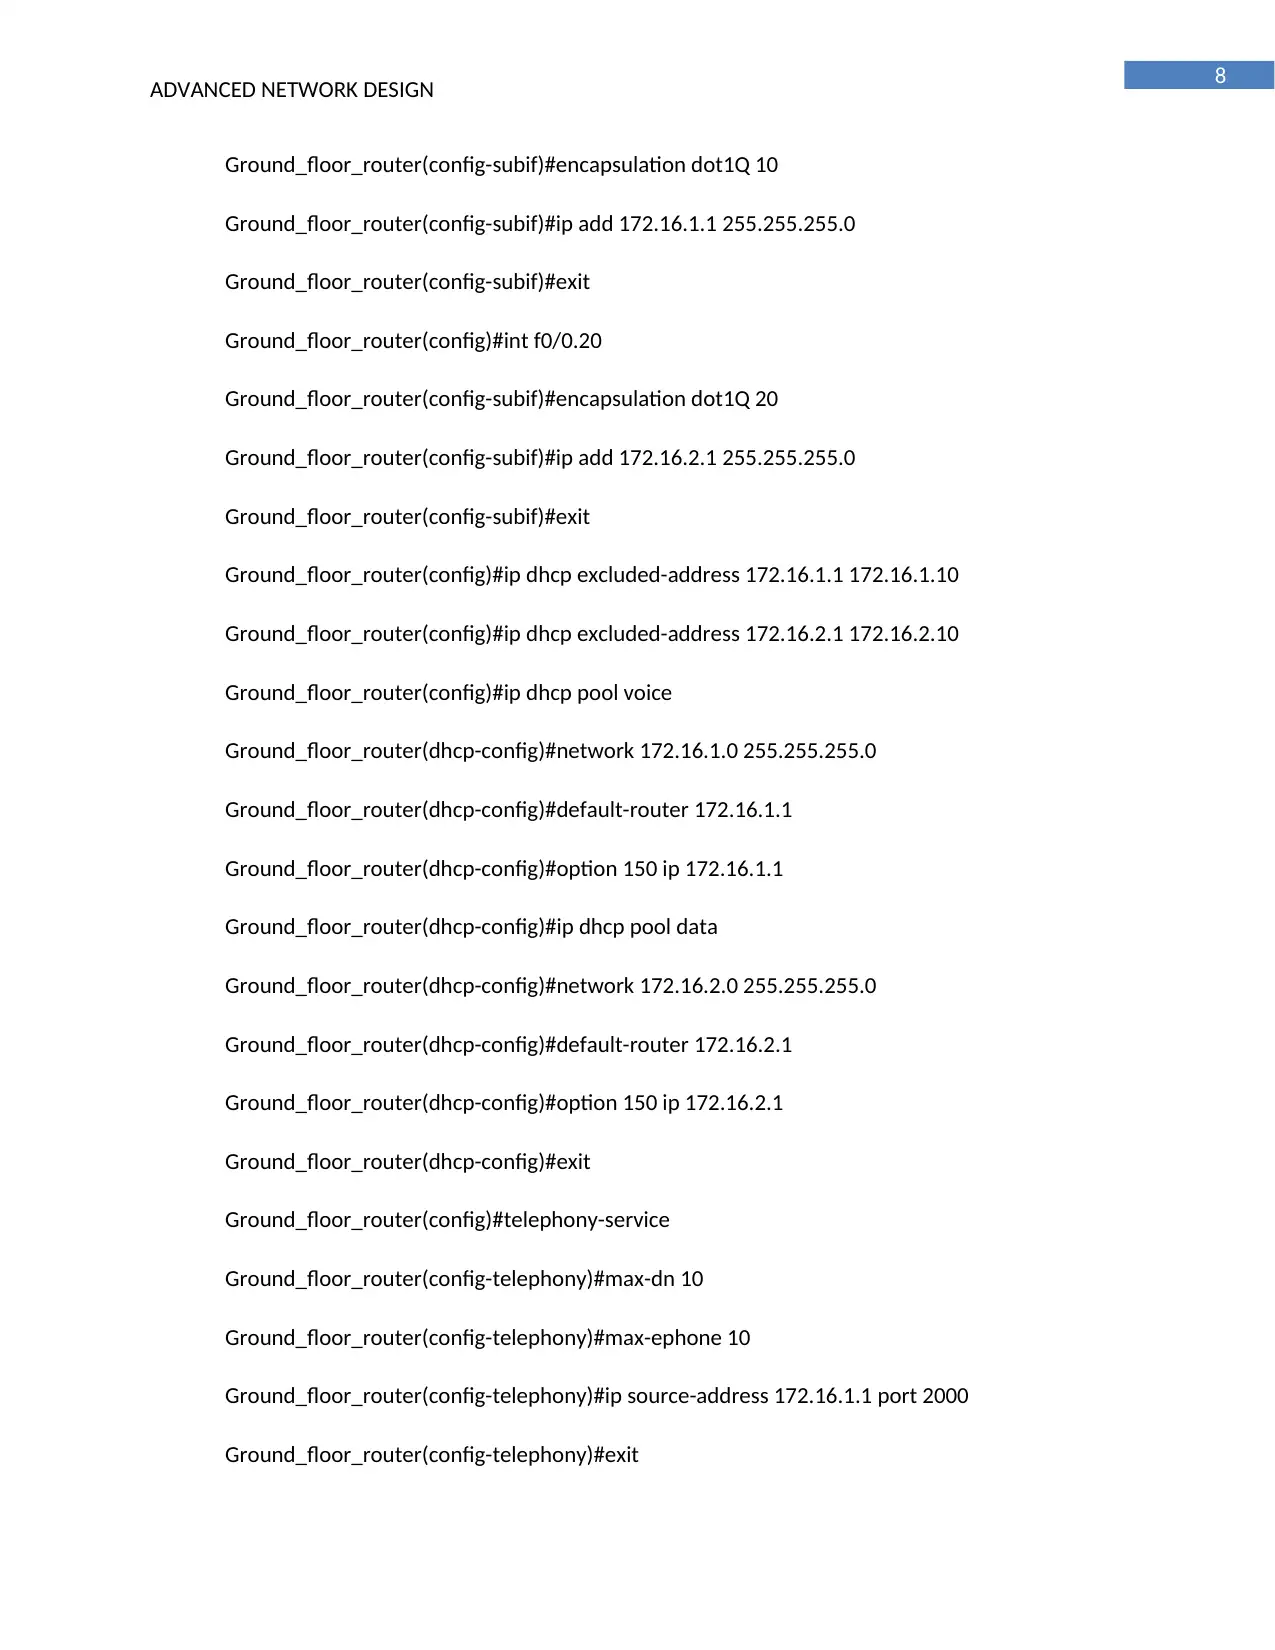
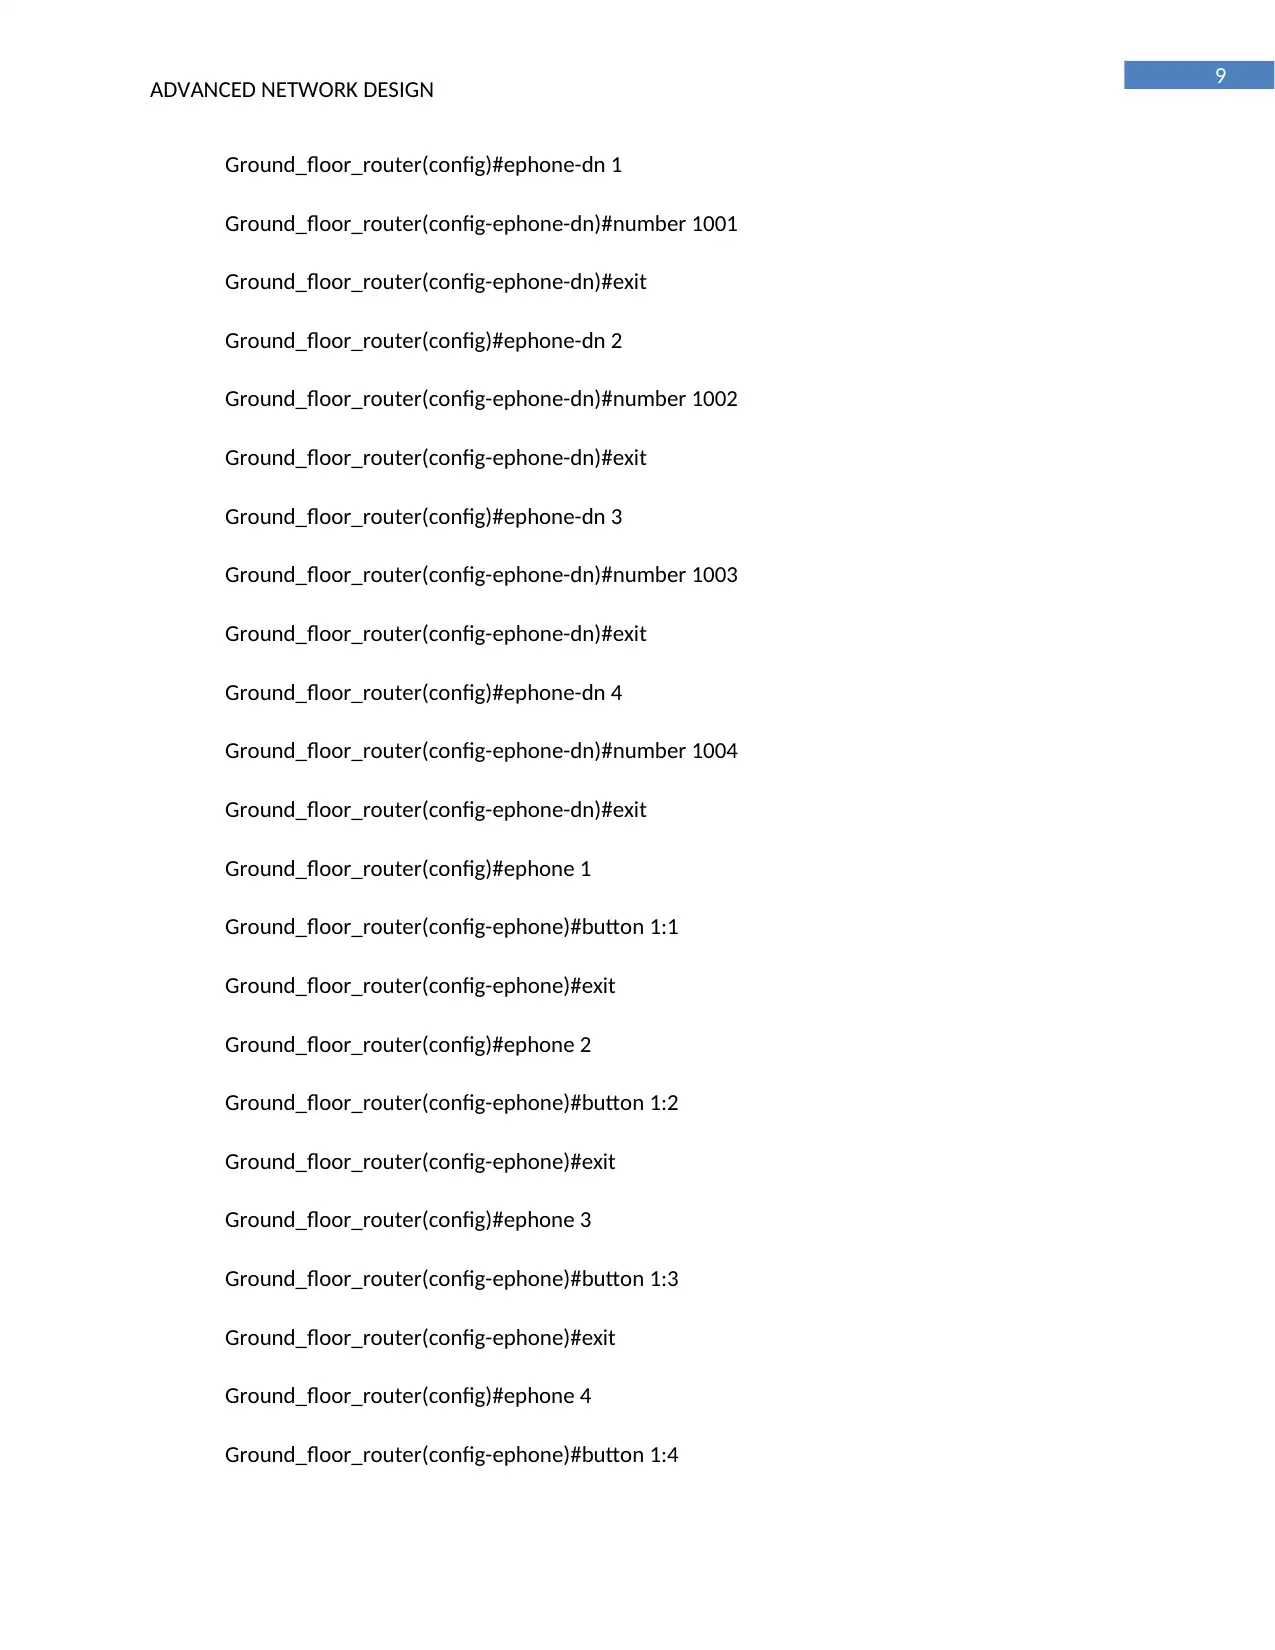
6. Configurations commands of the network devices
The following are the configuration command used for the configuration of the routers and the
switches used for the development of the network solution:
ground_floor_router Configuration
Ground_floor_router>en
Ground_floor_router#config t
Ground_floor_router(config)#int f0/0
Ground_floor_router(config-if)#no shut
Ground_floor_router(config-if)#exit
Ground_floor_router(config)#int f0/0.10
ADVANCED NETWORK DESIGN
of the first floor. The second floor router is also connected with a layer three switch for easy
management of the network. The data packets and the voice packets are sent in the network using
different VLAN for reducing the risk of congestion and delay in communication. The routers installed in
the network are configured with DHCP protocol for allocation of the IP address to the nodes connected
in the network. Four server are installed in the network i.e. database server, file server, webserver and
email sever. For the server the windows server 2012 R2 is used and the active directory are configured
according to the business requirement if the organization. The access point installed in the network are
secured with WPA/ PSK 2 for securing the network from illegal access. The firewall installed in the
network are configured such that the normal users does not have access to the file and the database
server and the company information are kept secured.
Frame relay, TDM and HDLC protocol are used for the configuration of the network. The frame
relay uses the packet switching for the transmission of the data packets in the network and the high
level data link control is used for the establishment of point to multipoint connection between the
source and the destination nodes in the network. The time division multiplexing is used for the
avoidance of the deadlock situation in the network and increase its efficiency.
Asynchronous transfer mode and CSMA/CD is used as a LAN protocol for the development of
the network solution. The SDP and RTP (Session description and real time transfer protocol) is used for
the configuration of the VOIP devices in the network.
6. Configurations commands of the network devices
The following are the configuration command used for the configuration of the routers and the
switches used for the development of the network solution:
ground_floor_router Configuration
Ground_floor_router>en
Ground_floor_router#config t
Ground_floor_router(config)#int f0/0
Ground_floor_router(config-if)#no shut
Ground_floor_router(config-if)#exit
Ground_floor_router(config)#int f0/0.10
8
ADVANCED NETWORK DESIGN
Ground_floor_router(config-subif)#encapsulation dot1Q 10
Ground_floor_router(config-subif)#ip add 172.16.1.1 255.255.255.0
Ground_floor_router(config-subif)#exit
Ground_floor_router(config)#int f0/0.20
Ground_floor_router(config-subif)#encapsulation dot1Q 20
Ground_floor_router(config-subif)#ip add 172.16.2.1 255.255.255.0
Ground_floor_router(config-subif)#exit
Ground_floor_router(config)#ip dhcp excluded-address 172.16.1.1 172.16.1.10
Ground_floor_router(config)#ip dhcp excluded-address 172.16.2.1 172.16.2.10
Ground_floor_router(config)#ip dhcp pool voice
Ground_floor_router(dhcp-config)#network 172.16.1.0 255.255.255.0
Ground_floor_router(dhcp-config)#default-router 172.16.1.1
Ground_floor_router(dhcp-config)#option 150 ip 172.16.1.1
Ground_floor_router(dhcp-config)#ip dhcp pool data
Ground_floor_router(dhcp-config)#network 172.16.2.0 255.255.255.0
Ground_floor_router(dhcp-config)#default-router 172.16.2.1
Ground_floor_router(dhcp-config)#option 150 ip 172.16.2.1
Ground_floor_router(dhcp-config)#exit
Ground_floor_router(config)#telephony-service
Ground_floor_router(config-telephony)#max-dn 10
Ground_floor_router(config-telephony)#max-ephone 10
Ground_floor_router(config-telephony)#ip source-address 172.16.1.1 port 2000
Ground_floor_router(config-telephony)#exit
⊘ This is a preview!⊘
Do you want full access?
Subscribe today to unlock all pages.
Trusted by 1+ million students worldwide
9
ADVANCED NETWORK DESIGN
Ground_floor_router(config)#ephone-dn 1
Ground_floor_router(config-ephone-dn)#number 1001
Ground_floor_router(config-ephone-dn)#exit
Ground_floor_router(config)#ephone-dn 2
Ground_floor_router(config-ephone-dn)#number 1002
Ground_floor_router(config-ephone-dn)#exit
Ground_floor_router(config)#ephone-dn 3
Ground_floor_router(config-ephone-dn)#number 1003
Ground_floor_router(config-ephone-dn)#exit
Ground_floor_router(config)#ephone-dn 4
Ground_floor_router(config-ephone-dn)#number 1004
Ground_floor_router(config-ephone-dn)#exit
Ground_floor_router(config)#ephone 1
Ground_floor_router(config-ephone)#button 1:1
Ground_floor_router(config-ephone)#exit
Ground_floor_router(config)#ephone 2
Ground_floor_router(config-ephone)#button 1:2
Ground_floor_router(config-ephone)#exit
Ground_floor_router(config)#ephone 3
Ground_floor_router(config-ephone)#button 1:3
Ground_floor_router(config-ephone)#exit
Ground_floor_router(config)#ephone 4
Ground_floor_router(config-ephone)#button 1:4
Paraphrase This Document
Need a fresh take? Get an instant paraphrase of this document with our AI Paraphraser
10
ADVANCED NETWORK DESIGN
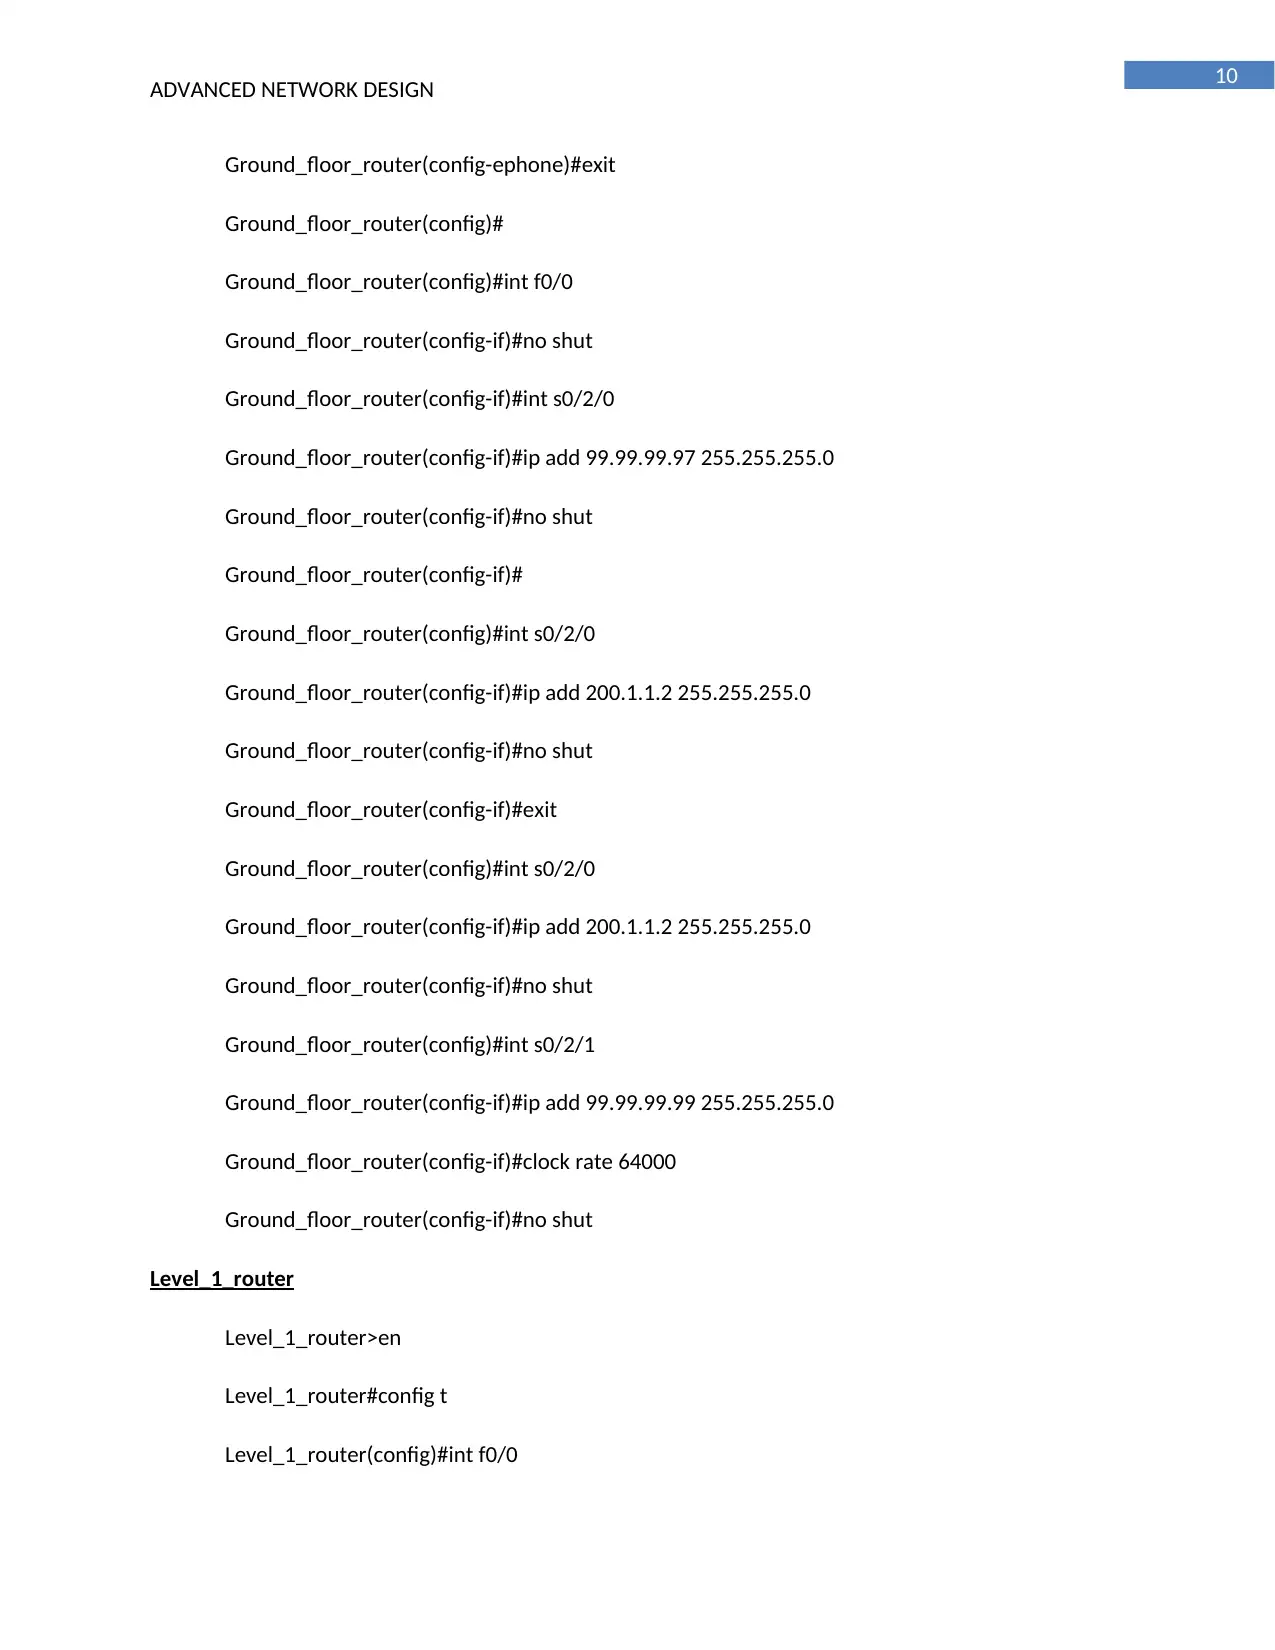
Ground_floor_router(config-ephone)#exit
Ground_floor_router(config)#
Ground_floor_router(config)#int f0/0
Ground_floor_router(config-if)#no shut
Ground_floor_router(config-if)#int s0/2/0
Ground_floor_router(config-if)#ip add 99.99.99.97 255.255.255.0
Ground_floor_router(config-if)#no shut
Ground_floor_router(config-if)#
Ground_floor_router(config)#int s0/2/0
Ground_floor_router(config-if)#ip add 200.1.1.2 255.255.255.0
Ground_floor_router(config-if)#no shut
Ground_floor_router(config-if)#exit
Ground_floor_router(config)#int s0/2/0
Ground_floor_router(config-if)#ip add 200.1.1.2 255.255.255.0
Ground_floor_router(config-if)#no shut
Ground_floor_router(config)#int s0/2/1
Ground_floor_router(config-if)#ip add 99.99.99.99 255.255.255.0
Ground_floor_router(config-if)#clock rate 64000
Ground_floor_router(config-if)#no shut
Level_1_router
Level_1_router>en
Level_1_router#config t
Level_1_router(config)#int f0/0
ADVANCED NETWORK DESIGN
Ground_floor_router(config-ephone)#exit
Ground_floor_router(config)#
Ground_floor_router(config)#int f0/0
Ground_floor_router(config-if)#no shut
Ground_floor_router(config-if)#int s0/2/0
Ground_floor_router(config-if)#ip add 99.99.99.97 255.255.255.0
Ground_floor_router(config-if)#no shut
Ground_floor_router(config-if)#
Ground_floor_router(config)#int s0/2/0
Ground_floor_router(config-if)#ip add 200.1.1.2 255.255.255.0
Ground_floor_router(config-if)#no shut
Ground_floor_router(config-if)#exit
Ground_floor_router(config)#int s0/2/0
Ground_floor_router(config-if)#ip add 200.1.1.2 255.255.255.0
Ground_floor_router(config-if)#no shut
Ground_floor_router(config)#int s0/2/1
Ground_floor_router(config-if)#ip add 99.99.99.99 255.255.255.0
Ground_floor_router(config-if)#clock rate 64000
Ground_floor_router(config-if)#no shut
Level_1_router
Level_1_router>en
Level_1_router#config t
Level_1_router(config)#int f0/0
11
ADVANCED NETWORK DESIGN
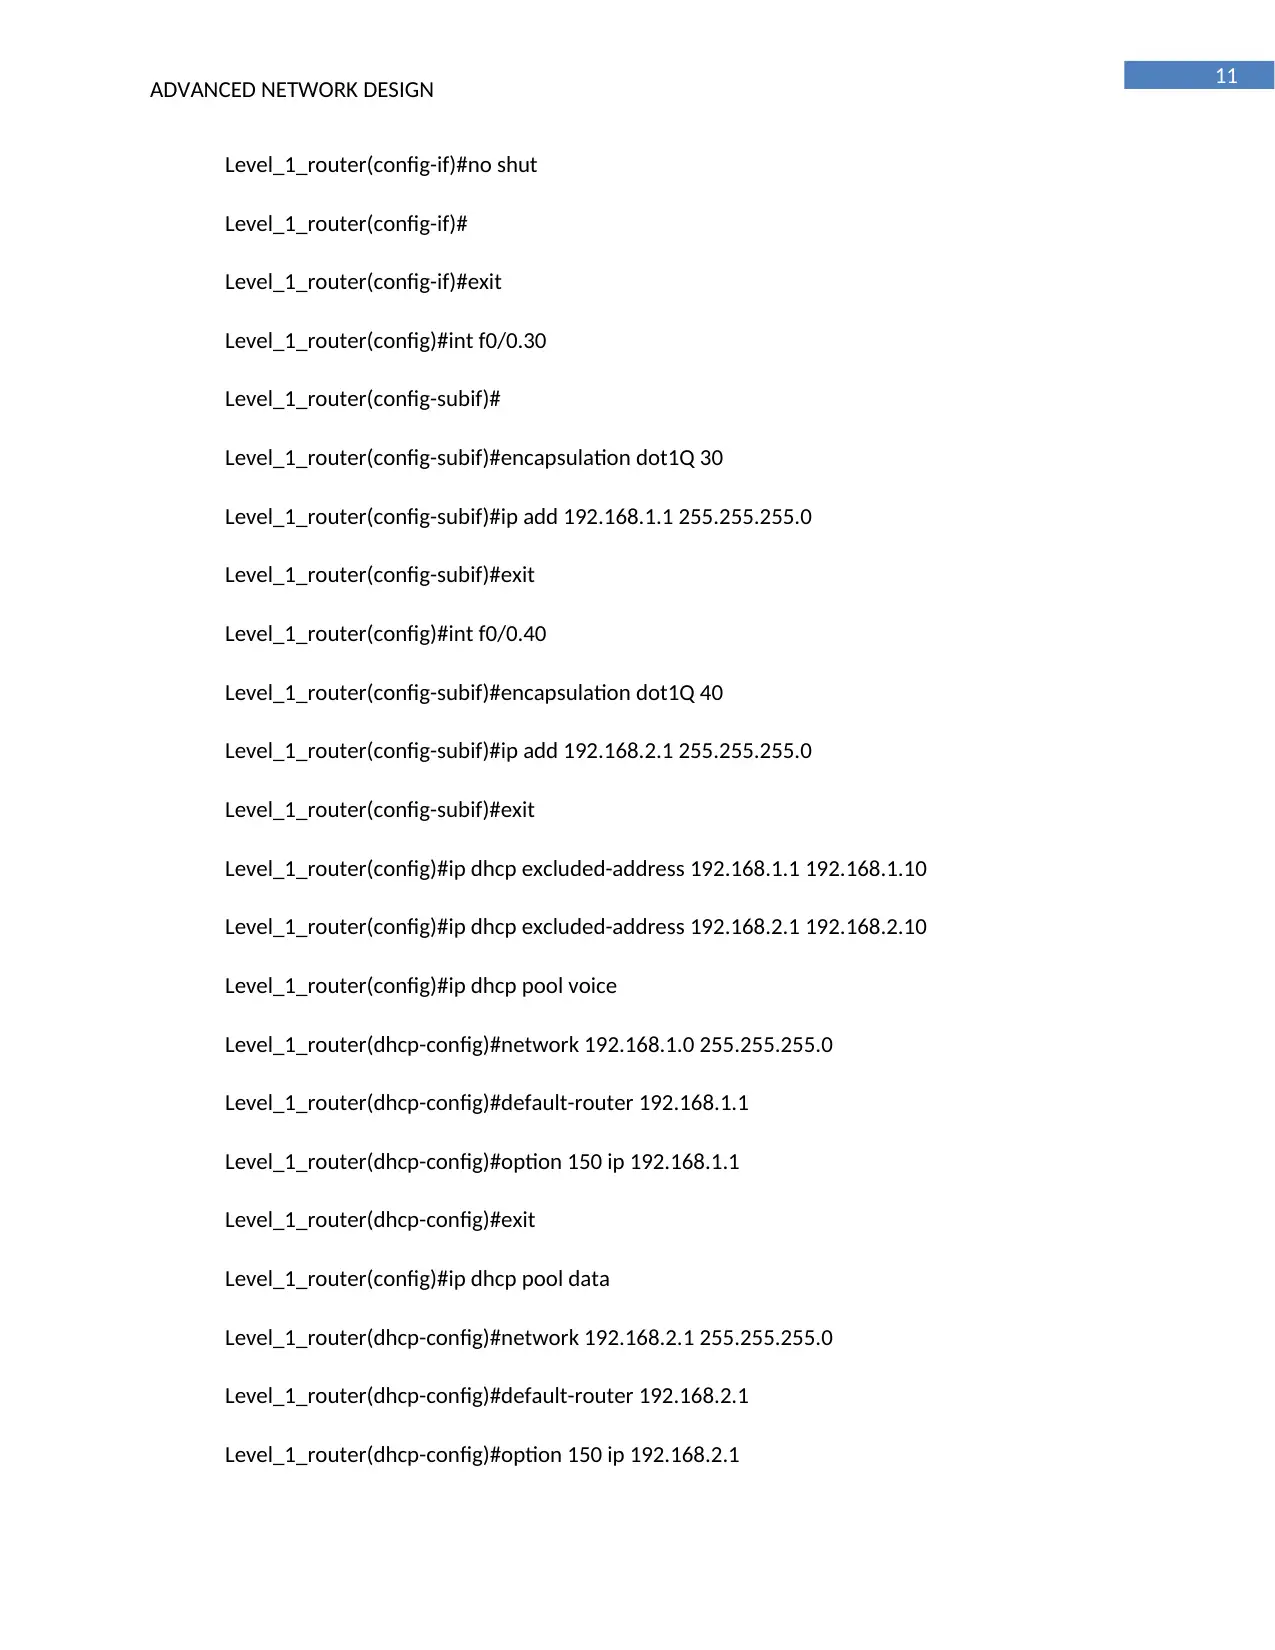
Level_1_router(config-if)#no shut
Level_1_router(config-if)#
Level_1_router(config-if)#exit
Level_1_router(config)#int f0/0.30
Level_1_router(config-subif)#
Level_1_router(config-subif)#encapsulation dot1Q 30
Level_1_router(config-subif)#ip add 192.168.1.1 255.255.255.0
Level_1_router(config-subif)#exit
Level_1_router(config)#int f0/0.40
Level_1_router(config-subif)#encapsulation dot1Q 40
Level_1_router(config-subif)#ip add 192.168.2.1 255.255.255.0
Level_1_router(config-subif)#exit
Level_1_router(config)#ip dhcp excluded-address 192.168.1.1 192.168.1.10
Level_1_router(config)#ip dhcp excluded-address 192.168.2.1 192.168.2.10
Level_1_router(config)#ip dhcp pool voice
Level_1_router(dhcp-config)#network 192.168.1.0 255.255.255.0
Level_1_router(dhcp-config)#default-router 192.168.1.1
Level_1_router(dhcp-config)#option 150 ip 192.168.1.1
Level_1_router(dhcp-config)#exit
Level_1_router(config)#ip dhcp pool data
Level_1_router(dhcp-config)#network 192.168.2.1 255.255.255.0
Level_1_router(dhcp-config)#default-router 192.168.2.1
Level_1_router(dhcp-config)#option 150 ip 192.168.2.1
ADVANCED NETWORK DESIGN
Level_1_router(config-if)#no shut
Level_1_router(config-if)#
Level_1_router(config-if)#exit
Level_1_router(config)#int f0/0.30
Level_1_router(config-subif)#
Level_1_router(config-subif)#encapsulation dot1Q 30
Level_1_router(config-subif)#ip add 192.168.1.1 255.255.255.0
Level_1_router(config-subif)#exit
Level_1_router(config)#int f0/0.40
Level_1_router(config-subif)#encapsulation dot1Q 40
Level_1_router(config-subif)#ip add 192.168.2.1 255.255.255.0
Level_1_router(config-subif)#exit
Level_1_router(config)#ip dhcp excluded-address 192.168.1.1 192.168.1.10
Level_1_router(config)#ip dhcp excluded-address 192.168.2.1 192.168.2.10
Level_1_router(config)#ip dhcp pool voice
Level_1_router(dhcp-config)#network 192.168.1.0 255.255.255.0
Level_1_router(dhcp-config)#default-router 192.168.1.1
Level_1_router(dhcp-config)#option 150 ip 192.168.1.1
Level_1_router(dhcp-config)#exit
Level_1_router(config)#ip dhcp pool data
Level_1_router(dhcp-config)#network 192.168.2.1 255.255.255.0
Level_1_router(dhcp-config)#default-router 192.168.2.1
Level_1_router(dhcp-config)#option 150 ip 192.168.2.1
⊘ This is a preview!⊘
Do you want full access?
Subscribe today to unlock all pages.
Trusted by 1+ million students worldwide
1 out of 21
Related Documents


Your All-in-One AI-Powered Toolkit for Academic Success.
+13062052269
info@desklib.com
Available 24*7 on WhatsApp / Email
![[object Object]](/_next/static/media/star-bottom.7253800d.svg)
Unlock your academic potential
Copyright © 2020–2026 A2Z Services. All Rights Reserved. Developed and managed by ZUCOL.