IFN507 Network Systems: Practical Problem Solving Tasks Report
VerifiedAdded on 2023/06/07
|15
|2745
|137
Practical Assignment
AI Summary
This assignment solution for IFN507 Network Systems details the practical implementation of several networking concepts. It includes setting up and utilizing remote desktop connections, designing operation scenarios, and controlling a remote computer. The solution also covers establishing remote connections using SSH via PuTTY, performing file operations, and configuring a virtual machine using Oracle VirtualBox. Furthermore, it addresses IPv4 subnetting, including designing a variable-length addressing scheme and assigning IP addresses with unique subnets to router interfaces. The document includes reflections on the learning process and screenshots as evidence of the practical tasks completed. This resource is available on Desklib, which offers a wide range of study tools and solved assignments for students.

etwork SystemsIFN507 N
Assignment ractical roblem Solving asks01 - P P T
Assignment ractical roblem Solving asks01 - P P T
Paraphrase This Document
Need a fresh take? Get an instant paraphrase of this document with our AI Paraphraser
1. Problem Solving Task 1: Remote Desktop
Sub-task 1:
To achieve sub-task 1, two computers has been connected through the same internet. The
operating system on both computers is Windows 7 and I have used ‘Remote Desktop
Connection’ program to connect both computers.
Pre-requisites before making a connection to remote computer:
Make sure the computer is switched on and connected to network.
Make sure ‘Remote Desktop’ option is enabled and network access is possible.
Note down the name of the computer you are going to connect to.
Make sure firewall is allowing Remote Desktop Connections.
To enable Remote Desktop option on computer you want to connect to:
Right-Click on Computer and Select Properties
Open Remote Settings window
Under Remote tab Remote Desktop Check on the box “Allow Connections only
from computers running Desktop with Network Level Authentication (more secure)
Click Ok.
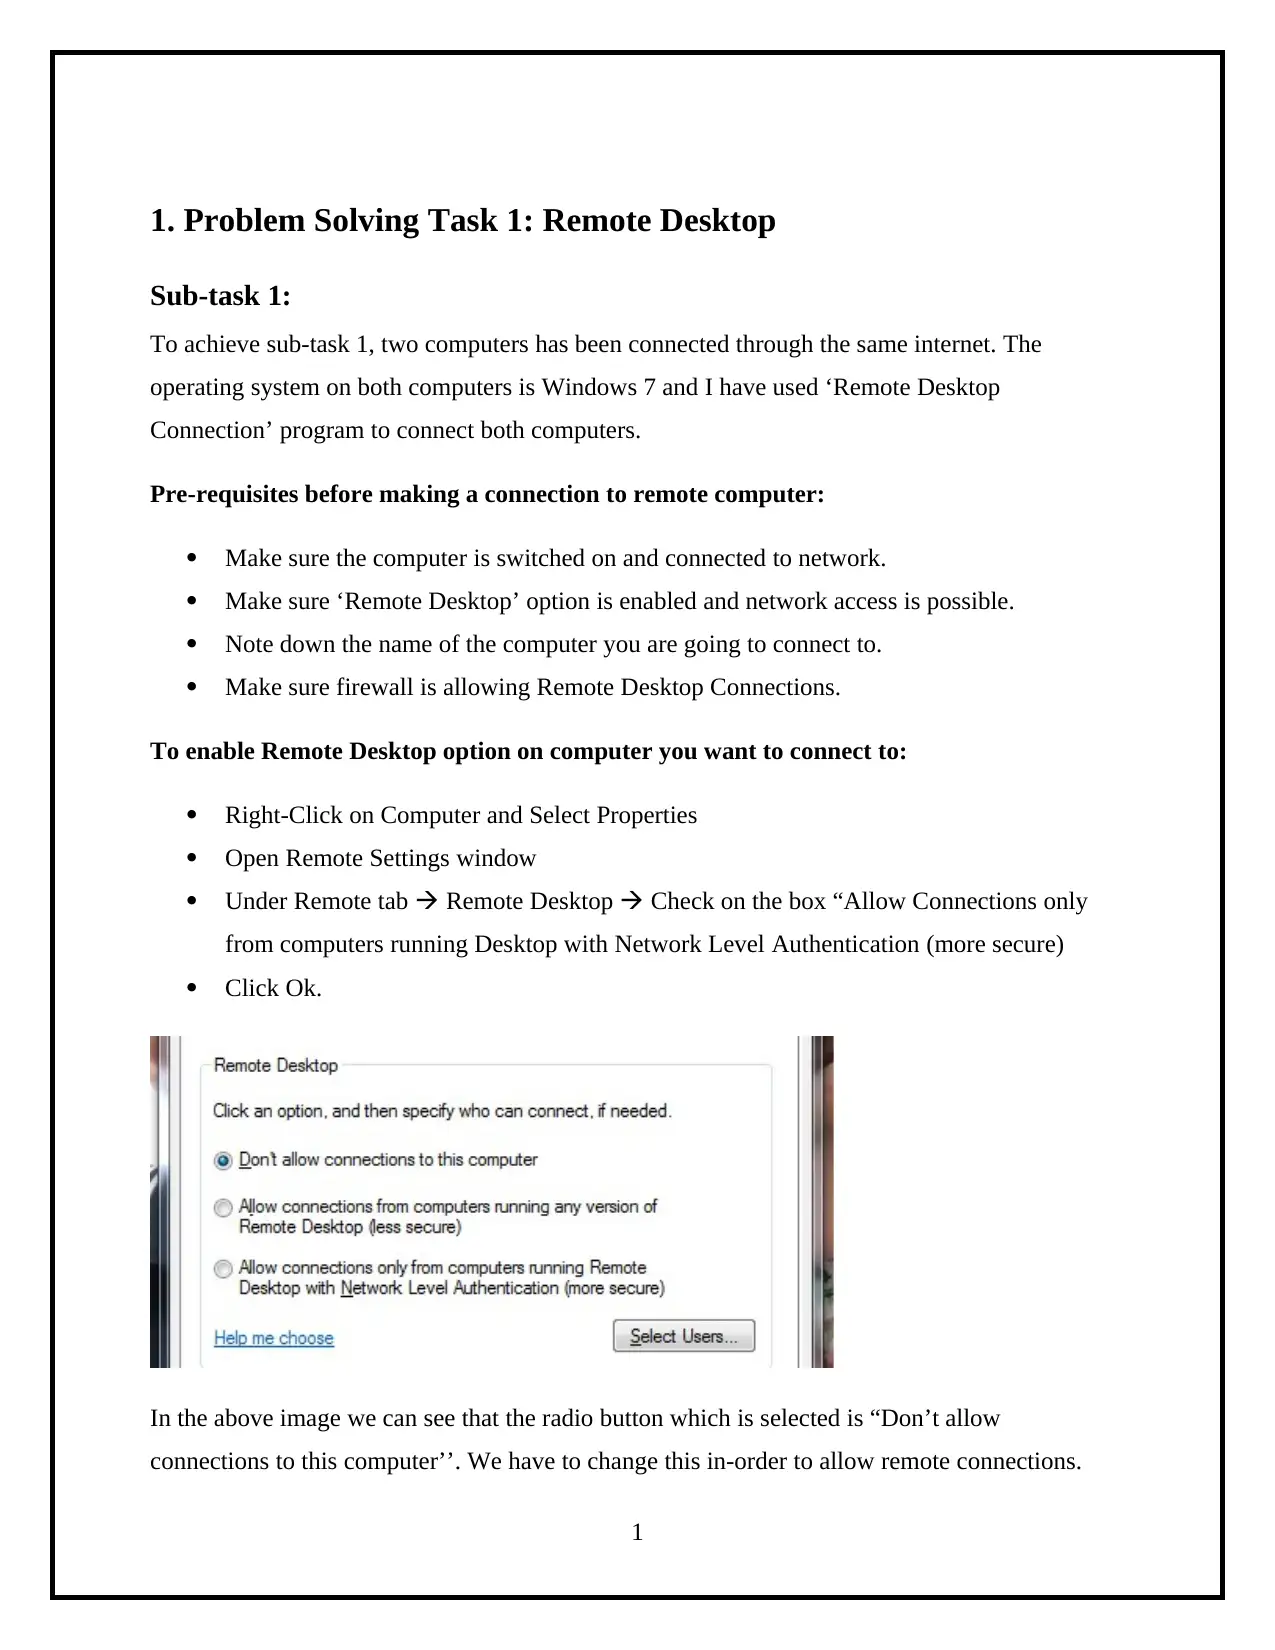
In the above image we can see that the radio button which is selected is “Don’t allow
connections to this computer’’. We have to change this in-order to allow remote connections.
1
To check the name of the computer:
Right-Click on Computer and Select Properties
Under Computer name, domain and workgroup settings you will find Computer name
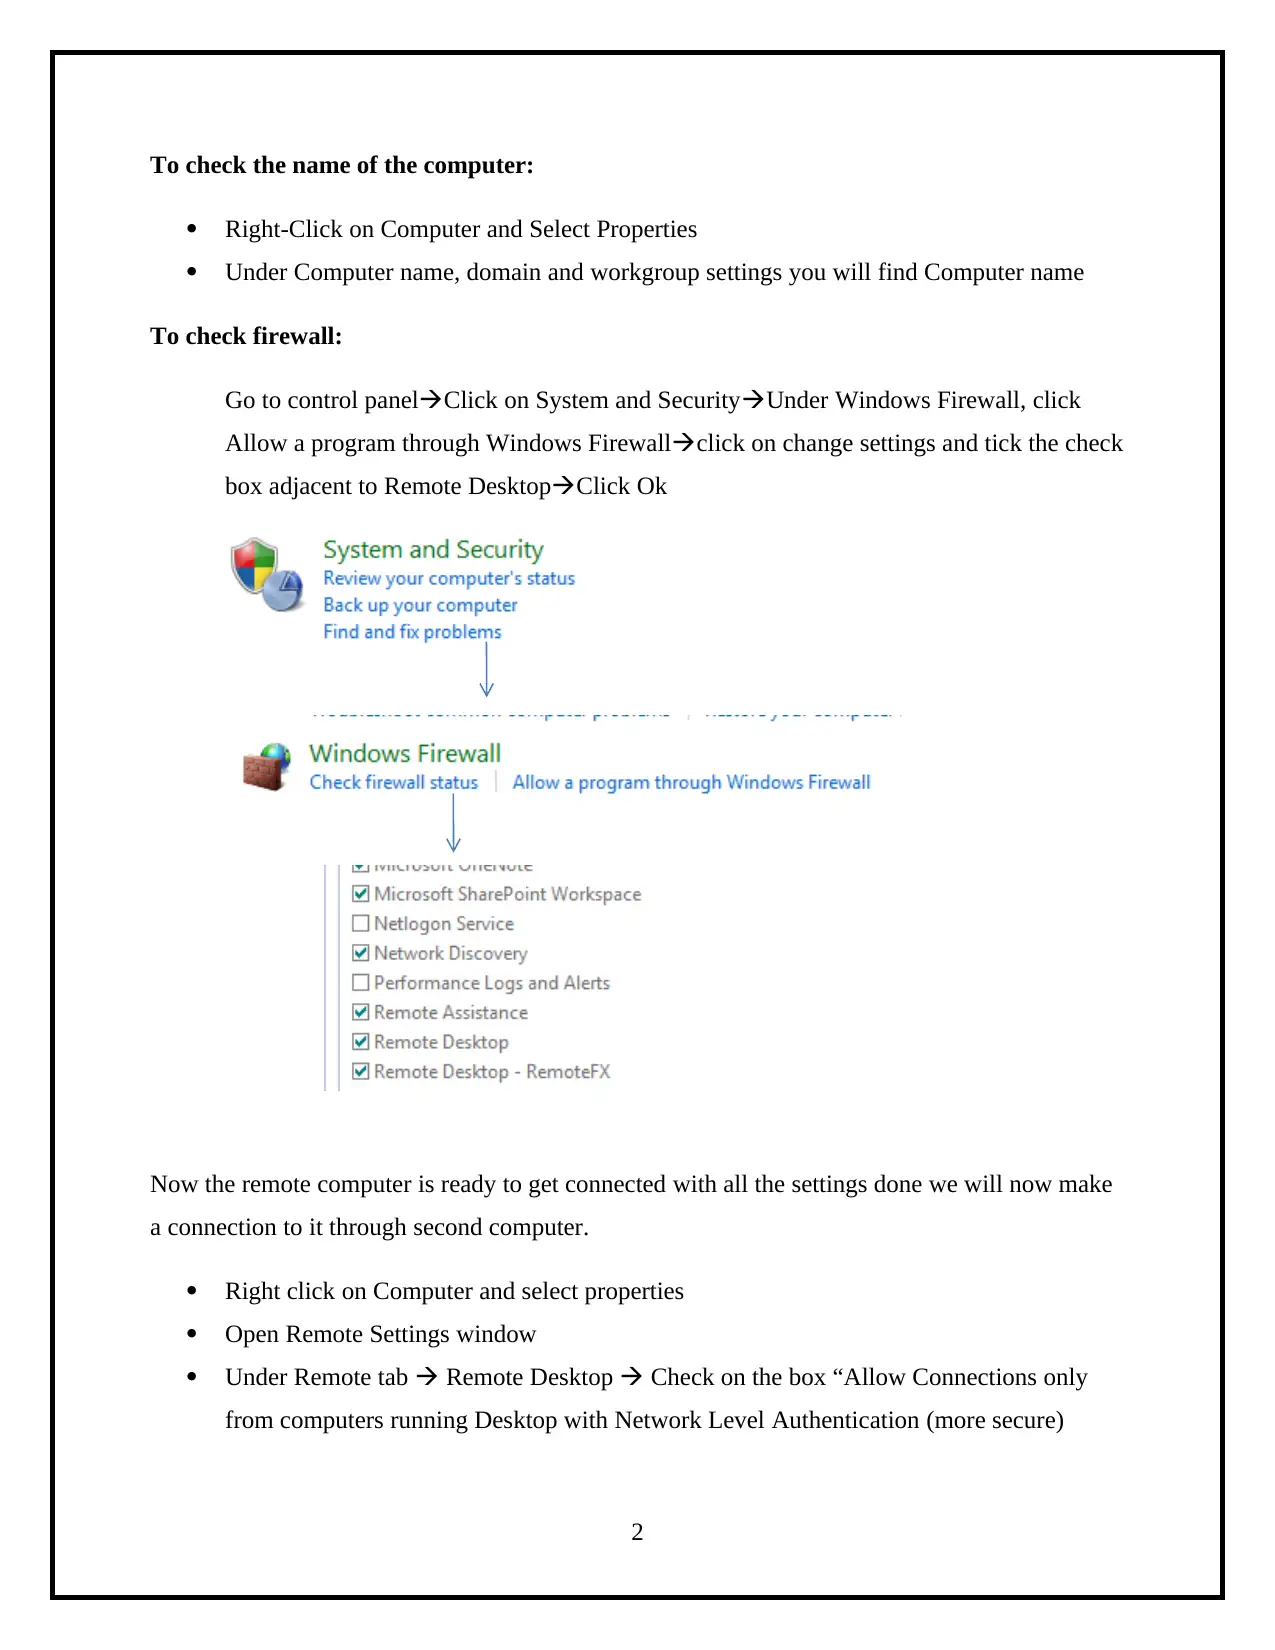
To check firewall:
Go to control panelClick on System and SecurityUnder Windows Firewall, click
Allow a program through Windows Firewallclick on change settings and tick the check
box adjacent to Remote DesktopClick Ok
Now the remote computer is ready to get connected with all the settings done we will now make
a connection to it through second computer.
Right click on Computer and select properties
Open Remote Settings window
Under Remote tab Remote Desktop Check on the box “Allow Connections only
from computers running Desktop with Network Level Authentication (more secure)
2
⊘ This is a preview!⊘
Do you want full access?
Subscribe today to unlock all pages.

Trusted by 1+ million students worldwide
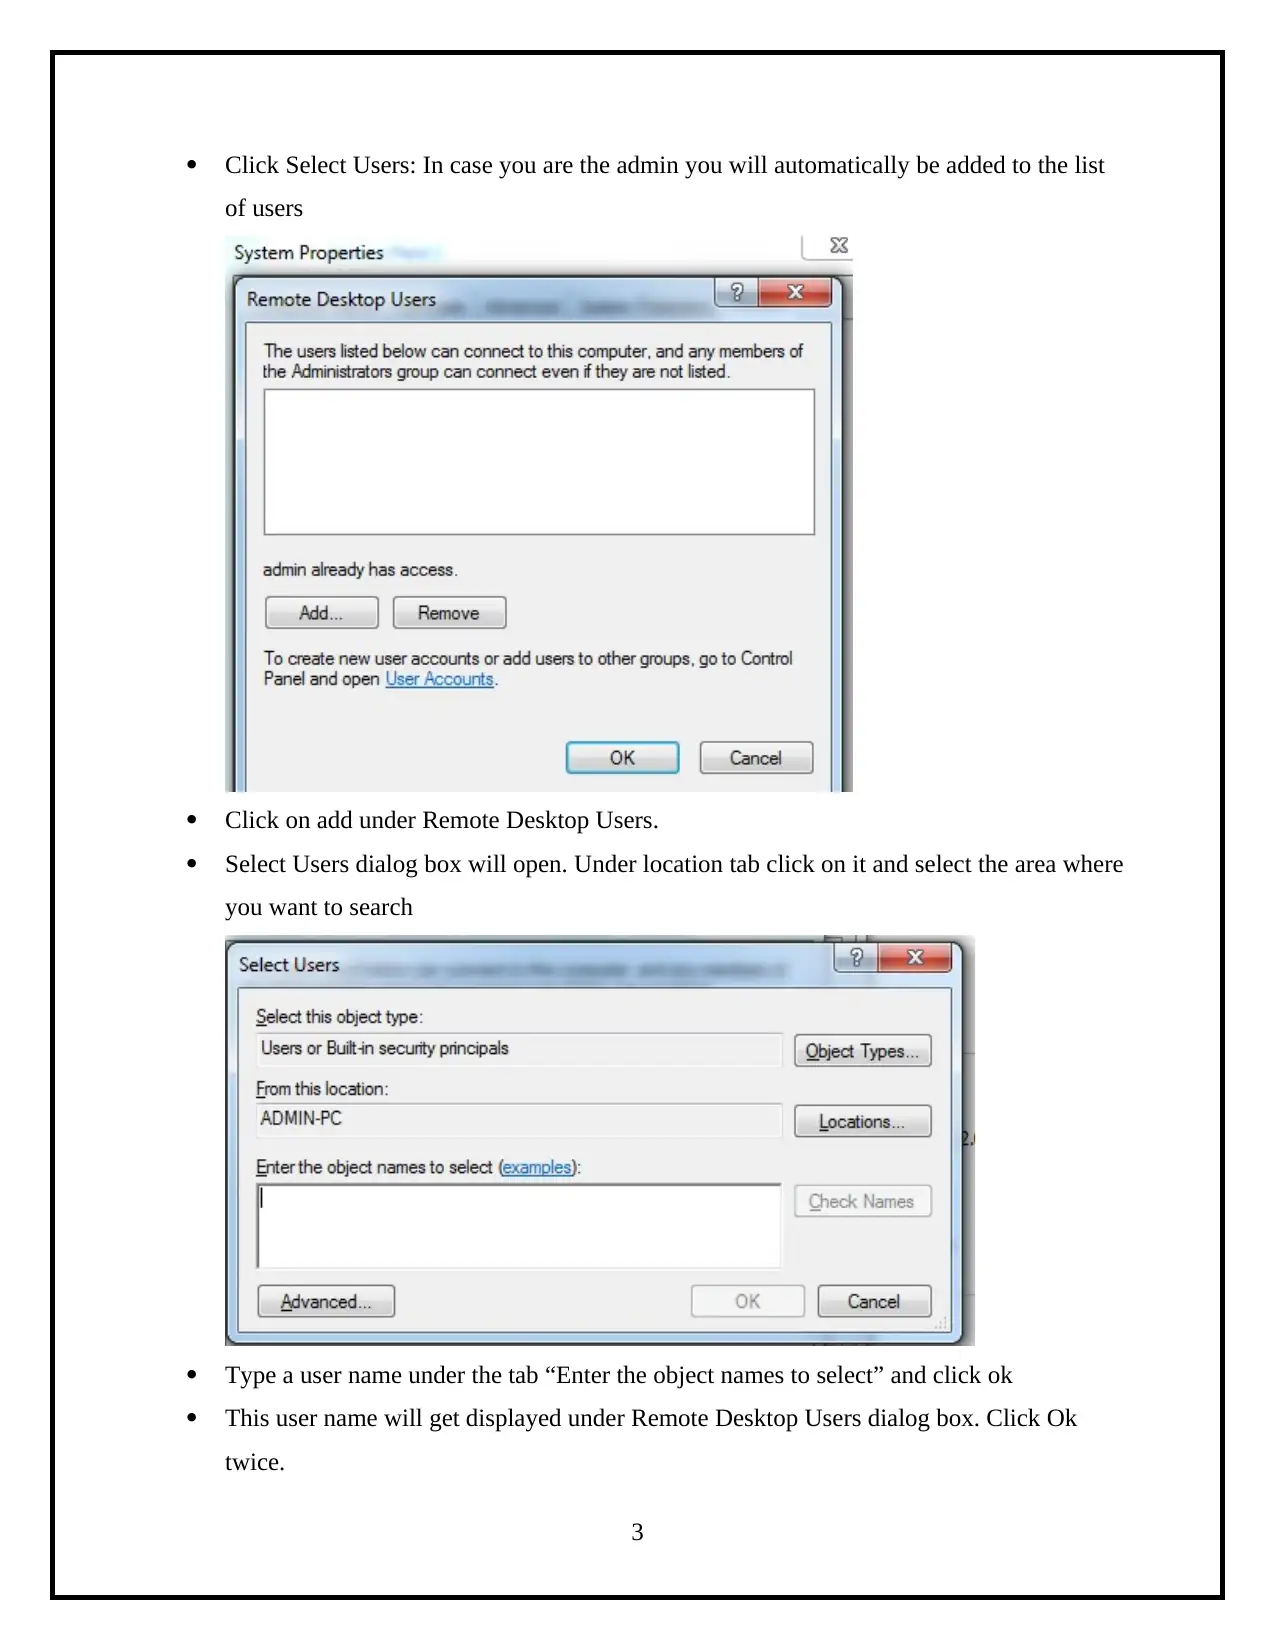
Click Select Users: In case you are the admin you will automatically be added to the list
of users
Click on add under Remote Desktop Users.
Select Users dialog box will open. Under location tab click on it and select the area where
you want to search
Type a user name under the tab “Enter the object names to select” and click ok
This user name will get displayed under Remote Desktop Users dialog box. Click Ok
twice.
3
Paraphrase This Document
Need a fresh take? Get an instant paraphrase of this document with our AI Paraphraser
Make sure the remote computer has been set to Never in hibernations and sleep settings
under power supply otherwise connection will not be possible.
Connection is now set up.
To start working on the remote computer
Type Remote Desktop Connection in the search box then from the list provided select
Remote Desktop Connection.
Inside the box: the computer, either type the IP address or name of the computer you want to
connect to.
You may start Working.
Sub-task 2
After a successful connection has been established to the remote computer from the local
computer following scenarios was performed on the remote computer via local computer.
Copy an existing file from the D drive of the remote computer to the E drive of the
remote computer.
Go to the desktop in remote computer. Select the file explorer folder and double
click it.
Double click on the D drive and select the file to copy with a single click. Hover
the mouse arrow on the file and right click and select copy.
Now go to E drive and click there.
Right click with the mouse and select paste.
File will be copied from D drive to E drive on the remote computer.
Creating a new MS Word file on the desktop and rename it to ‘Network Project’
Go to the desktop in remote computer.
Right click in the empty space on the desktop and select New
From the options select Microsoft Word document
A word document will then appear on the desktop
Right click on it and select Rename
4
Type ‘Network Project’ and enter.
A new MS Word file with name ‘Network Project’ will be created on the desktop of
the remote computer.
Composing an email and sending it via remote computer
Go to the desktop in remote computer.
Open a browser and type the address of the mail explorer to be used for the
purpose of sending an email
Login with your Id and Passwords.
Compose a mail and send it to the receiver
Logout the email id and close the explorer.
In this case an email will be sent to the receiver with the IP address of the remote
computer irrespective it has been handled through local computer.
Deleting an existing file in the D drive by the name “Network Project”
Go to the desktop in remote computer.
Select the file explorer folder and double click it.
Double click on the D drive and select the file with name “Network Explorer”.
Right click on it and click Delete. A window will appear. Select ok from it.
File will be deleted from the D drive.
The file will be permanently deleted from the remote computer and it will not come
back after the remote connection is disabled.
All the scenarios designed above when handled on remote computer through local
computer will act as if they are being handled locally and any changes made will be
permanent and will remain even after the connection is de-established.
Sub-Task 3
After the connection was established, an invitation file was sent to local computer to allow it to
take over the controls of remote computer. It was conducted by following steps:
5
⊘ This is a preview!⊘
Do you want full access?
Subscribe today to unlock all pages.

Trusted by 1+ million students worldwide
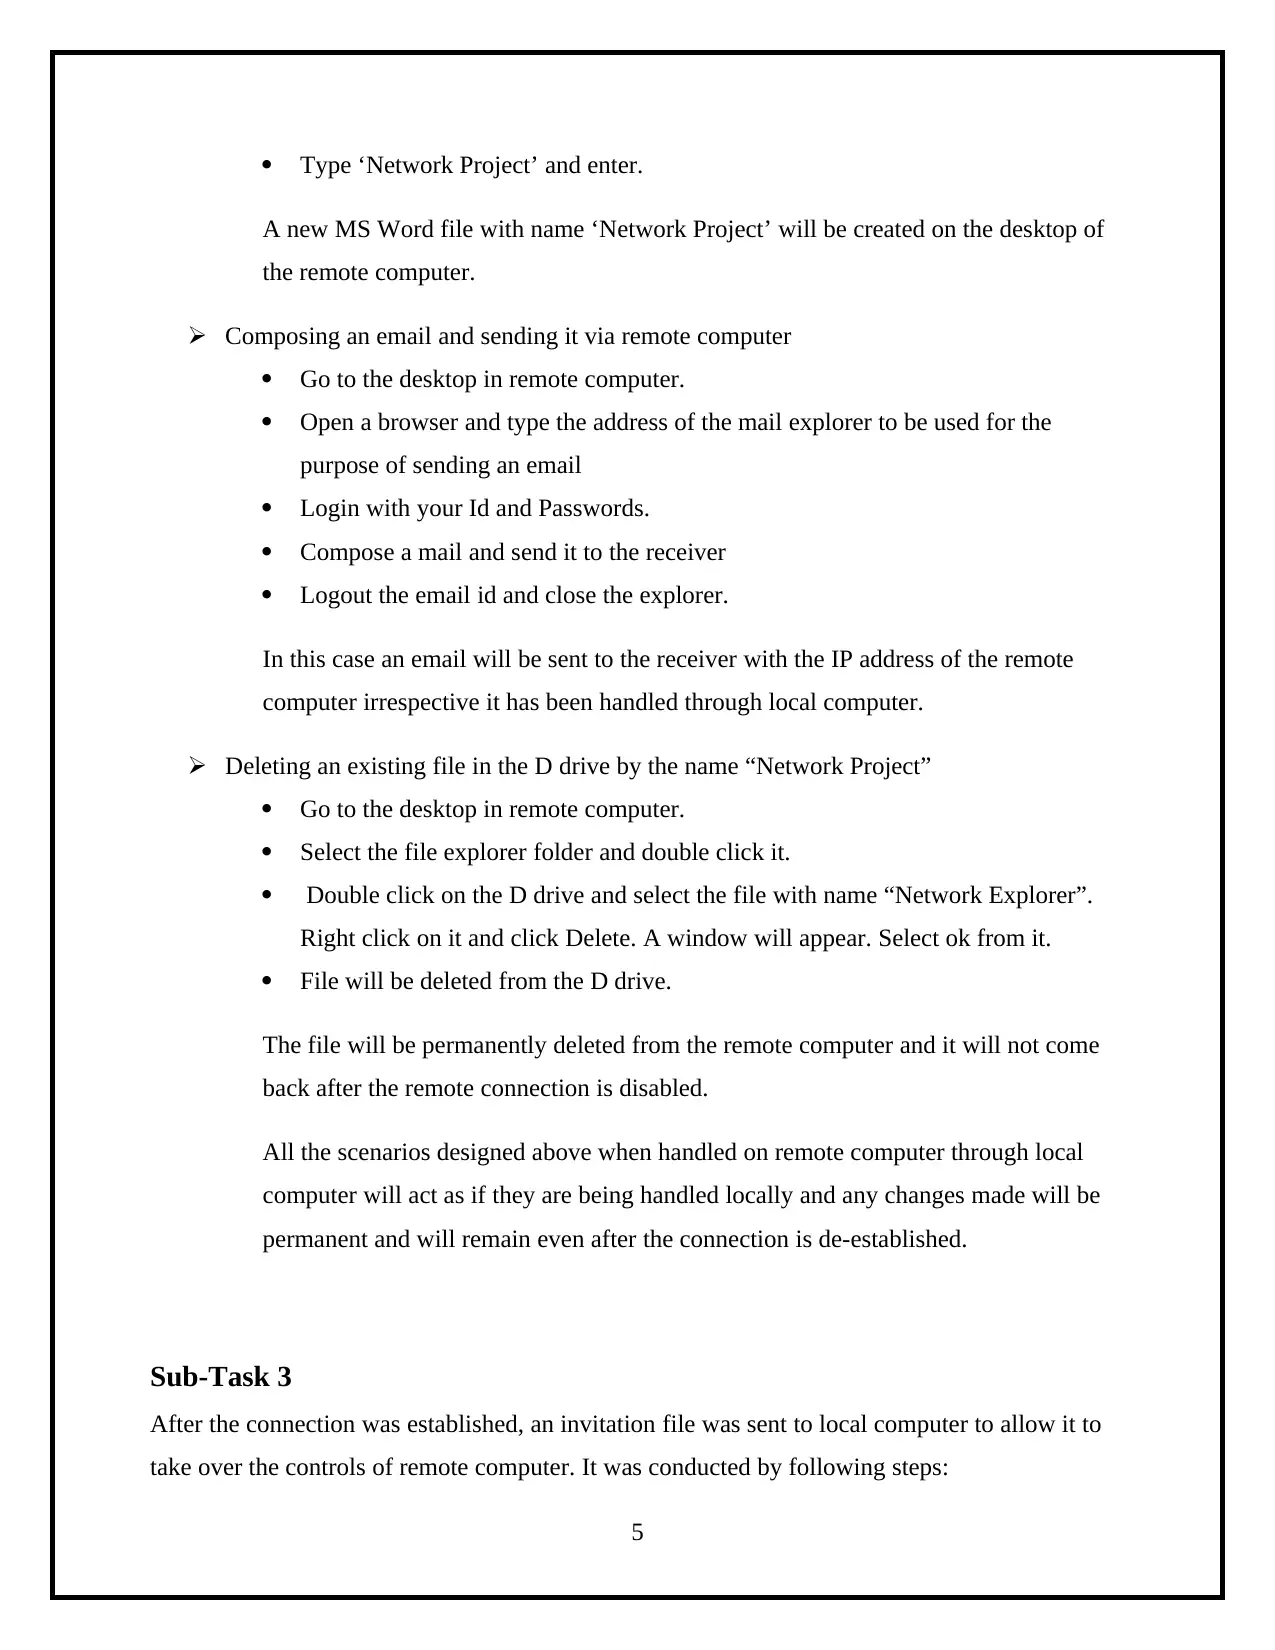
Type: Windows Help and support in search bar and select Windows Remote Assistance
Select ‘Invite someone you trust to help you’ and email the invitation file provided. On the
local computer select ‘Help someone who has invited you’ and enter the password provided.
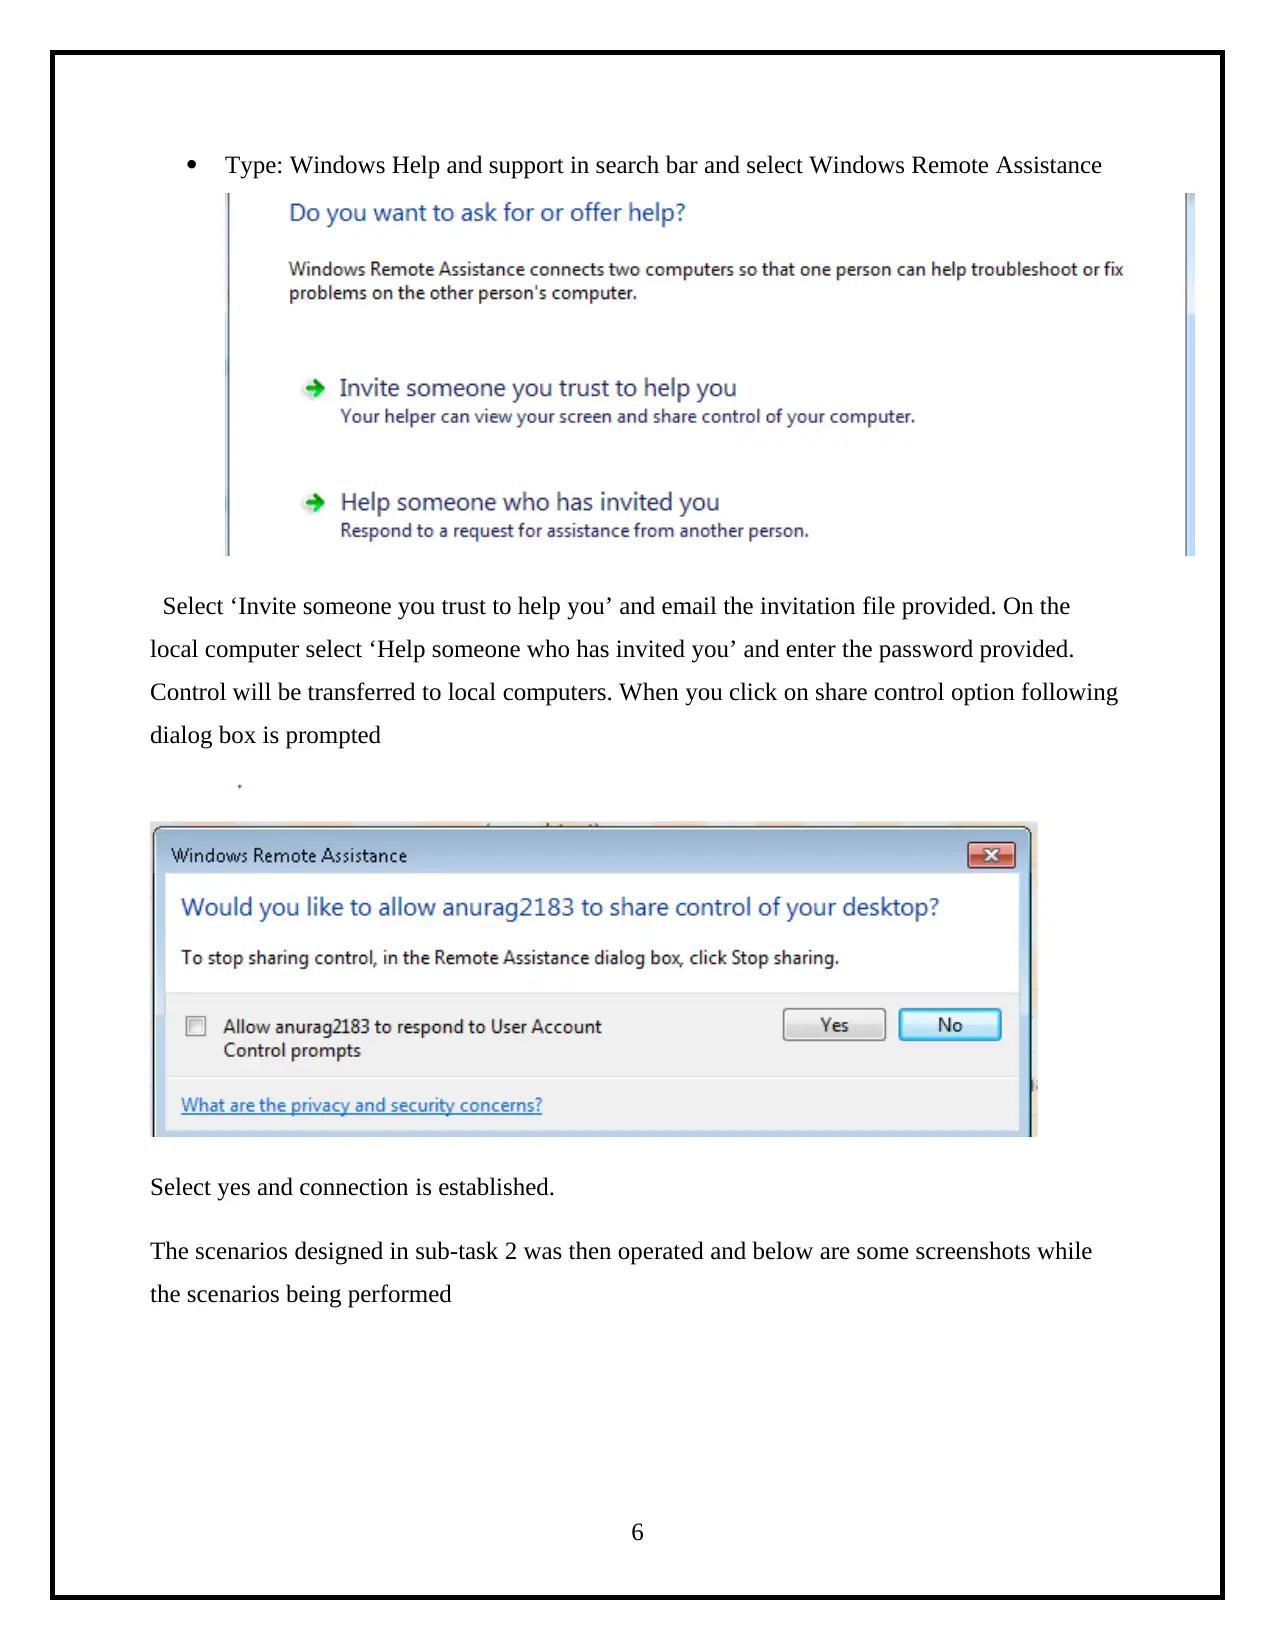
Control will be transferred to local computers. When you click on share control option following
dialog box is prompted
Select yes and connection is established.
The scenarios designed in sub-task 2 was then operated and below are some screenshots while
the scenarios being performed
6
Paraphrase This Document
Need a fresh take? Get an instant paraphrase of this document with our AI Paraphraser
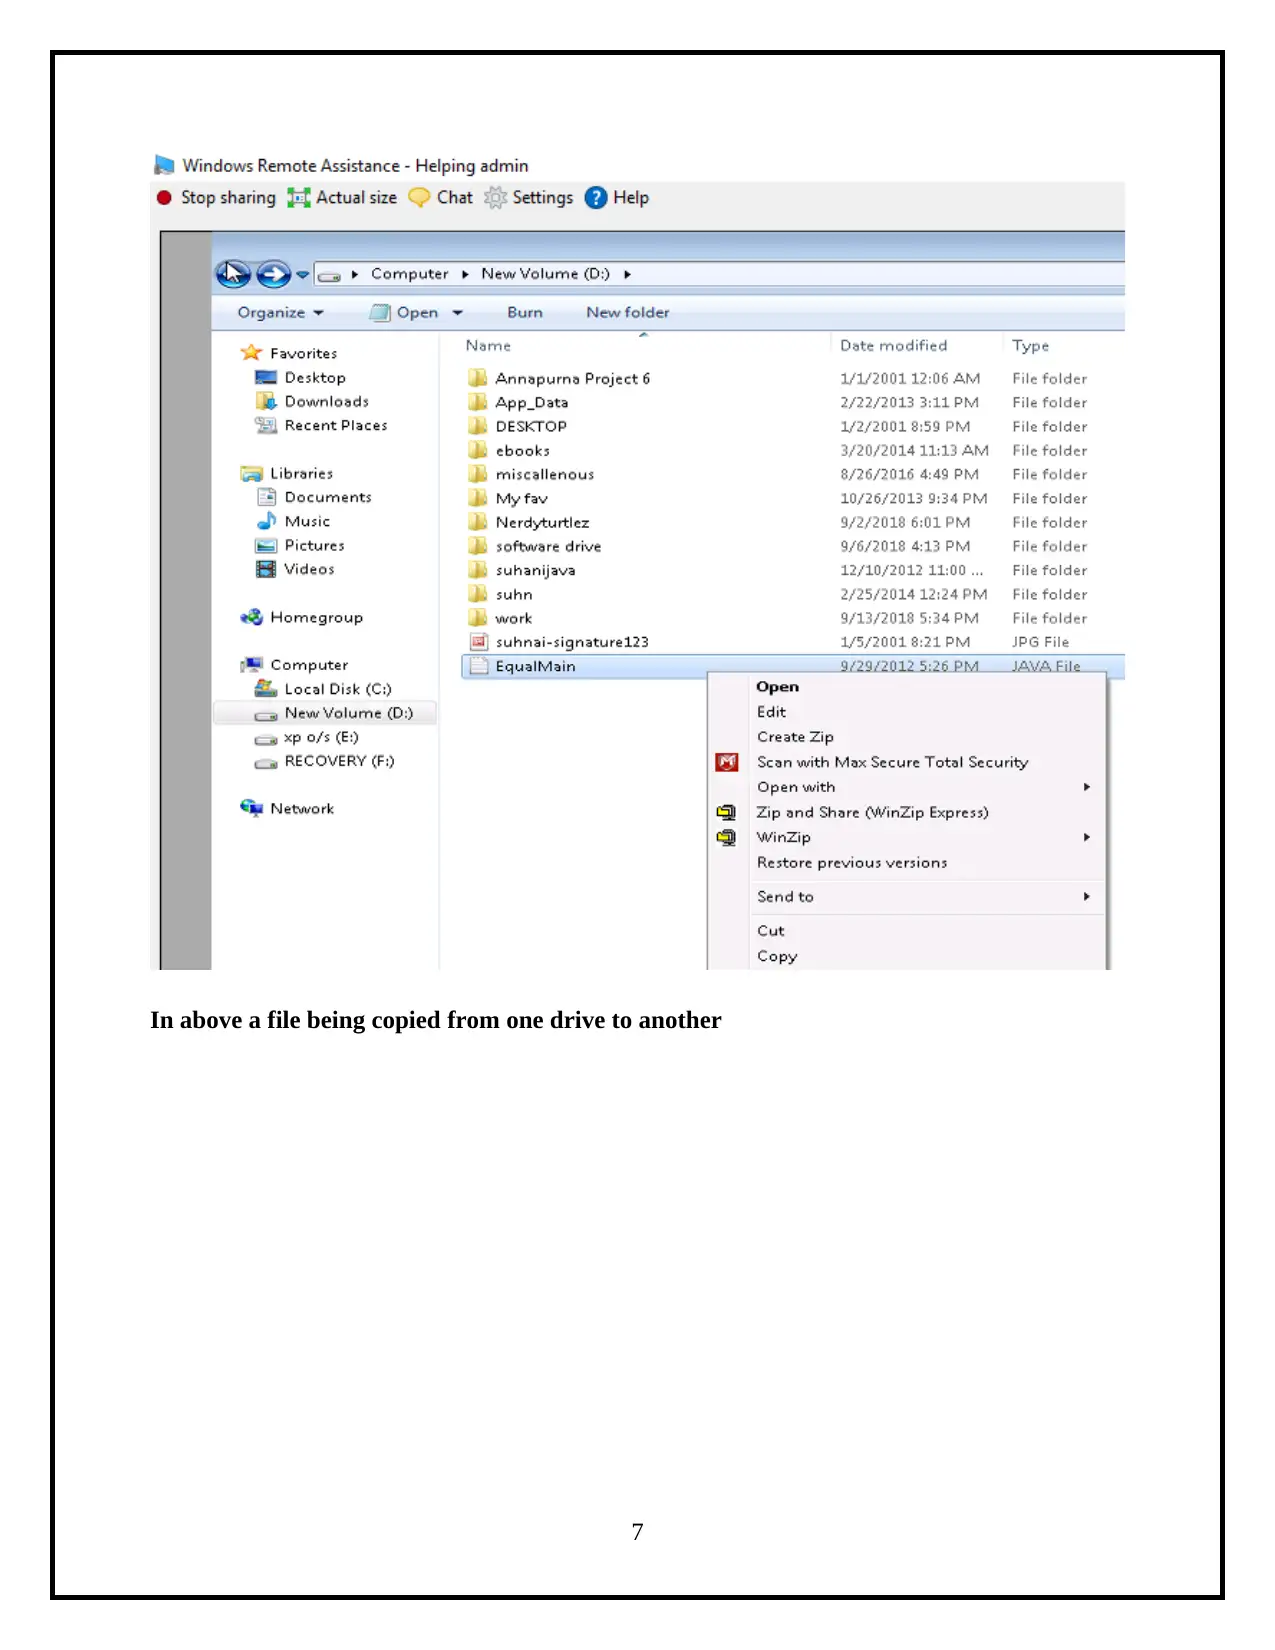
In above a file being copied from one drive to another
7
7
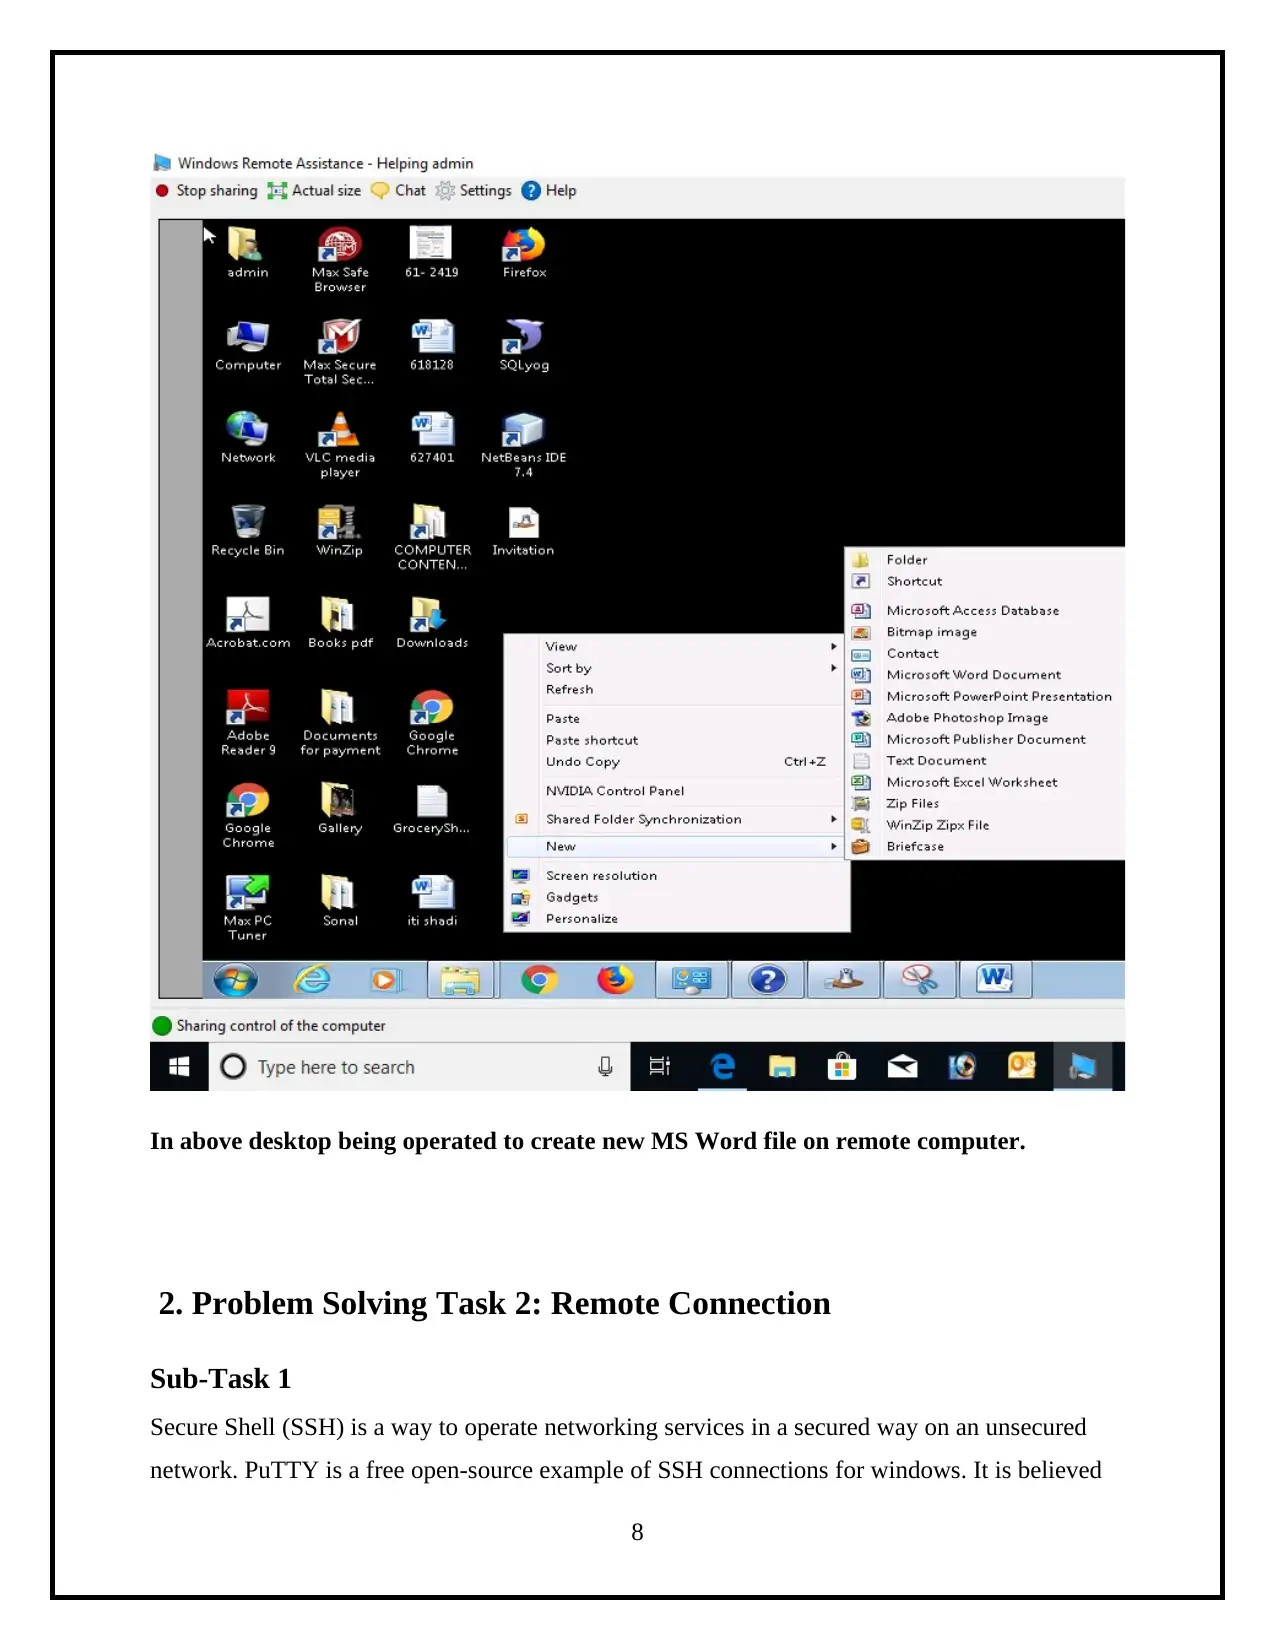
In above desktop being operated to create new MS Word file on remote computer.
2. Problem Solving Task 2: Remote Connection
Sub-Task 1
Secure Shell (SSH) is a way to operate networking services in a secured way on an unsecured
network. PuTTY is a free open-source example of SSH connections for windows. It is believed
8
2. Problem Solving Task 2: Remote Connection
Sub-Task 1
Secure Shell (SSH) is a way to operate networking services in a secured way on an unsecured
network. PuTTY is a free open-source example of SSH connections for windows. It is believed
8
⊘ This is a preview!⊘
Do you want full access?
Subscribe today to unlock all pages.

Trusted by 1+ million students worldwide
to be the best amongst its alike alternatives. To connect two computers via PuTTY, following
steps has to be performed:
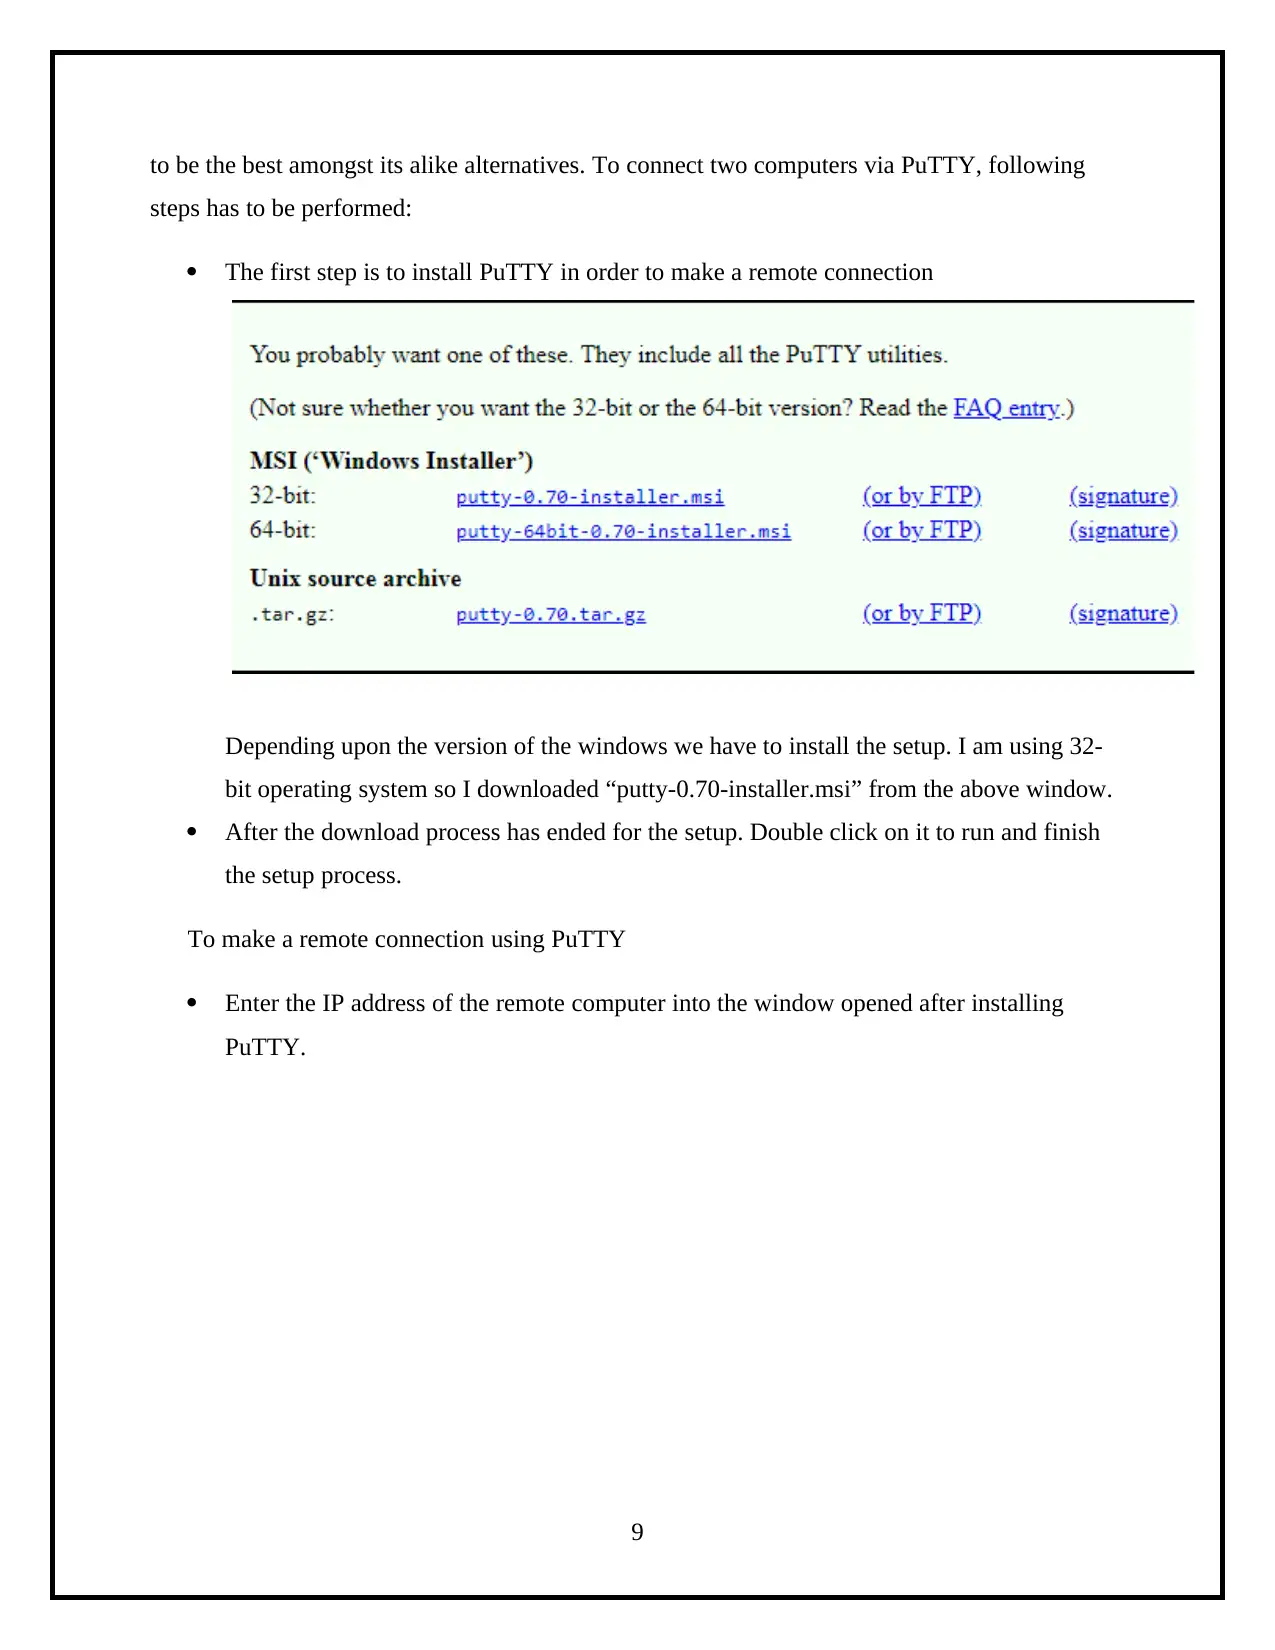
The first step is to install PuTTY in order to make a remote connection
Depending upon the version of the windows we have to install the setup. I am using 32-
bit operating system so I downloaded “putty-0.70-installer.msi” from the above window.
After the download process has ended for the setup. Double click on it to run and finish
the setup process.
To make a remote connection using PuTTY
Enter the IP address of the remote computer into the window opened after installing
PuTTY.
9
Paraphrase This Document
Need a fresh take? Get an instant paraphrase of this document with our AI Paraphraser
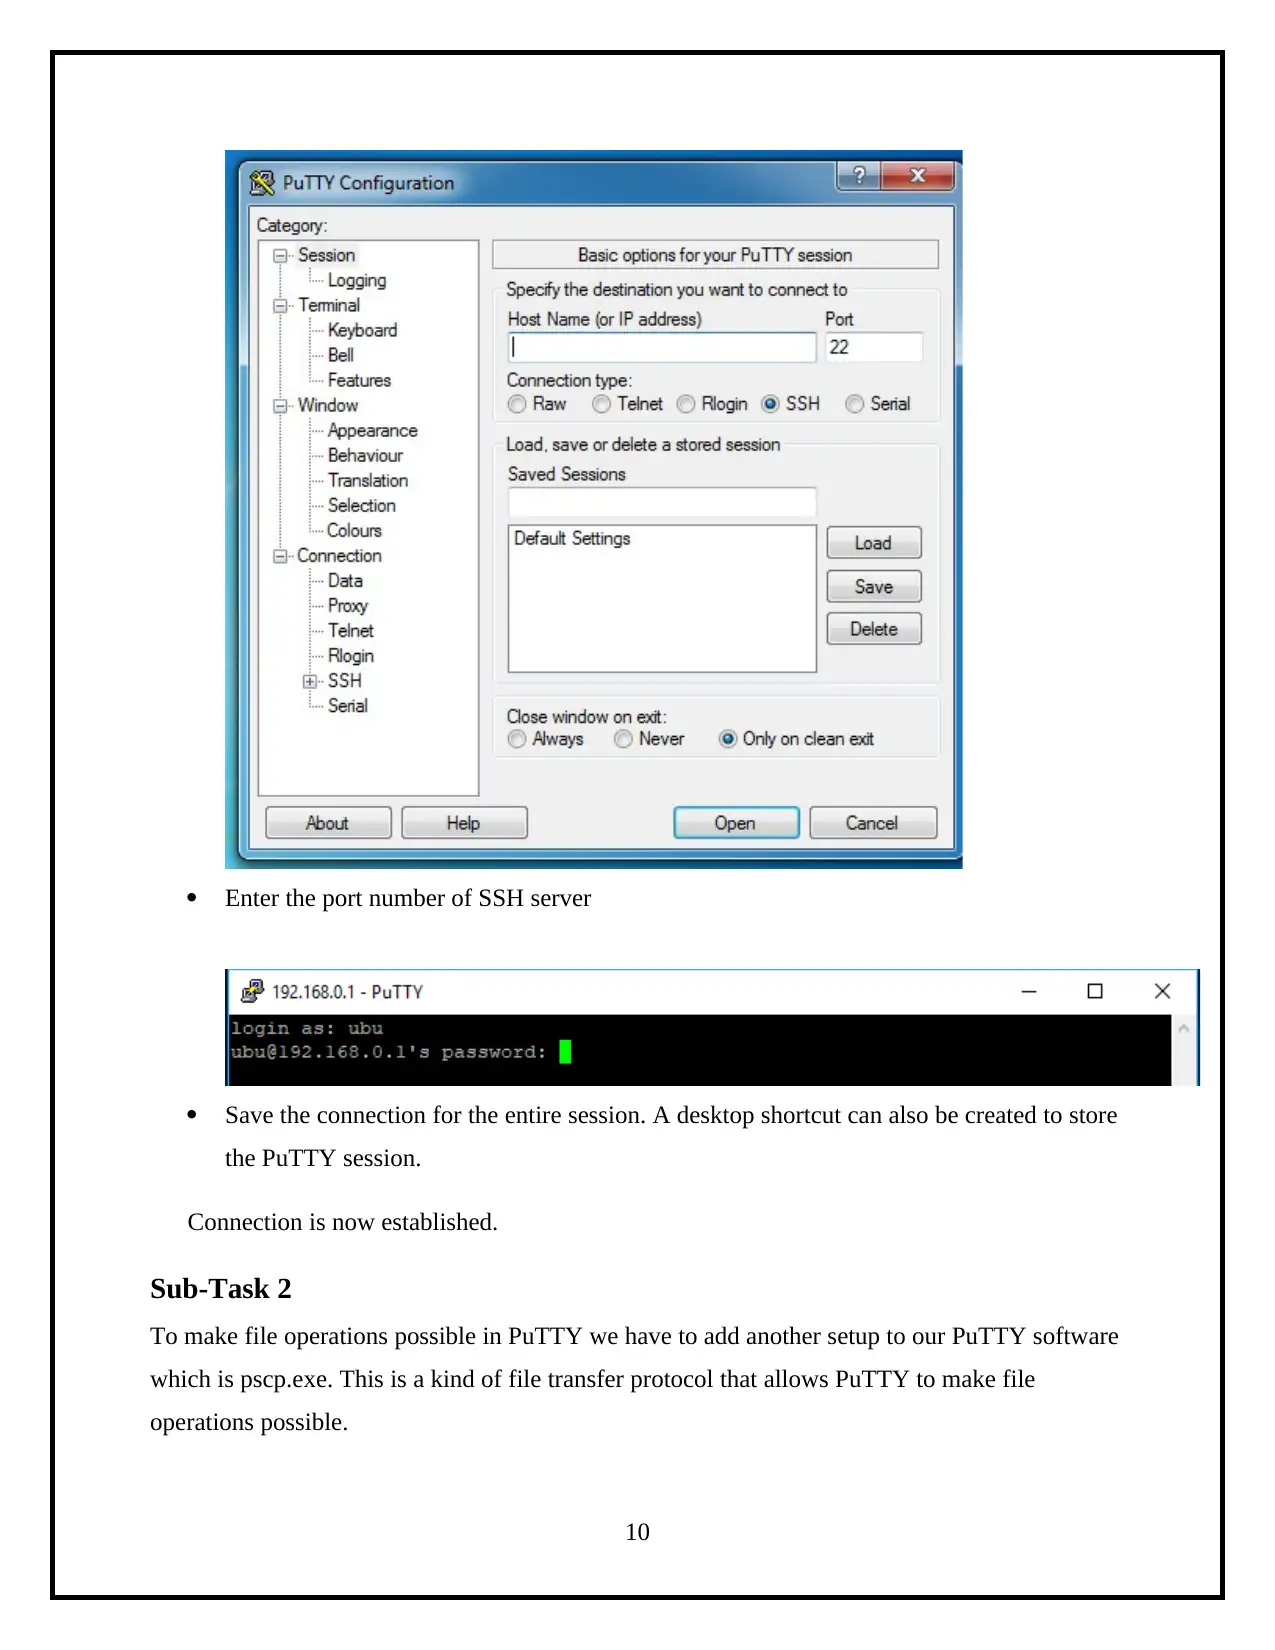
Enter the port number of SSH server
Save the connection for the entire session. A desktop shortcut can also be created to store
the PuTTY session.
Connection is now established.
Sub-Task 2
To make file operations possible in PuTTY we have to add another setup to our PuTTY software
which is pscp.exe. This is a kind of file transfer protocol that allows PuTTY to make file
operations possible.
10
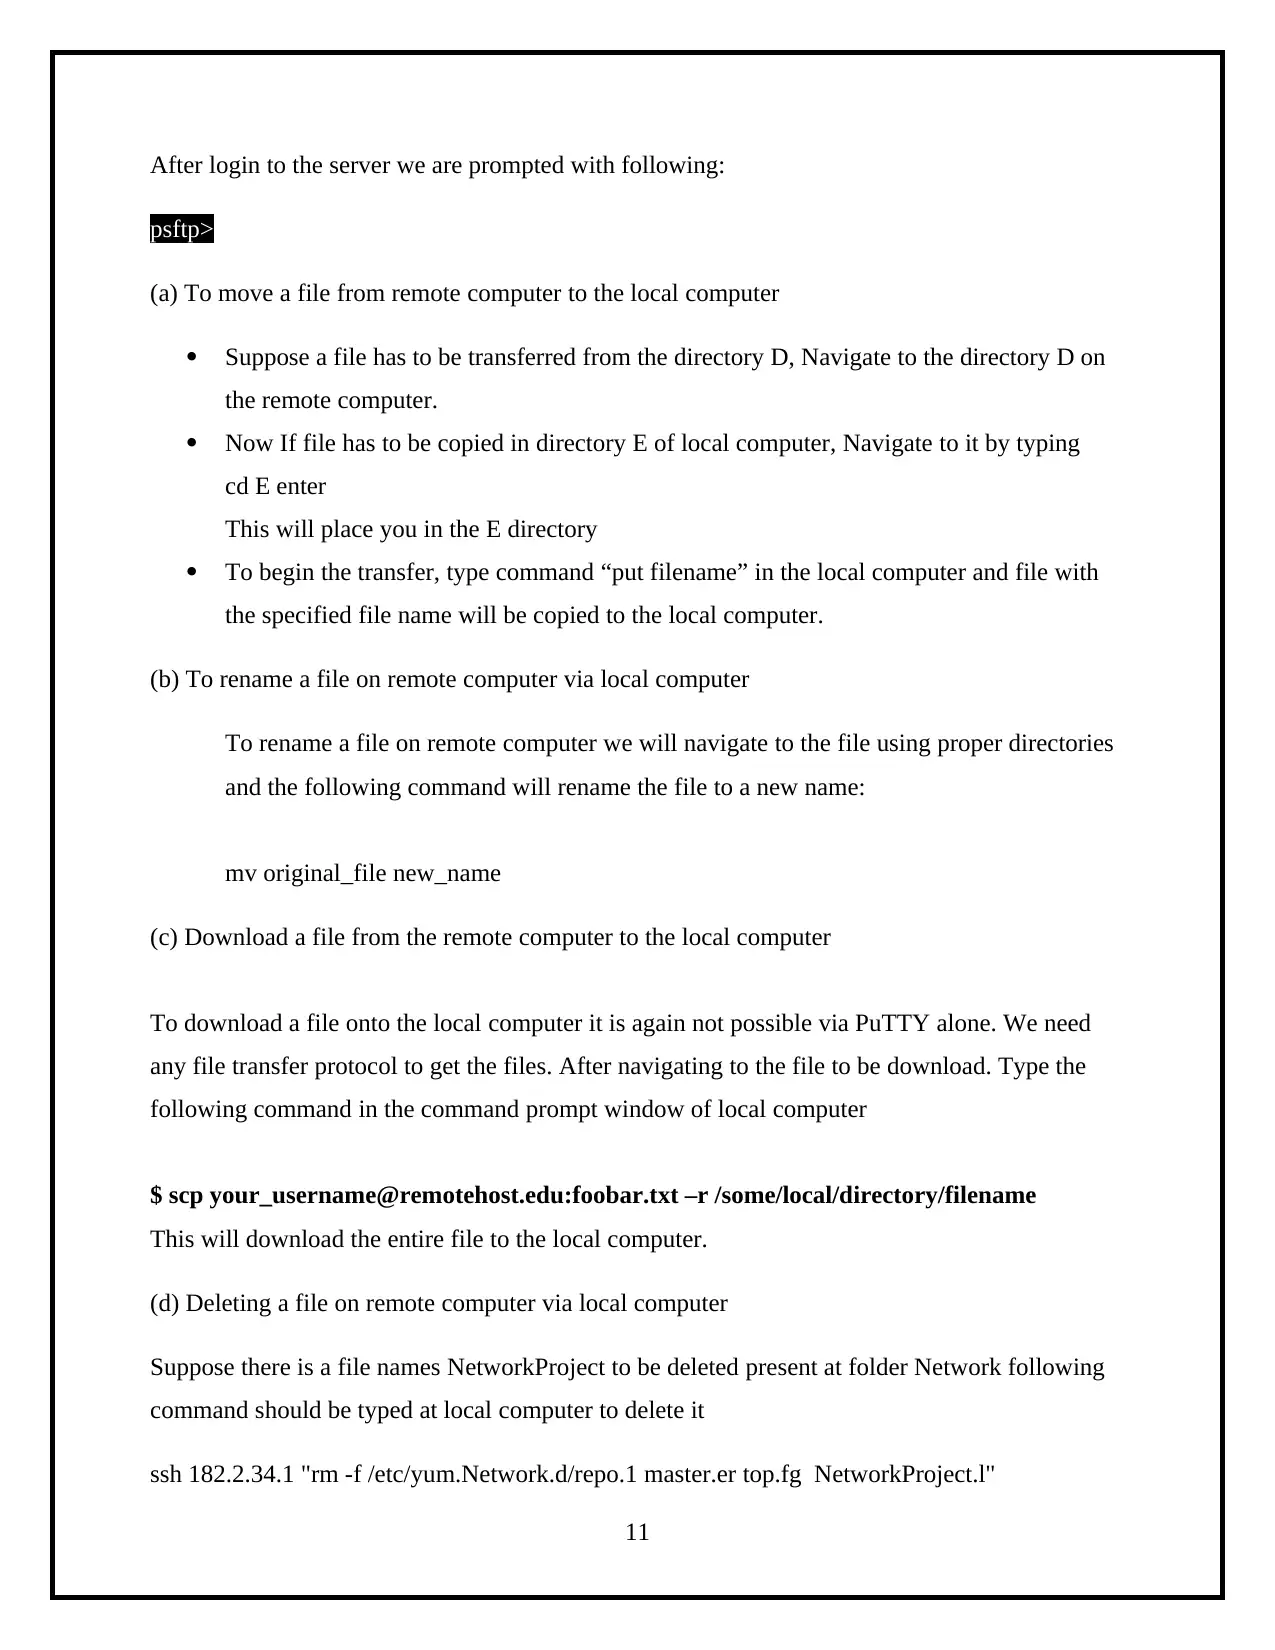
After login to the server we are prompted with following:
psftp>
(a) To move a file from remote computer to the local computer
Suppose a file has to be transferred from the directory D, Navigate to the directory D on
the remote computer.
Now If file has to be copied in directory E of local computer, Navigate to it by typing
cd E enter
This will place you in the E directory
To begin the transfer, type command “put filename” in the local computer and file with
the specified file name will be copied to the local computer.
(b) To rename a file on remote computer via local computer
To rename a file on remote computer we will navigate to the file using proper directories
and the following command will rename the file to a new name:
mv original_file new_name
(c) Download a file from the remote computer to the local computer
To download a file onto the local computer it is again not possible via PuTTY alone. We need
any file transfer protocol to get the files. After navigating to the file to be download. Type the
following command in the command prompt window of local computer
$ scp your_username@remotehost.edu:foobar.txt –r /some/local/directory/filename
This will download the entire file to the local computer.
(d) Deleting a file on remote computer via local computer
Suppose there is a file names NetworkProject to be deleted present at folder Network following
command should be typed at local computer to delete it
ssh 182.2.34.1 "rm -f /etc/yum.Network.d/repo.1 master.er top.fg NetworkProject.l"
11
⊘ This is a preview!⊘
Do you want full access?
Subscribe today to unlock all pages.

Trusted by 1+ million students worldwide
1 out of 15
Related Documents
Your All-in-One AI-Powered Toolkit for Academic Success.
+13062052269
info@desklib.com
Available 24*7 on WhatsApp / Email
![[object Object]](/_next/static/media/star-bottom.7253800d.svg)
Unlock your academic potential
Copyright © 2020–2025 A2Z Services. All Rights Reserved. Developed and managed by ZUCOL.


