On-Road Assessment Route Development & Risk Assessment Task
VerifiedAdded on 2023/06/18
|9
|2758
|64
Practical Assignment
AI Summary
This assignment requires trainee instructors to develop an on-road assessment route suitable for a specific class of driver training (e.g., C, LR, MR, HR, HC), incorporating two maneuvers and a variety of driving situations across different speed zones. The route should include intersections, lane driving scenarios, and varying traffic densities, aligning with Q-Safe standards. The assignment also involves a risk management component, where potential hazardous situations during maneuvers are identified and assessed using a risk evaluation matrix, considering the likelihood and consequences of accidents. The task includes planning the route from Port Augusta to Port Pirie, detailing specific roads and turns, and addressing safety considerations for both the assessor and the learner. The student has to determine if the road situation selected is safe for a learner to conduct the maneuver. The assessment emphasizes the importance of hazard identification, risk control, and contingency measures in ensuring safe and effective learner driver training.
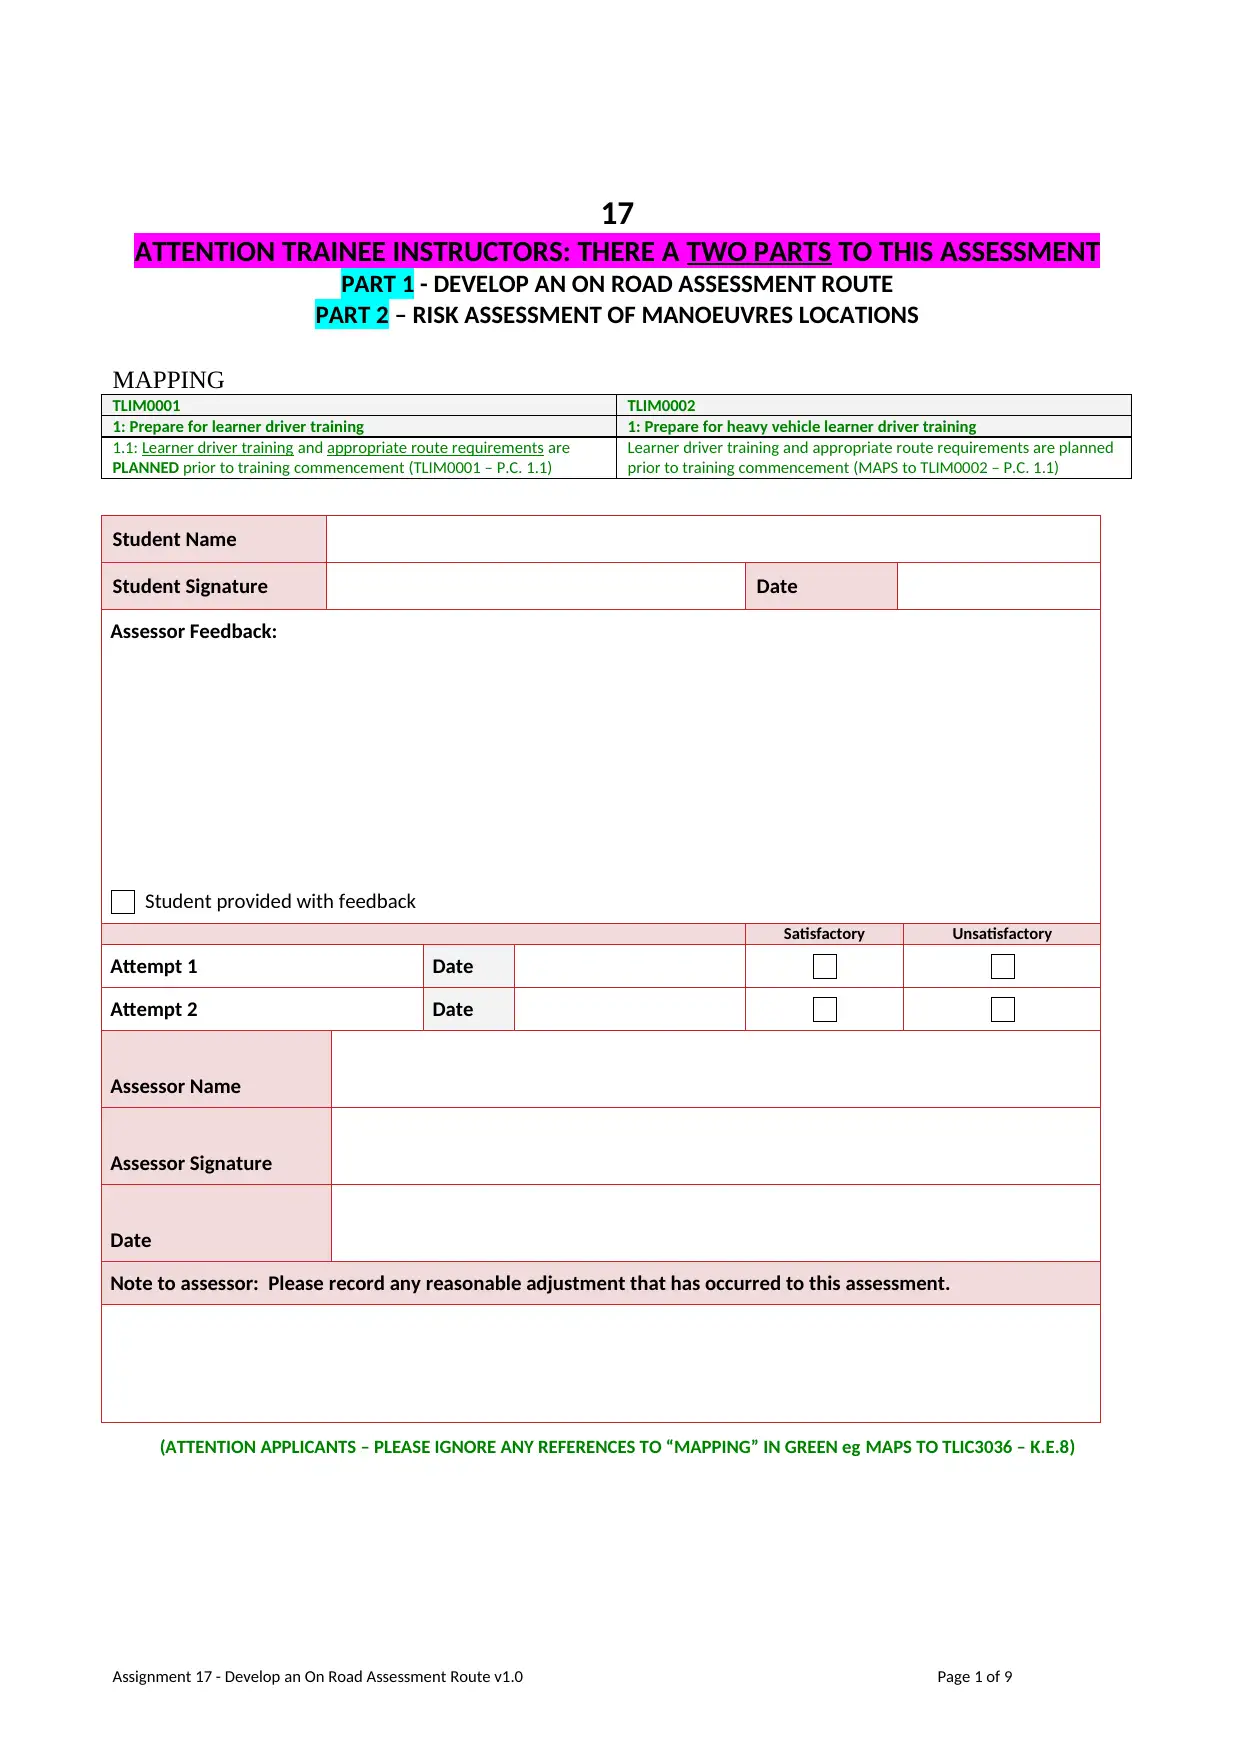
17
ATTENTION TRAINEE INSTRUCTORS: THERE A TWO PARTS TO THIS ASSESSMENT
PART 1 - DEVELOP AN ON ROAD ASSESSMENT ROUTE
PART 2 – RISK ASSESSMENT OF MANOEUVRES LOCATIONS
MAPPING
TLIM0001 TLIM0002
1: Prepare for learner driver training 1: Prepare for heavy vehicle learner driver training
1.1: Learner driver training and appropriate route requirements are
PLANNED prior to training commencement (TLIM0001 – P.C. 1.1)
Learner driver training and appropriate route requirements are planned
prior to training commencement (MAPS to TLIM0002 – P.C. 1.1)
Student Name
Student Signature Date
Assessor Feedback:
Student provided with feedback
Satisfactory Unsatisfactory
Attempt 1 Date
Attempt 2 Date
Assessor Name
Assessor Signature
Date
Note to assessor: Please record any reasonable adjustment that has occurred to this assessment.
(ATTENTION APPLICANTS – PLEASE IGNORE ANY REFERENCES TO “MAPPING” IN GREEN eg MAPS TO TLIC3036 – K.E.8)
Assignment 17 - Develop an On Road Assessment Route v1.0 Page 1 of 9
Paraphrase This Document
Need a fresh take? Get an instant paraphrase of this document with our AI Paraphraser
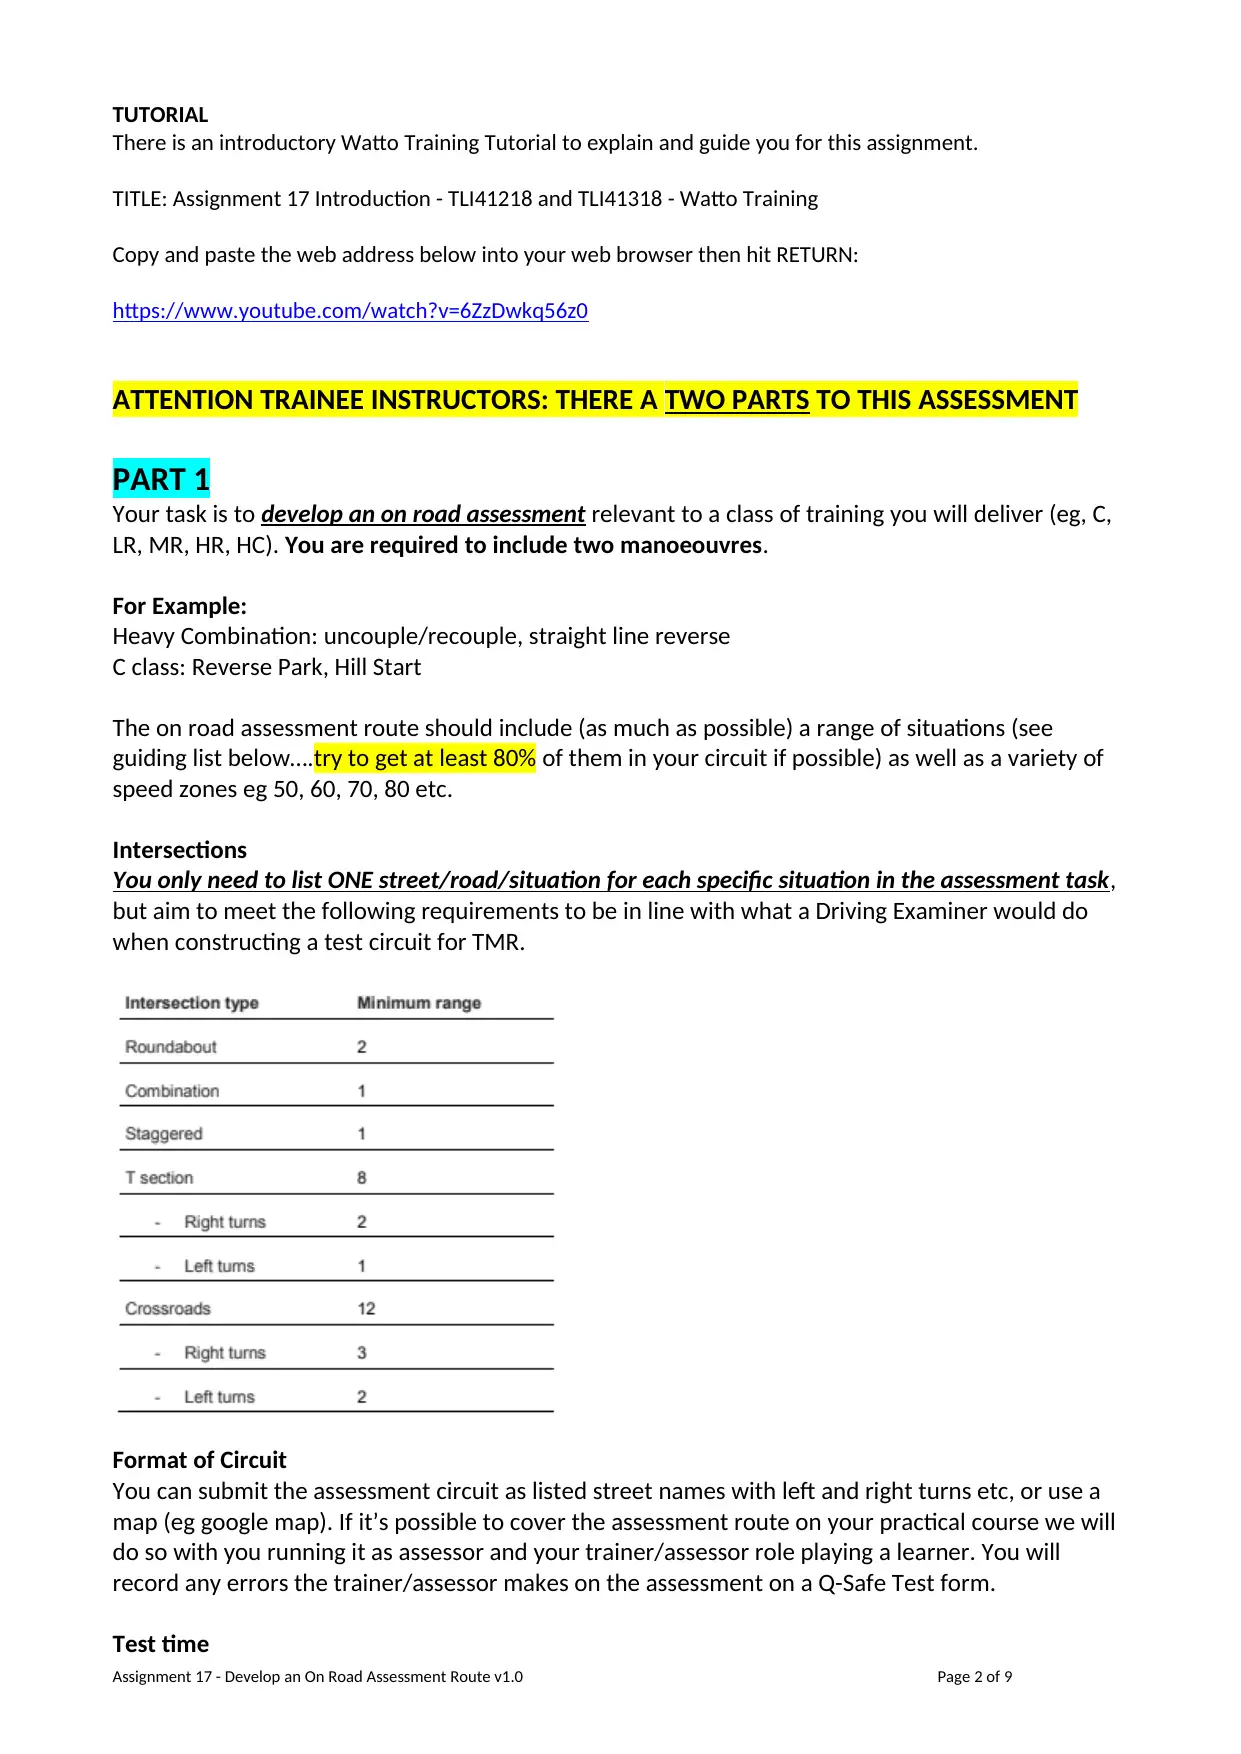
TUTORIAL
There is an introductory Watto Training Tutorial to explain and guide you for this assignment.
TITLE: Assignment 17 Introduction - TLI41218 and TLI41318 - Watto Training
Copy and paste the web address below into your web browser then hit RETURN:
https://www.youtube.com/watch?v=6ZzDwkq56z0
ATTENTION TRAINEE INSTRUCTORS: THERE A TWO PARTS TO THIS ASSESSMENT
PART 1
Your task is to develop an on road assessment relevant to a class of training you will deliver (eg, C,
LR, MR, HR, HC). You are required to include two manoeouvres.
For Example:
Heavy Combination: uncouple/recouple, straight line reverse
C class: Reverse Park, Hill Start
The on road assessment route should include (as much as possible) a range of situations (see
guiding list below….try to get at least 80% of them in your circuit if possible) as well as a variety of
speed zones eg 50, 60, 70, 80 etc.
Intersections
You only need to list ONE street/road/situation for each specific situation in the assessment task,
but aim to meet the following requirements to be in line with what a Driving Examiner would do
when constructing a test circuit for TMR.
Format of Circuit
You can submit the assessment circuit as listed street names with left and right turns etc, or use a
map (eg google map). If it’s possible to cover the assessment route on your practical course we will
do so with you running it as assessor and your trainer/assessor role playing a learner. You will
record any errors the trainer/assessor makes on the assessment on a Q-Safe Test form.
Test time
Assignment 17 - Develop an On Road Assessment Route v1.0 Page 2 of 9
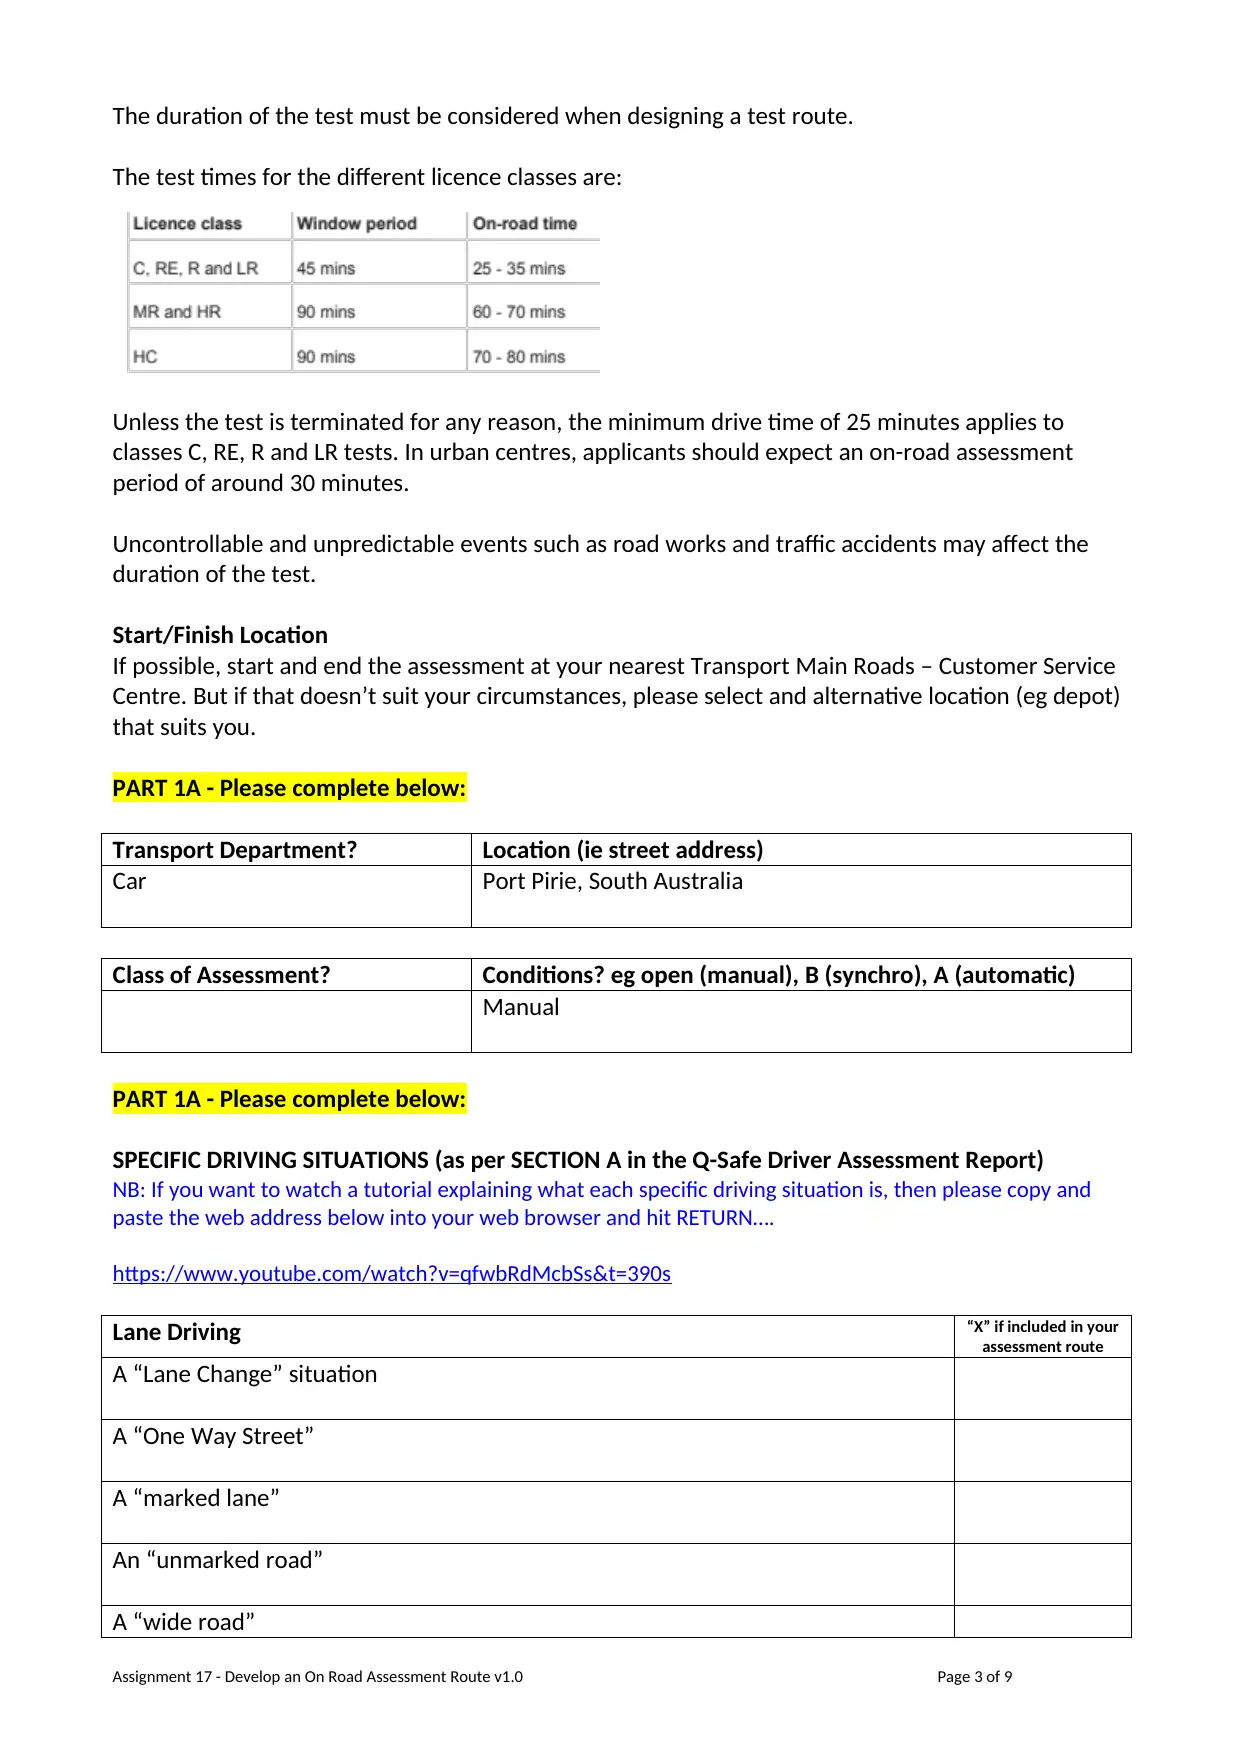
The duration of the test must be considered when designing a test route.
The test times for the different licence classes are:
Unless the test is terminated for any reason, the minimum drive time of 25 minutes applies to
classes C, RE, R and LR tests. In urban centres, applicants should expect an on-road assessment
period of around 30 minutes.
Uncontrollable and unpredictable events such as road works and traffic accidents may affect the
duration of the test.
Start/Finish Location
If possible, start and end the assessment at your nearest Transport Main Roads – Customer Service
Centre. But if that doesn’t suit your circumstances, please select and alternative location (eg depot)
that suits you.
PART 1A - Please complete below:
Transport Department? Location (ie street address)
Car Port Pirie, South Australia
Class of Assessment? Conditions? eg open (manual), B (synchro), A (automatic)
Manual
PART 1A - Please complete below:
SPECIFIC DRIVING SITUATIONS (as per SECTION A in the Q-Safe Driver Assessment Report)
NB: If you want to watch a tutorial explaining what each specific driving situation is, then please copy and
paste the web address below into your web browser and hit RETURN….
https://www.youtube.com/watch?v=qfwbRdMcbSs&t=390s
Lane Driving “X” if included in your
assessment route
A “Lane Change” situation
A “One Way Street”
A “marked lane”
An “unmarked road”
A “wide road”
Assignment 17 - Develop an On Road Assessment Route v1.0 Page 3 of 9
⊘ This is a preview!⊘
Do you want full access?
Subscribe today to unlock all pages.
Trusted by 1+ million students worldwide
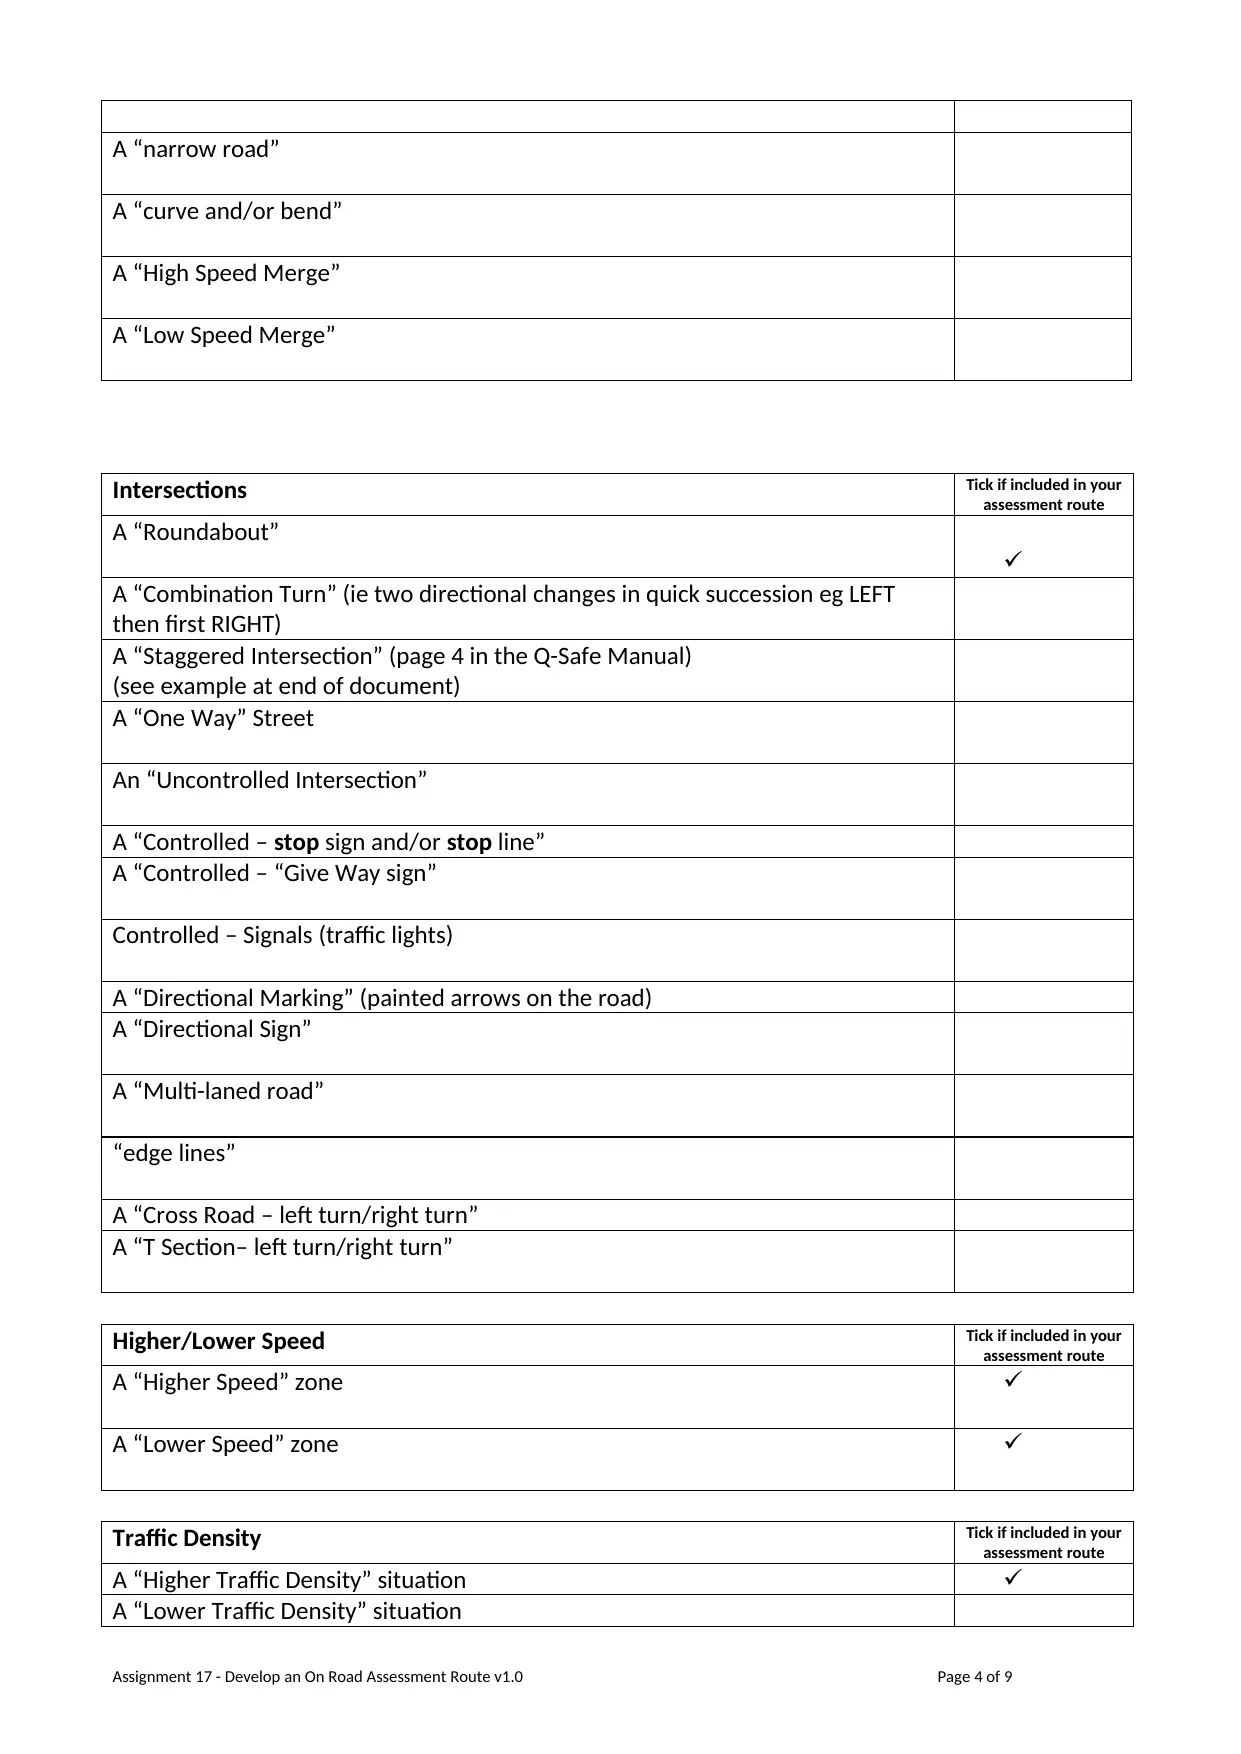
A “narrow road”
A “curve and/or bend”
A “High Speed Merge”
A “Low Speed Merge”
Intersections Tick if included in your
assessment route
A “Roundabout”
A “Combination Turn” (ie two directional changes in quick succession eg LEFT
then first RIGHT)
A “Staggered Intersection” (page 4 in the Q-Safe Manual)
(see example at end of document)
A “One Way” Street
An “Uncontrolled Intersection”
A “Controlled – stop sign and/or stop line”
A “Controlled – “Give Way sign”
Controlled – Signals (traffic lights)
A “Directional Marking” (painted arrows on the road)
A “Directional Sign”
A “Multi-laned road”
“edge lines”
A “Cross Road – left turn/right turn”
A “T Section– left turn/right turn”
Higher/Lower Speed Tick if included in your
assessment route
A “Higher Speed” zone
A “Lower Speed” zone
Traffic Density Tick if included in your
assessment route
A “Higher Traffic Density” situation
A “Lower Traffic Density” situation
Assignment 17 - Develop an On Road Assessment Route v1.0 Page 4 of 9
Paraphrase This Document
Need a fresh take? Get an instant paraphrase of this document with our AI Paraphraser
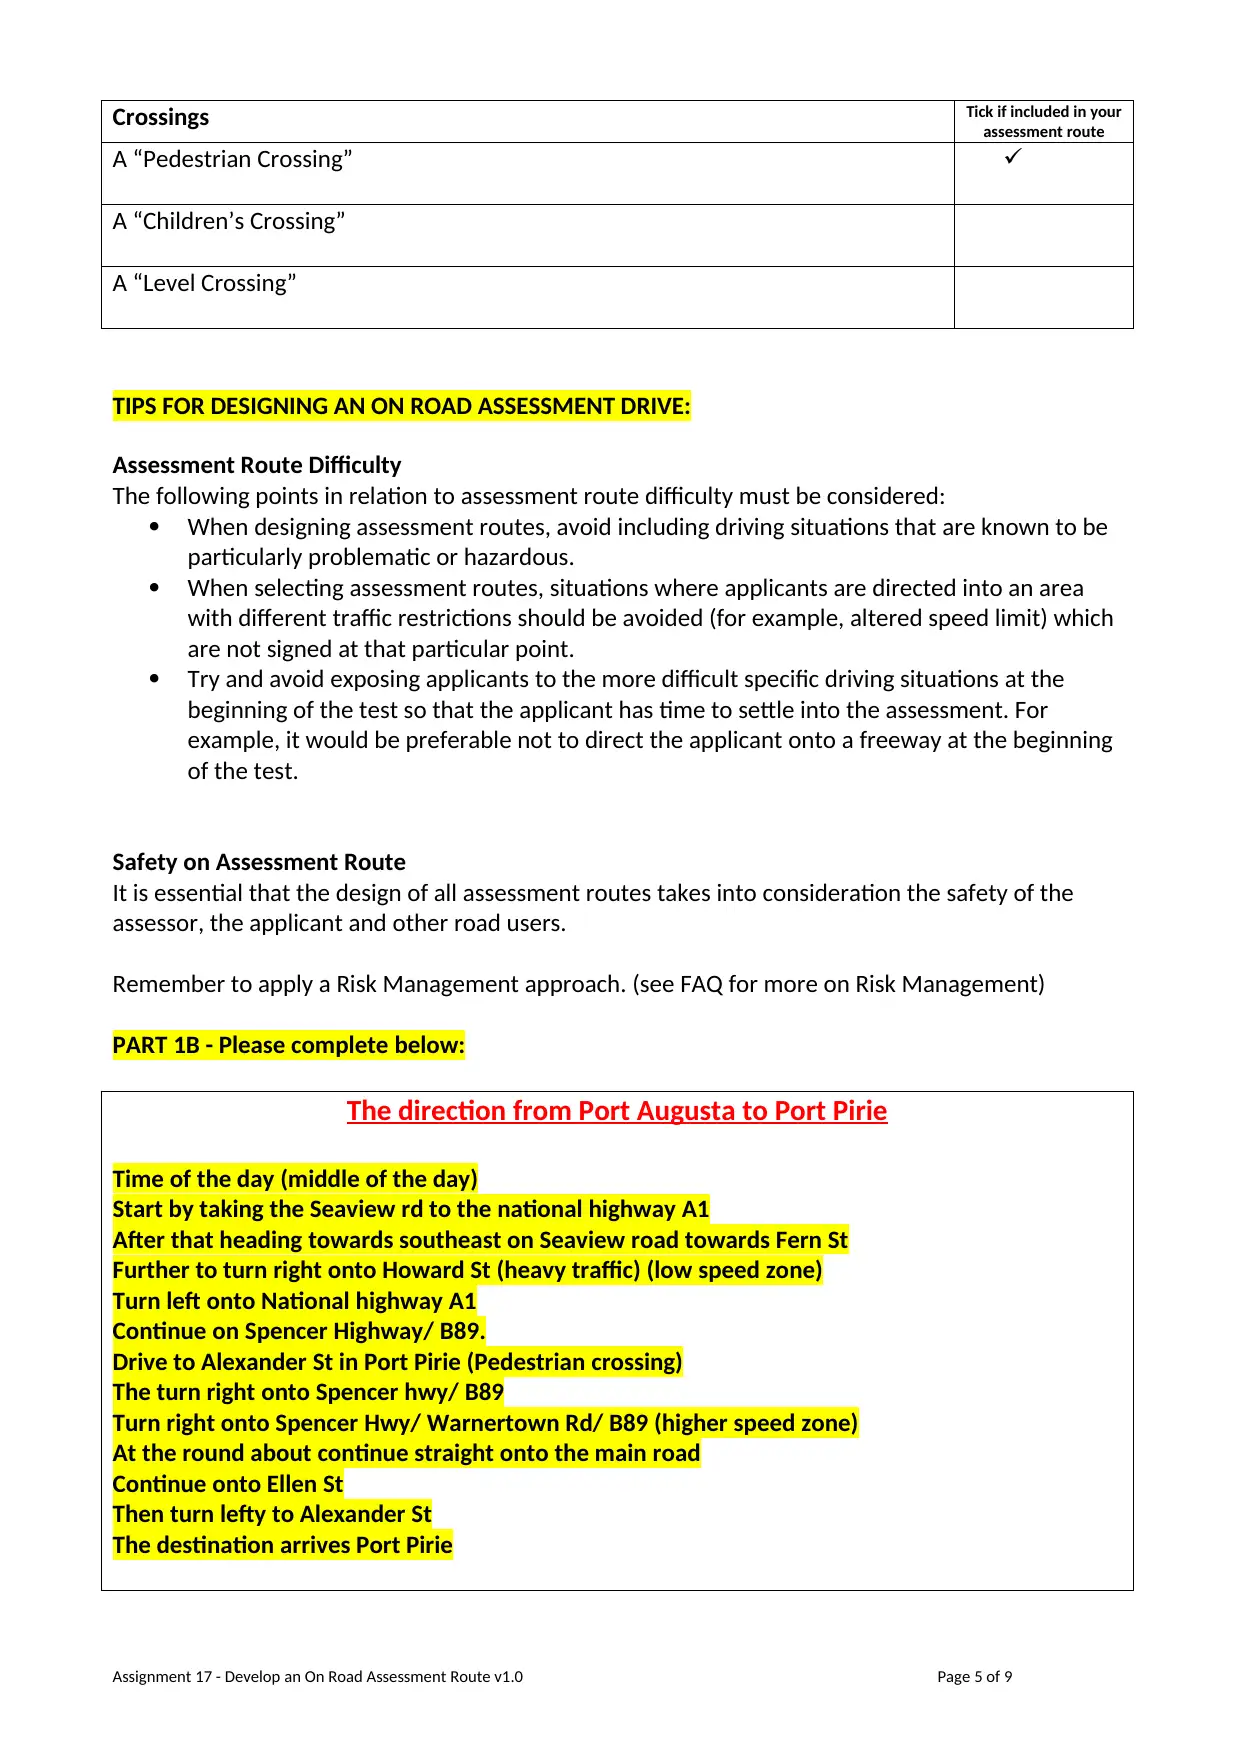
Crossings Tick if included in your
assessment route
A “Pedestrian Crossing”
A “Children’s Crossing”
A “Level Crossing”
TIPS FOR DESIGNING AN ON ROAD ASSESSMENT DRIVE:
Assessment Route Difficulty
The following points in relation to assessment route difficulty must be considered:
When designing assessment routes, avoid including driving situations that are known to be
particularly problematic or hazardous.
When selecting assessment routes, situations where applicants are directed into an area
with different traffic restrictions should be avoided (for example, altered speed limit) which
are not signed at that particular point.
Try and avoid exposing applicants to the more difficult specific driving situations at the
beginning of the test so that the applicant has time to settle into the assessment. For
example, it would be preferable not to direct the applicant onto a freeway at the beginning
of the test.
Safety on Assessment Route
It is essential that the design of all assessment routes takes into consideration the safety of the
assessor, the applicant and other road users.
Remember to apply a Risk Management approach. (see FAQ for more on Risk Management)
PART 1B - Please complete below:
The direction from Port Augusta to Port Pirie
Time of the day (middle of the day)
Start by taking the Seaview rd to the national highway A1
After that heading towards southeast on Seaview road towards Fern St
Further to turn right onto Howard St (heavy traffic) (low speed zone)
Turn left onto National highway A1
Continue on Spencer Highway/ B89.
Drive to Alexander St in Port Pirie (Pedestrian crossing)
The turn right onto Spencer hwy/ B89
Turn right onto Spencer Hwy/ Warnertown Rd/ B89 (higher speed zone)
At the round about continue straight onto the main road
Continue onto Ellen St
Then turn lefty to Alexander St
The destination arrives Port Pirie
Assignment 17 - Develop an On Road Assessment Route v1.0 Page 5 of 9
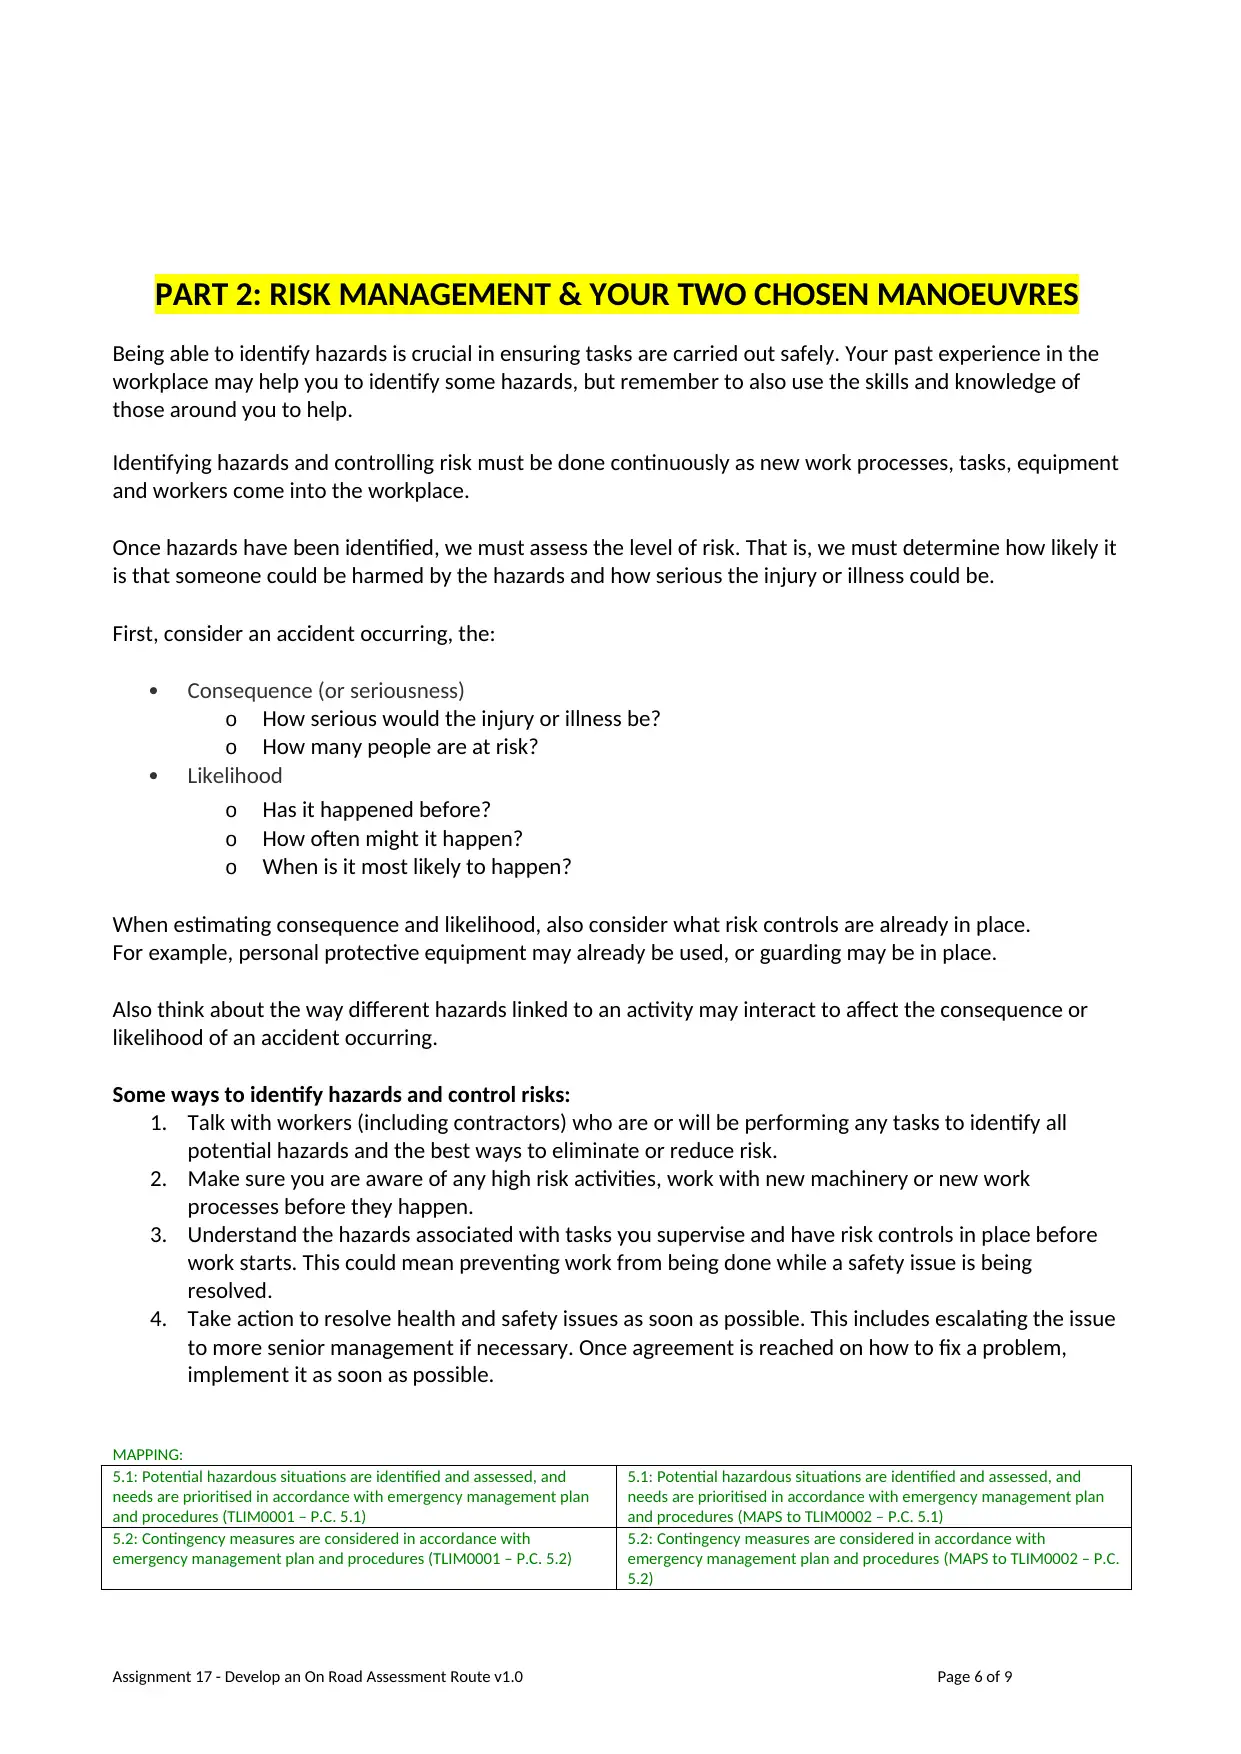
PART 2: RISK MANAGEMENT & YOUR TWO CHOSEN MANOEUVRES
Being able to identify hazards is crucial in ensuring tasks are carried out safely. Your past experience in the
workplace may help you to identify some hazards, but remember to also use the skills and knowledge of
those around you to help.
Identifying hazards and controlling risk must be done continuously as new work processes, tasks, equipment
and workers come into the workplace.
Once hazards have been identified, we must assess the level of risk. That is, we must determine how likely it
is that someone could be harmed by the hazards and how serious the injury or illness could be.
First, consider an accident occurring, the:
Consequence (or seriousness)
o How serious would the injury or illness be?
o How many people are at risk?
Likelihood
o Has it happened before?
o How often might it happen?
o When is it most likely to happen?
When estimating consequence and likelihood, also consider what risk controls are already in place.
For example, personal protective equipment may already be used, or guarding may be in place.
Also think about the way different hazards linked to an activity may interact to affect the consequence or
likelihood of an accident occurring.
Some ways to identify hazards and control risks:
1. Talk with workers (including contractors) who are or will be performing any tasks to identify all
potential hazards and the best ways to eliminate or reduce risk.
2. Make sure you are aware of any high risk activities, work with new machinery or new work
processes before they happen.
3. Understand the hazards associated with tasks you supervise and have risk controls in place before
work starts. This could mean preventing work from being done while a safety issue is being
resolved.
4. Take action to resolve health and safety issues as soon as possible. This includes escalating the issue
to more senior management if necessary. Once agreement is reached on how to fix a problem,
implement it as soon as possible.
MAPPING:
5.1: Potential hazardous situations are identified and assessed, and
needs are prioritised in accordance with emergency management plan
and procedures (TLIM0001 – P.C. 5.1)
5.1: Potential hazardous situations are identified and assessed, and
needs are prioritised in accordance with emergency management plan
and procedures (MAPS to TLIM0002 – P.C. 5.1)
5.2: Contingency measures are considered in accordance with
emergency management plan and procedures (TLIM0001 – P.C. 5.2)
5.2: Contingency measures are considered in accordance with
emergency management plan and procedures (MAPS to TLIM0002 – P.C.
5.2)
Assignment 17 - Develop an On Road Assessment Route v1.0 Page 6 of 9
⊘ This is a preview!⊘
Do you want full access?
Subscribe today to unlock all pages.
Trusted by 1+ million students worldwide
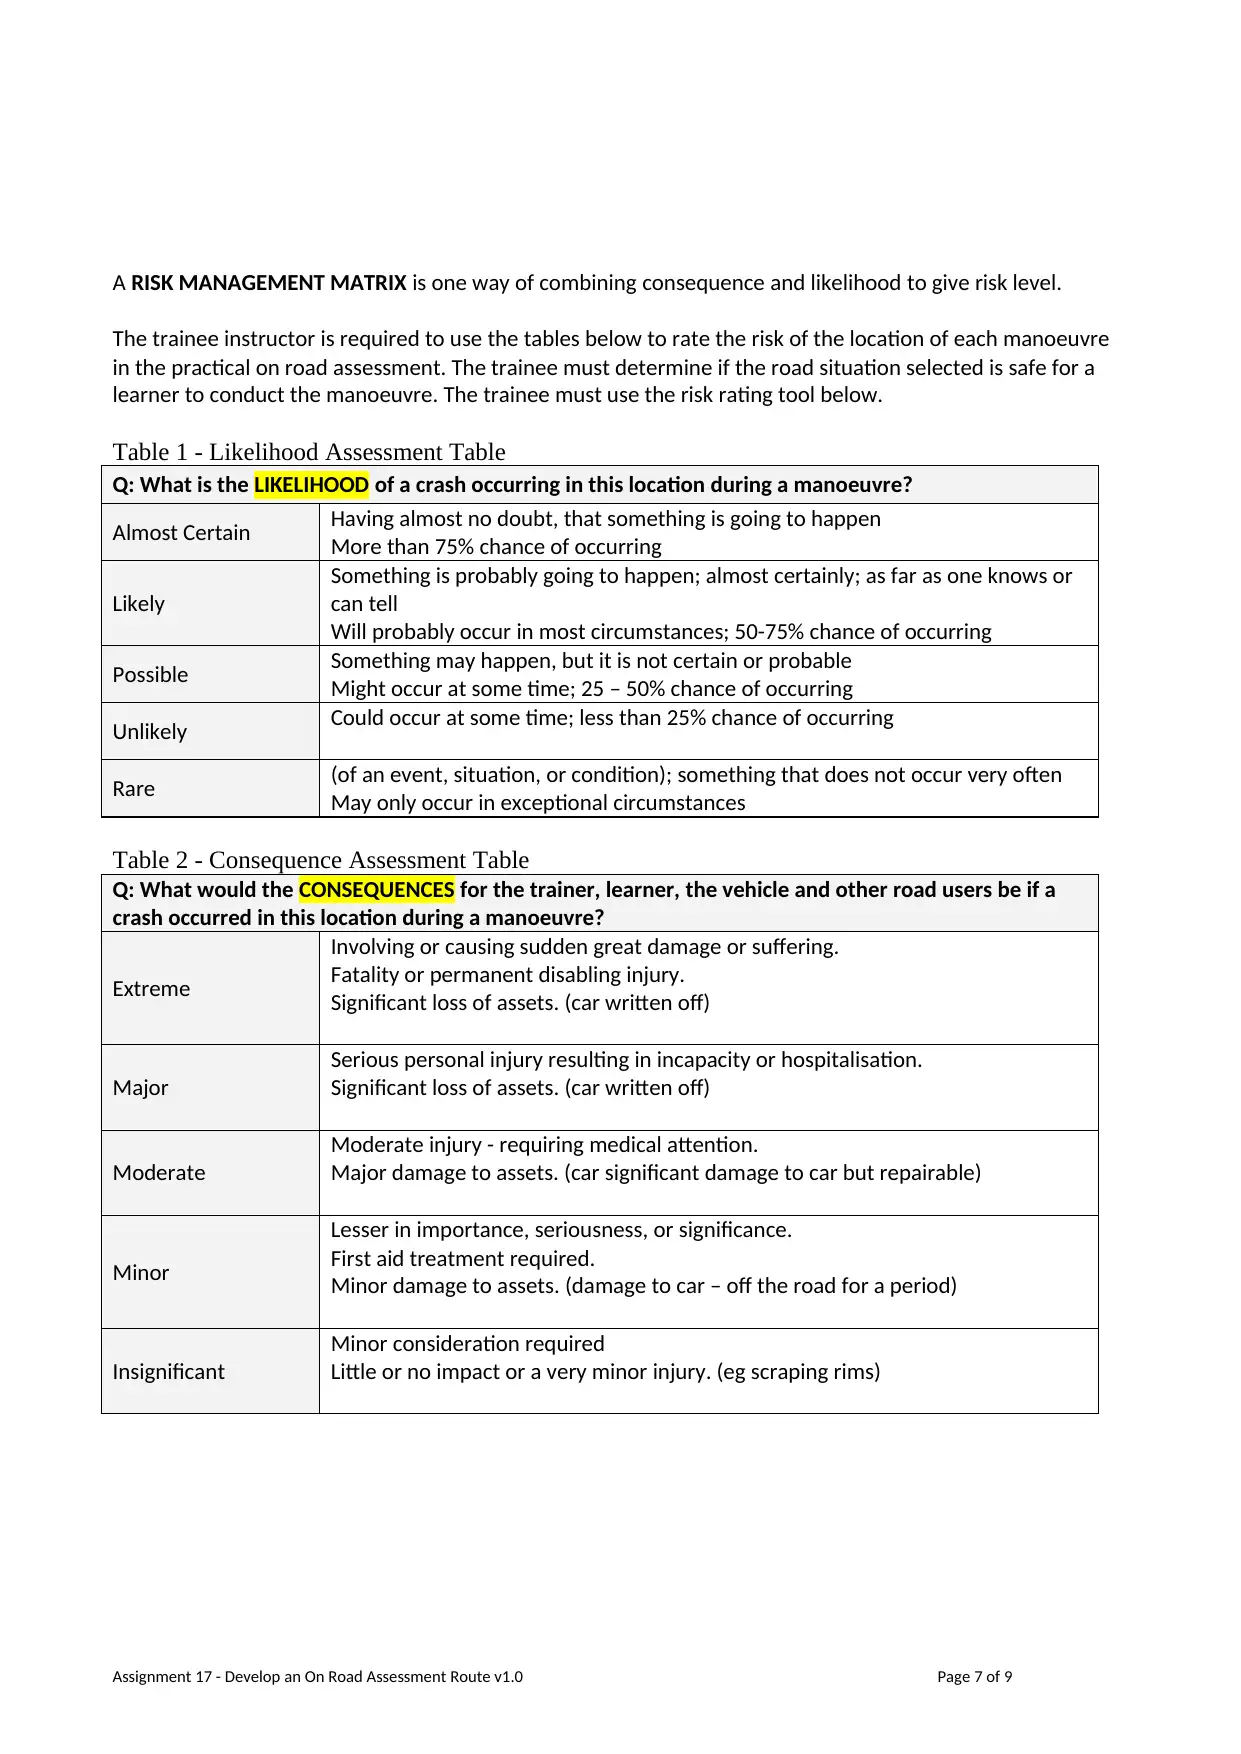
A RISK MANAGEMENT MATRIX is one way of combining consequence and likelihood to give risk level.
The trainee instructor is required to use the tables below to rate the risk of the location of each manoeuvre
in the practical on road assessment. The trainee must determine if the road situation selected is safe for a
learner to conduct the manoeuvre. The trainee must use the risk rating tool below.
Table 1 - Likelihood Assessment Table
Q: What is the LIKELIHOOD of a crash occurring in this location during a manoeuvre?
Almost Certain Having almost no doubt, that something is going to happen
More than 75% chance of occurring
Likely
Something is probably going to happen; almost certainly; as far as one knows or
can tell
Will probably occur in most circumstances; 50-75% chance of occurring
Possible Something may happen, but it is not certain or probable
Might occur at some time; 25 – 50% chance of occurring
Unlikely Could occur at some time; less than 25% chance of occurring
Rare (of an event, situation, or condition); something that does not occur very often
May only occur in exceptional circumstances
Table 2 - Consequence Assessment Table
Q: What would the CONSEQUENCES for the trainer, learner, the vehicle and other road users be if a
crash occurred in this location during a manoeuvre?
Extreme
Involving or causing sudden great damage or suffering.
Fatality or permanent disabling injury.
Significant loss of assets. (car written off)
Major
Serious personal injury resulting in incapacity or hospitalisation.
Significant loss of assets. (car written off)
Moderate
Moderate injury - requiring medical attention.
Major damage to assets. (car significant damage to car but repairable)
Minor
Lesser in importance, seriousness, or significance.
First aid treatment required.
Minor damage to assets. (damage to car – off the road for a period)
Insignificant
Minor consideration required
Little or no impact or a very minor injury. (eg scraping rims)
Assignment 17 - Develop an On Road Assessment Route v1.0 Page 7 of 9
Paraphrase This Document
Need a fresh take? Get an instant paraphrase of this document with our AI Paraphraser
Table 3 - Risk Evaluation Matrix
Match the LIKELIHOOD and the CONSEQUENCE to make your evaluation.
CONSEQUENCE
LIKELIHOOD Insignificant Minor Moderate Major Extreme
Rare Low Low Low Low Low
Unlikely Low Low Low Medium Medium
Possible Low Low Medium Medium Medium
Likely Low Medium Medium High High
Almost certain Low Medium Medium High Extreme
TUTORIAL:
There is a tutorial about the Risk Assessment (Part 2 of Assignment 17) to assist you with completing the
final part of this assessment.
TITLE: Risk Assessment TutorialManoeuvres (for Qld applicants)
If you copy and paste this web address into your web browser and hit RETURN, it will take you to the
relevant tutorial.
https://www.youtube.com/watch?v=YmYz4GRxVqU
PART 2 - Please complete below:
2.1 - Manoeuvre Type: Reverse park
TASK: THE TRAINEE MUST USE Tables 1, 2 and 3 - Risk Evaluation Matrix to
select the consequence, the likelihood and the risk rating on a selected site
for the manoeuvre asking the questions…..
RISK ASSESSMENT
Q1: What is the LIKELIHOOD of us having a crash in this location? SELECT (ONE)
Rare
Unlikely
Possible
Likely
Almost certain
Q2: What would be the CONSEQUENCES of us having a crash in this location? SELECT (ONE)
Insignificant
Minor
Moderate
Major
Catastrophic
Q3: What is the RISK RATING? SELECT (ONE)
L - Low Risk
M - Medium Risk
H - High Risk
E - Extreme Risk
Assignment 17 - Develop an On Road Assessment Route v1.0 Page 8 of 9
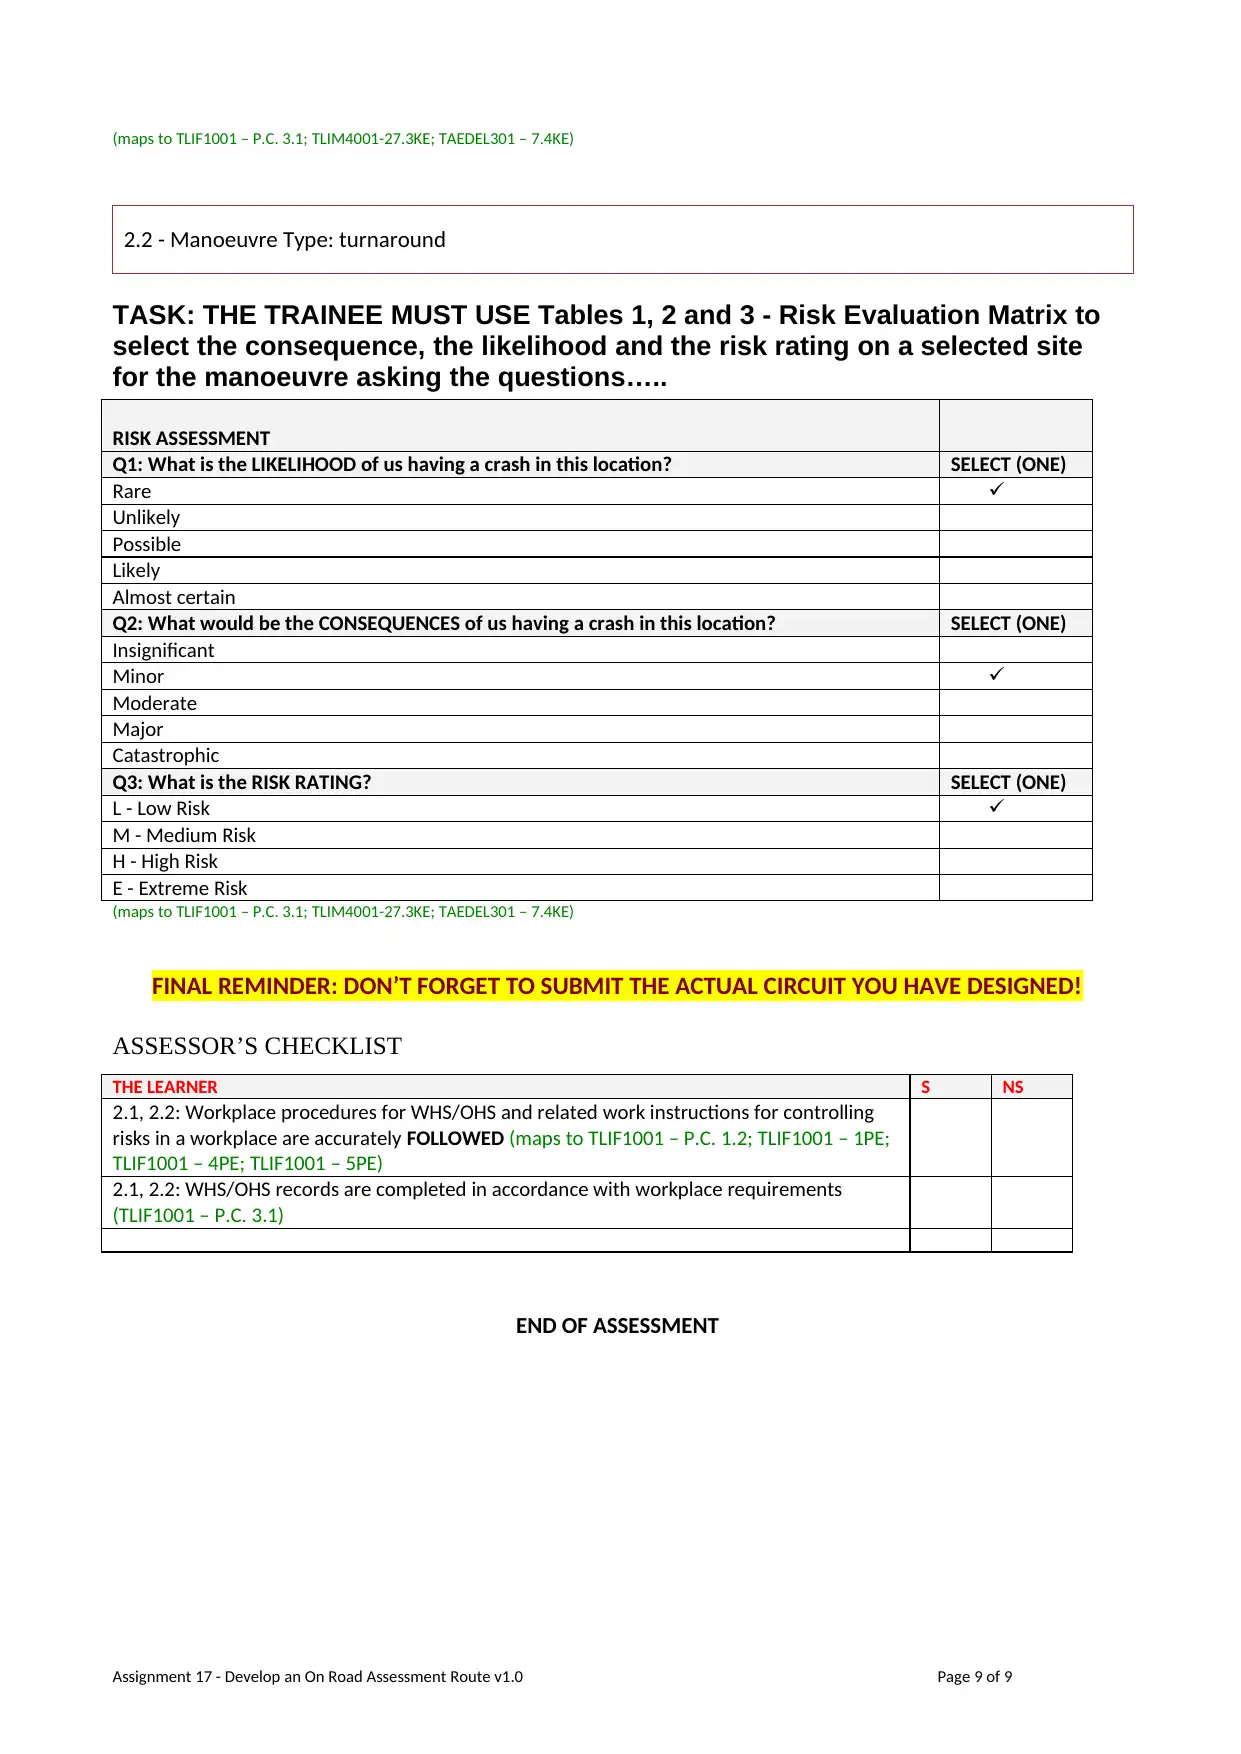
(maps to TLIF1001 – P.C. 3.1; TLIM4001-27.3KE; TAEDEL301 – 7.4KE)
2.2 - Manoeuvre Type: turnaround
TASK: THE TRAINEE MUST USE Tables 1, 2 and 3 - Risk Evaluation Matrix to
select the consequence, the likelihood and the risk rating on a selected site
for the manoeuvre asking the questions…..
RISK ASSESSMENT
Q1: What is the LIKELIHOOD of us having a crash in this location? SELECT (ONE)
Rare
Unlikely
Possible
Likely
Almost certain
Q2: What would be the CONSEQUENCES of us having a crash in this location? SELECT (ONE)
Insignificant
Minor
Moderate
Major
Catastrophic
Q3: What is the RISK RATING? SELECT (ONE)
L - Low Risk
M - Medium Risk
H - High Risk
E - Extreme Risk
(maps to TLIF1001 – P.C. 3.1; TLIM4001-27.3KE; TAEDEL301 – 7.4KE)
FINAL REMINDER: DON’T FORGET TO SUBMIT THE ACTUAL CIRCUIT YOU HAVE DESIGNED!
ASSESSOR’S CHECKLIST
THE LEARNER S NS
2.1, 2.2: Workplace procedures for WHS/OHS and related work instructions for controlling
risks in a workplace are accurately FOLLOWED (maps to TLIF1001 – P.C. 1.2; TLIF1001 – 1PE;
TLIF1001 – 4PE; TLIF1001 – 5PE)
2.1, 2.2: WHS/OHS records are completed in accordance with workplace requirements
(TLIF1001 – P.C. 3.1)
END OF ASSESSMENT
Assignment 17 - Develop an On Road Assessment Route v1.0 Page 9 of 9
⊘ This is a preview!⊘
Do you want full access?
Subscribe today to unlock all pages.
Trusted by 1+ million students worldwide
1 out of 9
Related Documents


Your All-in-One AI-Powered Toolkit for Academic Success.
+13062052269
info@desklib.com
Available 24*7 on WhatsApp / Email
![[object Object]](/_next/static/media/star-bottom.7253800d.svg)
Unlock your academic potential
Copyright © 2020–2026 A2Z Services. All Rights Reserved. Developed and managed by ZUCOL.