Configuring Network Protocols and Services with Packet Tracer
VerifiedAdded on 2020/04/07
|36
|1787
|33
AI Summary
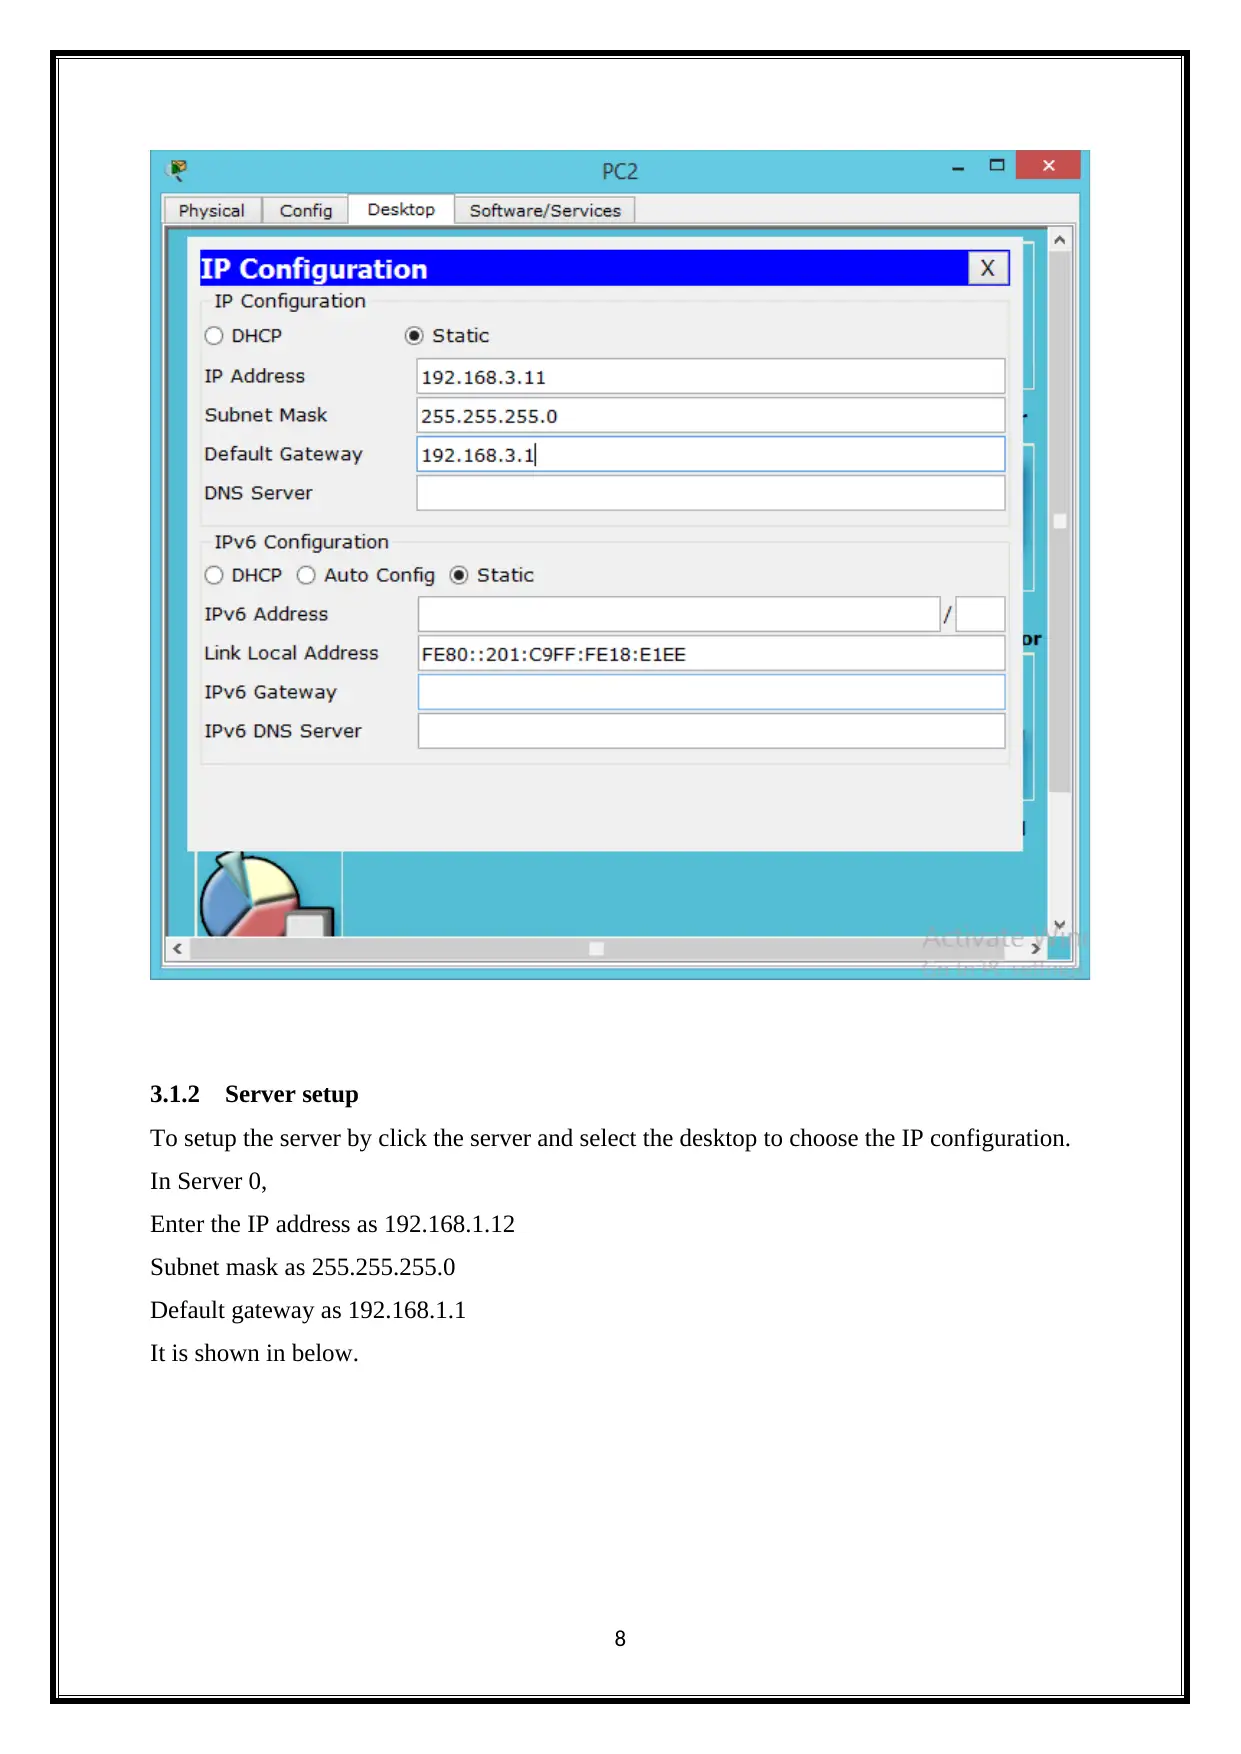
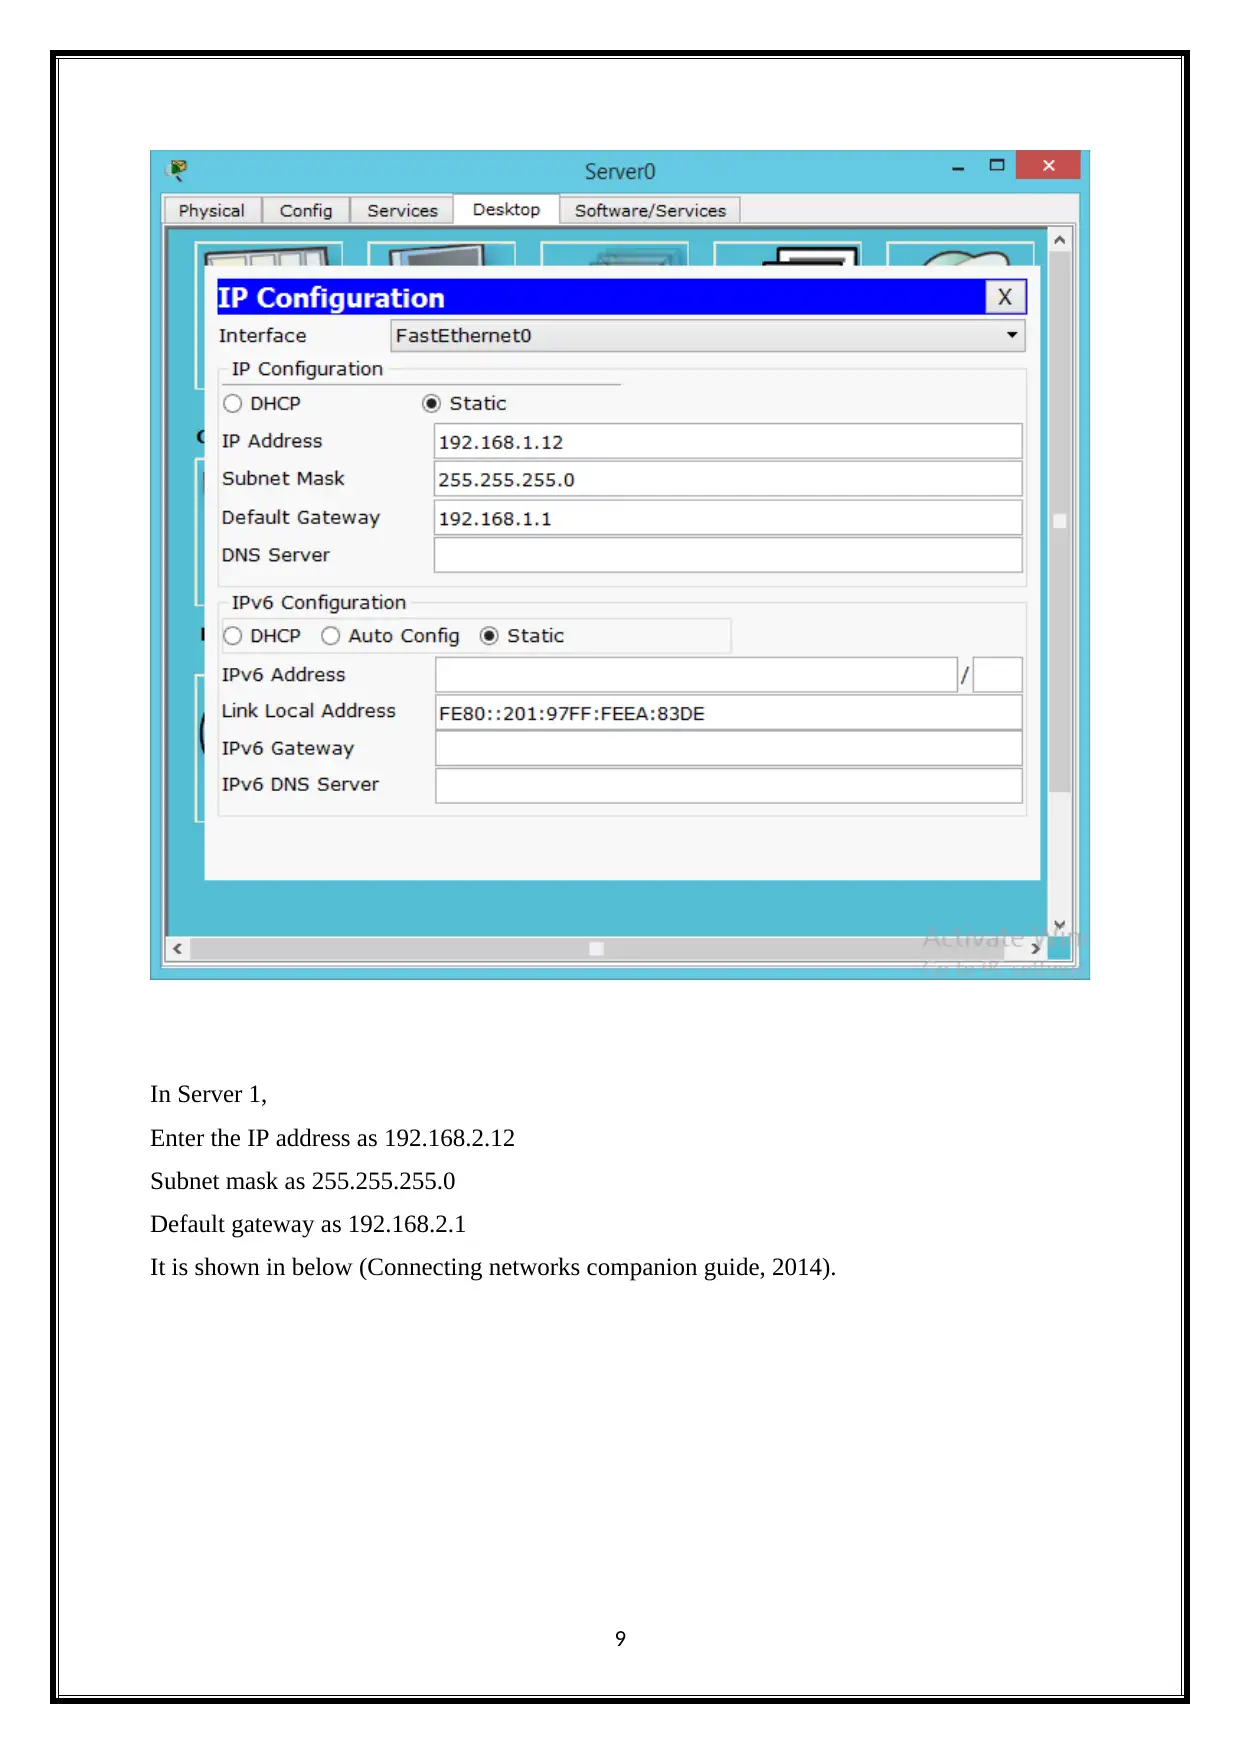
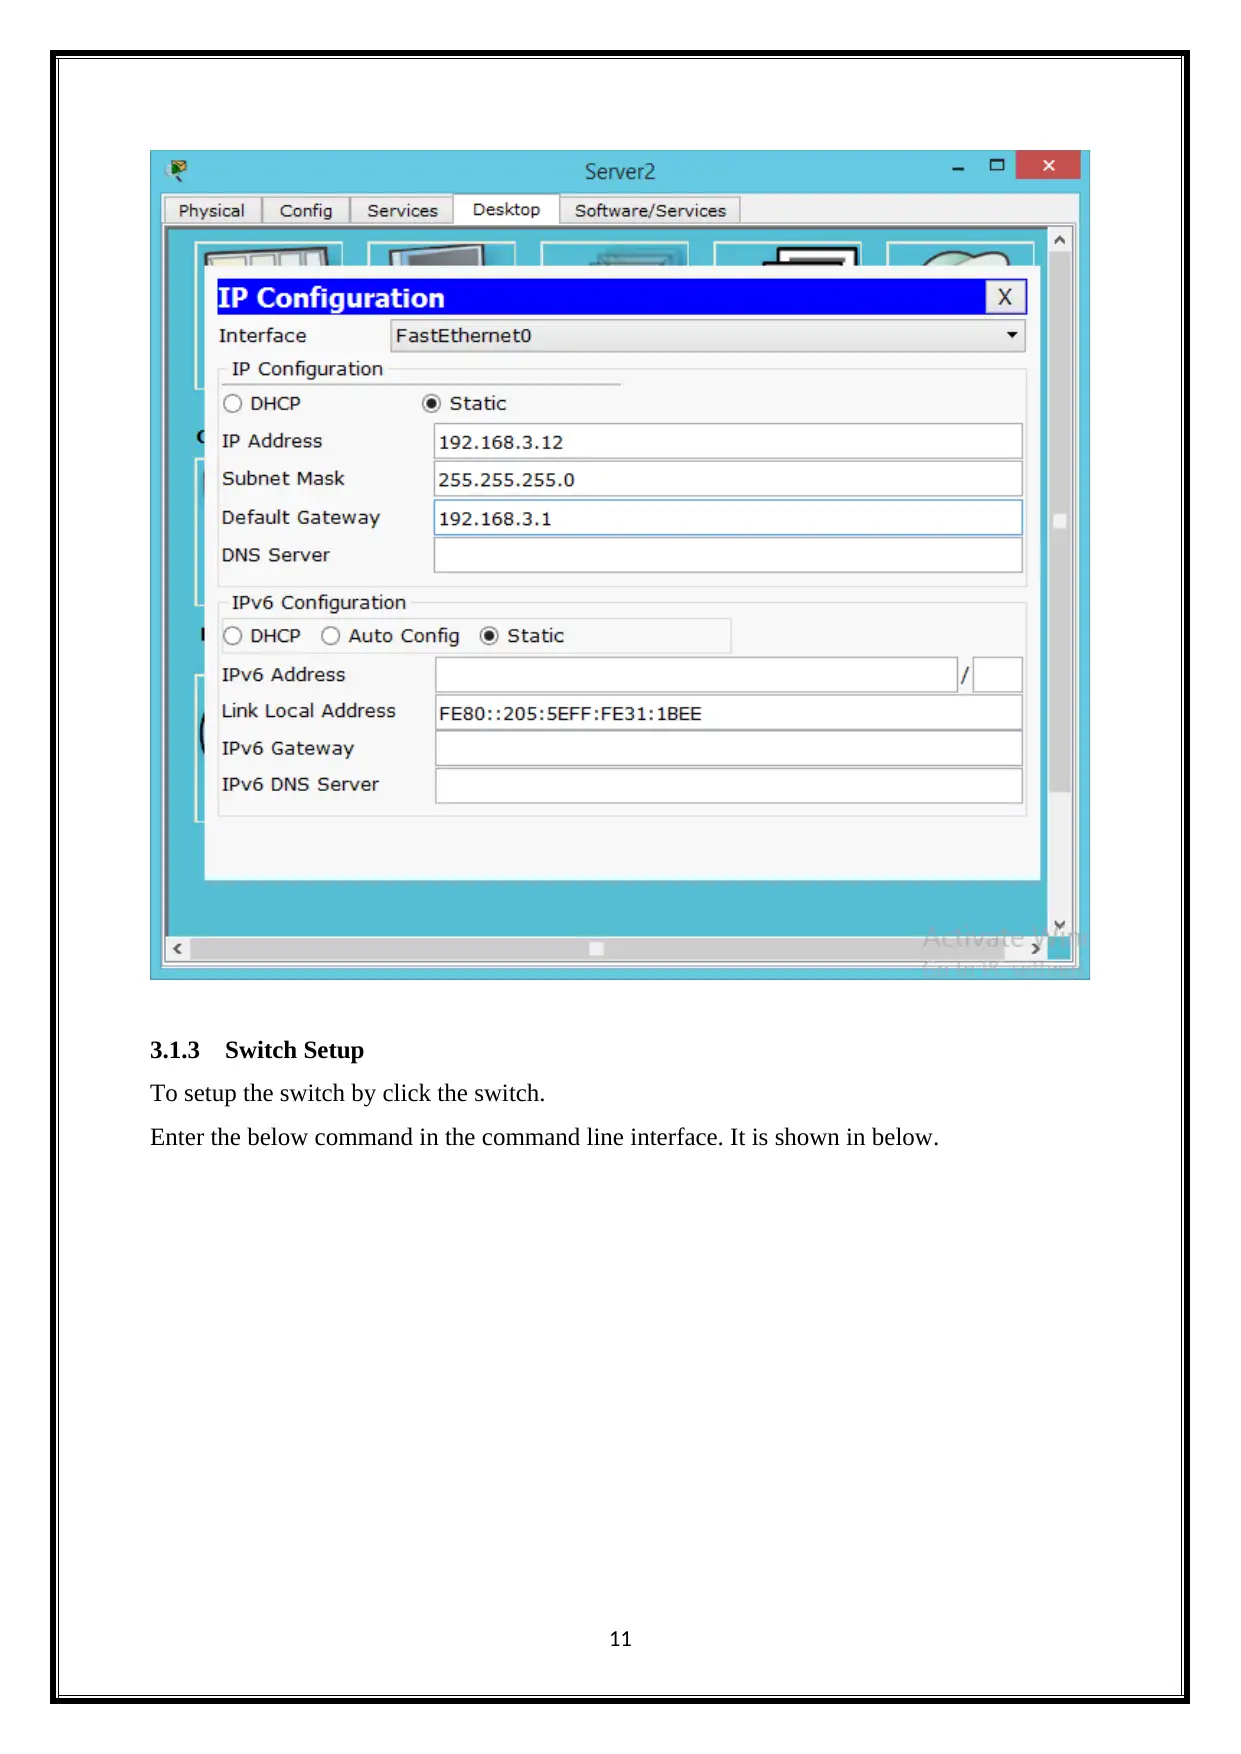
The guide elaborates on the process of configuring various network services such as Dynamic Host Configuration Protocol (DHCP), Domain Name System (DNS), web servers, and firewall settings within a simulated environment provided by Cisco's Packet Tracer. It begins with instructions on setting up DHCP to automatically assign IP addresses in a local network subnet. Subsequently, it outlines the steps for establishing DNS services, which translate human-readable domain names into machine-readable IP addresses. The guide further explains how to enable web servers and test connectivity through web browsers using IP addresses or domain names configured in the simulated environment. Lastly, it details the configuration of firewall rules that govern network traffic between clients and servers, illustrating how specific protocols like TCP can be allowed or blocked according to security requirements. Each section provides precise instructions for interacting with Packet Tracer's interface and tools to facilitate a practical understanding of these networking fundamentals.

internetworking with tcp/ip
Paraphrase This Document
Need a fresh take? Get an instant paraphrase of this document with our AI Paraphraser

Table of Contents
1. Project Objective.................................................................................................................1
2. Network Setup Requirements.............................................................................................2
3. Network setting...................................................................................................................2
3.1 Device Setup................................................................................................................2
3.1.1 PC setup...............................................................................................................2
3.1.2 Server setup..........................................................................................................8
3.1.3 Switch Setup.......................................................................................................11
3.1.4 Router Setup.......................................................................................................14
3.2 Network Diagran.......................................................................................................17
3.3 IP route......................................................................................................................18
3.4 Ping............................................................................................................................21
3.5 Trace Route Command..............................................................................................23
4. Network services...............................................................................................................25
4.1 DHCP services...........................................................................................................25
4.2 Web services..............................................................................................................27
4.3 DNS service...............................................................................................................28
4.4 Firewall services........................................................................................................33
References................................................................................................................................35
1. Project Objective
Objective of this project is to set up the simple network. It contains the more than two
routers, switches, server and personal computers. The network setup will be done by using
the cisco packet tracer. The cisco packet tracer is the one of network simulator. It provides
1

the high effective network setup. The Network setup using the cisco products such as cisco
routers, switches and server. The Routers are connected with the Switches. The Switches are
connecting the two personal PC ‘s and server. The network setup using the three servers.
Because the network services are done by using the server. The network services are DNS,
firewall, Web and DHCP services. These services re will be configured.
2. Network Setup Requirements
The network setup hardware requirements are shown below.
Cisco Routers - 3
Cisco Switches - 3
Cisco Server - 3
Personal Computer - 6
Operating System - Windows 7
Hard Drive - 2.4 GB
Memory - 2 GB RAM
3. Network setting
The simple network divided into two steps such as (Introduction to networks, n.d.),
Device setup
Network services configuration
These are discussed in detail.
3.1 Device Setup
The device setup includes the four main steps such as,
PC setup
Switch setup
Server setup
Router setup
These are shown below.
3.1.1 PC setup
To setup the PC by click the PC and choose the Desktop to select the IP
configuration.
In PC 0,
2
⊘ This is a preview!⊘
Do you want full access?
Subscribe today to unlock all pages.

Trusted by 1+ million students worldwide

Enter the IP address as 192.168.1.10, subnet mask as 255.255.255.0 and default gateway as
192.168.1.1. It is displayed in below (NETworking, 2013).
In PC 1,
Enter the IP address as 192.168.1.11, subnet mask as 255.255.255.0 and default gateway as
192.168.1.1. It is displayed in below.
3
192.168.1.1. It is displayed in below (NETworking, 2013).
In PC 1,
Enter the IP address as 192.168.1.11, subnet mask as 255.255.255.0 and default gateway as
192.168.1.1. It is displayed in below.
3
Paraphrase This Document
Need a fresh take? Get an instant paraphrase of this document with our AI Paraphraser

In PC 3,
Enter the IP address as 192.168.2.10, subnet mask as 255.255.255.0 and default gateway as
192.168.2.1. It is displayed in below (Packet tracer, 2012).
4
Enter the IP address as 192.168.2.10, subnet mask as 255.255.255.0 and default gateway as
192.168.2.1. It is displayed in below (Packet tracer, 2012).
4

In PC 4,
Enter the IP address as 192.168.2.11, subnet mask as 255.255.255.0 and default gateway as
192.168.2.1. It is displayed in below.
5
Enter the IP address as 192.168.2.11, subnet mask as 255.255.255.0 and default gateway as
192.168.2.1. It is displayed in below.
5
⊘ This is a preview!⊘
Do you want full access?
Subscribe today to unlock all pages.

Trusted by 1+ million students worldwide

In PC 5,
Enter the IP address as 192.168.3.10, subnet mask as 255.255.255.0 and default gateway as
192.168.3.1. It is displayed in below (Jesin, 2014).
6
Enter the IP address as 192.168.3.10, subnet mask as 255.255.255.0 and default gateway as
192.168.3.1. It is displayed in below (Jesin, 2014).
6
Paraphrase This Document
Need a fresh take? Get an instant paraphrase of this document with our AI Paraphraser

In PC 2,
Enter the IP address as 192.168.3.11, subnet mask as 255.255.255.0 and default gateway as
192.168.3.1. It is displayed in below (Scaling networks companion guide, n.d.).
7
Enter the IP address as 192.168.3.11, subnet mask as 255.255.255.0 and default gateway as
192.168.3.1. It is displayed in below (Scaling networks companion guide, n.d.).
7

3.1.2 Server setup
To setup the server by click the server and select the desktop to choose the IP configuration.
In Server 0,
Enter the IP address as 192.168.1.12
Subnet mask as 255.255.255.0
Default gateway as 192.168.1.1
It is shown in below.
8
To setup the server by click the server and select the desktop to choose the IP configuration.
In Server 0,
Enter the IP address as 192.168.1.12
Subnet mask as 255.255.255.0
Default gateway as 192.168.1.1
It is shown in below.
8
⊘ This is a preview!⊘
Do you want full access?
Subscribe today to unlock all pages.

Trusted by 1+ million students worldwide

In Server 1,
Enter the IP address as 192.168.2.12
Subnet mask as 255.255.255.0
Default gateway as 192.168.2.1
It is shown in below (Connecting networks companion guide, 2014).
9
Enter the IP address as 192.168.2.12
Subnet mask as 255.255.255.0
Default gateway as 192.168.2.1
It is shown in below (Connecting networks companion guide, 2014).
9
Paraphrase This Document
Need a fresh take? Get an instant paraphrase of this document with our AI Paraphraser

In Server 1,
Enter the IP address as 192.168.3.12
Subnet mask as 255.255.255.0
Default gateway as 192.168.3.1
It is shown in below.
10
Enter the IP address as 192.168.3.12
Subnet mask as 255.255.255.0
Default gateway as 192.168.3.1
It is shown in below.
10

3.1.3 Switch Setup
To setup the switch by click the switch.
Enter the below command in the command line interface. It is shown in below.
11
To setup the switch by click the switch.
Enter the below command in the command line interface. It is shown in below.
11
⊘ This is a preview!⊘
Do you want full access?
Subscribe today to unlock all pages.

Trusted by 1+ million students worldwide
1 out of 36
Related Documents

Your All-in-One AI-Powered Toolkit for Academic Success.
+13062052269
info@desklib.com
Available 24*7 on WhatsApp / Email
Unlock your academic potential
Copyright © 2020–2025 A2Z Services. All Rights Reserved. Developed and managed by ZUCOL.