Ethical Hacking Report: Penetration Testing and Flag Capture
VerifiedAdded on 2022/10/16
|56
|6920
|253
Report
AI Summary
This report details an ethical hacking assignment involving penetration testing of a virtual machine to attain root privileges and capture five strategically placed flags. The methodology employed includes the use of tools like NMAP and enum4linux to identify vulnerabilities and exploit them. The report outlines each test and attack performed, along with the results and recommendations for securing the system. The process involves web application analysis, password cracking, and privilege escalation techniques. The report also includes a section on custom-developed tools and essential security recommendations. The assignment assesses the student's ability to articulate and write a penetration testing report following industry standards, demonstrating creative problem-solving and critical thinking skills. The report also includes information on NMAP commands and provides insights into the overall process of ethical hacking and system compromise.

ETHICAL HACKING
Paraphrase This Document
Need a fresh take? Get an instant paraphrase of this document with our AI Paraphraser
Contents
1. Introduction.......................................................................................................................................2
2. Methodology.......................................................................................................................................2
3. Ethical considerations.....................................................................................................................14
4. Results and Recommendations.......................................................................................................17
5. Custom developed tools...................................................................................................................41
6. Recommendations............................................................................................................................51
1. Encrypt your Drive (Full Disk Encryption)...............................................................................52
2. Enable Your Firewall..................................................................................................................52
3. Disable SSH Login via Root........................................................................................................52
4. Make your BIOS More Secure...................................................................................................53
5. Disable USB Mount.....................................................................................................................53
7. Conclusion........................................................................................................................................53
8. References........................................................................................................................................54
1
1. Introduction
In this project, we are required to design and apply a procedure illustrating a scenario where
ethical hacking is being done. This test-like project will examine your knowledge based on what
we have understood from the contents that are sent to you on a weekly basis. The assessment is
to know what we’ve learnt regarding writing and articulating a report on penetration testing
according to the industry standard.
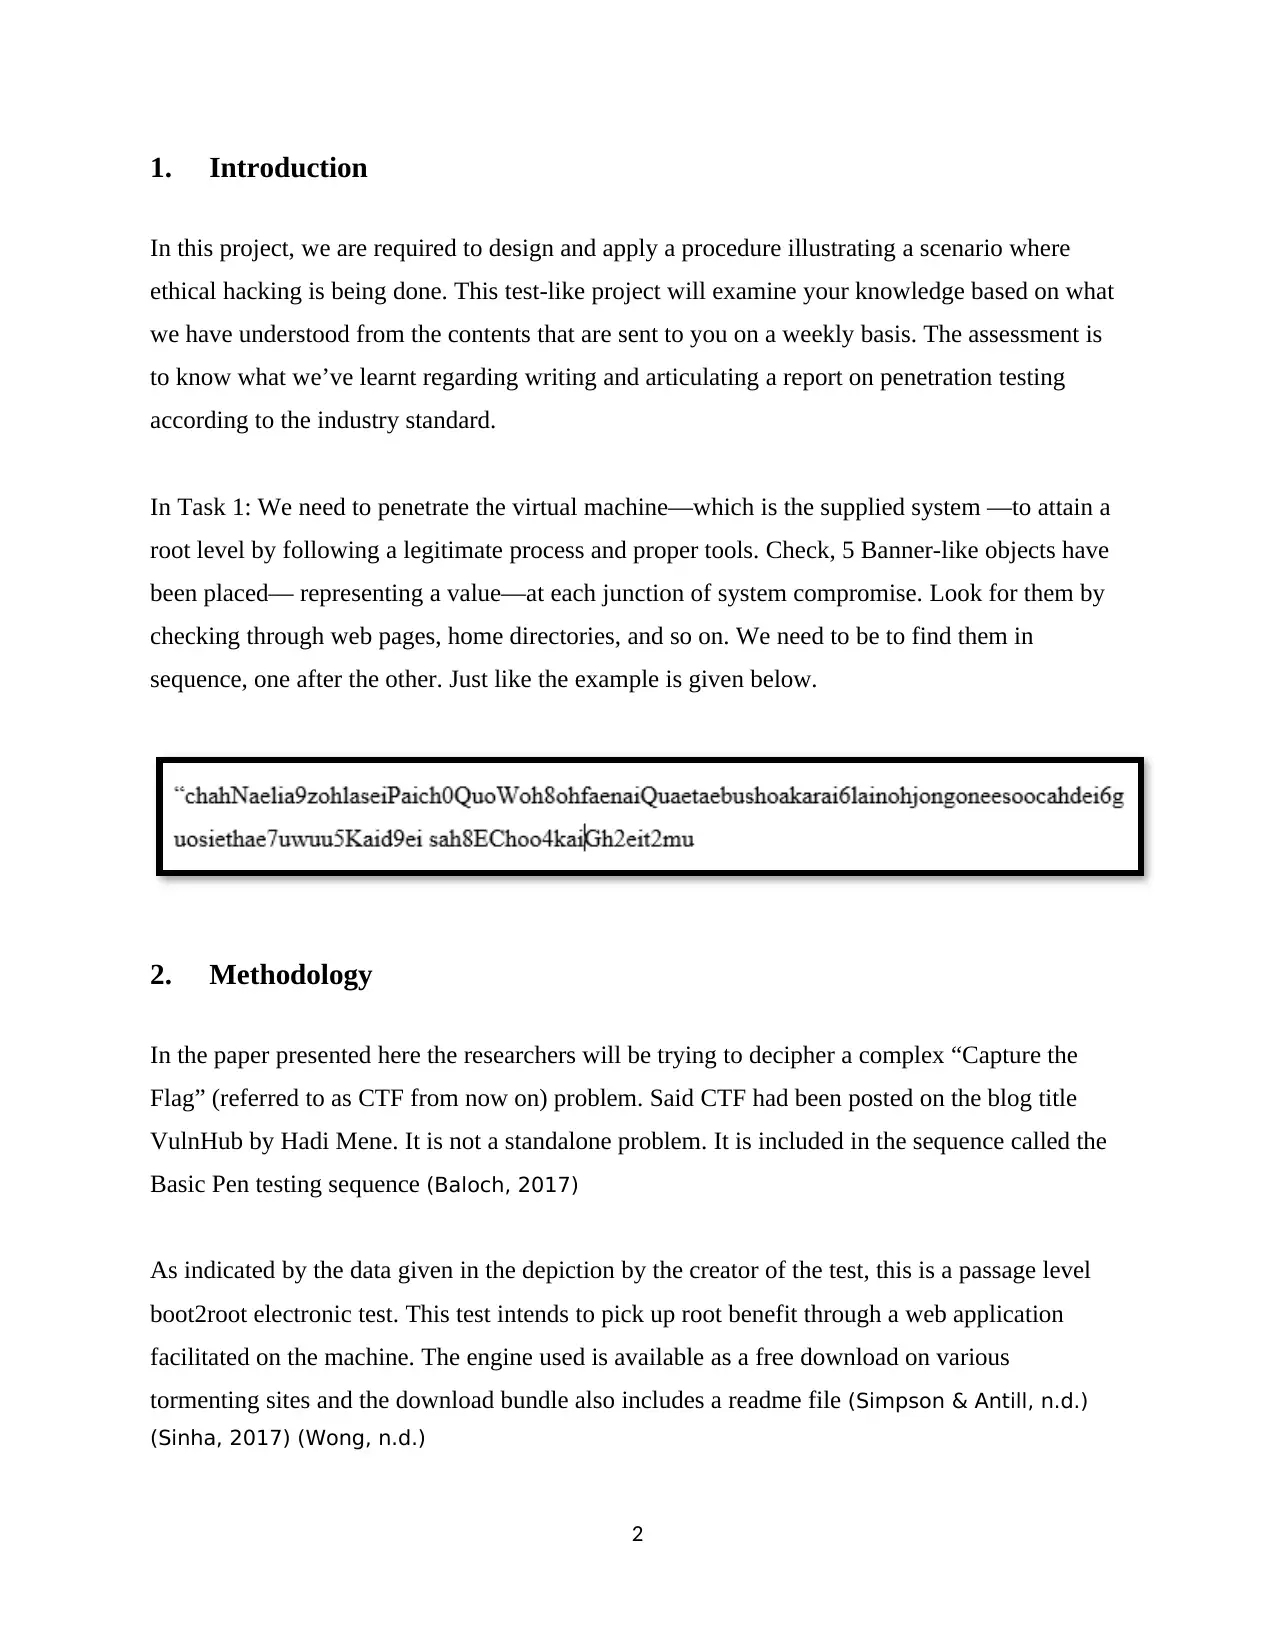
In Task 1: We need to penetrate the virtual machine—which is the supplied system —to attain a
root level by following a legitimate process and proper tools. Check, 5 Banner-like objects have
been placed— representing a value—at each junction of system compromise. Look for them by
checking through web pages, home directories, and so on. We need to be to find them in
sequence, one after the other. Just like the example is given below.
2. Methodology
In the paper presented here the researchers will be trying to decipher a complex “Capture the
Flag” (referred to as CTF from now on) problem. Said CTF had been posted on the blog title
VulnHub by Hadi Mene. It is not a standalone problem. It is included in the sequence called the
Basic Pen testing sequence (Baloch, 2017)
As indicated by the data given in the depiction by the creator of the test, this is a passage level
boot2root electronic test. This test intends to pick up root benefit through a web application
facilitated on the machine. The engine used is available as a free download on various
tormenting sites and the download bundle also includes a readme file (Simpson & Antill, n.d.)
(Sinha, 2017) (Wong, n.d.)
2
In this project, we are required to design and apply a procedure illustrating a scenario where
ethical hacking is being done. This test-like project will examine your knowledge based on what
we have understood from the contents that are sent to you on a weekly basis. The assessment is
to know what we’ve learnt regarding writing and articulating a report on penetration testing
according to the industry standard.
In Task 1: We need to penetrate the virtual machine—which is the supplied system —to attain a
root level by following a legitimate process and proper tools. Check, 5 Banner-like objects have
been placed— representing a value—at each junction of system compromise. Look for them by
checking through web pages, home directories, and so on. We need to be to find them in
sequence, one after the other. Just like the example is given below.
2. Methodology
In the paper presented here the researchers will be trying to decipher a complex “Capture the
Flag” (referred to as CTF from now on) problem. Said CTF had been posted on the blog title
VulnHub by Hadi Mene. It is not a standalone problem. It is included in the sequence called the
Basic Pen testing sequence (Baloch, 2017)
As indicated by the data given in the depiction by the creator of the test, this is a passage level
boot2root electronic test. This test intends to pick up root benefit through a web application
facilitated on the machine. The engine used is available as a free download on various
tormenting sites and the download bundle also includes a readme file (Simpson & Antill, n.d.)
(Sinha, 2017) (Wong, n.d.)
2
⊘ This is a preview!⊘
Do you want full access?
Subscribe today to unlock all pages.
Trusted by 1+ million students worldwide
A well-known webpage, VulnHub is an outstanding site for security specialists. Its point is to
furnish clients with an approach to learn and rehearse their hacking aptitudes through a
progression of difficulties in a protected and lawful condition. This website can be used to
download defenseless machines (Beaver, n.d.) and attempt to use them according to the
requirements you have (Engebretson, 2013).
A brief introduction to CTF
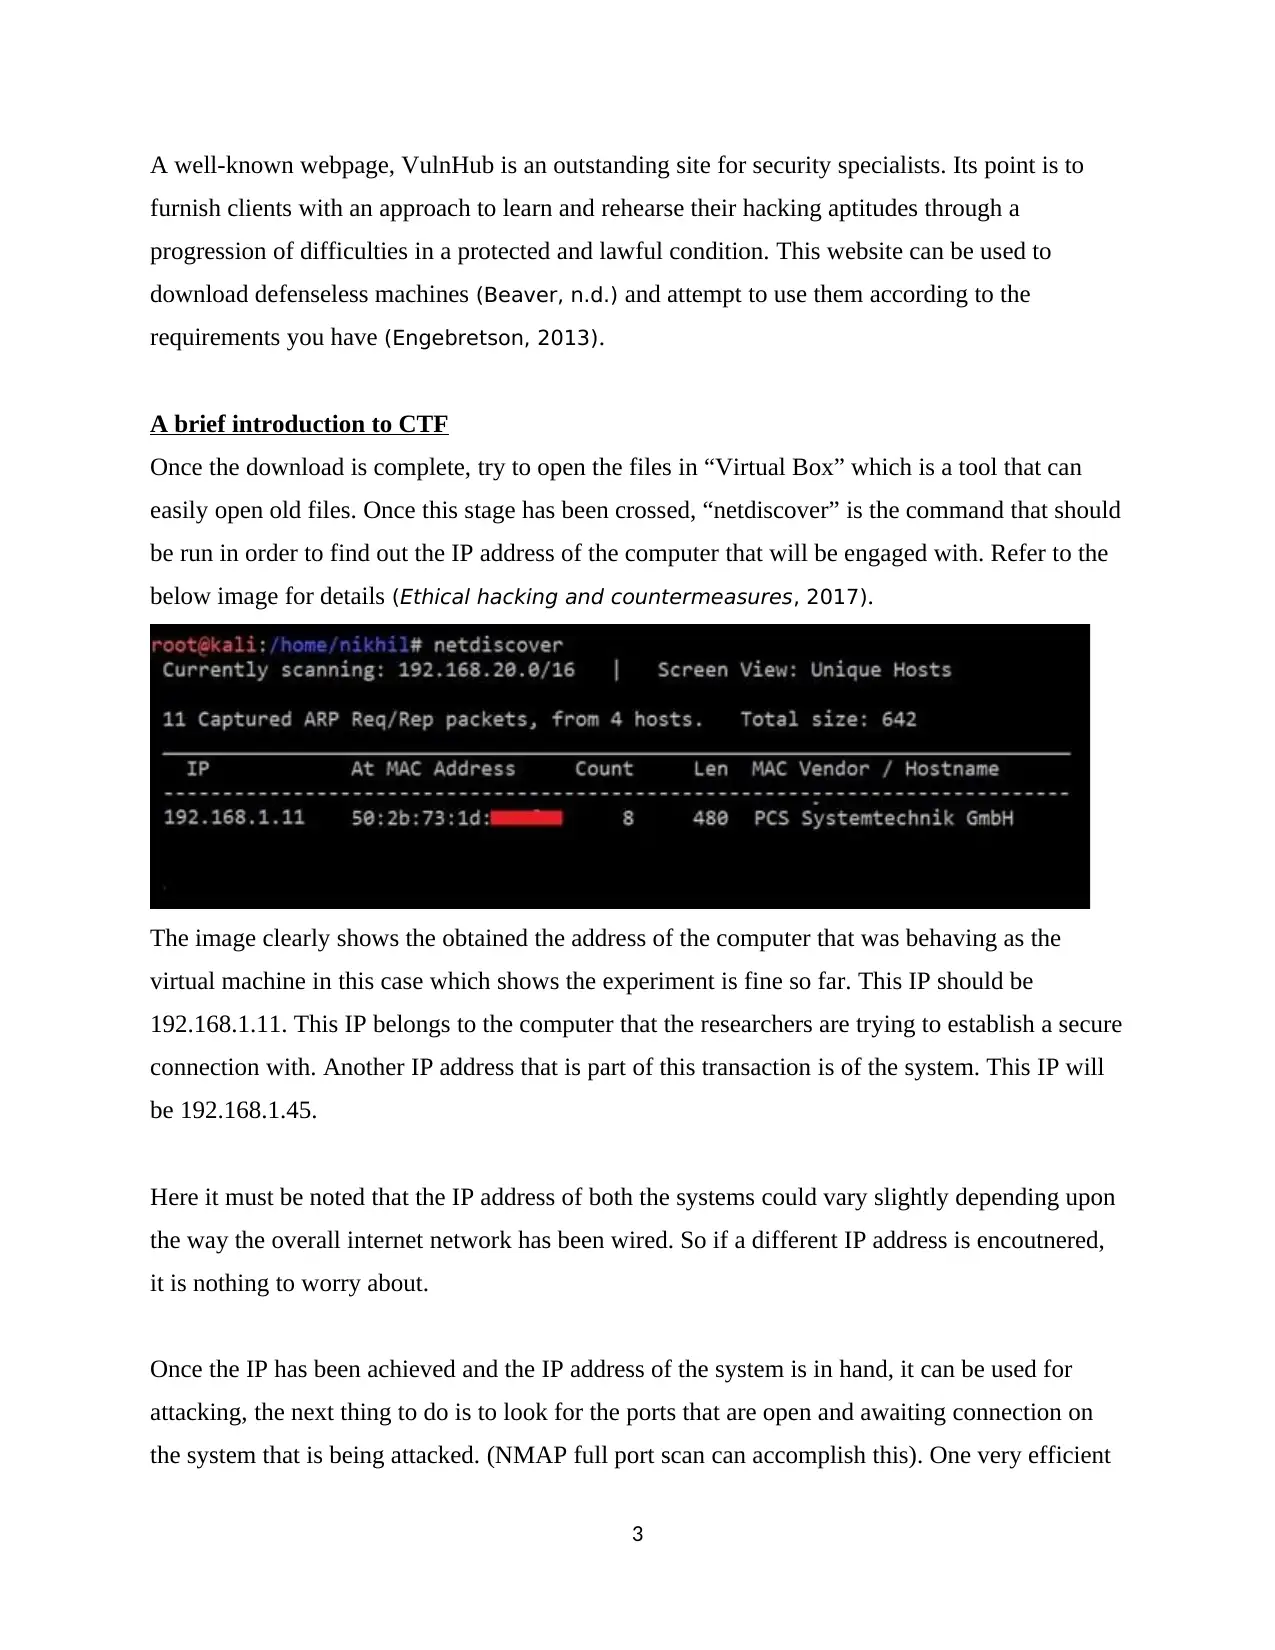
Once the download is complete, try to open the files in “Virtual Box” which is a tool that can
easily open old files. Once this stage has been crossed, “netdiscover” is the command that should
be run in order to find out the IP address of the computer that will be engaged with. Refer to the
below image for details (Ethical hacking and countermeasures, 2017).
The image clearly shows the obtained the address of the computer that was behaving as the
virtual machine in this case which shows the experiment is fine so far. This IP should be
192.168.1.11. This IP belongs to the computer that the researchers are trying to establish a secure
connection with. Another IP address that is part of this transaction is of the system. This IP will
be 192.168.1.45.
Here it must be noted that the IP address of both the systems could vary slightly depending upon
the way the overall internet network has been wired. So if a different IP address is encoutnered,
it is nothing to worry about.
Once the IP has been achieved and the IP address of the system is in hand, it can be used for
attacking, the next thing to do is to look for the ports that are open and awaiting connection on
the system that is being attacked. (NMAP full port scan can accomplish this). One very efficient
3
furnish clients with an approach to learn and rehearse their hacking aptitudes through a
progression of difficulties in a protected and lawful condition. This website can be used to
download defenseless machines (Beaver, n.d.) and attempt to use them according to the
requirements you have (Engebretson, 2013).
A brief introduction to CTF
Once the download is complete, try to open the files in “Virtual Box” which is a tool that can
easily open old files. Once this stage has been crossed, “netdiscover” is the command that should
be run in order to find out the IP address of the computer that will be engaged with. Refer to the
below image for details (Ethical hacking and countermeasures, 2017).
The image clearly shows the obtained the address of the computer that was behaving as the
virtual machine in this case which shows the experiment is fine so far. This IP should be
192.168.1.11. This IP belongs to the computer that the researchers are trying to establish a secure
connection with. Another IP address that is part of this transaction is of the system. This IP will
be 192.168.1.45.
Here it must be noted that the IP address of both the systems could vary slightly depending upon
the way the overall internet network has been wired. So if a different IP address is encoutnered,
it is nothing to worry about.
Once the IP has been achieved and the IP address of the system is in hand, it can be used for
attacking, the next thing to do is to look for the ports that are open and awaiting connection on
the system that is being attacked. (NMAP full port scan can accomplish this). One very efficient
3
Paraphrase This Document
Need a fresh take? Get an instant paraphrase of this document with our AI Paraphraser
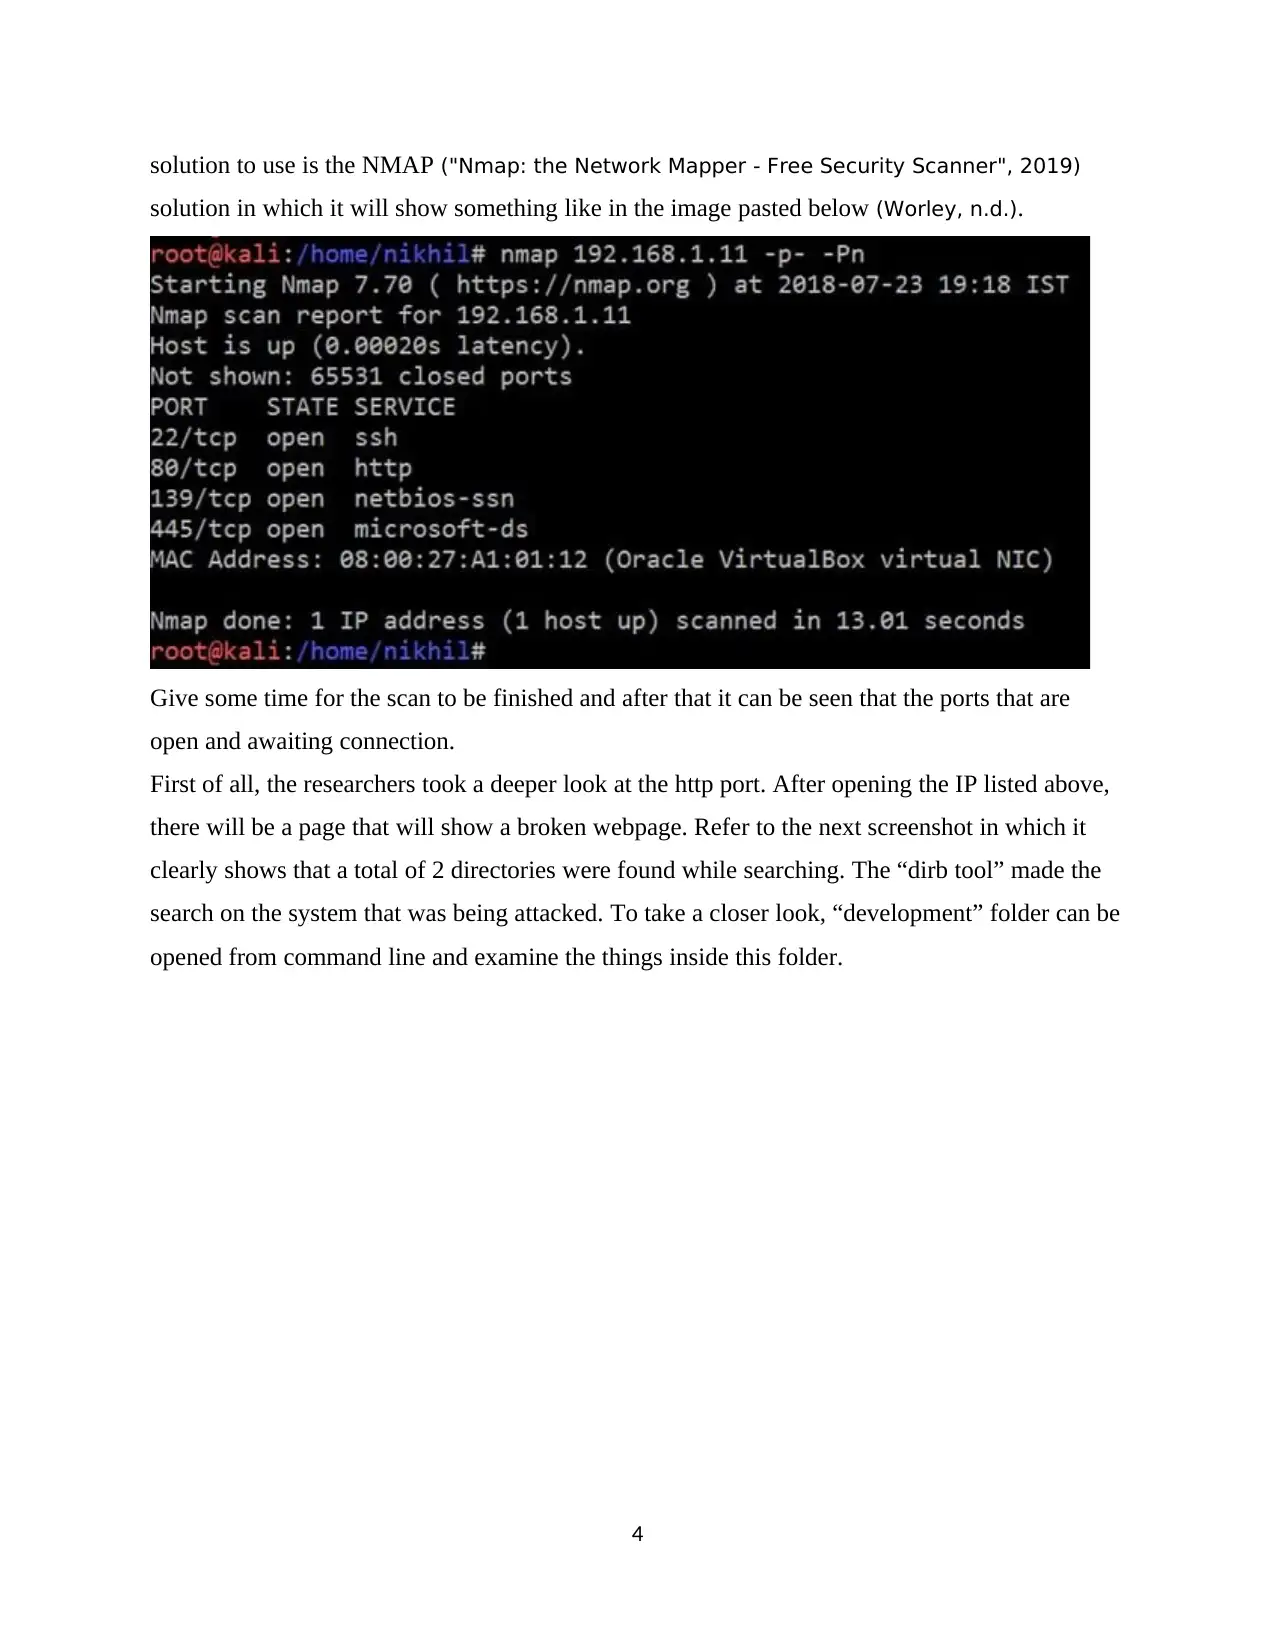
solution to use is the NMAP ("Nmap: the Network Mapper - Free Security Scanner", 2019)
solution in which it will show something like in the image pasted below (Worley, n.d.).
Give some time for the scan to be finished and after that it can be seen that the ports that are
open and awaiting connection.
First of all, the researchers took a deeper look at the http port. After opening the IP listed above,
there will be a page that will show a broken webpage. Refer to the next screenshot in which it
clearly shows that a total of 2 directories were found while searching. The “dirb tool” made the
search on the system that was being attacked. To take a closer look, “development” folder can be
opened from command line and examine the things inside this folder.
4

In this folder the folder list had been made not disable so that it could show all options. Other
than that it can also be seen that two text files were made. If the first file is opened it can be seen
that something similar to the next screenshot is displayed.
5
than that it can also be seen that two text files were made. If the first file is opened it can be seen
that something similar to the next screenshot is displayed.
5
⊘ This is a preview!⊘
Do you want full access?
Subscribe today to unlock all pages.
Trusted by 1+ million students worldwide
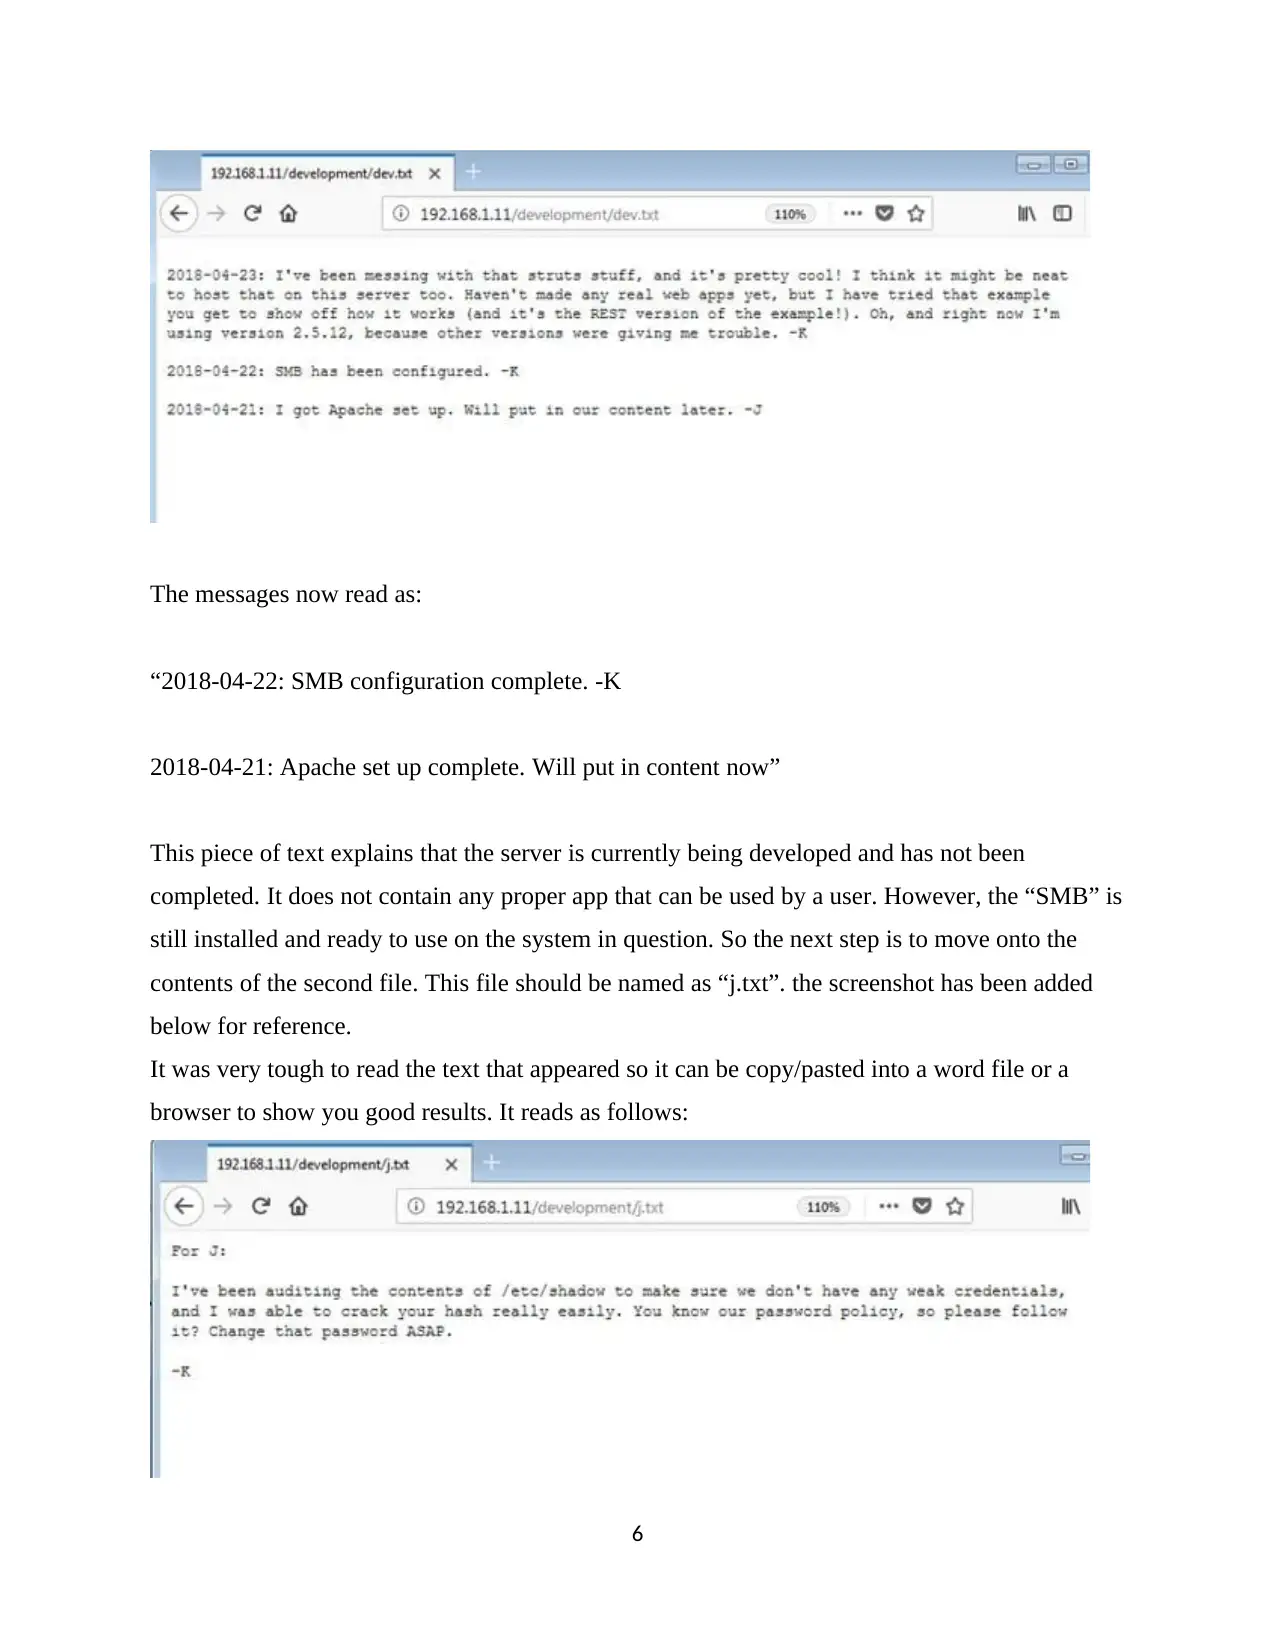
The messages now read as:
“2018-04-22: SMB configuration complete. -K
2018-04-21: Apache set up complete. Will put in content now”
This piece of text explains that the server is currently being developed and has not been
completed. It does not contain any proper app that can be used by a user. However, the “SMB” is
still installed and ready to use on the system in question. So the next step is to move onto the
contents of the second file. This file should be named as “j.txt”. the screenshot has been added
below for reference.
It was very tough to read the text that appeared so it can be copy/pasted into a word file or a
browser to show you good results. It reads as follows:
6
Paraphrase This Document
Need a fresh take? Get an instant paraphrase of this document with our AI Paraphraser
“For J:
I've been auditing the contents of /etc/shadow to make sure we don't have any weak credentials,
and I was able to crack your hash really easily. You know our password policy, so please follow
it? Change that password ASAP.
-K"
The above are the exact words of the message. After giving it some thought the conclusion can
be reached that the message was meant for some user named “J” and it originated from another
user named “K”. Other than that it also explains that a password was cracked very easily and
poses this as a warning to change the password before any harm is done.
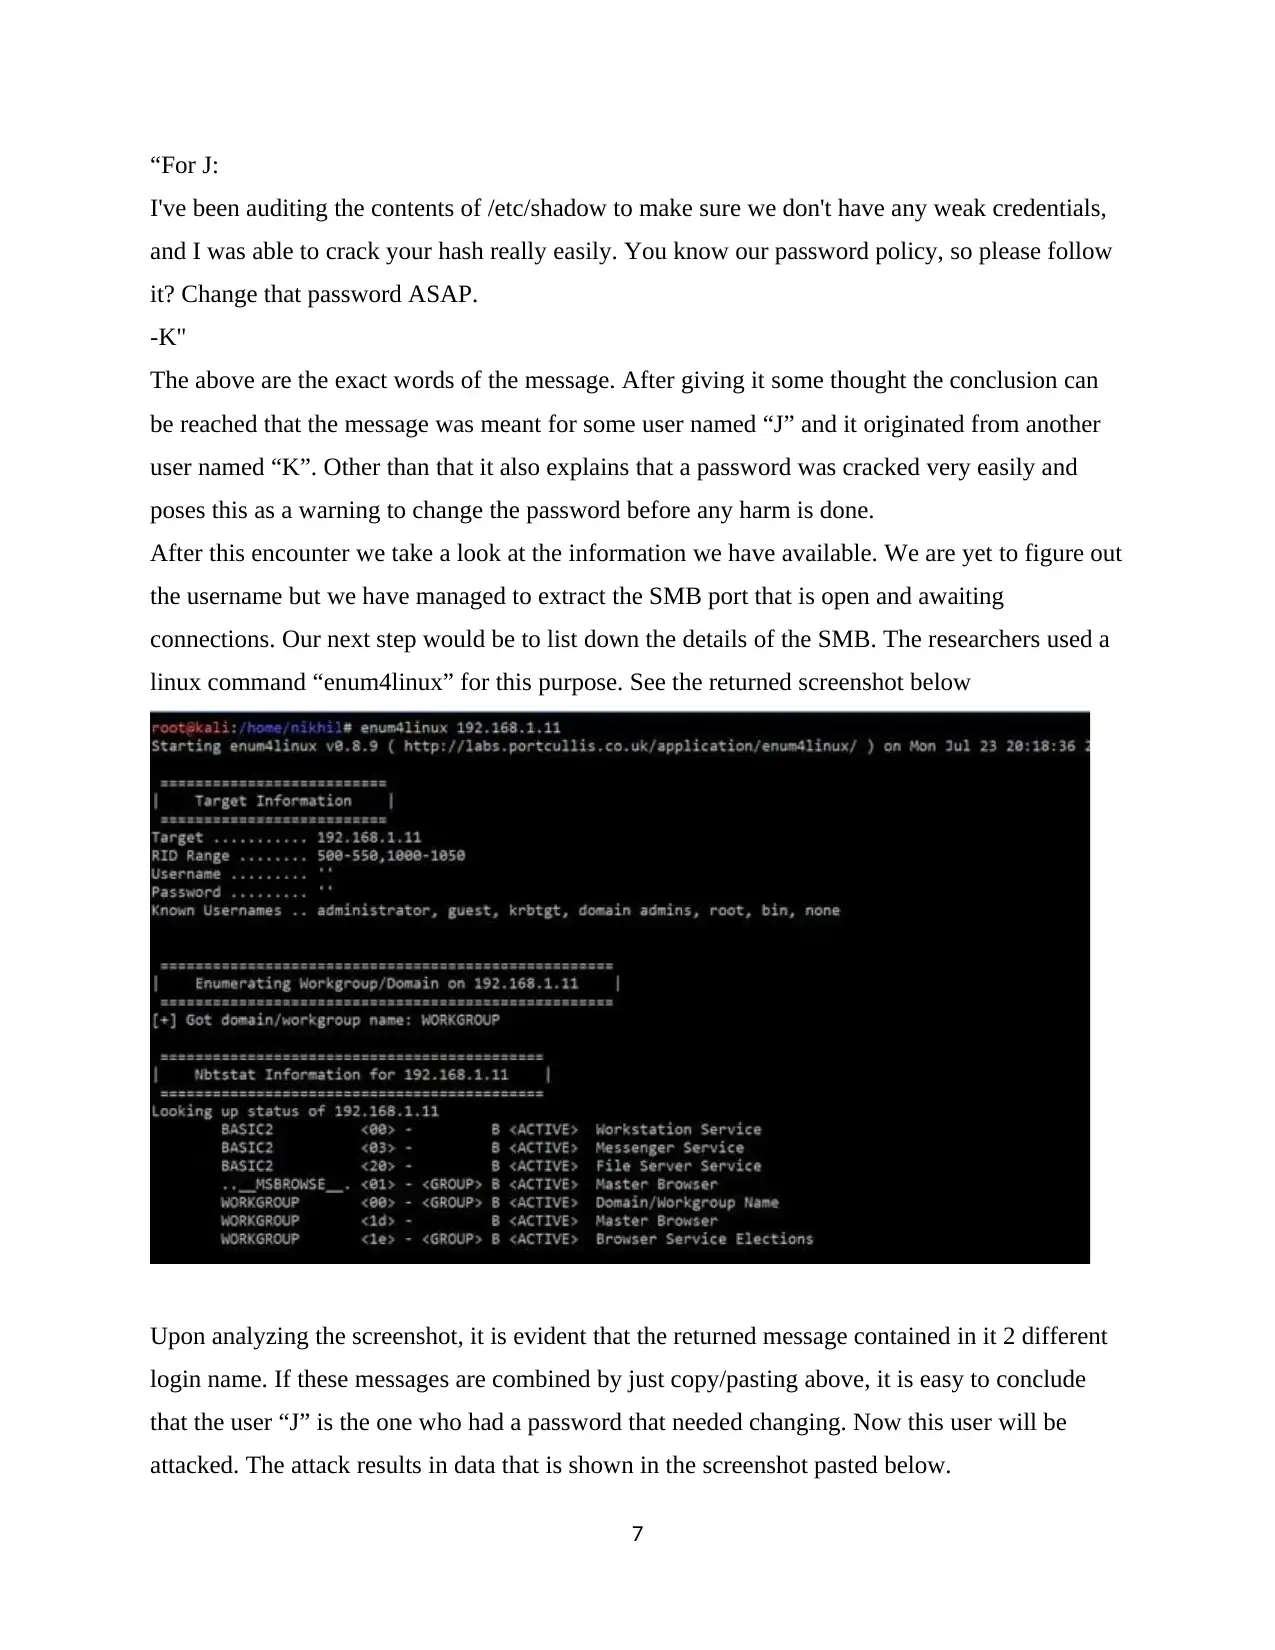
After this encounter we take a look at the information we have available. We are yet to figure out
the username but we have managed to extract the SMB port that is open and awaiting
connections. Our next step would be to list down the details of the SMB. The researchers used a
linux command “enum4linux” for this purpose. See the returned screenshot below
Upon analyzing the screenshot, it is evident that the returned message contained in it 2 different
login name. If these messages are combined by just copy/pasting above, it is easy to conclude
that the user “J” is the one who had a password that needed changing. Now this user will be
attacked. The attack results in data that is shown in the screenshot pasted below.
7
I've been auditing the contents of /etc/shadow to make sure we don't have any weak credentials,
and I was able to crack your hash really easily. You know our password policy, so please follow
it? Change that password ASAP.
-K"
The above are the exact words of the message. After giving it some thought the conclusion can
be reached that the message was meant for some user named “J” and it originated from another
user named “K”. Other than that it also explains that a password was cracked very easily and
poses this as a warning to change the password before any harm is done.
After this encounter we take a look at the information we have available. We are yet to figure out
the username but we have managed to extract the SMB port that is open and awaiting
connections. Our next step would be to list down the details of the SMB. The researchers used a
linux command “enum4linux” for this purpose. See the returned screenshot below
Upon analyzing the screenshot, it is evident that the returned message contained in it 2 different
login name. If these messages are combined by just copy/pasting above, it is easy to conclude
that the user “J” is the one who had a password that needed changing. Now this user will be
attacked. The attack results in data that is shown in the screenshot pasted below.
7
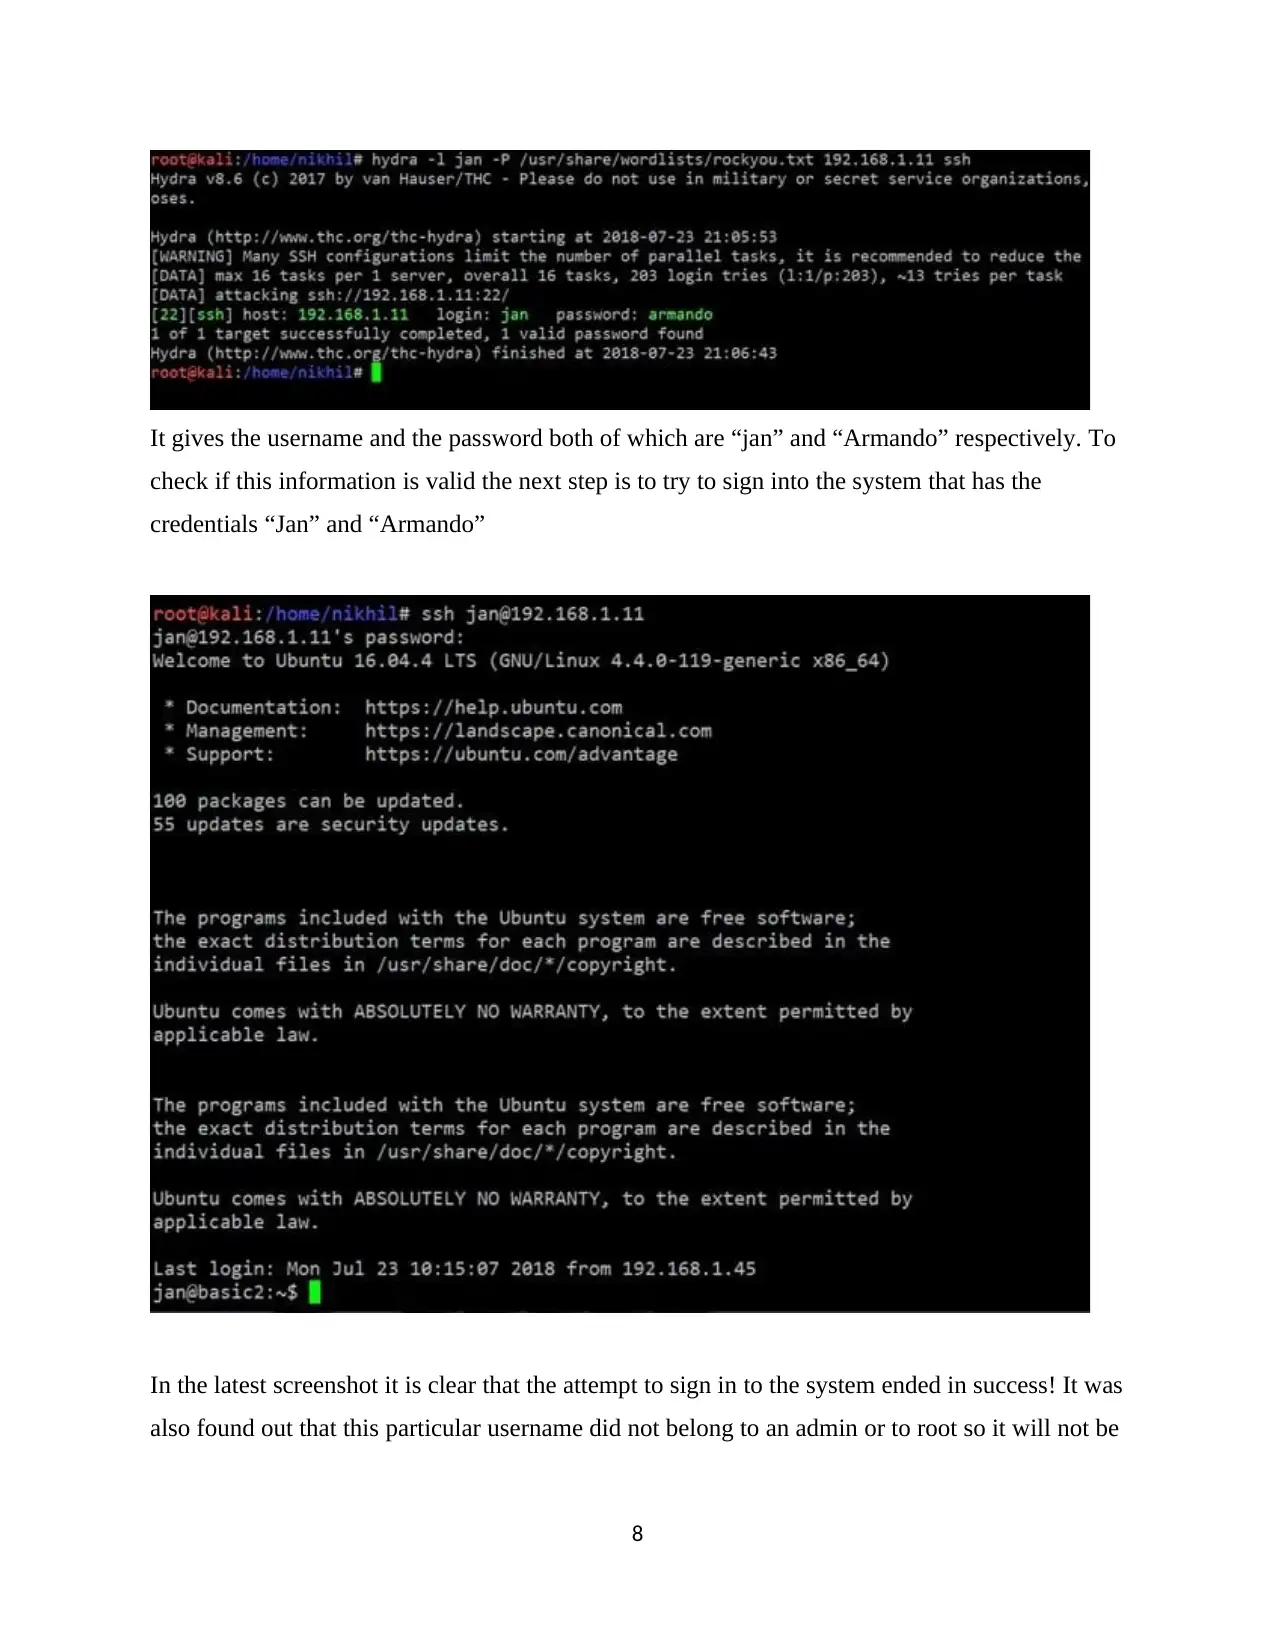
It gives the username and the password both of which are “jan” and “Armando” respectively. To
check if this information is valid the next step is to try to sign into the system that has the
credentials “Jan” and “Armando”
In the latest screenshot it is clear that the attempt to sign in to the system ended in success! It was
also found out that this particular username did not belong to an admin or to root so it will not be
8
⊘ This is a preview!⊘
Do you want full access?
Subscribe today to unlock all pages.
Trusted by 1+ million students worldwide
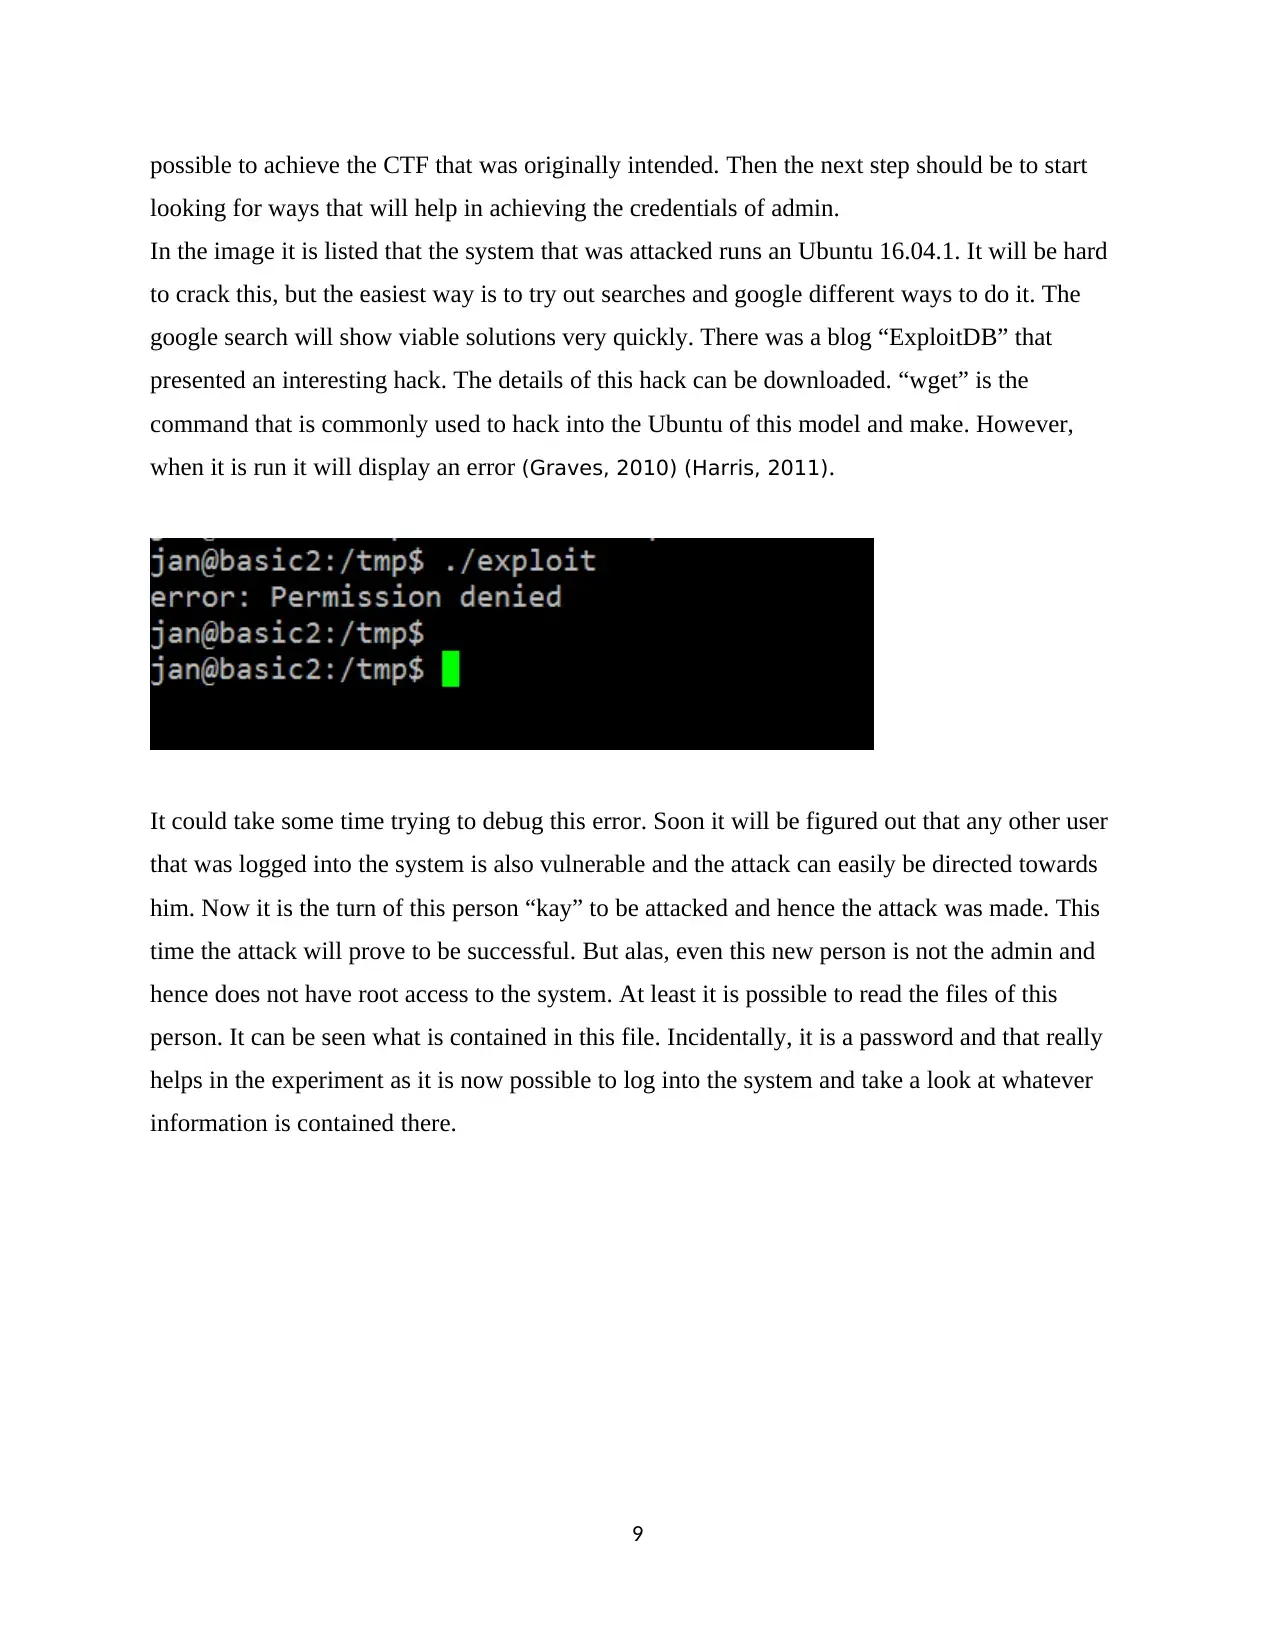
possible to achieve the CTF that was originally intended. Then the next step should be to start
looking for ways that will help in achieving the credentials of admin.
In the image it is listed that the system that was attacked runs an Ubuntu 16.04.1. It will be hard
to crack this, but the easiest way is to try out searches and google different ways to do it. The
google search will show viable solutions very quickly. There was a blog “ExploitDB” that
presented an interesting hack. The details of this hack can be downloaded. “wget” is the
command that is commonly used to hack into the Ubuntu of this model and make. However,
when it is run it will display an error (Graves, 2010) (Harris, 2011).
It could take some time trying to debug this error. Soon it will be figured out that any other user
that was logged into the system is also vulnerable and the attack can easily be directed towards
him. Now it is the turn of this person “kay” to be attacked and hence the attack was made. This
time the attack will prove to be successful. But alas, even this new person is not the admin and
hence does not have root access to the system. At least it is possible to read the files of this
person. It can be seen what is contained in this file. Incidentally, it is a password and that really
helps in the experiment as it is now possible to log into the system and take a look at whatever
information is contained there.
9
Paraphrase This Document
Need a fresh take? Get an instant paraphrase of this document with our AI Paraphraser
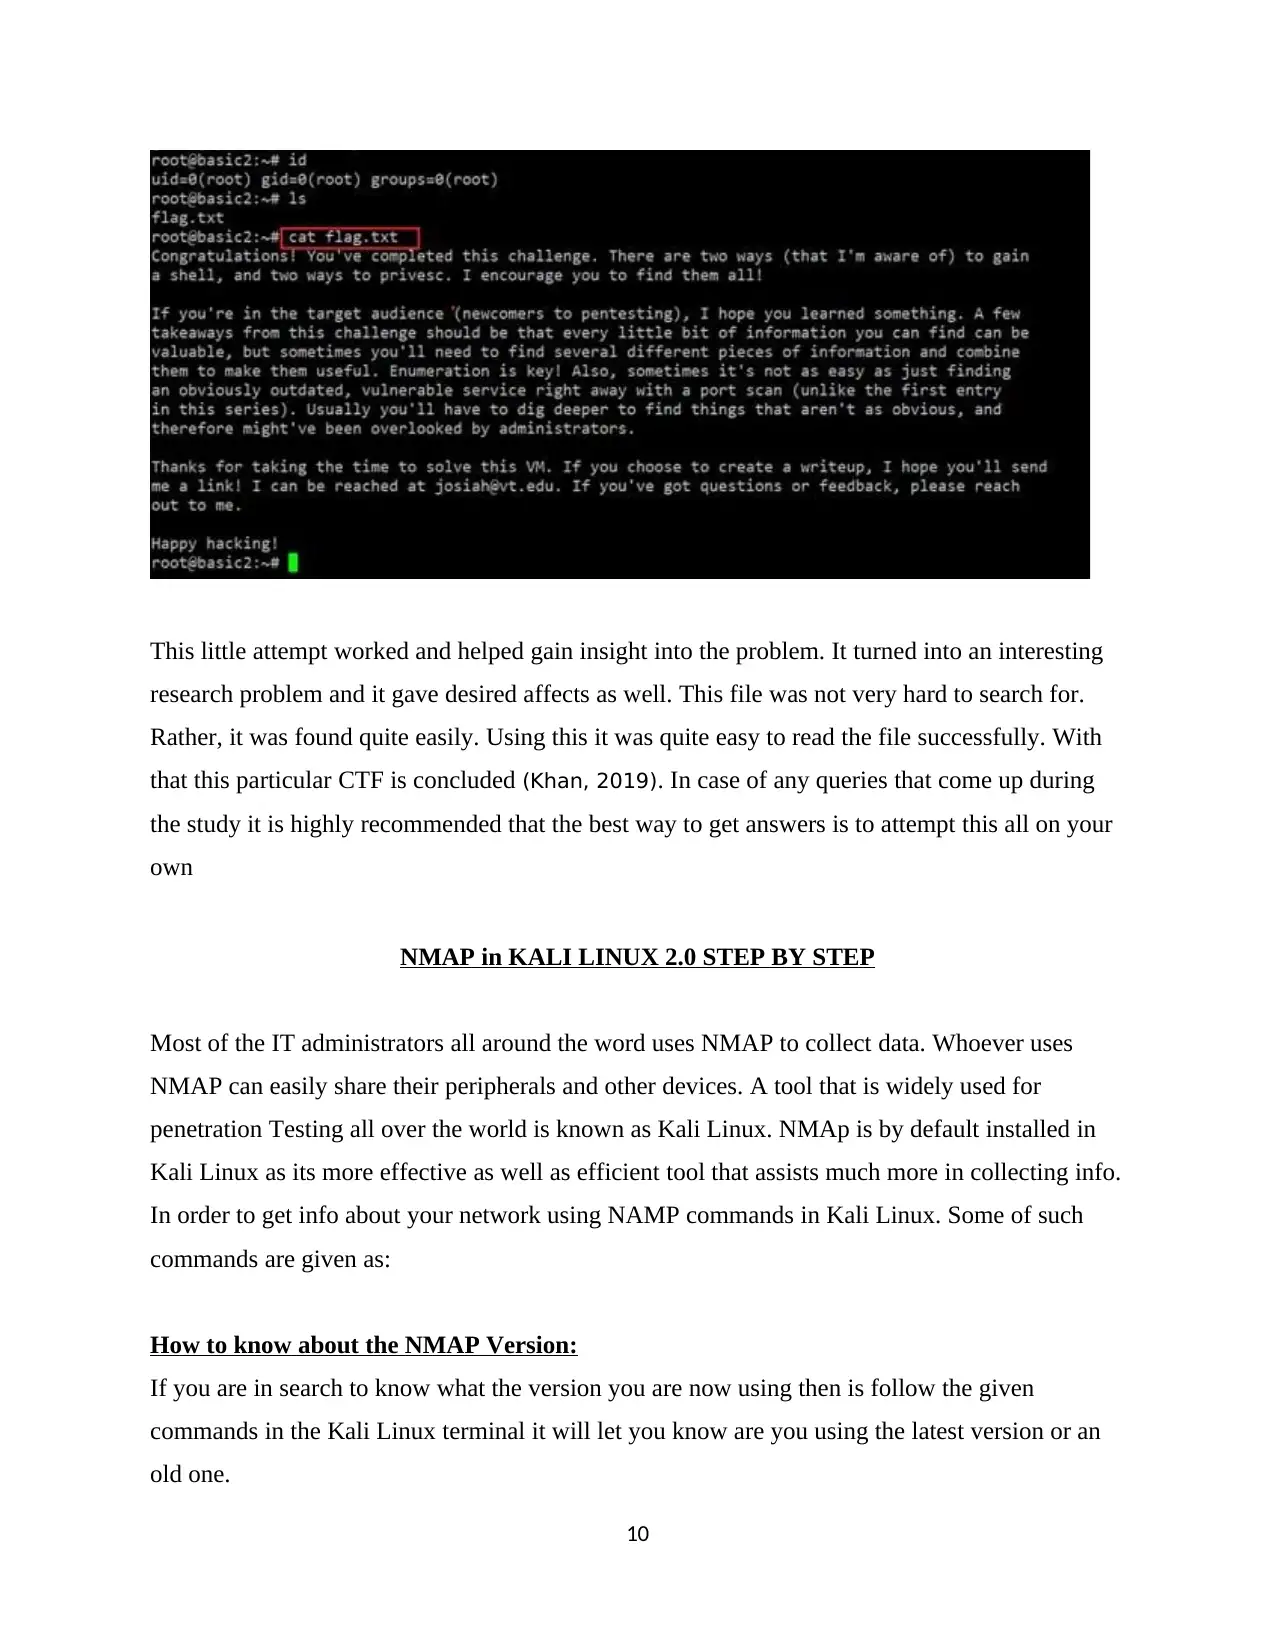
This little attempt worked and helped gain insight into the problem. It turned into an interesting
research problem and it gave desired affects as well. This file was not very hard to search for.
Rather, it was found quite easily. Using this it was quite easy to read the file successfully. With
that this particular CTF is concluded (Khan, 2019). In case of any queries that come up during
the study it is highly recommended that the best way to get answers is to attempt this all on your
own
NMAP in KALI LINUX 2.0 STEP BY STEP
Most of the IT administrators all around the word uses NMAP to collect data. Whoever uses
NMAP can easily share their peripherals and other devices. A tool that is widely used for
penetration Testing all over the world is known as Kali Linux. NMAp is by default installed in
Kali Linux as its more effective as well as efficient tool that assists much more in collecting info.
In order to get info about your network using NAMP commands in Kali Linux. Some of such
commands are given as:
How to know about the NMAP Version:
If you are in search to know what the version you are now using then is follow the given
commands in the Kali Linux terminal it will let you know are you using the latest version or an
old one.
10
Command: #nmap --version or #nmap -v
After finding the version of the NMAP if you saw that the version you are using now is an old
one then goes for updating of the NMAP package in the Kali Linux by following the given
command.
Command: #apt-get update nmap
How to know about Host Using NMAP:
If you want to know what host you are using now via NMAP then only go with the given
commands and get to know about host.
Command: nmap –sS –O 172.26.1.0/29
The above command will check the type of your operating system and fingerprints that were
used on the attached devices before. The above command will scan monitor the live status of
your network and then it will let you know the host. Or the one who is searching for the host may
also use the given command to monitor the network device. here is the command given below
Command: nmap –sS –O 172.26.1.0/29
How to Get the Logs of NMAP:
If you are in need to get the logs then it will be beneficial for you to go with the TCPDUMP. It
will provide you log line by line using your network path. Enable TCPDUMP to store the logs in
your system via Kali Linux. An excellent administrative network let you to get logs and store
them. As well as its comparatively convenient to troubleshot with logs other than monitoring
settings in your applications. NMAP default login options can be used in this regard.
How to search for Open ports:
If anyone is in search of open ports under the NMAP then go with the command mentioned
below. It will provide you the wanted open ports with advanced options this command provide
output like the Operating system provides.it scans the targeted system in a safe or you can say
hidden mode or event and provide you the kernel version of the operating system of the targeted
system use. The same command is used to hunt for more details in Kali Linux system.
11
⊘ This is a preview!⊘
Do you want full access?
Subscribe today to unlock all pages.
Trusted by 1+ million students worldwide
1 out of 56
Related Documents


Your All-in-One AI-Powered Toolkit for Academic Success.
+13062052269
info@desklib.com
Available 24*7 on WhatsApp / Email
![[object Object]](/_next/static/media/star-bottom.7253800d.svg)
Unlock your academic potential
Copyright © 2020–2026 A2Z Services. All Rights Reserved. Developed and managed by ZUCOL.