TridentS Network: Local Area Network Design and Configurations Project

Verified

Added on  2020/04/07

|21
|2405
|142
Project
AI Summary
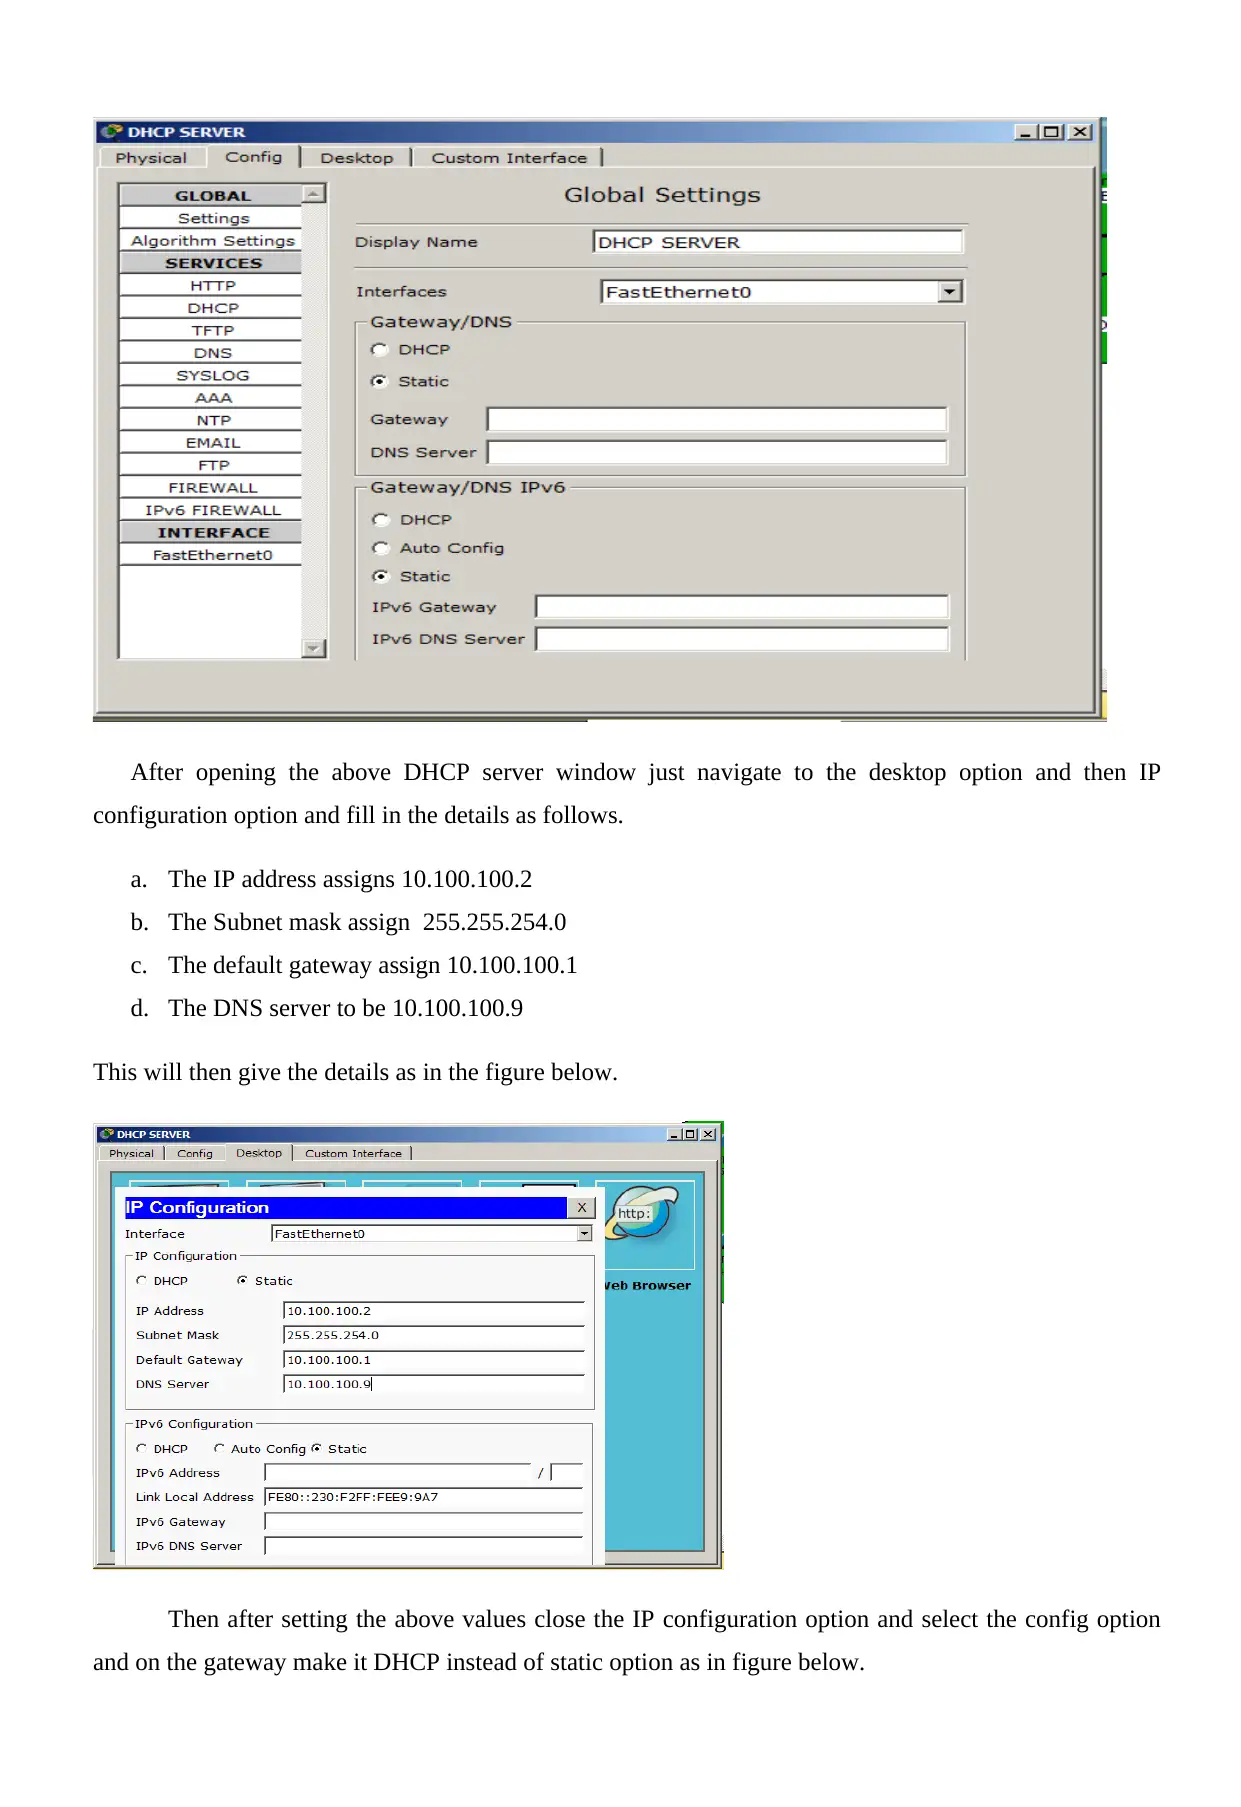
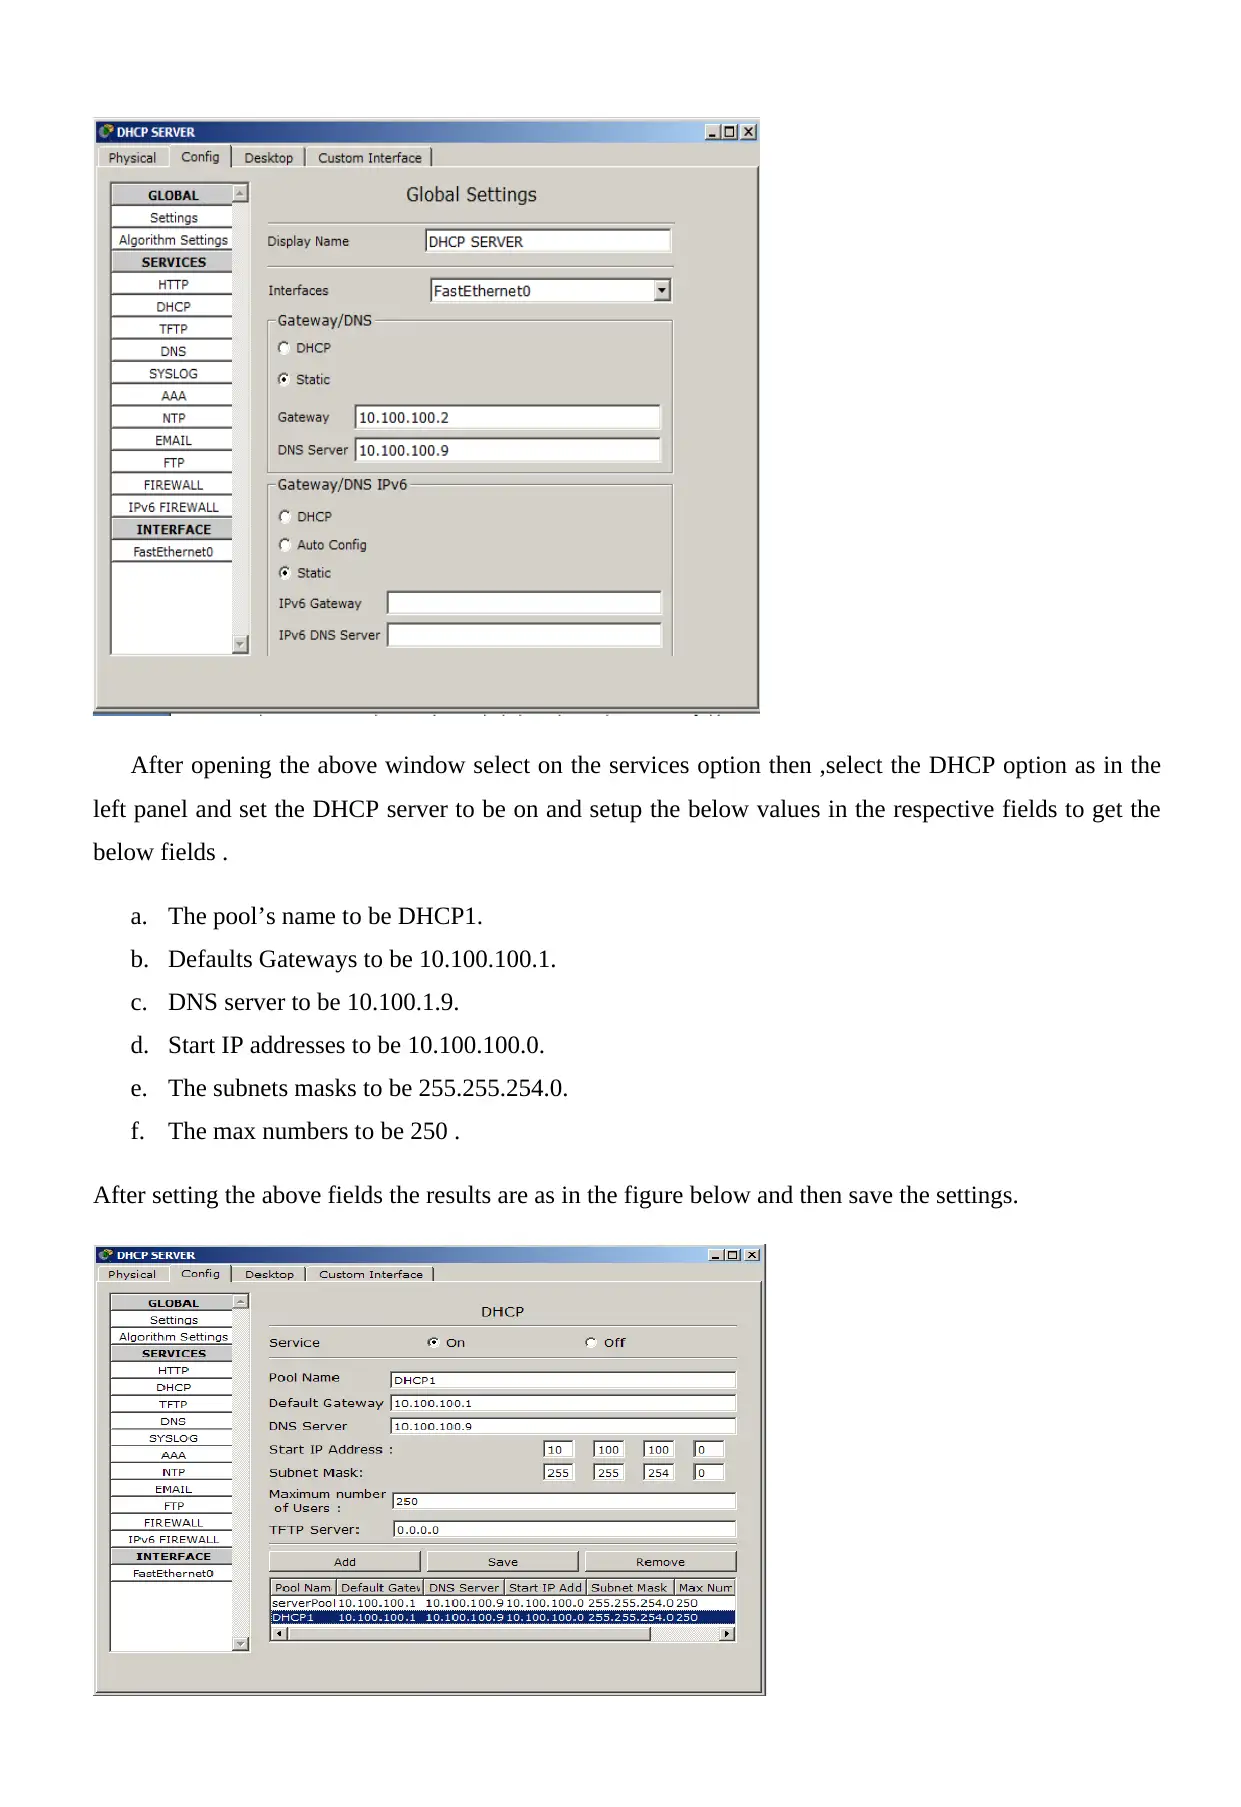
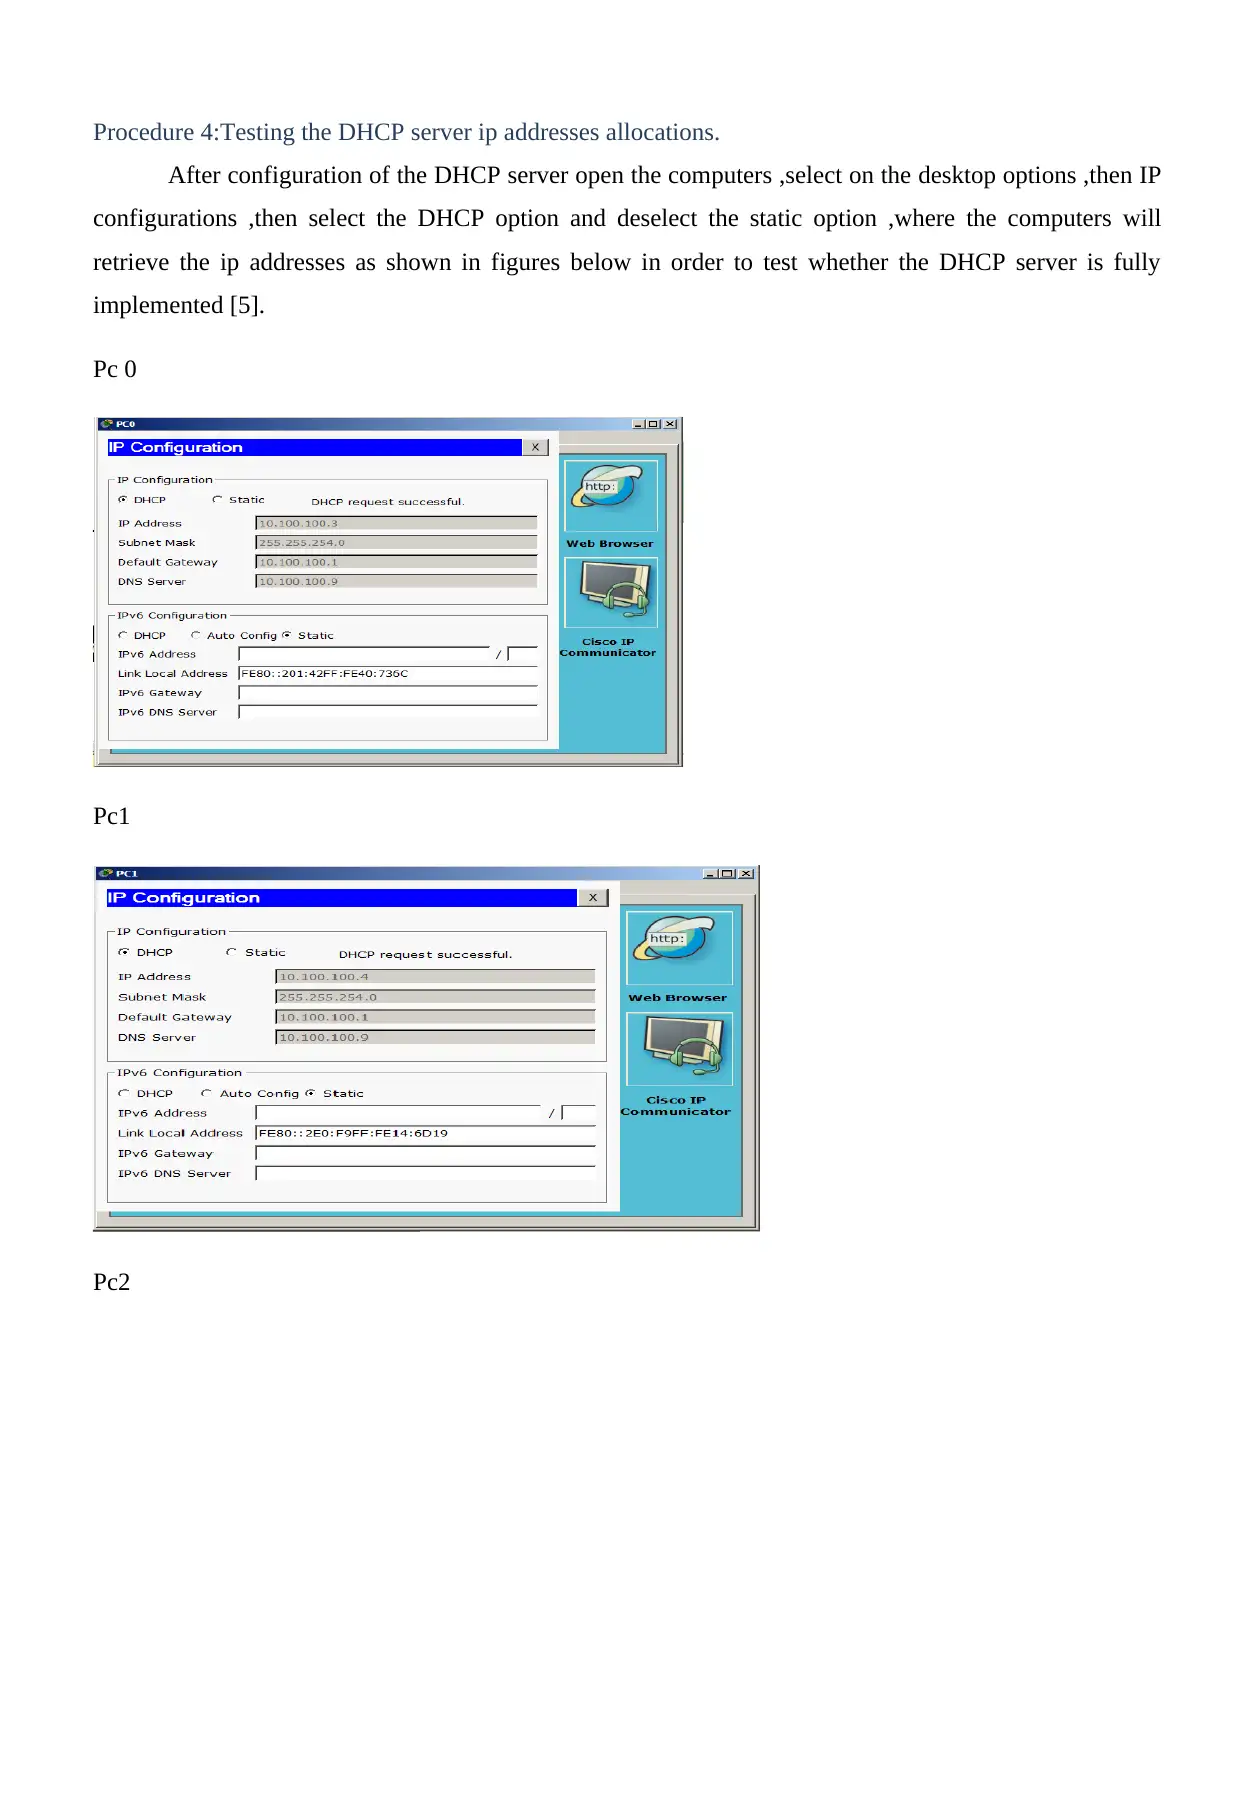
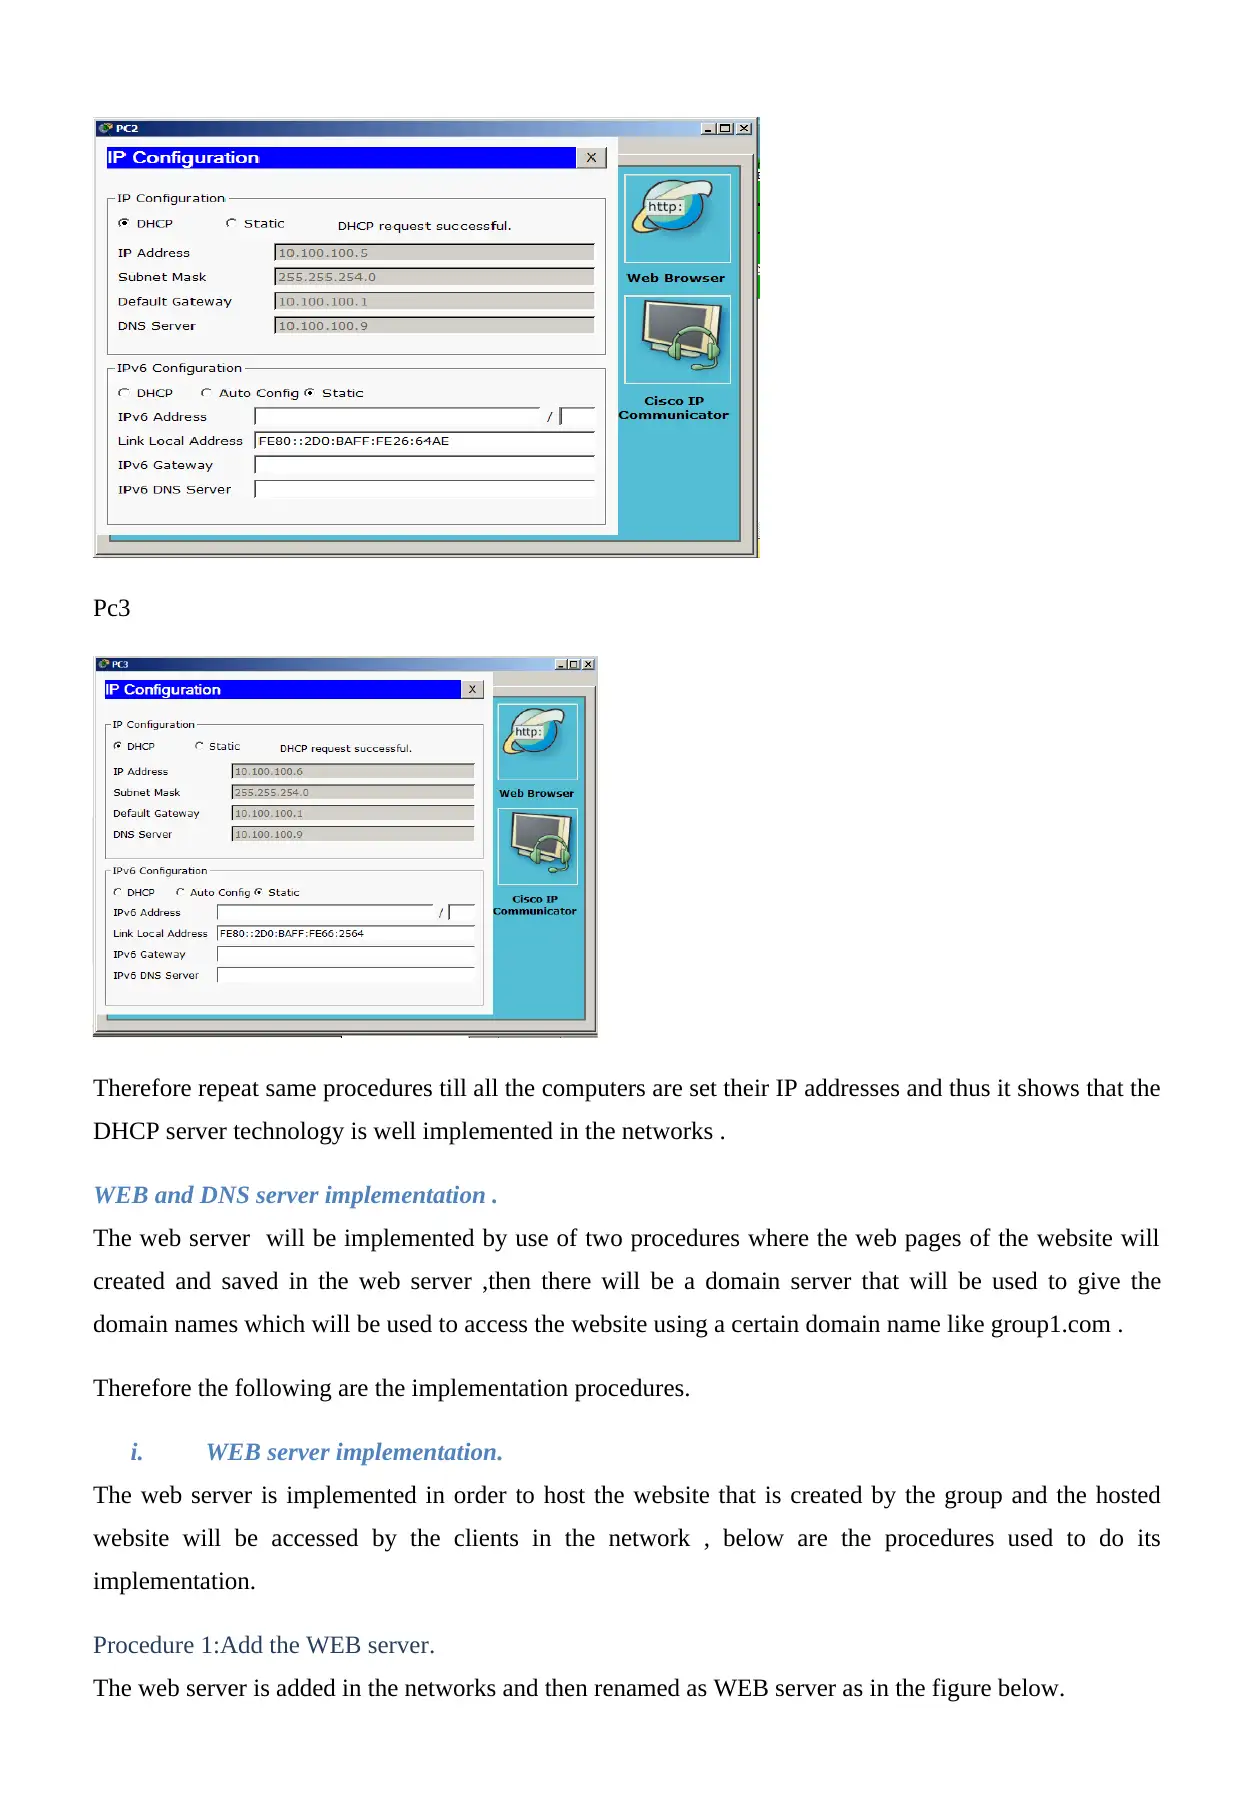
This project report details the design and configuration of a Local Area Network (LAN) called TridentS, implemented to provide various services across departments including Developers, Marketing, Operations, and Finance. The project covers the implementation of several key technologies: a DHCP server for automatic IP address allocation, a web and DNS server for hosting a website accessible via a domain name (group1.com), a file server for centralized data storage and sharing, and a printer for network-wide printing capabilities. The implementation steps for each technology are outlined, including router configuration, server setup, and testing procedures. Furthermore, the report highlights the importance of network security and describes the implementation of access control lists to restrict unauthorized access to resources. The project demonstrates a practical understanding of network design principles and the configuration of essential network services.
tabler-icon-diamond-filled.svg

Contribute Materials

Your contribution can guide someone’s learning journey. Share your documents today.
Document Page
LOCAL AREA NETWORK DESIGNING AND CONFIGURATIONS
Submitted to
[lecture name]
Local area network designing and configurations.
[Date]
By
[Student name]
tabler-icon-diamond-filled.svg

Secure Best Marks with AI Grader

Need help grading? Try our AI Grader for instant feedback on your assignments.
Document Page
TABLE OF Contents
TECHNOLOGIES USED...............................................................................................................................3
TECHNOLOGY IMPLEMENTATION........................................................................................................3
DHCP server implementation.....................................................................................................................4
WEB and DNS server implementation .....................................................................................................11
WEB server implementation..................................................................................................................11
DNS server
implementation………………………………………………………………………………………………
…………………………..14
File server implementation........................................................................................................................17
Setting up the authentication.....................................................................................................................19
References.....................................................................................................................................................21
TECHNOLOGIES USED.
The TridentS network is a network that is set to offer various services to the users where there are
various departments which are able to have access to a number of services.
Document Page
However there are various technologies that are going to be used in order to do the implementation
of the network, this network is meant to offer various services where there will be authentications, printing
services, DHCP server services where all the devices will be able to access the IP addresses through the
DHCP server ,the hosting and accessibility of the website and enable the users to save their files in the file
servers [1].
Below are some of the technologies to be implemented:
a. DHCP server implementation.
b. WEB and DNS server implementation .
c. File server implementation.
d. Installation of printer.
e. Setting up the authentication.
However through implementation of the above technologies all the services will e accessible to the
clients in this network. Below are the steps used to do the implementation of the services.
TECHNOLOGY IMPLEMENTATION.
The TridentS network is implemented according to the below design ,however there are various
departments which included the Developers, Marketing, Operations, and Finance departments .
In these departments there were various resources where Developers department had two
computers and the HCP server was installed there, Marketing department had two computers , Finance
department has two computers and Operations department has two computers WEB and DNS
server ,FILE server and a printer where the users in other departments were able to print over the network
and then collect their printouts from that departments.
Document Page
DHCP server implementation.
The DHCP server technology is implemented and it is used to provide the IP addresses to the other
network devices automatically through DHCP instead of the static option which is more tedious, below
are the procedures used to do implementation of the DHCP server [2].
Procedure 1:settingup a network.
Set up a network as below and add the server as it is name it as DHCP serve as in below figure.
Procedure 2. Configure the router.
Open the router in the above network then click on the ICL option then configure the network
10.100.100.1 and then 10.101.110.1 where the mask network will be 255.255.254.0 this is to enable the
communication between the clients computers and the file servers in order to be able to save their files as
follows.
tabler-icon-diamond-filled.svg

Secure Best Marks with AI Grader

Need help grading? Try our AI Grader for instant feedback on your assignments.
Document Page
Enter the following configuration codes to configure the interfaces
Router>enable
Router#config t
Enter configuration commands, one per line. End with CNTL/Z.
Router(config)#int fa 0/1
Router(config-if)#ip address 10.100.100.1 255.255.254.0
Router(config-if)#no shutdown
%LINK-5-CHANGED: Interface FastEthernet0/1, changed state to up [3].
Router>enable
Router#config t
Document Page
Enter configuration commands, one per line. End with CNTL/Z.
Router(config)#int fa 0/0
Router(config-if)#ip address 10.101.110.1 255.255.254.0
Router(config-if)#no shutdown
%LINK-5-CHANGED: Interface FastEthernet0/0, changed state to up
After the configuration the router interfaces changes from red to green showing that the
communication is sufficient as in the figure below.
Procedure 3:configure DHCP server
After configuration of the router then the DHCP server is configured as below .First Open the
DHCP server by clicking on the following window opens [4].
Document Page
After opening the above DHCP server window just navigate to the desktop option and then IP
configuration option and fill in the details as follows.
a. The IP address assigns 10.100.100.2
b. The Subnet mask assign 255.255.254.0
c. The default gateway assign 10.100.100.1
d. The DNS server to be 10.100.100.9
This will then give the details as in the figure below.
Then after setting the above values close the IP configuration option and select the config option
and on the gateway make it DHCP instead of static option as in figure below.
tabler-icon-diamond-filled.svg

Paraphrase This Document

Need a fresh take? Get an instant paraphrase of this document with our AI Paraphraser
Document Page
After opening the above window select on the services option then ,select the DHCP option as in the
left panel and set the DHCP server to be on and setup the below values in the respective fields to get the
below fields .
a. The pool’s name to be DHCP1.
b. Defaults Gateways to be 10.100.100.1.
c. DNS server to be 10.100.1.9.
d. Start IP addresses to be 10.100.100.0.
e. The subnets masks to be 255.255.254.0.
f. The max numbers to be 250 .
After setting the above fields the results are as in the figure below and then save the settings.
Document Page
Procedure 4:Testing the DHCP server ip addresses allocations.
After configuration of the DHCP server open the computers ,select on the desktop options ,then IP
configurations ,then select the DHCP option and deselect the static option ,where the computers will
retrieve the ip addresses as shown in figures below in order to test whether the DHCP server is fully
implemented [5].
Pc 0
Pc1
Pc2
Document Page
Pc3
Therefore repeat same procedures till all the computers are set their IP addresses and thus it shows that the
DHCP server technology is well implemented in the networks .
WEB and DNS server implementation .
The web server will be implemented by use of two procedures where the web pages of the website will
created and saved in the web server ,then there will be a domain server that will be used to give the
domain names which will be used to access the website using a certain domain name like group1.com .
Therefore the following are the implementation procedures.
i. WEB server implementation.
The web server is implemented in order to host the website that is created by the group and the hosted
website will be accessed by the clients in the network , below are the procedures used to do its
implementation.
Procedure 1:Add the WEB server.
The web server is added in the networks and then renamed as WEB server as in the figure below.
tabler-icon-diamond-filled.svg

Secure Best Marks with AI Grader

Need help grading? Try our AI Grader for instant feedback on your assignments.
Document Page
Procedure 2: open the WEB server and retrieve the IP address from DHCP server.
After opening the WEB server select on the cofig option then select the DHCP option to retrieve the IP
address automatically from the DHCP server as in figure below.
Procedure 3: select on the service options then choose from the panel on left the HTTP option.
After retrieval of the ip addresses, select on the services options to be able to create a web page then
choose on the HTTP option and create the webpage with details of the students IDs of the group members
as in the figure below.
Document Page
ii. DNS server implementation.
After implementation of the WEB server the next is to implement the DNS server where the
implementation will be done using the same server used to implement the WEB server , the DNS server
will enable the adding of the domain name that will be used to retrieve the web pages created and stored in
the WEB server.
The other use of the DNS server is to fix the printer in the network which is in the Operations
department and enable the users to print items from their respective departments into that printer through
the network, this will be enabled since the printer will be using the DNS server IP address hence it will be
accessible by any device in the network [6].
The DNS domain name will be group1.com which will then be used by the clients to access that
website in the web server ,however below are the procedures used to implement the DNS server.
Procedure 1:Open the DNS server and retrieve the IP addresses.
The DNS server will be opened by clicking on it one time and then navigate to desktop then IP
configuration options to get the respective addresses as below.
Document Page
Procedure 2: Select the DNS option and create the domain .
To set up the Domain open the DNS server and then choose on the config tab on the window
displayed and navigate to services then DNS option on the left menu.
The window that opens as below select the DNS to be on ,then enter the name in the field called
name to be group1.com and the ip address set it to be 10.100.100.9 and then click adding and the saving
button as shown in figure below.
Procedure 3:Perform the DNS testing.
After saving the domain name as group1.com use any computer in the network like computer
PC0 ,open it select desktop tab ,then select the Web browser option ,then in the window that opens type
tabler-icon-diamond-filled.svg

Paraphrase This Document

Need a fresh take? Get an instant paraphrase of this document with our AI Paraphraser
Document Page
the group1.com domain in the URL field and then end by clicking go button to view the website details as
in figures below [7].
Repeat same procedure using other computer to get same results as follows.
Document Page
Therefore that shows that the WEB server is now fully functional ,and all the network client computers
can be able to access the website from the WEB server.
iii. PRINTER implementation.
The printer is installed in this network and it can be able to print documents from the various clients
computers in the network ,this is made succesfull since the printer uses the DNS sever address which is
used by the clients computers in the network to access it ,below are the procedures used to implement it in
this network.
Procedure 1: Install the PRINTER in the network.
The printer is installed in the network where it resides in the operation department as in figure
below.
Document Page
Procedure 2: Open the printer and retrieve the DNS ip address.
After installation the printer is opened and the using the DHCP option the DNS address is retrieved
as below .
Procedure 3: Test the printer by ping command.
To check whether it is accessible from any part of the network as below using PC 4.
From the above results it shows the printer is accessible by any client computer in network for the
purpose of doing the printing processes.
tabler-icon-diamond-filled.svg

Secure Best Marks with AI Grader

Need help grading? Try our AI Grader for instant feedback on your assignments.
Document Page
File server implementation.
The file server is set up in this network ,this is because the management want the client s to be able
to store the information in the same server and this will ease the process of sharing the data among the
clients which will also cut on the operation cost as well .
The file server will be installed in the Operations department since there is no other room set aside
and it will be having the ip address 10.101.110.2 ,this will enable the administrator to restrict the access to
the file server though authentication.
Below is the procedure used.
Procedure 1: Add the FILE server in the network.
The file server will be added in the network as below and then the configuration will be setup to
allow it accessible to the other computers.
Document Page
Procedure 2: Test its accessibility by clients computers.
To test whether the server is accessible by other computers just ping from any computer in the
network as figure below.
The above results of ping from the PC0 to the FILE server showing it can be accessible as well as
it can access the clients computers too as in figure below.
The above two results shows that the network FILE server can be able to communicate with clients
computers as well as the clients computers can communicate with FILE server thus its installation is
implemented.
Document Page
Setting up the authentication.
The network security is very vital in this network this will assist in blocking the intruders from
accessing the server or any other resources in the network ,this is implemented through a way of setting
the list of the accessible ip addresses though the network router .
The implementation will be done using below commands.
Router>enable
Router#config t
Enter configuration commands, one per line. End with CNTL/Z.
Router(config)#access-list 1 permit 10.100.100.0 0.100.100.13
Router(config)#access-list 2 permit 10.101.110.0 0.101.110.2
Router#wr
Building configuration...
[OK]
After setting those authentications for any other device attached in the network will not be able to
access the file server or make use of the printers ,for example PC 9 added by a visitor in operation
department as in figure below cannot access the network FILE server as shown in ping results below.
tabler-icon-diamond-filled.svg

Paraphrase This Document

Need a fresh take? Get an instant paraphrase of this document with our AI Paraphraser
Document Page
Ping from PC9 to the FILE server.
Therefore the output above shows that the server cannot be accessed by clients computers which
are not authorized to access it hence the network is secure.
Document Page
References.
[1] A.Thomas,The Practice of System and Network Administration, New York:Addison-Wesley
Professional.
[2] D.Jeff,Routing TCP/IP, London: Cisco Press.,2016.
[3].D.Kevin, Cisco IOS Cookbook, New York: O'Reilly Media,2015.
[4] E.Douglas, Internetworking with TCP/IP Principles, Protocols, and Architecture, New York: Prentice
Hall,2015.
[5] K.James , Computer Networking: A Top-Down Approach, Toronto:Pearson publishers,2014.
[6].L.John,Computer Architecture:A Quantitative Approach,New York:Morgan Kaufmann
publishers ,2015.
[7] S.Andrew,TCP/IP Network Administration Craig Hunt Computer,New Yorj: O'Reilly Media,2014.
chevron_up_icon
1 out of 21
circle_padding
hide_on_mobile
zoom_out_icon
logo.png

Your All-in-One AI-Powered Toolkit for Academic Success.

Available 24*7 on WhatsApp / Email

[object Object]