Ubuntu Server 18.04 Installation and Configuration on VirtualBox

Verified

Added on  2023/04/21

|19
|1451
|383
Practical Assignment
AI Summary
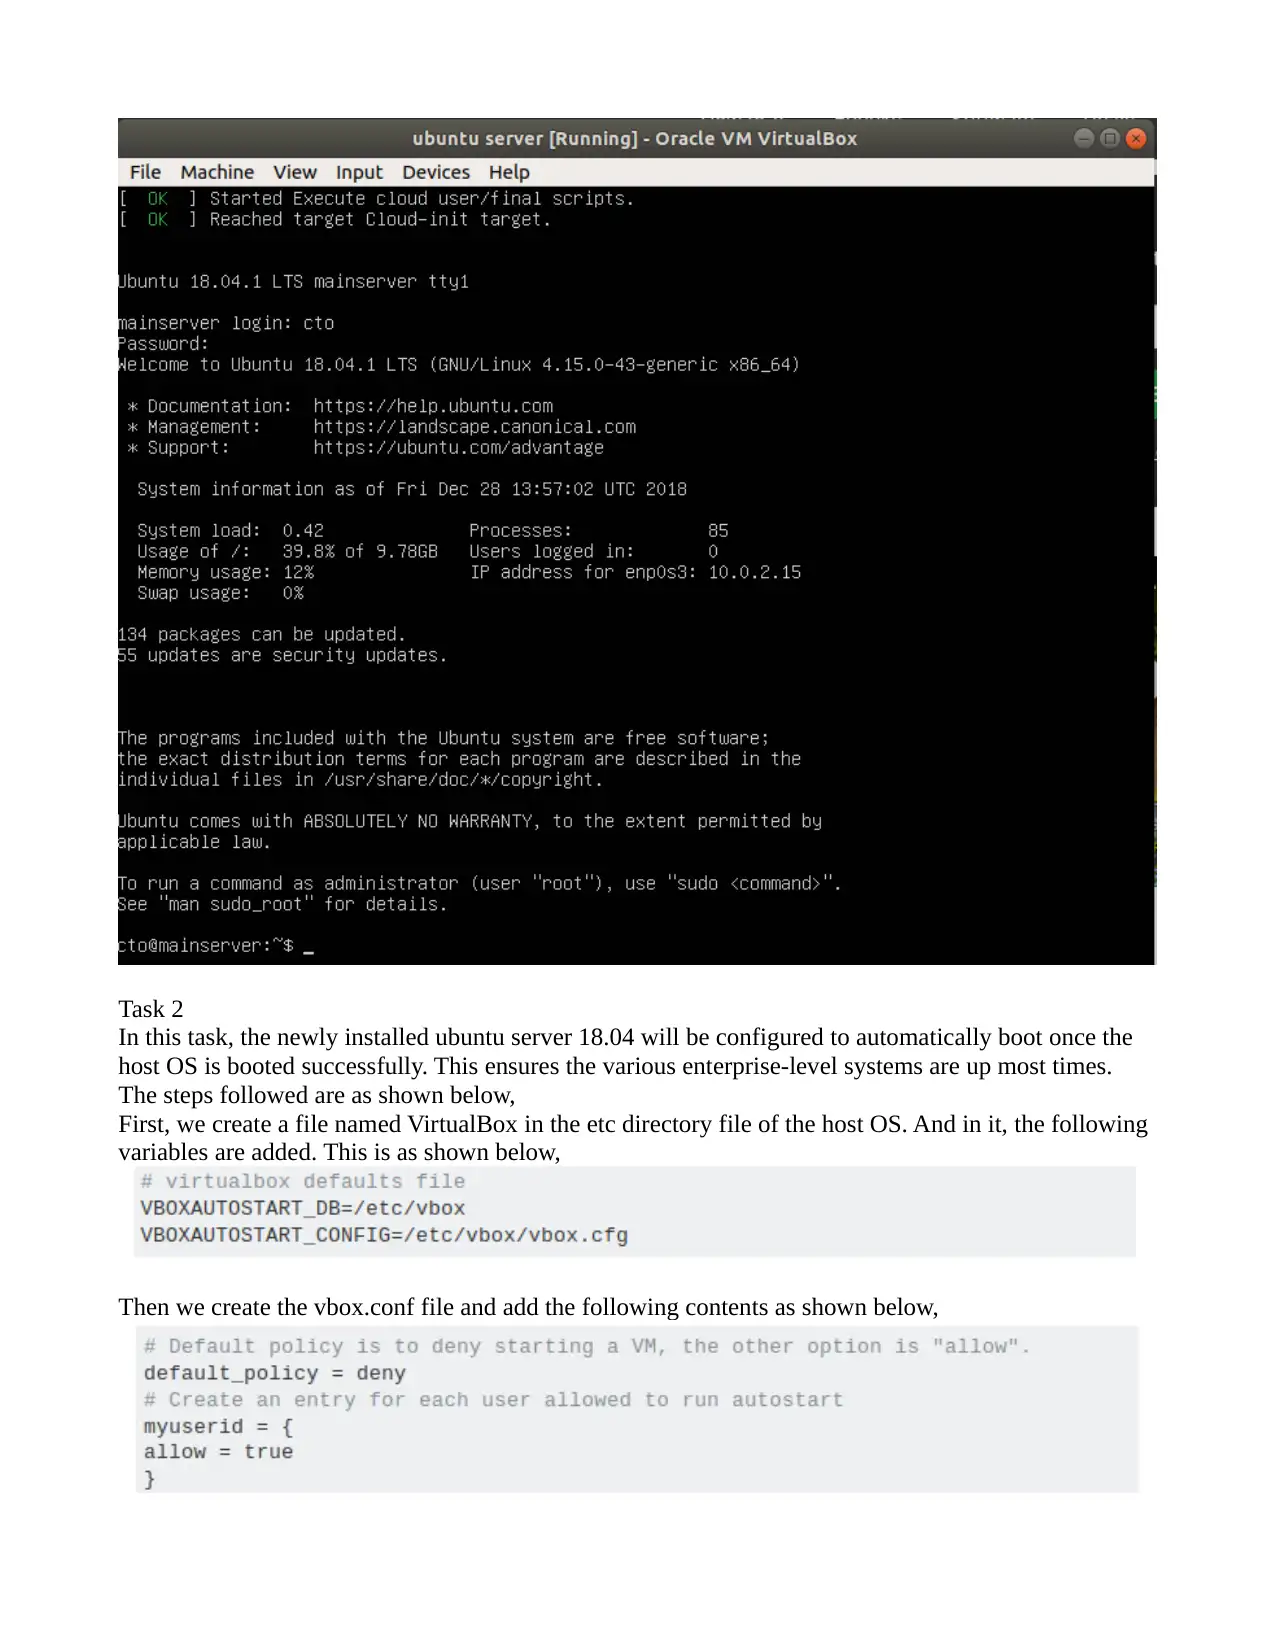
This assignment details the complete process of installing and configuring Ubuntu Server 18.04 on VirtualBox to simulate an enterprise-wide operating system. The solution covers the initial setup of the virtual machine, including allocating RAM and hard disk space. It then guides through the installation of Ubuntu Server, including creating user accounts and setting the hostname. The assignment further explores configuring the OS for automatic boot, creating disk partitions, and managing file systems. It includes steps for updating and patching the system, mounting and unmounting file systems, and creating files, folders, users, and groups. The solution also covers using shell commands for file manipulation, managing user and group accounts, scheduling tasks with cron, and implementing an iptables firewall to manage network traffic. The assignment concludes with a list of references used in the process.
Document Page
tabler-icon-diamond-filled.svg

Paraphrase This Document

Need a fresh take? Get an instant paraphrase of this document with our AI Paraphraser
Document Page
Task 1 Installing Enterprise-wide Operating System on Virtual Box
To accomplish this task, Ubuntu Server 18.04 was used as the enterprise-wide OS installed on the
virtual box running on Ubuntu 18.04 desktop as the host OS. The steps are described below,
Open the virtual box and create a new virtual machine by clicking the new button as shown below
Give the machine the recommended RAM as shown in the screenshot below
Document Page
Give the machine the recommended hard disk space that shall be used by the enterprise-wide OS. This
should be enough to hold most file owned by users and other libraries used by the OS. This is as
shown below
Once the parameter has been set, power on the machine and browse through the .iso file that contains
the bootable file of the new enterprise OS. This is as shown below
Document Page
Once all the parameters are set, click the done button to allow the installation of the machine on virtual
box. This is as shown below
tabler-icon-diamond-filled.svg

Paraphrase This Document

Need a fresh take? Get an instant paraphrase of this document with our AI Paraphraser
Document Page
Document Page
Once the installation is complete, there is a need to create a user account and set the hostname of the
OS In this case, a to is the user account and mainserver is the hostname. This is as shown below,
Document Page
Optionally, you can install some packages suggested by Ubuntu 18.04 and hit done. In this case, we are
going to ignore the package suggestions and hit done as shown below,
tabler-icon-diamond-filled.svg

Paraphrase This Document

Need a fresh take? Get an instant paraphrase of this document with our AI Paraphraser
Document Page
Allow Ubuntu to use the settings provided to complete the installation as shown below,
Document Page
Once done, reboot the system and the Ubuntu login terminal will be presented, enter the username and
password to login to the OS as shown below,
Document Page
Task 2
In this task, the newly installed ubuntu server 18.04 will be configured to automatically boot once the
host OS is booted successfully. This ensures the various enterprise-level systems are up most times.
The steps followed are as shown below,
First, we create a file named VirtualBox in the etc directory file of the host OS. And in it, the following
variables are added. This is as shown below,
Then we create the vbox.conf file and add the following contents as shown below,
tabler-icon-diamond-filled.svg

Paraphrase This Document

Need a fresh take? Get an instant paraphrase of this document with our AI Paraphraser
Document Page
Now, we need to set the permission for the vboxusers to 1775 as shown below,
Then we add each user to the vbox user group using the command below,
To ensure individual users autostart the virtual machine, the following command is used,
To ensure the changes take effect, we restart the vboxautostart-service using the command shown
below,
Finally, we reboot the system for the machine to boot automatically on host boot.
Task 3 Create disk partition and other file systems. Provide evidence of file management
File management in our newly created enterprise OS involves the use of disk command utility. We will
need to create a partition and format it to a Linux file system so as to be ready for the file from
enterprise-wide applications.
First, let's list the partitions available. This is done as shown in the screenshot below,
Document Page
The first disk device sda which is 10GB will be the one partitioned further. To list partitions currently
on sda, the following command is used,
Once we know the various devices, we enter the command mode for the file system management using
the following command,
Using the n command, we create a primary partition as shown below,
To write the changes to the disk, we use the w command as shown below,
chevron_up_icon
1 out of 19
circle_padding
hide_on_mobile
zoom_out_icon
[object Object]