CPCC50210 Diploma: Wall System Rectification, Bracing, and Cladding
VerifiedAdded on 2021/08/30
|30
|5252
|262
Practical Assignment
AI Summary
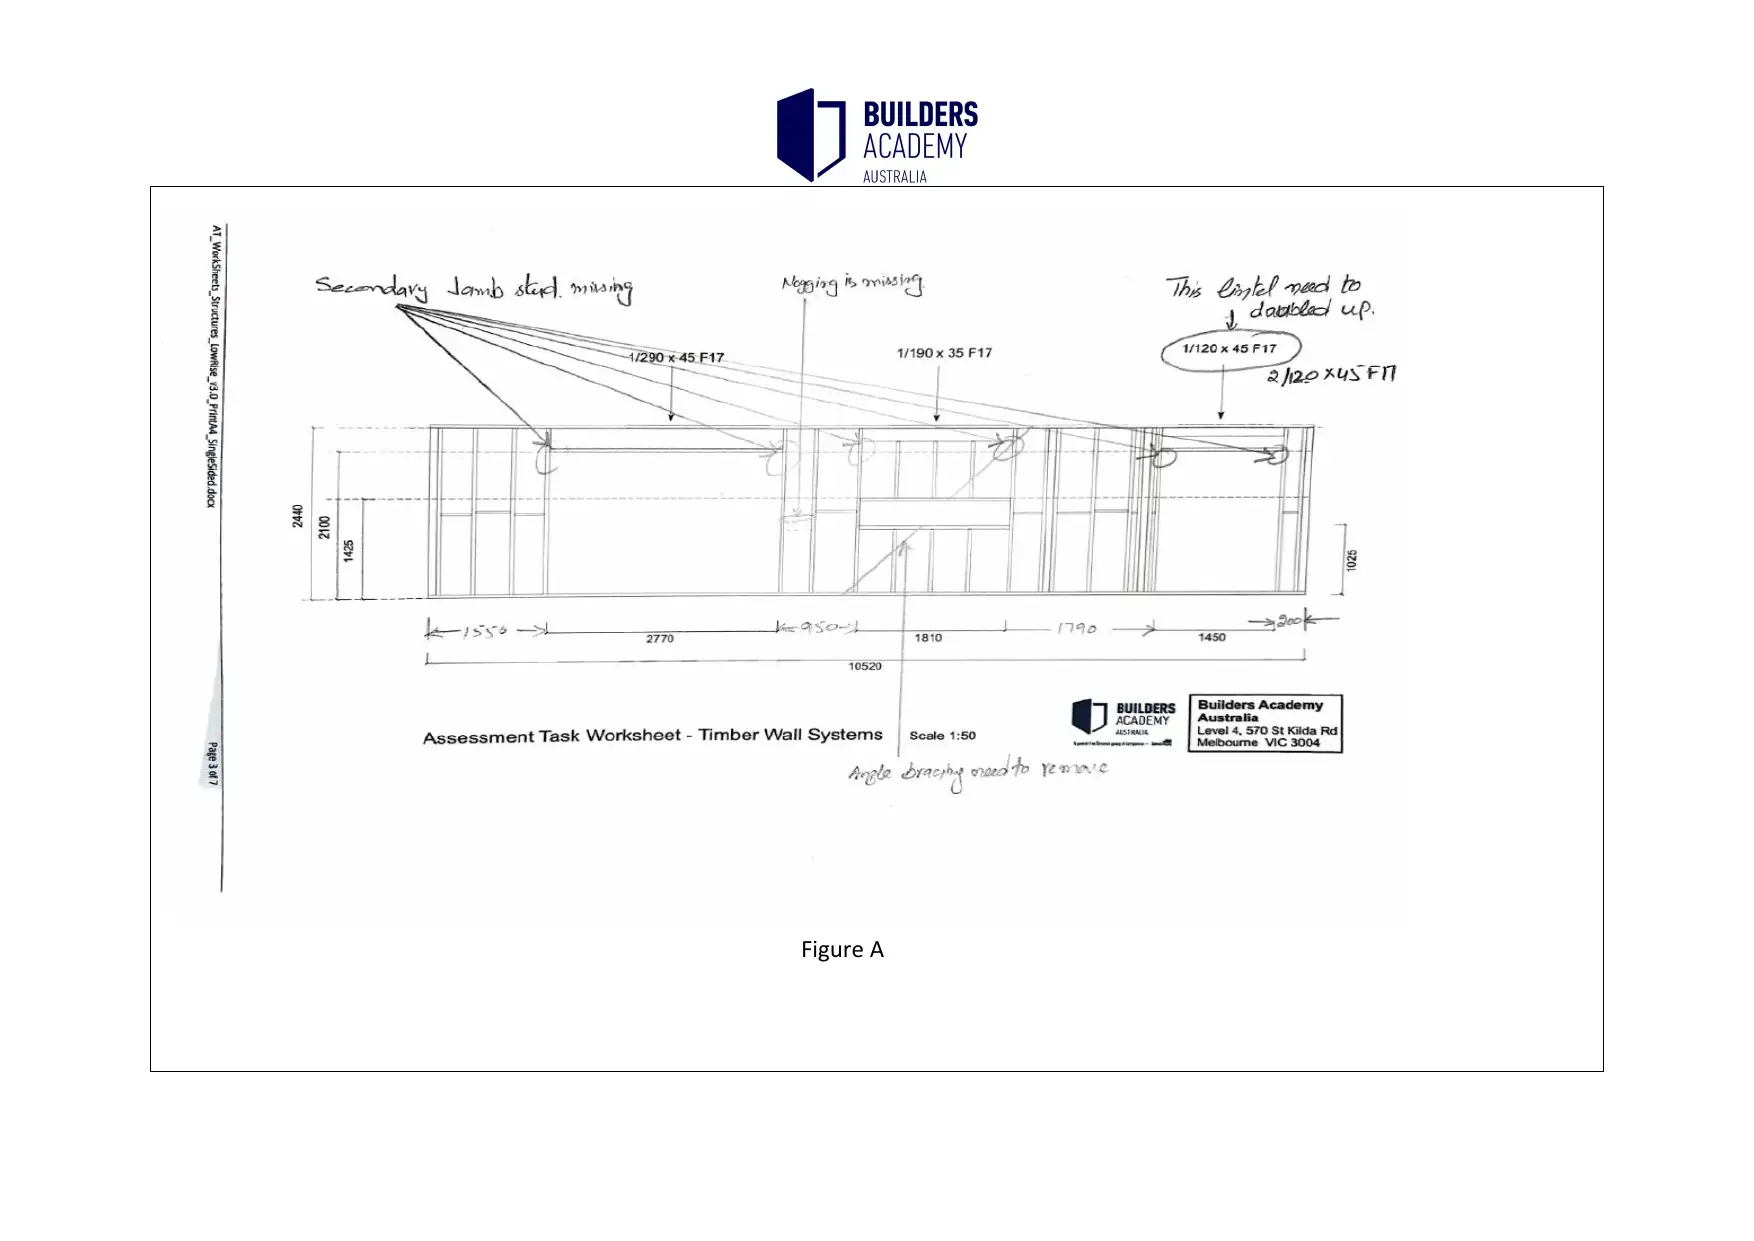
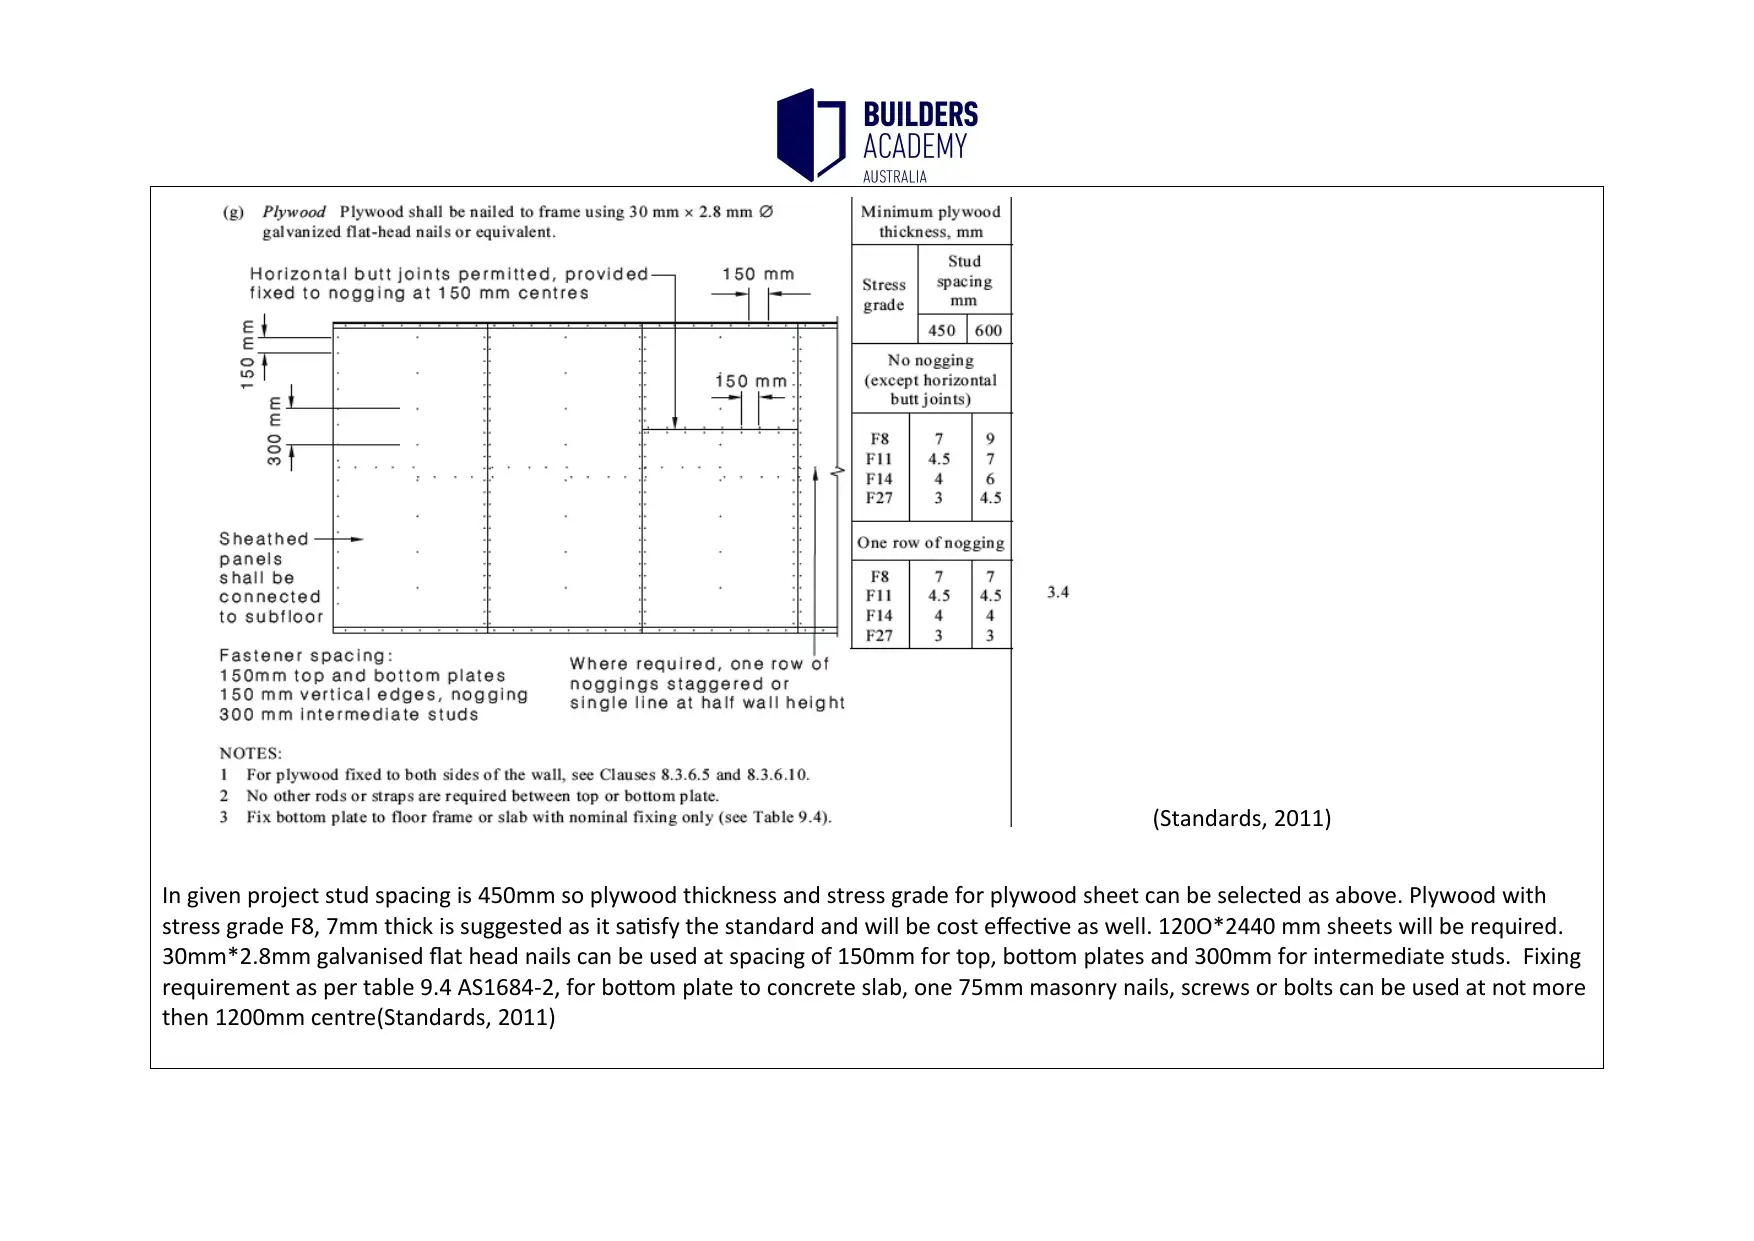
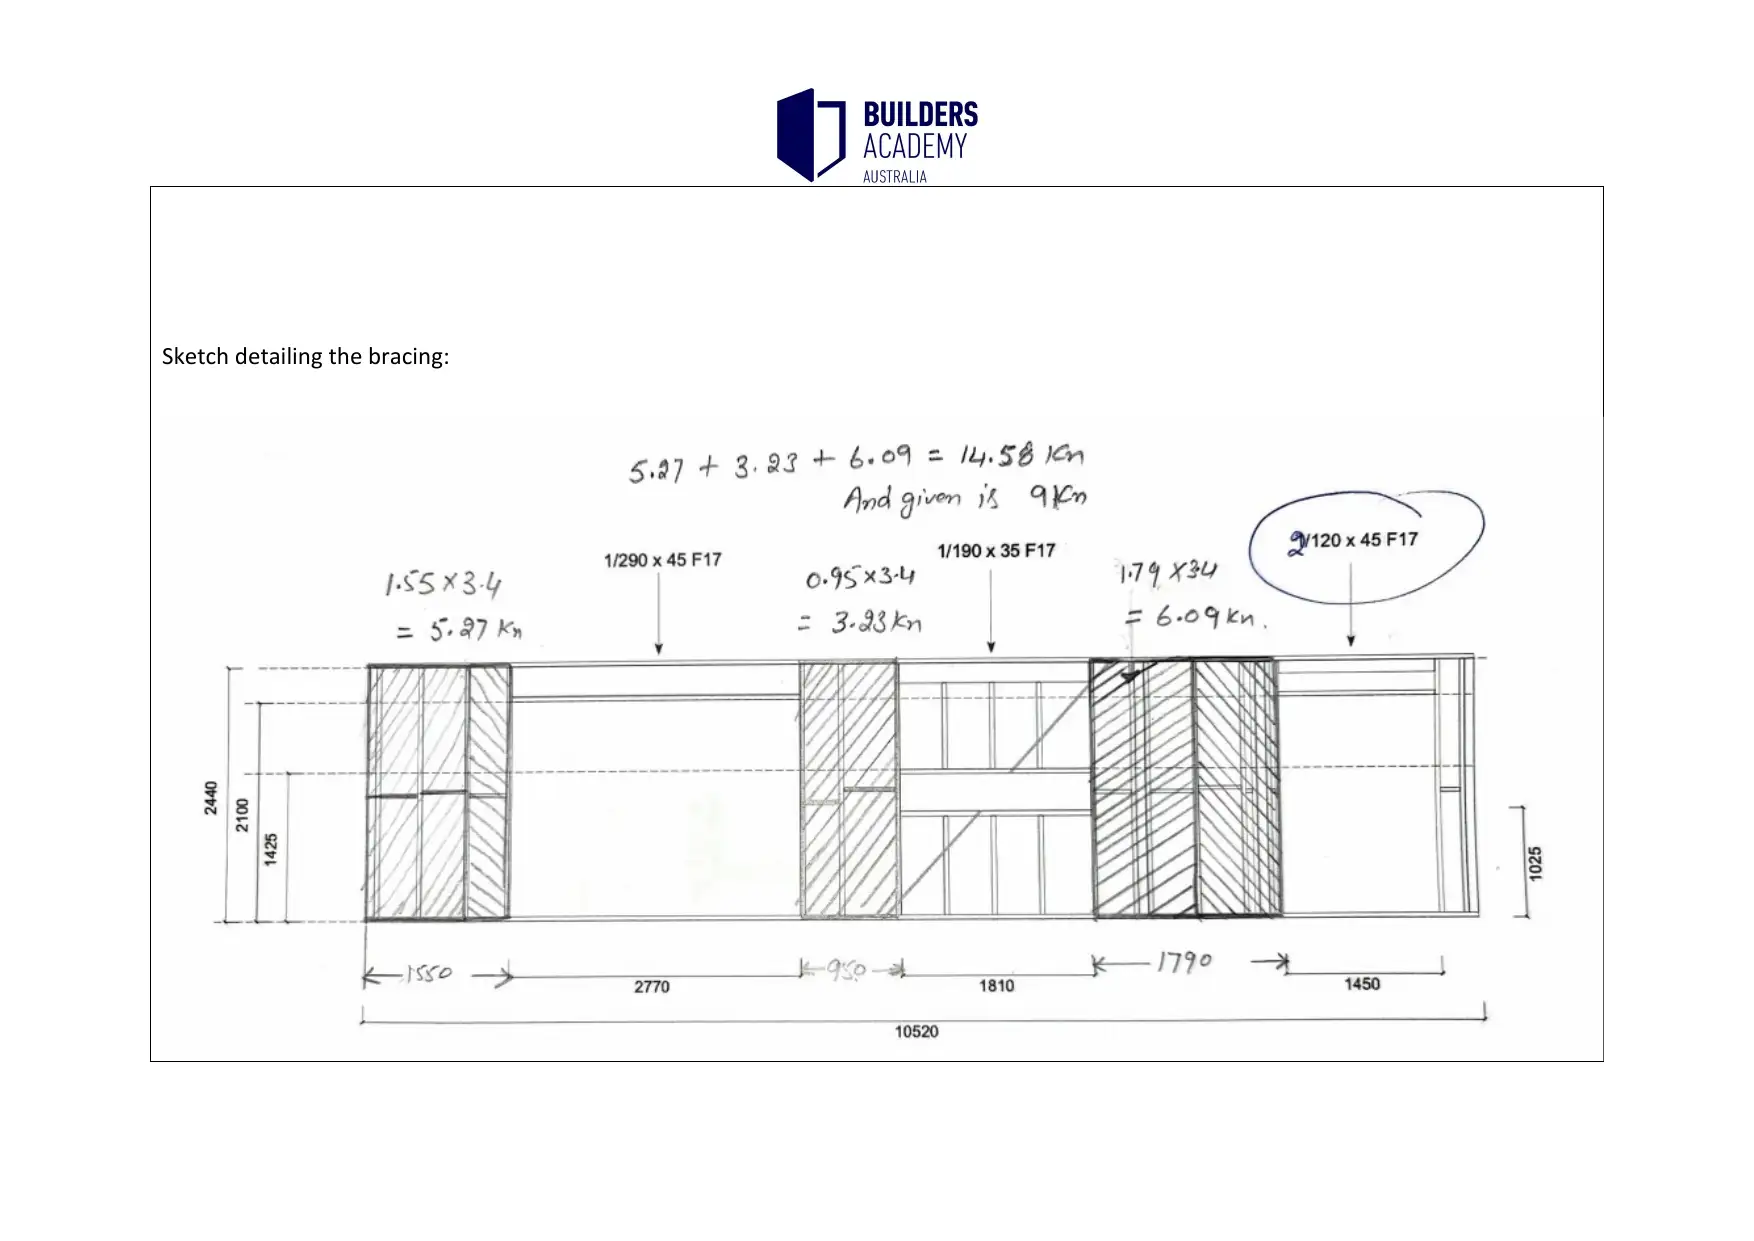
This assignment solution addresses the rectification of timber and brick wall systems for a building project (Pelican Way Project 433324). The student, Gurmeet Singh Brar, analyzes errors in the provided timber wall system worksheet, including incorrect lintel sizes, missing jamb studs and noggings, and insufficient bracing. The solution provides a site instruction to the carpenter detailing these errors and specifying rectification requirements, including a sketch of plywood sheet bracing, fixing requirements, and key points for window installation and vapor barrier implementation. The assignment also covers the brick veneer wall system, including missing components, their function, and the relevant codes and standards (AS1684). Finally, it explores alternative cladding options (rendered cement sheeting and veneered timber sheeting) and their implications for the building's bracing requirements. The solution emphasizes the importance of adhering to building codes and standards to ensure structural integrity and compliance.

ASSESSMENT COVER SHEET
Student Surname Brar Student Given
Name
Gurmeet Singh
Qualification CPCC50210 Diploma of Building and Construction (Building)
Module of Study Module 1
Assessment Name
(Select from dropdown list)
Activity 1.3: Wall systems
Trainer Name Mr Sami K
STUDENT STATEMENT
Plagiarism is a form of cheating. It is taking and using someone else’s thoughts or writings and representing them as your own. Plagiarism is a serious act and may result in
a participant’s exclusion from a Unit of Competency or a course. This in turn may require for students to pay to re-complete the module or course at a later date.
The following list outlines some of the activities for which a participant can be accused of plagiarism:
1. Presenting any work by another individual as one’s own unintentionally
2. Handing in assessments markedly similar to or copied from another student
3. Presenting the work of another individual or group as their own work.
4. Handing up assessments without the adequate acknowledgement of sources used, including assessments taken totally or in part from the internet.
Paraphrase This Document
Need a fresh take? Get an instant paraphrase of this document with our AI Paraphraser

Many of the workbook activities are ‘open book’ yet should still be conducted under test conditions without consultation with other students. If you are unsure of any
assessment requirements you should check with your Trainer / Assessor.
By submitting this assessment electronically you declare that all work for assessment tasks submitted for this assessment is your own with no part of any assessment being
copied/plagiarised from another person’s work, except where authorised and listed / referenced.
Referring to the Timber Wall System Worksheet (Page 2 of Low Rise Structures - AT Worksheets) and using the Span Table, you are required to
determine if the lintels are correct. Once you have quality checked the drawings, you are required to:
Write (must be typed, not handwritten) a Site Instruction to the Carpenter describing all the errors and rectification requirements
Site instruction must include:
o Sketch detailing the bracing you would use. This can be hand drawn or produced electronically. Email format is acceptable.
o Describe the fixings that would be required to ensure this bracing meets the NCC requirements
o Include key points required for the window installation once the wall frame rectification is complete
o Include key points required for the vapour permeable sarking or a waterproof membrane

Enter your answers below:
Part A
Project: Pelican Way Project 433324
To: Carpenter
Objective: Rectification Required for Timber Wall System Worksheet : Low Rise Structure
Part A
Project: Pelican Way Project 433324
To: Carpenter
Objective: Rectification Required for Timber Wall System Worksheet : Low Rise Structure
⊘ This is a preview!⊘
Do you want full access?
Subscribe today to unlock all pages.

Trusted by 1+ million students worldwide

Figure A
Paraphrase This Document
Need a fresh take? Get an instant paraphrase of this document with our AI Paraphraser

Rectification Required:
1. Lintels at opening 1450 does not comply with AS1684 , Figure 3.4.4.3. It must be rectified to 2/120*45 F17.
2. Secondary Jam studs are missing under all lintels and required to be installed.
studs can be large single ones, or two or more stud nails laminated together. Please note Jamb studs in external walls and other load
bearing walls must not be:
notched within the middle half of their height
or
within the height of the opening.
3. One side nogging is missing next to living opening:
The maximum spacing for noggings is 1,350 mm. There is usually one nogging for walls up to 2,700 mm height. Noggings are not required to
be stress graded. Nogging thickness must be:
a minimum of 25 mm
suitable for fixing cladding and linings.
Noggings must be installed either centrally in the depth of the studs or flush with one face of the stud.
4. Angle Bracing required to be removed. Please Refer to figure B below for bracing installation.
BRACING

Given Bracing is not sufficient. AS 1684.2 Section 8 requires bracing to withstand the wind pressure on the timber framed structure
Any further Directive, guidance and clarification about Bracing can be found in following Australian Regulation if required during the whole
bracing process:
1. Wind classification is determined as per Clauses 1.4.2 & 1.5 & AS4055/AS/NZS1170.2
2. Wind pressure is guided by Clause 8.3.2 & Tables 8.1 to 8.5 AS1684-2
3. Area of elevation is directed by Clause 8.3.3 and Figure 8.2(A) or (B) AS1684-2
4. Calculation of the racking force can be calculated according to Clause 8.3.4 and Tables 8.1 to 8.5 of AS1684-2. Formulae used for racking
force is
Total Racking Force (kN) = Projected Area of Elevation (m2 ) x Lateral Wind Pressure (kPa)
5. Bracing systems is designed as per Clause 8.3.6, Tables 8.18 and 8.19, AS1684-2
6. Even distribution and spacing is checked as per Clause 8.3.6.6 and 8.3.6.7, Tables 8.20 – 8.21 AS1684-2.
7. Connection of bracing is led by Clause 8.3.6.9 and 8.3.6.10, Table 8.23AS1684-2
(Board, 2016; Standards, 2011)
In the given project wind classification is N2, and the racking force is given as 9 KN. Wall frame height is 2.44m which is less then 2.7m , thus
guidance for bracing can be achieved from Table 8.18. plywood sheet bracing can provide bracing capacity of 3.4Kn/m through which
correct bracing for racking force 9kn can be achieved as per Table 8.18 AS1684-2. Plywood bracing is recommended. Please ensure that
plywood used has been manufactured to the requirements of AS/NZS 2269.0. Fixing requirement is given in AS1684 -2, Table 8.18/ section
‘g’ as following (Standards, 2011):
⊘ This is a preview!⊘
Do you want full access?
Subscribe today to unlock all pages.

Trusted by 1+ million students worldwide

(Standards, 2011)
In given project stud spacing is 450mm so plywood thickness and stress grade for plywood sheet can be selected as above. Plywood with
stress grade F8, 7mm thick is suggested as it satisfy the standard and will be cost effective as well. 120O*2440 mm sheets will be required.
30mm*2.8mm galvanised flat head nails can be used at spacing of 150mm for top, bottom plates and 300mm for intermediate studs. Fixing
requirement as per table 9.4 AS1684-2, for bottom plate to concrete slab, one 75mm masonry nails, screws or bolts can be used at not more
then 1200mm centre(Standards, 2011)
Paraphrase This Document
Need a fresh take? Get an instant paraphrase of this document with our AI Paraphraser

Sketch detailing the bracing:

Window Installation :
Windows are designed and constructed in accordance with AS2047 section 3.6.0., part 3.0 to meet performance requirements set in P2.1
and P2.2 of NCC. In given plan different glazed windows are being used. For glazed assemblies not covered by AS2047 compliance to AS1288
-2006 is required. AS 1288- 2006 sets out the data and procedures for determining the glass type and thickness requirements for all
buildings. It is referenced in the National Construction Code (NCC) section 3.6.2 for Wind class not exceeding N2. Further AGWA, Australian
glass and window Association can be referred for selection and installation of glass.
Aluminium windows are suggested for given project because aluminium windows are extremely durable, can withstand hottest and coldest
temperature and require low maintenance in long term .
The method of fixing through reveals to studs is suggested. Timber reveals are fitted first as width of reveals is suitable for brick veneer. It
does not require any additional flashing. Stud opening must be of window width of plus 50mm and height of plus 60mm as given in plan
43324, sheet no:6.1. Now window frame can be fixed once the opening is ready . (BAA, 2016).
Key points required for the window installation once the wall frame rectification is complete (Board, 2016):
Where possible, all four sides of the frame should be secured as follows:-
Sufficient space around glass should be allowed so that window glass should not bear any type stress from wall in any direction.
Jambs and heads must be plumb and level.
Corner jamb fixings should be between 100 mm and 150 mm from the external comer.
Edges should flush with internal wall lining and allow 10mm plasterboard internal lining.
No fixings should be less than 100 mm from the centre line of a mullion or transom.
Intermediate fixings should be at centres no greater than 600mm.
There should be a minimum of two fixings on each jamb.
On windows over 1800 mm wide, central head and sub-sill fixings should be provided
As per plan 43224 , sheet number 3.2 ‘All windows to be set at 2100mm O/A head unless nominated otherwise/ if brickwork over,
adjust head height to within 5-10mm of Lintel
⊘ This is a preview!⊘
Do you want full access?
Subscribe today to unlock all pages.

Trusted by 1+ million students worldwide

(Henderson & Ginger, 2008)
Seals: NCC Vol 2, Section P2.2.2 requires external wall to be weather proof Perimeter joints should be sealed on both the outside and the
inside, with a sealant appropriate to the frame surface, the substrate material, joint size, and configuration, anticipated joint movement and
anticipated exposure to weather. The sealant should be applied against a firm backing(Burton et al., 2010; Smith, 2019)
Key points required for the vapour permeable sarking or a waterproof membrane:
Paraphrase This Document
Need a fresh take? Get an instant paraphrase of this document with our AI Paraphraser

A vapor Barrier will be used on inside walls to reduce the risk of condensation forming in wall from the building and a sarking/ breather
membrane will be installed on outer side to prevent water entering from atmosphere while allowing the building to breath the vapours out.
Vapour permeable membrane will be used as a protective second skin behind wall claddings as per NCC vol2 Performance requirement
p2.2.2 and p2.2.3 to
Reduces the risk of condensation formation inside the building frame in cold climates.
Improves energy efficiency by reducing draughts allowing insulation to work more effectively.
Protects the building frame from decay by reducing the entry of wind driven rain and dust.
Wall sarking product should have flammable index less than 5 and should not be more than 1mm thick to meet NCC, Vol2, Section 3.7.1.1
and AS 1530.2
Wall sarking should be installed in accordance with AS/NZS 4200.2:2017 Pliable Building Membranes and Underlays - Installation.
Recommended instructions for a compliant installation:(Board, 2016)
• Surface side (in or out) should be adhered strictly as per product information
• The product should be applied to a stud and rolled around the wall frame horizontally.
• When wrapping around corners, 150mm should extend around that corner.
• When applying a new roll horizontally it should overlap the previous roll by 150mm.
• Affix using galvanised staples/metal fixings every 150mm, where possible all overlaps and end joints should line up with a wall stud for
the given project of timber frames
• When applying the top layer of wrap, it should overlap the bottom layer of wrap by 150mm.
• To create an air or vapour barrier, all overlaps and nailed/stapled points should be sealed and taped. Tape used should be heat resistant
pressure sensitive 75mm wide tape.
• All damaged, punctured, or torn material should be repaired or replaced to maintain the original properties of the product.
References:

BAA. (2016). Learner Guide.
BAA Learner Guide, 2. Retrieved from https://online.fliphtml5.com/nzcu/zuiu/#p=2
Board, A. B. C. (2016). What is the National Construction Code (NCC).
Council of Australian Governments.
Burton, C. R., Dorenkamp, T. D., Kugel, M. J., Haar, E. R. V., Baier, B. A., Mullen, M., & Jungling, J. L. (2010). Window installation method. In: Google Patents.
Henderson, D., & Ginger, J. (2008). Role of building codes and construction standards in windstorm disaster mitigation.
Australian Journal of Emergency
Management, The, 23(2), 40.
Reardon, C. (2013). Australia's guide to environmentally sustainable homes.
Your Home. Retrieved from https://www.yourhome.gov.au/materials/cladding-
systems
Smith, G. (2019). Window and door framing materials-Aluminium.
Building Connection(Winter 2019), 50.
Standards, A. (2011). AS/nzs 1170.2:2011 Structural design actions Part2: Wind actions, Standards Australia,.
PART B
⊘ This is a preview!⊘
Do you want full access?
Subscribe today to unlock all pages.

Trusted by 1+ million students worldwide
1 out of 30
Related Documents

Your All-in-One AI-Powered Toolkit for Academic Success.
+13062052269
info@desklib.com
Available 24*7 on WhatsApp / Email
Unlock your academic potential
Copyright © 2020–2025 A2Z Services. All Rights Reserved. Developed and managed by ZUCOL.