Comprehensive Report: Web Application Development, APIs, and Database

Verified

Added on  2022/09/01

|16
|1108
|23
Report
AI Summary
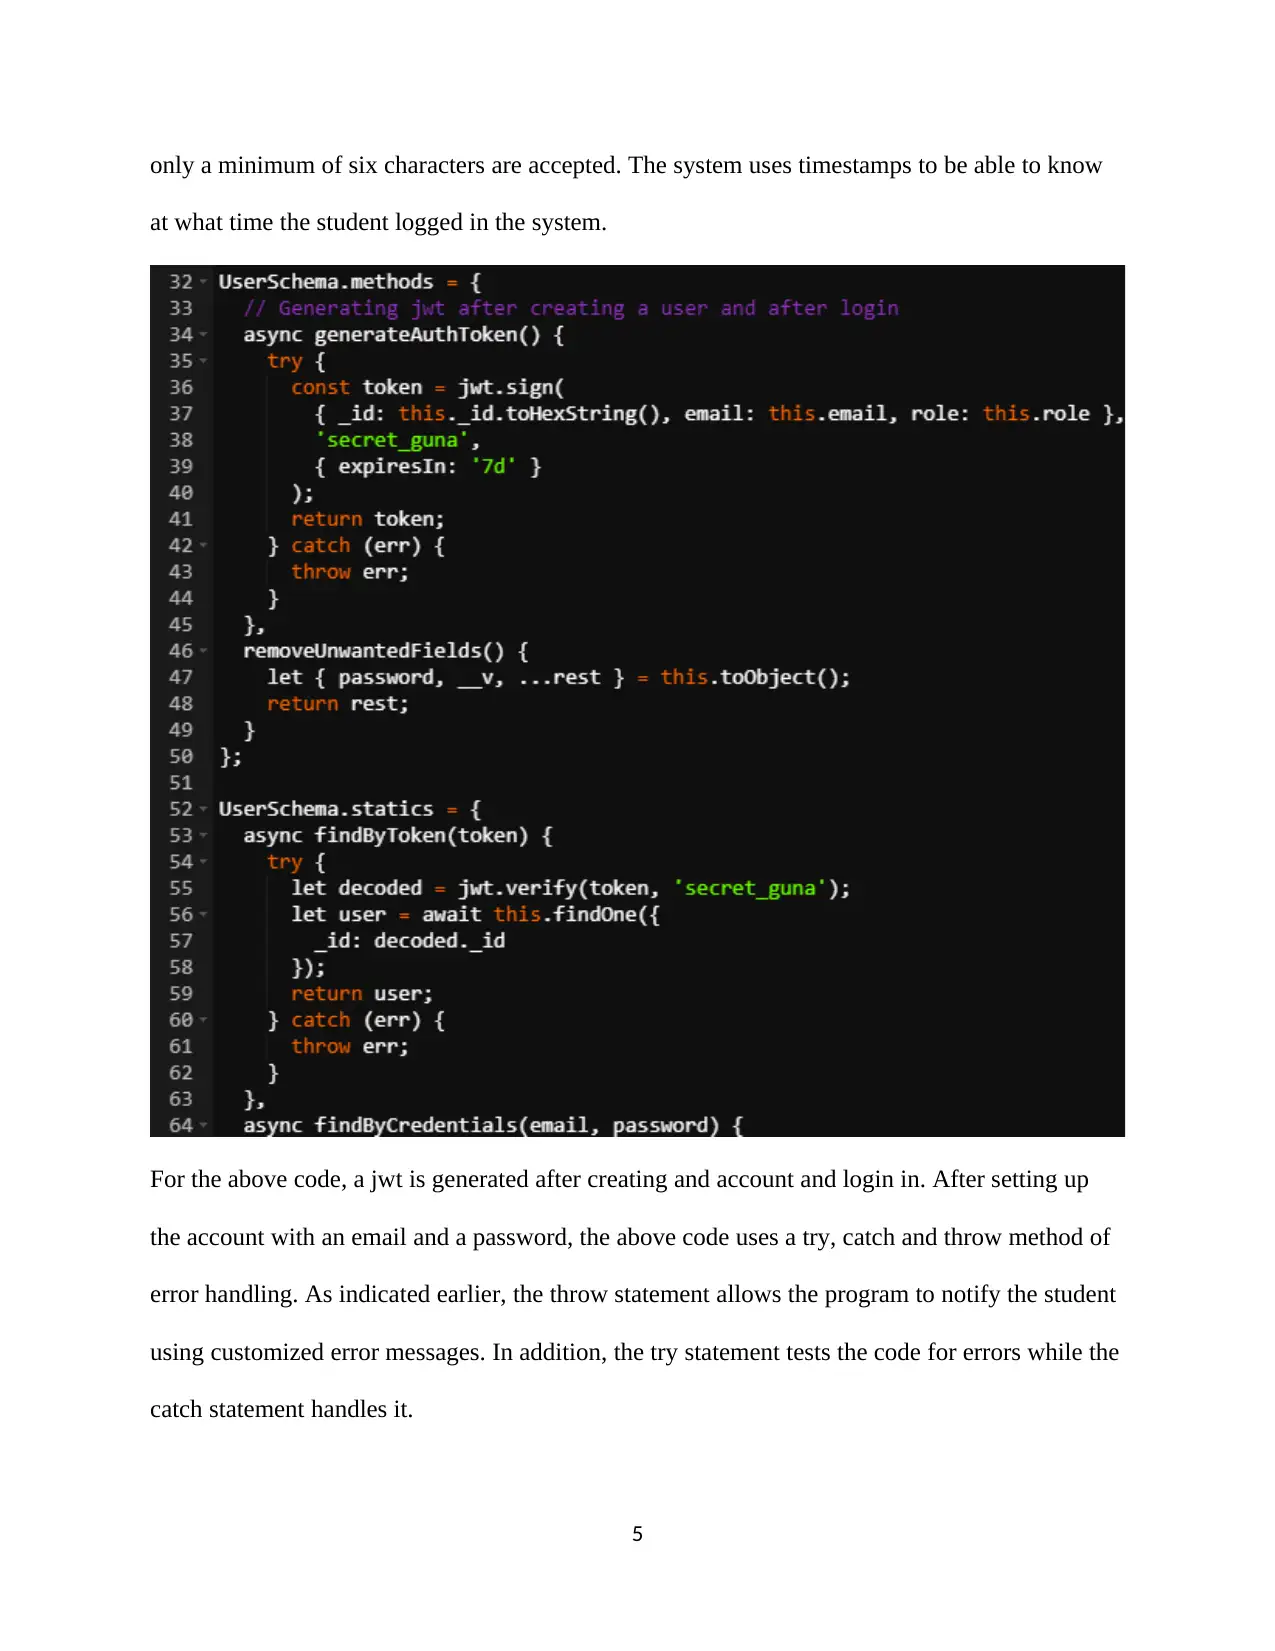
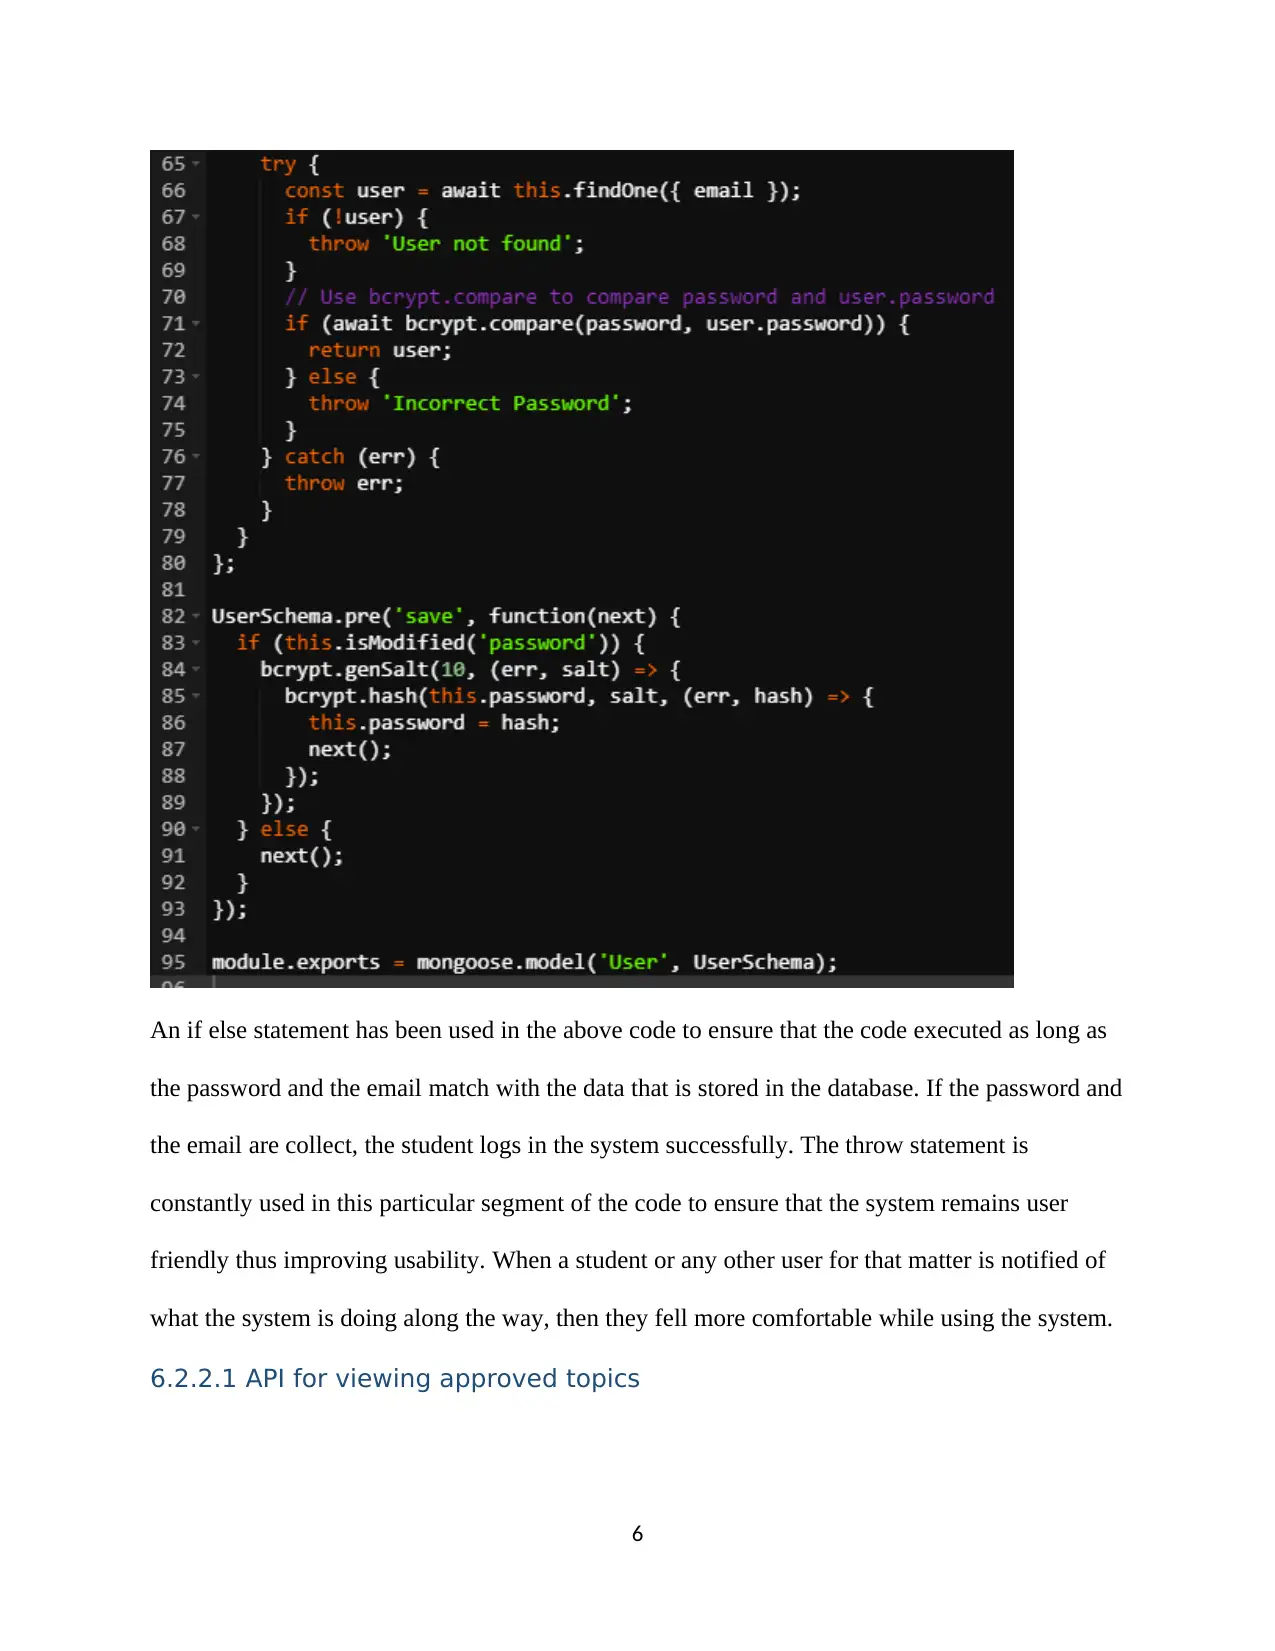
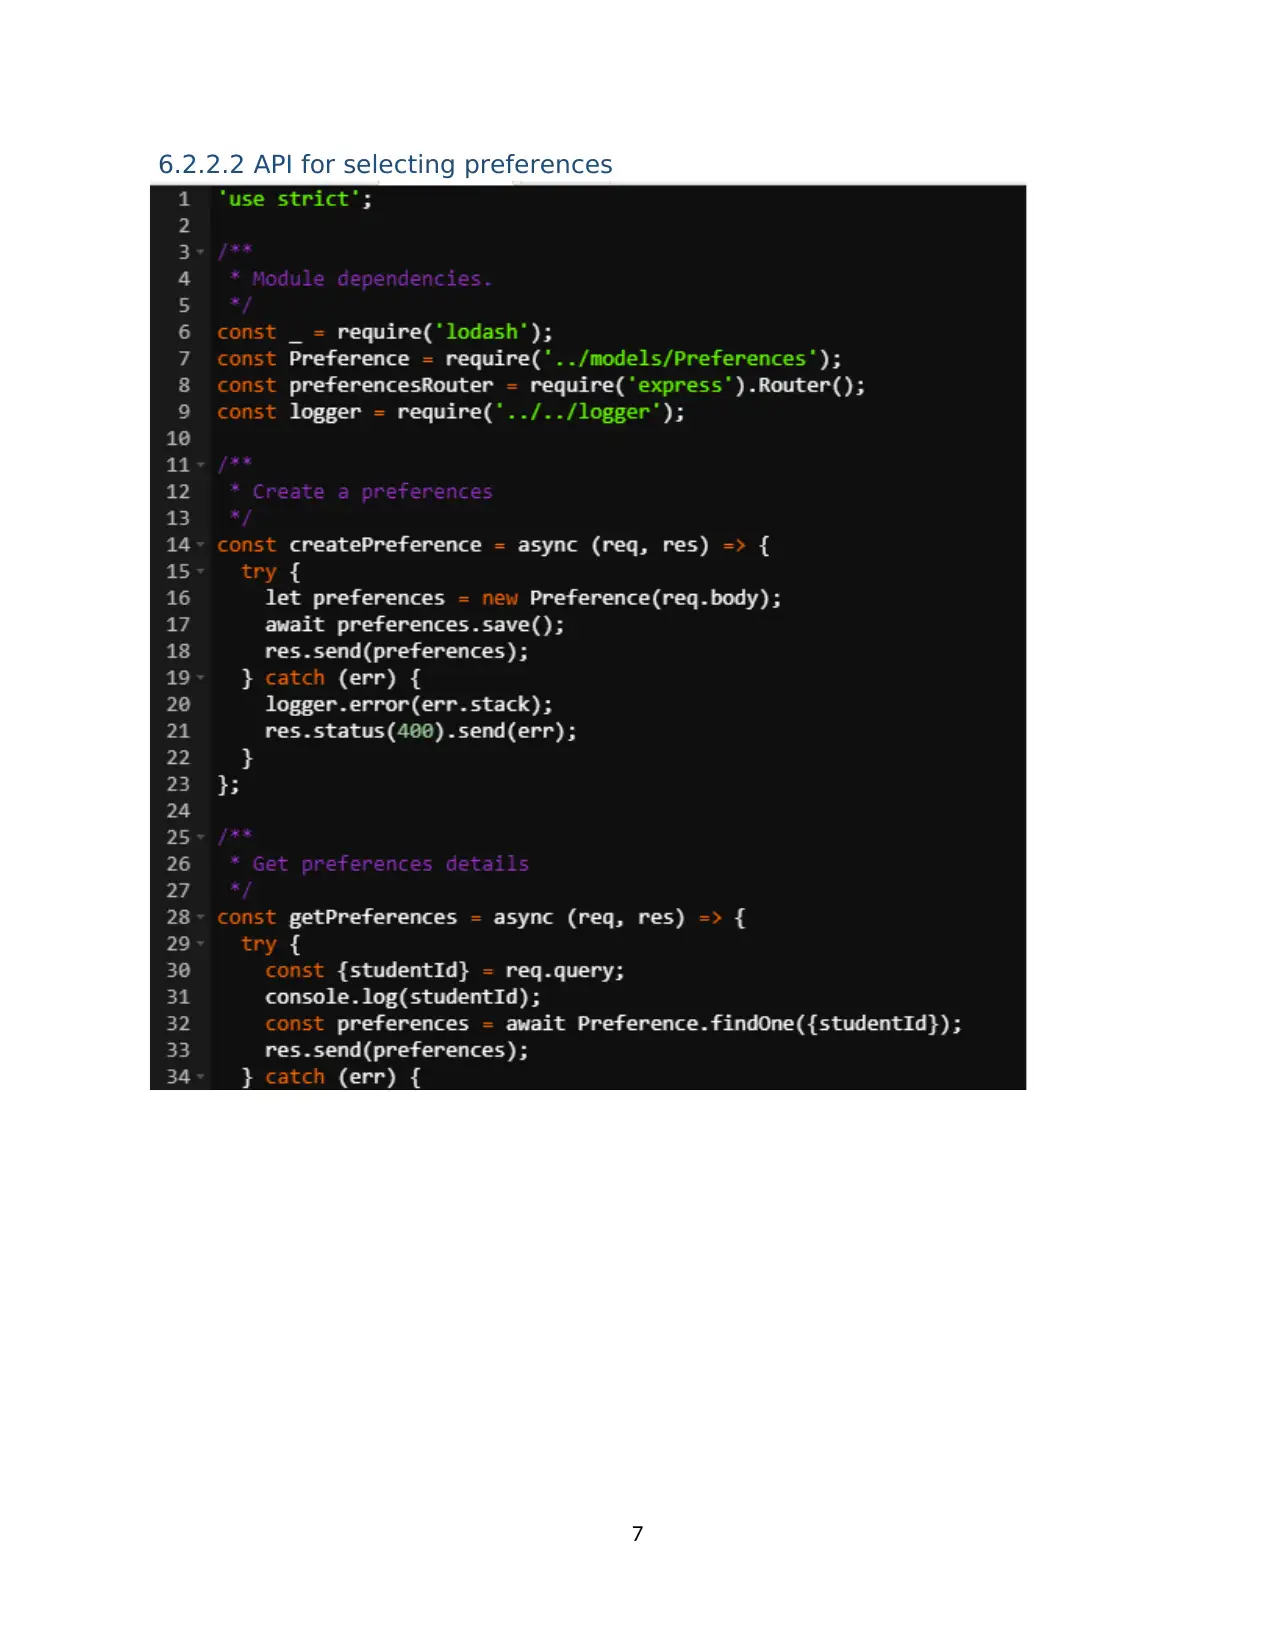
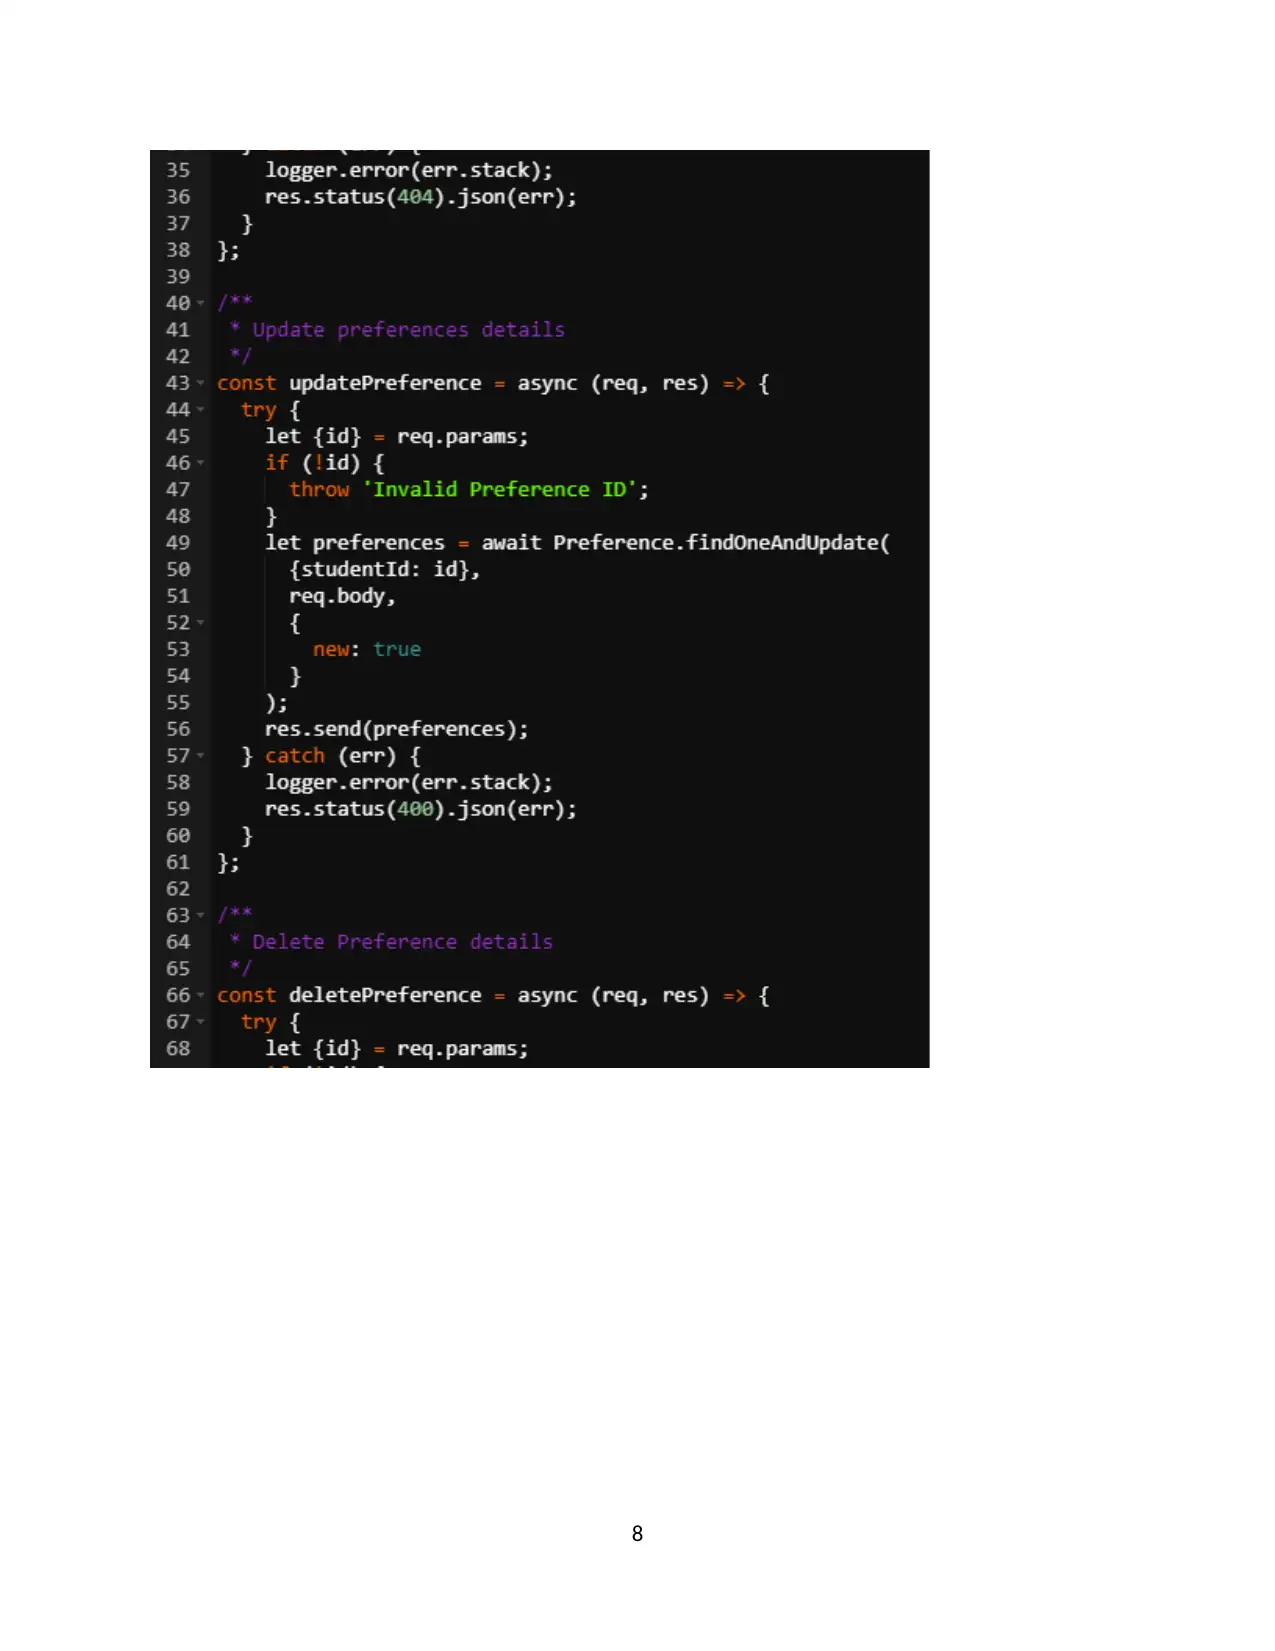
This report provides a comprehensive overview of a web application's development, detailing the database design using MongoDB and the backend APIs implemented using JavaScript. The report covers various modules, including the login module, student account creation and management, admin functionalities for topic management and user approvals, and supervisor-related APIs. It highlights key aspects such as API endpoints for viewing approved topics, selecting preferences, and showing allocations. Furthermore, the report emphasizes error handling techniques using try-catch blocks and customized error messages, ensuring user-friendly interactions. The report also describes API endpoints for admin users to add, update, and delete topics, as well as publish approved users and allocations. The use of JWT for authentication and the overall architecture of the web application are also discussed, providing a detailed insight into the system's functionality and design.
Document Page
Web Application Report
Student’s name
Institution Affiliation(s)
tabler-icon-diamond-filled.svg

Paraphrase This Document

Need a fresh take? Get an instant paraphrase of this document with our AI Paraphraser
Document Page
Table of Contents
5.2 Database Design....................................................................................................................................2
6.2 Backend API...........................................................................................................................................3
6.2.1 Login module..................................................................................................................................3
6.2.2 Student...........................................................................................................................................4
6.2.2.1 API for viewing approved topics..............................................................................................6
6.2.2.2 API for selecting preferences...................................................................................................7
6.2.2.3 API for showing allocated topics and groups...........................................................................9
6.2.3 Admin...........................................................................................................................................10
6.2.3.1 API for adding topics..............................................................................................................10
6.2.3.2 API for publishing approved users.........................................................................................13
6.2.3.3 API for viewing preferences...................................................................................................14
6.2.3.4 API for viewing Allocations....................................................................................................14
6.2.3.5 API for publishing allocations.................................................................................................14
6.2.4 Supervisor.....................................................................................................................................14
References.................................................................................................................................................15
1
Document Page
5.2 Database Design
The above code snippet is the code that was used to connect the JavaScript web application to
the mongo database. The try and catch block has been included where the try statement allows
the program to test a block of code for errors and the catch statement lets the program handle the
error. Everything done on mongoose database is based on a schema where each schema is
mapped to a mongoDB collection that is responsible for defining and shaping the documents
within that collection.
For this web application the try and catch block will try the code for errors and return ‘error’
while the catch block will handle the error and if successful the database will be connected to the
application. When the user logs out of the system, the status will change to ‘disconnected’.
Mongodb was used as the preferred database. MongoDB can be explained as a database program
that is both document-based and can be used in various platforms.
2
Document Page
MongoBd features such as ACID properties that allow for multi-document transactions,
MapReduce properties for JavaScript execution, sharding which allows MongoDB to scale
horizontally and replication are some of the main reasons why I choose to use MongoDB.
MongoDB is a NoSQL type of database.
NoSQL
6.2 Backend API
6.2.1 Login module
The login module recalls the user details for the already existing users from the database. Users
will be required to type in their email and their password after which the try and catch block will
3
tabler-icon-diamond-filled.svg

Paraphrase This Document

Need a fresh take? Get an instant paraphrase of this document with our AI Paraphraser
Document Page
be executed to validate the credentials. If both the email and the passwords match with the
existing user details then the user is allowed to login successfully.
6.2.2 Student
The above snippet is the code that enables students to create their account and login after
creating an account. As is with JavaScript and JSON, the code is initialized and then the critical
libraries are imported. Then all the data types that will be required are initialized and their
conditions such as the minimum length of the data and whether it is required or it can be skipped
are determined. For this case, the email is a string data type and only a min of four characters are
allowed. The password on the other hand, must be unique for every user, a string data type and
4
Document Page
only a minimum of six characters are accepted. The system uses timestamps to be able to know
at what time the student logged in the system.
For the above code, a jwt is generated after creating and account and login in. After setting up
the account with an email and a password, the above code uses a try, catch and throw method of
error handling. As indicated earlier, the throw statement allows the program to notify the student
using customized error messages. In addition, the try statement tests the code for errors while the
catch statement handles it.
5
Document Page
An if else statement has been used in the above code to ensure that the code executed as long as
the password and the email match with the data that is stored in the database. If the password and
the email are collect, the student logs in the system successfully. The throw statement is
constantly used in this particular segment of the code to ensure that the system remains user
friendly thus improving usability. When a student or any other user for that matter is notified of
what the system is doing along the way, then they fell more comfortable while using the system.
6.2.2.1 API for viewing approved topics
6
tabler-icon-diamond-filled.svg

Paraphrase This Document

Need a fresh take? Get an instant paraphrase of this document with our AI Paraphraser
Document Page
6.2.2.2 API for selecting preferences
7
Document Page
8
Document Page
6.2.2.3 API for showing allocated topics and groups
9
tabler-icon-diamond-filled.svg

Paraphrase This Document

Need a fresh take? Get an instant paraphrase of this document with our AI Paraphraser
Document Page
6.2.3 Admin
The admin is responsible for overseeing the whole system as well as maintenance. For this
particular web application, the admin have roles such as adding topics, publishing approved
users, viewing student’s topic preferences, and viewing and publishing topic allocations. The
following sections explain the various APIs for the admin.
6.2.3.1 API for adding topics
10
Document Page
In the first segment of the above code snippet, the topic is initialized and all the required libraries
imported. JavaScript models are also used in reference to the libraries. The second part of the
code is where the admin creates a new topic. At this point, the system uses a try and catch block
to validate and make sure that only topics that are new can be added to the system. The last
segment in the above snippet is the code that the admin use when checking for topic details to
ensure they have been added to the system successfully.
11
chevron_up_icon
1 out of 16
circle_padding
hide_on_mobile
zoom_out_icon
[object Object]