Network Design and Configuration: Windows Server Domains Project
VerifiedAdded on 2020/03/23
|18
|2298
|150
Project
AI Summary
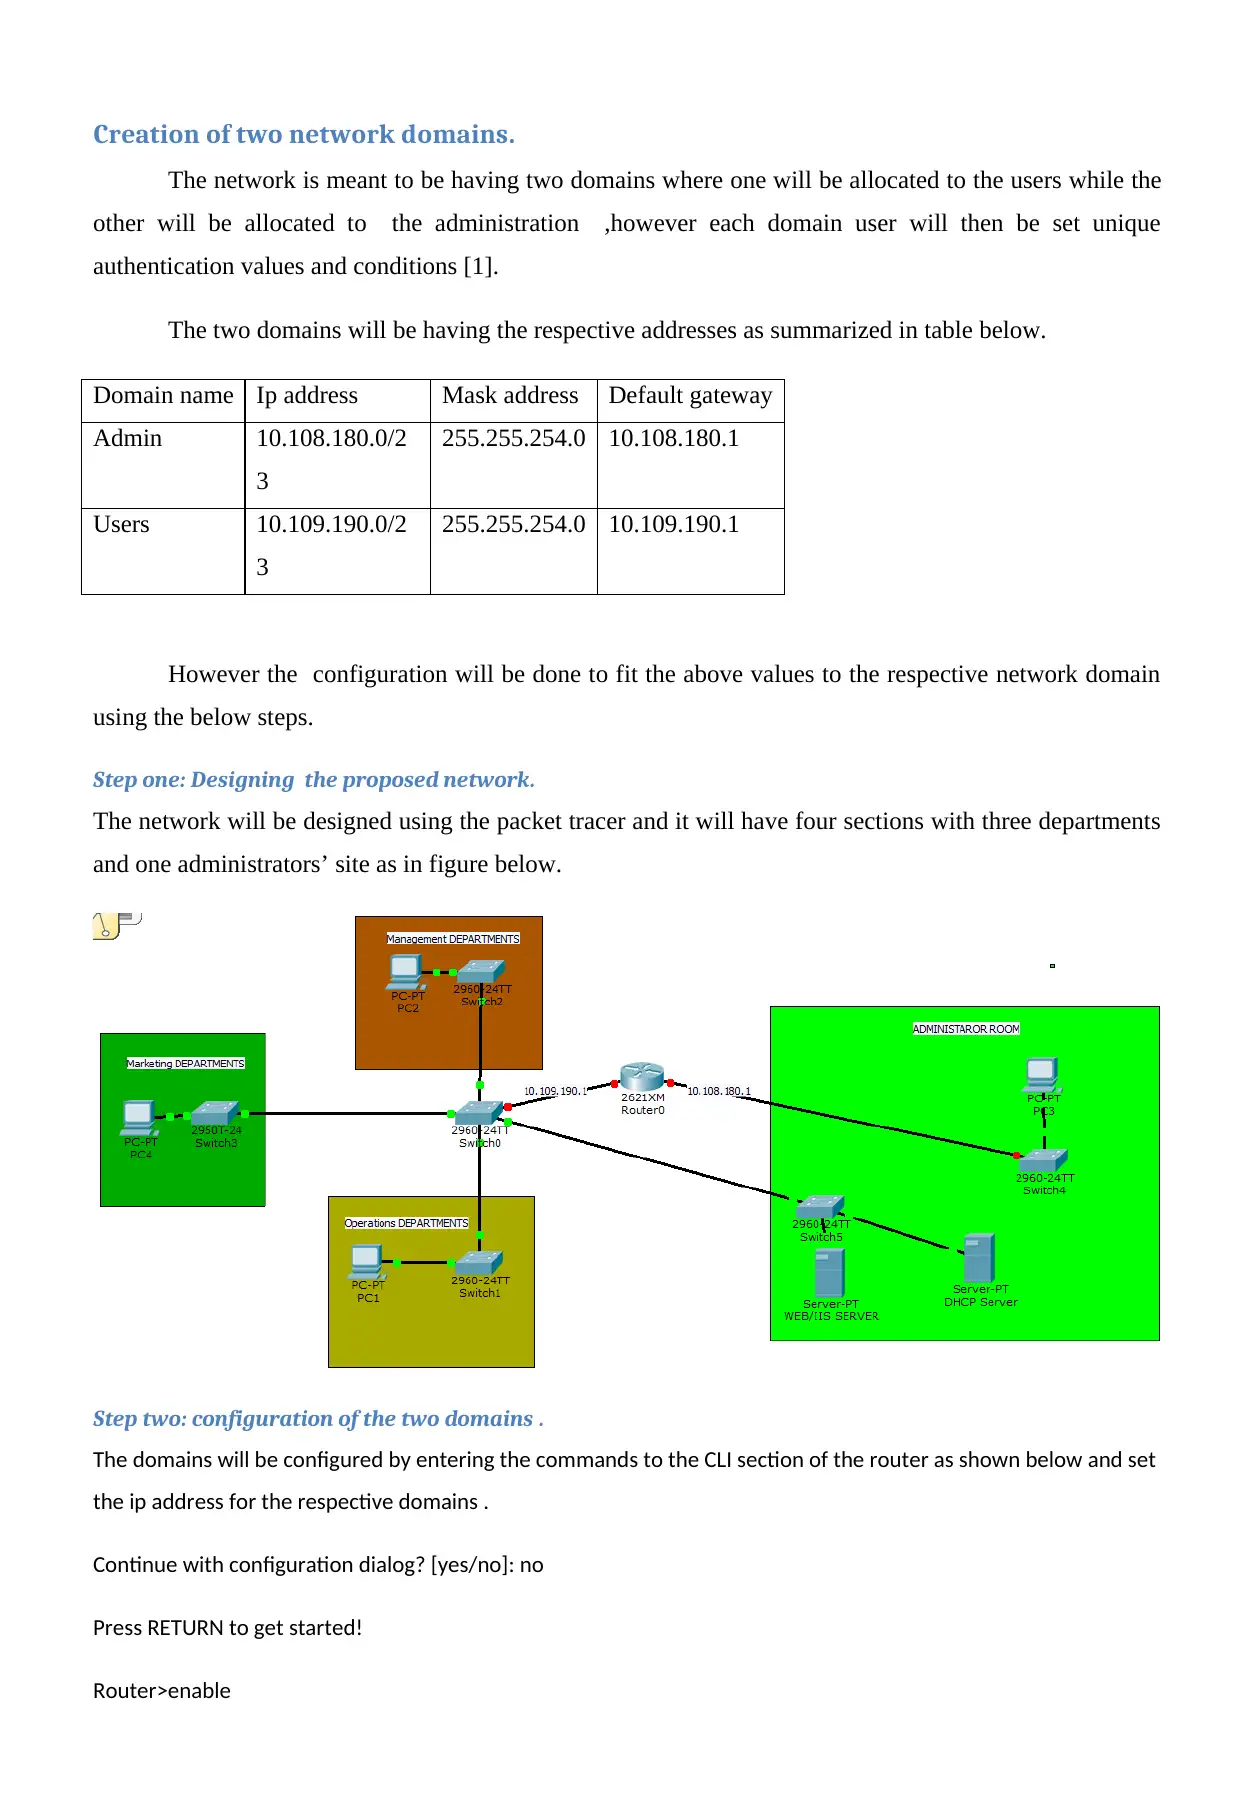
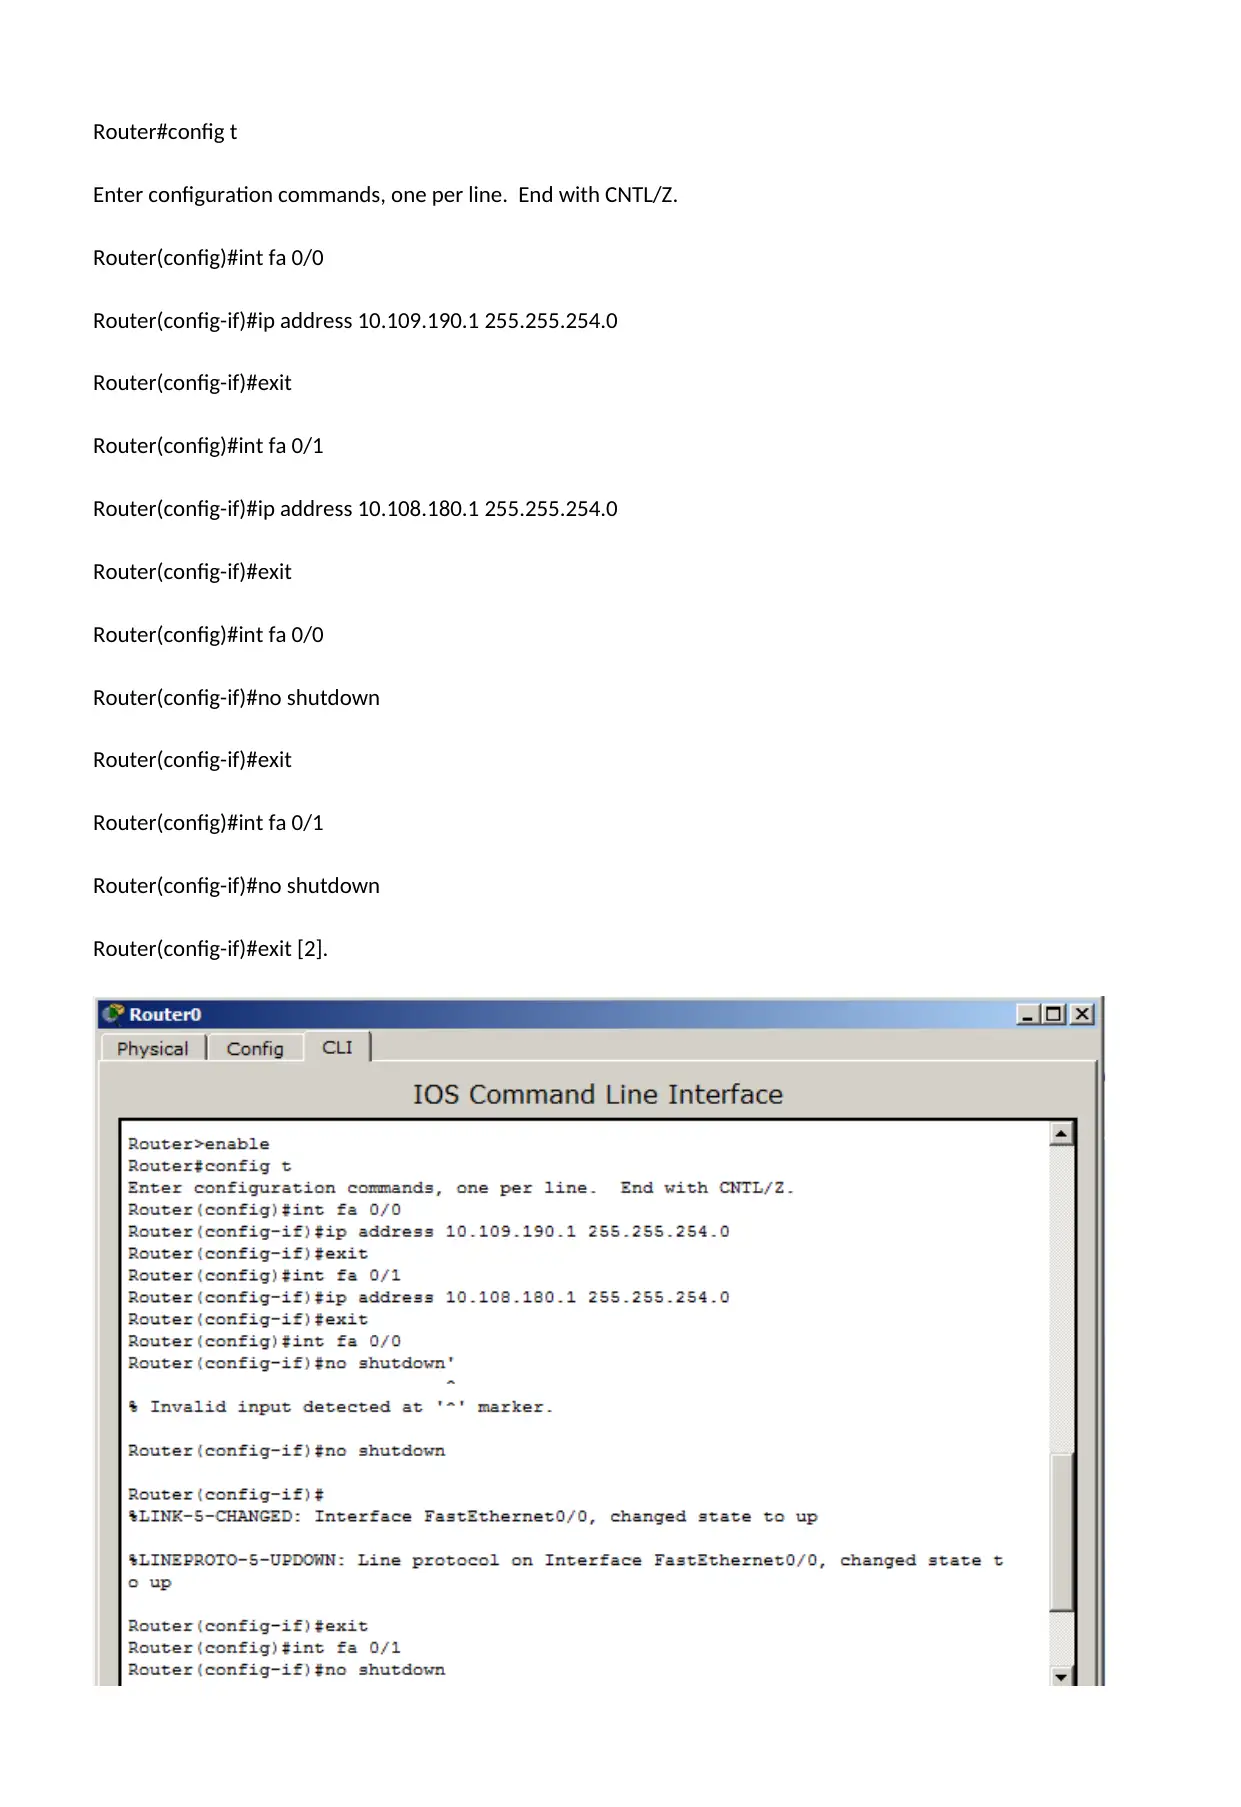
This project details the design and implementation of a local area network (LAN) supporting multiple Windows Server domains. The assignment begins with outlining the technologies employed, including the creation of two network domains (admin and user), user authentication, DHCP server installation, web/IIS server setup, and DNS server configuration. The implementation phase utilizes the Packet Tracer simulation tool to design and test the network. It involves configuring router settings, setting up IP addresses, and establishing user authentication protocols. The DHCP server is configured to automatically assign IP addresses, while the web/IIS server hosts web pages accessible via a DNS server. The project culminates in testing the functionality of the web and DNS servers, ensuring that users can access web pages using domain names. The project is well-structured, providing detailed steps and configurations, and includes references to relevant networking literature.

THE NETWORK DESIGN AND CONFIGURATIONS.
Submitted to
[lecture name]
The Support For Multiple Windows Servers Domains In A Local Area Networks
[Date]
By
[Student name]
Submitted to
[lecture name]
The Support For Multiple Windows Servers Domains In A Local Area Networks
[Date]
By
[Student name]
Paraphrase This Document
Need a fresh take? Get an instant paraphrase of this document with our AI Paraphraser

Table of Contents
TYPES OF TECHNOLOGIES USED..................................................................................................................................3
THE TECHNOLOGIES IMPLIMENTATIONS.....................................................................................................................3
Creation of two network domains...........................................................................................................................4
Step one: Designing the proposed network.........................................................................................................4
Step two: configuration of the two domains .......................................................................................................4
Authentications for the different users....................................................................................................................6
Step one :open the DHCP server and navigate to the AAA option .......................................................................6
Step two: Enter the admin network configurations and the user set up in the figure above................................7
Step three: Enter the users network configurations and the user set up in the figure above..............................7
Installation of the DHCP server................................................................................................................................8
Step one: Do DHCP server configuration to the admin domain................................................................................8
Step two: configuring the users DHCP server..........................................................................................................8
Step three: Testing g the DHCP server....................................................................................................................10
Installation of the WEB / IIS server........................................................................................................................12
Step one: Adding a network WEB/IIS server.....................................................................................................12
Step two: Opening the config and the HTTP options to create the web pages..................................................12
Installation of the DNS server................................................................................................................................14
Step one :open the WEB server for DNS server configurations...........................................................................14
Step two: open the config and then DNS options to create domain name.........................................................15
Step three: Do the testing of the WEB/IIS server and the DNS server using computer pc1...............................16
References ................................................................................................................................................................18

TYPES OF TECHNOLOGIES USED.
In computing there are a number of technologies that are used to offer various services, however one
of these technologies is the use of the computer network that has various advantages and is used to
facilitate easy communication, sharing of the resources and also easy management of data and sharing of
data.
However this network there are various services that are going to be implemented which will
include hosting and accessing of the websites in the web servers, allocation of the ip addresses to the
network hosts and setting the different authentications of the various network users.
This network will involve a number of technologies which will be implemented in order to offer
those services to the networks users ,these technologies used includes :-
i. Creation of two network domains.
There will be two different network domains which will be set up where one will be allocated to the
users network and the other to the administrator network where each will be configured separately to
enhance the communication.
ii. Authentications for the different users.
This is the process where there will be set privileges to the different users of the network and this will
control the access to the different network domains by the respective users.
iii. Installation of the DHCP server.
This is a special type of server that will be used to ensure any host connected to the network can
effective receives the IP address automatically without any configurations.
iv. Installation of the WEB / IIS server.
The WEB server technology is used to enable the creation and hosting of the web pages on the web
servers and this will ensure the web pages created are accessible by the various clients.
v. Installation of the DNS server.
This is the technology that will enable setting up of the human readable domain names which can be
used to access the web pages from the various hosts instead of using the server IP address.
Therefore for this network to offer all those services all above technologies must be well implemented
as in the section below.
THE TECHNOLOGIES IMPLIMENTATIONS.
This network will be designed and implemented using the above sited technologies which will
eventually enable the usage of the network and offering of the specified services, therefore after the
implementation all the services will be available to the clients.
The network implementation will done by use of the simulations tool called the packet tracer ,and
will be used to design and for testing purpose as well ,however below are the steps used for network
implementation.
⊘ This is a preview!⊘
Do you want full access?
Subscribe today to unlock all pages.

Trusted by 1+ million students worldwide

Creation of two network domains.
The network is meant to be having two domains where one will be allocated to the users while the
other will be allocated to the administration ,however each domain user will then be set unique
authentication values and conditions [1].
The two domains will be having the respective addresses as summarized in table below.
Domain name Ip address Mask address Default gateway
Admin 10.108.180.0/2
3
255.255.254.0 10.108.180.1
Users 10.109.190.0/2
3
255.255.254.0 10.109.190.1
However the configuration will be done to fit the above values to the respective network domain
using the below steps.
Step one: Designing the proposed network.
The network will be designed using the packet tracer and it will have four sections with three departments
and one administrators’ site as in figure below.
Step two: configuration of the two domains .
The domains will be configured by entering the commands to the CLI section of the router as shown below and set
the ip address for the respective domains .
Continue with configuration dialog? [yes/no]: no
Press RETURN to get started!
Router>enable
Paraphrase This Document
Need a fresh take? Get an instant paraphrase of this document with our AI Paraphraser

Router#config t
Enter configuration commands, one per line. End with CNTL/Z.
Router(config)#int fa 0/0
Router(config-if)#ip address 10.109.190.1 255.255.254.0
Router(config-if)#exit
Router(config)#int fa 0/1
Router(config-if)#ip address 10.108.180.1 255.255.254.0
Router(config-if)#exit
Router(config)#int fa 0/0
Router(config-if)#no shutdown
Router(config-if)#exit
Router(config)#int fa 0/1
Router(config-if)#no shutdown
Router(config-if)#exit [2].

After configuration of the domains as above then the authentication of the users is set as in below.
Authentications for the different users.
In this network there is need to set the privileges to the various users therefore there will be set
different authentications for the two different groups ,this will involve setting of the user names and the
access password respectively where both will be unique.
Below are steps used to configure the authentications.
Step one :open the DHCP server and navigate to the AAA option .
To enter the settings open the server then choose config menu then under the services select on the
AAA option as below.
⊘ This is a preview!⊘
Do you want full access?
Subscribe today to unlock all pages.

Trusted by 1+ million students worldwide

Step two: Enter the admin network configurations and the user set up in the figure above.
To set up the authentication of the admin by entering the client names as admin ,client IP as
10.108.180.1 and secret as admin@1234 ,then in the user setup enter the username as admin and password
as admin@1234 and then click the add button as in figure below .
Step three: Enter the users network configurations and the user set up in the figure above.
To set up the authentication of the users by entering the client names as users ,client IP as
10.109.190.1 and secret as users1234 ,then in the user setup enter the username as users and password as
users1234 and then click the add button as in figure below[3] .
Paraphrase This Document
Need a fresh take? Get an instant paraphrase of this document with our AI Paraphraser

Installation of the DHCP server.
The dhcp server is installed to ensure that the devices in the network can easily retrieve the IP addresses
from the DHCP server without manual configurations, however below are the steps followed.
Step one: Do DHCP server configuration to the admin domain.
To enable the configuration of the admin domain to allow the allocation of the ip addresses automatically
the following commands are entered in the router CLI as follows.
Router>enable
Router#config t
Enter configuration commands, one per line. End with CNTL/Z.
Router(config)#int fa 0/1
Router(config-if)#ip dhcp pool admin
Router(dhcp-config)#network 10.108.180.0 255.255.254.0
Router(dhcp-config)#default-router 10.108.180.1
Router(dhcp-config)#dns-server 10.108.180.2
Router(dhcp-config)#exit
Step two: configuring the users DHCP server
The DHCP server is configured for the users by first adding the server to the administrators site then
ensure the Ethernet connection is all successfully done as below.
Then the server is opened and the respective IP addresses are set together with the default gateway and
the dns server values which can be done using the below steps.

i. Add the DHCP server to network as below.
ii. Click the DHCP server to open the IP configuration settings and then enter the respective ip addresses
as shown below.
ii. Click the DHCP server to open the IP configuration settings and then enter the respective ip addresses
as shown below.
⊘ This is a preview!⊘
Do you want full access?
Subscribe today to unlock all pages.

Trusted by 1+ million students worldwide

iii. Open the config menu ,then services and then choose the DHCP and enter the addresses as in figure
below and set the services to be on.
Step three: Testing g the DHCP server.
After the configuration of the DHCP server for the both network domains the test is done by
allocating the ip addresses to the computer which is done by clicking computer ,then navigate to the desk
top menus and select the icon called the IP configuration and then choose the DHCP option instead of the
static option to get the results as in the below figures[4].
Paraphrase This Document
Need a fresh take? Get an instant paraphrase of this document with our AI Paraphraser

Therefore the same process is followed until all the devices are allocate their respective ip address
as shown above.
as shown above.

Installation of the WEB / IIS server.
The network will have the ability to store and retrieve the web pages saved by the admin, therefore
the network will be installed with the web server which will be responsible of hosting these web pages.
This webs server will be implemented through the following steps .
Step one: Adding a network WEB/IIS server
The server to be used is added to the admin site and then connection is made to the switches
awaiting the final configurations as below.
Step two: Opening the config and the HTTP options to create the web pages.
In order to create the web pages the user opens the server by moving to the config option ,however
by clicking on the DHCP option the addresses for the default gateway and the dns server are set
automatically from the DHCP server [5].
Then to create the web pages click on the HTTP option in the panel placed on the left side and edit
the web page by entering the details of the students IDS that will be viewed through the web browsers
from the other computer as shown in the figures below.
⊘ This is a preview!⊘
Do you want full access?
Subscribe today to unlock all pages.

Trusted by 1+ million students worldwide
1 out of 18
Related Documents

Your All-in-One AI-Powered Toolkit for Academic Success.
+13062052269
info@desklib.com
Available 24*7 on WhatsApp / Email
Unlock your academic potential
Copyright © 2020–2025 A2Z Services. All Rights Reserved. Developed and managed by ZUCOL.