Developing a Web Application with XAMPP for Student and Staff Login

Verified

Added on  2020/05/11

|40
|4587
|44
Project
AI Summary
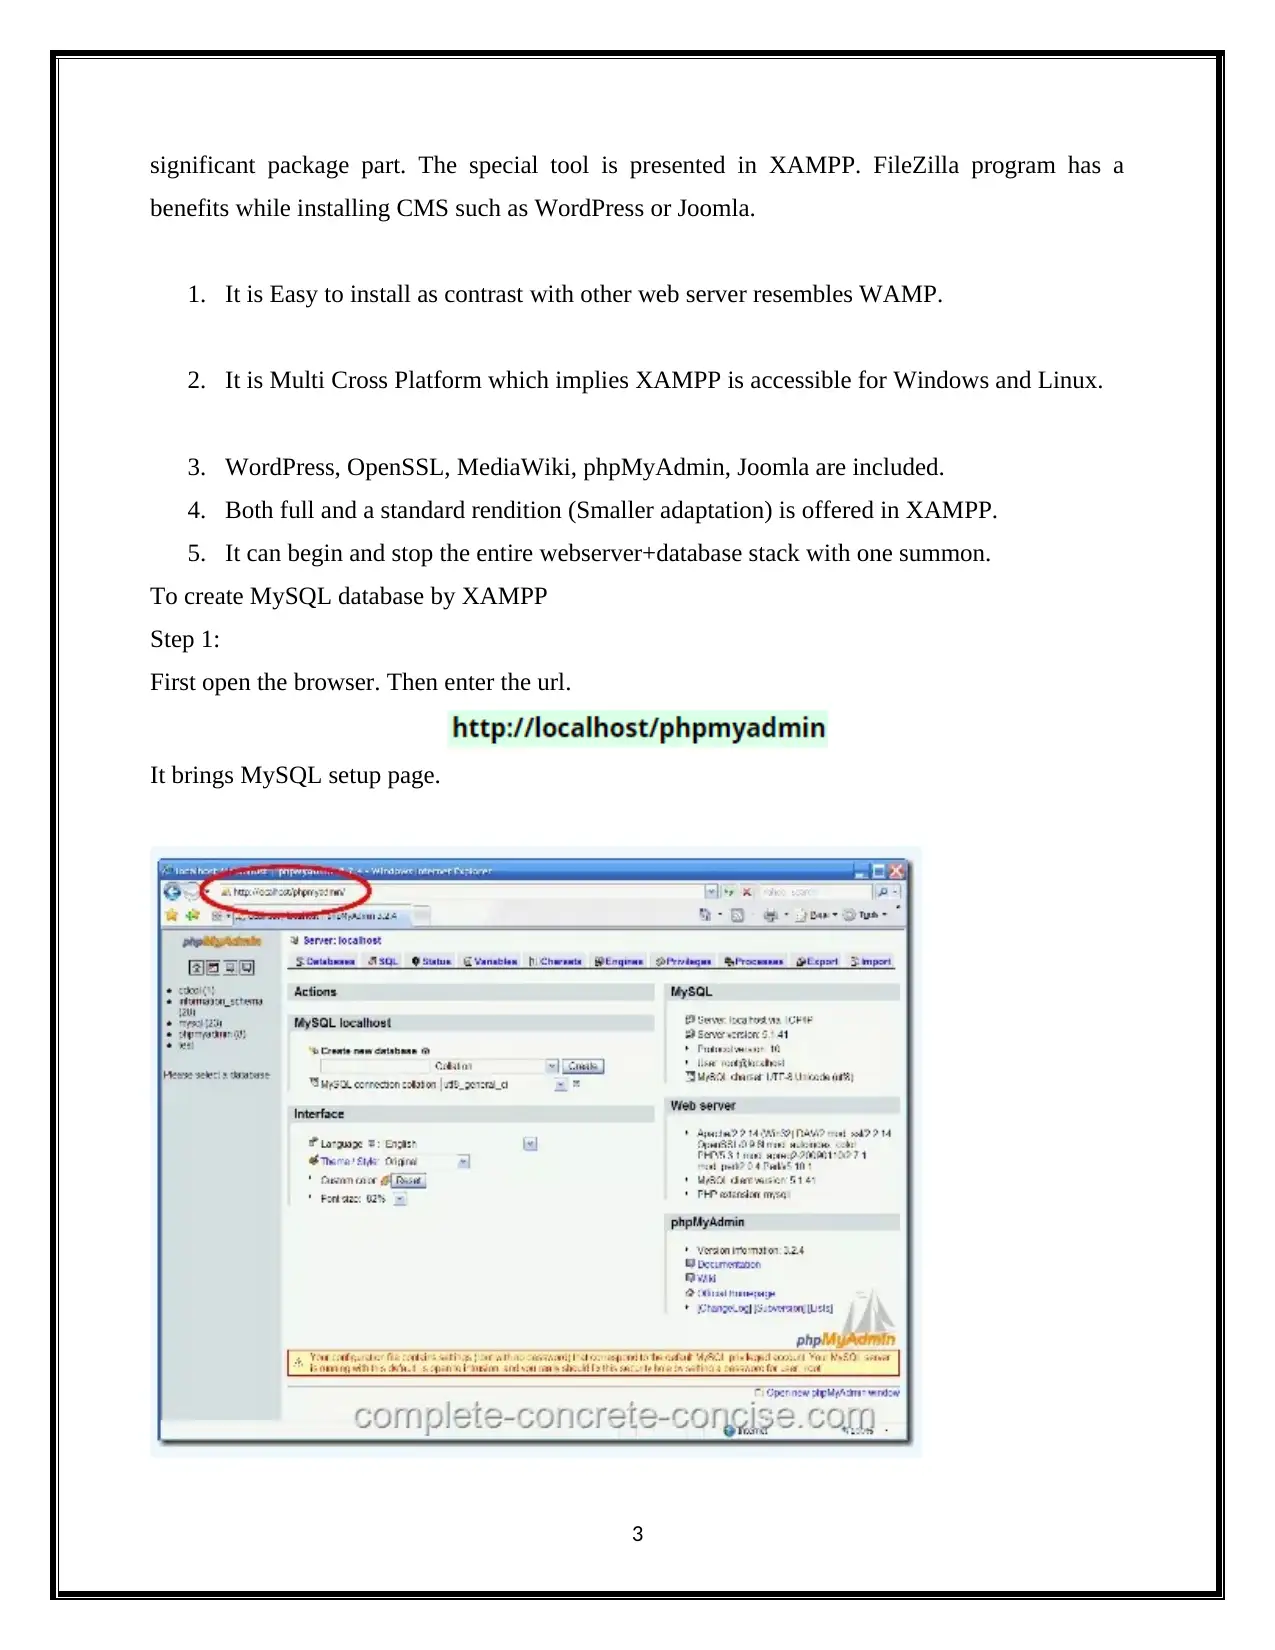
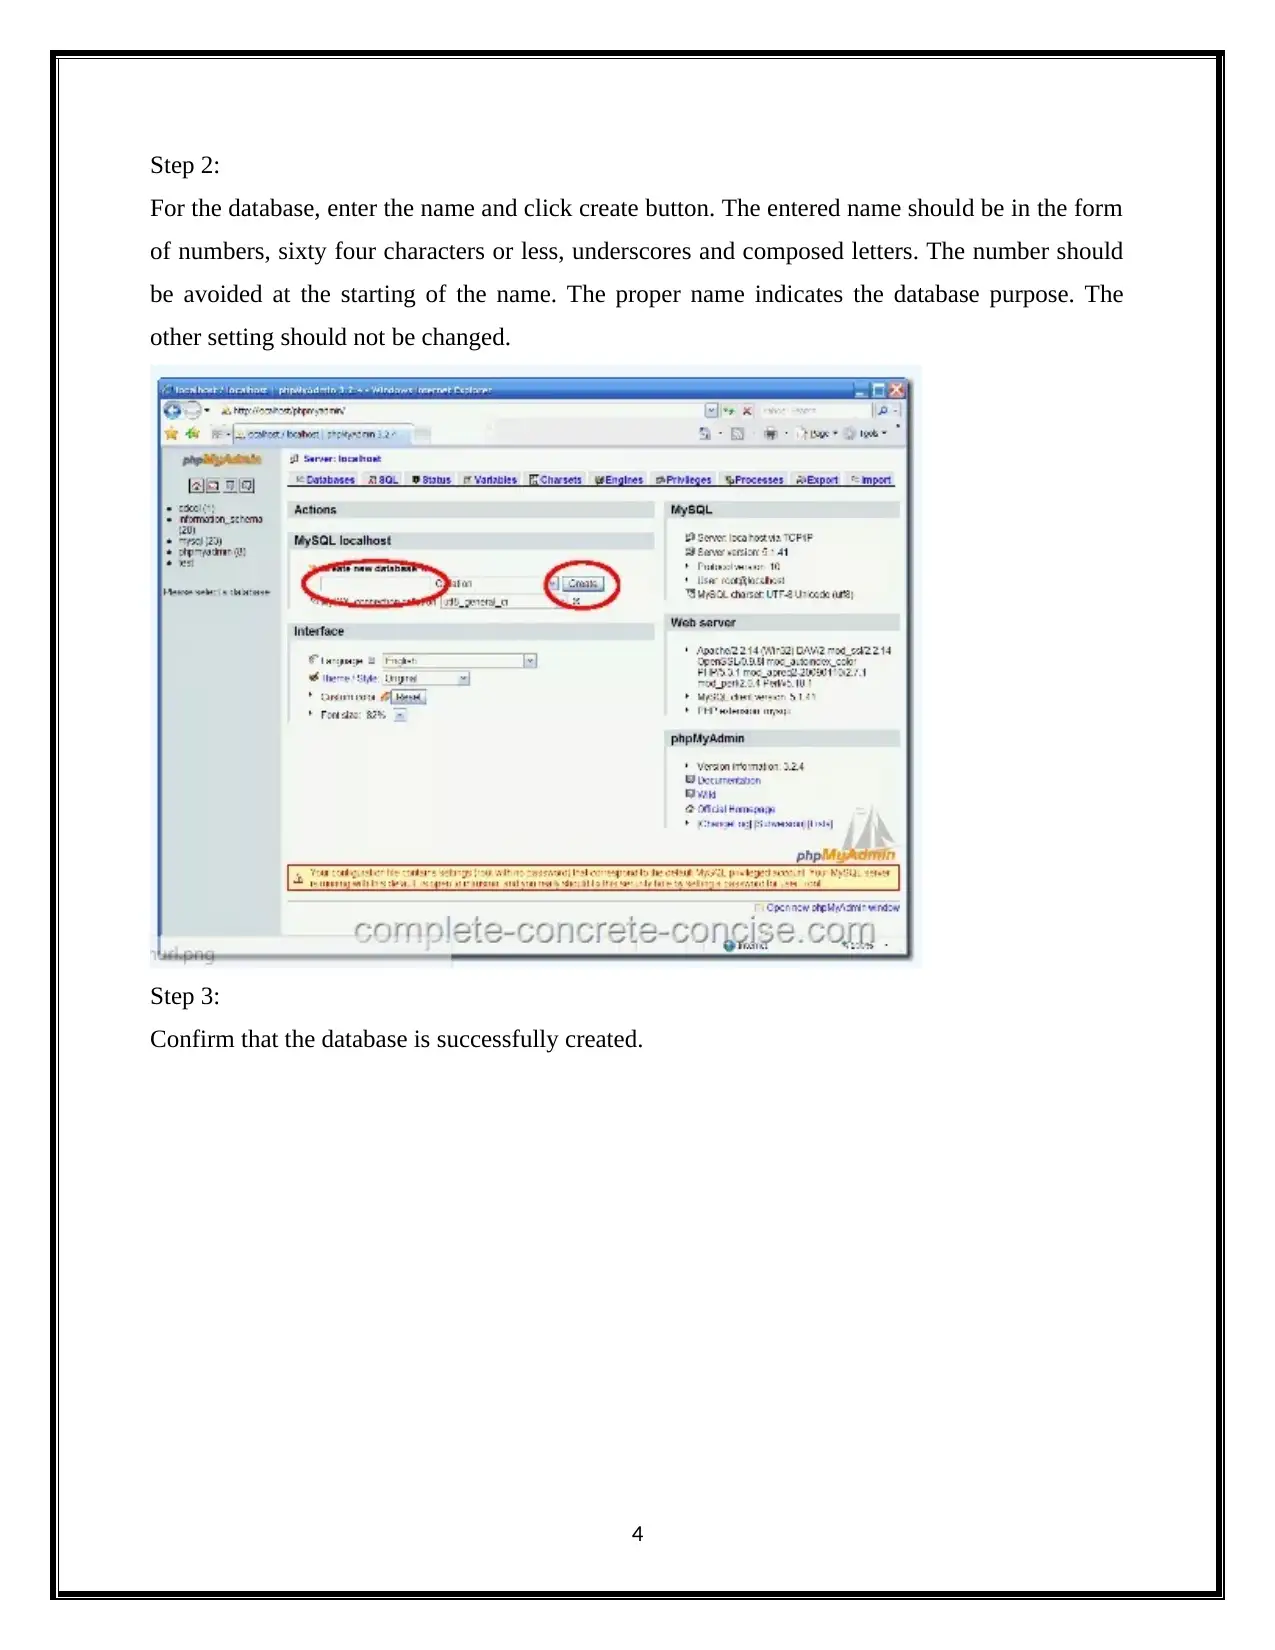
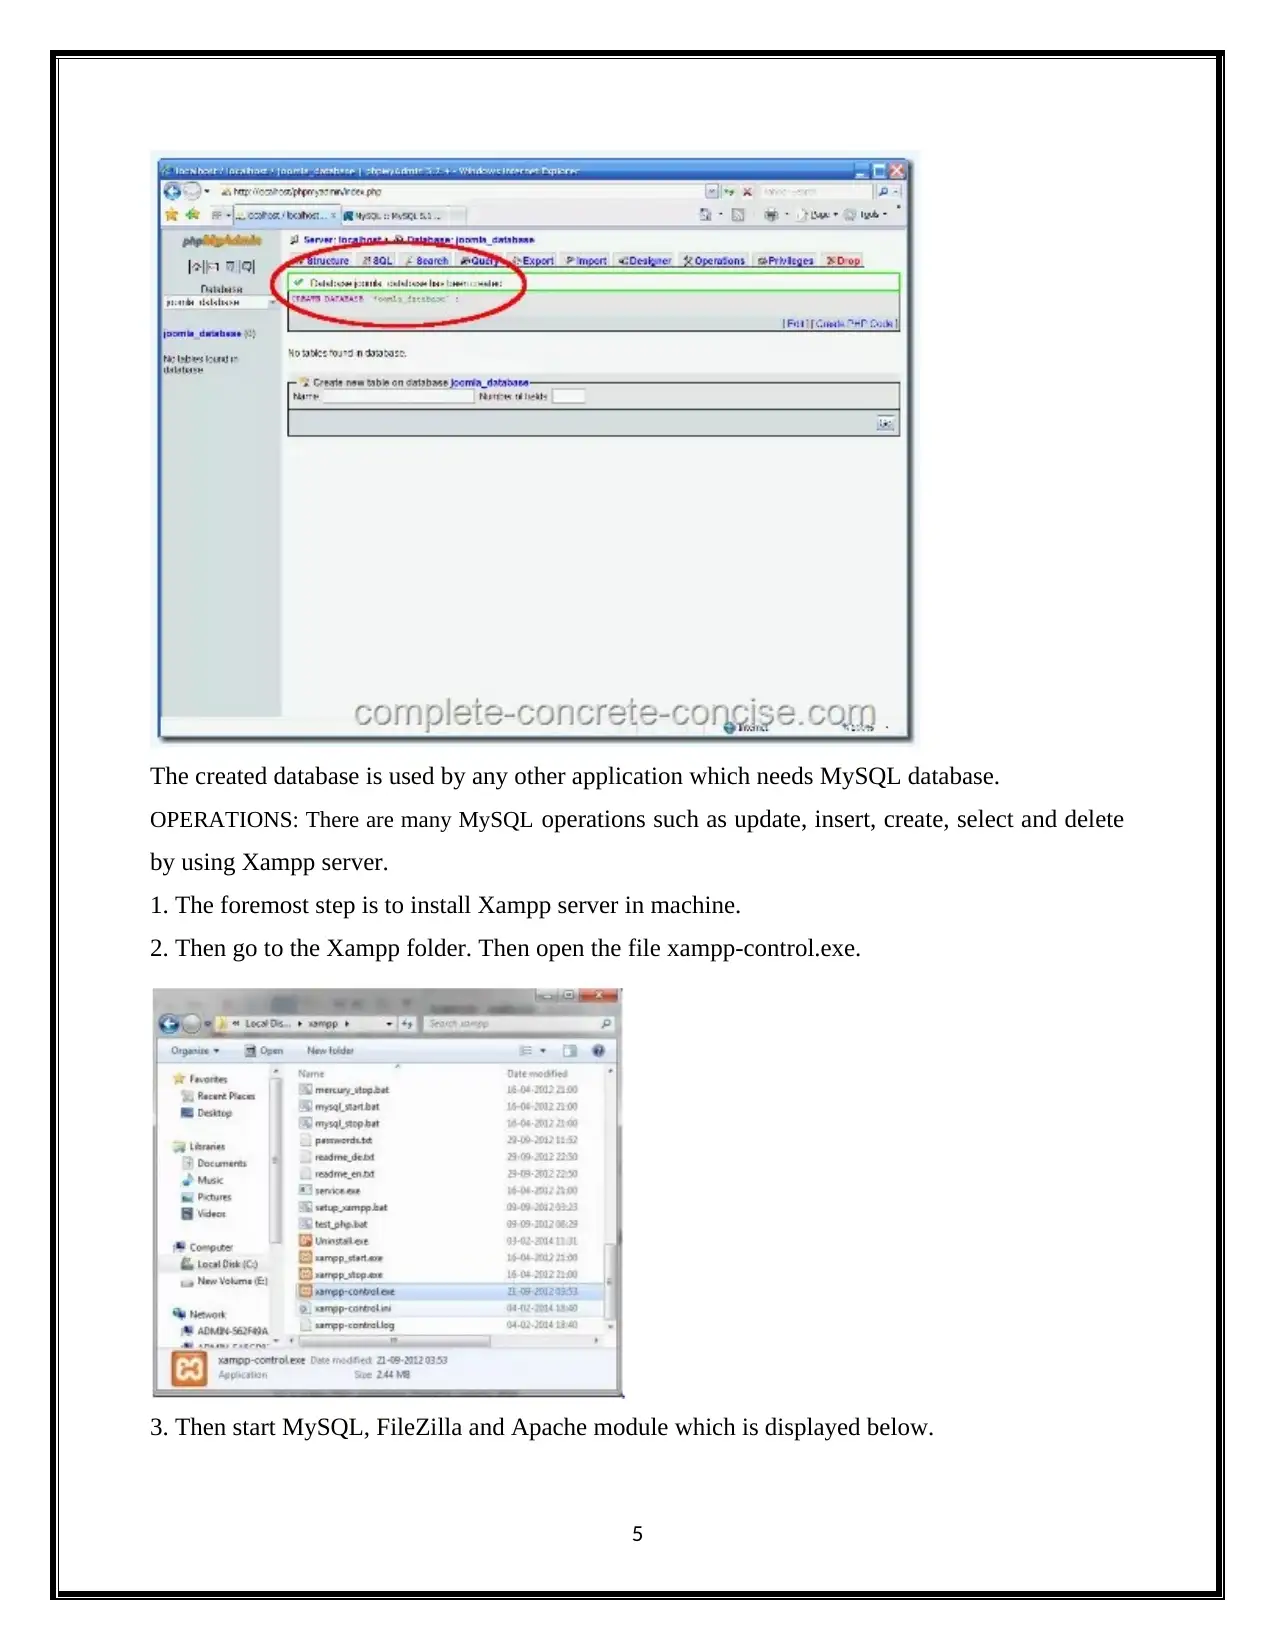
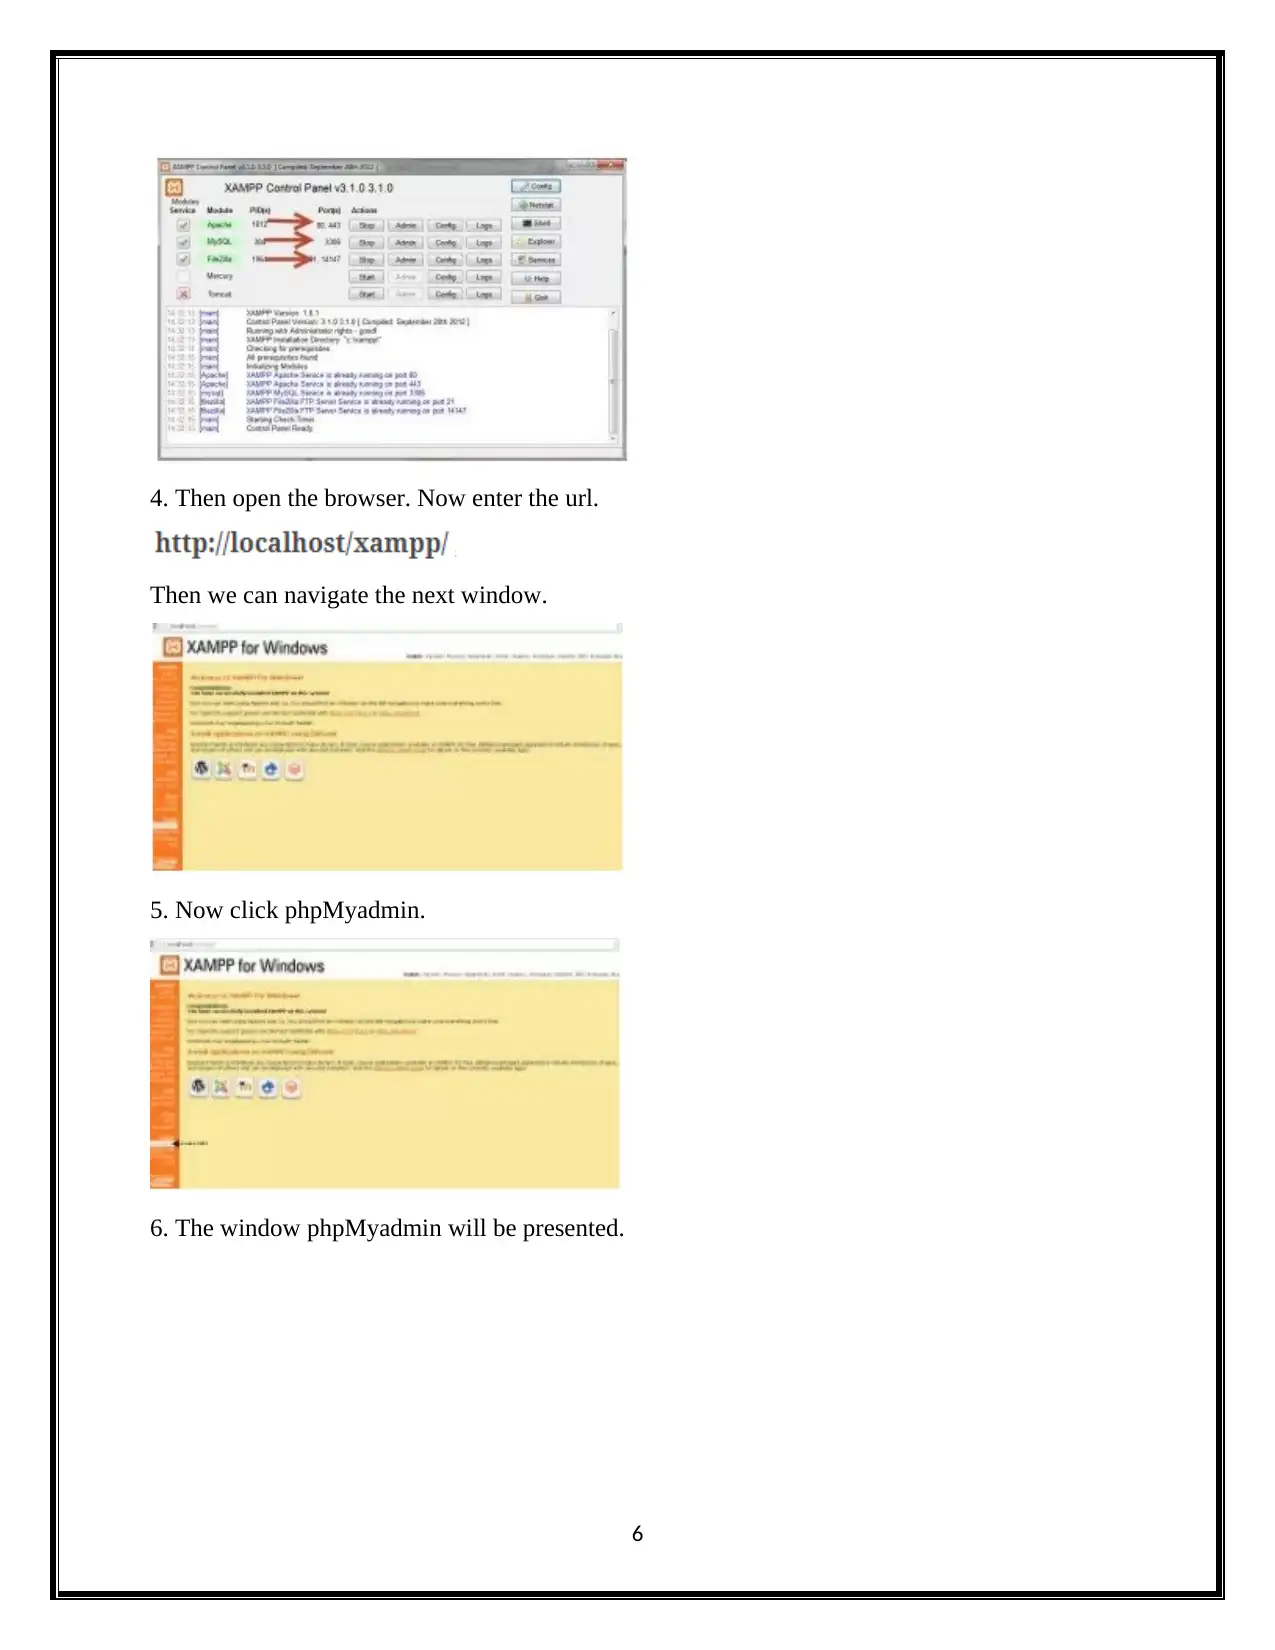
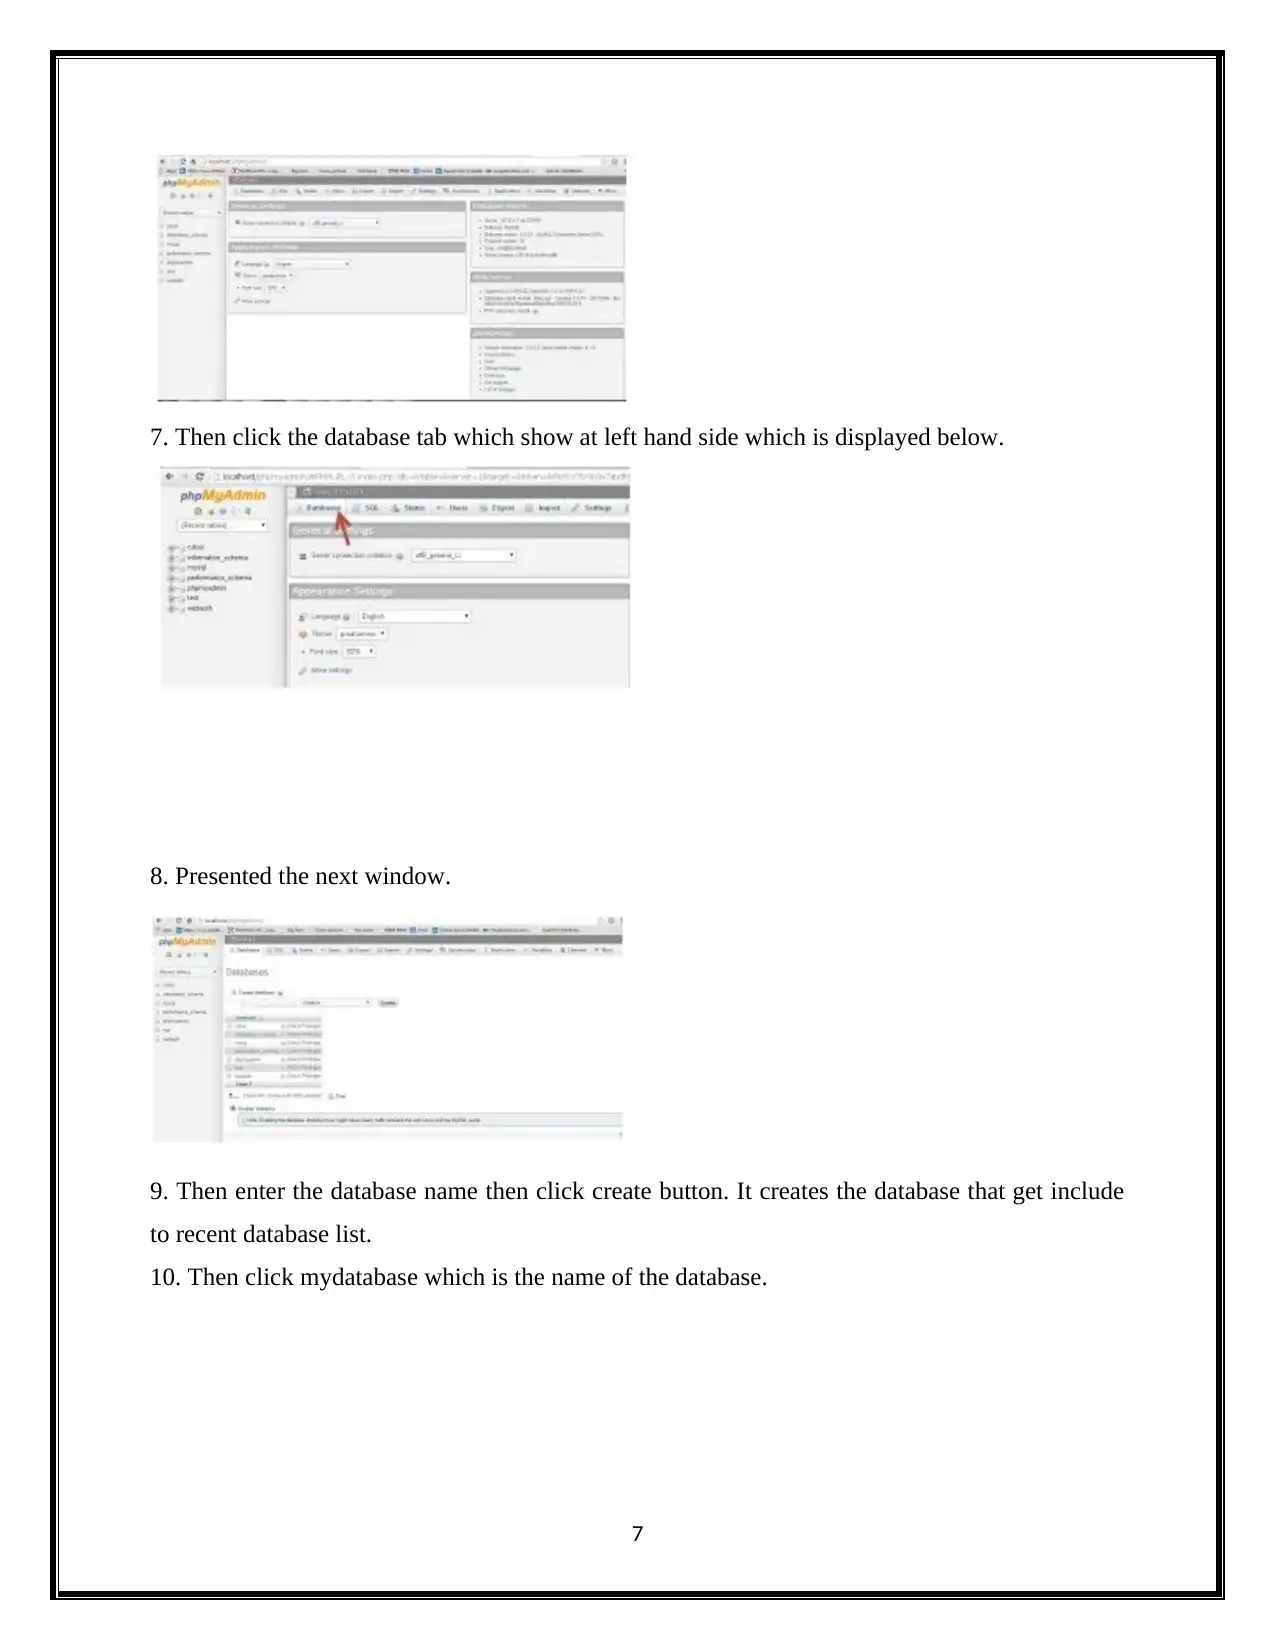
This project details the creation of a web application using XAMPP and MySQL, designed to provide login access for both students and staff within an institution. The introduction outlines the project's implementation, focusing on the use of PHP and MySQL through XAMPP to establish a functional web-based system. The project aims to reduce paperwork and streamline information sharing by providing a user-friendly interface for updating academic details and disseminating information. The document explains XAMPP, including its components like Apache, MariaDB, PHP, and Perl, along with installation and configuration steps. It details the creation of a MySQL database and demonstrates fundamental database operations such as creating, inserting, updating, selecting, and deleting records. Furthermore, the project explores the need for online web system applications, emphasizing enhanced user experience, accessibility through mobile devices, and simplified training processes. It also highlights the benefits of such systems, including cost-effectiveness, data customization, and the ability to provide novel academic support. The document further details the procedures for managing MySQL passwords, and the system functions, including login processes for the WordPress admin panel. Overall, the project provides a comprehensive guide to developing and implementing a web application that enhances information management and accessibility within an educational environment.
Document Page
IT
tabler-icon-diamond-filled.svg

Paraphrase This Document

Need a fresh take? Get an instant paraphrase of this document with our AI Paraphraser
Document Page
Table of Contents
1. Introduction.......................................................................................................................................2
2. Xampp................................................................................................................................................2
3. Need for online web system application.........................................................................................12
4. System functions..............................................................................................................................14
5. Implementation................................................................................................................................17
6. Conclusion........................................................................................................................................22
7. References........................................................................................................................................22
1
Document Page
1. Introduction
The project will be implemented in MySQL xampp. Requirements of the project will be
met. The screenshots will be clearly explained. XAMPP, is done by php and the required website
for the staff and the student login is created. It has all the server details for running without the
use of another computer. Basically, this bundle incorporates a few applications and
administrations all packaged together for quick and simple arrangement. The web server unit has
adaptation 1.8 that will take time to attain and will have different upgrades and fixes. As per the
requirements the login id for the staffs and the students to pass the information will be created. It
will be created for reducing the working time and to reduce the paper work. A webpage with the
Home page with the welcome note and the login page for the students and login page for the
staff. In window basic it includes the path for the website creation.
Aim
The aim is to create webpage and to provide login access to Student and the staff of the
institution, so that they can update all the details regarding the academic session and to pass
information to the students in an effective manner.
Objective
The objective for developing the online web application is to reduce paper work and to reduce
the time management. By doing this reduces the work and to increase the work efficiency. The
project provide the information about the notification or other data that is to be transferred to the
students. A flexible system with the essential documents is provided.
2. Xampp
It is developed by Apache Friends involves MariaDB database, interpreters and Apache
HTTP server for the scripts which is written in the Perl Programming and PHP languages. It is an
open source cross-platform. It is a free and web server solution stack package. Cross-platform,
Apache, MariaDB, PHP and Perl denotes as XAMPP. Xammp is a lightweight Apache
distribution. Developing process is made easy for the developers. A web server is created using
the deployment and testing purpose. Each and everything is required to set up in web server. The
extractable file includes database, scripting language and server application. XAMPP works well
on Mac, windows and Linux. It provides aids to create and manipulate databases in SQLite and
MariaDB. It has the capability to serve the web pages on www.The password-protect is the
2
Document Page
significant package part. The special tool is presented in XAMPP. FileZilla program has a
benefits while installing CMS such as WordPress or Joomla.
1. It is Easy to install as contrast with other web server resembles WAMP.
2. It is Multi Cross Platform which implies XAMPP is accessible for Windows and Linux.
3. WordPress, OpenSSL, MediaWiki, phpMyAdmin, Joomla are included.
4. Both full and a standard rendition (Smaller adaptation) is offered in XAMPP.
5. It can begin and stop the entire webserver+database stack with one summon.
To create MySQL database by XAMPP
Step 1:
First open the browser. Then enter the url.
It brings MySQL setup page.
3
tabler-icon-diamond-filled.svg

Paraphrase This Document

Need a fresh take? Get an instant paraphrase of this document with our AI Paraphraser
Document Page
Step 2:
For the database, enter the name and click create button. The entered name should be in the form
of numbers, sixty four characters or less, underscores and composed letters. The number should
be avoided at the starting of the name. The proper name indicates the database purpose. The
other setting should not be changed.
Step 3:
Confirm that the database is successfully created.
4
Document Page
The created database is used by any other application which needs MySQL database.
OPERATIONS: There are many MySQL operations such as update, insert, create, select and delete
by using Xampp server.
1. The foremost step is to install Xampp server in machine.
2. Then go to the Xampp folder. Then open the file xampp-control.exe.
3. Then start MySQL, FileZilla and Apache module which is displayed below.
5
Document Page
4. Then open the browser. Now enter the url.
Then we can navigate the next window.
5. Now click phpMyadmin.
6. The window phpMyadmin will be presented.
6
tabler-icon-diamond-filled.svg

Paraphrase This Document

Need a fresh take? Get an instant paraphrase of this document with our AI Paraphraser
Document Page
7. Then click the database tab which show at left hand side which is displayed below.
8. Presented the next window.
9. Then enter the database name then click create button. It creates the database that get include
to recent database list.
10. Then click mydatabase which is the name of the database.
7
Document Page
11. The next will be appear after click the mydatabase.
12. Naming the table as well as indicate the column number to add. Then click go button. The
field should be entered and saved.
13. Create the table structure after click the save button.
14. In the table, if we wish to insert the record, click insert tab.
15. The next window will be presented where we will insert the record into the table after
clicking insert tab.
8
Document Page
16. Click browse to see the contents of the table after insert the record.
17. In MySQL database, to trigger queries, click database name which is at left hand side.
18. Then click SQL tab. The dialog box will be shown.
9
tabler-icon-diamond-filled.svg

Paraphrase This Document

Need a fresh take? Get an instant paraphrase of this document with our AI Paraphraser
Document Page
19. We could fire SQL queries.
In the table, to update the record, update command is used.
It will alter the 2nd record that has id which is equal to 2.
20. Then click browse tab. It will display updated structure of table.
21. Likely, we could use the command such as select, delete and insert to preform the
corresponding operations in the table.
22. To demonstrate the select command, sql tab is selected and the query is written in it.
23. Likewise, we could perform several operations on the database.
Hence on xampp server, we successfully performed the fundamental operations of MySQL.
10
Document Page
PROCEDURES: As a matter of course, when you introduce XAMPP in your windows machine,
the root secret word for the MySQL is set to purge. In any case, this isn't prescribed, as the
MySQL database without a secret word will be open to everybody. To dodge this, a
legitimate/secure secret word must be set to the client root. To do it in XAMPP, there are two
ways.
First method:
Through the web interface, reset xampp MySQL root password:
After you began your XAMPP server, go to the program and sort the URL
Incase if the XAMPP is changed server port, you have to incorporate that port number
likewise in past URL. The security page will be indicated where you can change the root secret
word for MySQL. This will refresh the phpMyAdmin config too.
Second method:
Through SQL update, reset xampp MySQL root password:
1. Begin the Apache Server and MySQL occasions from the XAMPP control board.
2. After the server began, open any web program and give
On the off chance that you are running.
3. This will open the phpMyAdmin interface. Utilizing this interface we would manager be
able to the MySQL server from the web program.
4. In the phpMyAdmin window, select SQL tab from the correct board. This will open the
SQL tab where we can run the SQL questions.
5. Presently sort the accompanying inquiry in the text area and snap
6. Presently you will see a message saying that the question has been executed effectively.
7. On the off chance that you revive the page, you will get a blunder message. This is on
account of the phpMyAdmin design record doesn't know about our recently set root
password. To do this we need to alter the phpMyAdmin config document.
8. Open the record [XAMPP Installation Path]/phpmyadmin/config.inc.php in your most
loved word processor.
11
chevron_up_icon
1 out of 40
circle_padding
hide_on_mobile
zoom_out_icon
[object Object]