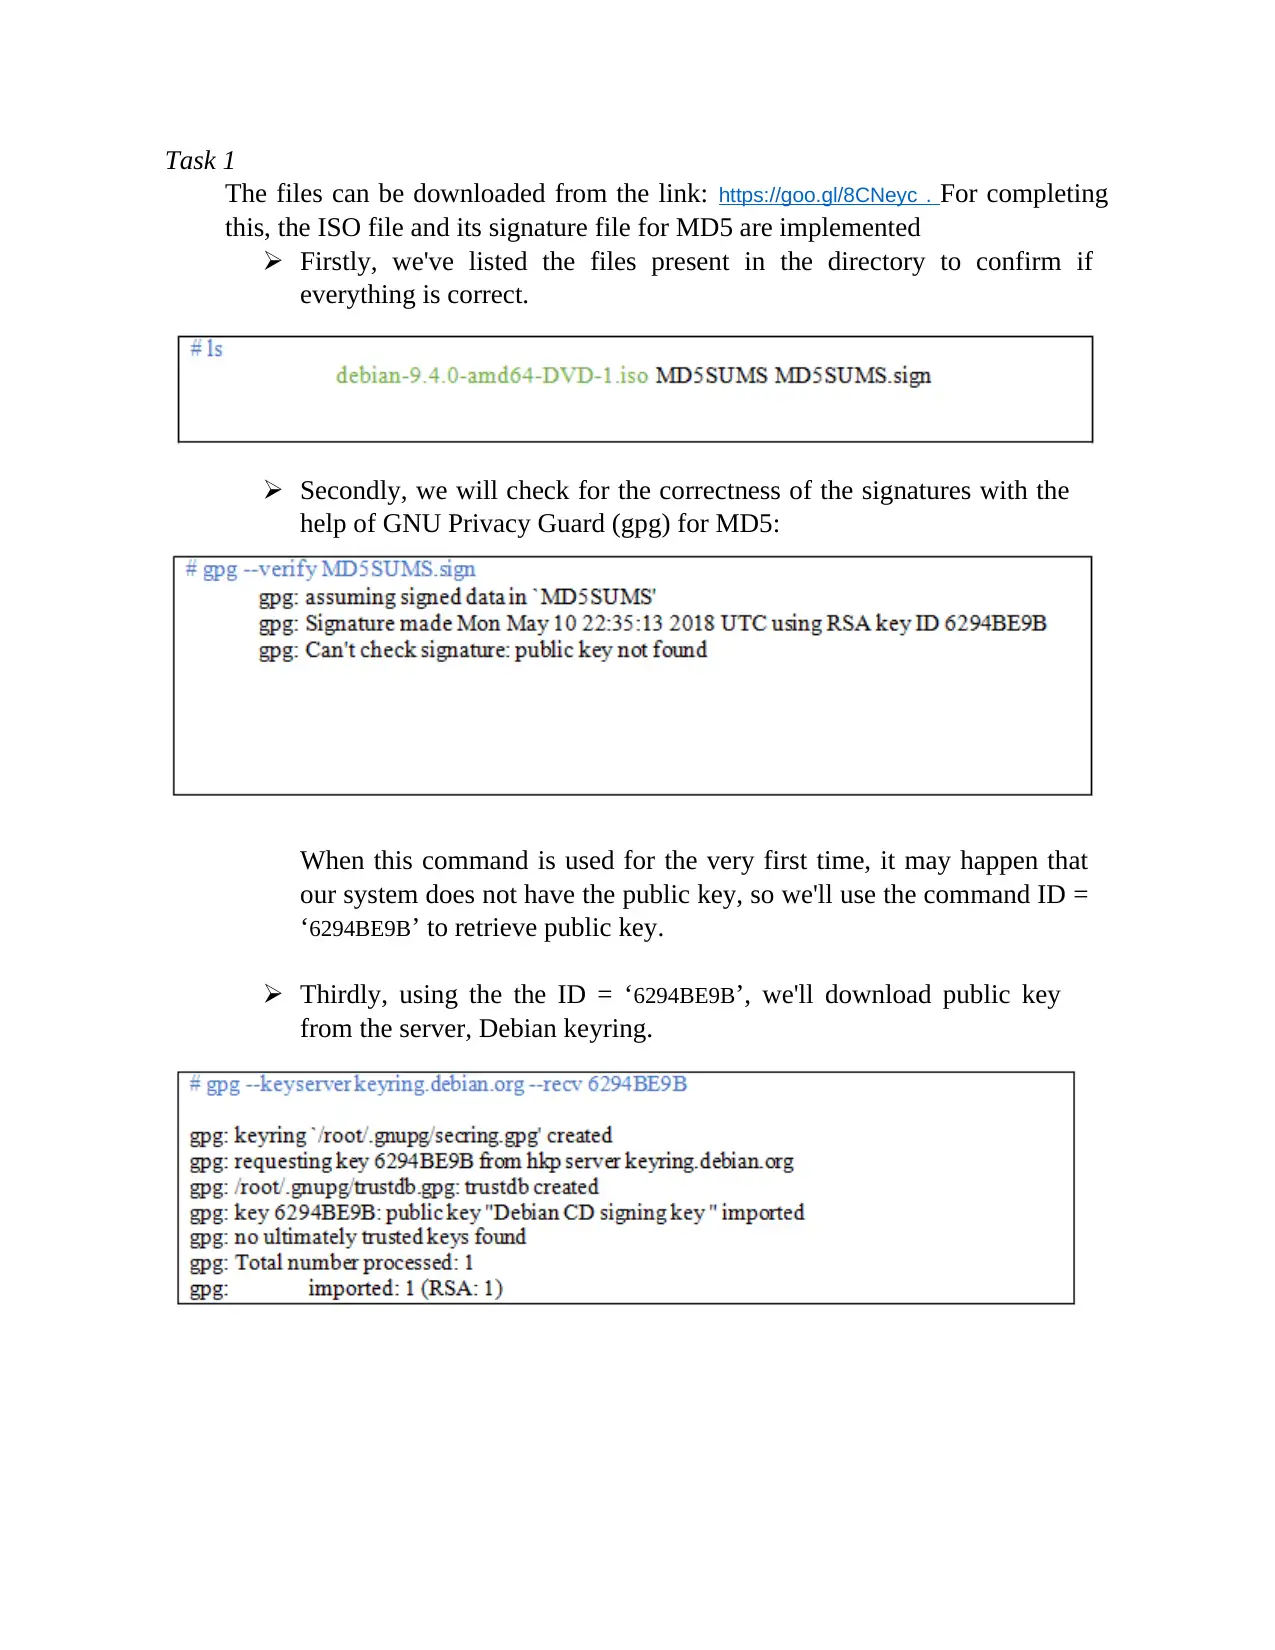
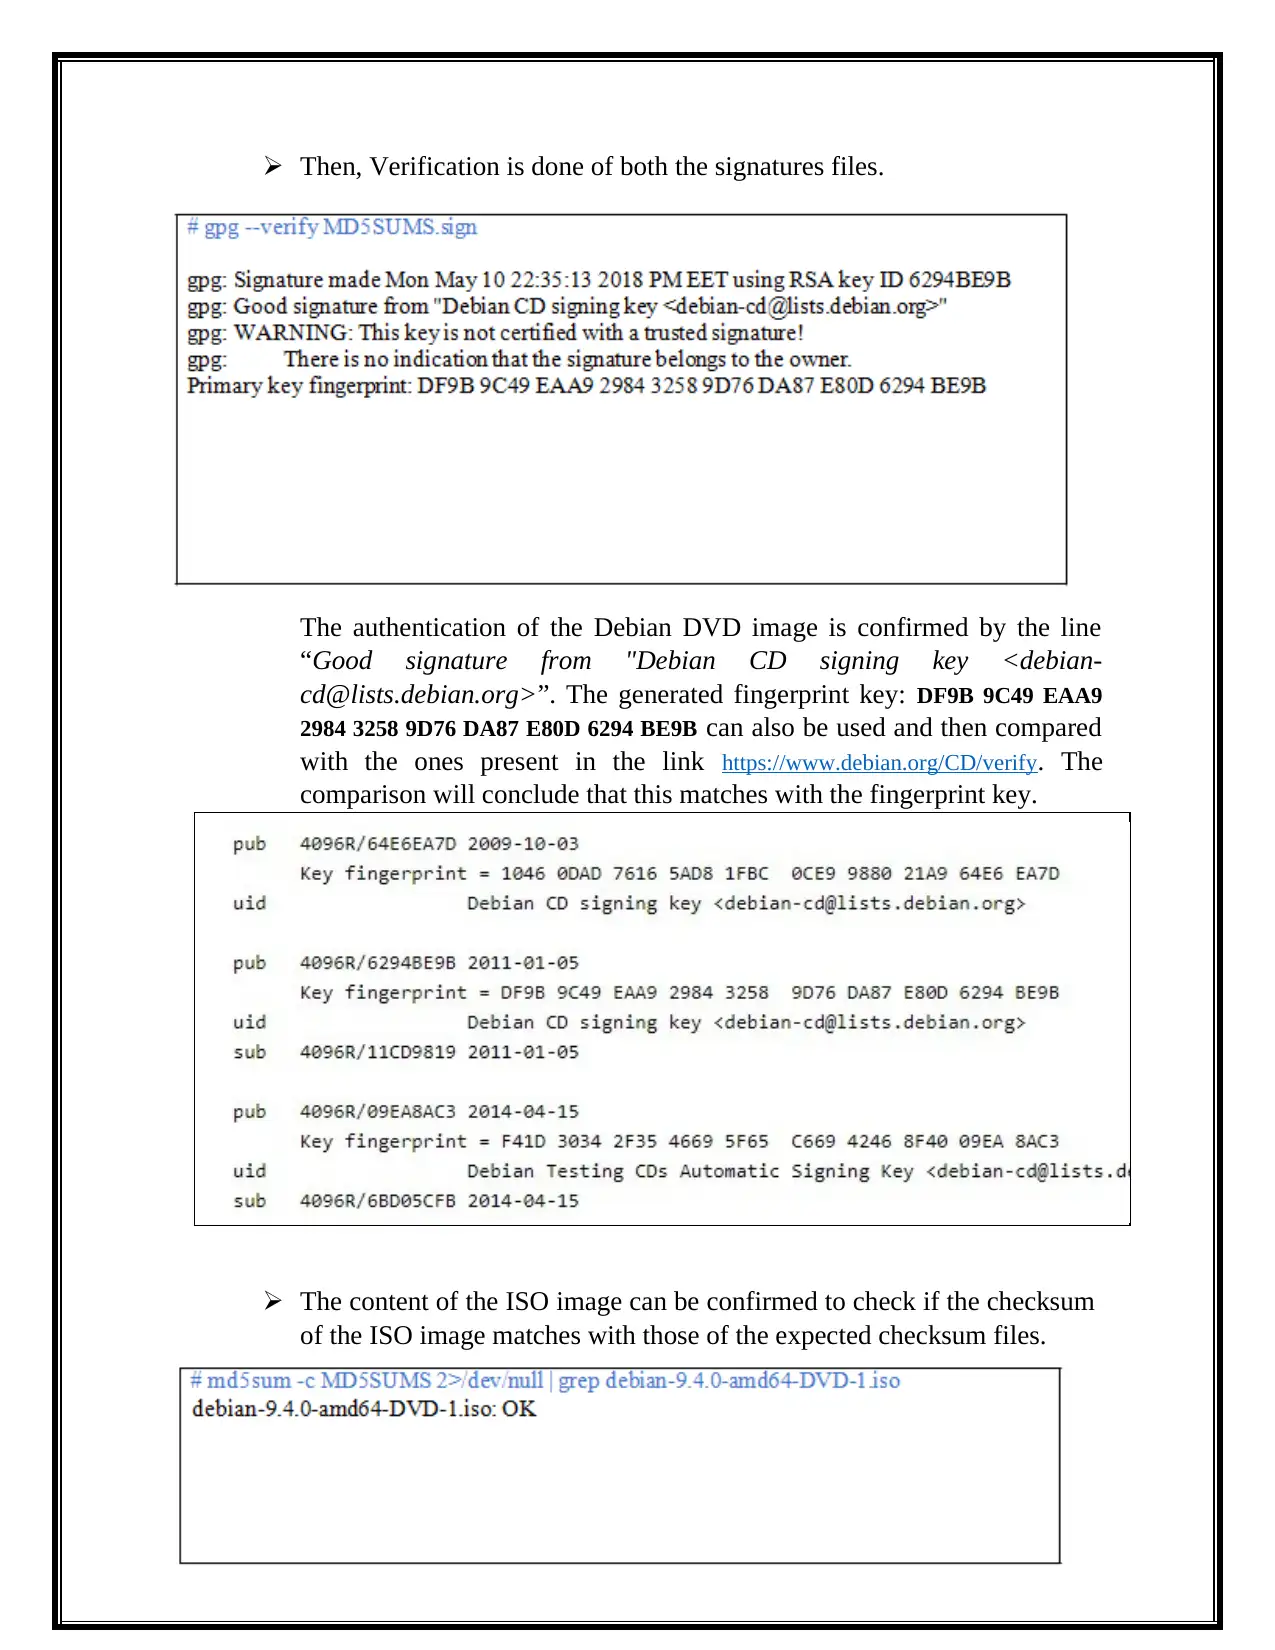
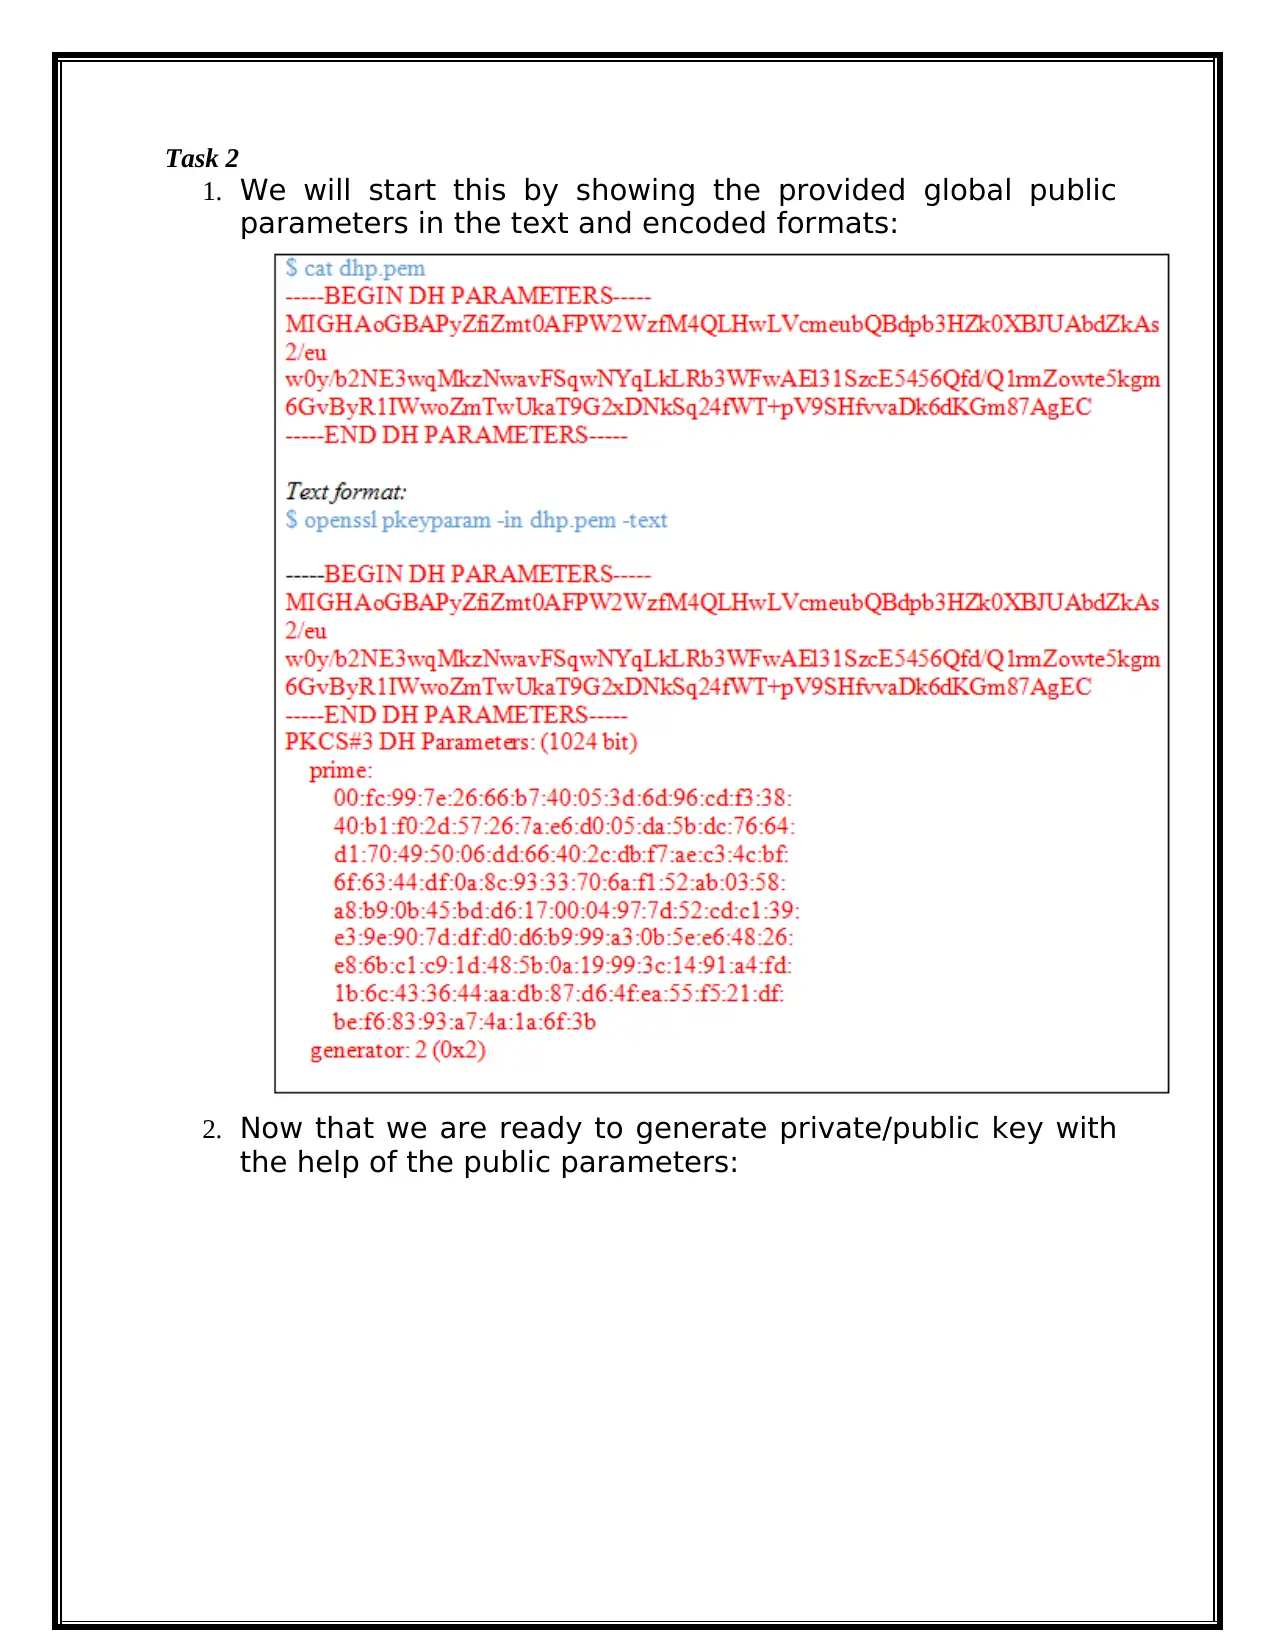
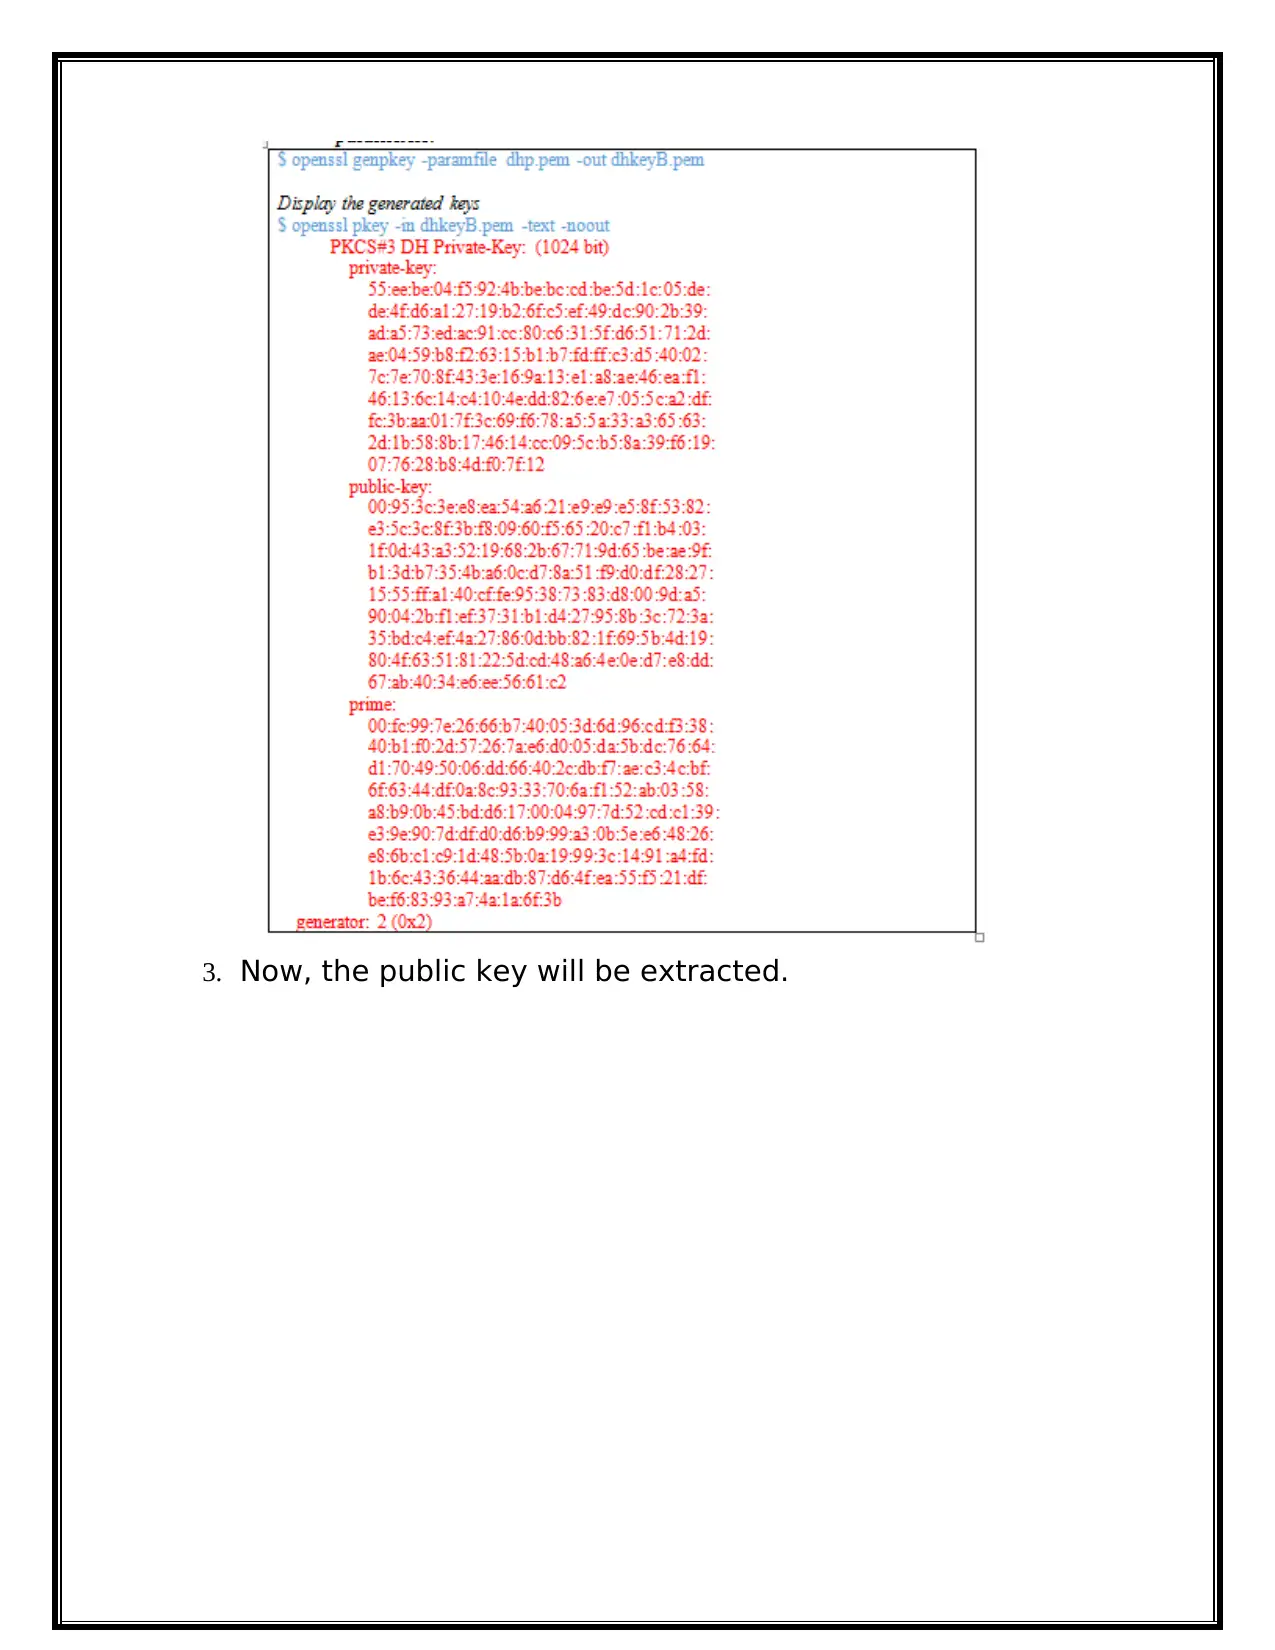
Cryptography and Security - Assignment 2: Digital Certificates and Public Key Infrastructure
VerifiedAdded on 2024/05/29
|9
|1159
|294
AI Summary
Contribute Materials
Your contribution can guide someone’s learning journey. Share your
documents today.
CSC8419
Cryptography and Security
Assignment 2
Cryptography and Security
Assignment 2
Secure Best Marks with AI Grader
Need help grading? Try our AI Grader for instant feedback on your assignments.
Task 1
The files can be downloaded from the link: https://goo.gl/8CNeyc . For completing
this, the ISO file and its signature file for MD5 are implemented
Firstly, we've listed the files present in the directory to confirm if
everything is correct.
Secondly, we will check for the correctness of the signatures with the
help of GNU Privacy Guard (gpg) for MD5:
When this command is used for the very first time, it may happen that
our system does not have the public key, so we'll use the command ID =
‘6294BE9B’ to retrieve public key.
Thirdly, using the the ID = ‘6294BE9B’, we'll download public key
from the server, Debian keyring.
Then, Verification is done of both the signatures files.
The authentication of the Debian DVD image is confirmed by the line
“Good signature from "Debian CD signing key <debian-
cd@lists.debian.org>”. The generated fingerprint key: DF9B 9C49 EAA9
2984 3258 9D76 DA87 E80D 6294 BE9B can also be used and then compared
with the ones present in the link https://www.debian.org/CD/verify. The
comparison will conclude that this matches with the fingerprint key.
The content of the ISO image can be confirmed to check if the checksum
of the ISO image matches with those of the expected checksum files.
Task 2
1. We will start this by showing the provided global public
parameters in the text and encoded formats:
2. Now that we are ready to generate private/public key with
the help of the public parameters:
1. We will start this by showing the provided global public
parameters in the text and encoded formats:
2. Now that we are ready to generate private/public key with
the help of the public parameters:
Secure Best Marks with AI Grader
Need help grading? Try our AI Grader for instant feedback on your assignments.
3. Now, the public key will be extracted.
4. We will now generate the secret key, that is to be shared,
using the instructor's public and private key.
5. Here the shared key will be generated and this should be same as the key
shared at instructor side.
using the instructor's public and private key.
5. Here the shared key will be generated and this should be same as the key
shared at instructor side.
Task 4
To create Digital Certificates using OpenSSL
For tasks related to Public key infrastructure and https, a versatile command line tool
called OpenSSL can be used. This provides a reference to OpenSSL commands that
will be further useful. You can generate private keys, can sign certificate requests, and
can also convert the certificate format.
Why create digital certificates? There might be possible that you have a website of
yours running on an internal network and you want all the interactions of your website
to be on HTTPS. Another reason could be that you might want to create your own
certificate for configuring a web server using HTTPS.
Certificate Signing Requests: To obtain SSL certificate from the certificate authority,
the certificate signing requests are needed to be generated. It consists of key pair's
public key along with some additional data. These are needed to insert in the certificate
during the signing.
While generating CSR file, it will ask for additional information related to the
certificate. This information is called Distinguished Name. Common Name is one such
important field in the DN. The other fields in the DN will provide additional data about
your organisation or business. So if you are purchasing the SSL certificate then it is
required that you check these additional field as well as they will reflect your business
details.
Certificate Authority: For creating your own certificate, a certificate authority is
needed to sign it. So for creating a certificate authority use command: ~$ mkdir my
certificate authority. Then add a sub folder in the newly created folder to store the
signed certificates using the command: ~/myCertificateAuthority$ mkdir certificates.
Then a file with the name serial is created so each time when a certificate is signed the
file will be automatically converted.
Certificate Authority configuration file: This configuration file contains the
knowledge about certificate authority. Information such as name, email etc will be
contained in it. Additionally, it will also contain the default values.
Paraphrase This Document
Need a fresh take? Get an instant paraphrase of this document with our AI Paraphraser
Certificate Signing Request: This file will be sent to the certificate authority for
verification. It will include the information required to create the certificate. The CA
will validate the information. If the information is correct then a signed certificate will
be issued.
Step 1: First install the OpenSSL to move ahead
Click on the link: https://wiki.openssl.org/index.php/Binaries to download OpenSSL.
There you will see many links for downloading, select third-party OpenSSL. There you
go at last of the page. There you'll find the download link. Click on the link to
download non-light edition and double click on the setting which is default to finish the
installation.
Step 2: Open the setup window and click on run button. In the open dialogue box, type
CMD and click on ok. A command prompt window will appear. Type: cd \OpenSSL-
Win32 and change it to = C:\OpenSSL-Win32. Now type the command: set
OPENSSL_CONF=c:\OpenSSL-Win32\bin\openssl.cfg
Step 3: Open the downloaded OpenSSL. Create the certificate authority. For this, make
a certificate request file. The subject in the file illustrates the certificate's user.
Step 4: Create one key file for storing the private key. This will remove the password
protection from the requested file so we do not have to type the password every time to
use the certificate.
Step 5: Create a X.509 digital certificate using certificate request.
Step 6: Then create an encoded file which will contain the certificate along with its
private key. After this, we will get a CA certificate which further can be installed on the
web browser.
Step 7: After creating a digital certificate for one user, You can create the CSR file for
the use of another user. You can also provide a suitable subject.
Step 8: Then create a private key file without any password protection. Then create a
new X.509 certificate. then optionally you can create an encoded version of the public
key. Then create the encoded file.
You can repeat the above steps to create as many digital certificates as you want. They
keys are needed to be kept secure and once you are done you can delete them. But
remember do not delete the CA private key file, as it will be needed to sign other
certificates.
Results: Now the CA certificate can be installed into the WebSphere for signing.
remember do not delete the CA private key file, as it will be needed to sign other
certificates.
Results: Now the CA certificate can be installed into the WebSphere for signing.
1 out of 9
Related Documents
Your All-in-One AI-Powered Toolkit for Academic Success.
+13062052269
info@desklib.com
Available 24*7 on WhatsApp / Email
Unlock your academic potential
© 2024 | Zucol Services PVT LTD | All rights reserved.