What Is a Lesson Plan and How Do You Make One?
VerifiedAdded on 2022/08/23
|7
|2320
|23
AI Summary
Contribute Materials
Your contribution can guide someone’s learning journey. Share your
documents today.
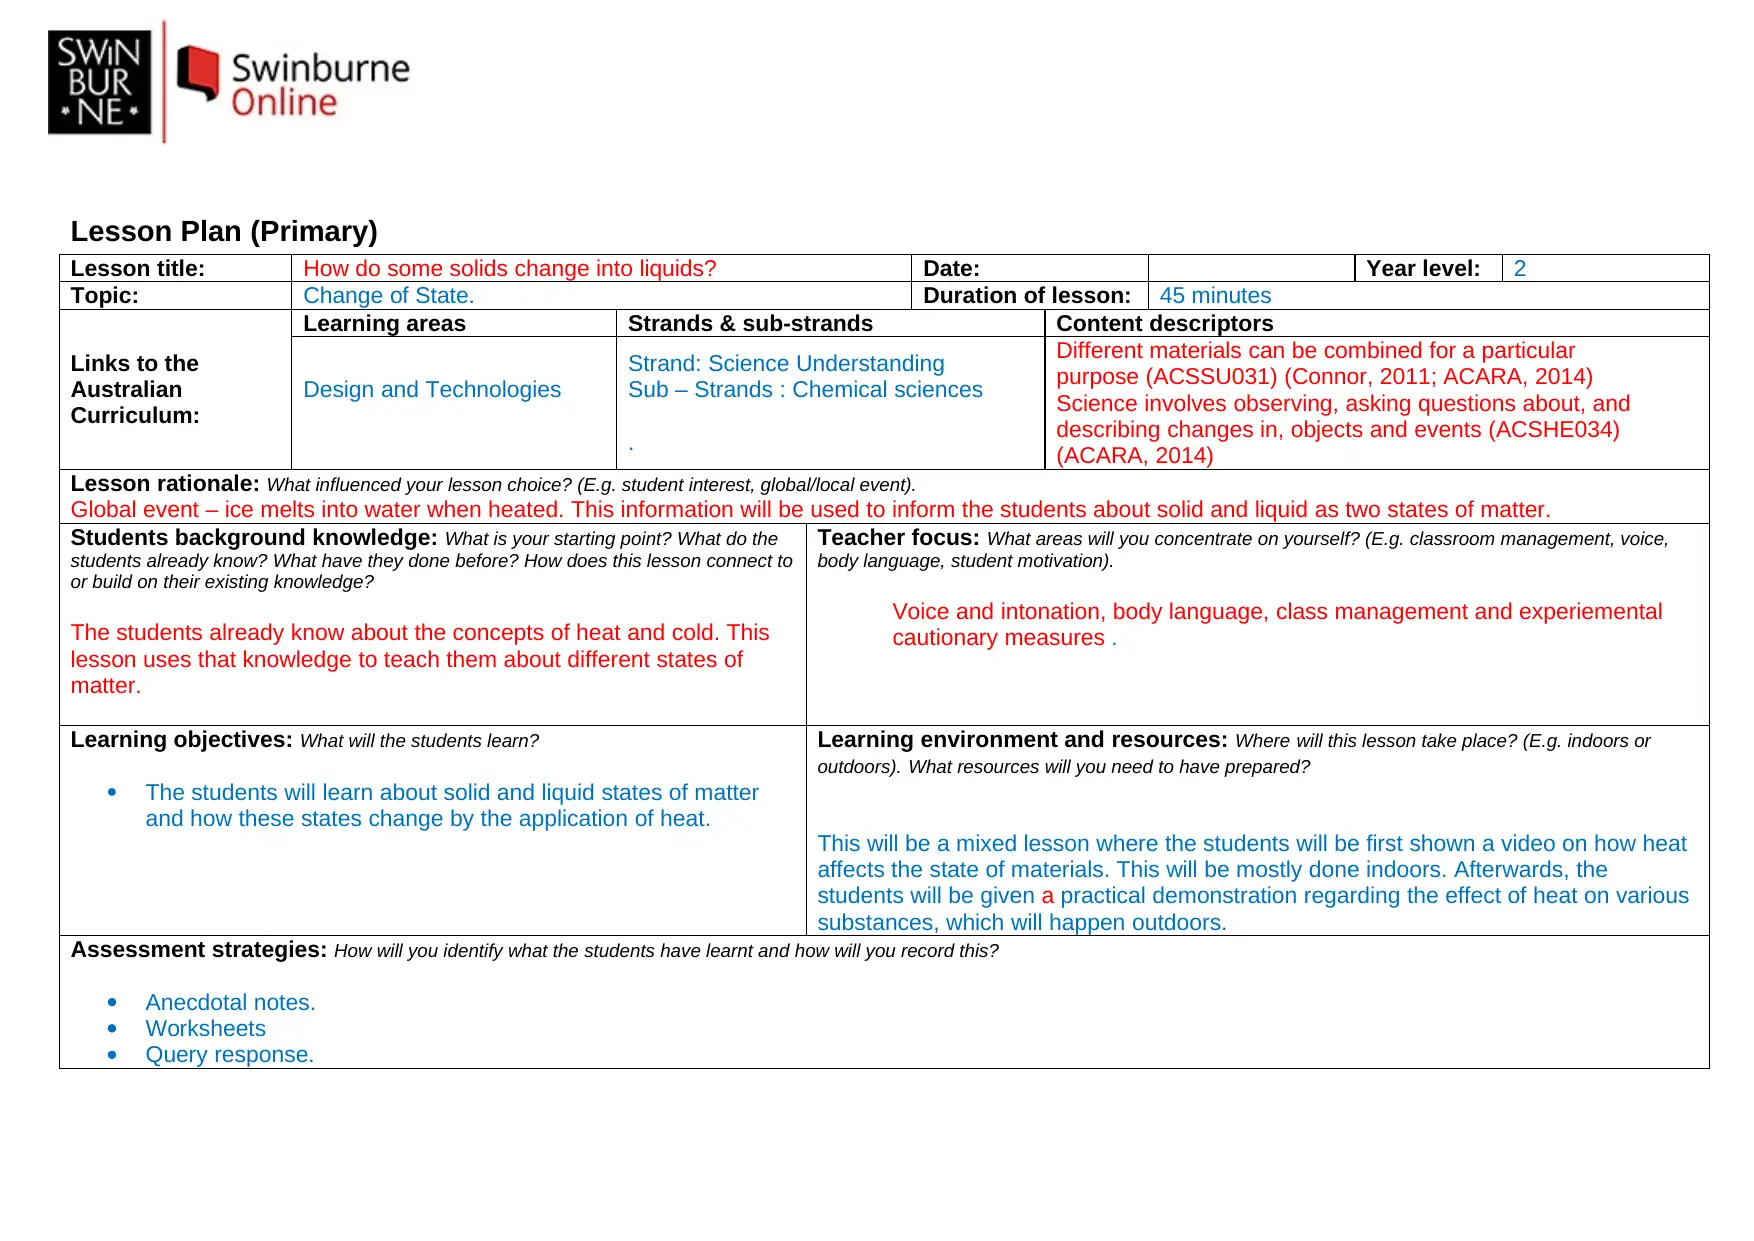
Lesson Plan (Primary)
Lesson title: How do some solids change into liquids? Date: Year level: 2
Topic: Change of State. Duration of lesson: 45 minutes
Links to the
Australian
Curriculum:
Learning areas Strands & sub-strands Content descriptors
Design and Technologies
Strand: Science Understanding
Sub – Strands : Chemical sciences
.
Different materials can be combined for a particular
purpose (ACSSU031) (Connor, 2011; ACARA, 2014)
Science involves observing, asking questions about, and
describing changes in, objects and events (ACSHE034)
(ACARA, 2014)
Lesson rationale: What influenced your lesson choice? (E.g. student interest, global/local event).
Global event – ice melts into water when heated. This information will be used to inform the students about solid and liquid as two states of matter.
Students background knowledge: What is your starting point? What do the
students already know? What have they done before? How does this lesson connect to
or build on their existing knowledge?
The students already know about the concepts of heat and cold. This
lesson uses that knowledge to teach them about different states of
matter.
Teacher focus: What areas will you concentrate on yourself? (E.g. classroom management, voice,
body language, student motivation).
Voice and intonation, body language, class management and experiemental
cautionary measures .
Learning objectives: What will the students learn?
The students will learn about solid and liquid states of matter
and how these states change by the application of heat.
Learning environment and resources: Where will this lesson take place? (E.g. indoors or
outdoors). What resources will you need to have prepared?
This will be a mixed lesson where the students will be first shown a video on how heat
affects the state of materials. This will be mostly done indoors. Afterwards, the
students will be given a practical demonstration regarding the effect of heat on various
substances, which will happen outdoors.
Assessment strategies: How will you identify what the students have learnt and how will you record this?
Anecdotal notes.
Worksheets
Query response.
Secure Best Marks with AI Grader
Need help grading? Try our AI Grader for instant feedback on your assignments.
Stage of lesson Approx.
time
Pre-service teacher’s actions
What will you do during this time?
What prompting questions might you need to prepare?
How might you assess and record student learning?
How will you cater for individual differences?
Student actions/tasks
What will the students be doing during this time?
Stage 1
Introduction
How will you gain the
students’ attention,
engage the interest of
the students and
introduce the
concept(s)?
10
minutes
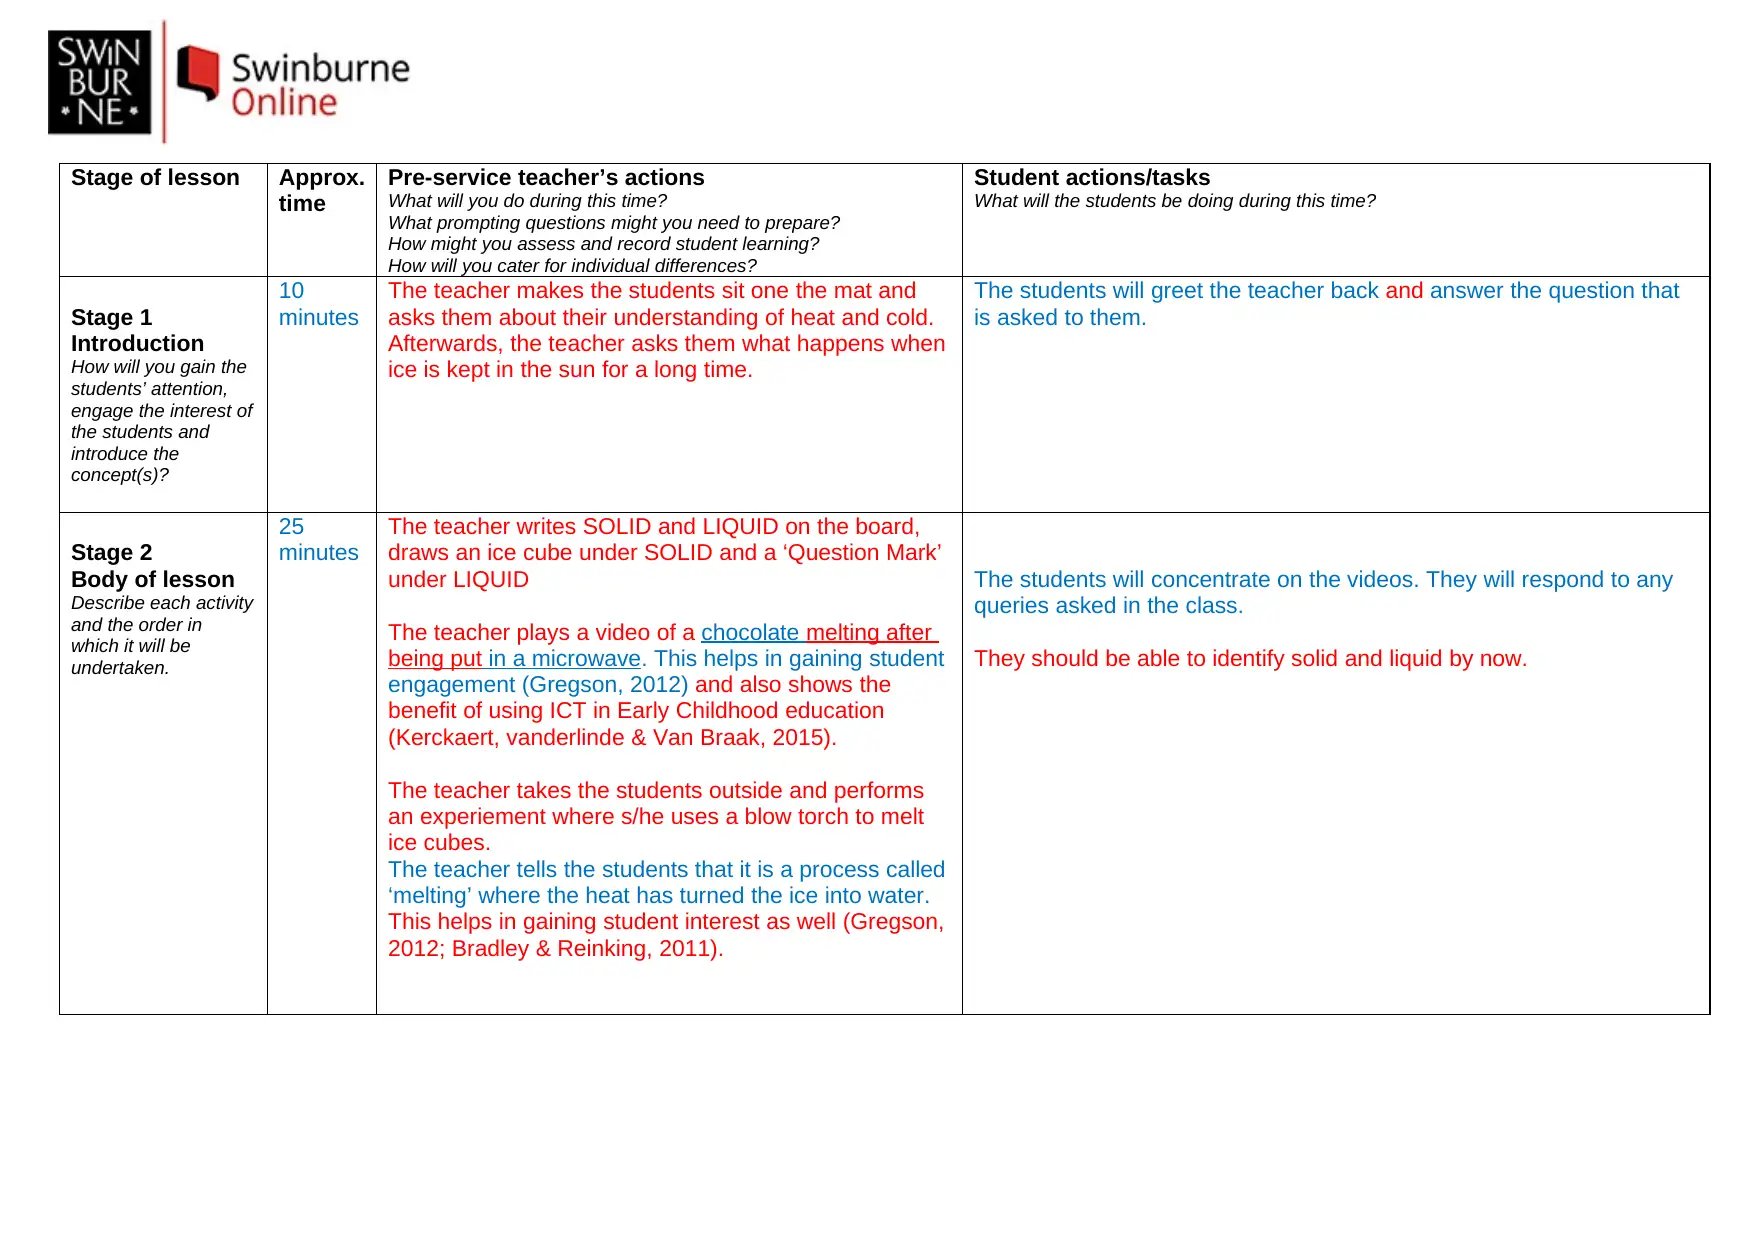
The teacher makes the students sit one the mat and
asks them about their understanding of heat and cold.
Afterwards, the teacher asks them what happens when
ice is kept in the sun for a long time.
The students will greet the teacher back and answer the question that
is asked to them.
Stage 2
Body of lesson
Describe each activity
and the order in
which it will be
undertaken.
25
minutes
The teacher writes SOLID and LIQUID on the board,
draws an ice cube under SOLID and a ‘Question Mark’
under LIQUID
The teacher plays a video of a chocolate melting after
being put in a microwave. This helps in gaining student
engagement (Gregson, 2012) and also shows the
benefit of using ICT in Early Childhood education
(Kerckaert, vanderlinde & Van Braak, 2015).
The teacher takes the students outside and performs
an experiement where s/he uses a blow torch to melt
ice cubes.
The teacher tells the students that it is a process called
‘melting’ where the heat has turned the ice into water.
This helps in gaining student interest as well (Gregson,
2012; Bradley & Reinking, 2011).
The students will concentrate on the videos. They will respond to any
queries asked in the class.
They should be able to identify solid and liquid by now.
Stage 3:
Conclusion
How will you draw the
lesson ideas together
so that the students
can evaluate what
they have learnt?
How will you prepare
the students for the
next task?
10
minutes
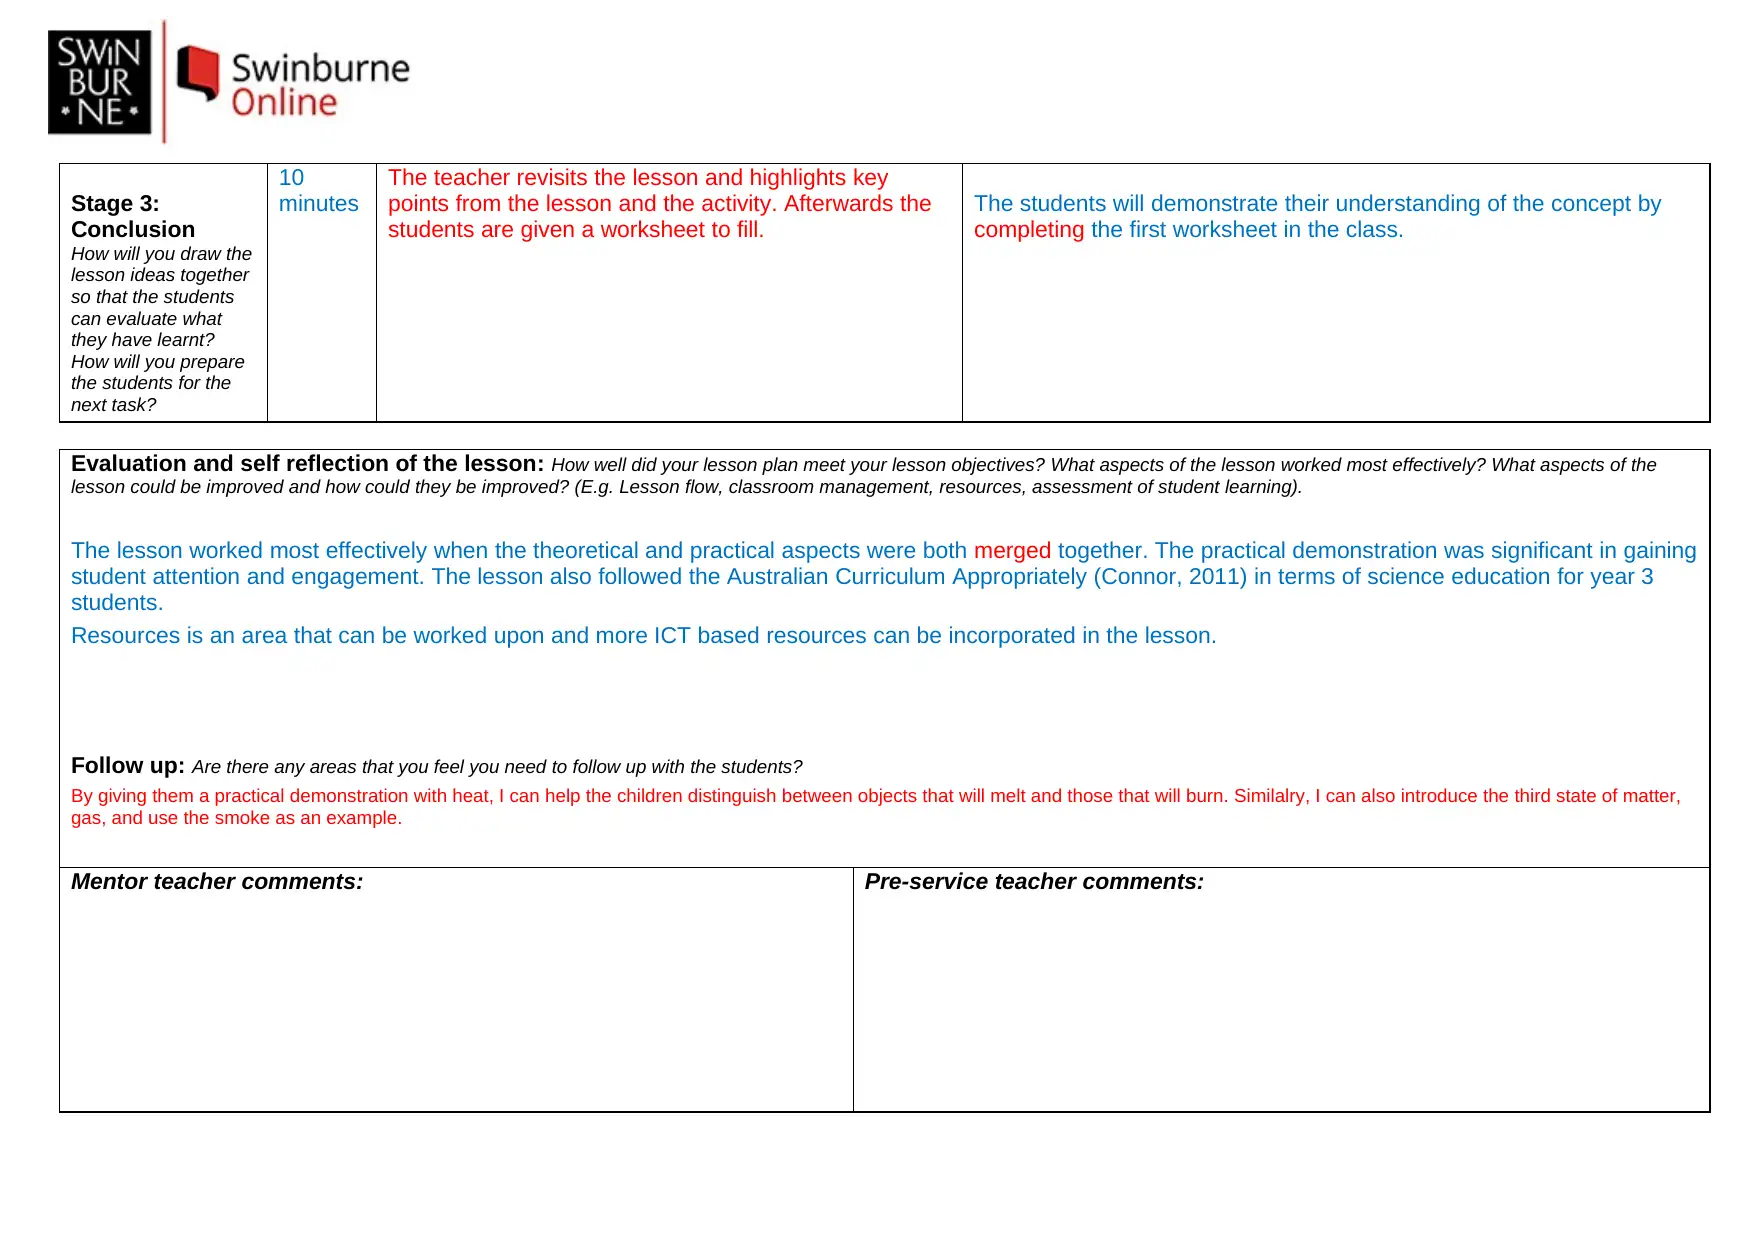
The teacher revisits the lesson and highlights key
points from the lesson and the activity. Afterwards the
students are given a worksheet to fill.
The students will demonstrate their understanding of the concept by
completing the first worksheet in the class.
Evaluation and self reflection of the lesson: How well did your lesson plan meet your lesson objectives? What aspects of the lesson worked most effectively? What aspects of the
lesson could be improved and how could they be improved? (E.g. Lesson flow, classroom management, resources, assessment of student learning).
The lesson worked most effectively when the theoretical and practical aspects were both merged together. The practical demonstration was significant in gaining
student attention and engagement. The lesson also followed the Australian Curriculum Appropriately (Connor, 2011) in terms of science education for year 3
students.
Resources is an area that can be worked upon and more ICT based resources can be incorporated in the lesson.
Follow up: Are there any areas that you feel you need to follow up with the students?
By giving them a practical demonstration with heat, I can help the children distinguish between objects that will melt and those that will burn. Similalry, I can also introduce the third state of matter,
gas, and use the smoke as an example.
Mentor teacher comments: Pre-service teacher comments:
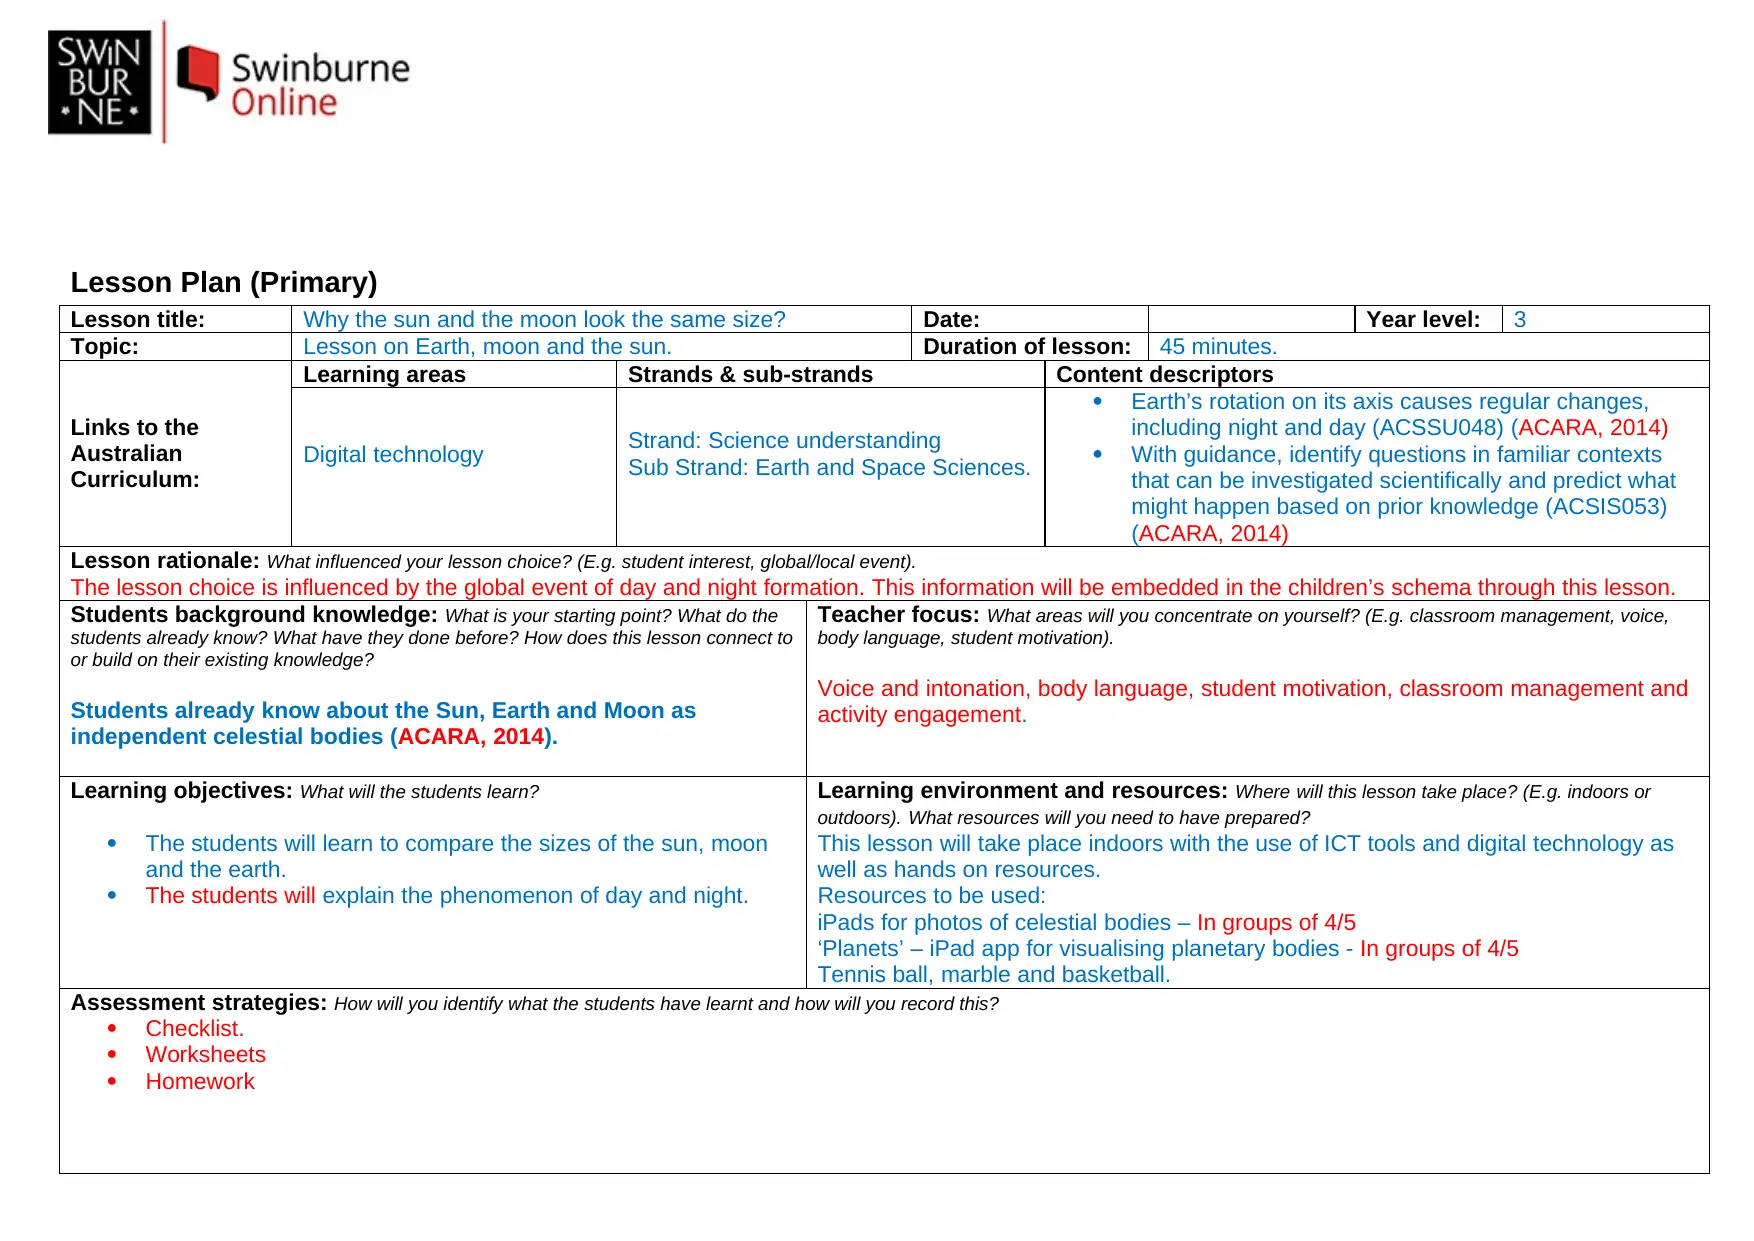
Lesson Plan (Primary)
Lesson title: Why the sun and the moon look the same size? Date: Year level: 3
Topic: Lesson on Earth, moon and the sun. Duration of lesson: 45 minutes.
Links to the
Australian
Curriculum:
Learning areas Strands & sub-strands Content descriptors
Digital technology Strand: Science understanding
Sub Strand: Earth and Space Sciences.
Earth’s rotation on its axis causes regular changes,
including night and day (ACSSU048) (ACARA, 2014)
With guidance, identify questions in familiar contexts
that can be investigated scientifically and predict what
might happen based on prior knowledge (ACSIS053)
(ACARA, 2014)
Lesson rationale: What influenced your lesson choice? (E.g. student interest, global/local event).
The lesson choice is influenced by the global event of day and night formation. This information will be embedded in the children’s schema through this lesson.
Students background knowledge: What is your starting point? What do the
students already know? What have they done before? How does this lesson connect to
or build on their existing knowledge?
Students already know about the Sun, Earth and Moon as
independent celestial bodies (ACARA, 2014).
Teacher focus: What areas will you concentrate on yourself? (E.g. classroom management, voice,
body language, student motivation).
Voice and intonation, body language, student motivation, classroom management and
activity engagement.
Learning objectives: What will the students learn?
The students will learn to compare the sizes of the sun, moon
and the earth.
The students will explain the phenomenon of day and night.
Learning environment and resources: Where will this lesson take place? (E.g. indoors or
outdoors). What resources will you need to have prepared?
This lesson will take place indoors with the use of ICT tools and digital technology as
well as hands on resources.
Resources to be used:
iPads for photos of celestial bodies – In groups of 4/5
‘Planets’ – iPad app for visualising planetary bodies - In groups of 4/5
Tennis ball, marble and basketball.
Assessment strategies: How will you identify what the students have learnt and how will you record this?
Checklist.
Worksheets
Homework
Secure Best Marks with AI Grader
Need help grading? Try our AI Grader for instant feedback on your assignments.
Stage of lesson Approx.
time
Pre-service teacher’s actions
What will you do during this time?
What prompting questions might you need to prepare?
How might you assess and record student learning?
How will you cater for individual differences?
Student actions/tasks
What will the students be doing during this time?
Stage 1
Introduction
How will you gain the
students’ attention,
engage the interest of
the students and
introduce the
concept(s)?
10
minutes
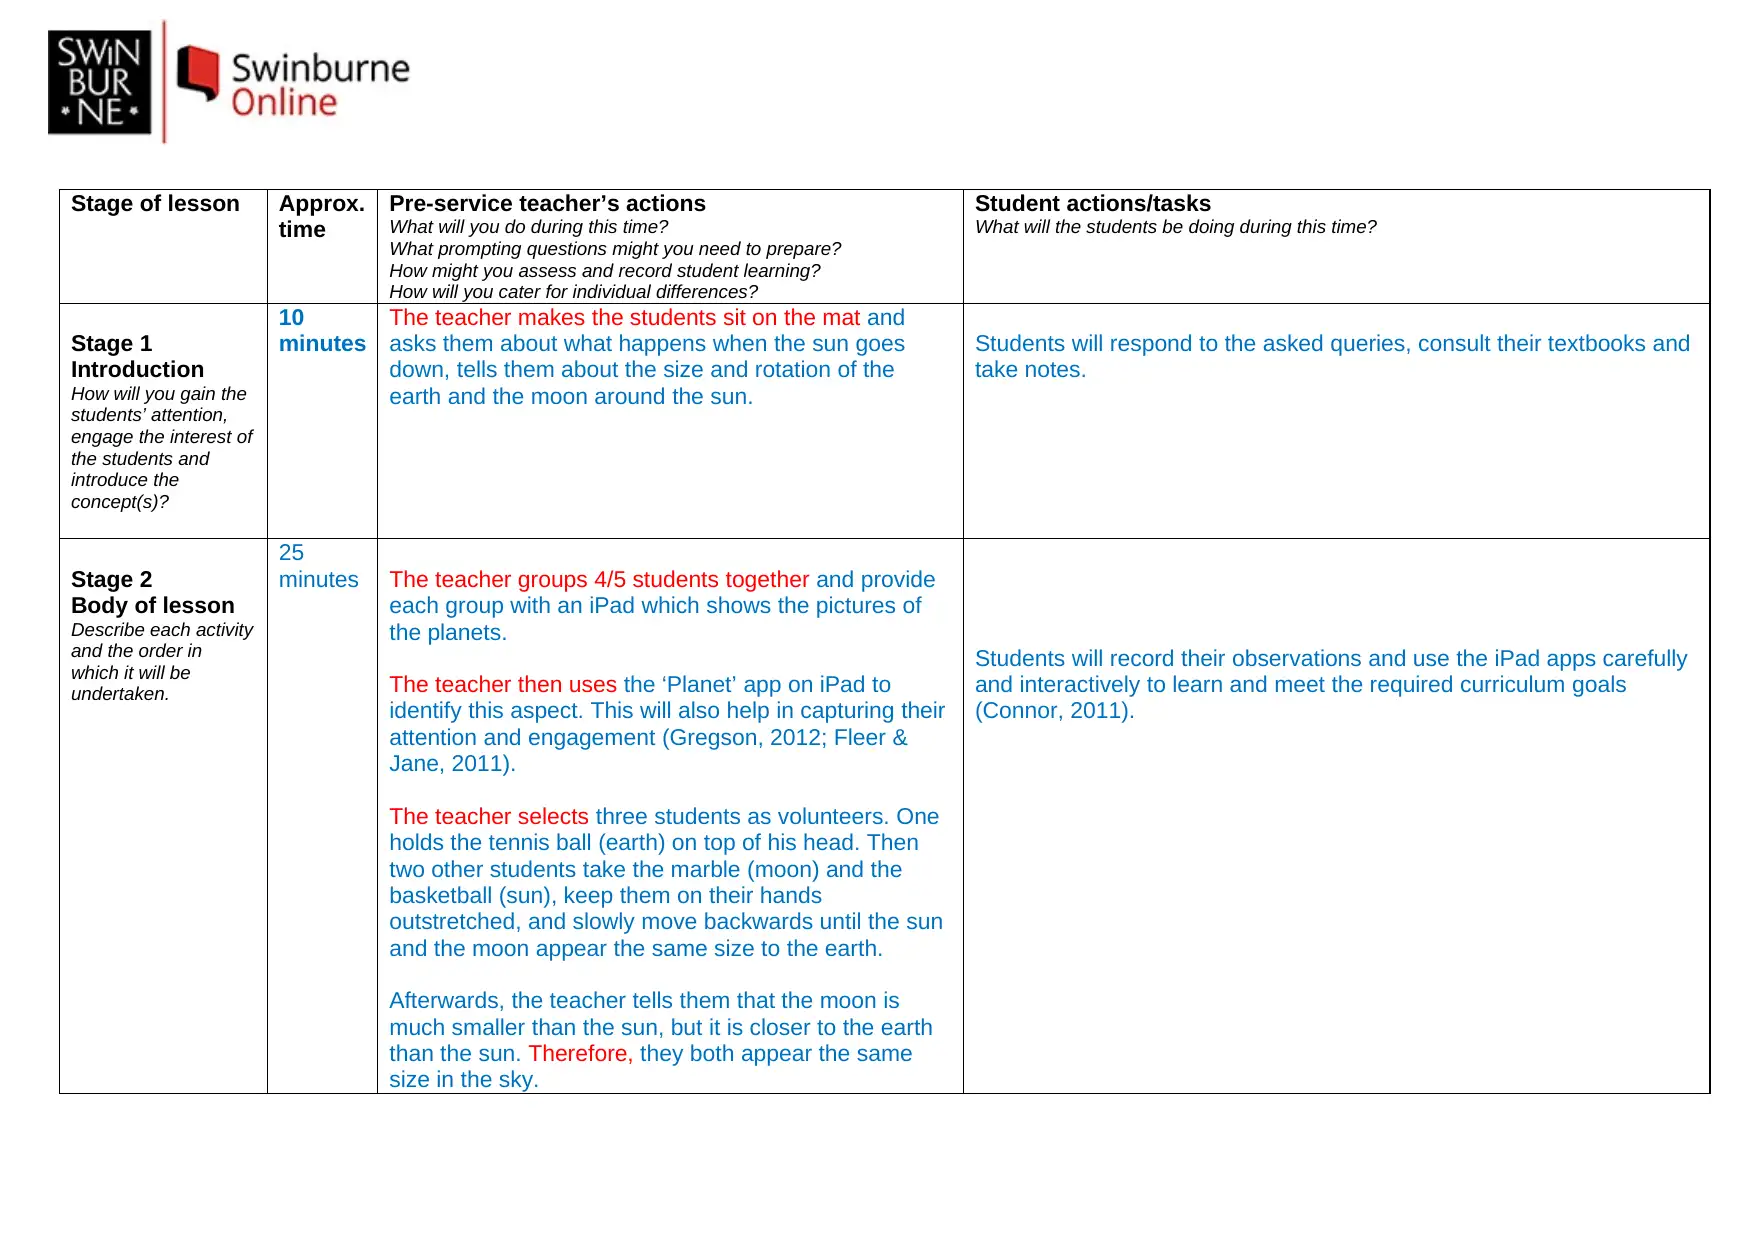
The teacher makes the students sit on the mat and
asks them about what happens when the sun goes
down, tells them about the size and rotation of the
earth and the moon around the sun.
Students will respond to the asked queries, consult their textbooks and
take notes.
Stage 2
Body of lesson
Describe each activity
and the order in
which it will be
undertaken.
25
minutes The teacher groups 4/5 students together and provide
each group with an iPad which shows the pictures of
the planets.
The teacher then uses the ‘Planet’ app on iPad to
identify this aspect. This will also help in capturing their
attention and engagement (Gregson, 2012; Fleer &
Jane, 2011).
The teacher selects three students as volunteers. One
holds the tennis ball (earth) on top of his head. Then
two other students take the marble (moon) and the
basketball (sun), keep them on their hands
outstretched, and slowly move backwards until the sun
and the moon appear the same size to the earth.
Afterwards, the teacher tells them that the moon is
much smaller than the sun, but it is closer to the earth
than the sun. Therefore, they both appear the same
size in the sky.
Students will record their observations and use the iPad apps carefully
and interactively to learn and meet the required curriculum goals
(Connor, 2011).
Stage 3:
Conclusion
How will you draw the
lesson ideas together
so that the students
can evaluate what
they have learnt?
How will you prepare
the students for the
next task?
10
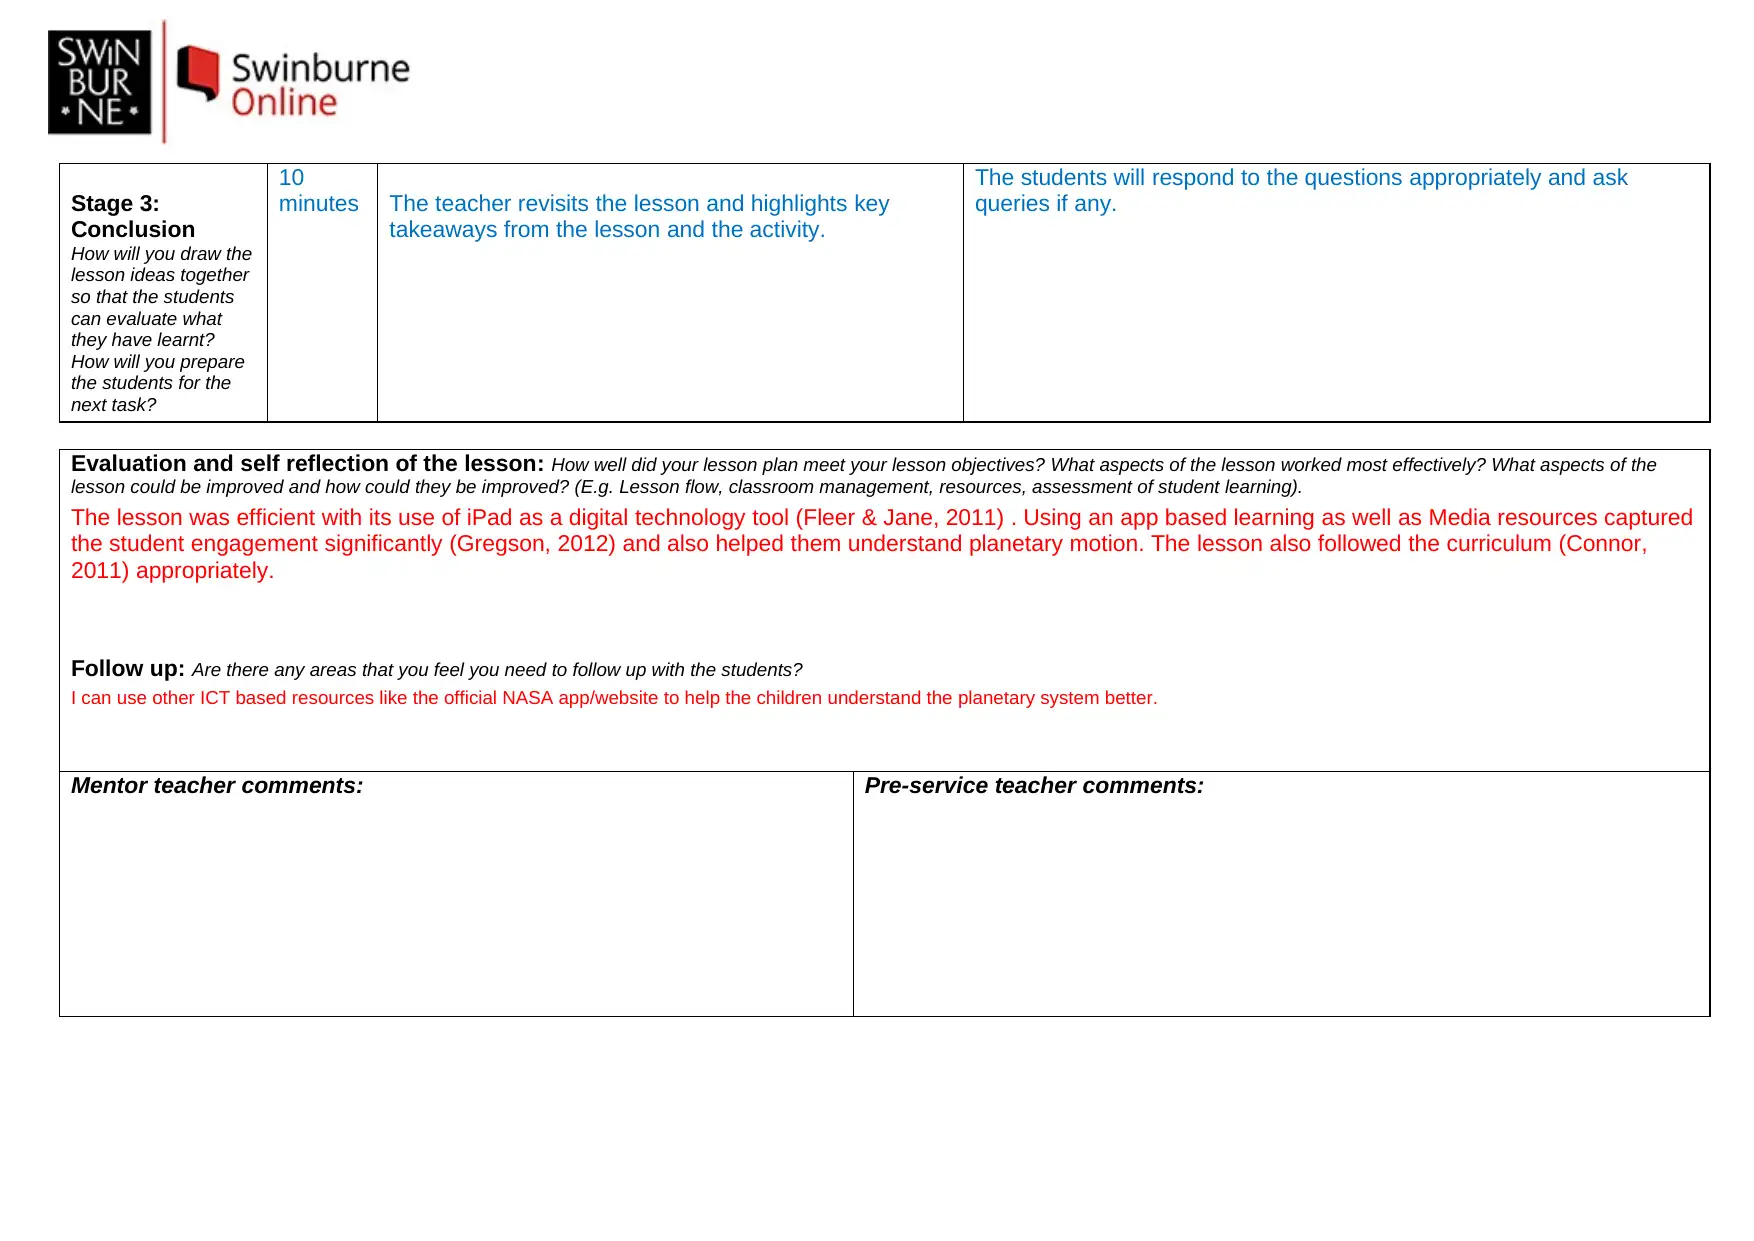
minutes The teacher revisits the lesson and highlights key
takeaways from the lesson and the activity.
The students will respond to the questions appropriately and ask
queries if any.
Evaluation and self reflection of the lesson: How well did your lesson plan meet your lesson objectives? What aspects of the lesson worked most effectively? What aspects of the
lesson could be improved and how could they be improved? (E.g. Lesson flow, classroom management, resources, assessment of student learning).
The lesson was efficient with its use of iPad as a digital technology tool (Fleer & Jane, 2011) . Using an app based learning as well as Media resources captured
the student engagement significantly (Gregson, 2012) and also helped them understand planetary motion. The lesson also followed the curriculum (Connor,
2011) appropriately.
Follow up: Are there any areas that you feel you need to follow up with the students?
I can use other ICT based resources like the official NASA app/website to help the children understand the planetary system better.
Mentor teacher comments: Pre-service teacher comments:
References.
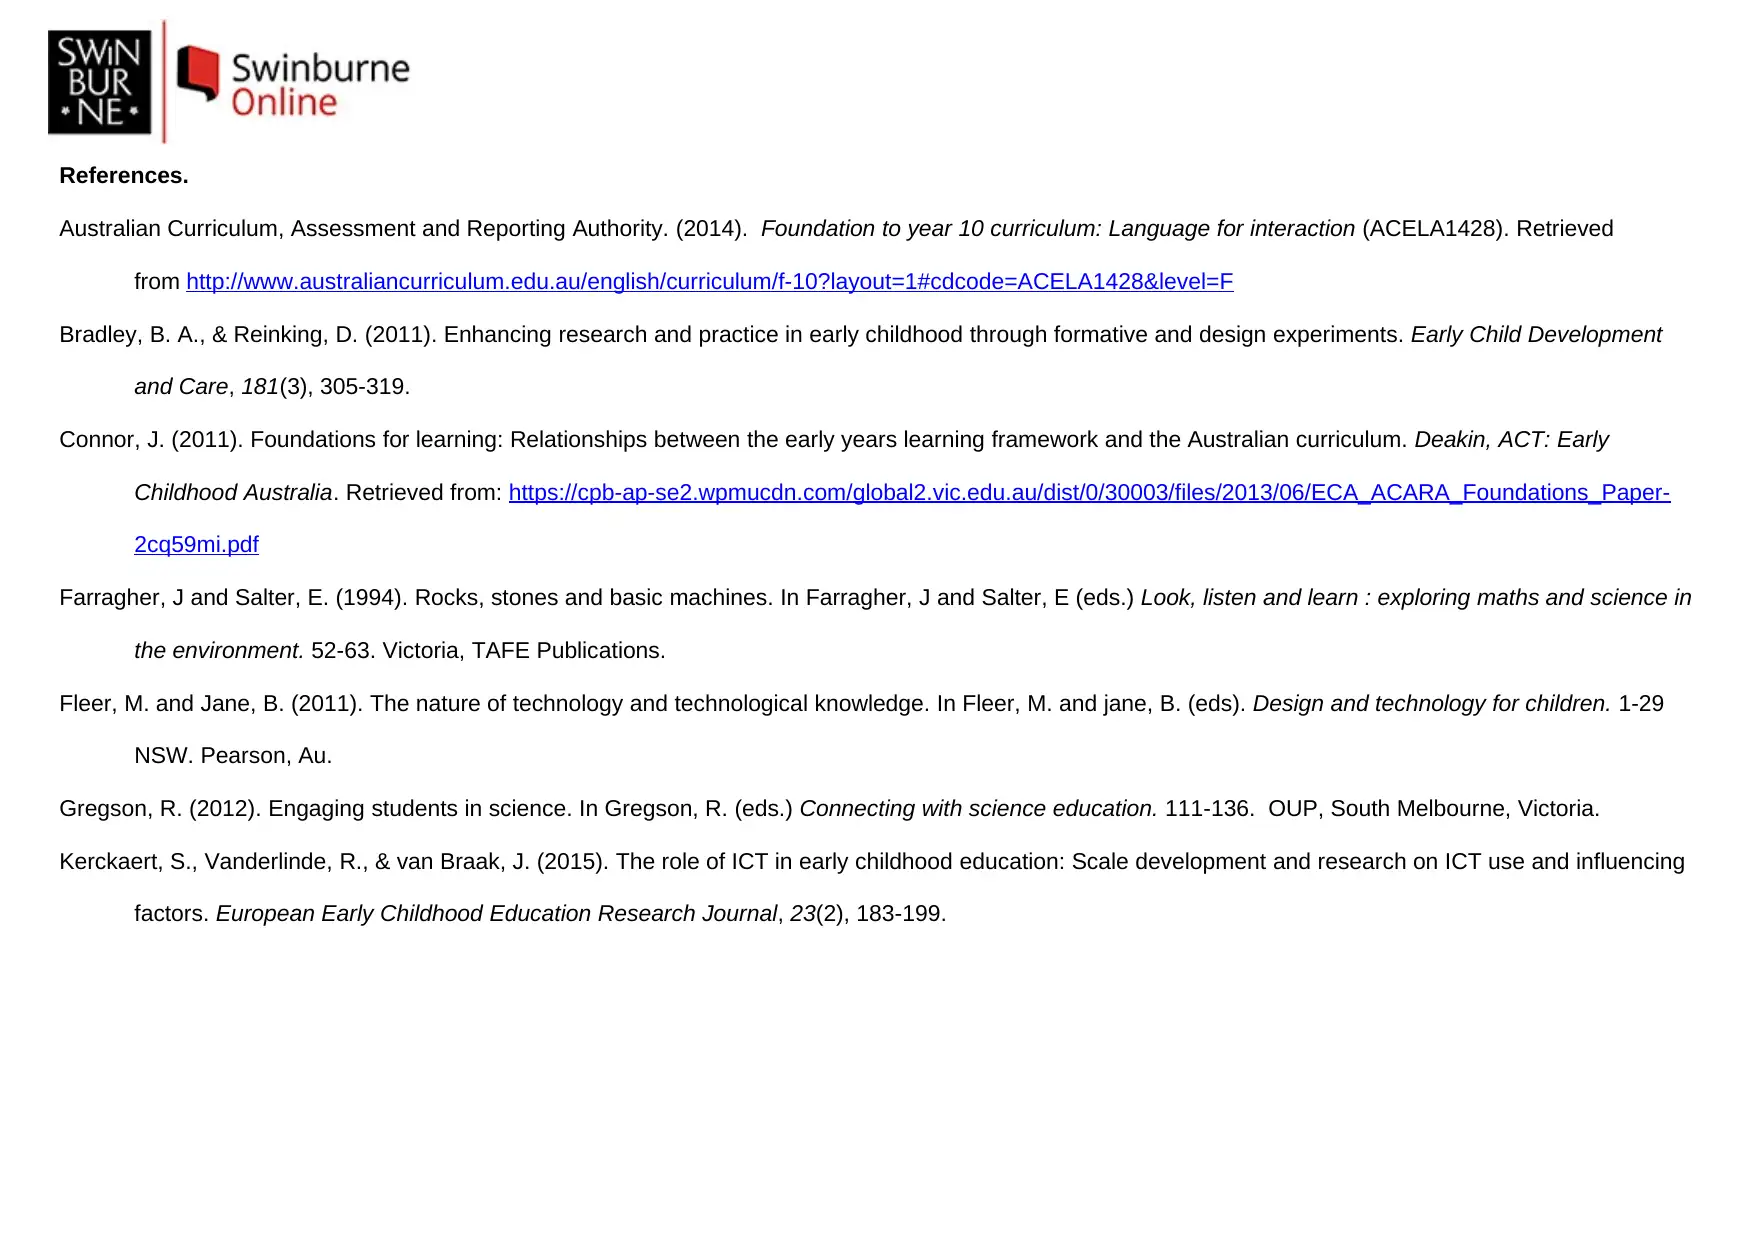
Australian Curriculum, Assessment and Reporting Authority. (2014). Foundation to year 10 curriculum: Language for interaction (ACELA1428). Retrieved
from http://www.australiancurriculum.edu.au/english/curriculum/f-10?layout=1#cdcode=ACELA1428&level=F
Bradley, B. A., & Reinking, D. (2011). Enhancing research and practice in early childhood through formative and design experiments. Early Child Development
and Care, 181(3), 305-319.
Connor, J. (2011). Foundations for learning: Relationships between the early years learning framework and the Australian curriculum. Deakin, ACT: Early
Childhood Australia. Retrieved from: https://cpb-ap-se2.wpmucdn.com/global2.vic.edu.au/dist/0/30003/files/2013/06/ECA_ACARA_Foundations_Paper-
2cq59mi.pdf
Farragher, J and Salter, E. (1994). Rocks, stones and basic machines. In Farragher, J and Salter, E (eds.) Look, listen and learn : exploring maths and science in
the environment. 52-63. Victoria, TAFE Publications.
Fleer, M. and Jane, B. (2011). The nature of technology and technological knowledge. In Fleer, M. and jane, B. (eds). Design and technology for children. 1-29
NSW. Pearson, Au.
Gregson, R. (2012). Engaging students in science. In Gregson, R. (eds.) Connecting with science education. 111-136. OUP, South Melbourne, Victoria.
Kerckaert, S., Vanderlinde, R., & van Braak, J. (2015). The role of ICT in early childhood education: Scale development and research on ICT use and influencing
factors. European Early Childhood Education Research Journal, 23(2), 183-199.
1 out of 7
Your All-in-One AI-Powered Toolkit for Academic Success.
+13062052269
info@desklib.com
Available 24*7 on WhatsApp / Email
![[object Object]](/_next/static/media/star-bottom.7253800d.svg)
Unlock your academic potential
© 2024 | Zucol Services PVT LTD | All rights reserved.


