Object Oriented Programming: Advanced Scientific Calculator Design and Implementation
VerifiedAdded on 2024/04/25
|57
|6282
|499
AI Summary
This report explores the principles, features, and implementation of object-oriented programming through the design and development of an advanced scientific calculator using Microsoft Visual Studio IDE. It covers UML class diagrams, testing scenarios, and user feedback.
Contribute Materials
Your contribution can guide someone’s learning journey. Share your
documents today.
Object Oriented Programming
1
1
Secure Best Marks with AI Grader
Need help grading? Try our AI Grader for instant feedback on your assignments.
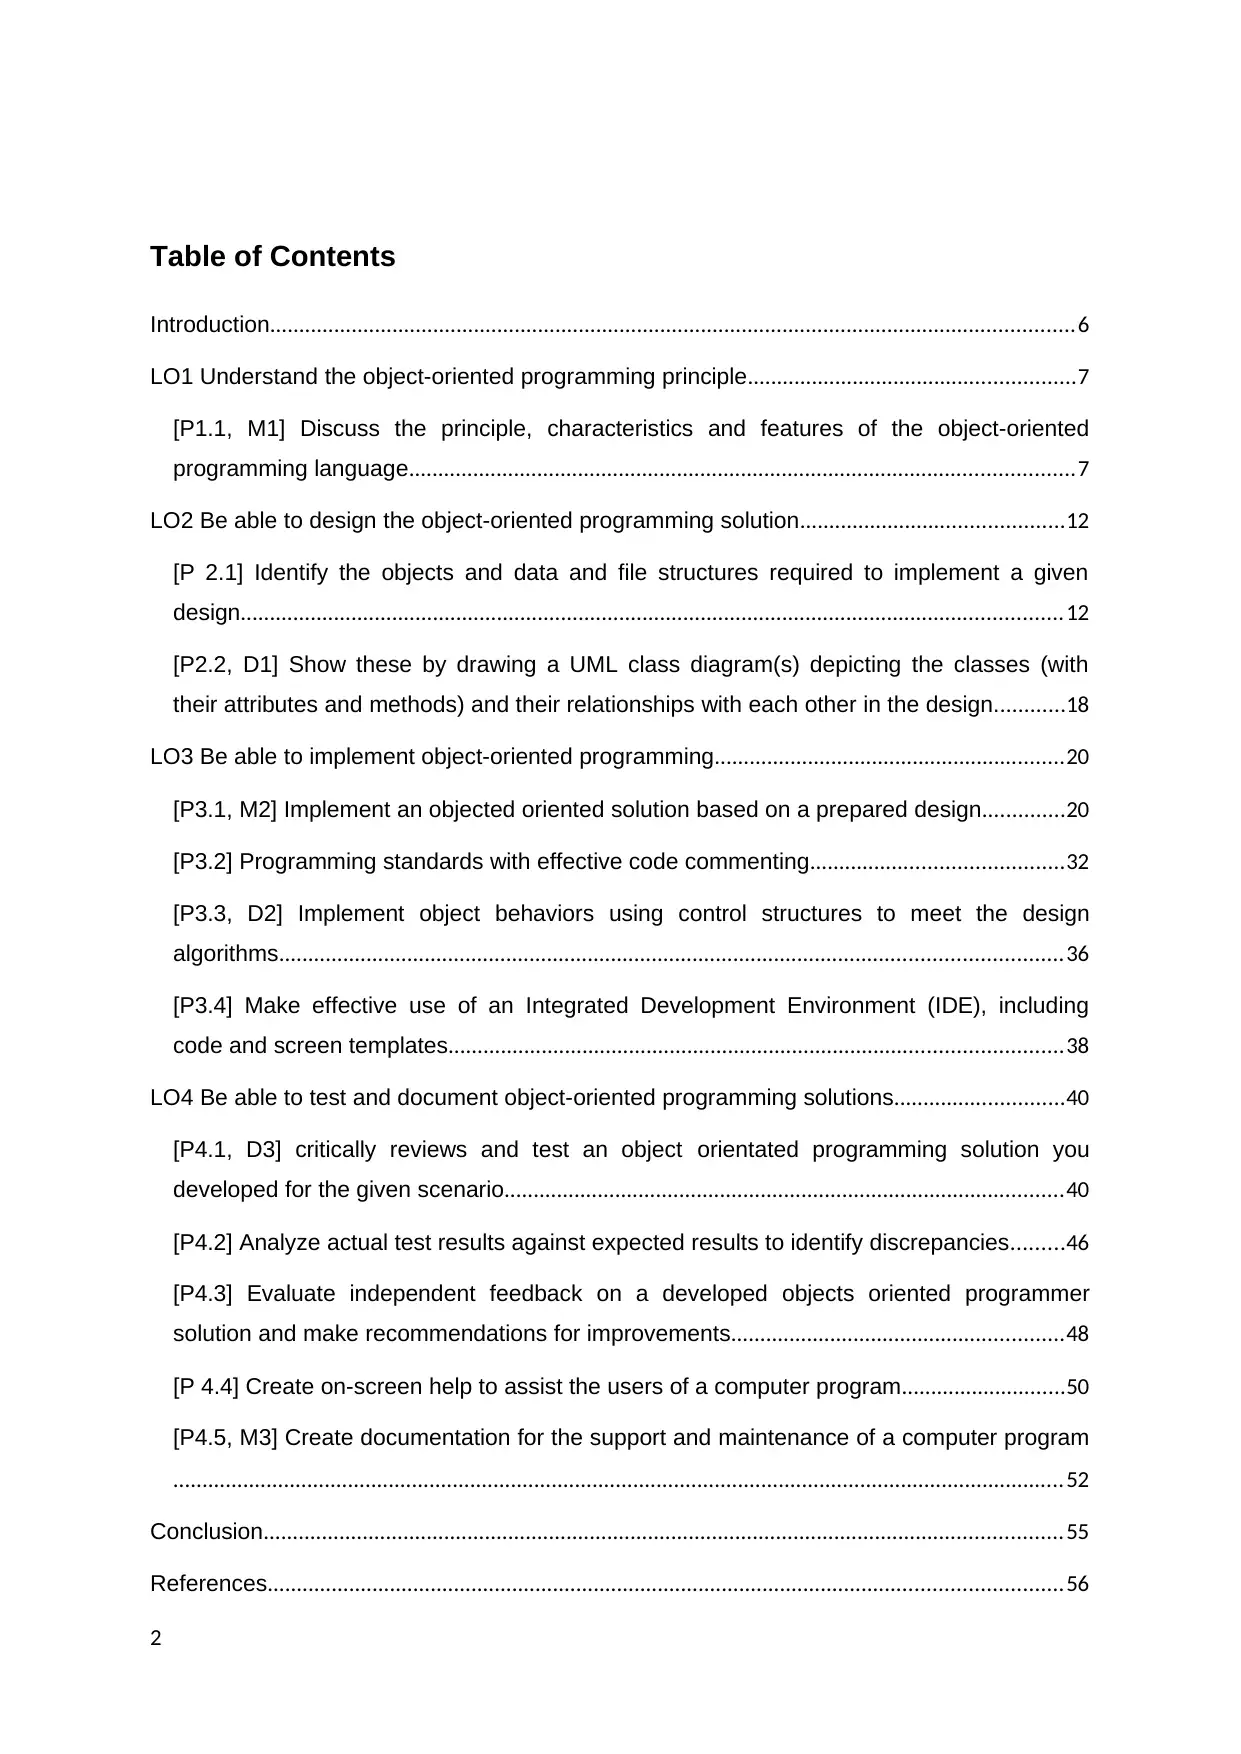
Table of Contents
Introduction..........................................................................................................................................6
LO1 Understand the object-oriented programming principle........................................................7
[P1.1, M1] Discuss the principle, characteristics and features of the object-oriented
programming language..................................................................................................................7
LO2 Be able to design the object-oriented programming solution.............................................12
[P 2.1] Identify the objects and data and file structures required to implement a given
design.............................................................................................................................................12
[P2.2, D1] Show these by drawing a UML class diagram(s) depicting the classes (with
their attributes and methods) and their relationships with each other in the design............18
LO3 Be able to implement object-oriented programming............................................................20
[P3.1, M2] Implement an objected oriented solution based on a prepared design..............20
[P3.2] Programming standards with effective code commenting...........................................32
[P3.3, D2] Implement object behaviors using control structures to meet the design
algorithms......................................................................................................................................36
[P3.4] Make effective use of an Integrated Development Environment (IDE), including
code and screen templates.........................................................................................................38
LO4 Be able to test and document object-oriented programming solutions.............................40
[P4.1, D3] critically reviews and test an object orientated programming solution you
developed for the given scenario................................................................................................40
[P4.2] Analyze actual test results against expected results to identify discrepancies.........46
[P4.3] Evaluate independent feedback on a developed objects oriented programmer
solution and make recommendations for improvements.........................................................48
[P 4.4] Create on-screen help to assist the users of a computer program............................50
[P4.5, M3] Create documentation for the support and maintenance of a computer program
.........................................................................................................................................................52
Conclusion.........................................................................................................................................55
References........................................................................................................................................56
2
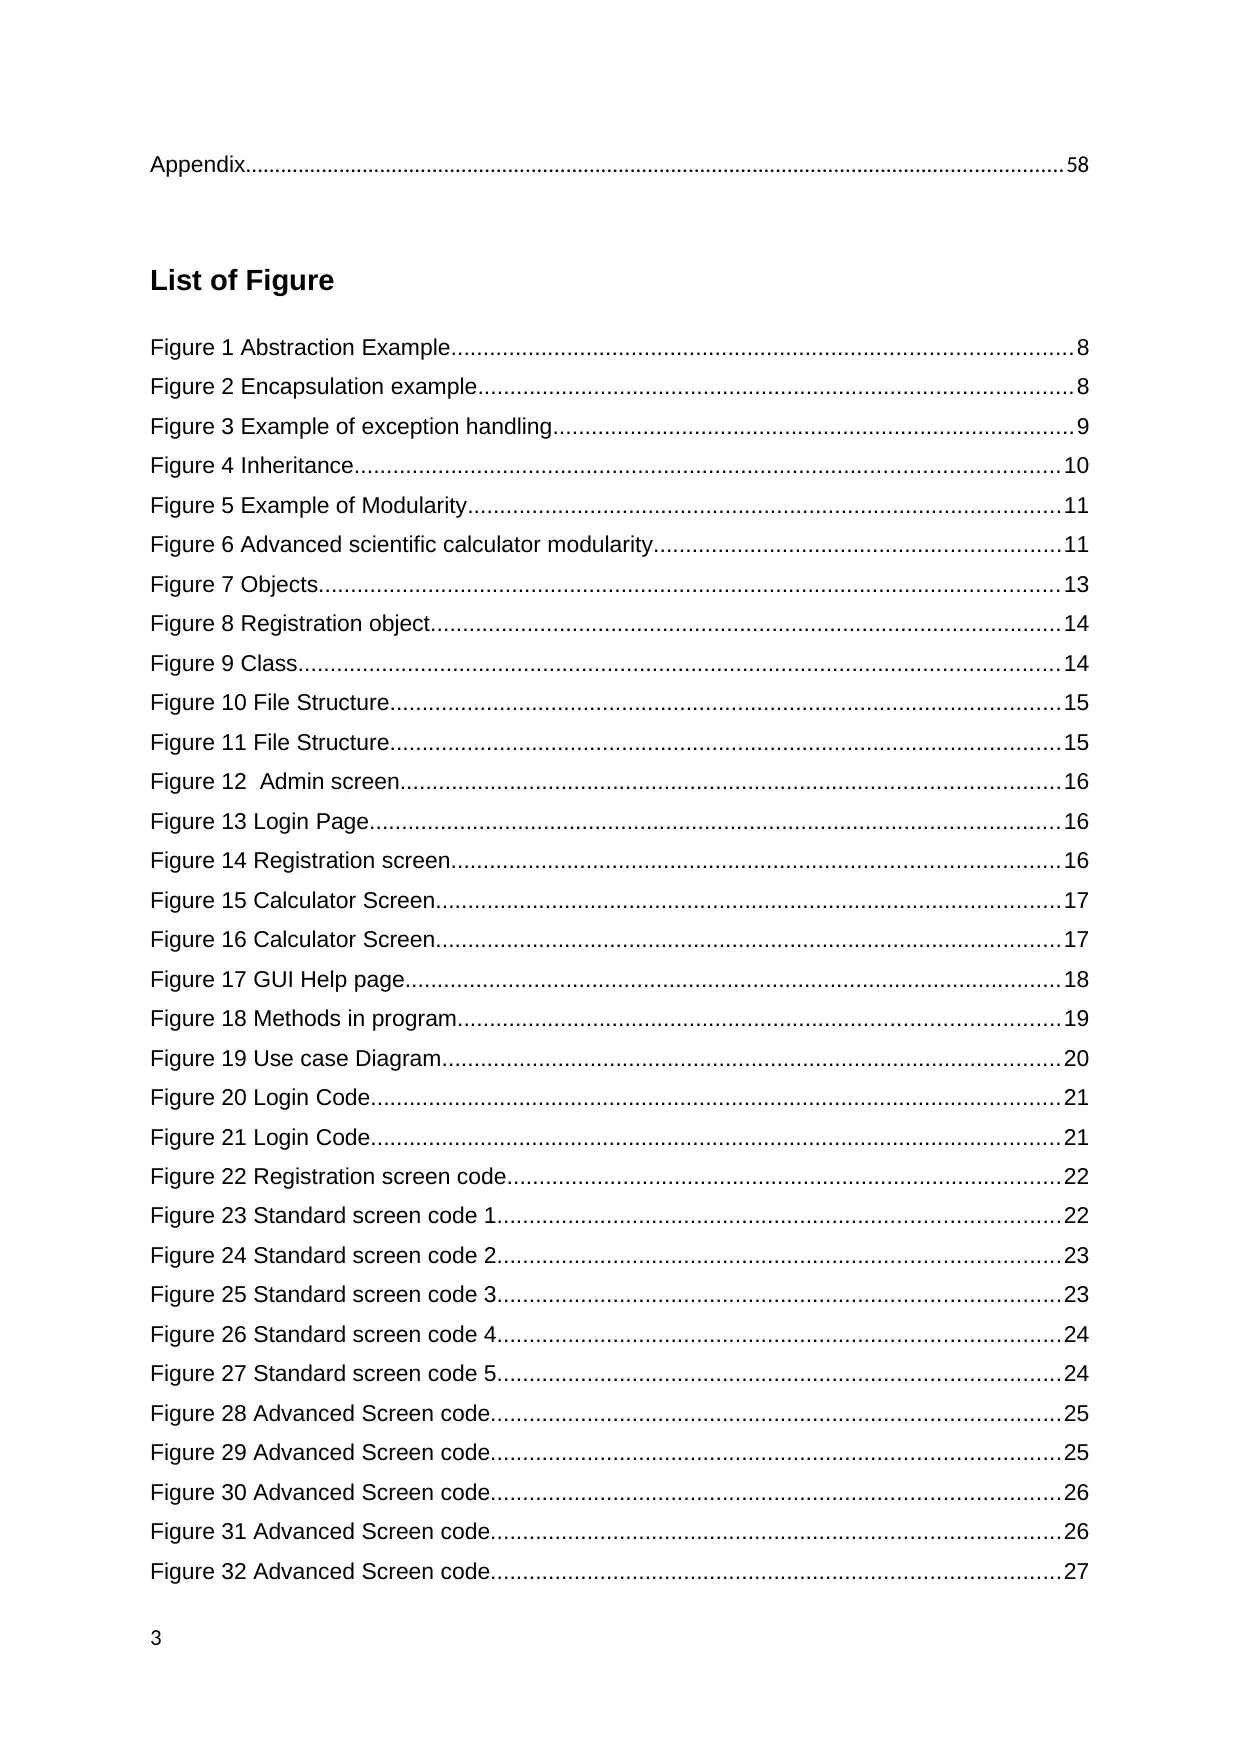
Appendix............................................................................................................................................58
List of Figure
Figure 1 Abstraction Example................................................................................................8
Figure 2 Encapsulation example............................................................................................8
Figure 3 Example of exception handling.................................................................................9
Figure 4 Inheritance.............................................................................................................10
Figure 5 Example of Modularity............................................................................................11
Figure 6 Advanced scientific calculator modularity...............................................................11
Figure 7 Objects................................................................................................................... 13
Figure 8 Registration object..................................................................................................14
Figure 9 Class...................................................................................................................... 14
Figure 10 File Structure........................................................................................................15
Figure 11 File Structure........................................................................................................15
Figure 12 Admin screen......................................................................................................16
Figure 13 Login Page........................................................................................................... 16
Figure 14 Registration screen..............................................................................................16
Figure 15 Calculator Screen.................................................................................................17
Figure 16 Calculator Screen.................................................................................................17
Figure 17 GUI Help page......................................................................................................18
Figure 18 Methods in program.............................................................................................19
Figure 19 Use case Diagram................................................................................................20
Figure 20 Login Code...........................................................................................................21
Figure 21 Login Code...........................................................................................................21
Figure 22 Registration screen code......................................................................................22
Figure 23 Standard screen code 1.......................................................................................22
Figure 24 Standard screen code 2.......................................................................................23
Figure 25 Standard screen code 3.......................................................................................23
Figure 26 Standard screen code 4.......................................................................................24
Figure 27 Standard screen code 5.......................................................................................24
Figure 28 Advanced Screen code........................................................................................25
Figure 29 Advanced Screen code........................................................................................25
Figure 30 Advanced Screen code........................................................................................26
Figure 31 Advanced Screen code........................................................................................26
Figure 32 Advanced Screen code........................................................................................27
3
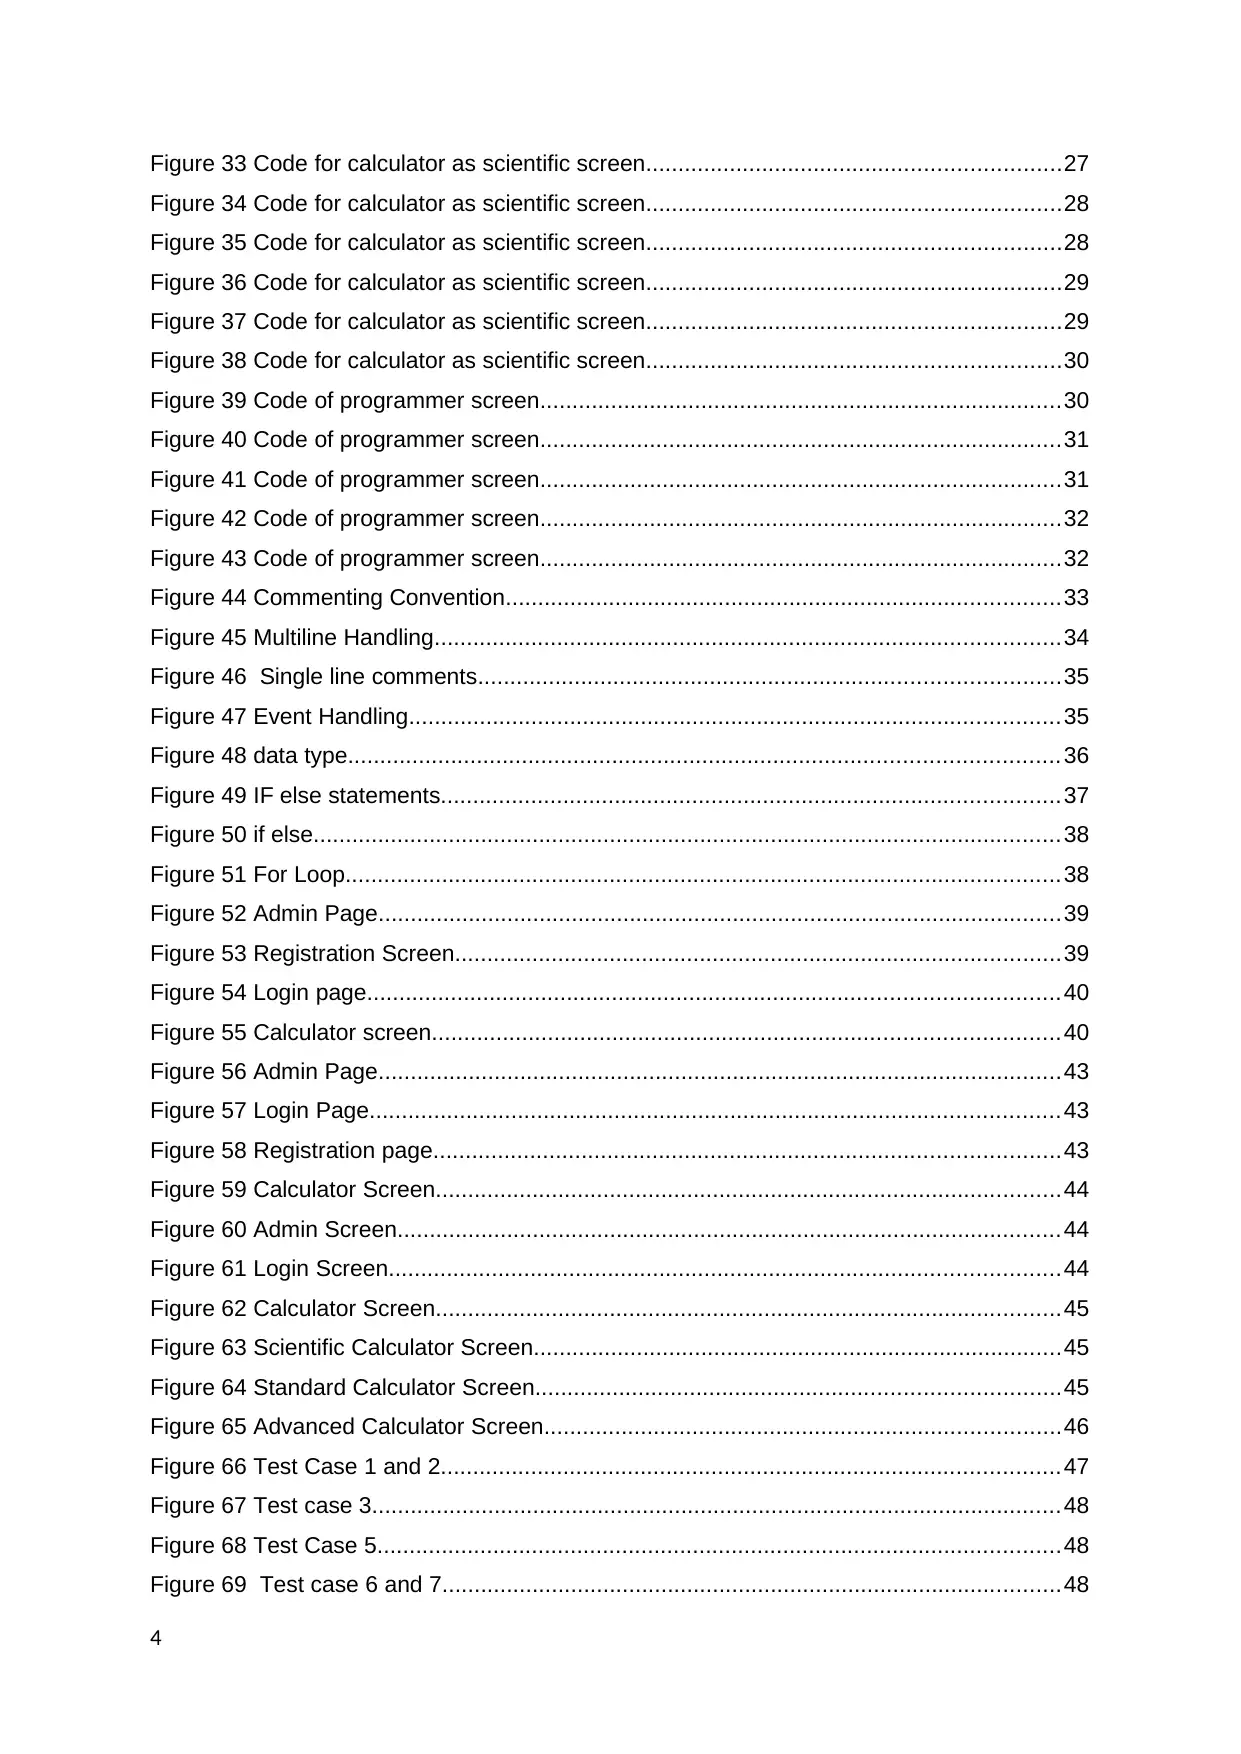
Figure 33 Code for calculator as scientific screen................................................................27
Figure 34 Code for calculator as scientific screen................................................................28
Figure 35 Code for calculator as scientific screen................................................................28
Figure 36 Code for calculator as scientific screen................................................................29
Figure 37 Code for calculator as scientific screen................................................................29
Figure 38 Code for calculator as scientific screen................................................................30
Figure 39 Code of programmer screen.................................................................................30
Figure 40 Code of programmer screen.................................................................................31
Figure 41 Code of programmer screen.................................................................................31
Figure 42 Code of programmer screen.................................................................................32
Figure 43 Code of programmer screen.................................................................................32
Figure 44 Commenting Convention......................................................................................33
Figure 45 Multiline Handling.................................................................................................34
Figure 46 Single line comments..........................................................................................35
Figure 47 Event Handling.....................................................................................................35
Figure 48 data type.............................................................................................................. 36
Figure 49 IF else statements................................................................................................37
Figure 50 if else....................................................................................................................38
Figure 51 For Loop...............................................................................................................38
Figure 52 Admin Page..........................................................................................................39
Figure 53 Registration Screen..............................................................................................39
Figure 54 Login page...........................................................................................................40
Figure 55 Calculator screen.................................................................................................40
Figure 56 Admin Page..........................................................................................................43
Figure 57 Login Page........................................................................................................... 43
Figure 58 Registration page.................................................................................................43
Figure 59 Calculator Screen.................................................................................................44
Figure 60 Admin Screen.......................................................................................................44
Figure 61 Login Screen........................................................................................................44
Figure 62 Calculator Screen.................................................................................................45
Figure 63 Scientific Calculator Screen..................................................................................45
Figure 64 Standard Calculator Screen.................................................................................45
Figure 65 Advanced Calculator Screen................................................................................46
Figure 66 Test Case 1 and 2................................................................................................47
Figure 67 Test case 3...........................................................................................................48
Figure 68 Test Case 5..........................................................................................................48
Figure 69 Test case 6 and 7................................................................................................48
4
Secure Best Marks with AI Grader
Need help grading? Try our AI Grader for instant feedback on your assignments.
Figure 70 Online Help screen...............................................................................................51
Figure 71 Login Help Screen................................................................................................52
Figure 72 Registration Screen..............................................................................................53
Figure 73 Login Screen........................................................................................................53
Figure 74 Admin Screen.......................................................................................................54
Figure 75 Calculator Screen.................................................................................................54
Figure 76 Calculator screen with programmer module.........................................................54
Figure 77 Scientific calculator screen...................................................................................55
5
Introduction
This report presents the advanced scientific calculator that solves the various operations of
mathematics such as standard problem, advance problems, scientific problems and
programmer problems. The calculator is developed by using the Microsoft visual studio IDLE
and to understand the program, I will design the UML class diagram and use diagram. This
report is divided into four sections where the first part is discussing the features, principle,
and characteristics of the object-oriented programming language. The second part of this
report discusses the object-oriented programming advantages and used program class, the
object as methods and other principles like inheritance and error handling etc. The third part
of this report presents the implementation of the advanced scientific calculator and in four-
part, I will prepare the test scenario to test the application according to given user and
system requirements.
6
LO1 Understand the object-oriented programming principle
[P1.1, M1] Discuss the principle, characteristics and features of the
object-oriented programming language
Features of the object-oriented programming language
The object-oriented programming language has followed the concept of the objects where
objects are referred to the procedures and attributes. The Opps mainly focus on the data
and objects for taking or implementing action by the application. Object-Oriented
Programming is a software design that is related with the conception, of course, thing and
different other concepts turning around this binary similar, similar to inheritance,
polymorphism, abstraction, encapsulation etc. now, we discuss the various concept of the
object-oriented programming:
Currently, let us converse selected of the foremost features of OOPS which we will be using
in C++ (exactly): Objects, Classes, Abstraction, Encapsulation, Inheritance, Overloading and
Exception handling
1. Objects: - Objects are the simple unit of OOP. They are examples of discussion,
which have facts associates and uses of much associate function to complete
responsibilities.
Here, I have presents the objects that are used in a program that is developed for
calculator application:
2. Class: It is comparable to the arrangement in C verbal. The class can likewise be
sharp as operator sharp facts category but it similarly contains occupations in this
one. The class contains the three main components of the program such as name,
attributes, and methods (Exforsys, 2006).
Here, I have presents the classes that are used in a program that is developed for
calculator application:
Principle and characteristics of the Object-oriented programming language
There are various principles of the object-oriented language which is followed by the
programming to develop an application. Let discuss the principle of the object-oriented
programming language:
7
Paraphrase This Document
Need a fresh take? Get an instant paraphrase of this document with our AI Paraphraser
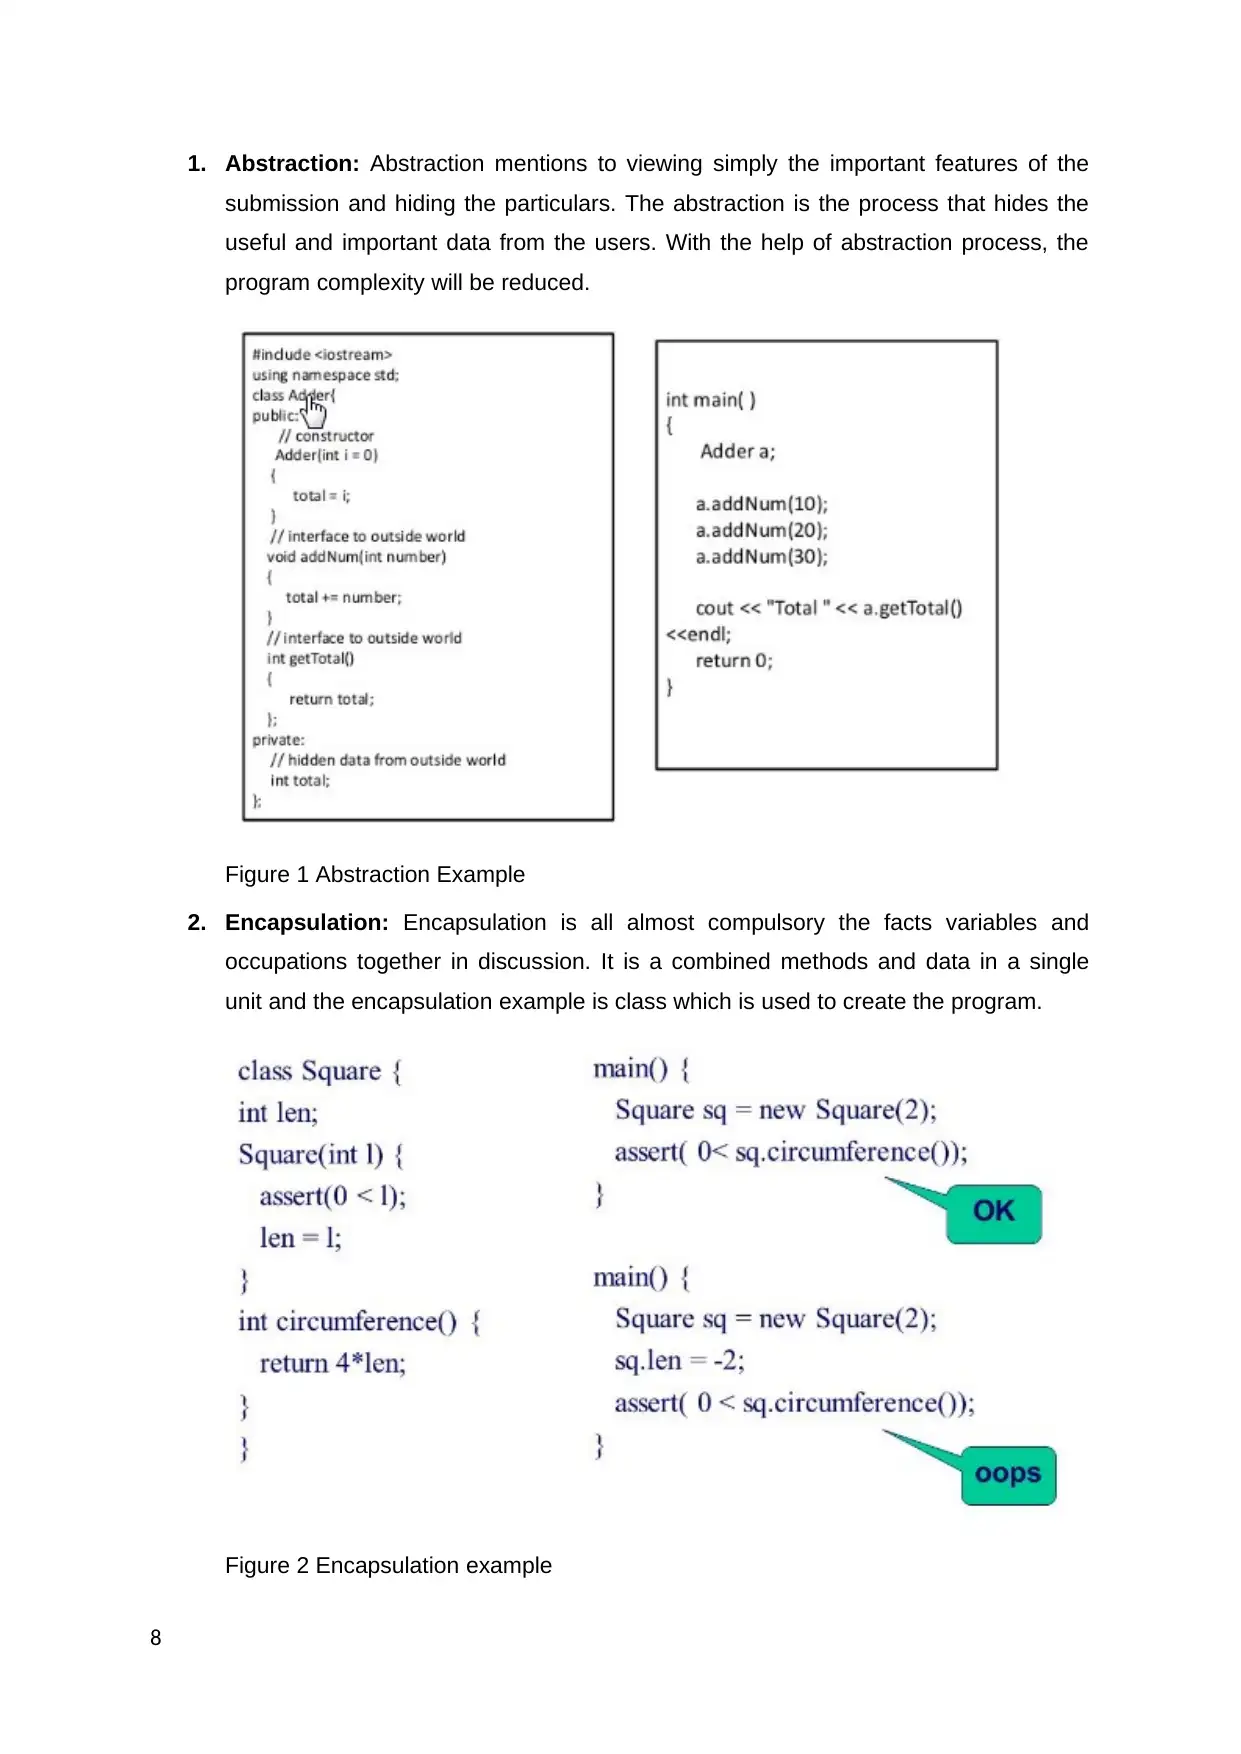
1. Abstraction: Abstraction mentions to viewing simply the important features of the
submission and hiding the particulars. The abstraction is the process that hides the
useful and important data from the users. With the help of abstraction process, the
program complexity will be reduced.
Figure 1 Abstraction Example
2. Encapsulation: Encapsulation is all almost compulsory the facts variables and
occupations together in discussion. It is a combined methods and data in a single
unit and the encapsulation example is class which is used to create the program.
Figure 2 Encapsulation example
8
3. Inheritance: Inheritance is a method to reprocess formerly printed program all over
again. It is the important feature in the object-oriented programming language that
presents the hierarchy of the class and improves the designed code. The inheritance
is divided into several types that are given as a multilevel inheritance, hierarchal
inheritance, single level inheritance, and hybrid.
4. Polymorphism: It’s a feature, which occupancies with similar designation but
changed instructions, and it is the two-word combination. The polymorphism is
implemented in both cases dynamic and static case. It is categorized into two types:
Compile time & run time and Overloading & overriding (Microsoft, 2015).
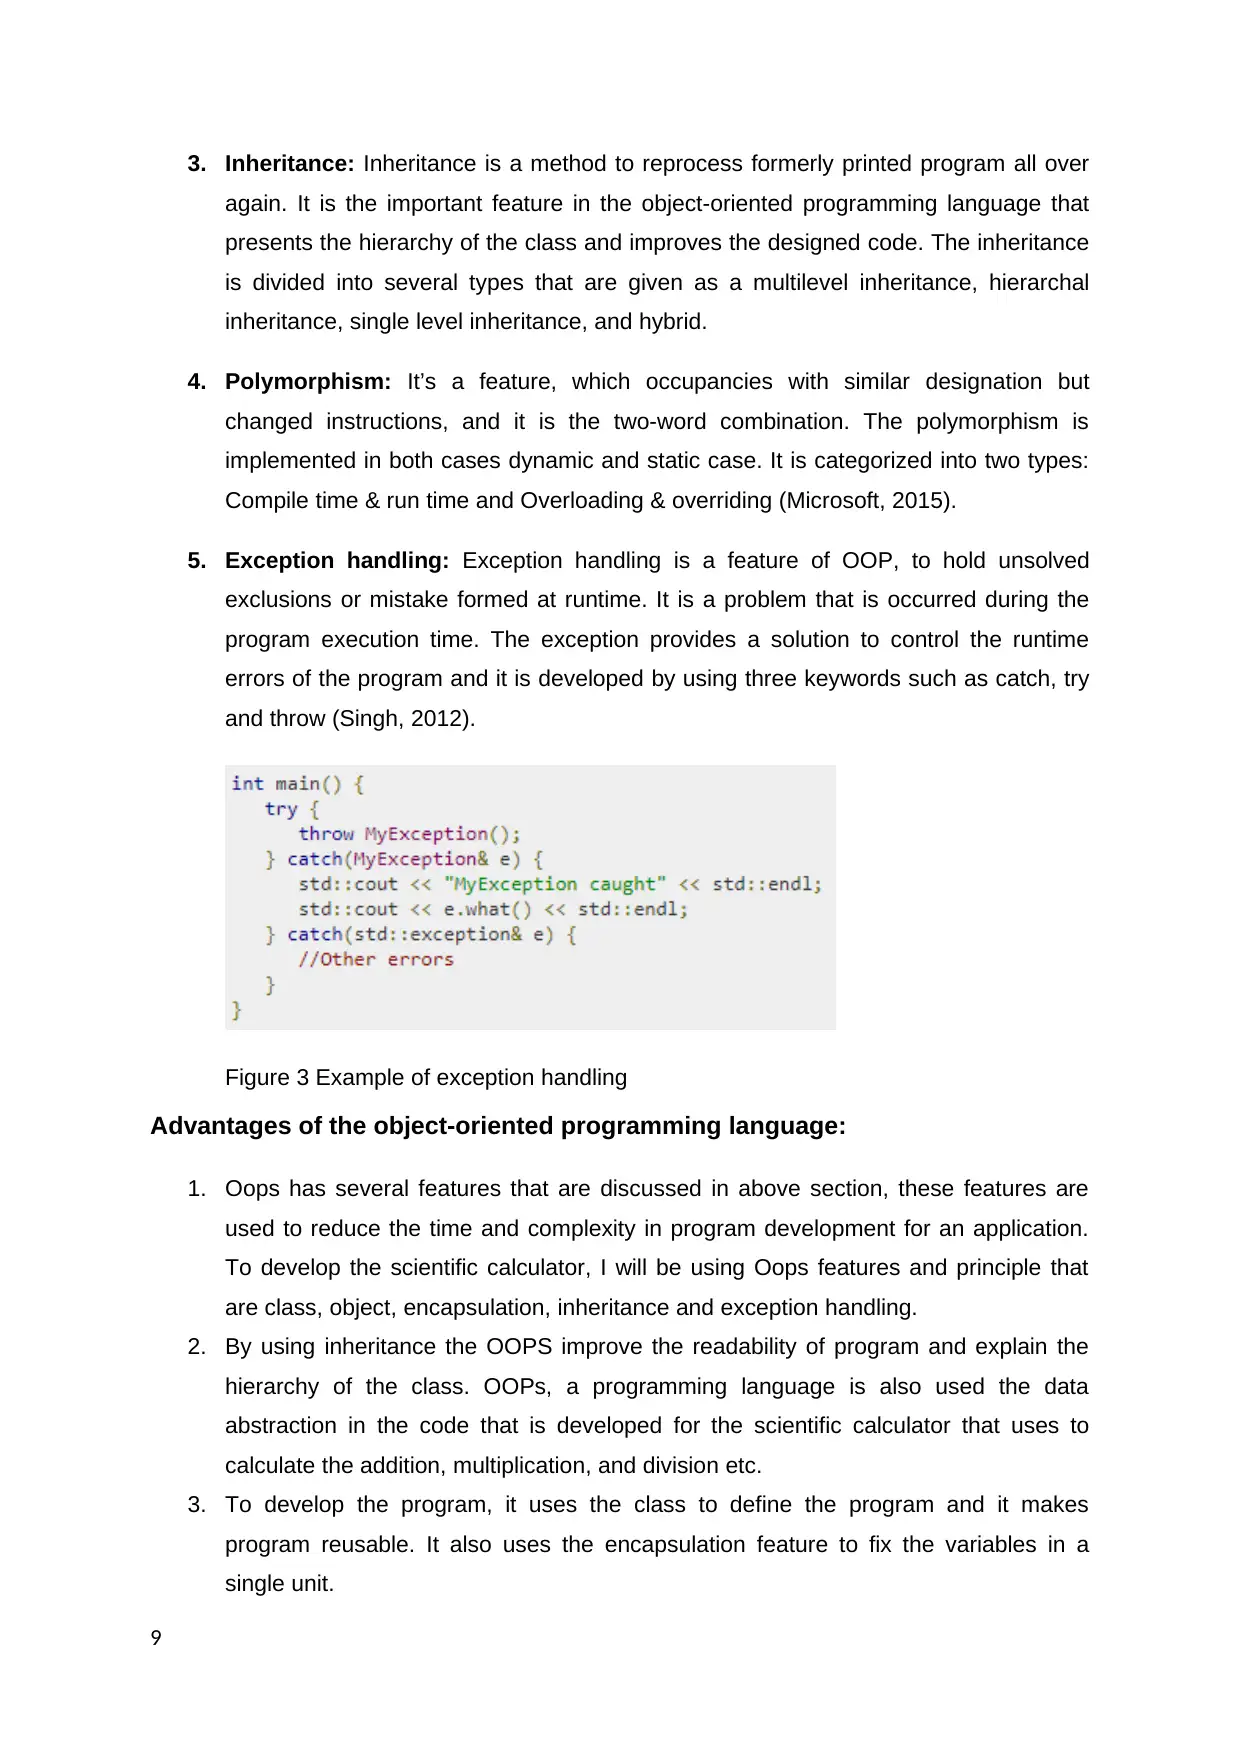
5. Exception handling: Exception handling is a feature of OOP, to hold unsolved
exclusions or mistake formed at runtime. It is a problem that is occurred during the
program execution time. The exception provides a solution to control the runtime
errors of the program and it is developed by using three keywords such as catch, try
and throw (Singh, 2012).
Figure 3 Example of exception handling
Advantages of the object-oriented programming language:
1. Oops has several features that are discussed in above section, these features are
used to reduce the time and complexity in program development for an application.
To develop the scientific calculator, I will be using Oops features and principle that
are class, object, encapsulation, inheritance and exception handling.
2. By using inheritance the OOPS improve the readability of program and explain the
hierarchy of the class. OOPs, a programming language is also used the data
abstraction in the code that is developed for the scientific calculator that uses to
calculate the addition, multiplication, and division etc.
3. To develop the program, it uses the class to define the program and it makes
program reusable. It also uses the encapsulation feature to fix the variables in a
single unit.
9
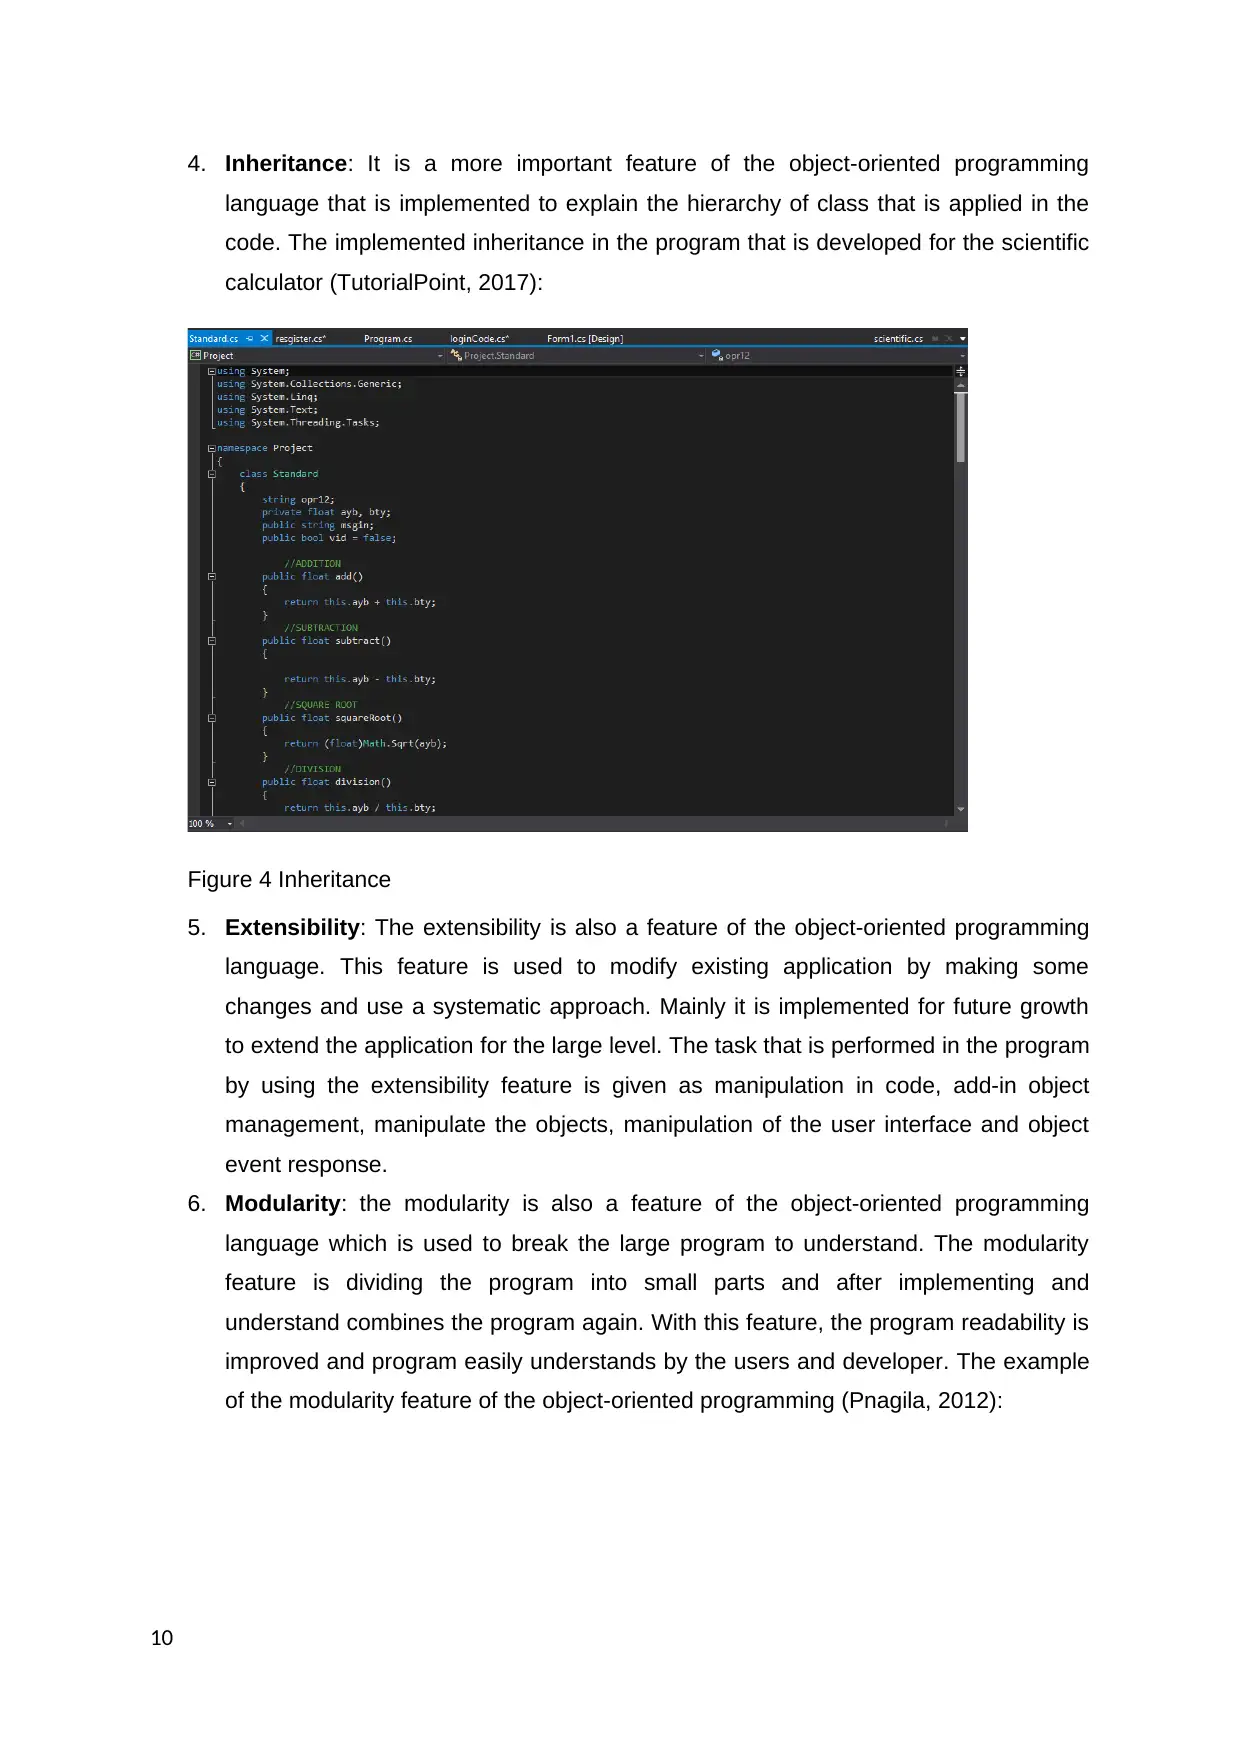
4. Inheritance: It is a more important feature of the object-oriented programming
language that is implemented to explain the hierarchy of class that is applied in the
code. The implemented inheritance in the program that is developed for the scientific
calculator (TutorialPoint, 2017):
Figure 4 Inheritance
5. Extensibility: The extensibility is also a feature of the object-oriented programming
language. This feature is used to modify existing application by making some
changes and use a systematic approach. Mainly it is implemented for future growth
to extend the application for the large level. The task that is performed in the program
by using the extensibility feature is given as manipulation in code, add-in object
management, manipulate the objects, manipulation of the user interface and object
event response.
6. Modularity: the modularity is also a feature of the object-oriented programming
language which is used to break the large program to understand. The modularity
feature is dividing the program into small parts and after implementing and
understand combines the program again. With this feature, the program readability is
improved and program easily understands by the users and developer. The example
of the modularity feature of the object-oriented programming (Pnagila, 2012):
10
Secure Best Marks with AI Grader
Need help grading? Try our AI Grader for instant feedback on your assignments.
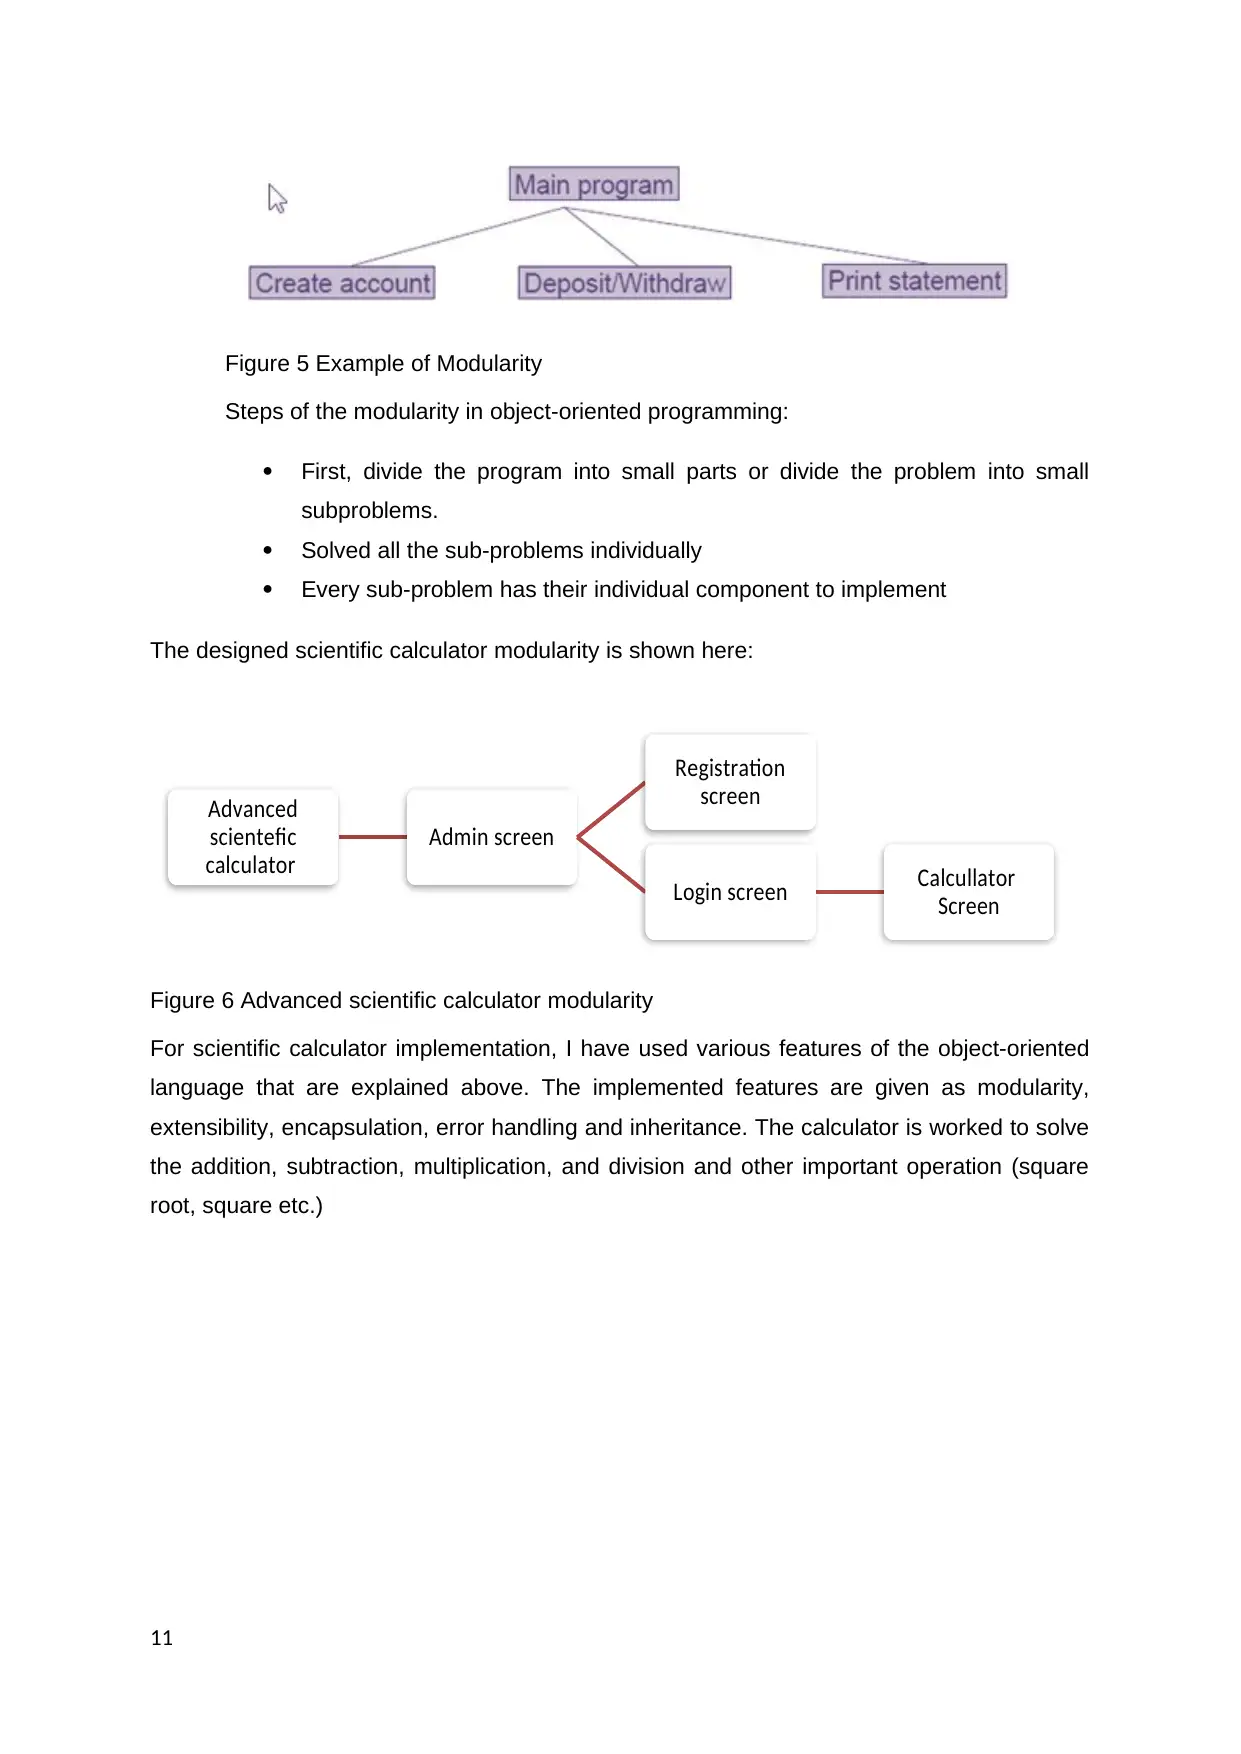
Figure 5 Example of Modularity
Steps of the modularity in object-oriented programming:
First, divide the program into small parts or divide the problem into small
subproblems.
Solved all the sub-problems individually
Every sub-problem has their individual component to implement
The designed scientific calculator modularity is shown here:
Figure 6 Advanced scientific calculator modularity
For scientific calculator implementation, I have used various features of the object-oriented
language that are explained above. The implemented features are given as modularity,
extensibility, encapsulation, error handling and inheritance. The calculator is worked to solve
the addition, subtraction, multiplication, and division and other important operation (square
root, square etc.)
11
Advanced
scientefic
calculator
Admin screen
Registration
screen
Login screen Calcullator
Screen
LO2 Be able to design the object-oriented programming solution
[P 2.1] Identify the objects and data and file structures required to
implement a given design
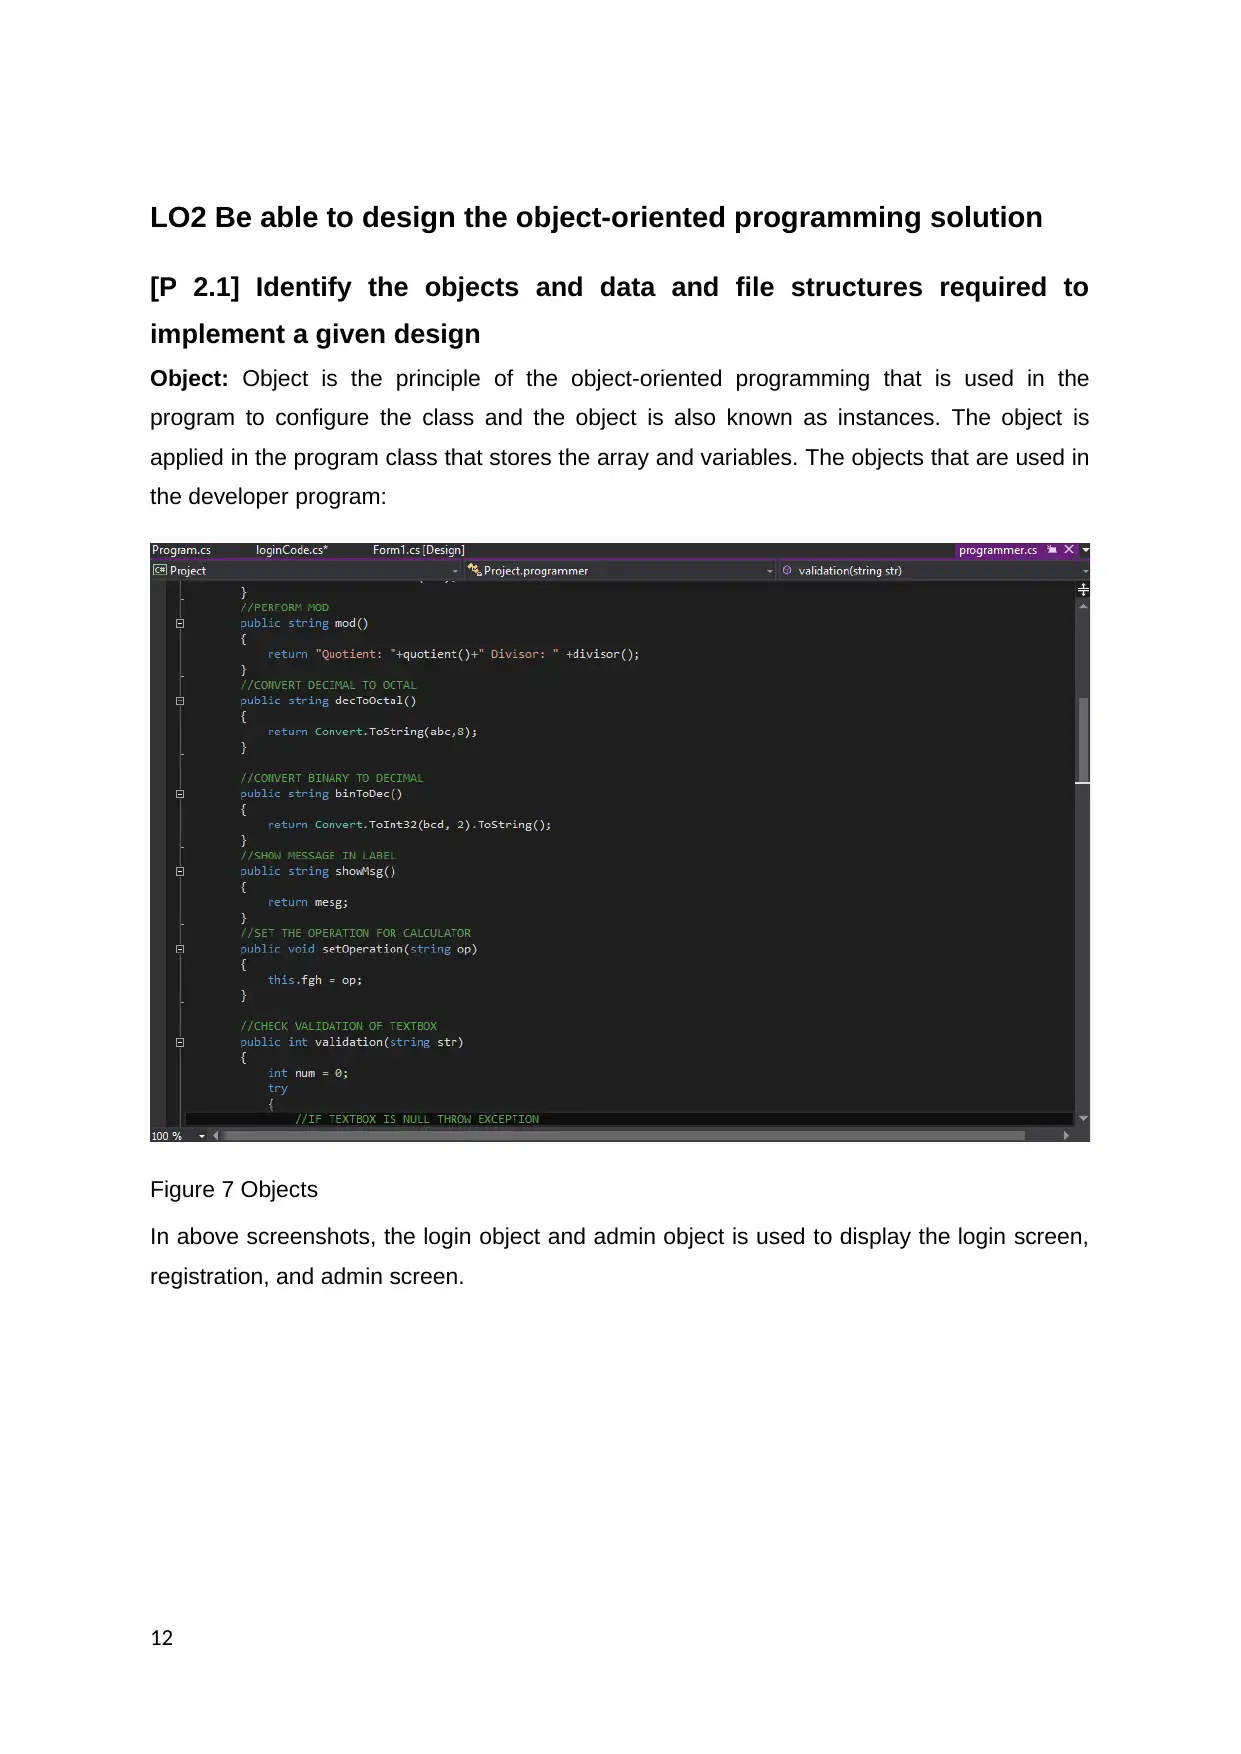
Object: Object is the principle of the object-oriented programming that is used in the
program to configure the class and the object is also known as instances. The object is
applied in the program class that stores the array and variables. The objects that are used in
the developer program:
Figure 7 Objects
In above screenshots, the login object and admin object is used to display the login screen,
registration, and admin screen.
12
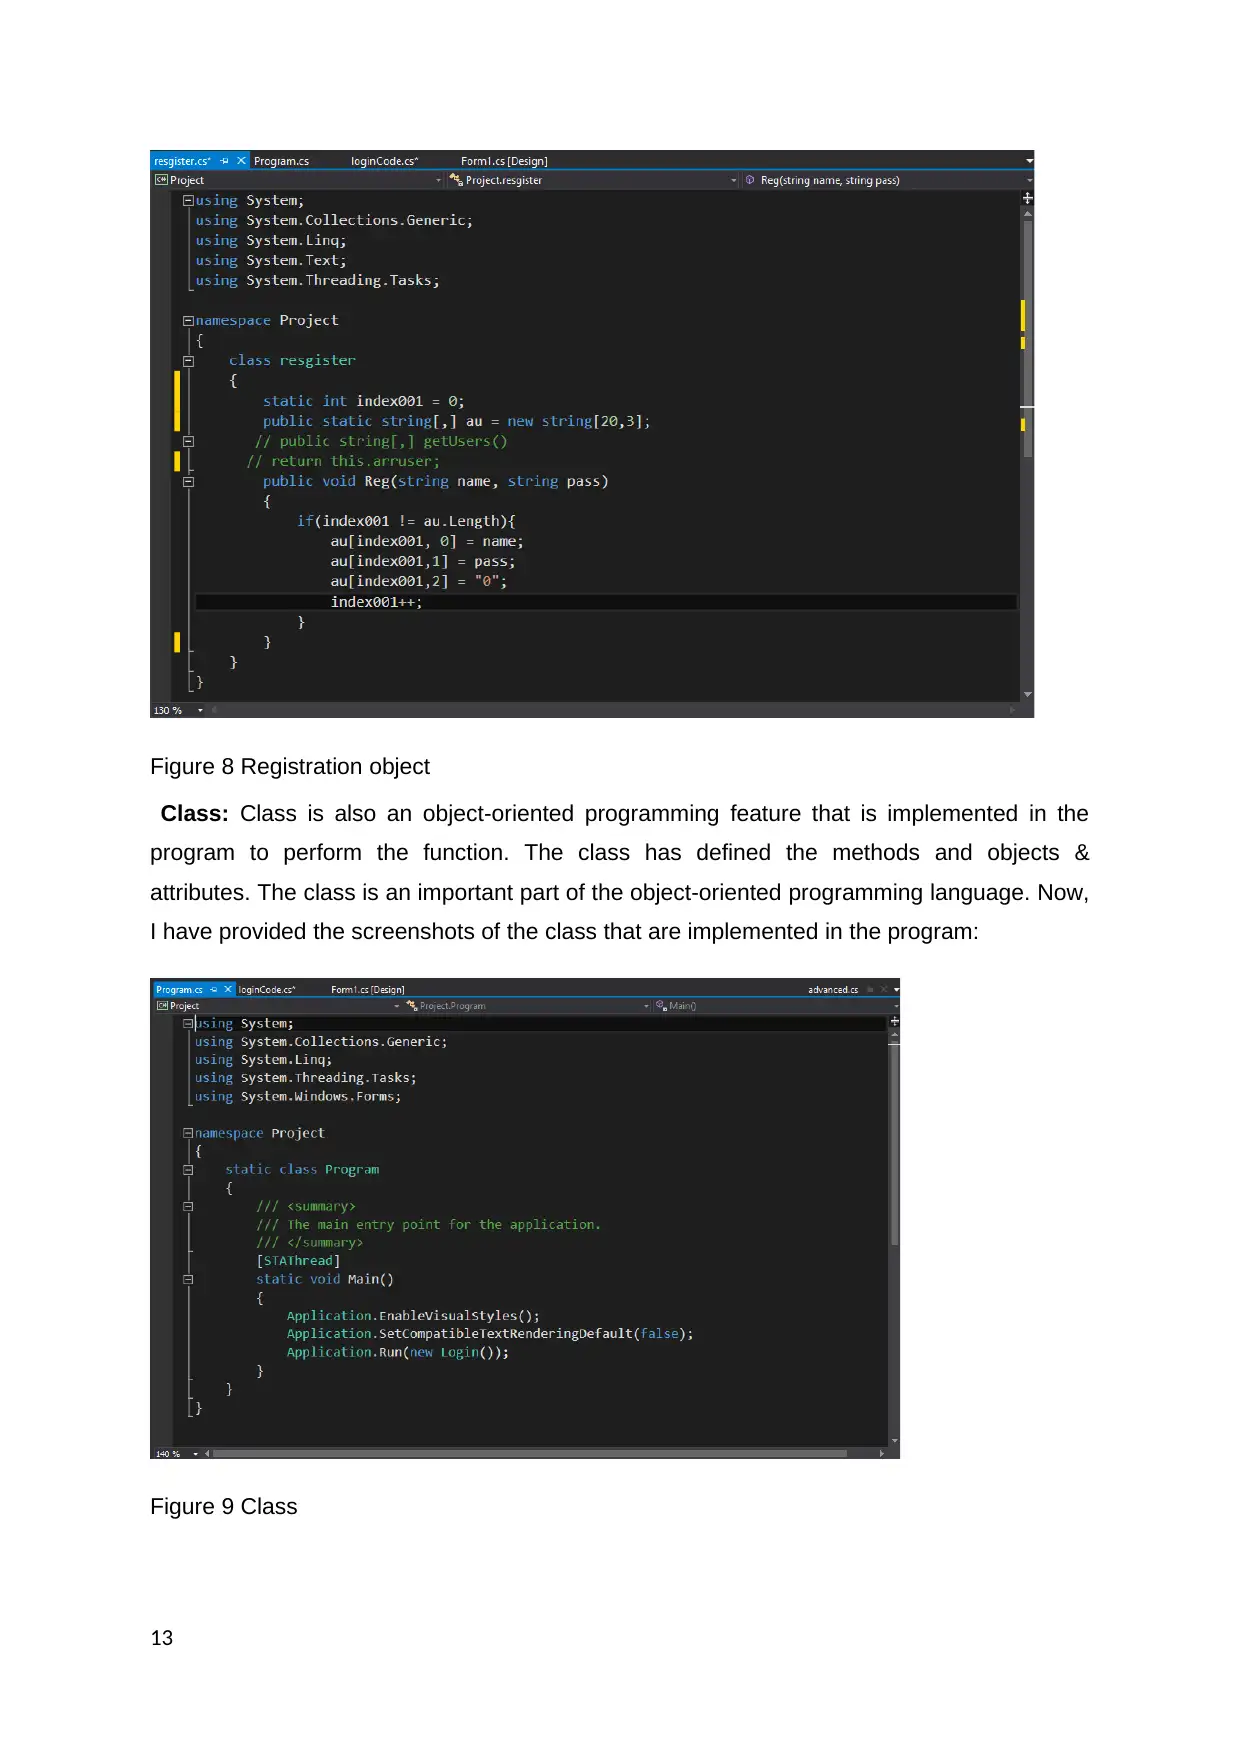
Figure 8 Registration object
Class: Class is also an object-oriented programming feature that is implemented in the
program to perform the function. The class has defined the methods and objects &
attributes. The class is an important part of the object-oriented programming language. Now,
I have provided the screenshots of the class that are implemented in the program:
Figure 9 Class
13
Paraphrase This Document
Need a fresh take? Get an instant paraphrase of this document with our AI Paraphraser
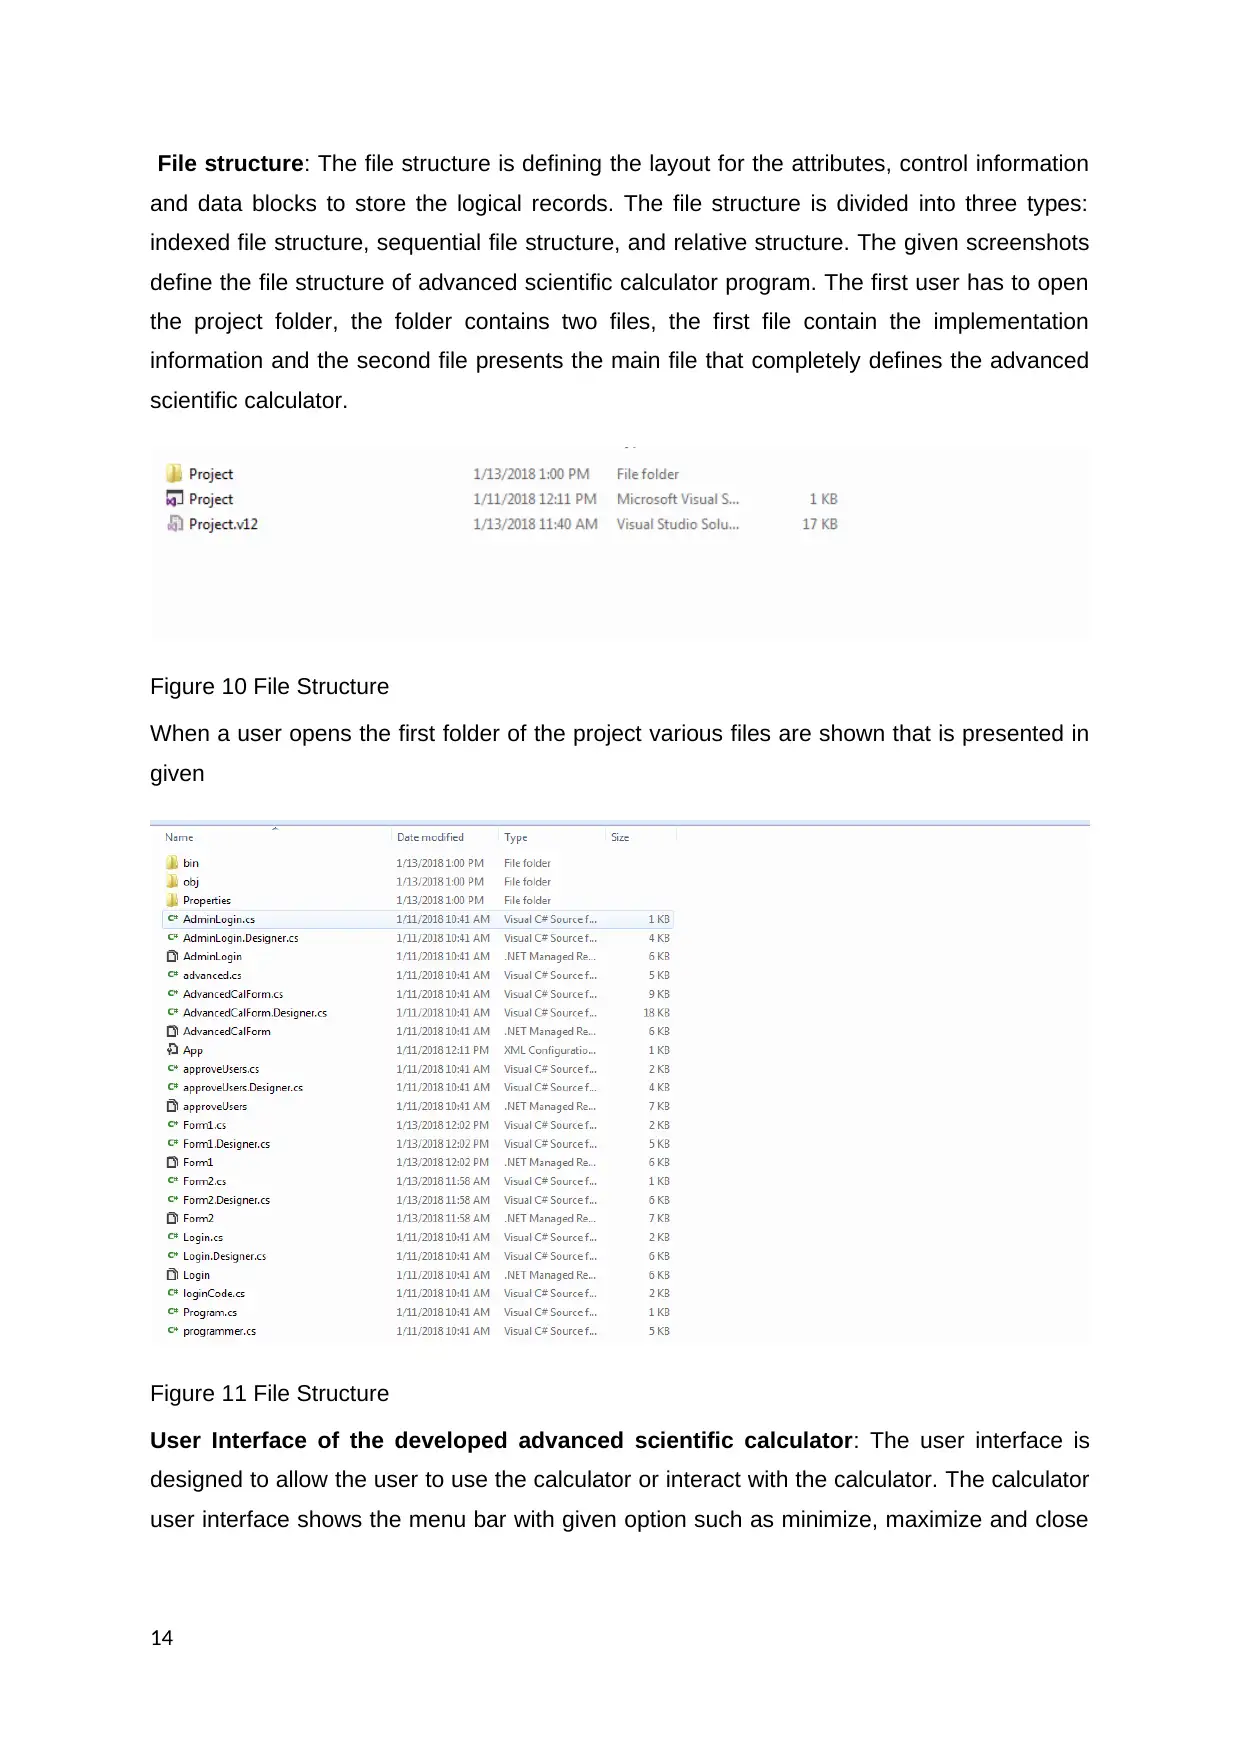
File structure: The file structure is defining the layout for the attributes, control information
and data blocks to store the logical records. The file structure is divided into three types:
indexed file structure, sequential file structure, and relative structure. The given screenshots
define the file structure of advanced scientific calculator program. The first user has to open
the project folder, the folder contains two files, the first file contain the implementation
information and the second file presents the main file that completely defines the advanced
scientific calculator.
Figure 10 File Structure
When a user opens the first folder of the project various files are shown that is presented in
given
Figure 11 File Structure
User Interface of the developed advanced scientific calculator: The user interface is
designed to allow the user to use the calculator or interact with the calculator. The calculator
user interface shows the menu bar with given option such as minimize, maximize and close
14
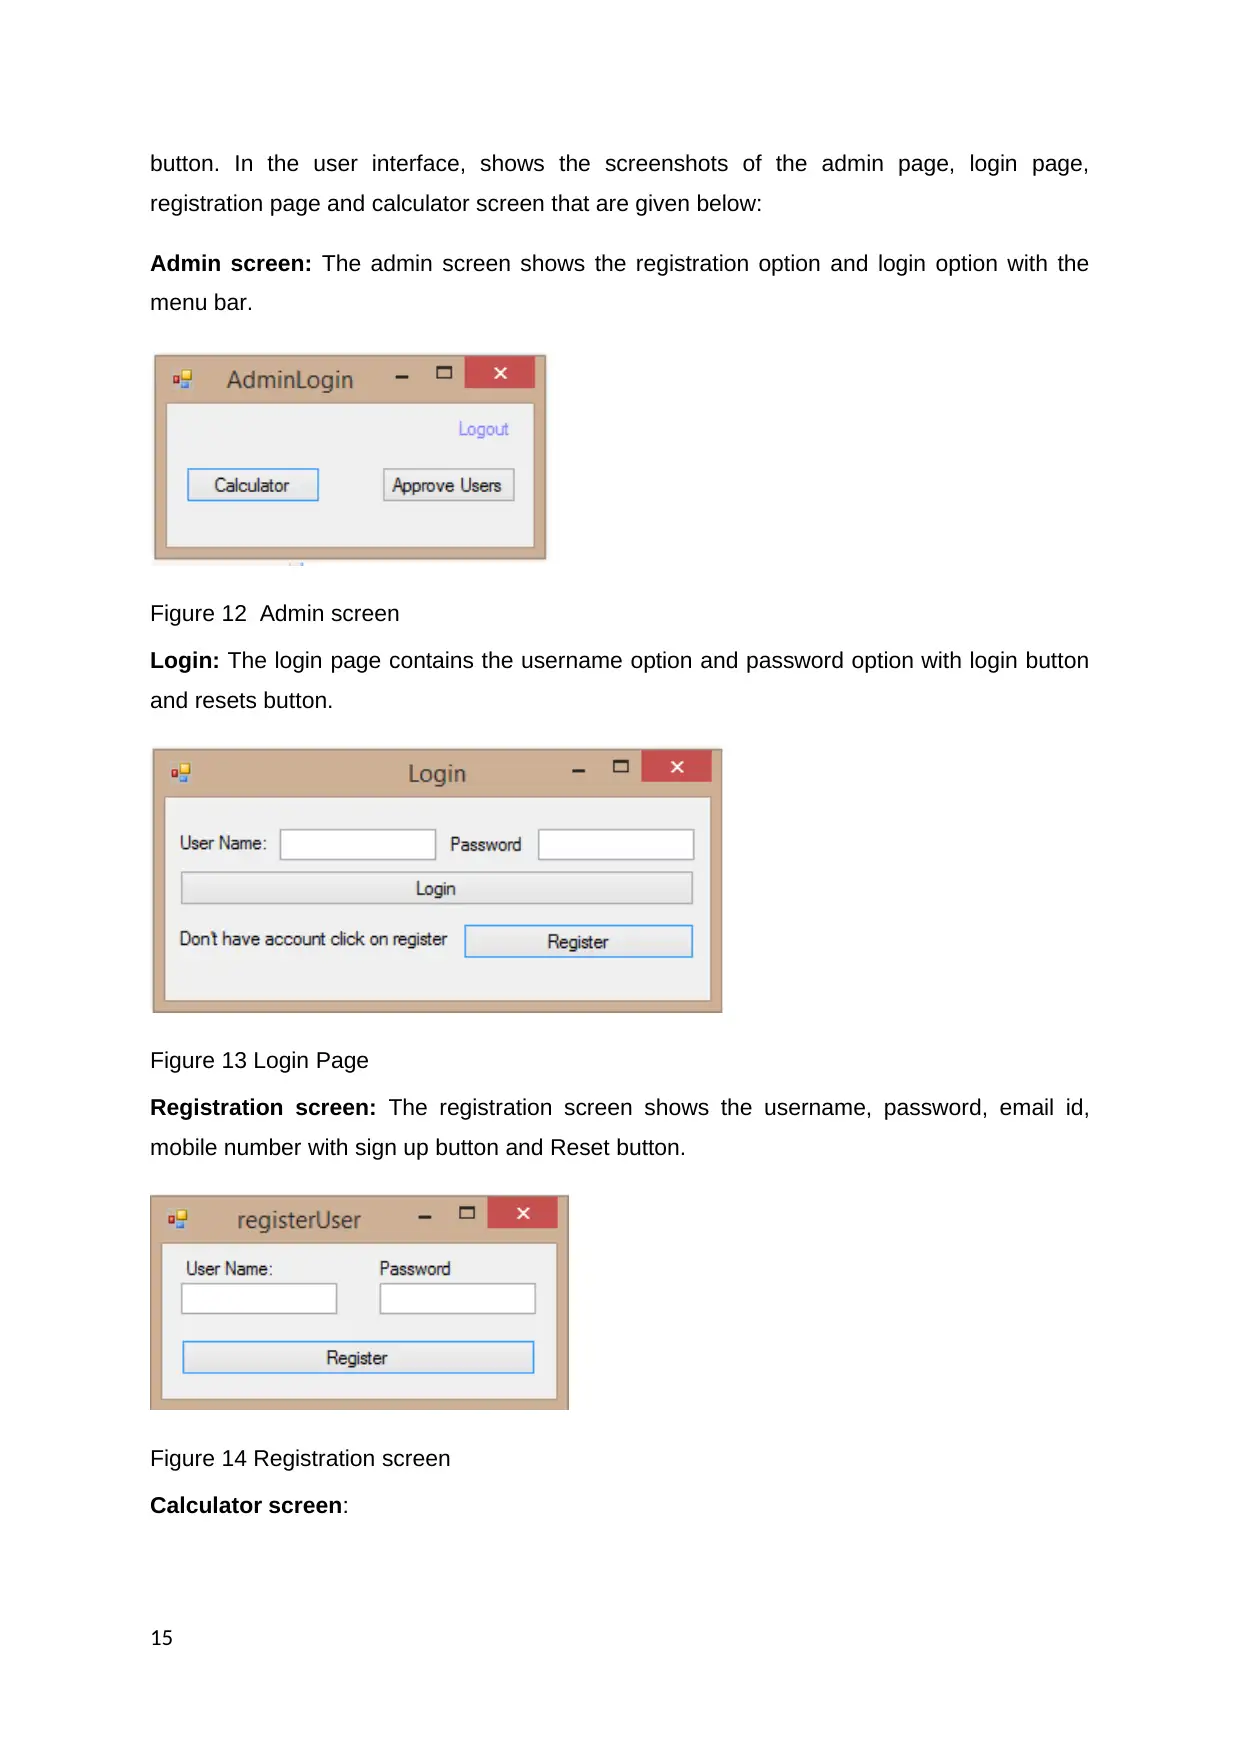
button. In the user interface, shows the screenshots of the admin page, login page,
registration page and calculator screen that are given below:
Admin screen: The admin screen shows the registration option and login option with the
menu bar.
Figure 12 Admin screen
Login: The login page contains the username option and password option with login button
and resets button.
Figure 13 Login Page
Registration screen: The registration screen shows the username, password, email id,
mobile number with sign up button and Reset button.
Figure 14 Registration screen
Calculator screen:
15
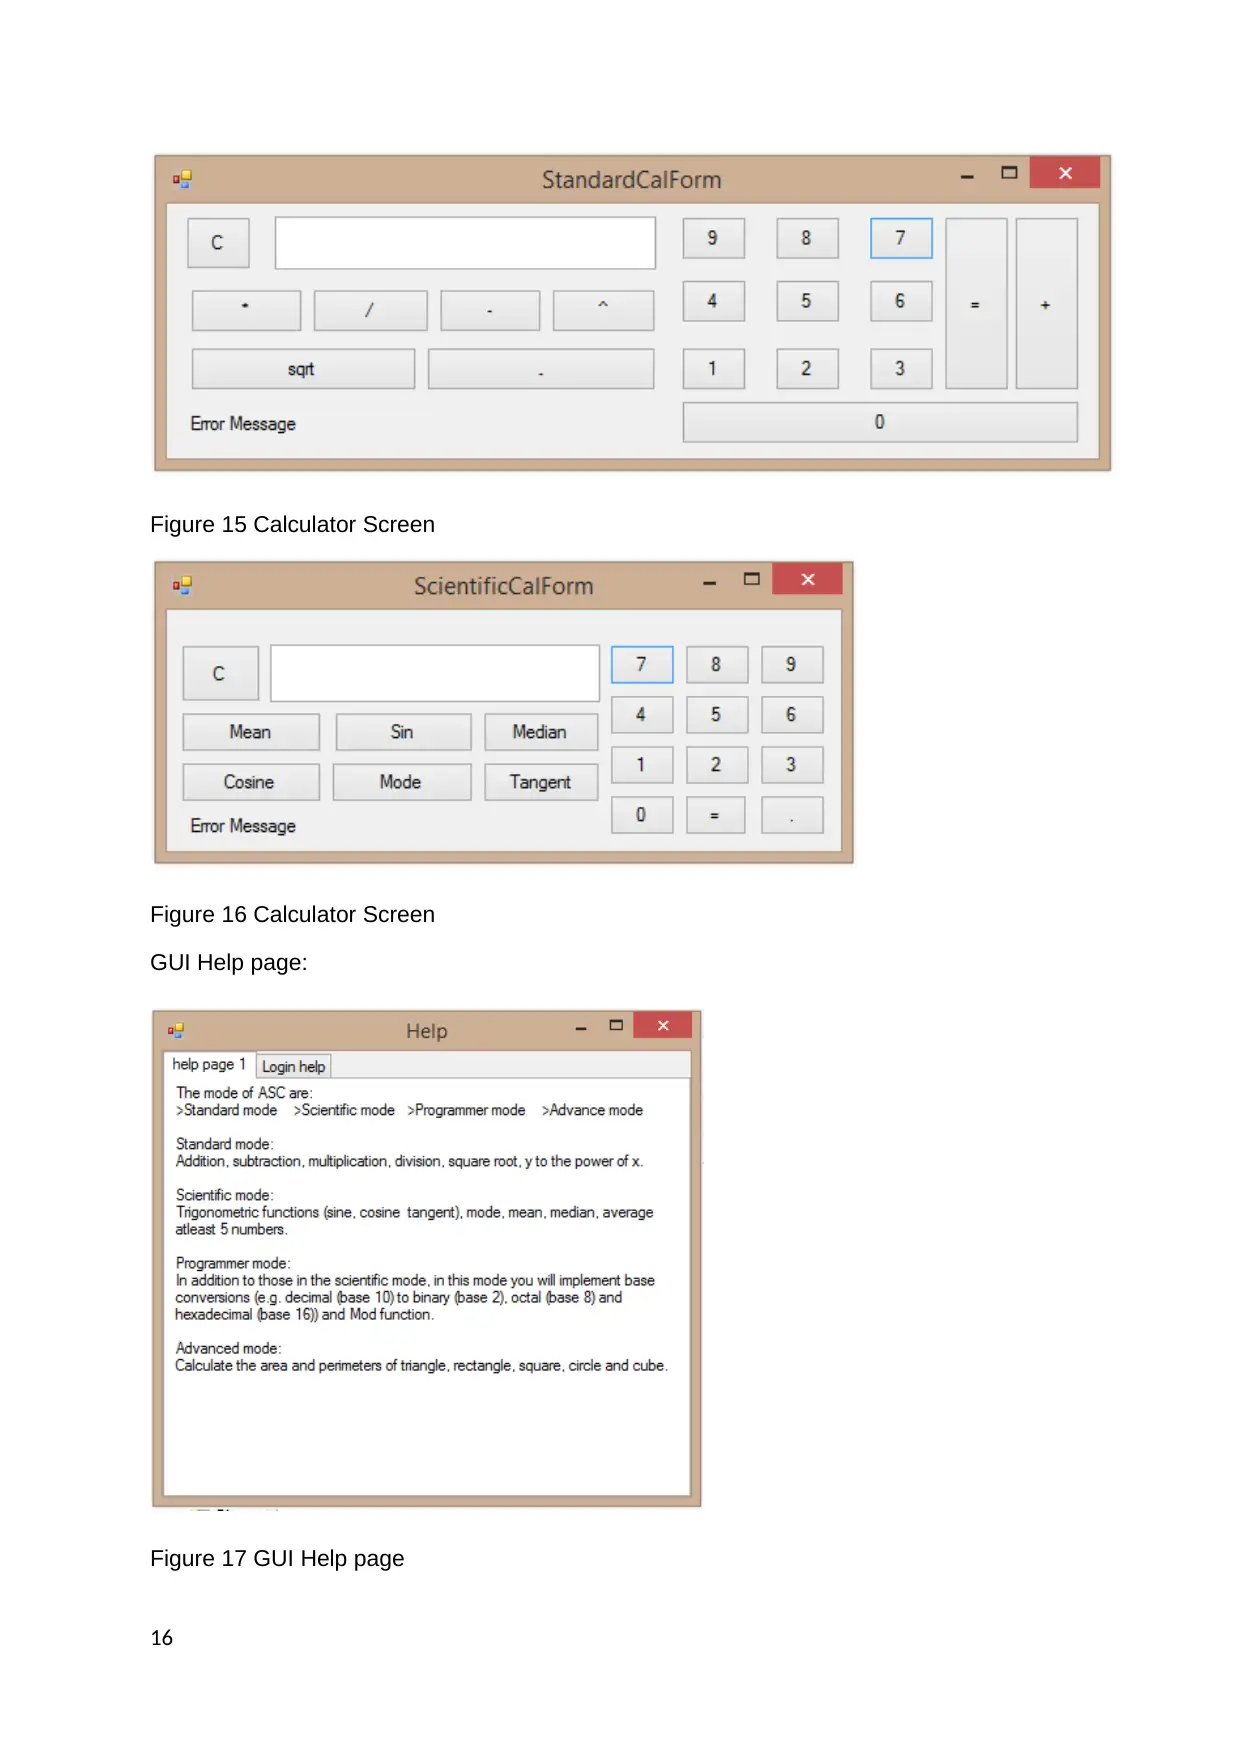
Figure 15 Calculator Screen
Figure 16 Calculator Screen
GUI Help page:
Figure 17 GUI Help page
16
Figure 16 Calculator Screen
GUI Help page:
Figure 17 GUI Help page
16
Secure Best Marks with AI Grader
Need help grading? Try our AI Grader for instant feedback on your assignments.
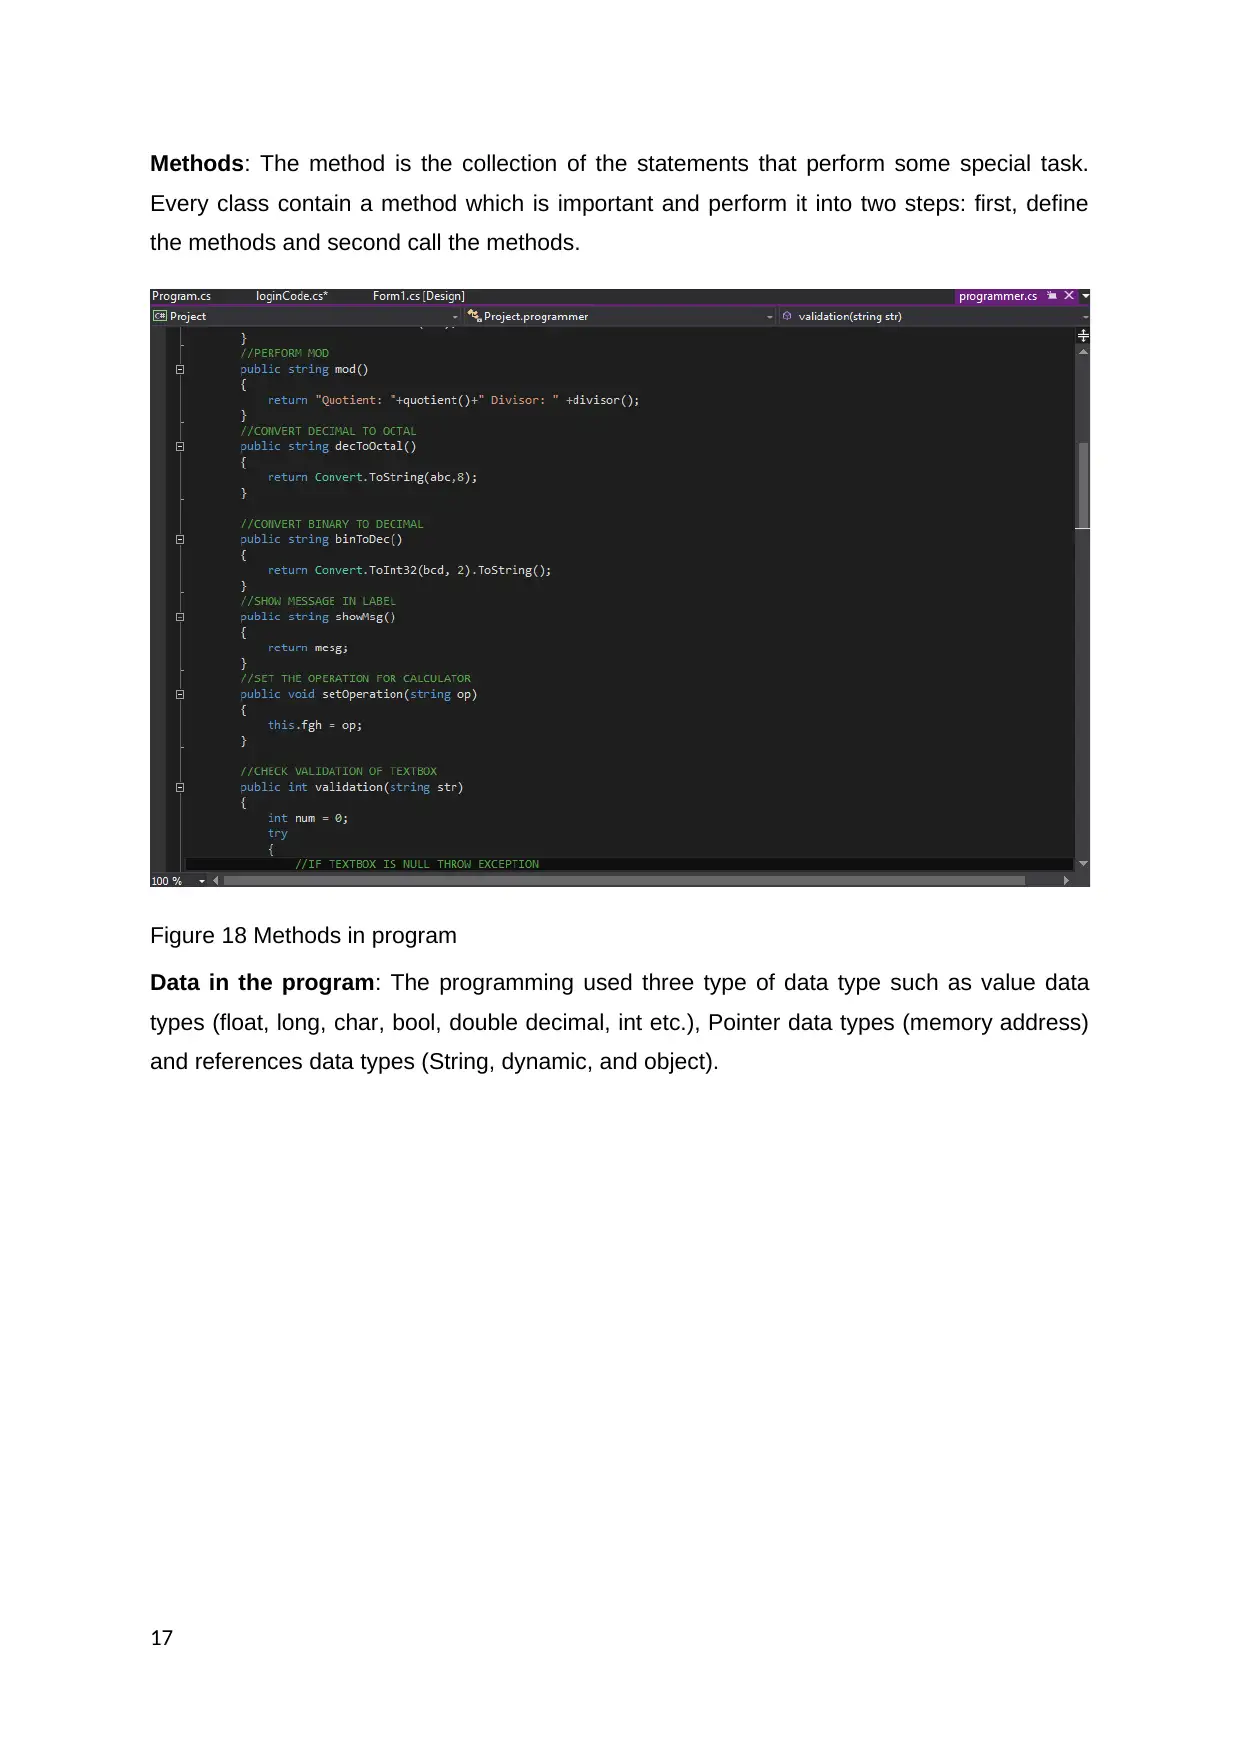
Methods: The method is the collection of the statements that perform some special task.
Every class contain a method which is important and perform it into two steps: first, define
the methods and second call the methods.
Figure 18 Methods in program
Data in the program: The programming used three type of data type such as value data
types (float, long, char, bool, double decimal, int etc.), Pointer data types (memory address)
and references data types (String, dynamic, and object).
17
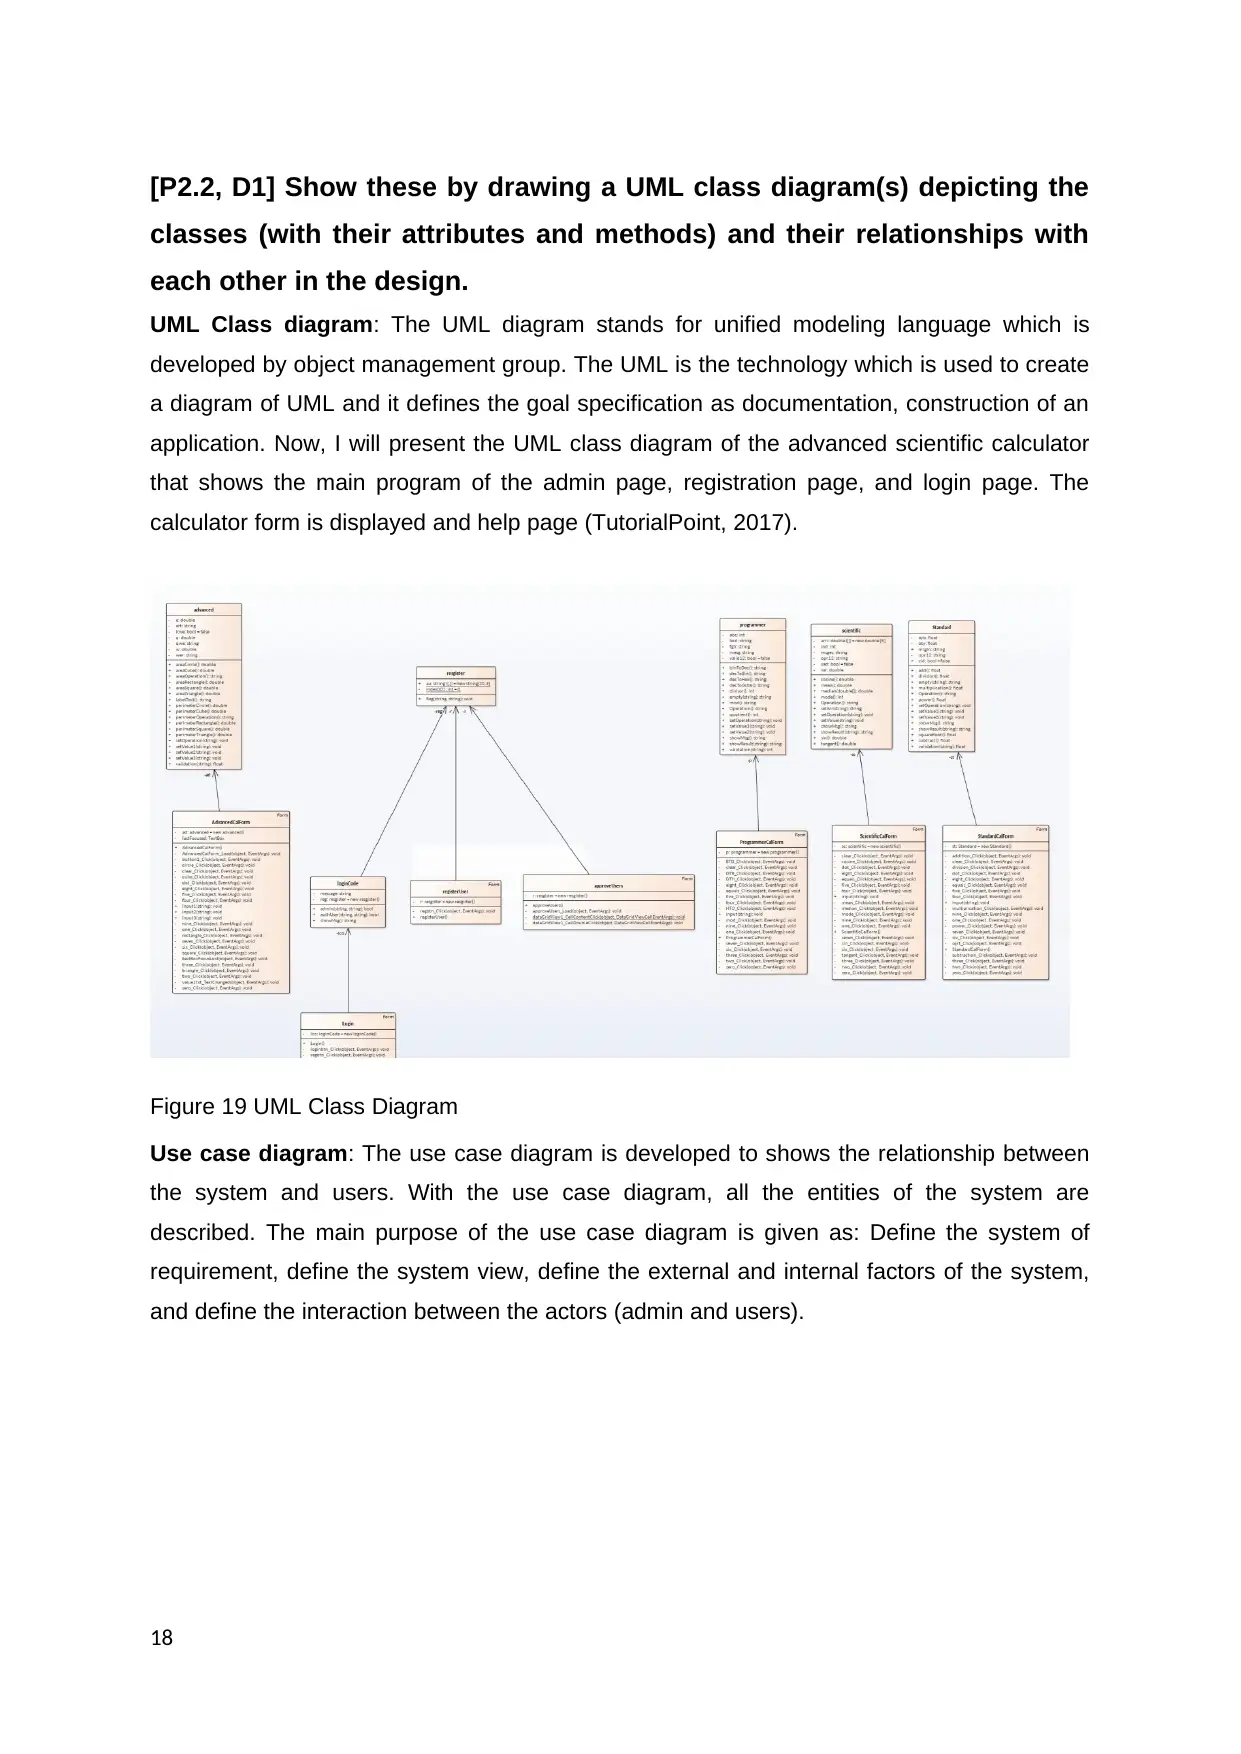
[P2.2, D1] Show these by drawing a UML class diagram(s) depicting the
classes (with their attributes and methods) and their relationships with
each other in the design.
UML Class diagram: The UML diagram stands for unified modeling language which is
developed by object management group. The UML is the technology which is used to create
a diagram of UML and it defines the goal specification as documentation, construction of an
application. Now, I will present the UML class diagram of the advanced scientific calculator
that shows the main program of the admin page, registration page, and login page. The
calculator form is displayed and help page (TutorialPoint, 2017).
Figure 19 UML Class Diagram
Use case diagram: The use case diagram is developed to shows the relationship between
the system and users. With the use case diagram, all the entities of the system are
described. The main purpose of the use case diagram is given as: Define the system of
requirement, define the system view, define the external and internal factors of the system,
and define the interaction between the actors (admin and users).
18
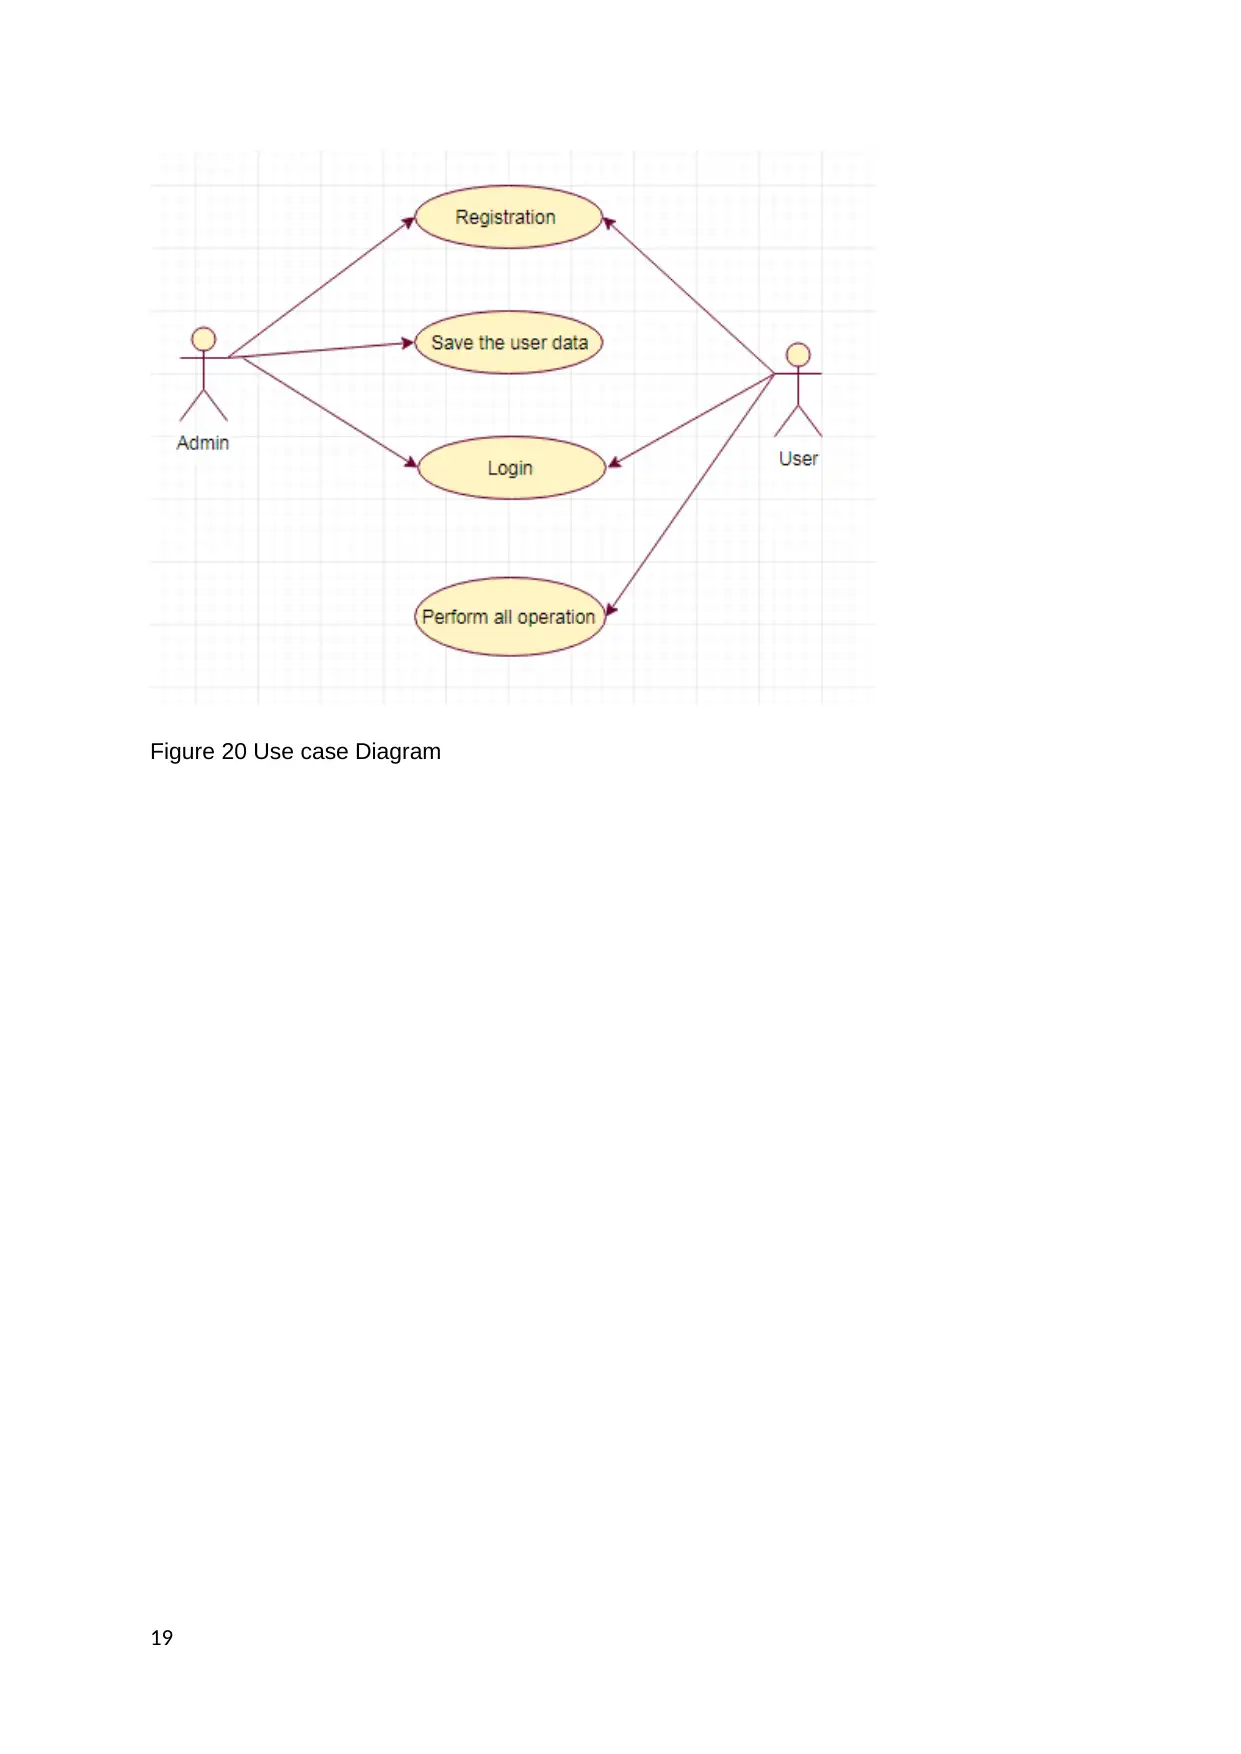
Figure 20 Use case Diagram
19
19
Paraphrase This Document
Need a fresh take? Get an instant paraphrase of this document with our AI Paraphraser
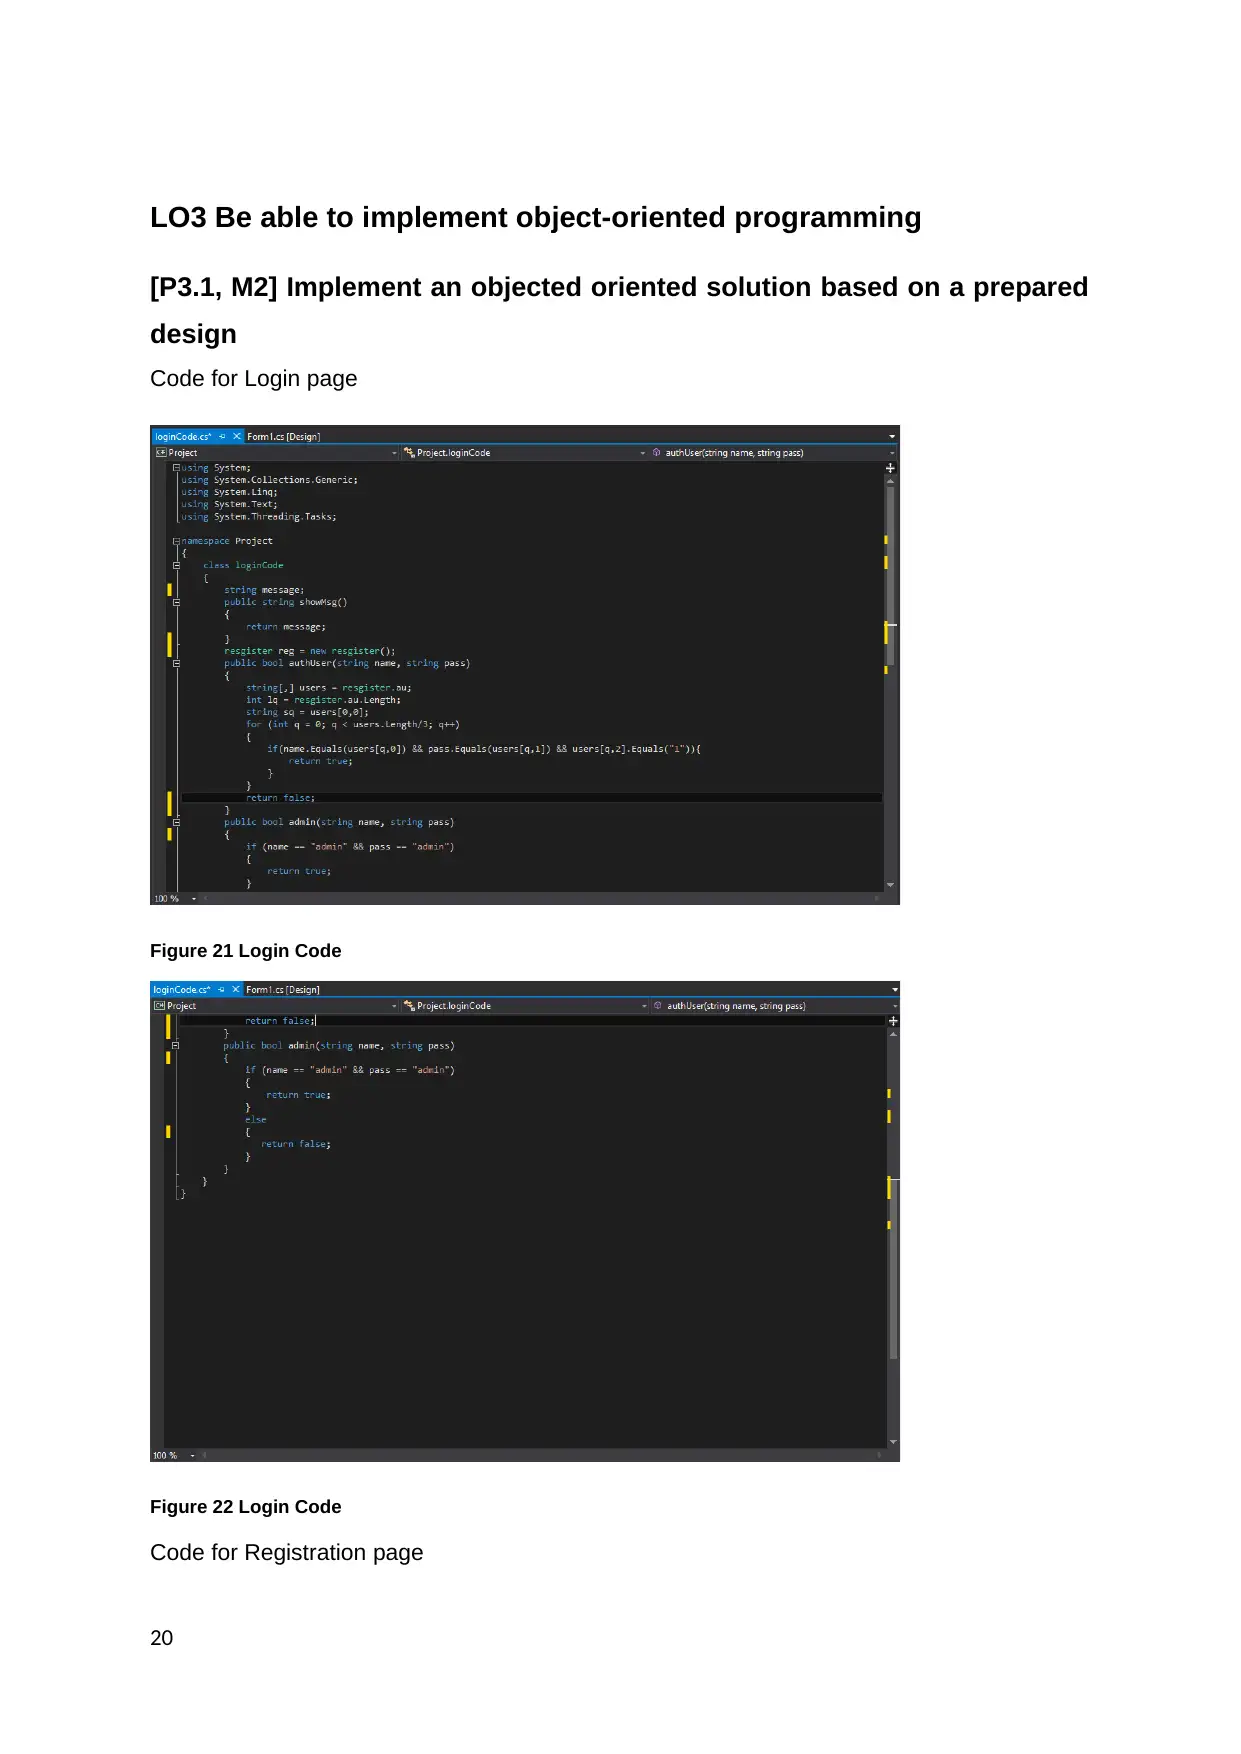
LO3 Be able to implement object-oriented programming
[P3.1, M2] Implement an objected oriented solution based on a prepared
design
Code for Login page
Figure 21 Login Code
Figure 22 Login Code
Code for Registration page
20
[P3.1, M2] Implement an objected oriented solution based on a prepared
design
Code for Login page
Figure 21 Login Code
Figure 22 Login Code
Code for Registration page
20
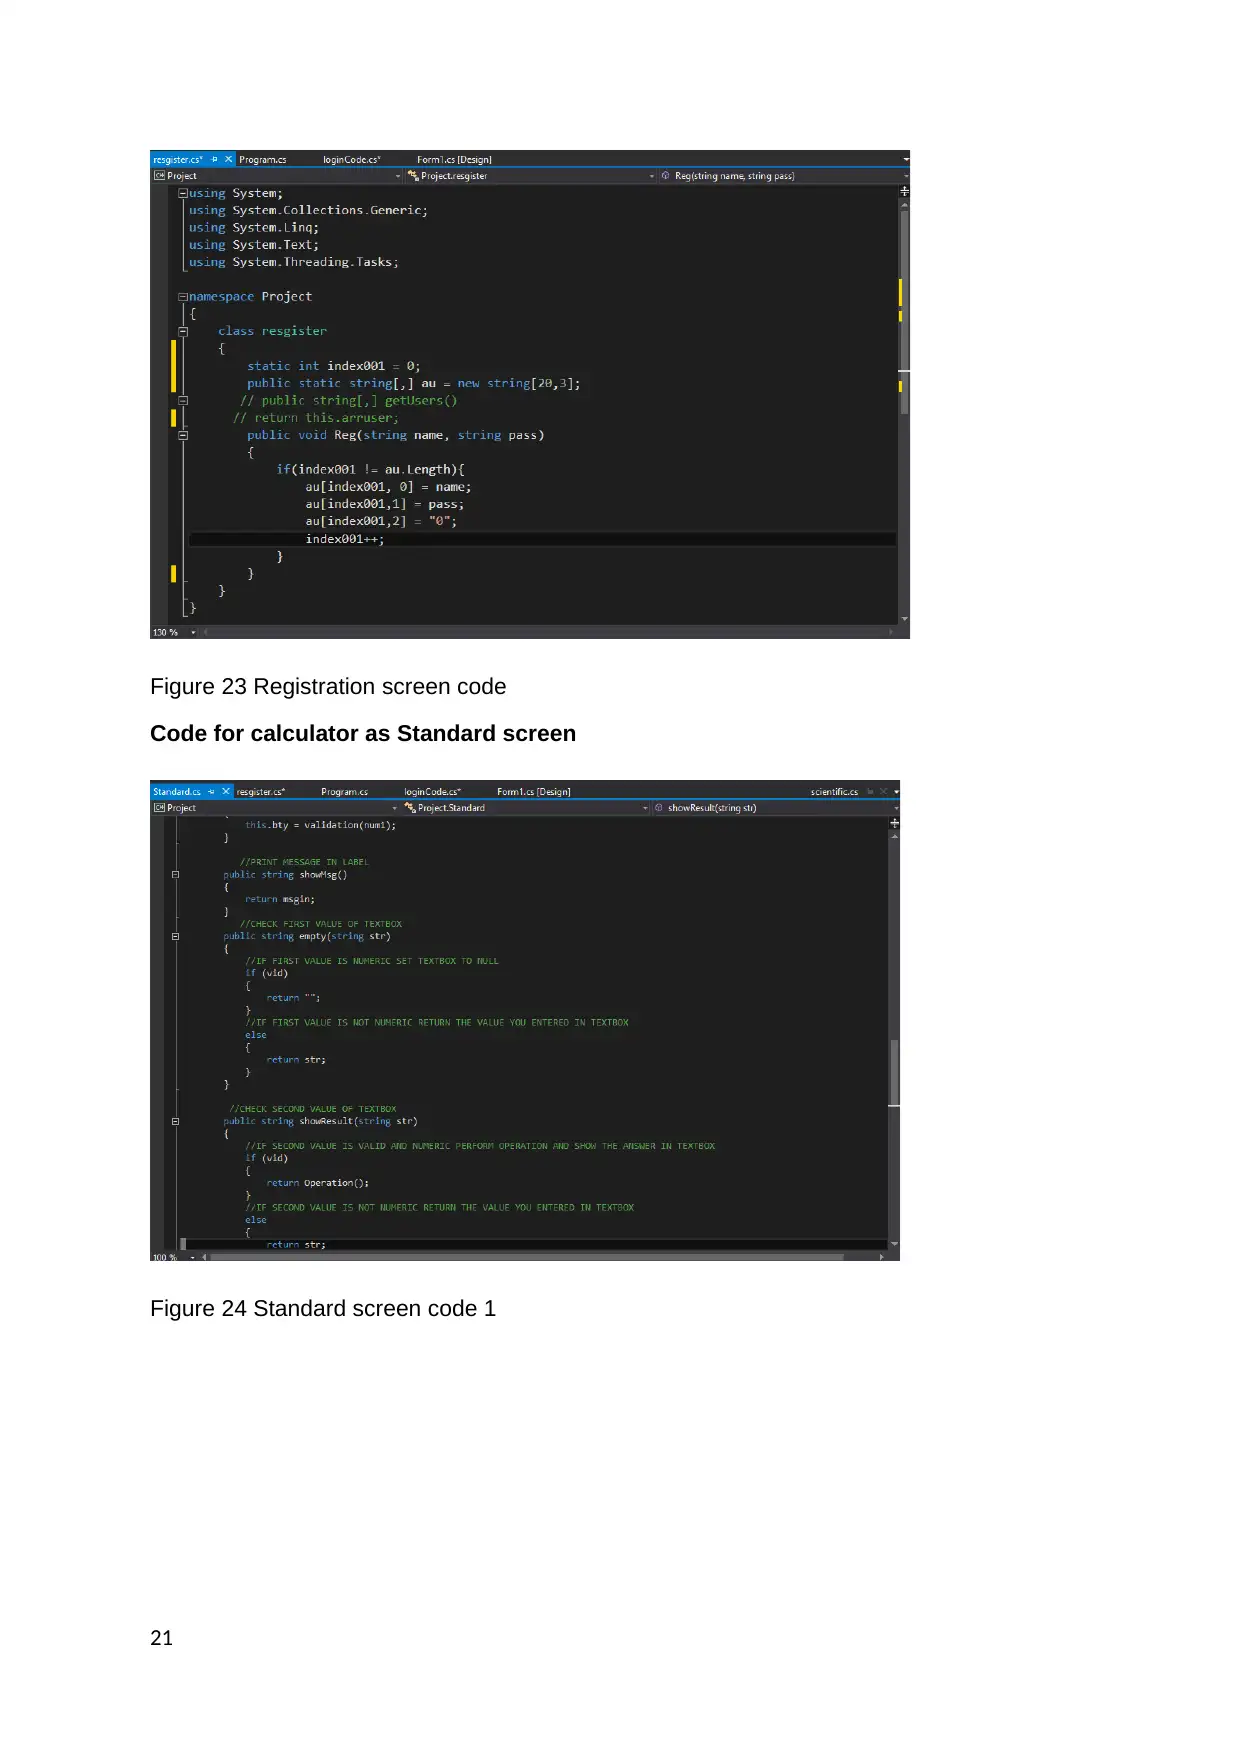
Figure 23 Registration screen code
Code for calculator as Standard screen
Figure 24 Standard screen code 1
21
Code for calculator as Standard screen
Figure 24 Standard screen code 1
21
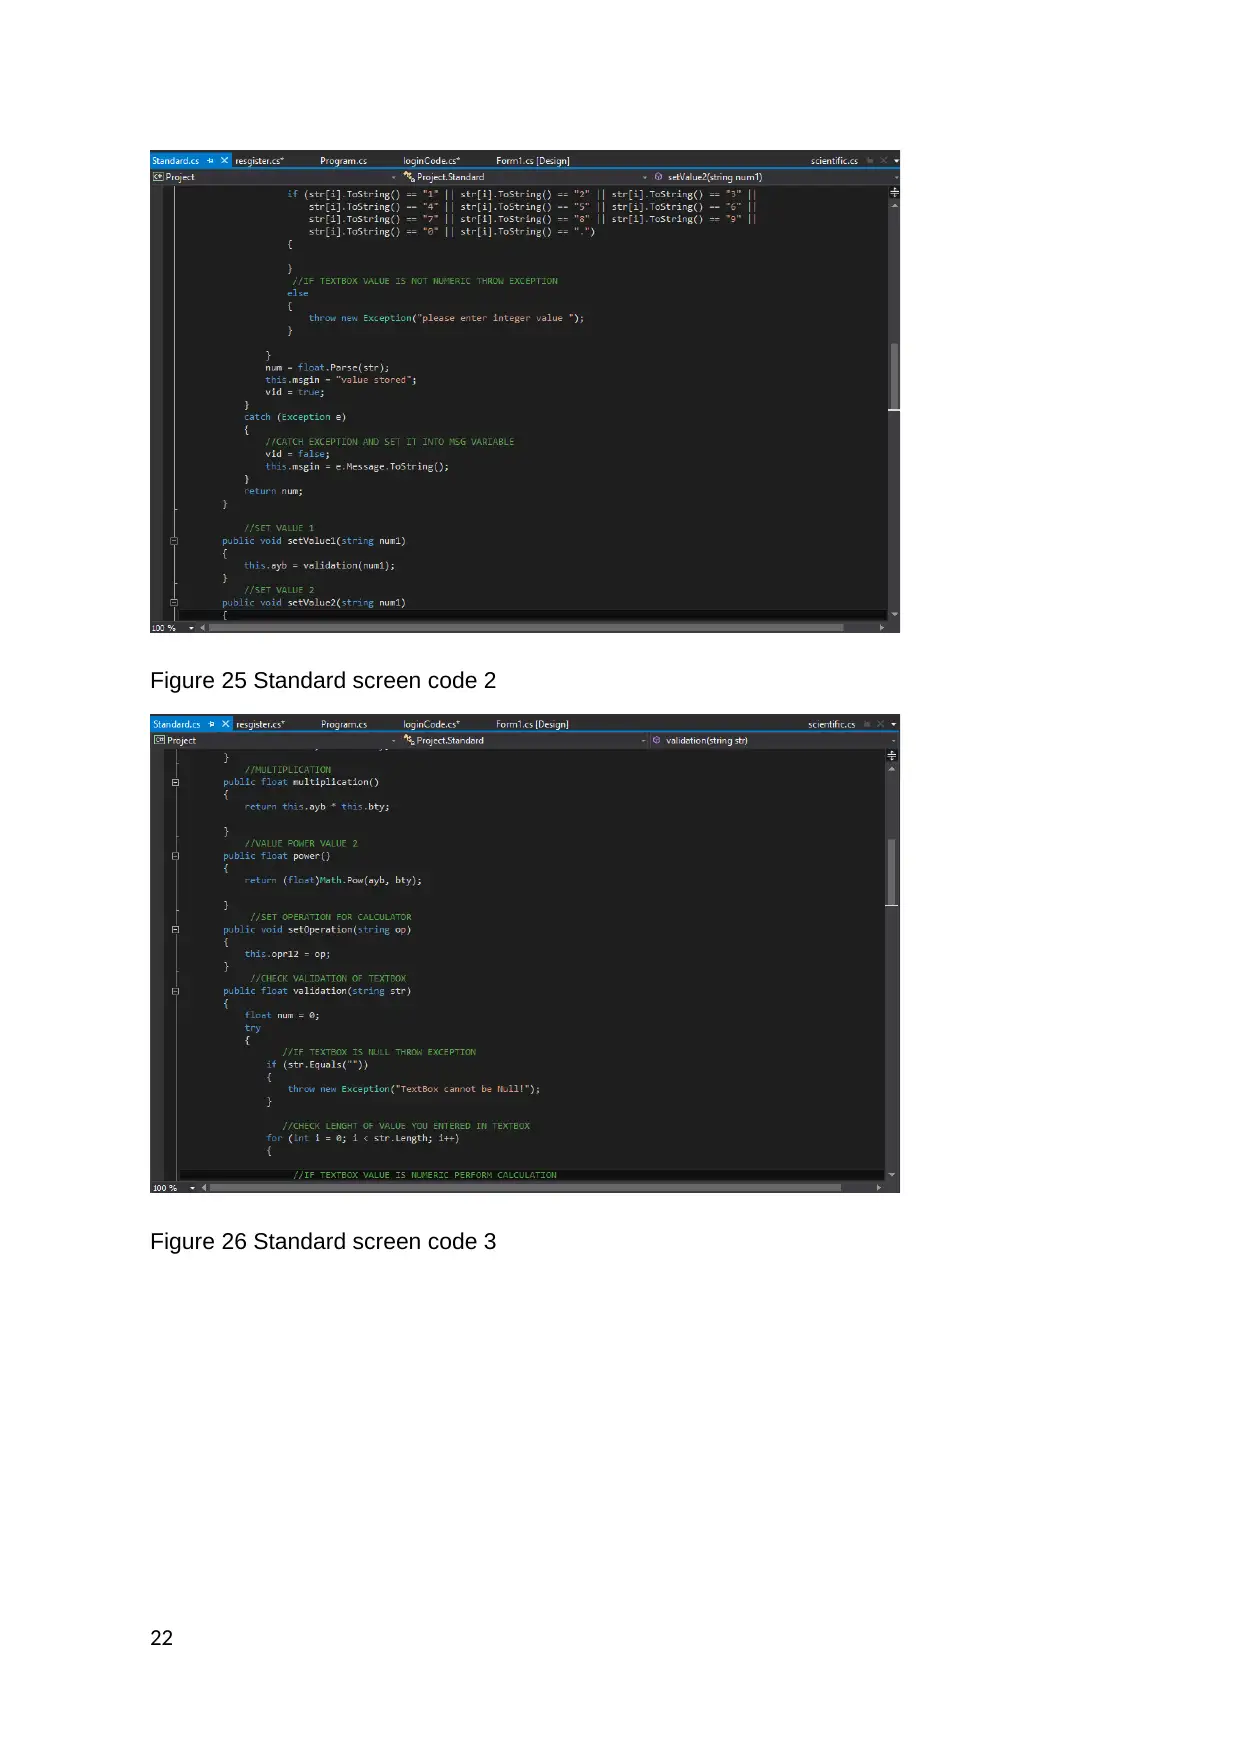
Figure 25 Standard screen code 2
Figure 26 Standard screen code 3
22
Figure 26 Standard screen code 3
22
Secure Best Marks with AI Grader
Need help grading? Try our AI Grader for instant feedback on your assignments.
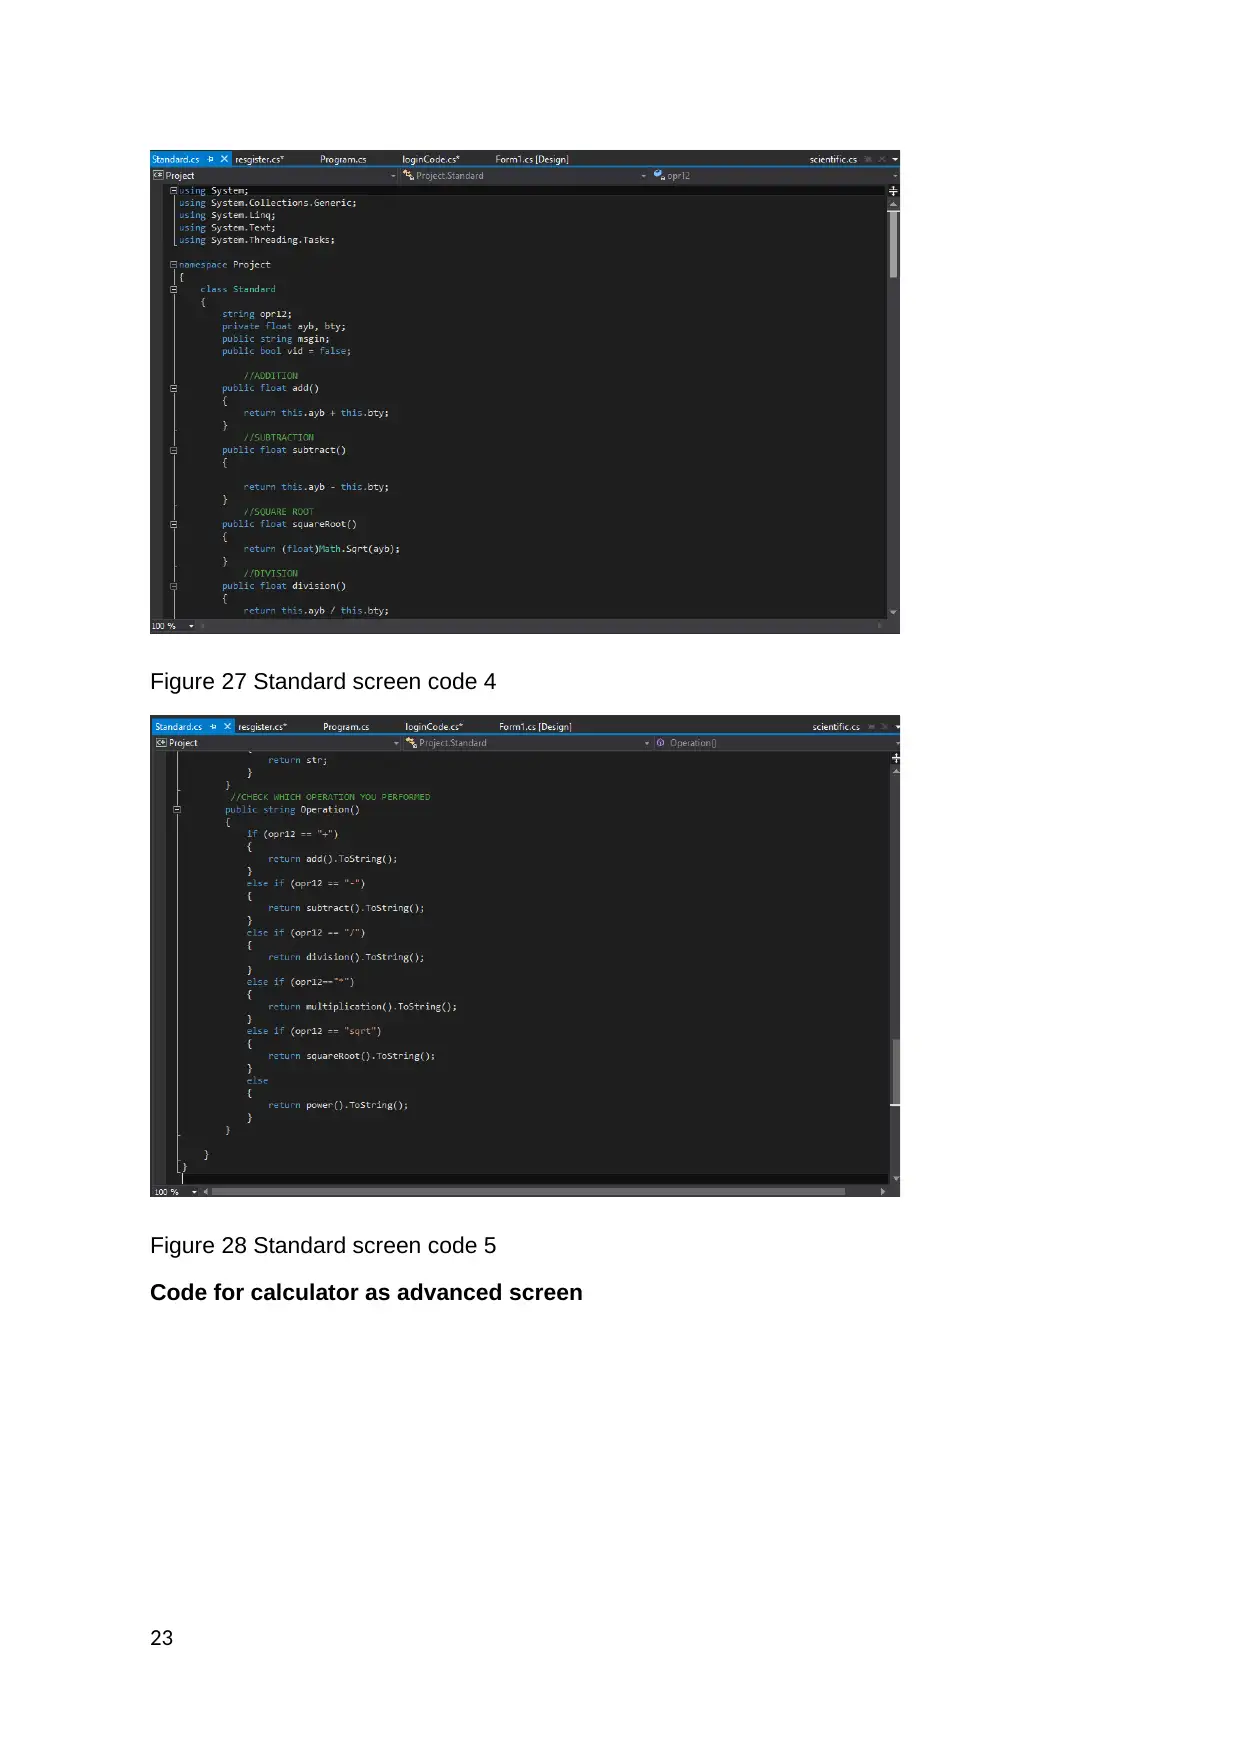
Figure 27 Standard screen code 4
Figure 28 Standard screen code 5
Code for calculator as advanced screen
23
Figure 28 Standard screen code 5
Code for calculator as advanced screen
23
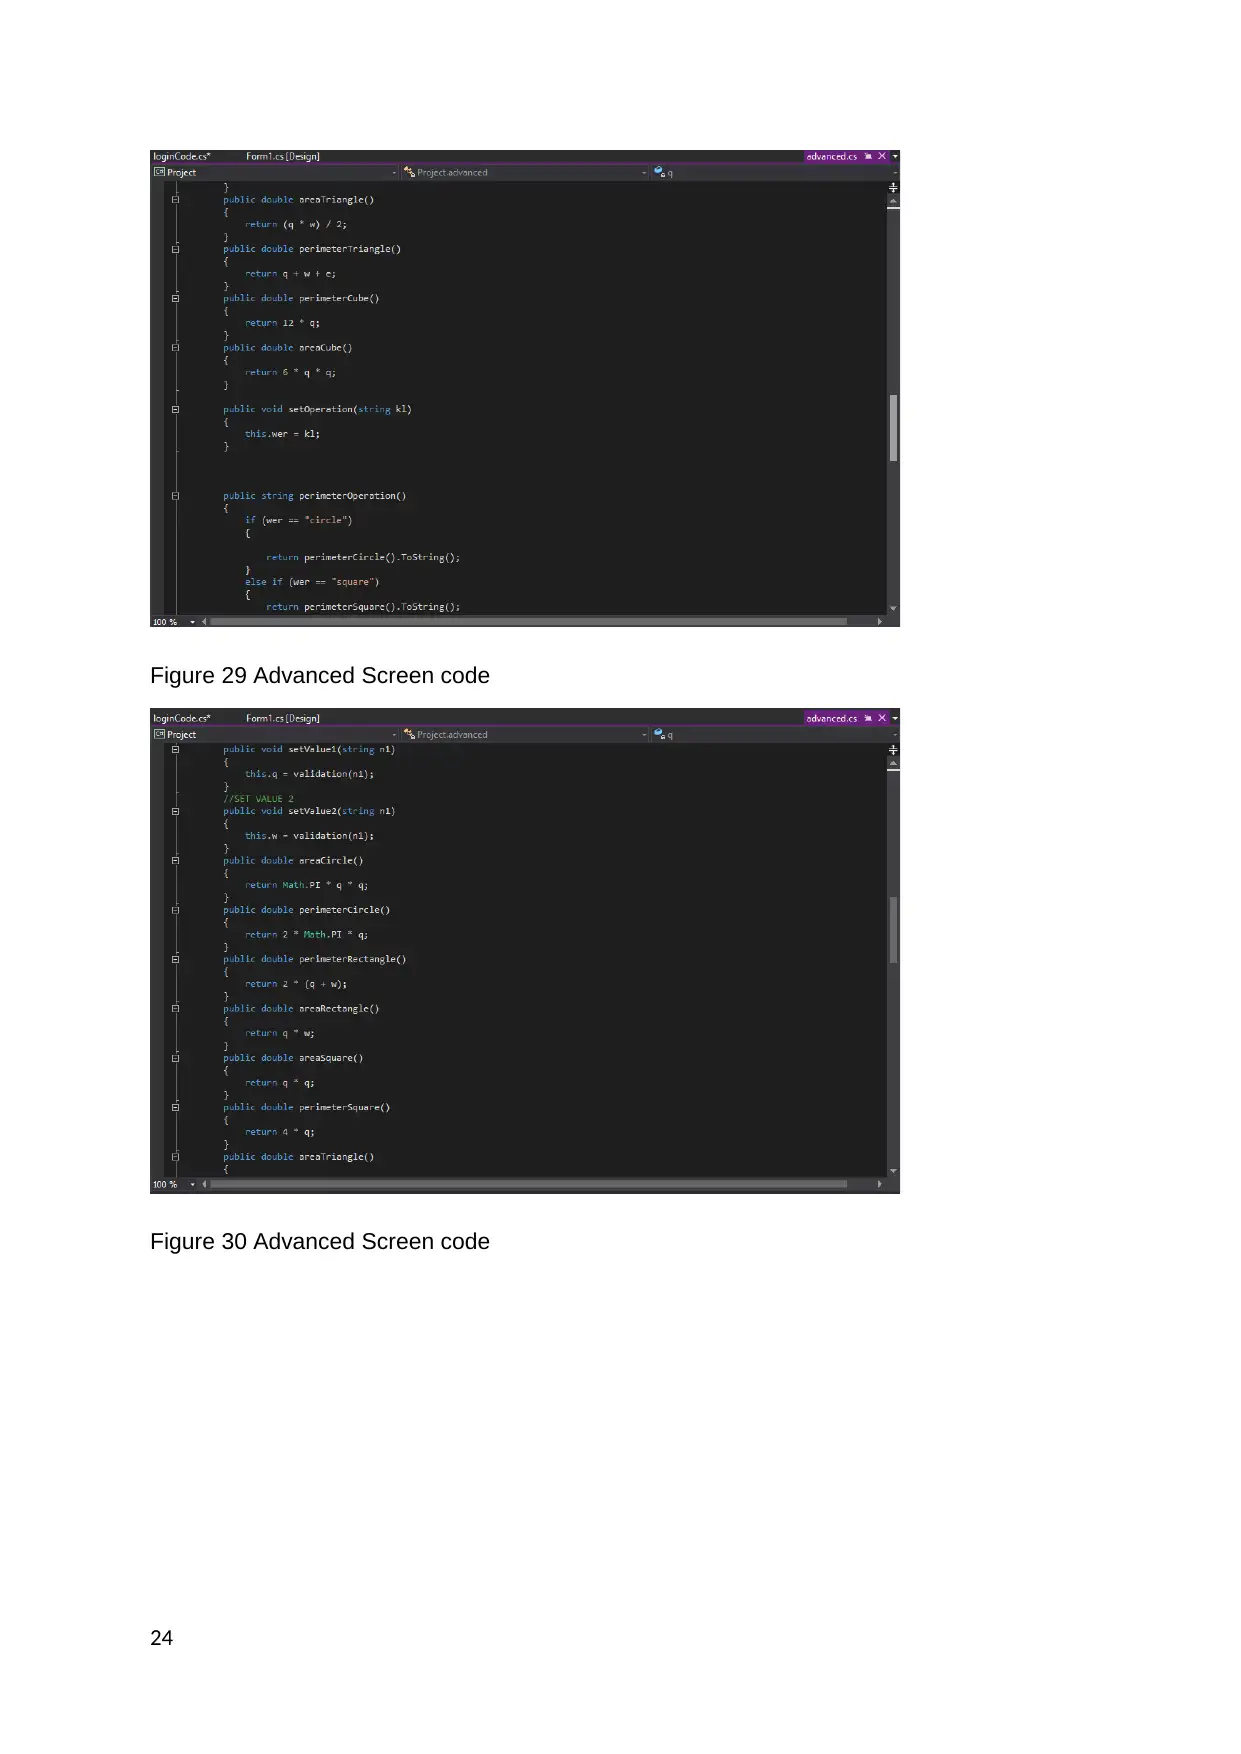
Figure 29 Advanced Screen code
Figure 30 Advanced Screen code
24
Figure 30 Advanced Screen code
24
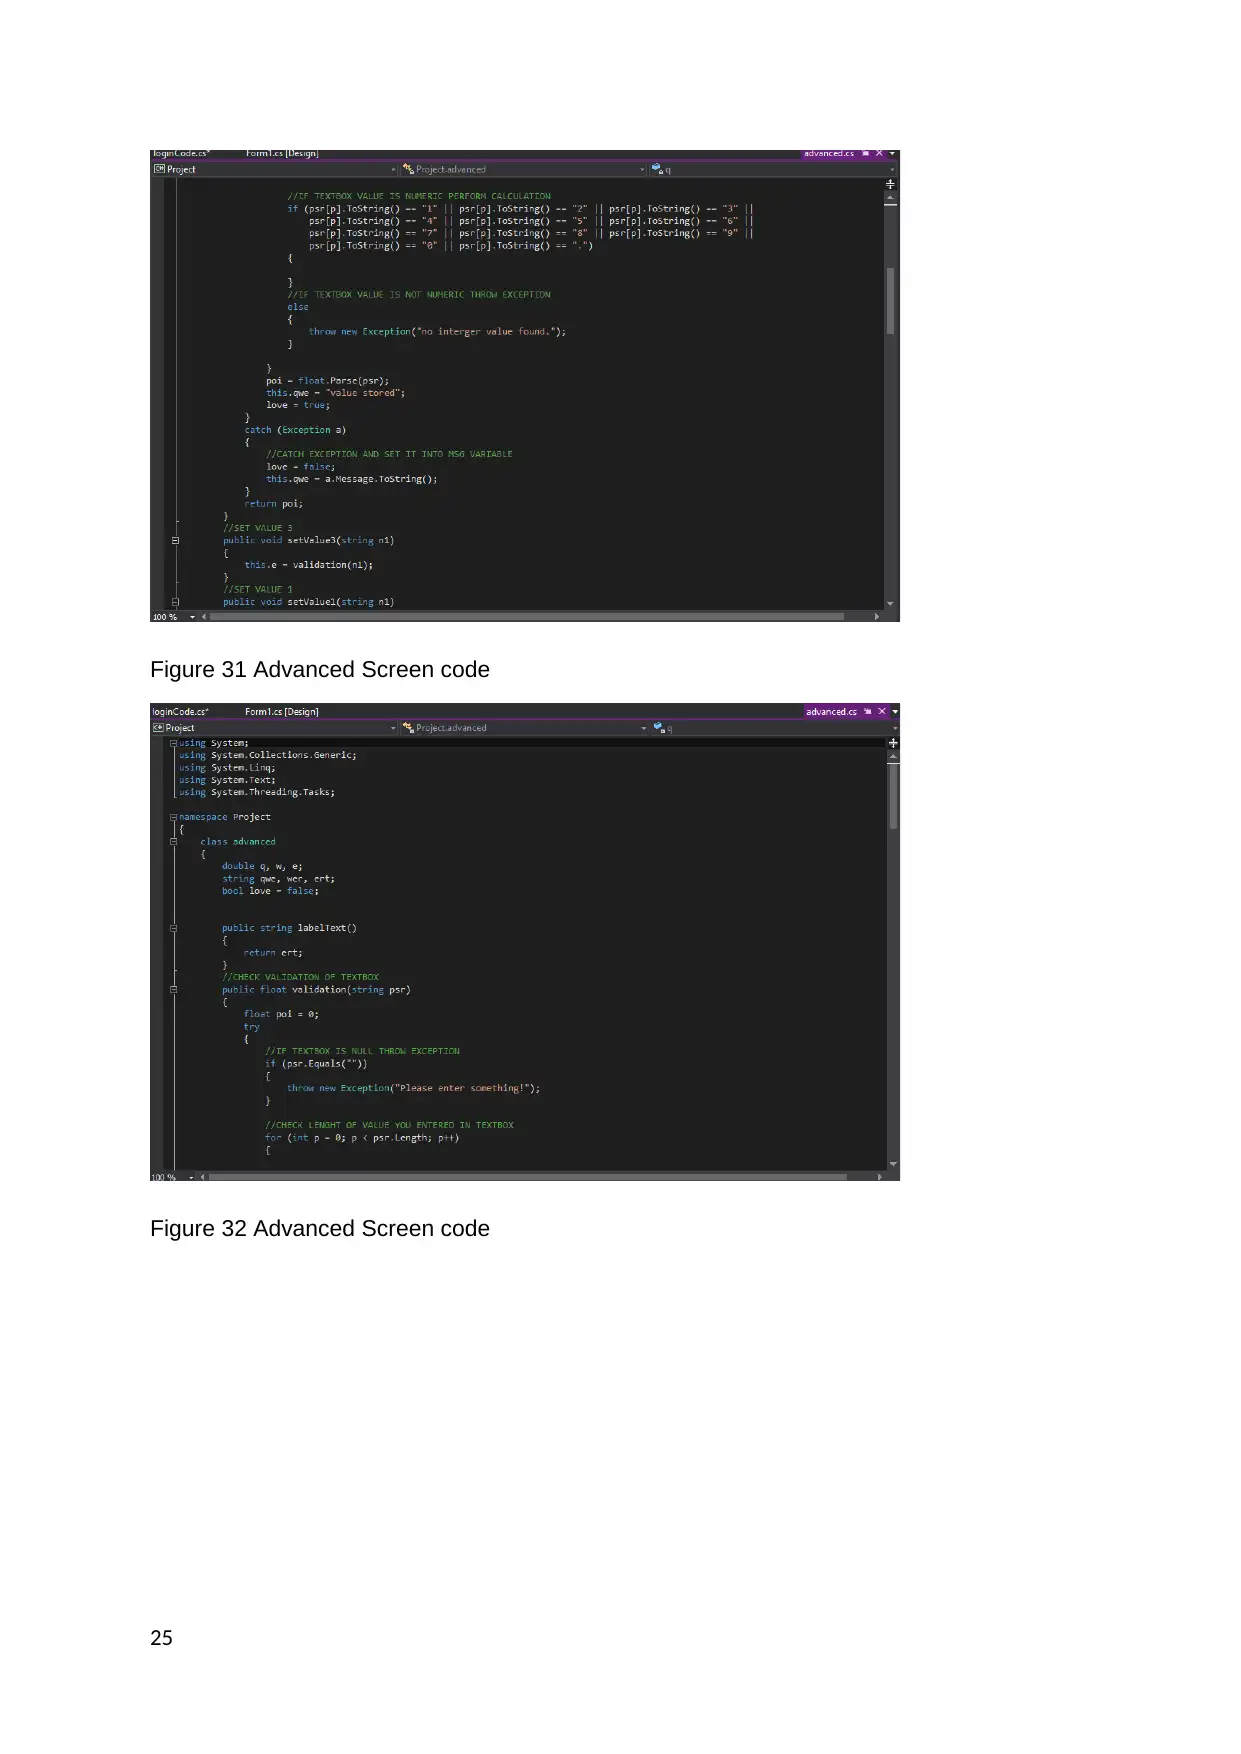
Figure 31 Advanced Screen code
Figure 32 Advanced Screen code
25
Figure 32 Advanced Screen code
25
Paraphrase This Document
Need a fresh take? Get an instant paraphrase of this document with our AI Paraphraser
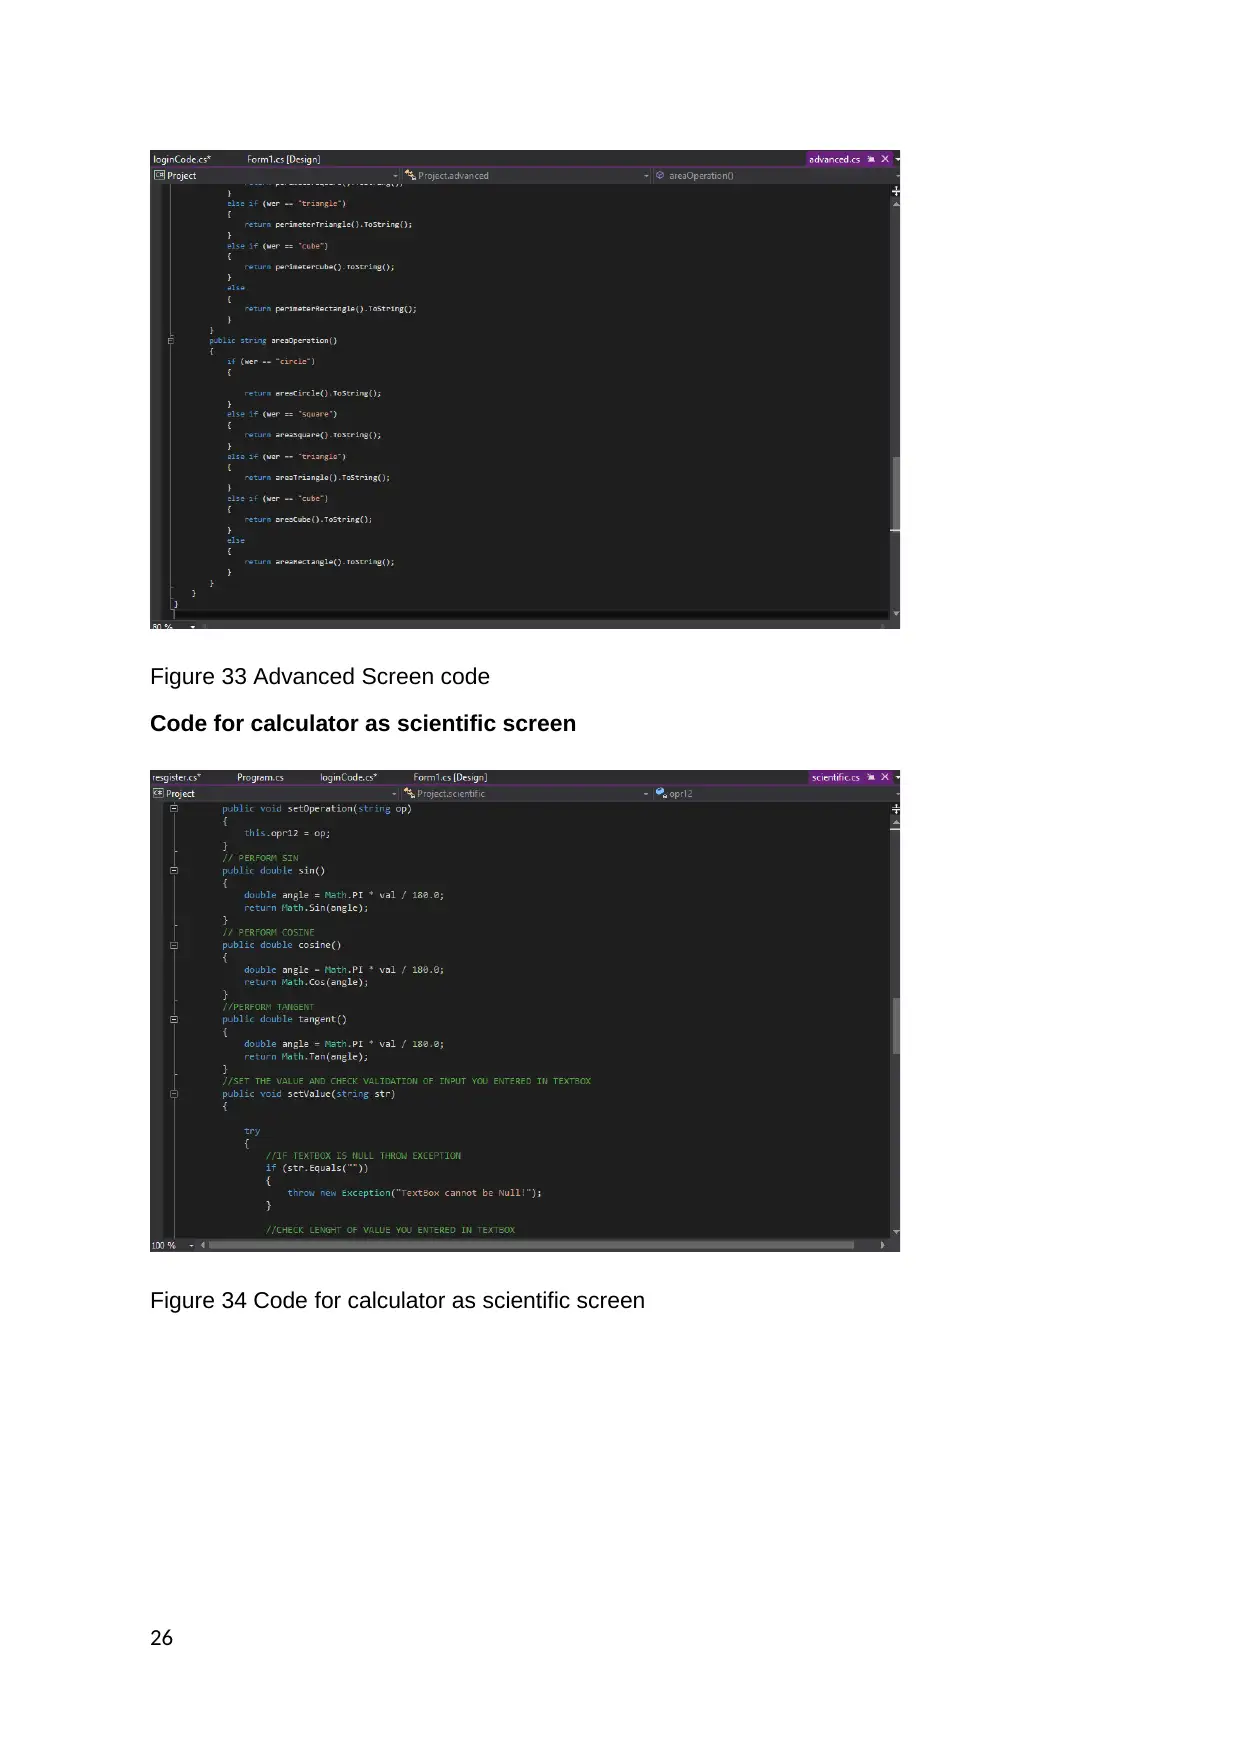
Figure 33 Advanced Screen code
Code for calculator as scientific screen
Figure 34 Code for calculator as scientific screen
26
Code for calculator as scientific screen
Figure 34 Code for calculator as scientific screen
26
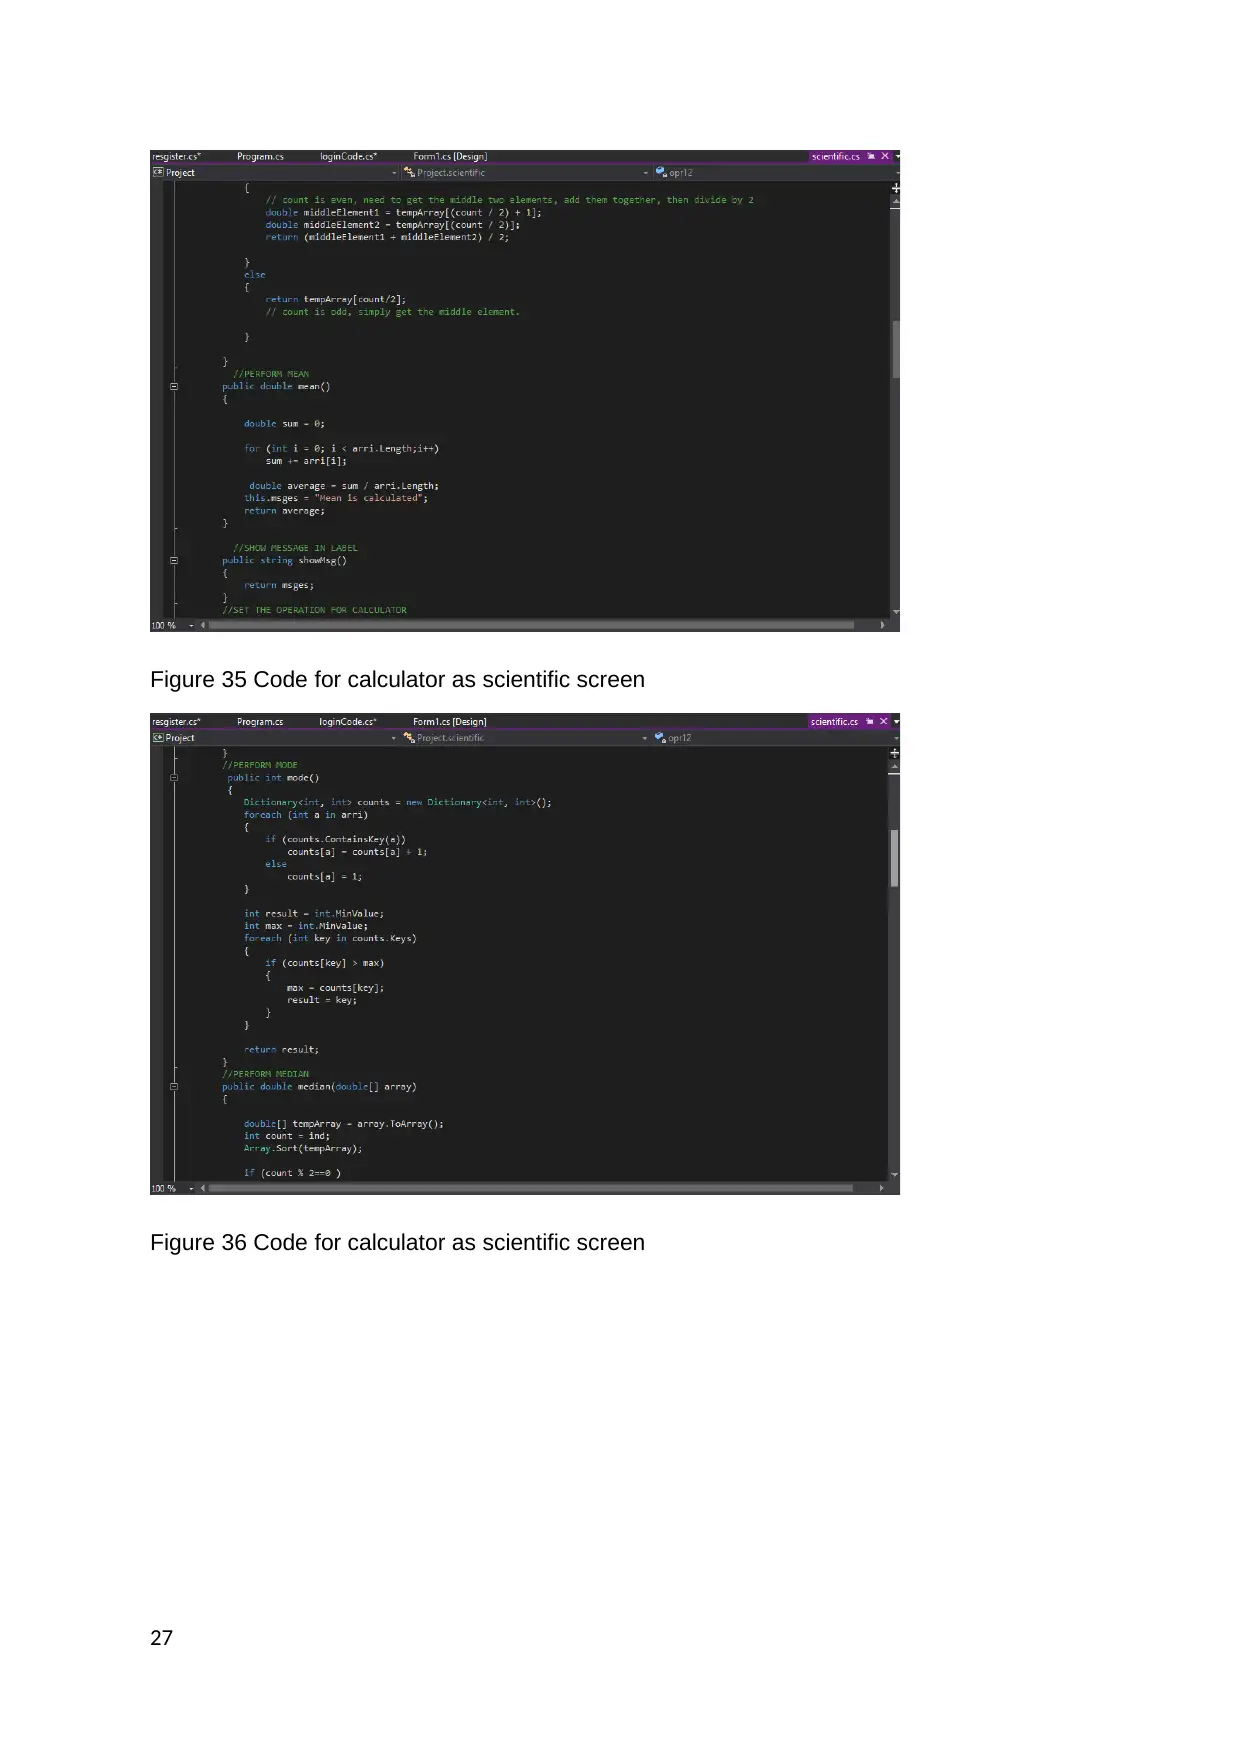
Figure 35 Code for calculator as scientific screen
Figure 36 Code for calculator as scientific screen
27
Figure 36 Code for calculator as scientific screen
27
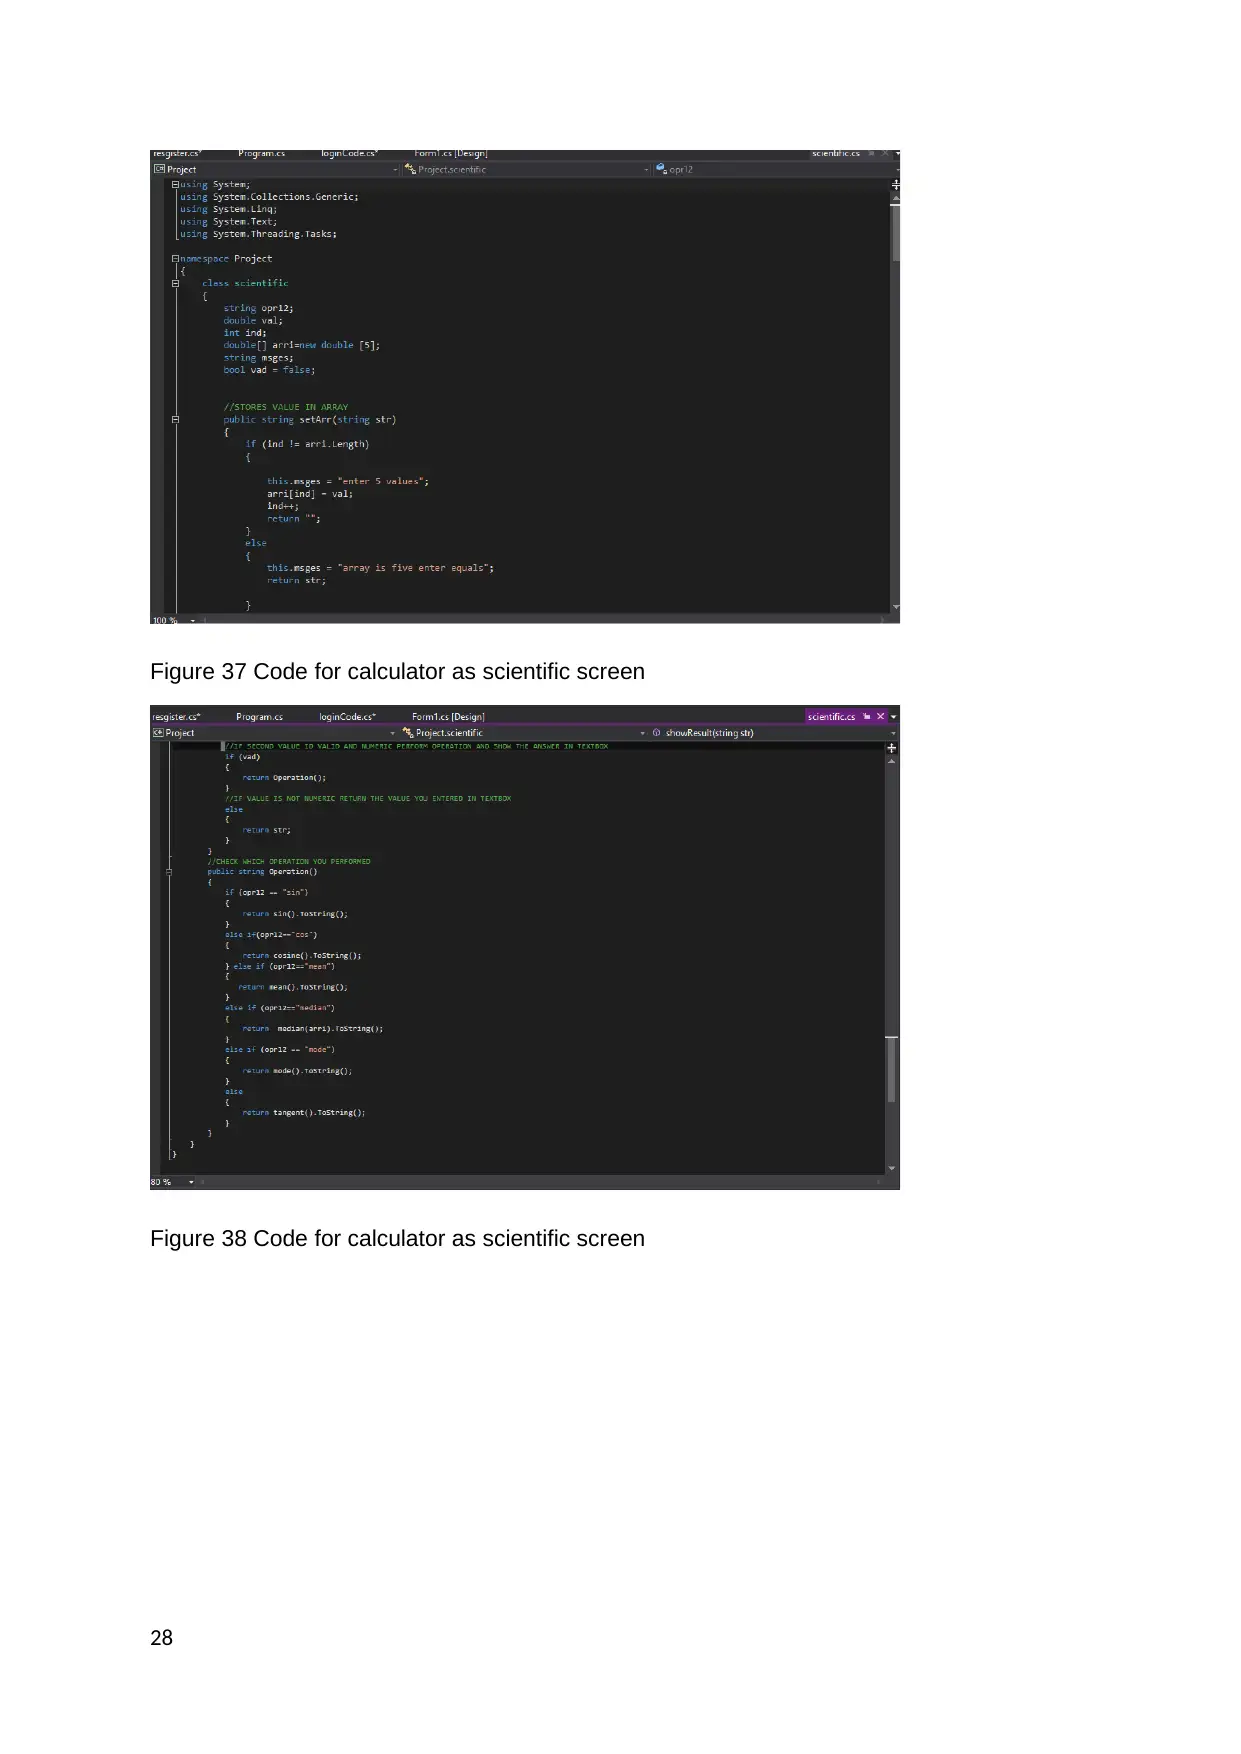
Figure 37 Code for calculator as scientific screen
Figure 38 Code for calculator as scientific screen
28
Figure 38 Code for calculator as scientific screen
28
Secure Best Marks with AI Grader
Need help grading? Try our AI Grader for instant feedback on your assignments.
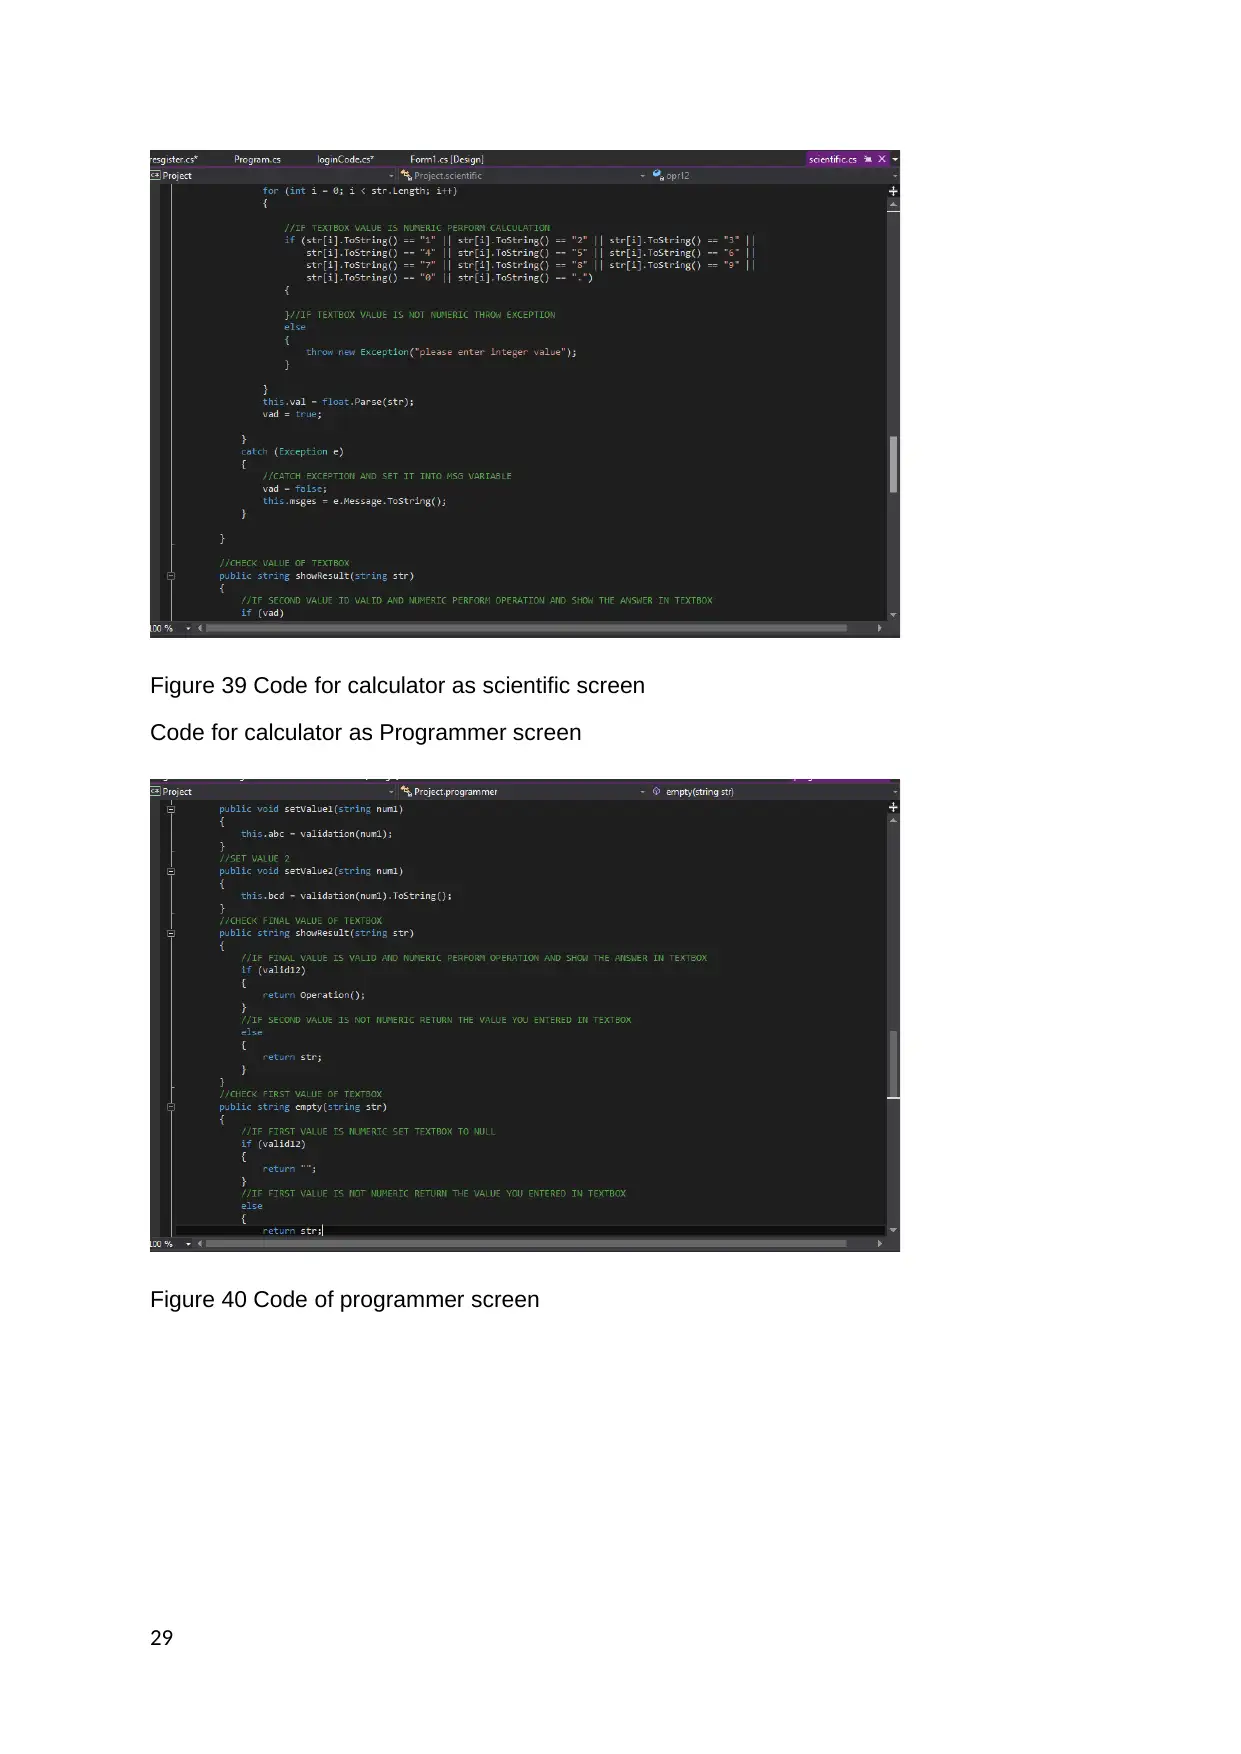
Figure 39 Code for calculator as scientific screen
Code for calculator as Programmer screen
Figure 40 Code of programmer screen
29
Code for calculator as Programmer screen
Figure 40 Code of programmer screen
29
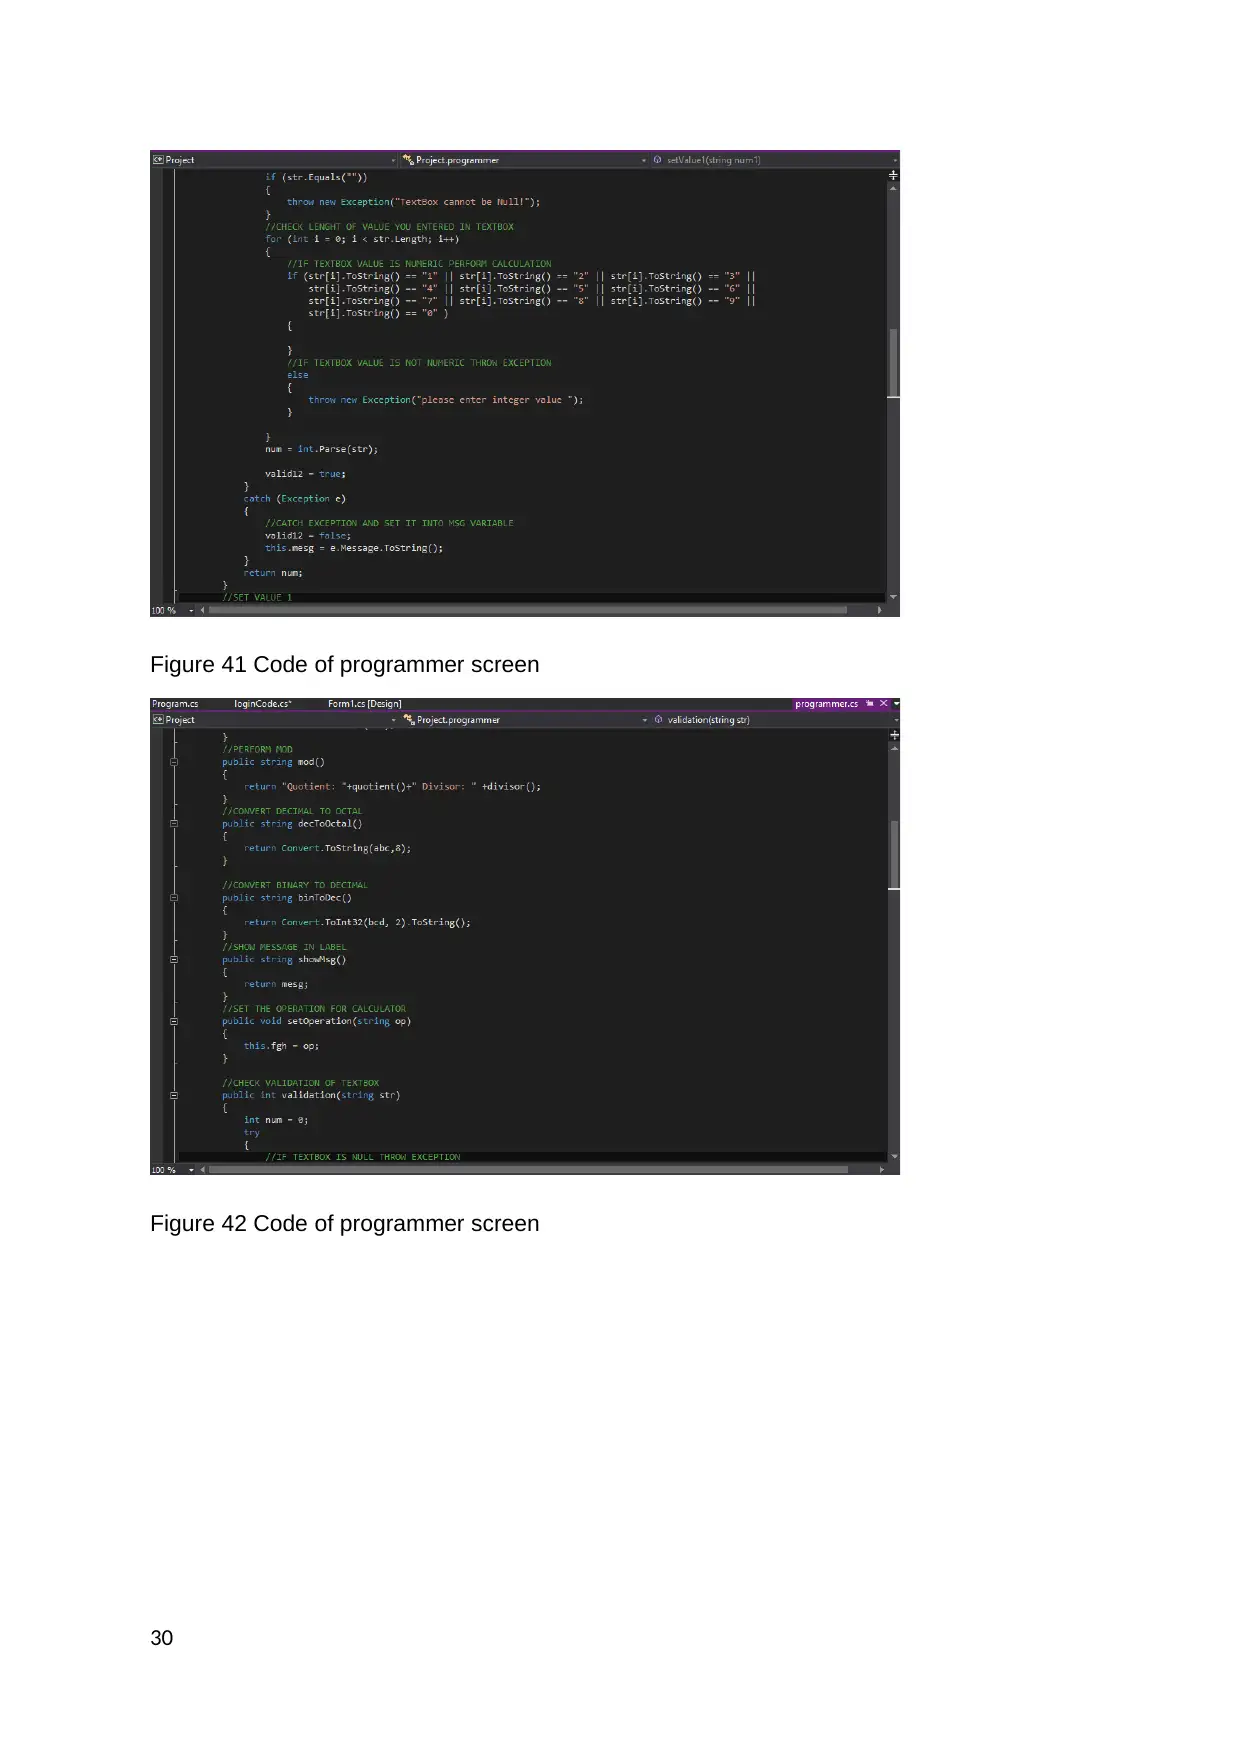
Figure 41 Code of programmer screen
Figure 42 Code of programmer screen
30
Figure 42 Code of programmer screen
30
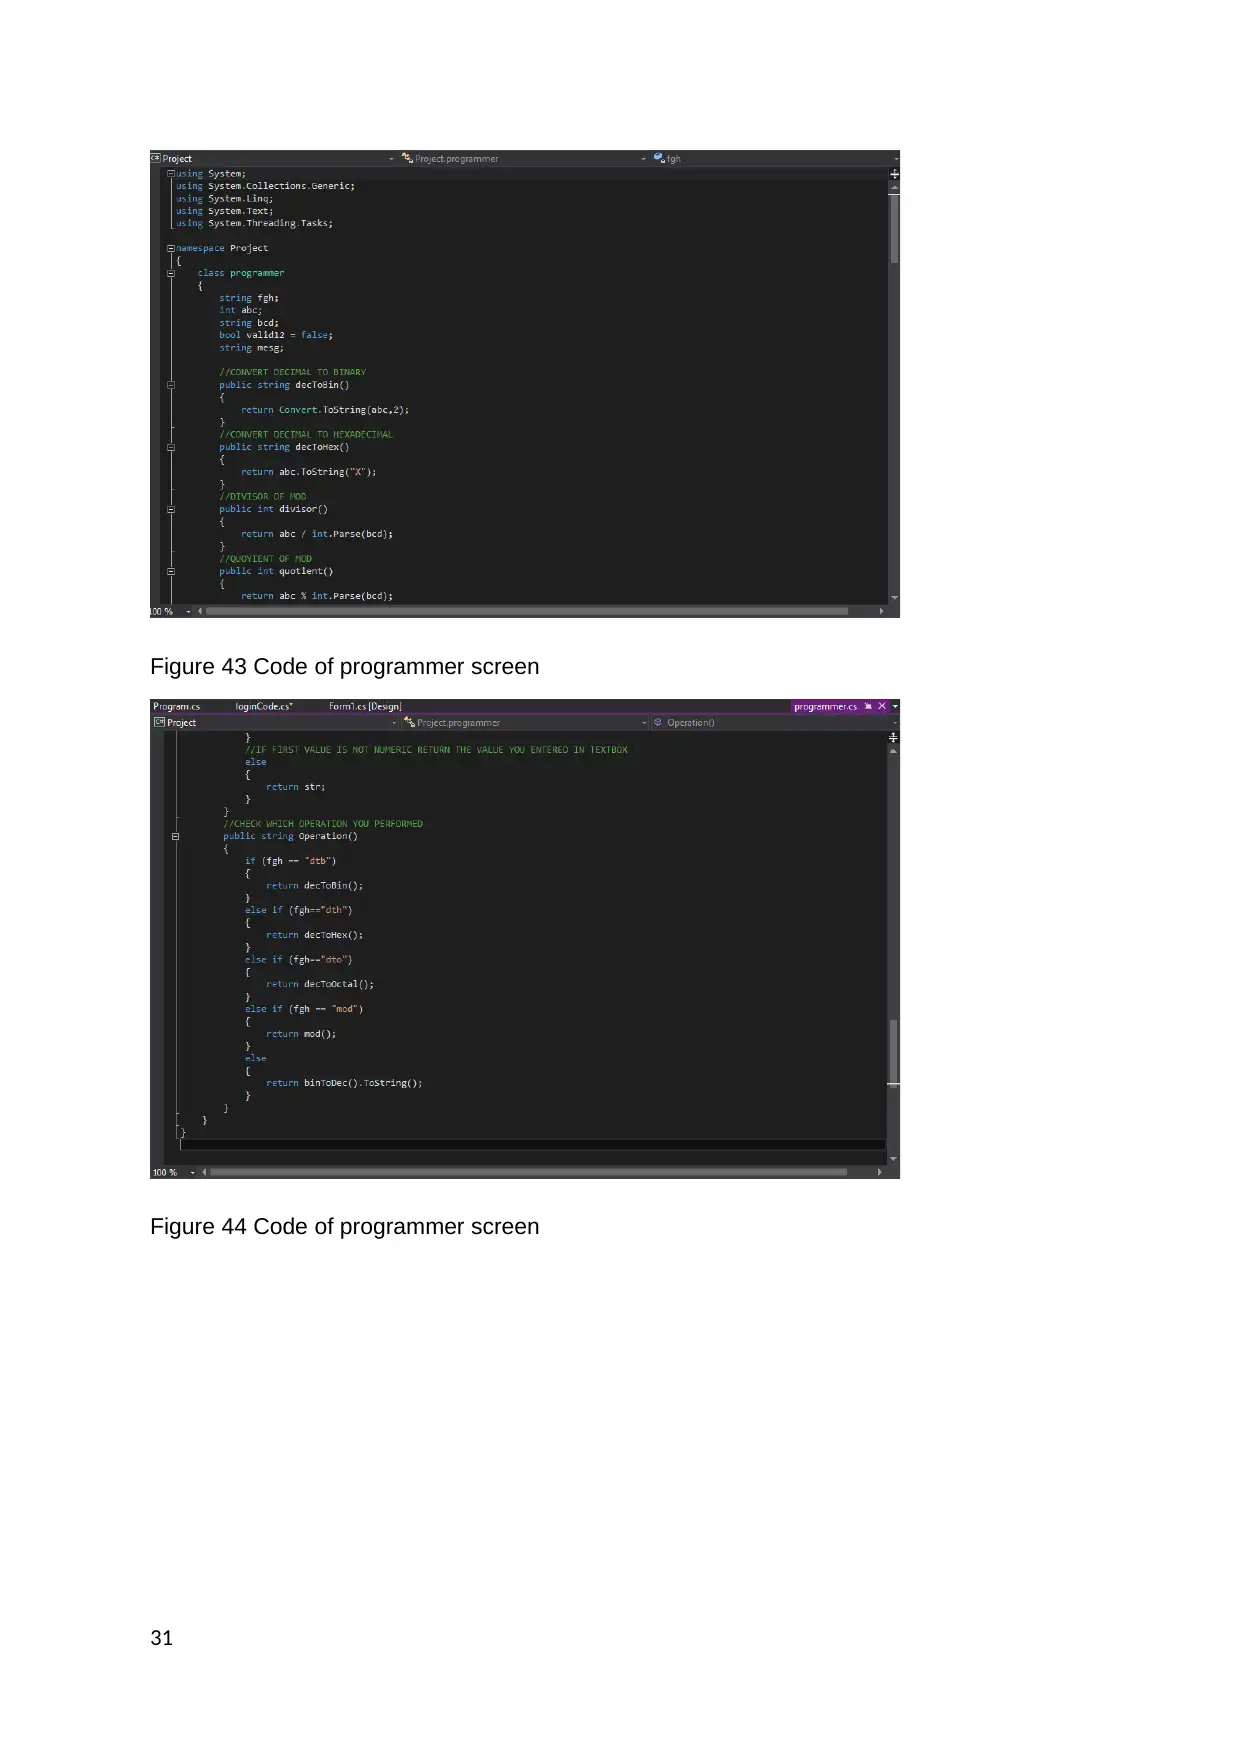
Figure 43 Code of programmer screen
Figure 44 Code of programmer screen
31
Figure 44 Code of programmer screen
31
Paraphrase This Document
Need a fresh take? Get an instant paraphrase of this document with our AI Paraphraser
[P3.2] Programming standards with effective code commenting
Naming conventions: The naming convention is imported in the project by default and its
named is broken with a dot. If naming convention is large in size then it will be broken by
applying a dot. In the program, the object name is not modified if it is already created in the
program by visual studio (Javapoint, n.d).
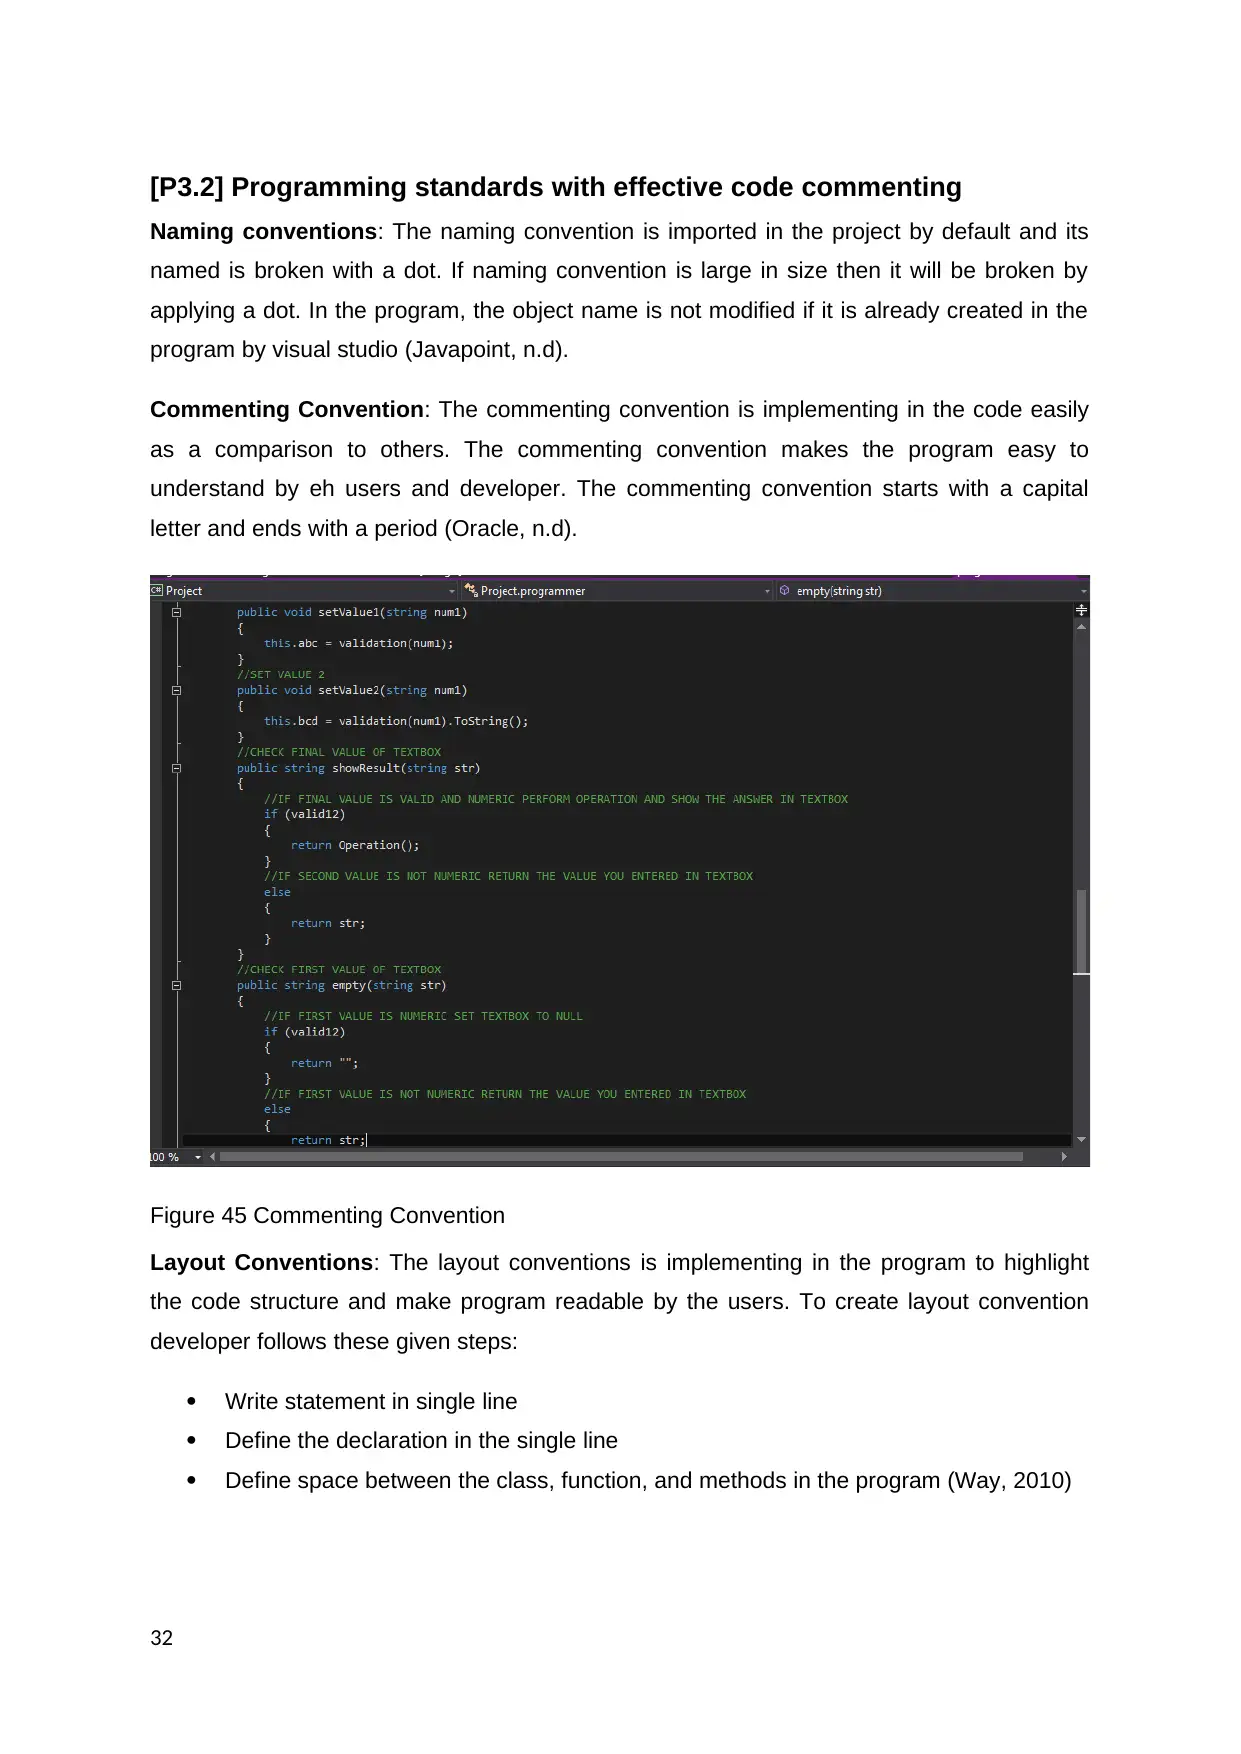
Commenting Convention: The commenting convention is implementing in the code easily
as a comparison to others. The commenting convention makes the program easy to
understand by eh users and developer. The commenting convention starts with a capital
letter and ends with a period (Oracle, n.d).
Figure 45 Commenting Convention
Layout Conventions: The layout conventions is implementing in the program to highlight
the code structure and make program readable by the users. To create layout convention
developer follows these given steps:
Write statement in single line
Define the declaration in the single line
Define space between the class, function, and methods in the program (Way, 2010)
32
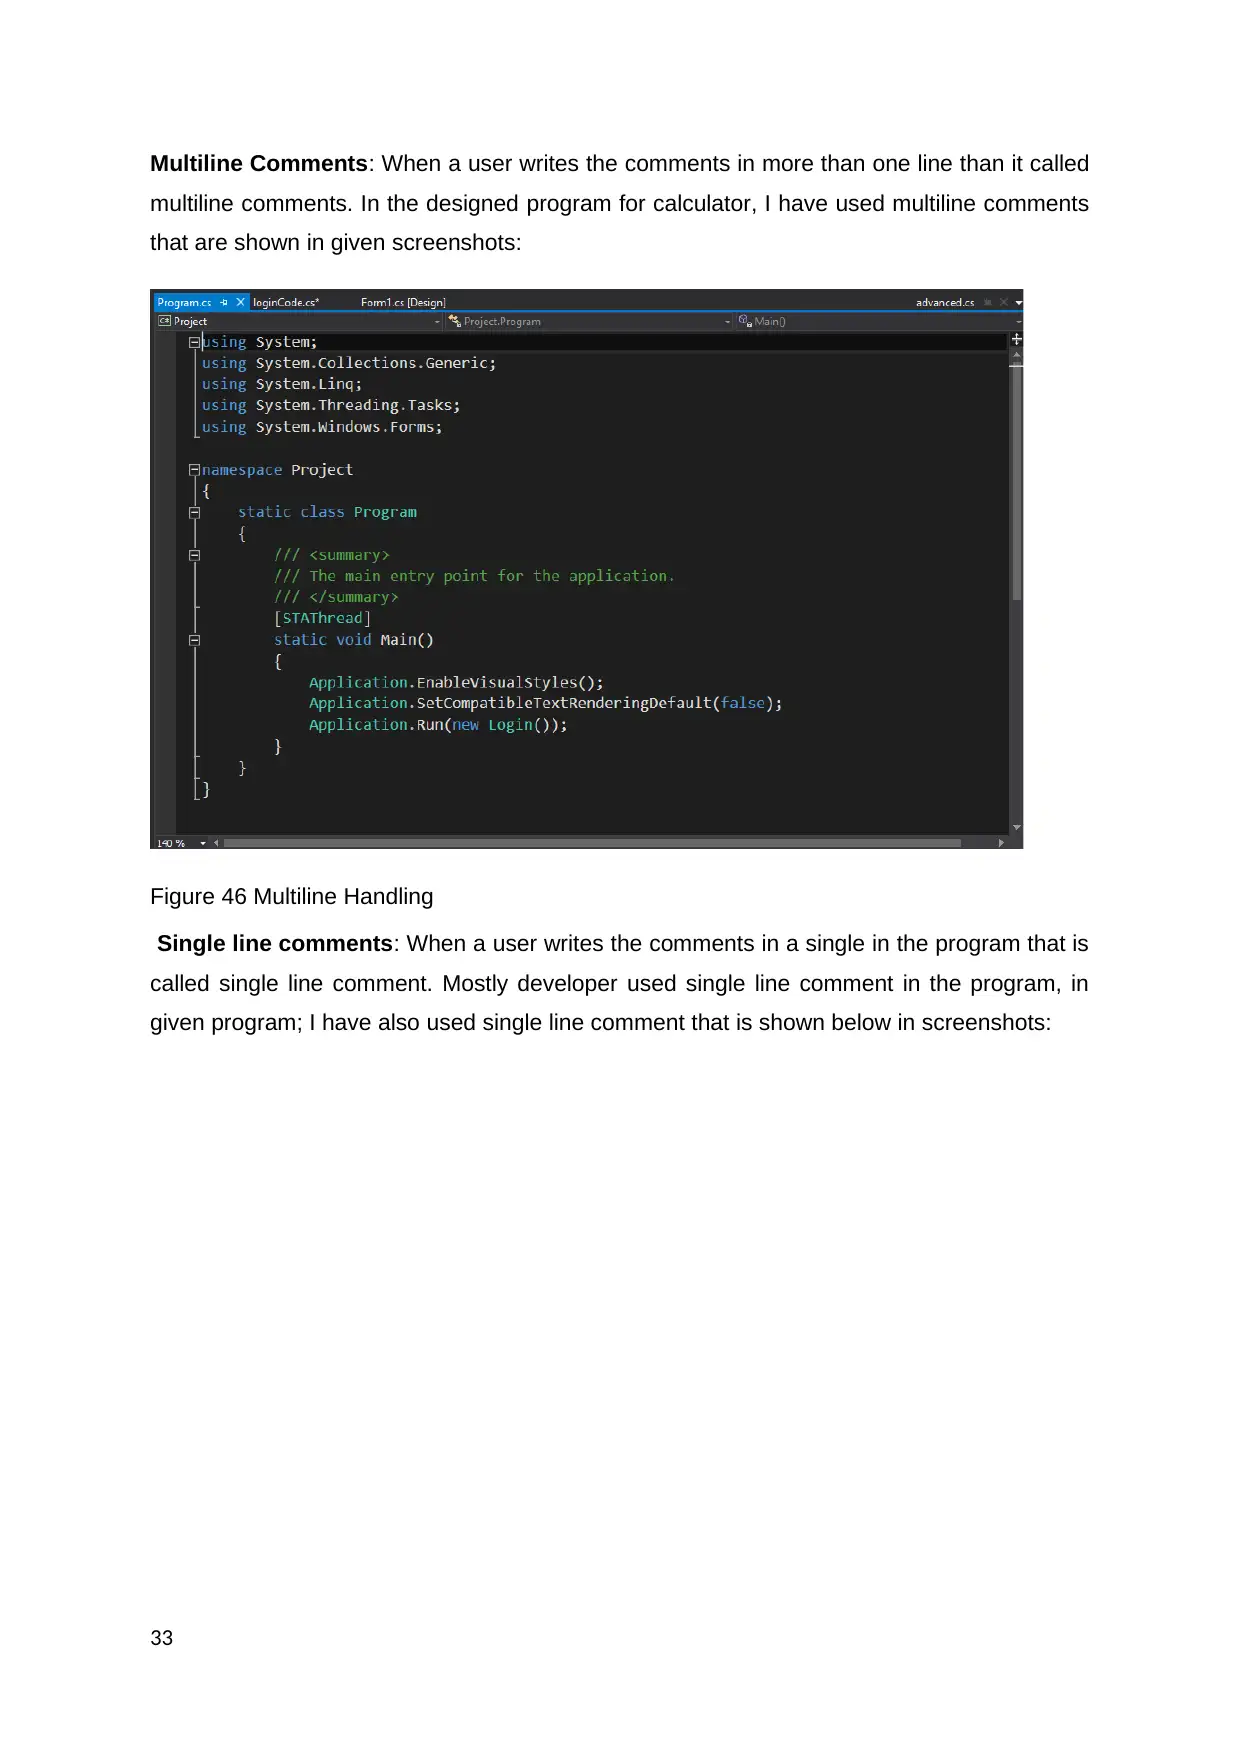
Multiline Comments: When a user writes the comments in more than one line than it called
multiline comments. In the designed program for calculator, I have used multiline comments
that are shown in given screenshots:
Figure 46 Multiline Handling
Single line comments: When a user writes the comments in a single in the program that is
called single line comment. Mostly developer used single line comment in the program, in
given program; I have also used single line comment that is shown below in screenshots:
33
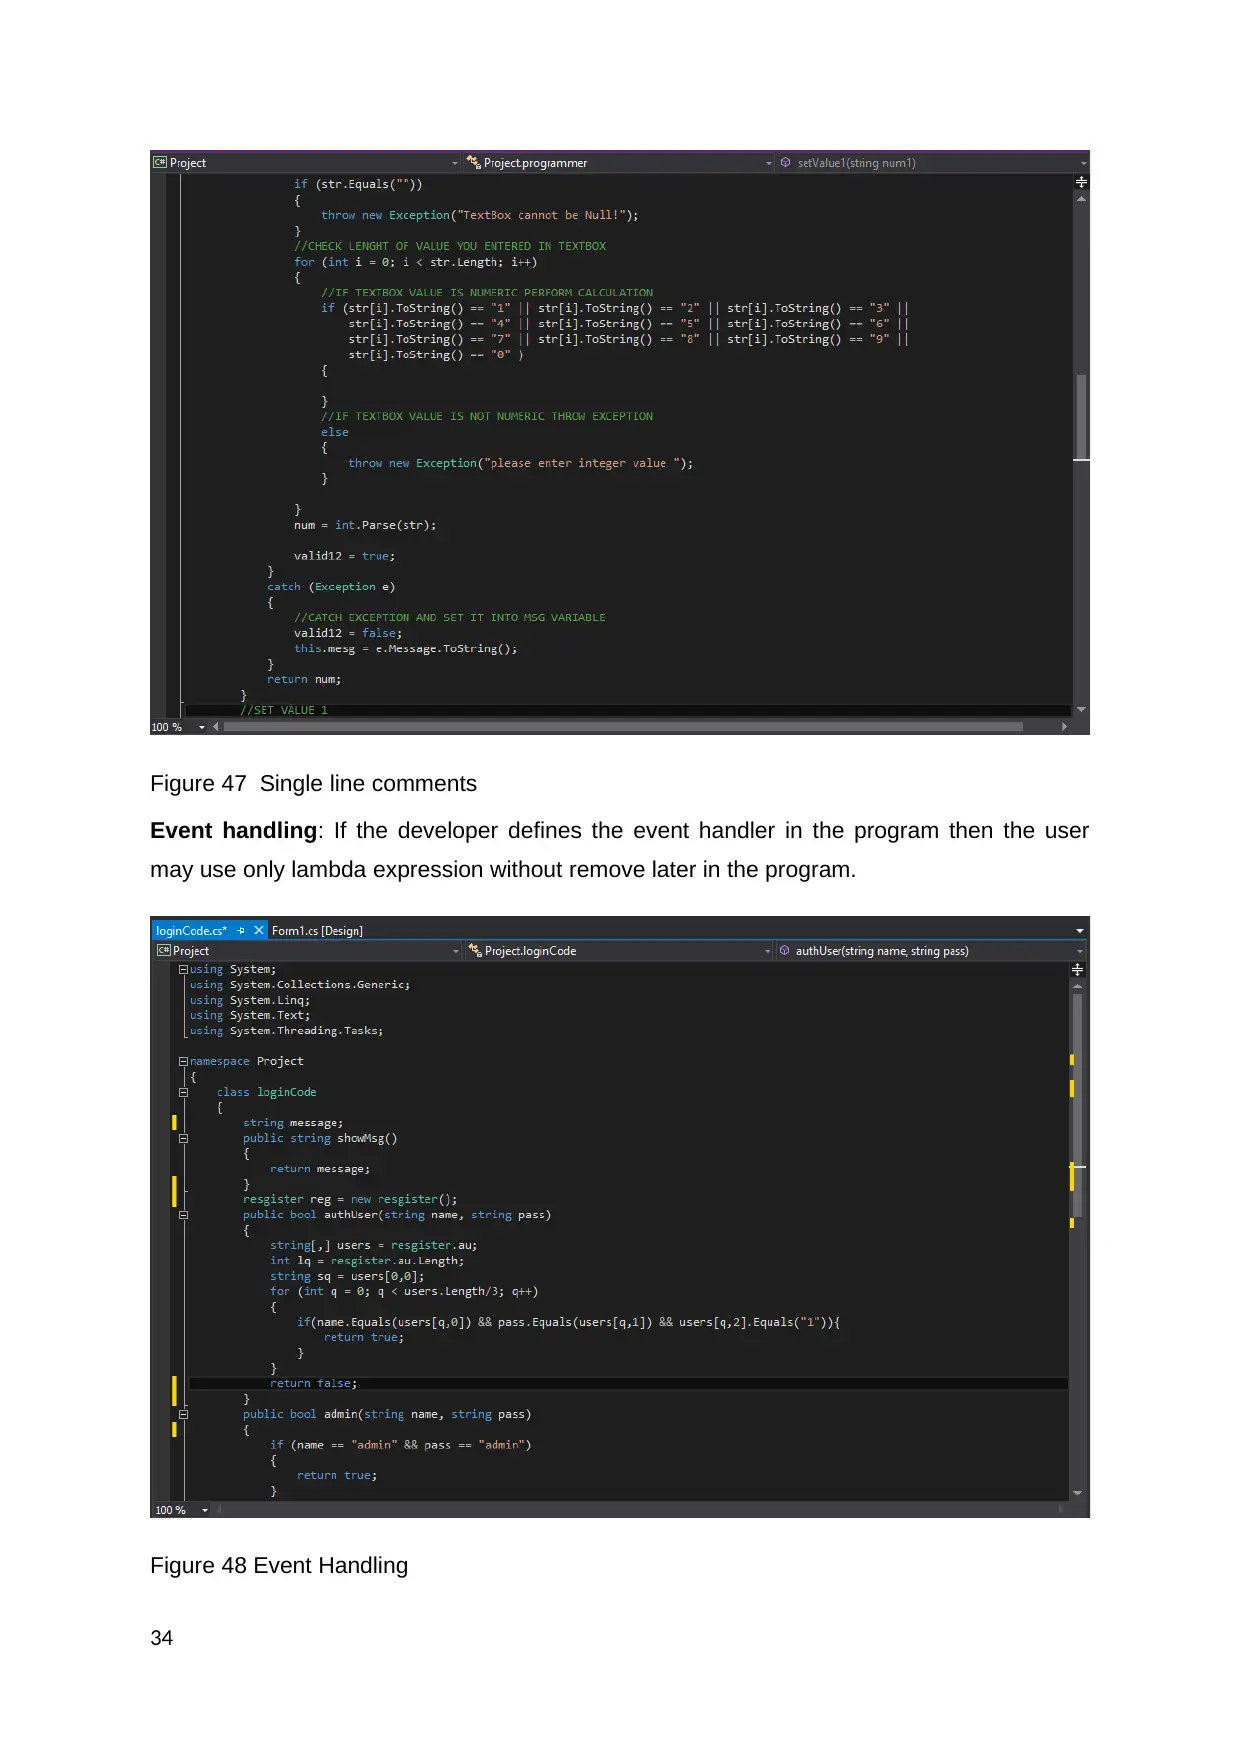
Figure 47 Single line comments
Event handling: If the developer defines the event handler in the program then the user
may use only lambda expression without remove later in the program.
Figure 48 Event Handling
34
Event handling: If the developer defines the event handler in the program then the user
may use only lambda expression without remove later in the program.
Figure 48 Event Handling
34
Secure Best Marks with AI Grader
Need help grading? Try our AI Grader for instant feedback on your assignments.
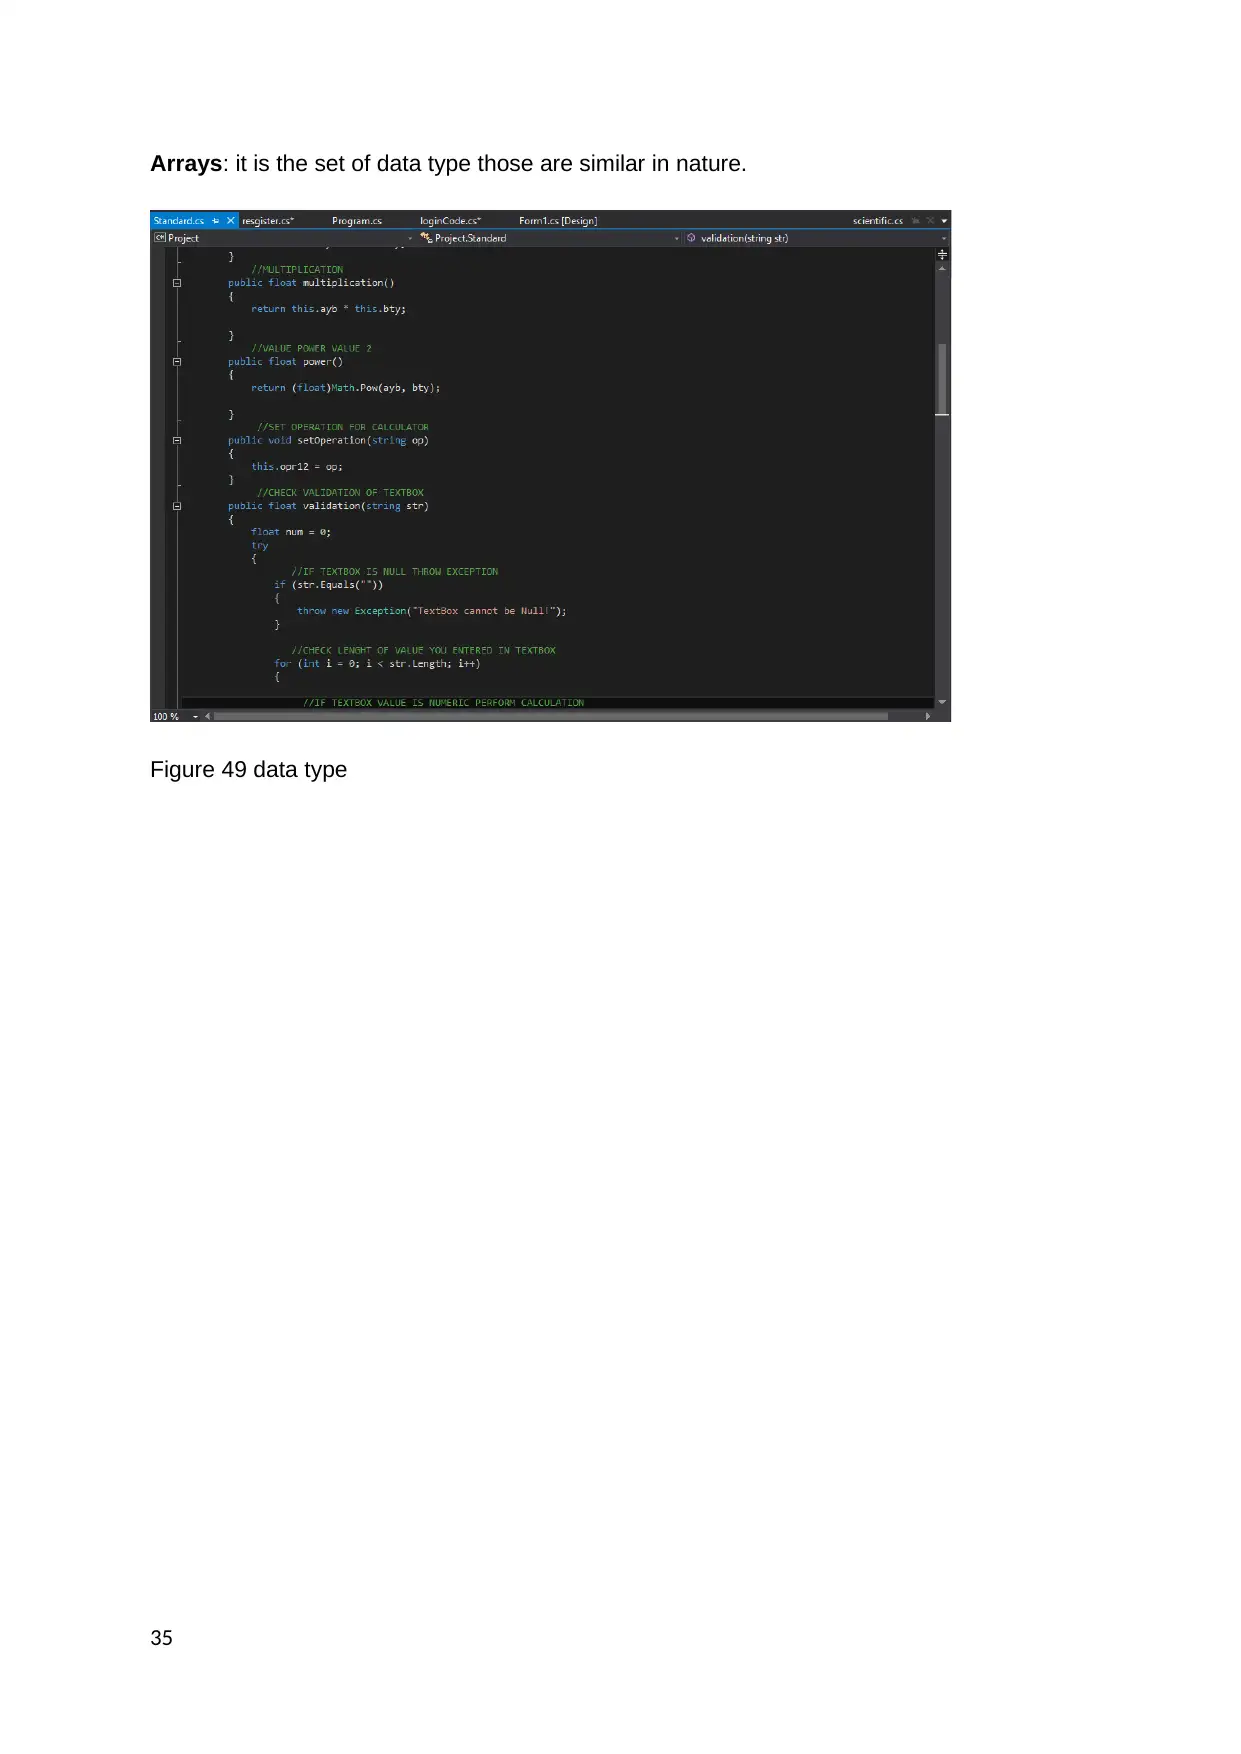
Arrays: it is the set of data type those are similar in nature.
Figure 49 data type
35
Figure 49 data type
35
[P3.3, D2] Implement object behaviors using control structures to meet the design algorithms
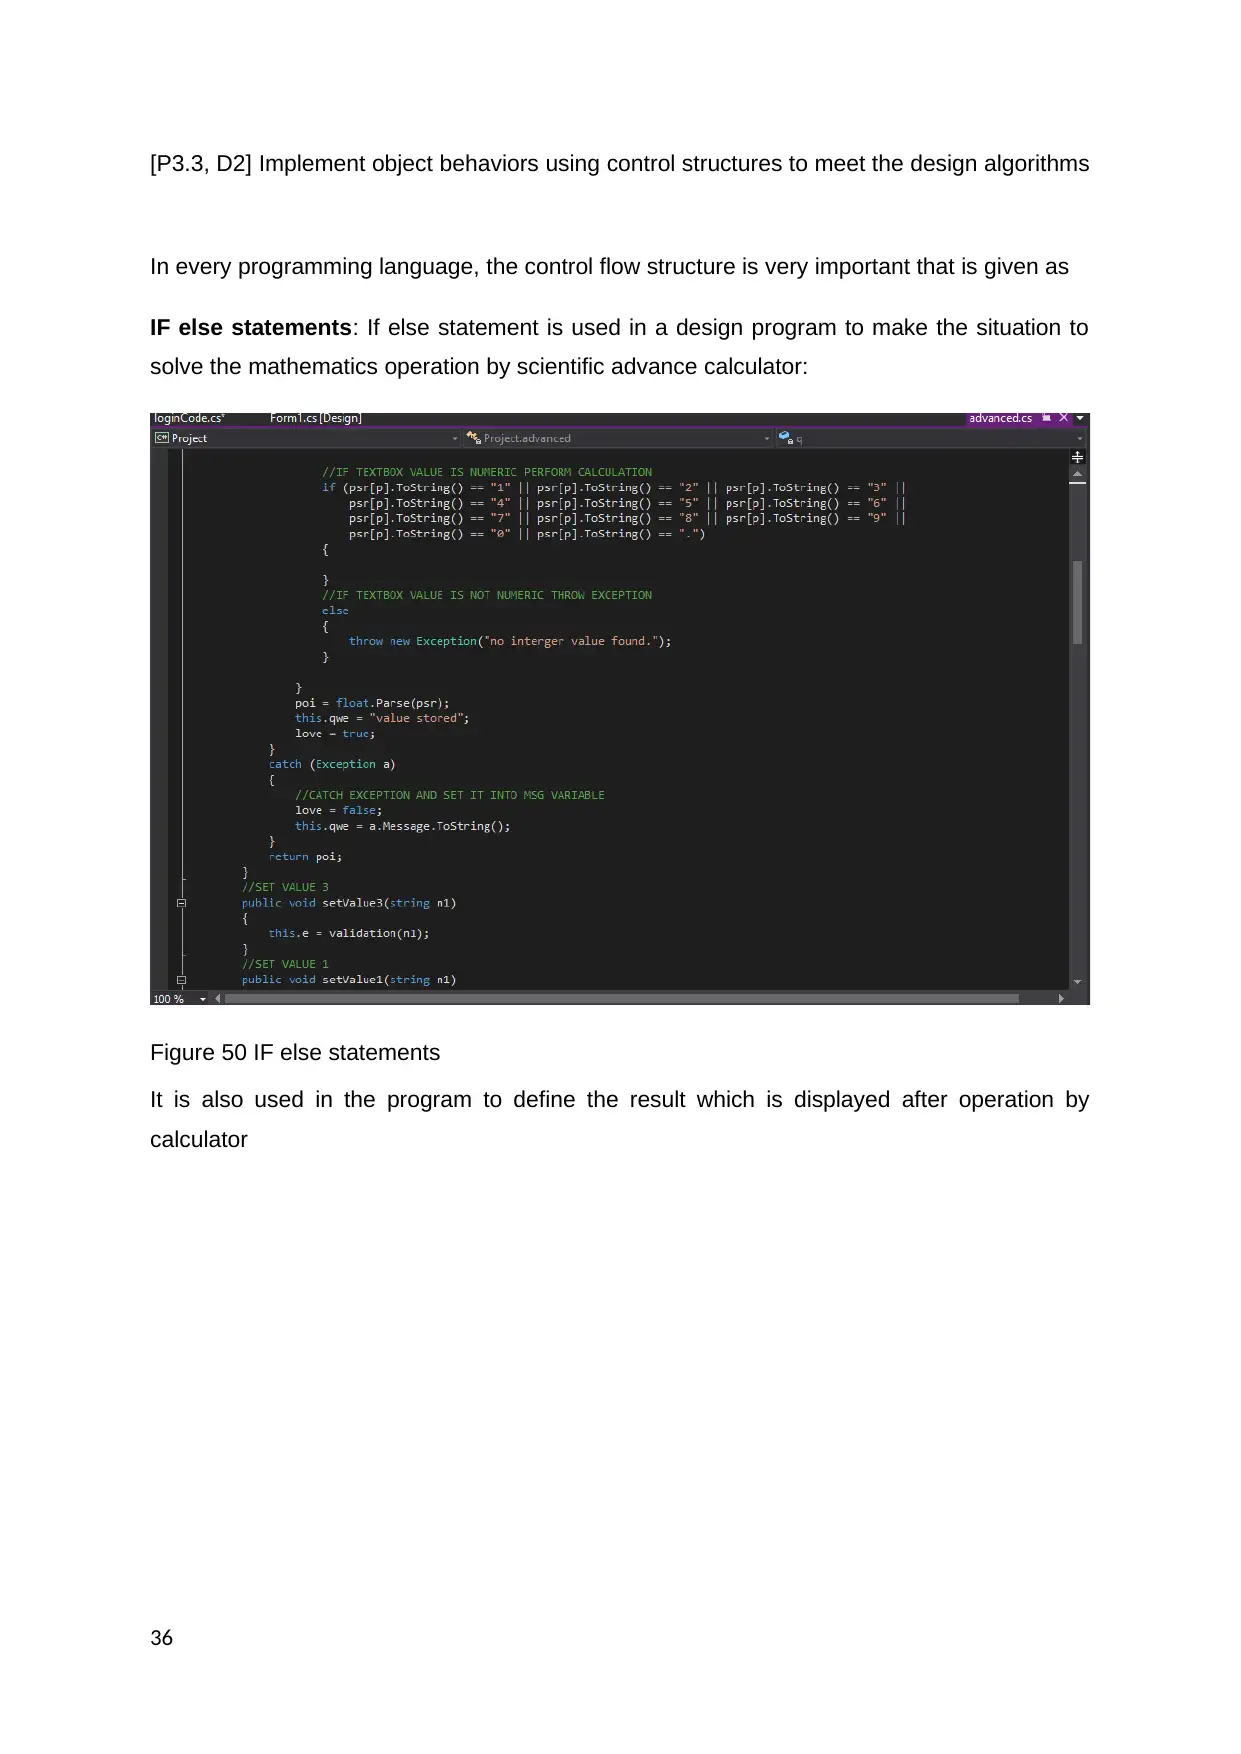
In every programming language, the control flow structure is very important that is given as
IF else statements: If else statement is used in a design program to make the situation to
solve the mathematics operation by scientific advance calculator:
Figure 50 IF else statements
It is also used in the program to define the result which is displayed after operation by
calculator
36
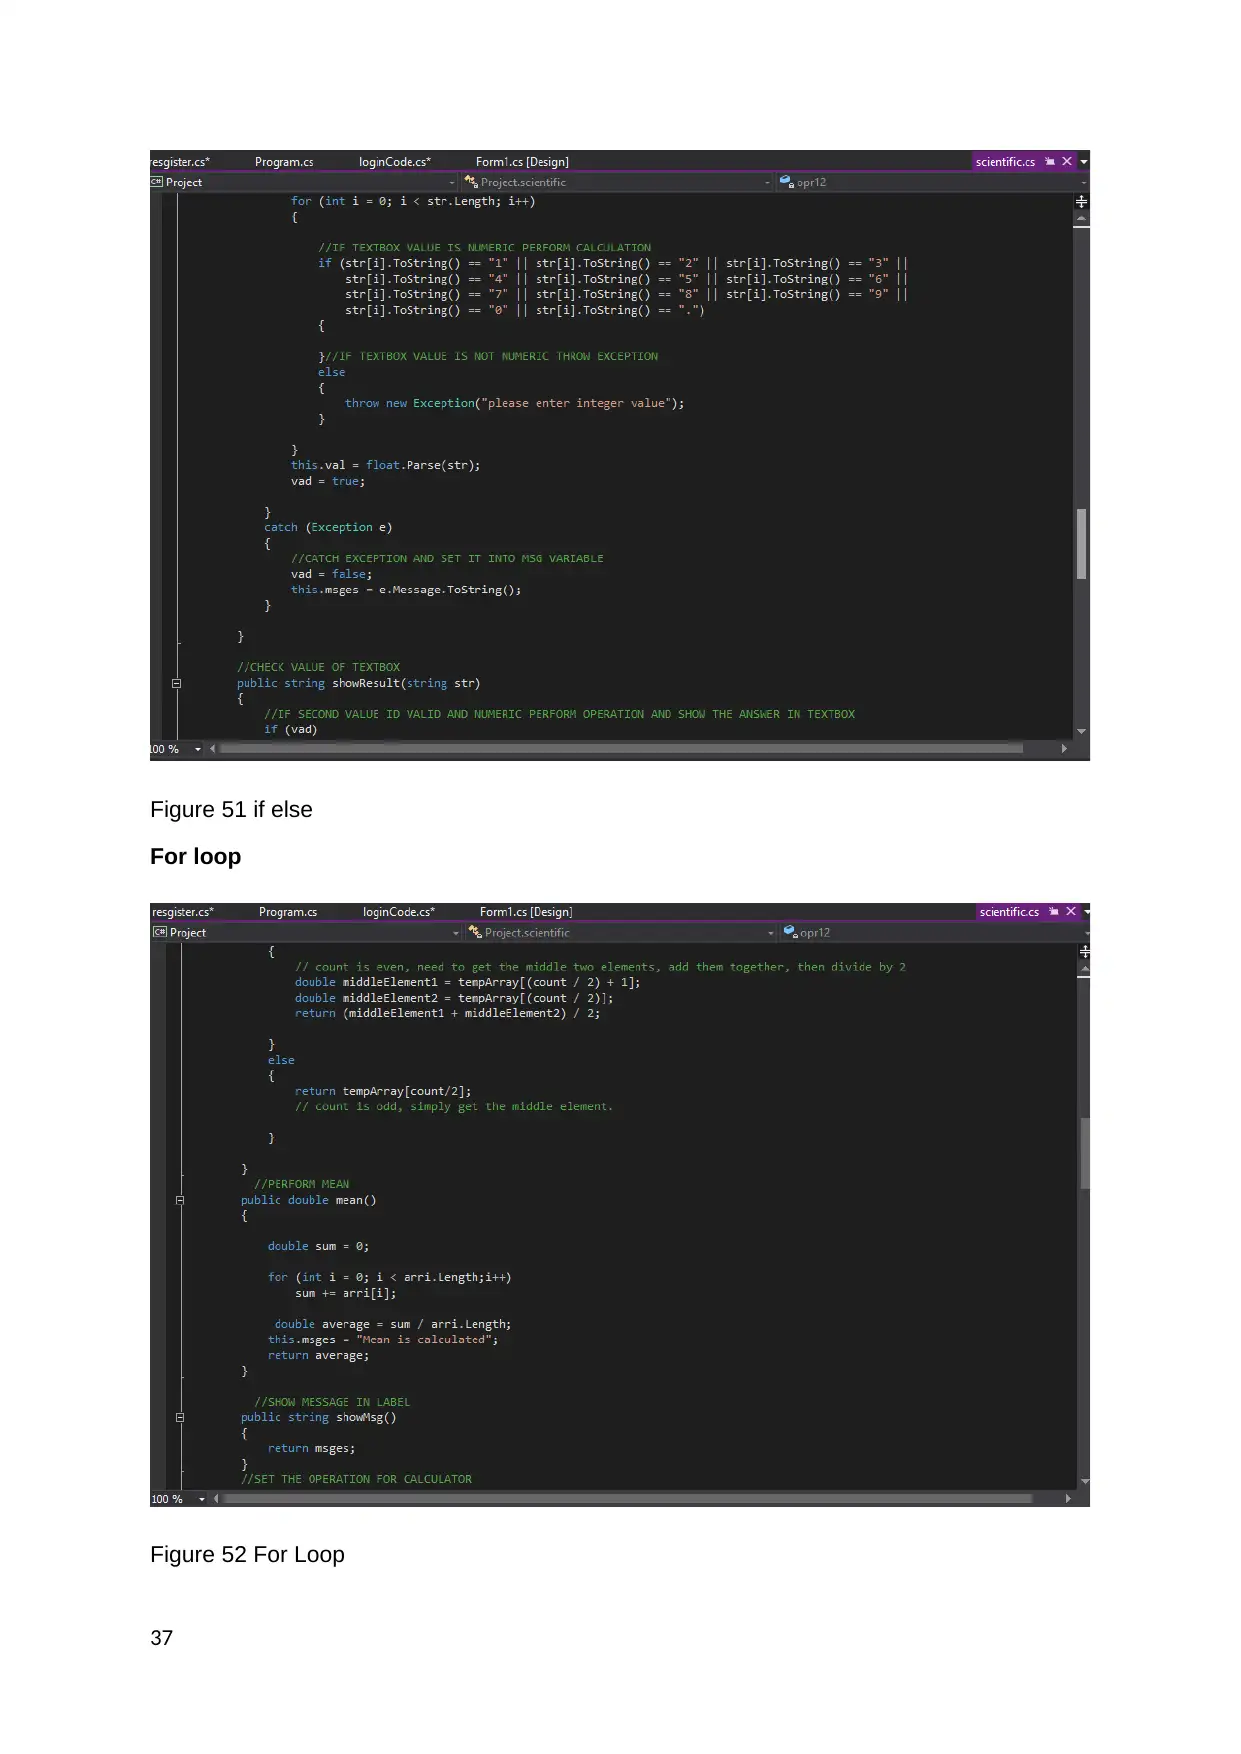
Figure 51 if else
For loop
Figure 52 For Loop
37
For loop
Figure 52 For Loop
37
Paraphrase This Document
Need a fresh take? Get an instant paraphrase of this document with our AI Paraphraser
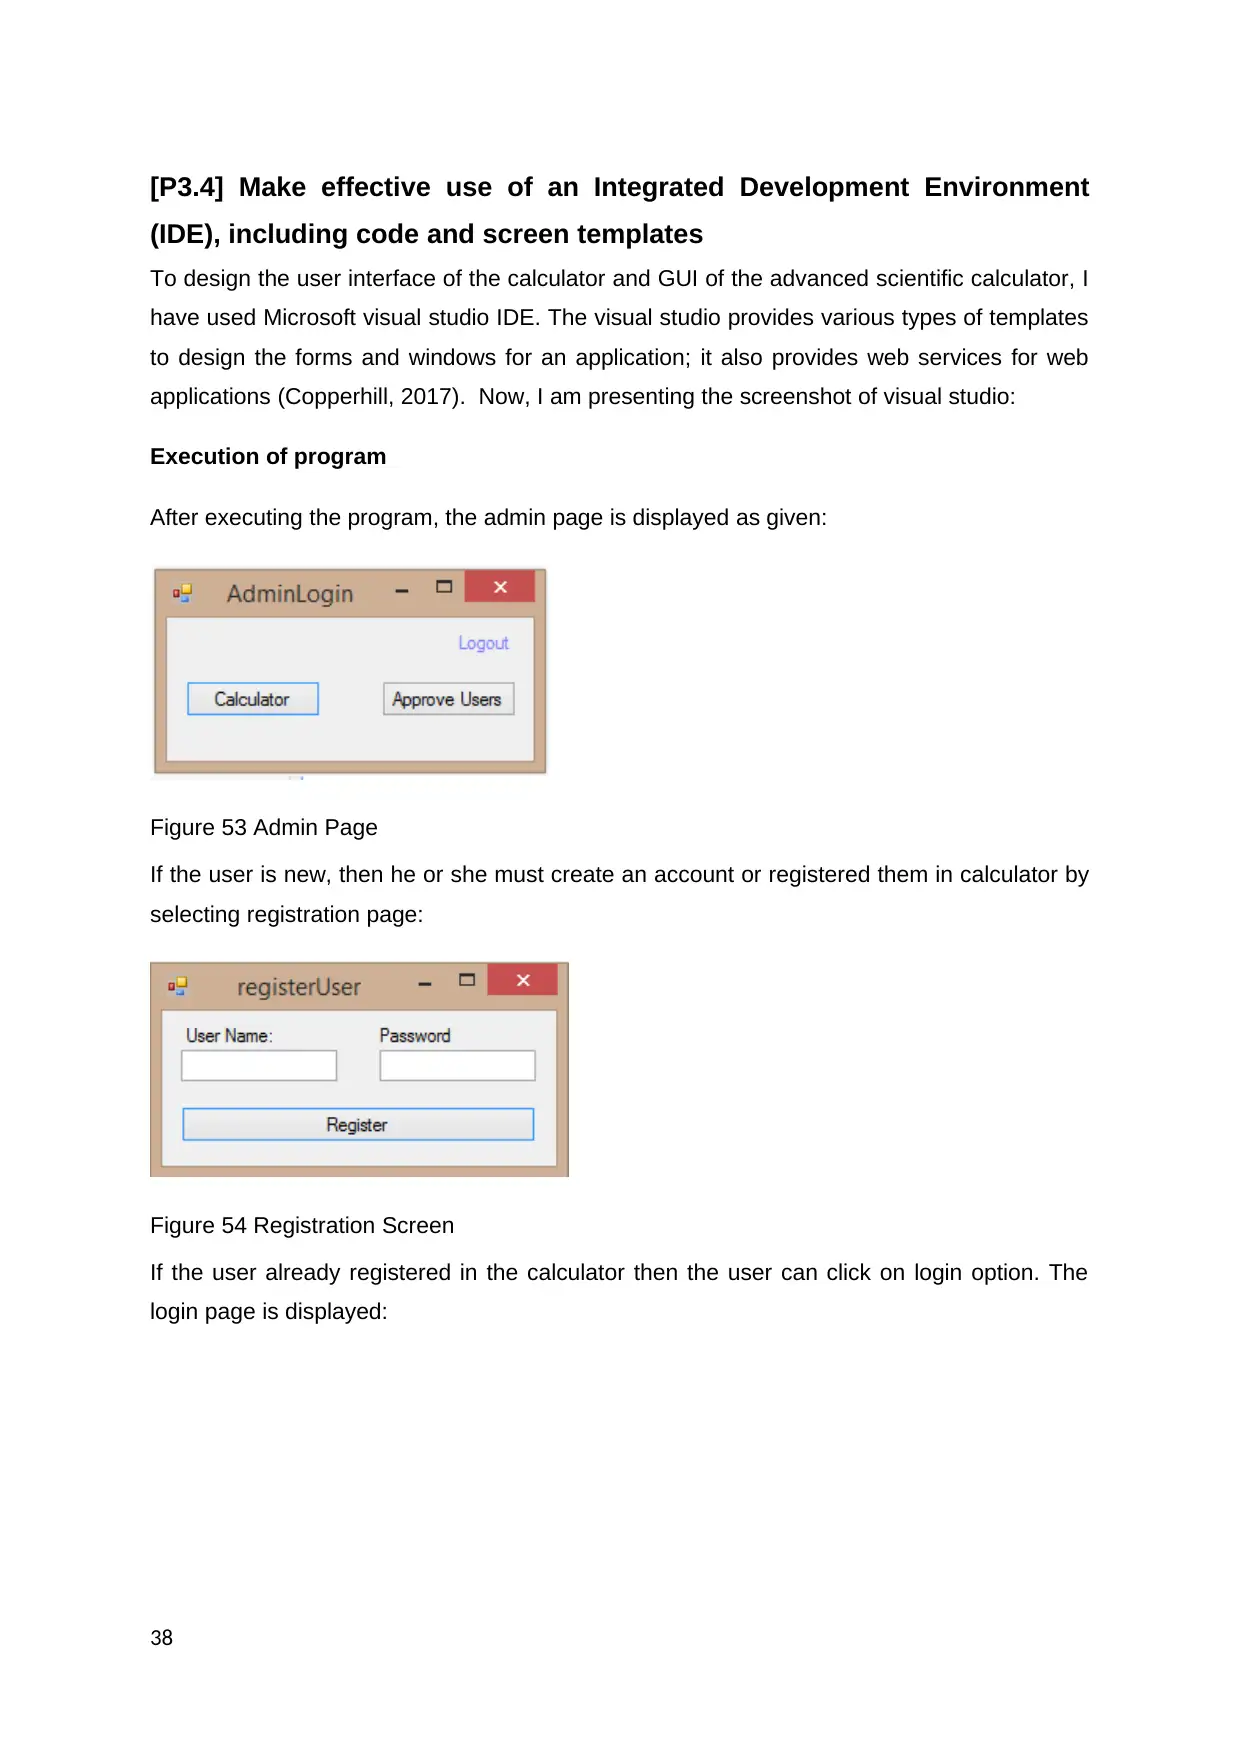
[P3.4] Make effective use of an Integrated Development Environment
(IDE), including code and screen templates
To design the user interface of the calculator and GUI of the advanced scientific calculator, I
have used Microsoft visual studio IDE. The visual studio provides various types of templates
to design the forms and windows for an application; it also provides web services for web
applications (Copperhill, 2017). Now, I am presenting the screenshot of visual studio:
Execution of program
After executing the program, the admin page is displayed as given:
Figure 53 Admin Page
If the user is new, then he or she must create an account or registered them in calculator by
selecting registration page:
Figure 54 Registration Screen
If the user already registered in the calculator then the user can click on login option. The
login page is displayed:
38
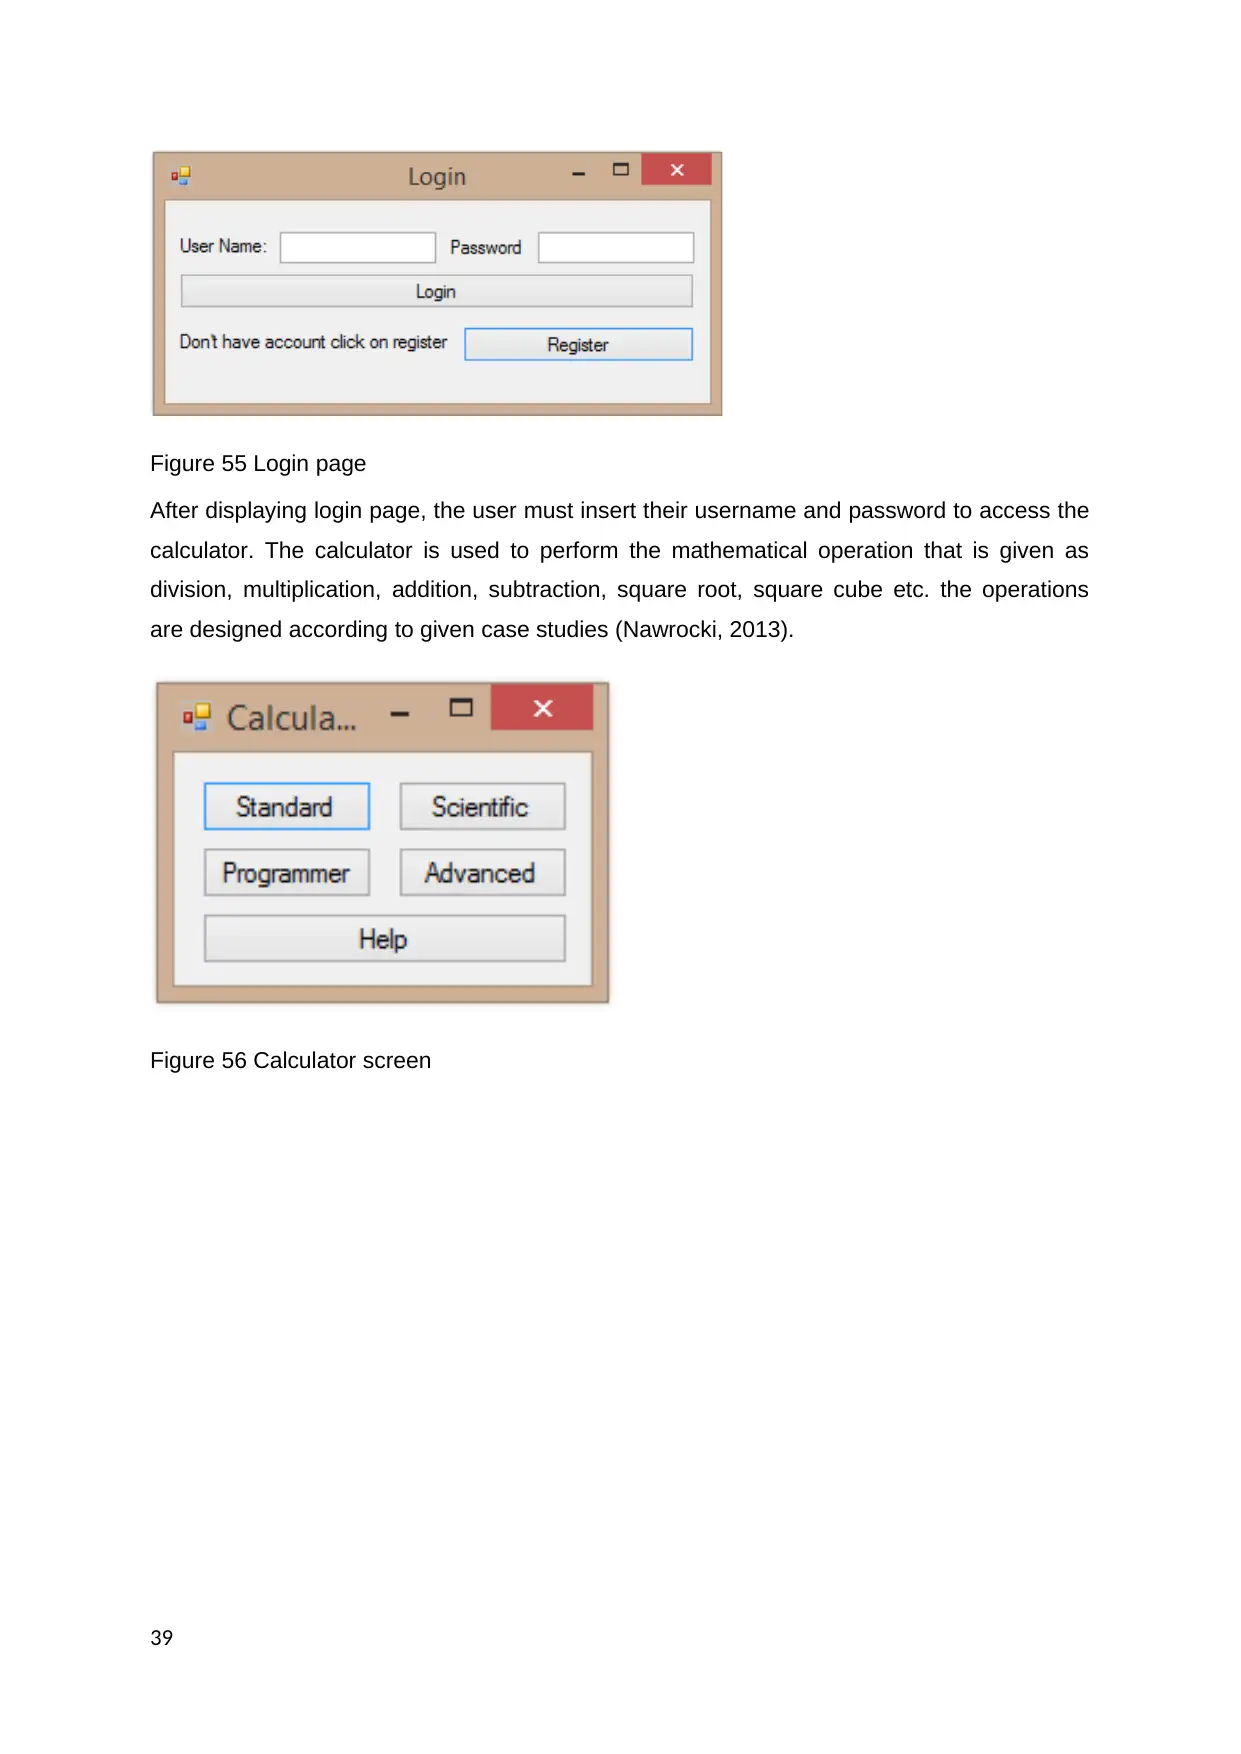
Figure 55 Login page
After displaying login page, the user must insert their username and password to access the
calculator. The calculator is used to perform the mathematical operation that is given as
division, multiplication, addition, subtraction, square root, square cube etc. the operations
are designed according to given case studies (Nawrocki, 2013).
Figure 56 Calculator screen
39
LO4 Be able to test and document object-oriented programming
solutions
[P4.1, D3] critically reviews and test an object orientated programming
solution you developed for the given scenario
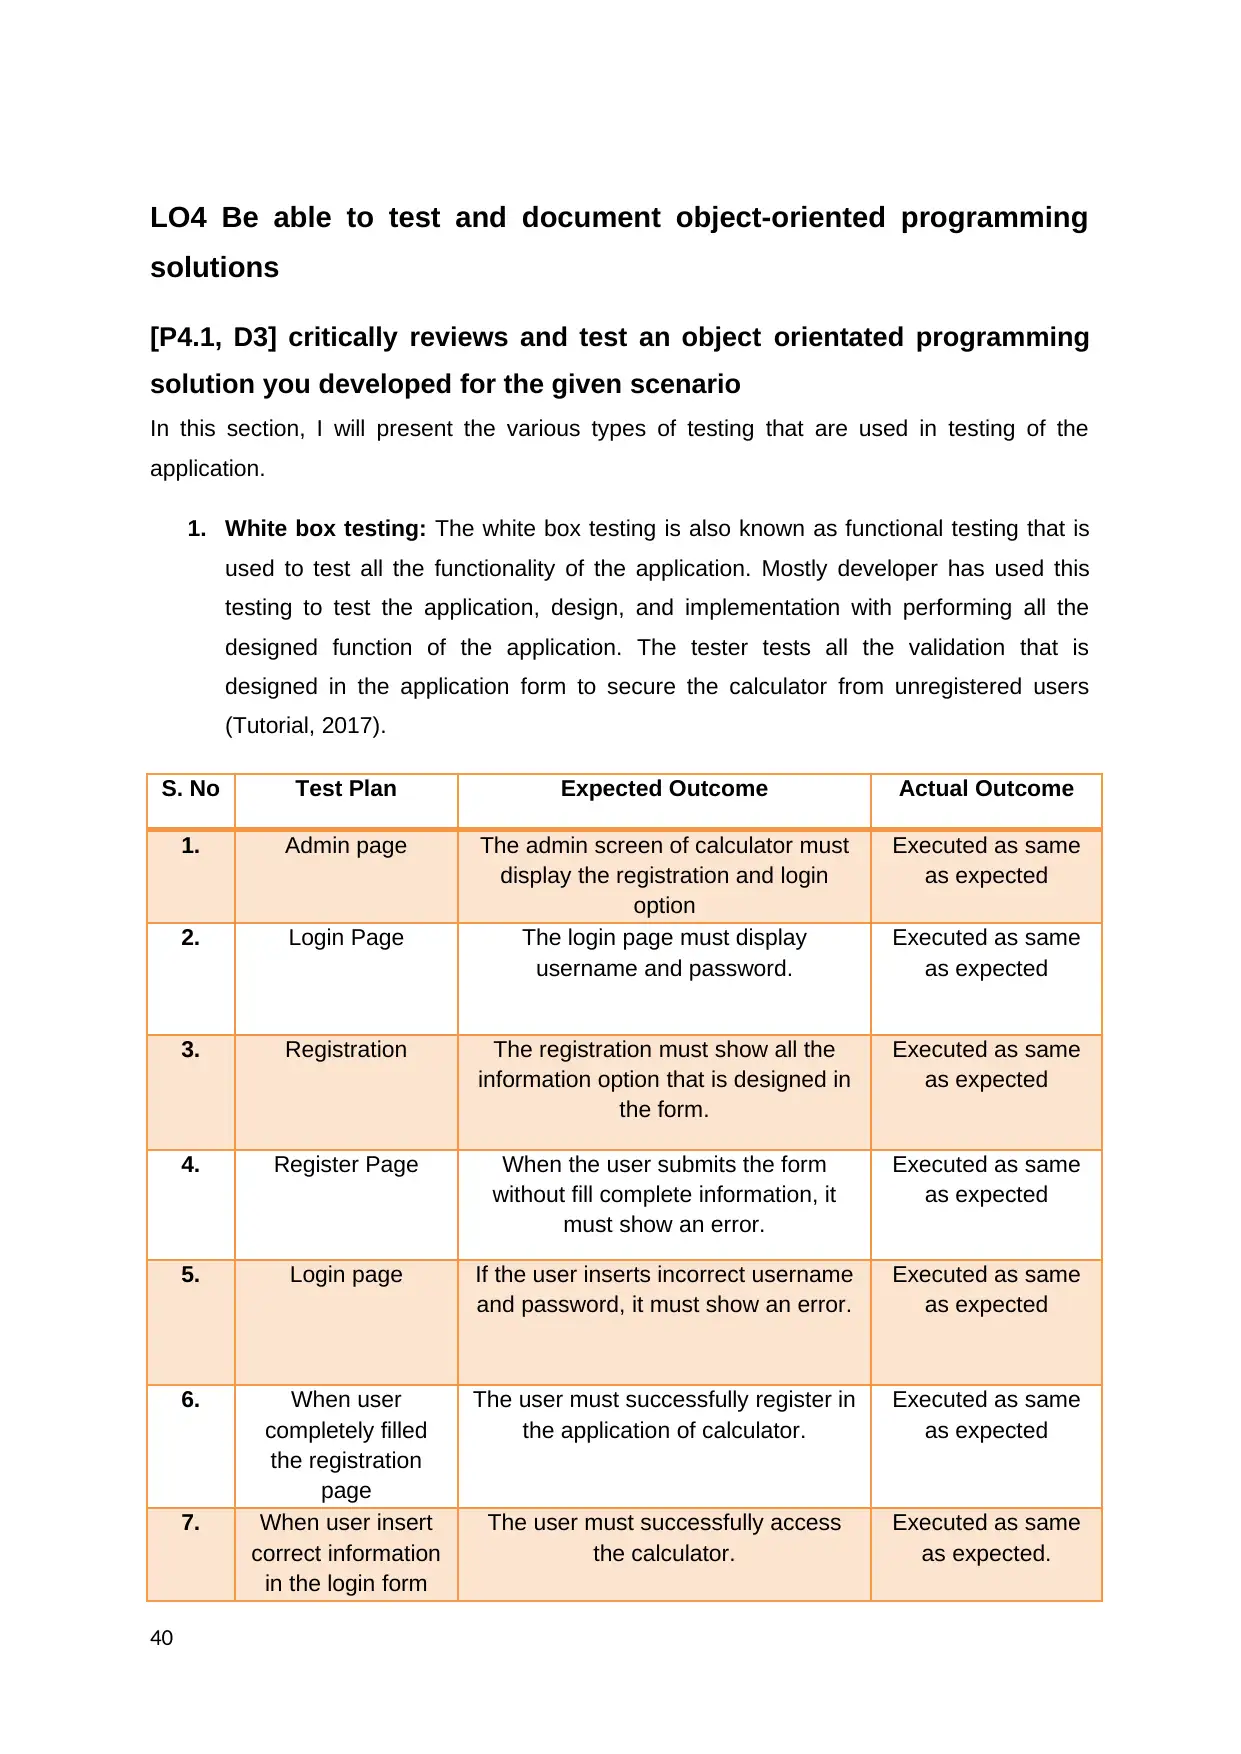
In this section, I will present the various types of testing that are used in testing of the
application.
1. White box testing: The white box testing is also known as functional testing that is
used to test all the functionality of the application. Mostly developer has used this
testing to test the application, design, and implementation with performing all the
designed function of the application. The tester tests all the validation that is
designed in the application form to secure the calculator from unregistered users
(Tutorial, 2017).
S. No Test Plan Expected Outcome Actual Outcome
1. Admin page The admin screen of calculator must
display the registration and login
option
Executed as same
as expected
2. Login Page The login page must display
username and password.
Executed as same
as expected
3. Registration The registration must show all the
information option that is designed in
the form.
Executed as same
as expected
4. Register Page When the user submits the form
without fill complete information, it
must show an error.
Executed as same
as expected
5. Login page If the user inserts incorrect username
and password, it must show an error.
Executed as same
as expected
6. When user
completely filled
the registration
page
The user must successfully register in
the application of calculator.
Executed as same
as expected
7. When user insert
correct information
in the login form
The user must successfully access
the calculator.
Executed as same
as expected.
40
Secure Best Marks with AI Grader
Need help grading? Try our AI Grader for instant feedback on your assignments.
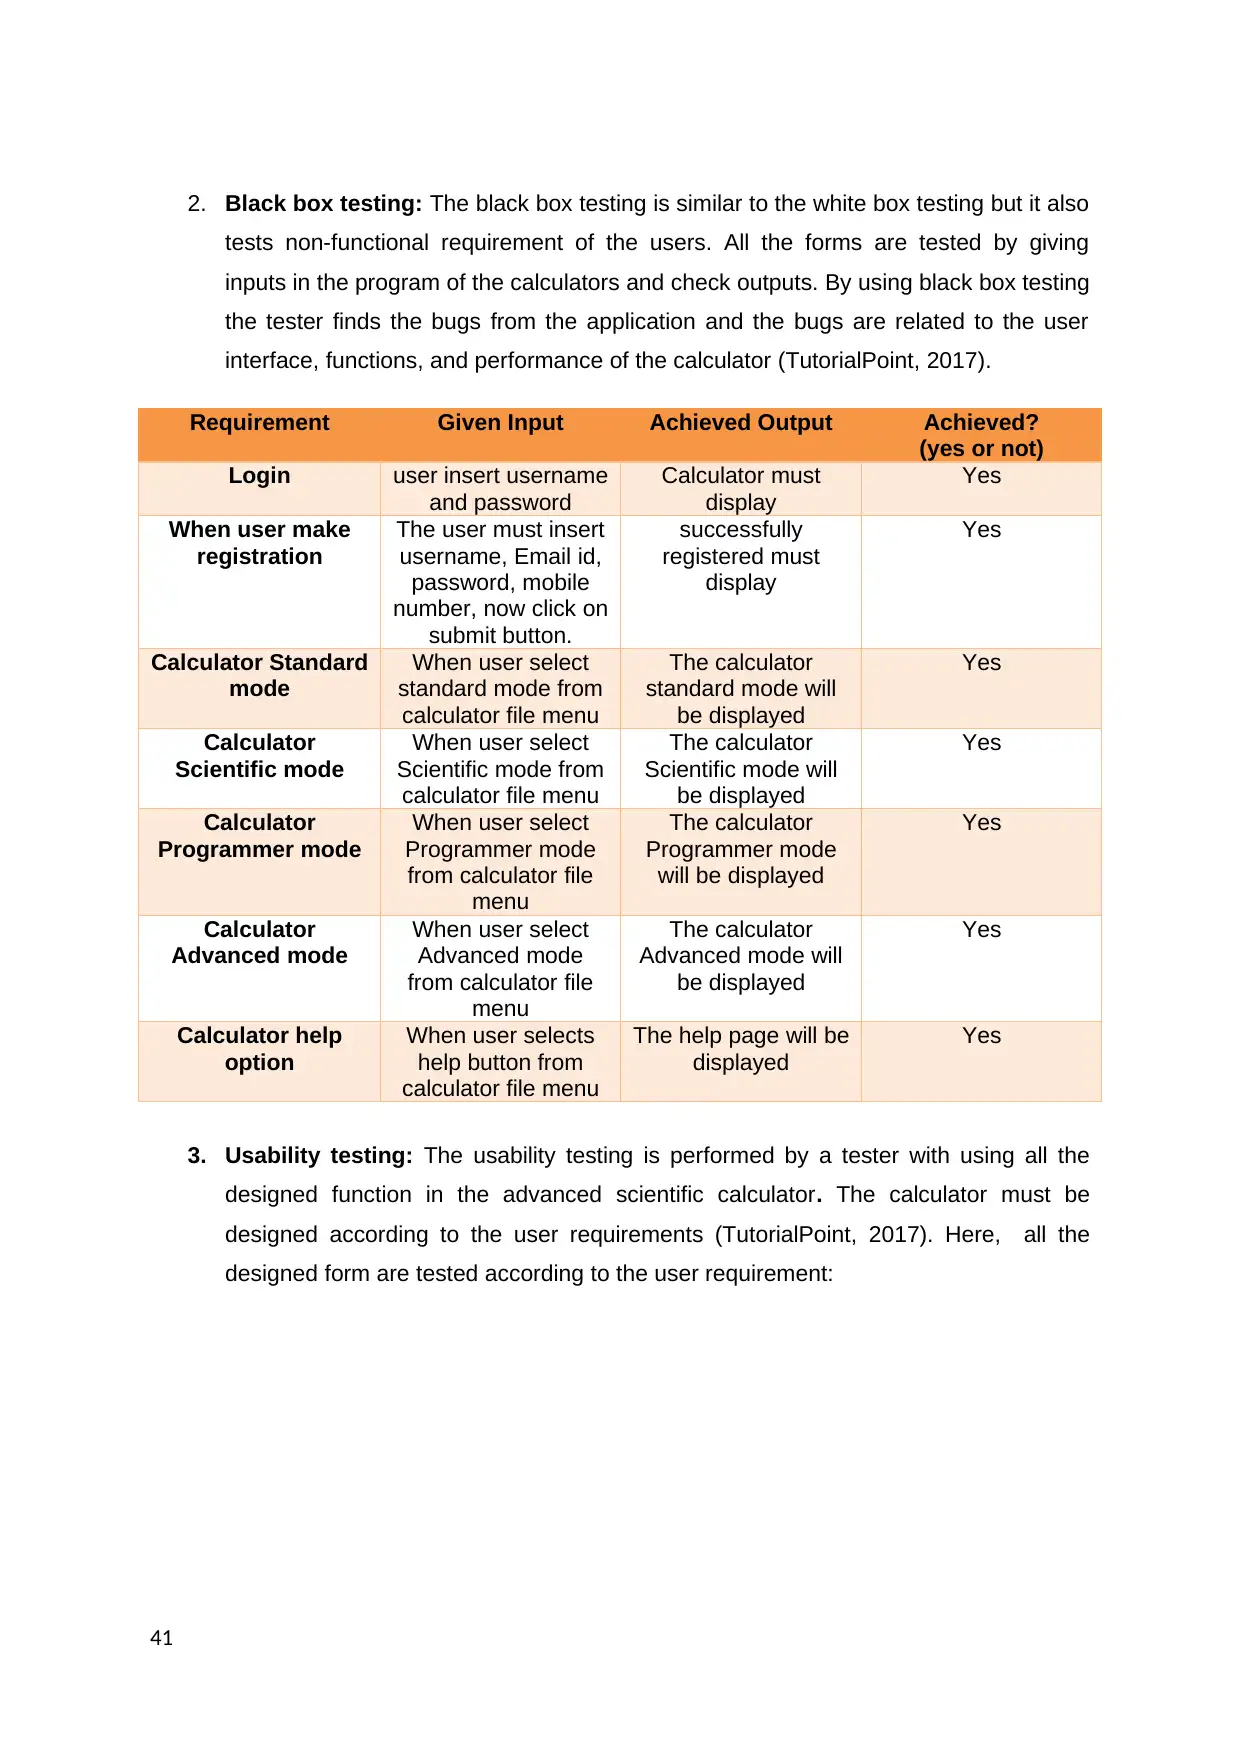
2. Black box testing: The black box testing is similar to the white box testing but it also
tests non-functional requirement of the users. All the forms are tested by giving
inputs in the program of the calculators and check outputs. By using black box testing
the tester finds the bugs from the application and the bugs are related to the user
interface, functions, and performance of the calculator (TutorialPoint, 2017).
Requirement Given Input Achieved Output Achieved?
(yes or not)
Login user insert username
and password
Calculator must
display
Yes
When user make
registration
The user must insert
username, Email id,
password, mobile
number, now click on
submit button.
successfully
registered must
display
Yes
Calculator Standard
mode
When user select
standard mode from
calculator file menu
The calculator
standard mode will
be displayed
Yes
Calculator
Scientific mode
When user select
Scientific mode from
calculator file menu
The calculator
Scientific mode will
be displayed
Yes
Calculator
Programmer mode
When user select
Programmer mode
from calculator file
menu
The calculator
Programmer mode
will be displayed
Yes
Calculator
Advanced mode
When user select
Advanced mode
from calculator file
menu
The calculator
Advanced mode will
be displayed
Yes
Calculator help
option
When user selects
help button from
calculator file menu
The help page will be
displayed
Yes
3. Usability testing: The usability testing is performed by a tester with using all the
designed function in the advanced scientific calculator. The calculator must be
designed according to the user requirements (TutorialPoint, 2017). Here, all the
designed form are tested according to the user requirement:
41
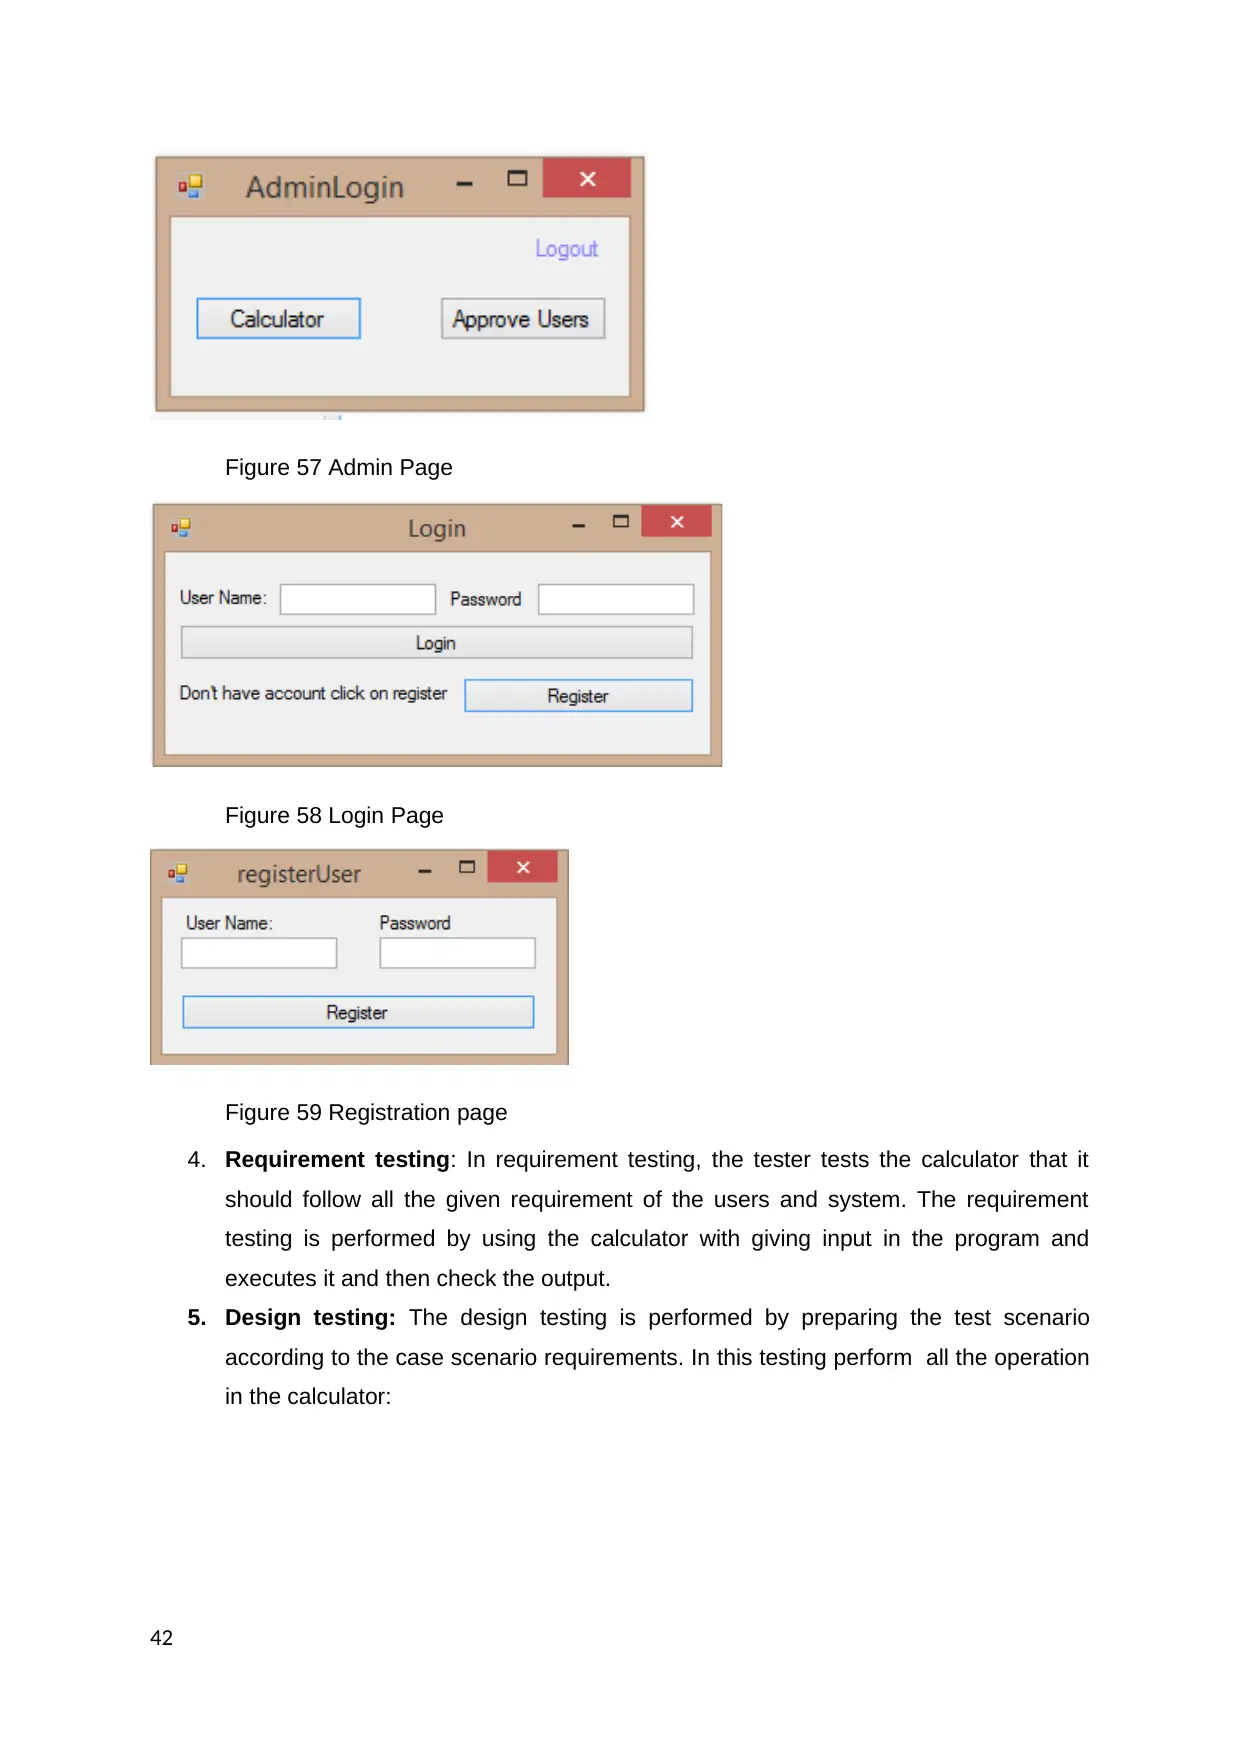
Figure 57 Admin Page
Figure 58 Login Page
Figure 59 Registration page
4. Requirement testing: In requirement testing, the tester tests the calculator that it
should follow all the given requirement of the users and system. The requirement
testing is performed by using the calculator with giving input in the program and
executes it and then check the output.
5. Design testing: The design testing is performed by preparing the test scenario
according to the case scenario requirements. In this testing perform all the operation
in the calculator:
42
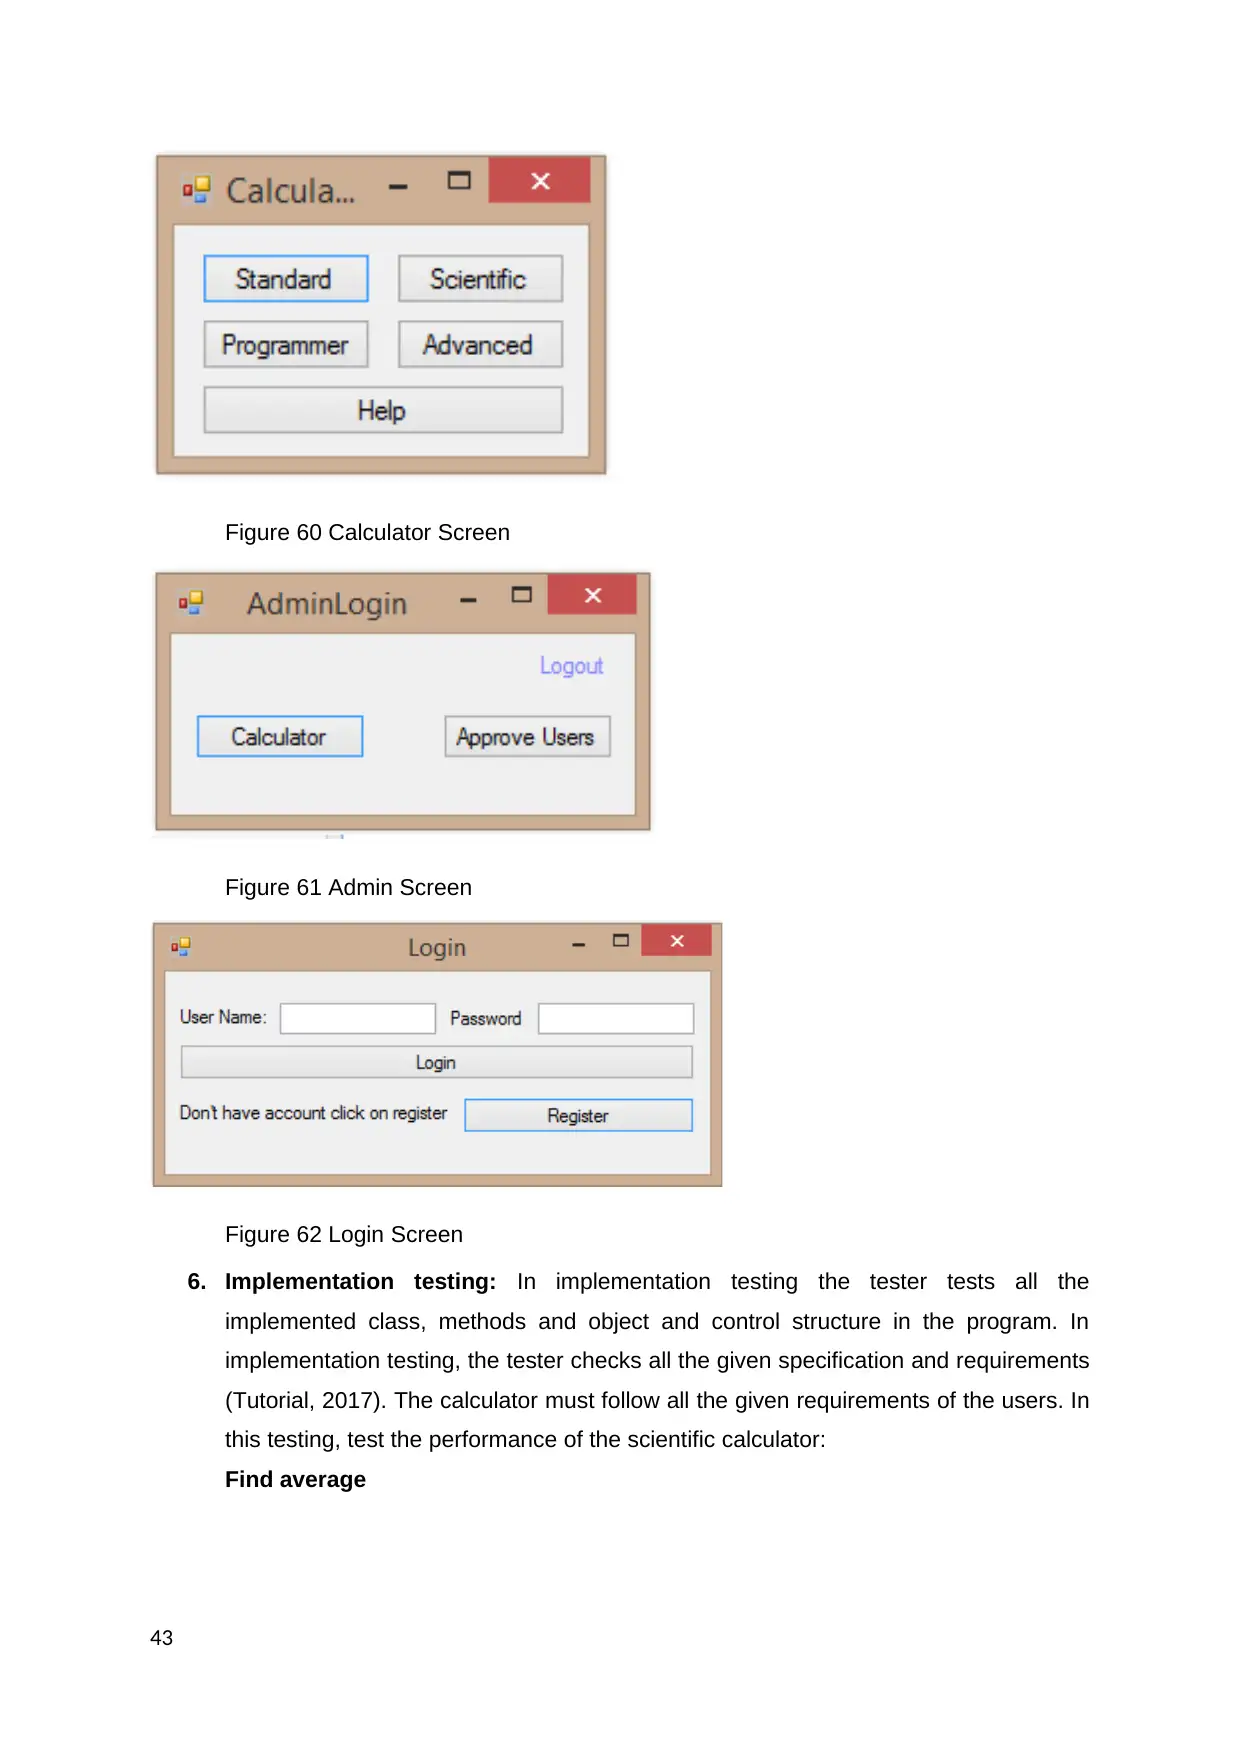
Figure 60 Calculator Screen
Figure 61 Admin Screen
Figure 62 Login Screen
6. Implementation testing: In implementation testing the tester tests all the
implemented class, methods and object and control structure in the program. In
implementation testing, the tester checks all the given specification and requirements
(Tutorial, 2017). The calculator must follow all the given requirements of the users. In
this testing, test the performance of the scientific calculator:
Find average
43
Paraphrase This Document
Need a fresh take? Get an instant paraphrase of this document with our AI Paraphraser
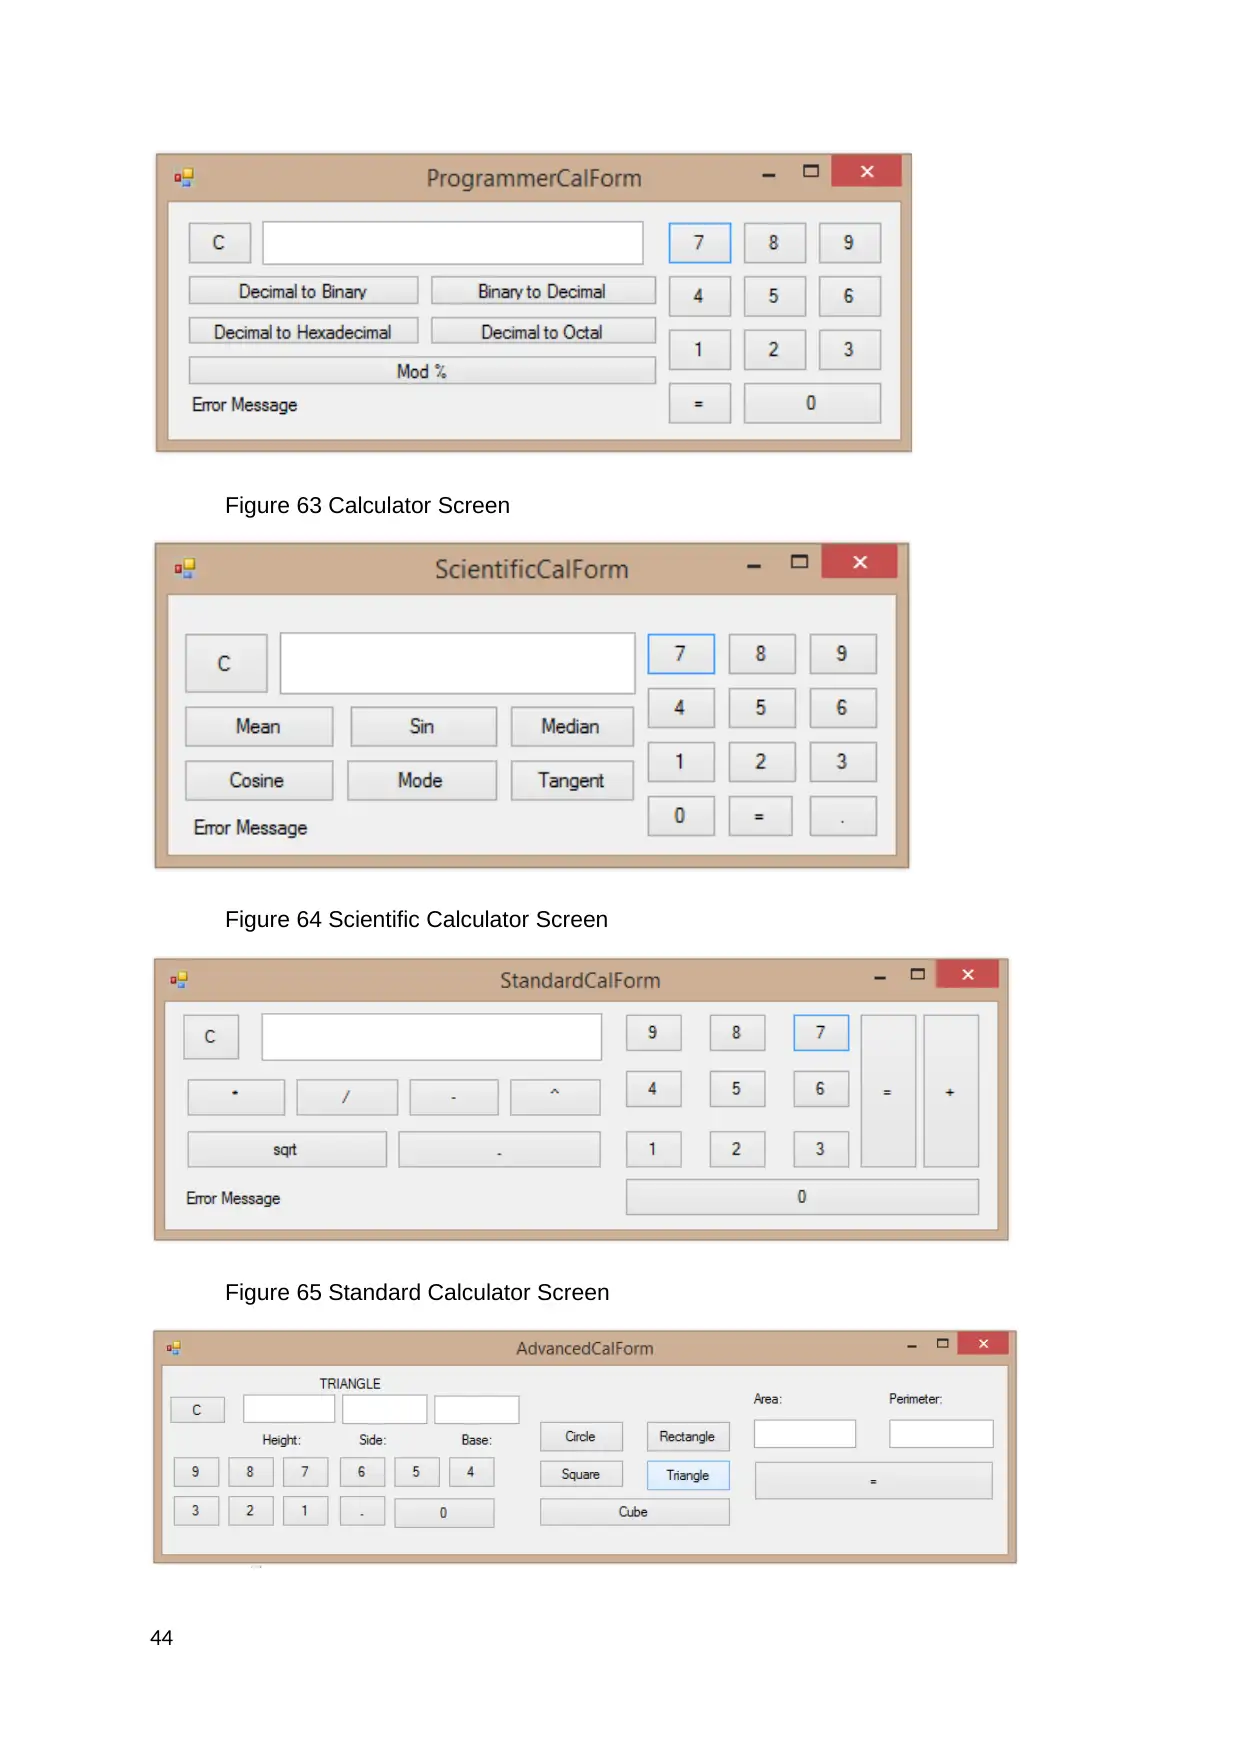
Figure 63 Calculator Screen
Figure 64 Scientific Calculator Screen
Figure 65 Standard Calculator Screen
44
Figure 64 Scientific Calculator Screen
Figure 65 Standard Calculator Screen
44
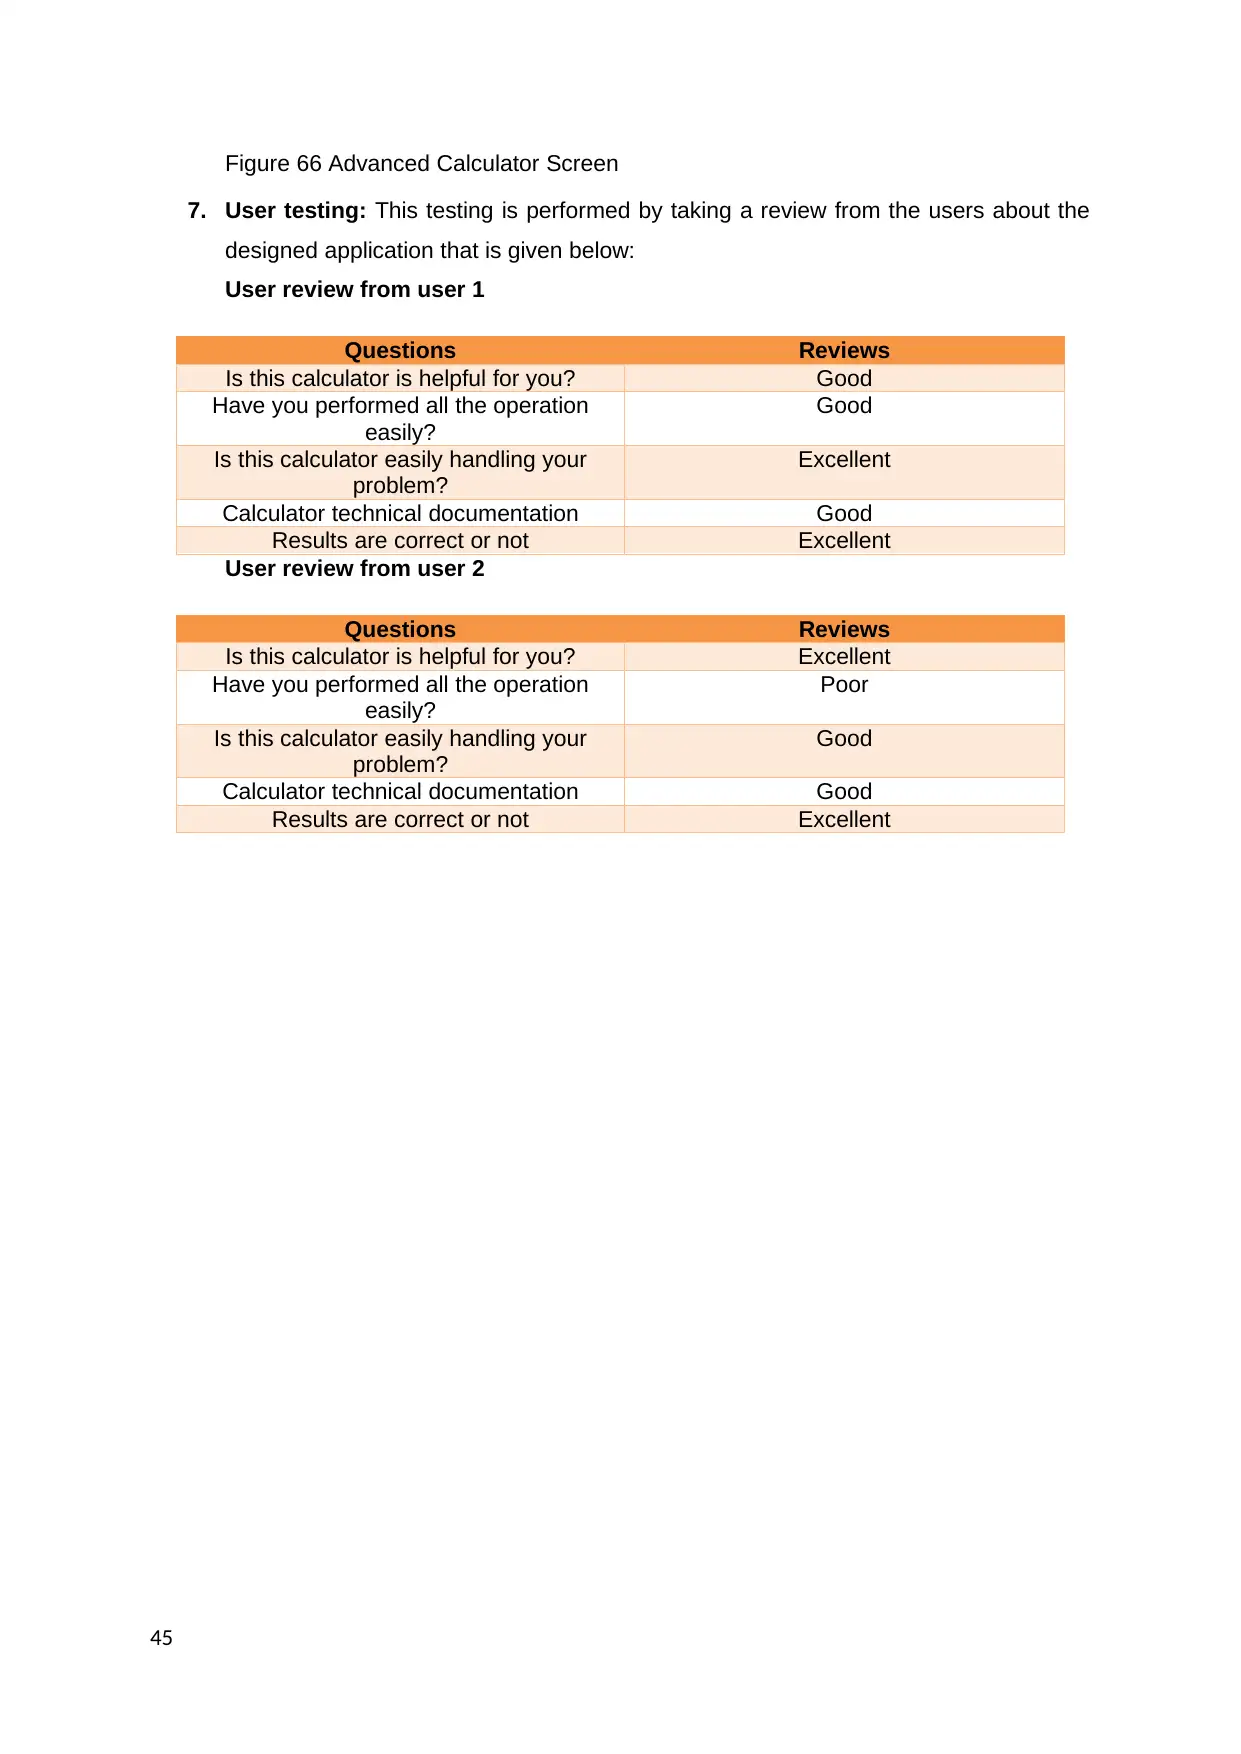
Figure 66 Advanced Calculator Screen
7. User testing: This testing is performed by taking a review from the users about the
designed application that is given below:
User review from user 1
Questions Reviews
Is this calculator is helpful for you? Good
Have you performed all the operation
easily?
Good
Is this calculator easily handling your
problem?
Excellent
Calculator technical documentation Good
Results are correct or not Excellent
User review from user 2
Questions Reviews
Is this calculator is helpful for you? Excellent
Have you performed all the operation
easily?
Poor
Is this calculator easily handling your
problem?
Good
Calculator technical documentation Good
Results are correct or not Excellent
45
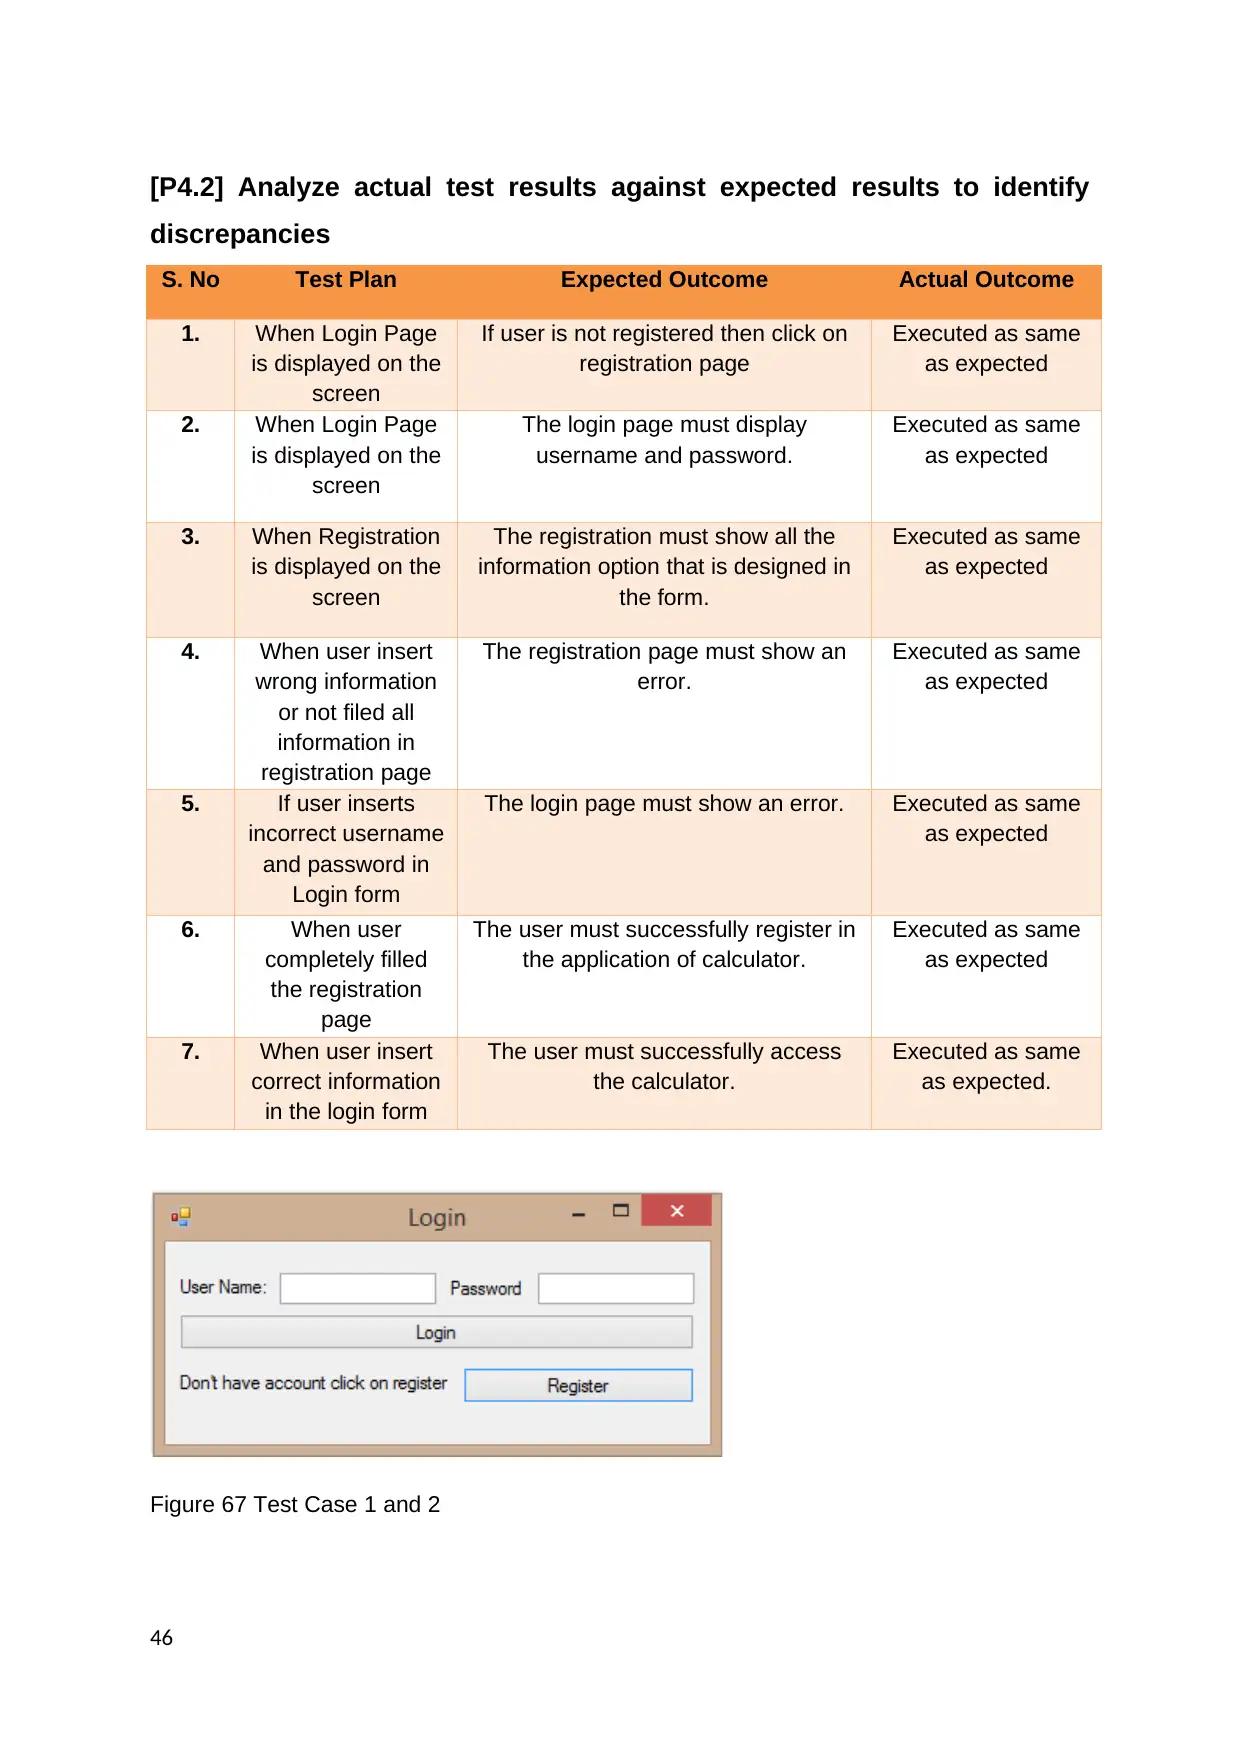
[P4.2] Analyze actual test results against expected results to identify
discrepancies
S. No Test Plan Expected Outcome Actual Outcome
1. When Login Page
is displayed on the
screen
If user is not registered then click on
registration page
Executed as same
as expected
2. When Login Page
is displayed on the
screen
The login page must display
username and password.
Executed as same
as expected
3. When Registration
is displayed on the
screen
The registration must show all the
information option that is designed in
the form.
Executed as same
as expected
4. When user insert
wrong information
or not filed all
information in
registration page
The registration page must show an
error.
Executed as same
as expected
5. If user inserts
incorrect username
and password in
Login form
The login page must show an error. Executed as same
as expected
6. When user
completely filled
the registration
page
The user must successfully register in
the application of calculator.
Executed as same
as expected
7. When user insert
correct information
in the login form
The user must successfully access
the calculator.
Executed as same
as expected.
Figure 67 Test Case 1 and 2
46
Secure Best Marks with AI Grader
Need help grading? Try our AI Grader for instant feedback on your assignments.
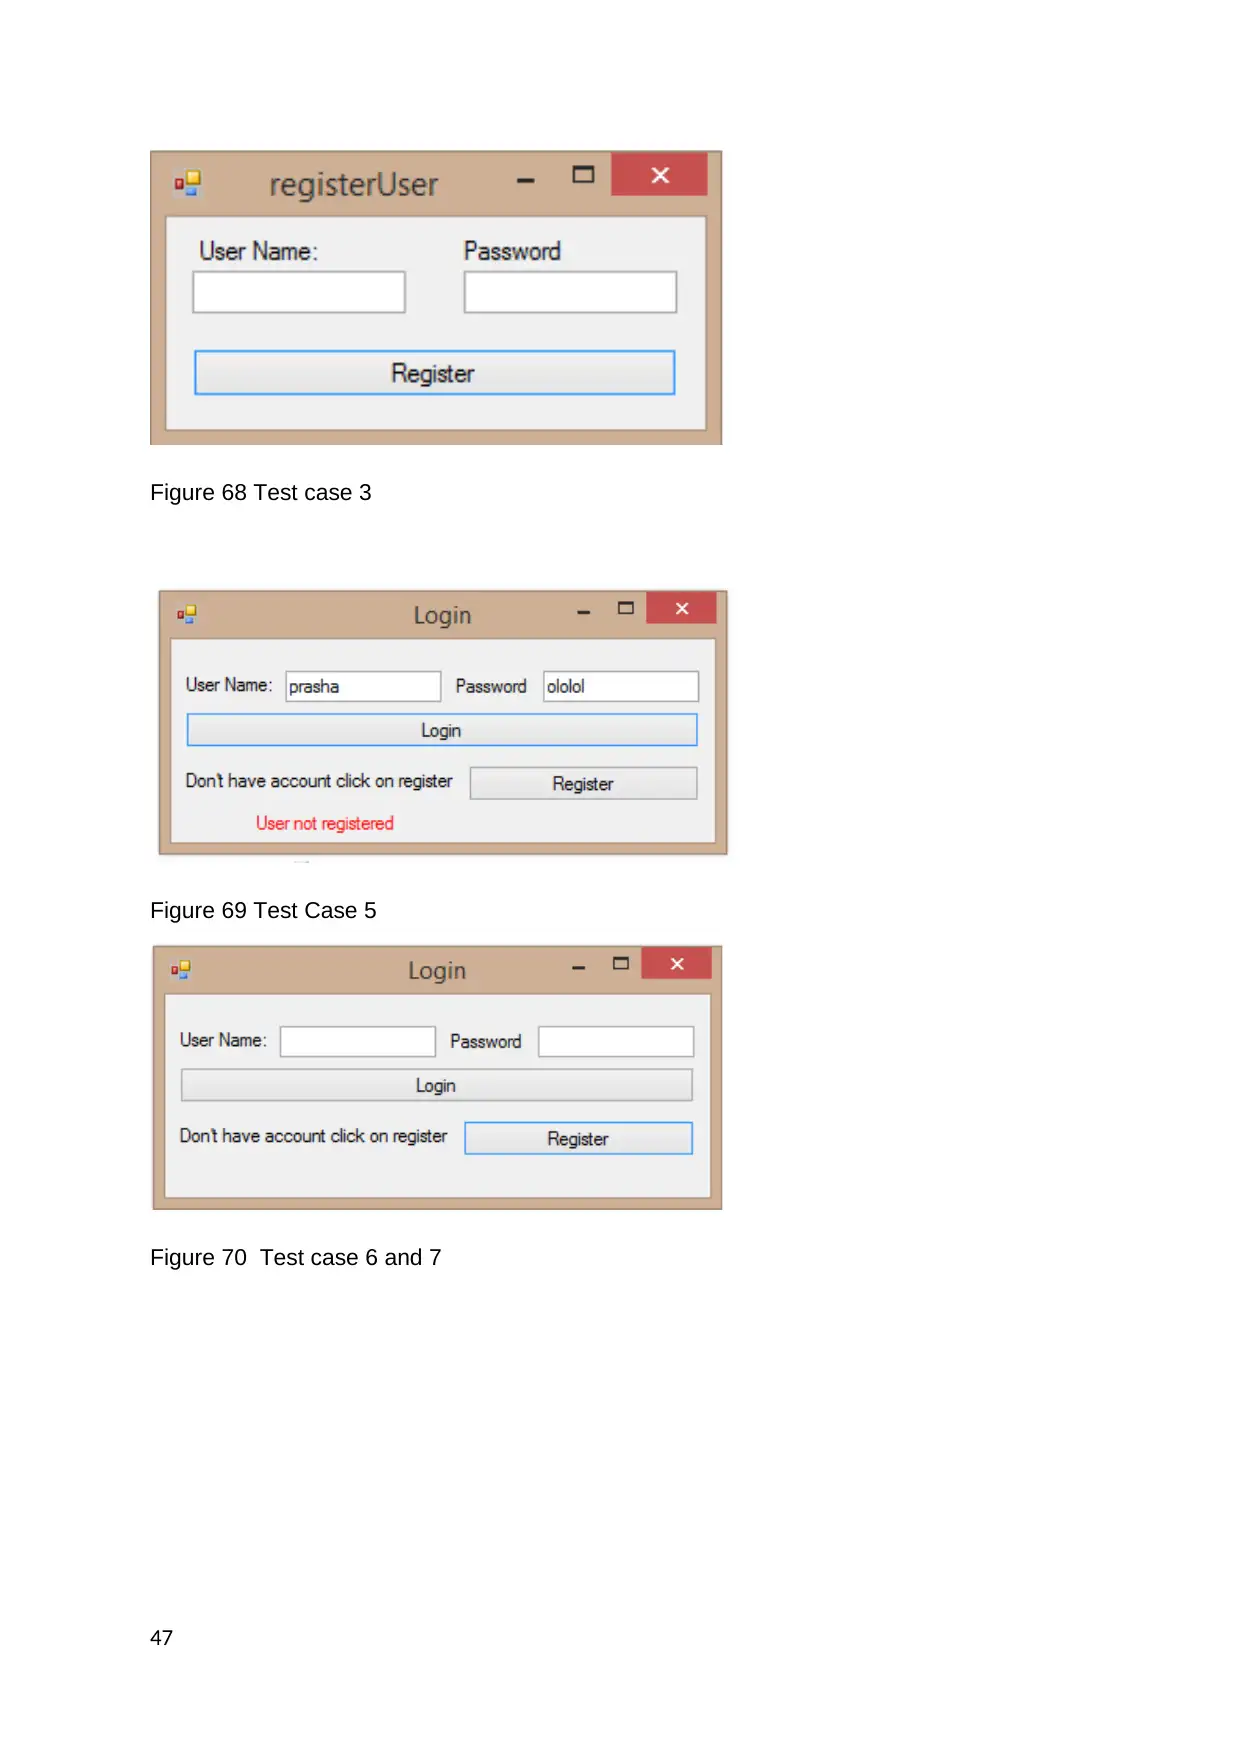
Figure 68 Test case 3
Figure 69 Test Case 5
Figure 70 Test case 6 and 7
47
Figure 69 Test Case 5
Figure 70 Test case 6 and 7
47
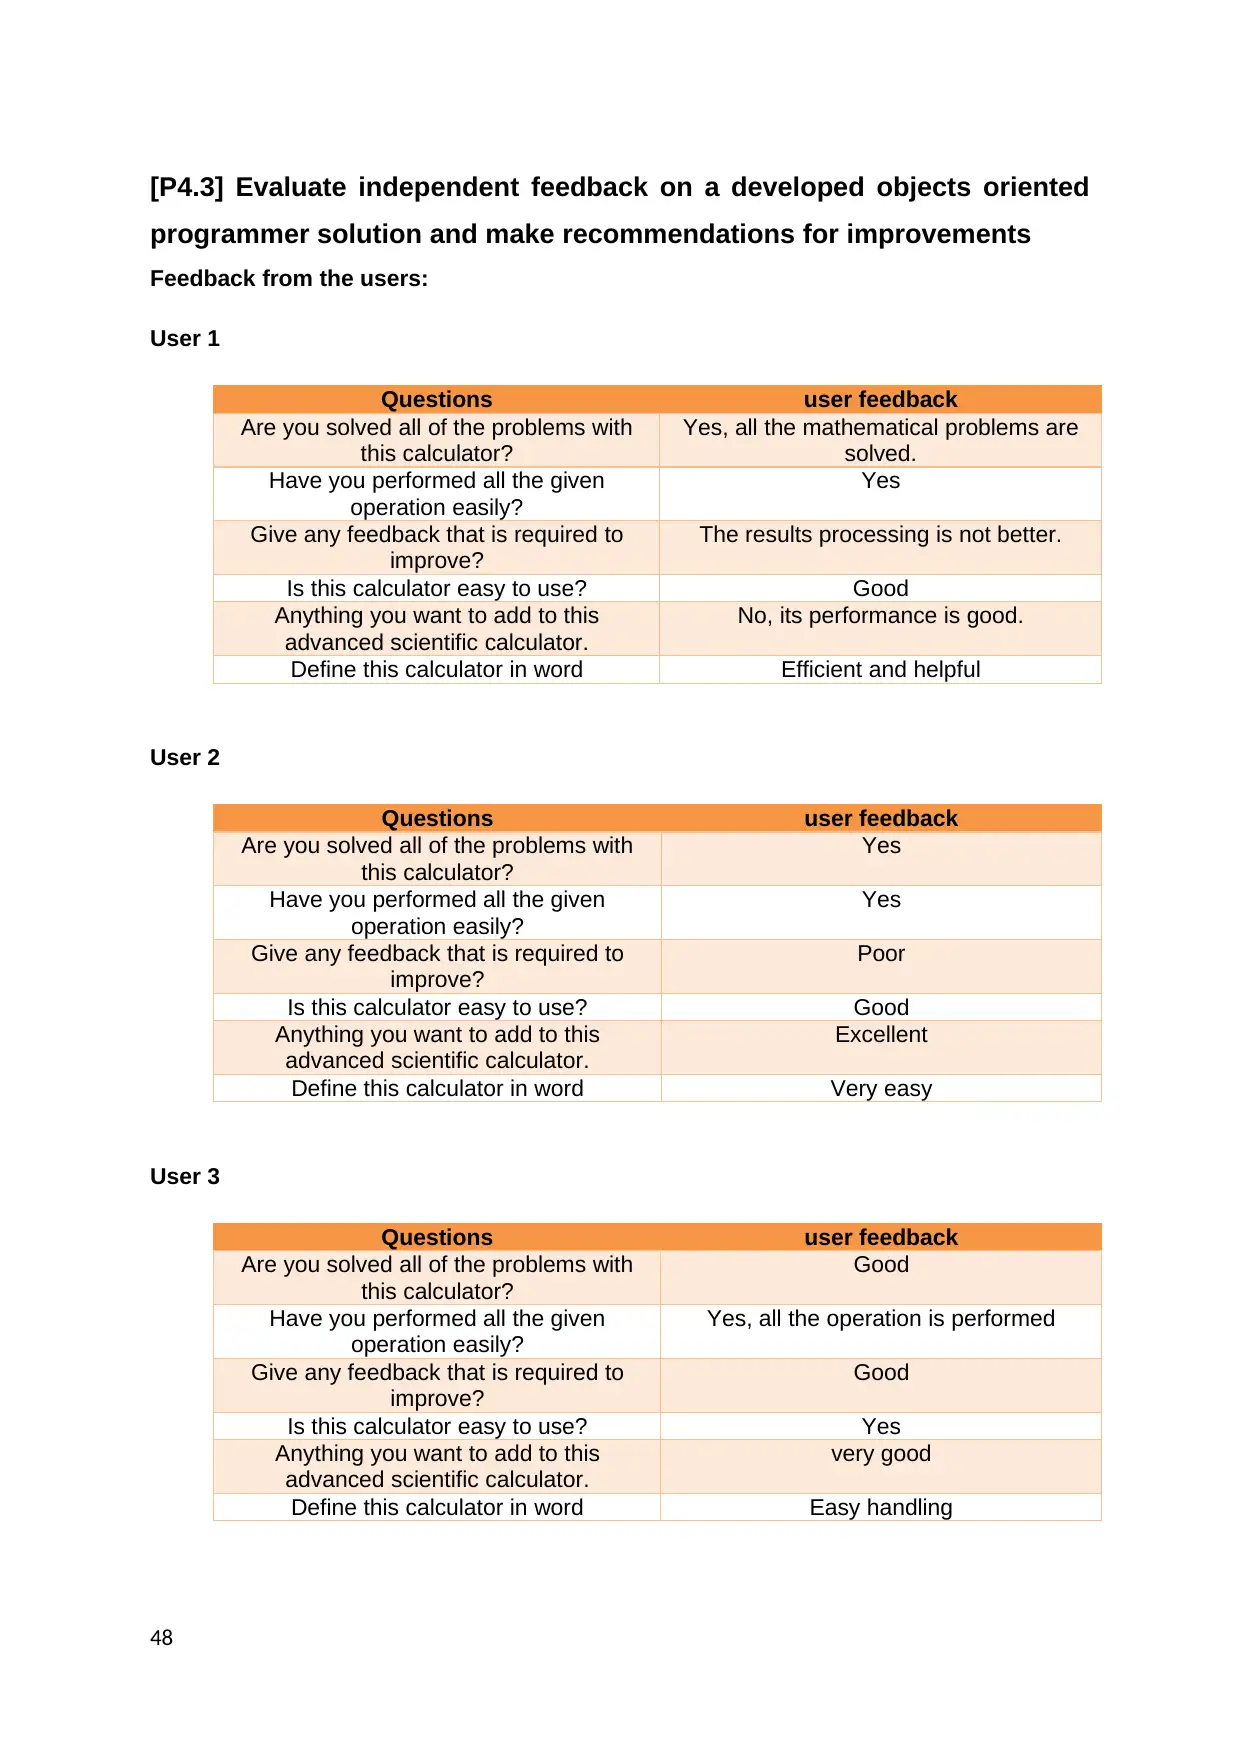
[P4.3] Evaluate independent feedback on a developed objects oriented
programmer solution and make recommendations for improvements
Feedback from the users:
User 1
Questions user feedback
Are you solved all of the problems with
this calculator?
Yes, all the mathematical problems are
solved.
Have you performed all the given
operation easily?
Yes
Give any feedback that is required to
improve?
The results processing is not better.
Is this calculator easy to use? Good
Anything you want to add to this
advanced scientific calculator.
No, its performance is good.
Define this calculator in word Efficient and helpful
User 2
Questions user feedback
Are you solved all of the problems with
this calculator?
Yes
Have you performed all the given
operation easily?
Yes
Give any feedback that is required to
improve?
Poor
Is this calculator easy to use? Good
Anything you want to add to this
advanced scientific calculator.
Excellent
Define this calculator in word Very easy
User 3
Questions user feedback
Are you solved all of the problems with
this calculator?
Good
Have you performed all the given
operation easily?
Yes, all the operation is performed
Give any feedback that is required to
improve?
Good
Is this calculator easy to use? Yes
Anything you want to add to this
advanced scientific calculator.
very good
Define this calculator in word Easy handling
48
Recommendation to improve the calculator in future:
The database should be stored all the user information securely and maintained.
The result processing should be improved in the future to make it better.
The information of background should be explained in brief.
The calculator must show error warning message.
The calculator must ask confirmation message before clicking on the ok or submit
button.
The language should be understandable and font size should be easily visible and
understand by the users.
The advanced scientific calculator application must be a support to each operating
system (Burnette, 2016).
49
Paraphrase This Document
Need a fresh take? Get an instant paraphrase of this document with our AI Paraphraser
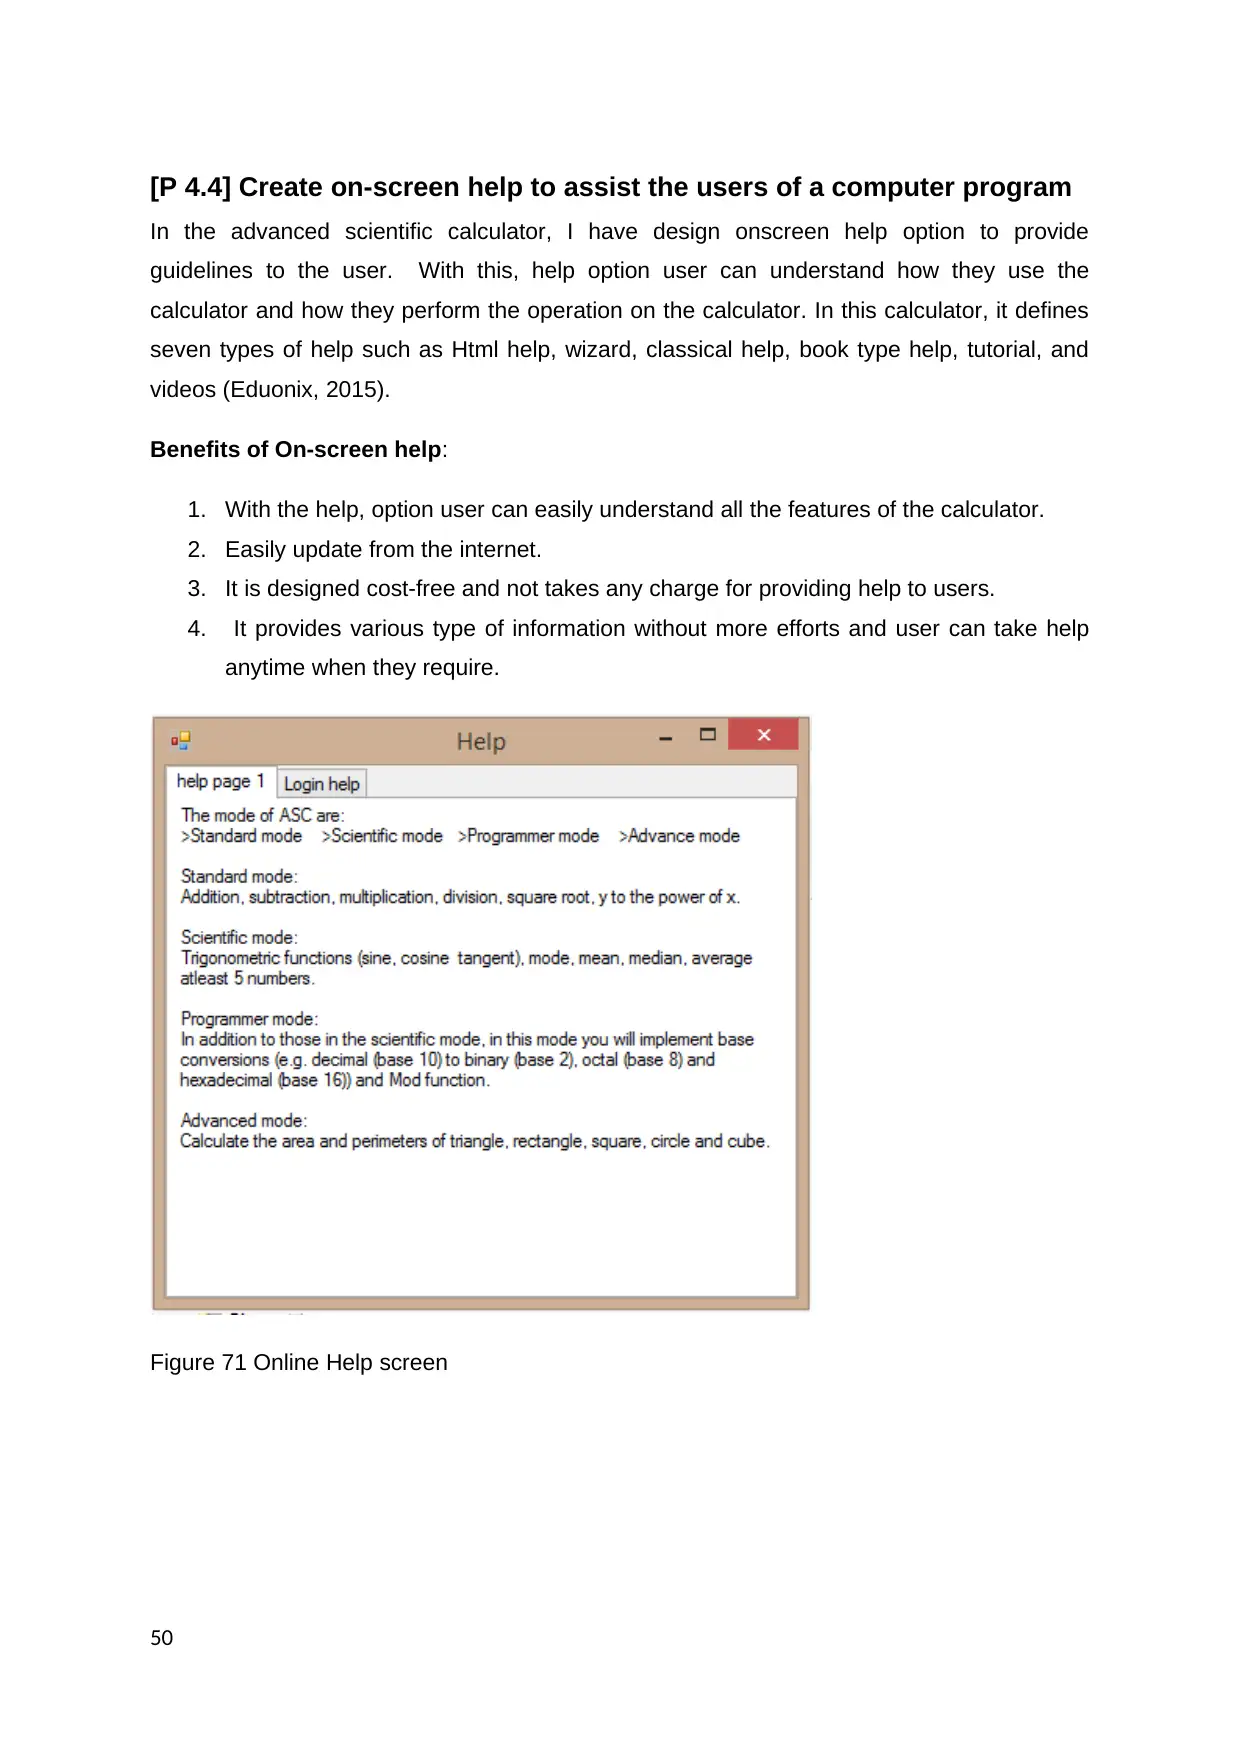
[P 4.4] Create on-screen help to assist the users of a computer program
In the advanced scientific calculator, I have design onscreen help option to provide
guidelines to the user. With this, help option user can understand how they use the
calculator and how they perform the operation on the calculator. In this calculator, it defines
seven types of help such as Html help, wizard, classical help, book type help, tutorial, and
videos (Eduonix, 2015).
Benefits of On-screen help:
1. With the help, option user can easily understand all the features of the calculator.
2. Easily update from the internet.
3. It is designed cost-free and not takes any charge for providing help to users.
4. It provides various type of information without more efforts and user can take help
anytime when they require.
Figure 71 Online Help screen
50
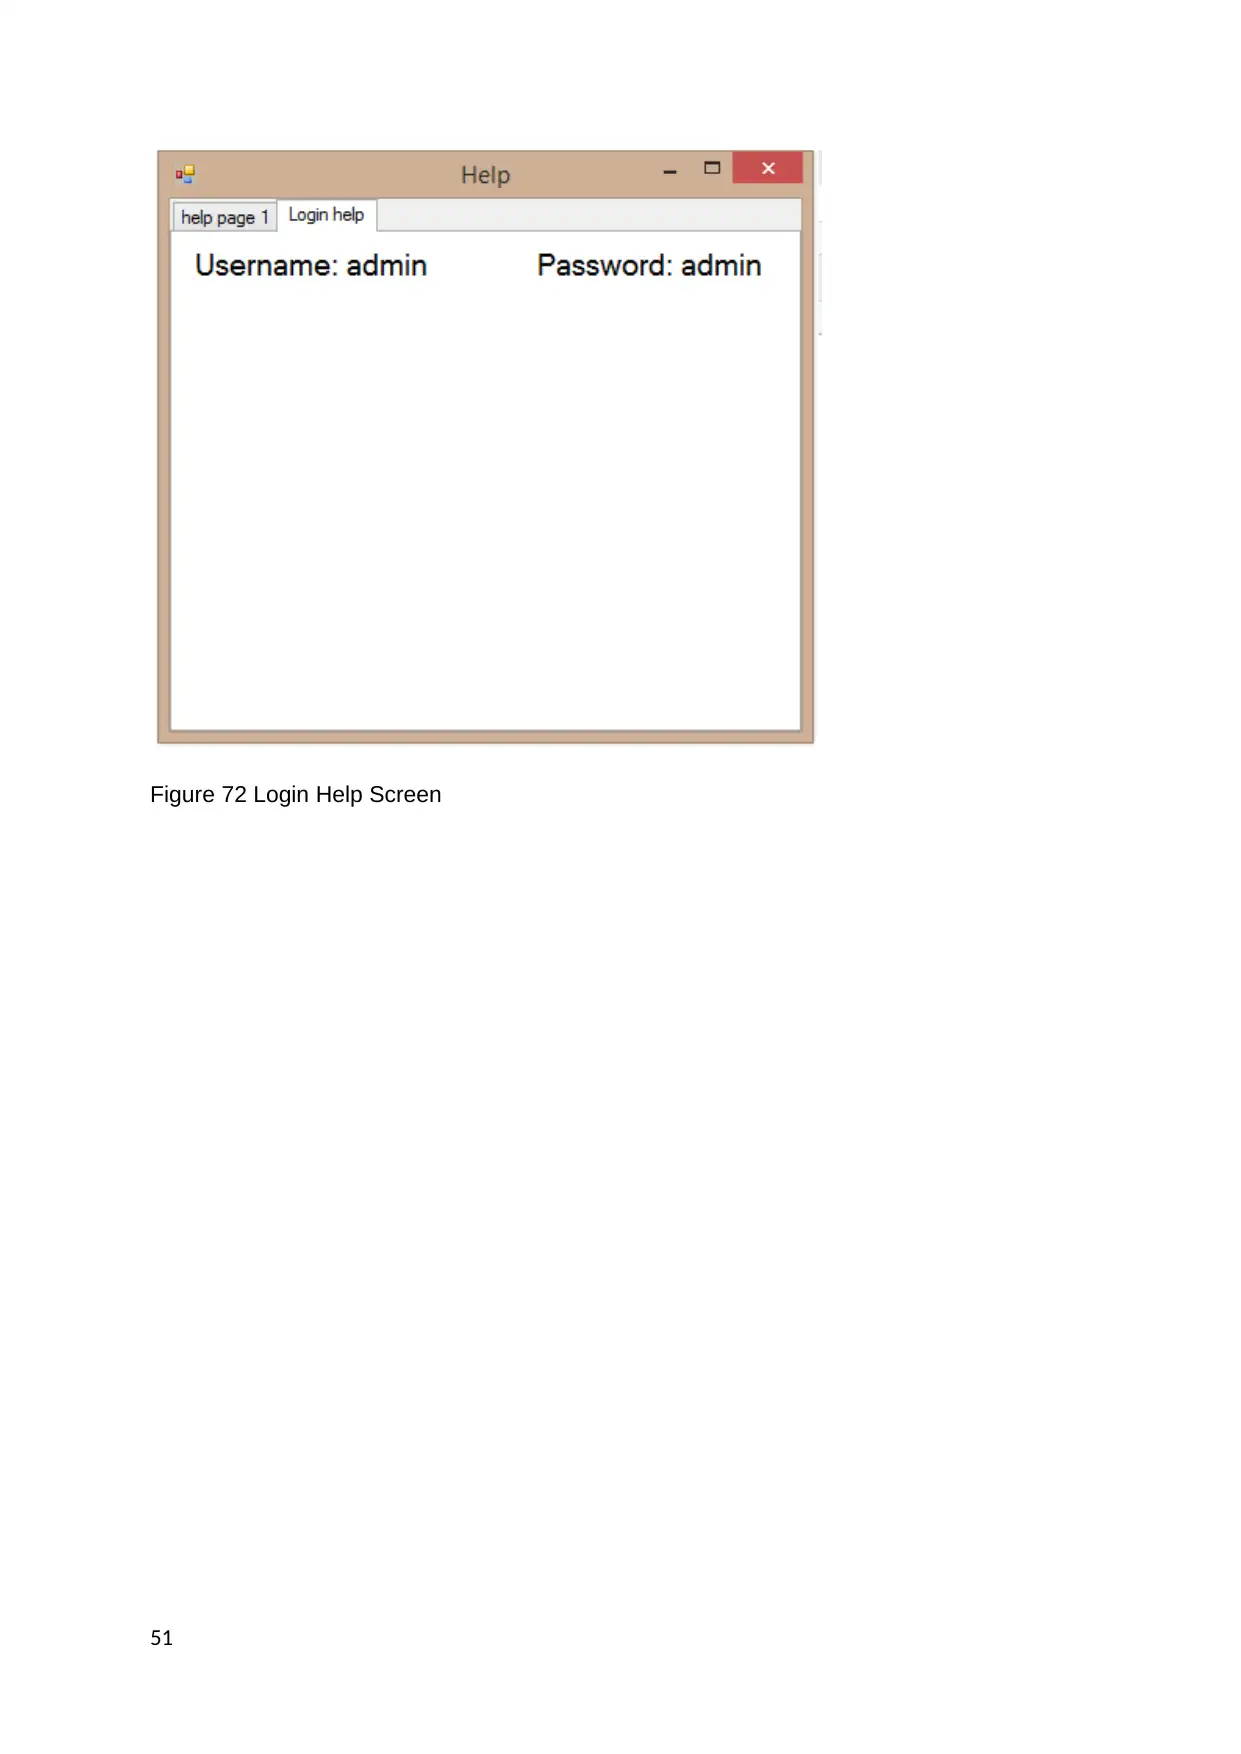
Figure 72 Login Help Screen
51
51
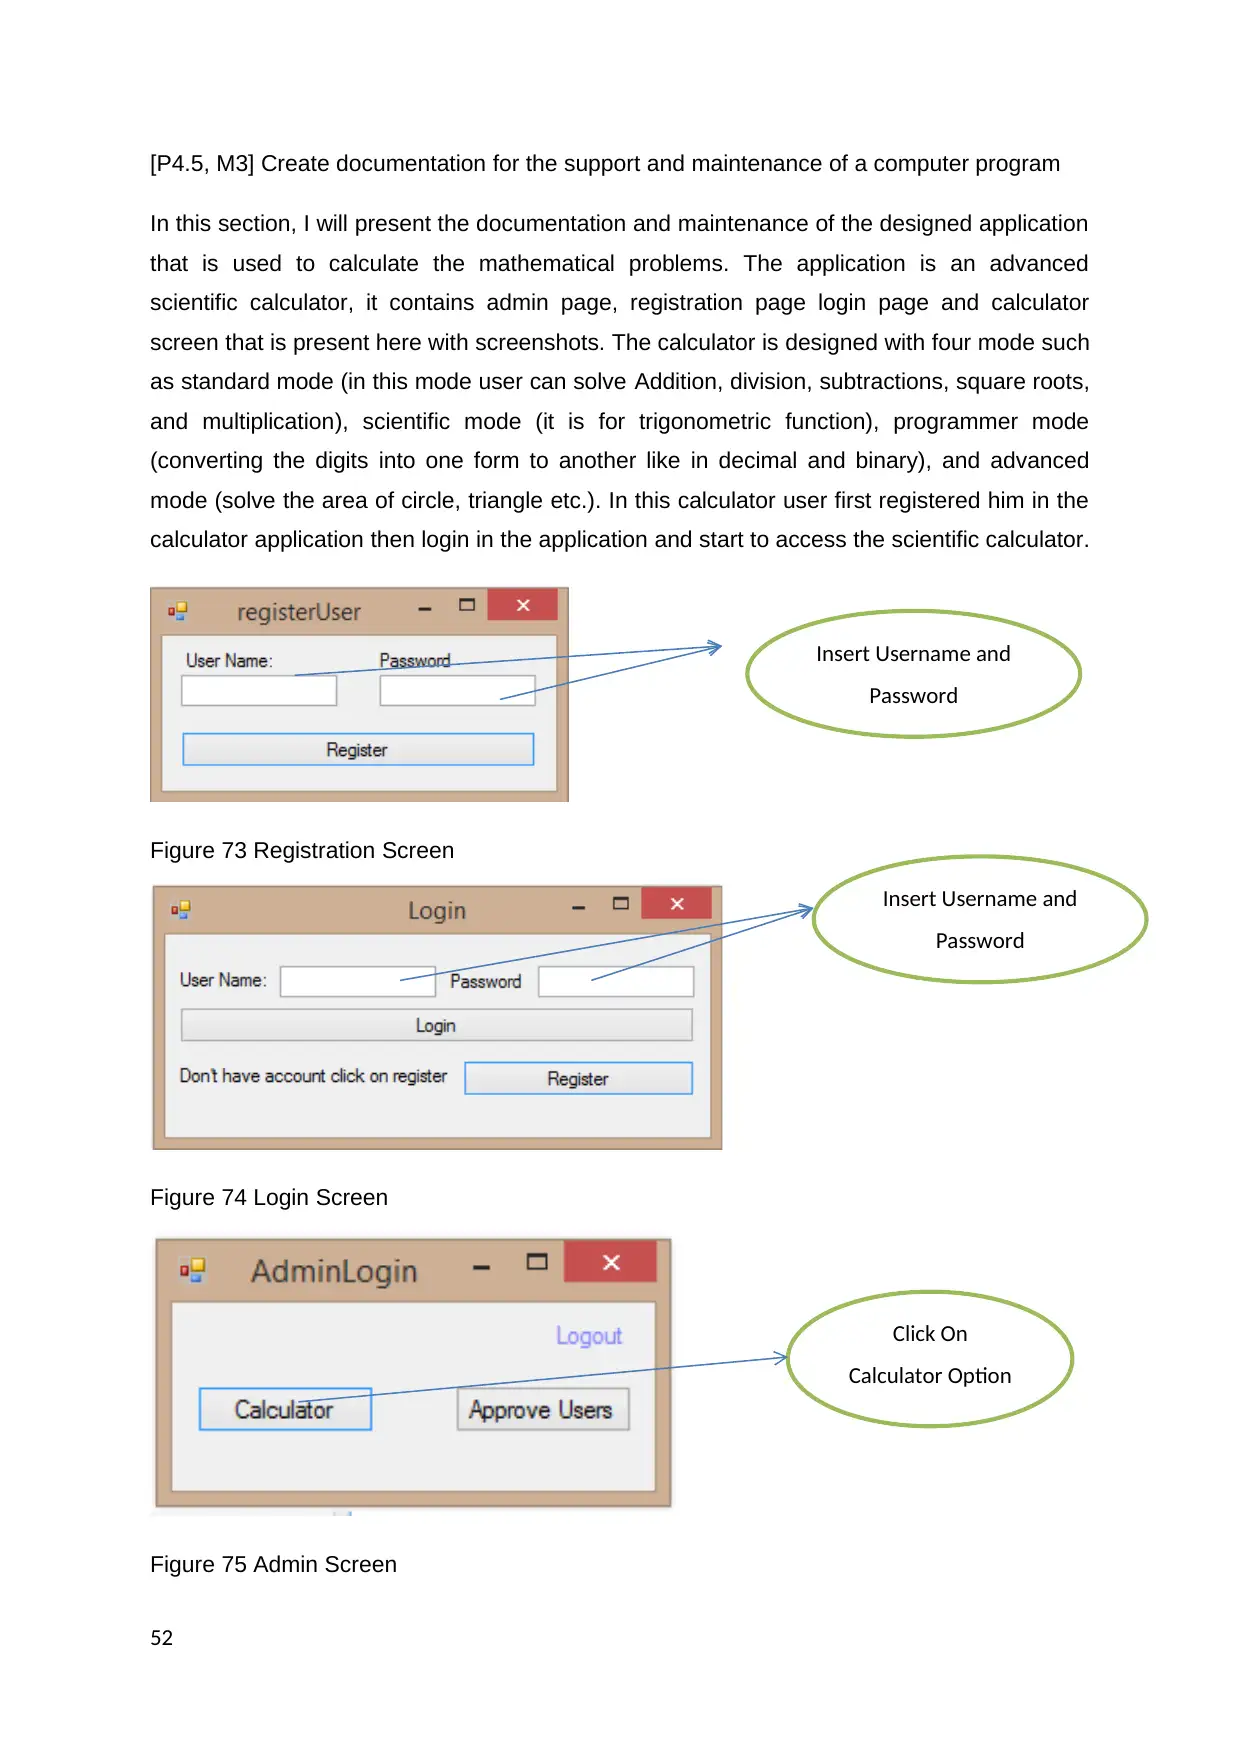
[P4.5, M3] Create documentation for the support and maintenance of a computer program
In this section, I will present the documentation and maintenance of the designed application
that is used to calculate the mathematical problems. The application is an advanced
scientific calculator, it contains admin page, registration page login page and calculator
screen that is present here with screenshots. The calculator is designed with four mode such
as standard mode (in this mode user can solve Addition, division, subtractions, square roots,
and multiplication), scientific mode (it is for trigonometric function), programmer mode
(converting the digits into one form to another like in decimal and binary), and advanced
mode (solve the area of circle, triangle etc.). In this calculator user first registered him in the
calculator application then login in the application and start to access the scientific calculator.
Figure 73 Registration Screen
Figure 74 Login Screen
Figure 75 Admin Screen
52
Insert Username and
Password
Insert Username and
Password
Click On
Calculator Option
Secure Best Marks with AI Grader
Need help grading? Try our AI Grader for instant feedback on your assignments.
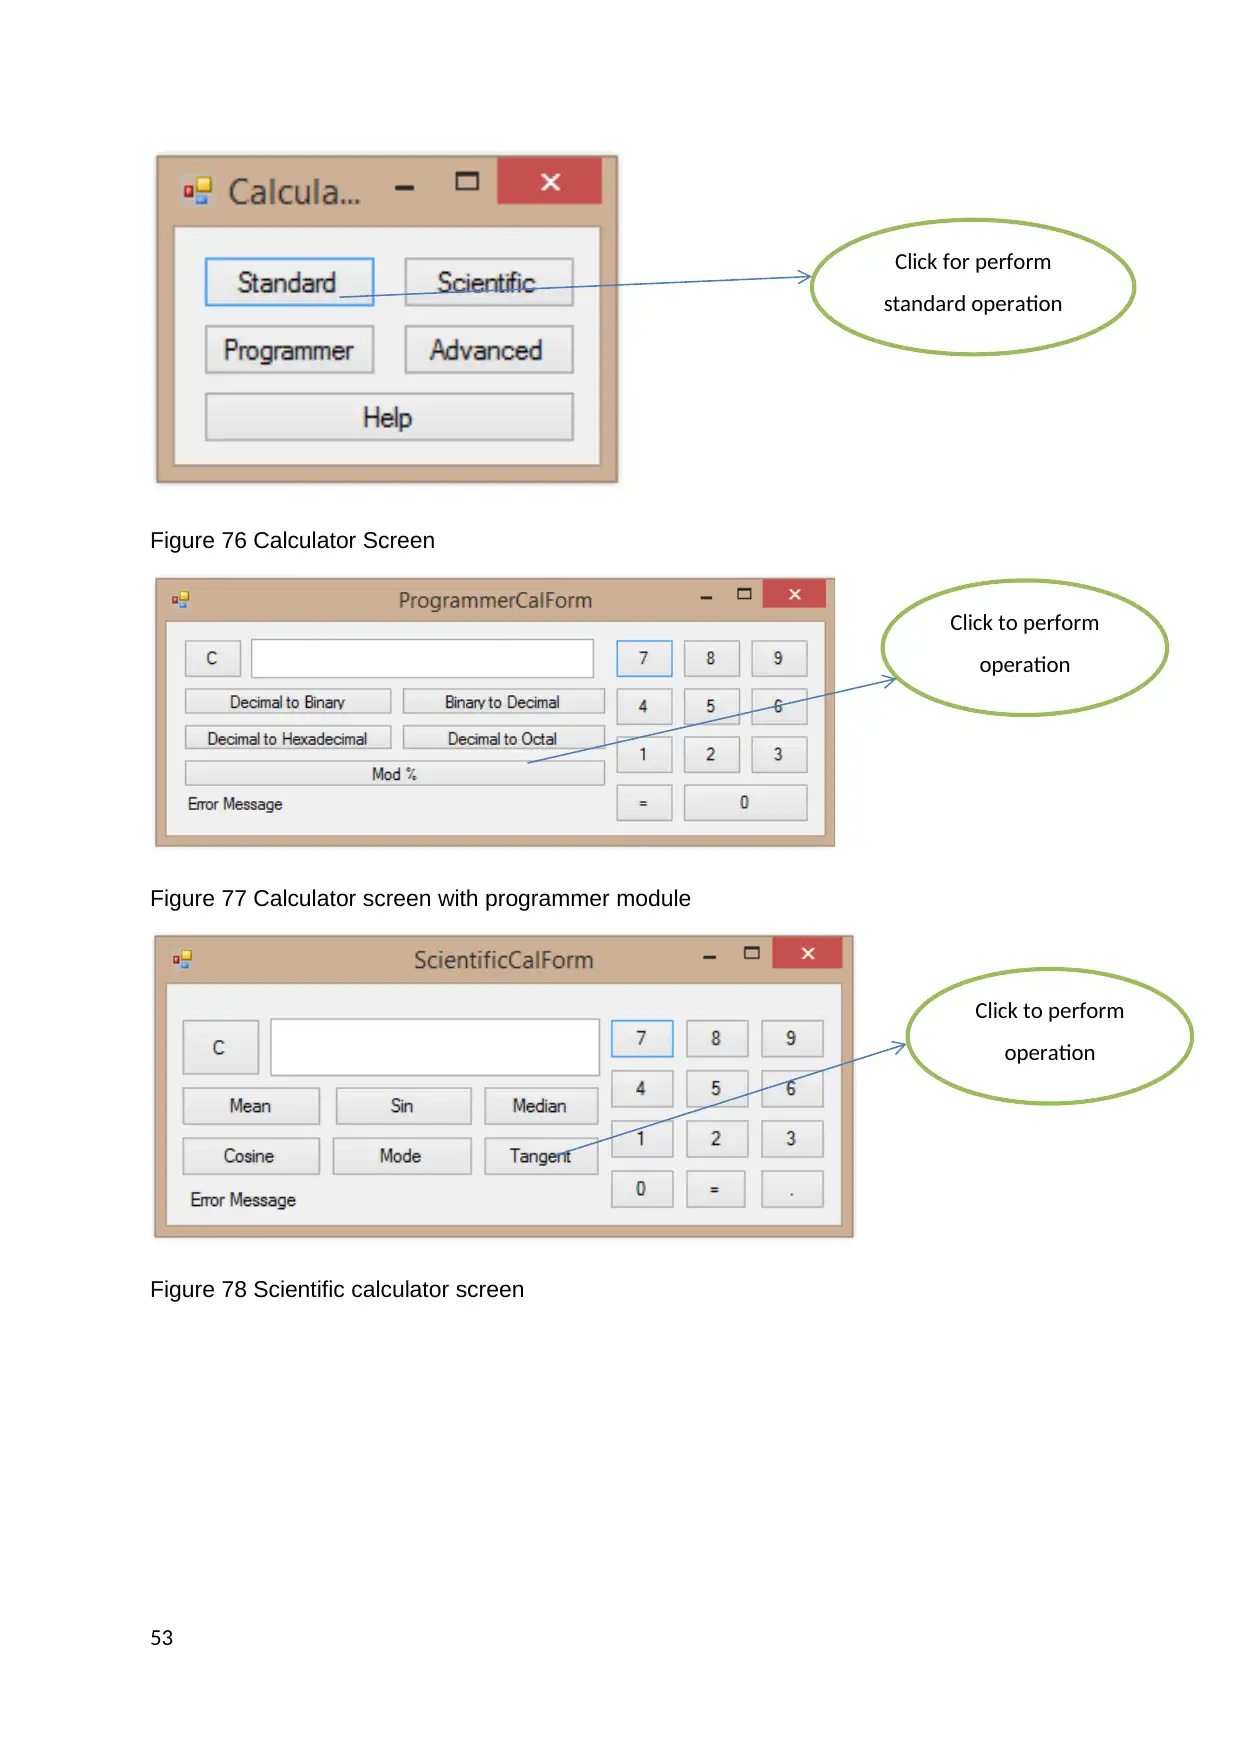
Figure 76 Calculator Screen
Figure 77 Calculator screen with programmer module
Figure 78 Scientific calculator screen
53
Click for perform
standard operation
Click to perform
operation
Click to perform
operation
Figure 77 Calculator screen with programmer module
Figure 78 Scientific calculator screen
53
Click for perform
standard operation
Click to perform
operation
Click to perform
operation
Conclusion
In this report, the calculator is designed by using IDLE Microsoft visual studio. With this
report, you learn about the object-oriented principle, features, and characteristics that are
used to develop the program with better aspects. To understand the program, I have
designed the UML class diagram and use case diagram in this report. In section 4, I have
prepared the test scenario to test the application according to the given requirement and
execute them and find the results.
54
References
Burnette, M. 2016. 5 Ways to Improve Your Online Banking Security. [online]
NerdWallet. Available at: https://www.nerdwallet.com/blog/banking/improve-online-
banking-security/ [Accessed 15 Jan. 2018].
Copperhill 2017. The MCUXpresso Integrated Development Environment (IDE). [online]
Available at: http://copperhilltech.com/blog/the-mcuxpresso-integrated-development-
environment-ide-/ [Accessed 15 Jan. 2018].
Eduonix Blog. 2015. Learn to create multiple frames in java. [online] Eduonix.org Blog.
Available at: https://www.eduonix.com/blog/java-programming-2/learn-to-create-multiple-
frames-java/ [Accessed 15 Jan. 2018].
Exforsys 2006. Features of OOP IT Training and Consulting. [online] Exforsys. Available
at: http://www.exforsys.com/tutorials/programming-concepts/features-of-oop.html
[Accessed 15 Jan. 2018].
Javapoint, n.d. Java Naming Conventions - Javatpoint. [online] Available at:
https://www.javatpoint.com/java-naming-conventions [Accessed 15 Jan. 2018].
Microsoft 2015. Polymorphism (C# Programming Guide). [online] Microsoft. Available at:
https://docs.microsoft.com/en-us/dotnet/csharp/programming-guide/classes-and-
structs/polymorphism [Accessed 15 Jan. 2018].
Nawrocki, M. 2013. Five Integrated Development Environment applications. [online] Available
at: https://www.techrepublic.com/blog/five-apps/five-integrated-development-environment-
applications/ [Accessed 15 Jan. 2018].
Oracle.com. 2018. Code Conventions for the Java Programming Language: 5.
Comments. [online] Available at:
http://www.oracle.com/technetwork/java/codeconventions-141999.html [Accessed 15
Jan. 2018].
Pnagila 2012. Advantages and disadvantages of Modular Programming. [online]
Available at: http://pnagila.blogspot.in/2012/05/advantages-and-disadvantages-of-
modular_15.html [Accessed 15 Jan. 2018].
Singh, C., Arango, J., Kurup, A., Sinhalese, A., Okpalaeke, J., Bharadwaj, I. and M, G.
2012. OOPs in Java: Encapsulation, Inheritance, Polymorphism, Abstraction. [online]
beginnersbook.com. Available at: https://beginnersbook.com/2013/03/oops-in-java-
encapsulation-inheritance-polymorphism-abstraction/ [Accessed 15 Jan. 2018].
TutorialPoint 2017. C++ Inheritance. [online] Available at:
https://www.tutorialspoint.com/cplusplus/cpp_inheritance.htm [Accessed 15 Jan. 2018].
55
Paraphrase This Document
Need a fresh take? Get an instant paraphrase of this document with our AI Paraphraser
TutorialPoint, 2017. White box Testing. [online] TutorialPoint. Available at:
https://www.tutorialspoint.com/software_testing_dictionary/white_box_testing.htm [Accessed
15 Jan. 2018].
TutorialPoint. 2017. UML - Class Diagram. [online] Available at:
https://www.tutorialspoint.com/uml/uml_class_diagram.htm [Accessed 15 Jan. 2018].
TutorialPoint. 2018. Black box Testing. [online] TutorialPoint. Available at:
https://www.tutorialspoint.com/software_testing_dictionary/black_box_testing.htm [Accessed
15 Jan. 2018].
TutorialPoint. 2018. Usability Testing. [online] TutorialPoint. Available at:
https://www.tutorialspoint.com/software_testing_dictionary/usability_testing.htm
[Accessed 15 Jan. 2018].
Way, J. 2010. 9 Confusing Naming Conventions for Beginners. [online] Code Envato
Tuts+. Available at: https://code.tutsplus.com/articles/9-confusing-naming-conventions-
for-beginners--net-15584 [Accessed 15 Jan. 2018].
56

Appendix
57
57
1 out of 57
Related Documents
Your All-in-One AI-Powered Toolkit for Academic Success.
+13062052269
info@desklib.com
Available 24*7 on WhatsApp / Email
![[object Object]](/_next/static/media/star-bottom.7253800d.svg)
Unlock your academic potential
© 2024 | Zucol Services PVT LTD | All rights reserved.


