GIT Process and PAM System Implementation in Organizations
VerifiedAdded on 2024/04/24
|13
|3798
|53
AI Summary
This assignment provides detailed solutions for GIT process and PAM system implementation in organizations. It covers topics like GIT functionalities, PAM system benefits, Syncthing installation, and time synchronization in organizations.
Contribute Materials
Your contribution can guide someone’s learning journey. Share your
documents today.

CSC8512
ASSIGNMENT
1
2019: Answers
ASSIGNMENT
1
2019: Answers
Secure Best Marks with AI Grader
Need help grading? Try our AI Grader for instant feedback on your assignments.

Contents
Solution #1:................................................................................................................................3
GIT.........................................................................................................................................3
GIT Process............................................................................................................................3
Code installation of existing repository:................................................................................4
Cloning of the Repository:.....................................................................................................4
File adding to the Repository.................................................................................................4
Recovering files from Repository:.........................................................................................5
Change in repository History and Status checking................................................................5
Changes in Master Repository (Pulling out and Pushing in local changes)..........................5
Repository permission setting:...............................................................................................5
Solution #2:................................................................................................................................6
PAM System:.........................................................................................................................6
Implementation of PAM:.......................................................................................................7
Solution #3:................................................................................................................................9
Installation of Syncthing:.....................................................................................................10
Starting Syncthing:...............................................................................................................10
Remote Device Addition:.....................................................................................................11
Solution #4:..............................................................................................................................12
References:...............................................................................................................................13
Solution #1:
GIT
GIT is a distributed version of the control systems that is used to track changes in the main
source code throughout the software development process. The main purpose of designing
such system is to coordinate the work between developers but now it can also be used as a
tracker that tracks the deviations in a set of software files. Content provided by it is filtered in
the sense where the data integrity, speed, time complexity, and support for circulated non-
linear workflows in focused. Distributed Virtual Control System is the core of the GIT.
DVCS are the source for other remote machine application. Therefore, using the GIT
approach developers are free to control the complete access of the source code of any
software.
It can also be said that Git is a source code management system which focuses on the speed
of the program execution. It was developed by Linus Torvalds for the Linux operating system
but now it is used as an open source controlling software because it benefits the developers
working in a group to merge their work and save time. But it don’t let the users or developers
to overwrite the source code, once it is done, it is done. Also it keeps the history of work done
and keeps on tracking and maintaining it.
Some functionalities of GIT are as followed.
Changes, made at one end of the repository are updated in the whole hierarchy without
changing the state of the development.
Keeps on tracking the activities and on that basis maintains the history of the program.
Commits the initials which should store all the information.
Works on the data integrity and speed.
Most of the users deploys the repository while maintaining it, to diminish this mistake, flags
cards are used for every momentous on which the history can stay committed.
GIT Process
Progressions in the GIT field are done in the following steps:
Repository can be cloned by using the following command in proper way.
“git clone {repo-url}”
In the repository, pulling and pushing operations can be done using the following
command.
“git pull {branch-name}” & “git push”
Repository can be uploaded by using the following command.
“git init”
Using the remote repositories, branches of the local repositories can be constructed by
following command:
“git branch {branch-name}” and “git checkout {branch-name}”
Code installation of existing repository:
Local directory can be created as:
“/home/Planets/ktransit”
In the initiation step the code that is used is:
“Git init”
Commit in the main history can be made using following command:
“git add path/to/file/myfile.ext”
After using the above commands the developer need to initialise the commit with the help
of following command:
“git commit, git –a commit”
Cloning of the Repository:
SSL or Secure Socket Layer codes are used for the main cloning process of the repository.
There is no change in the cloning for the complete workflow and it makes the consistency in
the program or source code. The only difference that can be seen will be on the main type and
the content that is programmed in the local directory.
i.e. “git clone proto://url//repo.git localdir”
Cloning process that is associated with the mercury software is programmed as:
/home/Planets/ktransit my- ktransit -clone”
File adding to the Repository
It is the initial step for every process as well as for GIT process. First of all the developer
need to add the function files in order to use them at the time of calling. This commit is used
for the amendment of the main file with repository files using the ‘commit’ command. The
particular command that is used for this purpose is:
“git add /path/to/file/myfile.ext”
Secure Best Marks with AI Grader
Need help grading? Try our AI Grader for instant feedback on your assignments.

Recovering files from Repository:
Main repository is supported by using the primary command when working to recover the
content in some online repository. The primary command is given as:
“git checkout {commit-sha | branch} /path/to/file/myfile.ext”
Change in repository History and Status checking
To change the history of the repository the following command is used:
“git log”
For the status checking of the GIT repository the developer can use the following particular
command:
“git status”
This command also assists in executing the changes made in main commit and non-staged
commits.
Changes in Master Repository (Pulling out and Pushing in local changes)
The changes that are made in the master repository can be take out using this command:
“git pull {remote-name}”
To push in the main repository into the central repository the following command is used:
“git push {remote-name}”
Repository permission setting:
To assign some proper permission settings to the repository following particular command is
used:
“chmod –R g+swX ktransit”
In this command
w = write permission
s = Inherit state
X = executes permissions respectively.
Solution #2:
PAM System:
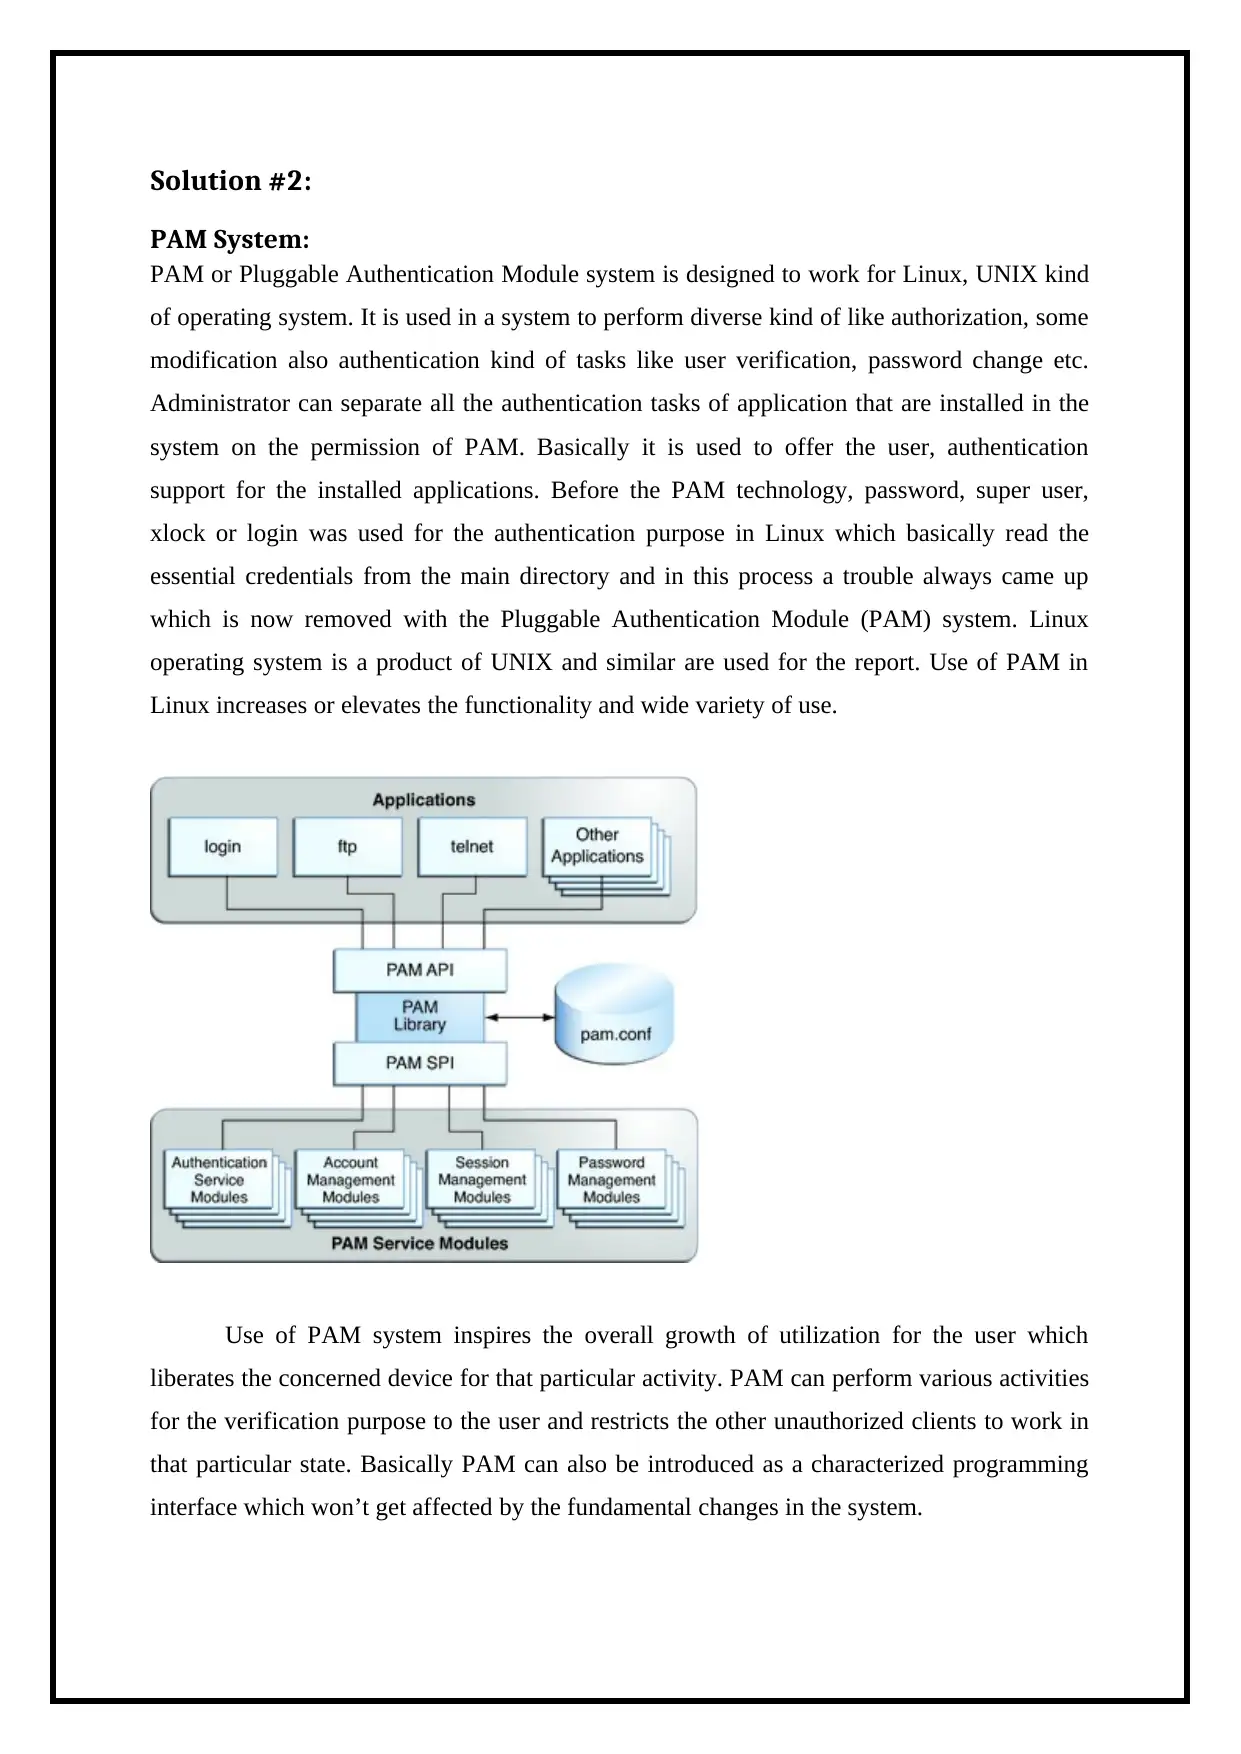
PAM or Pluggable Authentication Module system is designed to work for Linux, UNIX kind
of operating system. It is used in a system to perform diverse kind of like authorization, some
modification also authentication kind of tasks like user verification, password change etc.
Administrator can separate all the authentication tasks of application that are installed in the
system on the permission of PAM. Basically it is used to offer the user, authentication
support for the installed applications. Before the PAM technology, password, super user,
xlock or login was used for the authentication purpose in Linux which basically read the
essential credentials from the main directory and in this process a trouble always came up
which is now removed with the Pluggable Authentication Module (PAM) system. Linux
operating system is a product of UNIX and similar are used for the report. Use of PAM in
Linux increases or elevates the functionality and wide variety of use.
Use of PAM system inspires the overall growth of utilization for the user which
liberates the concerned device for that particular activity. PAM can perform various activities
for the verification purpose to the user and restricts the other unauthorized clients to work in
that particular state. Basically PAM can also be introduced as a characterized programming
interface which won’t get affected by the fundamental changes in the system.
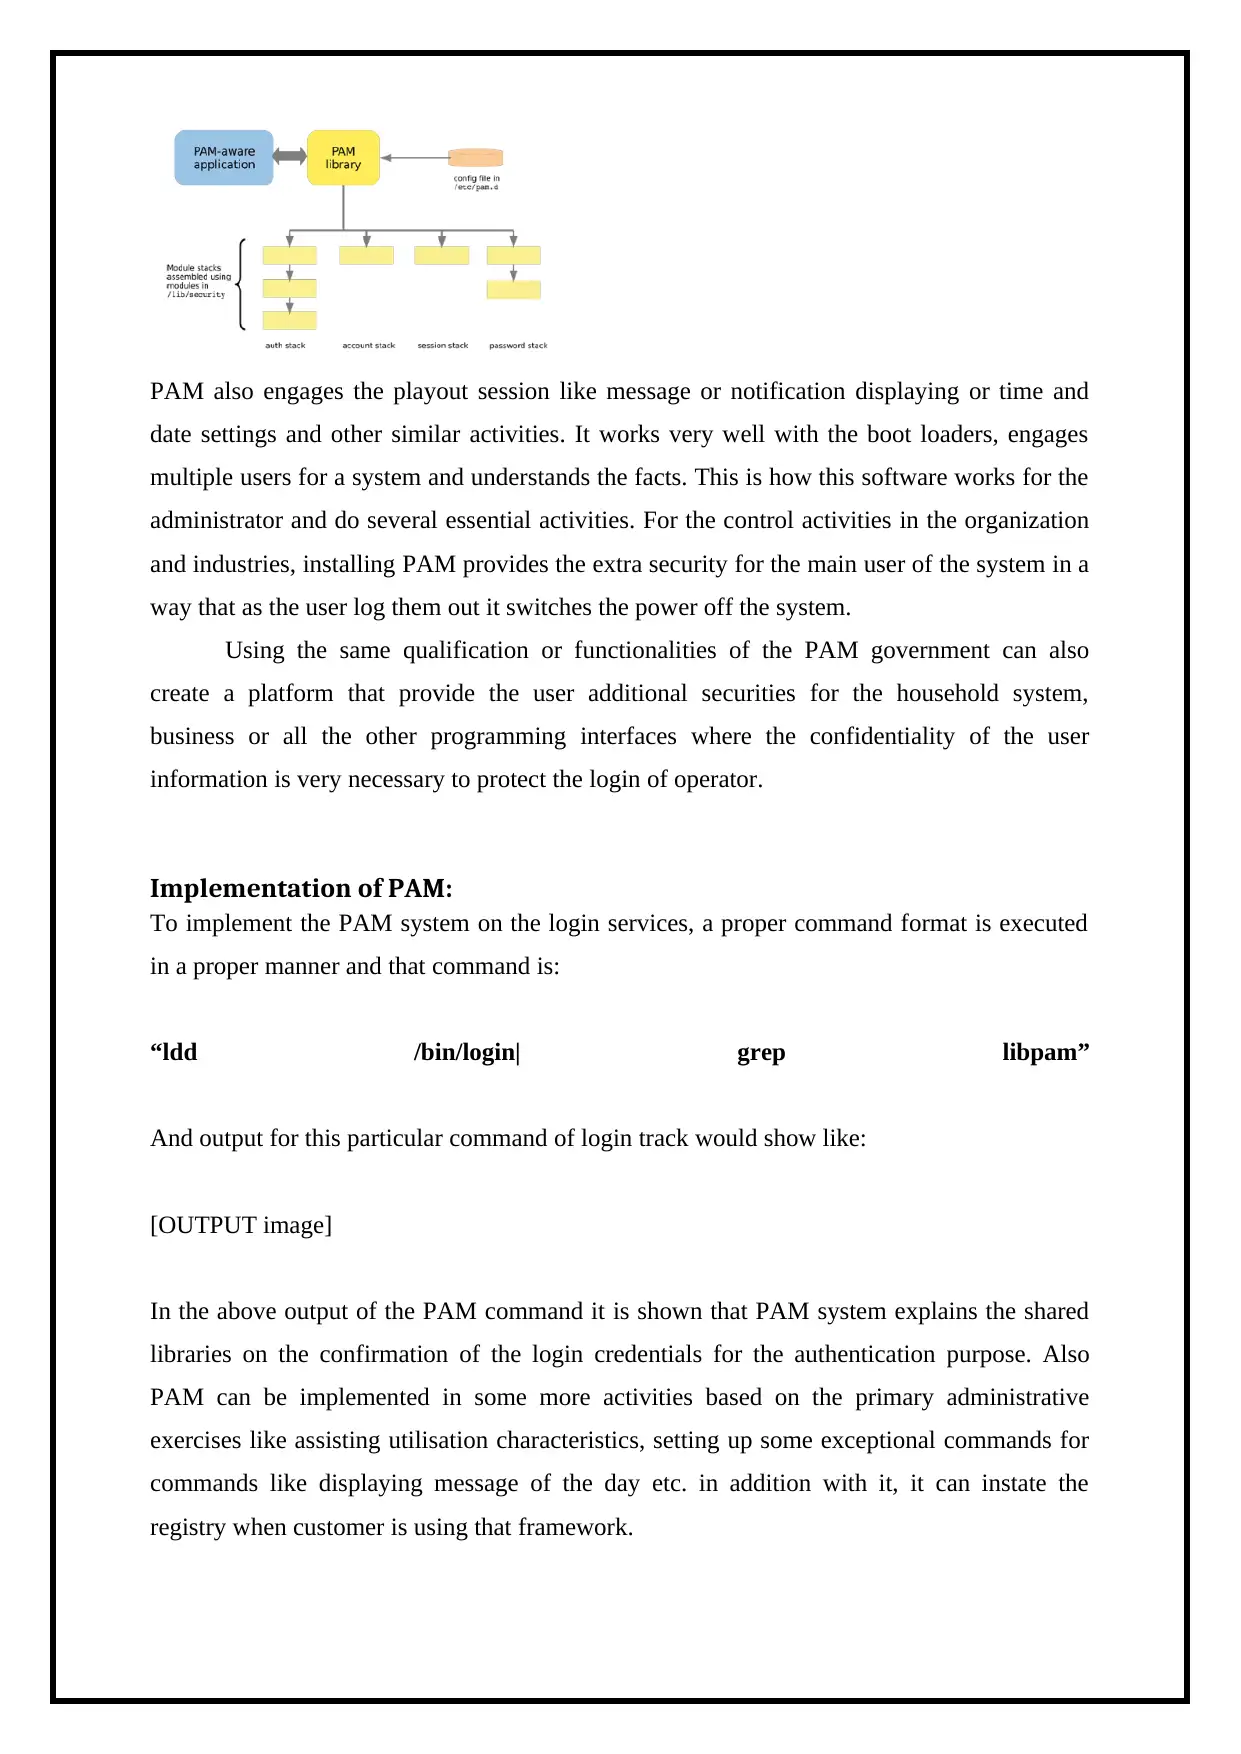
PAM also engages the playout session like message or notification displaying or time and
date settings and other similar activities. It works very well with the boot loaders, engages
multiple users for a system and understands the facts. This is how this software works for the
administrator and do several essential activities. For the control activities in the organization
and industries, installing PAM provides the extra security for the main user of the system in a
way that as the user log them out it switches the power off the system.
Using the same qualification or functionalities of the PAM government can also
create a platform that provide the user additional securities for the household system,
business or all the other programming interfaces where the confidentiality of the user
information is very necessary to protect the login of operator.
Implementation of PAM:
To implement the PAM system on the login services, a proper command format is executed
in a proper manner and that command is:
“ldd /bin/login| grep libpam”
And output for this particular command of login track would show like:
[OUTPUT image]
In the above output of the PAM command it is shown that PAM system explains the shared
libraries on the confirmation of the login credentials for the authentication purpose. Also
PAM can be implemented in some more activities based on the primary administrative
exercises like assisting utilisation characteristics, setting up some exceptional commands for
commands like displaying message of the day etc. in addition with it, it can instate the
registry when customer is using that framework.
Paraphrase This Document
Need a fresh take? Get an instant paraphrase of this document with our AI Paraphraser
As a result of login facilities PAM has capability of using the module factors which are
effective. There are also some optional services for the login authentication that are also very
essential in use if the PAM is not available.
[SOURCE CODE]
Control flags are the main flags in the commands which let the user check the status of the
program. Also these controls flags are status of diverse activities that are taken into the
charge using diverse no root instances for future purpose. There is a range of the vital
contents accompanying the growth of the Pluggable Authentication Module which also
comprises the main parameters used in the login services effectively. To complete the login
services in essential way, these authentication services are considered.
Solution #3:
An application which can be used to synchronize the data files on your device on other
devices is Syncthing. Synchronization basically means that the changes you made on a file in
your device will automatically replicate on your other synchronized device. Syncthing does
not upload only the data on the network but it also makes the changes in the synchronized file
if the source file is edited. When using cloud services for the same purpose, these services
make you first download the file then edit it and then again upload it to the server whereas the
Syncthing save you from uploading and downloading those data files.
One can trust this software on the basis of its protocol type. Syncthing uses an open protocol
with visible documentation with well-defined security mechanism which is visible in the
source code while other software uses hidden security properties and closed protocol service
with their software.
The way of working of Syncthing is it never edits the destination file directly instead it makes
a temporary copy of that file edits that file. In case, if there is something error during the file
editing, syncing or copying then the temporary file will be on the network for around one
day. This avoids the data requirement over that network.
Syncthing divides the file into fix blocks of size 128kb and computes the SHA256 hash of
every block which then results in list of blocks that comprises the size, hash and offset of all
the block presented in that file. When another block is received to that system from some
other device then its SHA256 hash is computed and then compared to its estimated value. If
the values are matched, that block is written to a temporary copy of that particular file and if
it doesn’t match, that block is rejected and Syncthing starts to find another block. As per this
description, Syncthing uses block of data from a file to transfer that to another device,
multiple devices can use this data without interrupting the speed of data transfer and also if
only a small portion of a large file is reformed then only the blocks of that changed part will
be transferred to the destination file which will save the data and most importantly time.
While transferring the data file to another device, by default, some properties get synced
always like file modification, Time, File content and some sometimes get synced and
sometimes not like symbolic links, file permissions whereas some never get synced like,
Hard links, resource forks, POSIX or NFS ACLs, FIFOs, Extended attributes, directory
modification time, sparse file etc.
Installation of Syncthing:
1. Download Syncthing online by the following link:
wget “https://github.com/syncthing/syncthing/releases/download/v1.1.0/syncthing-
linux-amd64-v1.1.0.tar.gz”
2. Extract the received tar file:
tar – xvf
In Linux based OS, file can be directly run from the current directory but for Operating
Systems based on Debian following procedure would be followed:
3. Cd to the extracted directory.
4. Then copy the Syncthing to /usr/bin.
sudo cp syncthing /usr/bin
note: there should be a user in the sudoers file or you can change that group into sudo.
Starting Syncthing:
It can be used directly using the Syncthing command or some other parameters can be passed
like upgrade, audit, etc.
In the initial process, it will automatically generate configuration file in
“$HOME/.config/syncthing” and configuration files are:
config.xml - xml format of configuration file.
csrftokens.txt - CSRF tokens that are recently issued.
index-*.db – this directory holds the database with metadata and hashes
cert.pem, key.pem - RSA public and private key of the device.
Due to some security measures, Syncthing is limited for the local machines, to make it
accessible for the remote machine as well following two methods can be used.
First is the temporary solution in which Synchting has to be run on the following particular
command:
"syncthing -gui-address = 0.0.0.0:8384".
Second one is the permanent solution in which the configuration file should be edited.
Access the configuration file by $HOME/.config/syncthing/config.xml
Search for the GUI tag and replace it with the 127.0.0.1:8384 with 0.0.0.0:8384 and
save this file.
Secure Best Marks with AI Grader
Need help grading? Try our AI Grader for instant feedback on your assignments.

Now access the Syncthing command and you will be able to access this from another
device as well.
But here comes a security concern as it lets any user to access your personal syncthing if
someone knows your device’s IP address. To avoid this issue, user can set a GUI
Authentication User and GUI Authentication Password.
Remote Device Addition:
The device ID is needed to connect two devices, then only they will be able to share the data
file or blocks.
“Add Device”, click on this button at the right bottom of both the devices and enter each
other’s device ID. By entering the device name, user can share their folders as optional.
After restarting Syncthing, all the changes will take effect like sharing, adding device,
therefore, and click on Restart.
To ensure the connection between both the devices, a popup notification will be there on
another device which will ask you to accept the new connection. Acceptation is the sign that
both the devices now know each other.
Again, clicking on add device will let the user to share the folders or files according to their
choice. After the completion of initial syncing, up to date devices will be shown.
The configuration of Syncthing:
After the package installation, the user has to enable the Syncthing on their device using the
command that is mentioned below.
More detailed content about Syncthing can be found on the following link. User can access to
this particular site and find the FAQs for some more information.
Till this time, if the user wants to access the Syncthing tool, they have to run it after every
reboot. To make it run automatically after every reboot, the following process should be
followed.
systemd is a command that is used to set Syncthing tool to system level or user level. Making
it to the system level will solve the reboot and run problem.
1. Choose an existing user or create a new one to run this. Here, the Admin is used.
2. Copy /etc/linux-systemd/system/syncthing@.service file and paste it into the load
path, i.e. /lib/systemd/system.
3. Run following commands by the root account.
systemctl enable syncthing@admin.service
systemctl start syncthing@admin.service
This course won't automatically start the eth0 interface, to start this interface automatically
user need to add the line "auto eth0" in /etc/network/interface file.
Solution #4:
The organization is a word that is derived from the word Organize which means that
everything is developing under this would be in a proper manner and constructed in a way
that the products that are produced by an organization will be accurate according to the
requirements. This principle is followed outside the organization but also inside of it, the
management should understand the word ‘Organization’. Time is the most crucial thing for
the management and for every organization out there. Mismatching of timestamps on the
devices that are used in the organization can cause a problem. Proper timekeeping should be
mandatory for all the devices operated.
The system clock is used to keep track of time on the system. Time zone is according to UTC
(Coordinated Universal Time). People also have a hardware clock which is RTC (Real Time
Clock) which is responsible to keep the time track when system turns off. RTC is a crystal
oscillator timer embedded on IC that is used for time scheduling and synchronization.
Time Stamp Counter or TSC are available with 64 bit of instruction in the processor,
an incremental register and works on clock cycle. Because of this register TSC has ability of
keeping track of accurate timings with rapid speed but TSC can also make mistakes due to
the change in CPU frequencies. These fluctuations in frequencies of the CPU in all the
systems make the time keeping different from each other and the system shows different
time. To handle time operations, HPET, High Precision Event Timer is also used. HPET
generated time impression are more accurate than the RTC. The system clock that is Linux
OS generated cannot be considered as accurate because of the fluctuations. Running too
many processes simultaneously can engage the system and cause time interrupts. Due to this
system clock can take longer time for the servicing and it will lose actual time.
Therefore, a centralized clock can be used to keep the same time for every system in
the organization because every other organisation uses either an internal clock or uses public
Internet Time Server to match the accurate timings. Internal clocks are in the form of NTP
(Network Time Protocol) that provide consistency in time. Every networking device and all
the end device should rely upon the NTP servers which uses the time synchronization with
respect to the Coordinated Universal Time.
The UTC is the main time zone that is followed by the other entire organisation that
working out on the hourly difference according to the location of the organisation. A strata or
stratum is followed by the NTP servers which are used to portray distance from reference
clock. A device should be there that work on UTC with little delay is the device with 0
stratums. The limit or synchronized clock is with stratum 15, above this limit the clock will
be considered as unsynchronized clock.
References:
1. McCormick, Z. and Schmidt, D.C., 2012, October. Data synchronization patterns in
mobile application design. In Proceedings of the 19th Conference on Pattern
Languages of Programs (p. 12). The Hillside Group.
2. Khosravy, M. and Novik, L., Microsoft Corp, 2012. Data synchronization for devices
supporting direction-based services. U.S. Patent 8,200,246.
3. Thakkar, D.D., Oracle International Corp, 2018. Pluggable authentication for
enterprise web application. U.S. Patent Application 15/473,502.
4. Proctor, W.C., Storm, P., Hanlon, M.R. and Mendoza, N., 2017, November. Securing
HPC: development of a low cost, open source multi-factor authentication
infrastructure. In Proceedings of the International Conference for High Performance
Computing, Networking, Storage and Analysis(p. 37). ACM.
5. Chang, D.Y., Benantar, M., Chang, J.Y.C. and Venkataramappa, V., International
Business Machines Corp, 2014. Authentication and authorization methods for cloud
computing security. U.S. Patent 8,769,622.
6. Wilde, E. and German, D., 2018. Merge‐Tree: Visualizing the integration of commits
into Linux. Journal of Software: Evolution and Process, 30(2), p.e1936.
7. Matotek, D., Turnbull, J. and Lieverdink, P., 2017. Pro Linux System Administration.
Apress.
8. Blischak, J.D., Davenport, E.R. and Wilson, G., 2016. A quick introduction to version
control with Git and GitHub. PLoS computational biology, 12(1), p.e1004668.
9. Tomlinson, T., 2015. Using Git. In Beginning Drupal 8 (pp. 177-183). Apress,
Berkeley, CA.
10. Crabtree, D. and Houston, J.S., International Business Machines Corp, 2017. Non-
disruptively merging coordinated timing networks. U.S. Patent Application
14/920,940.
1 out of 13
Related Documents
Your All-in-One AI-Powered Toolkit for Academic Success.
+13062052269
info@desklib.com
Available 24*7 on WhatsApp / Email
![[object Object]](/_next/static/media/star-bottom.7253800d.svg)
Unlock your academic potential
© 2024 | Zucol Services PVT LTD | All rights reserved.


