Window Server 2012 using VMware Workstation
VerifiedAdded on 2023/01/17
|137
|14476
|90
AI Summary
This document provides a step-by-step guide on how to create a Window Server 2012 using VMware Workstation and create virtual PCs on Hyper-V server. It also explains how to establish network connections and share folders between the server and virtual PCs. The document includes detailed configuration settings and testing procedures.
Contribute Materials
Your contribution can guide someone’s learning journey. Share your
documents today.
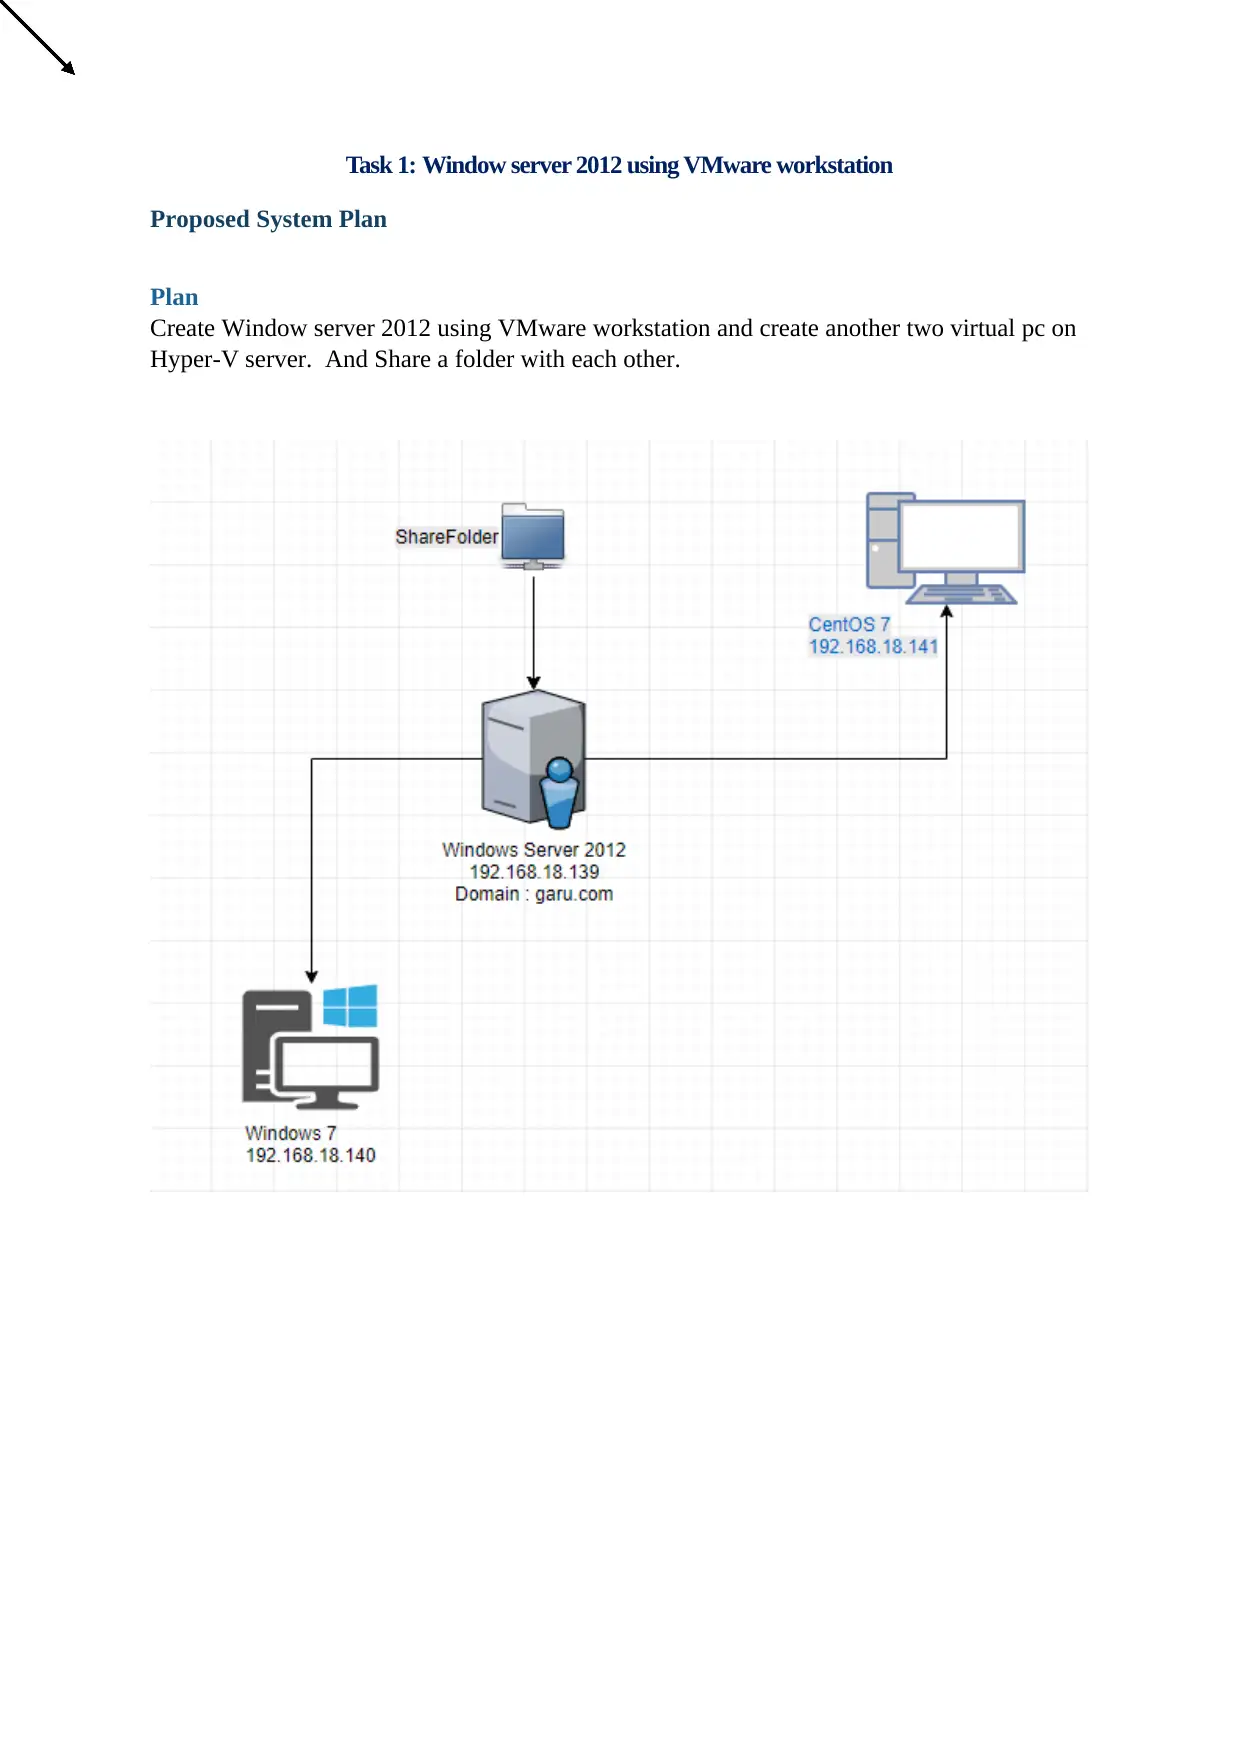
Task 1: Window server 2012 using VMware workstation
Proposed System Plan
Plan
Create Window server 2012 using VMware workstation and create another two virtual pc on
Hyper-V server. And Share a folder with each other.
Proposed System Plan
Plan
Create Window server 2012 using VMware workstation and create another two virtual pc on
Hyper-V server. And Share a folder with each other.
Secure Best Marks with AI Grader
Need help grading? Try our AI Grader for instant feedback on your assignments.
2
Configuration
Server
Processor Intel Core i5 2.3GHz
RAM 13.4Gb
HDD 100Gb
OS Windows Server 2012
Software VMware WorkStation 15
Virtual Pc 1
Processor 1 vCore
RAM 2Gb
HDD 20Gb
OS Windows 7
Software Hyper-v
Virtual Pc 2
Processor 1 vCore
RAM 2Gb
HDD 20Gb
OS CentOS 7
Software Hyper-v
Installation
Server
Using VMware workstation create a Windows server 2012. Then install active director and
Hyper-V server. Stablished network connection on windows server and physical machine.
Virtual PC 1
Create a virtual pc on Hyper-V server with above virtual pc1 configuration. Established
network connection with windows server.
Virtual PC 2
Create a virtual pc on Hyper-V server with above virtual pc2 configuration. Established
network connection with windows server.
Testing
Conduct the file sharing test on window server and other virtual pc’s should have access to
shared folder.
3
Post - Implementation Report
Purpose
This document explains requirements and configuration guides and outcome of the file
sharing test result of the implementation process of server and pc installation.
Requirement
Create an windows server and create another two virtual pc on Hyper-V server. Then
established a network connection in between two virtual pc and windows server. And share a
folder/file between all the pc.
Implementation
Configuration
Following configuration will be used on while creating server and virtual pcs.
Server
Processor Intel Core i5 2.3GHz
RAM 13.4Gb
HDD 100Gb
OS Windows Server 2012 / Active Directory /
Hyper-V server
Software VMware WorkStation 15
Virtual Pc 1
Processor 1 vCore
RAM 2Gb
HDD 20Gb
OS Windows 7
Software Hyper-V
Virtual Pc 2
Processor 1 vCore
RAM 2Gb
HDD 20Gb
OS CentOS 7
Software Hyper-V
4
Installation
Server
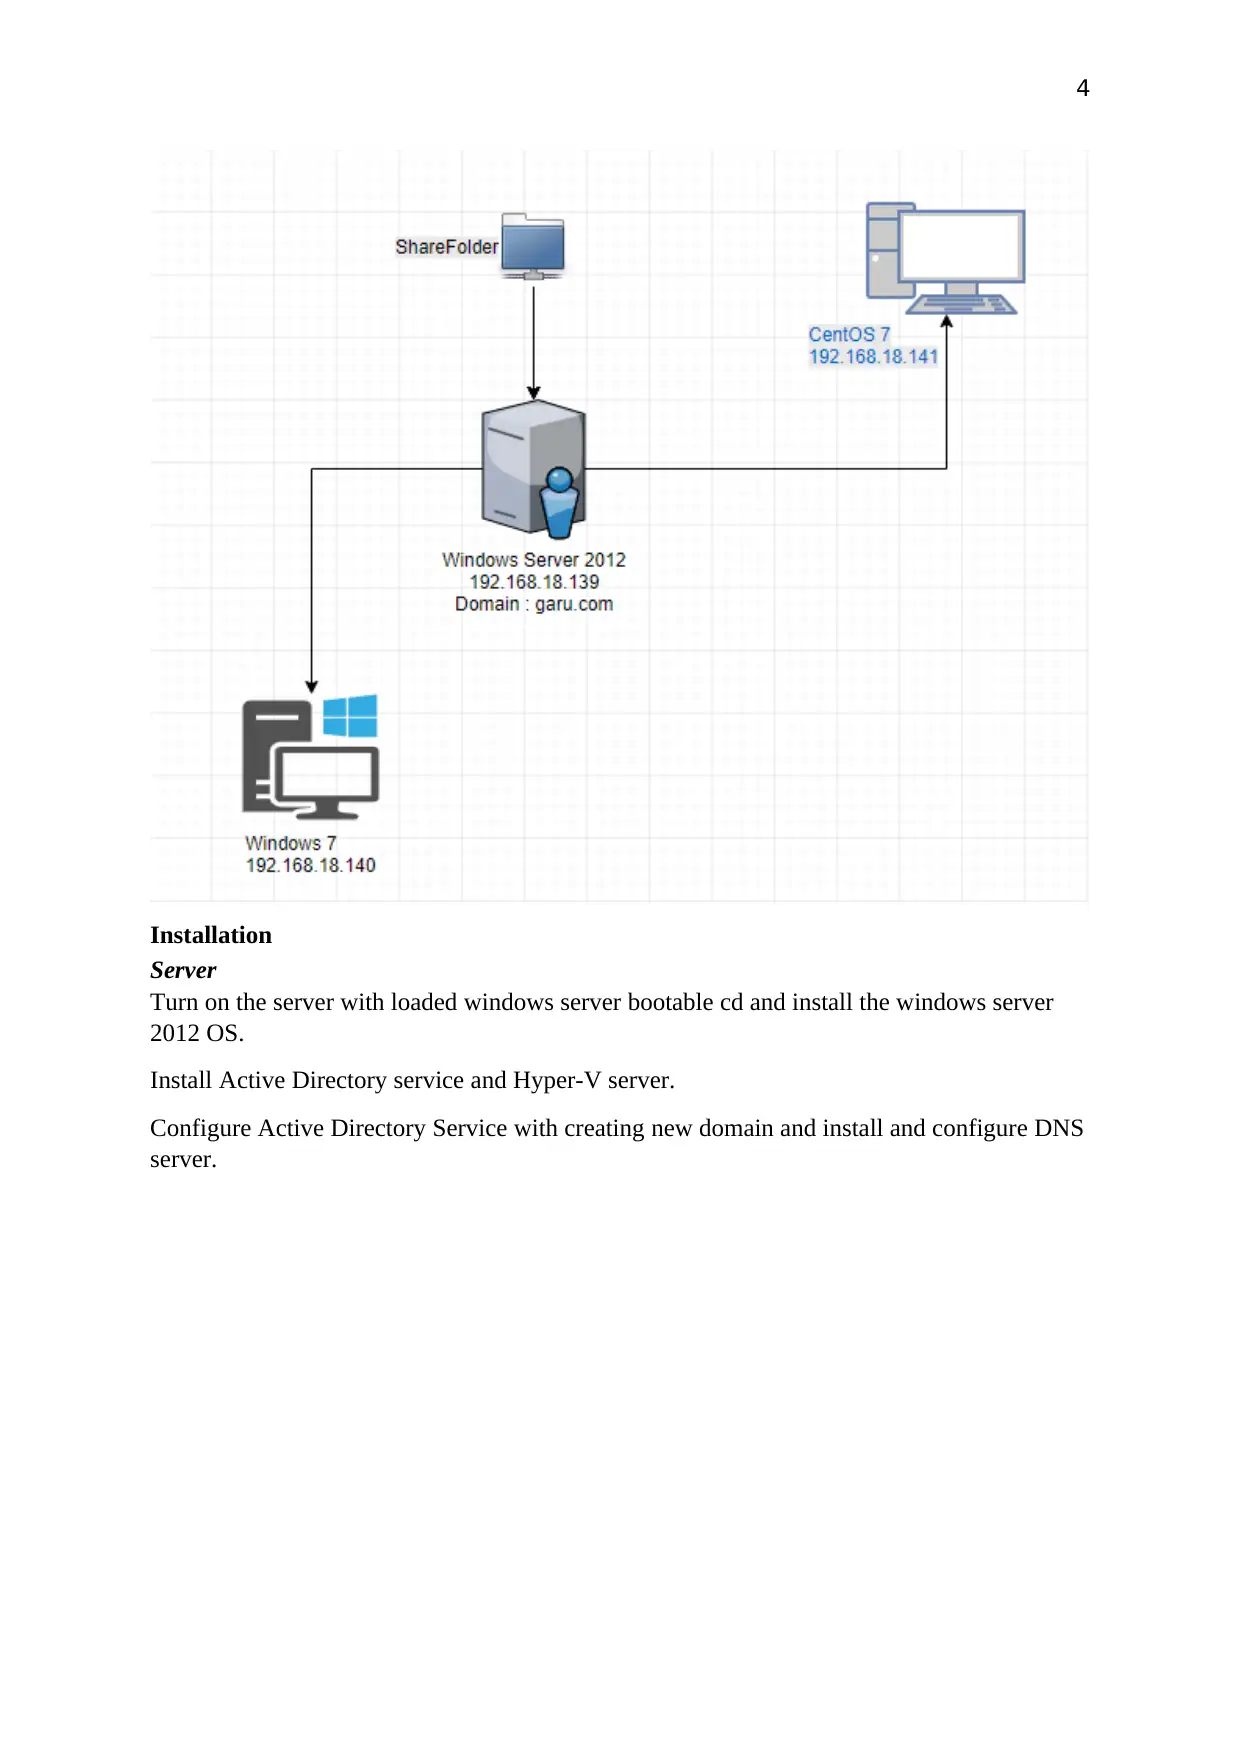
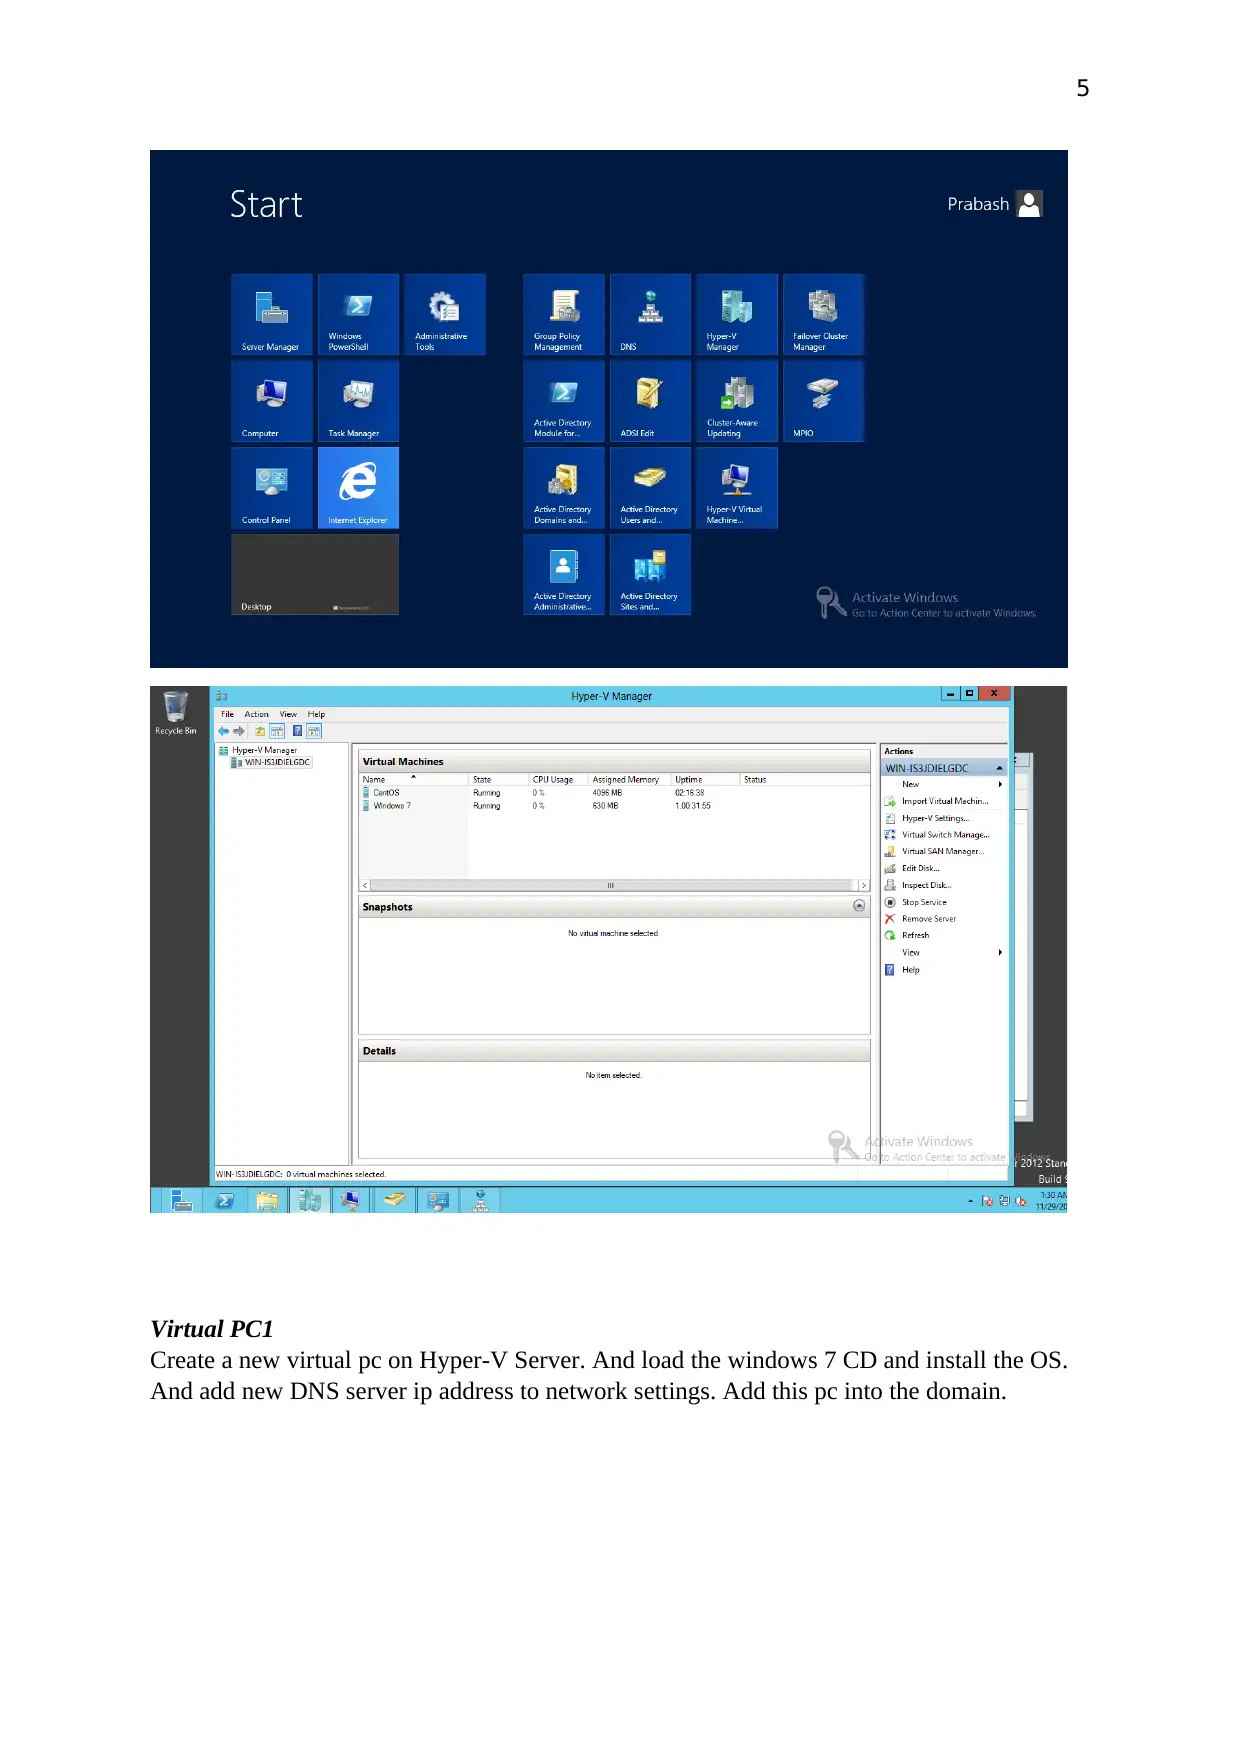
Turn on the server with loaded windows server bootable cd and install the windows server
2012 OS.
Install Active Directory service and Hyper-V server.
Configure Active Directory Service with creating new domain and install and configure DNS
server.
Installation
Server
Turn on the server with loaded windows server bootable cd and install the windows server
2012 OS.
Install Active Directory service and Hyper-V server.
Configure Active Directory Service with creating new domain and install and configure DNS
server.
Secure Best Marks with AI Grader
Need help grading? Try our AI Grader for instant feedback on your assignments.
5
Virtual PC1
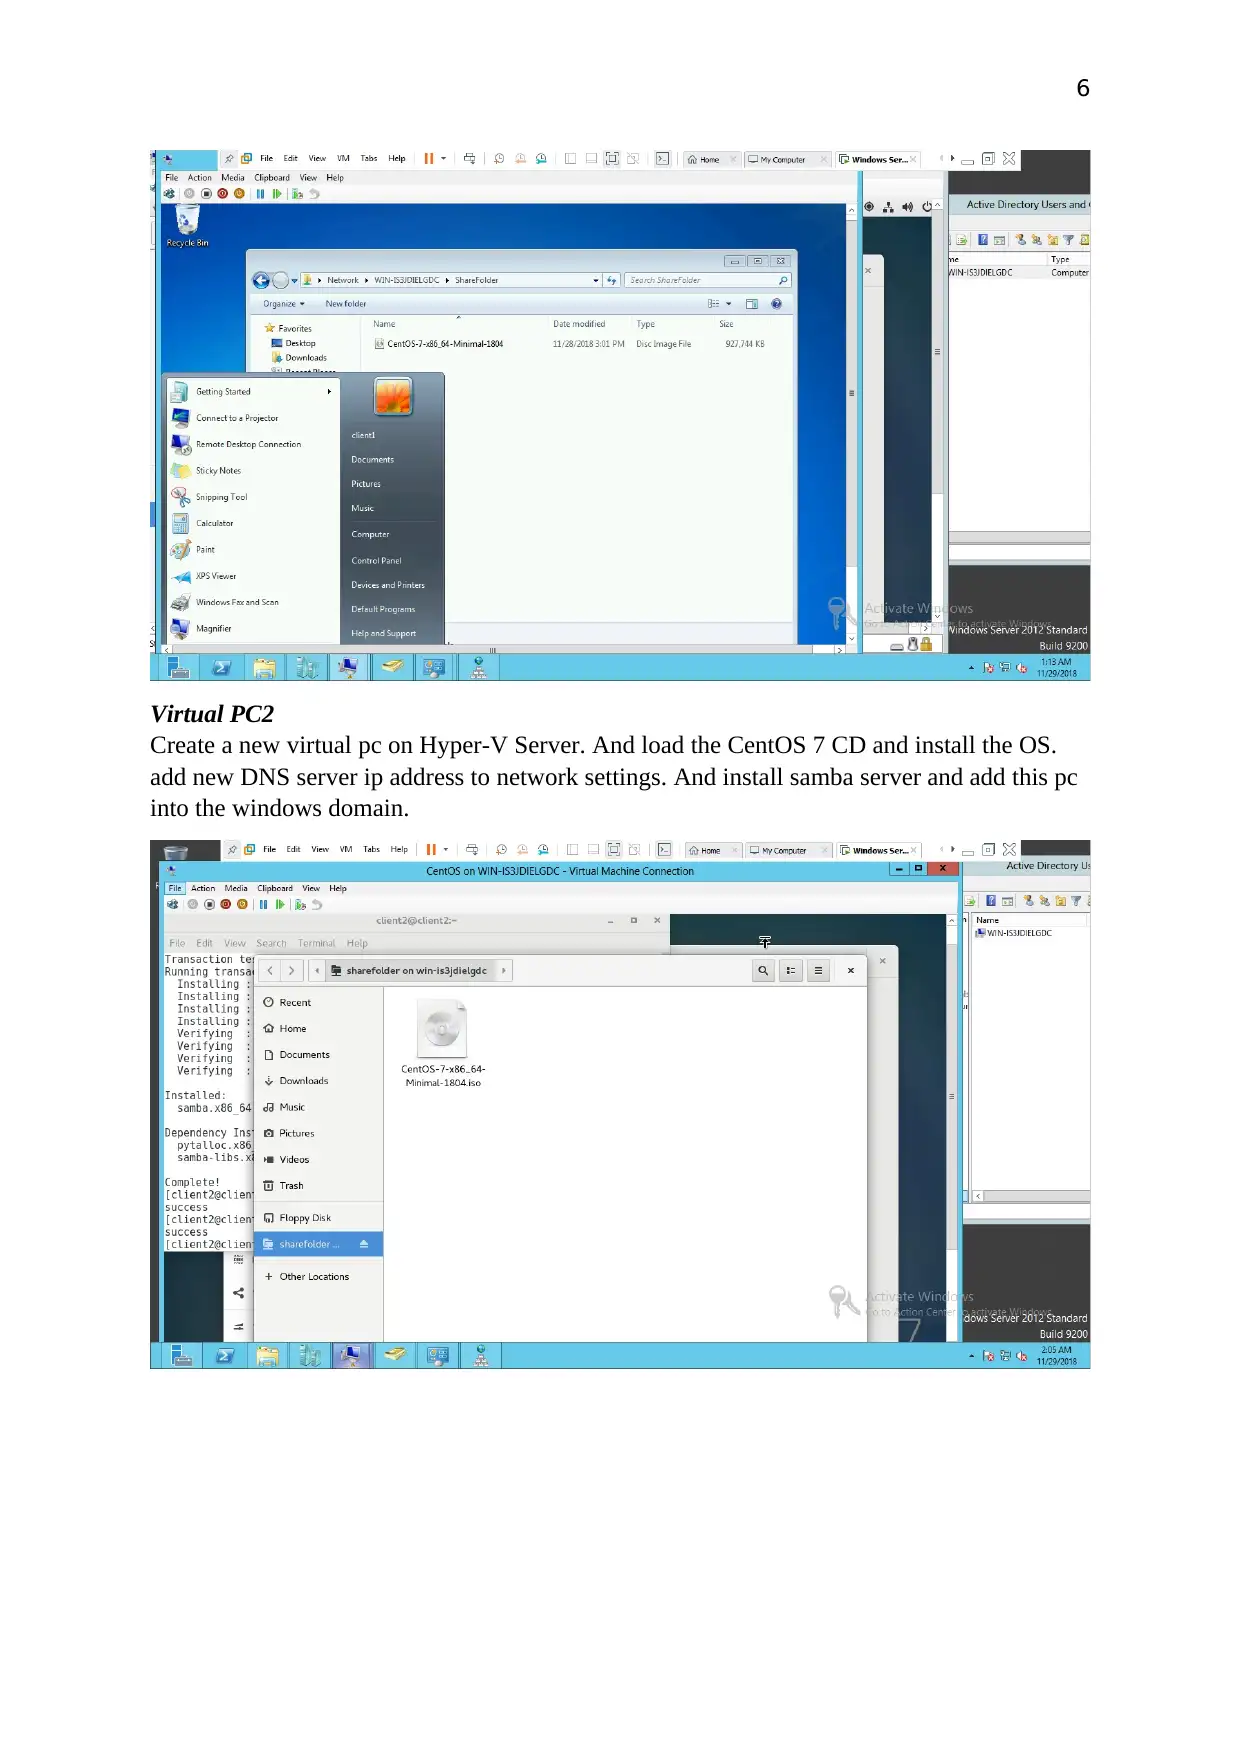
Create a new virtual pc on Hyper-V Server. And load the windows 7 CD and install the OS.
And add new DNS server ip address to network settings. Add this pc into the domain.
Virtual PC1
Create a new virtual pc on Hyper-V Server. And load the windows 7 CD and install the OS.
And add new DNS server ip address to network settings. Add this pc into the domain.
6
Virtual PC2
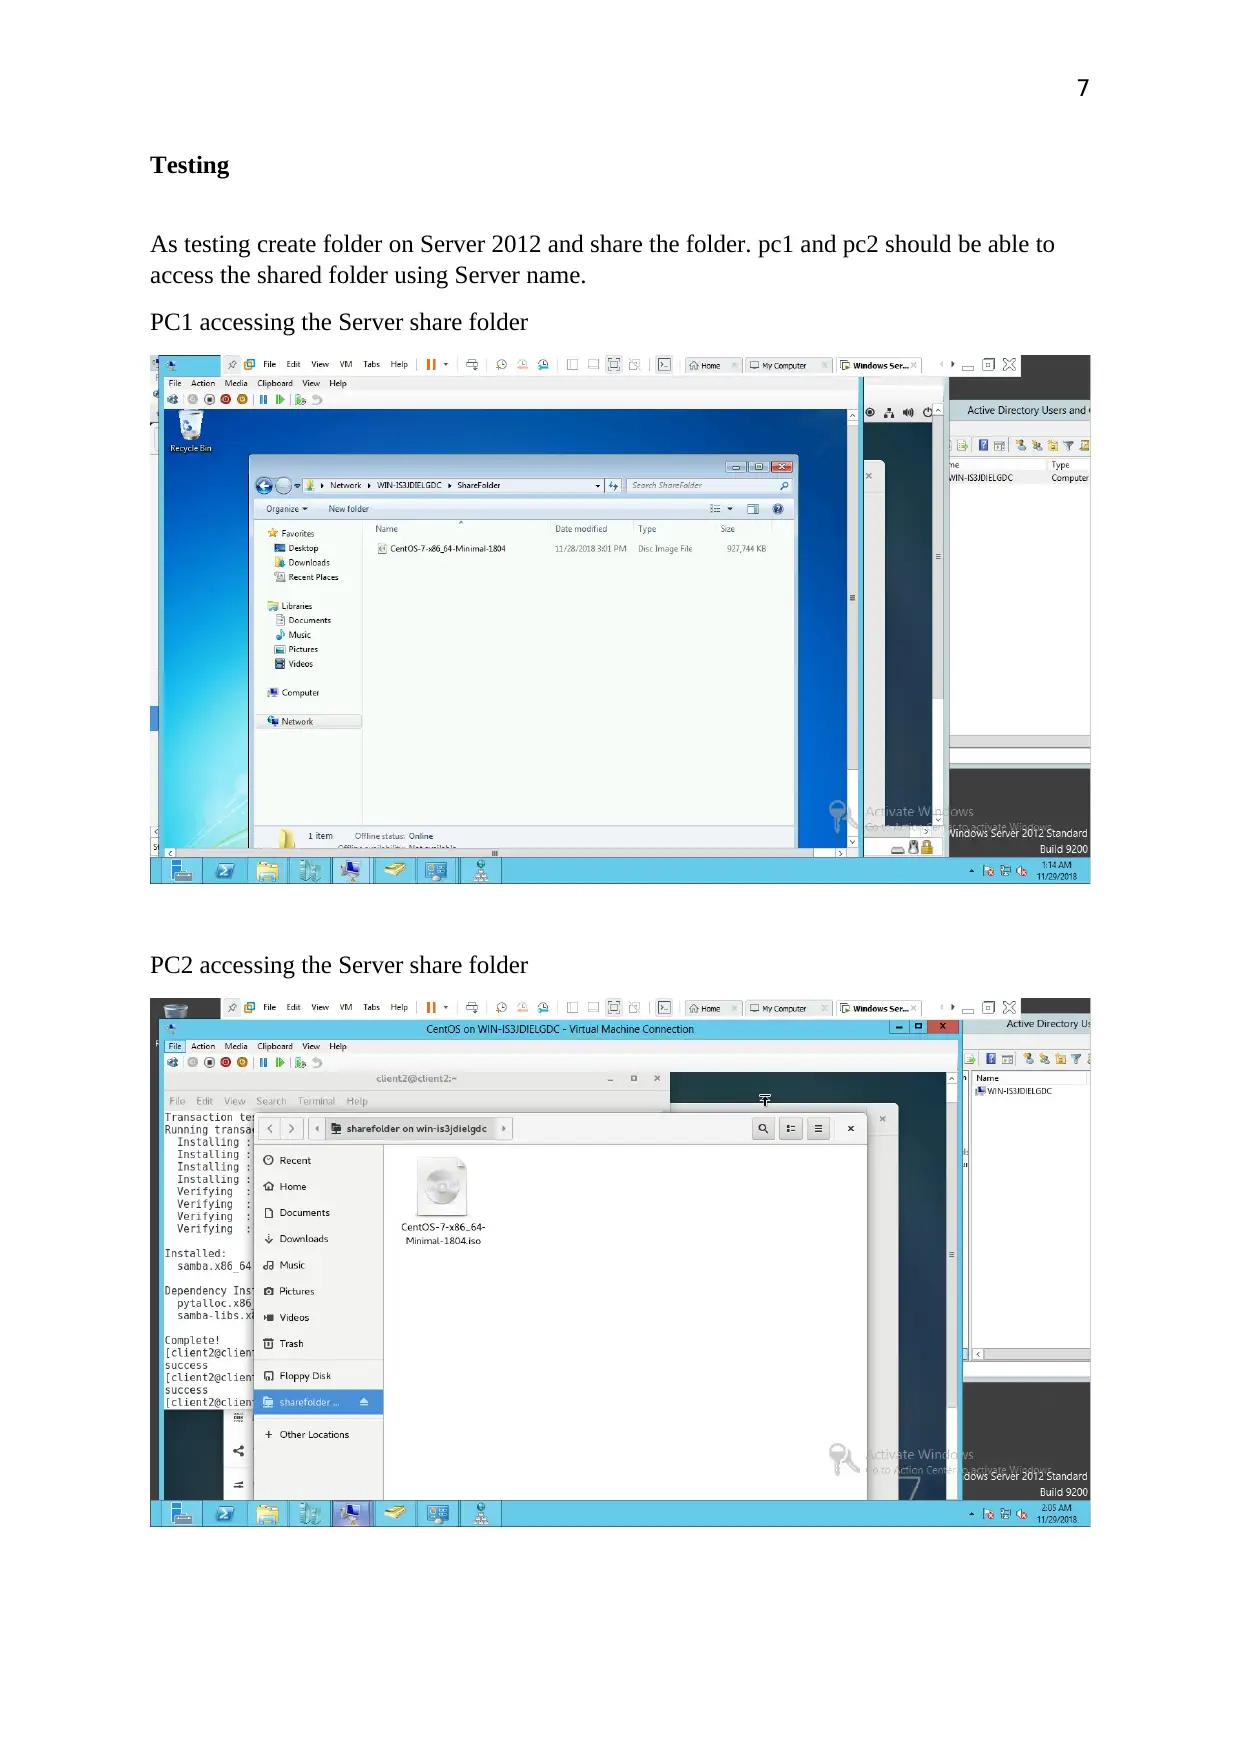
Create a new virtual pc on Hyper-V Server. And load the CentOS 7 CD and install the OS.
add new DNS server ip address to network settings. And install samba server and add this pc
into the windows domain.
Virtual PC2
Create a new virtual pc on Hyper-V Server. And load the CentOS 7 CD and install the OS.
add new DNS server ip address to network settings. And install samba server and add this pc
into the windows domain.
7
Testing
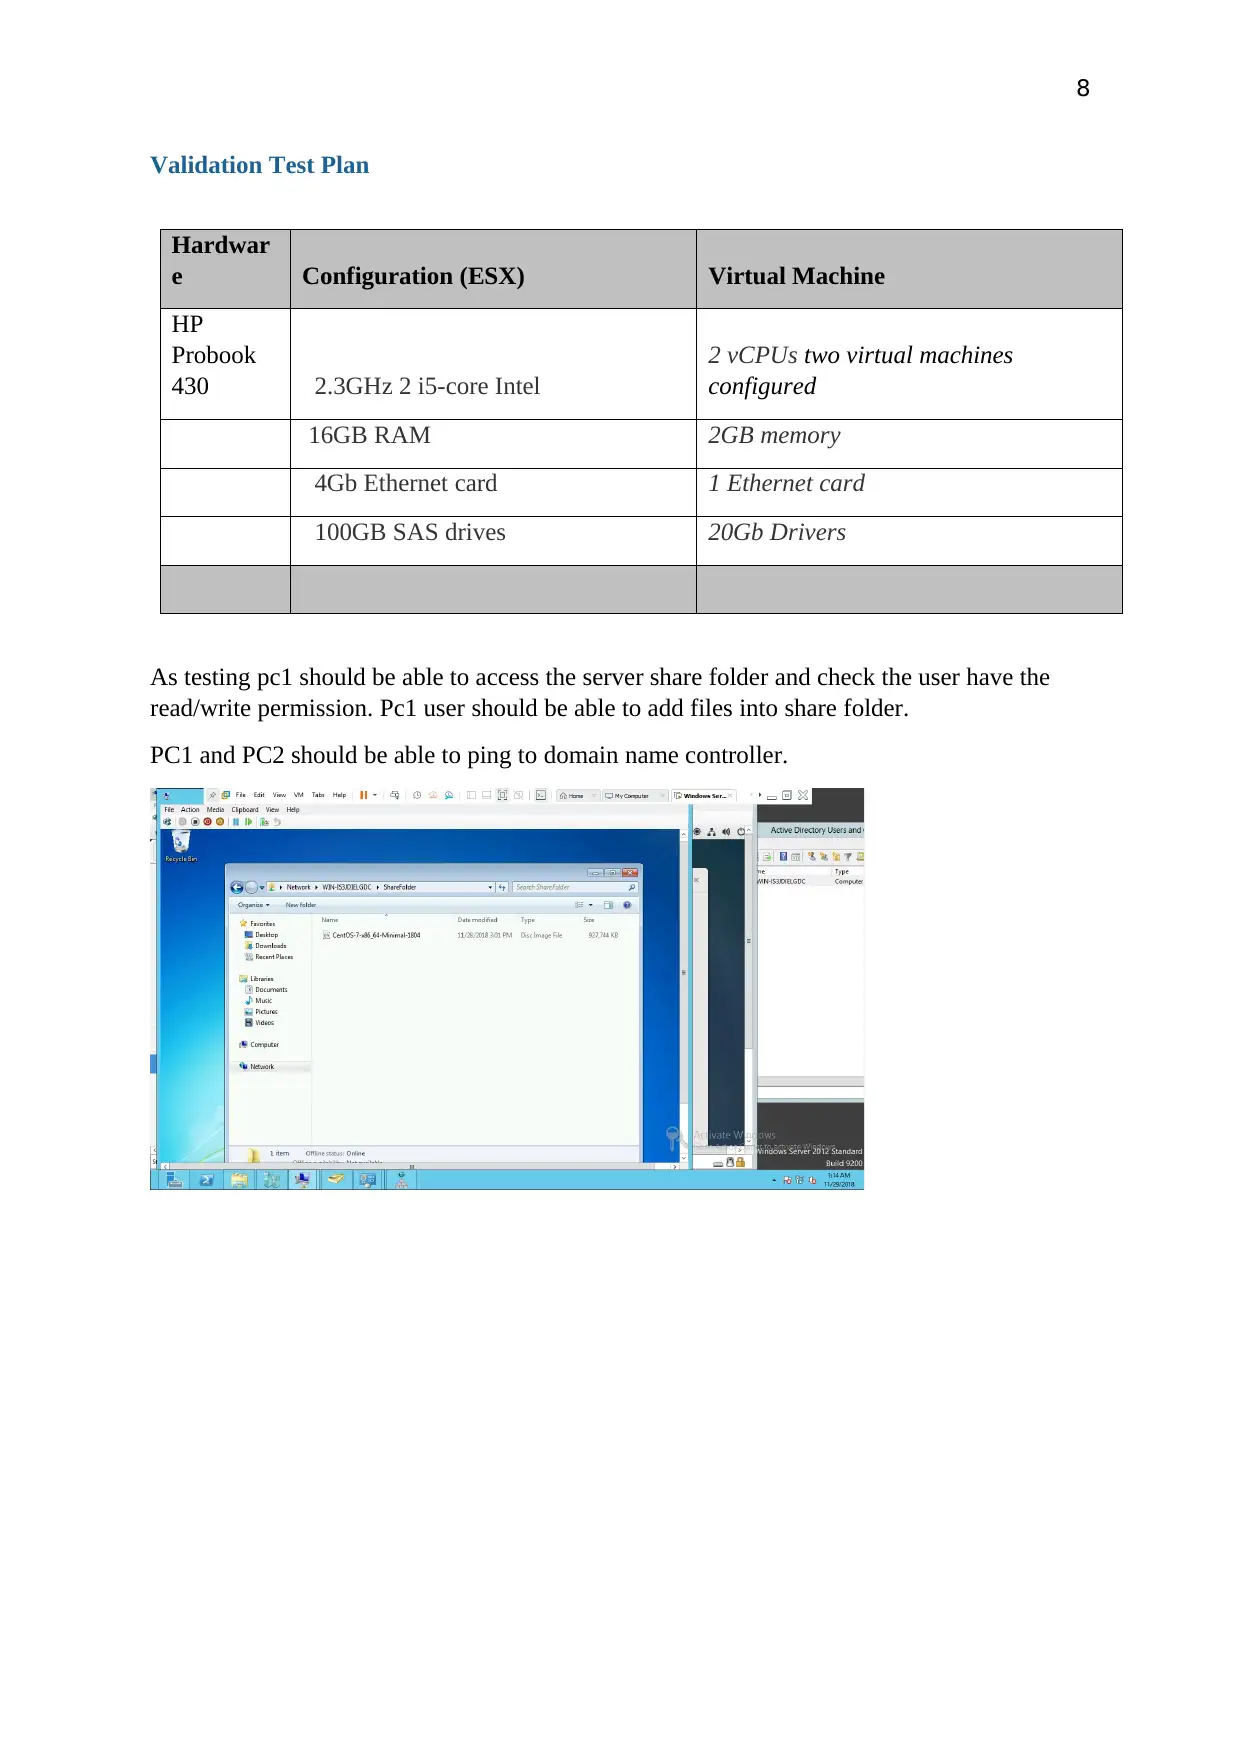
As testing create folder on Server 2012 and share the folder. pc1 and pc2 should be able to
access the shared folder using Server name.
PC1 accessing the Server share folder
PC2 accessing the Server share folder
Testing
As testing create folder on Server 2012 and share the folder. pc1 and pc2 should be able to
access the shared folder using Server name.
PC1 accessing the Server share folder
PC2 accessing the Server share folder
Paraphrase This Document
Need a fresh take? Get an instant paraphrase of this document with our AI Paraphraser
8
Validation Test Plan
Hardwar
e Configuration (ESX) Virtual Machine
HP
Probook
430 2.3GHz 2 i5-core Intel
2 vCPUs two virtual machines
configured
16GB RAM 2GB memory
4Gb Ethernet card 1 Ethernet card
100GB SAS drives 20Gb Drivers
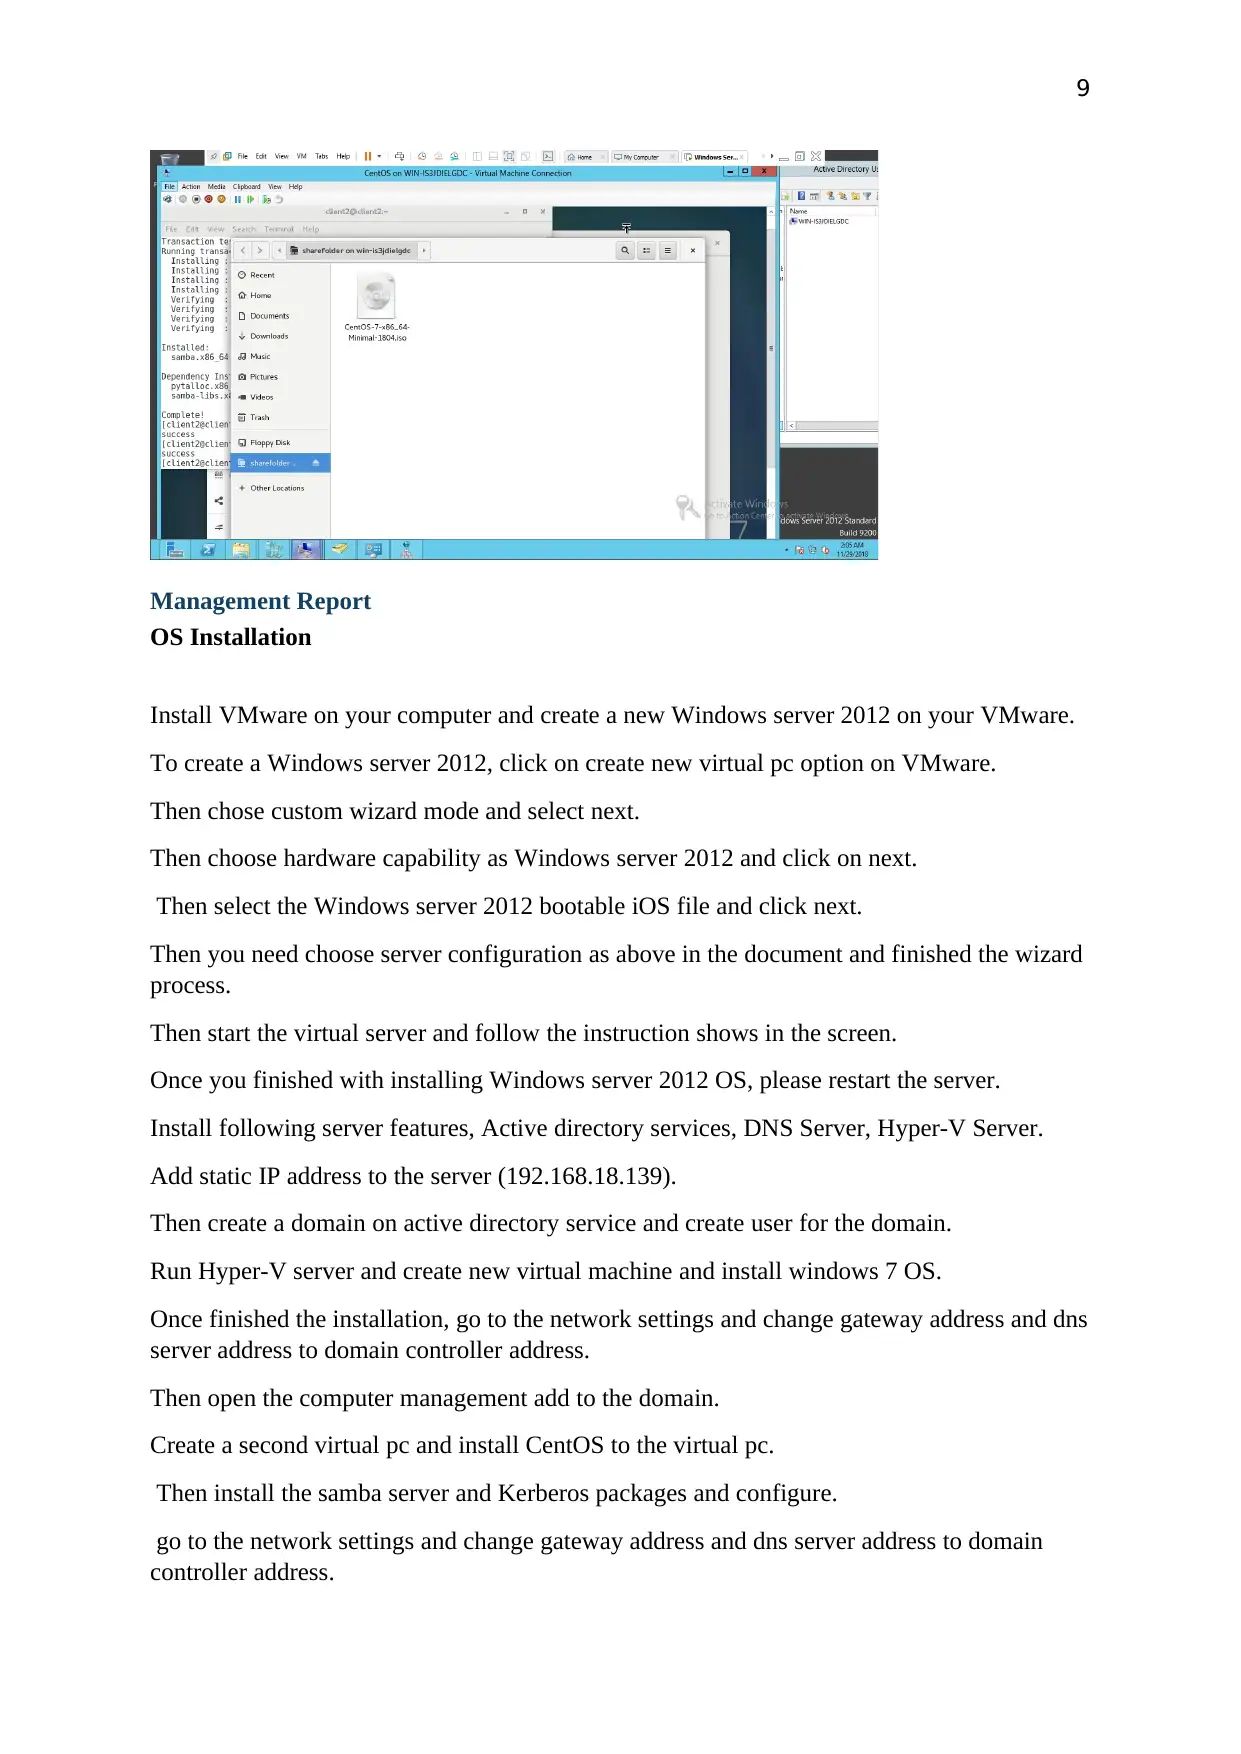
As testing pc1 should be able to access the server share folder and check the user have the
read/write permission. Pc1 user should be able to add files into share folder.
PC1 and PC2 should be able to ping to domain name controller.
9
Management Report
OS Installation
Install VMware on your computer and create a new Windows server 2012 on your VMware.
To create a Windows server 2012, click on create new virtual pc option on VMware.
Then chose custom wizard mode and select next.
Then choose hardware capability as Windows server 2012 and click on next.
Then select the Windows server 2012 bootable iOS file and click next.
Then you need choose server configuration as above in the document and finished the wizard
process.
Then start the virtual server and follow the instruction shows in the screen.
Once you finished with installing Windows server 2012 OS, please restart the server.
Install following server features, Active directory services, DNS Server, Hyper-V Server.
Add static IP address to the server (192.168.18.139).
Then create a domain on active directory service and create user for the domain.
Run Hyper-V server and create new virtual machine and install windows 7 OS.
Once finished the installation, go to the network settings and change gateway address and dns
server address to domain controller address.
Then open the computer management add to the domain.
Create a second virtual pc and install CentOS to the virtual pc.
Then install the samba server and Kerberos packages and configure.
go to the network settings and change gateway address and dns server address to domain
controller address.
10
Utilized Network Protocols
DNS Service
IP Service
Kerberos
Microsoft-DS
Authentication Method
- NTLMv2. This version of NTLM uses 128-bit encryption and is used for machines
running NT 4.0 SP4 and later. This is the most secure challenge-response
authentication available.
- Kerberos. Kerberos is essentially a ticket-based authentication protocol.
Configuration Settings
Server
Host Name Server
IP Address 192.168.18.139
Gateway 192.168.18.139
DNS 192.168.18.139
Domain Name Garu.com
User Name prabash
Virtual PC1
Host Name Client1
IP Address 192.168.18.140
Gateway 192.168.18.139
DNS 192.168.18.139
Domain Name Garu.com
User Name Client1
Virtual PC2
Host Name Client2
IP Address 192.168.18.141
Gateway 192.168.18.139
Secure Best Marks with AI Grader
Need help grading? Try our AI Grader for instant feedback on your assignments.

11
DNS 192.168.18.139
Domain Name Garu.com
User Name Client2
Summary of testing
PC 1 and PC2 able to access the shared folder on server and PC’s was able to ping domain
controller.
DNS 192.168.18.139
Domain Name Garu.com
User Name Client2
Summary of testing
PC 1 and PC2 able to access the shared folder on server and PC’s was able to ping domain
controller.
12
Workplace Health Safety
General
providing a safe and healthy work place;
protecting the environment by minimizing our impact on it;
complying with all relevant laws, regulations and standards; and
setting objectives and targets and reviewing our performance.
has established standards to address risk management, hazard control, training and
employee involvement;
shall take prompt and effective action to maintain a safe work place and take care of
the environment;
promote a culture of communication and involvement in HSE; and
Equipment Safety
Extreme care should be taken when operating equipment. Before you attempt to operate any
tool or piece of equipment, you must be fully trained by an experienced operator. Make sure
that all guards are in place and function properly and that all electrical connections are
properly made. You should observe the following precautions when using equipment:
Understand the correct operating procedures and safety precautions before operating a piece
of equipment.
Ensure that all guards are in place and functioning before any machine is started.
Report defective or unsafe equipment to a responsible individual to prevent serious injury.
Do not distract or interfere with the equipment operator.
Make sure that the cords to electrically powered tools are in good condition, with no frayed
parts or bare wires showing and make sure that the tools are properly grounded.
Keep edge-cutting tools properly sharpened so that they do the job well and do not have to be
forced because of dull edges.
Use tools only for their intended use and make sure the size of the tool is right for the job.
Report to your immediate supervisor any tool or piece of equipment that is broken or does not
function properly.
Ventilation systems
The environment in which you work is very important. The air around you may be filled with
smoke and steam.
Kitchens have some type of ventilation equipment usually housed in the same units as the fire
suppression systems. Many other types of ventilation equipment may be found in workplaces.
It is important, regardless of where you are working, to become familiar with the ventilation
equipment or systems and use them.
13
Emergency shutdown systems
Many kitchens have emergency shutdown systems or “panic buttons.” These are installed so
that only one switch has to be thrown to kill the power to a large amount of equipment. These
systems are to be used when a person is being electrocuted or is caught in a piece of
machinery. Under these circumstances, you do not have time to hunt for and throw the
correct switch. Fast action is necessary. Hit the panic button.
When you enter a kitchen for the first time, locate and learn how to use the emergency
shutdown.
Guards and barriers
Guards and barriers are used as safety devices on many pieces of equipment used in a modern
kitchen. Always use them to ensure you are operating the machinery in the safest way
possible. Never operate a piece of equipment unless all guards and barriers are in position.
Utilities
Each time you have a new work location, check the location of the shutoffs for all of the
utilities. That way you will be prepared for an emergency.
Electrical
You should make yourself aware of the location of the main panel or sub-panels being used,
and you should learn how to shut them off in case of an emergency. If you must shut the
power off, notify your supervisor right away. Obtain permission from the electrician before
using a new service.
Electrical extension cords, if they need to be used, should be orderly and not allowed to
become tangled. Such cords should be taped to the floor whenever possible as this will reduce
the chance of someone tripping over them
Electrical safety
Even though you may normally deal with low voltages and current, the values are never far
away from lethal levels. You can receive a shock or burn from any common electrical circuit.
The severity of the electrical shock depends on four factors:
Normal household current (plugs and light circuits) is generally limited by a circuit breaker to
a value of 15 amps. This device has been designed to trip and open a circuit if the 15-amp
value is exceeded. It is possible to cause fatal injury with a current flow of only 50
milliamperes (mA). One milliampere (1 mA) is one one-thousandth of an amp.
It is easy to see that the body is sensitive to relatively small values of current. In comparison,
a 100-watt light bulb draws approximately 0.85 amp (850 mA) of current when connected to
a 120-volt source. Remember, there are 15 amps available in each standard house circuit.
Industrial circuits may have a required flow of several hundred amps. In both cases, these are
dangerous amounts!
Paraphrase This Document
Need a fresh take? Get an instant paraphrase of this document with our AI Paraphraser
14
Analyzes Error / Troubleshooting Tools
When configuring I had issue on Hyper-V server, which was Hyper-V server not detect any
network card.
Command line tools helps to identified the issue.
Should have basic network tool to identified the issue.
Conclusion
In this report I have competed the planning, configuring and installing server and then
implemented the virtual pc. Completing this project, I confident to plan the virtualization task
and gather the requirement and finalized the server and pc configuration. Moreover,
implement and install the server OS and client OS.
15
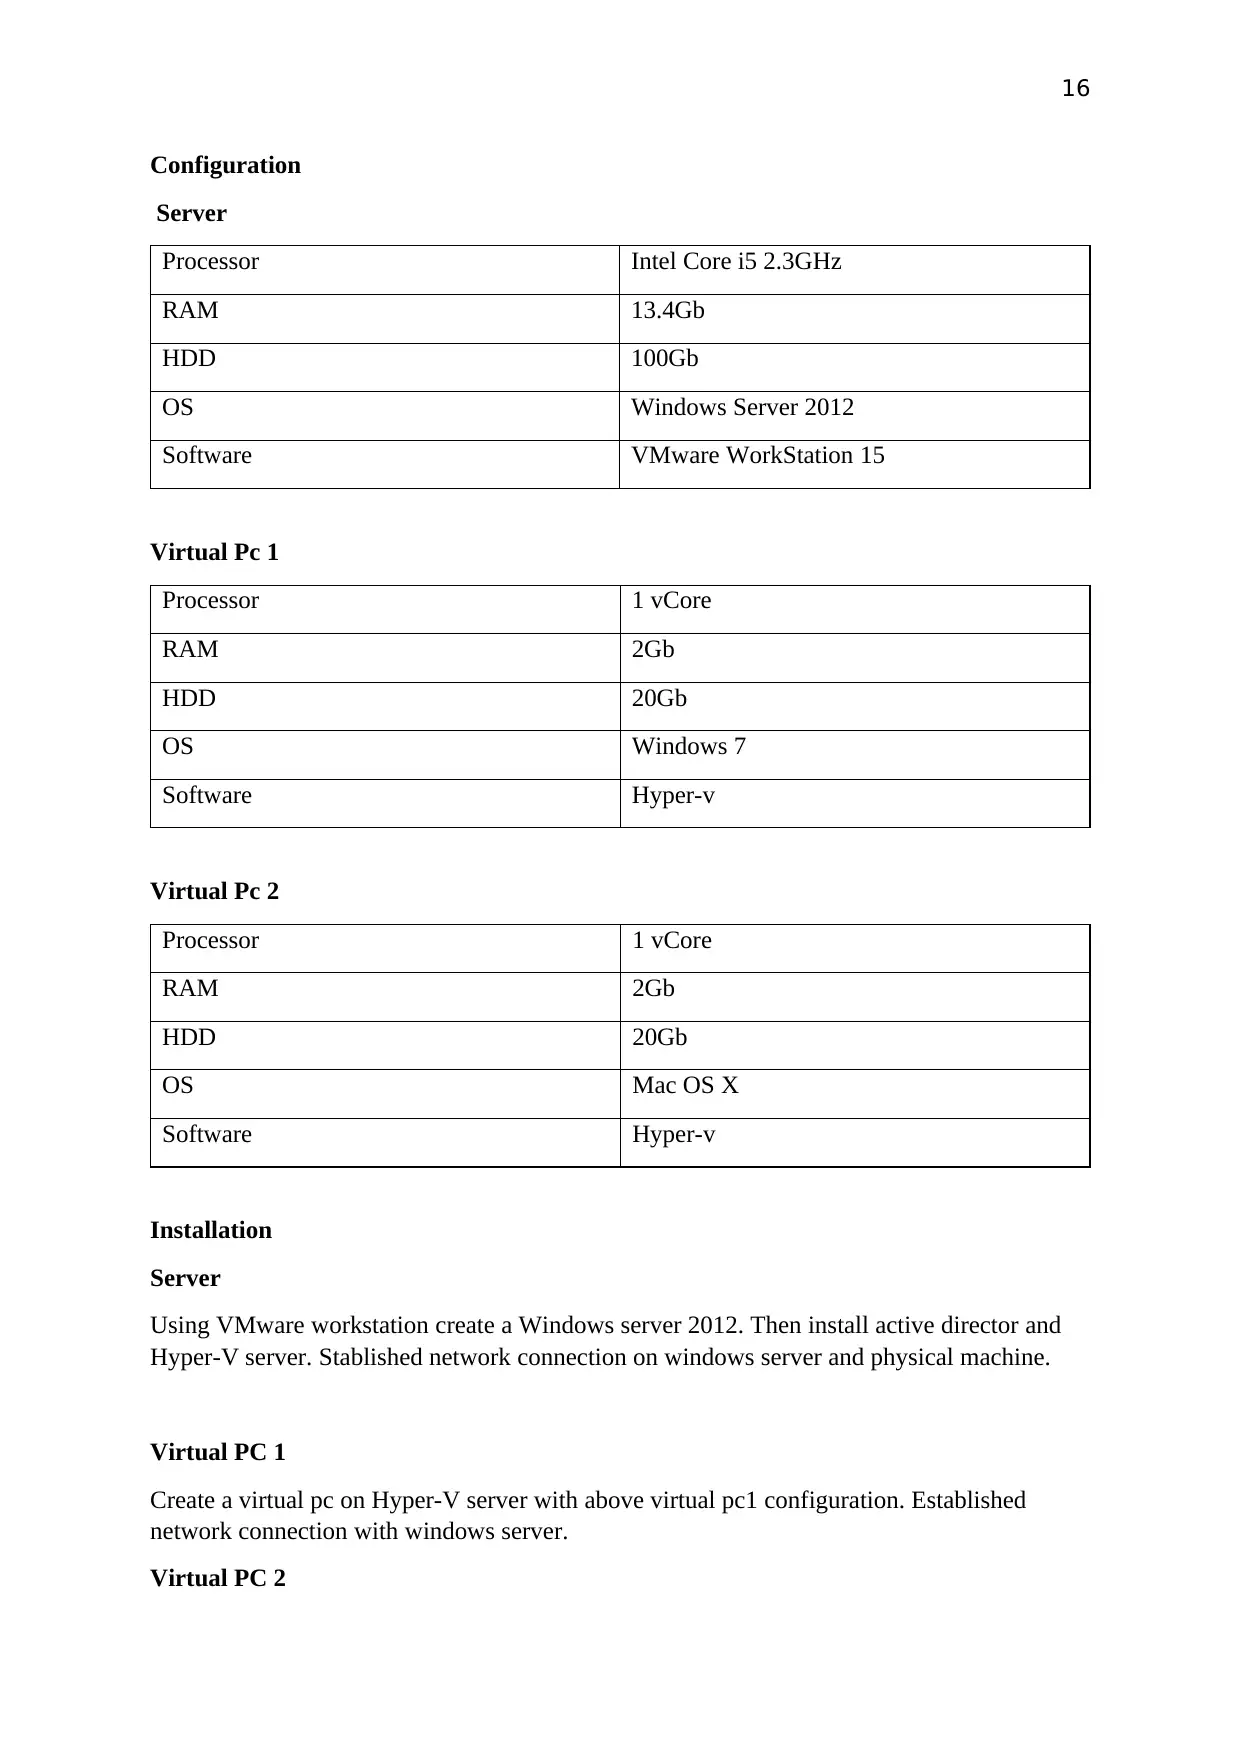
Task 2
Proposed System Plan
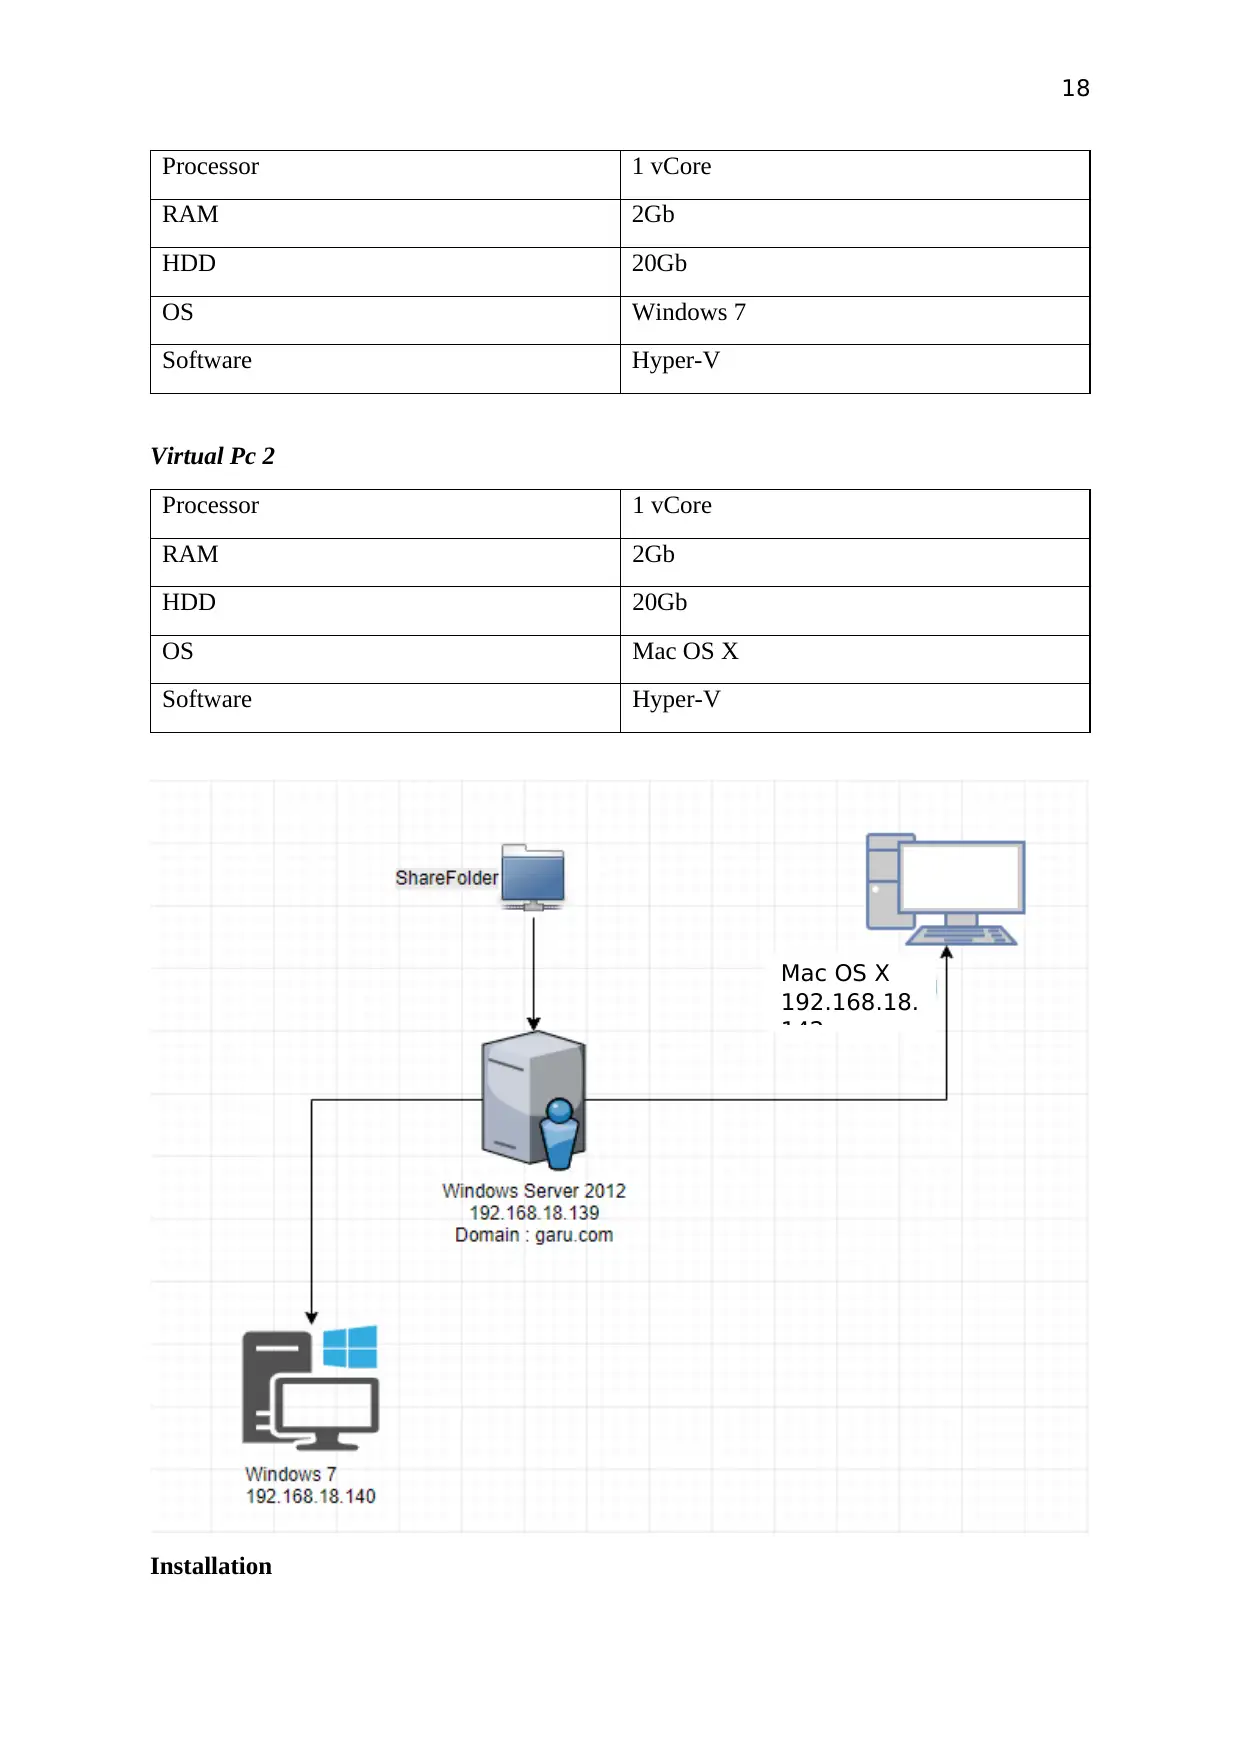
Plan
Create Window server 2012 using VMware workstation and create another two virtual pc on
Hyper-V server. And Share a folder with each other.
Mac OS X
192.168.18.
142
Task 2
Proposed System Plan
Plan
Create Window server 2012 using VMware workstation and create another two virtual pc on
Hyper-V server. And Share a folder with each other.
Mac OS X
192.168.18.
142
16
Configuration
Server
Processor Intel Core i5 2.3GHz
RAM 13.4Gb
HDD 100Gb
OS Windows Server 2012
Software VMware WorkStation 15
Virtual Pc 1
Processor 1 vCore
RAM 2Gb
HDD 20Gb
OS Windows 7
Software Hyper-v
Virtual Pc 2
Processor 1 vCore
RAM 2Gb
HDD 20Gb
OS Mac OS X
Software Hyper-v
Installation
Server
Using VMware workstation create a Windows server 2012. Then install active director and
Hyper-V server. Stablished network connection on windows server and physical machine.
Virtual PC 1
Create a virtual pc on Hyper-V server with above virtual pc1 configuration. Established
network connection with windows server.
Virtual PC 2
Secure Best Marks with AI Grader
Need help grading? Try our AI Grader for instant feedback on your assignments.
17
Create a virtual pc on Hyper-V server with above virtual pc2 configuration. Established
network connection with windows server.
Testing
Conduct the file sharing test on window server and other virtual pc’s should have access to
shared folder.
Post - Implementation Report
Purpose
This document explains requirements and configuration guides and outcome of the file
sharing test result of the implementation process of server and pc installation.
Requirement
Create an windows server and create another two virtual pc on Hyper-V server. Then
established a network connection in between two virtual pc and windows server. And share a
folder/file between all the pc.
Implementation
Configuration
Following configuration will be used on while creating server and virtual pcs.
Server
Processor Intel Core i5 2.3GHz
RAM 13.4Gb
HDD 100Gb
OS Windows Server 2012 / Active Directory /
Hyper-V server
Software VMware WorkStation 15
Virtual Pc 1
18
Processor 1 vCore
RAM 2Gb
HDD 20Gb
OS Windows 7
Software Hyper-V
Virtual Pc 2
Processor 1 vCore
RAM 2Gb
HDD 20Gb
OS Mac OS X
Software Hyper-V
Installation
Mac OS X
192.168.18.
142
Processor 1 vCore
RAM 2Gb
HDD 20Gb
OS Windows 7
Software Hyper-V
Virtual Pc 2
Processor 1 vCore
RAM 2Gb
HDD 20Gb
OS Mac OS X
Software Hyper-V
Installation
Mac OS X
192.168.18.
142
19
Server
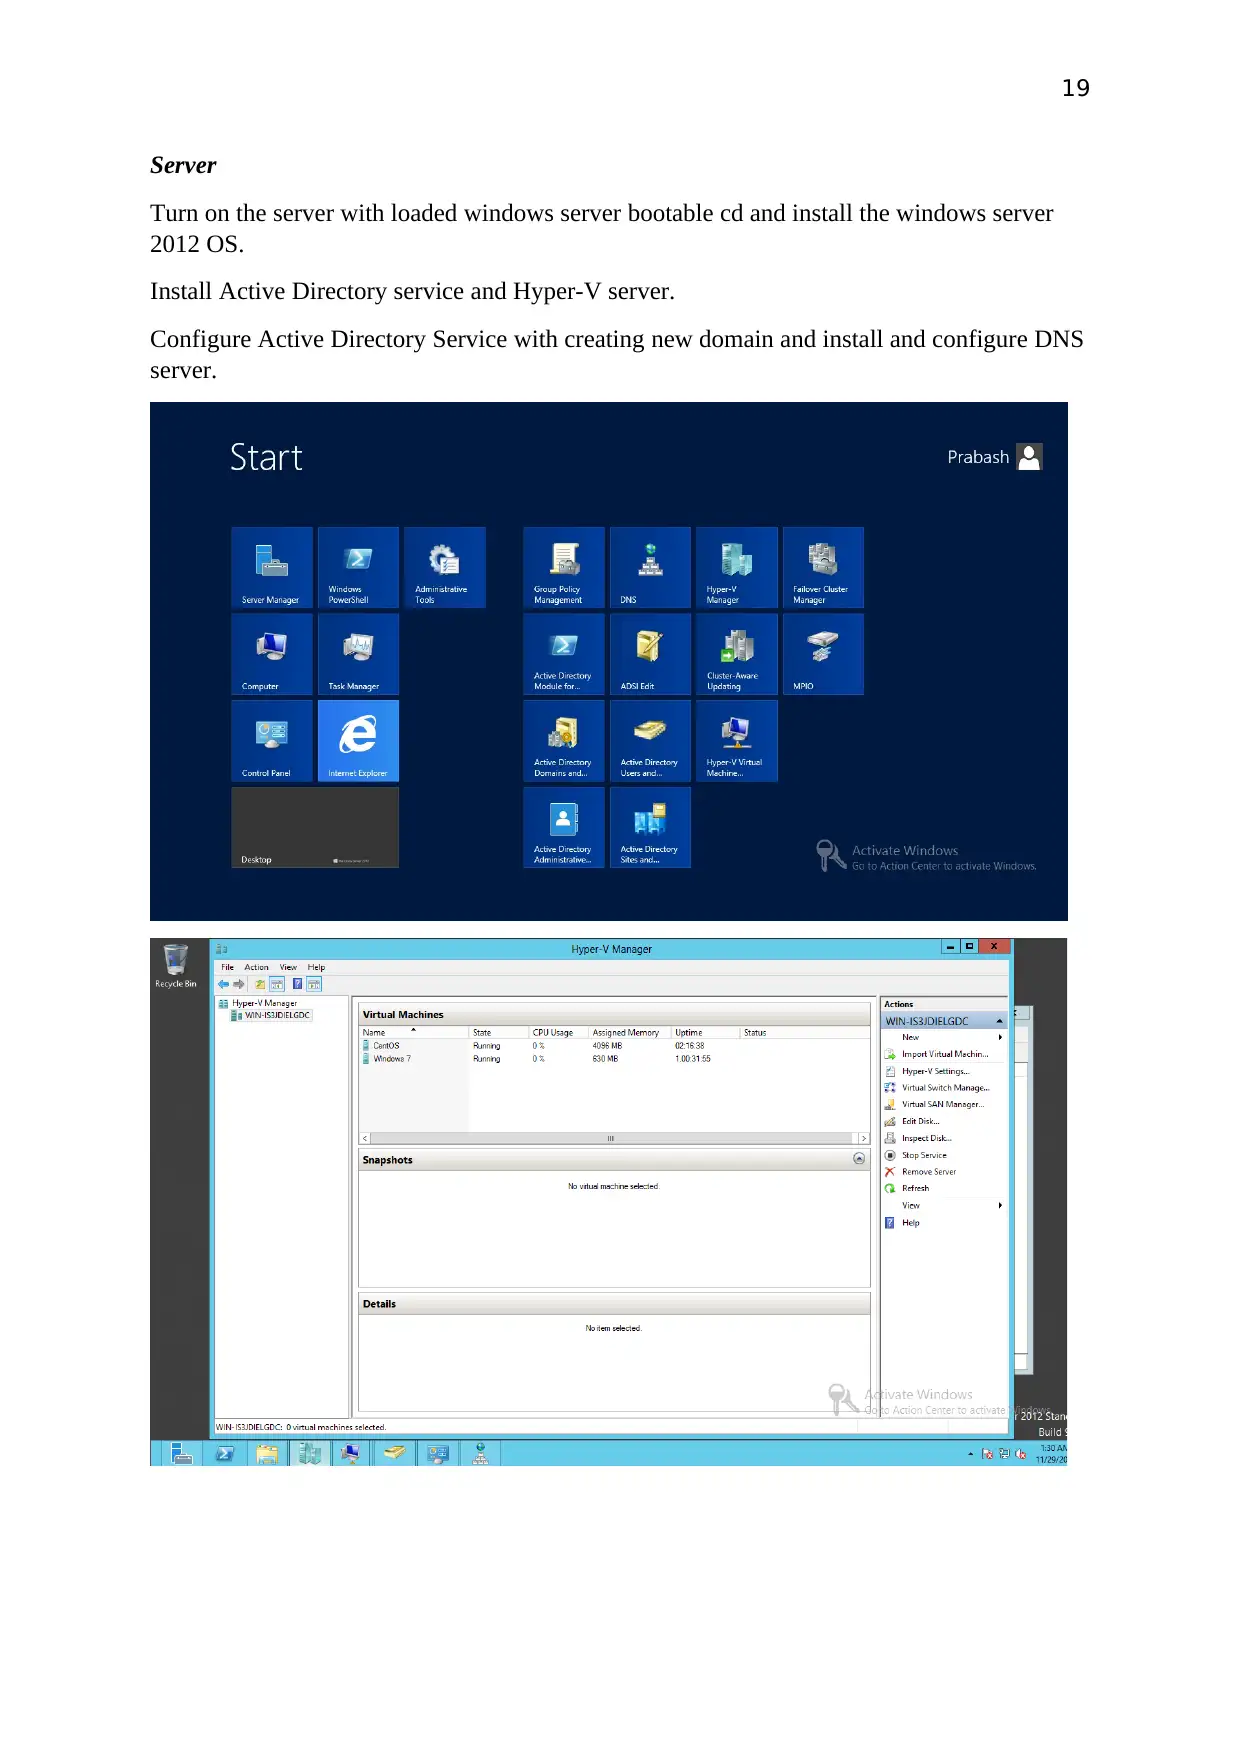
Turn on the server with loaded windows server bootable cd and install the windows server
2012 OS.
Install Active Directory service and Hyper-V server.
Configure Active Directory Service with creating new domain and install and configure DNS
server.
Server
Turn on the server with loaded windows server bootable cd and install the windows server
2012 OS.
Install Active Directory service and Hyper-V server.
Configure Active Directory Service with creating new domain and install and configure DNS
server.
Paraphrase This Document
Need a fresh take? Get an instant paraphrase of this document with our AI Paraphraser
20
Virtual PC1
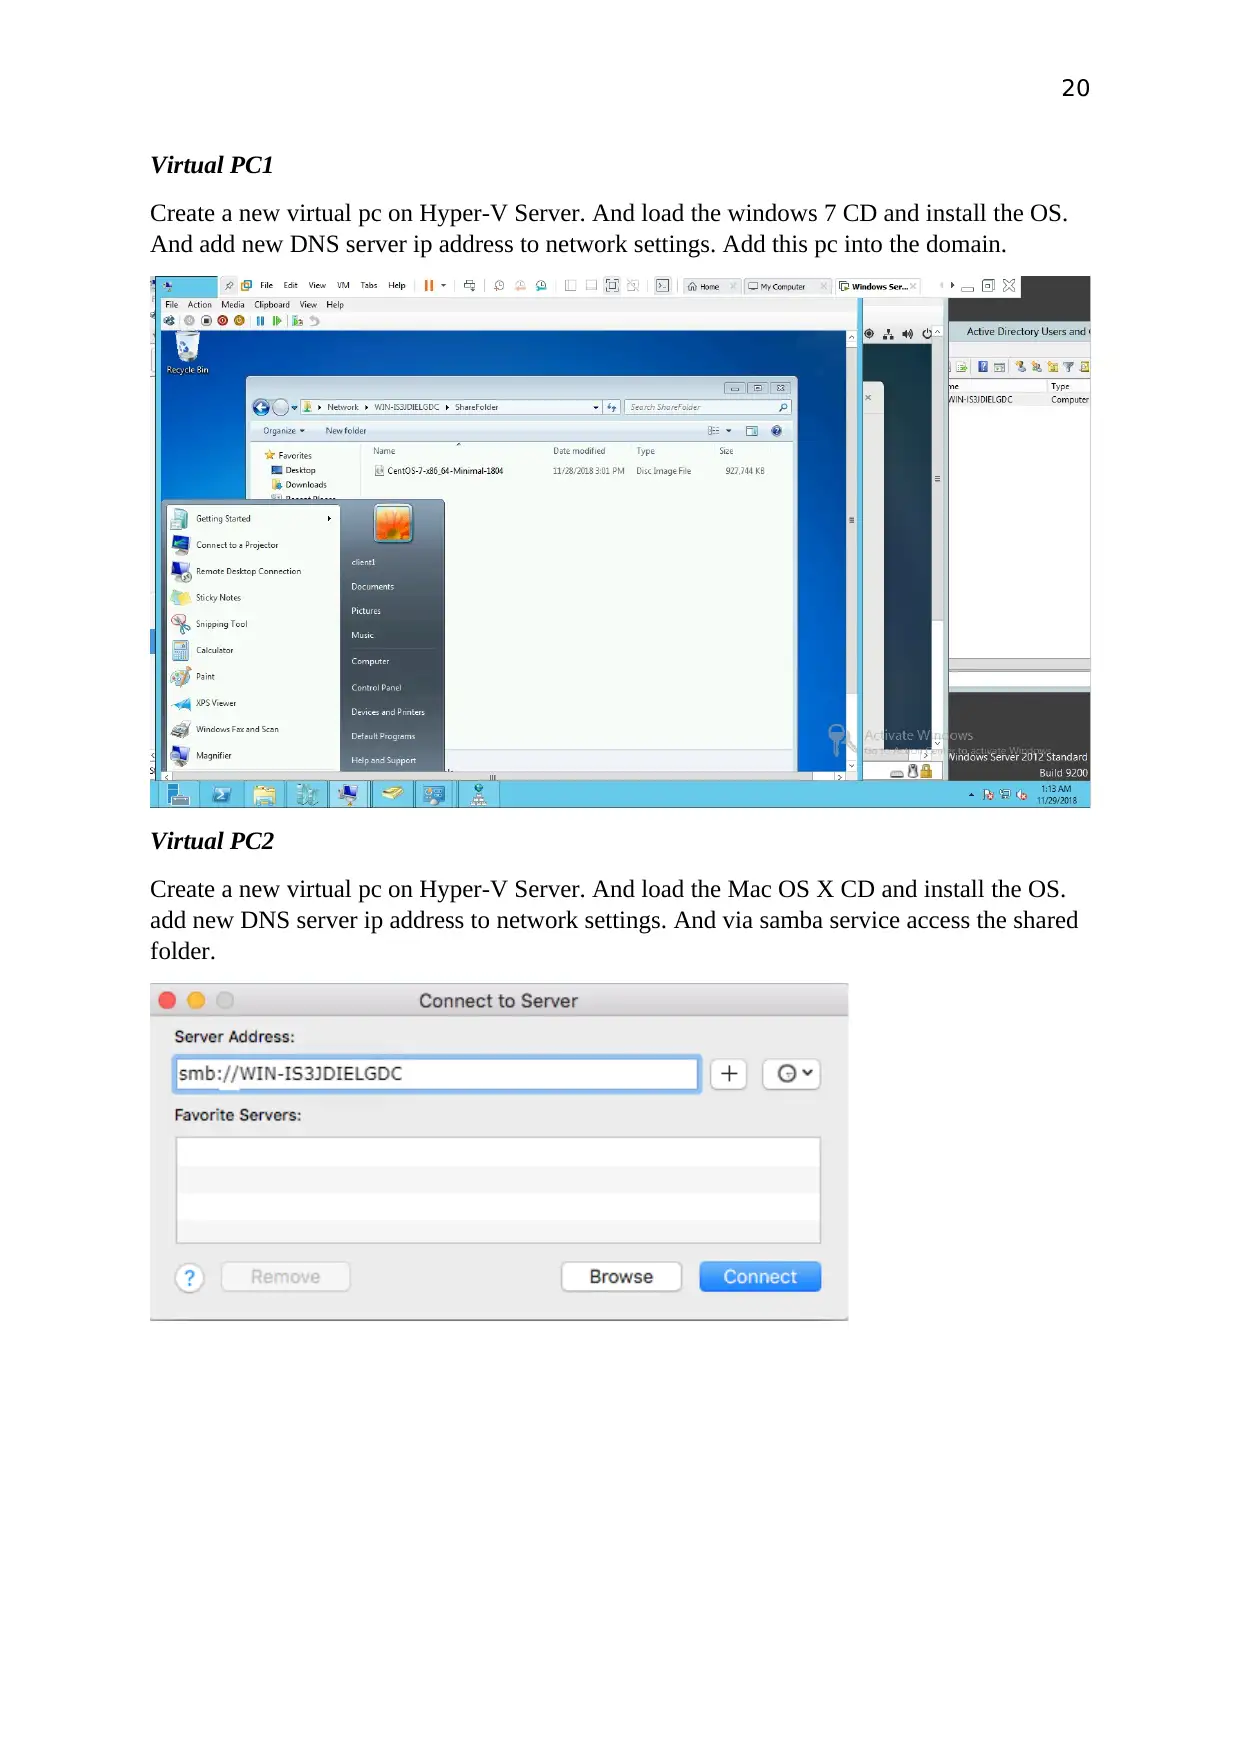
Create a new virtual pc on Hyper-V Server. And load the windows 7 CD and install the OS.
And add new DNS server ip address to network settings. Add this pc into the domain.
Virtual PC2
Create a new virtual pc on Hyper-V Server. And load the Mac OS X CD and install the OS.
add new DNS server ip address to network settings. And via samba service access the shared
folder.
21
Testing
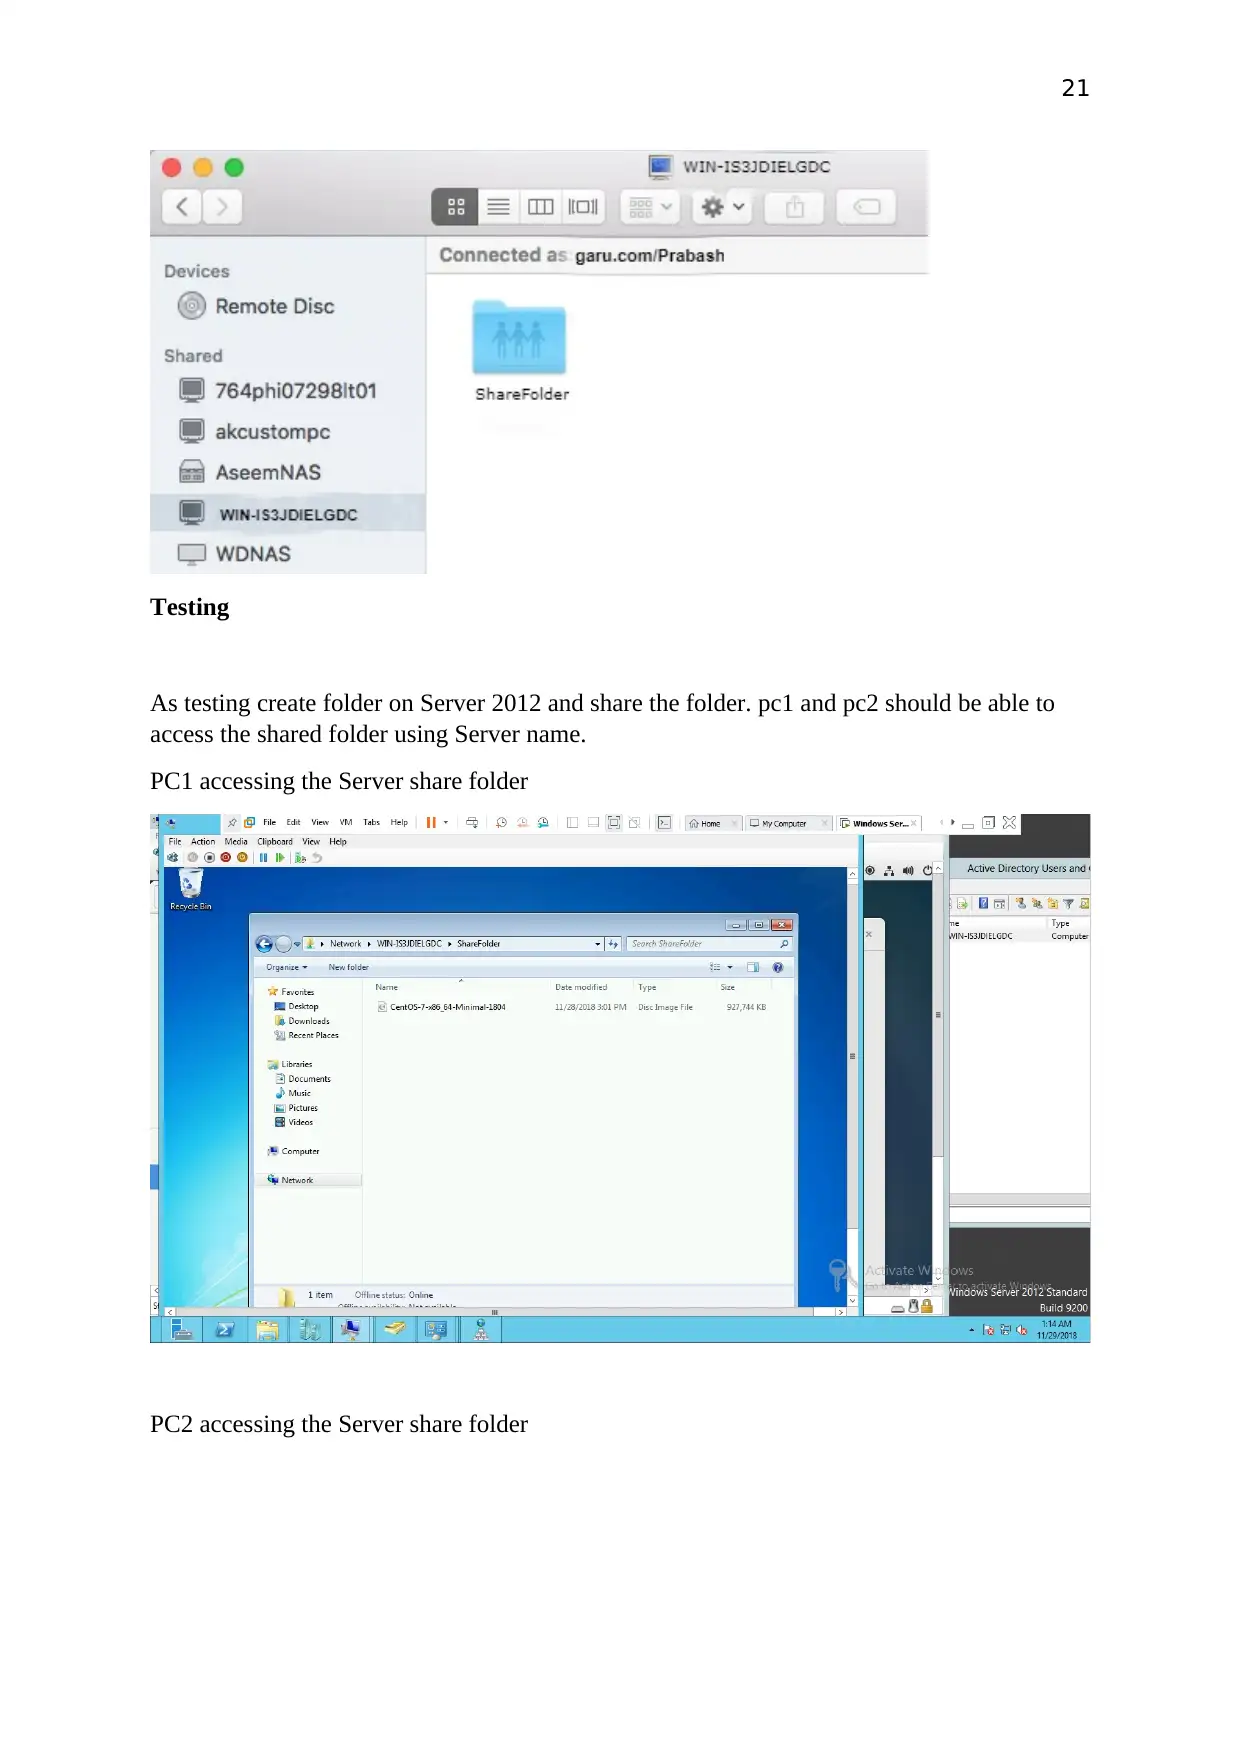
As testing create folder on Server 2012 and share the folder. pc1 and pc2 should be able to
access the shared folder using Server name.
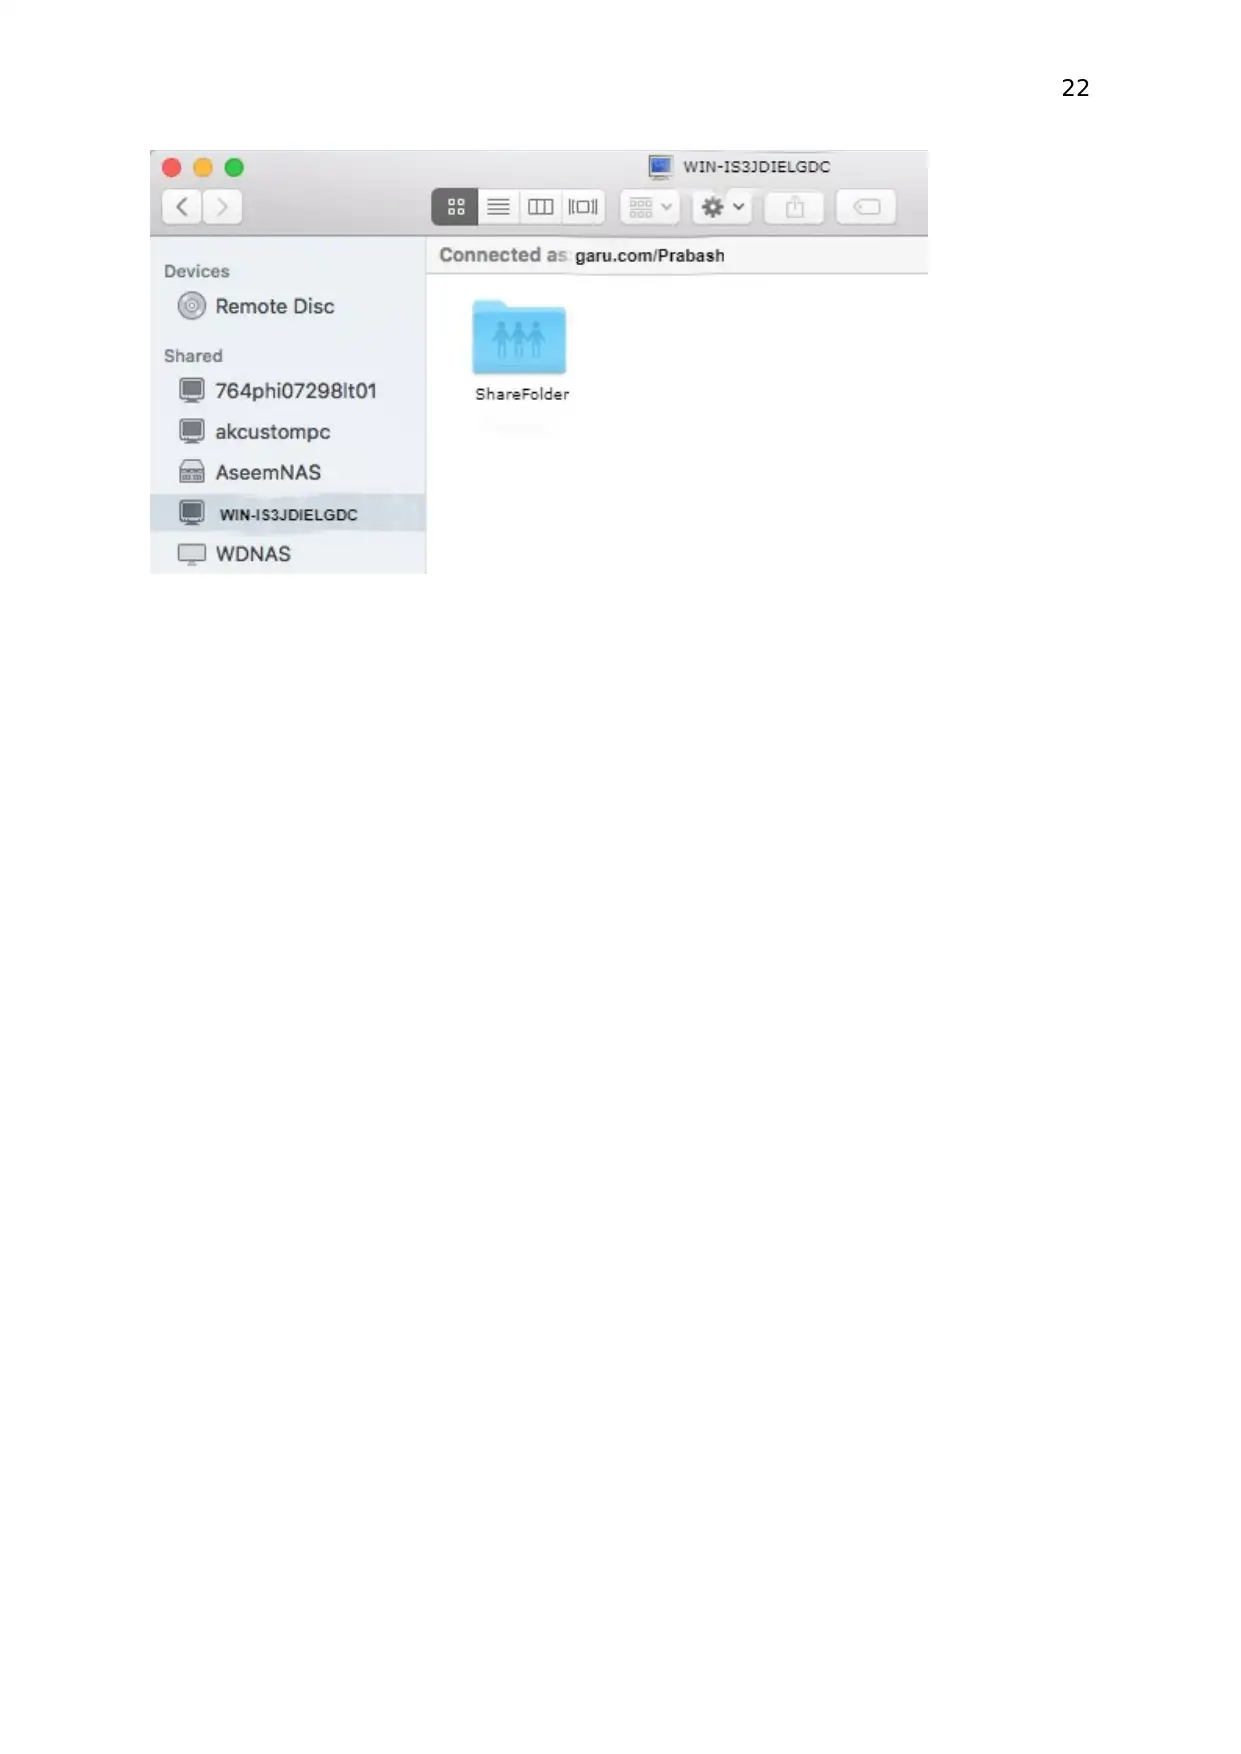
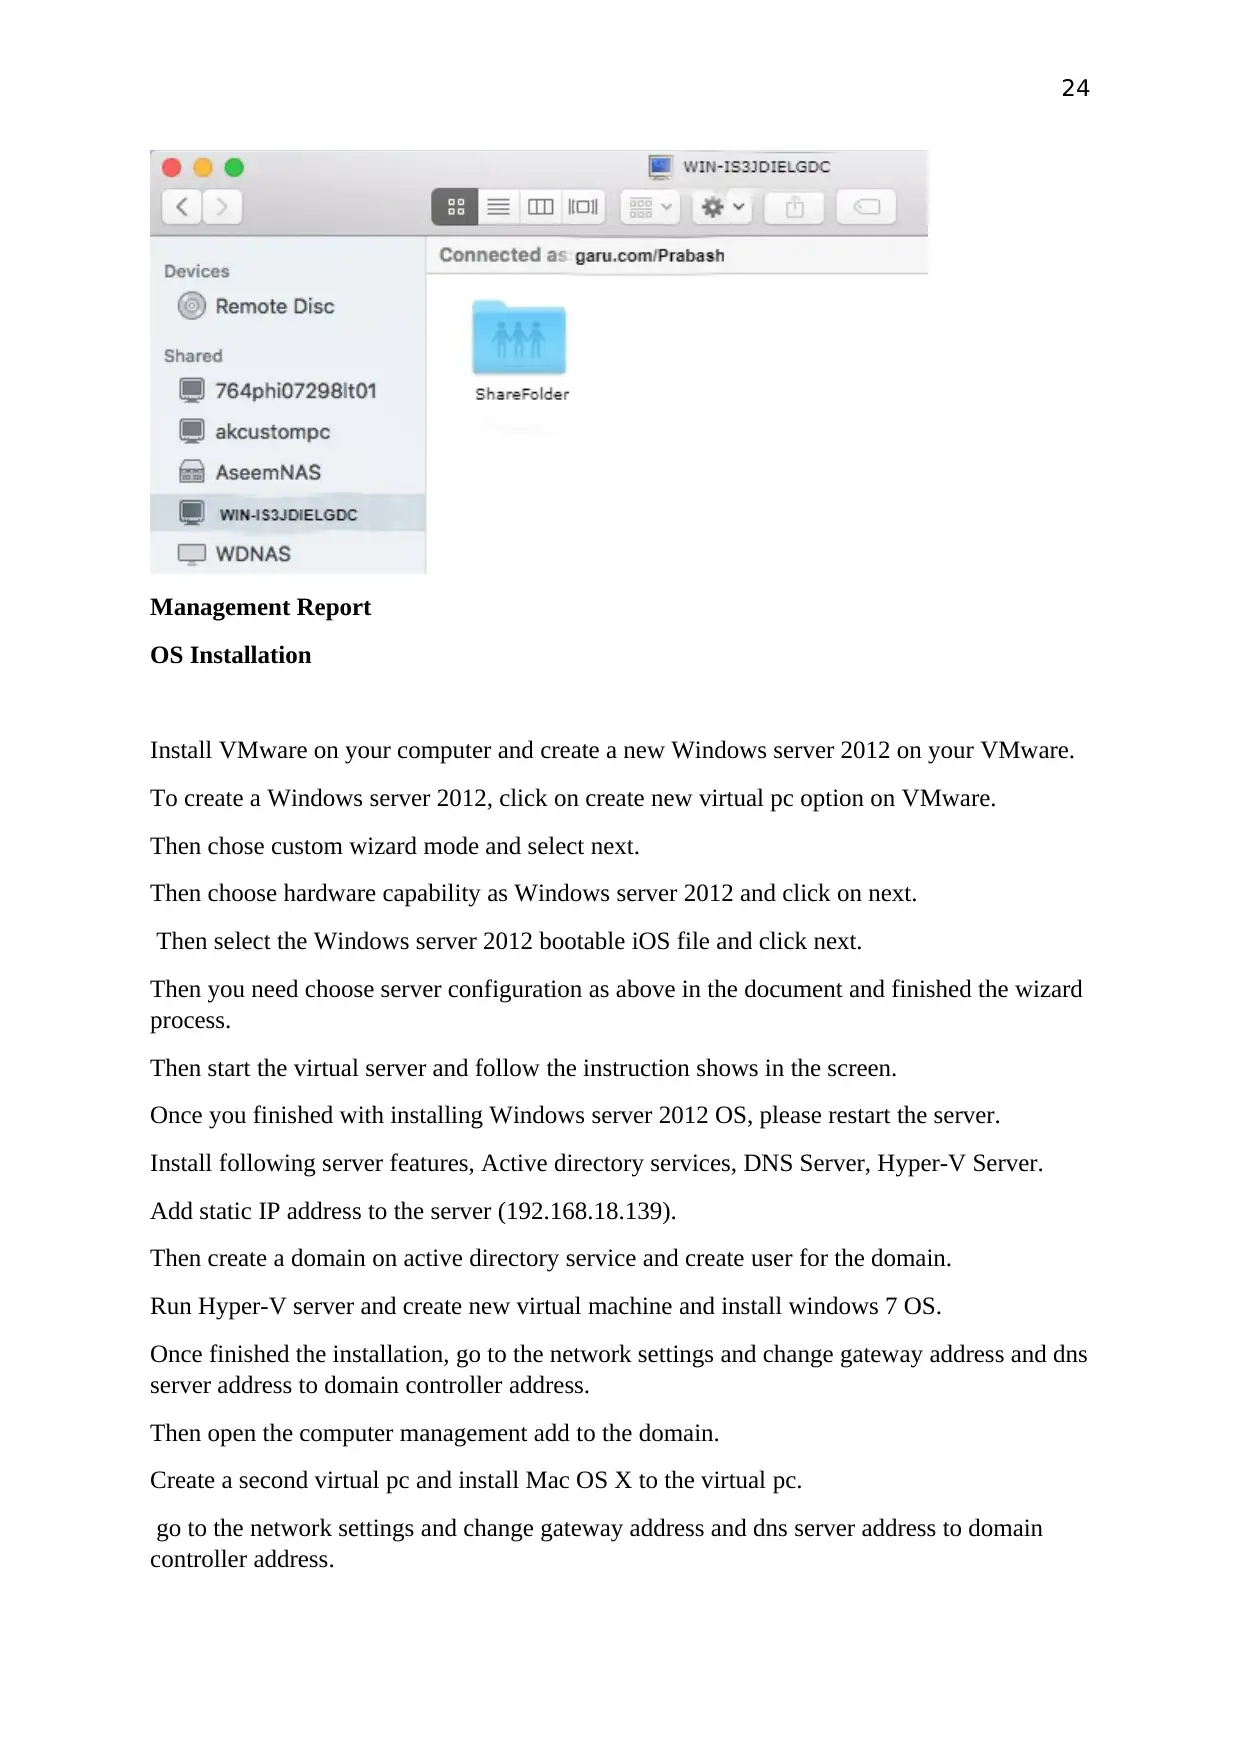
PC1 accessing the Server share folder
PC2 accessing the Server share folder
Testing
As testing create folder on Server 2012 and share the folder. pc1 and pc2 should be able to
access the shared folder using Server name.
PC1 accessing the Server share folder
PC2 accessing the Server share folder
22
Secure Best Marks with AI Grader
Need help grading? Try our AI Grader for instant feedback on your assignments.
23
Validation Test Plan
Hardwar
e Configuration (ESX) Virtual Machine
HP
Probook
430 2.3GHz 2 i5-core Intel
2 vCPUs two virtual machines
configured
16GB RAM 2GB memory
4Gb Ethernet card 1 Ethernet card
100GB SAS drives 20Gb Drivers
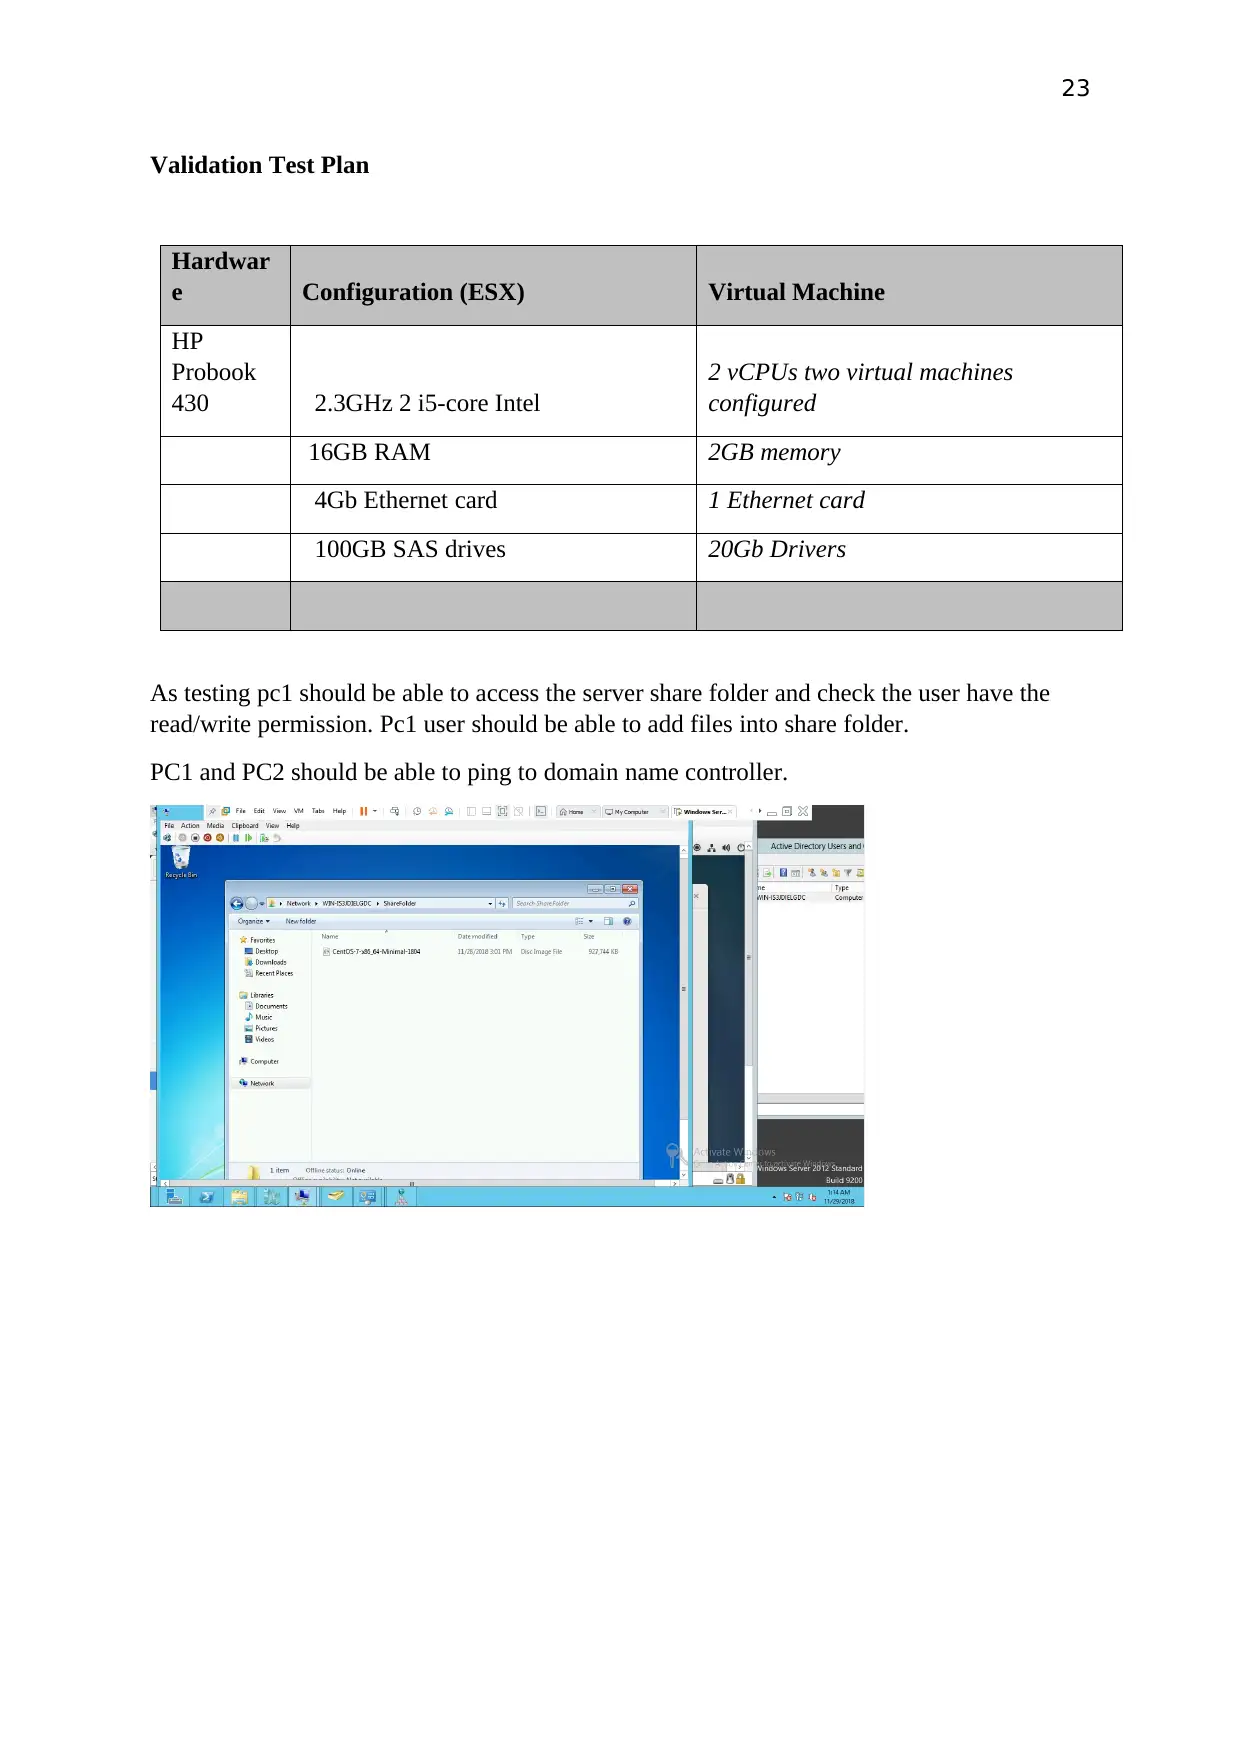
As testing pc1 should be able to access the server share folder and check the user have the
read/write permission. Pc1 user should be able to add files into share folder.
PC1 and PC2 should be able to ping to domain name controller.
24
Management Report
OS Installation
Install VMware on your computer and create a new Windows server 2012 on your VMware.
To create a Windows server 2012, click on create new virtual pc option on VMware.
Then chose custom wizard mode and select next.
Then choose hardware capability as Windows server 2012 and click on next.
Then select the Windows server 2012 bootable iOS file and click next.
Then you need choose server configuration as above in the document and finished the wizard
process.
Then start the virtual server and follow the instruction shows in the screen.
Once you finished with installing Windows server 2012 OS, please restart the server.
Install following server features, Active directory services, DNS Server, Hyper-V Server.
Add static IP address to the server (192.168.18.139).
Then create a domain on active directory service and create user for the domain.
Run Hyper-V server and create new virtual machine and install windows 7 OS.
Once finished the installation, go to the network settings and change gateway address and dns
server address to domain controller address.
Then open the computer management add to the domain.
Create a second virtual pc and install Mac OS X to the virtual pc.
go to the network settings and change gateway address and dns server address to domain
controller address.
25
Utilized Network Protocols
DNS Service
IP Service
Kerberos
Microsoft-DS
Samba Service
Authentication Method
- NTLMv2. This version of NTLM uses 128-bit encryption and is used for machines
running NT 4.0 SP4 and later. This is the most secure challenge-response
authentication available.
- Kerberos. Kerberos is essentially a ticket-based authentication protocol.
Configuration Settings
Server
Host Name Server
IP Address 192.168.18.139
Gateway 192.168.18.139
DNS 192.168.18.139
Domain Name Garu.com
User Name prabash
Virtual PC1
Host Name Client1
IP Address 192.168.18.140
Gateway 192.168.18.139
Paraphrase This Document
Need a fresh take? Get an instant paraphrase of this document with our AI Paraphraser
26
DNS 192.168.18.139
Domain Name Garu.com
User Name Client1
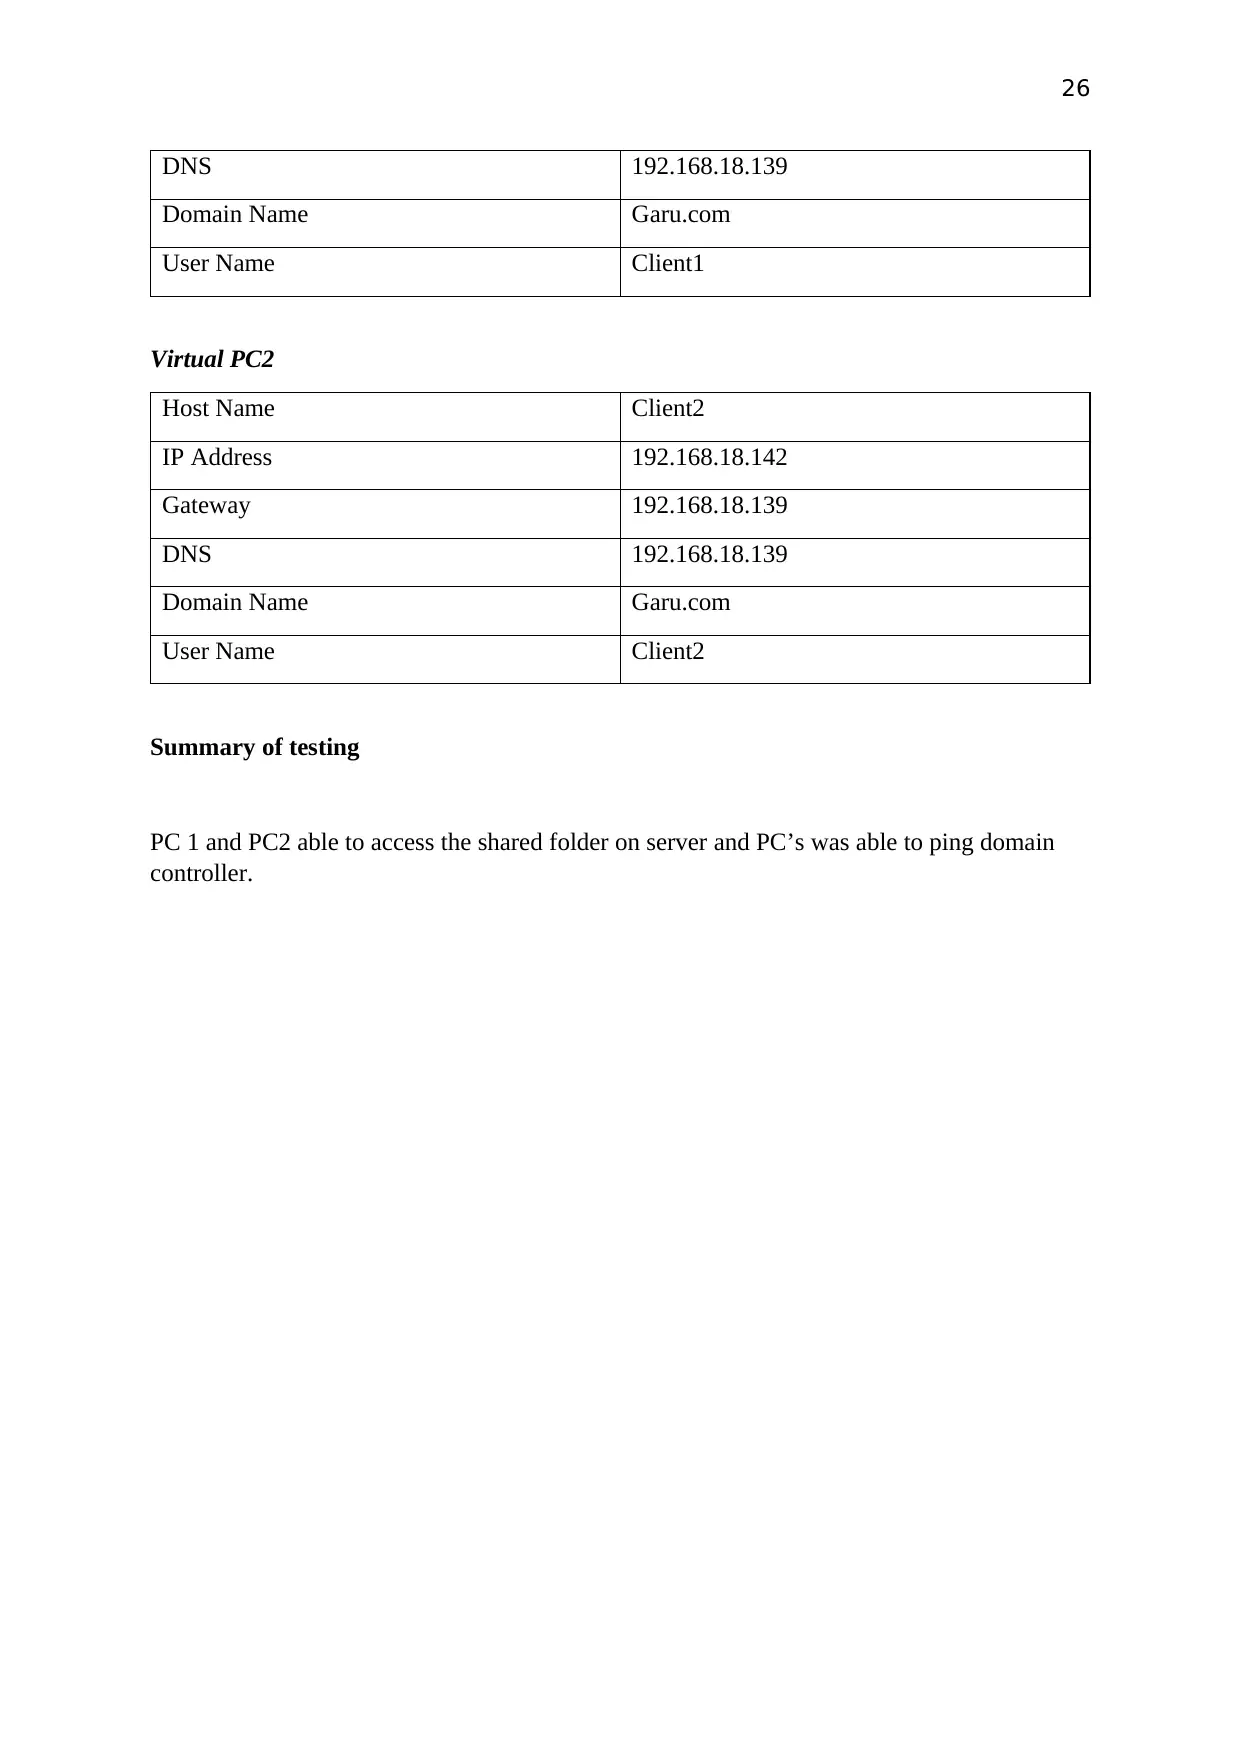
Virtual PC2
Host Name Client2
IP Address 192.168.18.142
Gateway 192.168.18.139
DNS 192.168.18.139
Domain Name Garu.com
User Name Client2
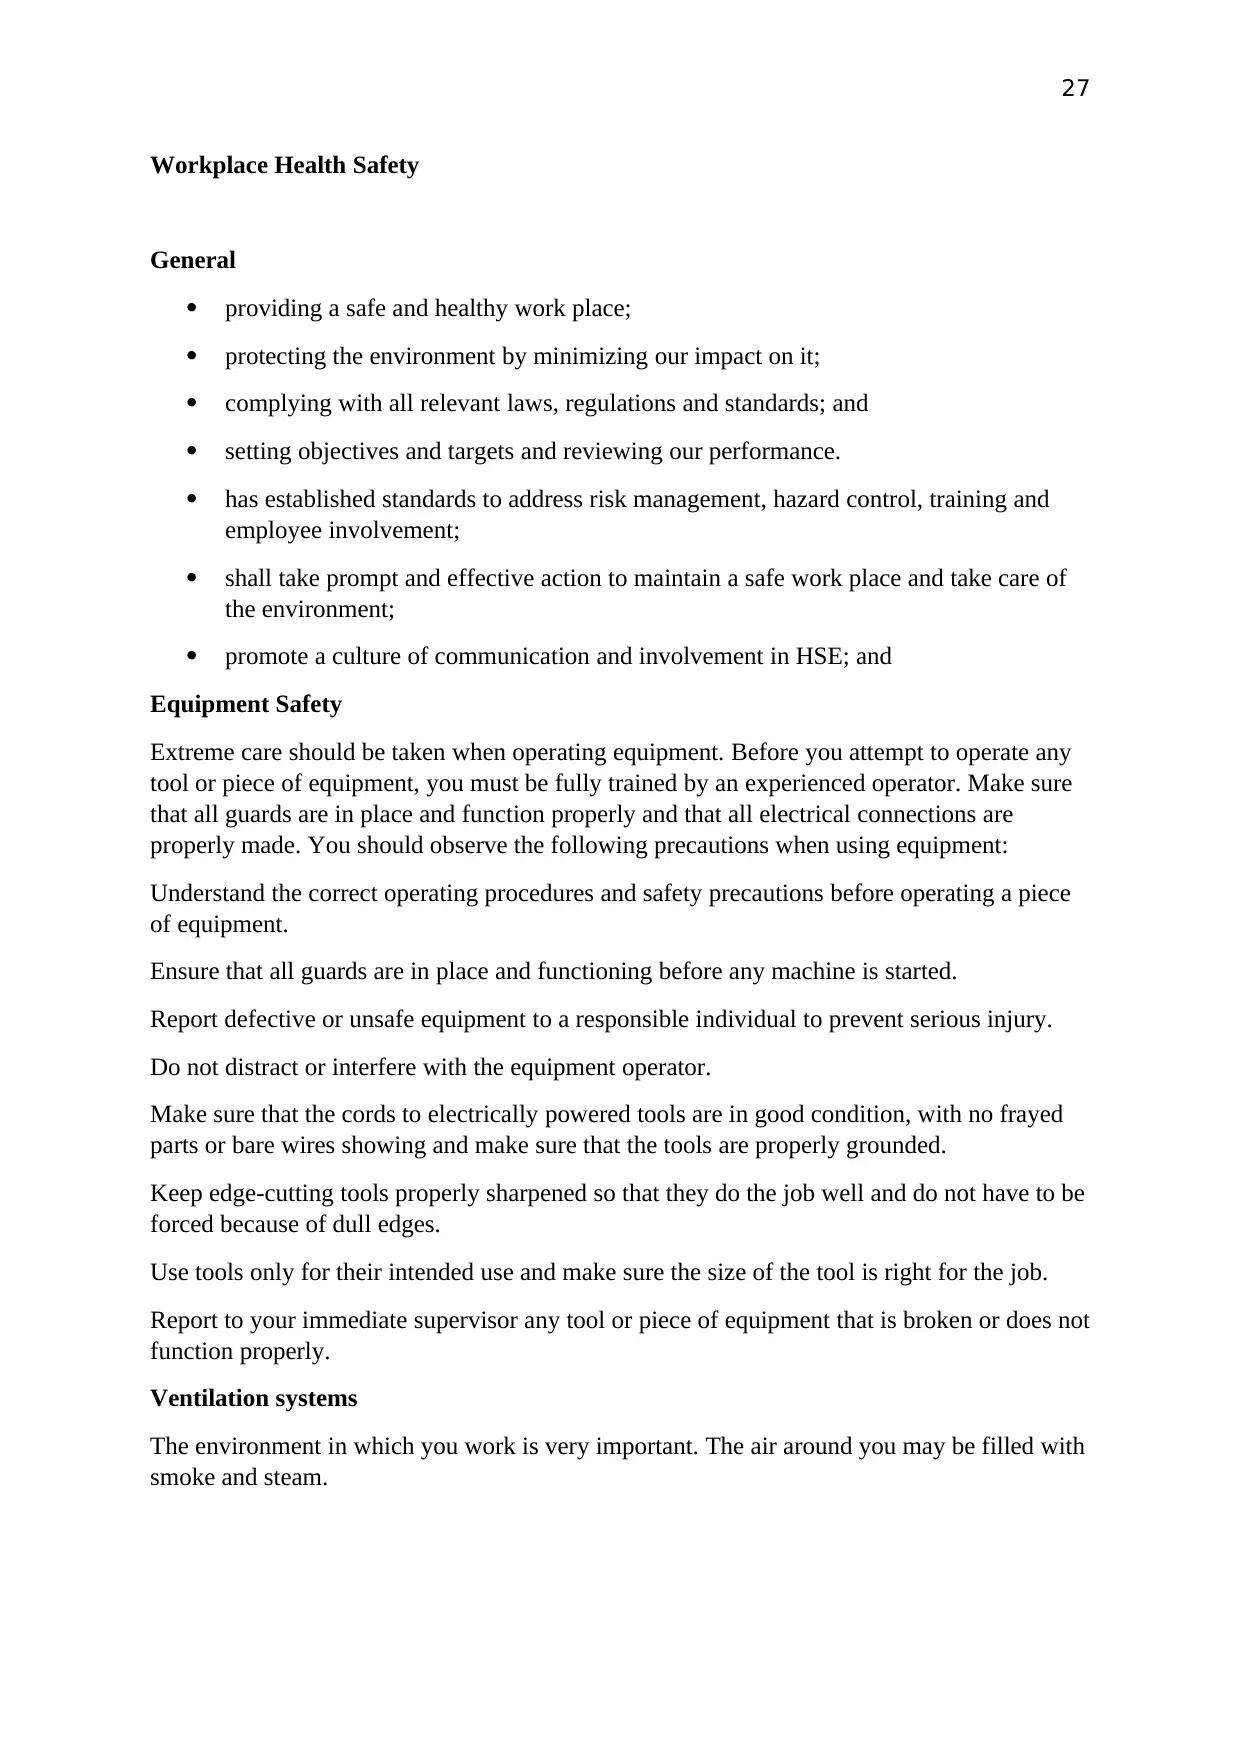
Summary of testing
PC 1 and PC2 able to access the shared folder on server and PC’s was able to ping domain
controller.
DNS 192.168.18.139
Domain Name Garu.com
User Name Client1
Virtual PC2
Host Name Client2
IP Address 192.168.18.142
Gateway 192.168.18.139
DNS 192.168.18.139
Domain Name Garu.com
User Name Client2
Summary of testing
PC 1 and PC2 able to access the shared folder on server and PC’s was able to ping domain
controller.
27
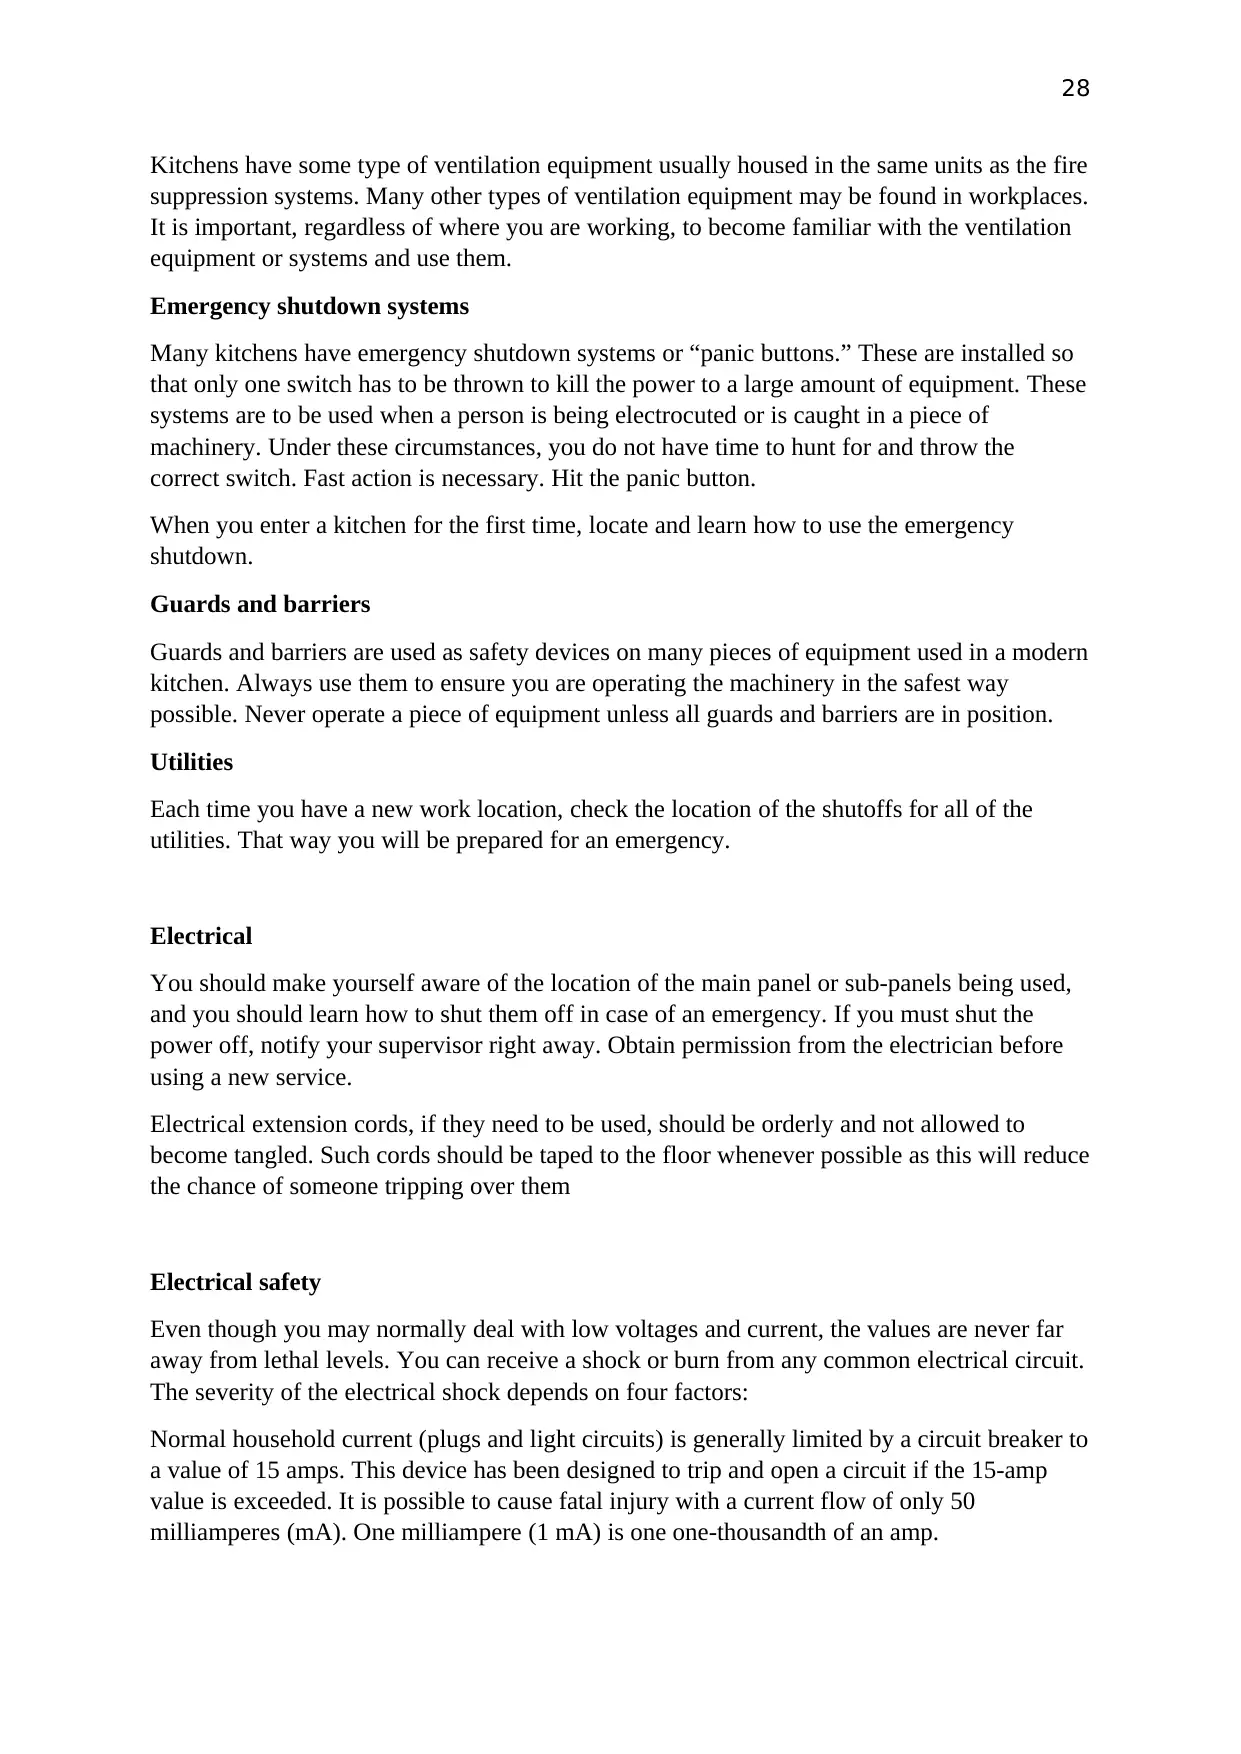
Workplace Health Safety
General
providing a safe and healthy work place;
protecting the environment by minimizing our impact on it;
complying with all relevant laws, regulations and standards; and
setting objectives and targets and reviewing our performance.
has established standards to address risk management, hazard control, training and
employee involvement;
shall take prompt and effective action to maintain a safe work place and take care of
the environment;
promote a culture of communication and involvement in HSE; and
Equipment Safety
Extreme care should be taken when operating equipment. Before you attempt to operate any
tool or piece of equipment, you must be fully trained by an experienced operator. Make sure
that all guards are in place and function properly and that all electrical connections are
properly made. You should observe the following precautions when using equipment:
Understand the correct operating procedures and safety precautions before operating a piece
of equipment.
Ensure that all guards are in place and functioning before any machine is started.
Report defective or unsafe equipment to a responsible individual to prevent serious injury.
Do not distract or interfere with the equipment operator.
Make sure that the cords to electrically powered tools are in good condition, with no frayed
parts or bare wires showing and make sure that the tools are properly grounded.
Keep edge-cutting tools properly sharpened so that they do the job well and do not have to be
forced because of dull edges.
Use tools only for their intended use and make sure the size of the tool is right for the job.
Report to your immediate supervisor any tool or piece of equipment that is broken or does not
function properly.
Ventilation systems
The environment in which you work is very important. The air around you may be filled with
smoke and steam.
28
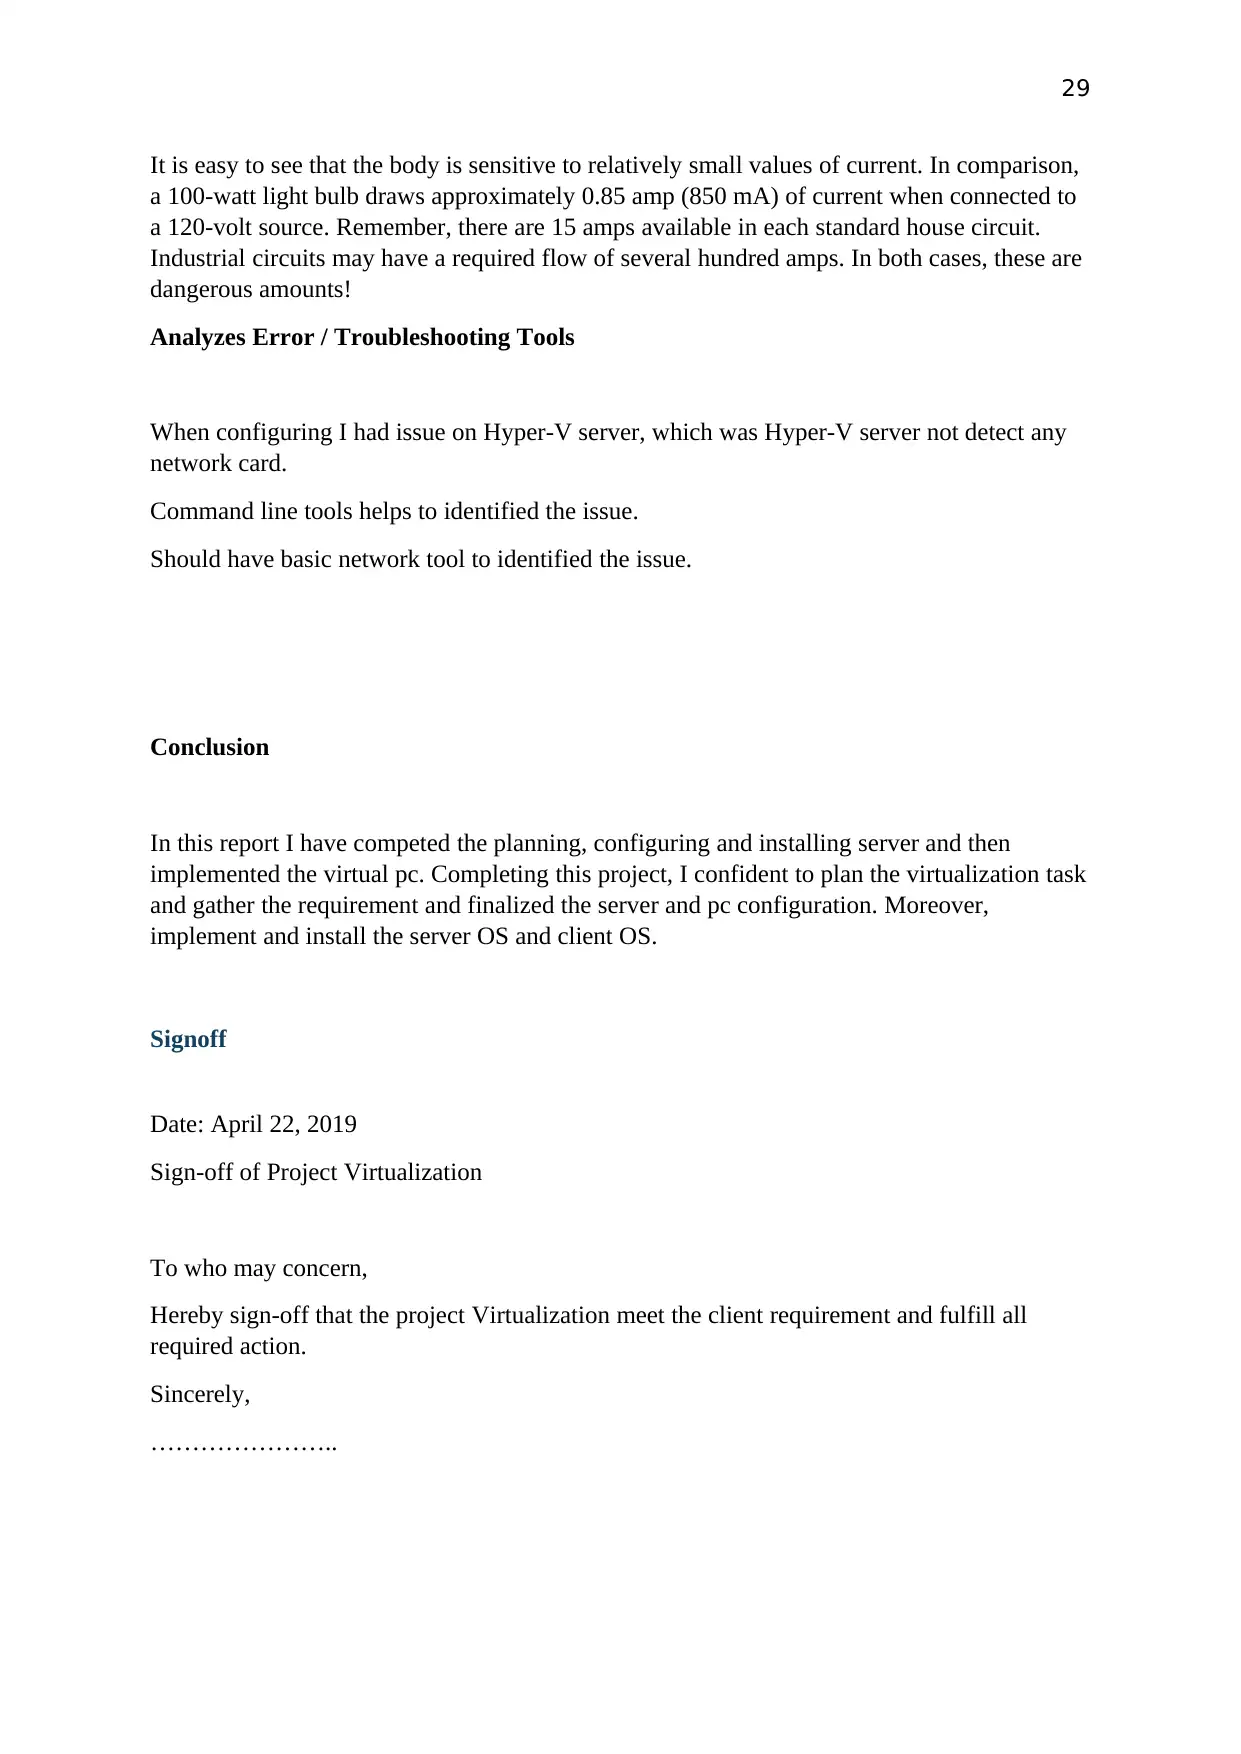
Kitchens have some type of ventilation equipment usually housed in the same units as the fire
suppression systems. Many other types of ventilation equipment may be found in workplaces.
It is important, regardless of where you are working, to become familiar with the ventilation
equipment or systems and use them.
Emergency shutdown systems
Many kitchens have emergency shutdown systems or “panic buttons.” These are installed so
that only one switch has to be thrown to kill the power to a large amount of equipment. These
systems are to be used when a person is being electrocuted or is caught in a piece of
machinery. Under these circumstances, you do not have time to hunt for and throw the
correct switch. Fast action is necessary. Hit the panic button.
When you enter a kitchen for the first time, locate and learn how to use the emergency
shutdown.
Guards and barriers
Guards and barriers are used as safety devices on many pieces of equipment used in a modern
kitchen. Always use them to ensure you are operating the machinery in the safest way
possible. Never operate a piece of equipment unless all guards and barriers are in position.
Utilities
Each time you have a new work location, check the location of the shutoffs for all of the
utilities. That way you will be prepared for an emergency.
Electrical
You should make yourself aware of the location of the main panel or sub-panels being used,
and you should learn how to shut them off in case of an emergency. If you must shut the
power off, notify your supervisor right away. Obtain permission from the electrician before
using a new service.
Electrical extension cords, if they need to be used, should be orderly and not allowed to
become tangled. Such cords should be taped to the floor whenever possible as this will reduce
the chance of someone tripping over them
Electrical safety
Even though you may normally deal with low voltages and current, the values are never far
away from lethal levels. You can receive a shock or burn from any common electrical circuit.
The severity of the electrical shock depends on four factors:
Normal household current (plugs and light circuits) is generally limited by a circuit breaker to
a value of 15 amps. This device has been designed to trip and open a circuit if the 15-amp
value is exceeded. It is possible to cause fatal injury with a current flow of only 50
milliamperes (mA). One milliampere (1 mA) is one one-thousandth of an amp.
Secure Best Marks with AI Grader
Need help grading? Try our AI Grader for instant feedback on your assignments.
29
It is easy to see that the body is sensitive to relatively small values of current. In comparison,
a 100-watt light bulb draws approximately 0.85 amp (850 mA) of current when connected to
a 120-volt source. Remember, there are 15 amps available in each standard house circuit.
Industrial circuits may have a required flow of several hundred amps. In both cases, these are
dangerous amounts!
Analyzes Error / Troubleshooting Tools
When configuring I had issue on Hyper-V server, which was Hyper-V server not detect any
network card.
Command line tools helps to identified the issue.
Should have basic network tool to identified the issue.
Conclusion
In this report I have competed the planning, configuring and installing server and then
implemented the virtual pc. Completing this project, I confident to plan the virtualization task
and gather the requirement and finalized the server and pc configuration. Moreover,
implement and install the server OS and client OS.
Signoff
Date: April 22, 2019
Sign-off of Project Virtualization
To who may concern,
Hereby sign-off that the project Virtualization meet the client requirement and fulfill all
required action.
Sincerely,
…………………..
30
Task 3 - Virtual Server Installation (VMware ESXi)
Proposal plan:
To configure two virtual machine and assign the following metrics such as Ram, memory,
CPU, OS and name the machine. Constructing the virtualisation servers using Hypervisor,
which serves as a host and to install windows 2012 at the same time as well as run them with
the desired features to cater to the needs of the client.
Installation:
These servers are going to be hosted in a windows-based environment, in order to address the
customer requirements the most suitable hypervisor will be Oracle VirtualBox; once installed
both servers (Windows Server 2012 and VMware ESXi) a virtual network will be configured
to establish communication between them
Configuration:
Virtual machine configurations: the test configuration consist of 2 VMware ESX hosts, each
running VMware ESX 6.0 update to 6.5 and above.
Hardware EXSi Hypervisor 6.0 OS Windows Server 2012
A Physical work station VMware vSphere
Hypervisor 6.5
Type: data Centre
With Windows 10 RAM: 4 GB RAM: 2 GB
Memory: 10 GB Storage: 60 GB
Based on the client requirements, I plan to develop virtualisation server. Further, the technical
information will be record for the user in order to assist them to tackle if any technical glitch
occurrence after the establishment of the systems. This user guide will have the step-by-step
detailed explanation along with the screenshots to handle the system in the absence of an
expert.
Application requirements:
Application
component
Software
version
Hardware
requirements
Model and
make
Specifications
Application
server
VMware
workstation 14
PRO
vSphere client
Physical
computer,
Keyboard,
Sever,
ThinkCentre
Lenovo
HP
PROliantML
150
HP
PROliantML
150
31
Network
connection,
Router
Webserver Windows 10
education
X64-based
processor
RAM 8GB
Intel(R)
Core(TM)
3.46 Ghz
Servers to
install
Window server
2012
VMware ESXi
6.5
RAM: 2 GB
Strorage
RAM: GB
Storage:
Testing:
I plan to conduct a test if the configuration has been setup well and if the installed servers are
on the network, working in unison with the each other. I need to conduct ping test from
command centre of each respective device and the server to make sure that they are up and
running.
Report on practical activity:
Purpose: The target of the project is to develop a server using VMware ESXi as hypervisor
and Windows server 2012 will be the server manager, this project is intended to serve the
needs of a Medium size firm for business and commercial purpose.
Requirements:
Procedure:
I plan to install the host using Hypervisor software and then configure two Virtual machines
onto it and hence designate the details to build a desired system to fir to the use of the client. I
will record the entire process in a detailed manner and disclose the pictures as per the
requirement.
The below process depicted here covers the installation, configuration, and testing processes.
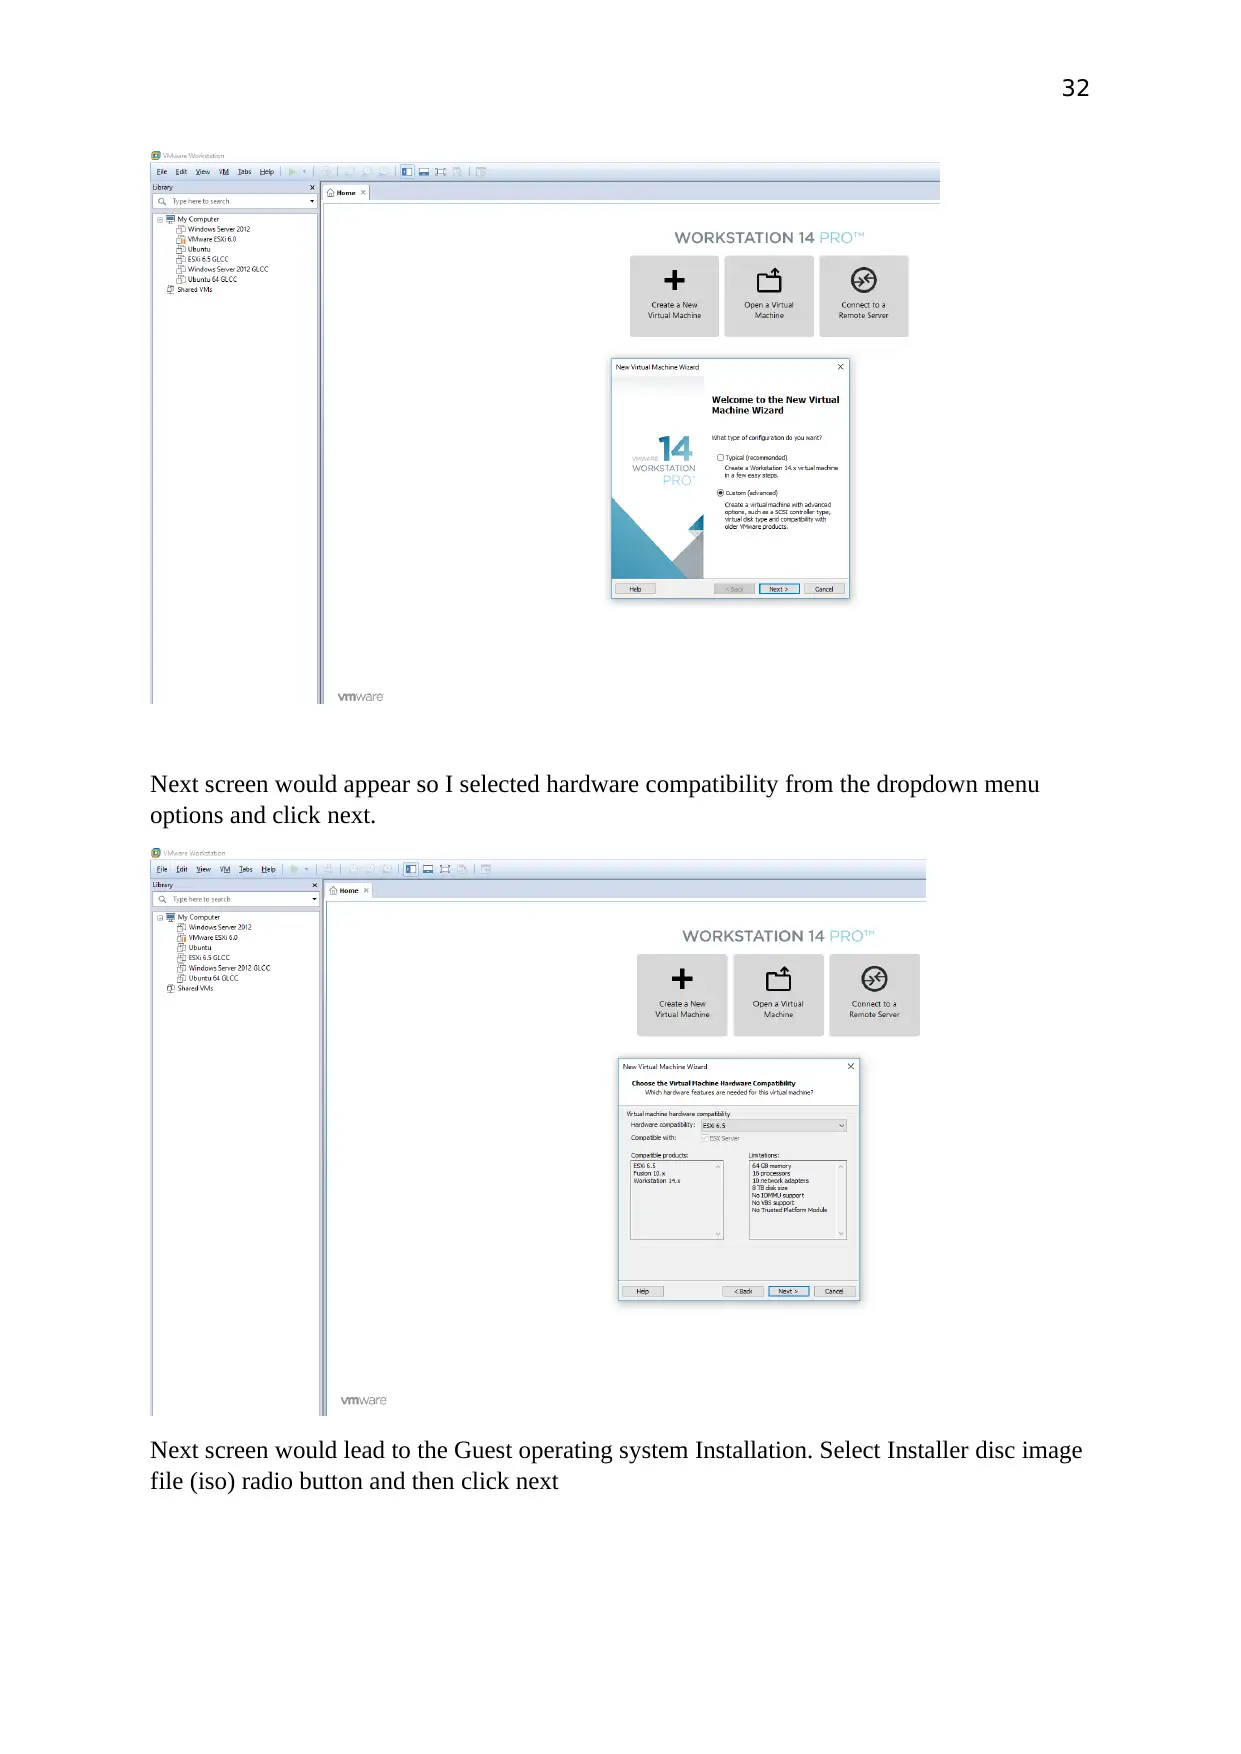
To begin with the process, double click on the icon of the VMware workstation 14 PRO. The
screen would appear as shown below and then click on create a new virtual machine and
select the Custom(advanced) option and select next.
Paraphrase This Document
Need a fresh take? Get an instant paraphrase of this document with our AI Paraphraser
32
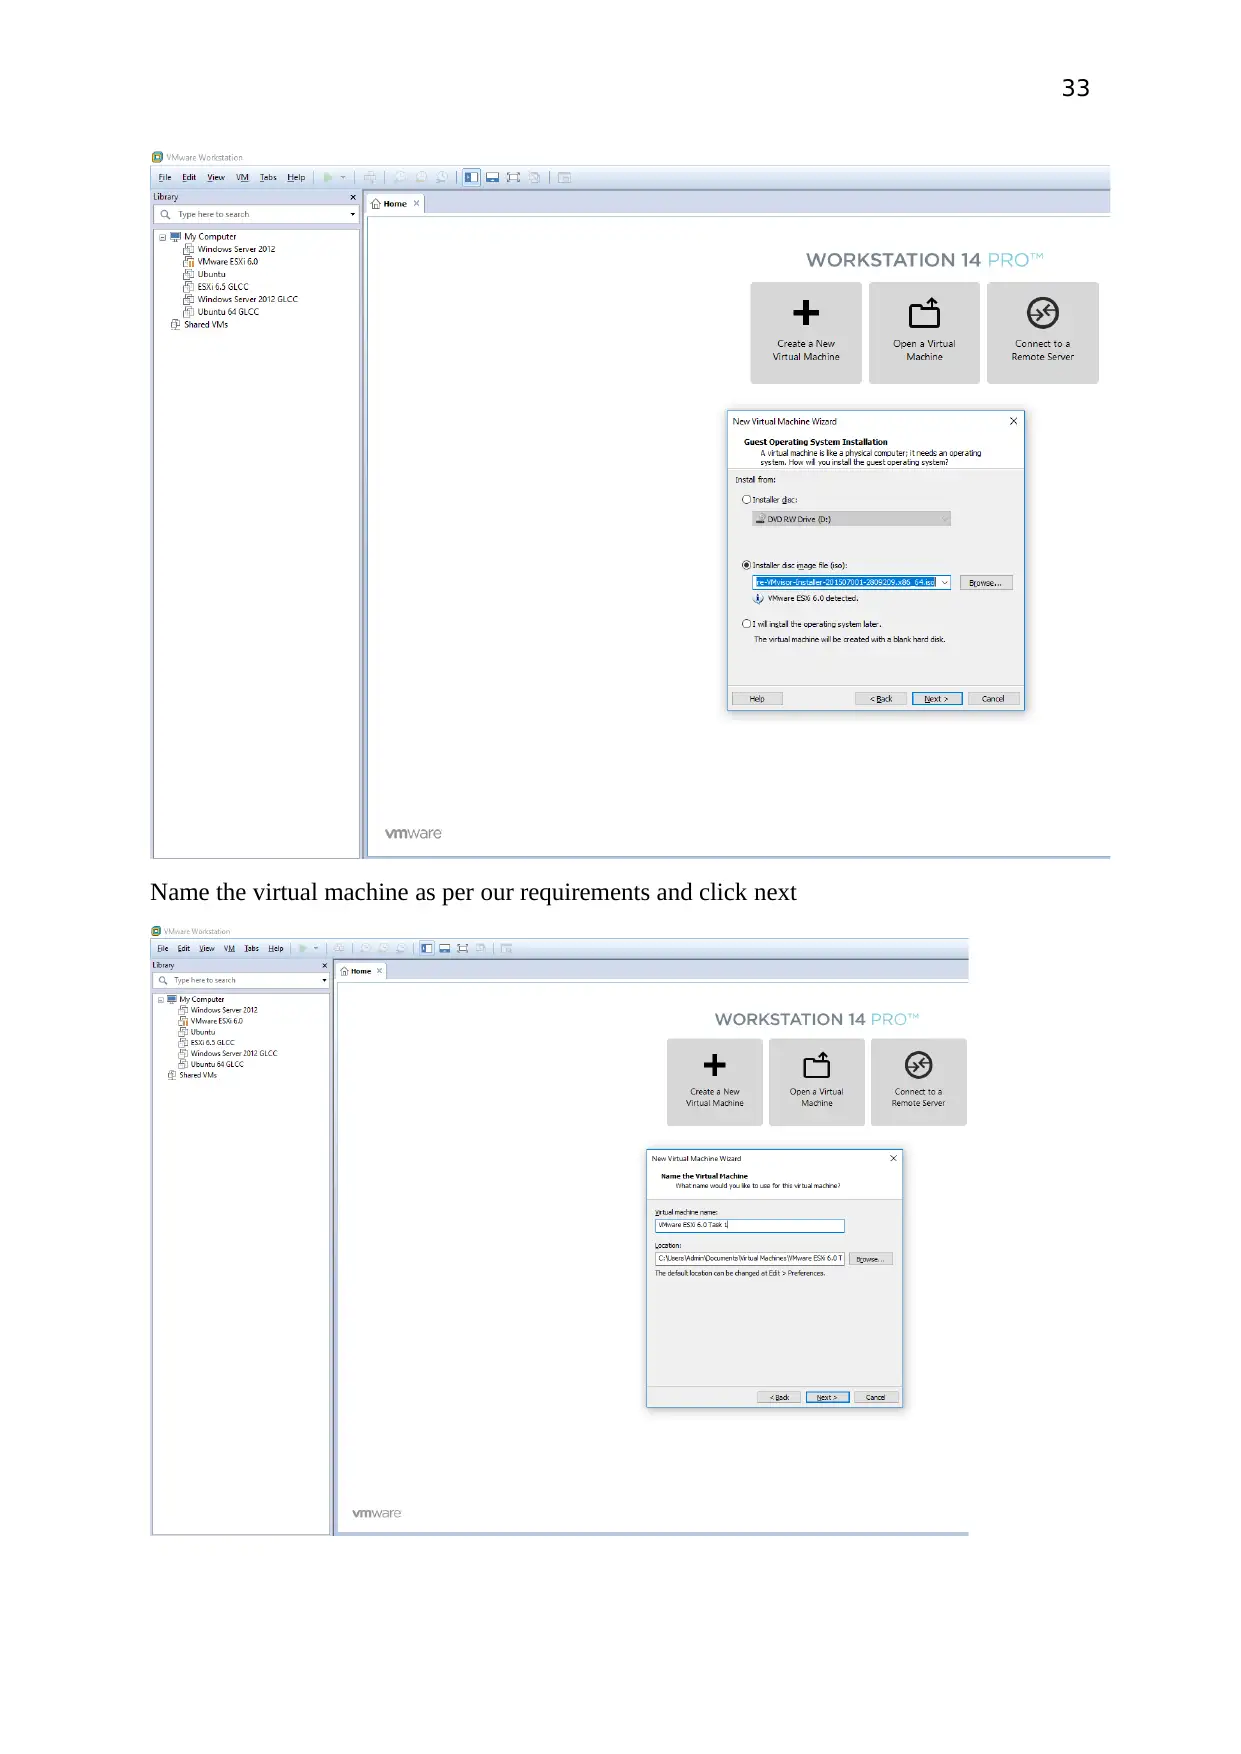
Next screen would appear so I selected hardware compatibility from the dropdown menu
options and click next.
Next screen would lead to the Guest operating system Installation. Select Installer disc image
file (iso) radio button and then click next
Next screen would appear so I selected hardware compatibility from the dropdown menu
options and click next.
Next screen would lead to the Guest operating system Installation. Select Installer disc image
file (iso) radio button and then click next
33
Name the virtual machine as per our requirements and click next
Name the virtual machine as per our requirements and click next
34
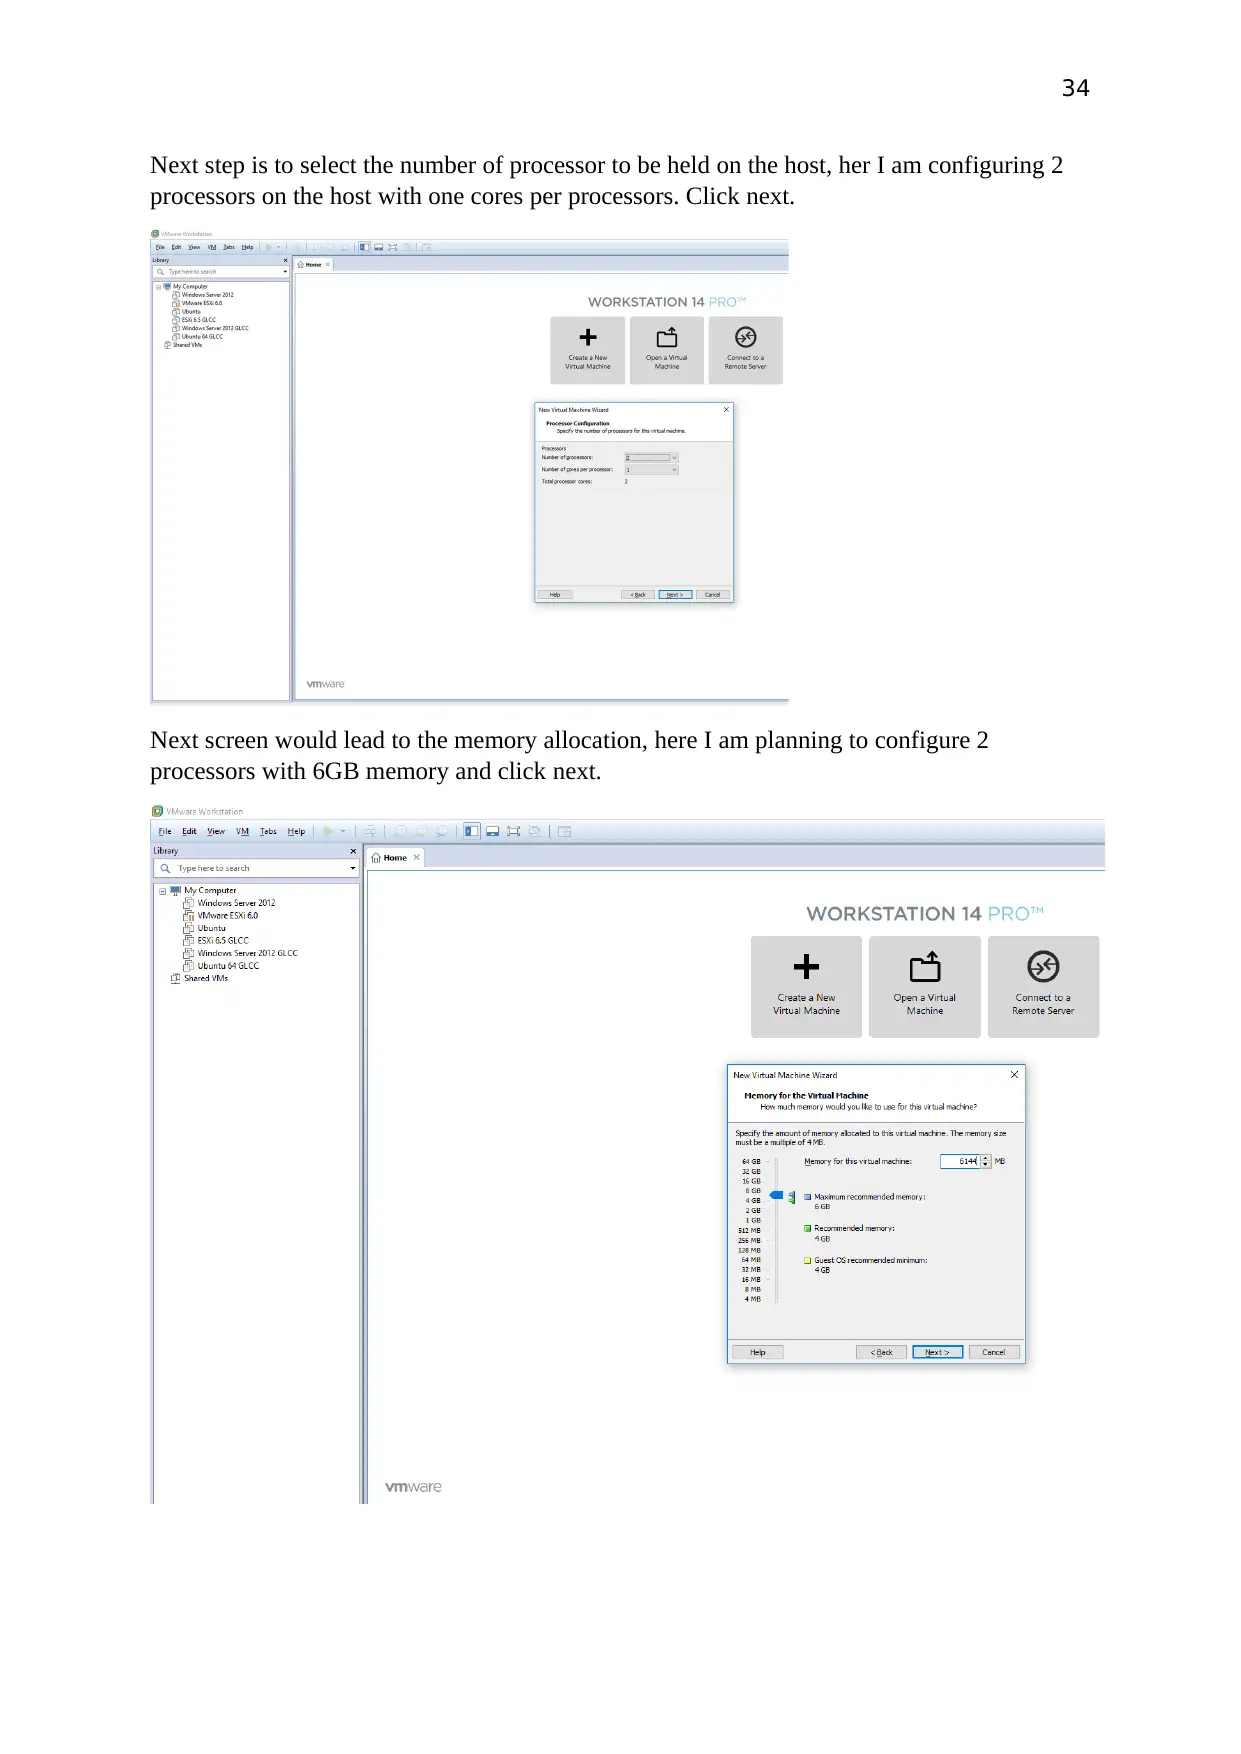
Next step is to select the number of processor to be held on the host, her I am configuring 2
processors on the host with one cores per processors. Click next.
Next screen would lead to the memory allocation, here I am planning to configure 2
processors with 6GB memory and click next.
Next step is to select the number of processor to be held on the host, her I am configuring 2
processors on the host with one cores per processors. Click next.
Next screen would lead to the memory allocation, here I am planning to configure 2
processors with 6GB memory and click next.
Secure Best Marks with AI Grader
Need help grading? Try our AI Grader for instant feedback on your assignments.
35
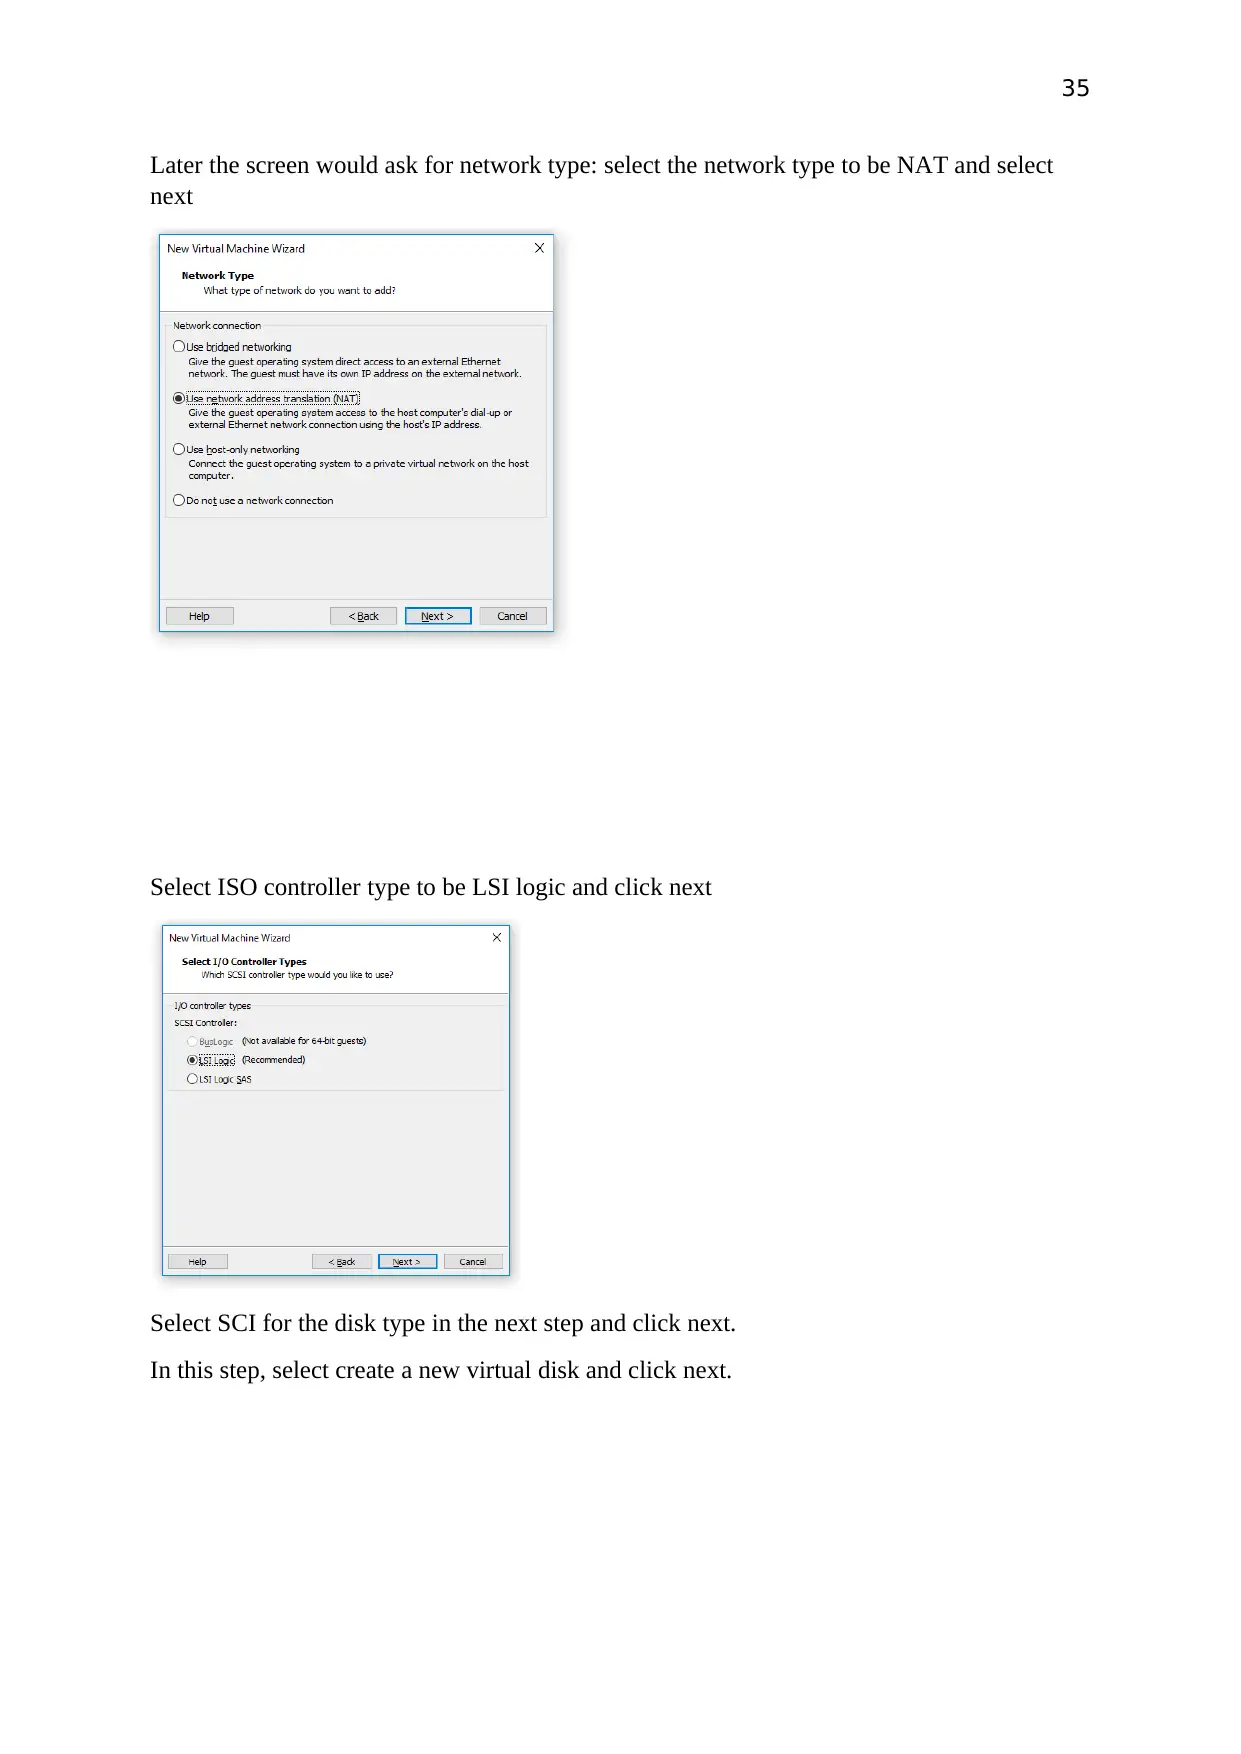
Later the screen would ask for network type: select the network type to be NAT and select
next
Select ISO controller type to be LSI logic and click next
Select SCI for the disk type in the next step and click next.
In this step, select create a new virtual disk and click next.
Later the screen would ask for network type: select the network type to be NAT and select
next
Select ISO controller type to be LSI logic and click next
Select SCI for the disk type in the next step and click next.
In this step, select create a new virtual disk and click next.
36
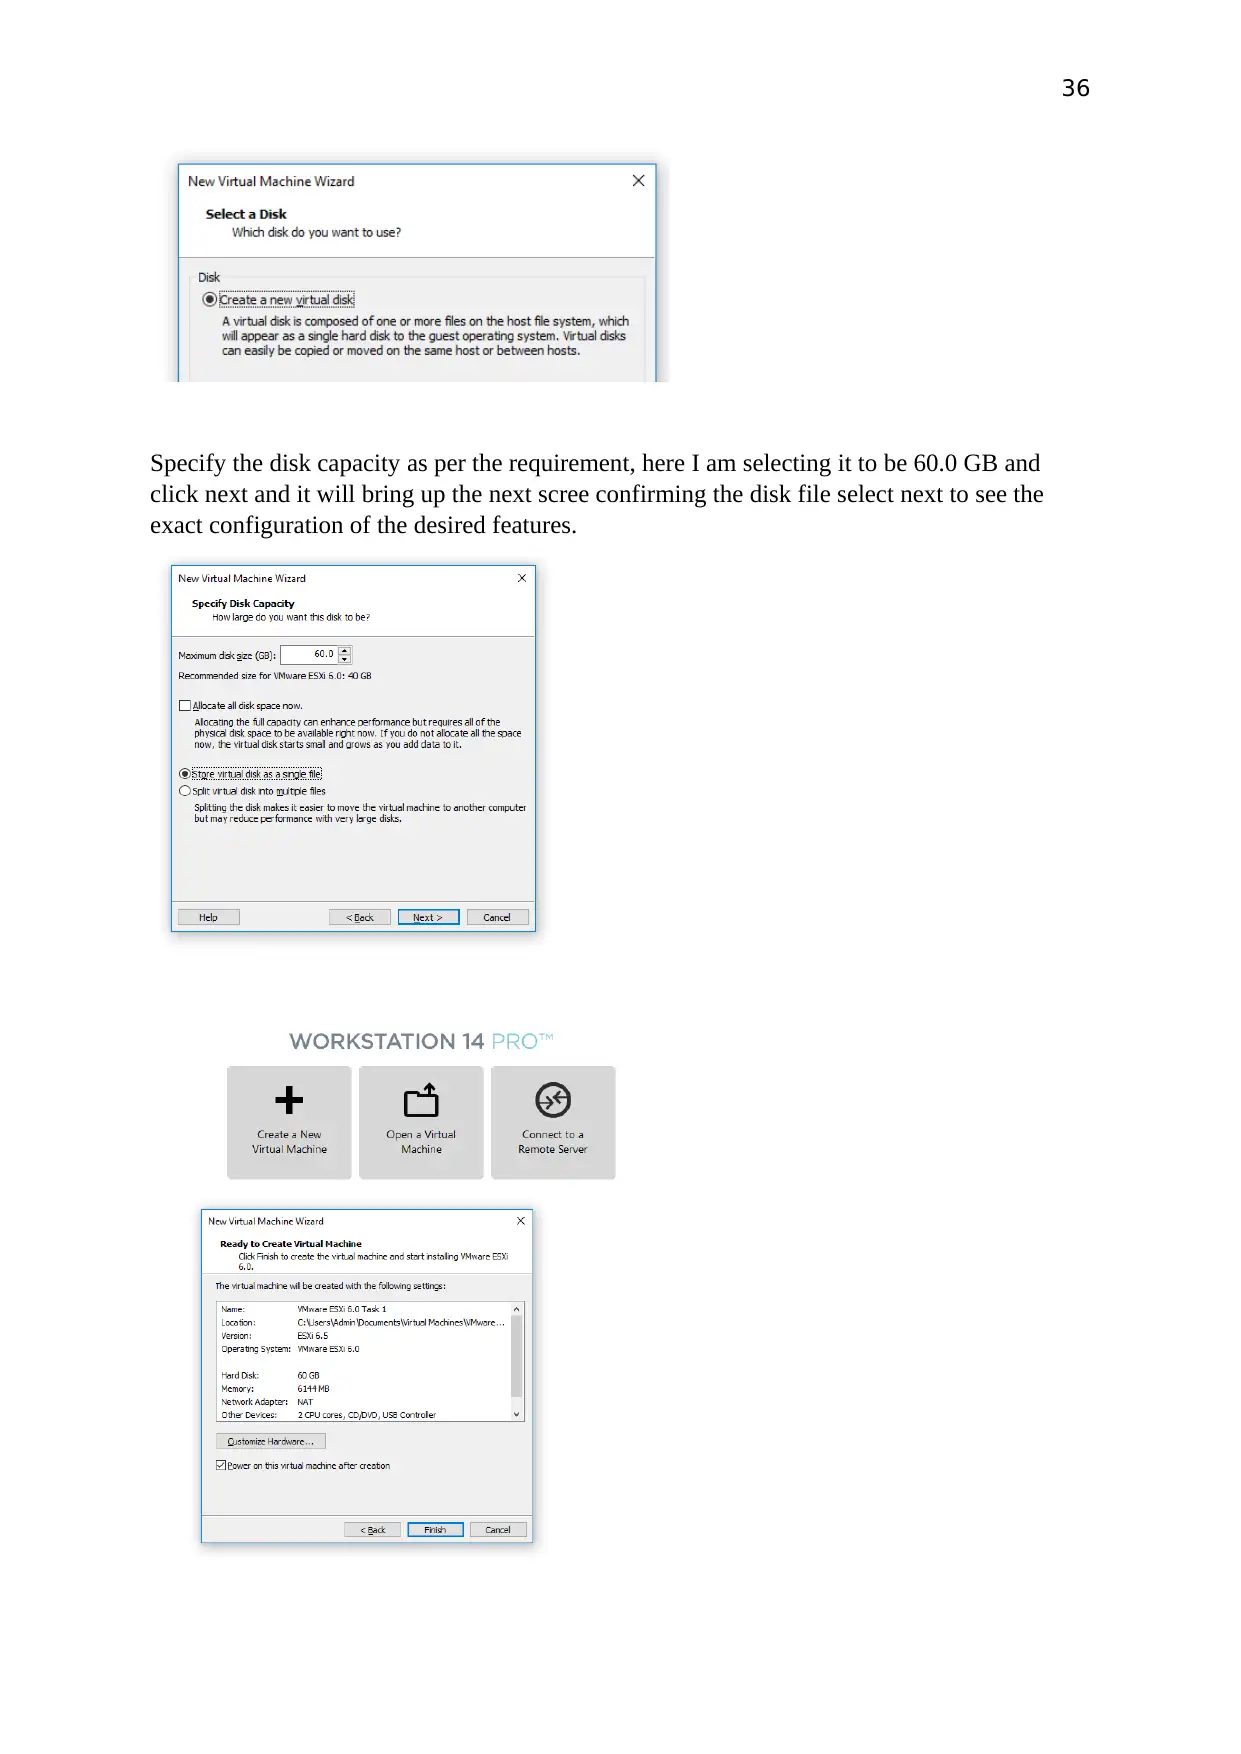
Specify the disk capacity as per the requirement, here I am selecting it to be 60.0 GB and
click next and it will bring up the next scree confirming the disk file select next to see the
exact configuration of the desired features.
Specify the disk capacity as per the requirement, here I am selecting it to be 60.0 GB and
click next and it will bring up the next scree confirming the disk file select next to see the
exact configuration of the desired features.
37
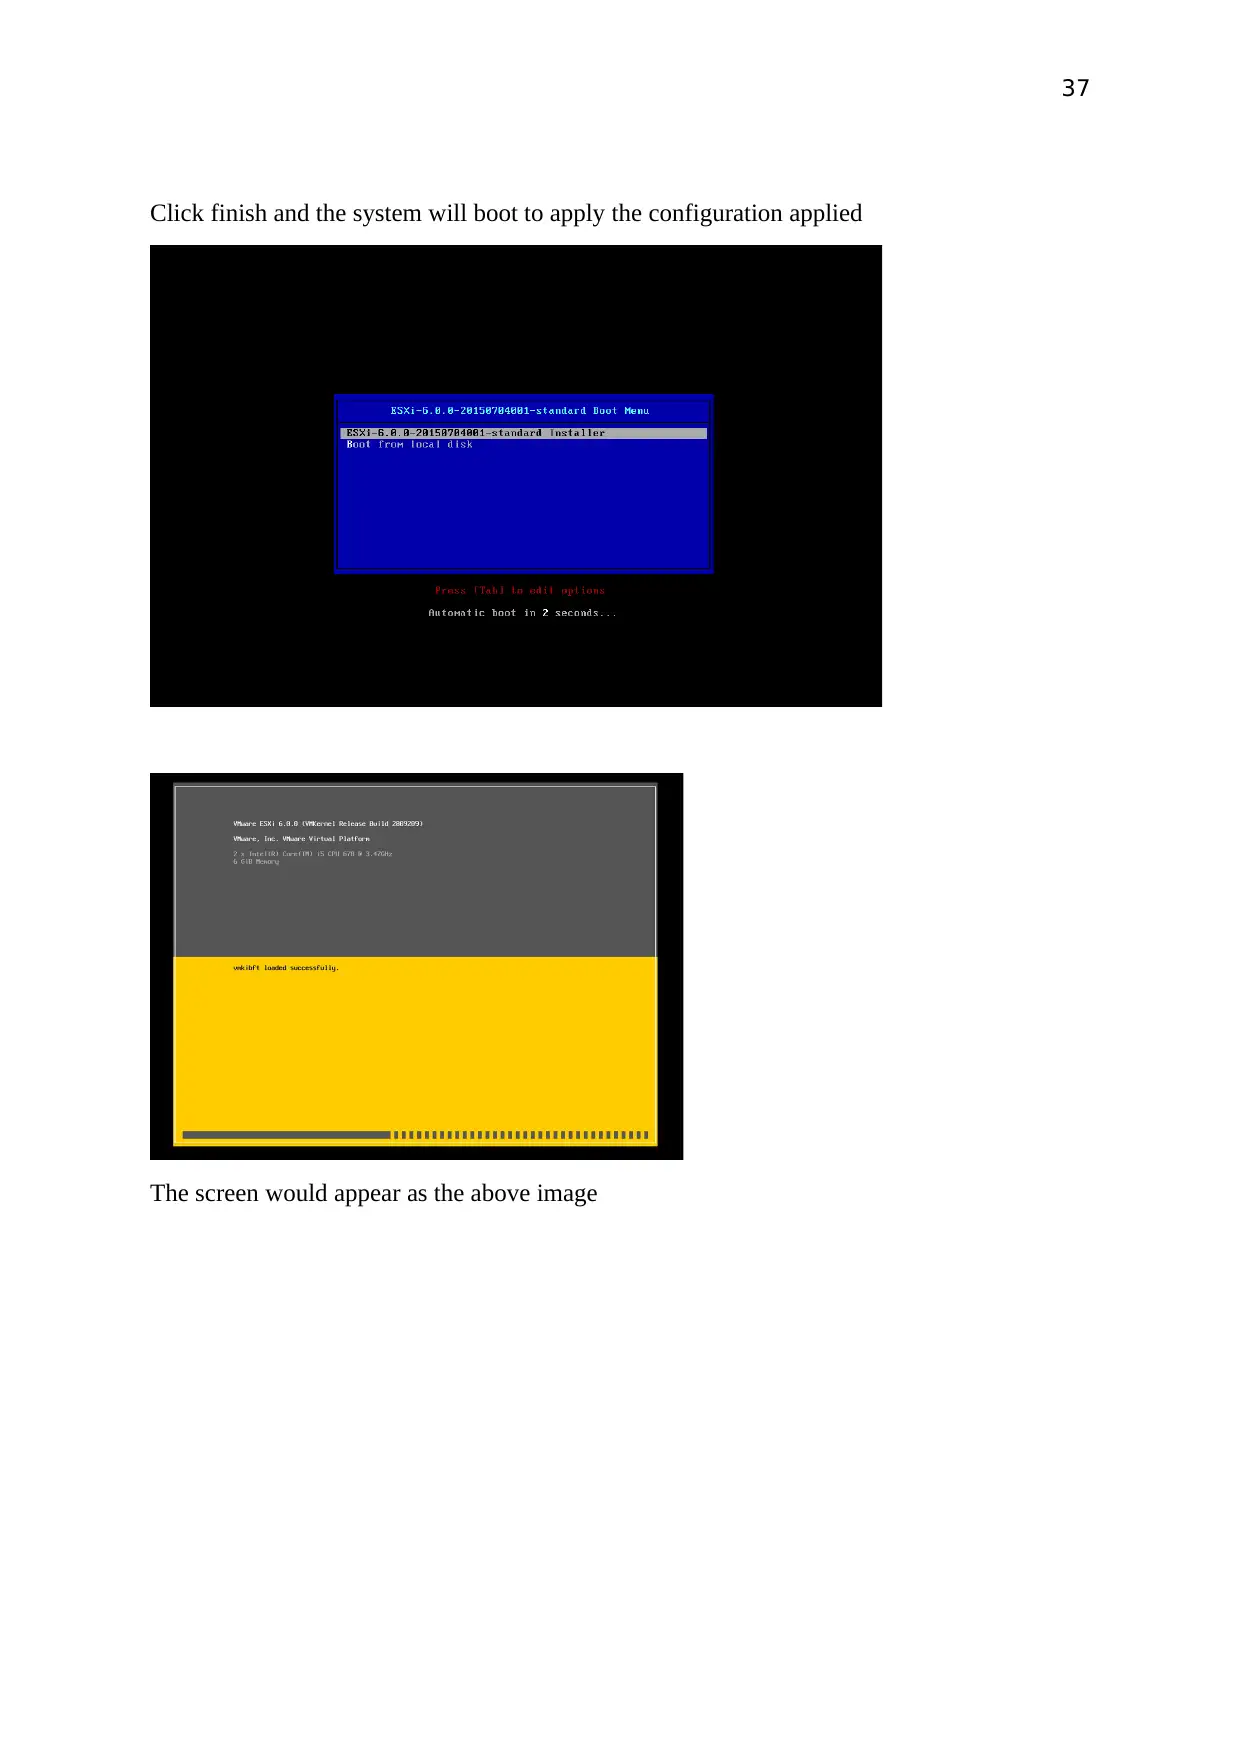
Click finish and the system will boot to apply the configuration applied
The screen would appear as the above image
Click finish and the system will boot to apply the configuration applied
The screen would appear as the above image
Paraphrase This Document
Need a fresh take? Get an instant paraphrase of this document with our AI Paraphraser
38
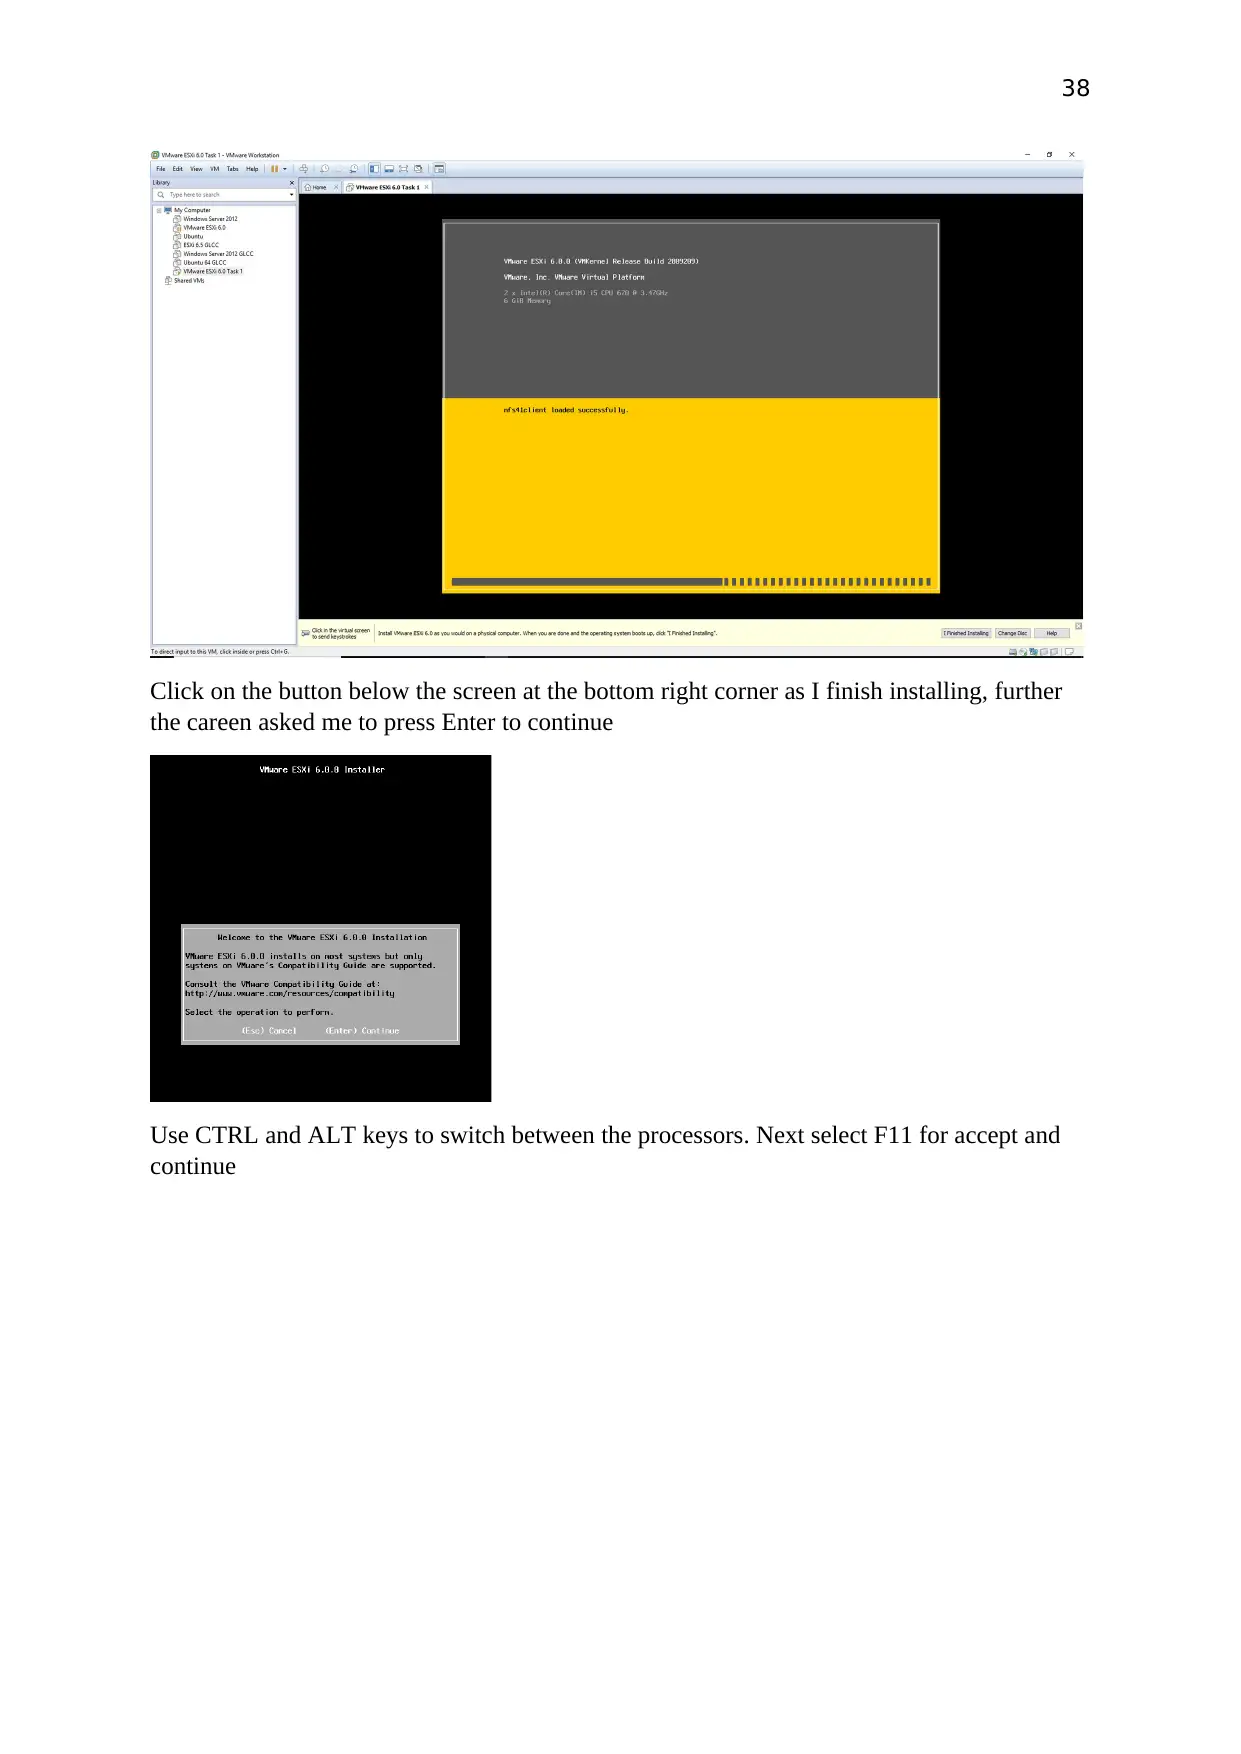
Click on the button below the screen at the bottom right corner as I finish installing, further
the careen asked me to press Enter to continue
Use CTRL and ALT keys to switch between the processors. Next select F11 for accept and
continue
Click on the button below the screen at the bottom right corner as I finish installing, further
the careen asked me to press Enter to continue
Use CTRL and ALT keys to switch between the processors. Next select F11 for accept and
continue
39
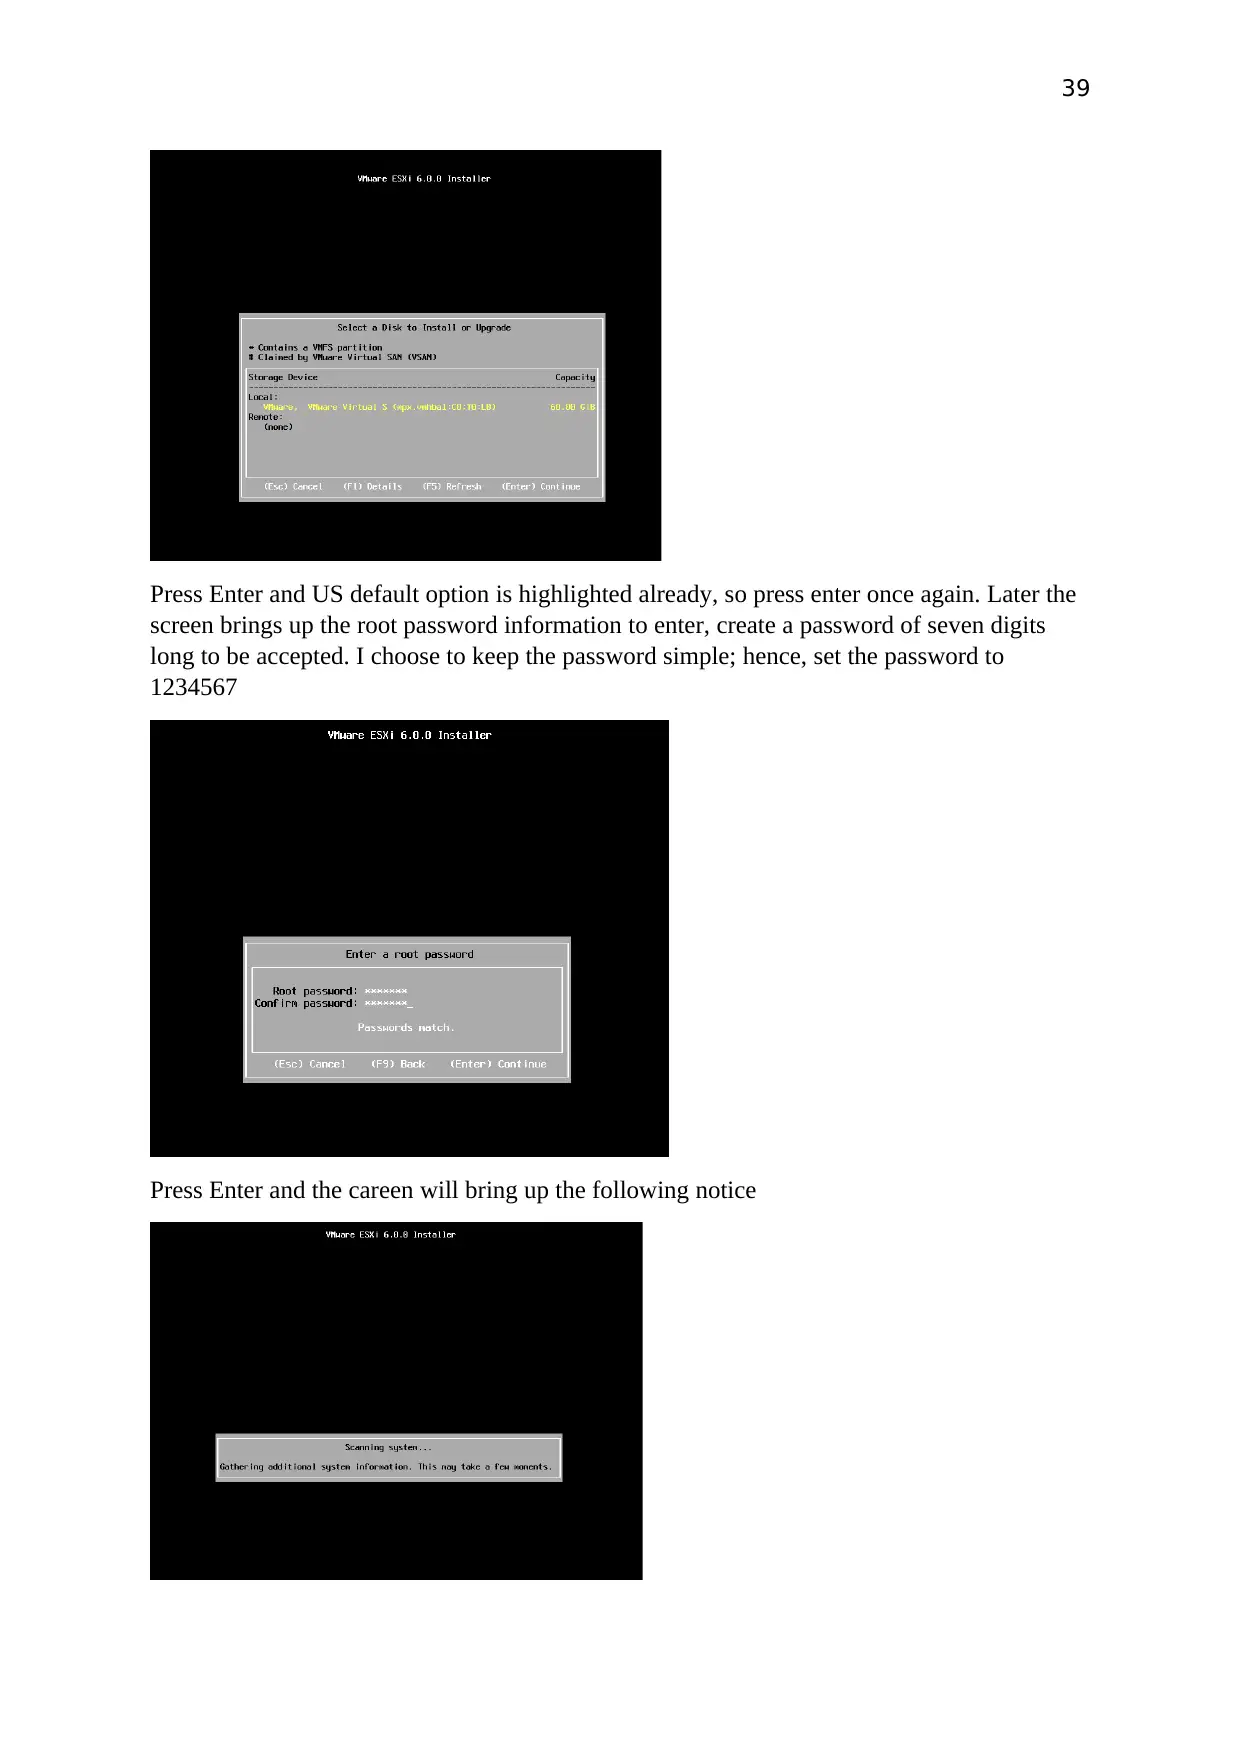
Press Enter and US default option is highlighted already, so press enter once again. Later the
screen brings up the root password information to enter, create a password of seven digits
long to be accepted. I choose to keep the password simple; hence, set the password to
1234567
Press Enter and the careen will bring up the following notice
40
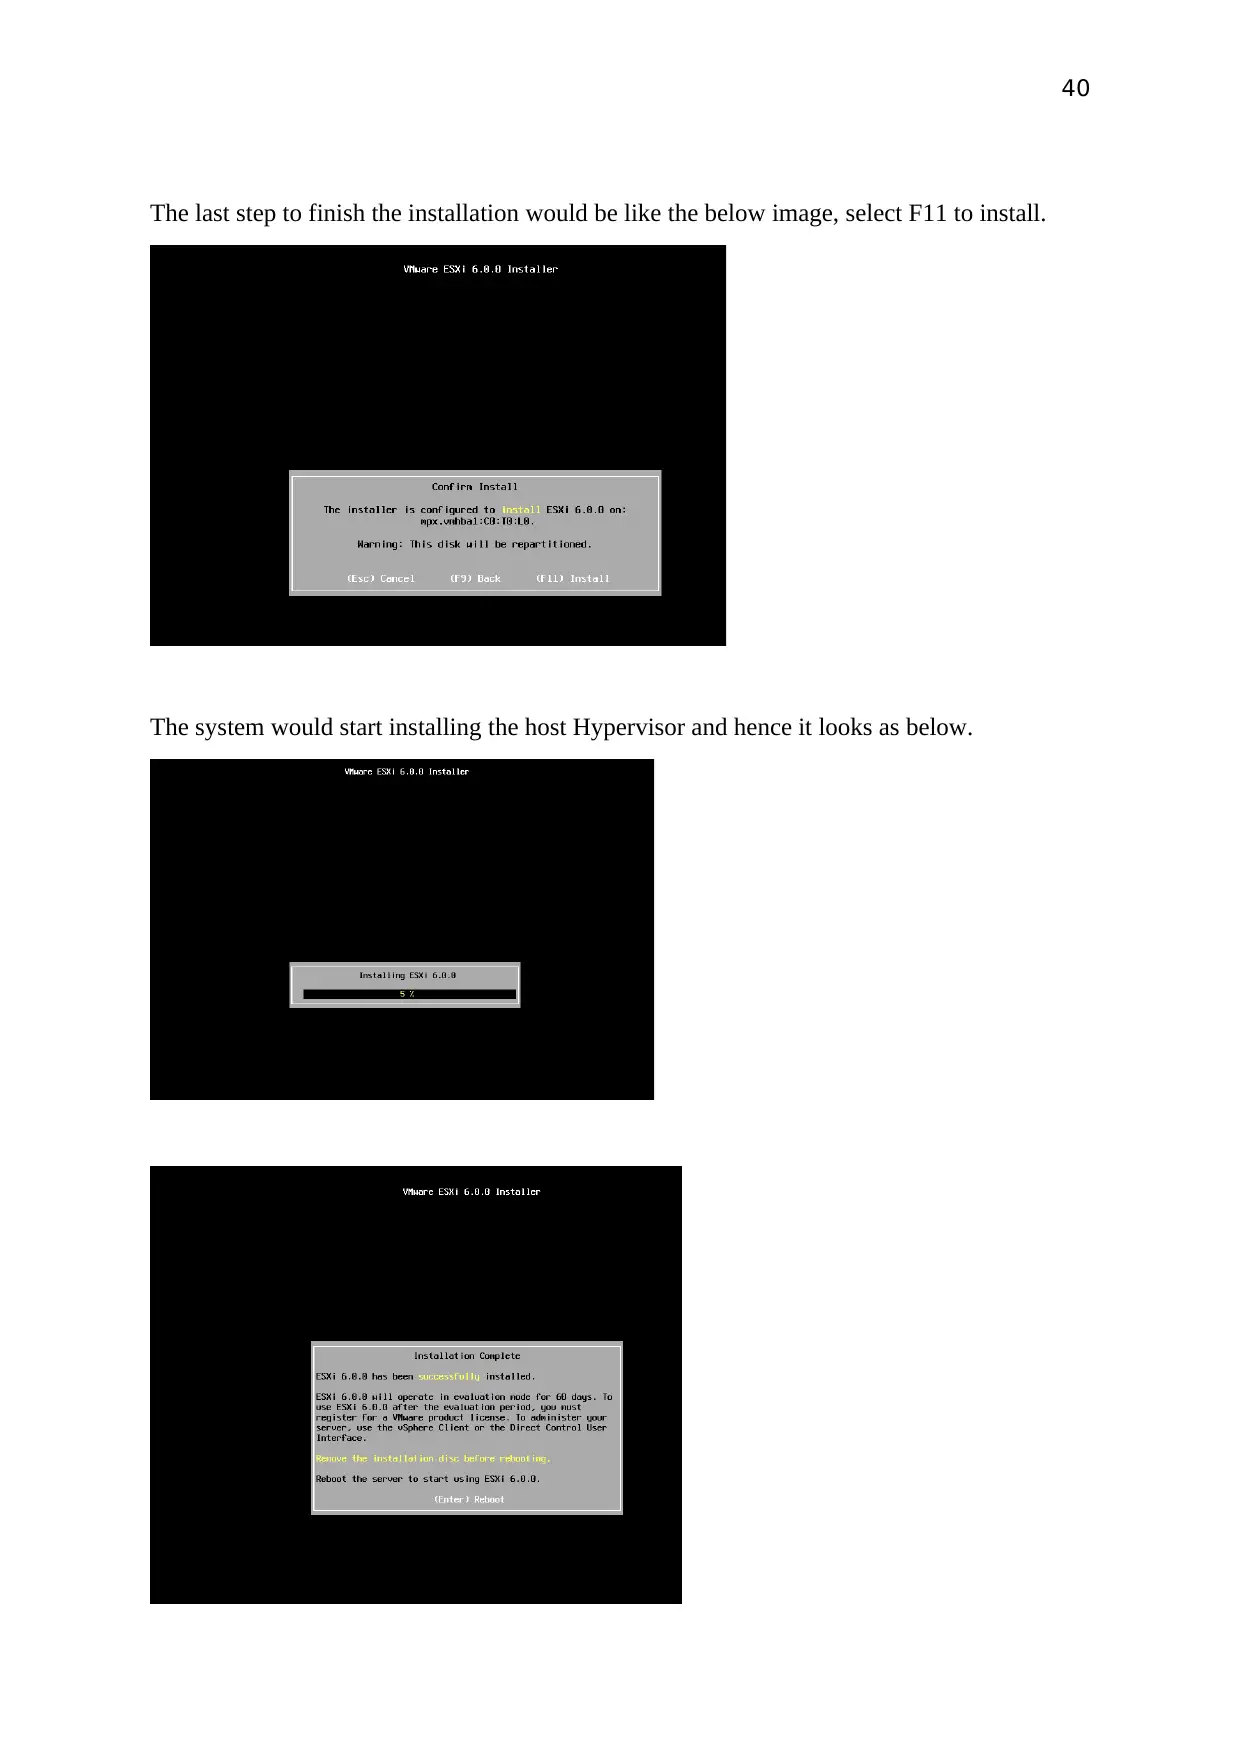
The last step to finish the installation would be like the below image, select F11 to install.
The system would start installing the host Hypervisor and hence it looks as below.
The last step to finish the installation would be like the below image, select F11 to install.
The system would start installing the host Hypervisor and hence it looks as below.
Secure Best Marks with AI Grader
Need help grading? Try our AI Grader for instant feedback on your assignments.
41
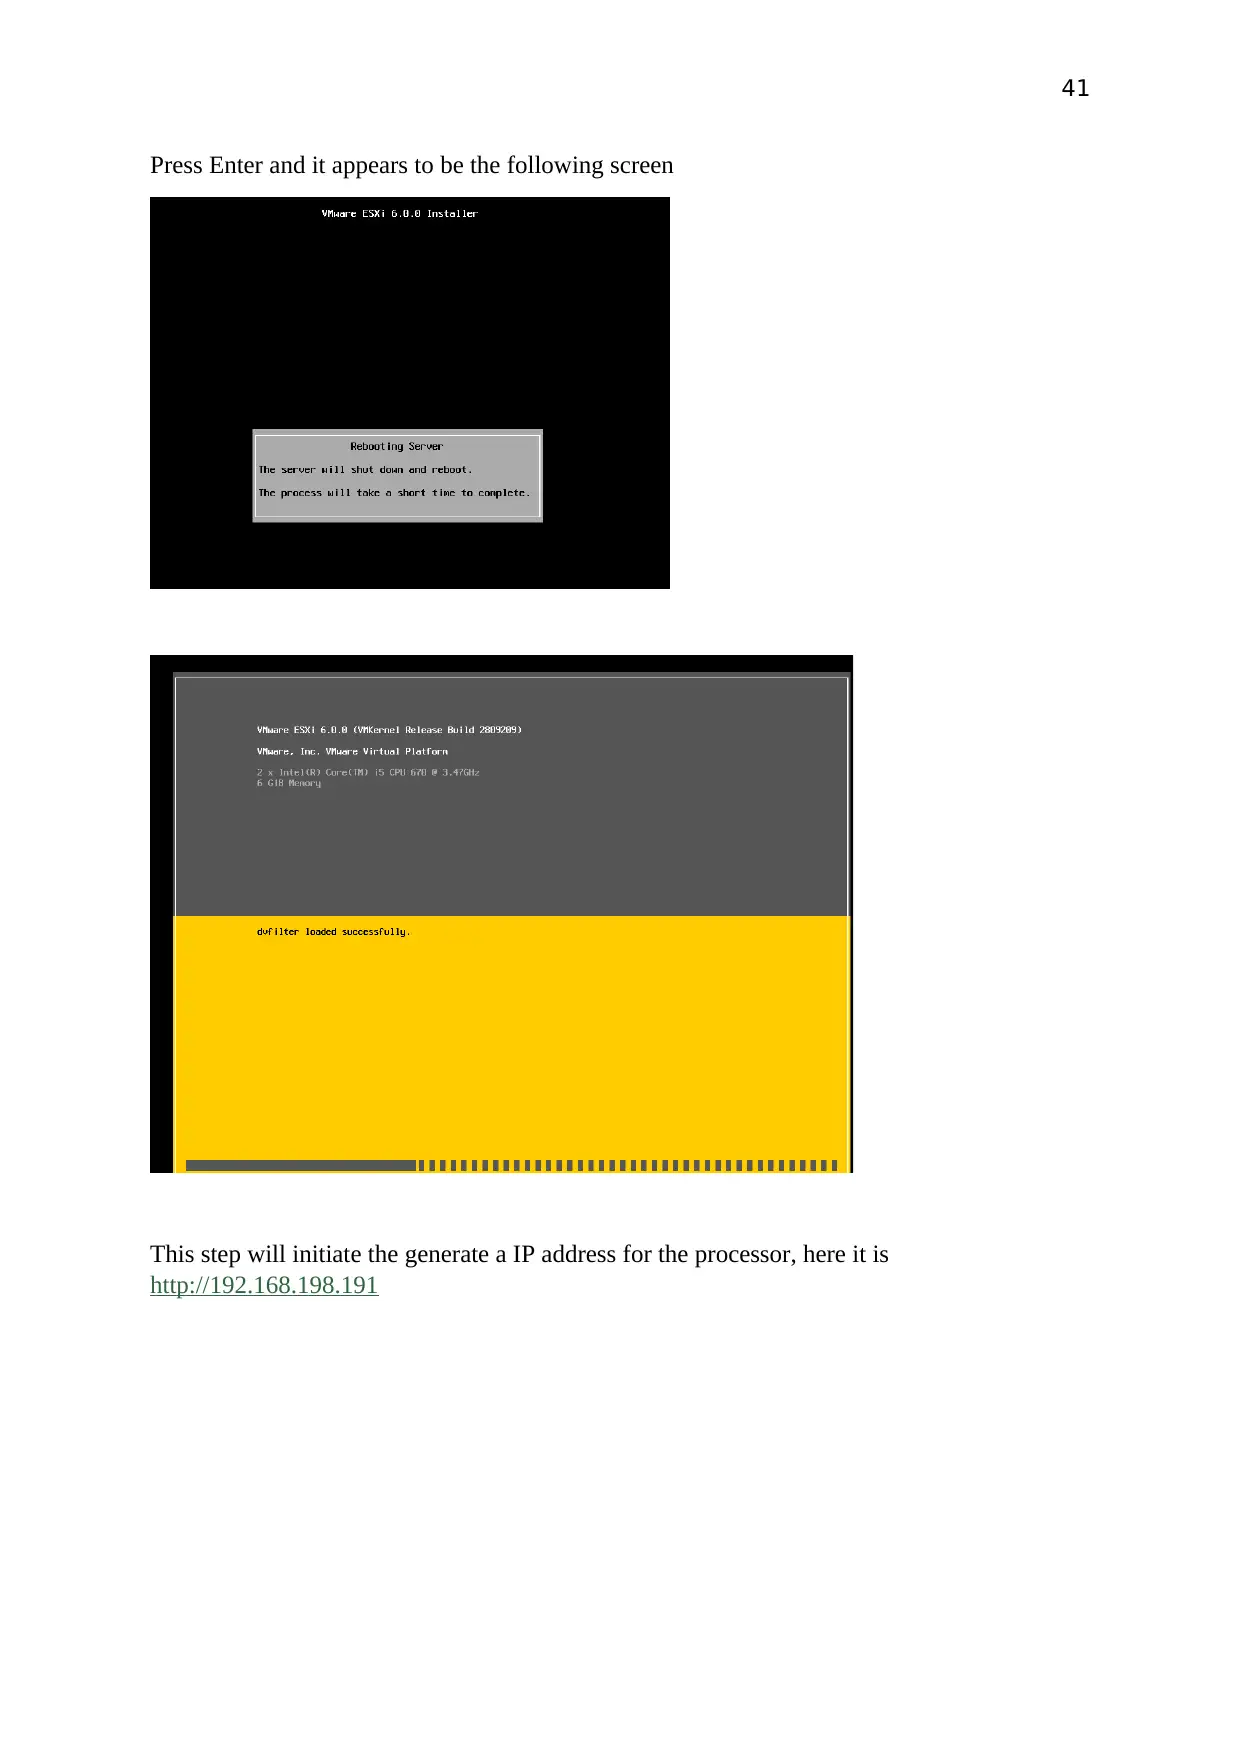
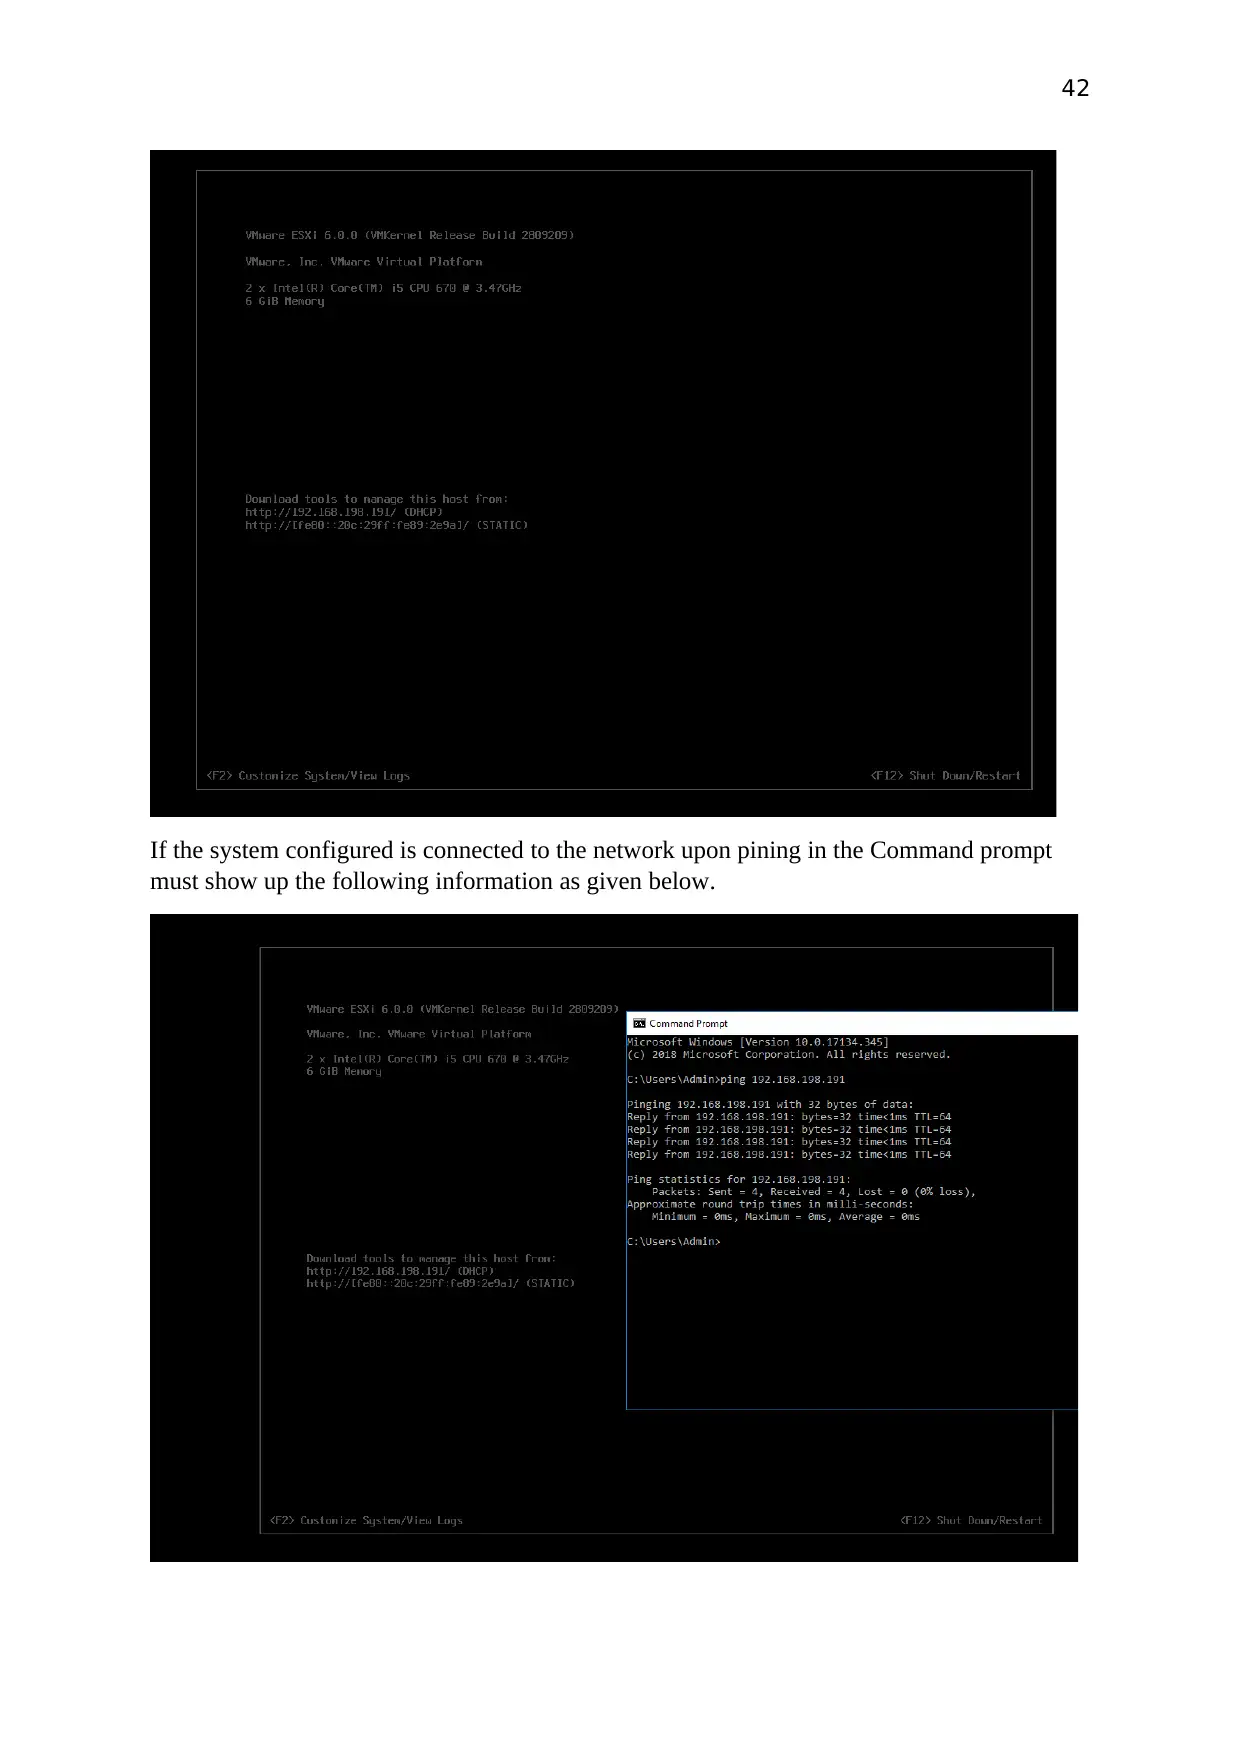
Press Enter and it appears to be the following screen
This step will initiate the generate a IP address for the processor, here it is
http://192.168.198.191
Press Enter and it appears to be the following screen
This step will initiate the generate a IP address for the processor, here it is
http://192.168.198.191
42
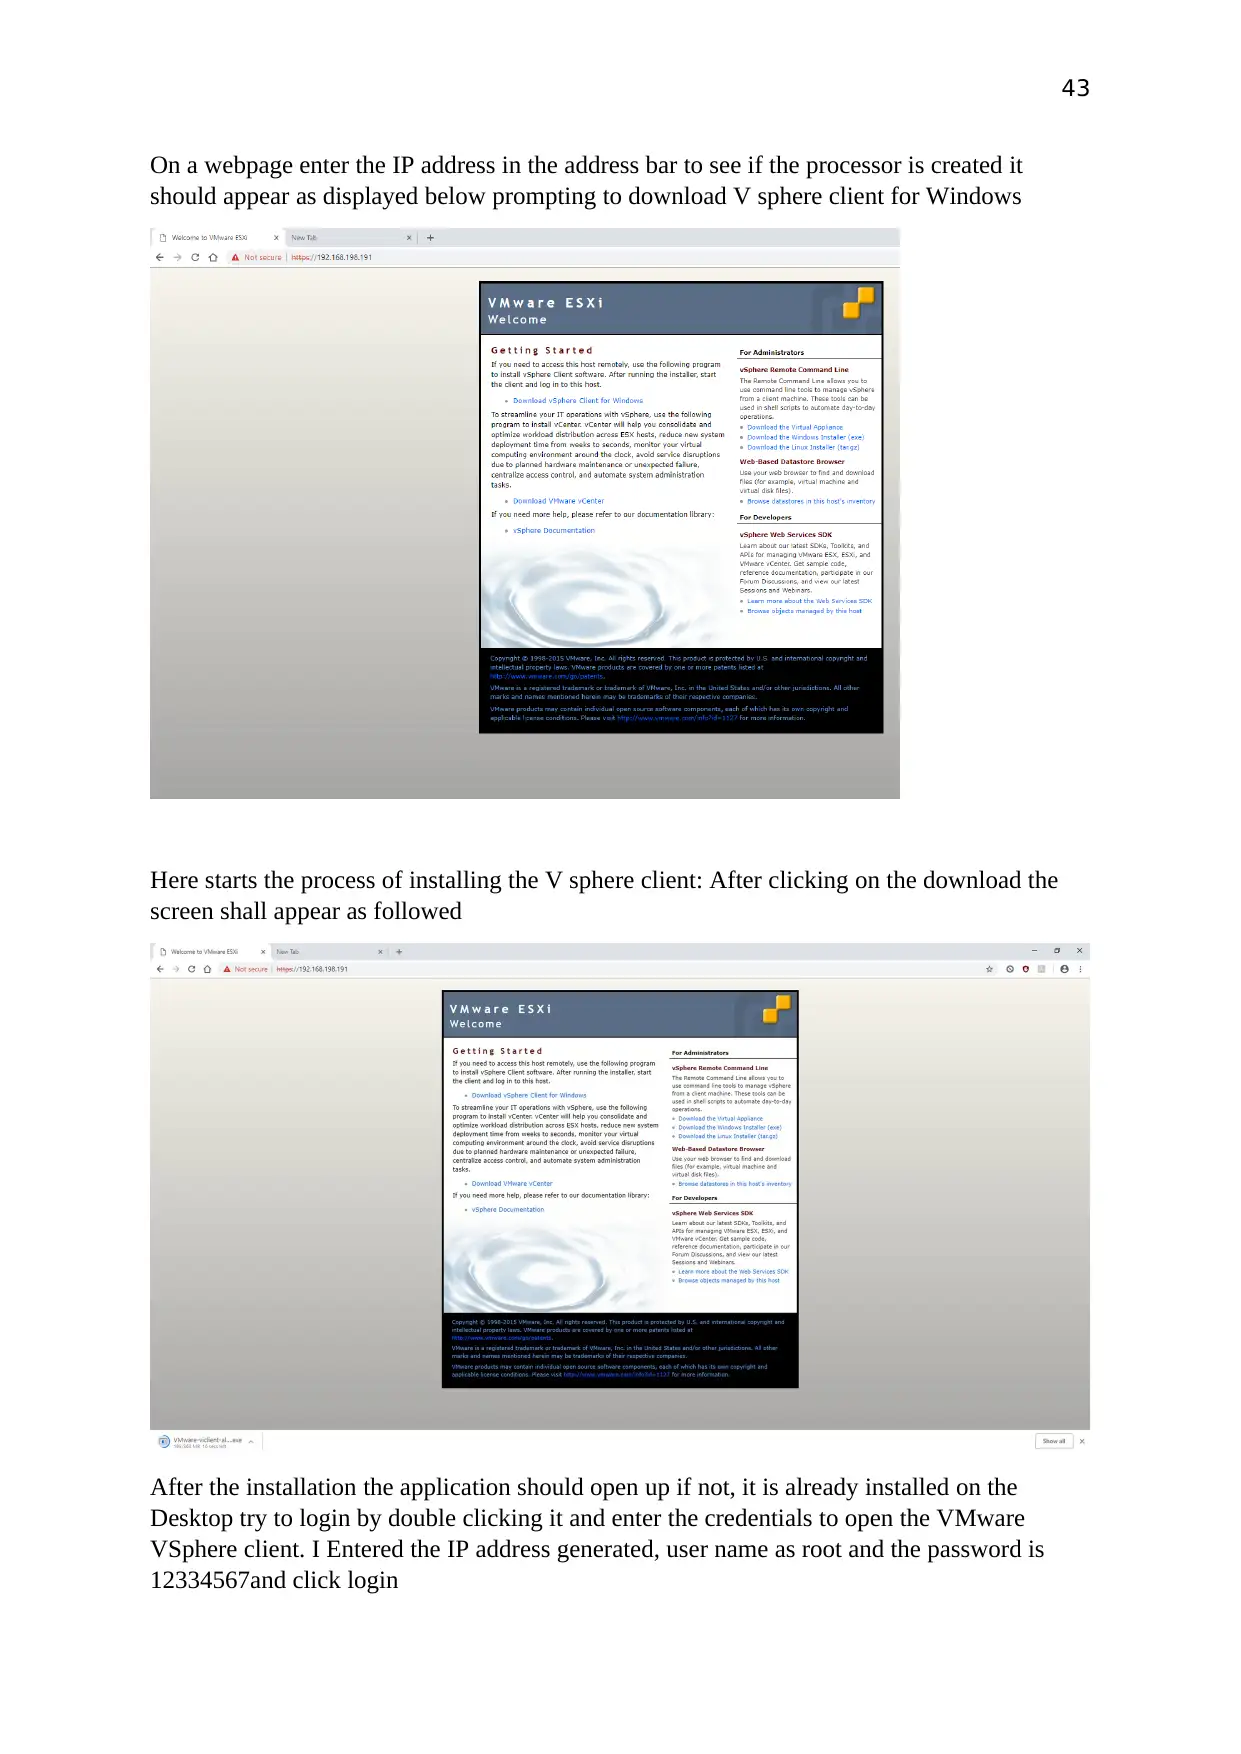
If the system configured is connected to the network upon pining in the Command prompt
must show up the following information as given below.
If the system configured is connected to the network upon pining in the Command prompt
must show up the following information as given below.
43
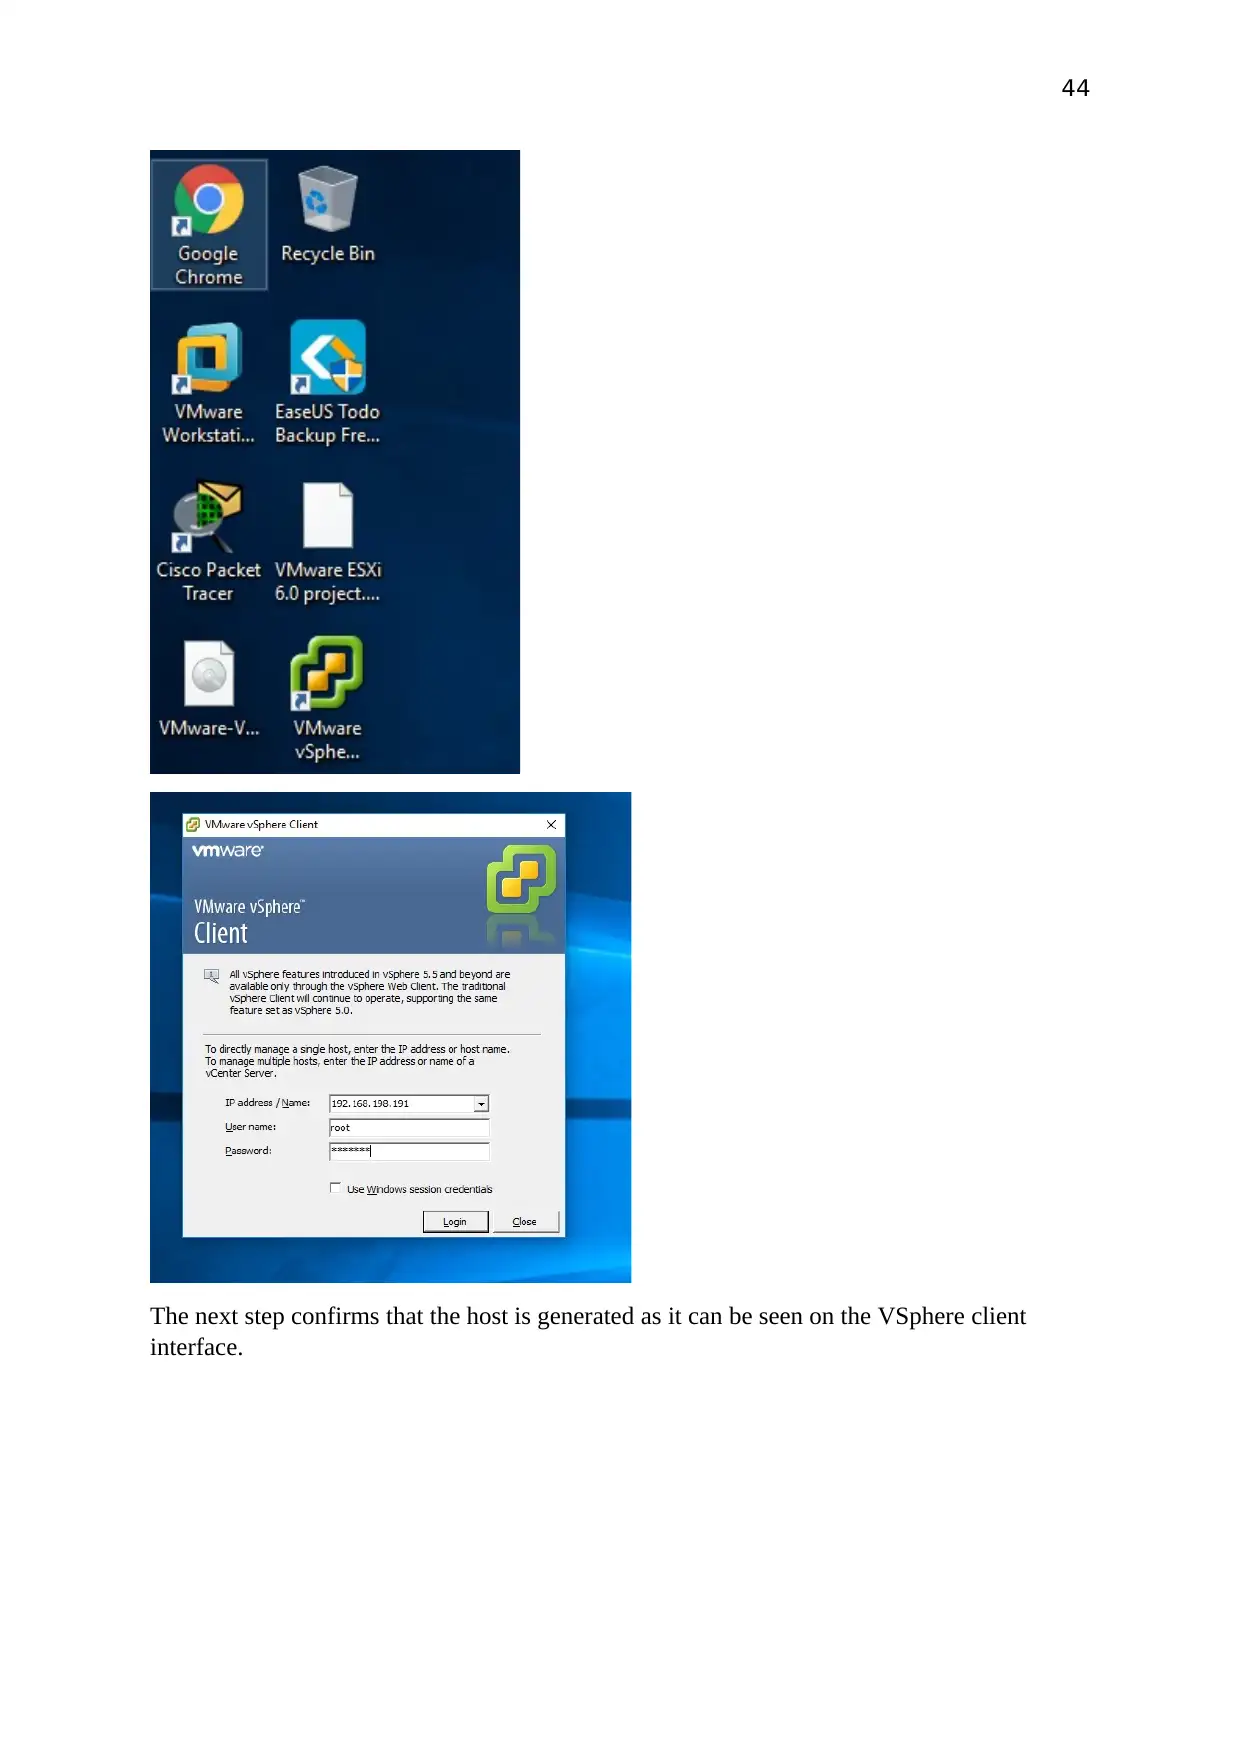
On a webpage enter the IP address in the address bar to see if the processor is created it
should appear as displayed below prompting to download V sphere client for Windows
Here starts the process of installing the V sphere client: After clicking on the download the
screen shall appear as followed
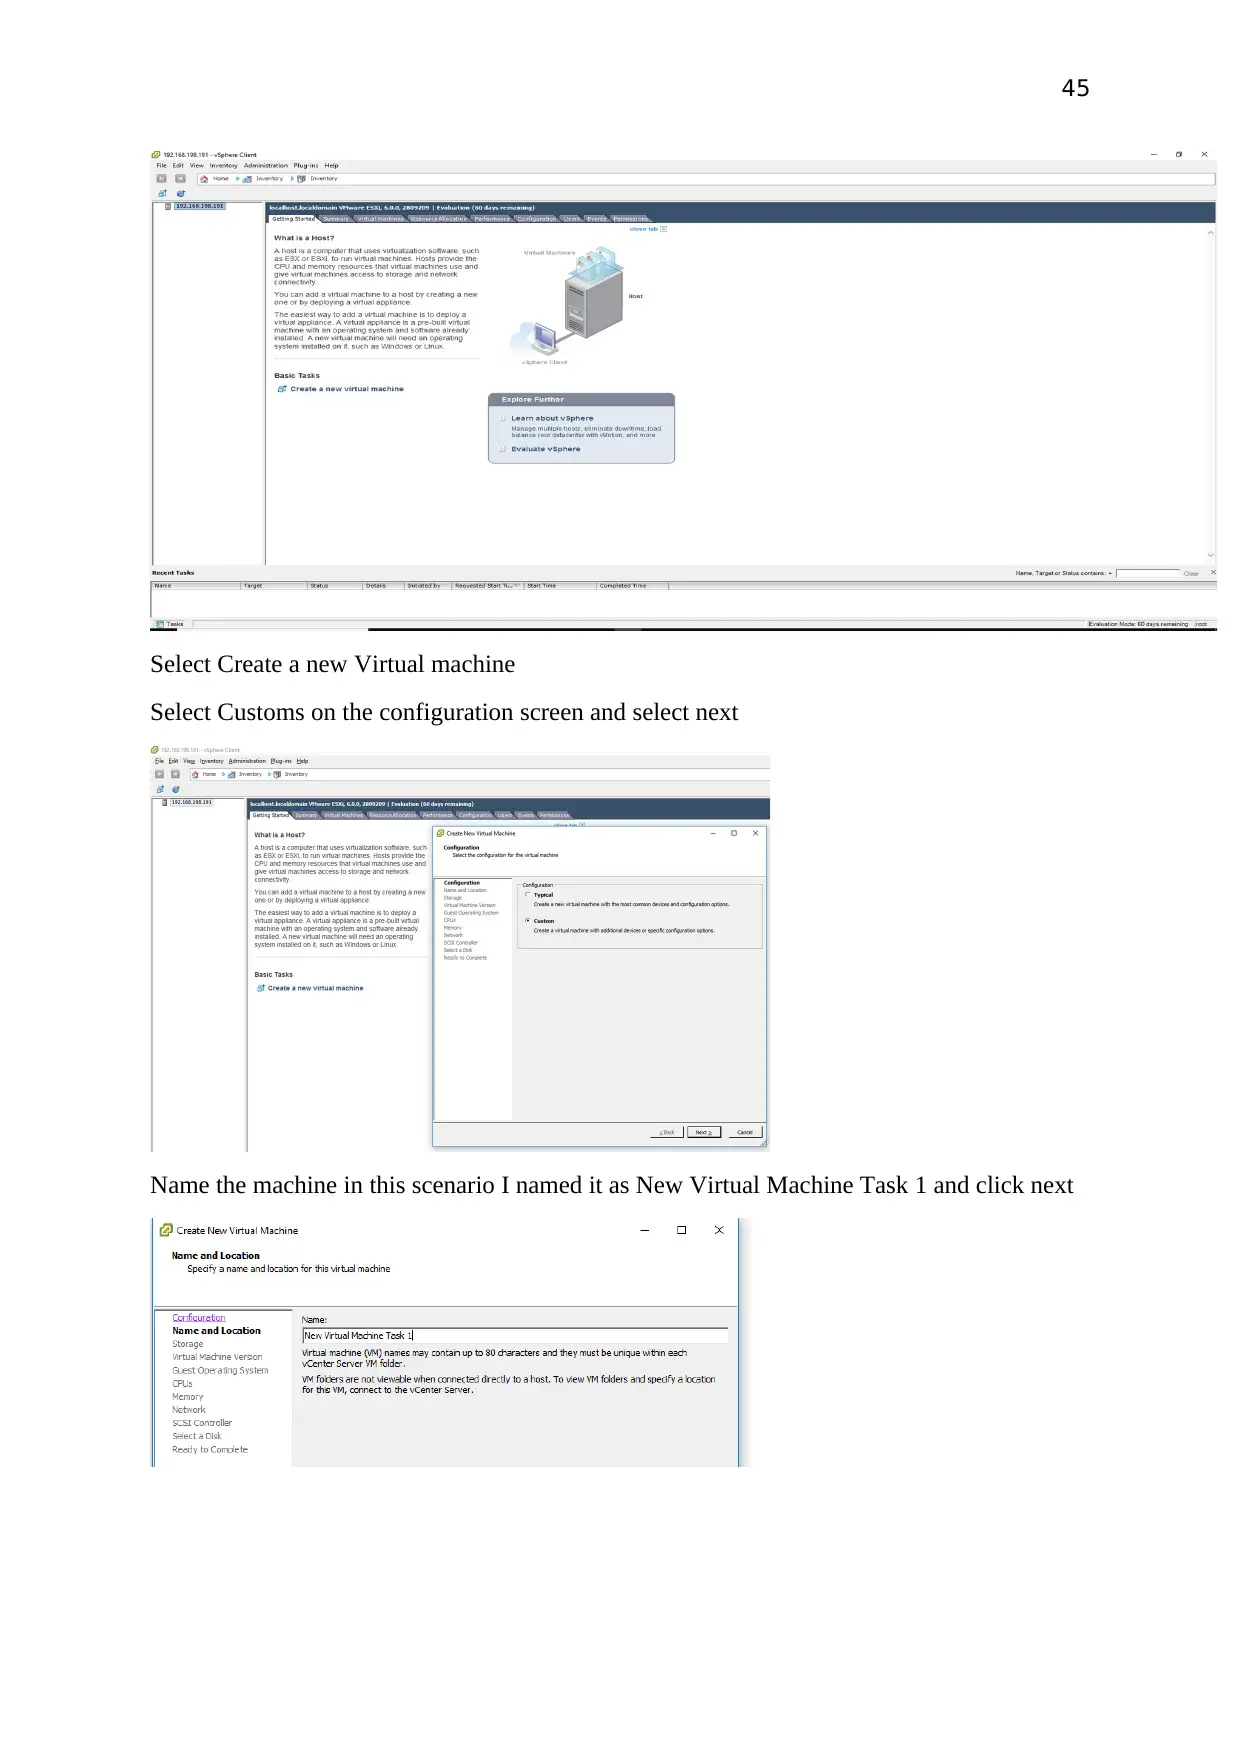
After the installation the application should open up if not, it is already installed on the
Desktop try to login by double clicking it and enter the credentials to open the VMware
VSphere client. I Entered the IP address generated, user name as root and the password is
12334567and click login
Paraphrase This Document
Need a fresh take? Get an instant paraphrase of this document with our AI Paraphraser
44
The next step confirms that the host is generated as it can be seen on the VSphere client
interface.
The next step confirms that the host is generated as it can be seen on the VSphere client
interface.
45
Select Create a new Virtual machine
Select Customs on the configuration screen and select next
Name the machine in this scenario I named it as New Virtual Machine Task 1 and click next
Select Create a new Virtual machine
Select Customs on the configuration screen and select next
Name the machine in this scenario I named it as New Virtual Machine Task 1 and click next
46
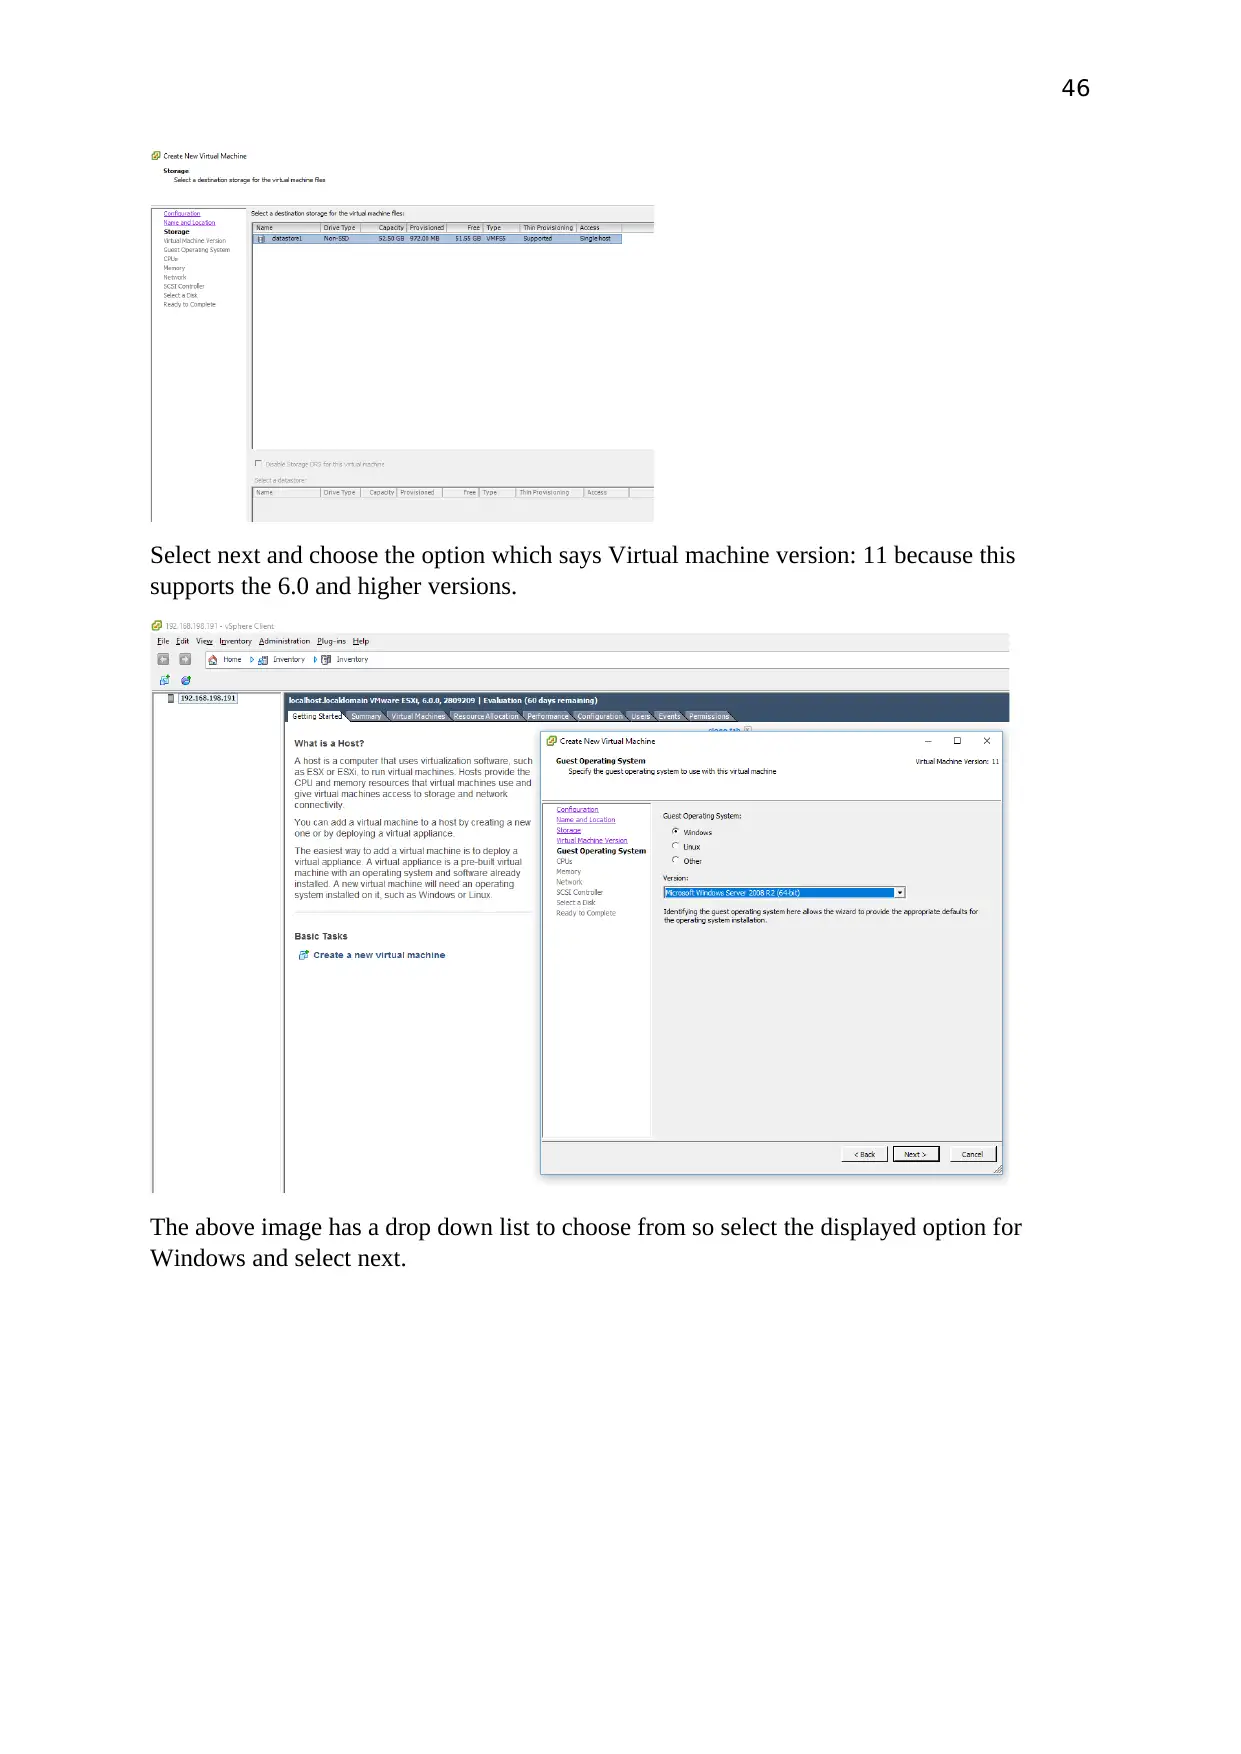
Select next and choose the option which says Virtual machine version: 11 because this
supports the 6.0 and higher versions.
The above image has a drop down list to choose from so select the displayed option for
Windows and select next.
Select next and choose the option which says Virtual machine version: 11 because this
supports the 6.0 and higher versions.
The above image has a drop down list to choose from so select the displayed option for
Windows and select next.
Secure Best Marks with AI Grader
Need help grading? Try our AI Grader for instant feedback on your assignments.
47
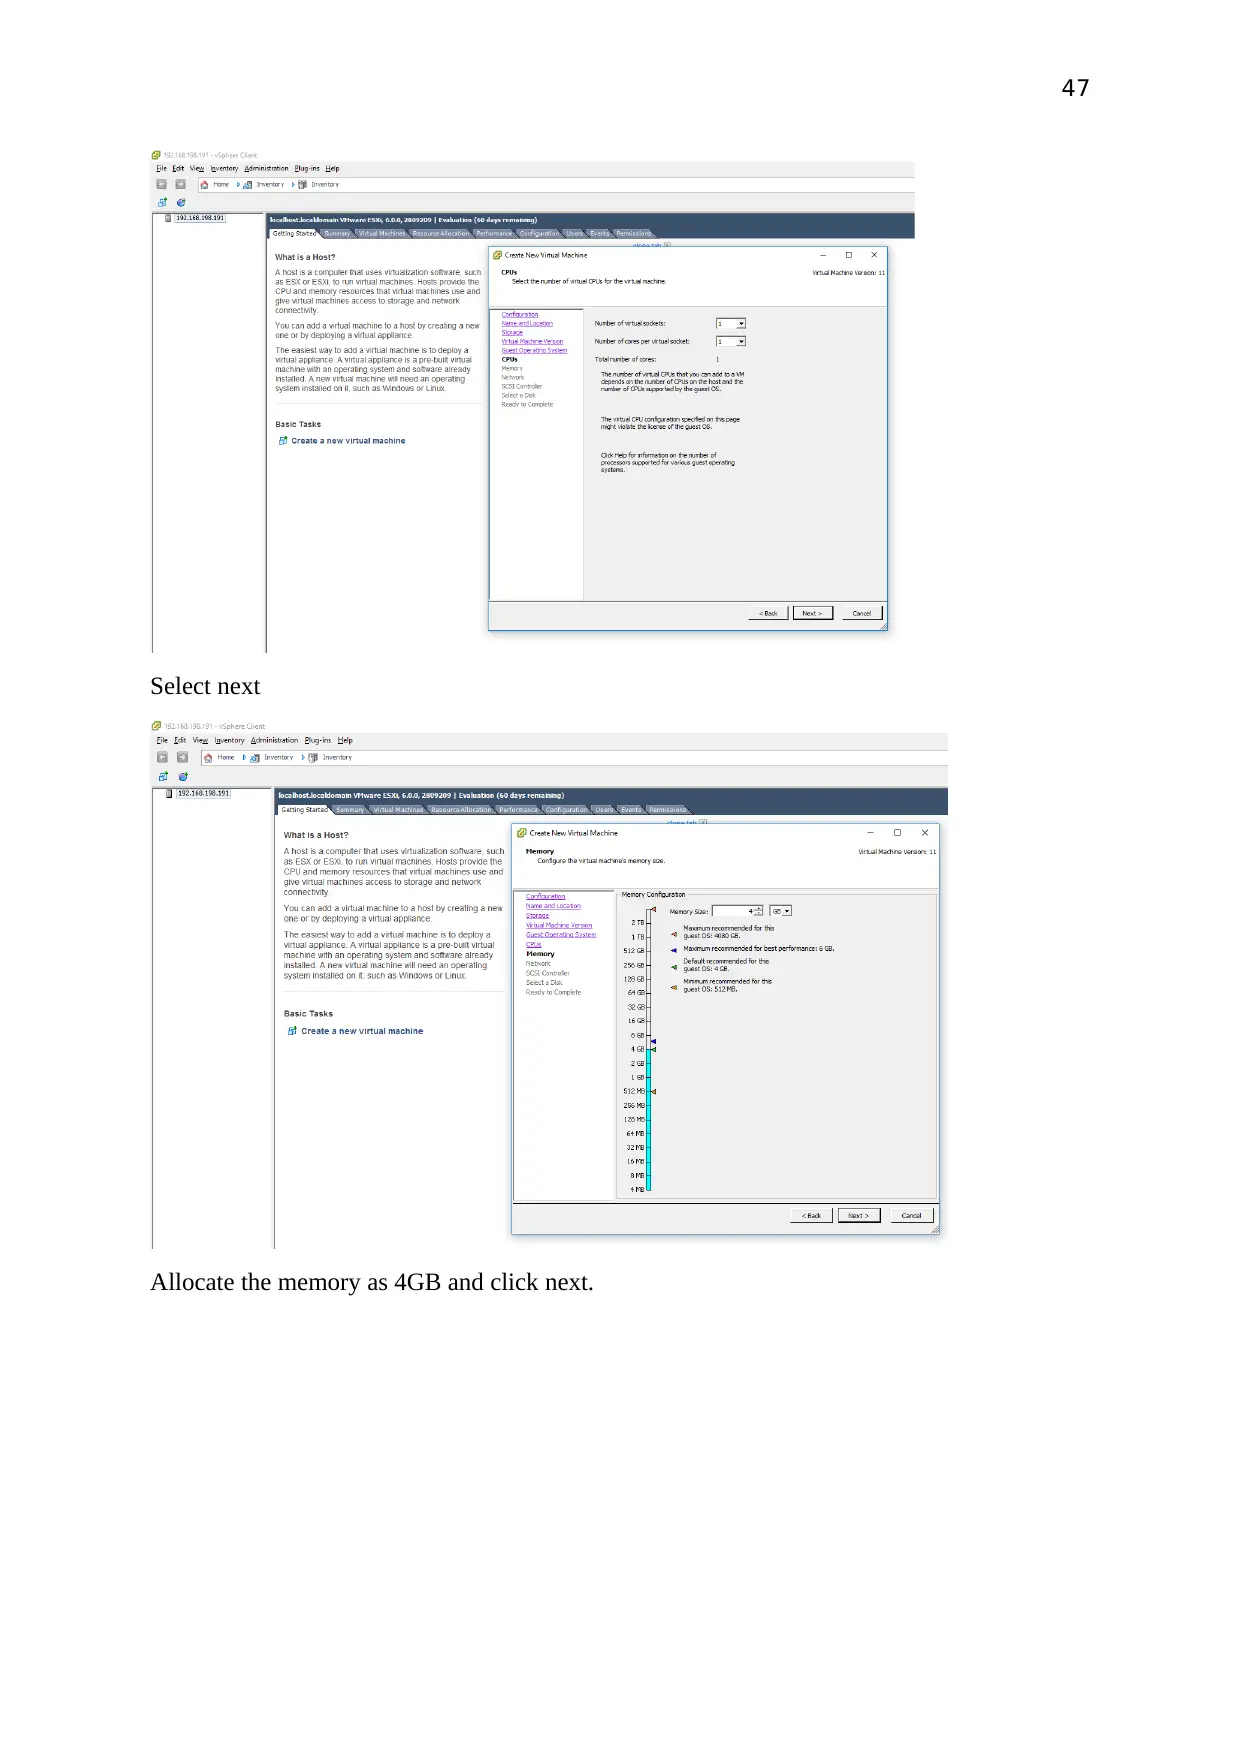
Select next
Allocate the memory as 4GB and click next.
Select next
Allocate the memory as 4GB and click next.
48
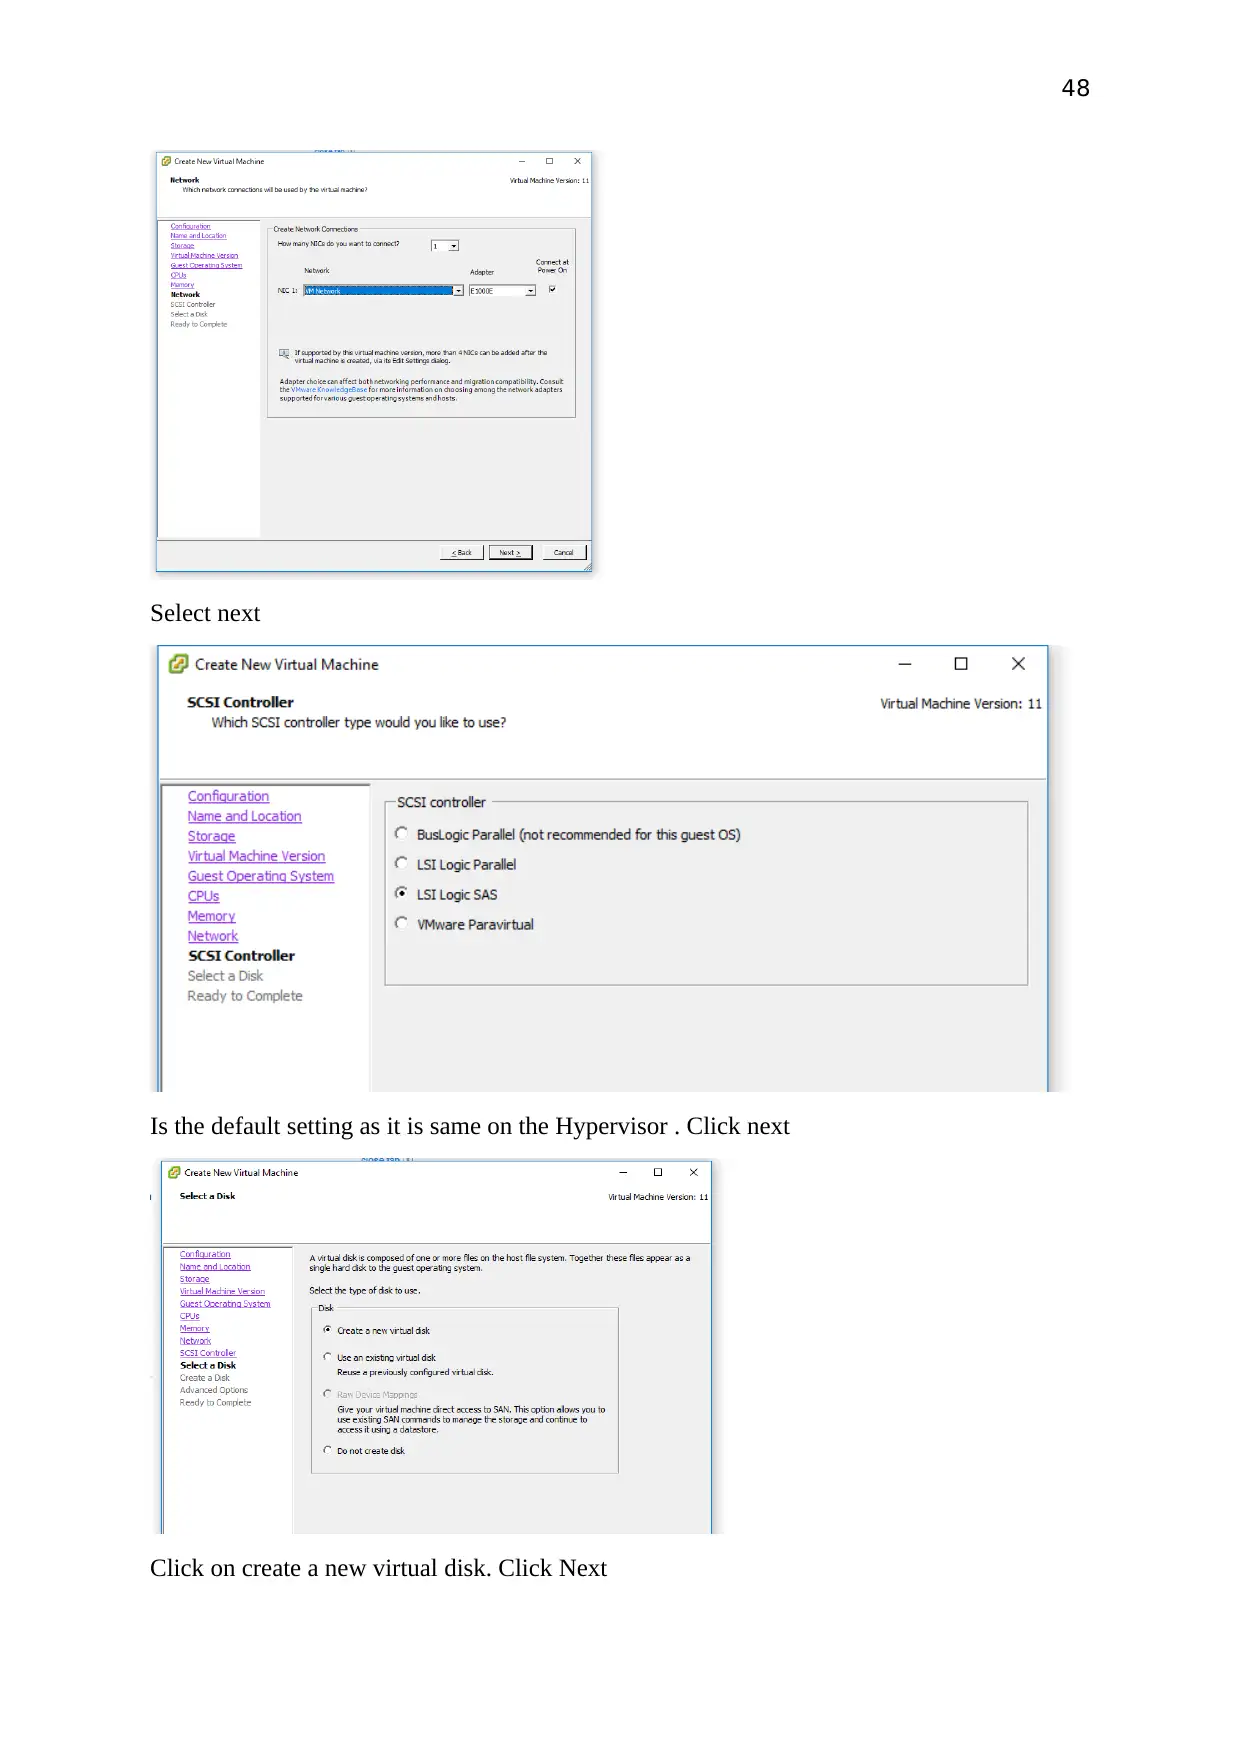
Select next
Is the default setting as it is same on the Hypervisor . Click next
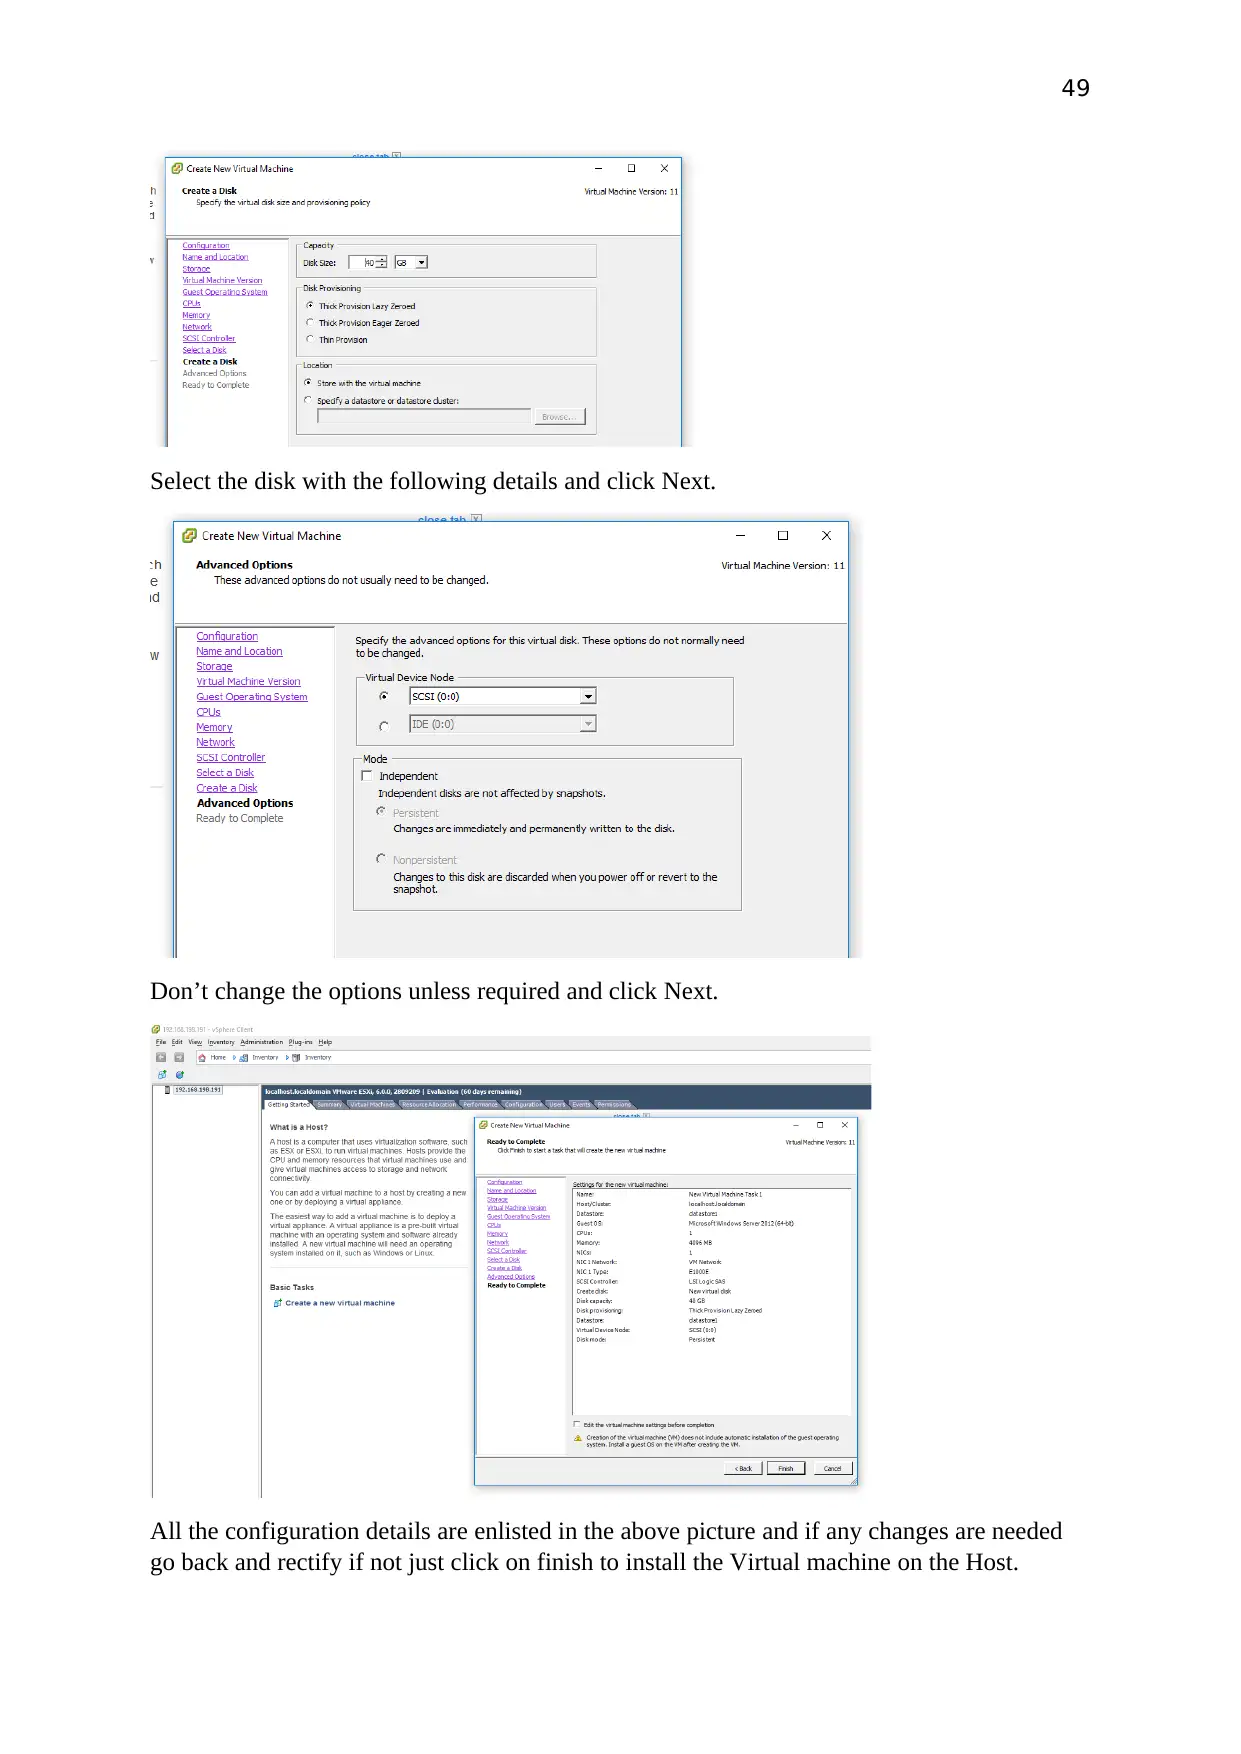
Click on create a new virtual disk. Click Next
Select next
Is the default setting as it is same on the Hypervisor . Click next
Click on create a new virtual disk. Click Next
49
Select the disk with the following details and click Next.
Don’t change the options unless required and click Next.
All the configuration details are enlisted in the above picture and if any changes are needed
go back and rectify if not just click on finish to install the Virtual machine on the Host.
Paraphrase This Document
Need a fresh take? Get an instant paraphrase of this document with our AI Paraphraser
50
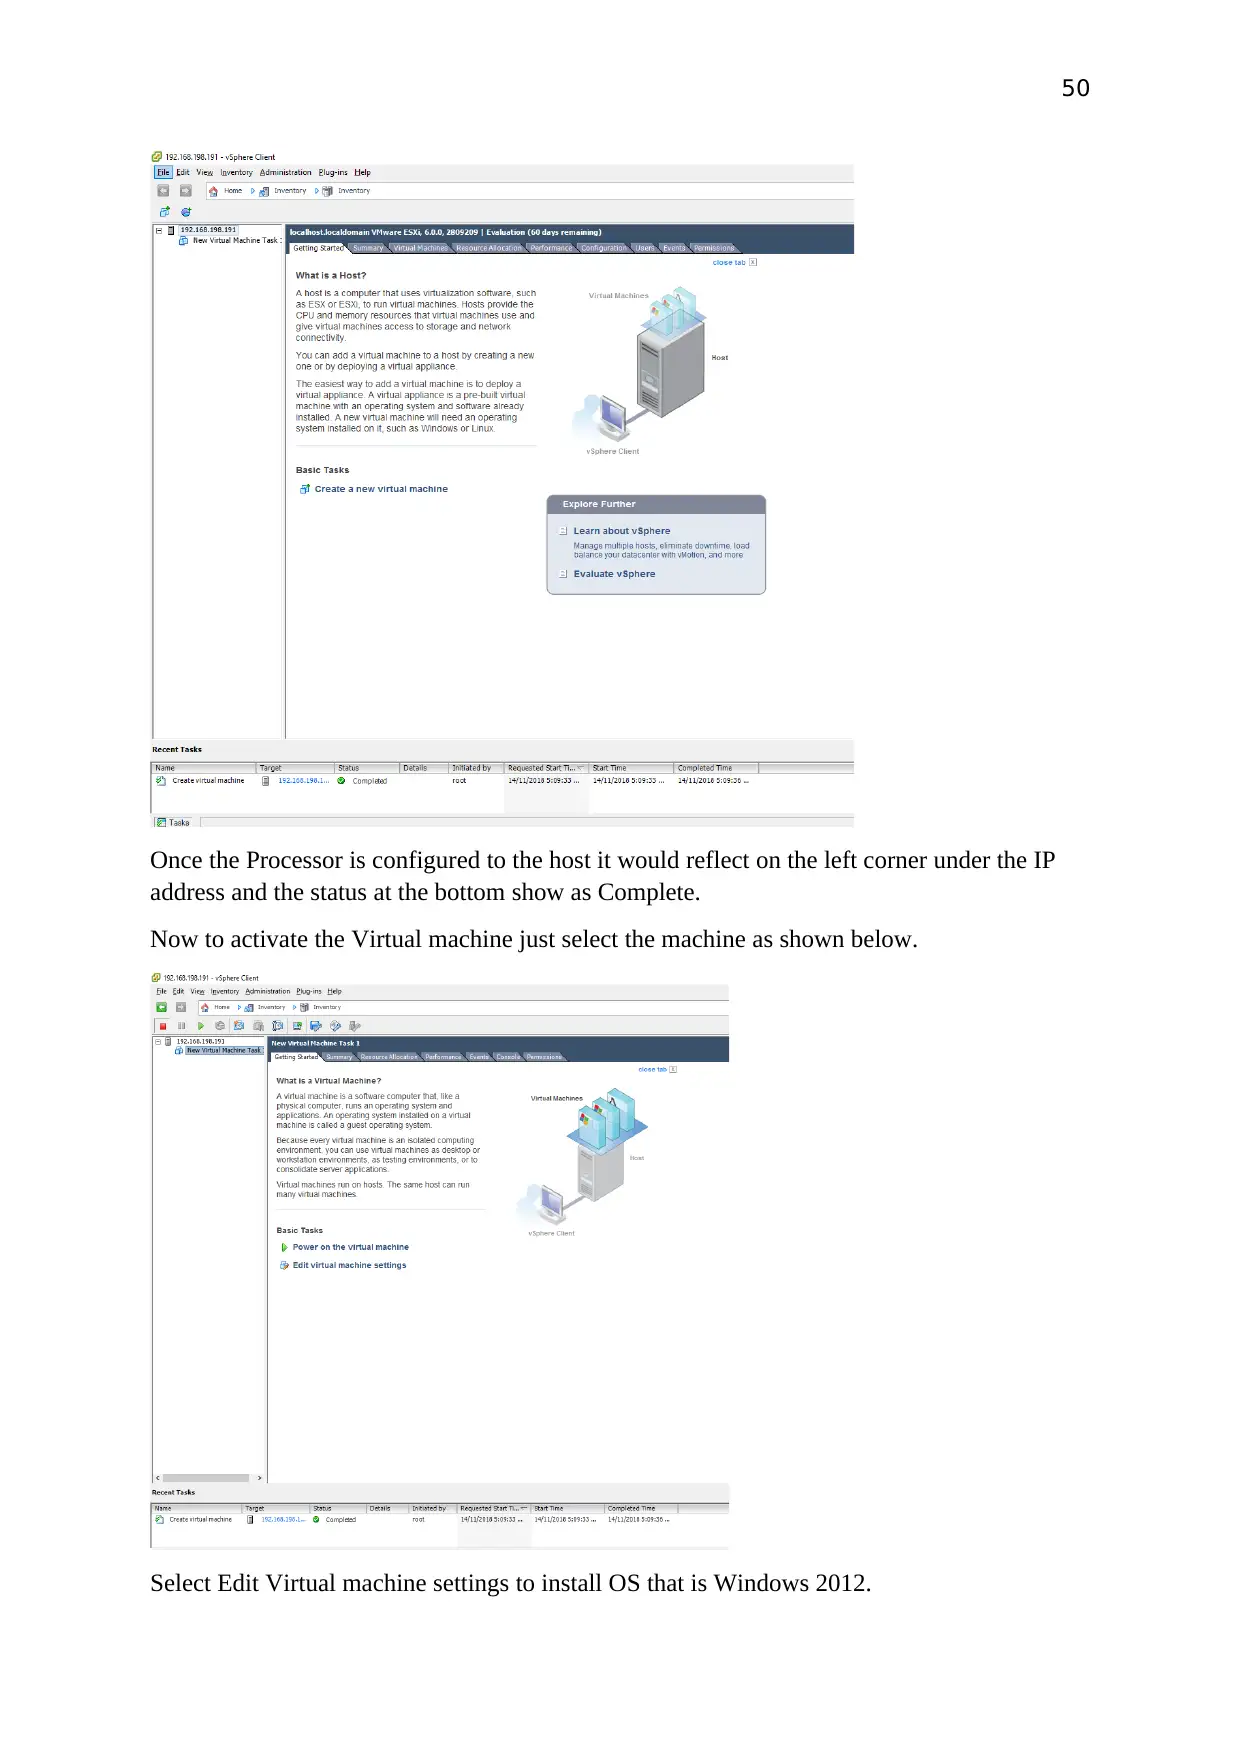
Once the Processor is configured to the host it would reflect on the left corner under the IP
address and the status at the bottom show as Complete.
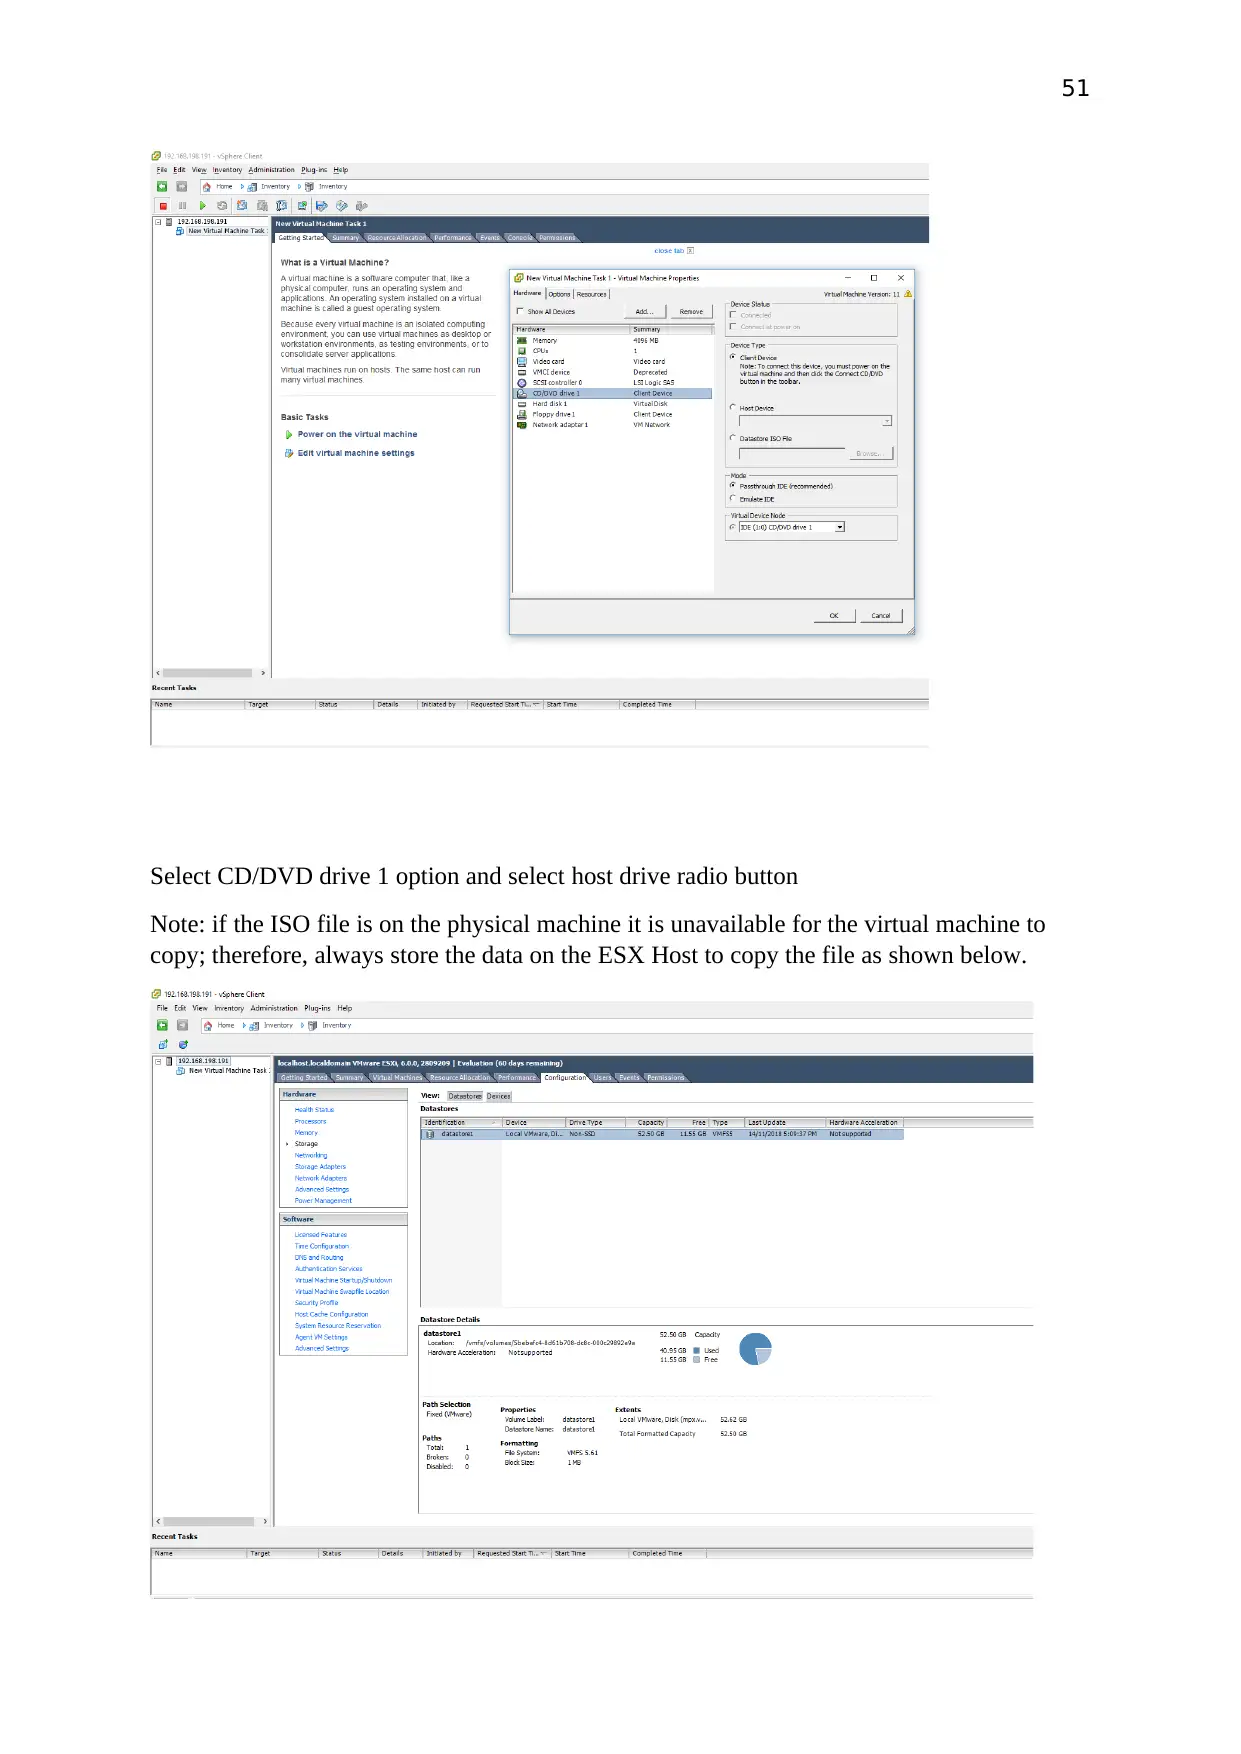
Now to activate the Virtual machine just select the machine as shown below.
Select Edit Virtual machine settings to install OS that is Windows 2012.
Once the Processor is configured to the host it would reflect on the left corner under the IP
address and the status at the bottom show as Complete.
Now to activate the Virtual machine just select the machine as shown below.
Select Edit Virtual machine settings to install OS that is Windows 2012.
51
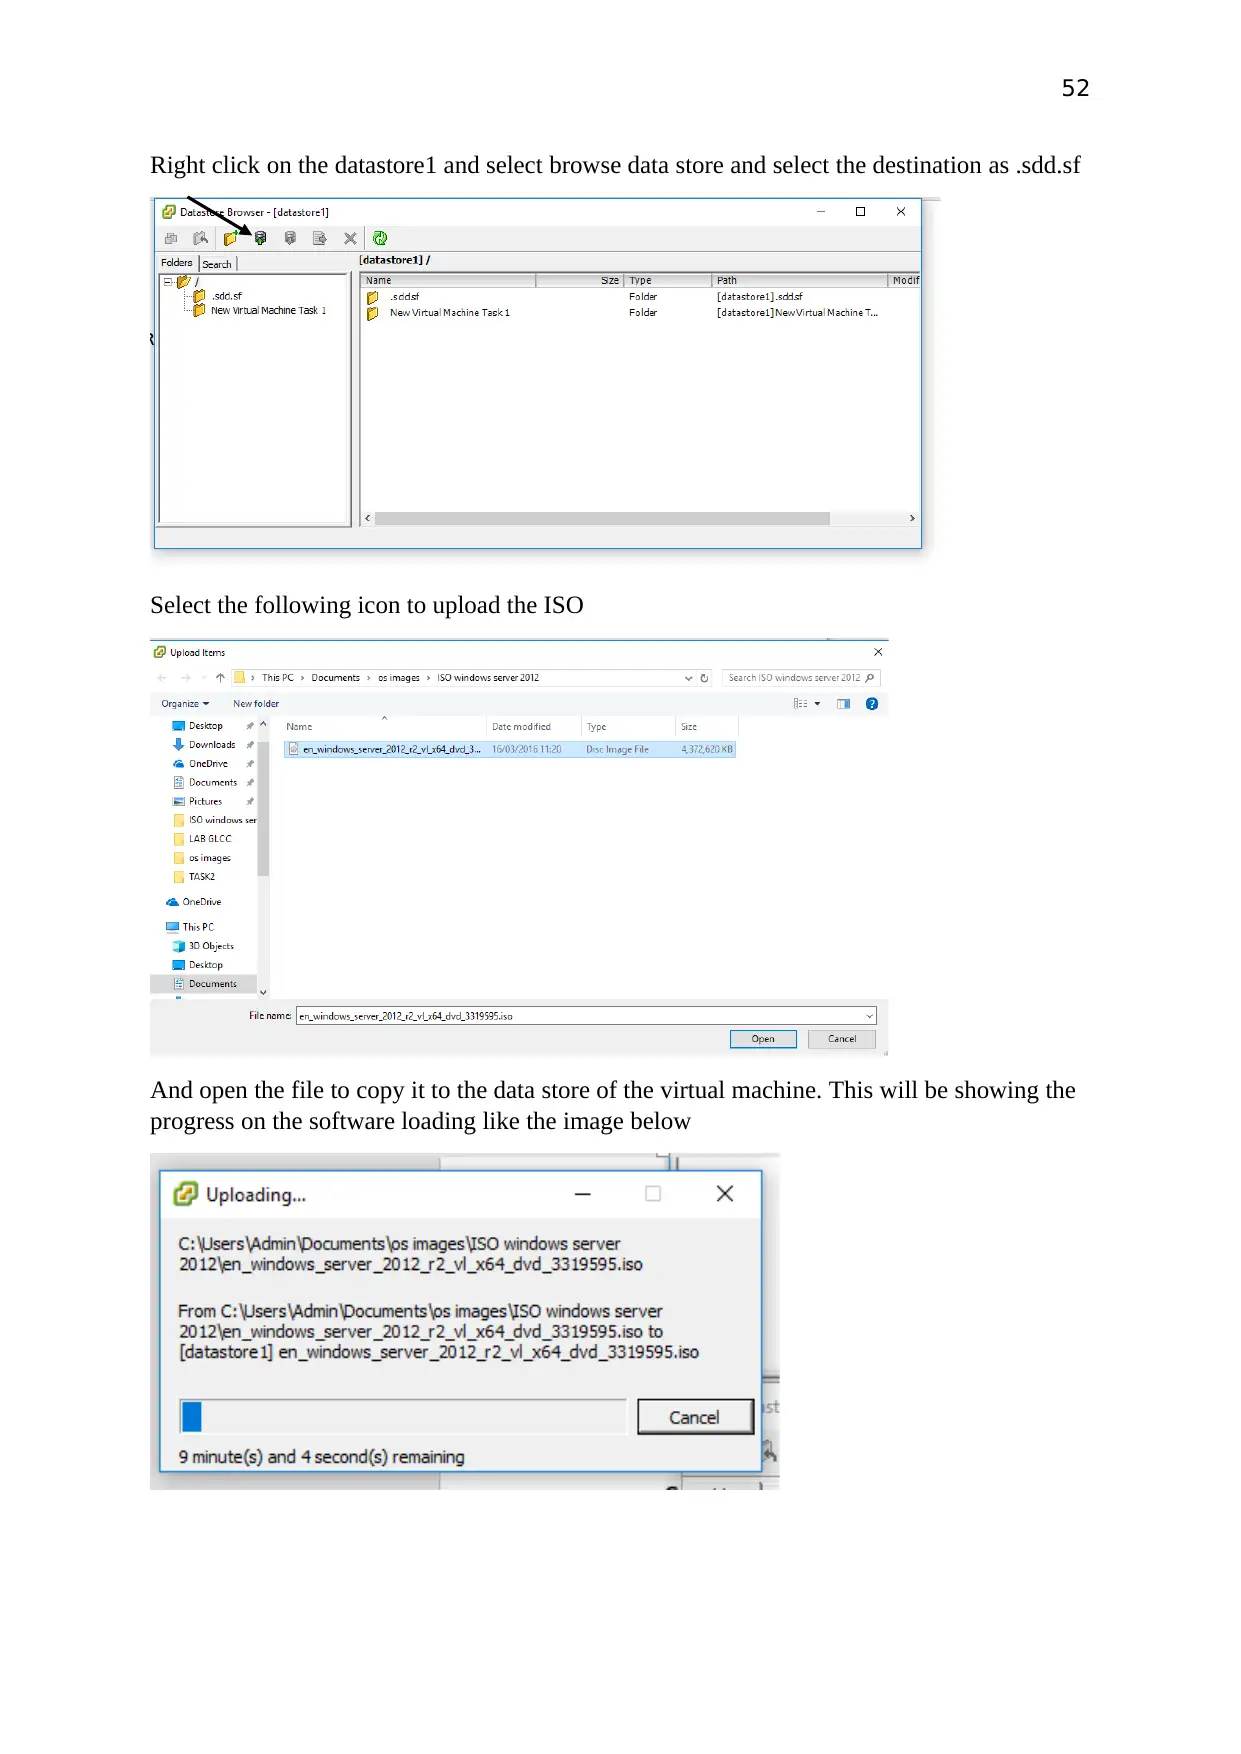
Select CD/DVD drive 1 option and select host drive radio button
Note: if the ISO file is on the physical machine it is unavailable for the virtual machine to
copy; therefore, always store the data on the ESX Host to copy the file as shown below.
Select CD/DVD drive 1 option and select host drive radio button
Note: if the ISO file is on the physical machine it is unavailable for the virtual machine to
copy; therefore, always store the data on the ESX Host to copy the file as shown below.
52
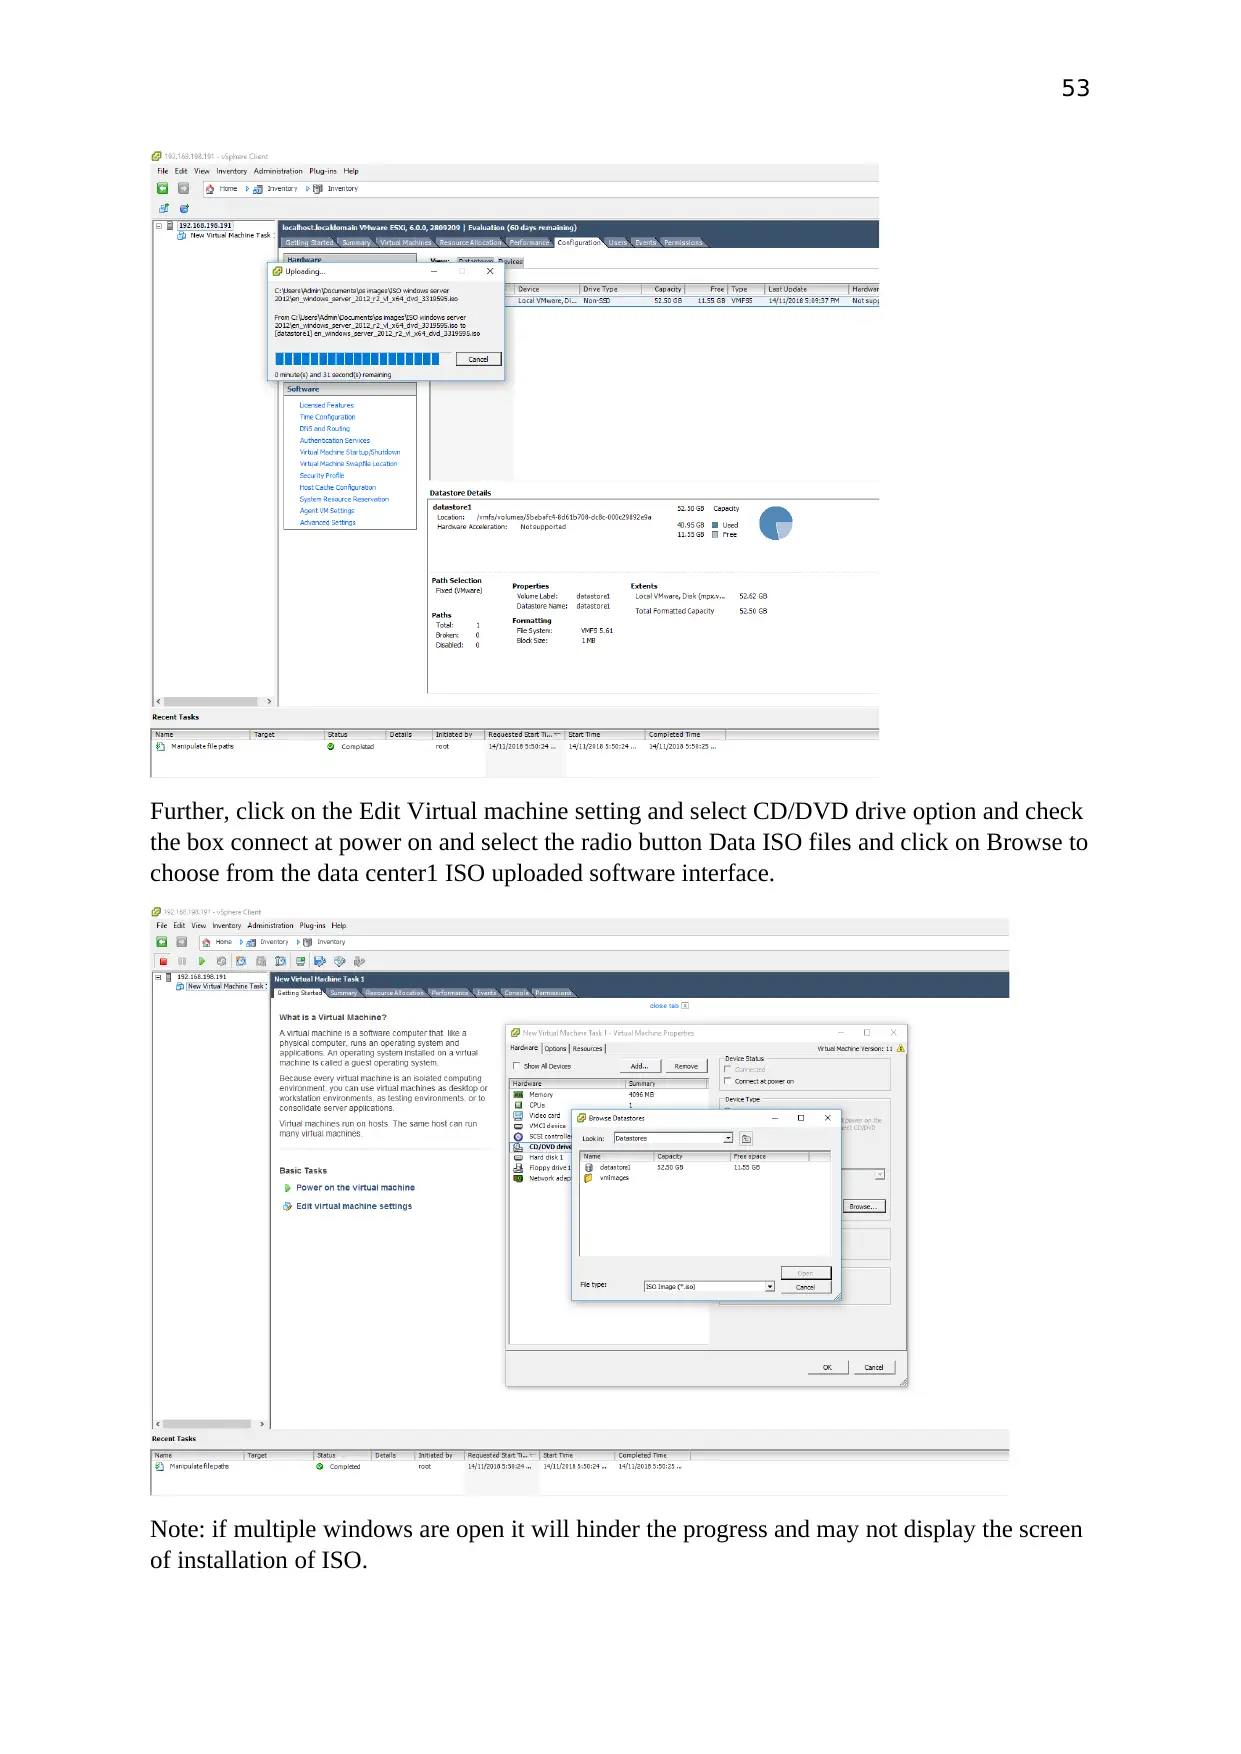
Right click on the datastore1 and select browse data store and select the destination as .sdd.sf
Select the following icon to upload the ISO
And open the file to copy it to the data store of the virtual machine. This will be showing the
progress on the software loading like the image below
Right click on the datastore1 and select browse data store and select the destination as .sdd.sf
Select the following icon to upload the ISO
And open the file to copy it to the data store of the virtual machine. This will be showing the
progress on the software loading like the image below
Secure Best Marks with AI Grader
Need help grading? Try our AI Grader for instant feedback on your assignments.
53
Further, click on the Edit Virtual machine setting and select CD/DVD drive option and check
the box connect at power on and select the radio button Data ISO files and click on Browse to
choose from the data center1 ISO uploaded software interface.
Note: if multiple windows are open it will hinder the progress and may not display the screen
of installation of ISO.
54
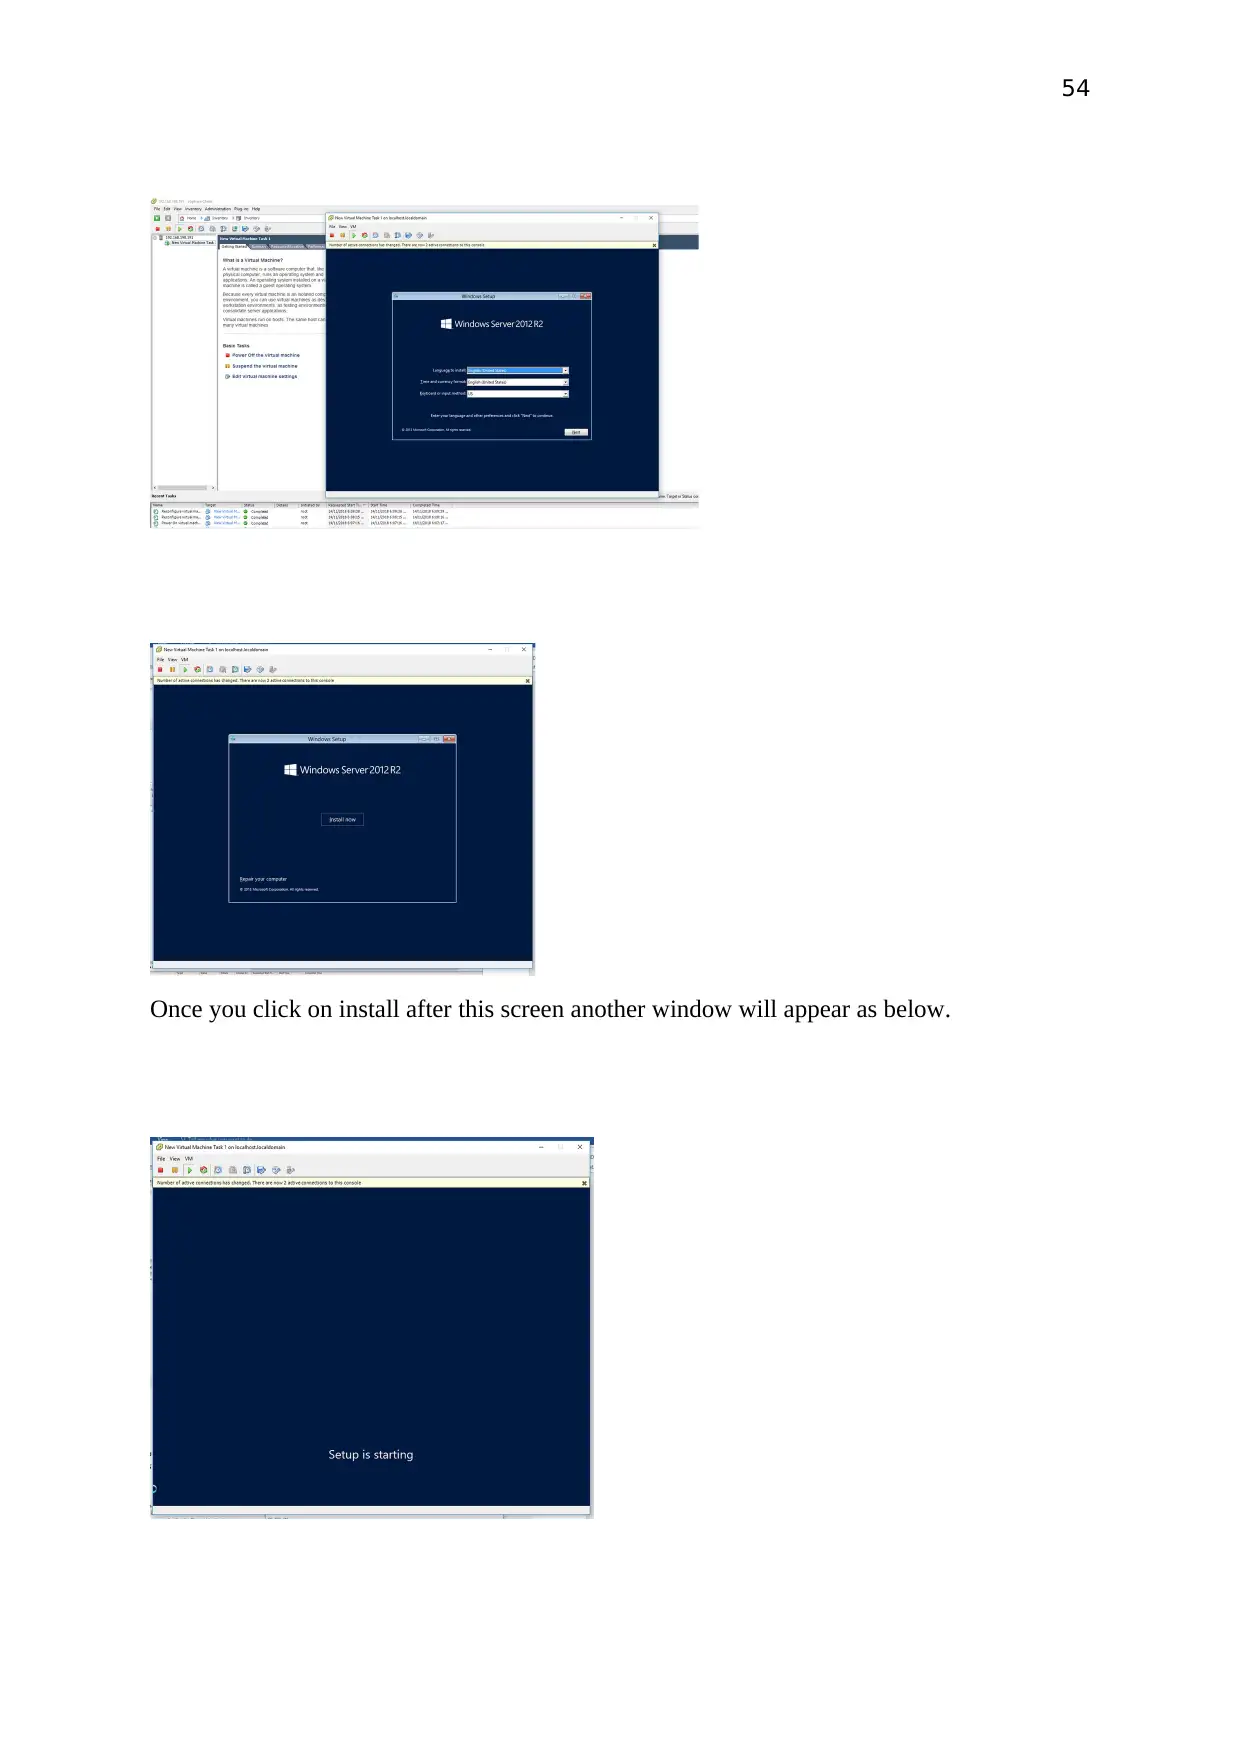
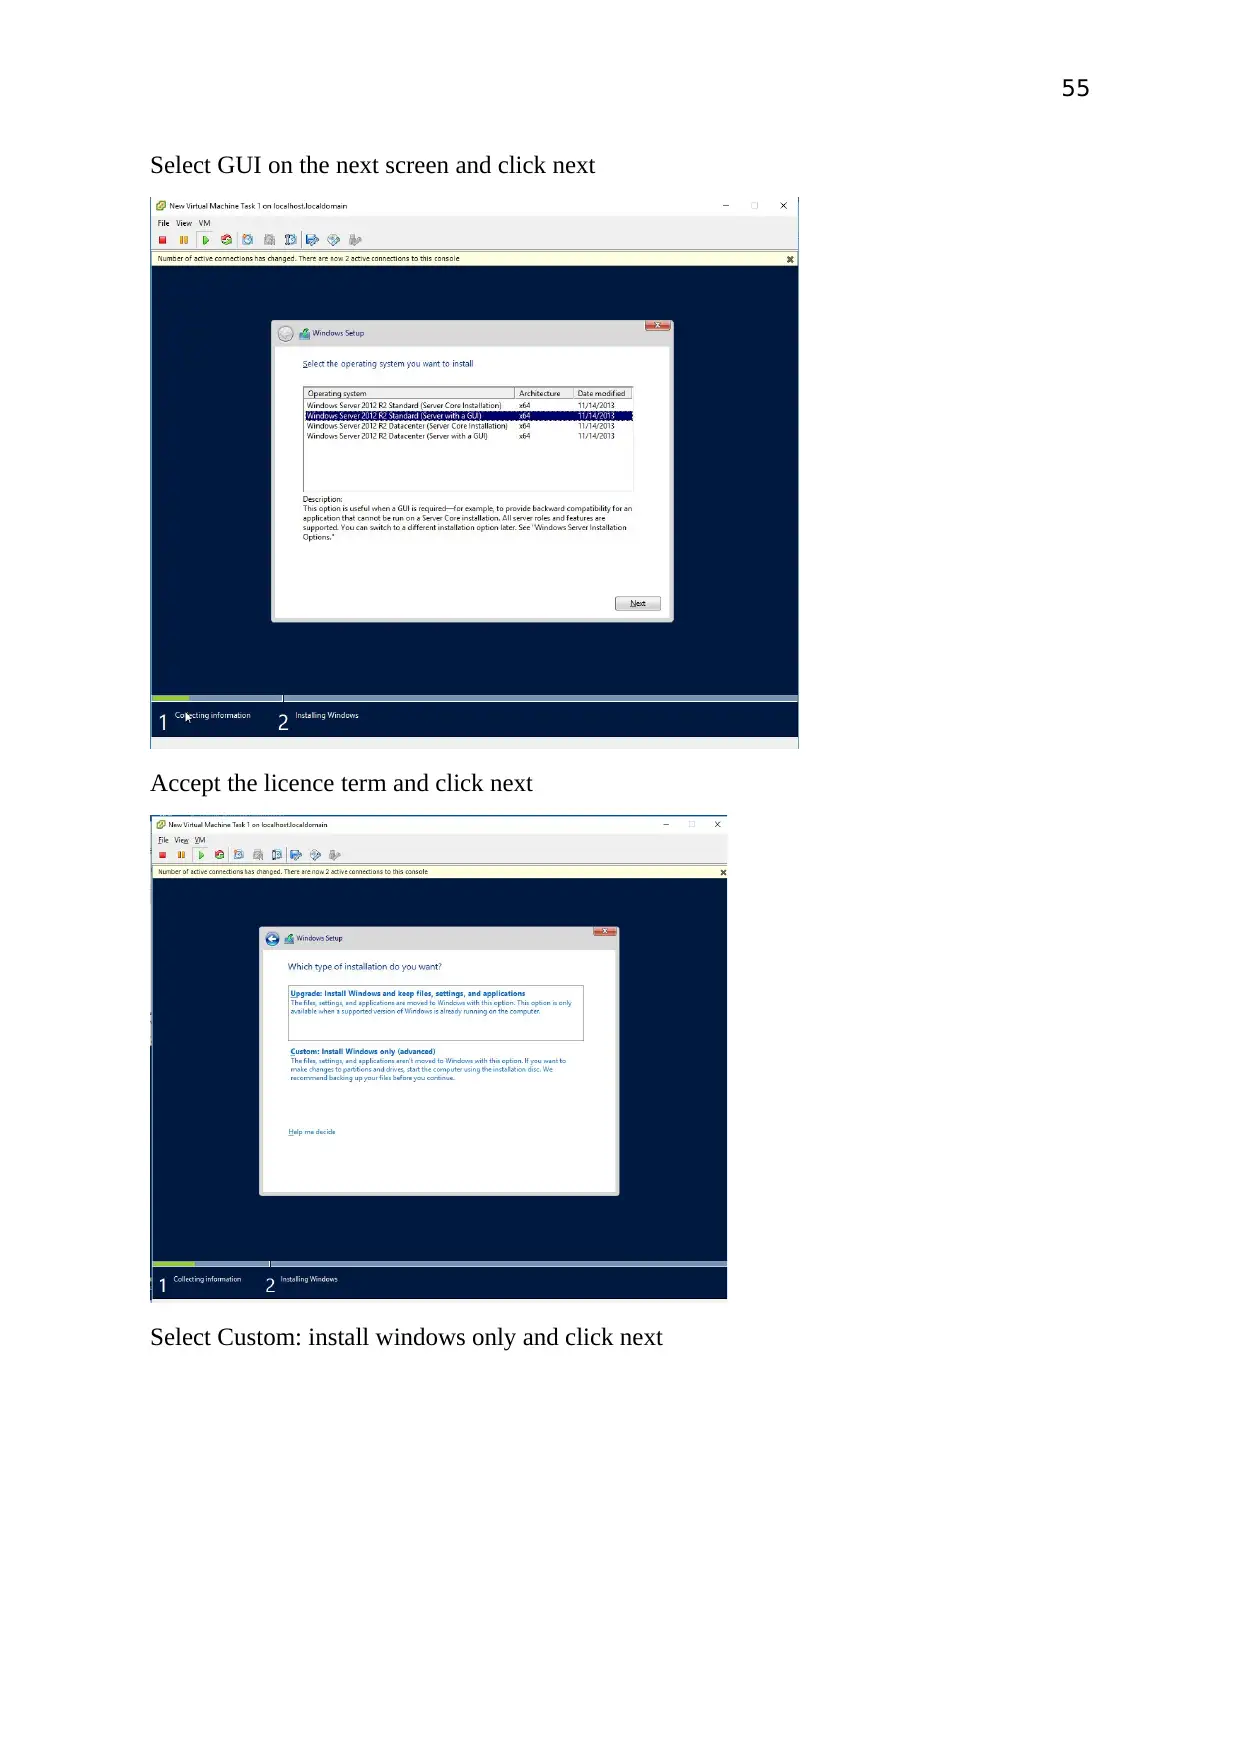
Once you click on install after this screen another window will appear as below.
Once you click on install after this screen another window will appear as below.
55
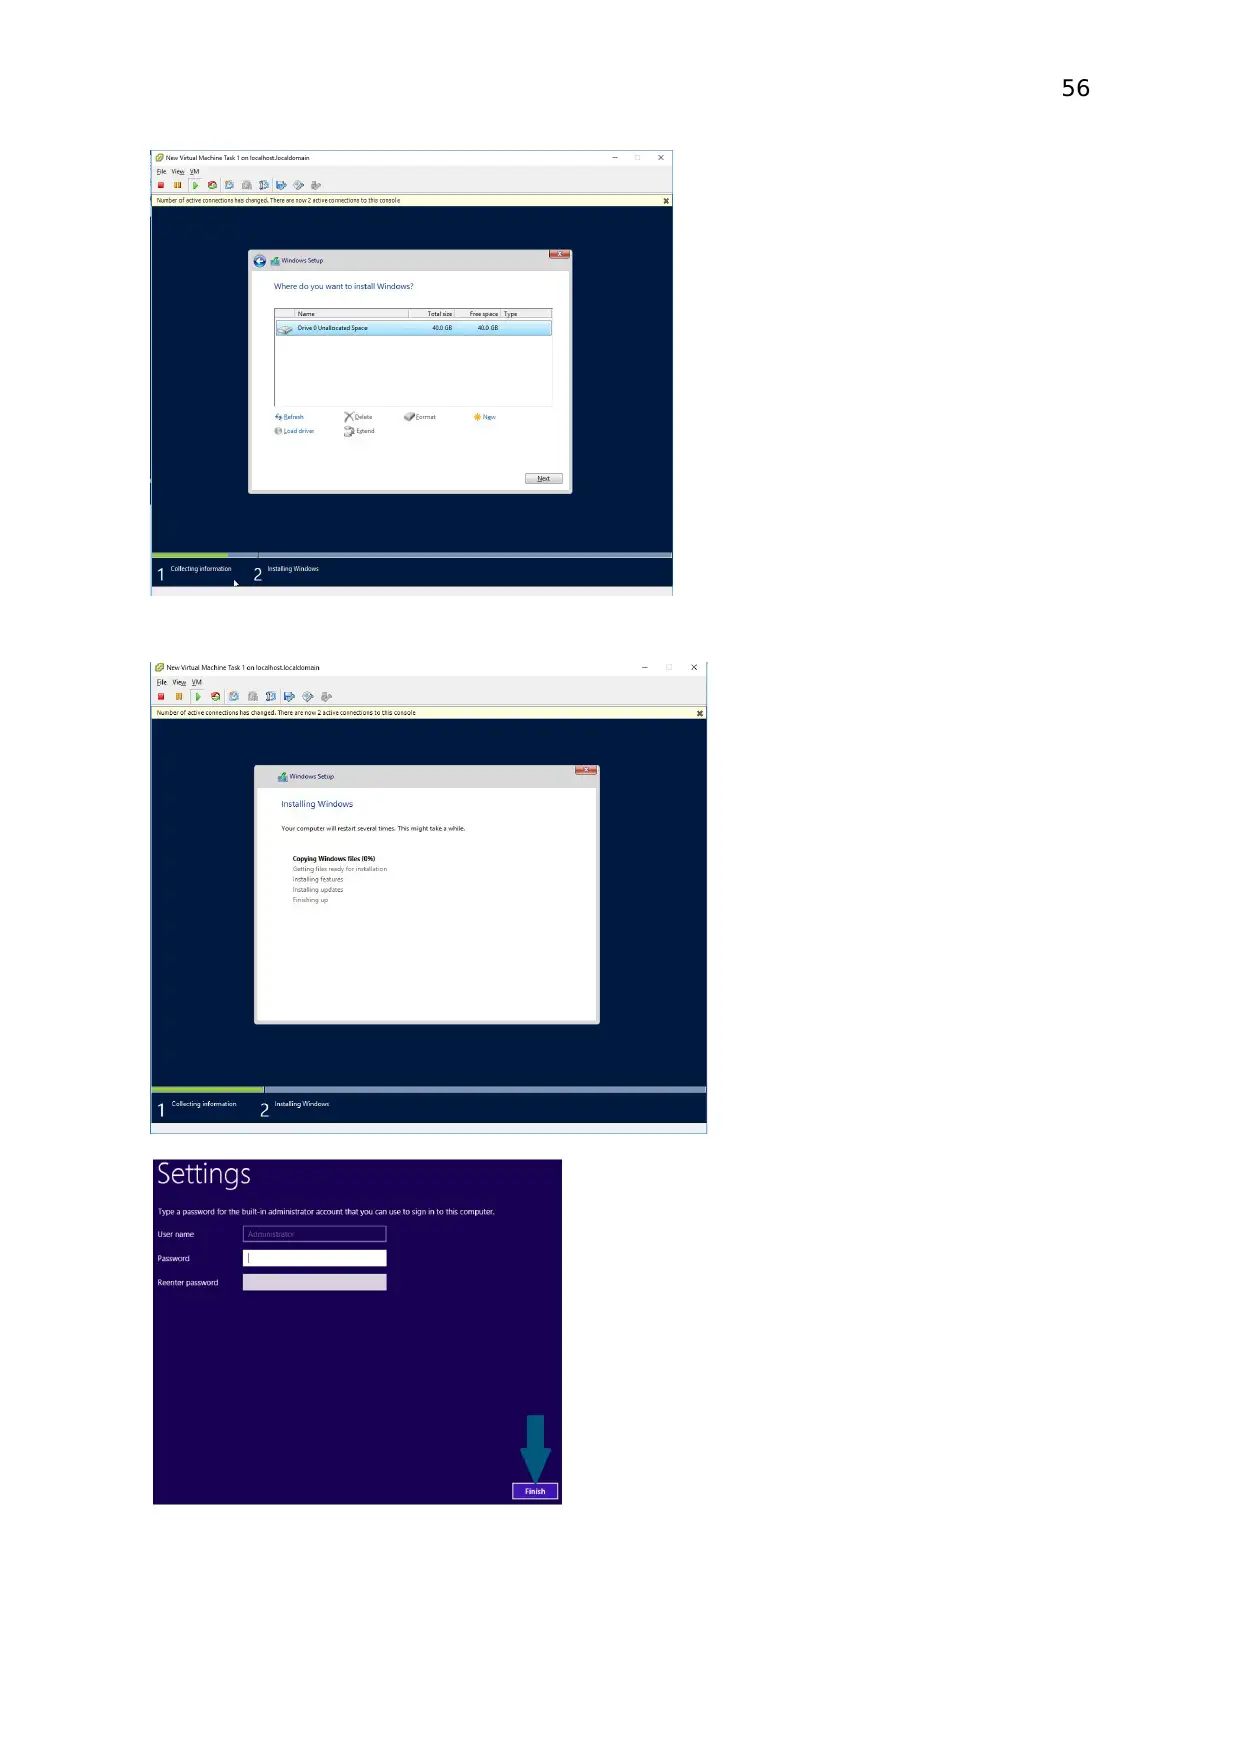
Select GUI on the next screen and click next
Accept the licence term and click next
Select Custom: install windows only and click next
Select GUI on the next screen and click next
Accept the licence term and click next
Select Custom: install windows only and click next
Paraphrase This Document
Need a fresh take? Get an instant paraphrase of this document with our AI Paraphraser
56
57
`
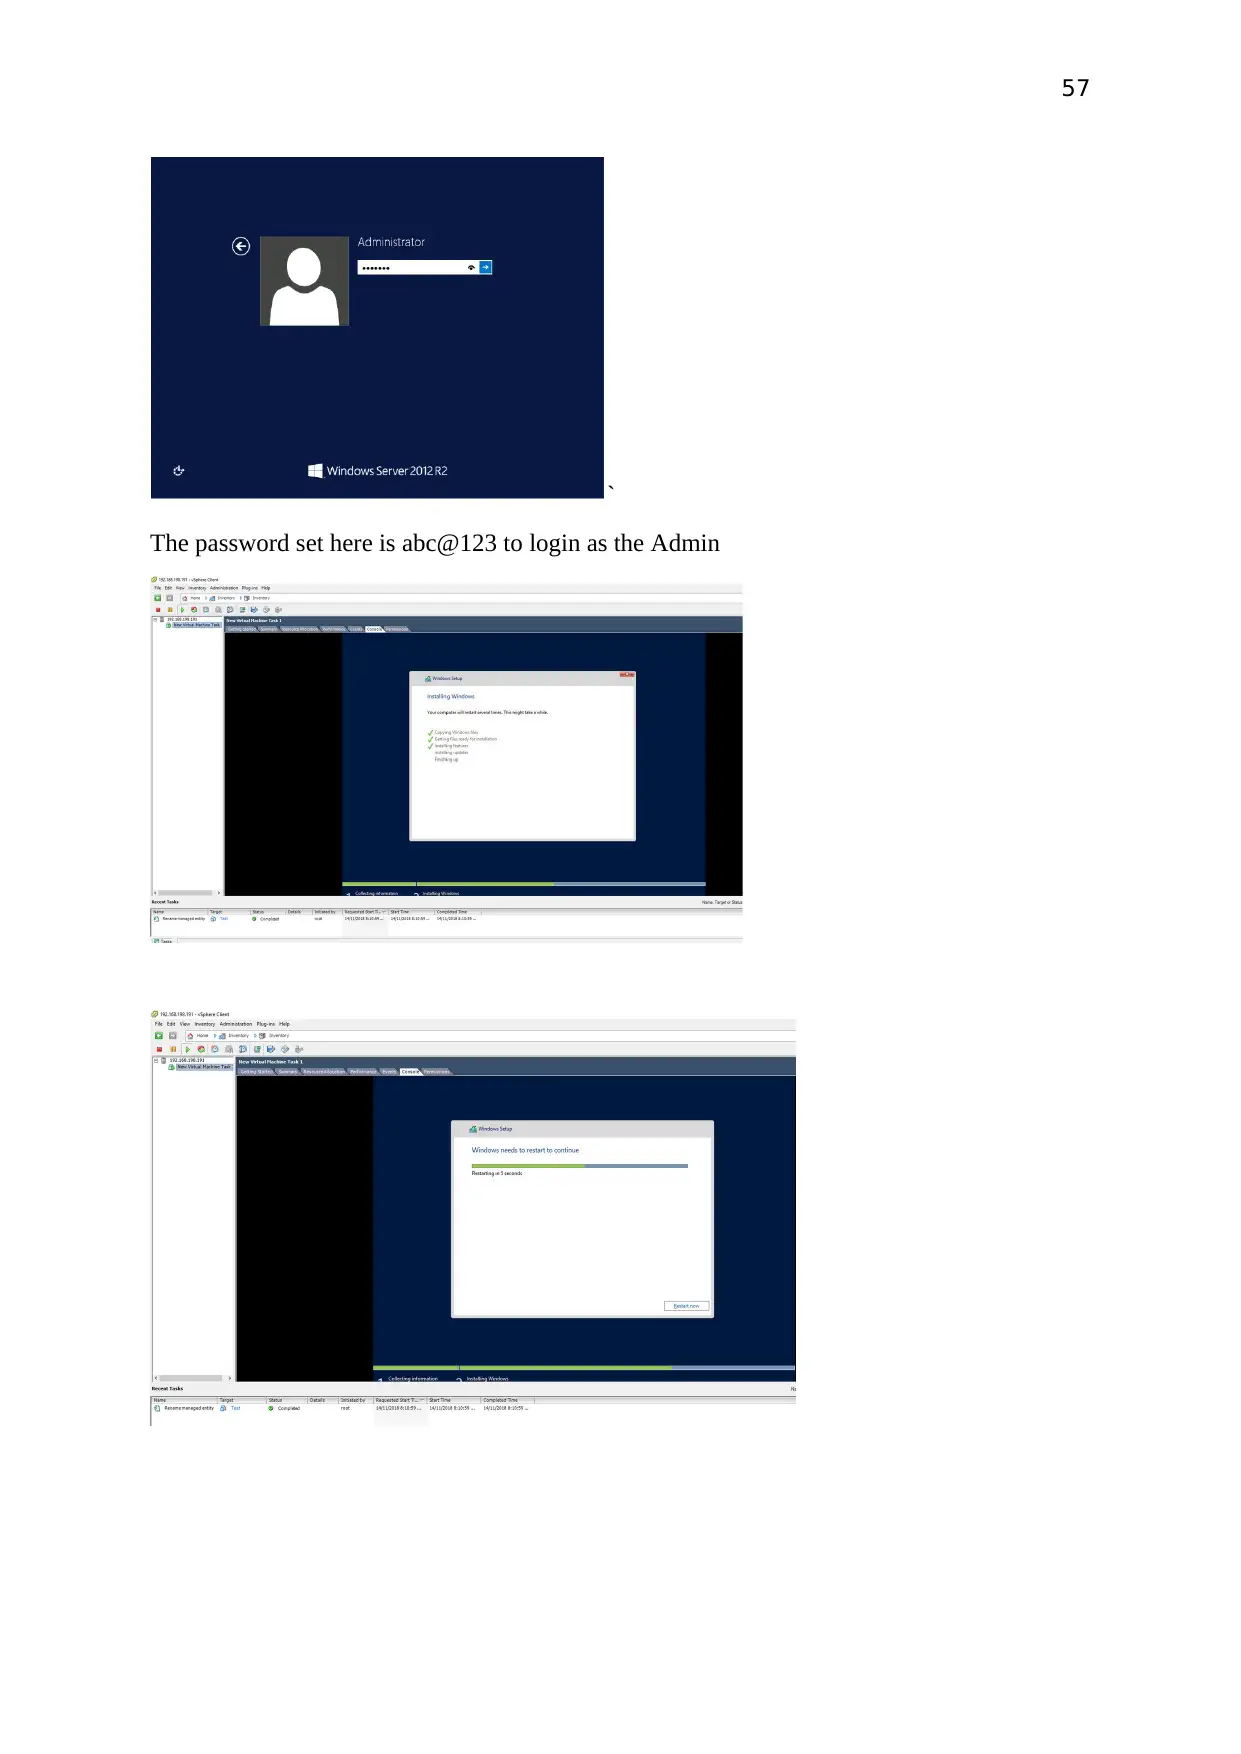
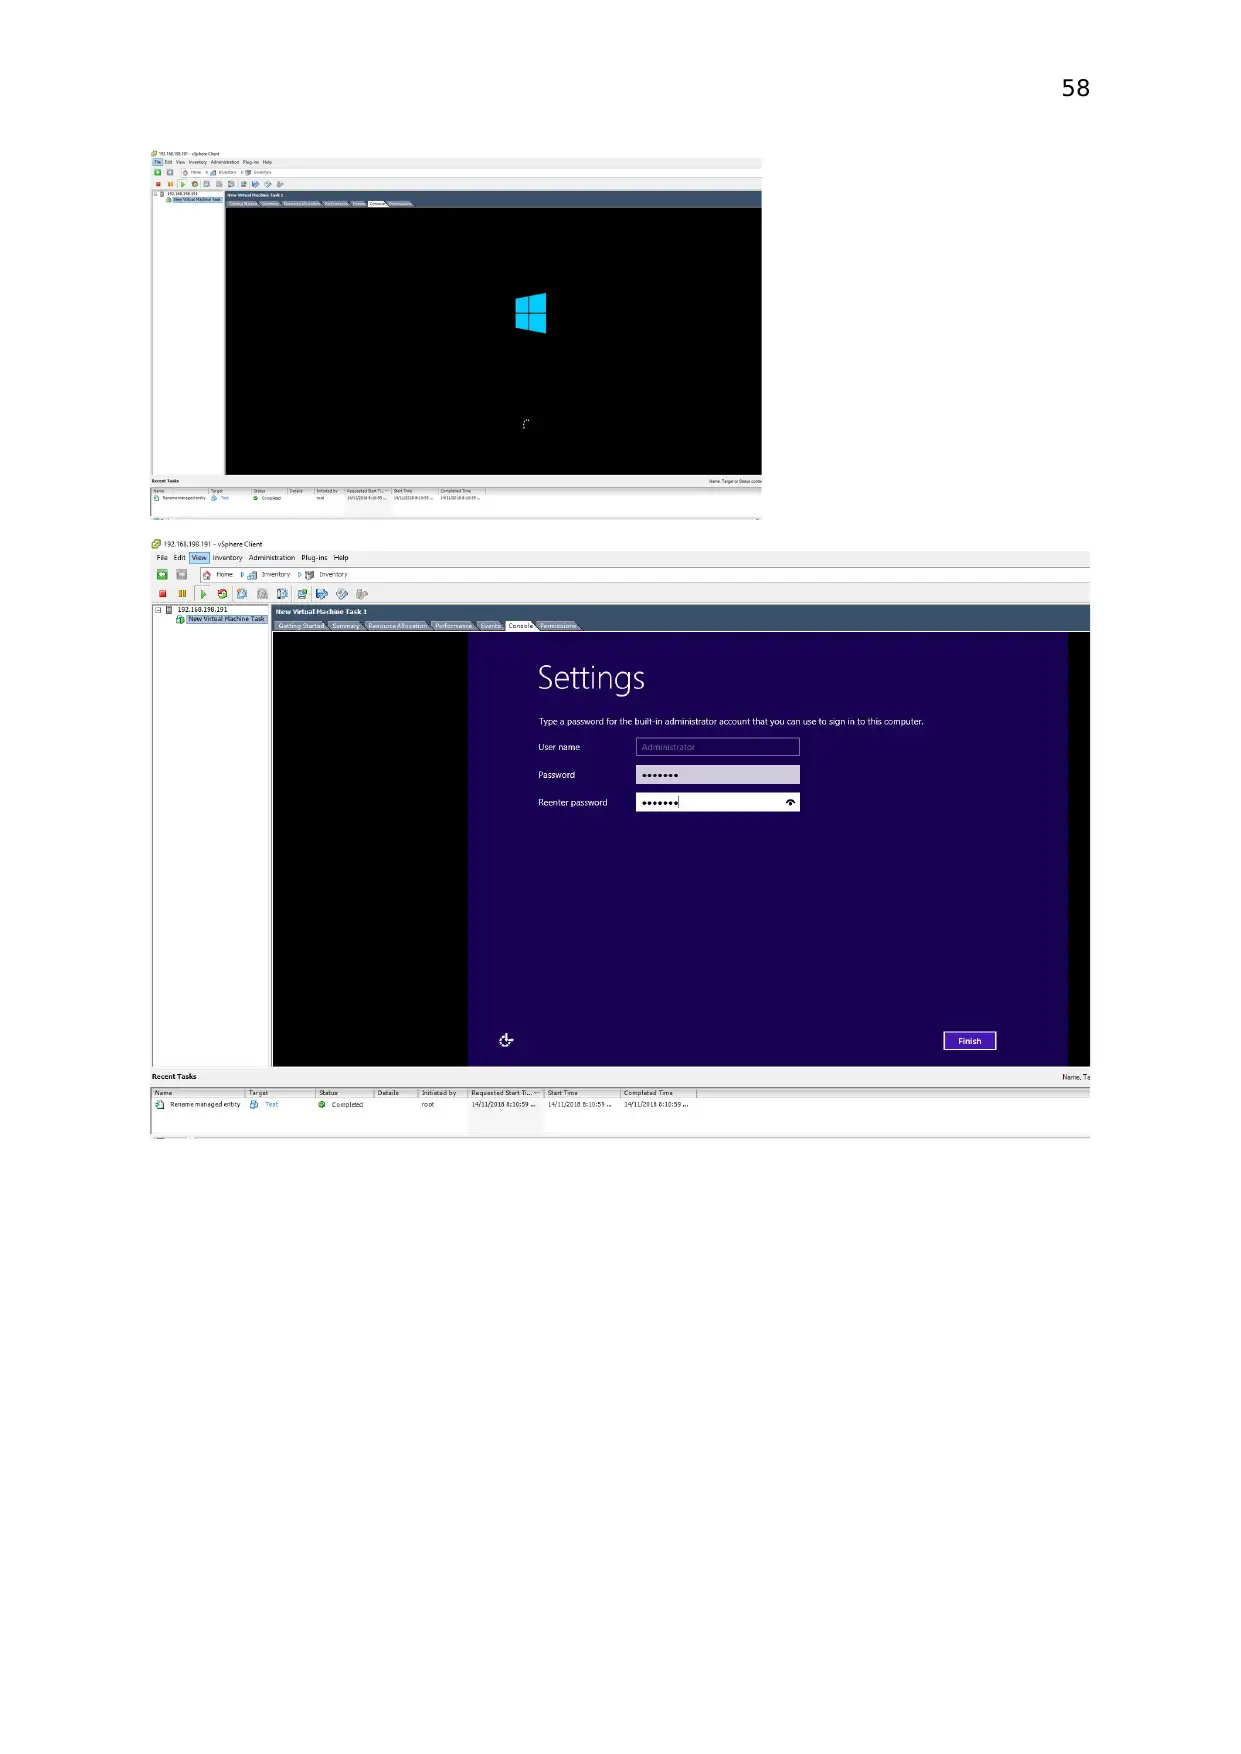
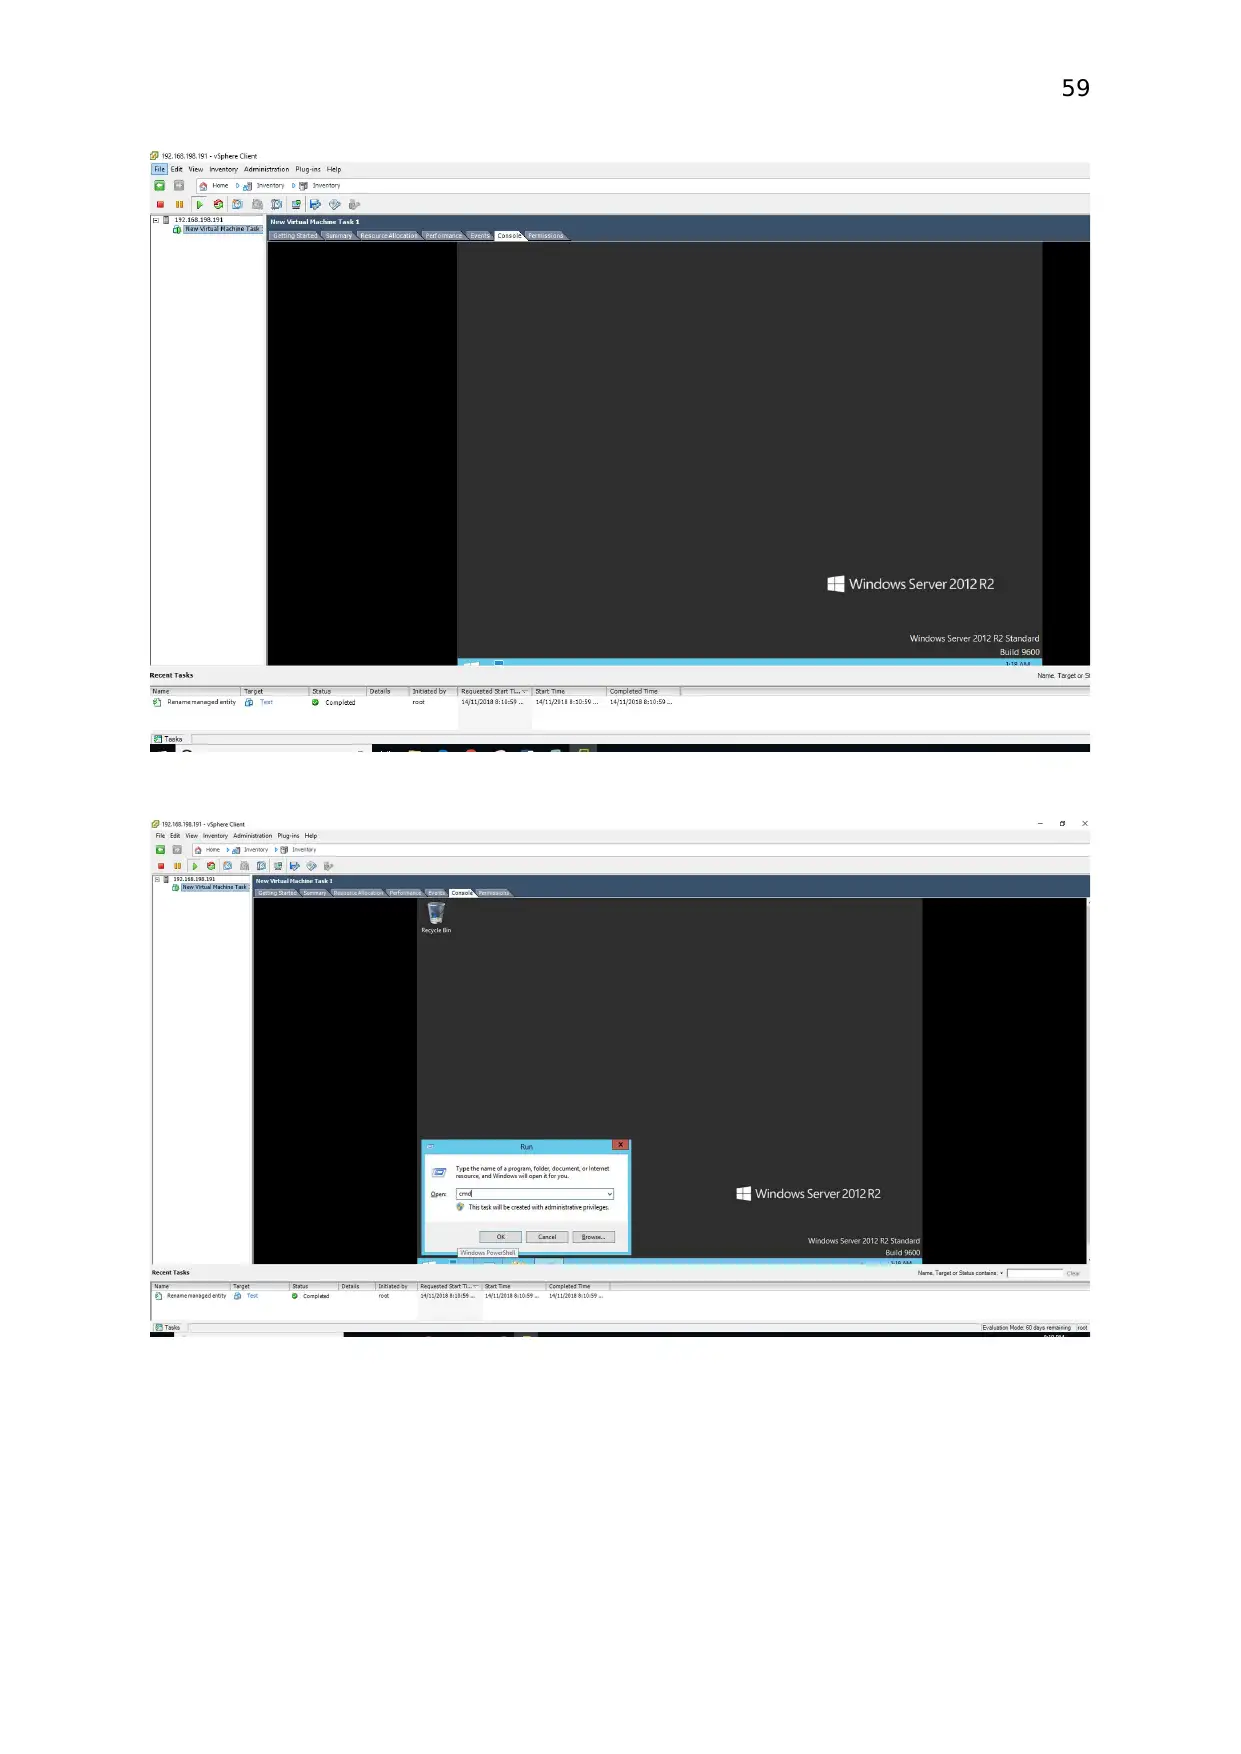
The password set here is abc@123 to login as the Admin
`
The password set here is abc@123 to login as the Admin
58
Secure Best Marks with AI Grader
Need help grading? Try our AI Grader for instant feedback on your assignments.
59
60
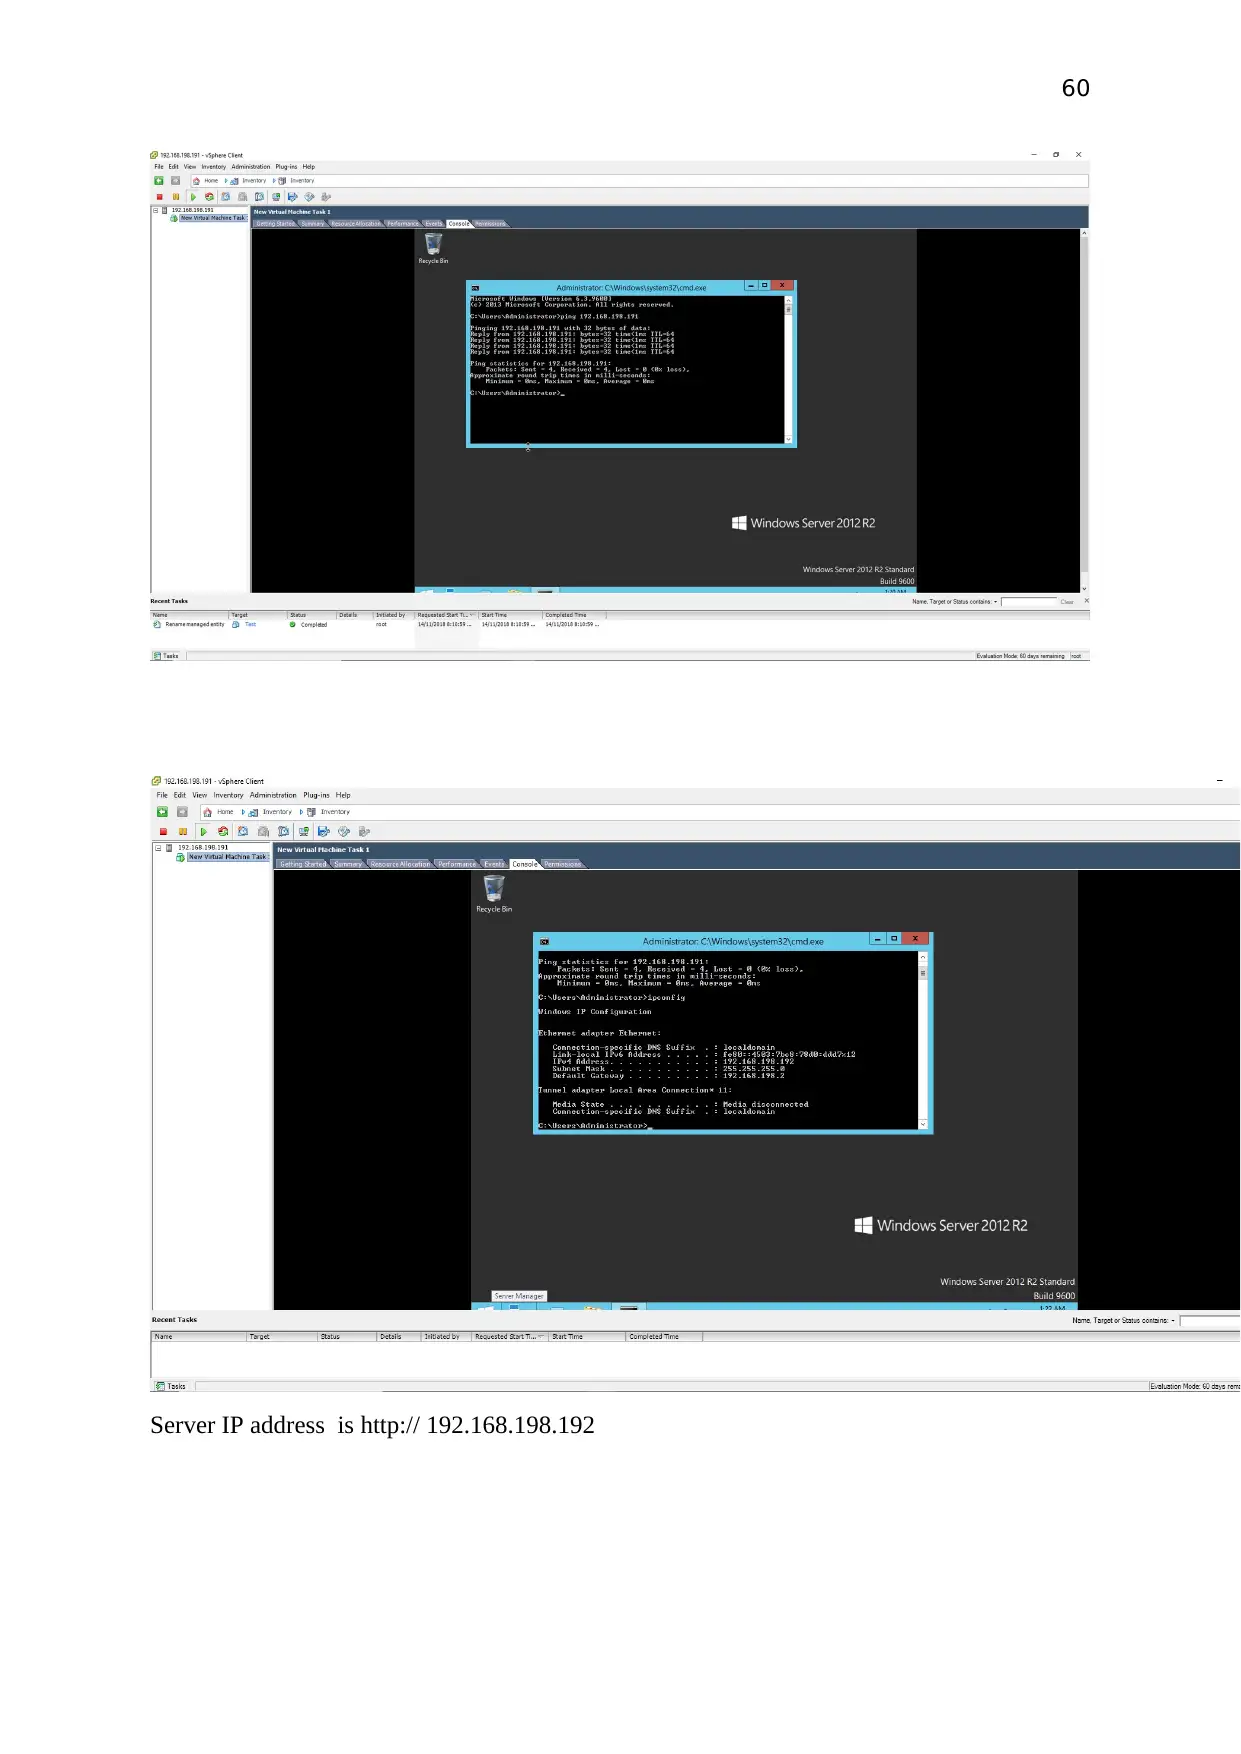
Server IP address is http:// 192.168.198.192
Server IP address is http:// 192.168.198.192
61
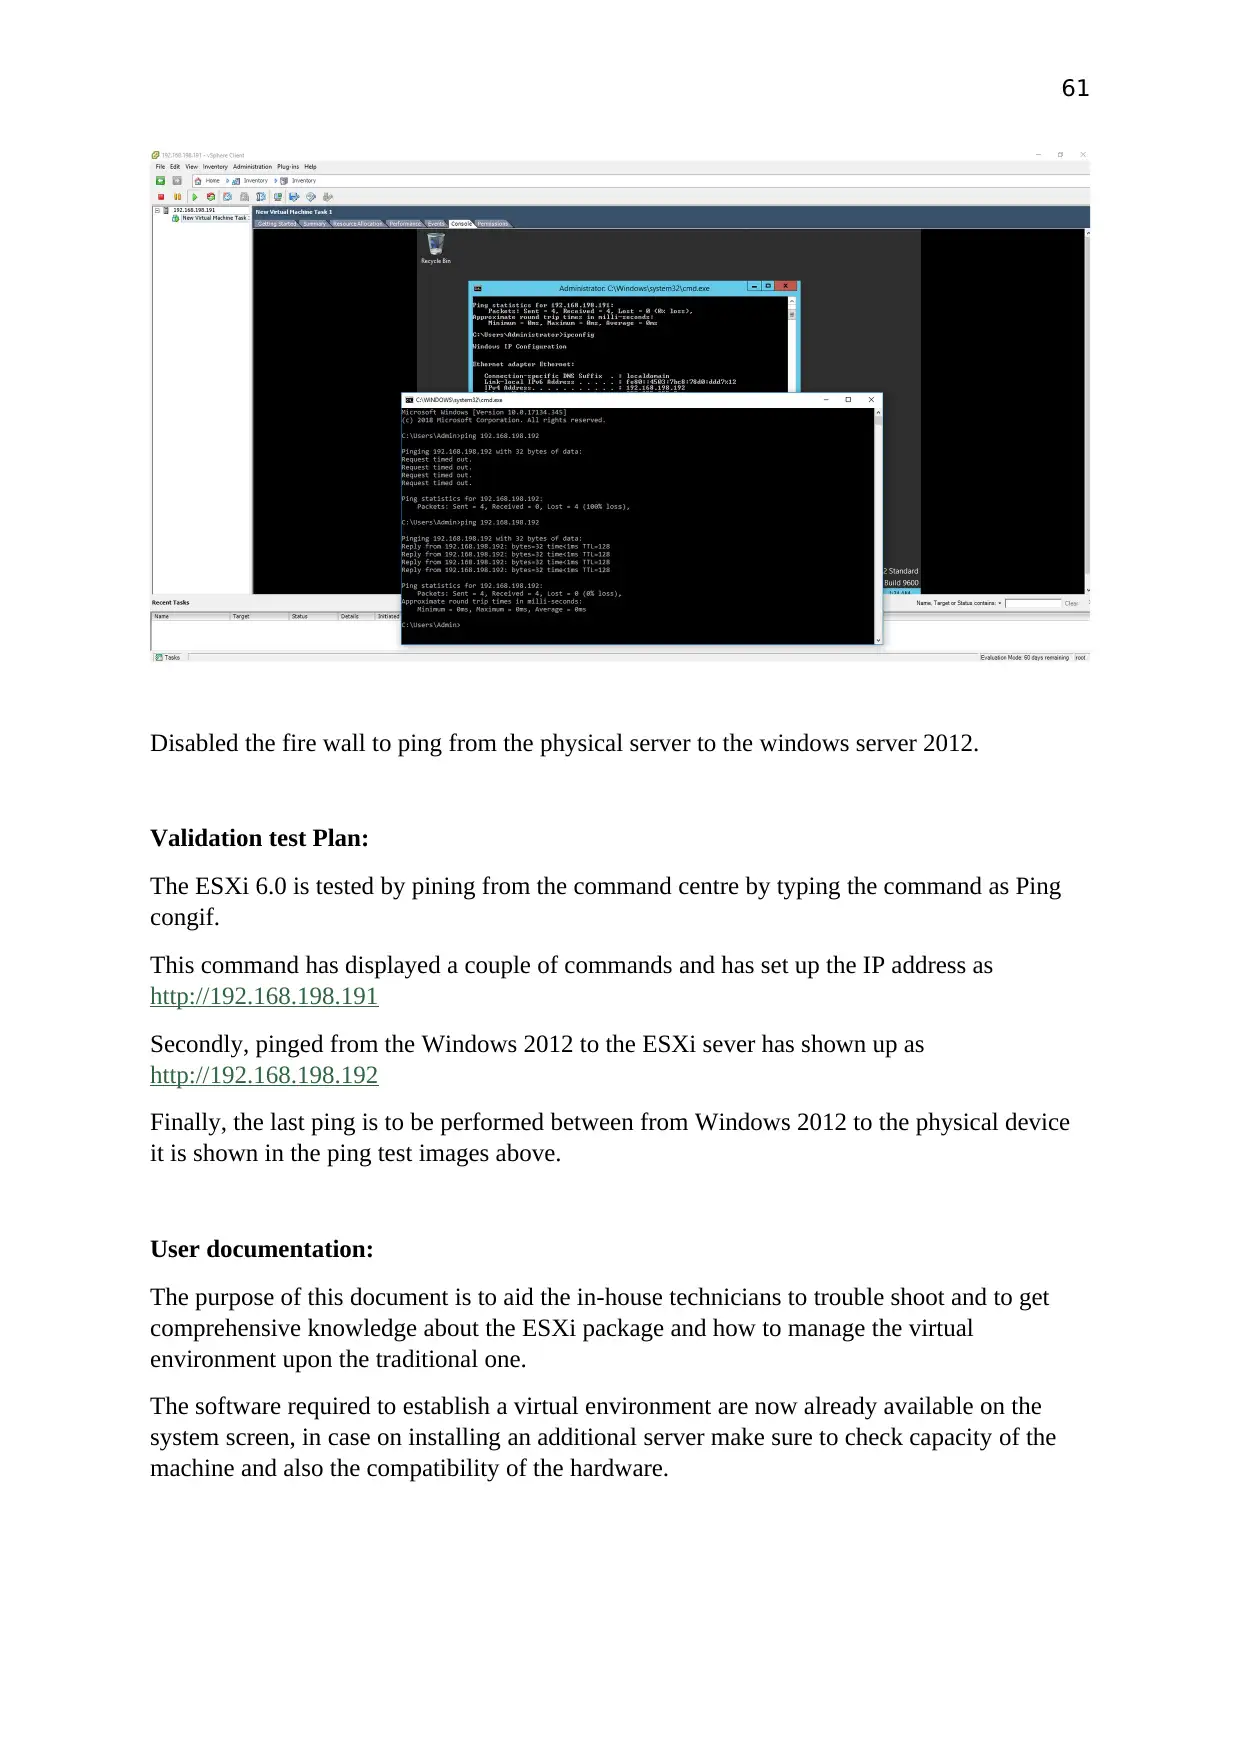
Disabled the fire wall to ping from the physical server to the windows server 2012.
Validation test Plan:
The ESXi 6.0 is tested by pining from the command centre by typing the command as Ping
congif.
This command has displayed a couple of commands and has set up the IP address as
http://192.168.198.191
Secondly, pinged from the Windows 2012 to the ESXi sever has shown up as
http://192.168.198.192
Finally, the last ping is to be performed between from Windows 2012 to the physical device
it is shown in the ping test images above.
User documentation:
The purpose of this document is to aid the in-house technicians to trouble shoot and to get
comprehensive knowledge about the ESXi package and how to manage the virtual
environment upon the traditional one.
The software required to establish a virtual environment are now already available on the
system screen, in case on installing an additional server make sure to check capacity of the
machine and also the compatibility of the hardware.
Paraphrase This Document
Need a fresh take? Get an instant paraphrase of this document with our AI Paraphraser
62
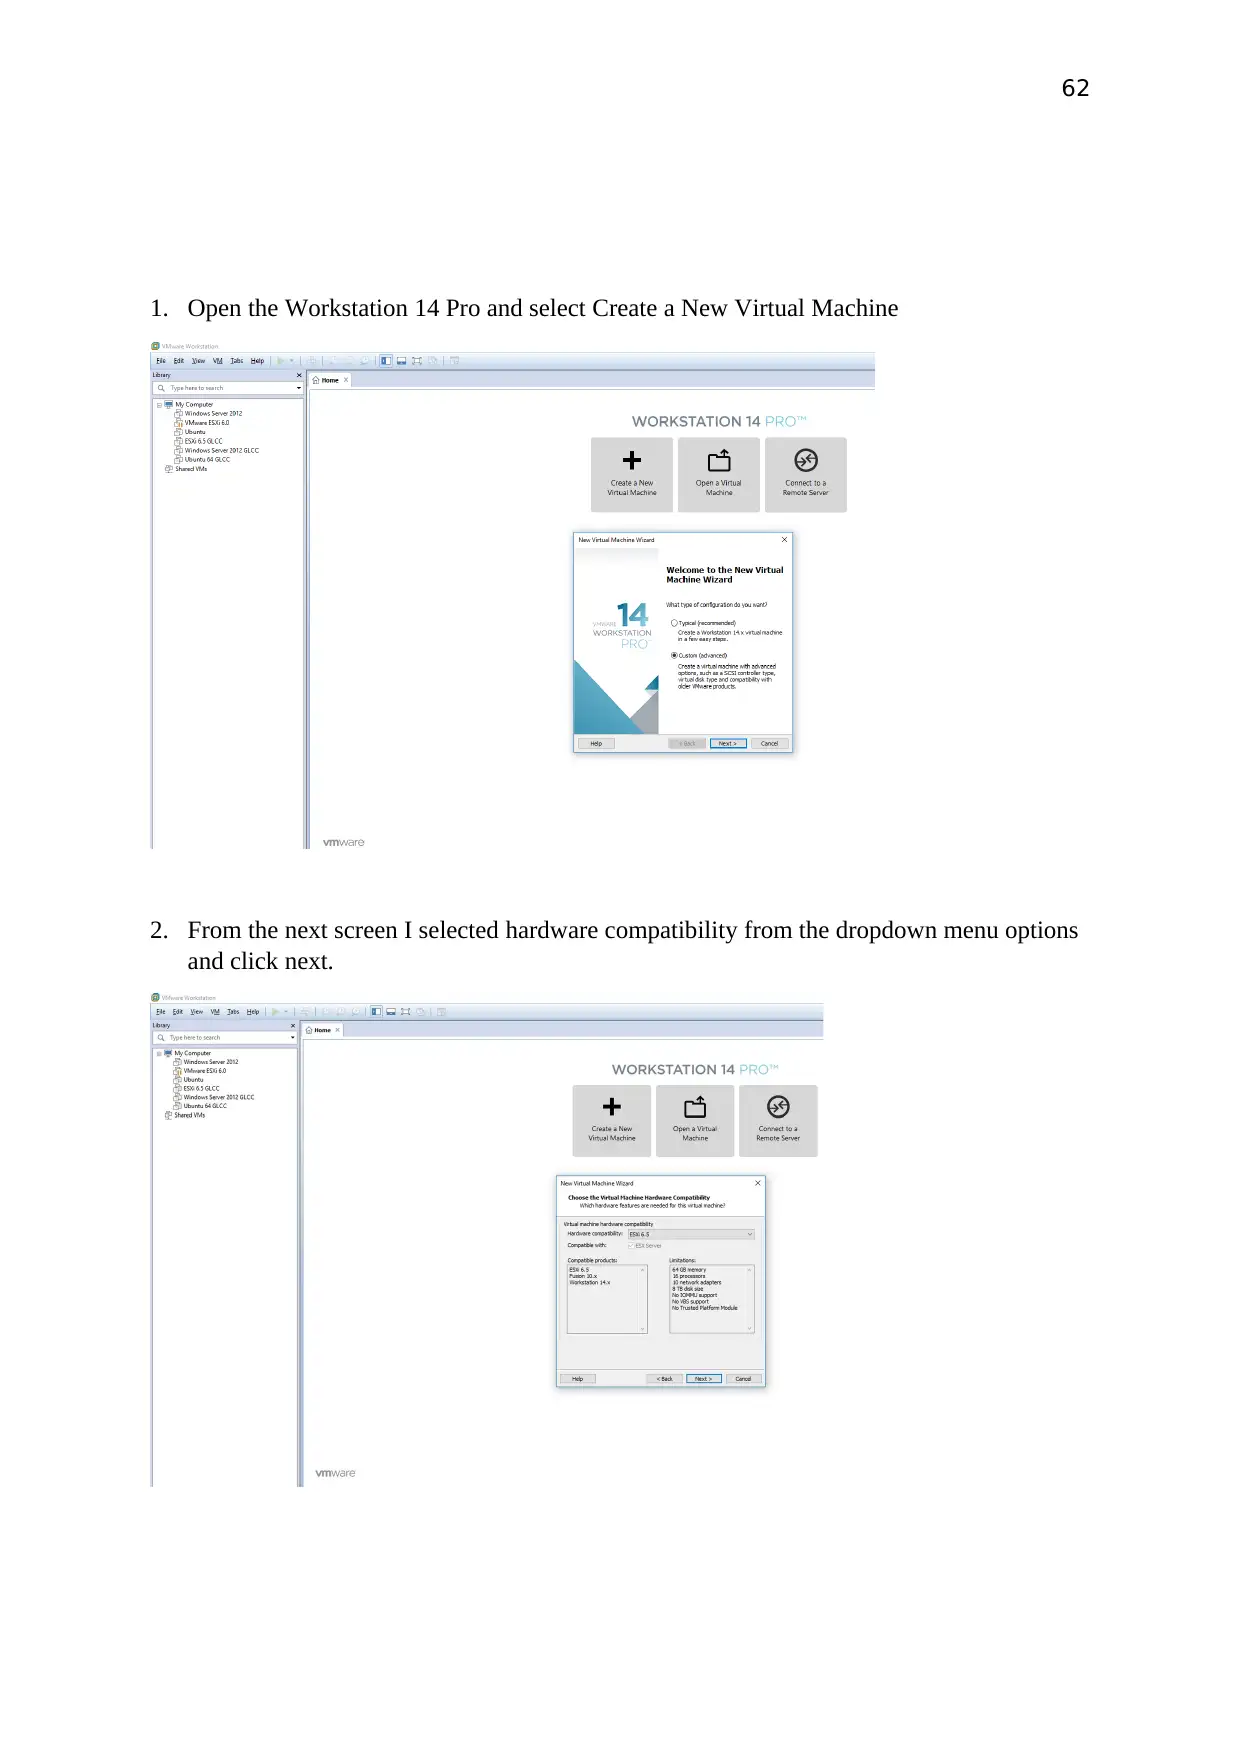
1. Open the Workstation 14 Pro and select Create a New Virtual Machine
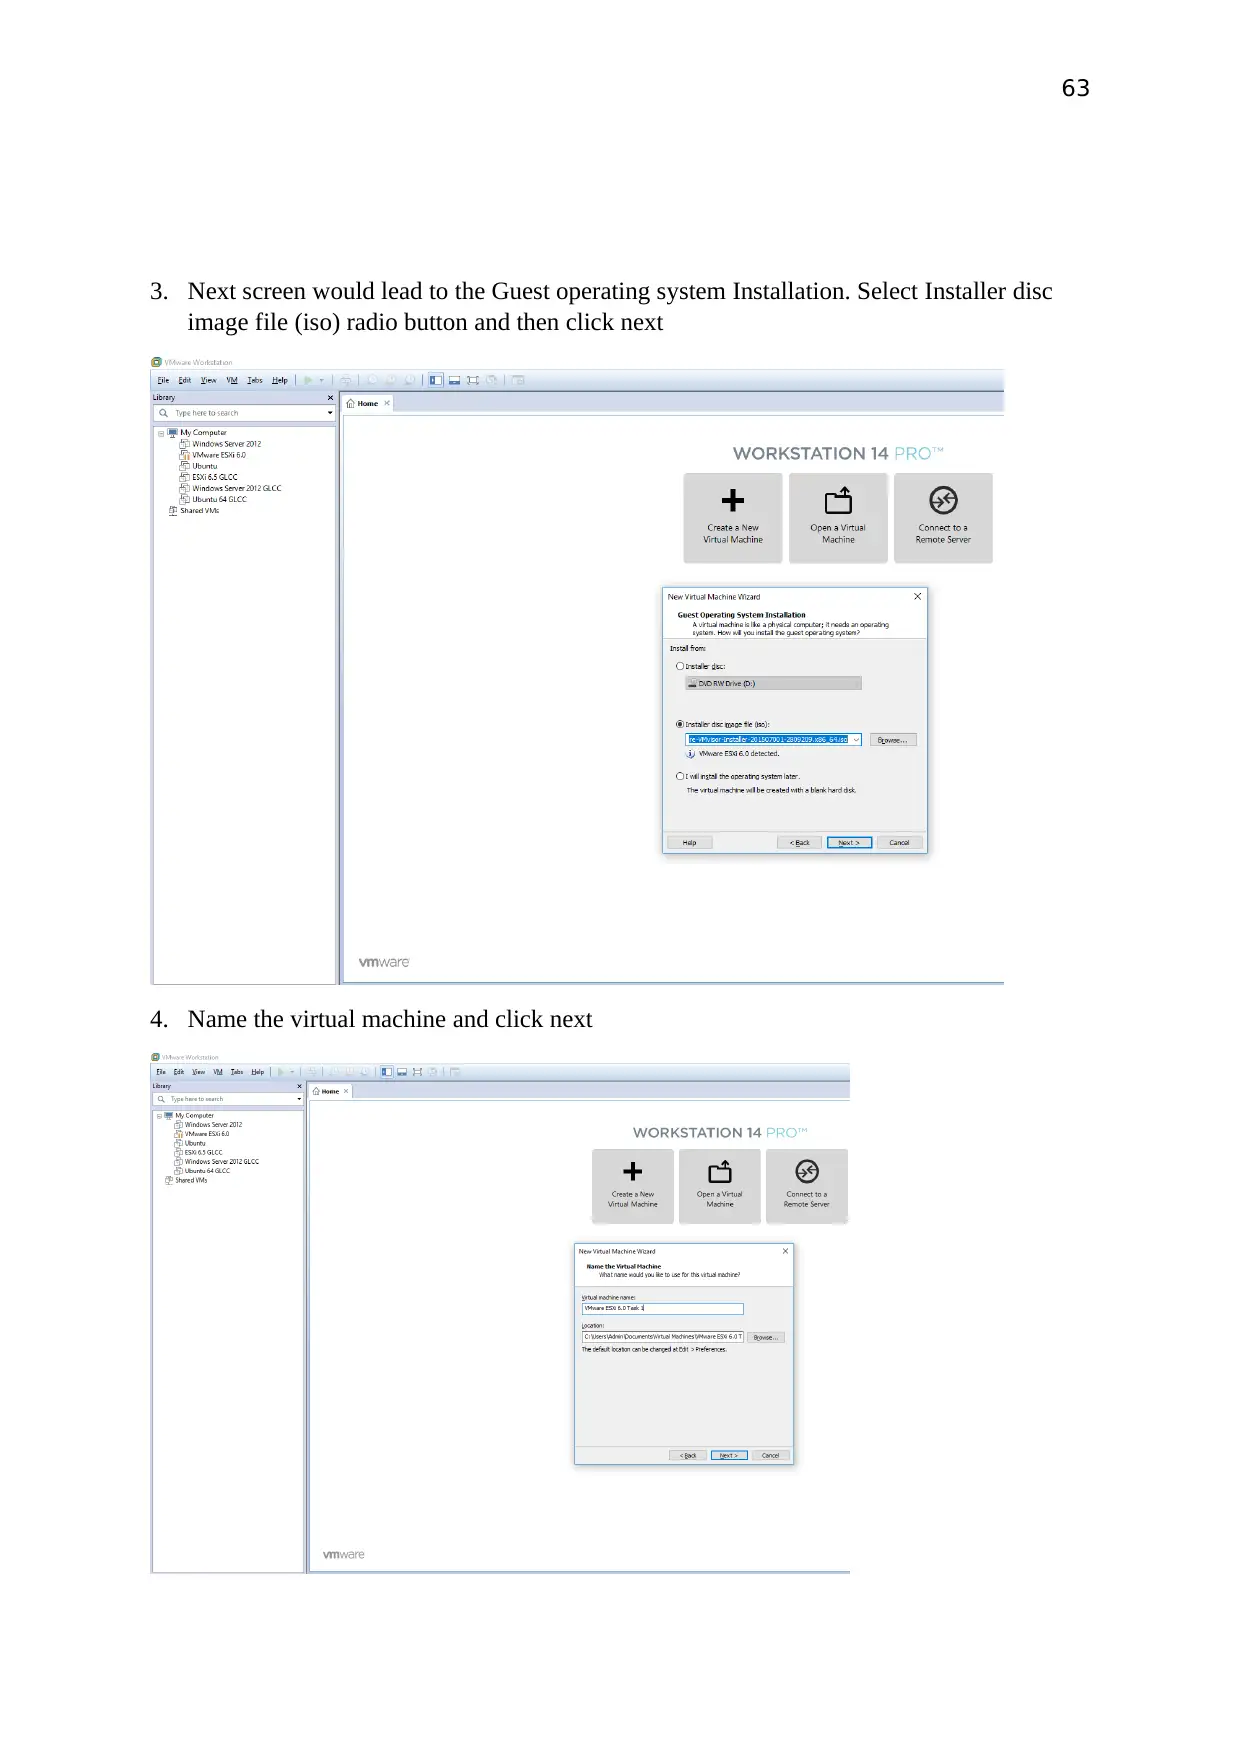
2. From the next screen I selected hardware compatibility from the dropdown menu options
and click next.
1. Open the Workstation 14 Pro and select Create a New Virtual Machine
2. From the next screen I selected hardware compatibility from the dropdown menu options
and click next.
63
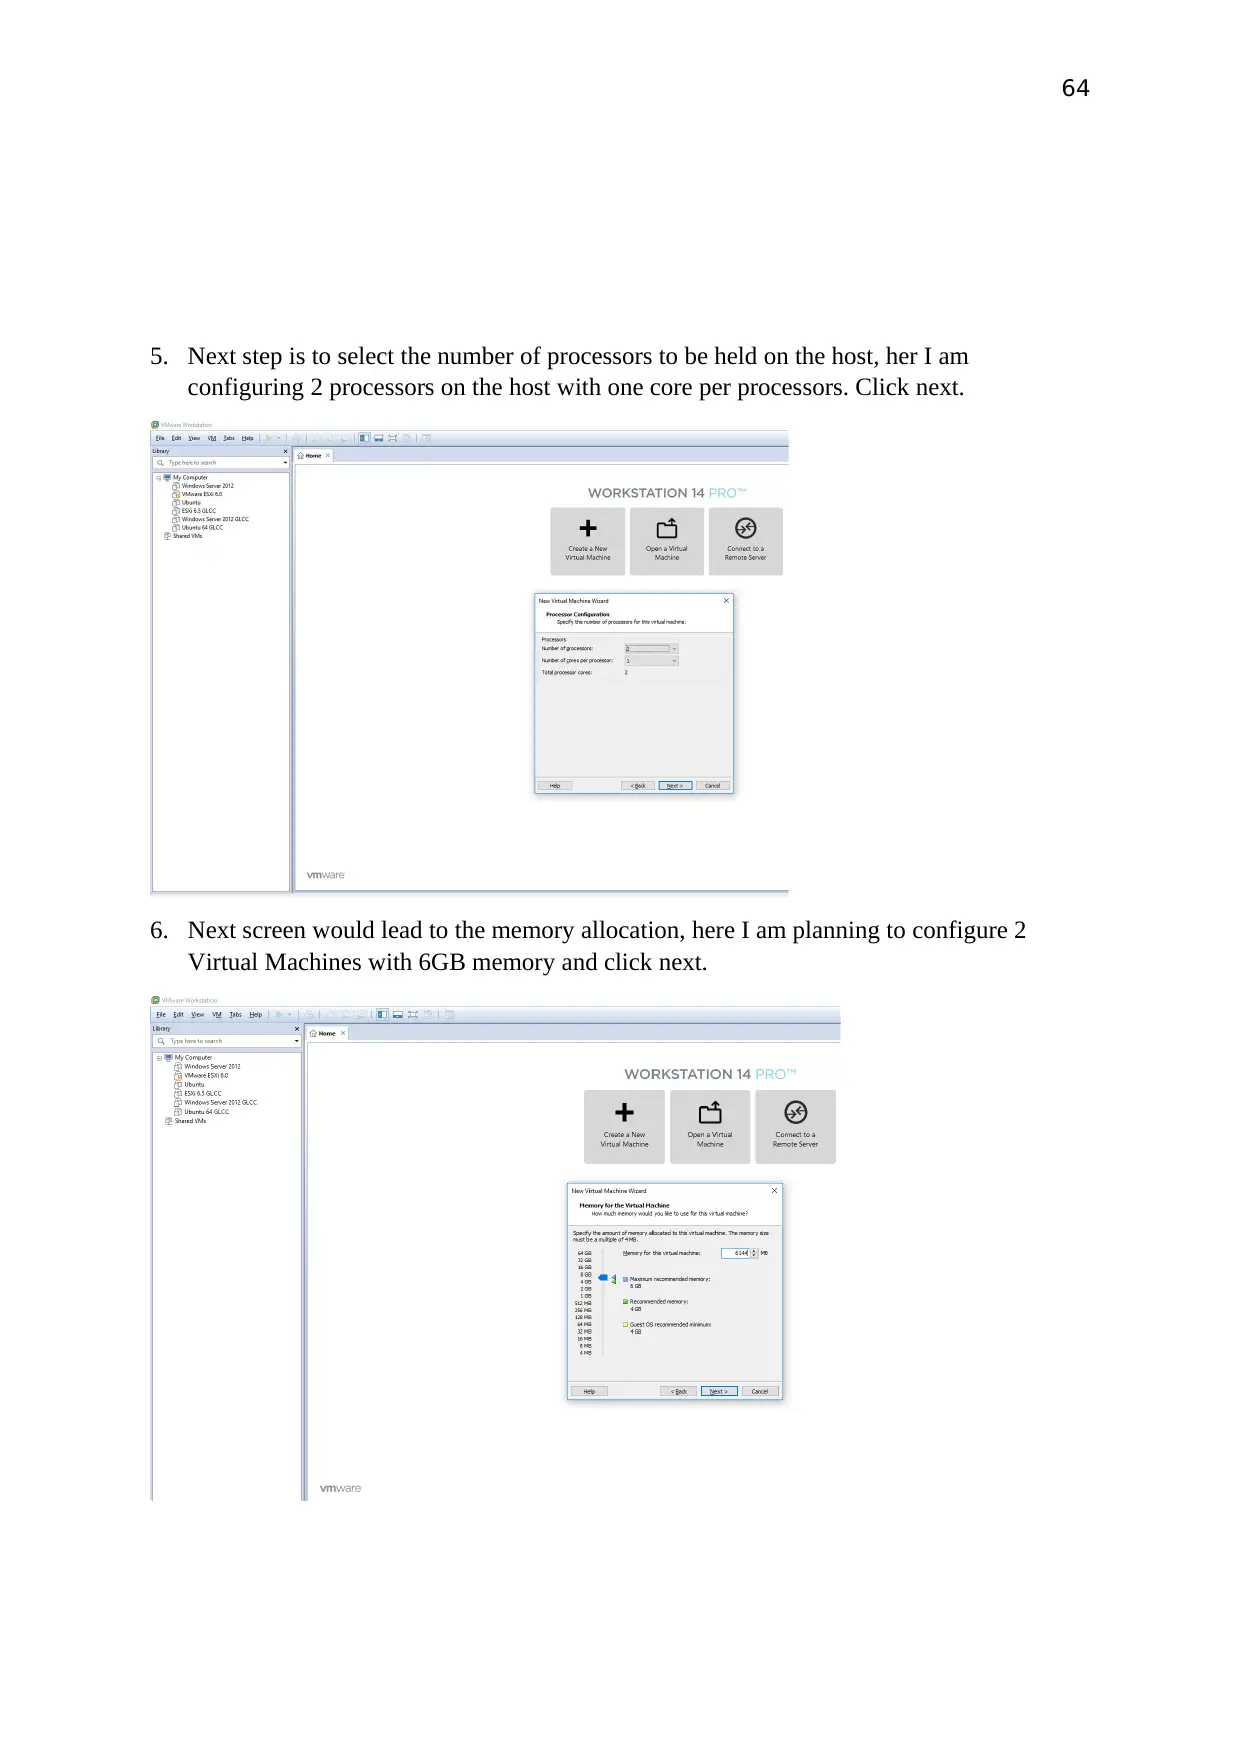
3. Next screen would lead to the Guest operating system Installation. Select Installer disc
image file (iso) radio button and then click next
4. Name the virtual machine and click next
3. Next screen would lead to the Guest operating system Installation. Select Installer disc
image file (iso) radio button and then click next
4. Name the virtual machine and click next
64
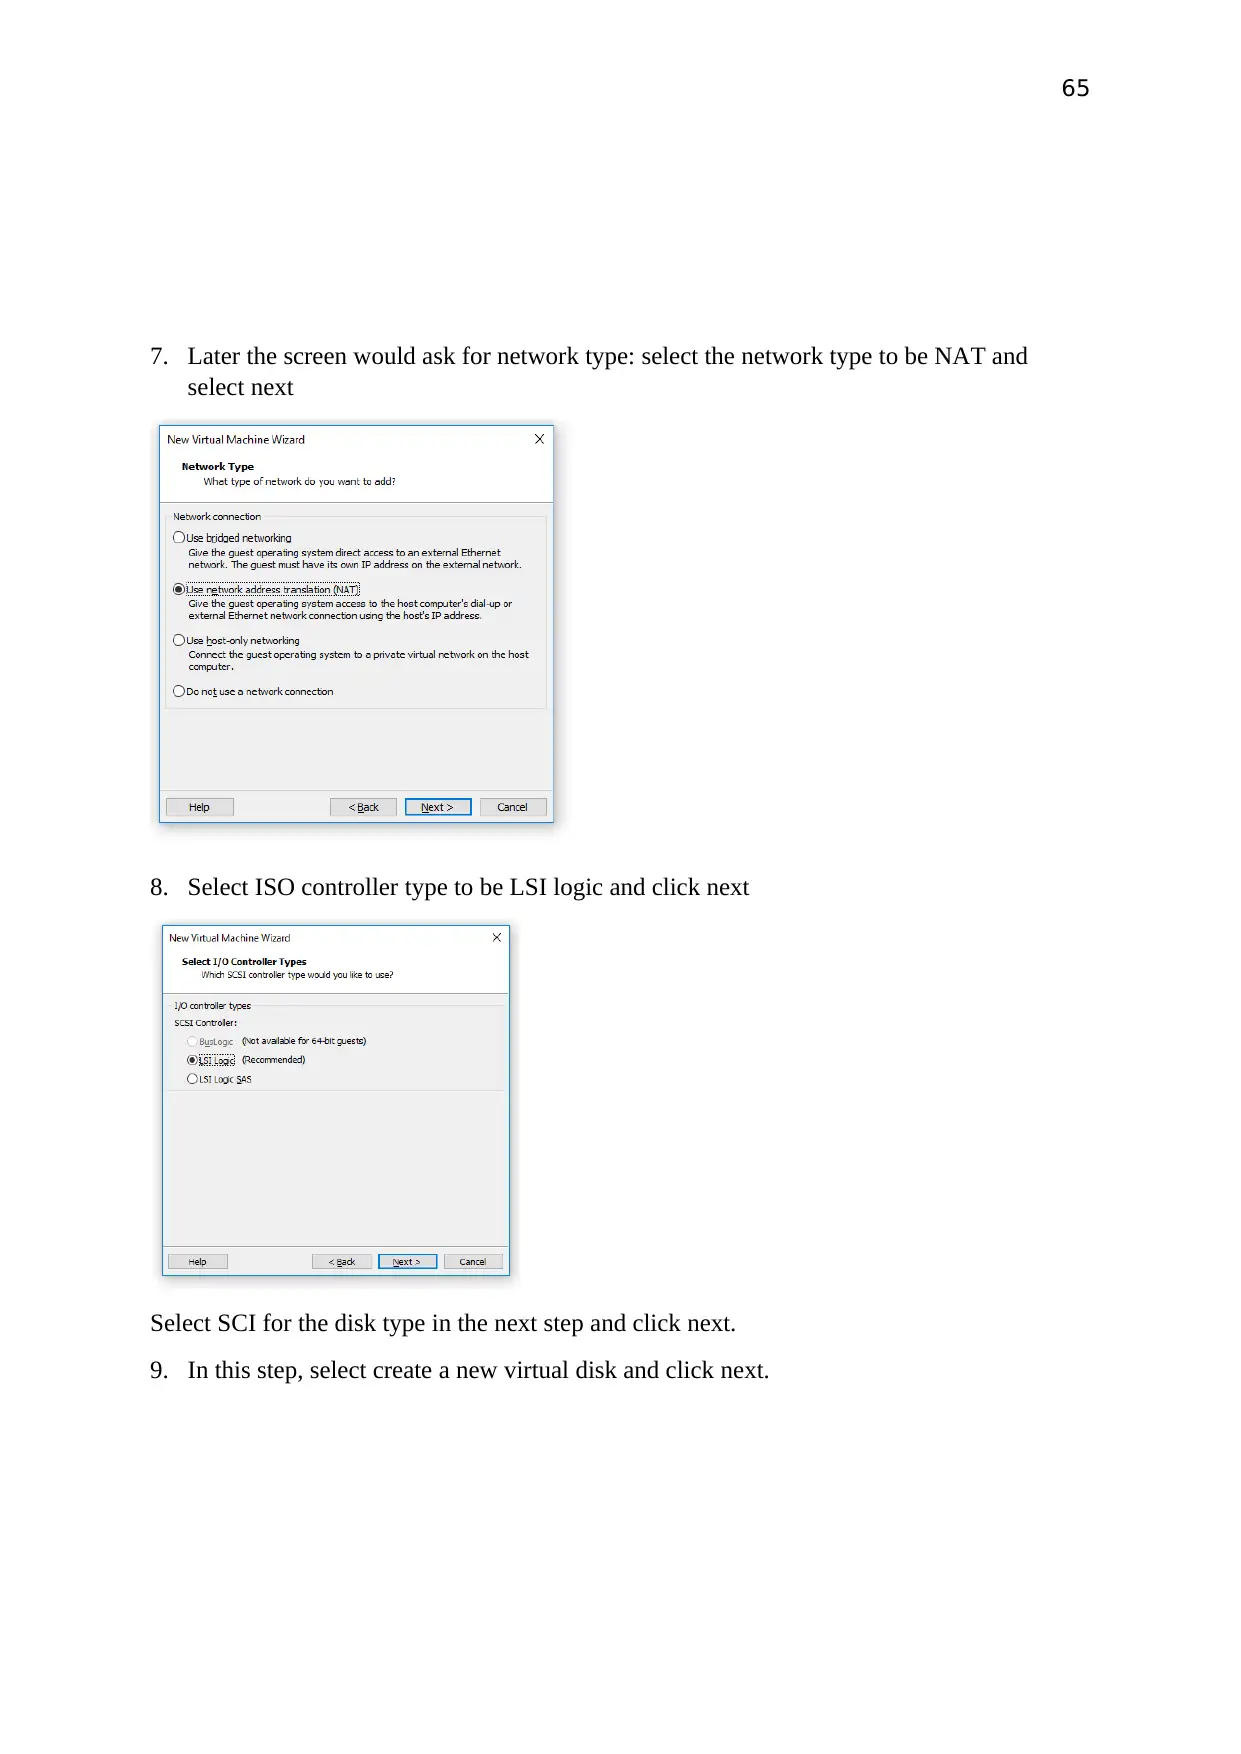
5. Next step is to select the number of processors to be held on the host, her I am
configuring 2 processors on the host with one core per processors. Click next.
6. Next screen would lead to the memory allocation, here I am planning to configure 2
Virtual Machines with 6GB memory and click next.
5. Next step is to select the number of processors to be held on the host, her I am
configuring 2 processors on the host with one core per processors. Click next.
6. Next screen would lead to the memory allocation, here I am planning to configure 2
Virtual Machines with 6GB memory and click next.
Secure Best Marks with AI Grader
Need help grading? Try our AI Grader for instant feedback on your assignments.
65
7. Later the screen would ask for network type: select the network type to be NAT and
select next
8. Select ISO controller type to be LSI logic and click next
Select SCI for the disk type in the next step and click next.
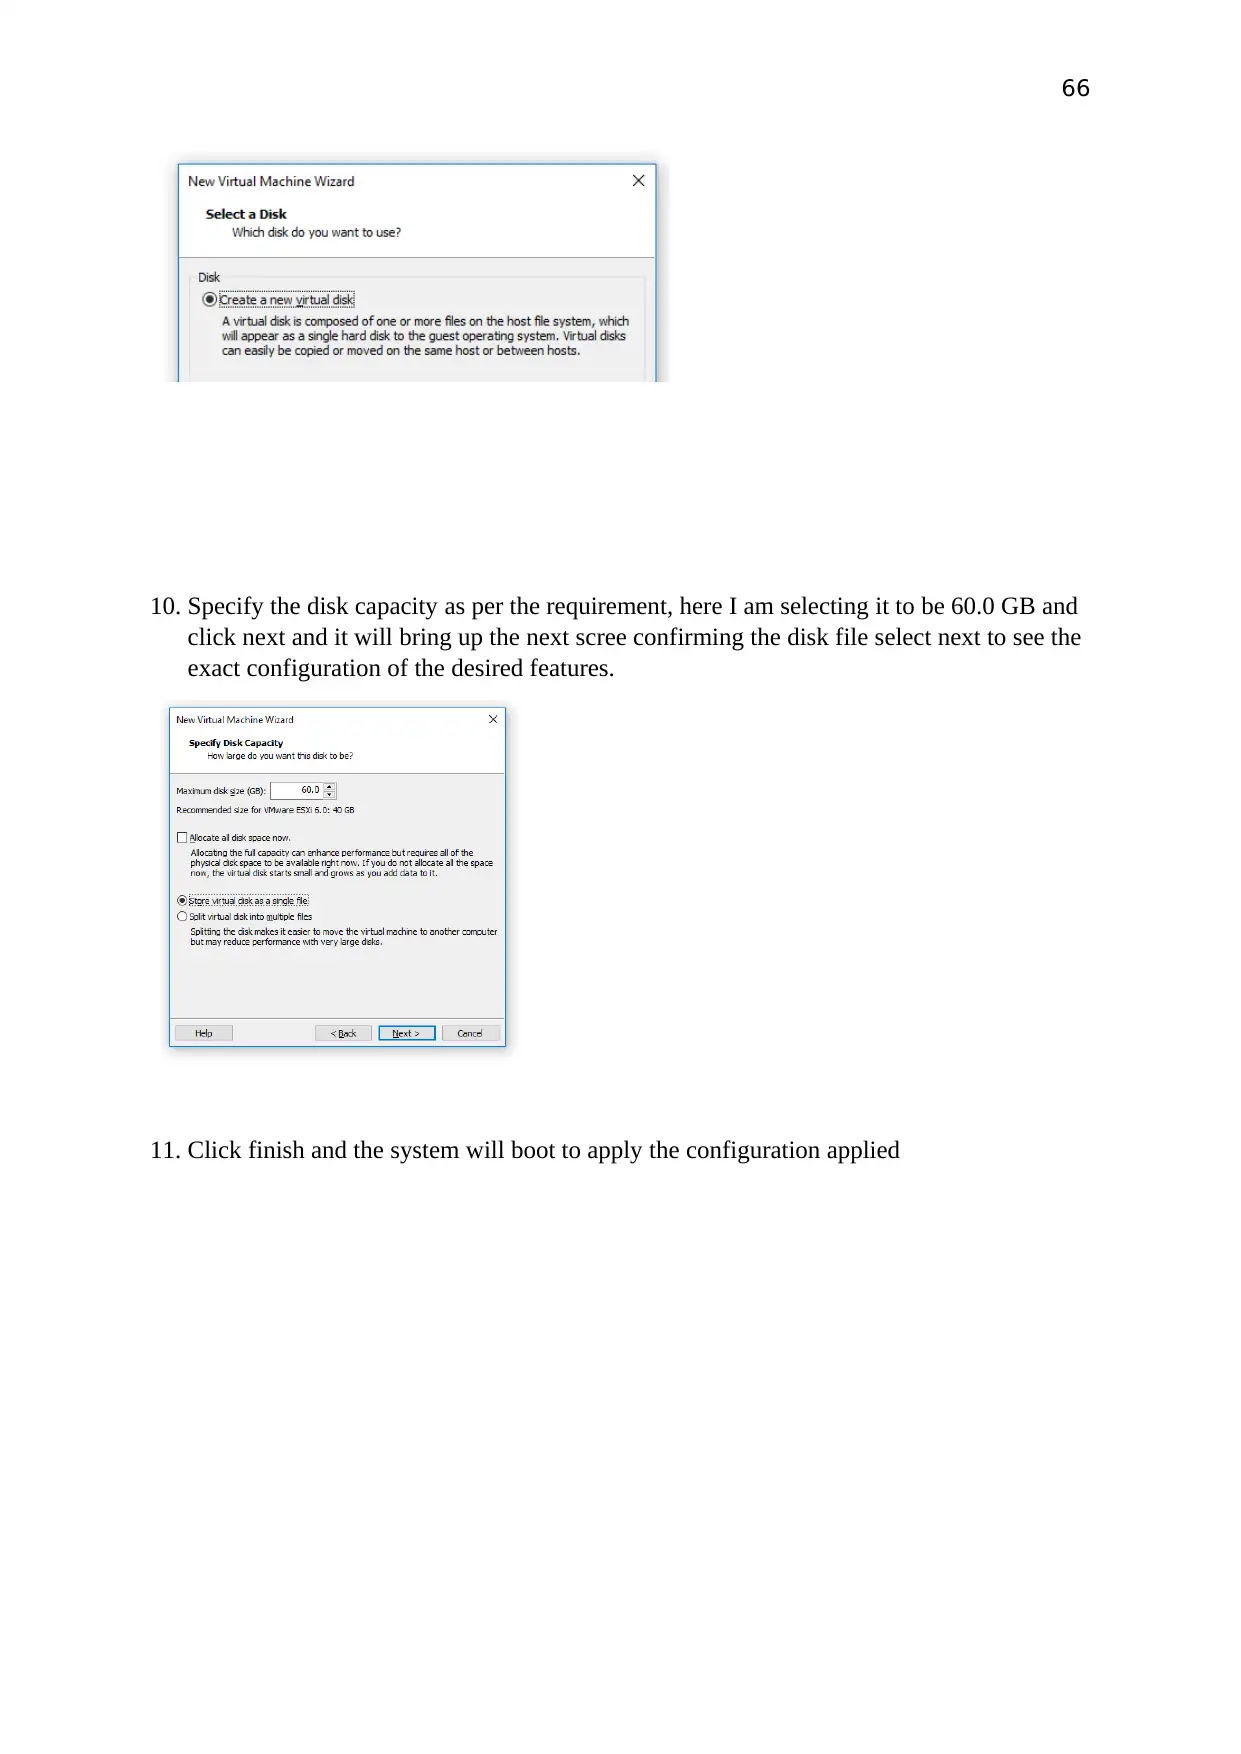
9. In this step, select create a new virtual disk and click next.
7. Later the screen would ask for network type: select the network type to be NAT and
select next
8. Select ISO controller type to be LSI logic and click next
Select SCI for the disk type in the next step and click next.
9. In this step, select create a new virtual disk and click next.
66
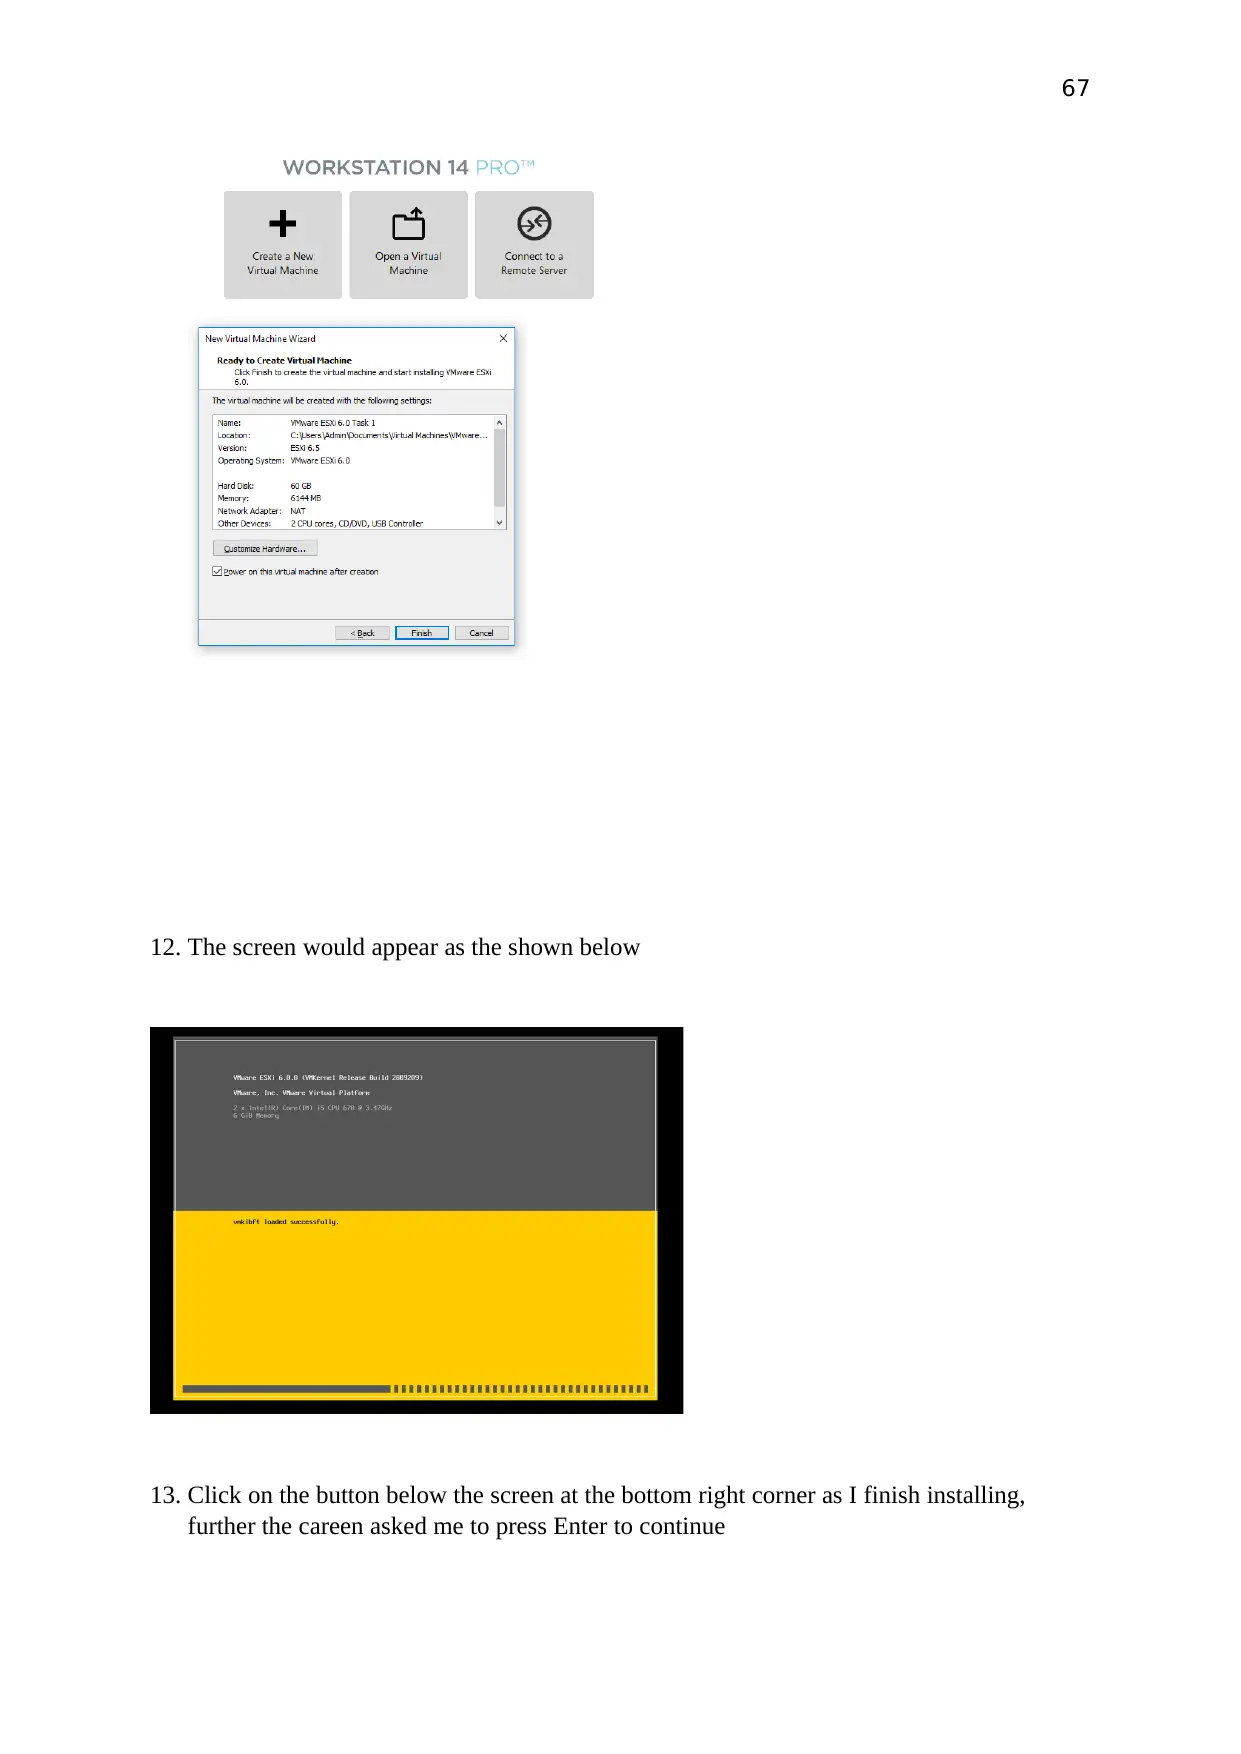
10. Specify the disk capacity as per the requirement, here I am selecting it to be 60.0 GB and
click next and it will bring up the next scree confirming the disk file select next to see the
exact configuration of the desired features.
11. Click finish and the system will boot to apply the configuration applied
67
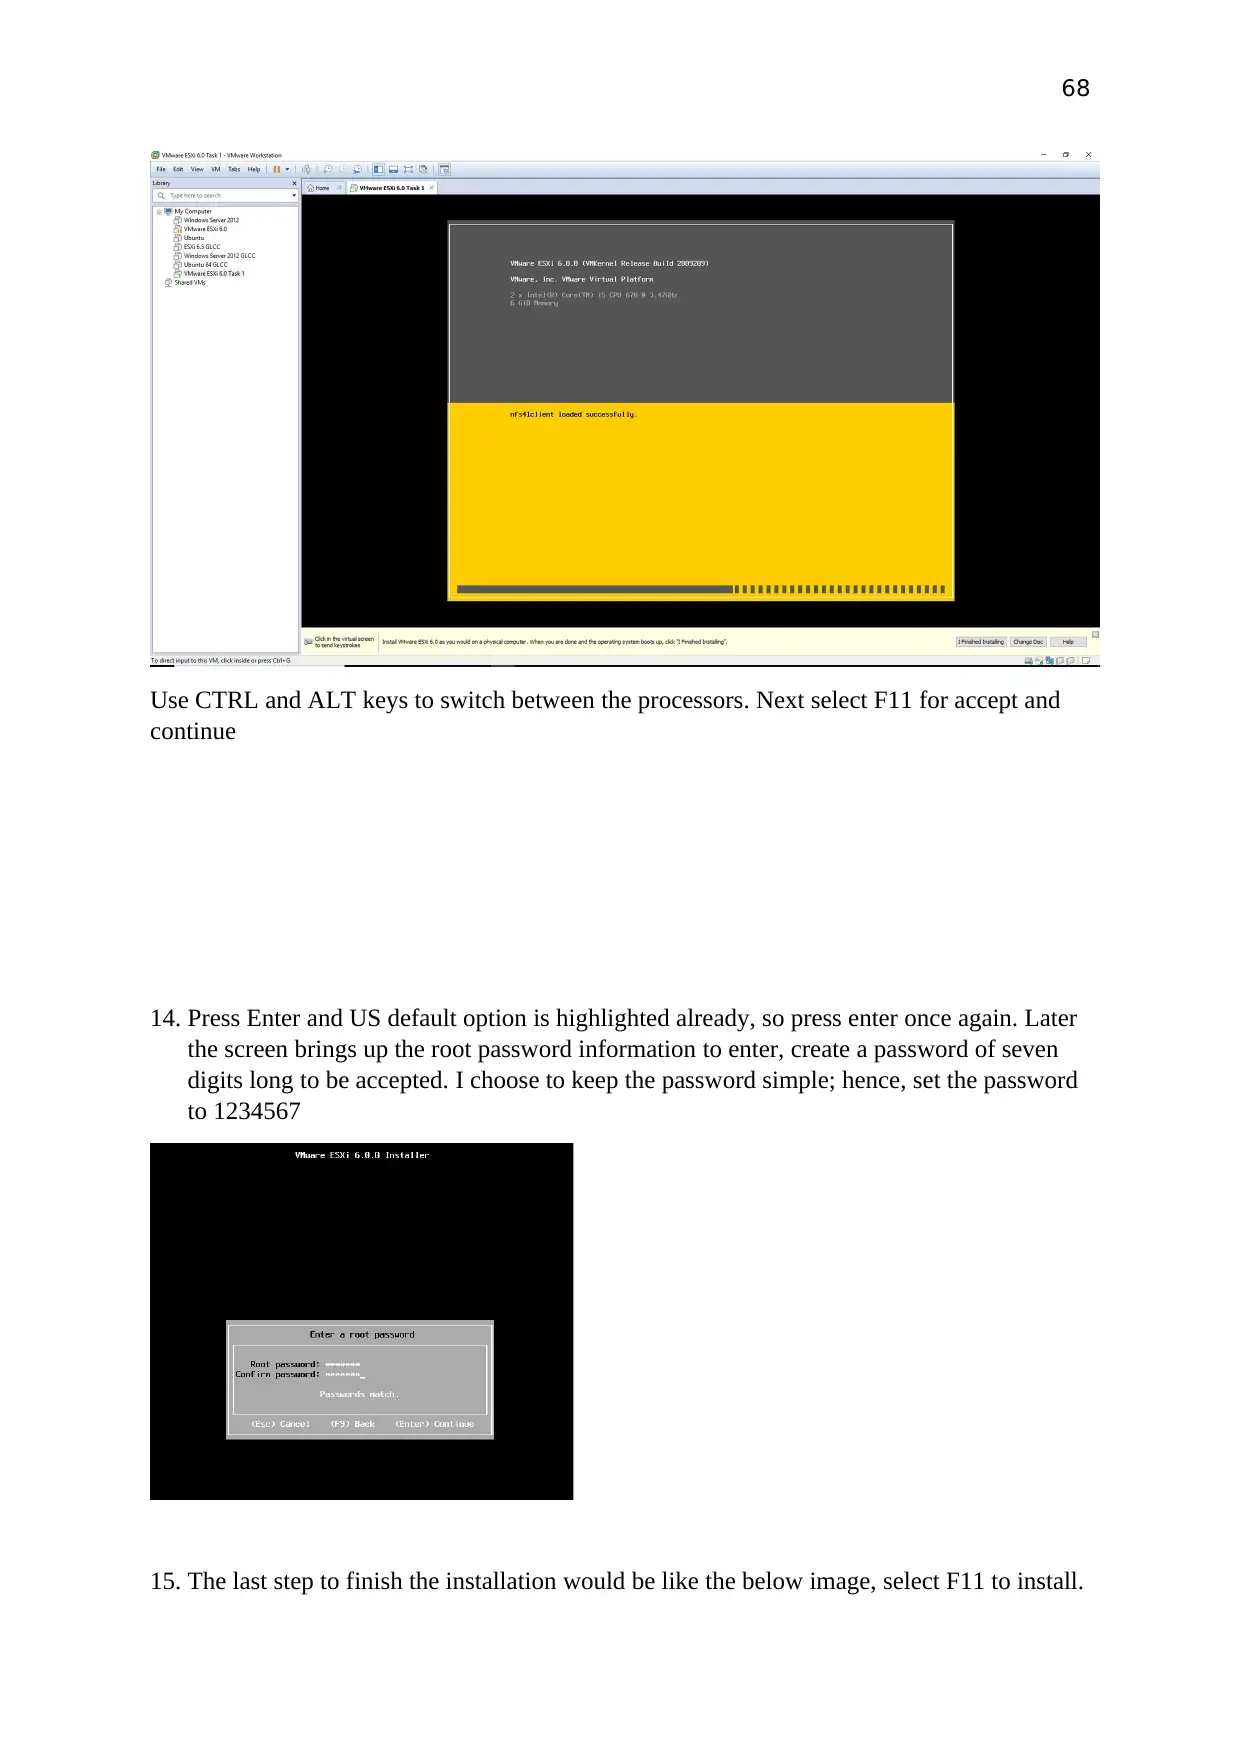
12. The screen would appear as the shown below
13. Click on the button below the screen at the bottom right corner as I finish installing,
further the careen asked me to press Enter to continue
12. The screen would appear as the shown below
13. Click on the button below the screen at the bottom right corner as I finish installing,
further the careen asked me to press Enter to continue
Paraphrase This Document
Need a fresh take? Get an instant paraphrase of this document with our AI Paraphraser
68
Use CTRL and ALT keys to switch between the processors. Next select F11 for accept and
continue
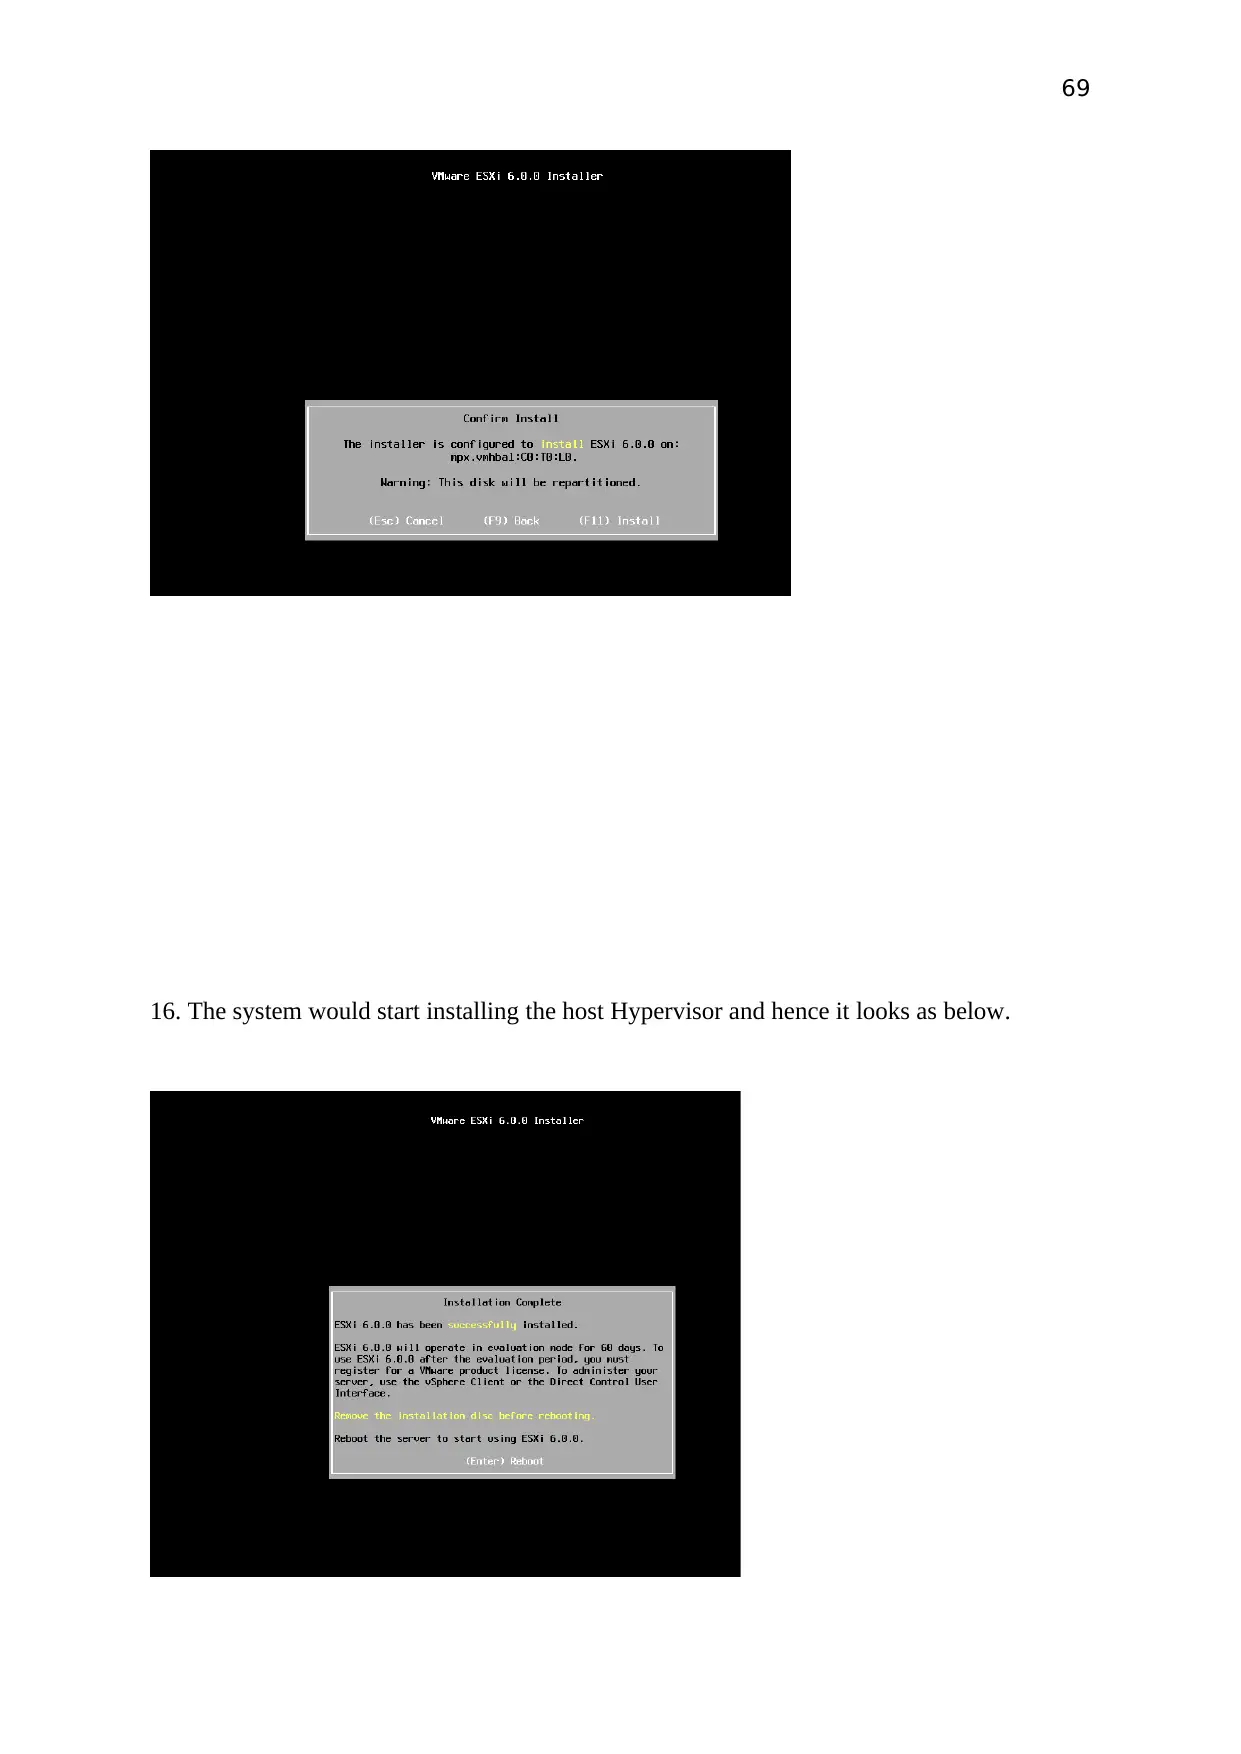
14. Press Enter and US default option is highlighted already, so press enter once again. Later
the screen brings up the root password information to enter, create a password of seven
digits long to be accepted. I choose to keep the password simple; hence, set the password
to 1234567
15. The last step to finish the installation would be like the below image, select F11 to install.
69
16. The system would start installing the host Hypervisor and hence it looks as below.
16. The system would start installing the host Hypervisor and hence it looks as below.

70
17. This step will initiate the generate an IP address for the processor, here it is
http://192.168.198.191
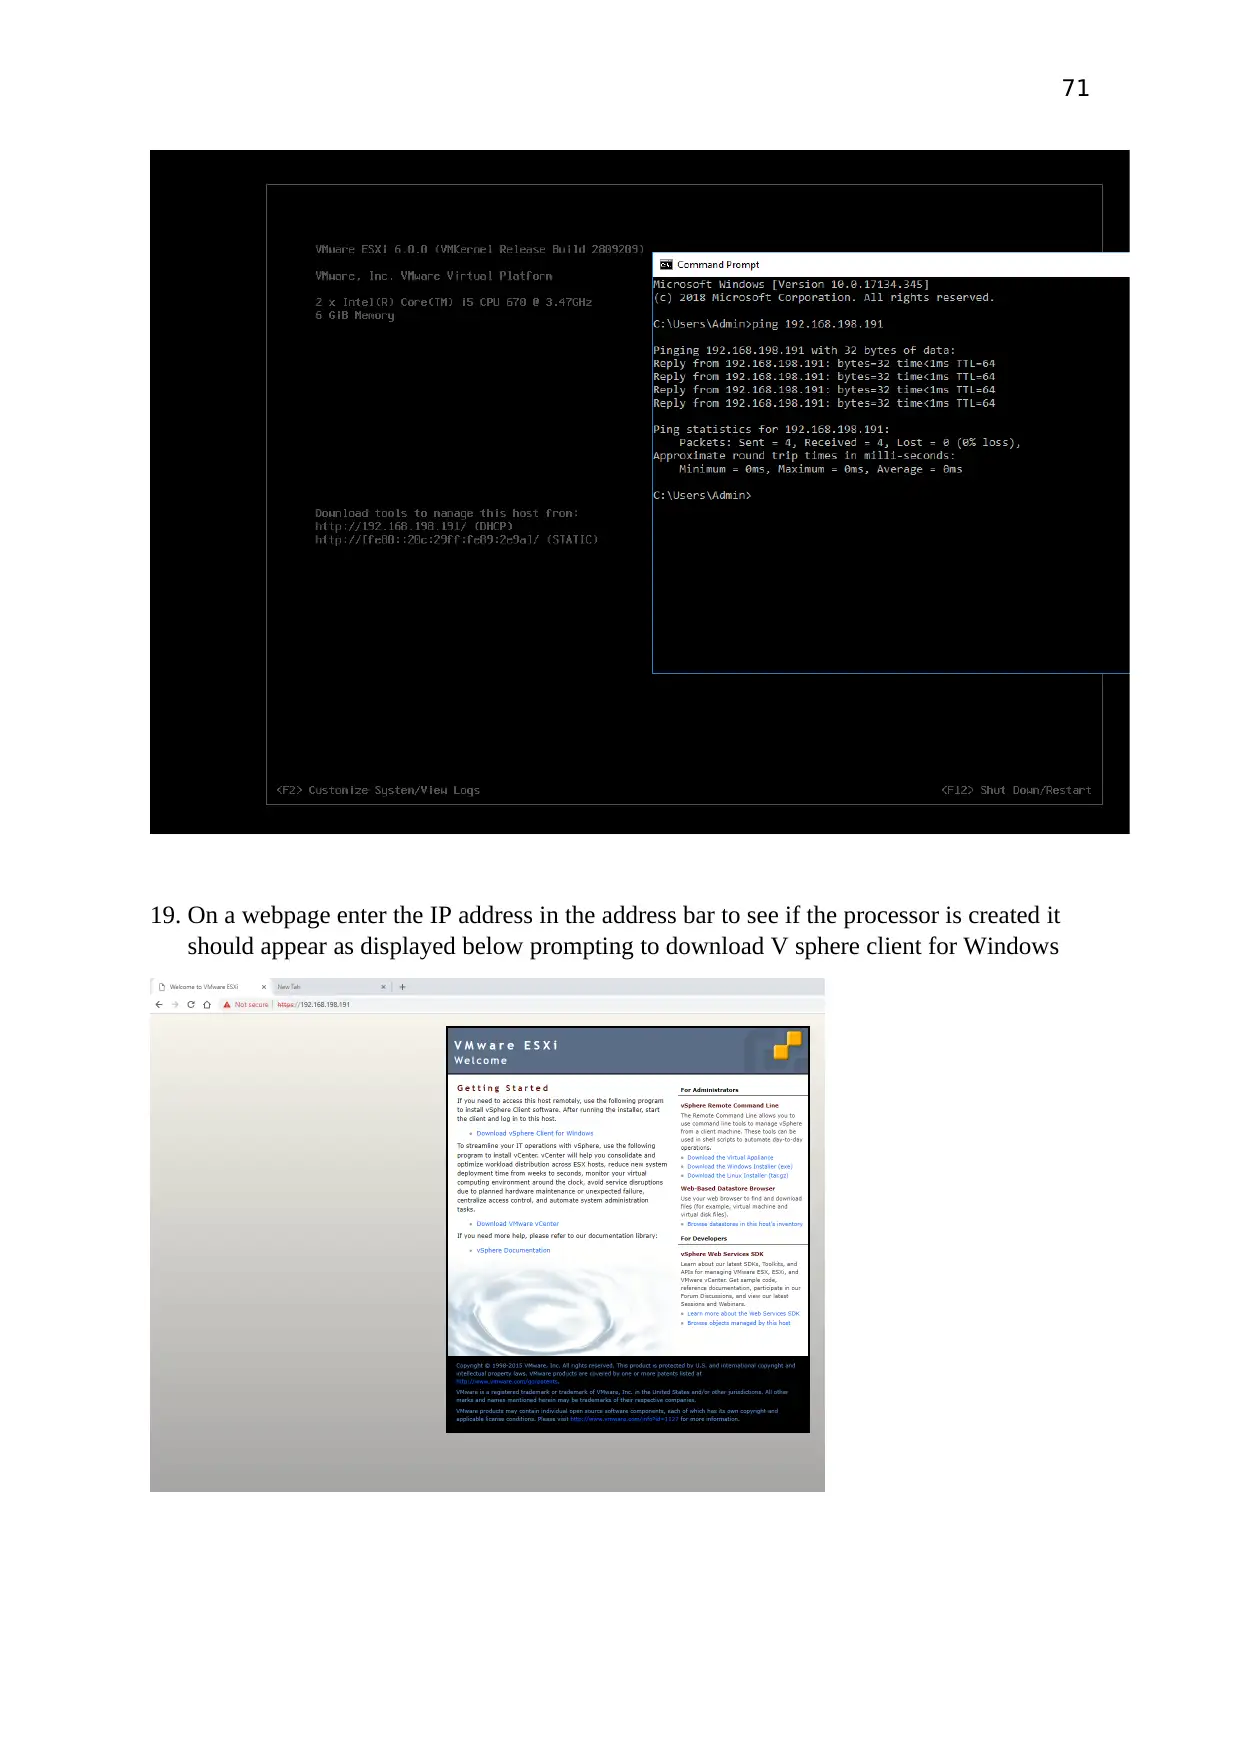
18. If the system configured is connected to the network upon pining in the Command prompt
must show up the following information as given below.
17. This step will initiate the generate an IP address for the processor, here it is
http://192.168.198.191
18. If the system configured is connected to the network upon pining in the Command prompt
must show up the following information as given below.
Secure Best Marks with AI Grader
Need help grading? Try our AI Grader for instant feedback on your assignments.
71
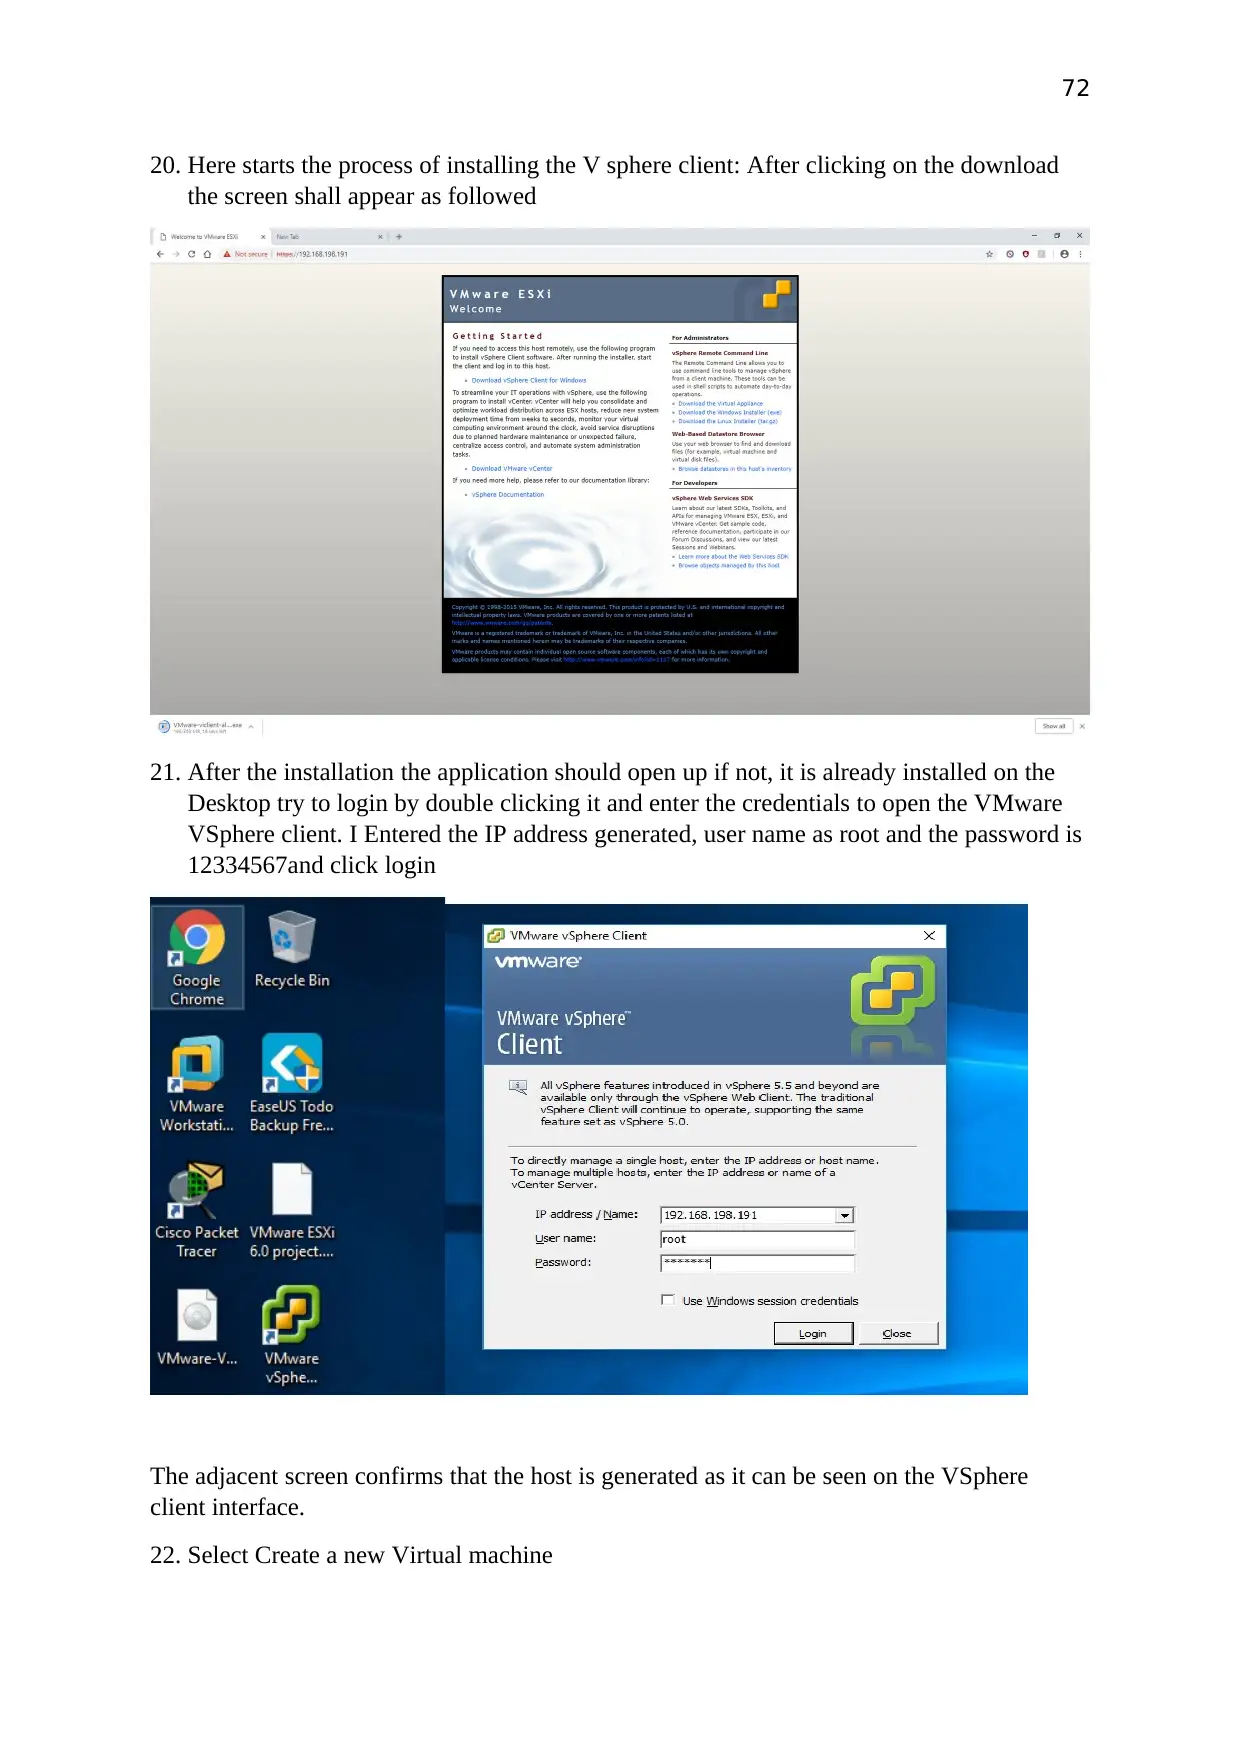
19. On a webpage enter the IP address in the address bar to see if the processor is created it
should appear as displayed below prompting to download V sphere client for Windows
19. On a webpage enter the IP address in the address bar to see if the processor is created it
should appear as displayed below prompting to download V sphere client for Windows
72
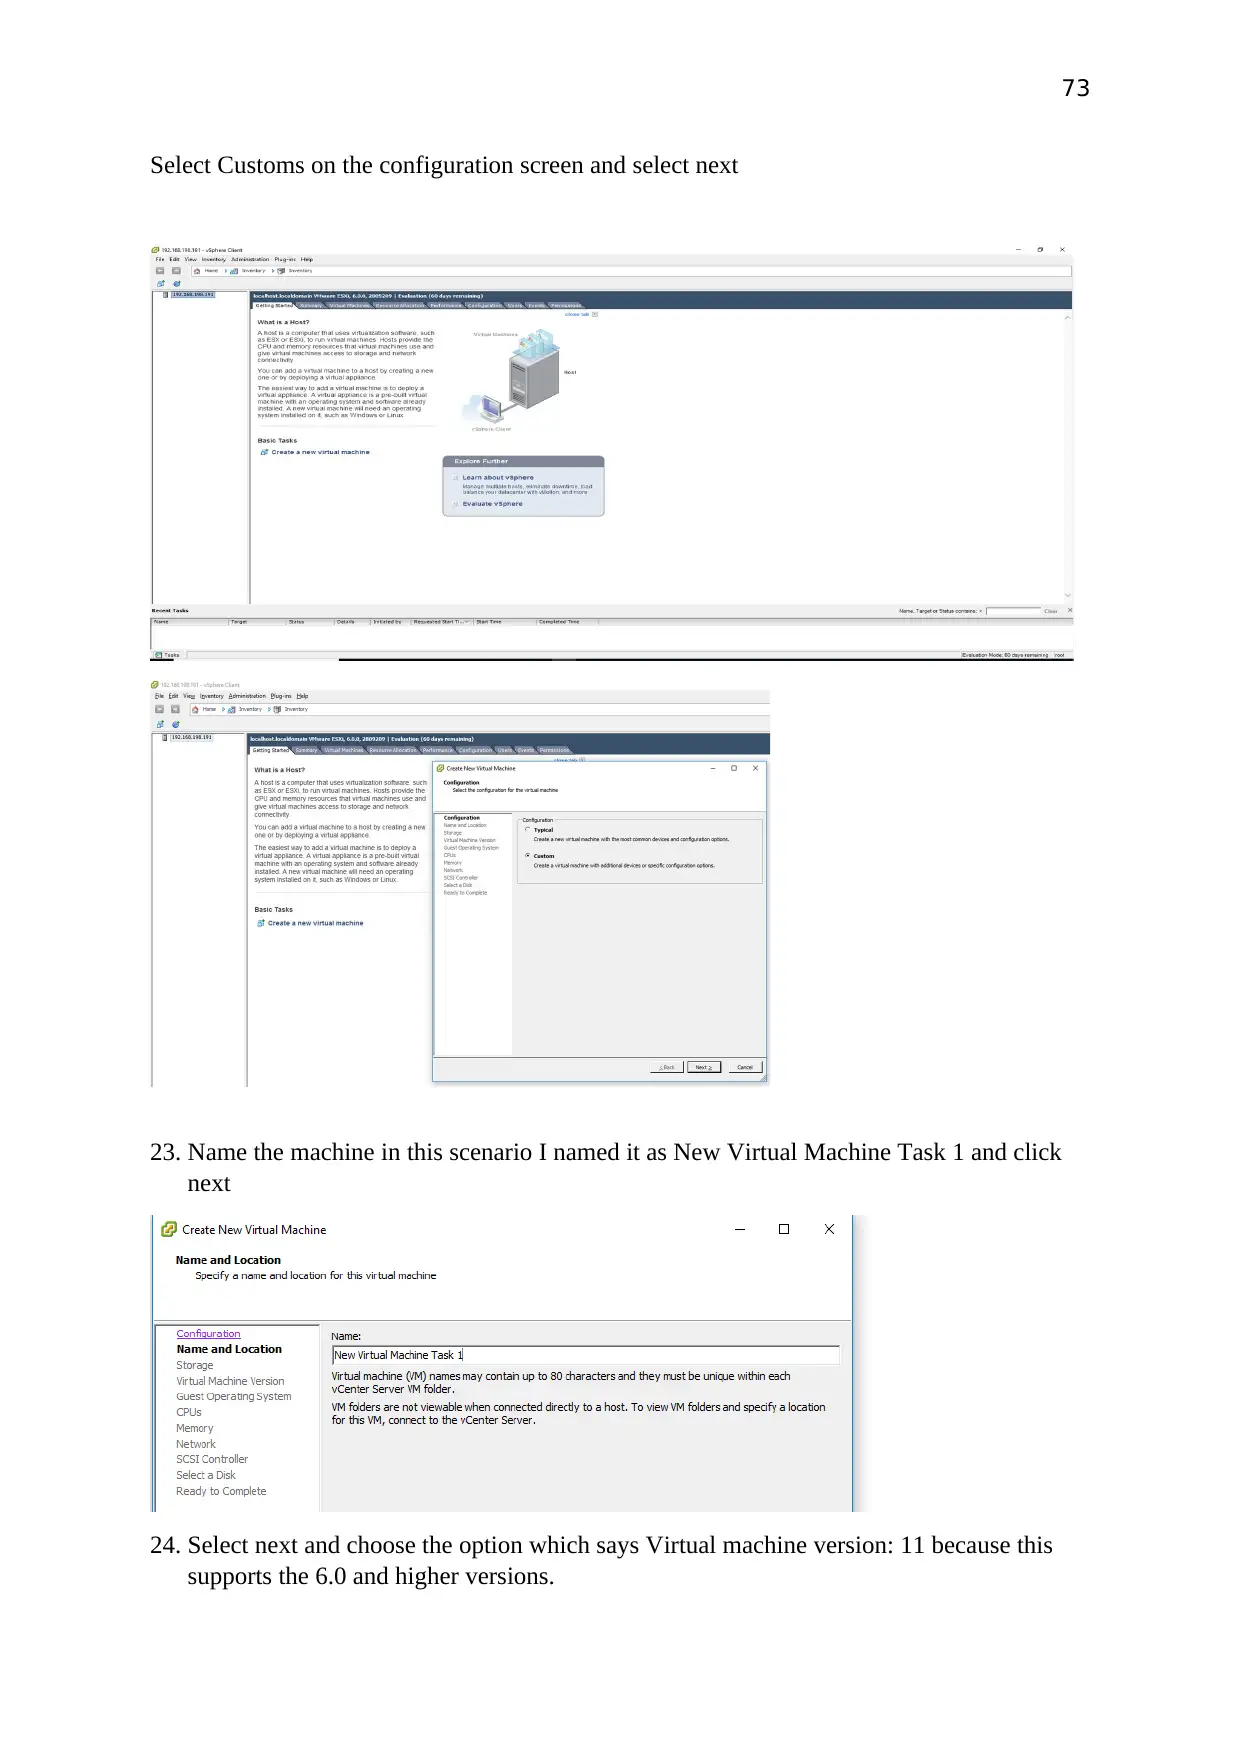
20. Here starts the process of installing the V sphere client: After clicking on the download
the screen shall appear as followed
21. After the installation the application should open up if not, it is already installed on the
Desktop try to login by double clicking it and enter the credentials to open the VMware
VSphere client. I Entered the IP address generated, user name as root and the password is
12334567and click login
The adjacent screen confirms that the host is generated as it can be seen on the VSphere
client interface.
22. Select Create a new Virtual machine
73
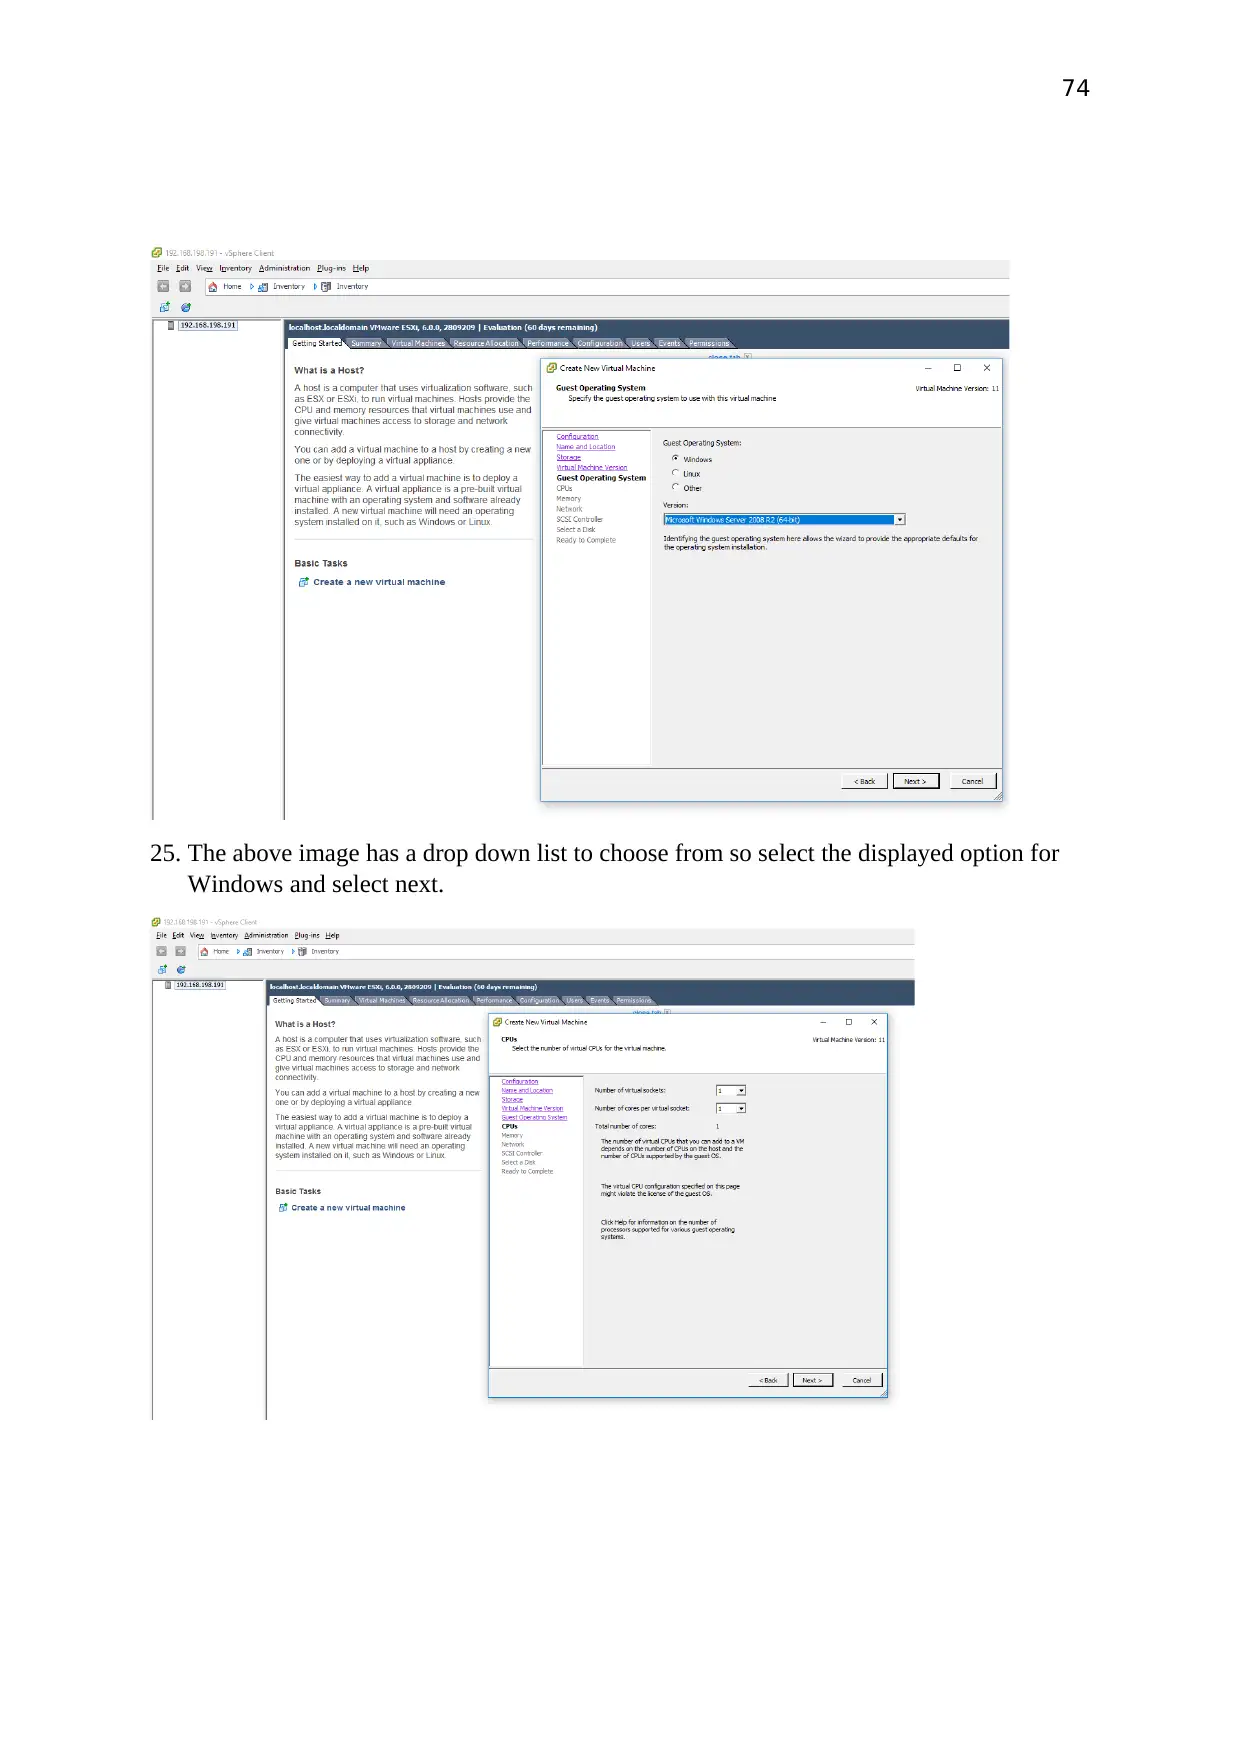
Select Customs on the configuration screen and select next
23. Name the machine in this scenario I named it as New Virtual Machine Task 1 and click
next
24. Select next and choose the option which says Virtual machine version: 11 because this
supports the 6.0 and higher versions.
Select Customs on the configuration screen and select next
23. Name the machine in this scenario I named it as New Virtual Machine Task 1 and click
next
24. Select next and choose the option which says Virtual machine version: 11 because this
supports the 6.0 and higher versions.
Paraphrase This Document
Need a fresh take? Get an instant paraphrase of this document with our AI Paraphraser
74
25. The above image has a drop down list to choose from so select the displayed option for
Windows and select next.
25. The above image has a drop down list to choose from so select the displayed option for
Windows and select next.
75
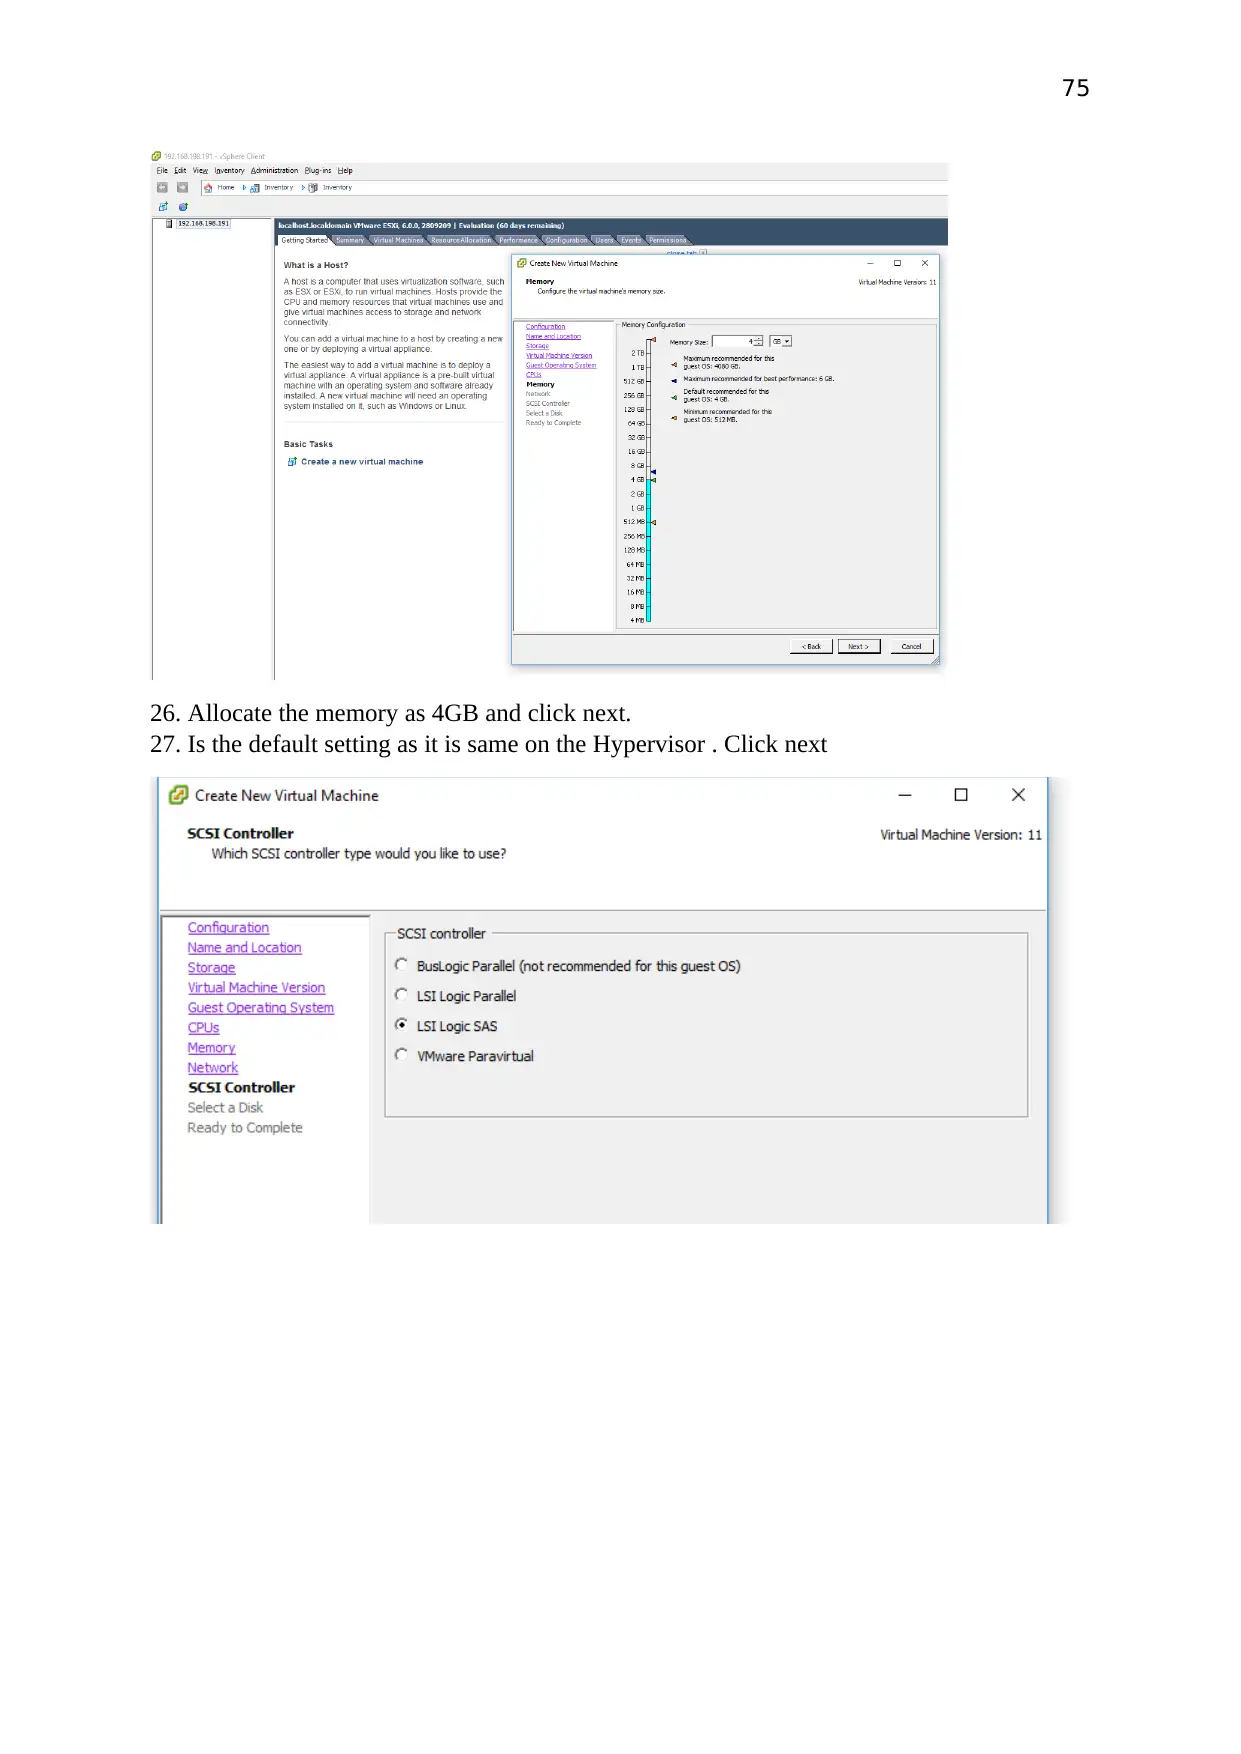
26. Allocate the memory as 4GB and click next.
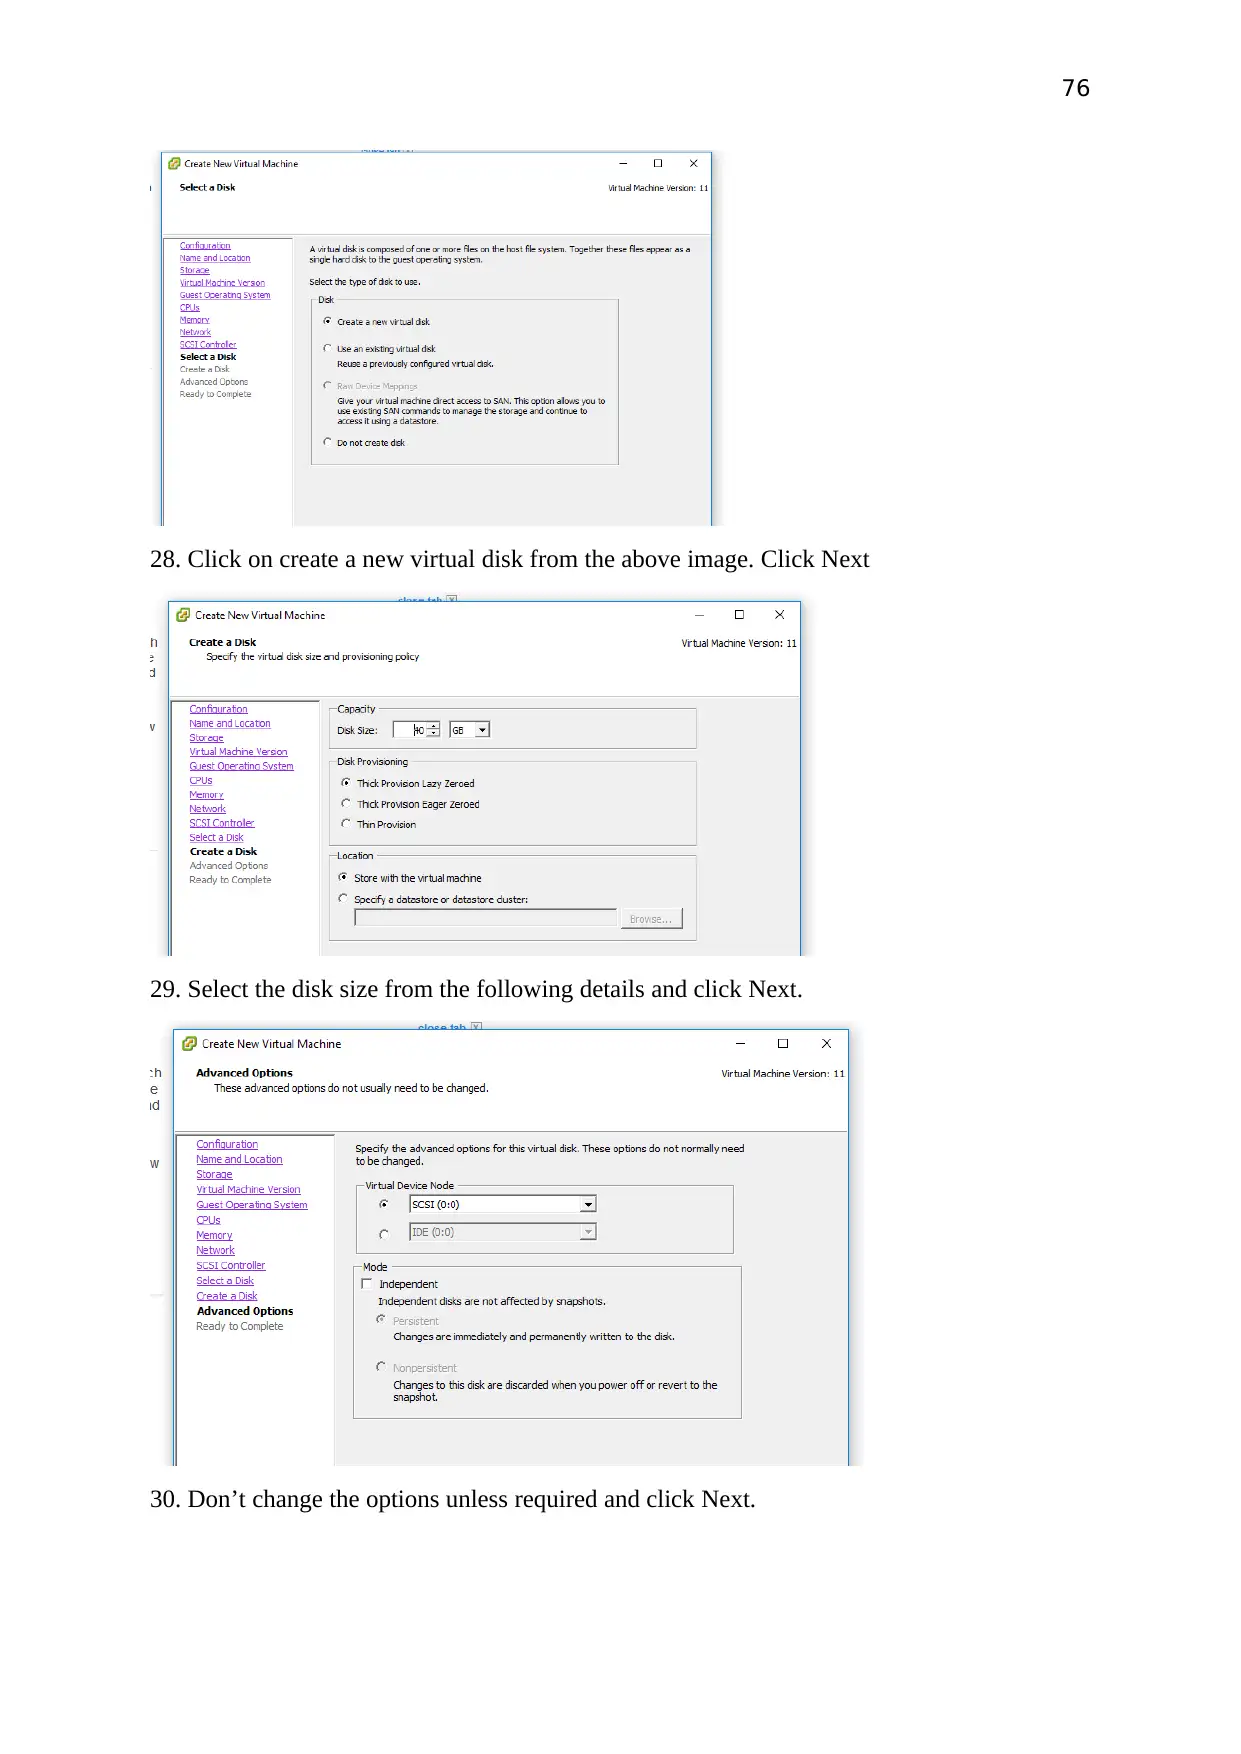
27. Is the default setting as it is same on the Hypervisor . Click next
26. Allocate the memory as 4GB and click next.
27. Is the default setting as it is same on the Hypervisor . Click next
76
28. Click on create a new virtual disk from the above image. Click Next
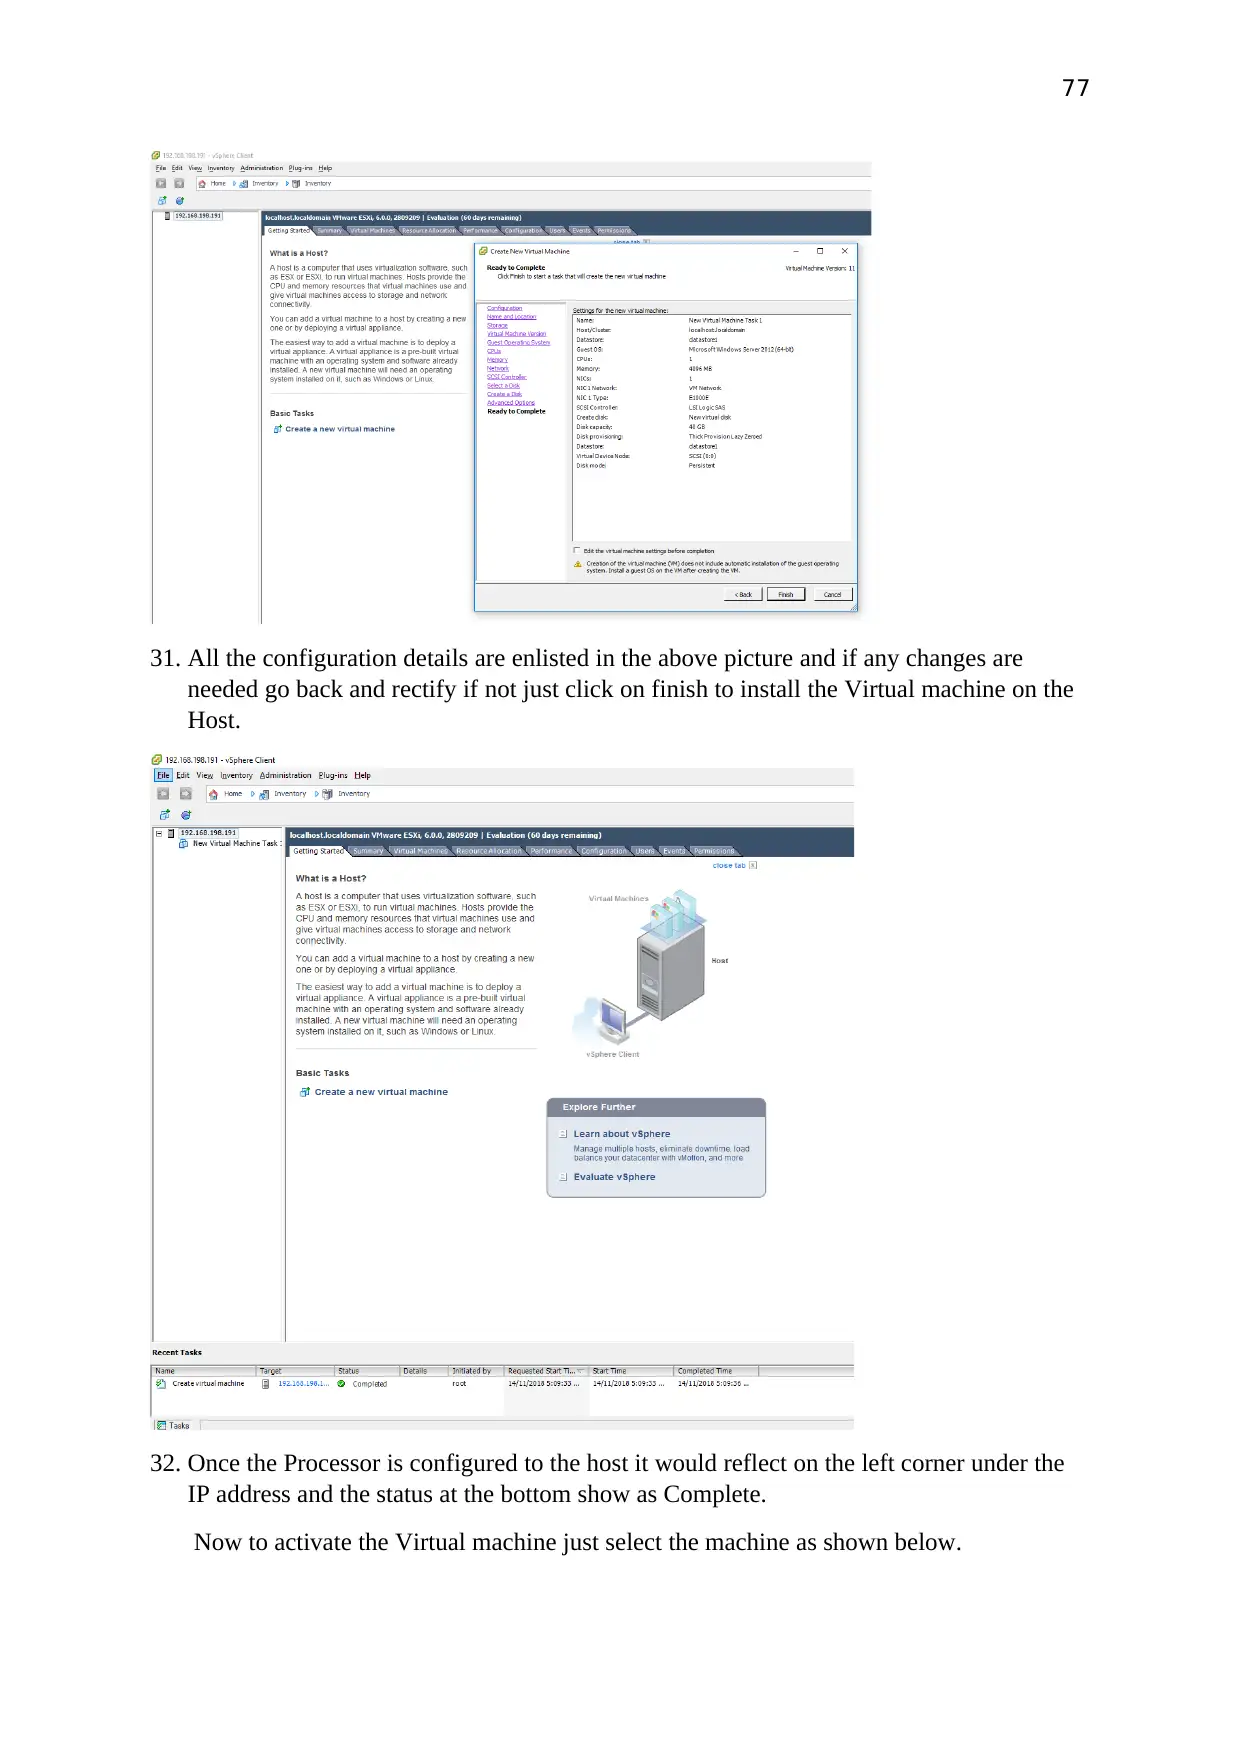
29. Select the disk size from the following details and click Next.
30. Don’t change the options unless required and click Next.
28. Click on create a new virtual disk from the above image. Click Next
29. Select the disk size from the following details and click Next.
30. Don’t change the options unless required and click Next.
Secure Best Marks with AI Grader
Need help grading? Try our AI Grader for instant feedback on your assignments.
77
31. All the configuration details are enlisted in the above picture and if any changes are
needed go back and rectify if not just click on finish to install the Virtual machine on the
Host.
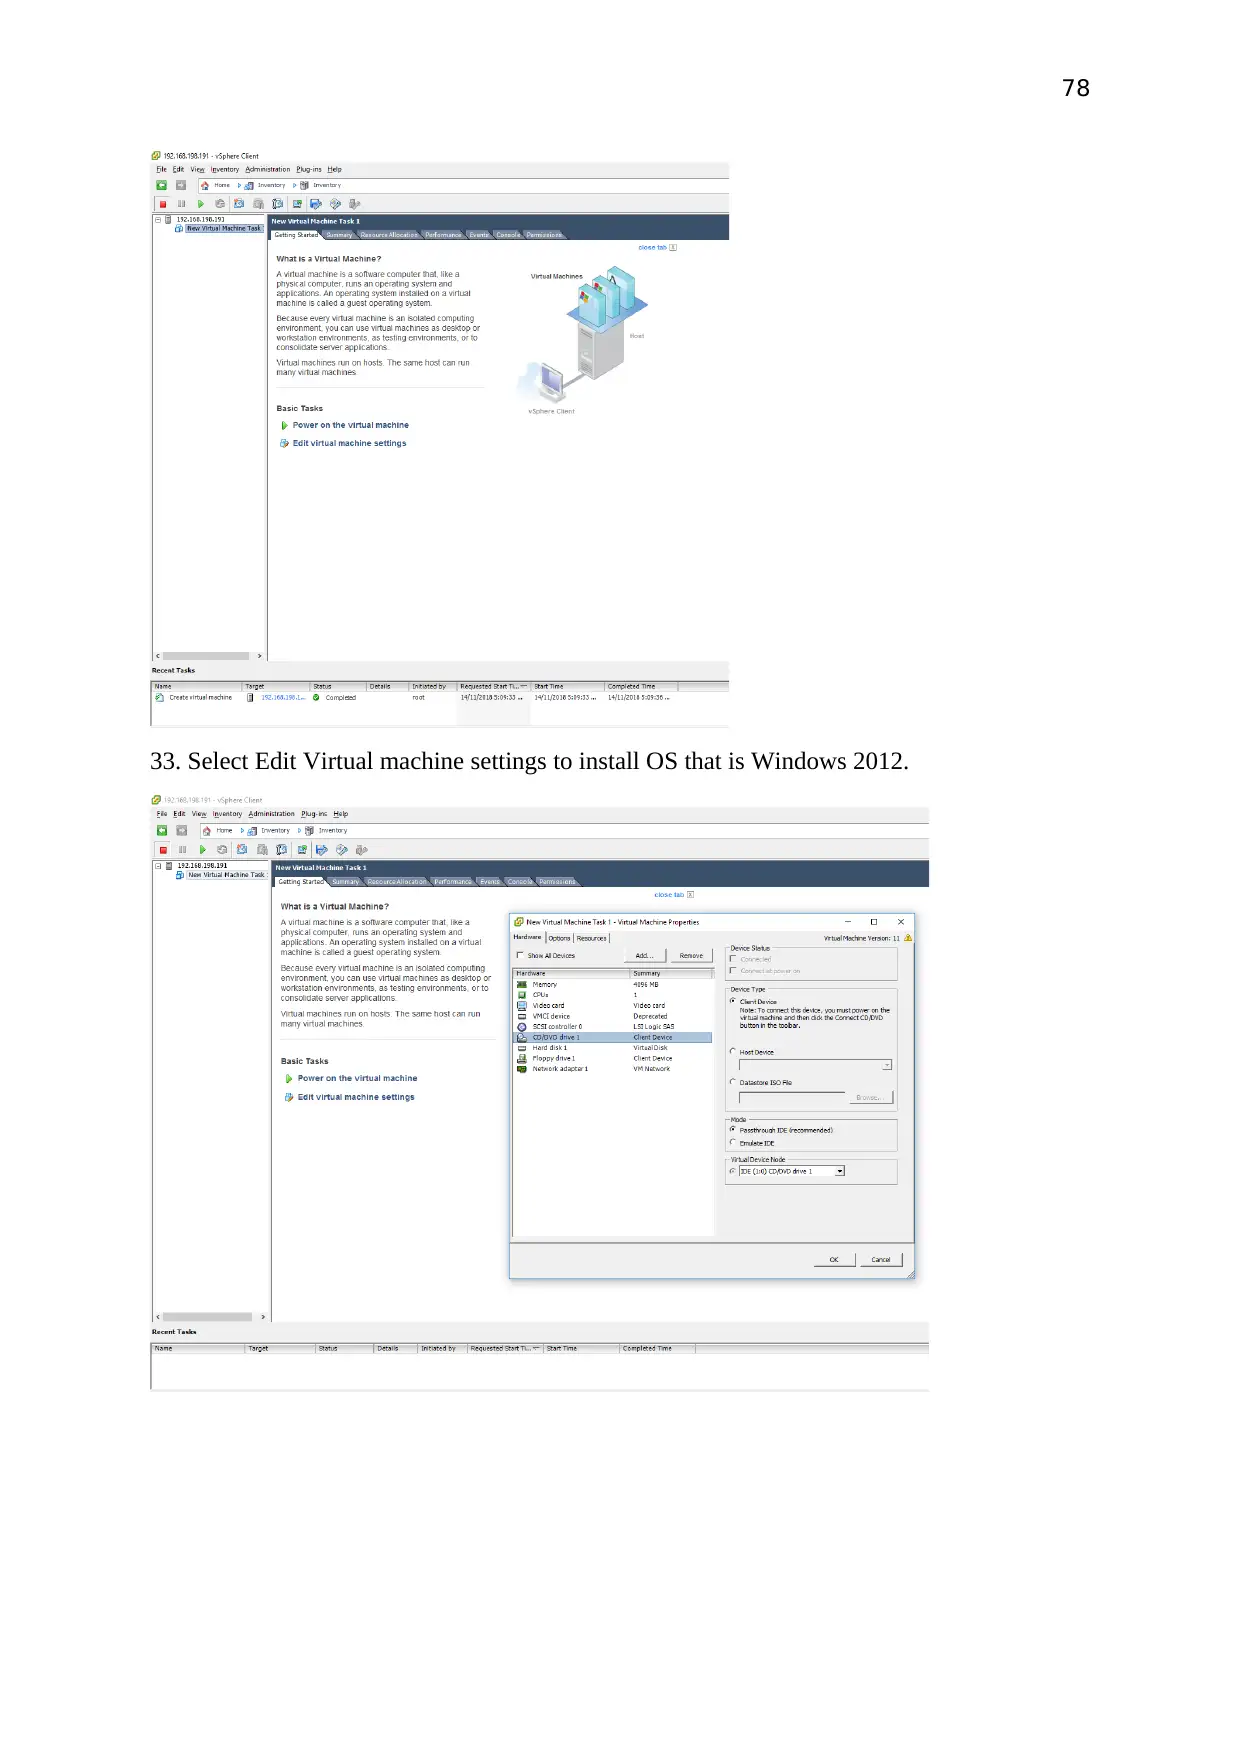
32. Once the Processor is configured to the host it would reflect on the left corner under the
IP address and the status at the bottom show as Complete.
Now to activate the Virtual machine just select the machine as shown below.
78
33. Select Edit Virtual machine settings to install OS that is Windows 2012.
33. Select Edit Virtual machine settings to install OS that is Windows 2012.
79
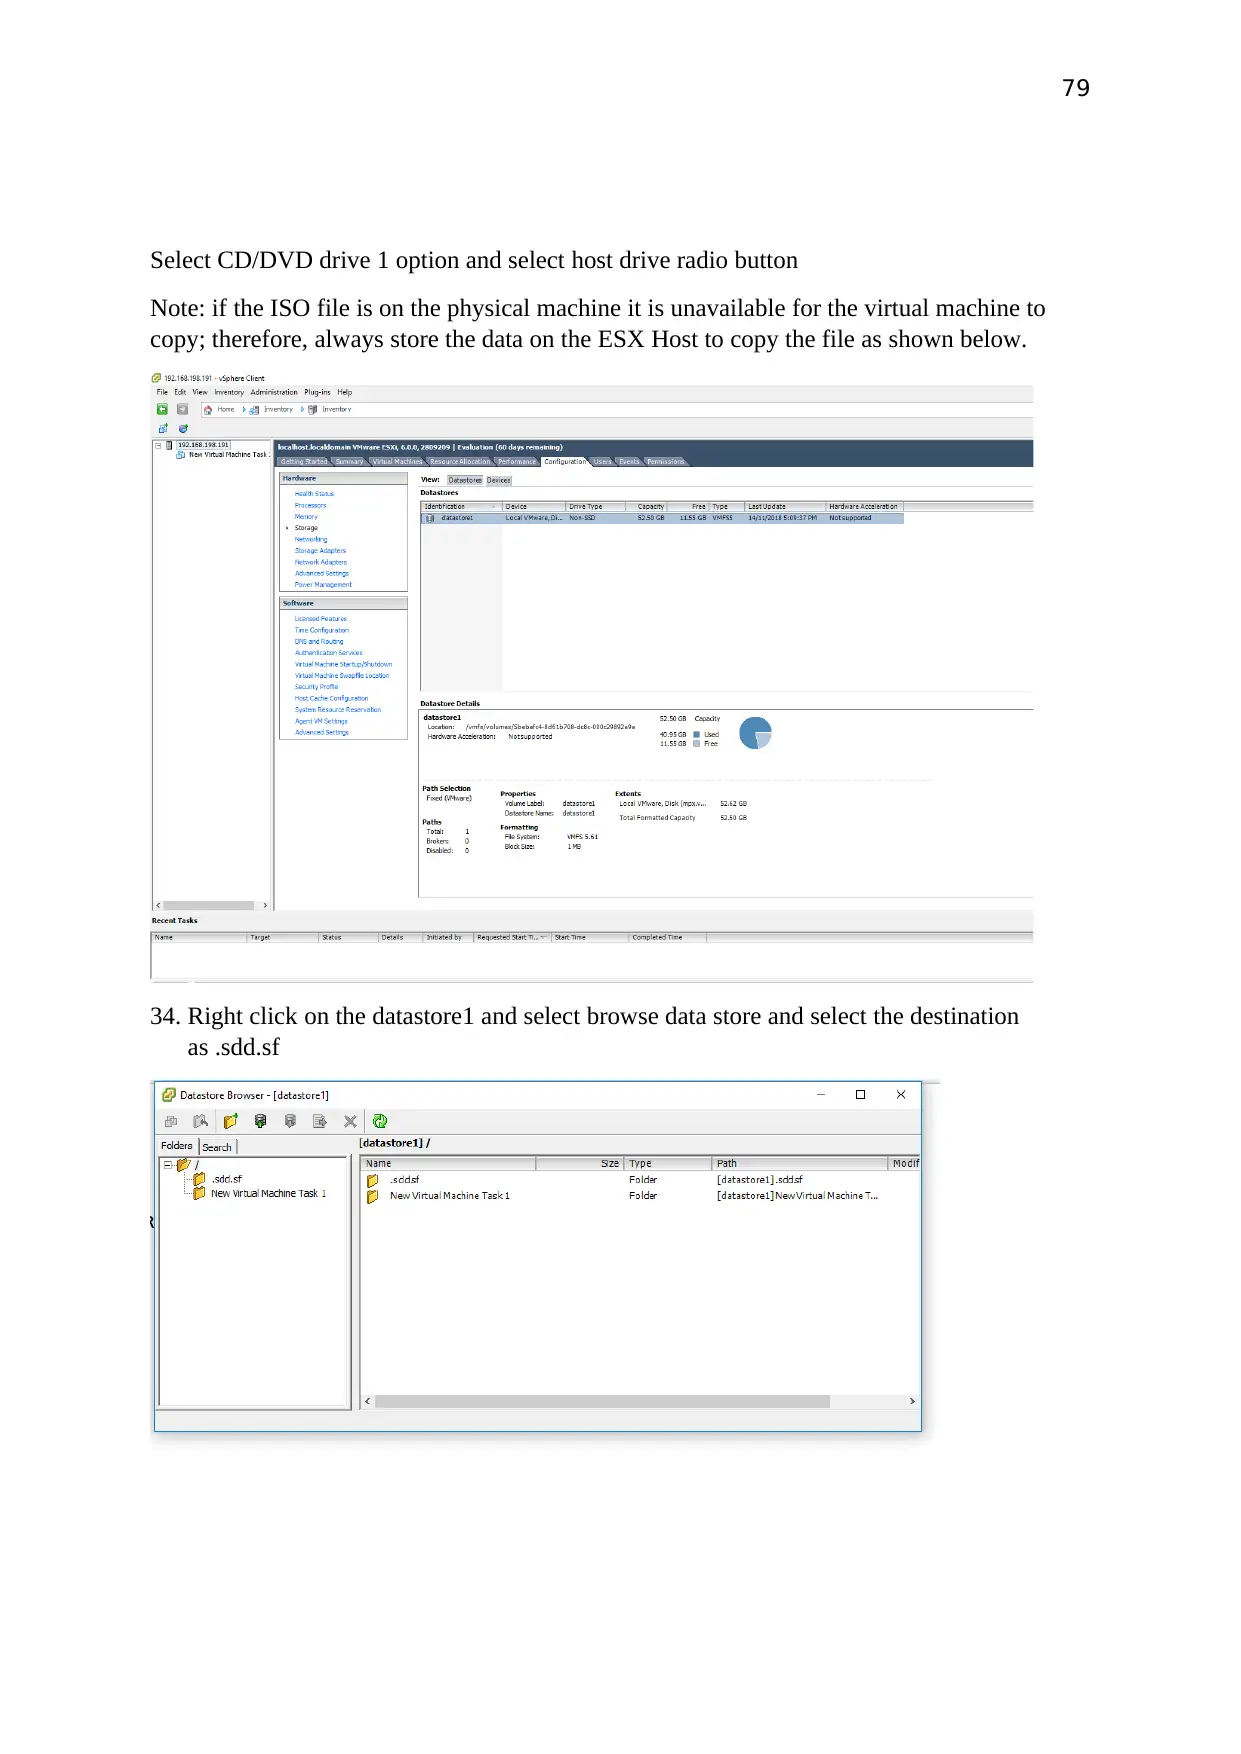
Select CD/DVD drive 1 option and select host drive radio button
Note: if the ISO file is on the physical machine it is unavailable for the virtual machine to
copy; therefore, always store the data on the ESX Host to copy the file as shown below.
34. Right click on the datastore1 and select browse data store and select the destination
as .sdd.sf
Paraphrase This Document
Need a fresh take? Get an instant paraphrase of this document with our AI Paraphraser
80
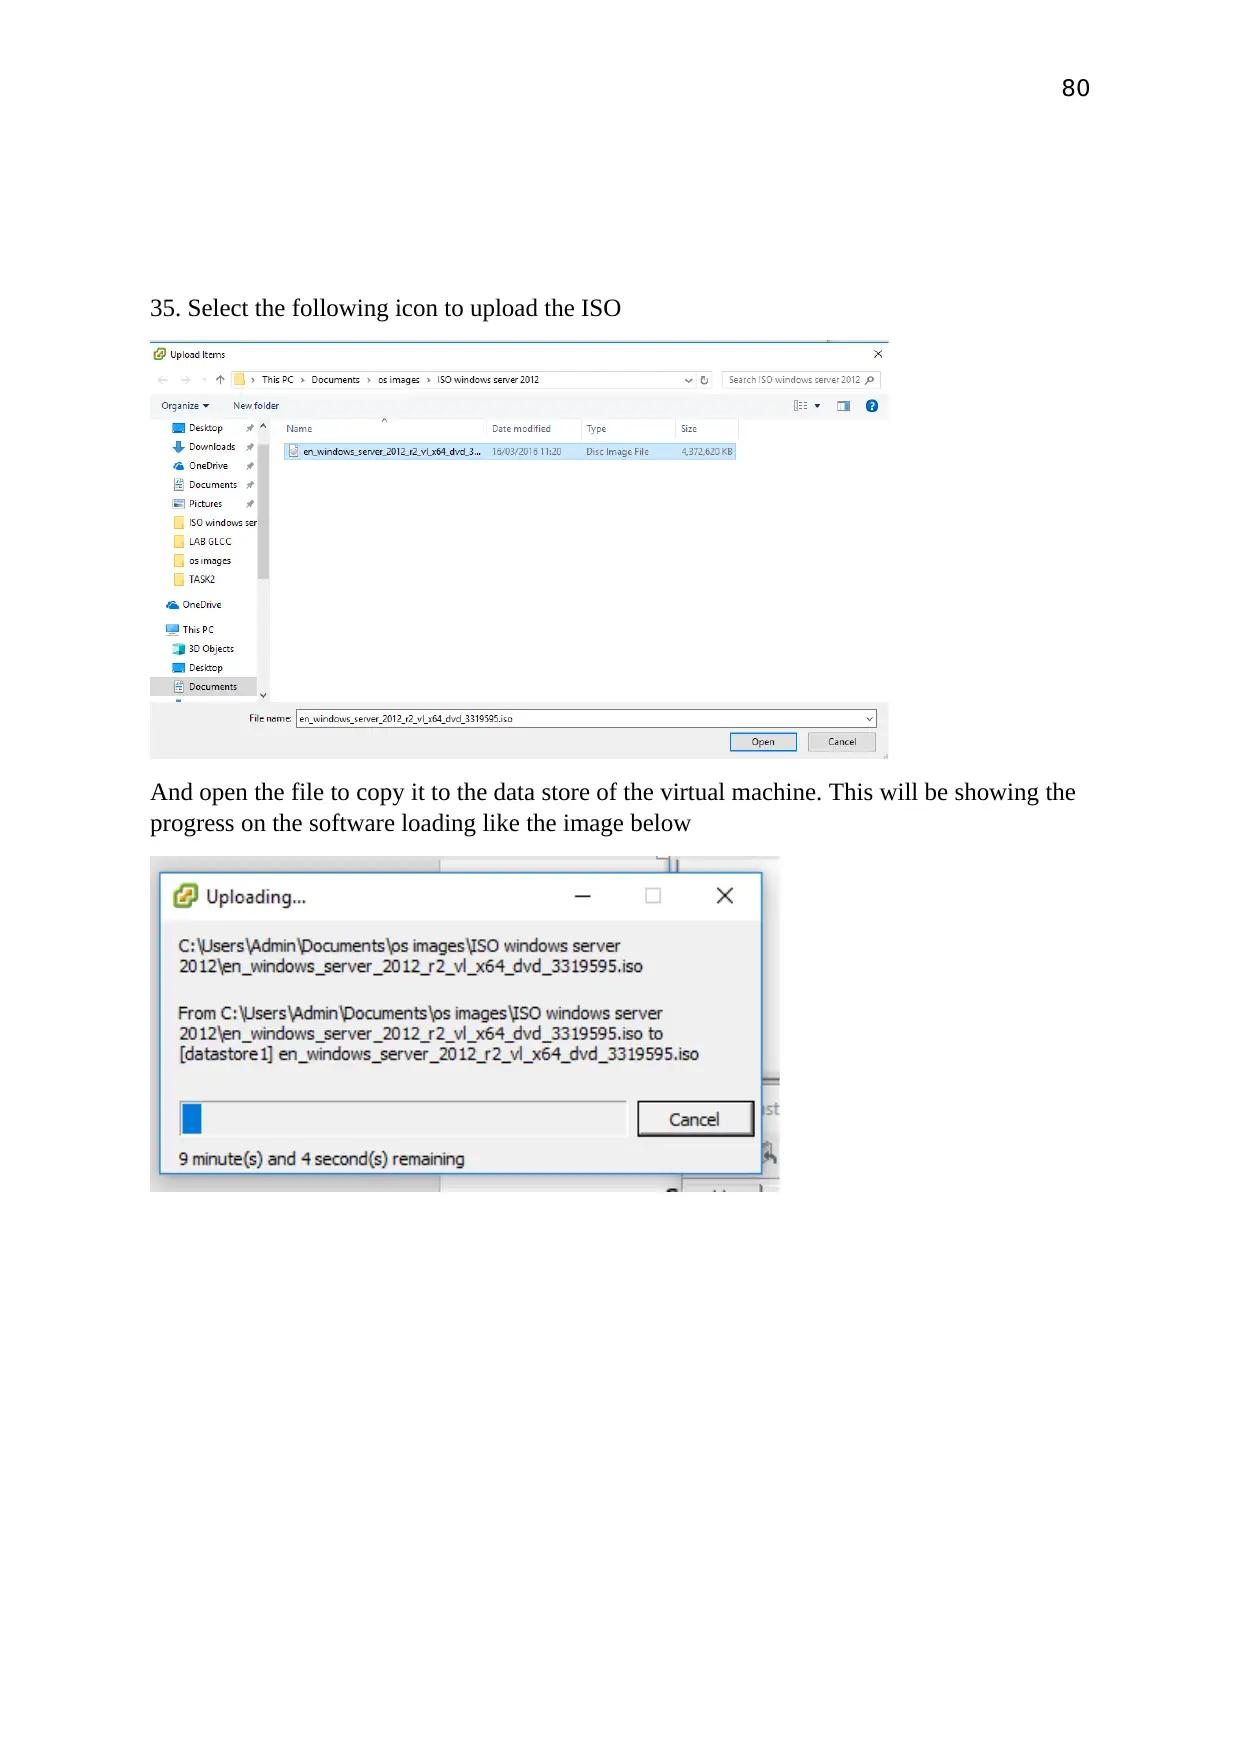
35. Select the following icon to upload the ISO
And open the file to copy it to the data store of the virtual machine. This will be showing the
progress on the software loading like the image below
35. Select the following icon to upload the ISO
And open the file to copy it to the data store of the virtual machine. This will be showing the
progress on the software loading like the image below
81
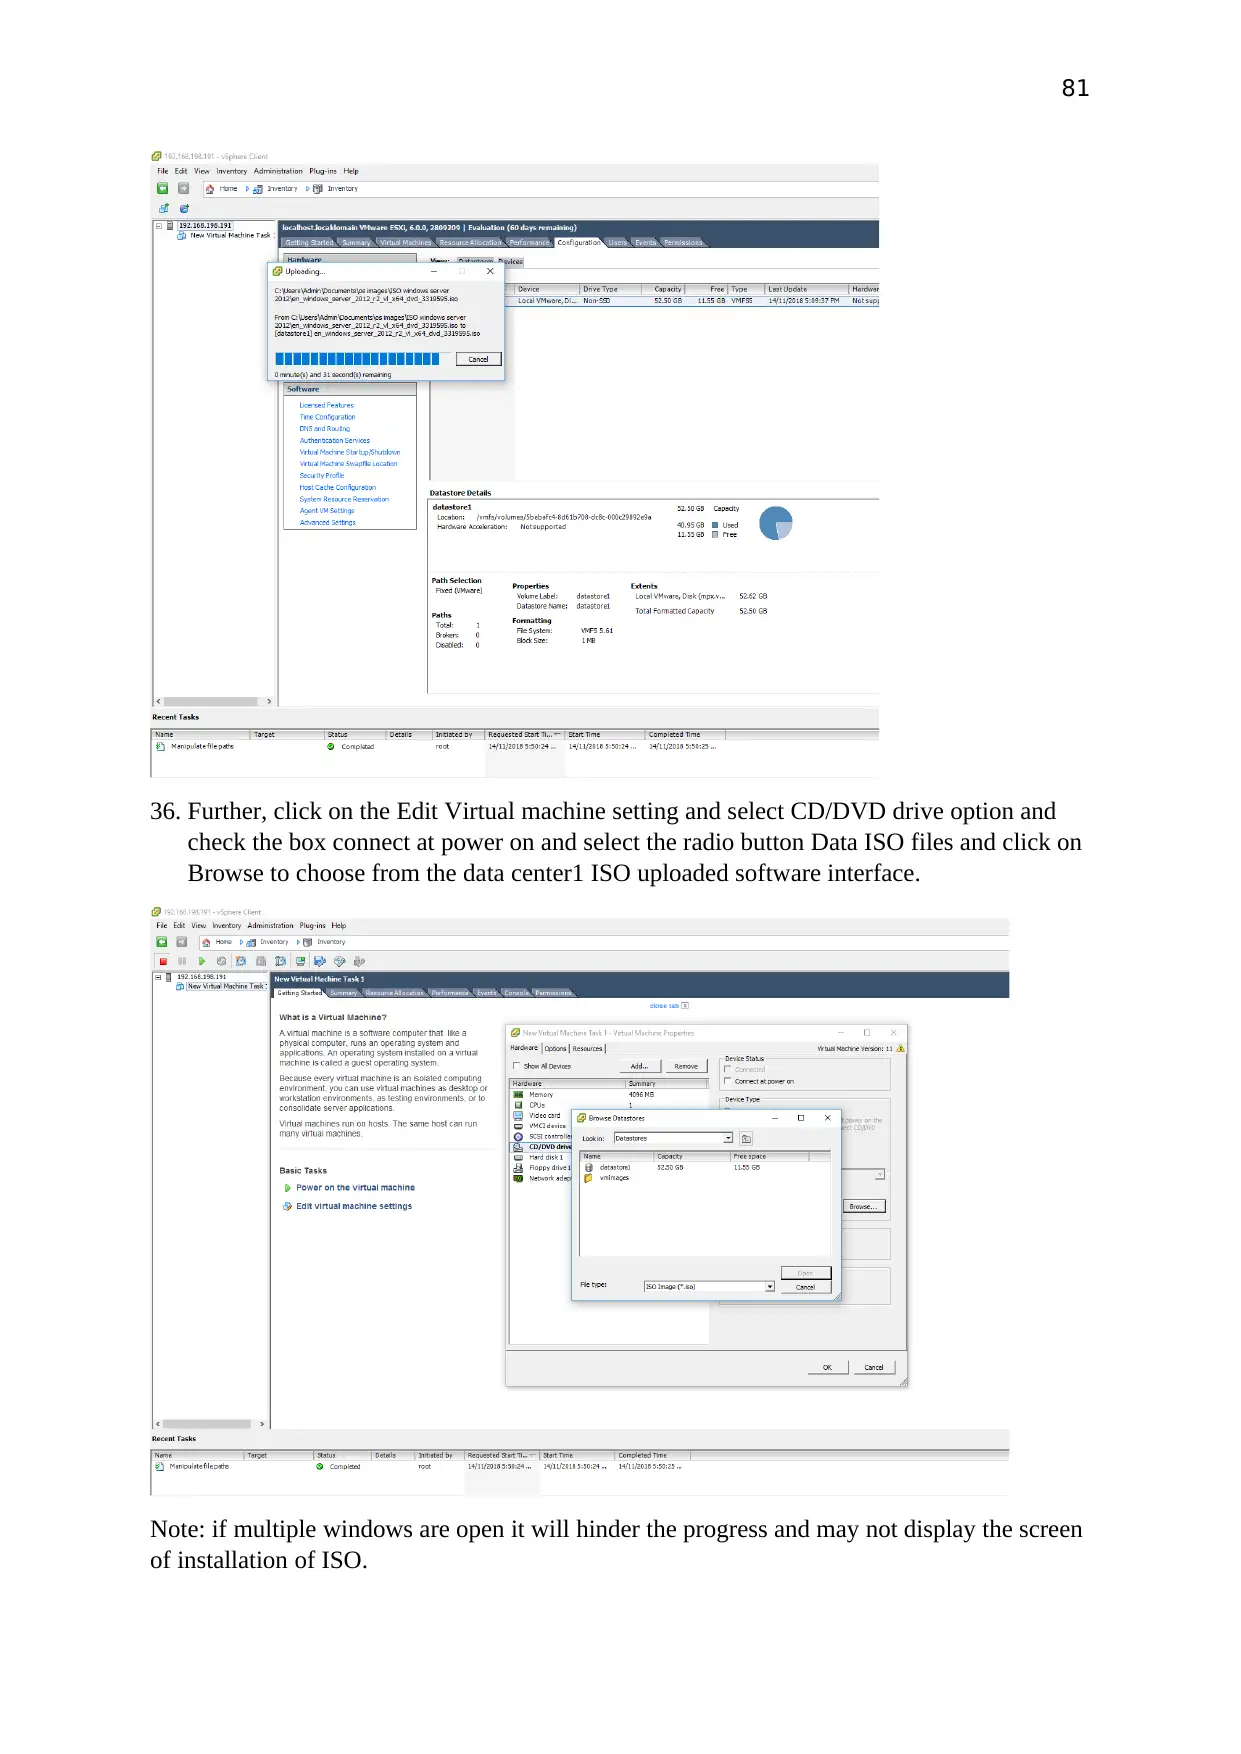
36. Further, click on the Edit Virtual machine setting and select CD/DVD drive option and
check the box connect at power on and select the radio button Data ISO files and click on
Browse to choose from the data center1 ISO uploaded software interface.
Note: if multiple windows are open it will hinder the progress and may not display the screen
of installation of ISO.
82
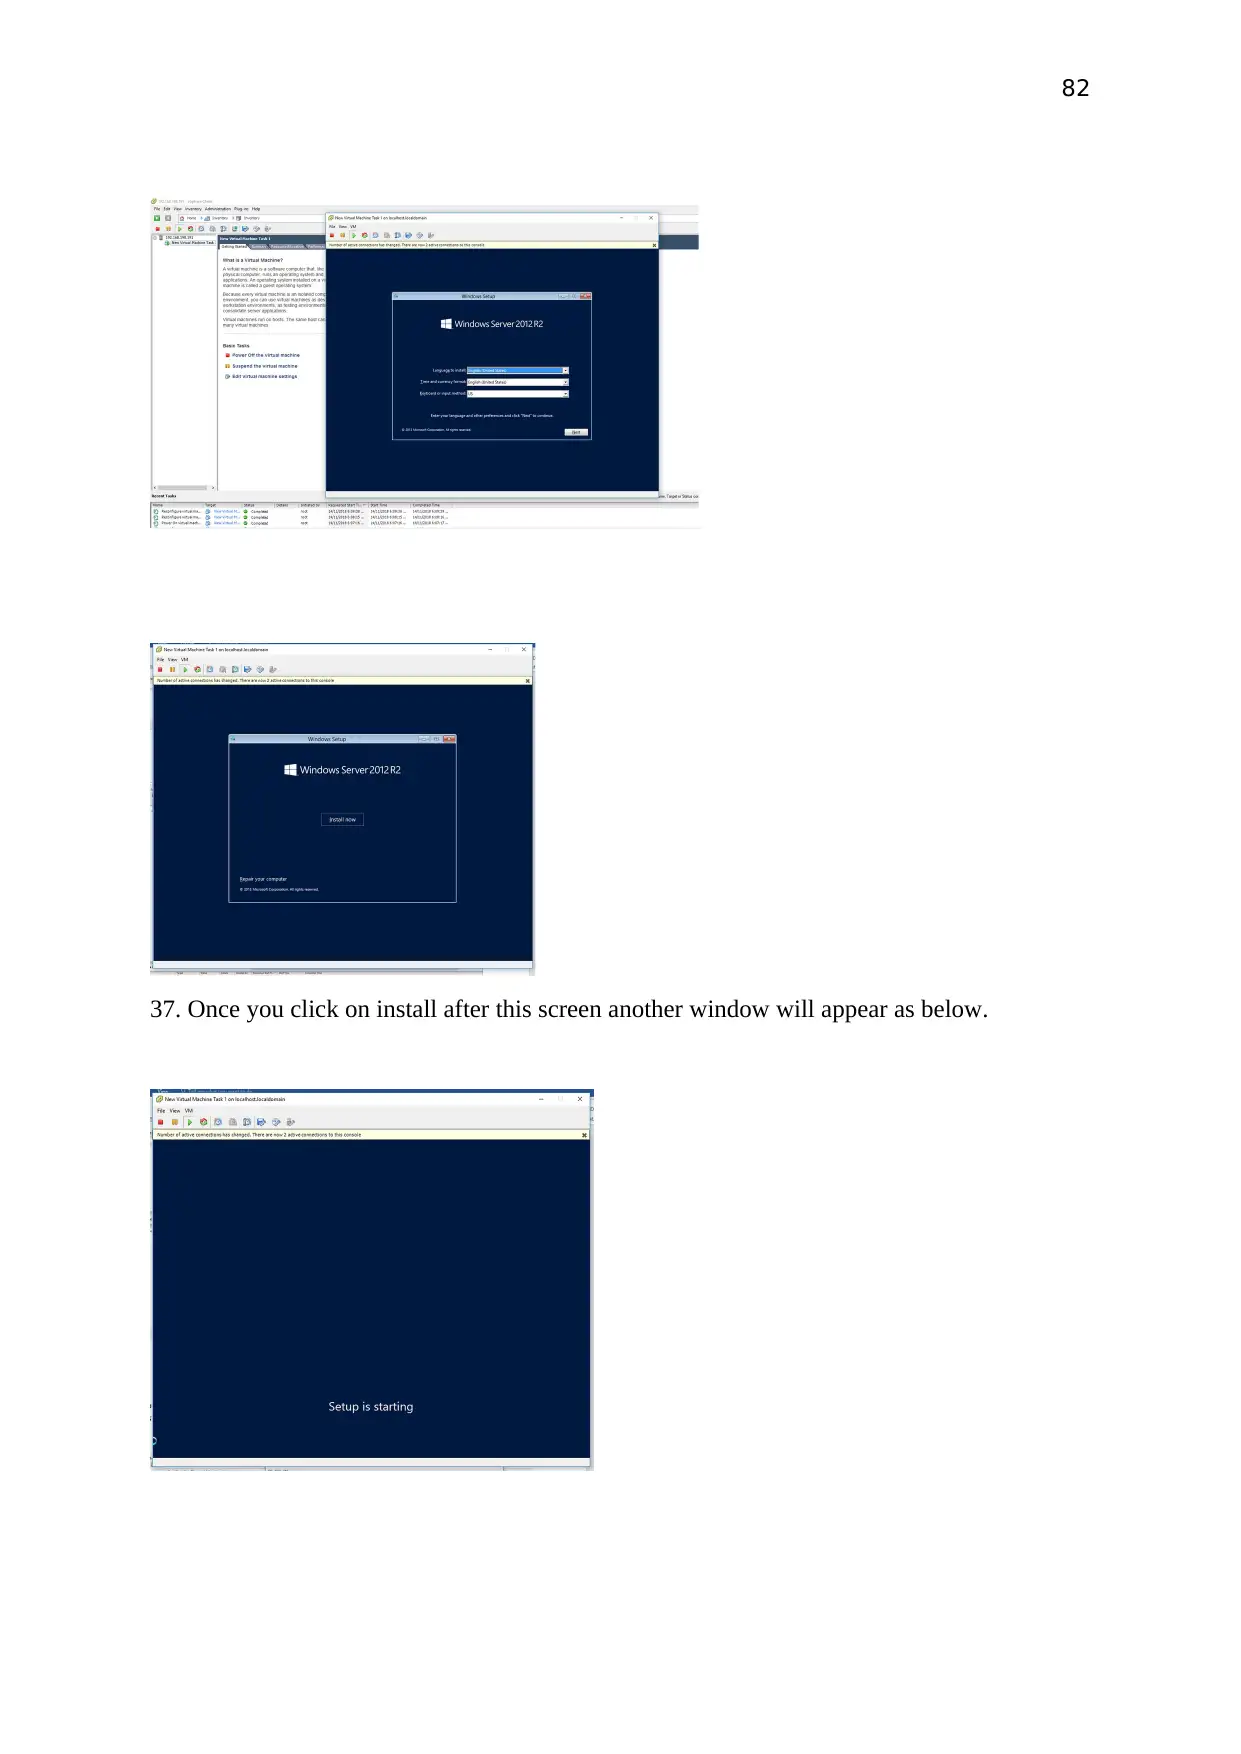
37. Once you click on install after this screen another window will appear as below.
37. Once you click on install after this screen another window will appear as below.
Secure Best Marks with AI Grader
Need help grading? Try our AI Grader for instant feedback on your assignments.
83
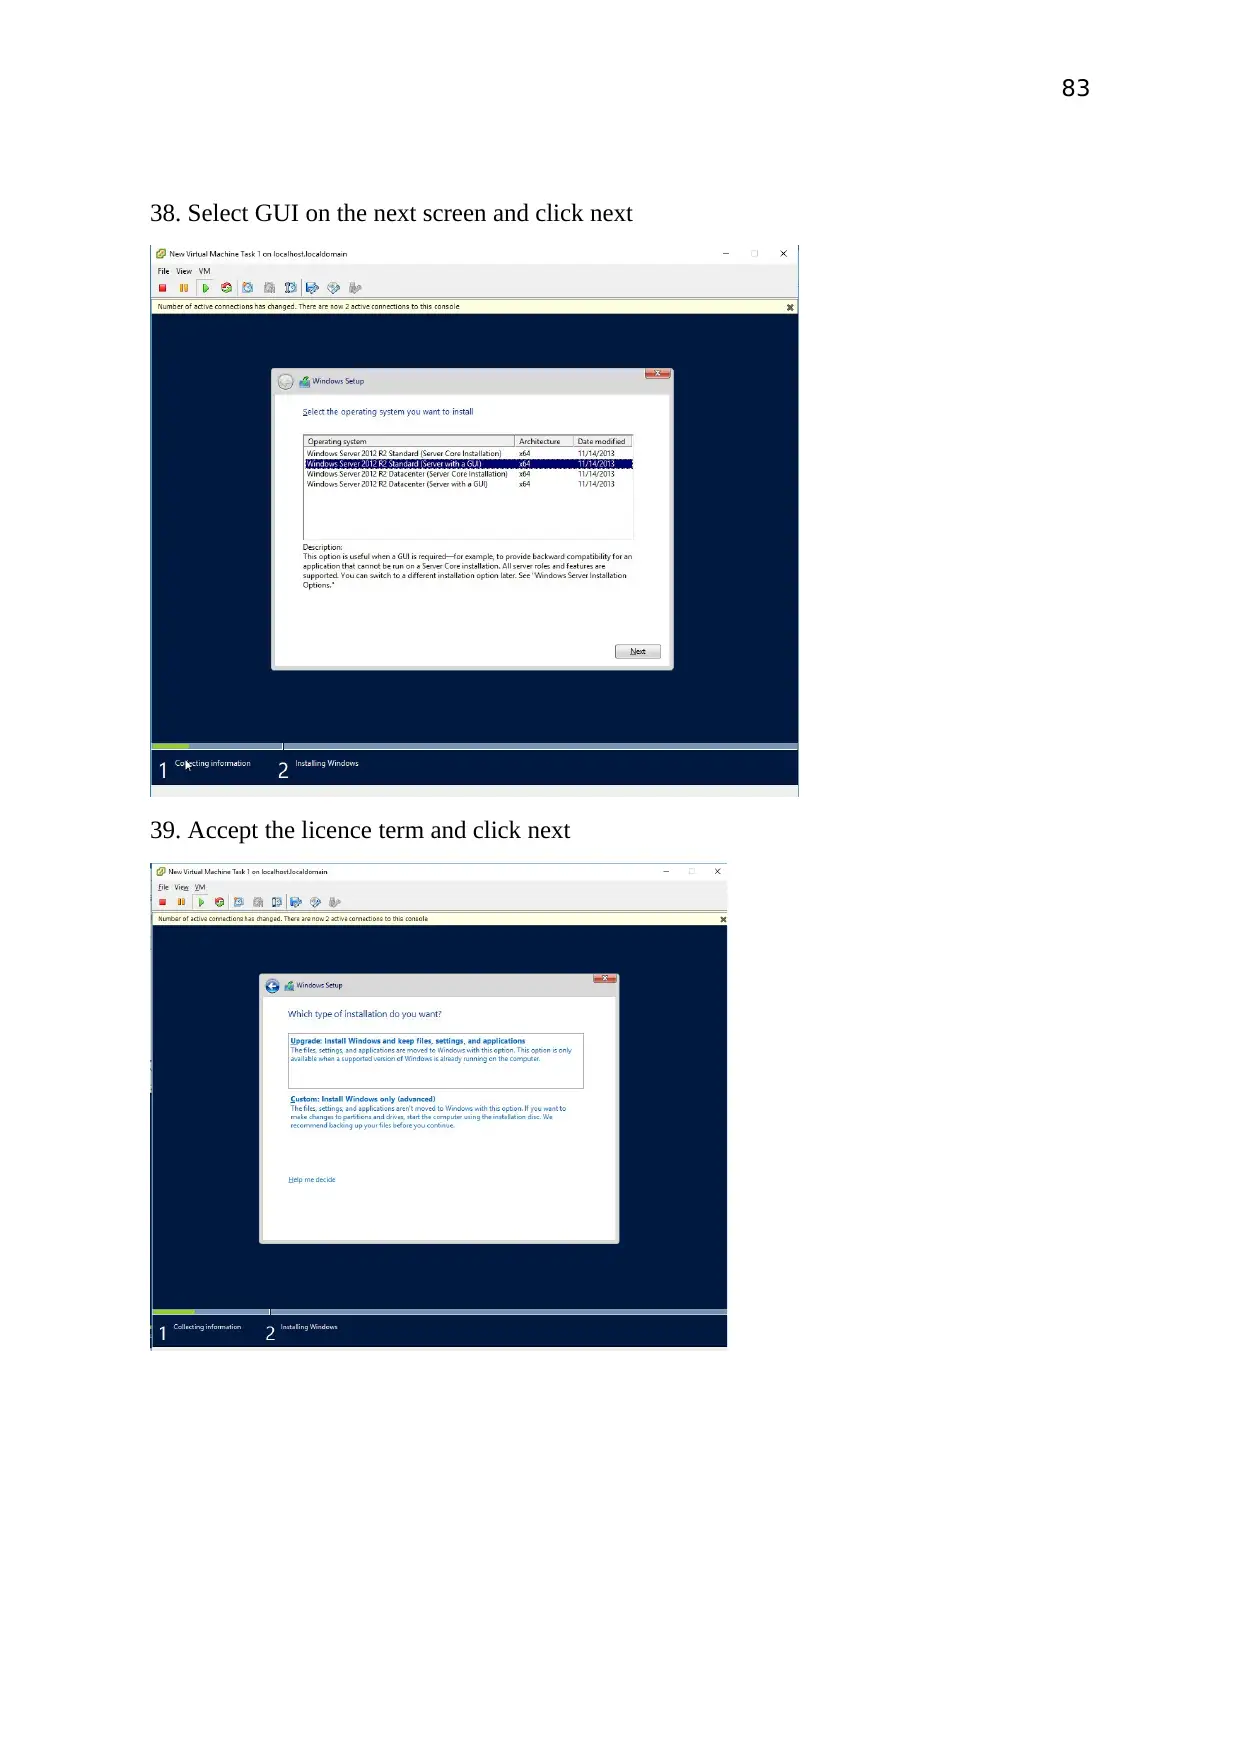
38. Select GUI on the next screen and click next
39. Accept the licence term and click next
38. Select GUI on the next screen and click next
39. Accept the licence term and click next
84
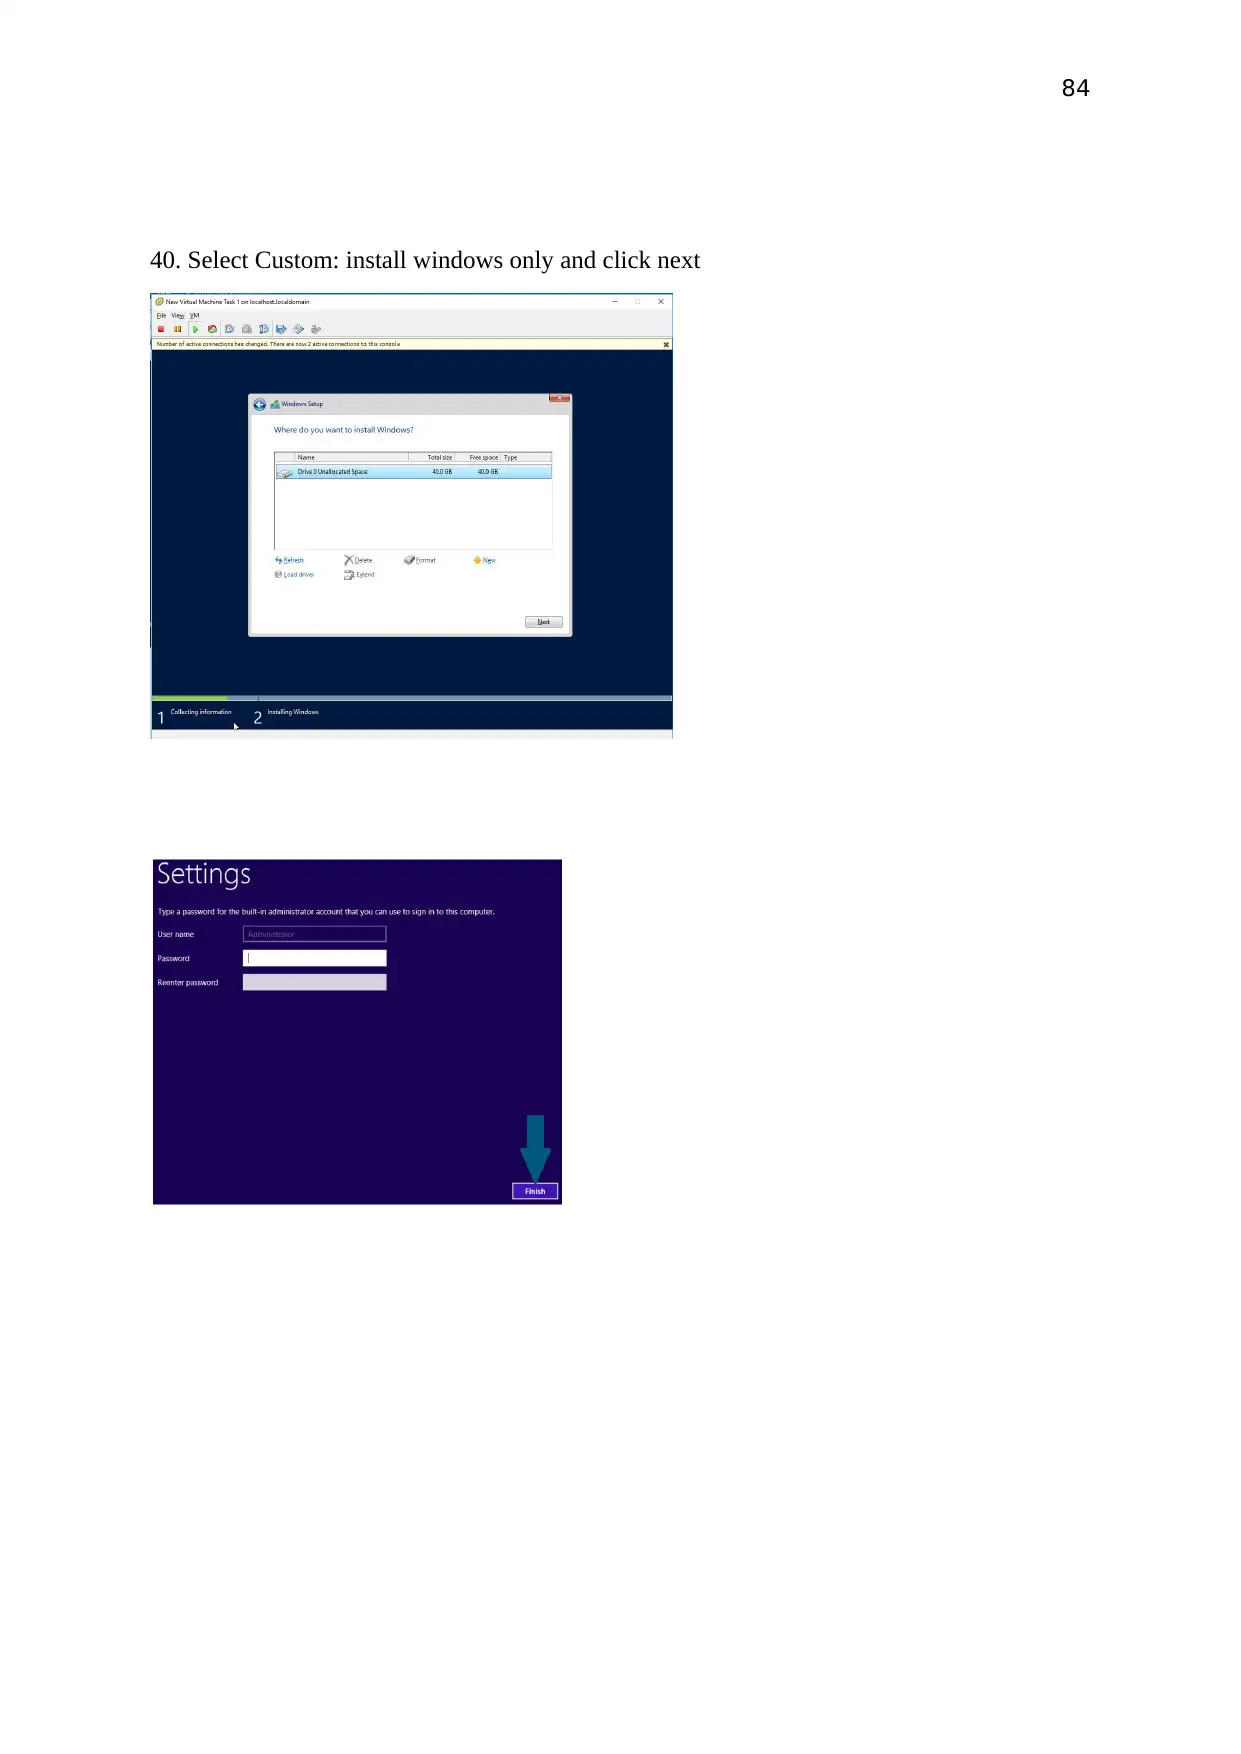
40. Select Custom: install windows only and click next
40. Select Custom: install windows only and click next
85
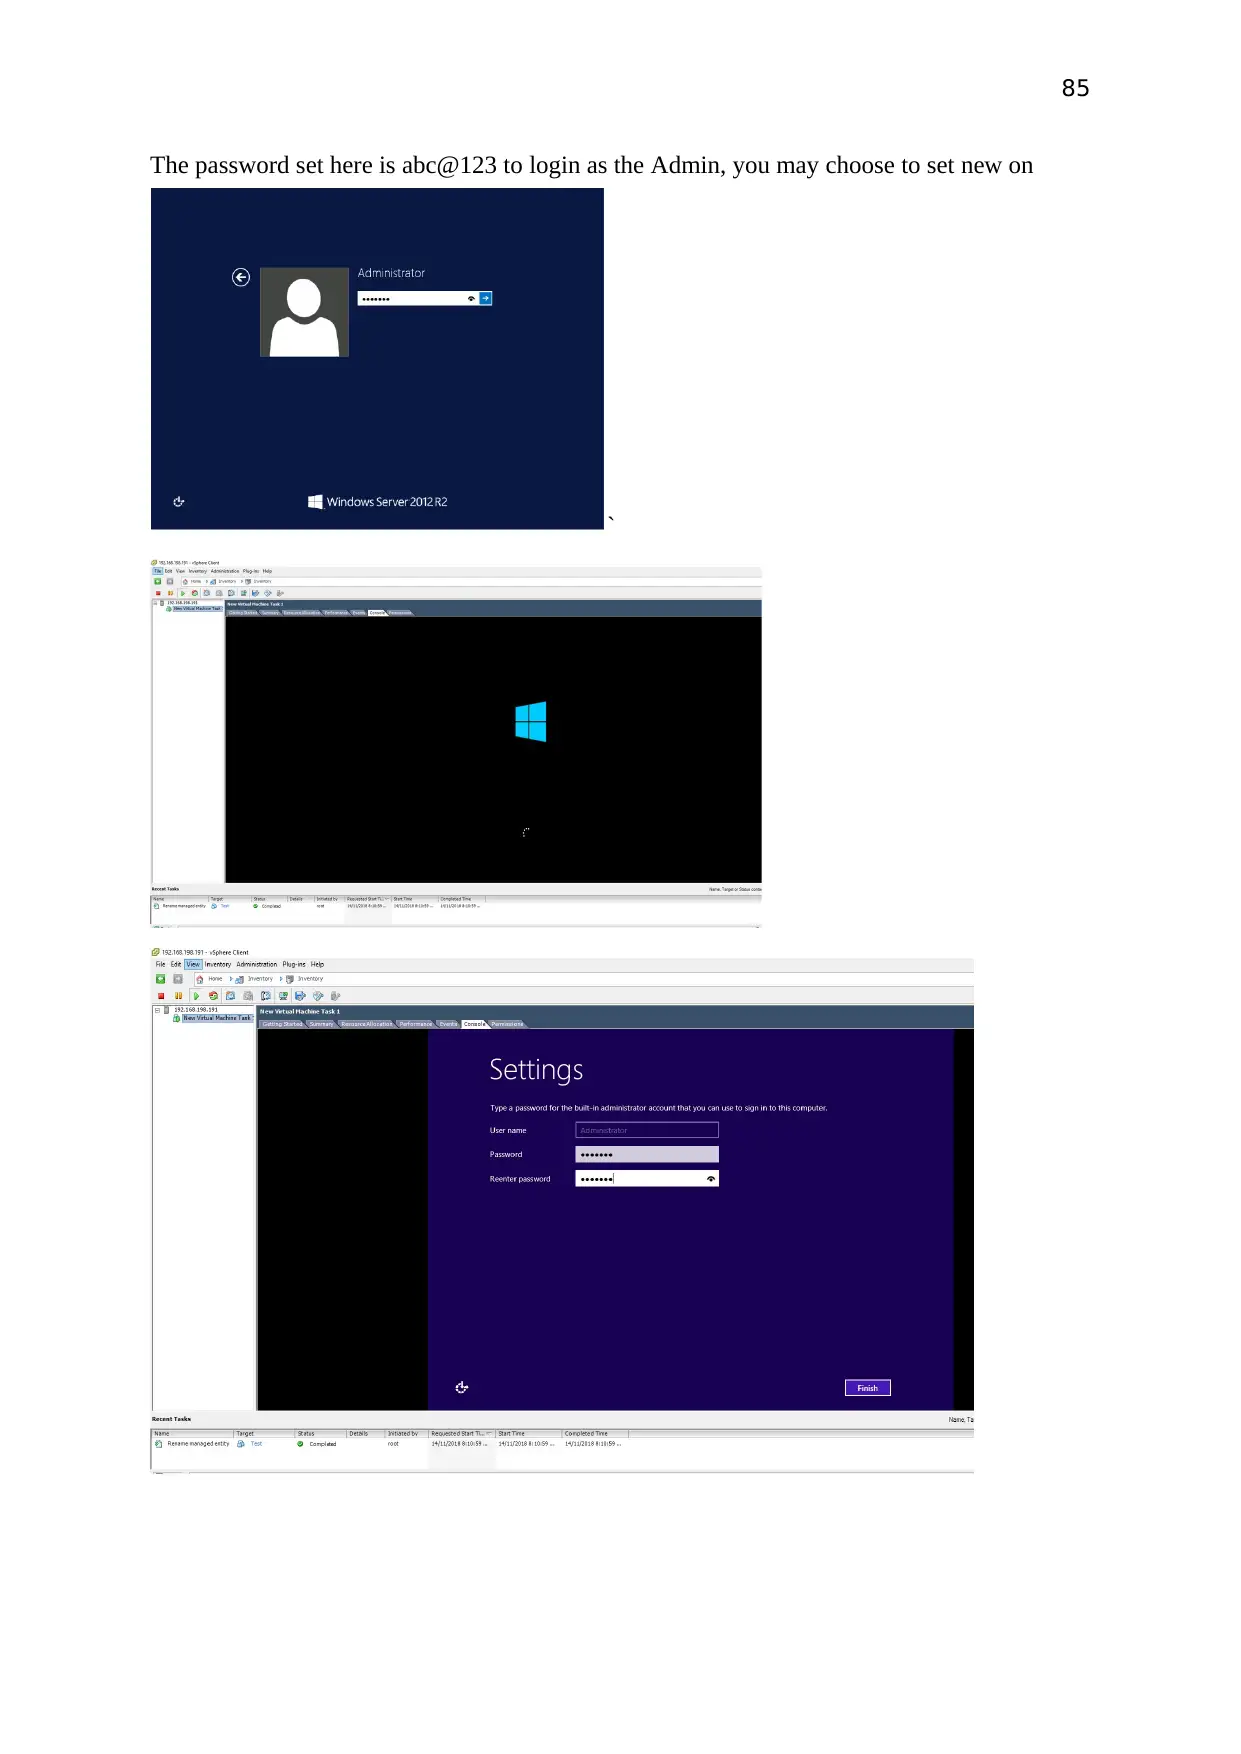
The password set here is abc@123 to login as the Admin, you may choose to set new on
`
The password set here is abc@123 to login as the Admin, you may choose to set new on
`
Paraphrase This Document
Need a fresh take? Get an instant paraphrase of this document with our AI Paraphraser
86
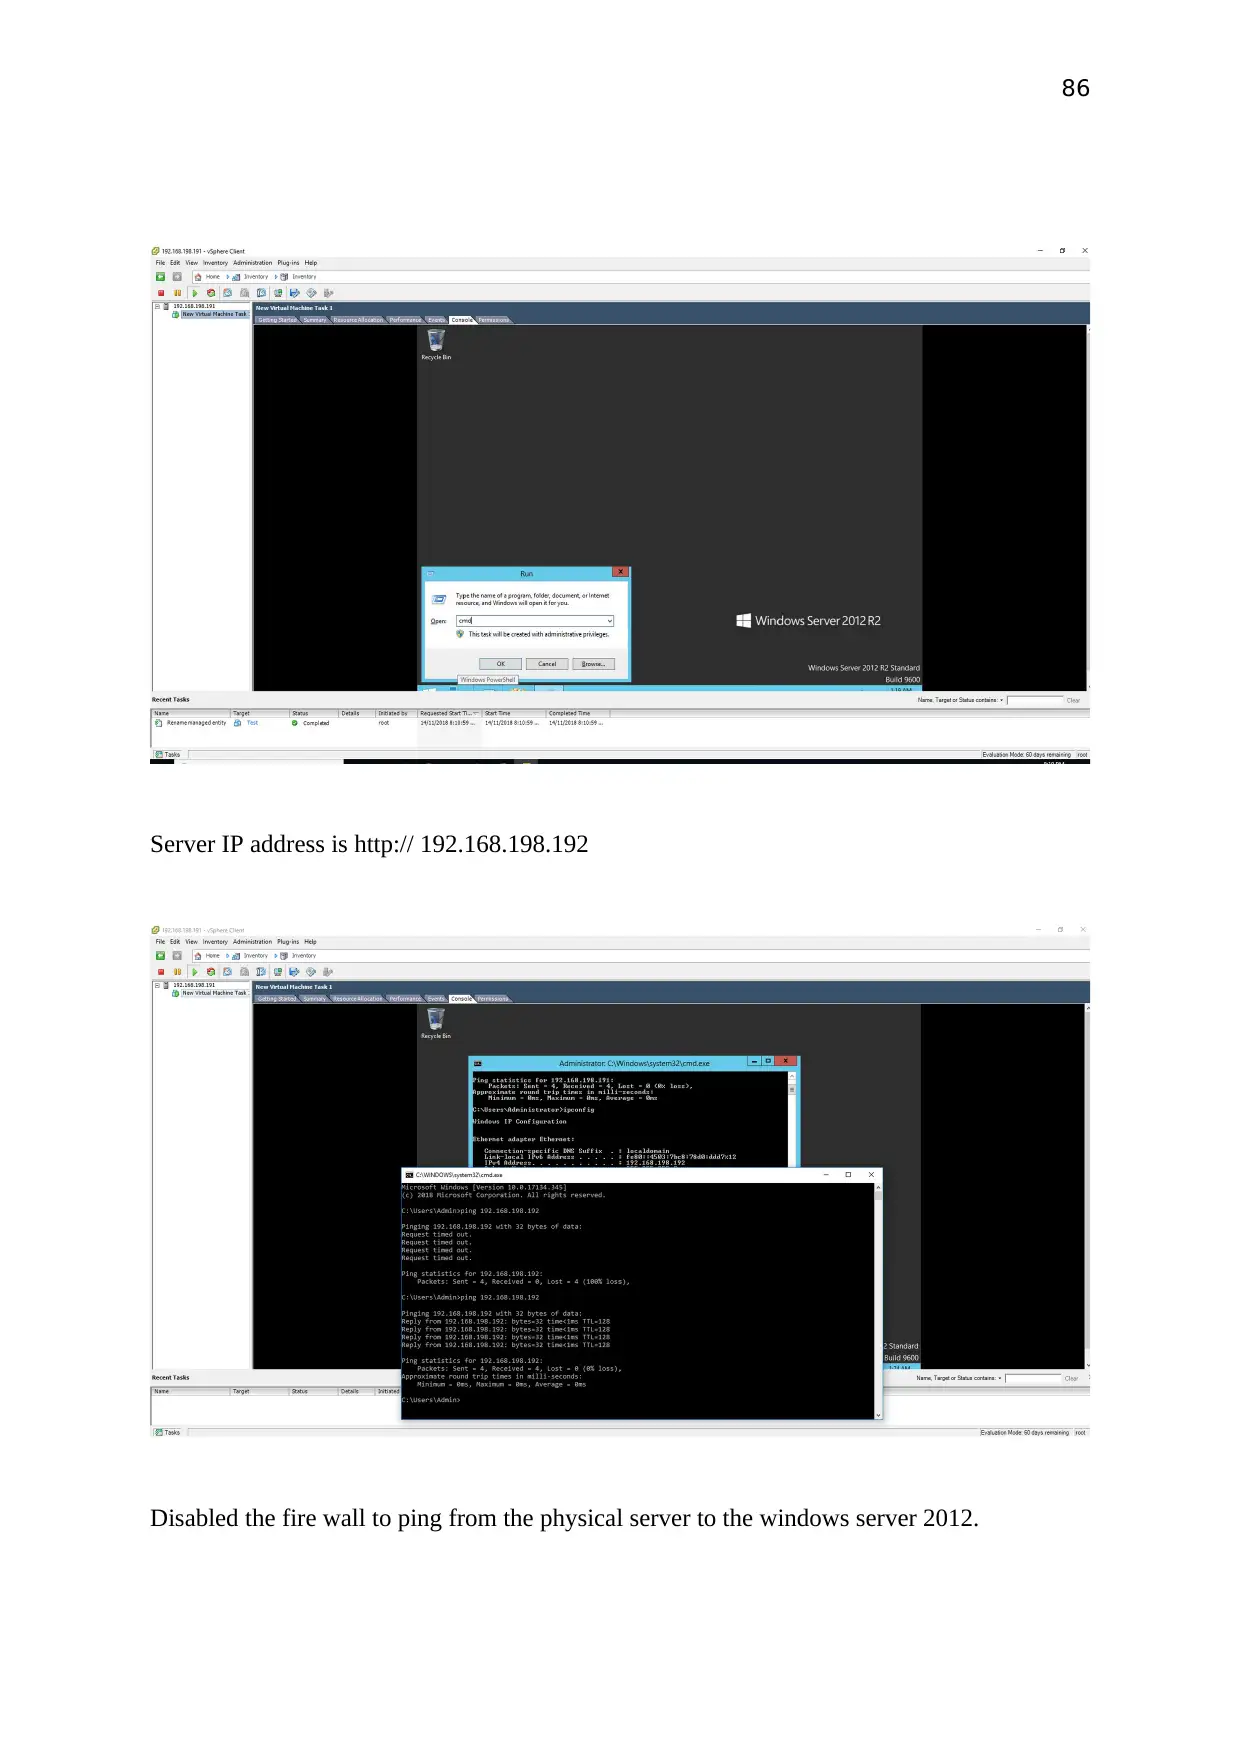
Server IP address is http:// 192.168.198.192
Disabled the fire wall to ping from the physical server to the windows server 2012.
Server IP address is http:// 192.168.198.192
Disabled the fire wall to ping from the physical server to the windows server 2012.
87
WHS procedures observed:
During the establishment of this project the WHS policy has been incorporated and
are adhered to at every stage of the project per se, before commencing the activities
the Team supervisor in charge has spotted the major risk and hazards which may
impact the project directly; further, the WHS system of the client has been outlined in
the project system in order to accomplish the customer’s requirements as per the
health and safety terms.
Moreover, the project manager has included on a daily basis, specific times
throughout the shifts to have scheduled breaks, allowing time for the workers to relax
from their routine at work so as to take care of their health. All of the necessary steps
have been implemented to avoid any accident, which might occur in the absence of
the specific ICT WHS rules. All the items have been covered in the WHS policy
which was previously disclosed and explained to the team members for their health
and well-being.
Request and the approval letter:
APPROVAL LETTERS
To,
Osben Koji
Senior Project Manager
Danford College
Subject – Seeking approval for developing Virtualisation environment
Mr. Koji,
Based on the needs outlined by your company IT technicians to address the commercial and
the business requirements, I would implore you to grant use the permission to develop server
virtualisation on the current workstations to incorporate sustainable ICT practice, which can
fully utilize the capacity of the current hardware and also be a cost-effective to accommodate
As massive amount of data on the existing physical hardware established in an ESXi
environment. Therefore, your consent will be much regraded in implementing, testing and in
finalising the outcome of the project.
88
Anticipating to receive your approval on the above discussed matter.
Regards,
Swathi Keerthi
ICT Networking Technician
Consent Letter
From,
Osben Koji
Senior Project Manager
Danford college
Subject: Approval granted to continue the project
Ms. Swathi Keerthi,
I would like to bring it to your notice that the company’s management is pleased to grant the
approval to develop the server virtualisation for a sustainable ICT management, designed in a
ESXi 6.0 environment. I request you to fulfil certain company’s legal prerequisites before we
continue further with the server virtualisation project.
Please refer to the company’s policies and the obligations mentioned in the official approval
sent out to you. If you have any other questions, please contact us immediately.
Regards,
Osben Koji
Danford College
Secure Best Marks with AI Grader
Need help grading? Try our AI Grader for instant feedback on your assignments.
89
DETAILED TASK LIST
Installation
Download and install VirtualBox in physical device.
Download the ESXi 6.5 ISO image from the VMware original website.
Download the Windows Server 2012 ISO image from the Windows website.
Set up a new VM according to the business needs and installing all the outlined technical
aspects.
Run the VM and install ESXi
Log into the ESXi UI in your browser and create a new VM
Set it up following the customer’s requirements
Install the OS
Configuration
Configure the network settings for the EXSi.
Configure the Windows Server environment.
Testing
Check the communication using a ping test,
CONCLUSION
To conclude, I have installed and integrated a virtual server in a network to avoid the need to
employ multiple physical servers, reducing energy consumption and additional physical
devices. Since this virtual machine has replaced the need of multiple devices as this
individual server has meet the sustainability targets aimed of.
90
SIGN OFF
I ____________________________acknowledge receiving the virtual networks, which have
the following agreements:
- The project was accomplished in time.
- The results satisfied the requirements
- Please refer to the checklist attached.
- Outcomes meet the project scope and quality.
- Documentation has been committed
- Project reaches its objectives and can be closed as appropriate.
- Project performers are no more responsible for further development without any new
billing.
Customer signature :________________________________
Date: _________________________________

91
Paraphrase This Document
Need a fresh take? Get an instant paraphrase of this document with our AI Paraphraser
92
Task No. 2 - Virtual Server Installation (KVM on an Ubuntu Server)
Proposal Plan
Installation
The server will be placed on a Windows-based environment. This will be configured as per
the needs of the client. To achieve this the most preferable hypervisor will be Oracle
VirtualBox.
Configuration
The hardware required are:
Ram - 1gb
OS: Ubuntu Server 18.04.1
Storage: 10GB
Testing
To confirm if the server is working, I am going to use the command prompt and ping the
linux command to test the KMV.
Report on partial Activity:
93
Purpose
I am designated to develop a server employing Ubuntu Server software, to cater to the needs
of a medium sized firm for their business and commercial needs.
Requirements
Application Component Software Version Hardware Requirements
Ubuntu Server 18.04.1 2.5 GHz Intel Core i5
1024 MB RAM
10 GB Memory
Procedures
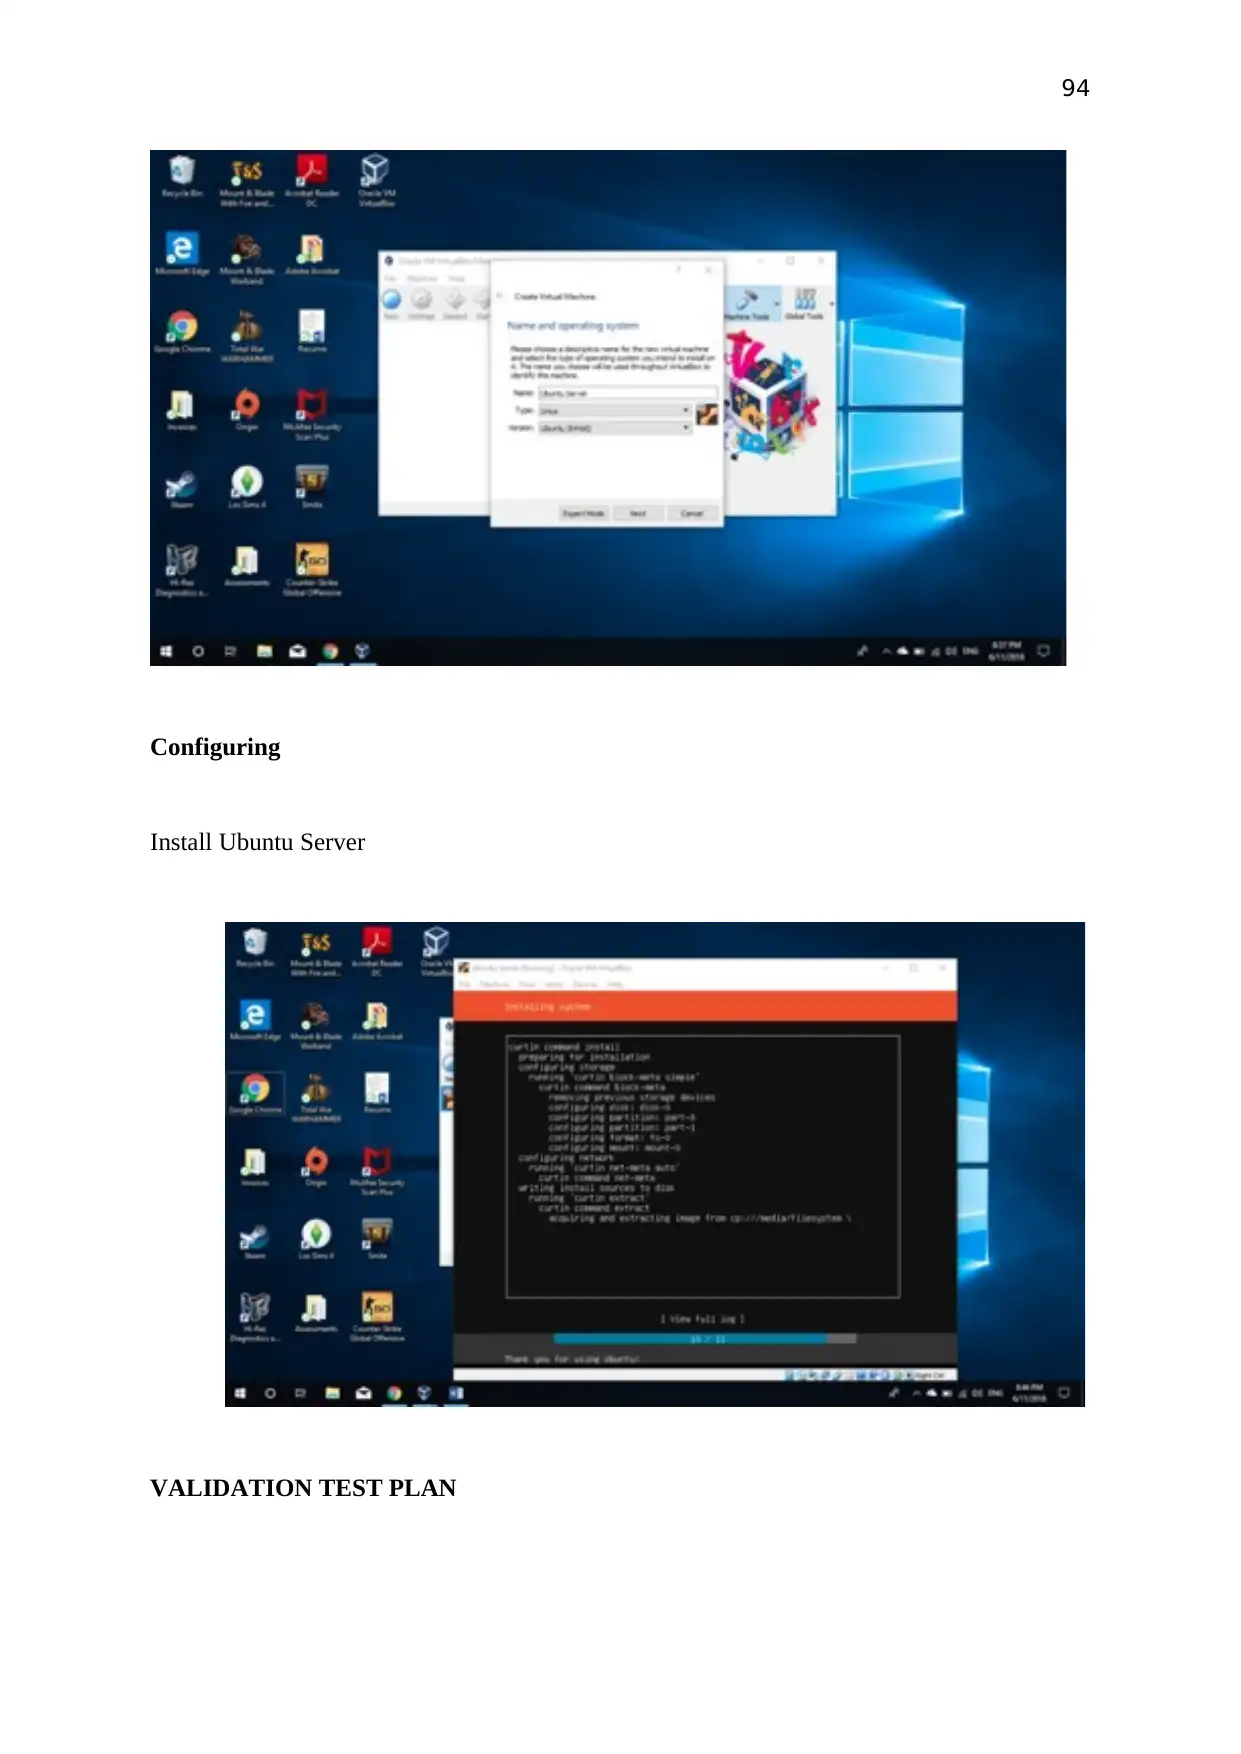
Installing
I plan to use VirtualBox to establish a virtual machine to run the ESXi Set it up as per the
need
94
Configuring
Install Ubuntu Server
VALIDATION TEST PLAN
Configuring
Install Ubuntu Server
VALIDATION TEST PLAN
Secure Best Marks with AI Grader
Need help grading? Try our AI Grader for instant feedback on your assignments.
95
The KVM is going to be tested using the command $ sudo kvm - ok the test will be successful
when you get the response NFO: /dev/kvm exists KVM acceleration can be used
USER DOCUMENTATION
Please be advised that this softwares are going to be installed using VirtualBox in its latest
version.
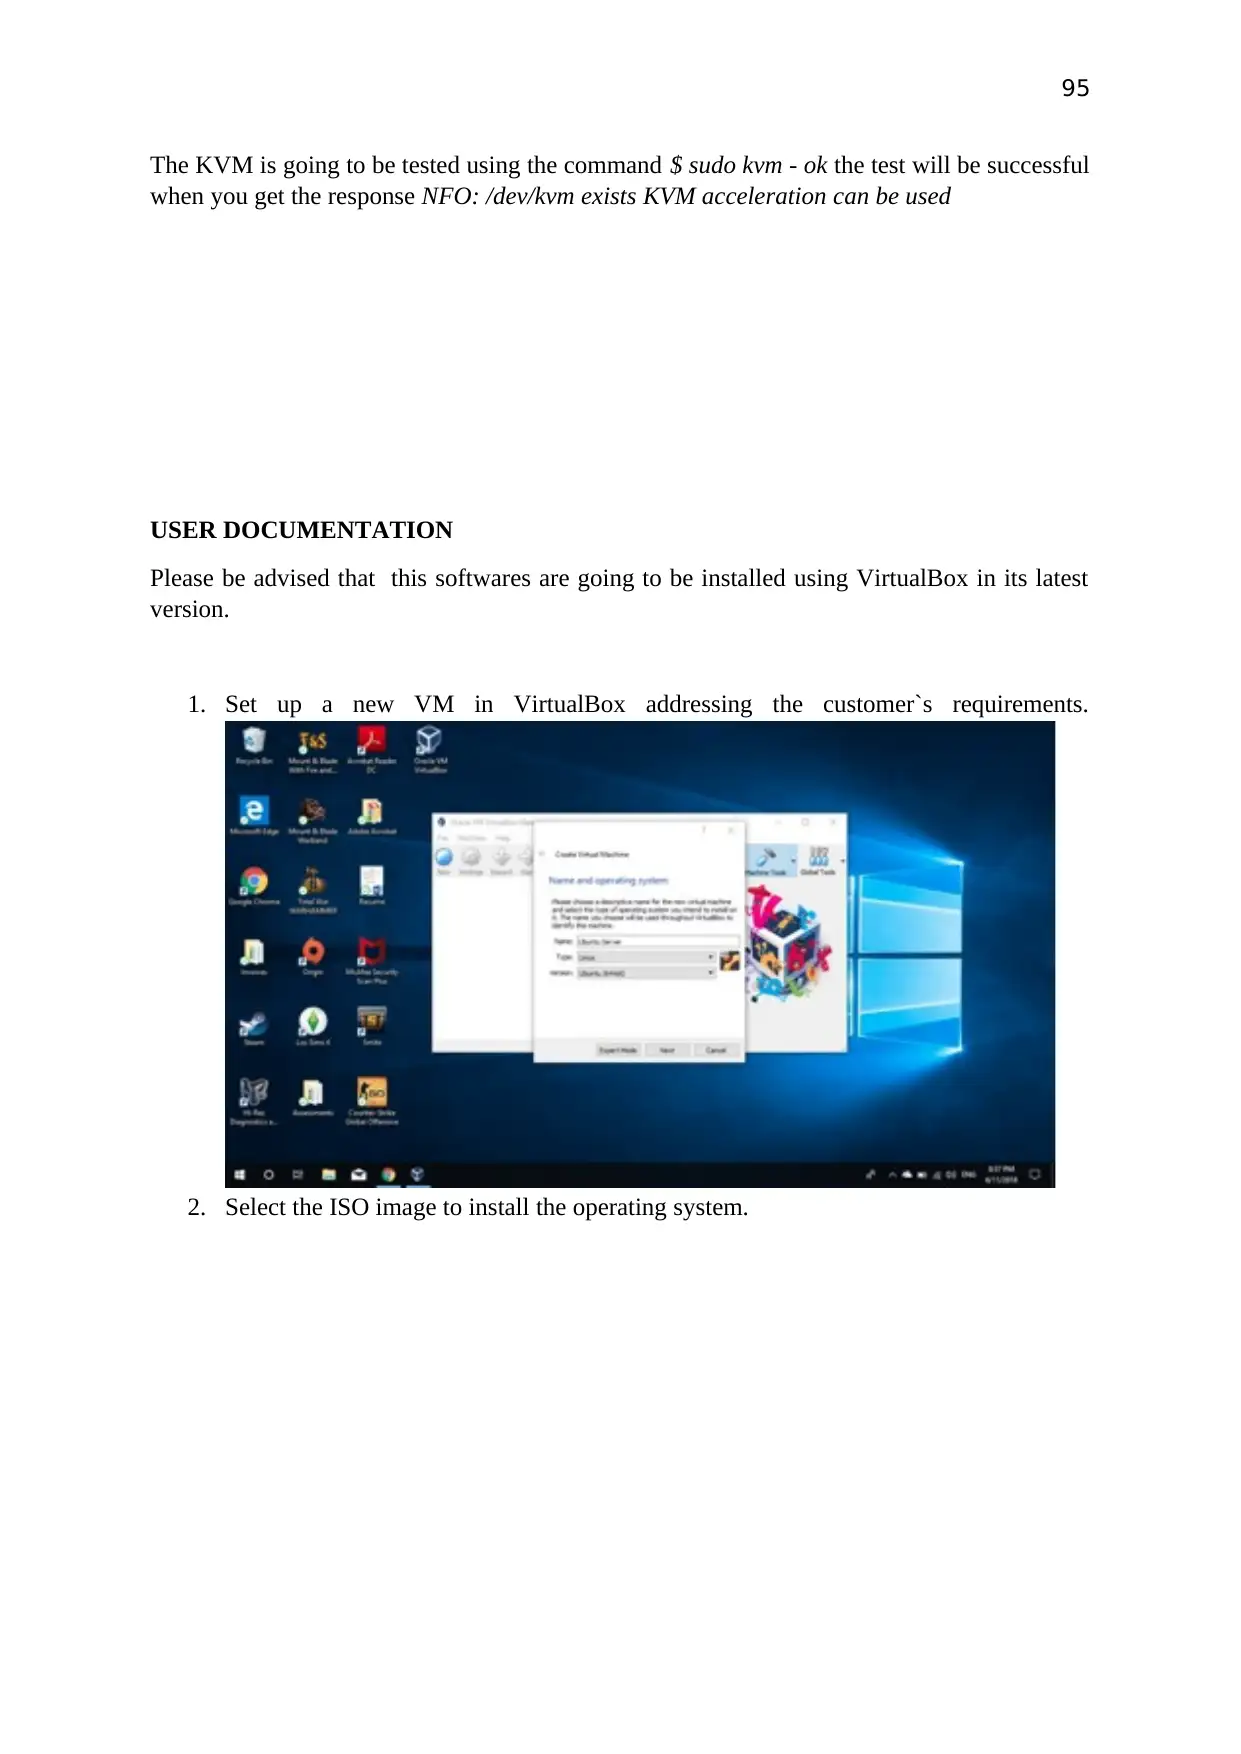
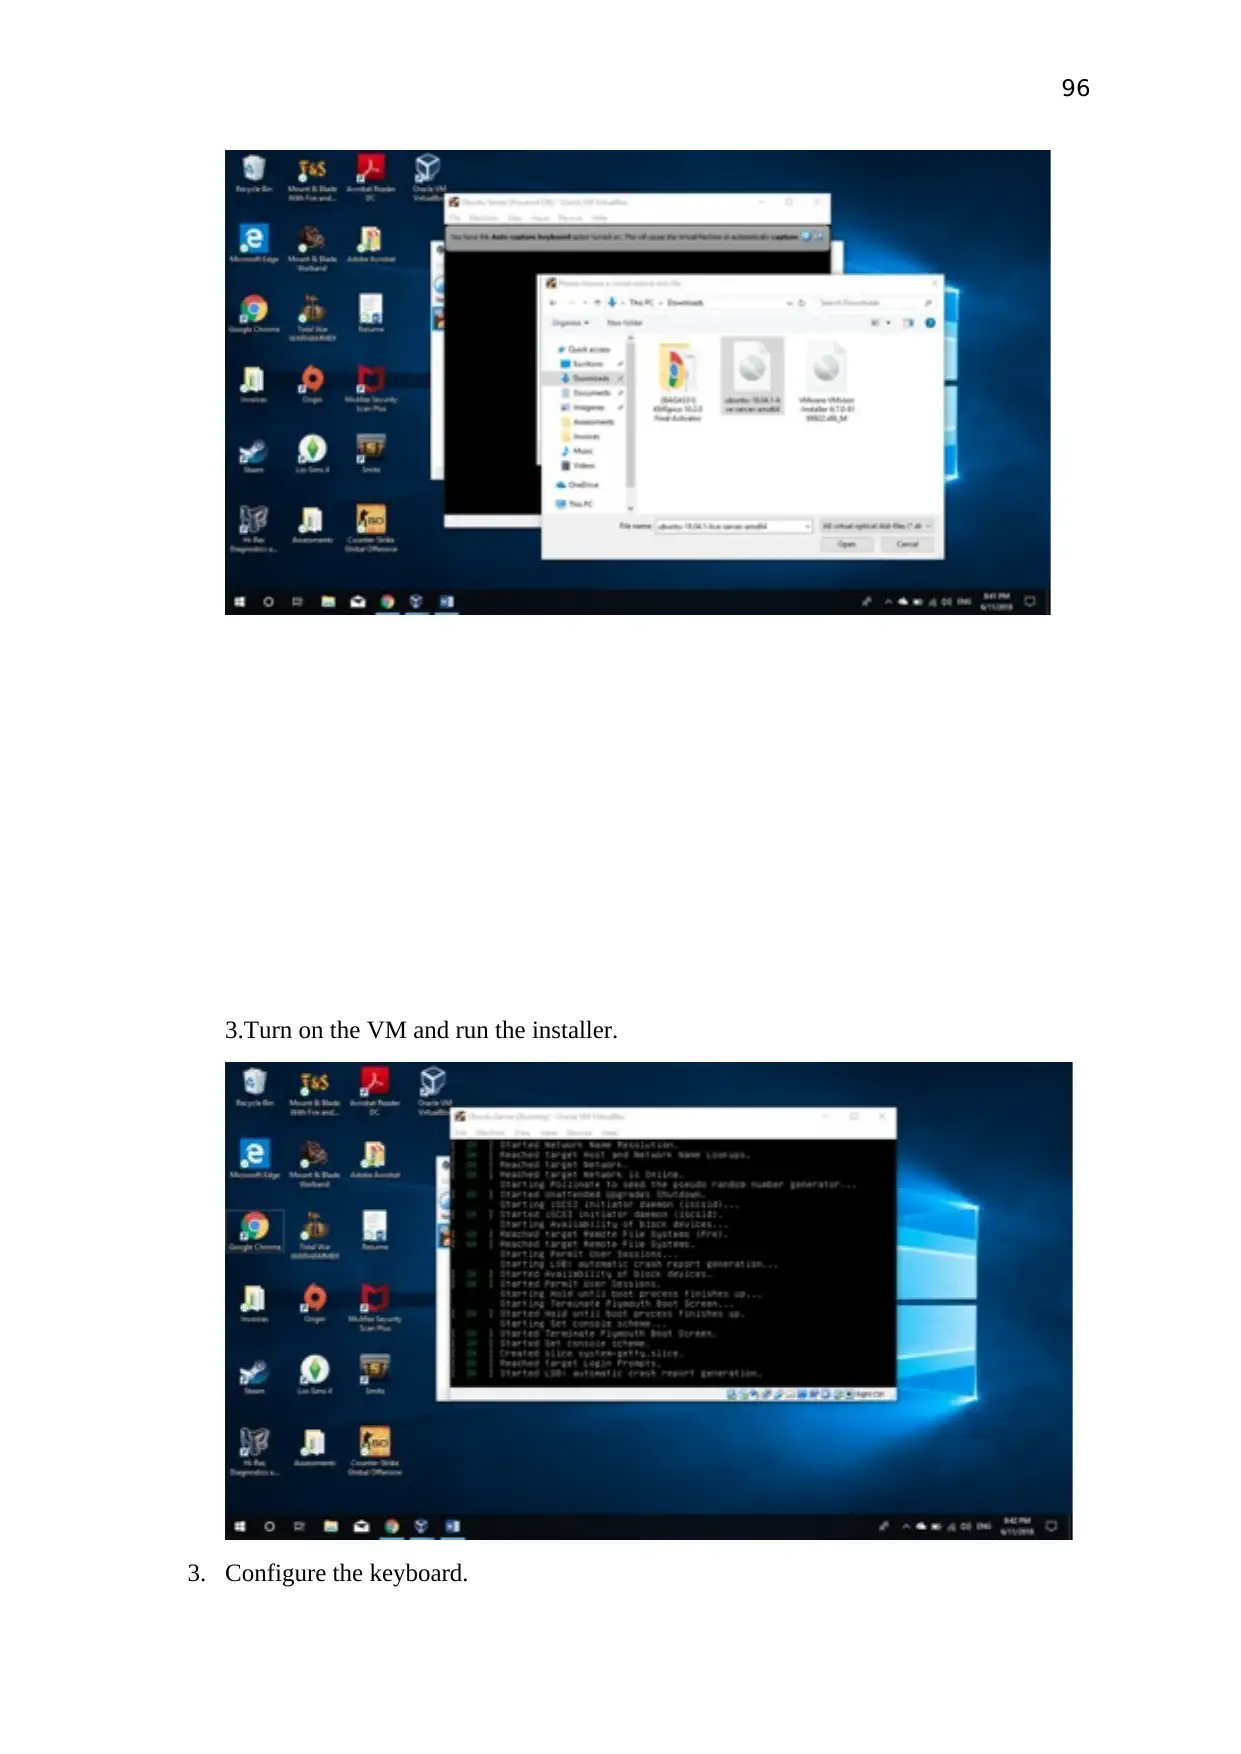
1. Set up a new VM in VirtualBox addressing the customer`s requirements.
2. Select the ISO image to install the operating system.
96
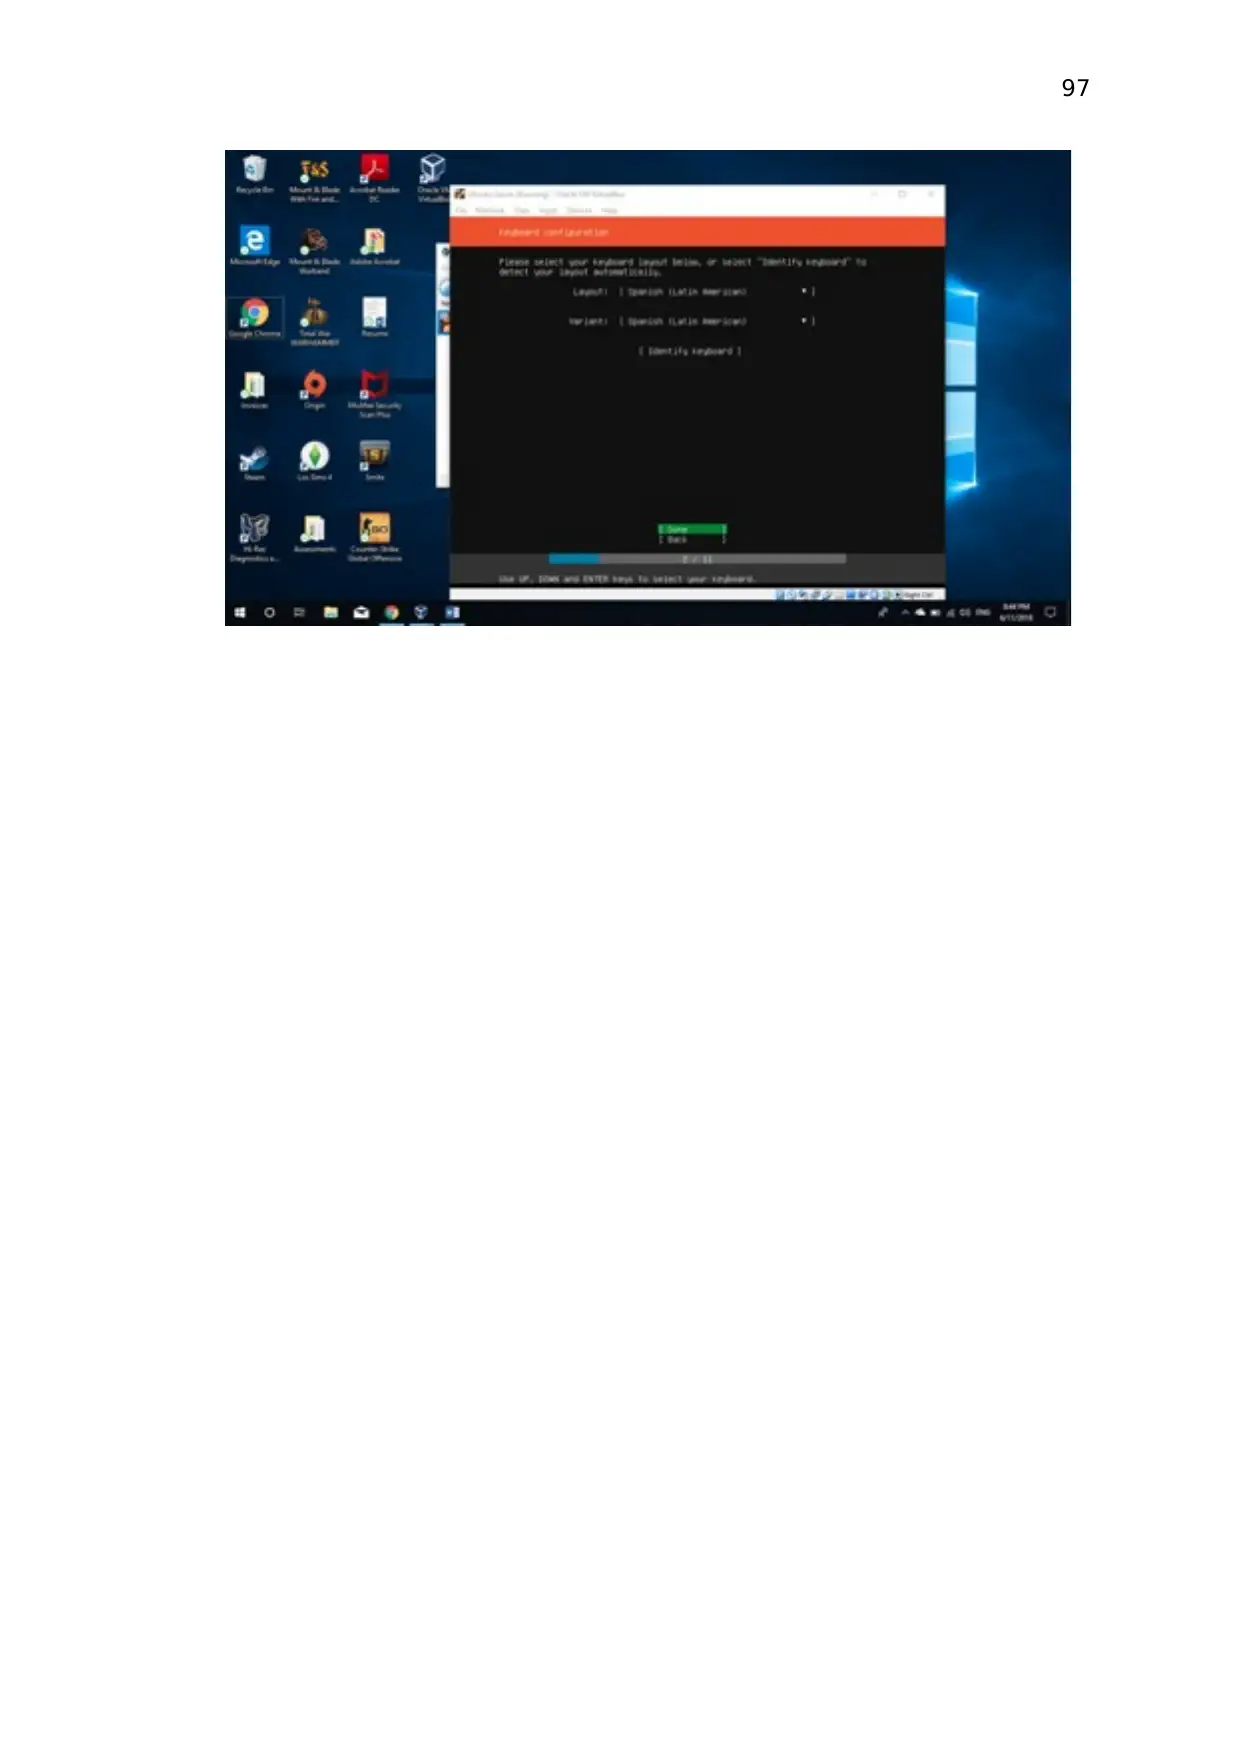
3.Turn on the VM and run the installer.
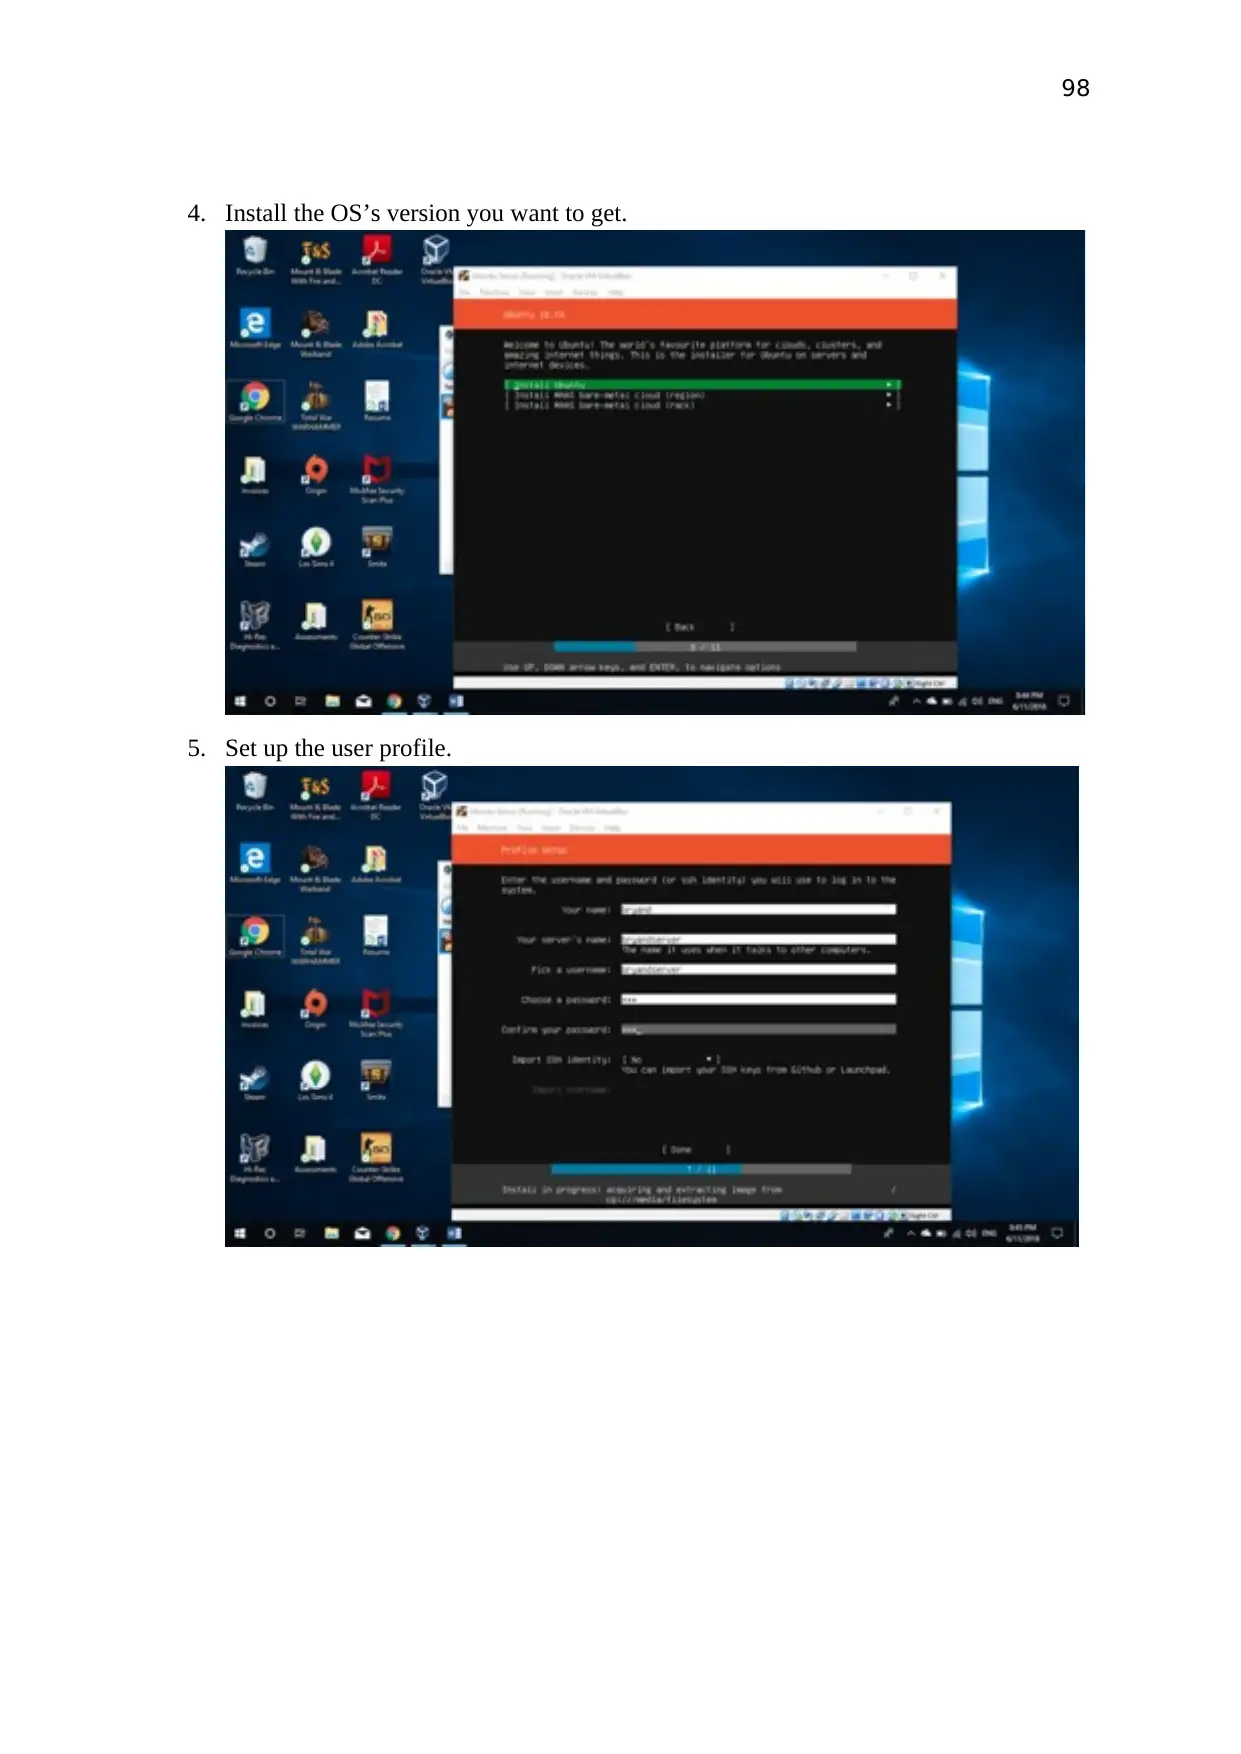
3. Configure the keyboard.
3.Turn on the VM and run the installer.
3. Configure the keyboard.
97
Paraphrase This Document
Need a fresh take? Get an instant paraphrase of this document with our AI Paraphraser
98
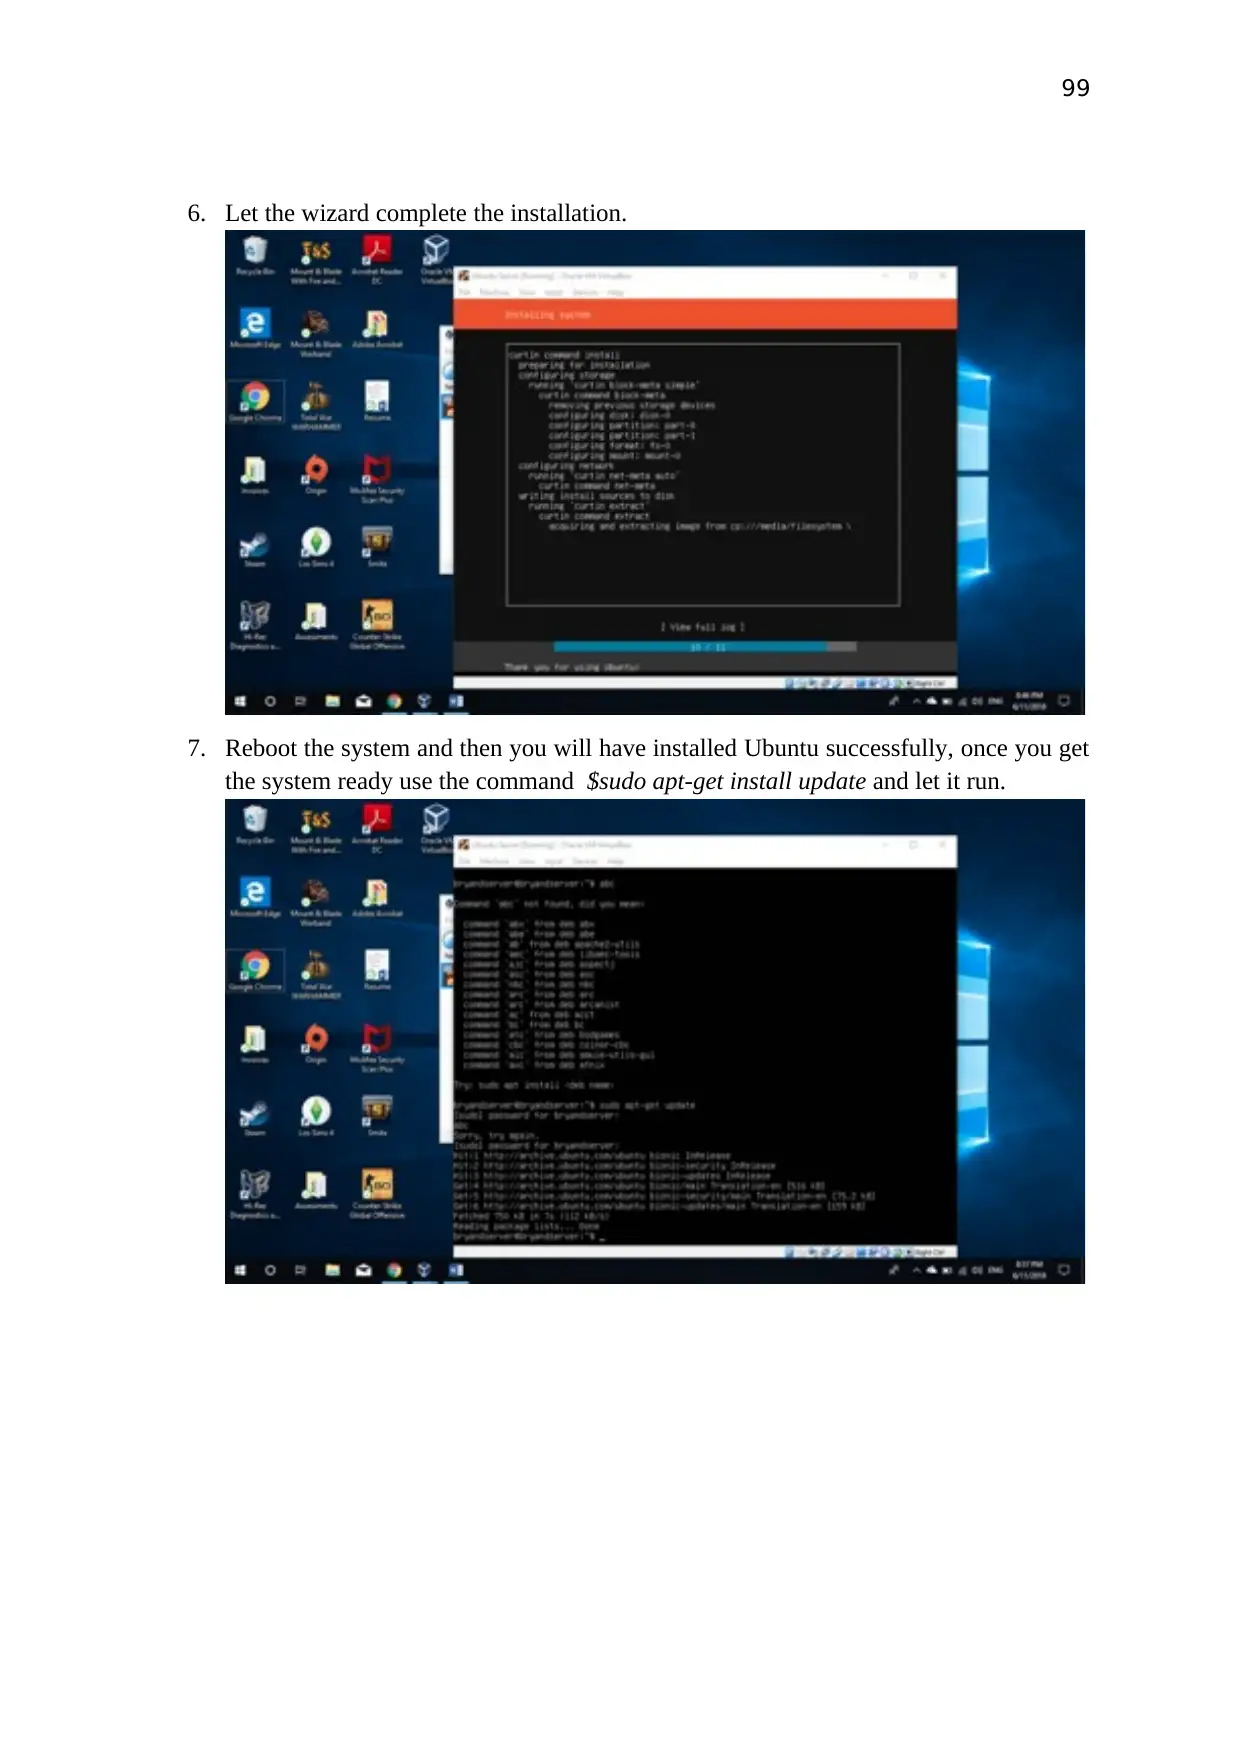
4. Install the OS’s version you want to get.
5. Set up the user profile.
4. Install the OS’s version you want to get.
5. Set up the user profile.
99
6. Let the wizard complete the installation.
7. Reboot the system and then you will have installed Ubuntu successfully, once you get
the system ready use the command $sudo apt-get install update and let it run.
6. Let the wizard complete the installation.
7. Reboot the system and then you will have installed Ubuntu successfully, once you get
the system ready use the command $sudo apt-get install update and let it run.
100
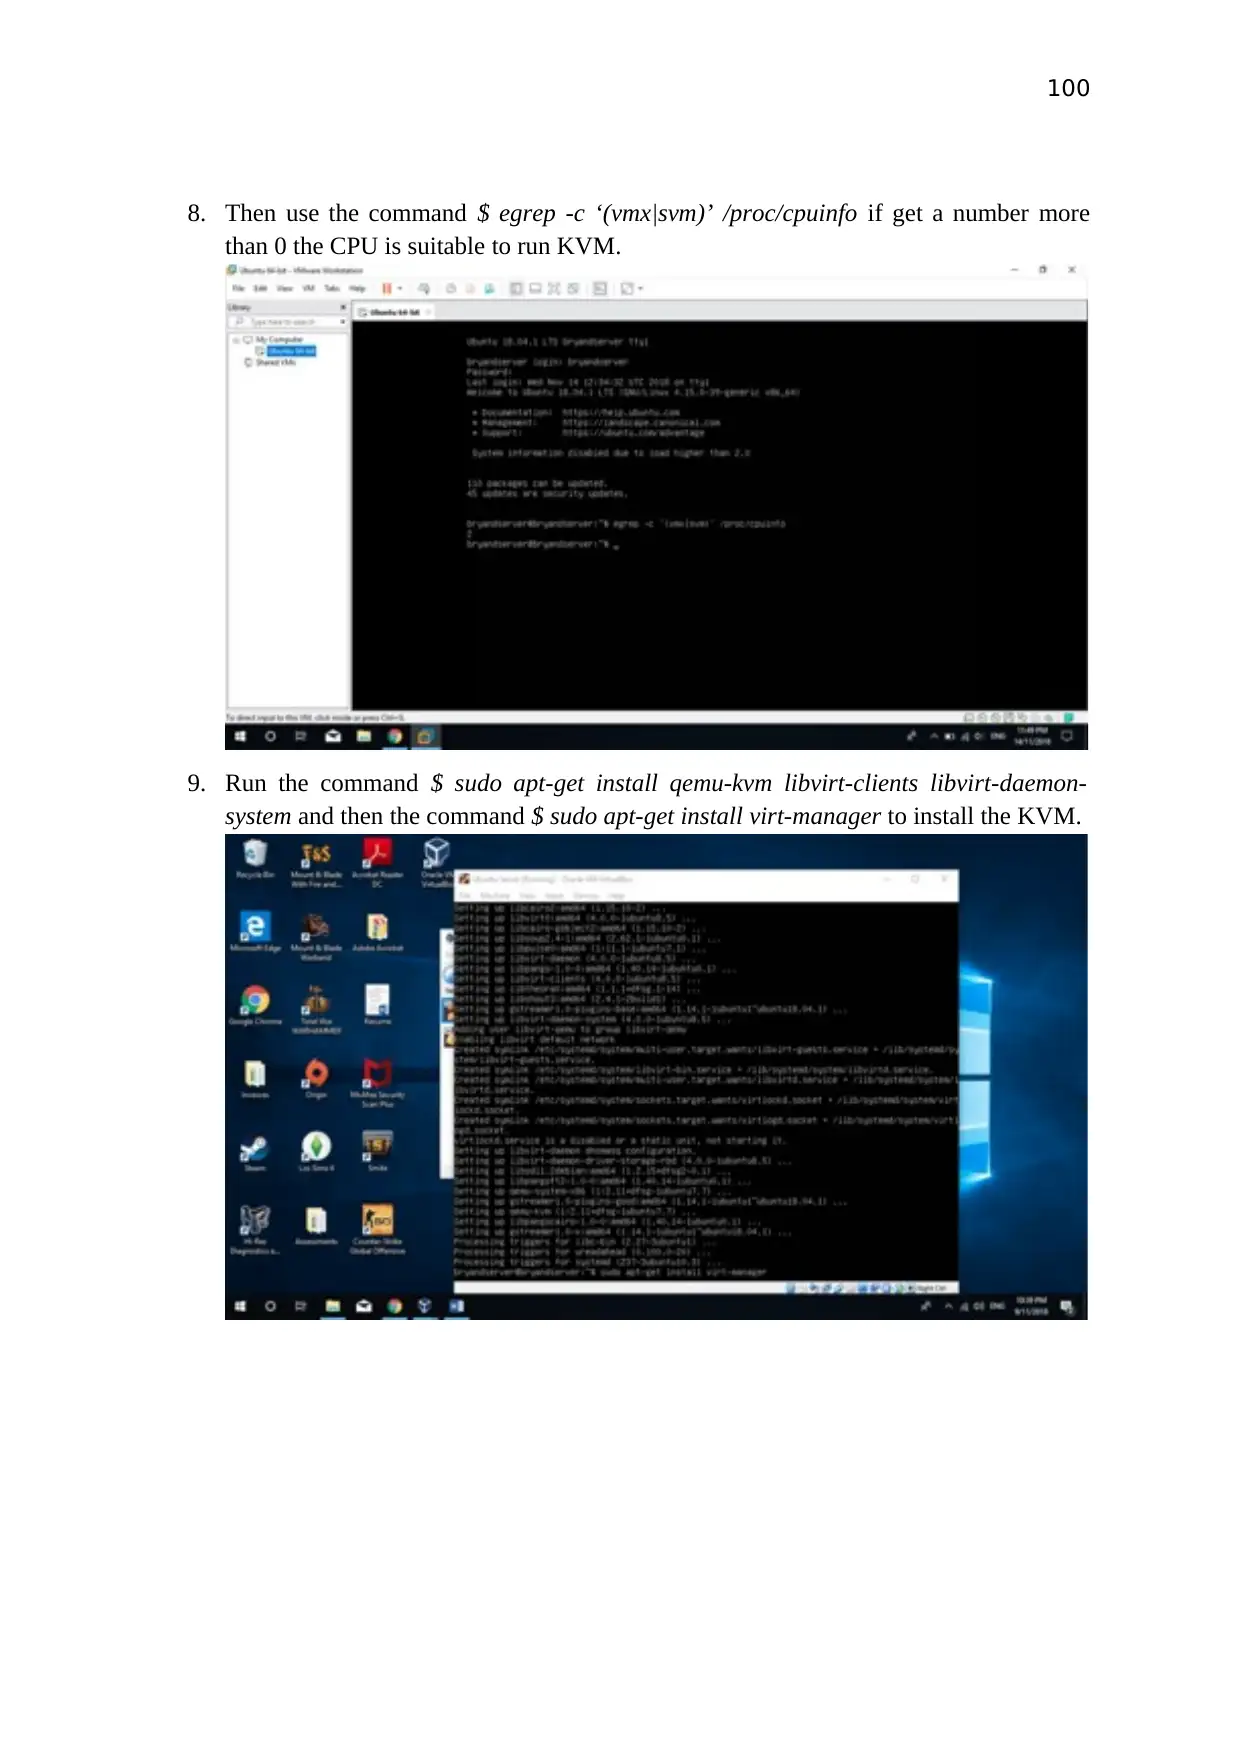
8. Then use the command $ egrep -c ‘(vmx|svm)’ /proc/cpuinfo if get a number more
than 0 the CPU is suitable to run KVM.
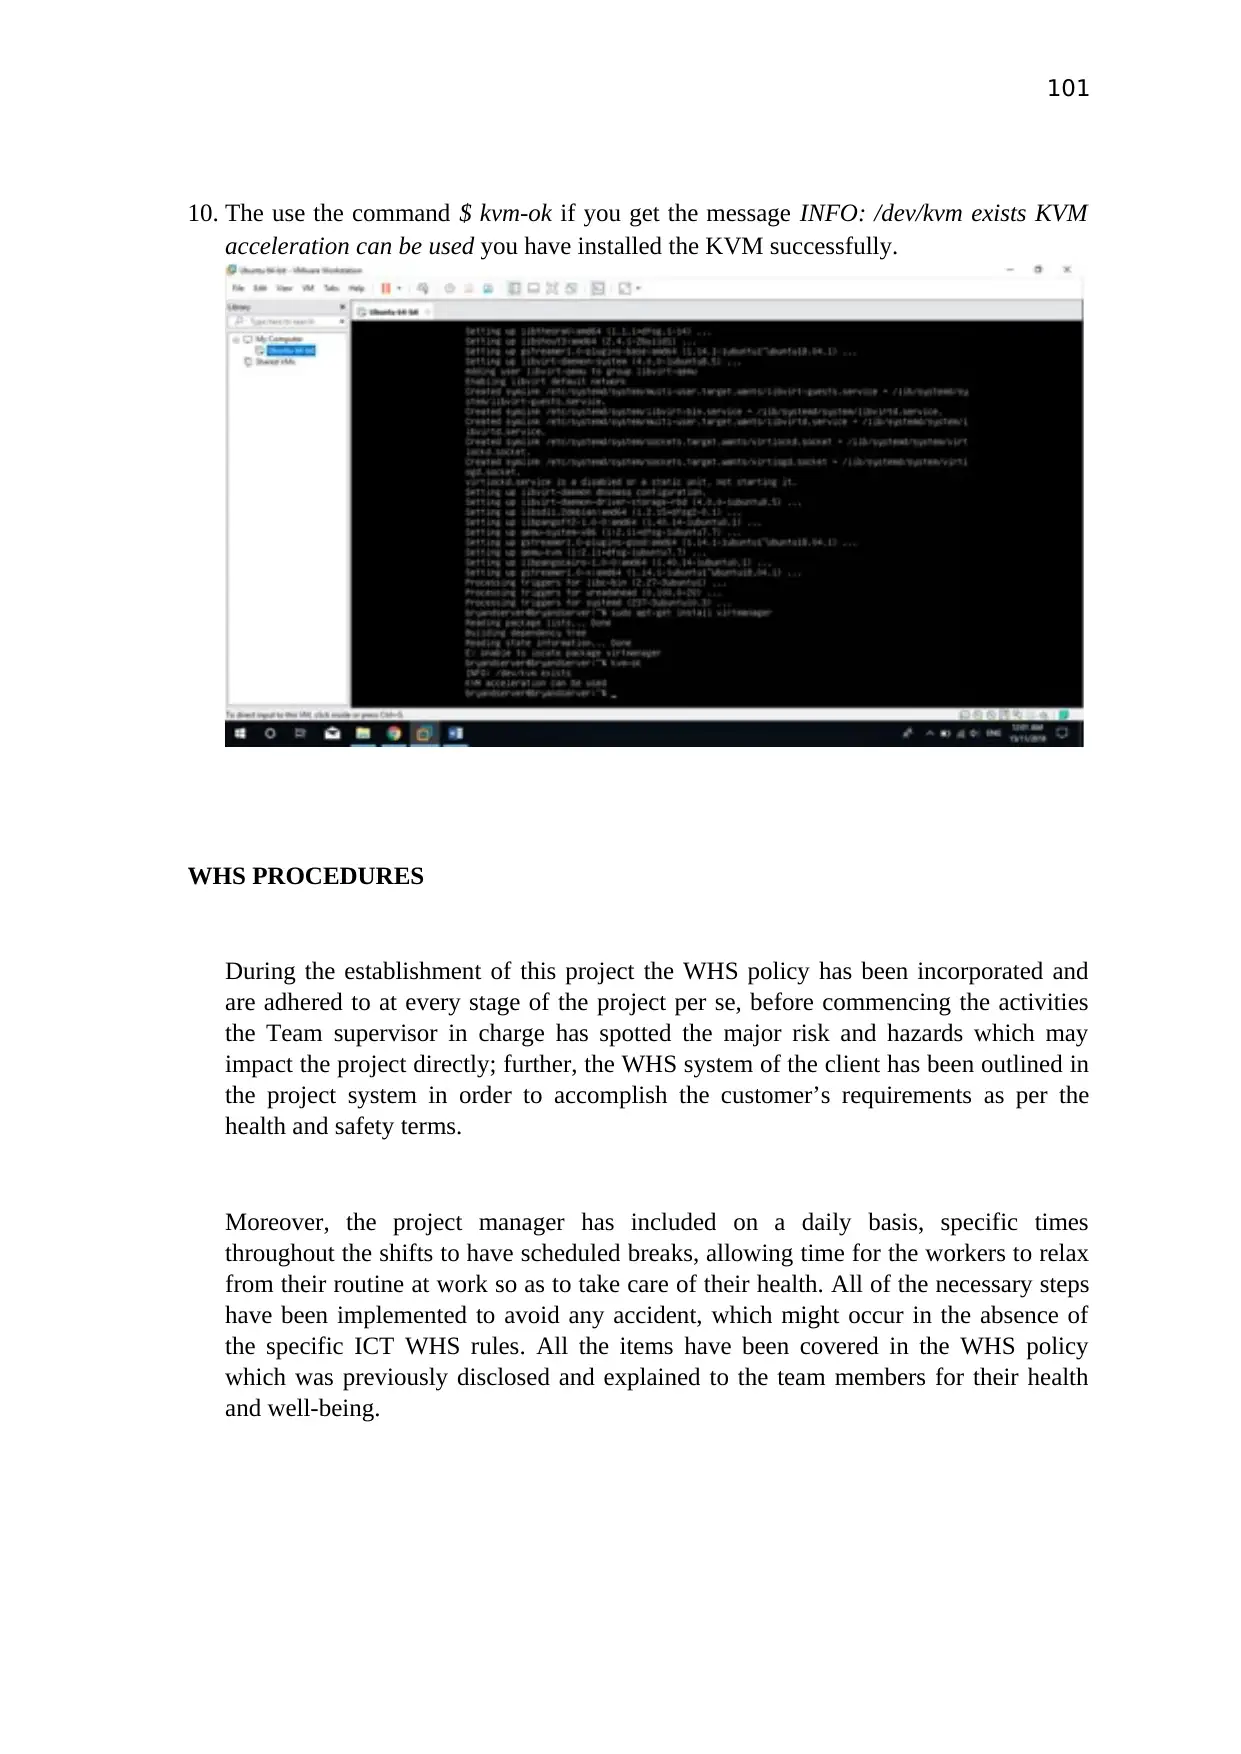
9. Run the command $ sudo apt-get install qemu-kvm libvirt-clients libvirt-daemon-
system and then the command $ sudo apt-get install virt-manager to install the KVM.
8. Then use the command $ egrep -c ‘(vmx|svm)’ /proc/cpuinfo if get a number more
than 0 the CPU is suitable to run KVM.
9. Run the command $ sudo apt-get install qemu-kvm libvirt-clients libvirt-daemon-
system and then the command $ sudo apt-get install virt-manager to install the KVM.
Secure Best Marks with AI Grader
Need help grading? Try our AI Grader for instant feedback on your assignments.
101
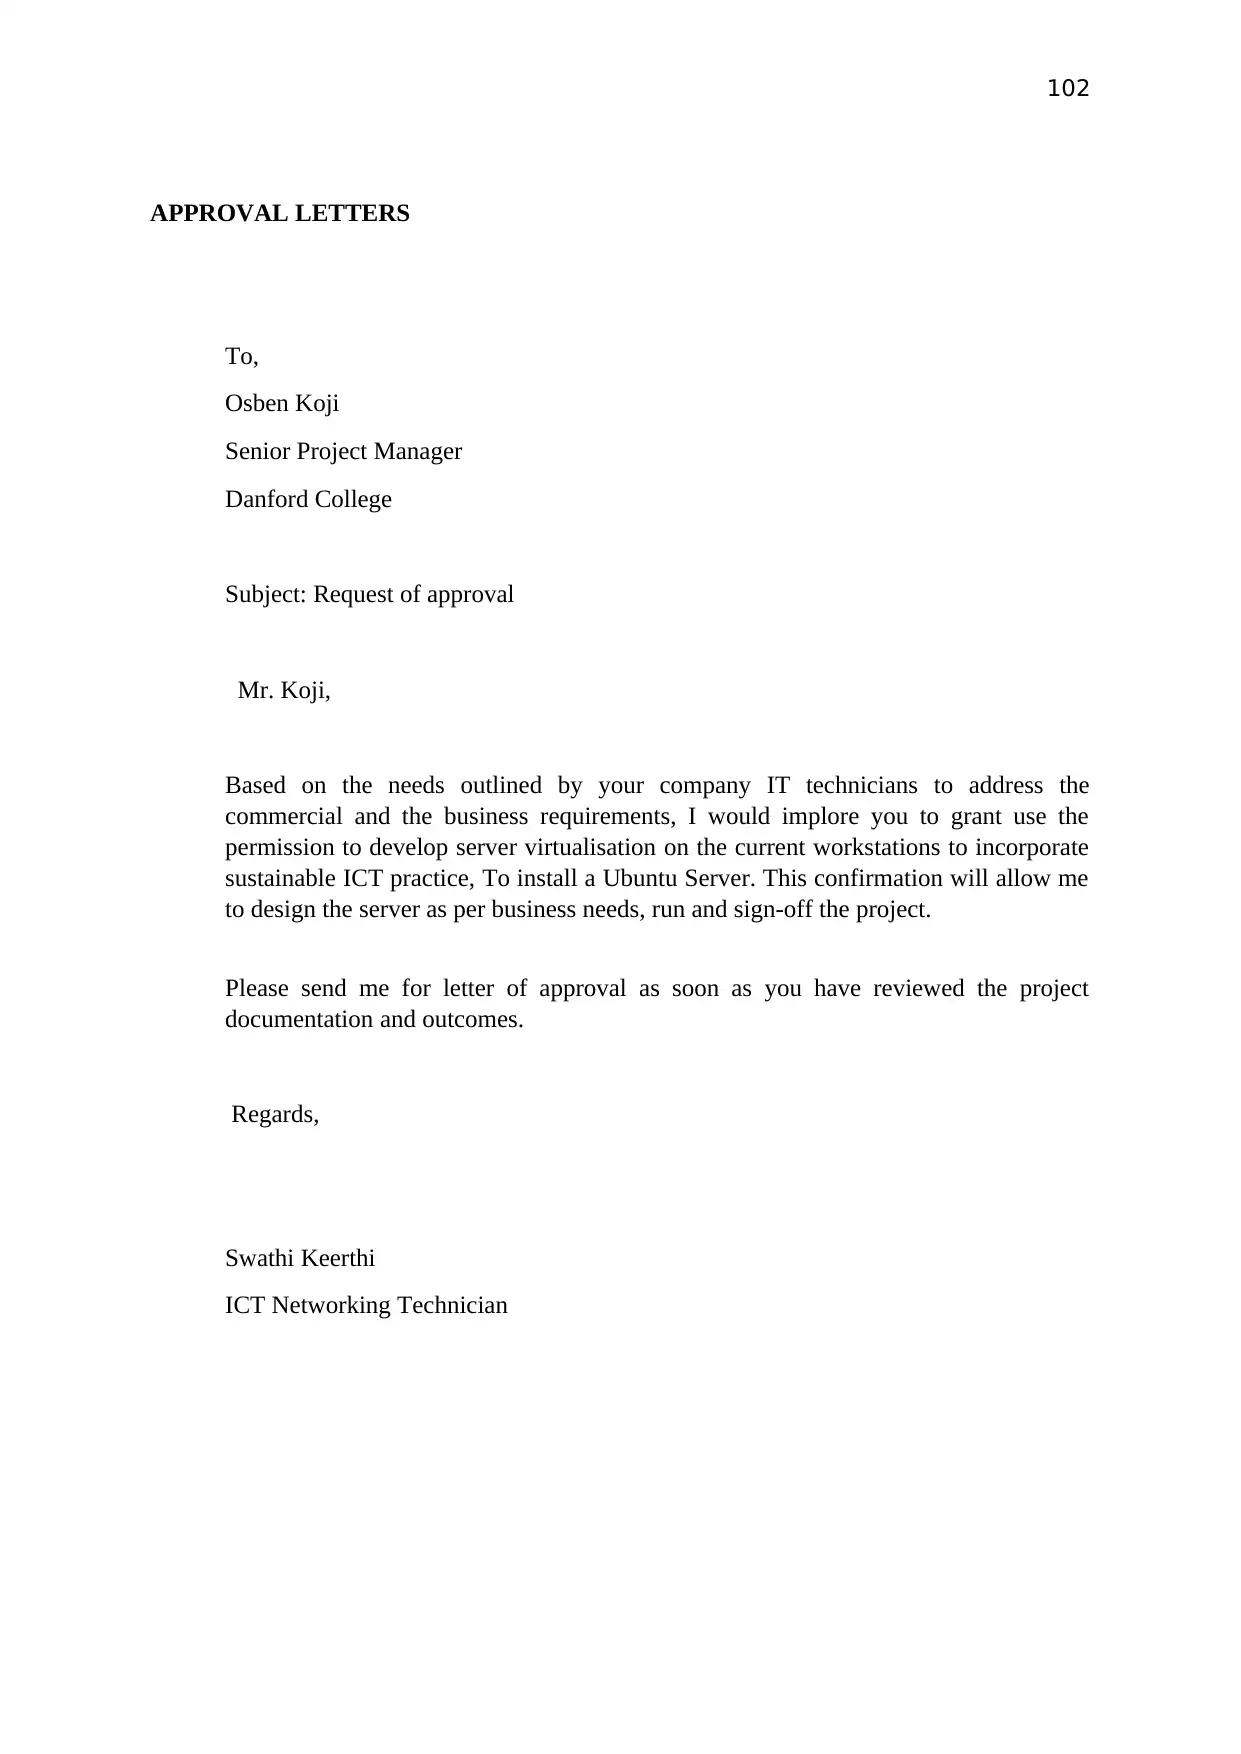
10. The use the command $ kvm-ok if you get the message INFO: /dev/kvm exists KVM
acceleration can be used you have installed the KVM successfully.
WHS PROCEDURES
During the establishment of this project the WHS policy has been incorporated and
are adhered to at every stage of the project per se, before commencing the activities
the Team supervisor in charge has spotted the major risk and hazards which may
impact the project directly; further, the WHS system of the client has been outlined in
the project system in order to accomplish the customer’s requirements as per the
health and safety terms.
Moreover, the project manager has included on a daily basis, specific times
throughout the shifts to have scheduled breaks, allowing time for the workers to relax
from their routine at work so as to take care of their health. All of the necessary steps
have been implemented to avoid any accident, which might occur in the absence of
the specific ICT WHS rules. All the items have been covered in the WHS policy
which was previously disclosed and explained to the team members for their health
and well-being.
102
APPROVAL LETTERS
To,
Osben Koji
Senior Project Manager
Danford College
Subject: Request of approval
Mr. Koji,
Based on the needs outlined by your company IT technicians to address the
commercial and the business requirements, I would implore you to grant use the
permission to develop server virtualisation on the current workstations to incorporate
sustainable ICT practice, To install a Ubuntu Server. This confirmation will allow me
to design the server as per business needs, run and sign-off the project.
Please send me for letter of approval as soon as you have reviewed the project
documentation and outcomes.
Regards,
Swathi Keerthi
ICT Networking Technician
103
From,
Osben Koji
Senior Project Manager
Danford College
Subject: Approval Project
Ms. Swathi Keerthi,
I would like to bring it to your notice that the company’s management is pleased to
grant the approval to develop the server virtualisation for a sustainable ICT
management, running a Ubuntu Server. I request you to fulfil certain company’s legal
prerequisites before we continue further with the server virtualisation project.
Please refer to the company’s policies and the obligations mentioned in the official
approval sent out to you. If you have any other questions, please contact us
immediately.
Kind regards,
Osben Koji
Danford College
DETAILED TASK LIST
Installing
Paraphrase This Document
Need a fresh take? Get an instant paraphrase of this document with our AI Paraphraser
104
Download and install the hypervisor to install the server (VirtualBox).
Download the Ubuntu Server ISO image from the Ubuntu official website.
Set up a new VM in VirtualBox following the technical requirements.
Launch the installation wizard and execute it.
Configurating
Set the customer’s parametres during the installation process.
Test the CPU if it is able to use KVM. (Use the command to do it)
Update the packages (Use the command to do it)
Configure the KVM, to do so use the proper command.
Testing
Check if the KVM can be used (run the command to do it)
CONCLUSION
To conclude, I have installed and integrated a virtual server in a network to avoid the need to
employ multiple physical servers, reducing energy consumption and additional physical
devices. Since this virtual machine has replaced the need of multiple devices as this
individual server has meet the sustainability targets aimed of.
.
SIGN OFF
I ____________________________acknowledge receiving the virtual networks, which have
the following agreements:

105
- The project was accomplished in time.
- The results satisfied the requirements
- Please refer to the checklist attached.
- Outcomes meet the project scope and quality.
- Documentation has been committed
- Project reaches its objectives and can be closed as appropriate.
- Project performers are no more responsible for further development without any new
billing.
Customer signature :________________________________
Date: _________________________________
106
Monitoring and Troubleshooting Virtual Environment
Task 1
Performance Troubleshooting VMware vSphere Memory
Performance problems are common in all computing environments. A stable
computing environment can experience some challenges due to change in demand for
resources and complex application behavior of the shared infrastructure destabilizing the
environment. The added layer in virtualized computing increases the complexity by creating
new interactions and therefore increasing chances of destabilizing computing environment.
Performance troubleshooting in virtualized computing environment is therefore necessary.
Plan for Troubleshooting Virtual Environment
In this paper, I will use esxtop virtual management tool to monitor and troubleshoot memory
performance in a virtual environment.
Once the VMware tools are installed in the virtual machine, they will provide the drivers of
the device into the host virtualization layer located in the guest operating system.
Installation of esxtop tool comes with balloon drivers that can be observed in the guest
operating system.
Secure Best Marks with AI Grader
Need help grading? Try our AI Grader for instant feedback on your assignments.
107
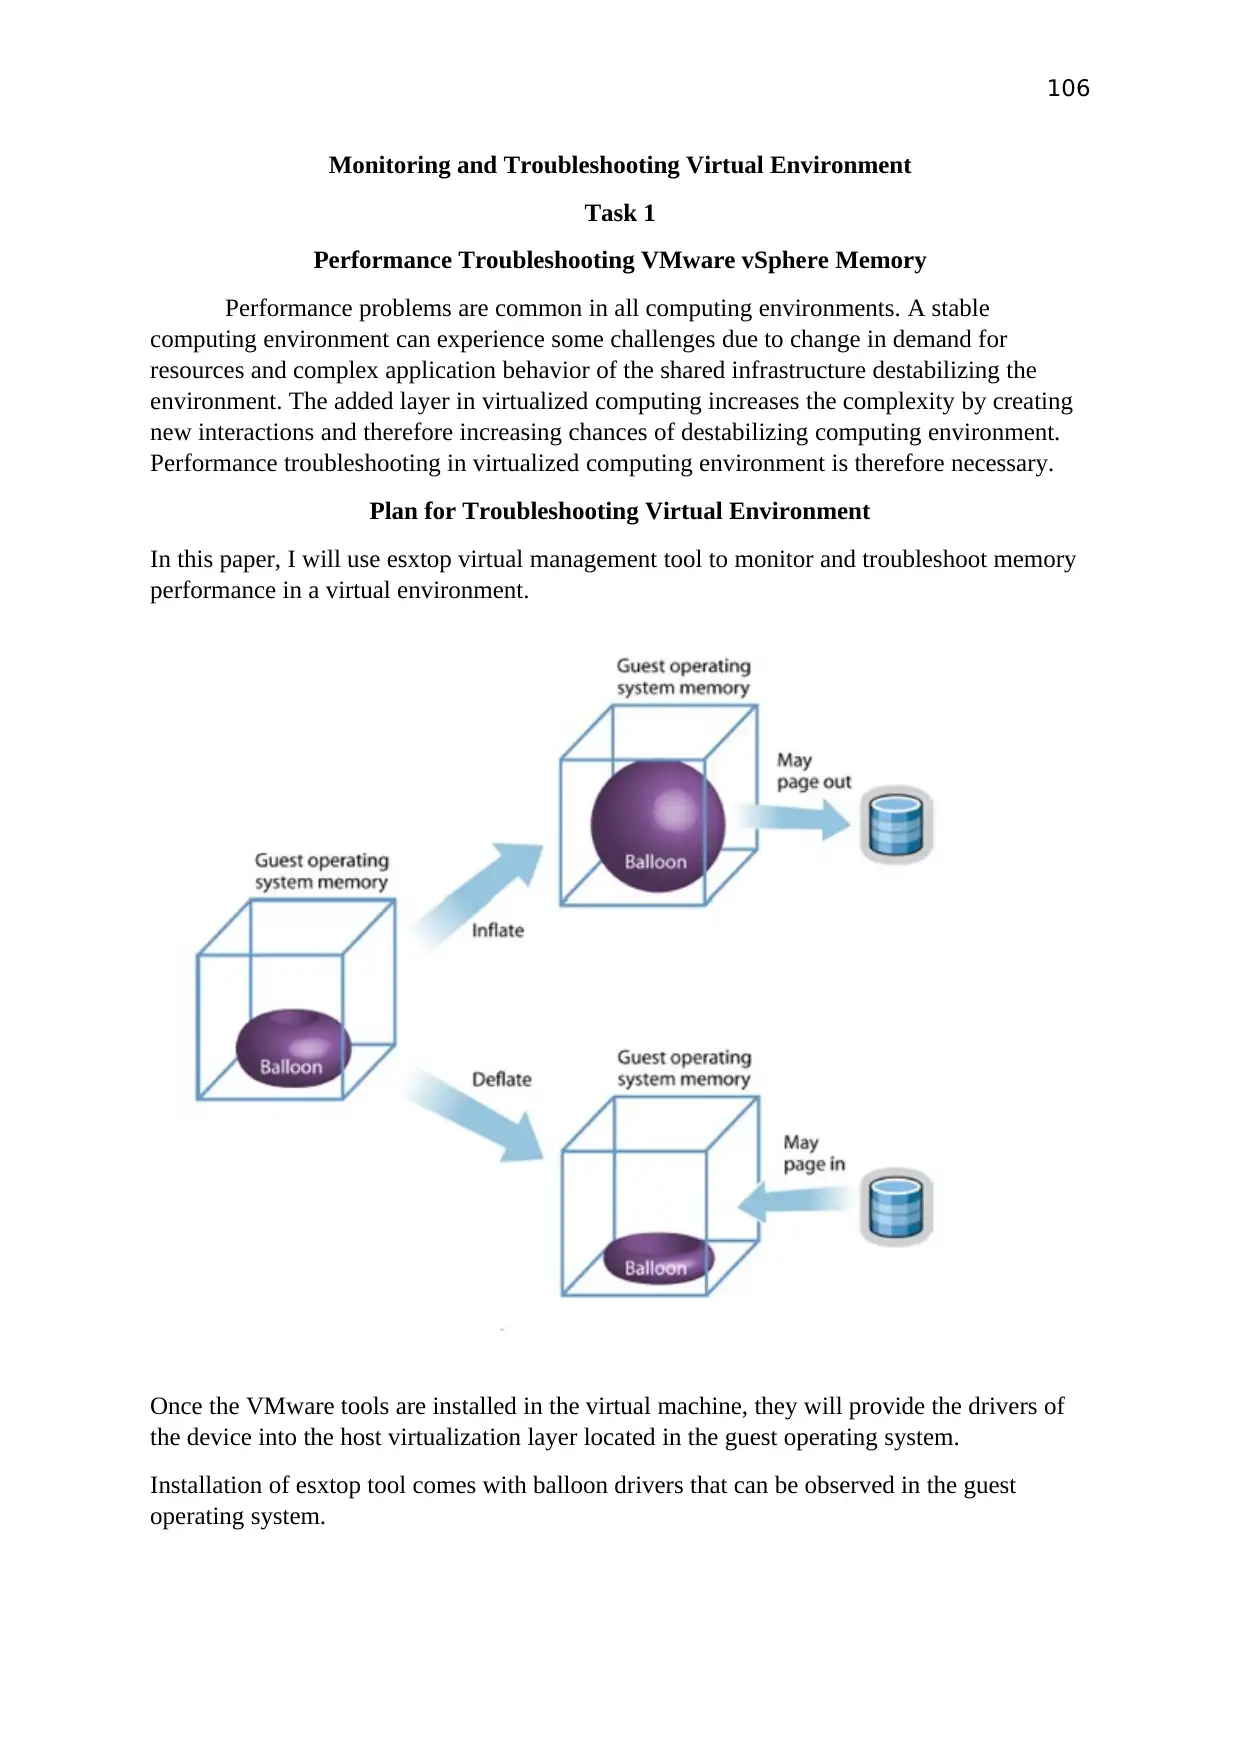
Balloon drivers works by claiming memory in the guest when the operating system of the
guest does not require the memory. Information about the status of the memory is
communicated by the guest to the hypervisor.
When the physical machine runs low on memory, balloon drivers will reclaim more memory
from the guest.
The technique prevents memory swap that can degrade performance when physical machine
run low on memory.
Installation and Configuration of esxtop
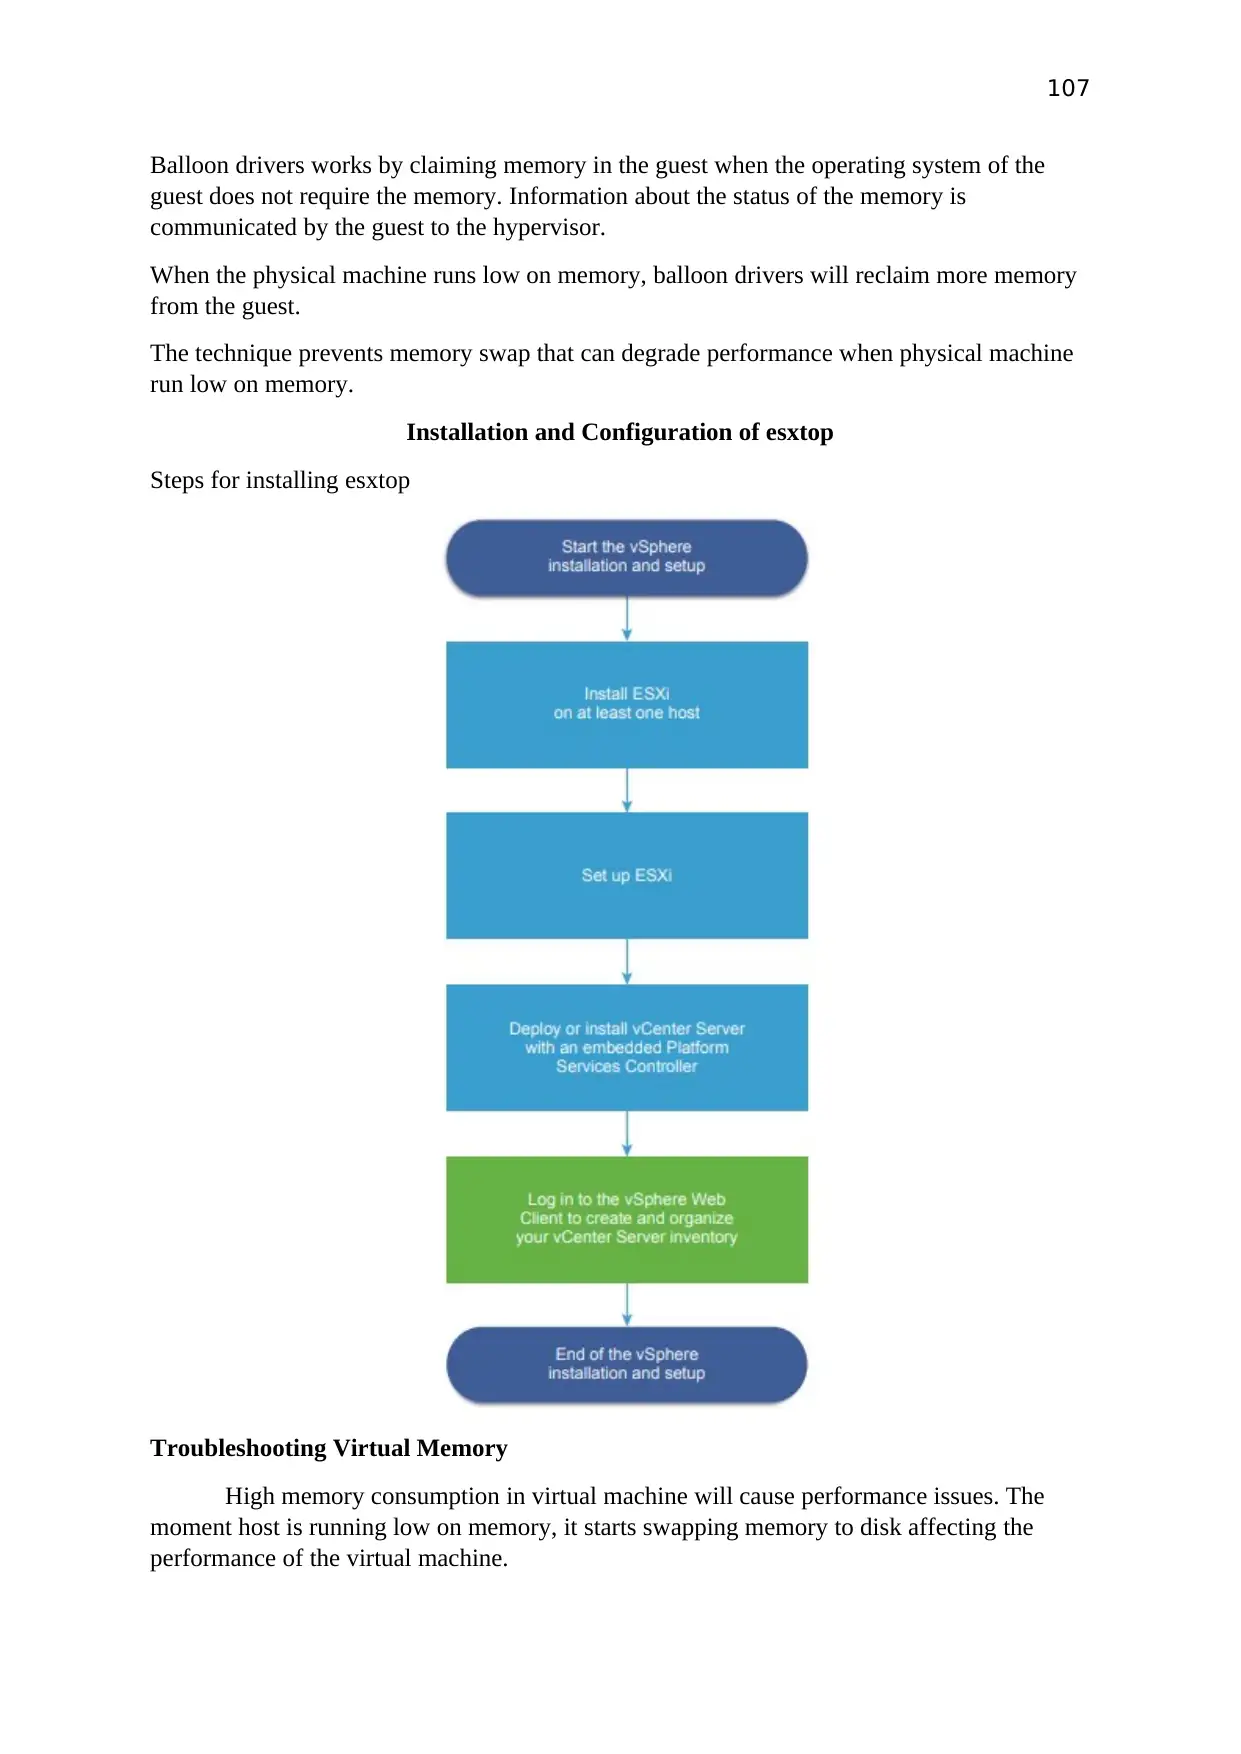
Steps for installing esxtop
Troubleshooting Virtual Memory
High memory consumption in virtual machine will cause performance issues. The
moment host is running low on memory, it starts swapping memory to disk affecting the
performance of the virtual machine.
108
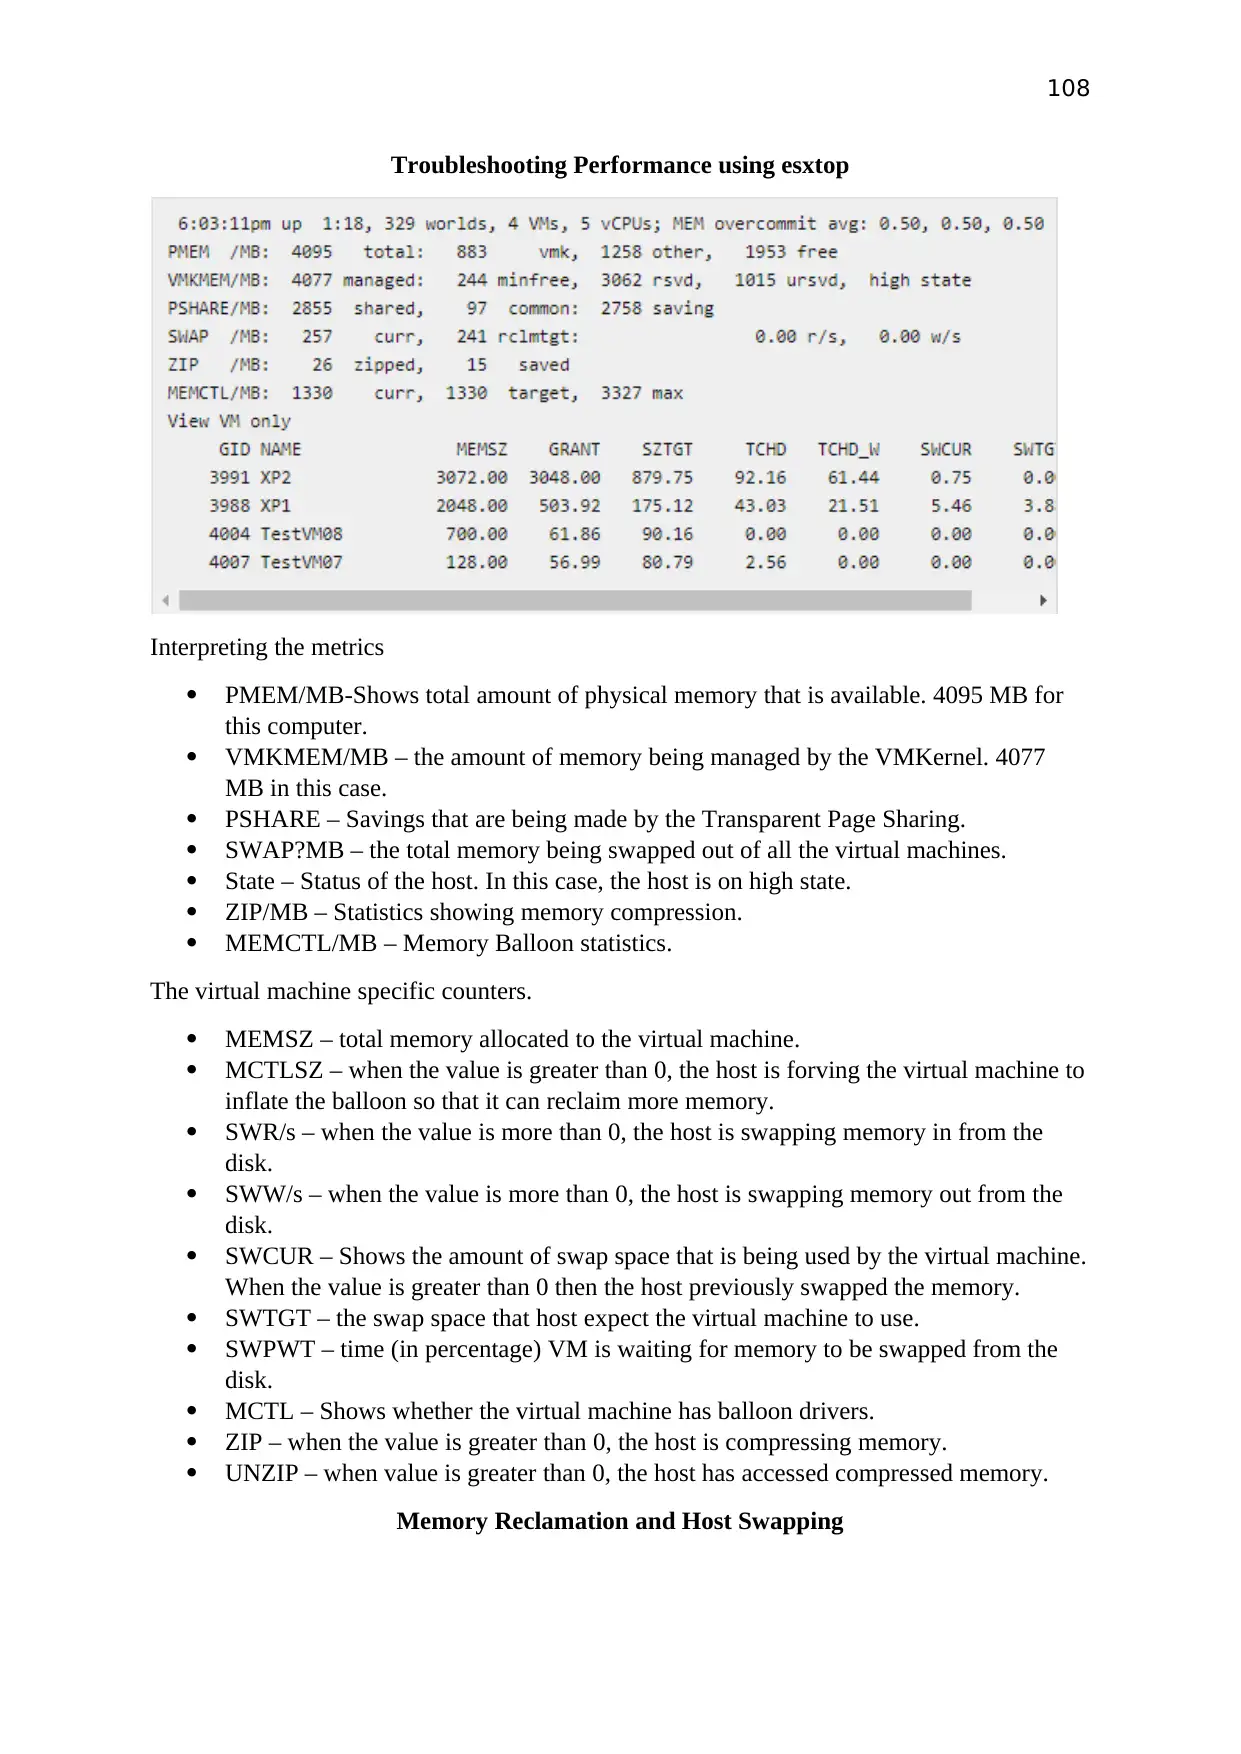
Troubleshooting Performance using esxtop
Interpreting the metrics
PMEM/MB-Shows total amount of physical memory that is available. 4095 MB for
this computer.
VMKMEM/MB – the amount of memory being managed by the VMKernel. 4077
MB in this case.
PSHARE – Savings that are being made by the Transparent Page Sharing.
SWAP?MB – the total memory being swapped out of all the virtual machines.
State – Status of the host. In this case, the host is on high state.
ZIP/MB – Statistics showing memory compression.
MEMCTL/MB – Memory Balloon statistics.
The virtual machine specific counters.
MEMSZ – total memory allocated to the virtual machine.
MCTLSZ – when the value is greater than 0, the host is forving the virtual machine to
inflate the balloon so that it can reclaim more memory.
SWR/s – when the value is more than 0, the host is swapping memory in from the
disk.
SWW/s – when the value is more than 0, the host is swapping memory out from the
disk.
SWCUR – Shows the amount of swap space that is being used by the virtual machine.
When the value is greater than 0 then the host previously swapped the memory.
SWTGT – the swap space that host expect the virtual machine to use.
SWPWT – time (in percentage) VM is waiting for memory to be swapped from the
disk.
MCTL – Shows whether the virtual machine has balloon drivers.
ZIP – when the value is greater than 0, the host is compressing memory.
UNZIP – when value is greater than 0, the host has accessed compressed memory.
Memory Reclamation and Host Swapping
109
Every time the host is running low out of memory, it will make attempts to reclaim
the memory that has already been allocated to virtual machines.
The host uses four states which include “High”, “Low”, “Hard” and “Soft” to show
whether it is making attempts to reclaim memory.
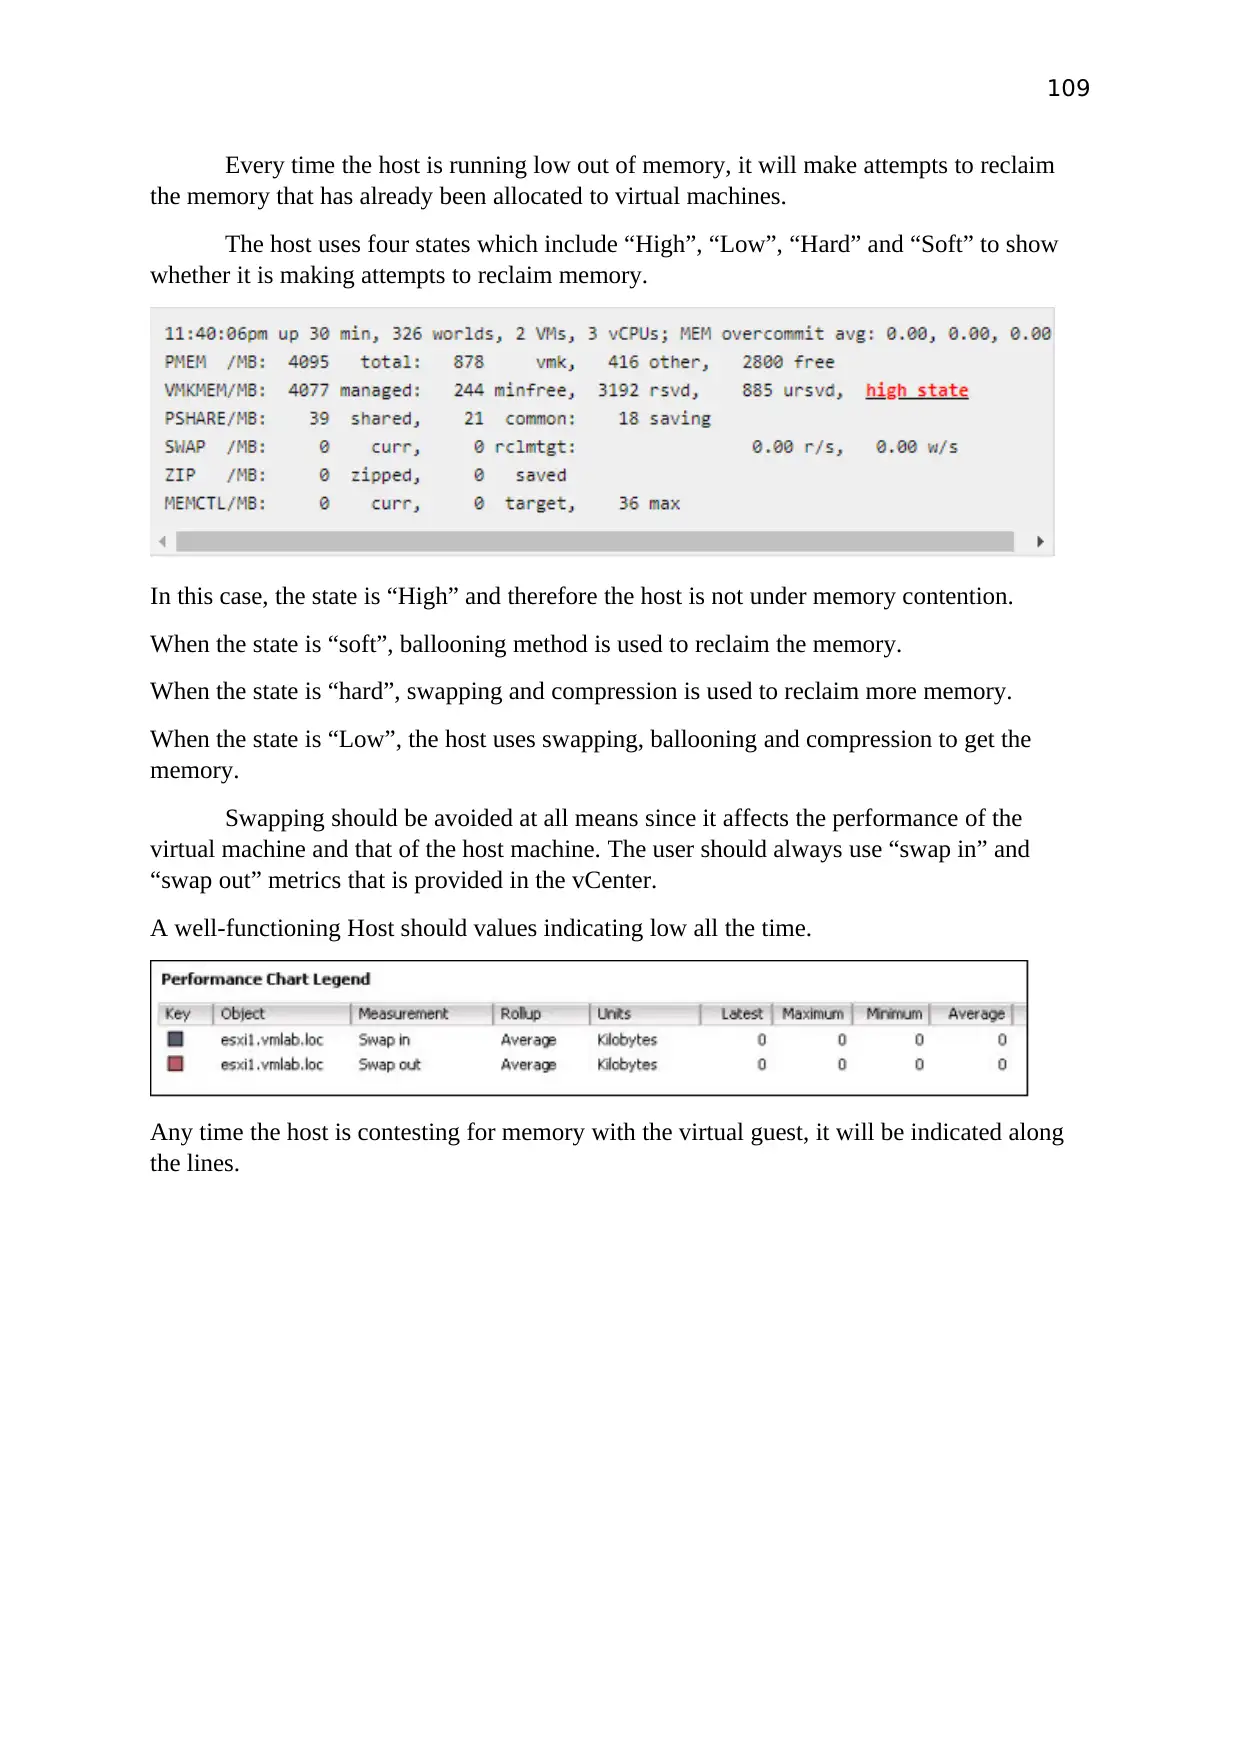
In this case, the state is “High” and therefore the host is not under memory contention.
When the state is “soft”, ballooning method is used to reclaim the memory.
When the state is “hard”, swapping and compression is used to reclaim more memory.
When the state is “Low”, the host uses swapping, ballooning and compression to get the
memory.
Swapping should be avoided at all means since it affects the performance of the
virtual machine and that of the host machine. The user should always use “swap in” and
“swap out” metrics that is provided in the vCenter.
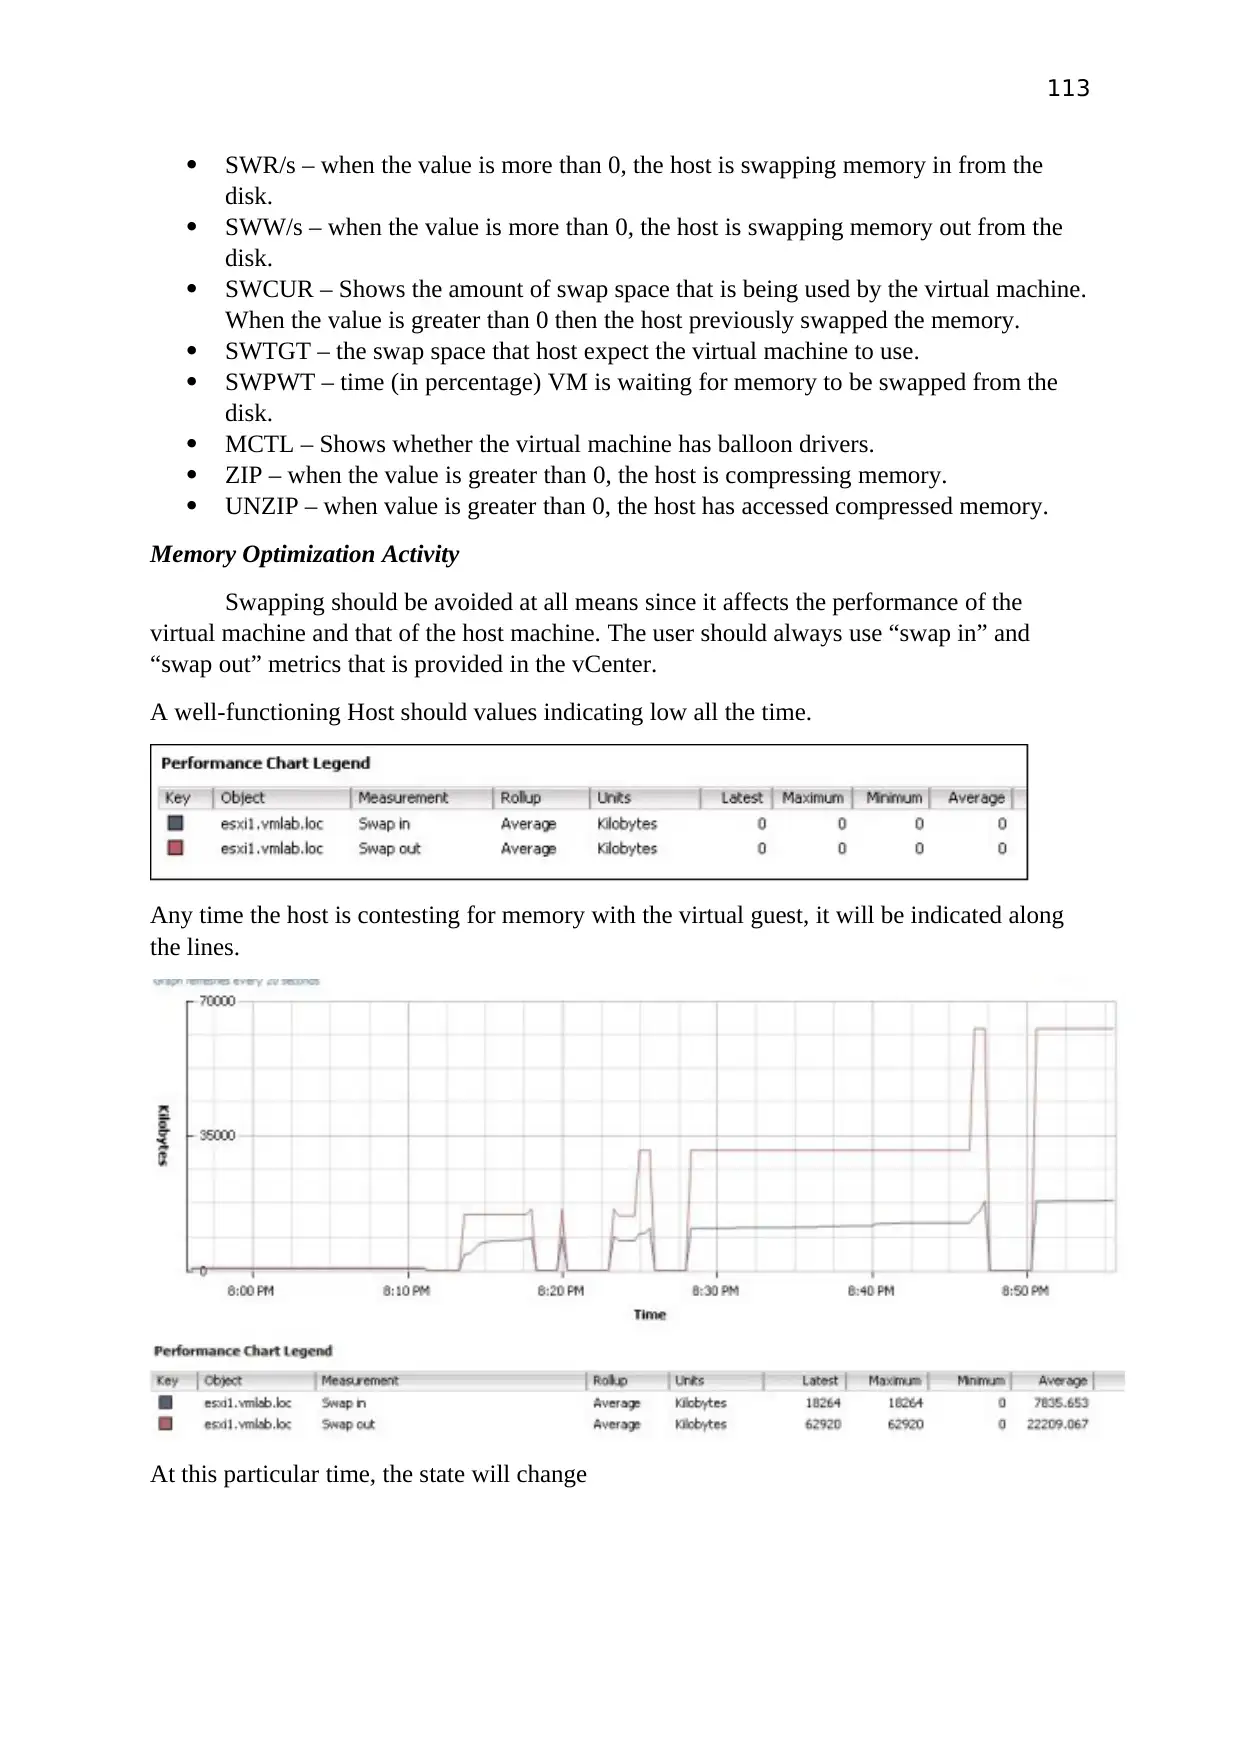
A well-functioning Host should values indicating low all the time.
Any time the host is contesting for memory with the virtual guest, it will be indicated along
the lines.
Paraphrase This Document
Need a fresh take? Get an instant paraphrase of this document with our AI Paraphraser
110
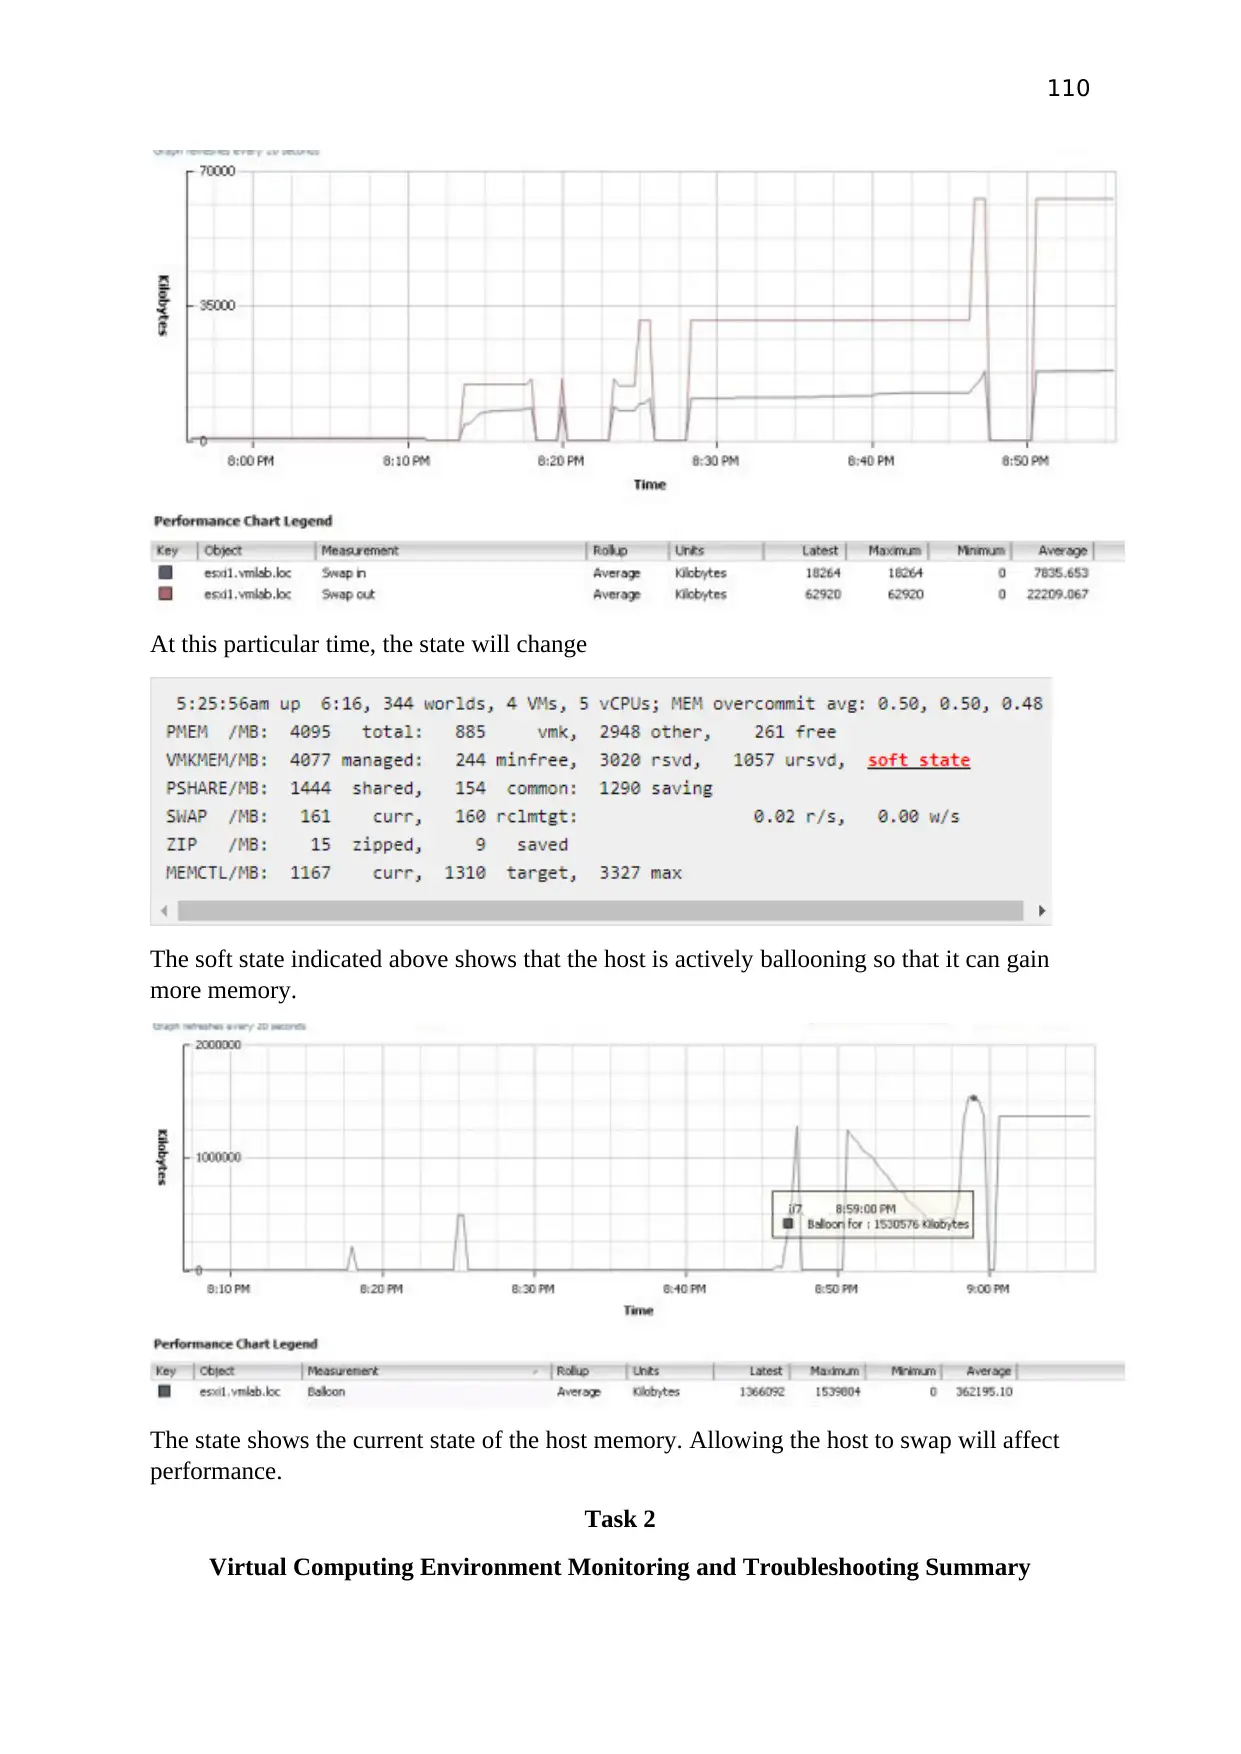
At this particular time, the state will change
The soft state indicated above shows that the host is actively ballooning so that it can gain
more memory.
The state shows the current state of the host memory. Allowing the host to swap will affect
performance.
Task 2
Virtual Computing Environment Monitoring and Troubleshooting Summary
111
Server Environment Description
Windows Server 2012 operating in a VMware virtual machine with other two guest operating
systems that communicate with the server and share information by accessing a shared folder.
The guest OS can access folder from the main computer. All the host and the virtual machine
share memory and other resources.
General Settings
The setup is using VMware as the virtual machine. The machine also has guest operating
systems which include Linux Ubuntu and Windows 10. The host is running Windows 10 pro.
Hardware Settings
The host machine has the following hardware components.
Core i5 2.3GHz processor
4GB Memory
40GB Storage
Environmental Critical Activity Level
The Windows Server 2012 will be built on a Virtual Computer. The design will make it
possible to install, configure and test this network based server. The design will also provide
an easy way of troubleshooting server and network related issues.
Resource Monitor
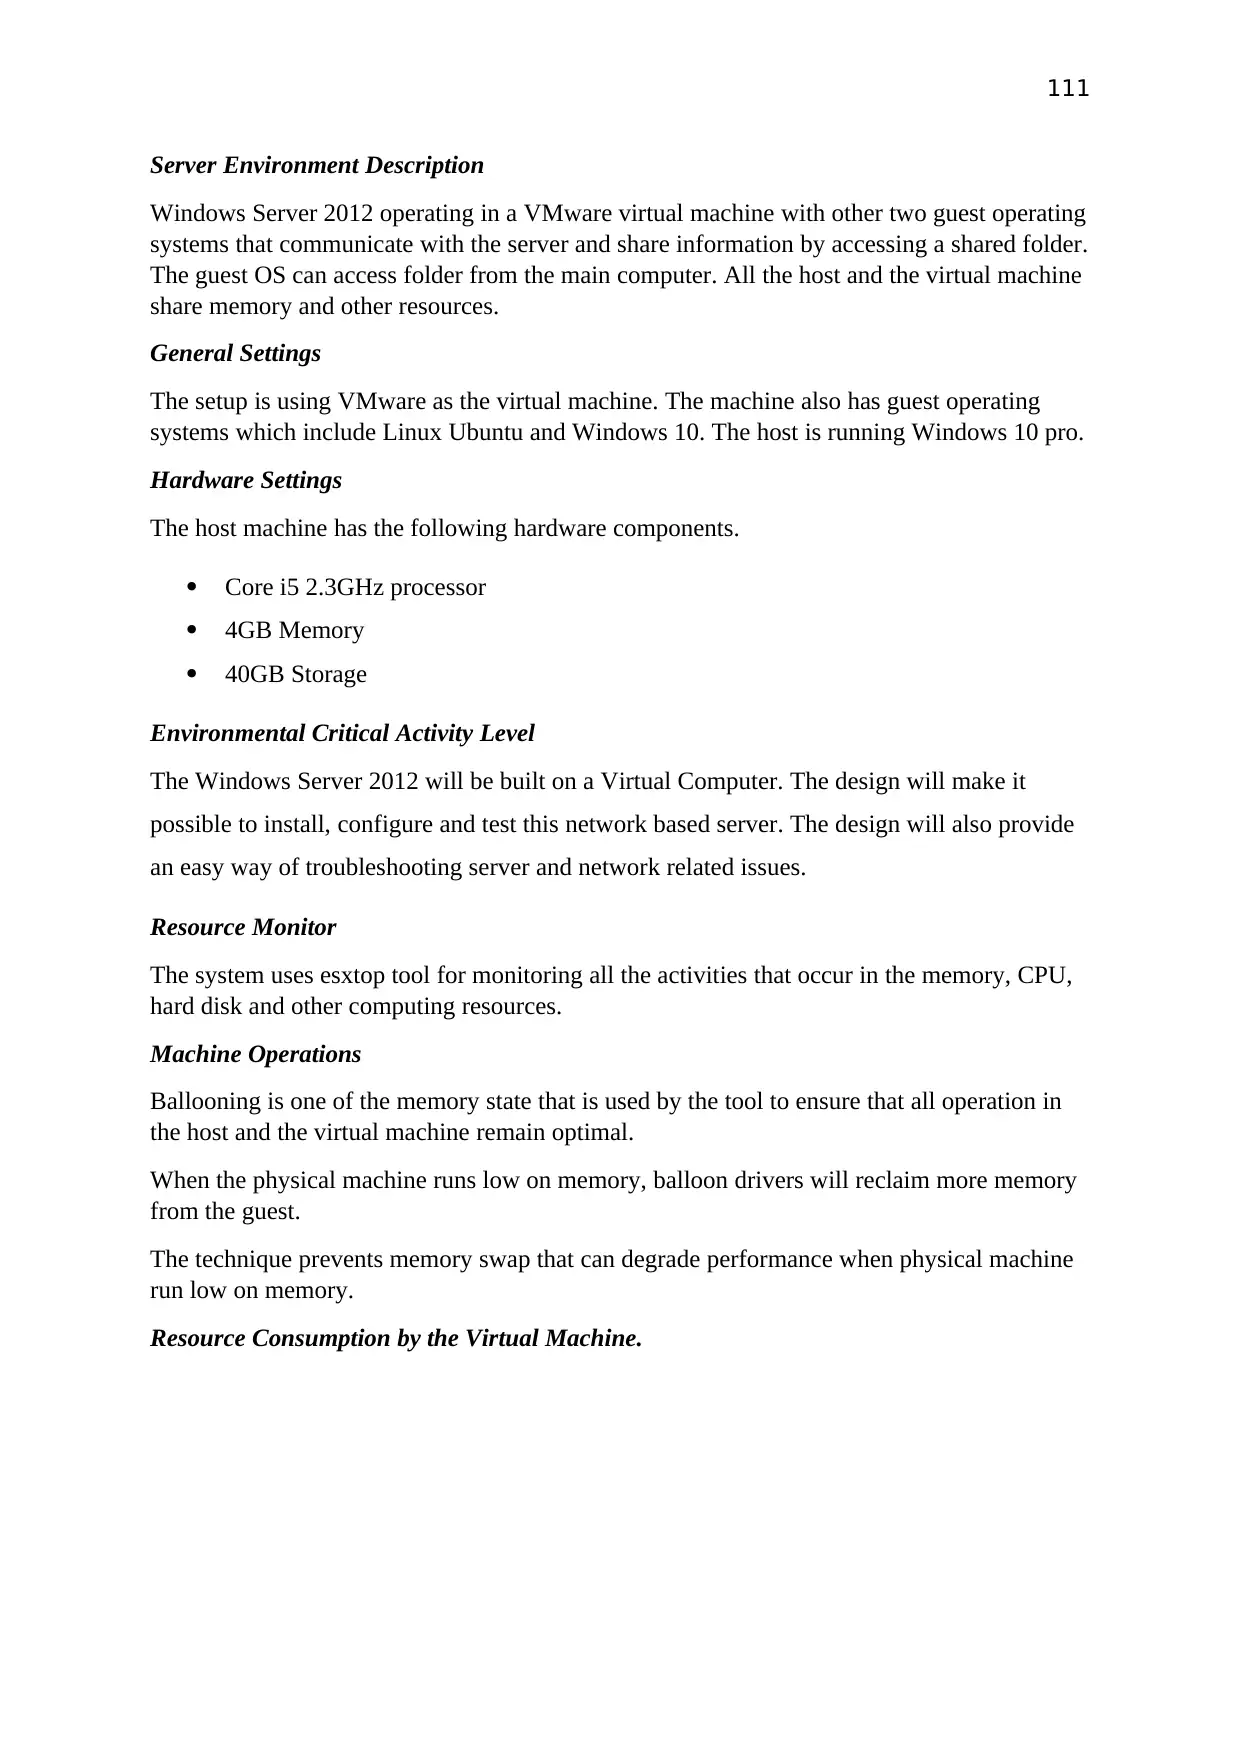
The system uses esxtop tool for monitoring all the activities that occur in the memory, CPU,
hard disk and other computing resources.
Machine Operations
Ballooning is one of the memory state that is used by the tool to ensure that all operation in
the host and the virtual machine remain optimal.
When the physical machine runs low on memory, balloon drivers will reclaim more memory
from the guest.
The technique prevents memory swap that can degrade performance when physical machine
run low on memory.
Resource Consumption by the Virtual Machine.
112
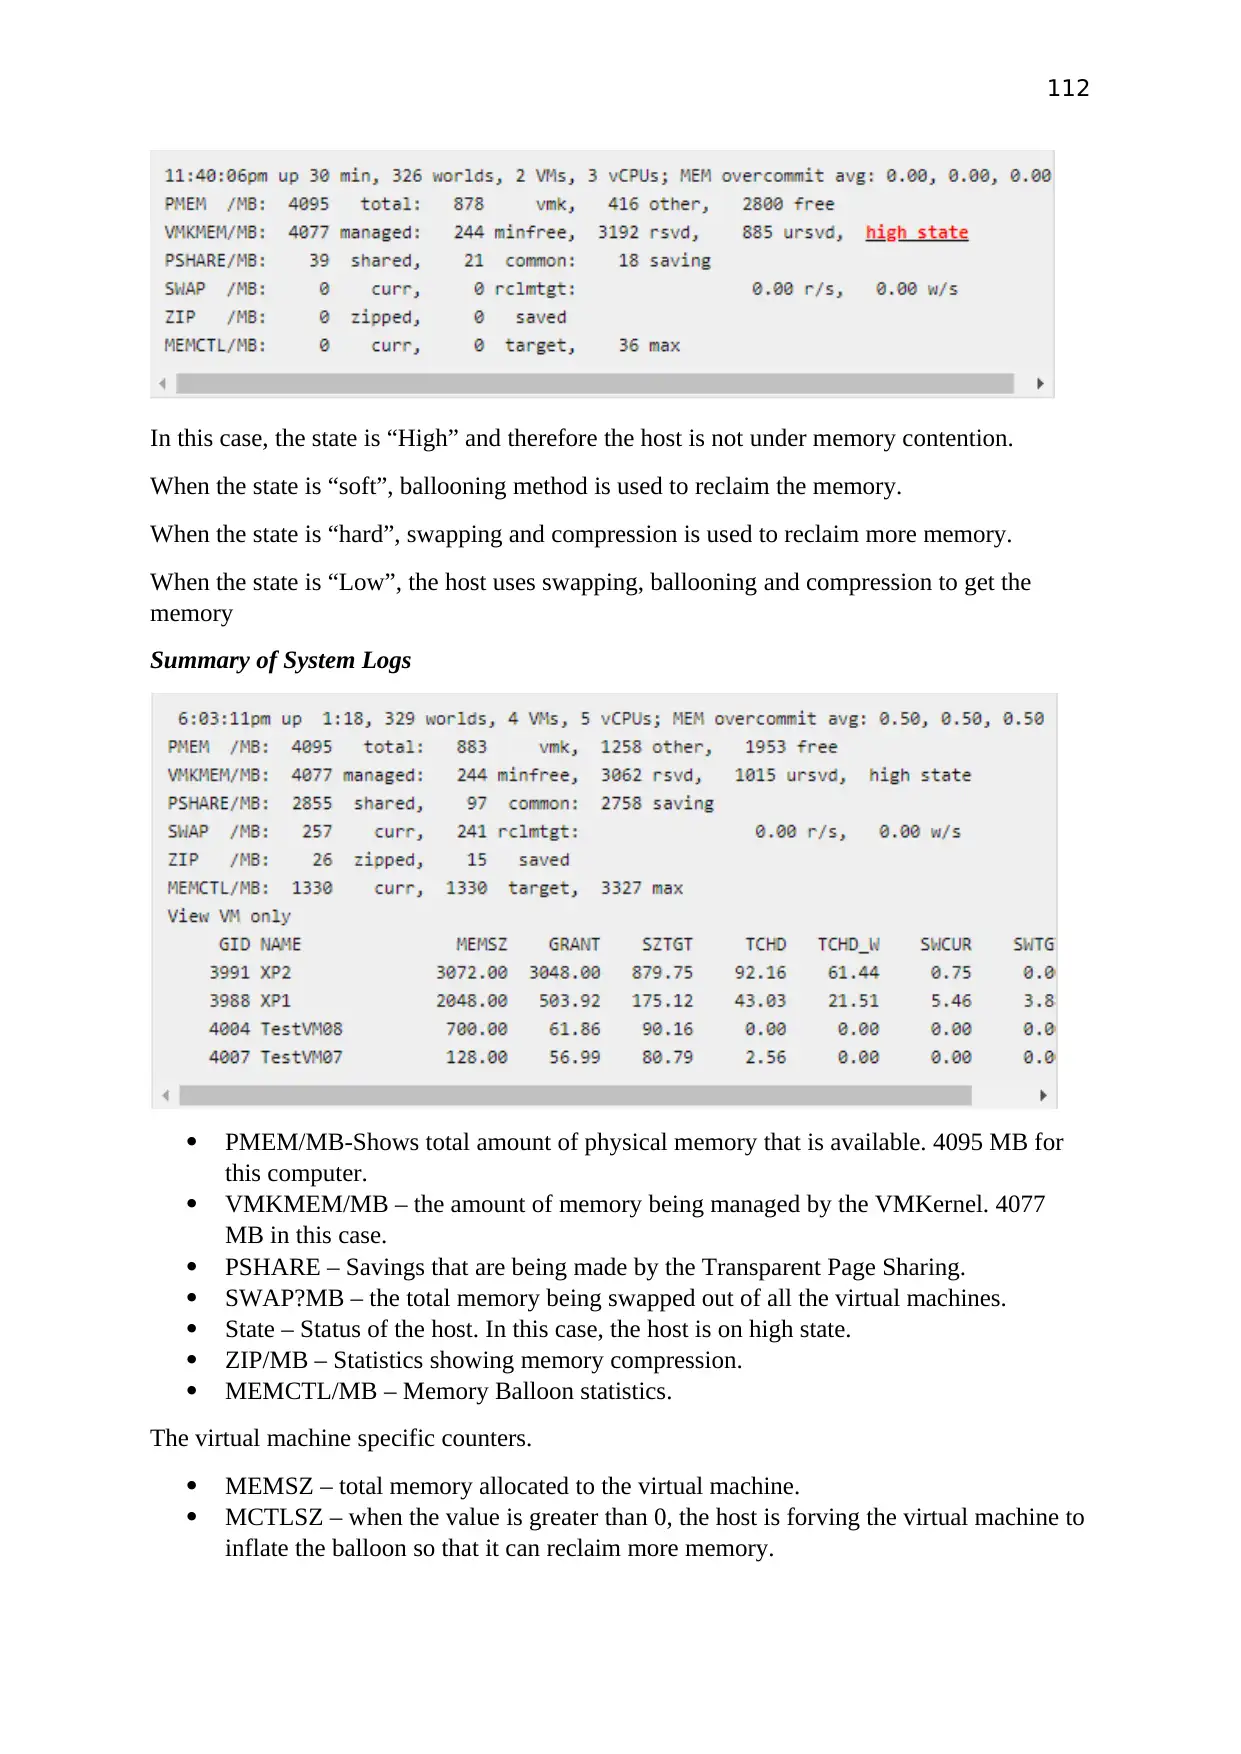
In this case, the state is “High” and therefore the host is not under memory contention.
When the state is “soft”, ballooning method is used to reclaim the memory.
When the state is “hard”, swapping and compression is used to reclaim more memory.
When the state is “Low”, the host uses swapping, ballooning and compression to get the
memory
Summary of System Logs
PMEM/MB-Shows total amount of physical memory that is available. 4095 MB for
this computer.
VMKMEM/MB – the amount of memory being managed by the VMKernel. 4077
MB in this case.
PSHARE – Savings that are being made by the Transparent Page Sharing.
SWAP?MB – the total memory being swapped out of all the virtual machines.
State – Status of the host. In this case, the host is on high state.
ZIP/MB – Statistics showing memory compression.
MEMCTL/MB – Memory Balloon statistics.
The virtual machine specific counters.
MEMSZ – total memory allocated to the virtual machine.
MCTLSZ – when the value is greater than 0, the host is forving the virtual machine to
inflate the balloon so that it can reclaim more memory.
Secure Best Marks with AI Grader
Need help grading? Try our AI Grader for instant feedback on your assignments.
113
SWR/s – when the value is more than 0, the host is swapping memory in from the
disk.
SWW/s – when the value is more than 0, the host is swapping memory out from the
disk.
SWCUR – Shows the amount of swap space that is being used by the virtual machine.
When the value is greater than 0 then the host previously swapped the memory.
SWTGT – the swap space that host expect the virtual machine to use.
SWPWT – time (in percentage) VM is waiting for memory to be swapped from the
disk.
MCTL – Shows whether the virtual machine has balloon drivers.
ZIP – when the value is greater than 0, the host is compressing memory.
UNZIP – when value is greater than 0, the host has accessed compressed memory.
Memory Optimization Activity
Swapping should be avoided at all means since it affects the performance of the
virtual machine and that of the host machine. The user should always use “swap in” and
“swap out” metrics that is provided in the vCenter.
A well-functioning Host should values indicating low all the time.
Any time the host is contesting for memory with the virtual guest, it will be indicated along
the lines.
At this particular time, the state will change
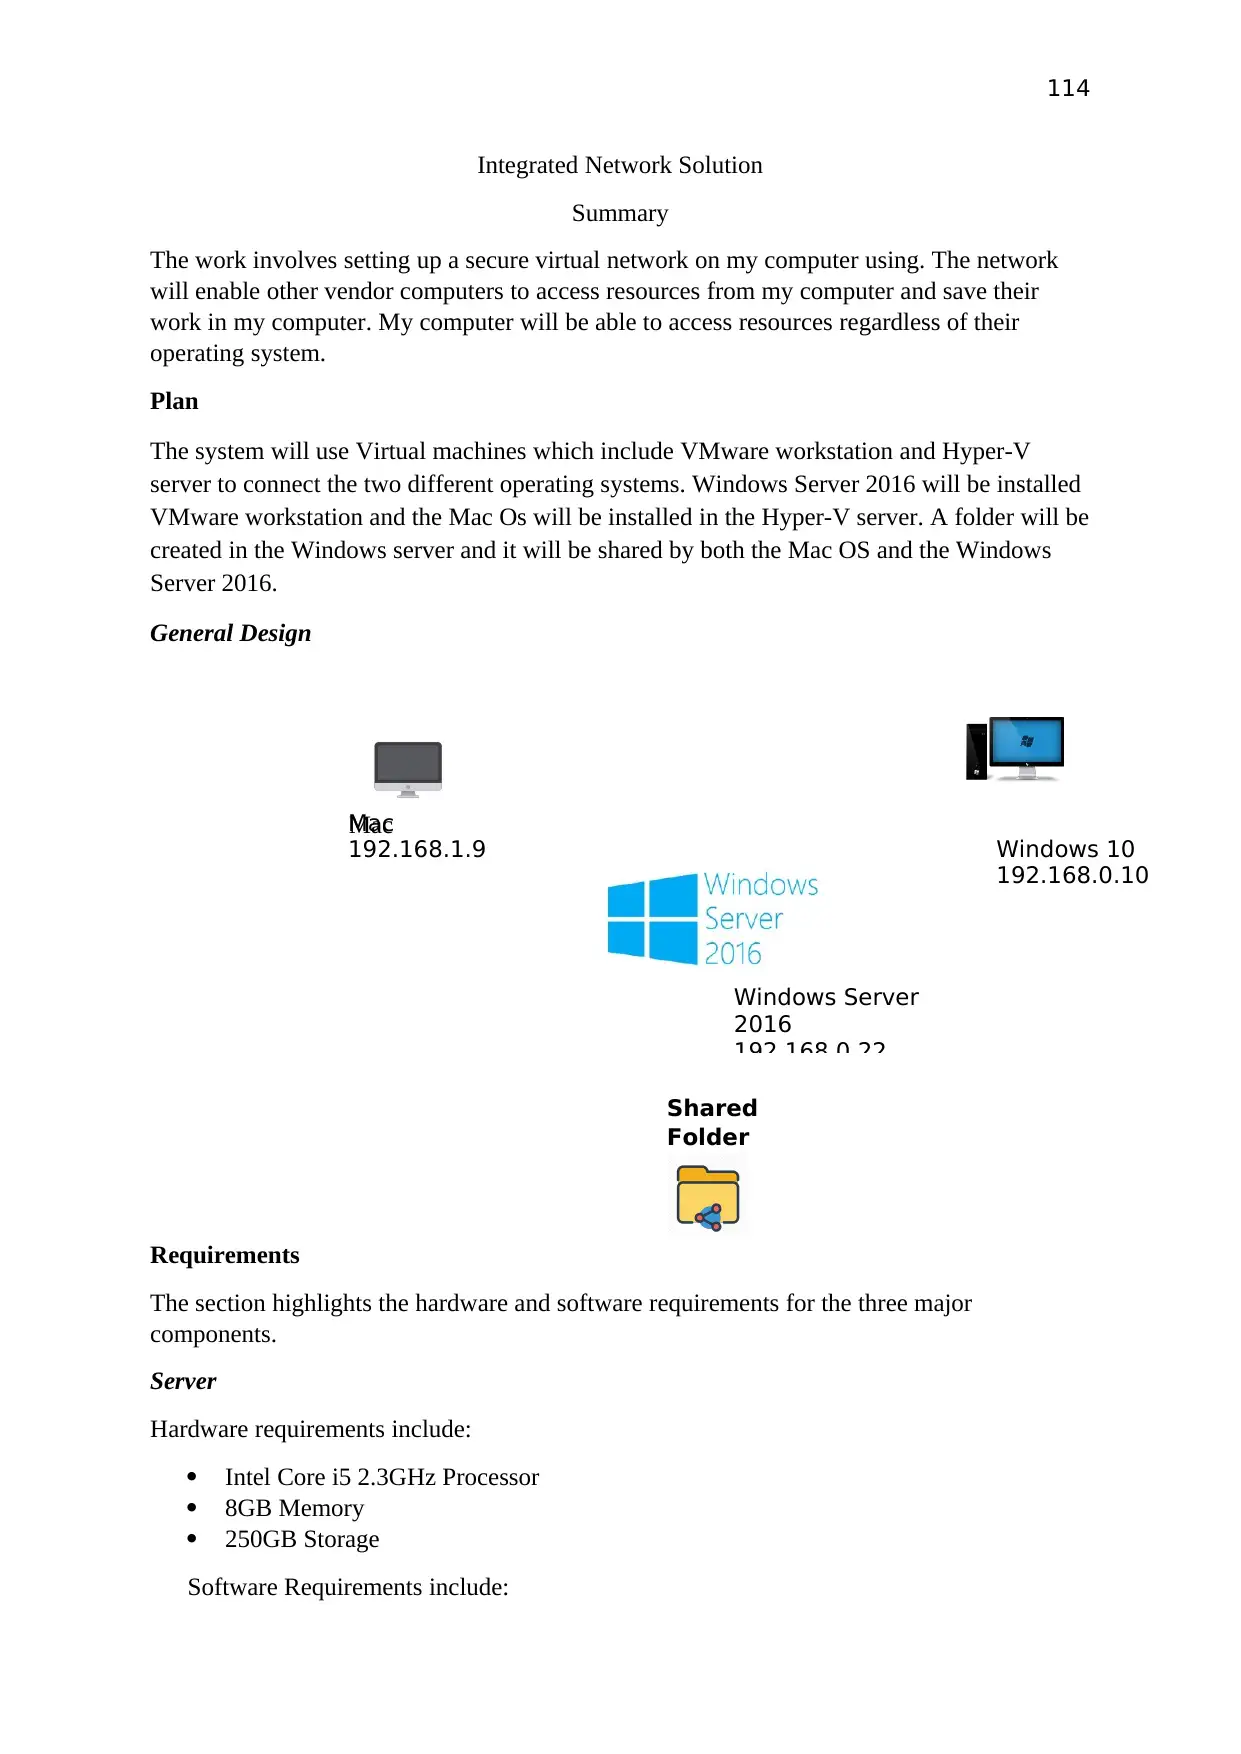
114
Integrated Network Solution
Summary
The work involves setting up a secure virtual network on my computer using. The network
will enable other vendor computers to access resources from my computer and save their
work in my computer. My computer will be able to access resources regardless of their
operating system.
Plan
The system will use Virtual machines which include VMware workstation and Hyper-V
server to connect the two different operating systems. Windows Server 2016 will be installed
VMware workstation and the Mac Os will be installed in the Hyper-V server. A folder will be
created in the Windows server and it will be shared by both the Mac OS and the Windows
Server 2016.
General Design
Mac
Requirements
The section highlights the hardware and software requirements for the three major
components.
Server
Hardware requirements include:
Intel Core i5 2.3GHz Processor
8GB Memory
250GB Storage
Software Requirements include:
Shared
Folder
Windows 10
192.168.0.10
Mac
192.168.1.9
Windows Server
2016
192.168.0.22
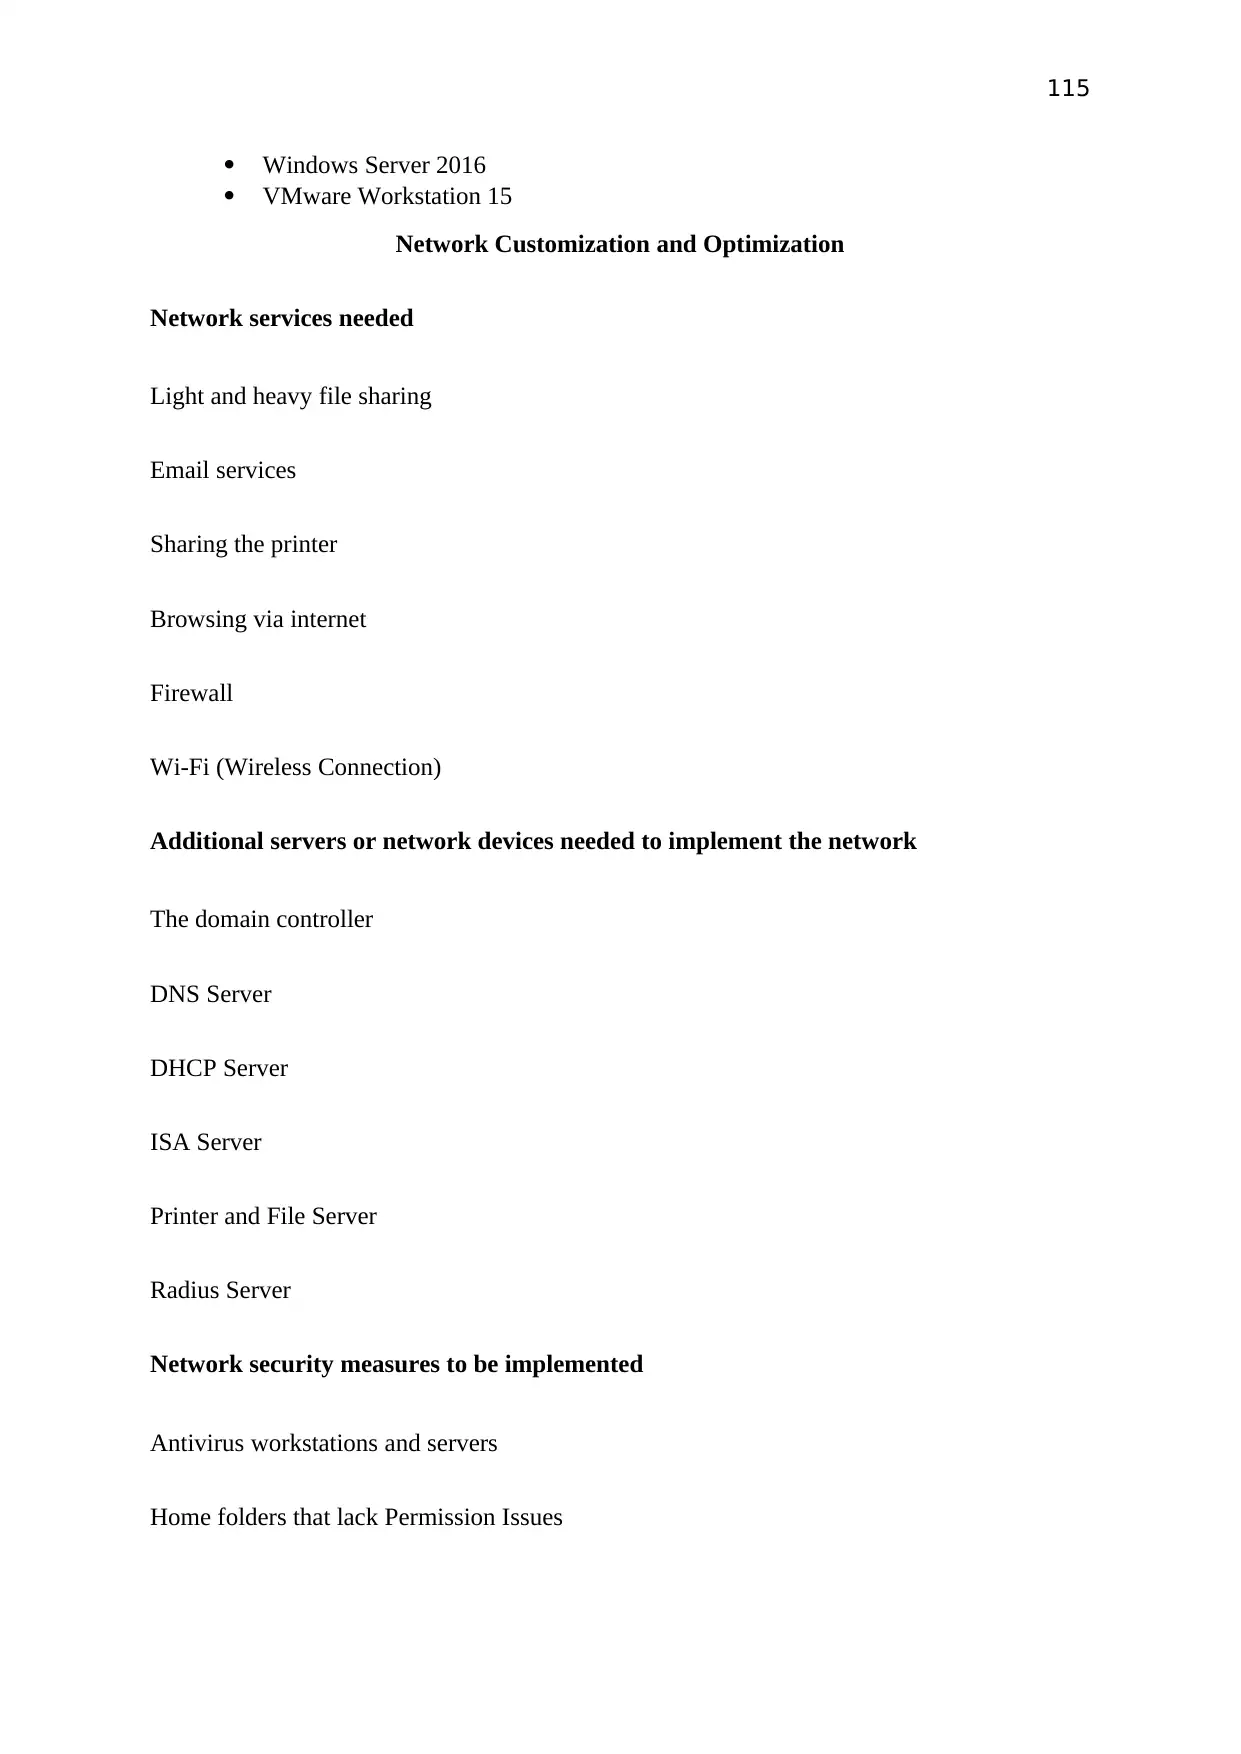
115
Windows Server 2016
VMware Workstation 15
Network Customization and Optimization
Network services needed
Light and heavy file sharing
Email services
Sharing the printer
Browsing via internet
Firewall
Wi-Fi (Wireless Connection)
Additional servers or network devices needed to implement the network
The domain controller
DNS Server
DHCP Server
ISA Server
Printer and File Server
Radius Server
Network security measures to be implemented
Antivirus workstations and servers
Home folders that lack Permission Issues
Paraphrase This Document
Need a fresh take? Get an instant paraphrase of this document with our AI Paraphraser
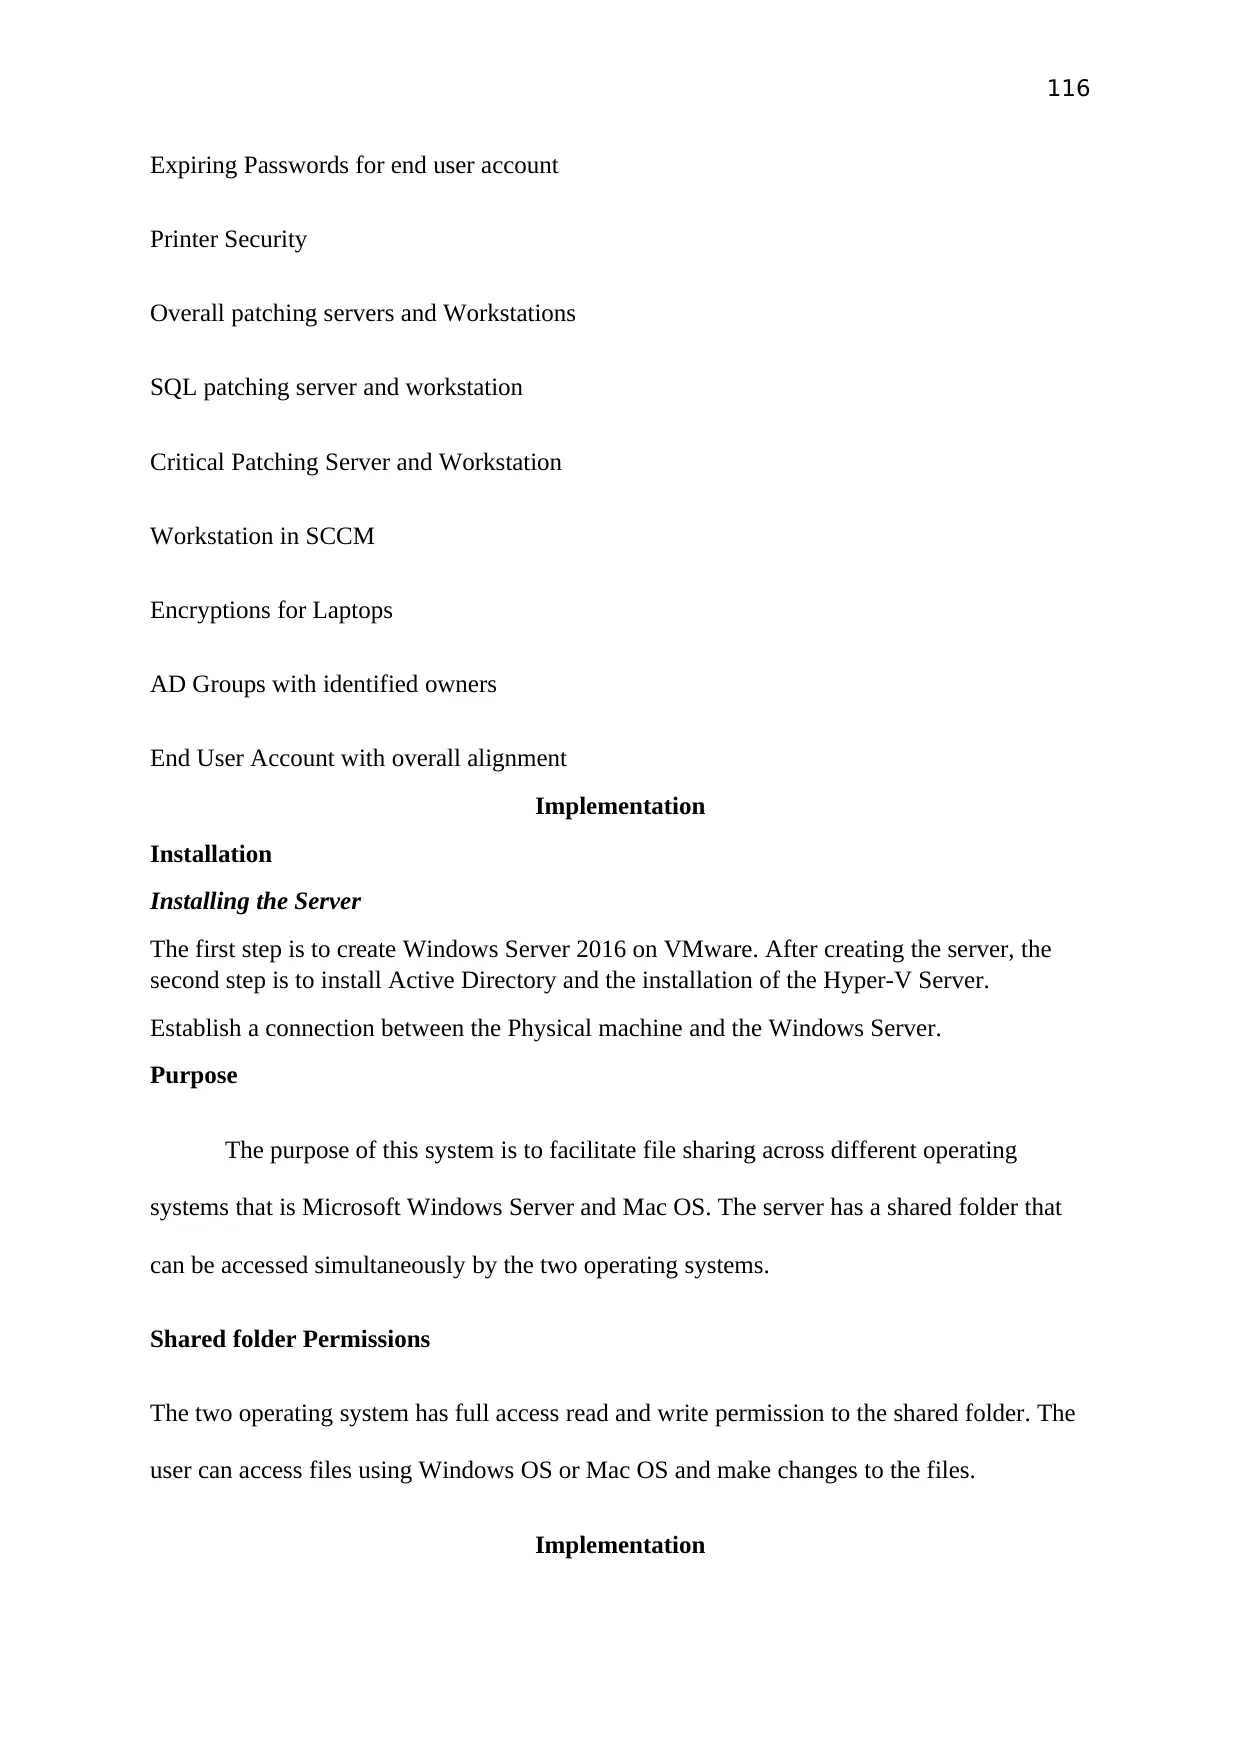
116
Expiring Passwords for end user account
Printer Security
Overall patching servers and Workstations
SQL patching server and workstation
Critical Patching Server and Workstation
Workstation in SCCM
Encryptions for Laptops
AD Groups with identified owners
End User Account with overall alignment
Implementation
Installation
Installing the Server
The first step is to create Windows Server 2016 on VMware. After creating the server, the
second step is to install Active Directory and the installation of the Hyper-V Server.
Establish a connection between the Physical machine and the Windows Server.
Purpose
The purpose of this system is to facilitate file sharing across different operating
systems that is Microsoft Windows Server and Mac OS. The server has a shared folder that
can be accessed simultaneously by the two operating systems.
Shared folder Permissions
The two operating system has full access read and write permission to the shared folder. The
user can access files using Windows OS or Mac OS and make changes to the files.
Implementation
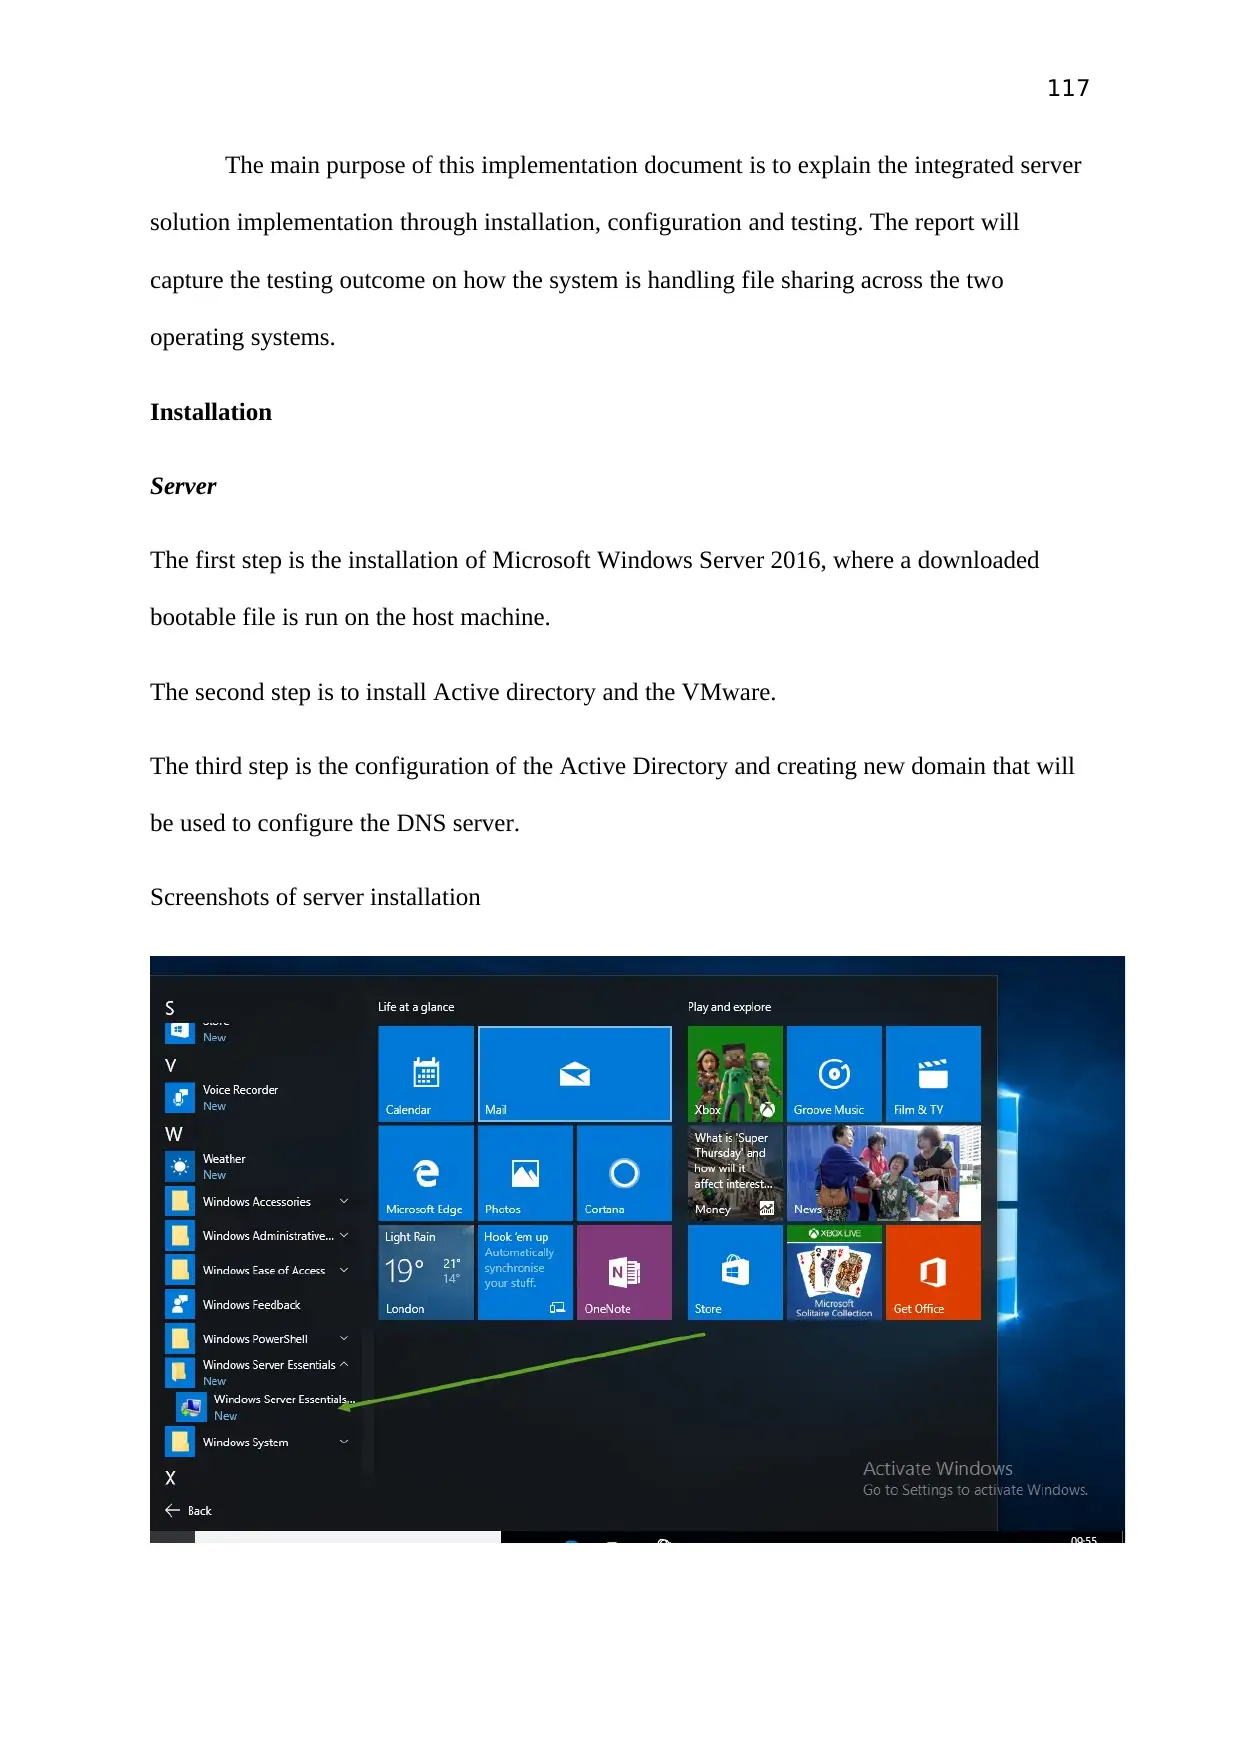
117
The main purpose of this implementation document is to explain the integrated server
solution implementation through installation, configuration and testing. The report will
capture the testing outcome on how the system is handling file sharing across the two
operating systems.
Installation
Server
The first step is the installation of Microsoft Windows Server 2016, where a downloaded
bootable file is run on the host machine.
The second step is to install Active directory and the VMware.
The third step is the configuration of the Active Directory and creating new domain that will
be used to configure the DNS server.
Screenshots of server installation
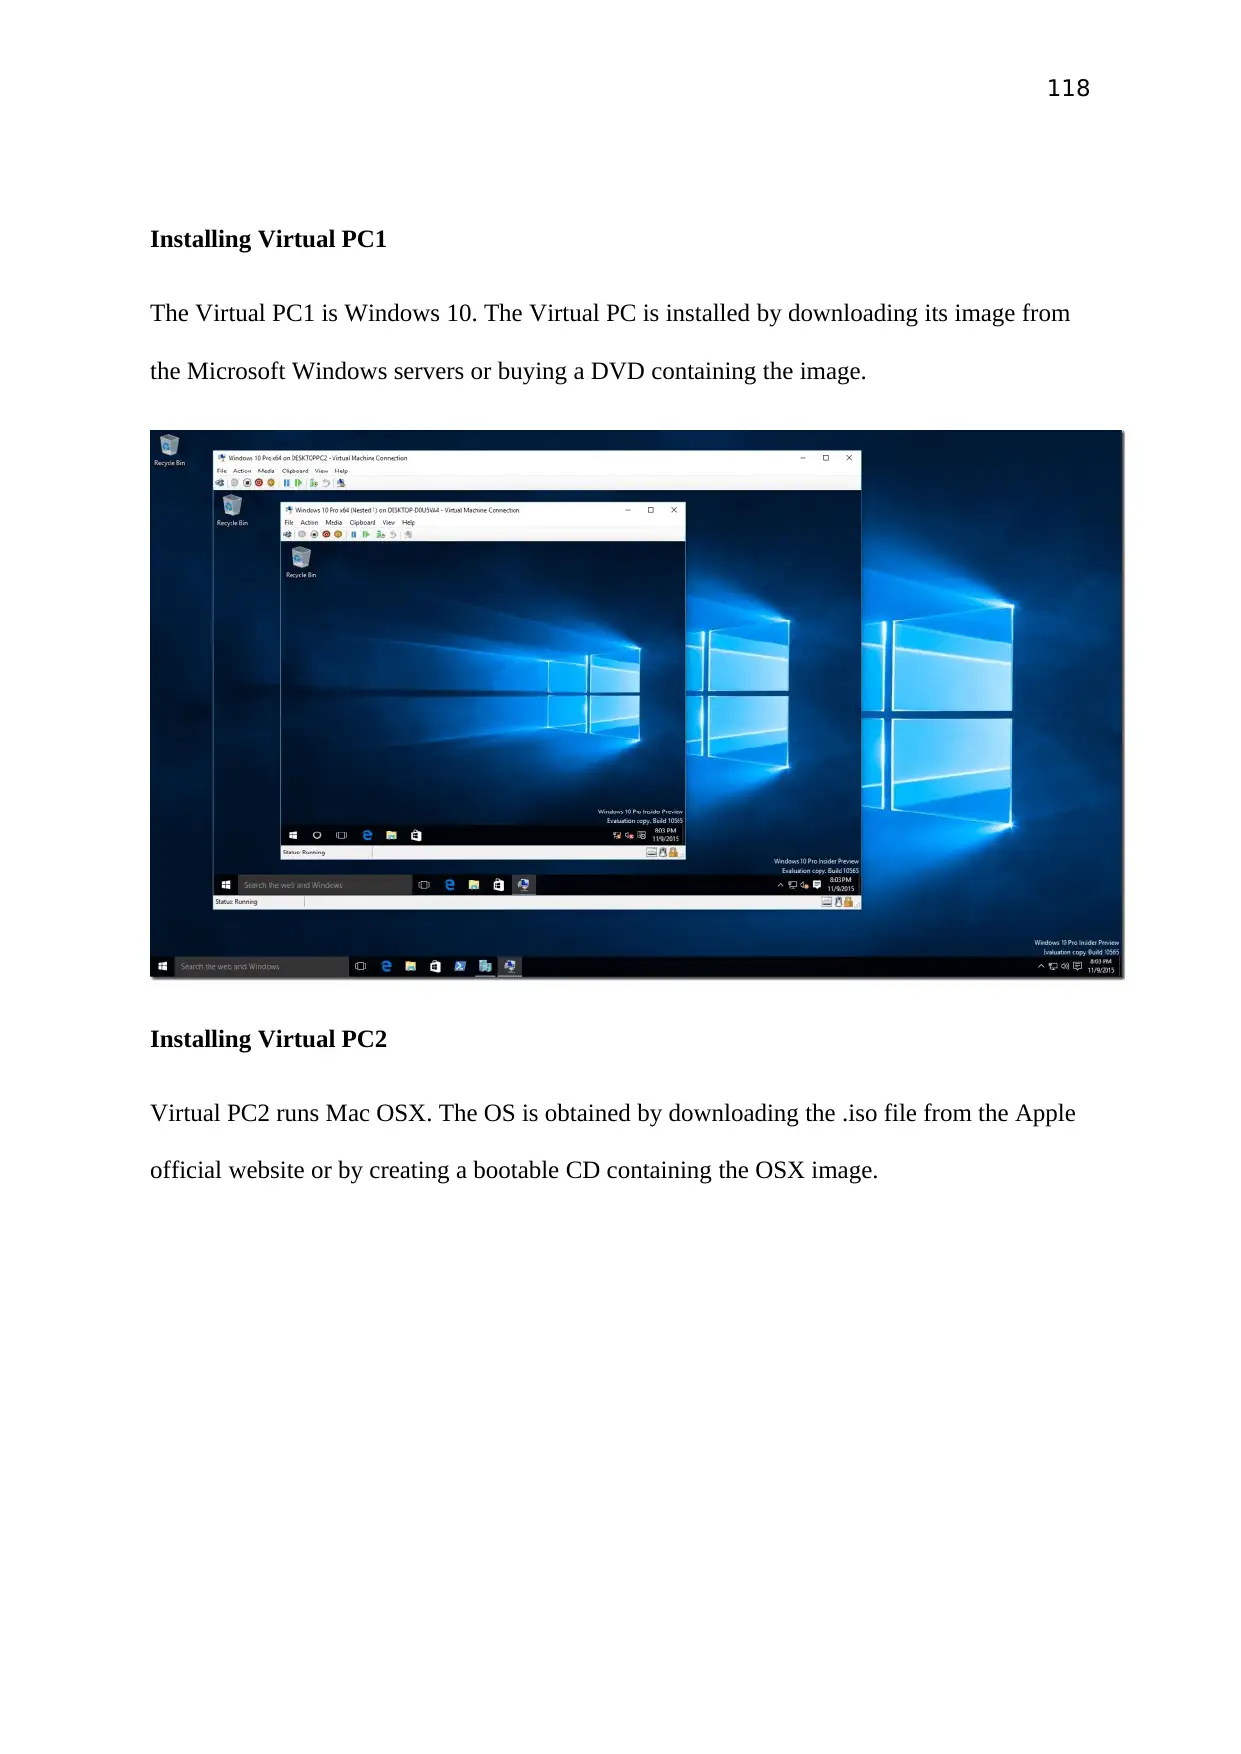
118
Installing Virtual PC1
The Virtual PC1 is Windows 10. The Virtual PC is installed by downloading its image from
the Microsoft Windows servers or buying a DVD containing the image.
Installing Virtual PC2
Virtual PC2 runs Mac OSX. The OS is obtained by downloading the .iso file from the Apple
official website or by creating a bootable CD containing the OSX image.
Secure Best Marks with AI Grader
Need help grading? Try our AI Grader for instant feedback on your assignments.
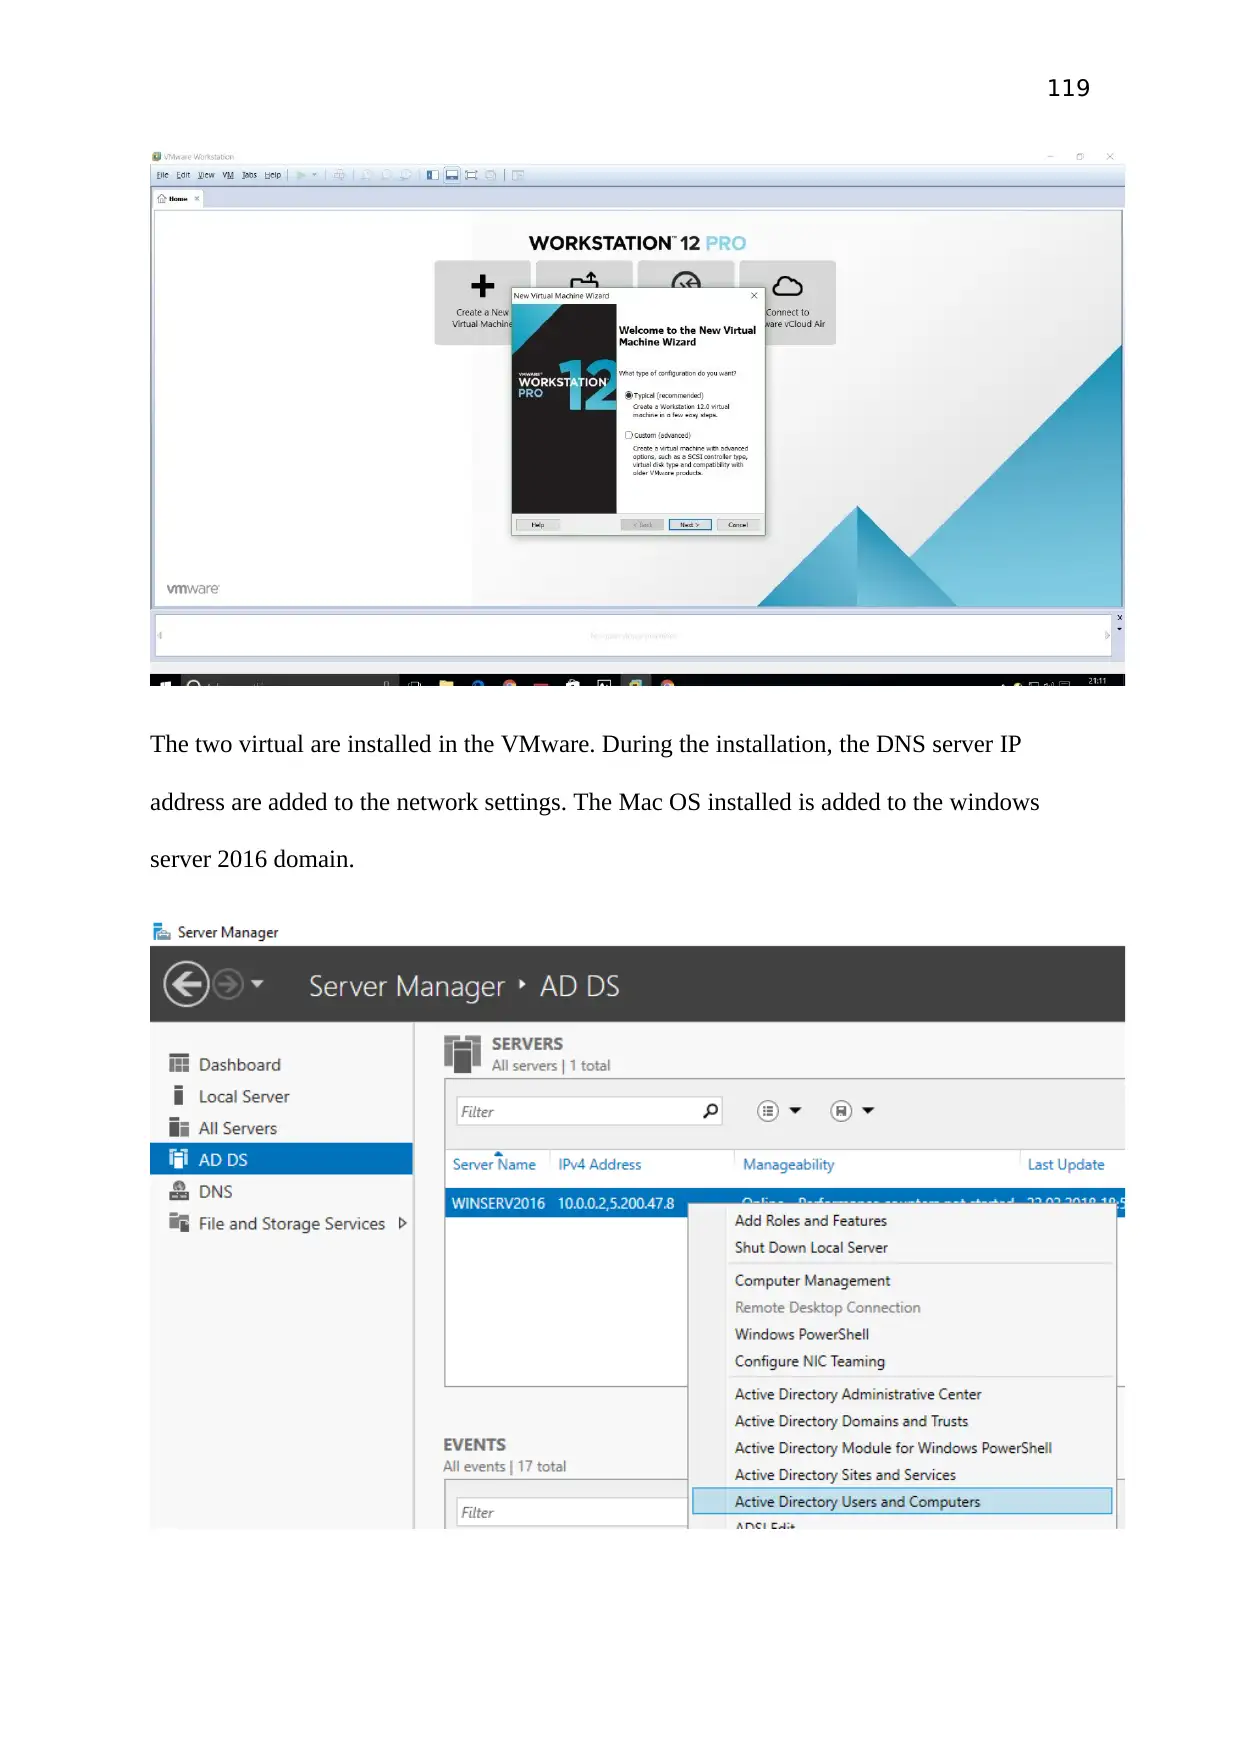
119
The two virtual are installed in the VMware. During the installation, the DNS server IP
address are added to the network settings. The Mac OS installed is added to the windows
server 2016 domain.
The two virtual are installed in the VMware. During the installation, the DNS server IP
address are added to the network settings. The Mac OS installed is added to the windows
server 2016 domain.
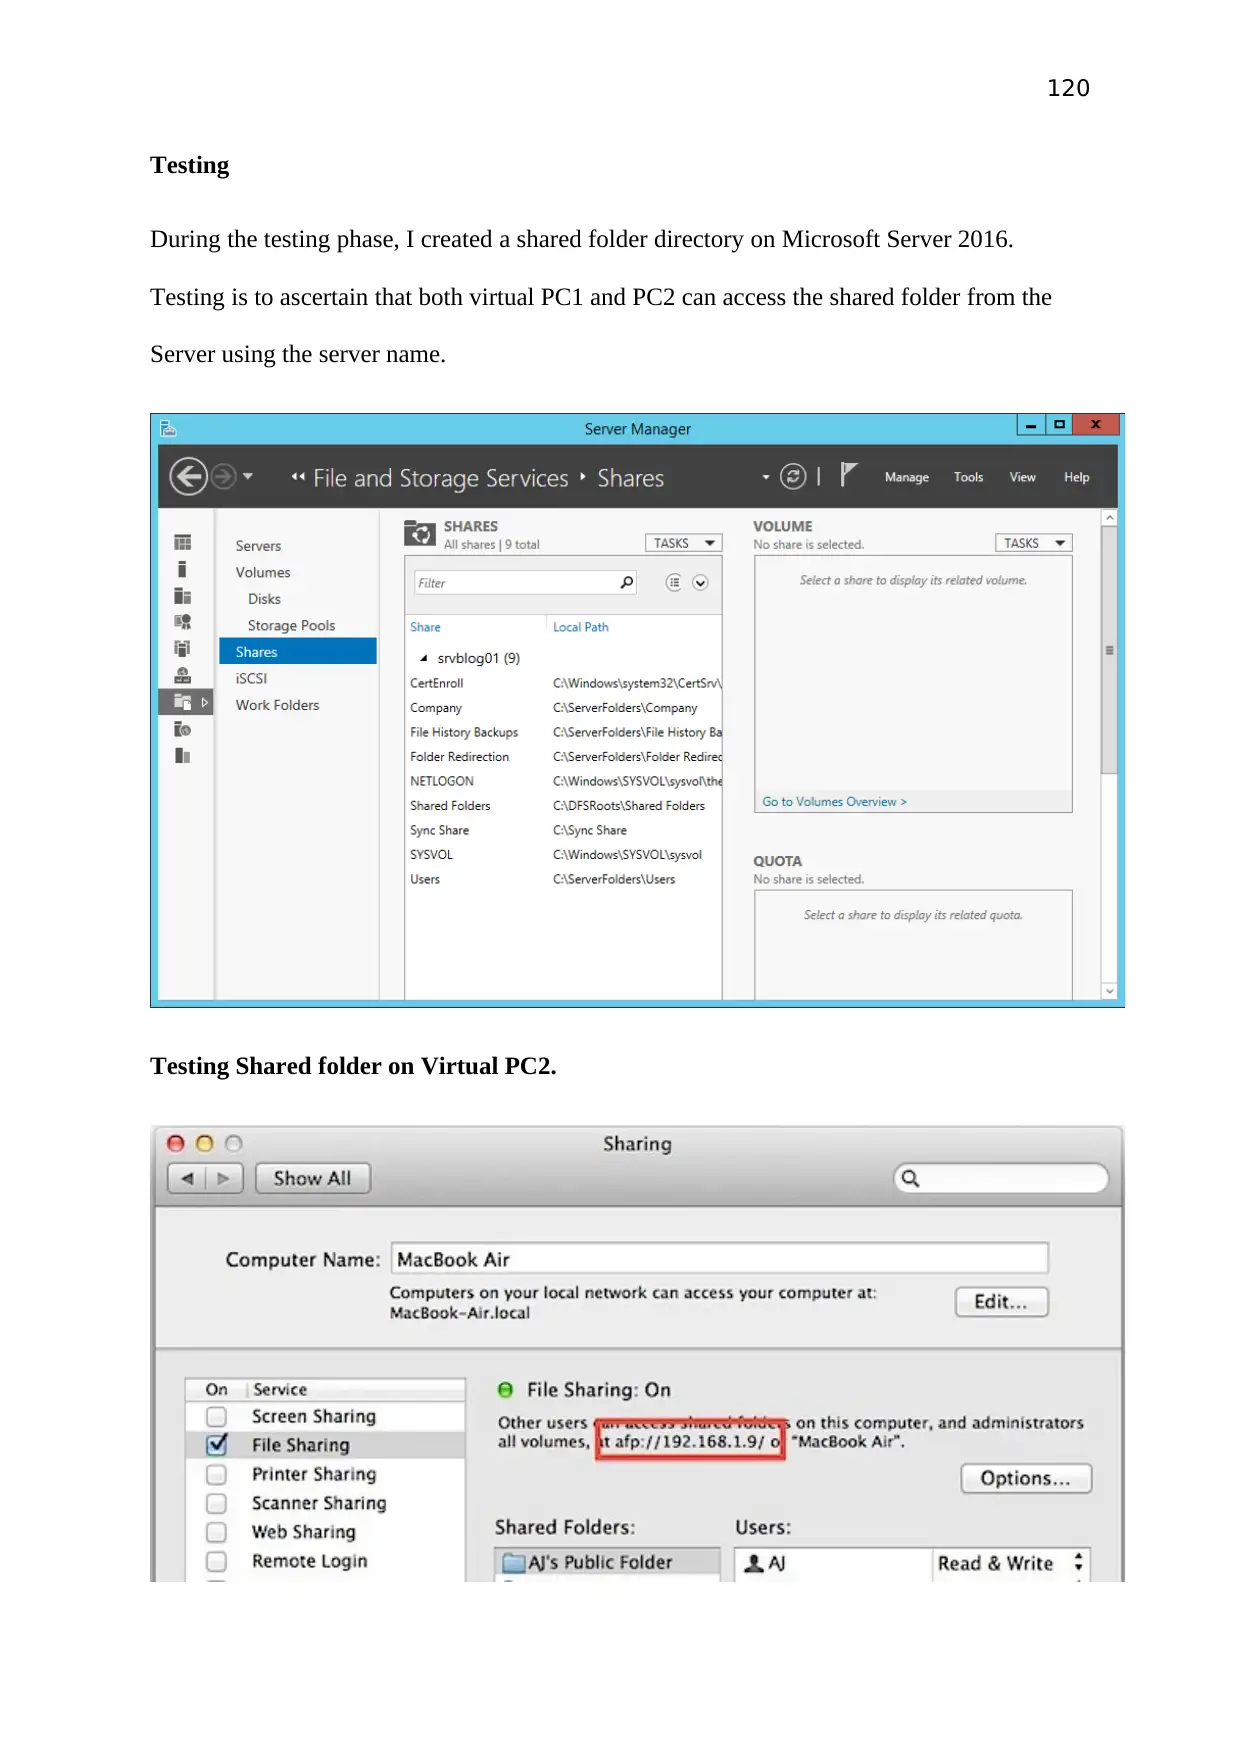
120
Testing
During the testing phase, I created a shared folder directory on Microsoft Server 2016.
Testing is to ascertain that both virtual PC1 and PC2 can access the shared folder from the
Server using the server name.
Testing Shared folder on Virtual PC2.
Testing
During the testing phase, I created a shared folder directory on Microsoft Server 2016.
Testing is to ascertain that both virtual PC1 and PC2 can access the shared folder from the
Server using the server name.
Testing Shared folder on Virtual PC2.
121
Validation Test Plan
The two virtual PCs should be able to access the shared folder. The shared folder offers read
and write permissions to both users. That means that the user can access, add, and delete files
from the shared folder in the server.
The test also uses ping command to verify that both the PC1 and the PC2 can access the
domain name controller.
Management Report
Installation of Operating Systems
The first step is to install a VMware on the host machine. The VMware offers a platform
where all other Virtual systems will be installed. The Microsoft Active Directory is also
installed alongside VMware.
The second part is to install Windows Server 2016 on the VMware. The installation is done
by obtaining a copy of the Windows server from the Microsoft Windows Official website.
The copy of the Windows Server 2016 is licensed and therefore one has to purchase the
license.
The second step is to install Hype-V ware.
The same procedure is followed in installing the Mac OS and Microsoft Windows 10. The
installation of the two makes them operate on one hardware component but independently.
The process of installing them is easy and guided by a simple wizard.
Paraphrase This Document
Need a fresh take? Get an instant paraphrase of this document with our AI Paraphraser
122
The final step is to configure the Windows Server 2016, Windows 10 and Mac OS by
changing the gateway address as well as the DNS server address. The configuration is done at
the domain controller.
Network protocols utilized
IP addresses
DNS Services
Microsoft DS and
Kerbros
Authentication Method
The system uses two level authentication. The username and the password are encrypted
using the NTLM version 2.
The system also uses Microsoft Active Directory. Active Directory in Windows
Server is a layer that is built on the domain name system. The Active Directory domain stores
the username and the password for the user.
Kerberos is an authentication technology that is built on top of the Active Directory.
Kerberos creates encrypted technology to avoid leaking the login credentials.
Configuration Settings
Server
Location / Equipment IP Address
Server room & Management VLAN 10.1.1.0/24
DNS Server 10.1.1.5
FTP Server 10.1.1.6
DHCP Server 10.1.1.7
123
Telnet Server 10.1.1.8
SMTP Server 10.1.1.9
Vendor 01 10.1.2.0 /27
Vendor 02 10.1.2.32 /27
Vendor 03 10.1.2.64 /27
Vendor 04 10.1.2.96 /27
Vendor 05 10.1.2.128 /27
Vendor 06 10.1.2.160 /27
Vendor 07 10.1.2.196 /27
Vendor 08 10.1.2.224 /27
Wi-Fi 10.1.3.0/24
Test observation
All computers were able to access the shared folder and to ping the domain controller.
Workplace Health and Safety
The main aim of health and safety measures is to ensure that the working place remains safe
for human beings and other species. The exercise should comply with the environmental
legislation and cause minimum damage to the environment. The health and safety measures
also state the risk mitigation process that would be taken when necessary.
Equipment Safety
The user should read and understand all the procedures that are supposed to be followed
when dealing with all the involved computing devices. The user should avoid opening any
124
equipment covers when connected to the power supply. All the power cables should be
checked to ensure they are in good condition.
Ventilations Systems
The working room should be well ventilated to ensure flow of clean and cool air.
Emergency Shutdown Systems
It is important to have an emergency shutdown in place. One of them is access to the main
switch when one can cut-off power. Some of the rooms are fitted with panic button that one
can use when in problem to get quick help.
Electricity
All the standard safety practices should be followed when dealing with mains electricity and
electrical appliances. The user should always be aware of the location of the sub-panels and
the main panels to cut of electricity in-case of an electrical short circuit.
Error Troubleshooting Tools
The command line and the Microsoft Windows Diagnostic tool are important in
troubleshooting whenever there is a connection problem. Other network tools should be used
to identify and solve issues related to networking.
Conclusion
The system design and implementation of integrated network solution offers a solution to
users working in an organization that runs Microsoft Windows server 2016. The main area of
concern is the sharing of resources between two different operating systems and the server.
Secure Best Marks with AI Grader
Need help grading? Try our AI Grader for instant feedback on your assignments.
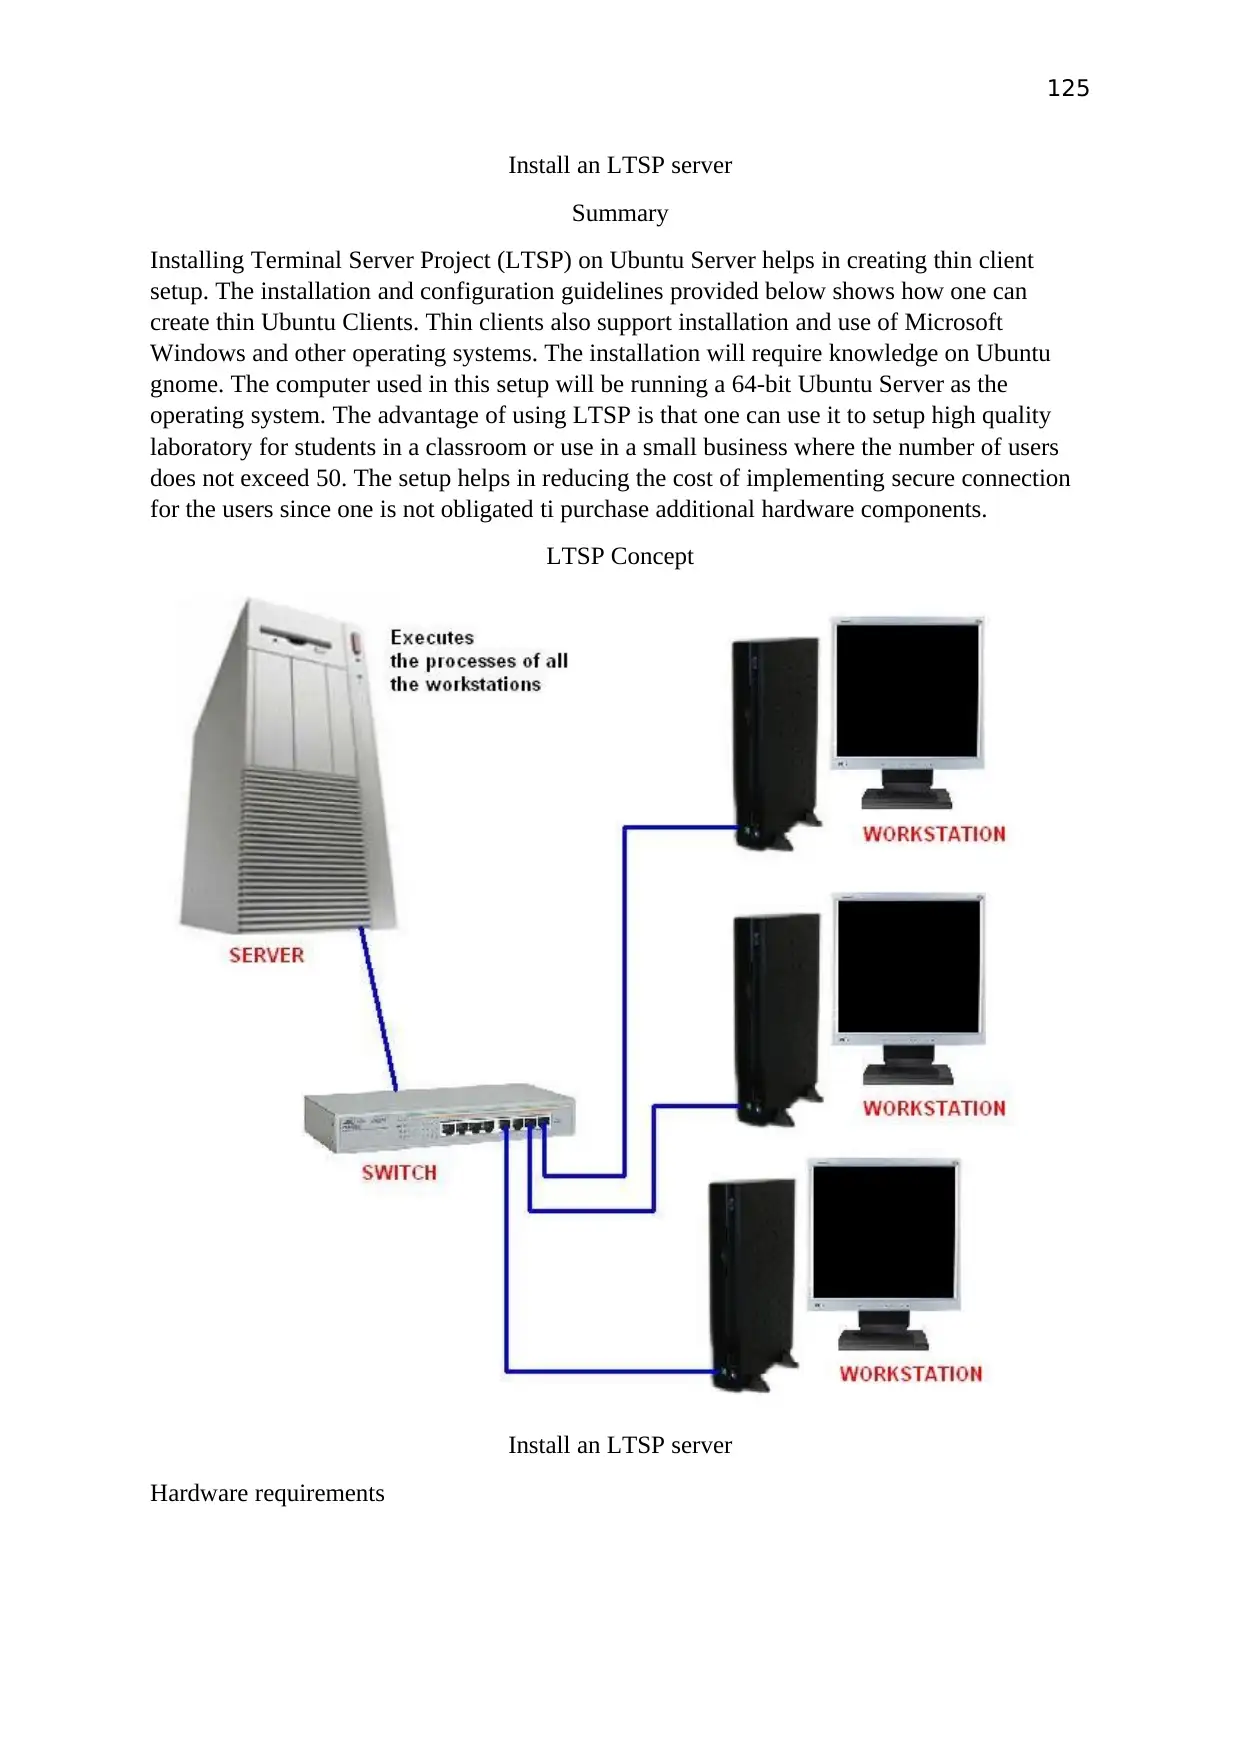
125
Install an LTSP server
Summary
Installing Terminal Server Project (LTSP) on Ubuntu Server helps in creating thin client
setup. The installation and configuration guidelines provided below shows how one can
create thin Ubuntu Clients. Thin clients also support installation and use of Microsoft
Windows and other operating systems. The installation will require knowledge on Ubuntu
gnome. The computer used in this setup will be running a 64-bit Ubuntu Server as the
operating system. The advantage of using LTSP is that one can use it to setup high quality
laboratory for students in a classroom or use in a small business where the number of users
does not exceed 50. The setup helps in reducing the cost of implementing secure connection
for the users since one is not obligated ti purchase additional hardware components.
LTSP Concept
Install an LTSP server
Hardware requirements
Install an LTSP server
Summary
Installing Terminal Server Project (LTSP) on Ubuntu Server helps in creating thin client
setup. The installation and configuration guidelines provided below shows how one can
create thin Ubuntu Clients. Thin clients also support installation and use of Microsoft
Windows and other operating systems. The installation will require knowledge on Ubuntu
gnome. The computer used in this setup will be running a 64-bit Ubuntu Server as the
operating system. The advantage of using LTSP is that one can use it to setup high quality
laboratory for students in a classroom or use in a small business where the number of users
does not exceed 50. The setup helps in reducing the cost of implementing secure connection
for the users since one is not obligated ti purchase additional hardware components.
LTSP Concept
Install an LTSP server
Hardware requirements
126
The setup will utilize the already existing personal computers within the school without
purchasing additional hardware components. Virtualization will be done where necessary.
The setup will be a small server that can hold up to fifty clients.
Client
The specification of machines that can be used by clients to access the server.
CPU
The use of LTSP default mode that is secure requires a computer that is slightly faster. The
CPU of the client computer should have a minimum speed of 533MHz. Use of slower CPU
will not function properly and the user will be exposed to security threats.
Network
Thin client uses a program called boot loader and therefore it can only boot over the network.
The boot loader is located in the card but for clients using older computer models, the boot
loader can be provided in a hard drive or CDRom and it is required to boot the thin client.
The required networs include:
PXE: It is the most common in many networks cards. It can also be found in the
build-in network cards found on the computer motherboard. All computers with this
component will start thin client without any problem.
Etherboot/gPXE: For clients using older computers that lack PXE, one can use a
software that is equal to Etherboot or gPEX which is its newer replacement. The
software can be booted from a memory stick or from a CDRom.
Memory
The minimum random access memory (RAM) required for one to use thin client is 48MB.
The client computer should have more than that to ensure smooth running of the program.
Video Card
The client should ensure that the computer connecting to the server has a minimum of 16MB
memory and a video card that utilizes the PCI bus.
Server
The advantage of using the LTPS thin client is that it is scalable. Installing the Server on a
powerful computer ensures that one can connect a number of thin clients. For one to add
more clients to the server, he or she will be required to either add the capability of the server
machine by expanding Memory and increasing speed or adding the number of the servers to
bear the load.
Memory
Linux based operating system are suitable since they make efficient use of the available
memory. The formula below is used to add memory to thin client server.
1500 + (30*N_FAT_CLIENTS) + (300*N_THIN_CLIENTS)
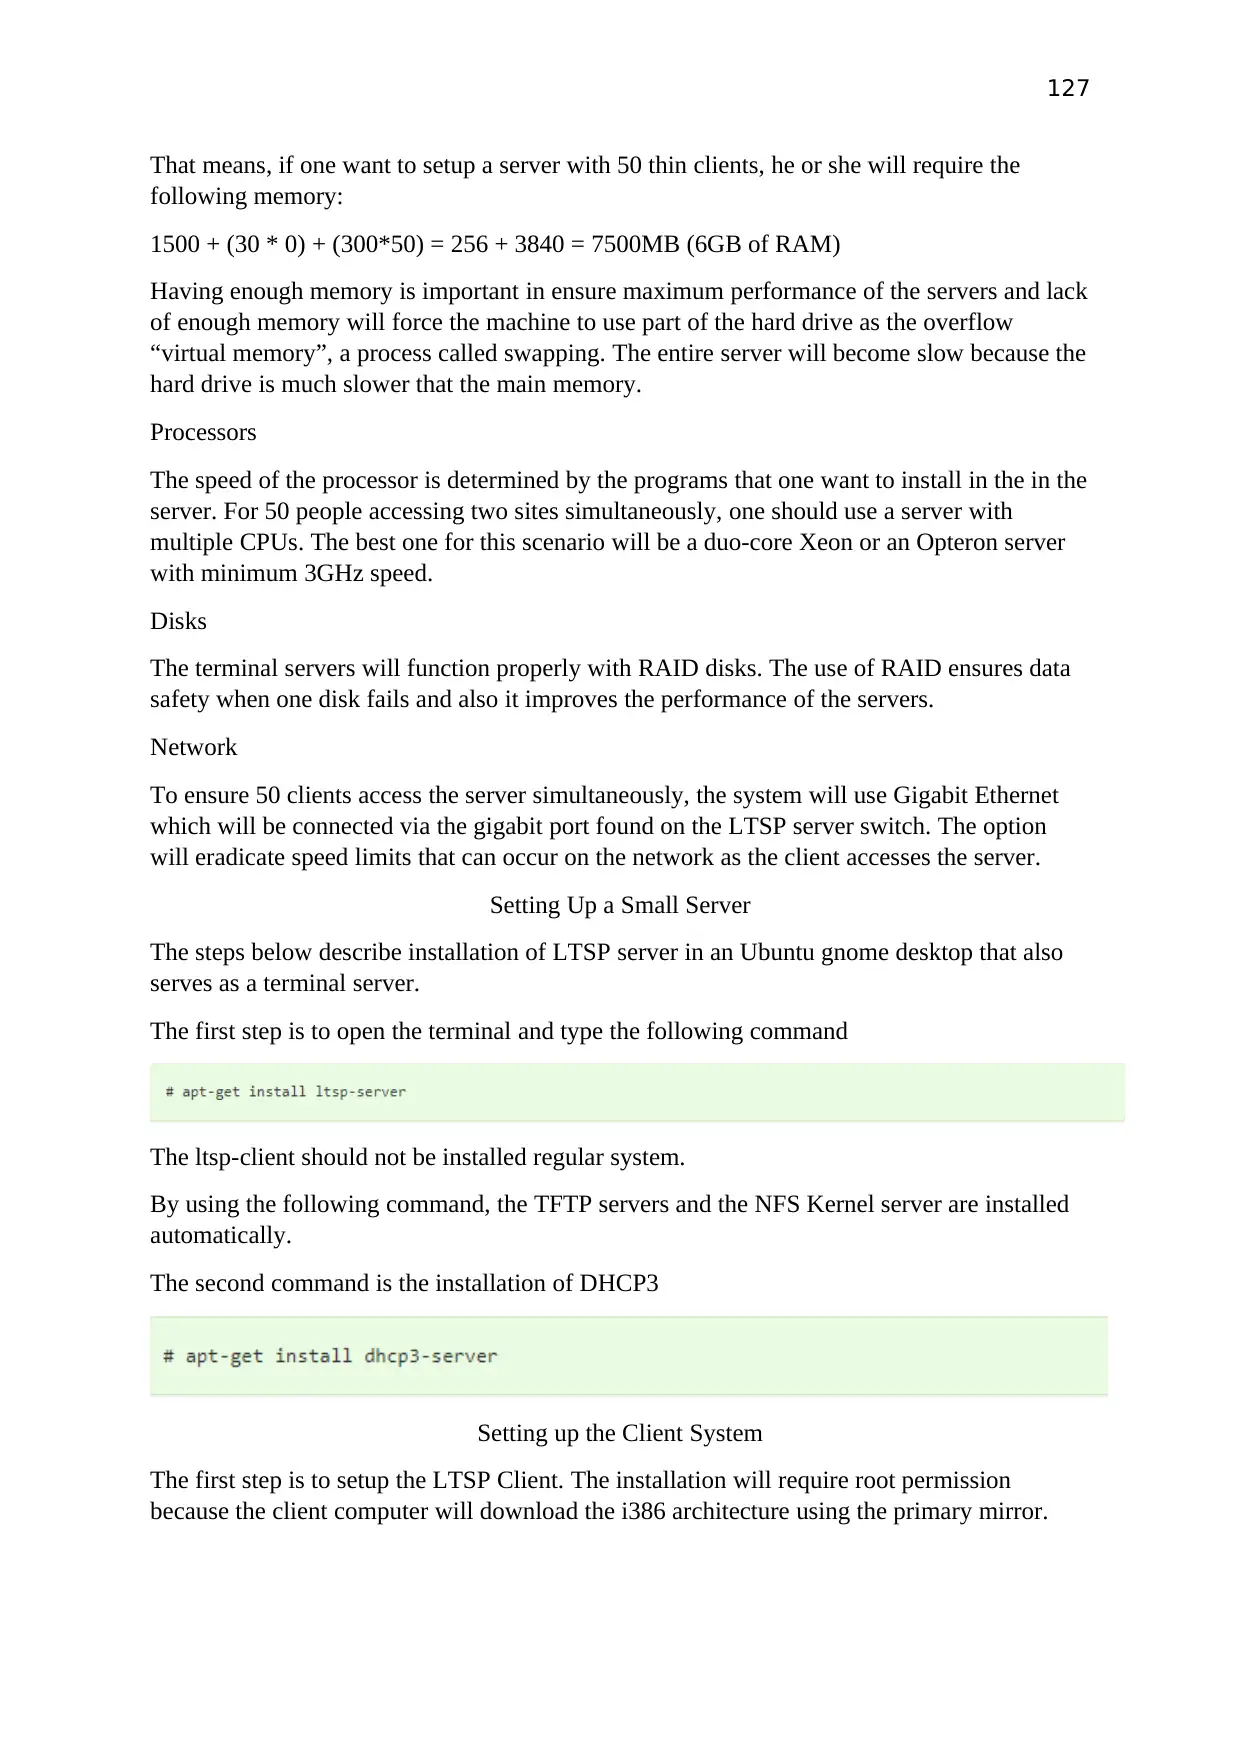
127
That means, if one want to setup a server with 50 thin clients, he or she will require the
following memory:
1500 + (30 * 0) + (300*50) = 256 + 3840 = 7500MB (6GB of RAM)
Having enough memory is important in ensure maximum performance of the servers and lack
of enough memory will force the machine to use part of the hard drive as the overflow
“virtual memory”, a process called swapping. The entire server will become slow because the
hard drive is much slower that the main memory.
Processors
The speed of the processor is determined by the programs that one want to install in the in the
server. For 50 people accessing two sites simultaneously, one should use a server with
multiple CPUs. The best one for this scenario will be a duo-core Xeon or an Opteron server
with minimum 3GHz speed.
Disks
The terminal servers will function properly with RAID disks. The use of RAID ensures data
safety when one disk fails and also it improves the performance of the servers.
Network
To ensure 50 clients access the server simultaneously, the system will use Gigabit Ethernet
which will be connected via the gigabit port found on the LTSP server switch. The option
will eradicate speed limits that can occur on the network as the client accesses the server.
Setting Up a Small Server
The steps below describe installation of LTSP server in an Ubuntu gnome desktop that also
serves as a terminal server.
The first step is to open the terminal and type the following command
The ltsp-client should not be installed regular system.
By using the following command, the TFTP servers and the NFS Kernel server are installed
automatically.
The second command is the installation of DHCP3
Setting up the Client System
The first step is to setup the LTSP Client. The installation will require root permission
because the client computer will download the i386 architecture using the primary mirror.
Paraphrase This Document
Need a fresh take? Get an instant paraphrase of this document with our AI Paraphraser
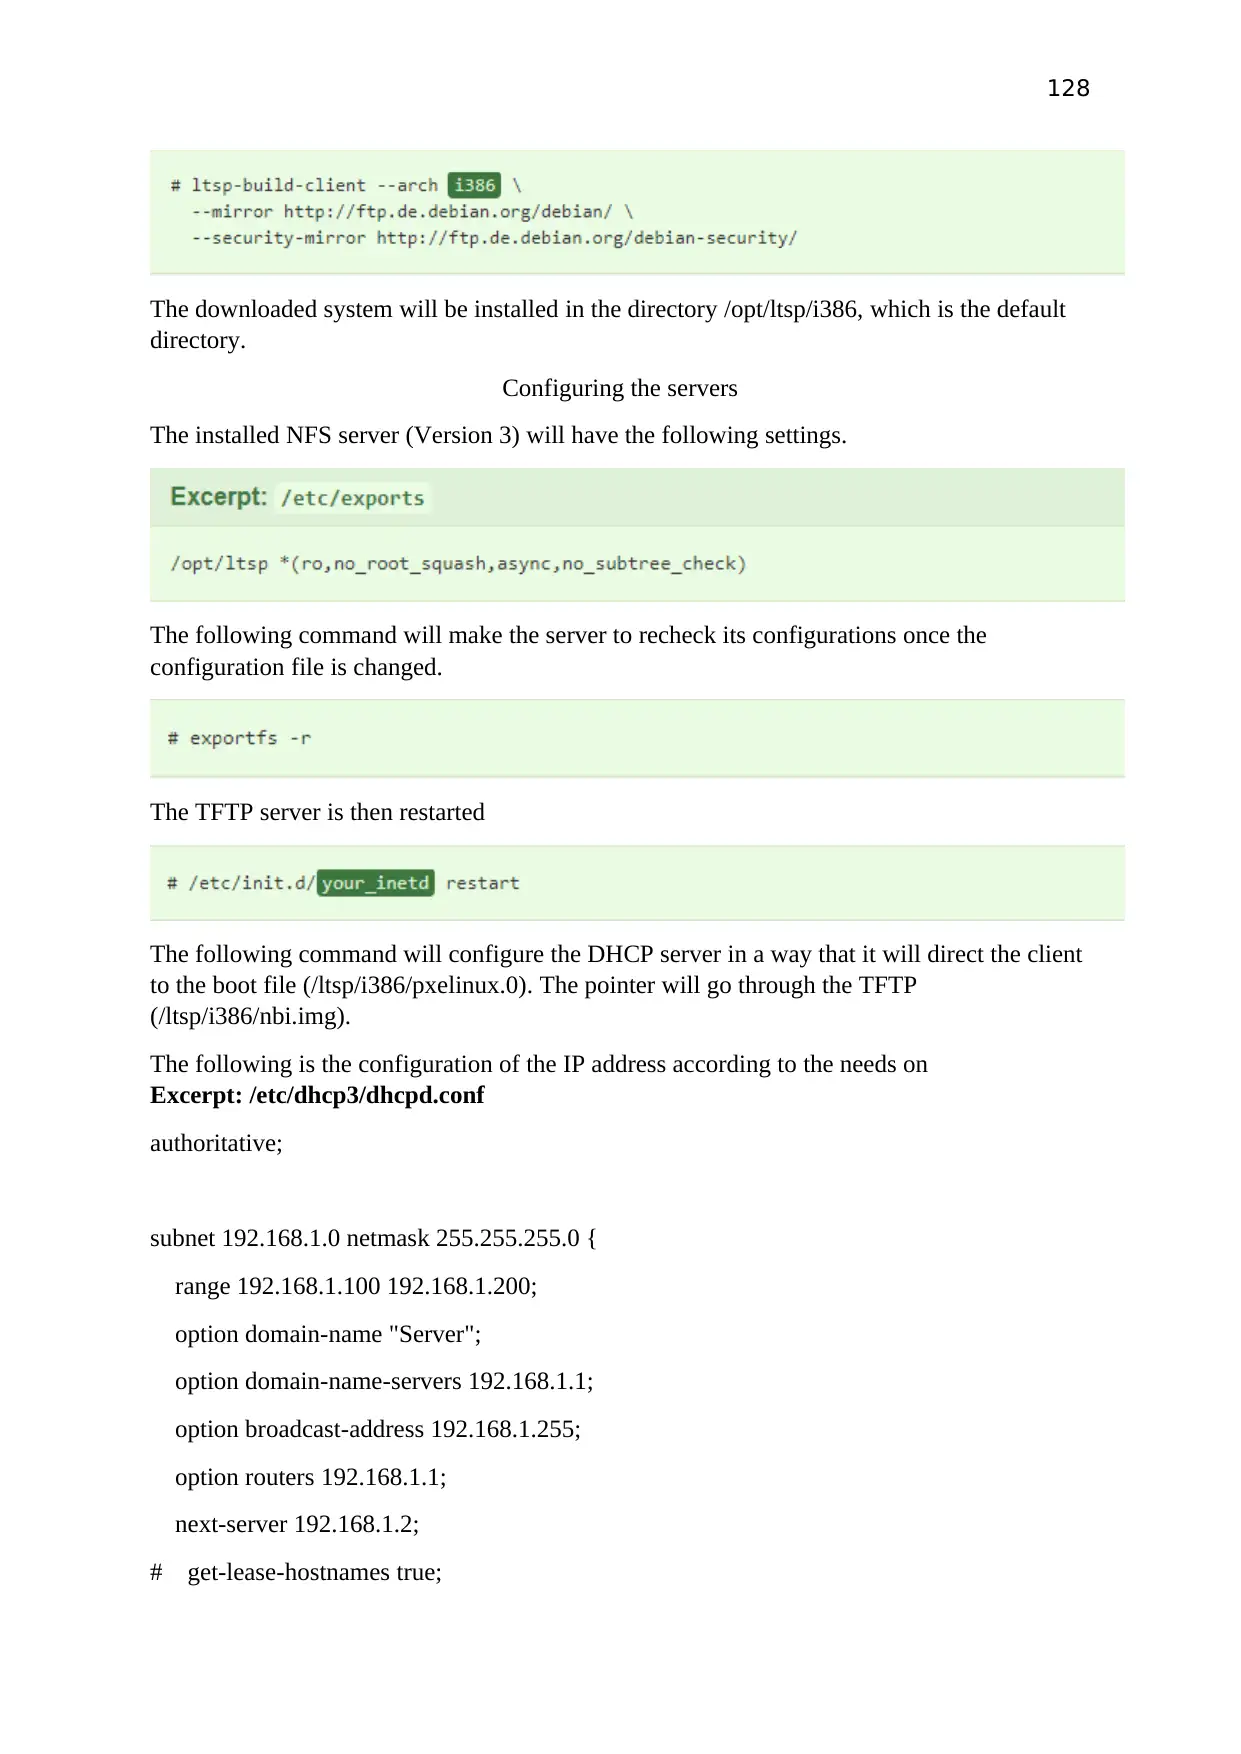
128
The downloaded system will be installed in the directory /opt/ltsp/i386, which is the default
directory.
Configuring the servers
The installed NFS server (Version 3) will have the following settings.
The following command will make the server to recheck its configurations once the
configuration file is changed.
The TFTP server is then restarted
The following command will configure the DHCP server in a way that it will direct the client
to the boot file (/ltsp/i386/pxelinux.0). The pointer will go through the TFTP
(/ltsp/i386/nbi.img).
The following is the configuration of the IP address according to the needs on
Excerpt: /etc/dhcp3/dhcpd.conf
authoritative;
subnet 192.168.1.0 netmask 255.255.255.0 {
range 192.168.1.100 192.168.1.200;
option domain-name "Server";
option domain-name-servers 192.168.1.1;
option broadcast-address 192.168.1.255;
option routers 192.168.1.1;
next-server 192.168.1.2;
# get-lease-hostnames true;
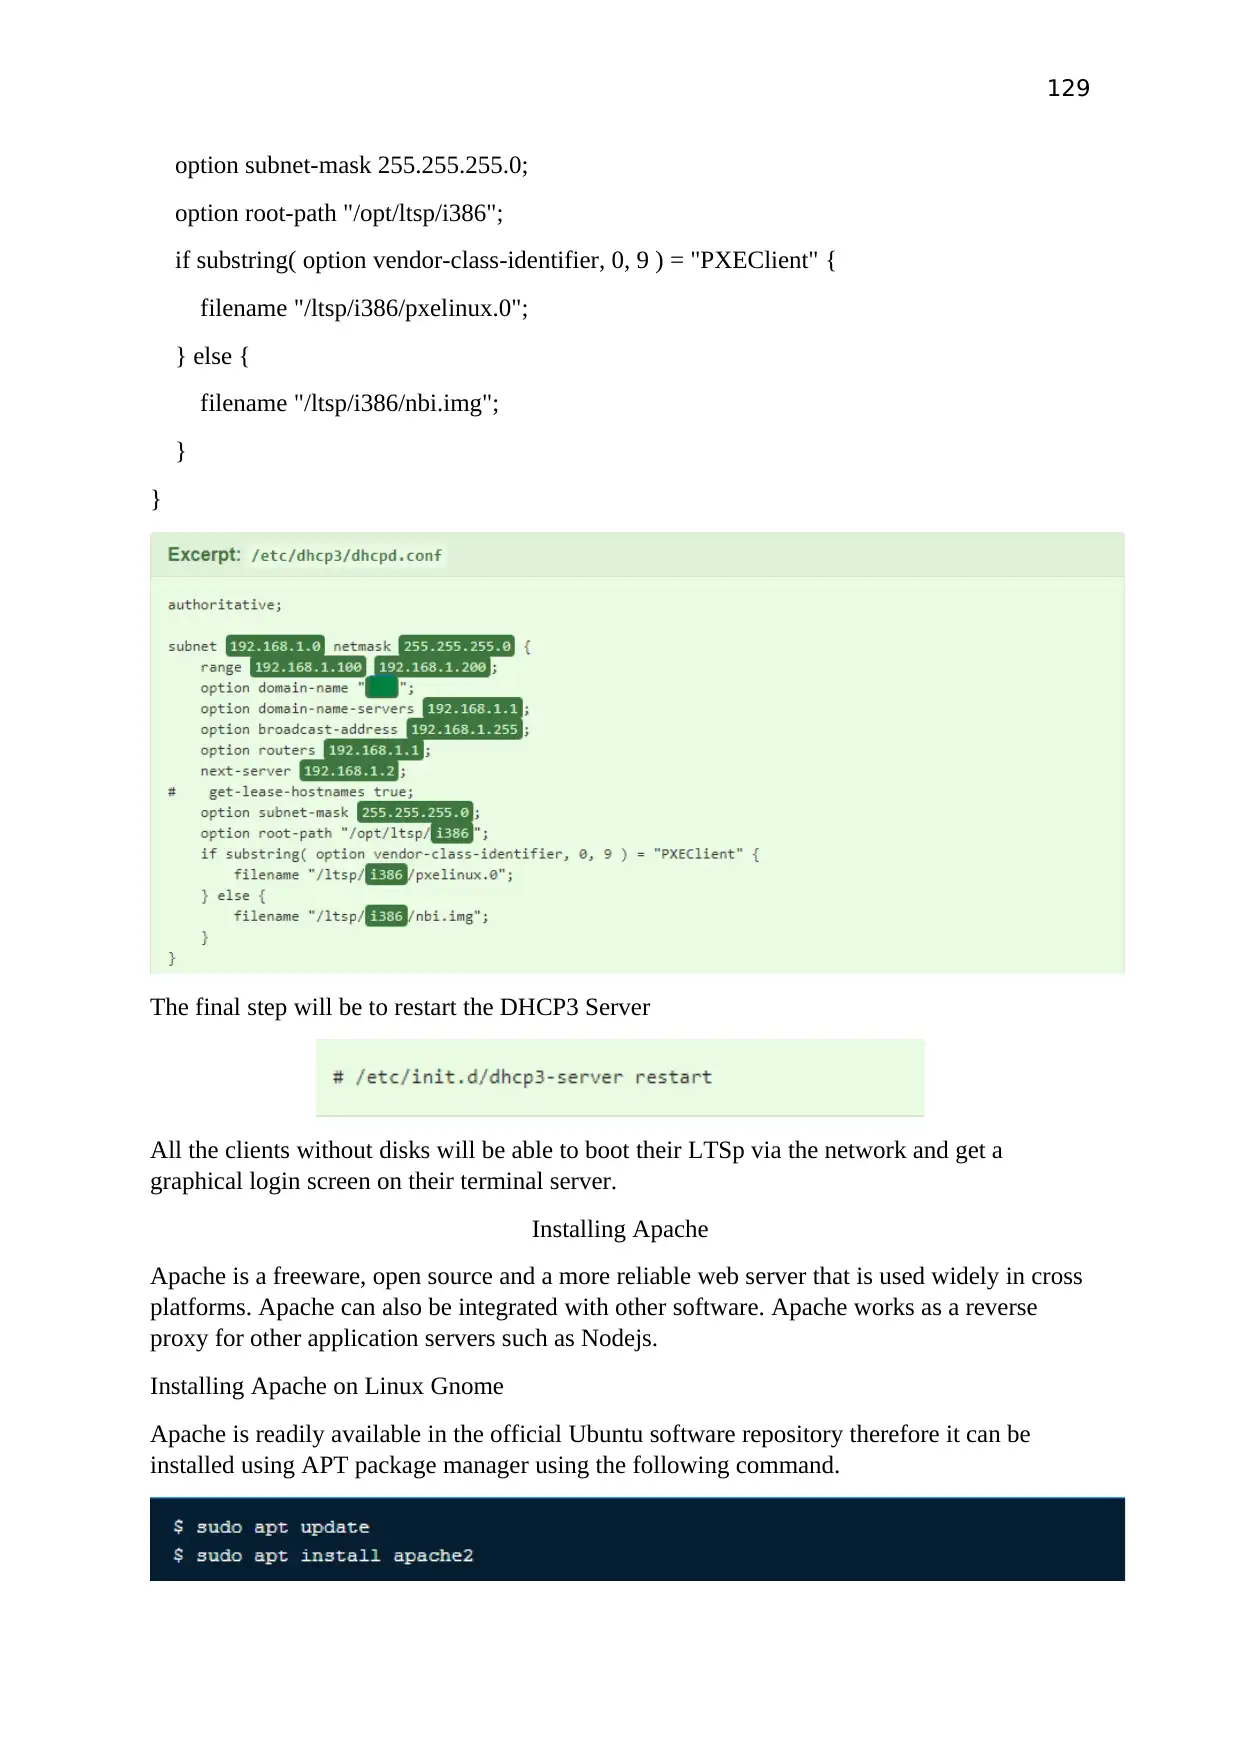
129
option subnet-mask 255.255.255.0;
option root-path "/opt/ltsp/i386";
if substring( option vendor-class-identifier, 0, 9 ) = "PXEClient" {
filename "/ltsp/i386/pxelinux.0";
} else {
filename "/ltsp/i386/nbi.img";
}
}
The final step will be to restart the DHCP3 Server
All the clients without disks will be able to boot their LTSp via the network and get a
graphical login screen on their terminal server.
Installing Apache
Apache is a freeware, open source and a more reliable web server that is used widely in cross
platforms. Apache can also be integrated with other software. Apache works as a reverse
proxy for other application servers such as Nodejs.
Installing Apache on Linux Gnome
Apache is readily available in the official Ubuntu software repository therefore it can be
installed using APT package manager using the following command.
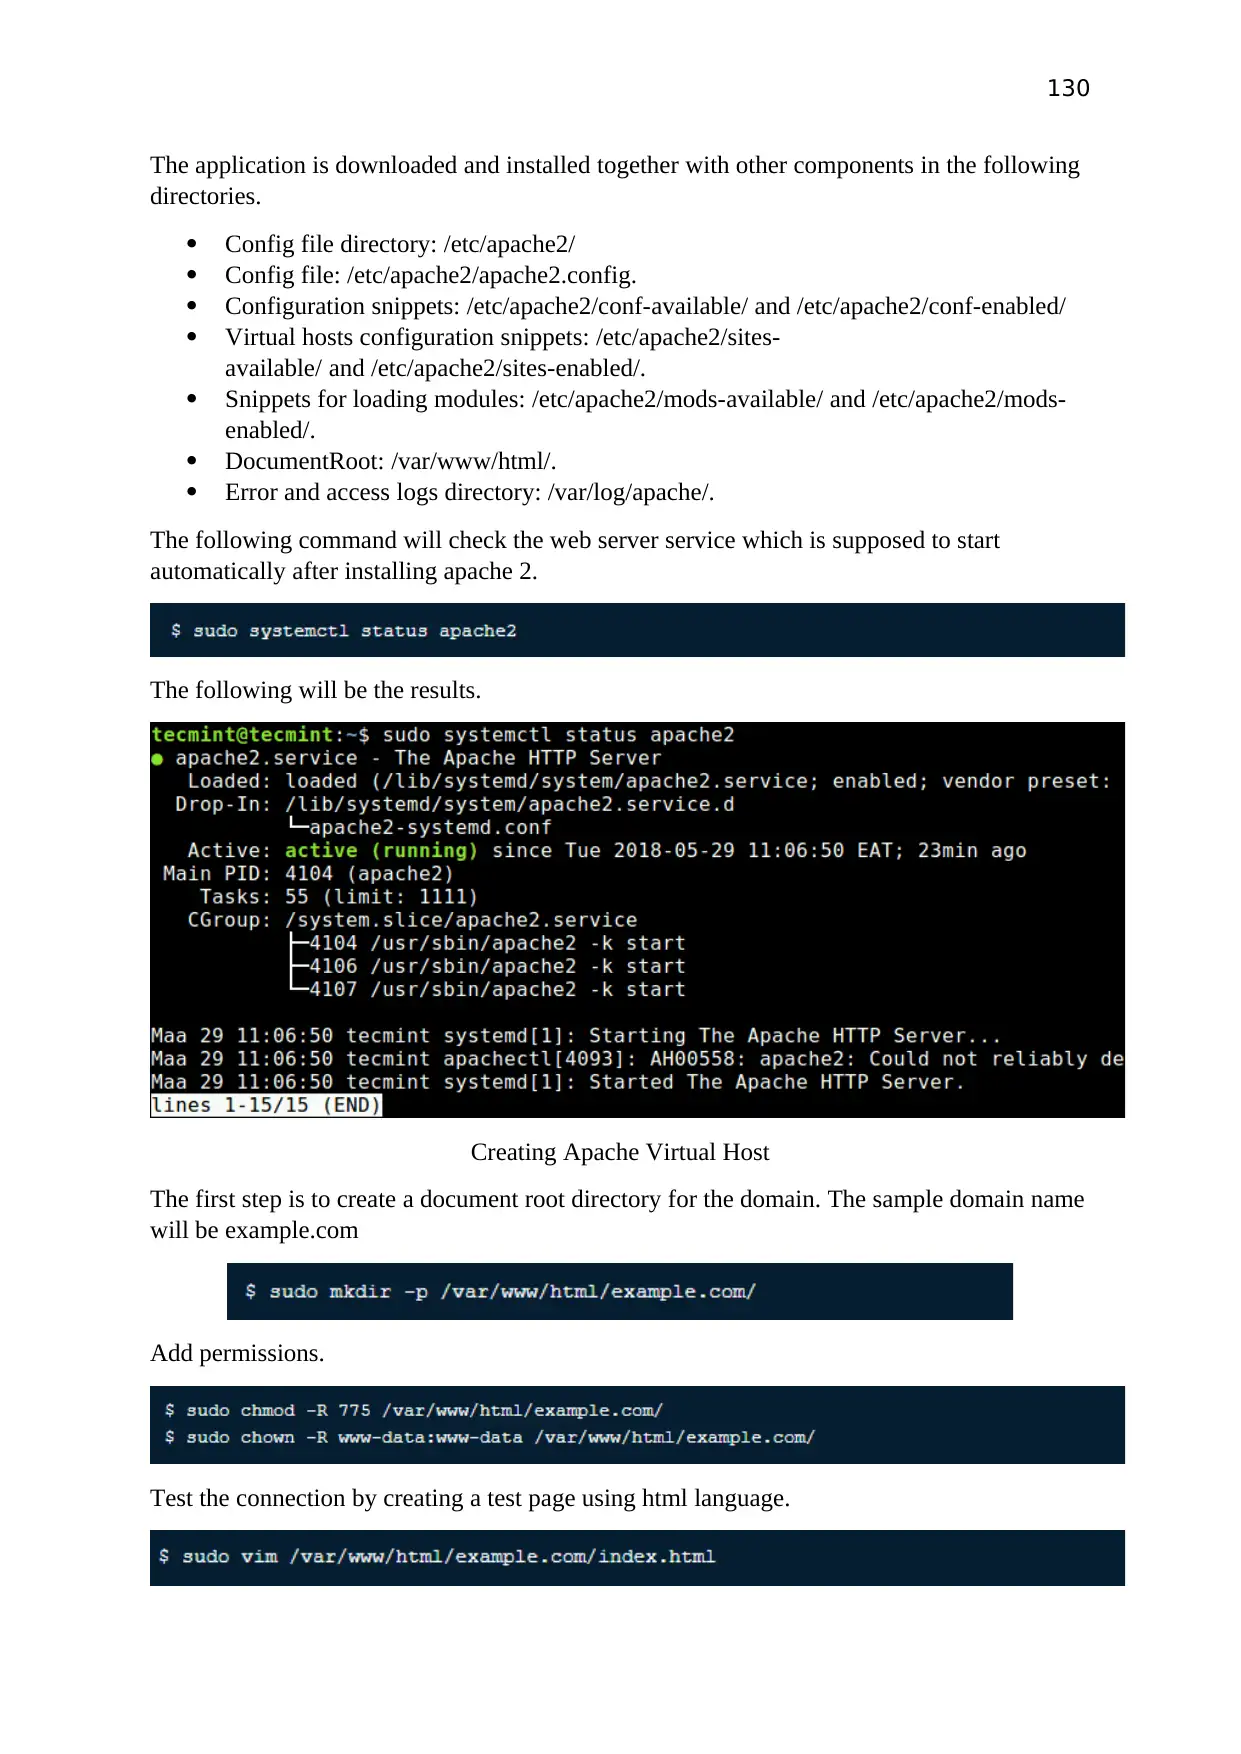
130
The application is downloaded and installed together with other components in the following
directories.
Config file directory: /etc/apache2/
Config file: /etc/apache2/apache2.config.
Configuration snippets: /etc/apache2/conf-available/ and /etc/apache2/conf-enabled/
Virtual hosts configuration snippets: /etc/apache2/sites-
available/ and /etc/apache2/sites-enabled/.
Snippets for loading modules: /etc/apache2/mods-available/ and /etc/apache2/mods-
enabled/.
DocumentRoot: /var/www/html/.
Error and access logs directory: /var/log/apache/.
The following command will check the web server service which is supposed to start
automatically after installing apache 2.
The following will be the results.
Creating Apache Virtual Host
The first step is to create a document root directory for the domain. The sample domain name
will be example.com
Add permissions.
Test the connection by creating a test page using html language.
Secure Best Marks with AI Grader
Need help grading? Try our AI Grader for instant feedback on your assignments.
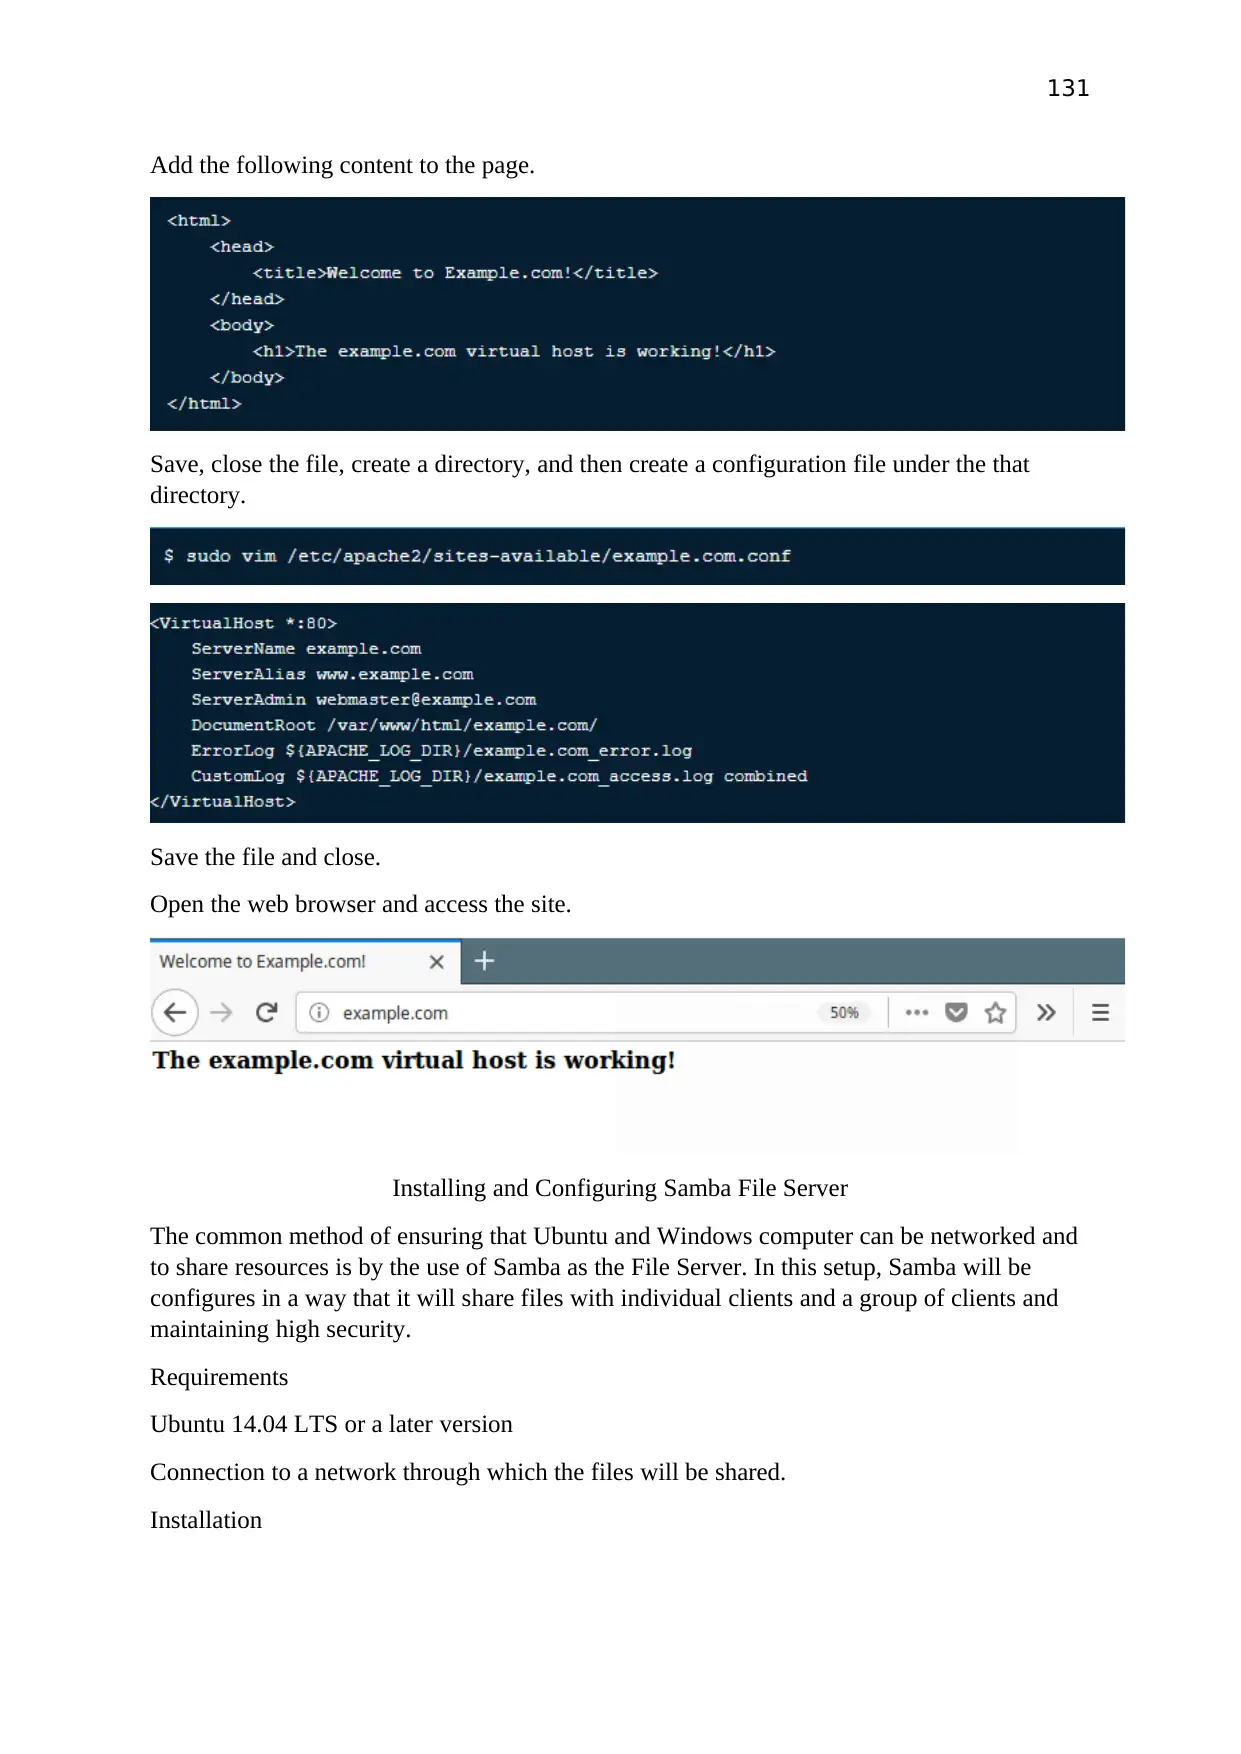
131
Add the following content to the page.
Save, close the file, create a directory, and then create a configuration file under the that
directory.
Save the file and close.
Open the web browser and access the site.
Installing and Configuring Samba File Server
The common method of ensuring that Ubuntu and Windows computer can be networked and
to share resources is by the use of Samba as the File Server. In this setup, Samba will be
configures in a way that it will share files with individual clients and a group of clients and
maintaining high security.
Requirements
Ubuntu 14.04 LTS or a later version
Connection to a network through which the files will be shared.
Installation
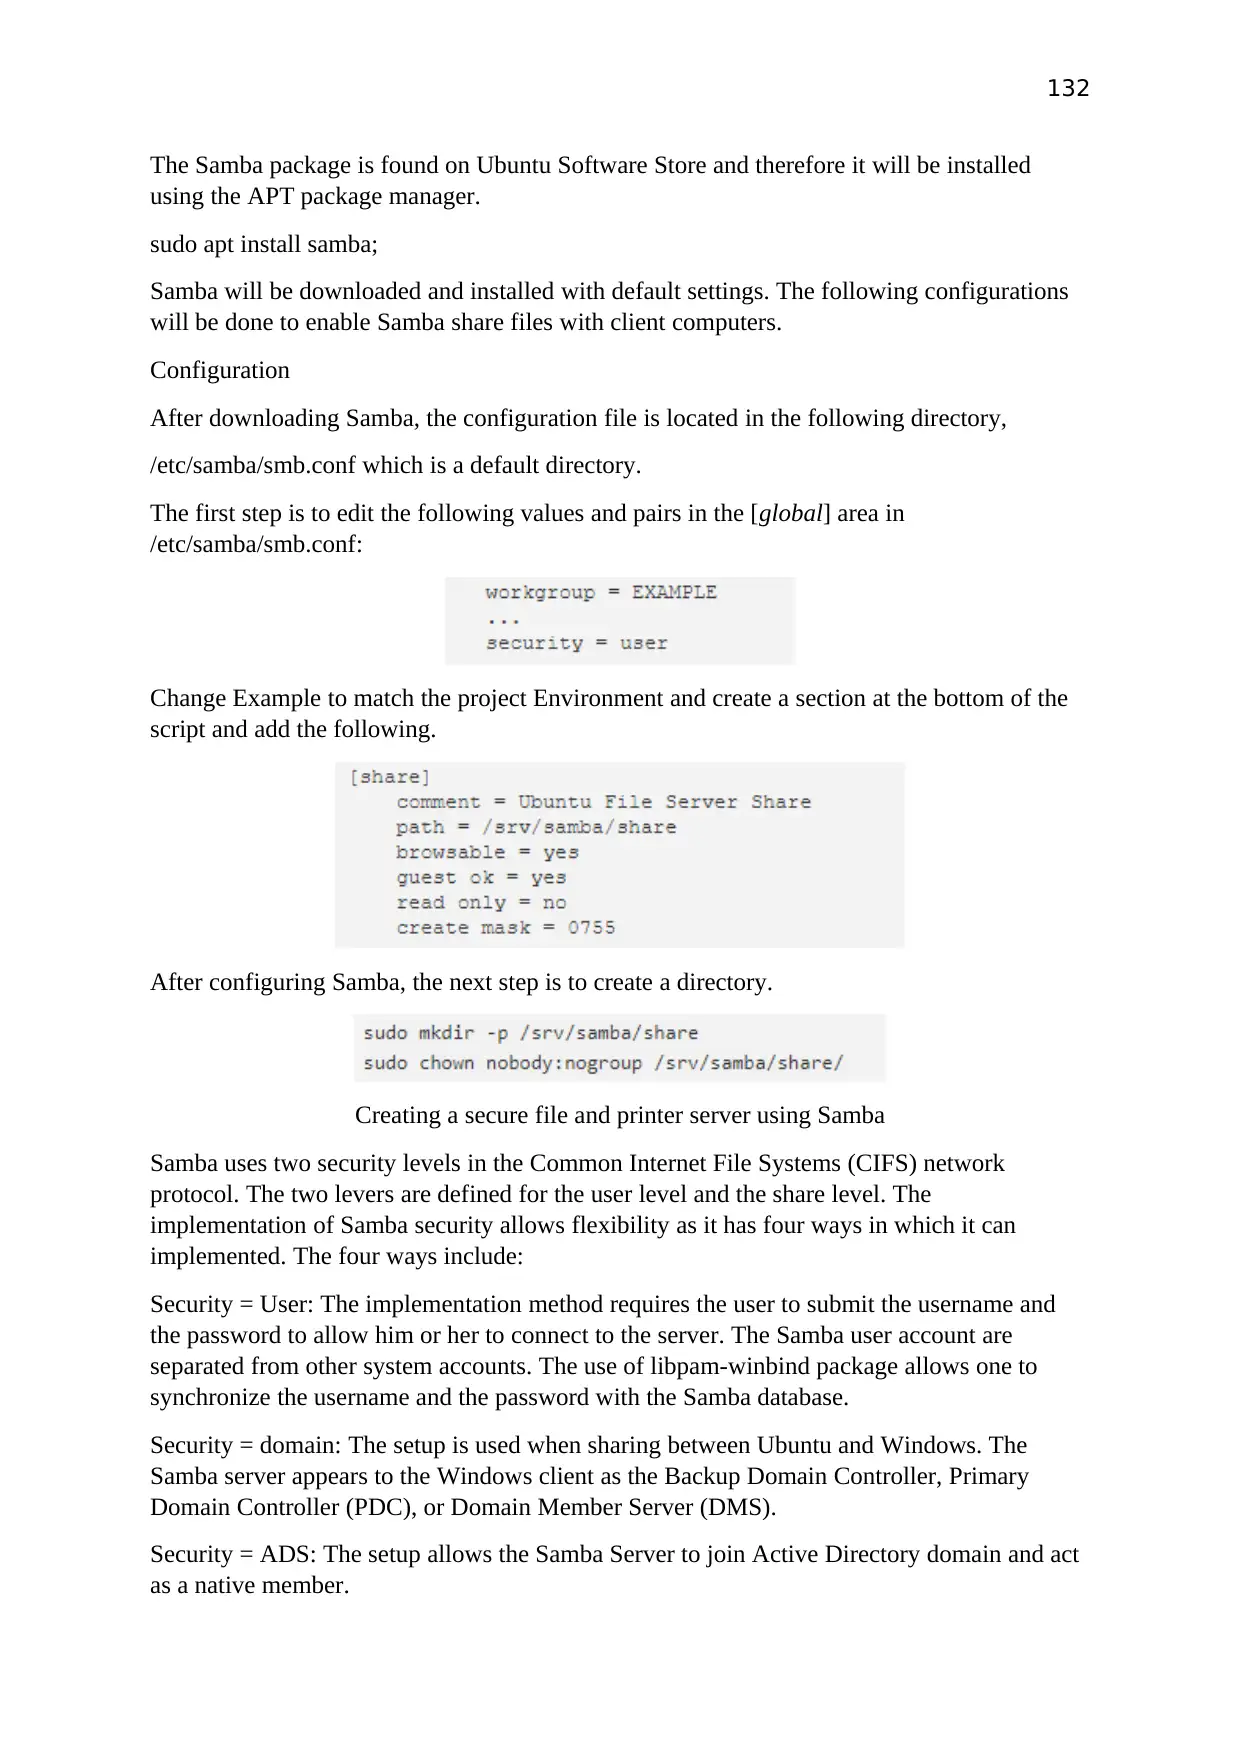
132
The Samba package is found on Ubuntu Software Store and therefore it will be installed
using the APT package manager.
sudo apt install samba;
Samba will be downloaded and installed with default settings. The following configurations
will be done to enable Samba share files with client computers.
Configuration
After downloading Samba, the configuration file is located in the following directory,
/etc/samba/smb.conf which is a default directory.
The first step is to edit the following values and pairs in the [global] area in
/etc/samba/smb.conf:
Change Example to match the project Environment and create a section at the bottom of the
script and add the following.
After configuring Samba, the next step is to create a directory.
Creating a secure file and printer server using Samba
Samba uses two security levels in the Common Internet File Systems (CIFS) network
protocol. The two levers are defined for the user level and the share level. The
implementation of Samba security allows flexibility as it has four ways in which it can
implemented. The four ways include:
Security = User: The implementation method requires the user to submit the username and
the password to allow him or her to connect to the server. The Samba user account are
separated from other system accounts. The use of libpam-winbind package allows one to
synchronize the username and the password with the Samba database.
Security = domain: The setup is used when sharing between Ubuntu and Windows. The
Samba server appears to the Windows client as the Backup Domain Controller, Primary
Domain Controller (PDC), or Domain Member Server (DMS).
Security = ADS: The setup allows the Samba Server to join Active Directory domain and act
as a native member.
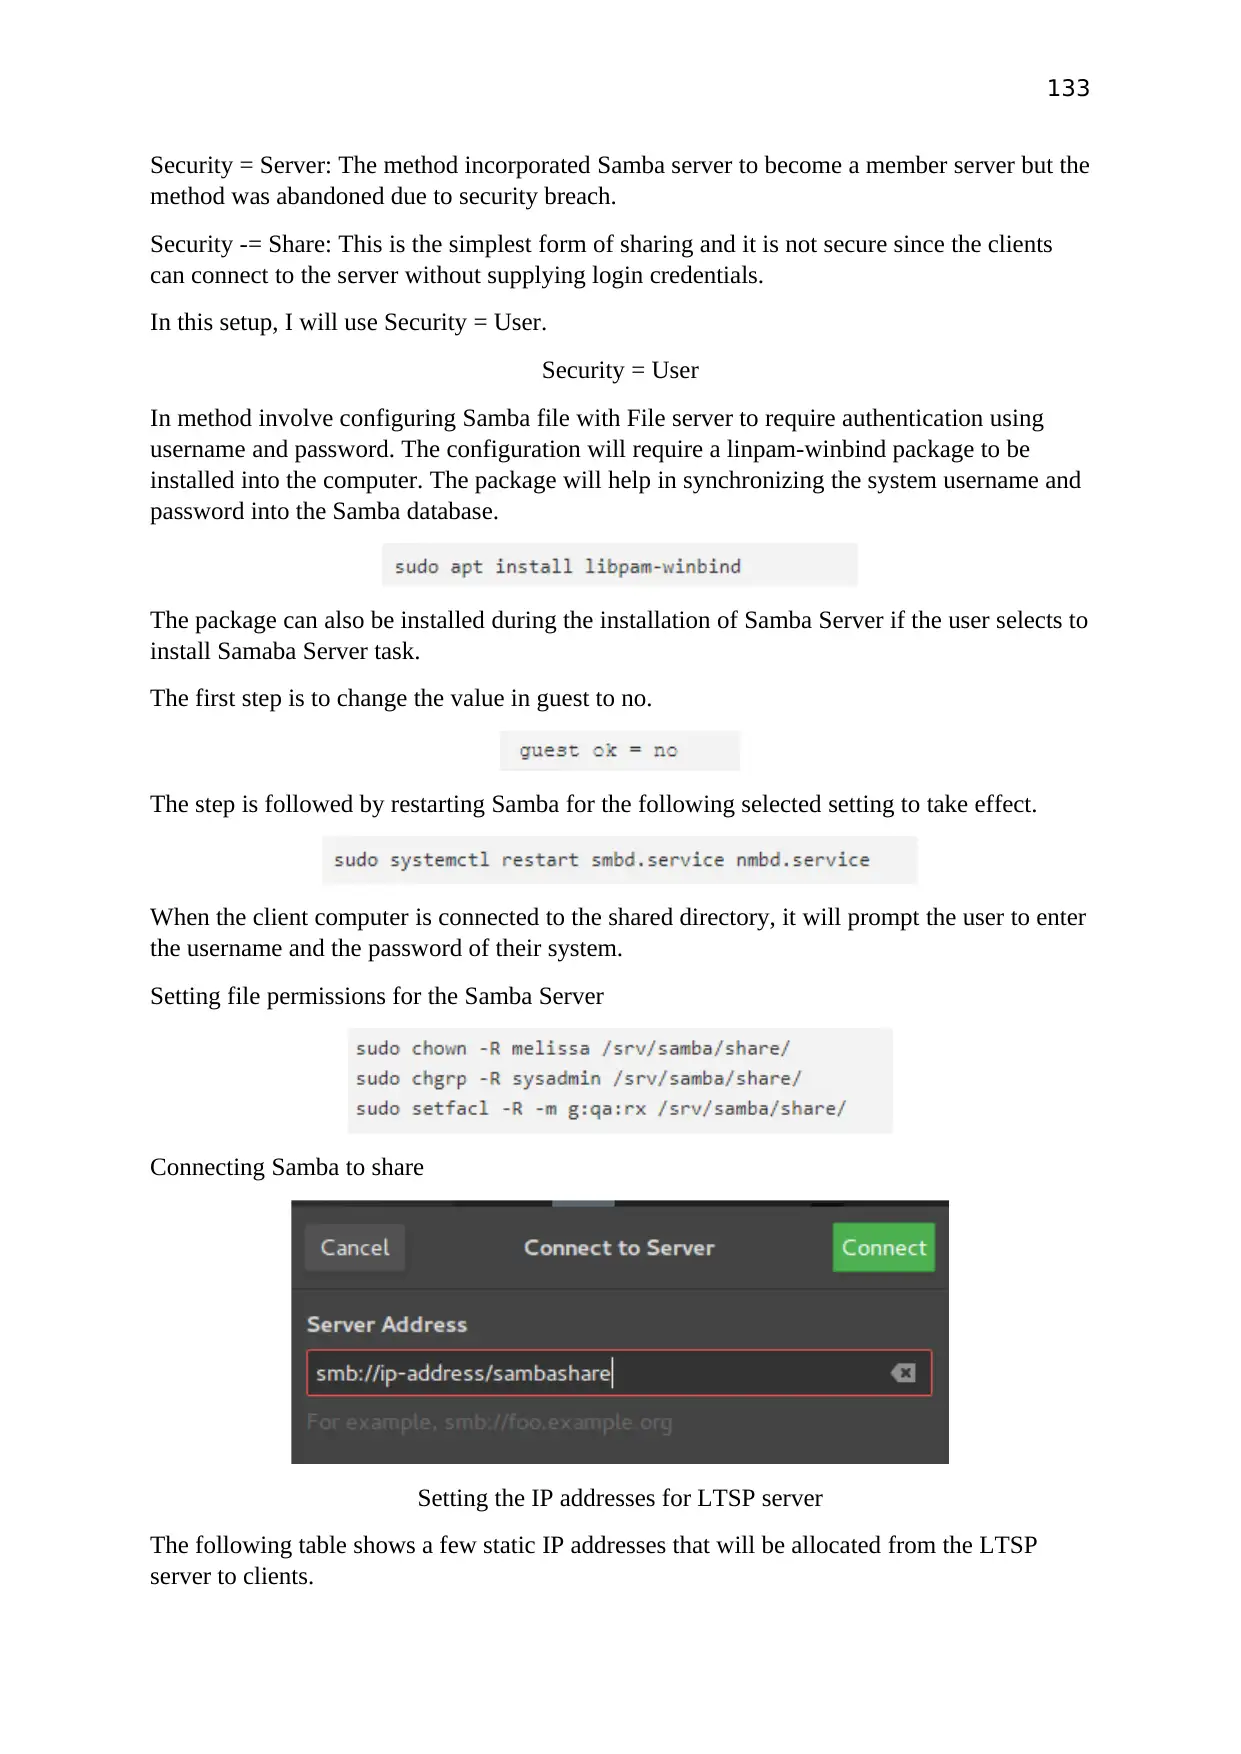
133
Security = Server: The method incorporated Samba server to become a member server but the
method was abandoned due to security breach.
Security -= Share: This is the simplest form of sharing and it is not secure since the clients
can connect to the server without supplying login credentials.
In this setup, I will use Security = User.
Security = User
In method involve configuring Samba file with File server to require authentication using
username and password. The configuration will require a linpam-winbind package to be
installed into the computer. The package will help in synchronizing the system username and
password into the Samba database.
The package can also be installed during the installation of Samba Server if the user selects to
install Samaba Server task.
The first step is to change the value in guest to no.
The step is followed by restarting Samba for the following selected setting to take effect.
When the client computer is connected to the shared directory, it will prompt the user to enter
the username and the password of their system.
Setting file permissions for the Samba Server
Connecting Samba to share
Setting the IP addresses for LTSP server
The following table shows a few static IP addresses that will be allocated from the LTSP
server to clients.
Paraphrase This Document
Need a fresh take? Get an instant paraphrase of this document with our AI Paraphraser
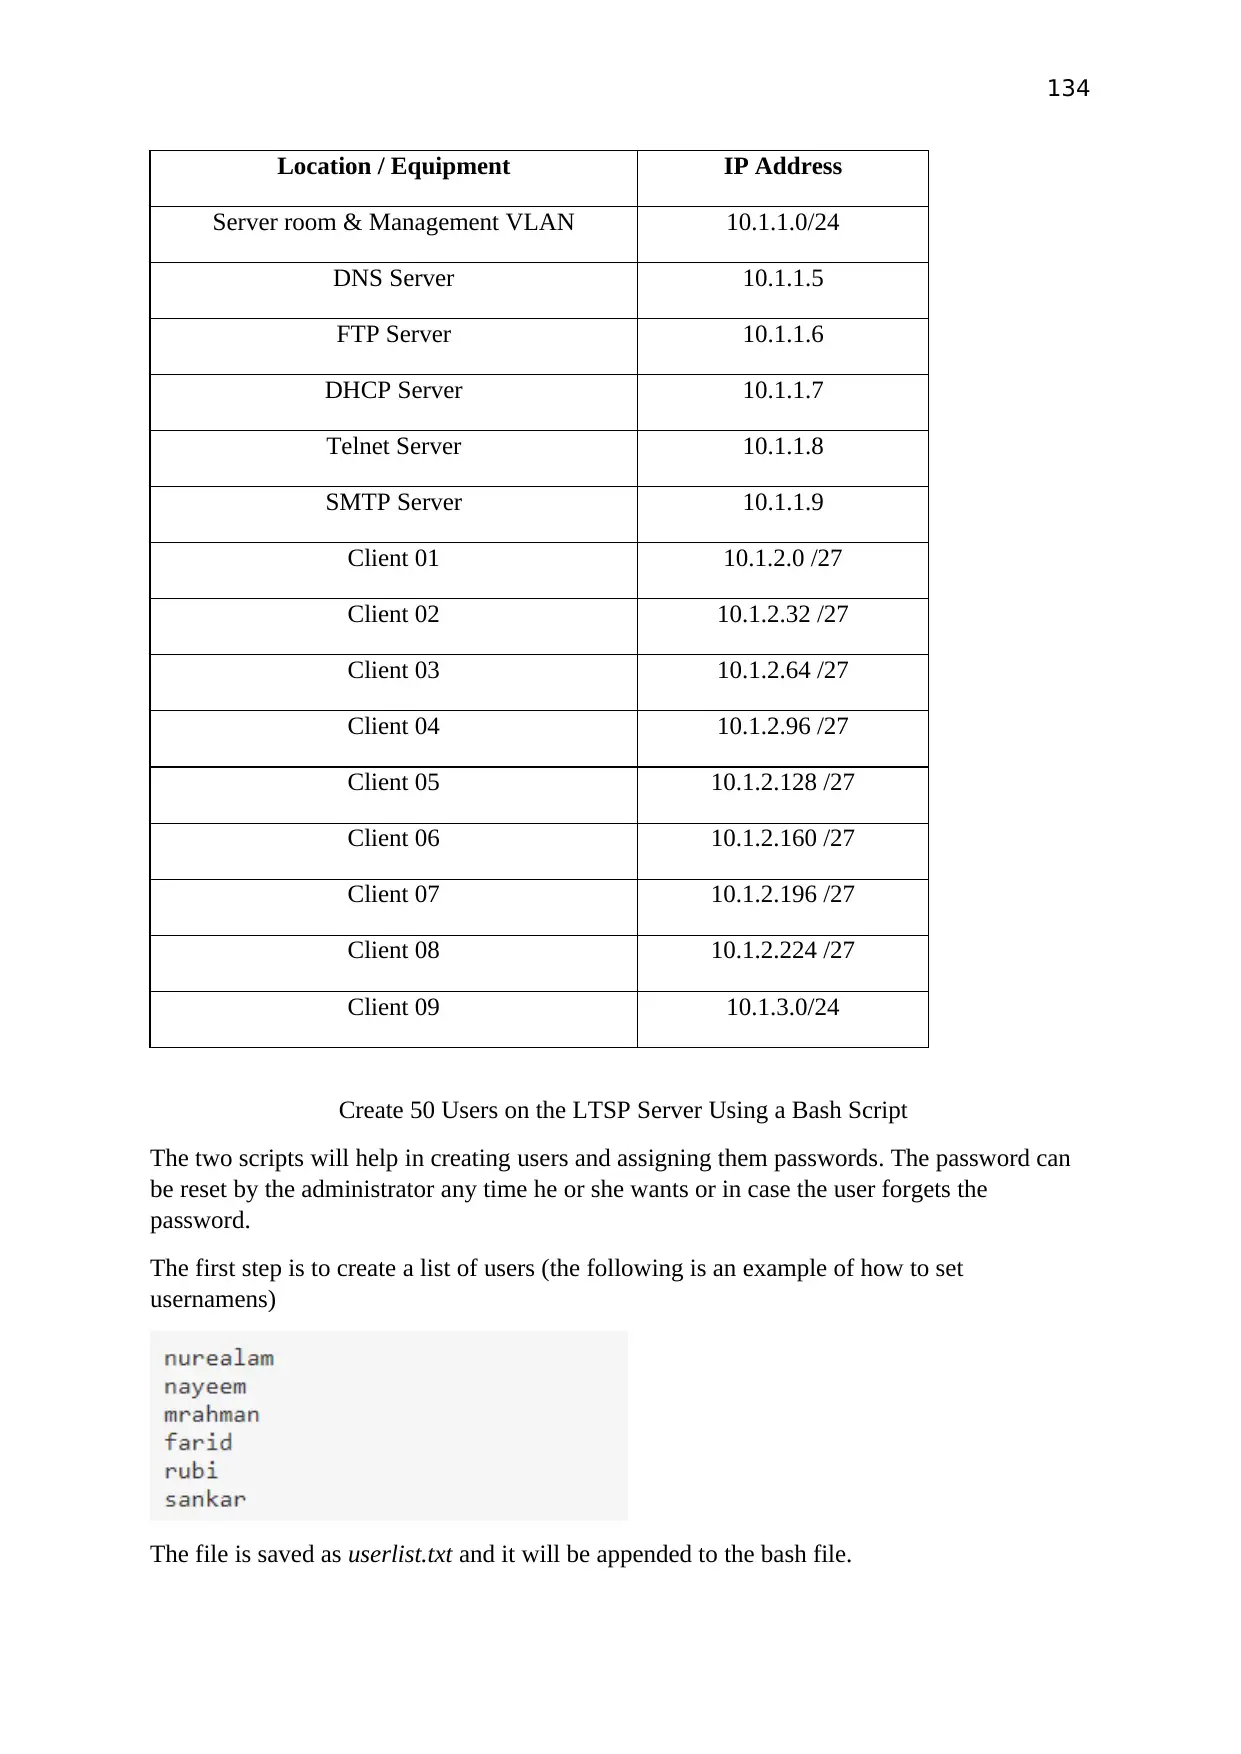
134
Location / Equipment IP Address
Server room & Management VLAN 10.1.1.0/24
DNS Server 10.1.1.5
FTP Server 10.1.1.6
DHCP Server 10.1.1.7
Telnet Server 10.1.1.8
SMTP Server 10.1.1.9
Client 01 10.1.2.0 /27
Client 02 10.1.2.32 /27
Client 03 10.1.2.64 /27
Client 04 10.1.2.96 /27
Client 05 10.1.2.128 /27
Client 06 10.1.2.160 /27
Client 07 10.1.2.196 /27
Client 08 10.1.2.224 /27
Client 09 10.1.3.0/24
Create 50 Users on the LTSP Server Using a Bash Script
The two scripts will help in creating users and assigning them passwords. The password can
be reset by the administrator any time he or she wants or in case the user forgets the
password.
The first step is to create a list of users (the following is an example of how to set
usernamens)
The file is saved as userlist.txt and it will be appended to the bash file.
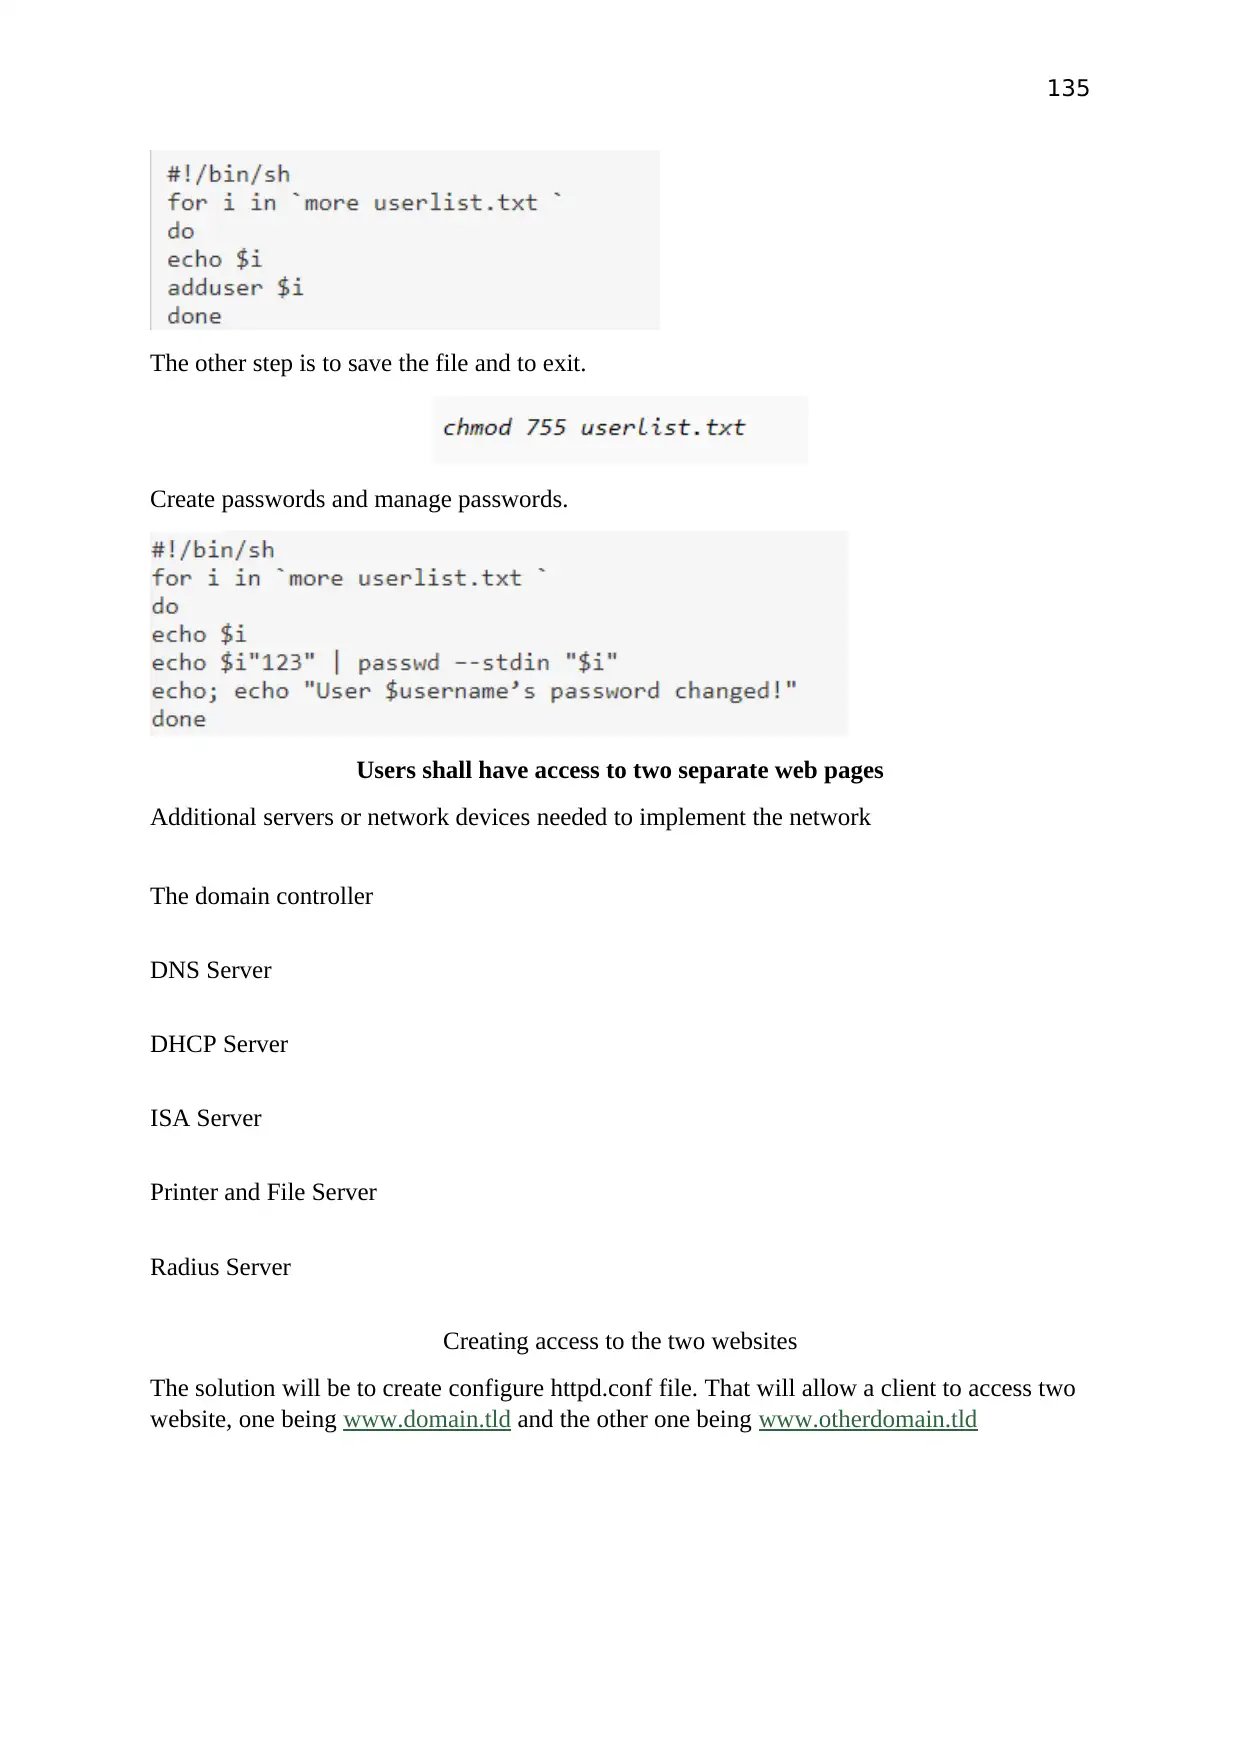
135
The other step is to save the file and to exit.
Create passwords and manage passwords.
Users shall have access to two separate web pages
Additional servers or network devices needed to implement the network
The domain controller
DNS Server
DHCP Server
ISA Server
Printer and File Server
Radius Server
Creating access to the two websites
The solution will be to create configure httpd.conf file. That will allow a client to access two
website, one being www.domain.tld and the other one being www.otherdomain.tld
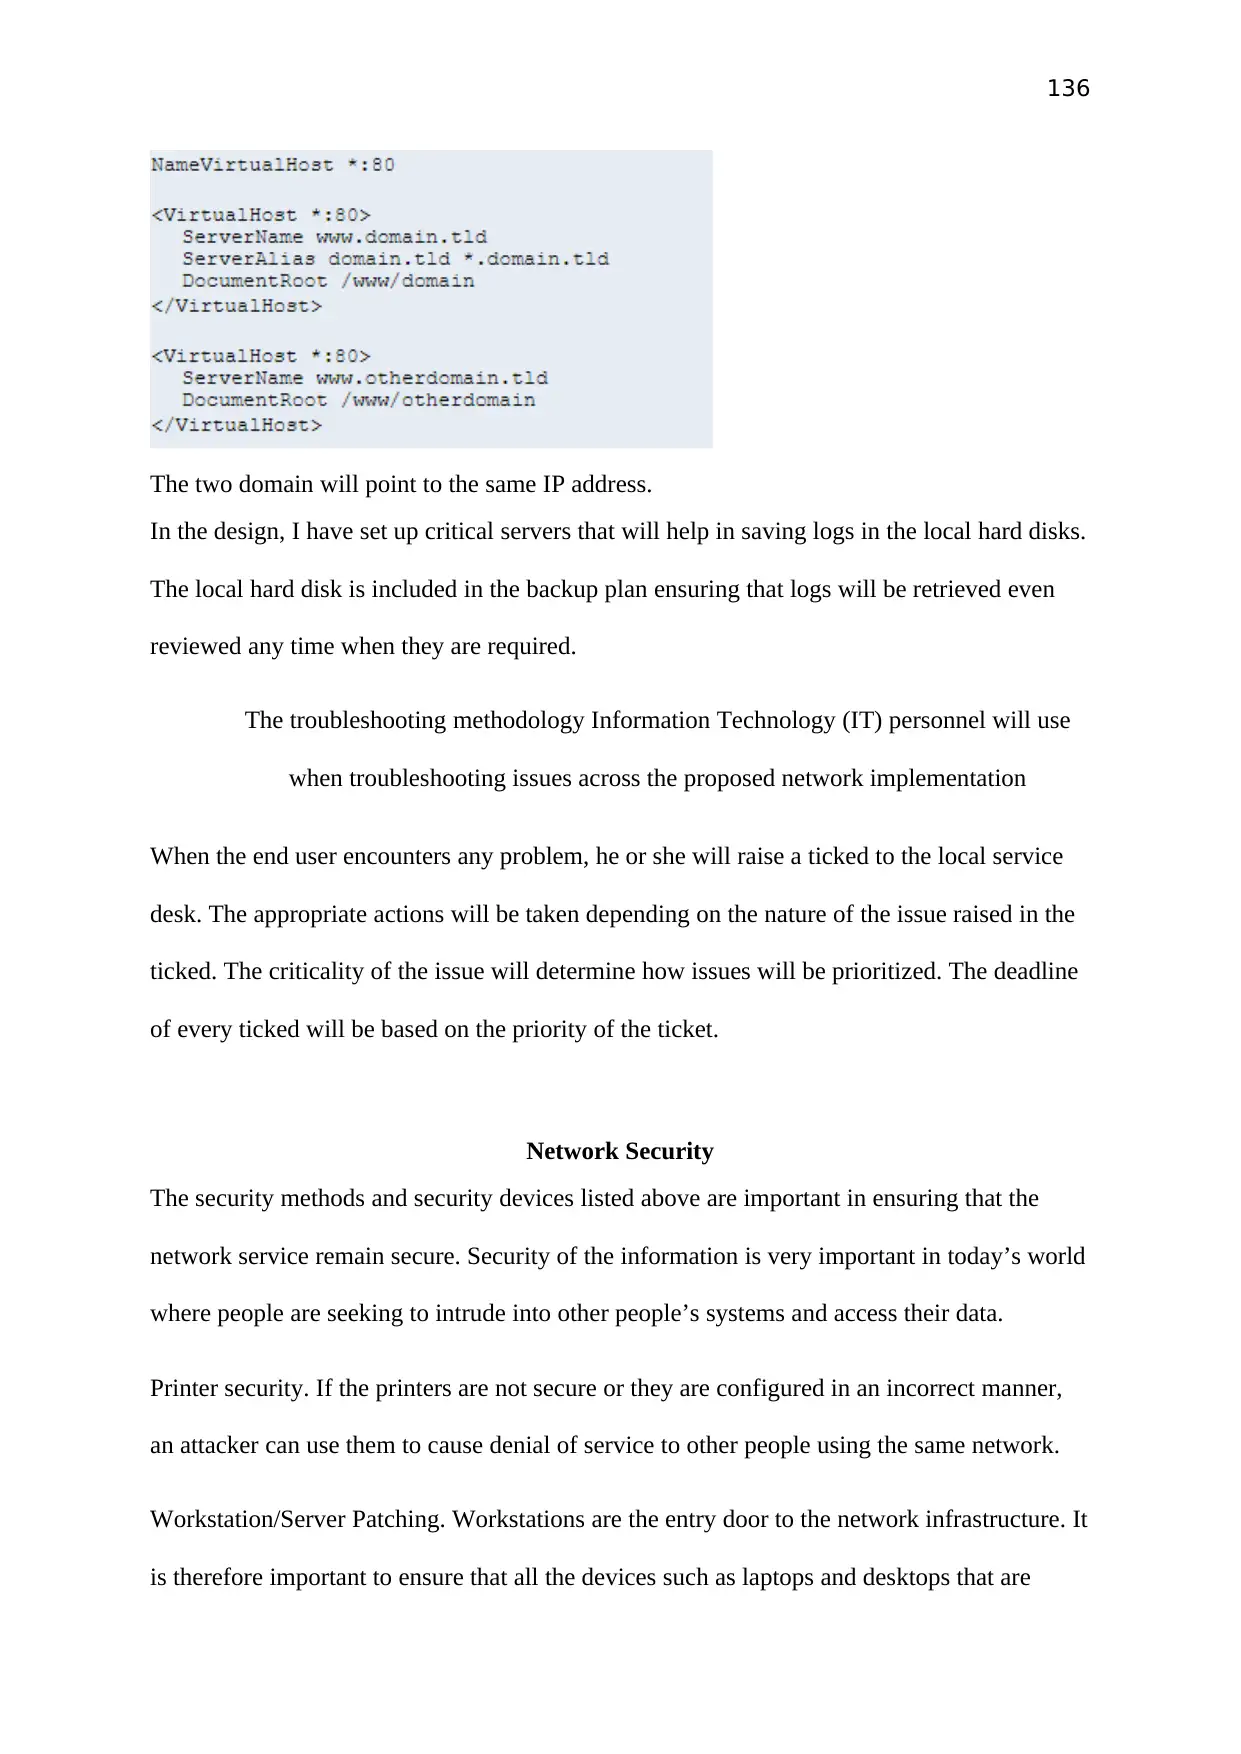
136
The two domain will point to the same IP address.
In the design, I have set up critical servers that will help in saving logs in the local hard disks.
The local hard disk is included in the backup plan ensuring that logs will be retrieved even
reviewed any time when they are required.
The troubleshooting methodology Information Technology (IT) personnel will use
when troubleshooting issues across the proposed network implementation
When the end user encounters any problem, he or she will raise a ticked to the local service
desk. The appropriate actions will be taken depending on the nature of the issue raised in the
ticked. The criticality of the issue will determine how issues will be prioritized. The deadline
of every ticked will be based on the priority of the ticket.
Network Security
The security methods and security devices listed above are important in ensuring that the
network service remain secure. Security of the information is very important in today’s world
where people are seeking to intrude into other people’s systems and access their data.
Printer security. If the printers are not secure or they are configured in an incorrect manner,
an attacker can use them to cause denial of service to other people using the same network.
Workstation/Server Patching. Workstations are the entry door to the network infrastructure. It
is therefore important to ensure that all the devices such as laptops and desktops that are
Secure Best Marks with AI Grader
Need help grading? Try our AI Grader for instant feedback on your assignments.
137
connected to the network adhere to the existing SLO as per the Vulnerability of the network
management document.
Workstation in SCCM. SCCM is used to provide updates and patches to every workstation.
Laptop Encryption. Encrypting hard drives in the laptops and desktops ensure that
information cannot be accessed by unauthorized individuals.
Conclusion
The use of backup storage is important in ensuring that all the data in computer can be
restored in case the original data is deleted or lost. The primary purpose of Data Backup is to
ensure data is recovered after the original data is deleted or corrupted. The other use of Data
Backup is to restore data as it was in earlier time after it has been modified.
Primary copy. Data is backed up in a disk pool or in the media server.
Secondary Copy. Data in disk pool and in the media server is duplicated and stored in
magnetic tapes.
All the servers will be set to automatically back up all the data in the primary backups after
office hours. Data saved in the primary backup will be transferred to the secondary backup at
the end of every week. This will ensure that all the data remain secure.
1 out of 137
Your All-in-One AI-Powered Toolkit for Academic Success.
+13062052269
info@desklib.com
Available 24*7 on WhatsApp / Email
![[object Object]](/_next/static/media/star-bottom.7253800d.svg)
Unlock your academic potential
© 2024 | Zucol Services PVT LTD | All rights reserved.

